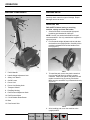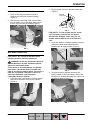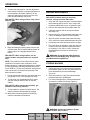
1
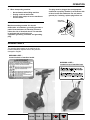
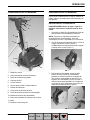
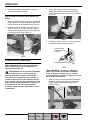
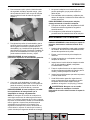
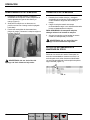
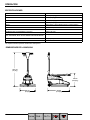
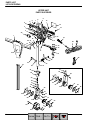
ENGLISH - ESPAÑOL
UltraShinet
Dust Control Burnisher
Máquina de Pisos
Model No.:
1000150
Operator and Parts Manual
Manual del Operador y Piezas
TENNANT COMPANY
701 NORTH LILAC DRIVE
MINNEAPOLIS, MN 55422
MAILING ADDRESS:
TENNANT COMPANY
P.O. BOX 1452
MINNEAPOLIS, MN 55440–1452
NOBLES CUSTOMER SERVICE:
1–800–365–6625
FAX: 1–800–678–4240
1001426
Rev. 03 (06-03)
TECHNICAL SUPPORT:
1–800–522–7839 EXT. 5356
Home
Find...
Go To..
IMPORTANT SAFETY INSTRUCTIONS
When using an electrical appliance, basic precautions should always be followed, including the
following:
READ ALL INSTRUCTIONS BEFORE USING (THIS APPLIANCE)
WARNING - To reduce the risk of fire, explosion, electric shock, or injury:
1. Do not use appliance with flammable or combustible liquids/fumes such as gasoline or use in
areas where they may be present.
2. Do not handle plug or appliance with wet hands, electric shock or personal injury may occur.
3. Do not use with damaged cord or plug, electric shock or personal injury may occur. If
appliance is not working as it should, has been dropped, damaged, left outdoors, or dropped
into water, return it to a service center.
4. Do not leave appliance when plugged in. Unplug from outlet when not in use and before
servicing.
5. Use only commercially available floor cleaners and waxes intended for machine application.
6. Do not allow to be used as a toy. Close attention is necessary when used by or near children.
7. Use only as described in this manual. Use only manufacturer’s recommended attachments.
8. Do not pull or carry by cord, use cord as a handle, close a door on cord, or pull cord around
sharp edges or corners. Do not run appliance over cord. Keep cord away from heated
surfaces.
9. Do not unplug by pulling on cord. To unplug, grasp the plug, not the cord.
10. Do not put any object into openings. Do not use with any opening blocked; keep free of dust,
lint, hair, and anything that may reduce air flow.
11. Keep hair, loose clothing, fingers, and all parts of body away from openings and moving
parts.
12. Turn off all controls before unplugging.
13. Use extra care when cleaning on stairs.
14. Use indoors only. Do not use outdoors and do not expose to rain.
SAVE THESE INSTRUCTIONS
2
Home
Find...
Go To..
UltraShinet Burnisher (01–02)
LIRE TOUTES LES INSTRUCTIONS AVANT
DE FAIRE FONCTIONNER
(CET APPAREIL)
ADVERTISSEMENT - Pour réduire les risques d’incendie, l’explosion, de choc électrique ou de
blessure:
1. Ne pas aspirer des liquides/vapeurs inflammables ou combustibles, comme de l’essence, et
ne pas faire fonctionner dans des endroits où peuvente se trouver de tels liquides.
2. Ne pas toucher la fiche ou l’appareil lorsque vos mains sont humides, la décharge électrique
ou blessures peut se produire.
3. Ne pas utiliser si le cordon ou la fiche est endommagé, la décharge électrique ou blessures
peut se produire. Retourner lappareil a un atelier de réparation s’il ne fonctionne pas bien, s’il
est tombé ou s’il a été endommage, oublie à l’extérieur ou immergé.
4. Ne pas laisser l’appareil san surveillance lorsqu’il est branché. Débrancher lorsque l’appareil
n’est pas utilisé et evant l’entretien.
5. Utiliser des produits nettoyants et des cires offerts sur le marché pour l’application à la
machine.
6. Ne pas permettre aux enfants de jouer avec l’appareil. une attention particuliér est nécessarie
lorsque lappareil est utilisé par des enfants ou à proximite de ces deniers.
7. Nutiliser que conformément à cette notice avec les accessories recommandés par le
fabricant.
8. Ne pas tirer soulever ou traîner l’appareil par le condon. Ne pas uliliser le cordon comme une
poignée, le coincer dans l’embrasure d’une porte ou l’appuyer contre des arêtes vives ou des
coins. Ne pas faire rouler l’appareil sur le cordon. Garder le cordon à l’écart des surfaces
chaudes.
9. Ne pas débracher en tirant sur le cordon. Tier plutôt la fiche.
10. N’insérer aucun objet dans les ouvertures. Ne pas utiliser l’appareil losqu’une ouverture est
bloquée. S’assurer que de la poussière, de la peluche, des cheveuxou d’autres matières ne
réduisent pas le débit d’air.
11. Maintenir les cheveux, les vêtements amples, les doigts et toutes les parties du corps l’écart des
ouvertures et des piéces mobiles
12. Mettre toutes les commandes a’la postion ARRêT avant de de’brancher l’appareil.
13. User de prudence lors du nettoyage des escaliers.
14. Utiliser á l’intererieur seulement. N’entreposez pas la machine à l’extérieur et évitez qu’elle ne
soit mouillée.
UltraShinet Burnisher (01–02)
Home
Find...
Go To..
3
INSTRUCCIONES IMPORTANTES DE SEGURIDAD
Deben observarse siempre instrucciones básicas de seguridad al usar artefactos eléctricos
incluyendo las siguientes:
LEER TODAS LAS INSTRUCCIONES DE SEGURIDAD
ANTES DE USAR (ESTE ARTEFACTO)
ADVERTENCIA – Para reducir el riesgo de incendio, choque eléctrico o lesiones:
1. No use el artefacto con líquidos/humos inflamables o combustibles tales como gasolina o
usar en áreas donde pueden estar presentes.
2. No maneje el enchufe o el artefacto con manos mojadas, ya que puede ocurrir choque
eléctrico o lesiones personales.
3. No use con cordón o enchufe dañados, ya que puede ocurrir choque eléctrico o lesiones
personales. Si el artefacto no está funcionando bien, se ha dejado caer, se ha dañado,
dejado al aire libre, o dejado caer al agua, devuélvalo al centro de servicio.
4. No dejar el artefacto desatendido cuando está enchufado. Desenchufar del tomacorrientes
cuando no se usa y antes de prestar servicio.
5. Usar sólo limpiadores de piso y ceras comercialmente disponibles destinadas para aplicación
a máquina.
6. No permitir que se use como un juguete. Se requiere mucha atención cuando se usa por o
cerca de los niños.
7. Usar sólo según se describe en este manual. Usar sólo los aditamentos recomendados por el
fabricante.
8. No tirar de ni arrastrar por el cordón, no usar el cordón como un mango, no cerrar la puerta
sobre el cordón ni tirar del cordón sobre bordes o esquinas aguzadas. No pasar el artefacto
sobre el cordón. Mantener el cordón alejado de superficies calientes.
9. No desenchufar tirando del cordón. Para desenchufar, sujetar el enchufe, no el cordón.
10. No colocar objetos en las aberturas. No usar con aberturas bloqueadas, mantener libre de
polvo, pelusa, cabellos y todo lo que pueda reducir el flujo de aire.
11. Mantener el cabello, ropas holgadas, dedos, y todas las partes del cuerpo alejadas de las
aberturas y piezas móviles.
12. Antes de desenchufar apagar todos los controles.
13. Ser muy precavido al limpiar sobre escaleras.
14. Usar siempre bajo techo. No usar al aire libre ni sobre superficies mojadas.
MANTENER ESTE INSTRUCCIONES
4
Home
Find...
Go To..
UltraShinet Burnisher (02–02)
GROUNDING INSTRUCTIONS
This appliance must be grounded. If it should malfunction or breakdown, grounding provides a
path of least resistance for electric current to reduce the risk of electric shock. This appliance is
equipped with a cord having an equipment–grounding conductor and grounding plug. The plug
must be plugged into an appropriate outlet that is properly installed and grounded in accordance
with all local codes and ordinances.
WARNING – Improper connection of the equipment–grounding conductor can result
in a risk of electric shock. Check with a qualified electrician or service person if you are in
doubt as to whether the outlet is properly grounded. Do not modify the plug provided with
the appliance – if it will not fit the outlet, have a proper outlet installed by a qualified electrician.
This appliance is for use on a nominal 120–volt circuit and has a grounding attachment plug that
looks like the plug illustrated in sketch. Make sure that the appliance is connected to an outlet
having the same configuration as the plug. No adaptor should be used with this appliance.
GROUNDED OUTLET
(3 HOLE)
GROUNDING PIN
INSTRUCTIONS VISANT LA MISE ‘A LA TERRE
Cet appareil doit être mis à la terre. En cas de défaillance ou de panne éventuelles, la mise à la
terre fournit au courant un chemin de moindre résistance qui réduit le risque de choc électrique.
Cet appareil est pourvu d’un cordon muni d’un conducteur de terre et d’une fiche avec broche de
terre. La fiche doit être branchée dans une prise appropriée correctement installée et mise à la
terre conformément aux règlements et ordonnances municipaux.
AVERTISSEMENT. Un conducteur de terre mal raccordé peut entraîner un risque de choc
électrique. Consulter un électricien ou un technicien d’entretien qualifié si vous n’êtes
pas certain que la prise est correctement mise à la terre. Ne pas modifier la fiche fournie
avec l’appareil – si elle ne peut être insérée dans la prise, faire installer une prise adéquate
par un électricien qualifié.
Cet appareil est destiné à un circuit de 120 v et est muni d’une fiche de mise à la terre semblable à
celle illustrée par le croquis. S’assurer que l’appareil est branché à une prise de courant ayant la même
configuration que la fiche. Aucun adaptateur ne devrait être utilisé avec cet appareil.
UltraShinet Burnisher (01–02)
Home
Find...
Go To..
5
INSTRUCCIONES DE CONEXION A TIERRA
Este artefacto debe conectarse a tierra. Si funciona mal o se descompone, la conexión a tierra
provee una trayectoria de menor resistencia para la corriente eléctrica, para reducir el riesgo de
choque eléctrico. Este artefacto está provisto con un cordón que tiene un conductor de conexión
a tierra del equipo y un enchufe de conexión a tierra. El enchufe debe enchufarse a un tomacorrientes apropiado que esté correctamente instalado y conectado a tierra de acuerdo con todos
los códigos y ordenanzas locales.
ADVERTENCIA: La conexión incorrecta del conductor de conexión a tierra del equipo
puede resultar en un riesgo de choque eléctrico. Consultar con un electricista calificado o
persona de servicio si existen dudas acerca de si el tomacorrientes está correctamente
conectado a tierra. No se debe modificar el enchufe provisto con el artefacto – si no se
inserta en el tomacorrientes hacer que un electricista calificado instale un tomacorrientes
correcto.
Este artefacto es para usar en un circuito nominal de 120 voltios y tiene un enchufe de aditamento para conectar a tierra que se parece al enchufe ilustrado en la figura. Asegurarse que el artefacto esté conectado a un tomacorrientes con la misma configuración que el enchufe. No se debe
usar un adaptador con este artefacto.
ENCHUFE CONECTADO A TIERRA
(3 ORIFICIOS)
CLAVIJA DE CONEXION A
TIERRA
6
Home
Find...
Go To..
UltraShinet Burnisher (02–02)
OPERATION
This manual is furnished with each new model . It
provides necessary operation and maintenance
instructions and an illustrated parts list.
MACHINE DATA
Read this manual completely and understand the
machine before operating or servicing it.
Please fill out at time of installation for future reference.
When ordering replacement parts, use the parts list
section in this manual. Before ordering parts or
supplies, be sure to have your machine model number
and serial number available. Parts and supplies may
be ordered by phone or mail from any authorized
Service Center or Distributor.
This machine will provide excellent service. However,
the best results will be obtained at minimum costs if:
Model No.Install. Date Serial No.E2002, 2003 Tennant Company
Printed in U.S.A.
Nobles is a registered United States trademark of Tennant Company.
UltraShine is a United States trademark of Tennant Company.
S The machine is operated with reasonable care.
S The machine is maintained regularly - per the
machine care instructions provided.
S The machine is maintained with manufacturer
supplied or equivalent parts.
TABLE OF CONTENTS
SAFETY PRECAUTIONS . . . . . . . . . . . . . . . . . . . .
GROUNDING INSTRUCTIONS . . . . . . . . . . .
8
9
WARNING LABELS . . . . . . . . . . . . . . . . . . . . . . . . .
9
MACHINE COMPONENTS . . . . . . . . . . . . . . . . . . .
10
MACHINE SETUP . . . . . . . . . . . . . . . . . . . . . . . . . .
INSTALLING PAD . . . . . . . . . . . . . . . . . . . . . . .
INSTALLING DUST CONTROL BAG . . . . . .
10
10
11
MACHINE OPERATION . . . . . . . . . . . . . . . . . . . . .
11
MACHINE MAINTENANCE . . . . . . . . . . . . . . . . . .
12
STORING MACHINE . . . . . . . . . . . . . . . . . . . . . . . .
12
TRANSPORTING MACHINE . . . . . . . . . . . . . . . . .
13
RECOMMENDED STOCK ITEMS . . . . . . . . . . . . .
13
TROUBLE SHOOTING . . . . . . . . . . . . . . . . . . . . . .
13
SPECIFICATIONS . . . . . . . . . . . . . . . . . . . . . . . . . .
14
MACHINE DIMENSIONS . . . . . . . . . . . . . . . . . . . .
14
ELECTRICAL DIAGRAM . . . . . . . . . . . . . . . . . . . .
25
PARTS LIST . . . . . . . . . . . . . . . . . . . . . . . . . . . . . . .
UPPER UNIT . . . . . . . . . . . . . . . . . . . . . . . . . . .
LOWER UNIT . . . . . . . . . . . . . . . . . . . . . . . . . . .
26
26
28
UltraShinet Burnisher (06–03)
Home
Find...
Go To..
7
OPERATION
–
–
SAFETY PRECAUTIONS
This machine is intended for commercial use only.
It is designed exclusively to burnish hard floors in
an indoor environment and is not constructed for
any other use. Use only recommended burnishing
pads and commercially available floor cleaners
and waxes intended for machine application.
All operators must read, understand and practice
the following safety precautions.
The following warning alert symbol and the “FOR
SAFETY” heading are used throughout this manual as
indicated in their description:
WARNING: To warn of hazards or unsafe
practices which could result in severe personal
injury or death.
–
–
–
–
–
–
–
Unless trained and authorized.
Unless operator manual is read and
understood.
Unless cord is properly grounded.
With damaged cord or plug.
If not in proper operating condition.
In outdoor areas.
In standing water.
Without dust bag in place.
With the use of an extension cord.
2. Before operating machine:
– Make sure all safety devices are in place
and operate properly.
– Remove loose objects on floor to prevent
dangerous projectiles if struck by spinning
pad.
WARNING: Do Not Operate With Damaged
Power Cord. Do Not Modify Plug. Unplug Power
Cord Before Servicing Machine
3. When using machine:
– Stay clear of spinning pad.
– Do not run machine over cord.
– Do not pull machine by plug or cord.
– Do not pull cord around sharp edges or
corners.
– Wear non-slip shoes.
– Do not close doors on cord.
– Do not unplug by pulling on cord.
– Do not stretch cord.
– Do not handle plug with wet hands.
– Keep cord away from heated surfaces.
– Never activate the power when the handle
is in the upright position.
– Do not release handles until pad comes to
a complete stop.
– Go slow on inclines and slippery surfaces.
– Never allow children to play on or around.
– Report machine damage or faulty
operation immediately.
If the supply cord is damaged or broken, it must
be replaced by the manufacturer or it’s service
agent or a similarly qualified person in order to
avoid a hazard.
4. Before leaving or servicing machine:
– Turn off machine.
– Unplug cord from wall outlet.
FOR SAFETY: To identify actions which must be
followed for safe operation of equipment.
Failure to follow these warnings may result in:
personal injury, electrocution, electric shock, fire
or explosion:
WARNING: Do Not Use Flammable Liquids Or
Operate Machine In Or Near Flammable Liquids,
Vapors Or Combustible Dusts.
This machine is not equipped with an explosion
proof motor. The electric motor will spark upon
start up and during operation which could cause a
flash fire or explosion if machine is used in an
area where flammable vapors/liquids or
combustible dusts are present.
WARNING: Do Not Use Outdoors. Do Not
Expose to Rain. Store Indoors.
The following information signals potentially
dangerous conditions to the operator or
equipment:
FOR SAFETY:
1. Do not operate machine:
– With flammable liquids or near flammable
vapors as an explosion or flash fire may
occur.
8
Home
Find...
5. When servicing machine:
– Unplug cord from wall outlet.
– Avoid moving parts. Do not wear loose
jackets, shirts, or sleeves.
– Use manufacturer supplied or approved
replacement parts.
– All repairs must be performed by a
qualified service person.
– Do not modify the machine from it’s
original design.
Go To..
UltraShinet Burnisher (06–03)
OPERATION
6. When transporting machine:
– Get assistance when lifting machine.
– Unplug cord from wall outlet.
– Use tie–down straps to secure machine to
truck or trailer.
The plug must be plugged into an appropriate
outlet that is properly installed in accordance with
all local codes and ordinances. Do not remove
ground pin; if missing, replace plug before use.
Grounded
3 Hole Outlet
GROUNDING INSTRUCTIONS
Machine must be grounded. If it should
malfunction or breakdown, grounding provides a
path of least resistance for electrical current to
reduce the risk of electrical shock. This machine
is equipped with a cord having an
equipment–grounding conductor and grounding
plug.
Ground Pin
WARNING LABELS
The warning labels appear on the machine in the
locations indicated. Replace labels if they become
damaged or illegible.
WARNING LABEL –
Located on back of machine handle.
WARNING LABEL –
Located on top of machine base.
UltraShinet Burnisher (06–03)
Home
Find...
Go To..
9
OPERATION
MACHINE COMPONENTS
MACHINE SETUP
Carefully check carton for signs of damage. Report
damages at once to carrier.
3
1
INSTALLING PAD
4
FOR SAFETY: Before leaving or servicing
machine, unplug cord from wall outlet.
2
11
1. Select and install a recommended high speed
burnishing pad intended for 2000 rpm.
5
6
NOTE: Consult your authorized distributor for pad
recommendations. Use only manufacturer supplied or
approved pads.
2. Pull the handle height adjustment lever and raise
the handle to the upright position. Carefully tilt the
machine backwards and rest the handle on the
floor (Figure 1).
10
9
12
8
7
13
FIG. 1
1. Control Handle
3. To install the pad, remove the plastic centerlock
ring from the pad driver by turning it counterclockwise. Position the pad on the pad driver and
replace centerlock ring by turning it clockwise.
Make sure the centerlock ring is fastened securely
(Figure 2).
2. Handle Height Adjustment lever
3. Safety Lock Button
4. On/Off Levers
5. Power Cord
6. Power Cord Storing Hook
7. Transport Wheels
8. Dust Bag Housing
9. Pad Pressure Adjustment Knob
10. Pad Pressure Meter
11. Circuit Breaker Reset Button
12. Base
13. Dust Control Skirt
FIG. 2
4. After installing pad, return the machine to the
upright position.
10
Home
Find...
Go To..
UltraShinet Burnisher (06–03)
OPERATION
2. Plug the power cord into a grounded wall outlet
(Figure 5).
INSTALLING DUST CONTROL BAG
Grounded
3 Hole Outlet
1. Open the dust bag compartment at rear of
machine by the the knob counter-clockwise
(Figure 3).
2. Slide the dust control bag collar over the intake
tube as shown. Prior to operating, always check
that an empty dust bag is installed (Figure 3).
Ground Pin
FIG. 5
FOR SAFETY: Do not operate machine unless
cord is properly grounded. Do not operate
machine with damaged cord or plug. Do not
operate machine with the use of an extension
cord.
3. Lower the handle to a desired operating height by
pulling the handle height adjustment lever.
Release lever to engage handle (Figure 6).
FIG. 3
MACHINE OPERATION
FOR SAFETY: Do not operate machine unless
operator manual is read and understood.
WARNING: Do Not Use Flammable Liquids Or
Operate Machine In Or Near Flammable Liquids,
Vapors Or Combustible Dusts.
This machine is not equipped with an explosion
proof motor. The electric motor will spark upon
start up and during operation which could cause a
flash fire or explosion if machine is used in an
area where flammable vapors/liquids or
combustible dusts are present.
1. Pull and turn the quick-release cord hook upward
and remove the power cord from the machine
(Figure 4).
FIG. 6
4. To begin burnishing, depress the safety lock
button, located on top of the handle, and pull the
On/Off levers. Release the safety lock button once
the machine starts (Figure 7).
FIG. 7
FIG. 4
UltraShinet Burnisher (09–02)
Home
Find...
Go To..
11
OPERATION
5. To adjust the pad pressure, turn the adjustment
knob counter-clockwise to increase pad pressure
and clockwise to decrease (Figure 8). Do not
adjust the pad pressure meter in the red zone,
motor and floor damage may result.
FOR SAFETY: When using machine, stay clear of
spinning pad.
MACHINE MAINTENANCE
FOR SAFETY: Before leaving or servicing
machine, unplug cord from wall outlet.
1. After each use, unplug the power cord and inspect
the burnishing pad for wear. If worn, remove the
burnishing pad and flip it over or replace the pad.
2. Remove and empty the dust bag after each use.
3. Clean the machine with an all purpose cleaner
after each use.
4. Inspect the power cord for damage after each use.
If worn or damaged, replace cord immediately.
5. Wipe the power cord with damp cloth and neatly
coil it around cord hook and handle after each use.
6. Periodically check that all bolts and nuts are tight.
FIG. 8
6. Begin burnishing by working away from the cord
and wall outlet. Use a forward and backward “W”
pattern motion or a straight path and return
motion.
FOR SAFETY: When using machine, do not
release handles until pad comes to a complete
stop.
NOTE: The machine’s circuit breaker will trip under
conditions of excessive motor overload. If circuit
breaker should trip, readjust the pad pressure, change
to a less aggressive pad and periodically check pad
for soil build–up. To reset circuit breaker, unplug power
cord, wait at least 15 seconds and press the reset
button located on handle.
7. Do not operate the machine in the same spot for a
long period of time. Floor damage may result.
8. To maneuver over thresholds and floor grates,
stop the machine and tilt it back on the rear
wheels.
7. Every 250 hours of operation, check the motor for
carbon brush wear. Replace brushes when worn
to a length of 1 cm (3/8 in) or less. Contact an
Authorized Service Center for carbon brush
inspection.
WARNING: Do Not Operate With Damaged
Power Cord. Do Not Modify Plug. Unplug Power
Cord Before Servicing Machine
STORING MACHINE
1. Unplug the power cord and remove the pad from
the machine. Neatly coil the cord around the cord
hook and handle to prevent cord damage
(Figure 9).
2. Store the machine in a dry area with the handle
positioned upward or folded down.
3. For minimal storage space, fold the handle down
and store the machine as shown (Figure 9).
FOR SAFETY: When transporting machine, get
assistance when lifting machine.
9. To stop machine, release the On/Off levers. The
safety lock button will automatically engage.
10. When done burnishing perform the following
machine maintenance procedures.
FIG. 9
WARNING: Do Not Use Outdoors. Do Not
Expose to Rain. Store Indoors.
12
Home
Find...
Go To..
UltraShinet Burnisher (06–03)
OPERATION
TRANSPORTING MACHINE
RECOMMENDED STOCK ITEMS
1. Unplug the power cord and remove the pad from
the machine. Neatly coil the cord around the cord
hook and handle to prevent cord damage.
Refer to the Parts List section for recommended stock
items. Stock Items are clearly identified with a bullet
preceding the parts description as shown (Figure 10).
2. Load the machine using a recommended loading
ramp or carefully lift the machine with adequate
assistance.
FOR SAFETY: When transporting machine, get
assistance when lifting machine.
3. Secure machine with tie–down straps when
transporting by vehicle.
FIG. 10
WARNING: Do Not Use Outdoors. Do Not
Expose to Rain. Store Indoors.
TROUBLE SHOOTING
PROBLEM
CAUSE
SOLUTION
Machine does not operate.
Machine is unplugged.
Plug machine in.
The cord connection between the
handle and the base is not properly
connected.
Ensure proper cord connection.
Machine circuit breaker tripped.
Reset the circuit breaker on machine.
Building circuit breaker tripped.
Reset circuit breaker in building.
Faulty power cord.
Contact Service Center.
Faulty wiring.
Contact Service Center.
Faulty On/Off Lever Switch.
Contact Service Center.
Faulty rectifier.
Contact Service Center.
Excessive pad pressure.
Adjust pad pressure knob.
Heavily soiled pad.
Replace Pad.
Improper pad for application.
Change to proper pad.
Faulty circuit breaker.
Contact Service Center.
Worn carbon brushes in motor.
Contact Service Center.
Machine circuit breaker trips
continuously.
UltraShinet Burnisher (06–03)
Home
Find...
Go To..
13
OPERATION
SPECIFICATIONS
MODEL
UltraShinet
LENGTH
800mm (31.5 in)
WIDTH
584mm (23 in)
HEIGHT
1194mm (47 in)
HEIGHT – HANDLE FOLDED
470mm (18.5 in)
WEIGHT
42 Kg (92 lbs) / 36 Kg (80 lbs) less power cord
DRIVE MOTOR
120V – 1.5 hp 15AMP 60Hz
PAD/BRUSH SPEED
2000 RPM
BRUSH PAD DIAMETER
508mm (20 in)
DECIBEL RATING AT
OPERATOR’S EAR,
INDOORS ON TILE FLOOR
66dB(A)
POWER CORD LENGTH
23m (75 ft)
OPERATING VOLTAGE
120V / 60 Hz
Specifications may change without notice.
MACHINE DIMENSIONS
1194 mm
(47 in)
470 mm
(18.5 in)
800 mm
(31.5 in)
584 mm
(23 in)
14
Home
Find...
Go To..
UltraShinet Burnisher (01–02)
OPERACIÓN
Este manual se provee con cada nuevo modelo.
Proporciona las instrucciones necesarias de operación
y mantenimiento y una lista ilustrada de piezas.
Leer este manual completamente y entender la
máquina antes de operar o prestar servicio.
DATOS DE LA MAQUINA
Por favor complete al momento de la instalación para
referencia futura.
Al ordenar piezas de repuesto, usar la sección de lista
de piezas en este manual. Antes de ordenar piezas o
suministros, asegurarse de tener disponible el número
de modelo y el número de serie disponible. Las piezas
y suministros pueden ordenarse por teléfono o por
correo de cualquier Centro de Servicio o Distribuidor,
autorizados.
No. de ModeloFecha de instalación No. de SerieE2002, 2003 Tennant Company
Printed in U.S.A.
Nobles es una marca registrada en Estados Unidos de Tennant Company.
Esta máquina provee un excelente servicio. Sin
embargo, los mejores resultados se obtienen a un
costo mínimo si:
UltraShine es una marca registrada en Estados Unidos de Tennant Company.
S La máquina se opera con un cuidado razonable.
S La máquina se mantiene regularmente – según las
instrucciones de cuidado de la máquina provistas.
S La máquina se mantiene con piezas provistas por el
fabricante o equivalentes.
TABLA DE MATERIAS
PRECAUCIONES DE SEGURIDAD . . . . . . . . . . .
INSTRUCCIONES DE CONEXION
A TIERRA . . . . . . . . . . . . . . . . . . . . . . . . . . . . . .
16
LOCALIZACION DE FALLAS . . . . . . . . . . . . . . . .
23
17
ESPECIFICACIONES . . . . . . . . . . . . . . . . . . . . . . .
DIMENSIONES DE LA MAQUINA . . . . . . . . .
24
24
ETIQUETA DE ADVERTENCIA . . . . . . . . . . . . . . .
18
DIAGRAMAS ELECTRICAS . . . . . . . . . . . . . . . . .
25
COMPONENTES DE LA MAQUINA . . . . . . . . . . .
19
PREPARACION DE LA MAQUINA . . . . . . . . . . . .
INSTALACION DE LA ALMOHADILLA . . . . .
INSTALACION DE LA BOLSA DE
CONTROL DE POLVO . . . . . . . . . . . . . . . . . . .
19
19
LISTA DE PIEZAS . . . . . . . . . . . . . . . . . . . . . . . . . .
PARTE SUPERIOR . . . . . . . . . . . . . . . . . . . . . .
PARTE INFERIOR . . . . . . . . . . . . . . . . . . . . . . .
26
26
28
OPERACION DE LA MAQUINA . . . . . . . . . . . . . .
20
MANTENIMIENTO DE LA MAQUINA . . . . . . . . .
21
ALMACENAMIENTO DE LA MAQUINA . . . . . . .
22
TRANSPORTE DE LA MAQUINA . . . . . . . . . . . . .
22
ARTICULOS RECOMENDADOS A
MANTENER EN STOCK . . . . . . . . . . . . . . . . . . . . .
22
UltraShinet Burnisher (06–03)
Home
Find...
20
Go To..
15
OPERACIÓN
La información siguiente señala condiciones
potencialmente peligrosas para el operador o el
equipo:
PRECAUCIONES de SEGURIDAD
PARA SEGURIDAD:
Esta máquina sólo se usa para uso comercial.
Está diseñada exclusivamente para pulir pisos
duros en un ambiente interior y no se construye
para ningún otro uso. Usa sólo
almohadillas/cepillos recomendados y
limpiadores de suelo y ceras disponibles
comercialmente y ceras destinados para la
aplicación de la máquina.
Todos los operadores deben leer, entender y
practicar las precauciones siguientes de
seguridad.
El siguiente símbolo de alerta de advertencia y el
encabezamiento de ”PARA SEGURIDAD” se usan en
este manual como se indica en su descripción:
ADVERTENCIA: Para advertir de riesgos o
prácticas inseguras que podrían resultar en
lesiones personales graves o la muerte.
PARA SEGURIDAD: Para identificar acciones que
deben seguirse para el funcionamiento seguro del
equipo.
El no seguir estas advertencias puede resultar en:
lesiones personales, electrocución, choque
eléctrico, fuego o explosión:
ADVERTENCIA: No use líquidos inflamables
ni opere la máquina en o cerca de líquidos y
vapores inflamables o polvos combustibles.
Esta máquina no está provista con un motor a
prueba de explosión. El motor eléctrico chispea
en el arranque y durante el funcionamiento lo que
podría causar un fuego explosivo o explosión si
la máquina se usa en una área donde están
presentes vapores/líquidos inflamables o polvos
combustibles.
ADVERTENCIA: No opere con un cordón
eléctrico dañado. No modifique el enchufe.
Desenchufe el cordón eléctrico antes de reparar la
máquina.
Si el cordón del suministro se daña o se rompe,
debe ser reemplazado por el fabricante o su
agente de servicio o una persona similarmente
calificada para evitar un riesgo.
1. No opere la máquina:
– Con líquidos inflamables o cerca de los
vapores inflamables ya que puede ocurrir
una explosión o fuego explosivo.
– A menos que se capacitó y fue autorizado.
– A menos que el manual del operador se
lea y entienda.
– A menos que el cordón se conecte
apropiadamente a tierra.
– Con un cordón o enchufe dañados.
– Si no está en una condición apropiada de
operación.
– En áreas al aire libre.
– En agua estancada.
– Sin bolsa del polvo en lugar.
– Con el uso de una extensión de cordón.
2. Antes de operar máquina:
– Asegúrese que todos los dispositivos de
seguridad están en su lugar y operando
apropiadamente.
– Quite objetos sueltos en suelo para
prevenir proyectiles peligrosos si son
golpeados por la almohadilla giratoria.
3. Al
–
–
–
–
–
–
–
–
–
–
–
–
–
ADVERTENCIA: No use al aire libre. No
exponga a la lluvia. Almacene bajo techo.
–
–
16
Home
Find...
usar máquina:
Aléjese de la almohadilla giratoria.
No pase la máquina encima del cordón.
No tire de la máquina por el enchufe o el
cordón.
No tire del cordón alrededor de bordes o
esquinas aguzados.
Use zapatos antiresbalosos.
No cierra las puertas sobre el cordón.
No desenchufe tirando del cordón.
No estire el cordón.
No maneje el enchufe con las manos
húmedas.
Mantenga el cordón lejos de las
superficies calientes.
Nunca active la potencia cuando la manija
esté en posición vertical.
No suelte las manijas hasta que la
almohadilla se detenga completa.
Proceda con lentitud en las cuestas y las
superficies resbaladizas.
Nunca permita que los niños jueguen en o
alrededor de la máquina.
Informe inmediatamente acerca de daños
o una operación defectuosa de la
máquina.
Go To..
UltraShinet Burnisher (06–03)
OPERACIÓN
4. Antes de dejar o reparar la máquina:
– Apague la máquina.
– Desconecte el cable del enchufe de la
pared.
5. Al prestar servicio a la máquina:
– Desenchufe cordón del tomacorriente de
la pared.
– Evite las piezas móviles. No use
chaquetas, camisas, o mangas, holgadas.
– Use piezas de repuesto provistas o
aprobadas por el fabricante
– Todas las reparaciones se deben realizar
por una persona cualificadad para el
servicio.
– No modifique la máquina de su diseño
original.
INSTRUCCIONES DE CONEXION A TIERRA
La máquina debe conectarse a tierra. En caso de
mal funcionamiento o desarreglo, la conexión a
tierra provee un recorrido de menor resistencia
para la corriente eléctrica para reducir el riesgo de
choque eléctrico. Esta máquina está equipada con
un cordón con un conductor de conexión a tierra
del equipo y enchufe de conexión a tierra. El
enchufe debe enchufarse en un tomacorrientes
apropiado correctamente instalado de acuerdo
con todos los códigos y ordenanzas locales.
No extraer la clavija de conexión a tierra; si falta,
reemplazar el enchufe antes de usar.
Conexión a tierra
Tomacorrientes
de 3 orificios
6. Al transportar máquina:
– Obtenga ayuda al alzar la máquina.
– Desenchufe cordón del tomacorriente de
la pared.
– Use correas de amarre para asegurar la
máquina al camión o remolque.
Clavija de conexión a tierra
UltraShinet Burnisher (06–03)
Home
Find...
Go To..
17
OPERACIÓN
ETIQUETAS DE ADVERTENCIA
Las etiquetas de advertencia aparecen en la máquina
en las ubicaciones indicadas. Reemplace las etiquetas
si se dañan o son ilegibles.
ETIQUETA DE ADVERTENCIA – Ubicada
en el reverso de la manija de la máquina.
ETIQUETA DE ADVERTENCIA –
Ubicada en el mango.
18
Home
Find...
Go To..
UltraShinet Burnisher (09–02)
OPERACIÓN
COMPONENTES DE LA MAQUINA
PREPARACION DE LA MAQUINA
Inspeccionar cuidadosamente la caja por señales de
daños. Informar inmediatamente acerca de daños, al
transportista.
3
1
INSTALACION DE LA ALMOHADILLA
4
PARA SEGURIDAD: Antes de dejar o reparar la
máquina, desconecte el cable del enchufe de la
pared.
2
11
1. Seleccione e instale una almohadilla de pulido de
alta velocidad recomendada para 2000 rpm.
5
6
NOTA: Consultar su distribuidor autorizado por
recomendaciones de almohadillas. Usar sólo
almohadillas provistas o aprobadas por el fabricante.
10
2. Tirar de la palanca de altura del mango y elevar el
mango a la posición vertical. Inclinar
cuidadosamente la máquina hacia atrás y apoyar
el mango sobre el piso (Figura 1).
9
12
8
7
13
FIG. 1
1. Mango de control
2. Palanca de ajuste de altura del mango
3. Botón de la traba de seguridad
4. Palancas On/Off
5. Cordón eléctrico
6. Gancho para enrollar el cordón eléctrico
3. Para instalar la almohadilla, extraer el anillo
plástico de traba central de la almohadilla
girándolo en sentido contrario a las agujas del
reloj. Colocar la almohadilla en posición en el
impulsor de la almohadilla y volver a colocar el
anillo de traba central girándolo en el sentido de
las agujas del reloj. Asegurarse que el anillo de
traba central esté bien firme (Figura 2).
7. Ruedas de transporte
8. Cerramiento de la bolsa de polvo
9. Perilla de ajuste de presión de la almohadilla
10. Medidor de presión de la almohadilla
11. Botón para regraduar el interruptor de circuitos
12. Base
13. Faldón de control de polvo
FIG. 2
UltraShinet Burnisher (06–03)
Home
Find...
Go To..
19
OPERACIÓN
4. Después de instalar la almohadilla, retornar la
máquina a la posición vertical.
1. Tirar y girar el gancho para de desenganche
rápido para enrollar el cordón eléctrico hacia
arriba y extraer el cordón eléctrico de la máquina
(Figura 4).
INSTALACION DE LA BOLSA DE CONTROL DE
POLVO
1. Abrir el compartimiento de la bolsa de polvo en la
parte posterior de la máquina girando la perilla en
sentido contrario a las agujas del reloj (Figura 3).
2. Deslizar el collar de la bolsa de control de polvo
sobre el tubo de toma según indicado. Previo a
operar, inspeccionar siempre que esté instalada
una bolsa vacía de polvo (Figura 3).
FIG. 4
2. Enchufar el cordón eléctrico a un tomacorrientes
de pared conectado a tierra (Figura 5).
Conexión a tierra
Tomacorrientes de
3 orificios
FIG. 3
OPERACION DE LA MAQUINA
Clavija de conexión a tierra
PARA SEGURIDAD: No utilice la máquina salvo
que el operario haya leído y comprendido el
manual de instrucciones.
ADVERTENCIA: No use líquidos inflamables
ni opere la máquina en o cerca de líquidos y
vapores inflamables o polvos combustibles.
Esta máquina no está provista con un motor a
prueba de explosión. El motor eléctrico chispea
en el arranque y durante el funcionamiento lo que
podría causar un fuego explosivo o explosión si
la máquina se usa en una área donde están
presentes vapores/líquidos inflamables o polvos
combustibles.
FIG. 5
PARA SEGURIDAD: No operar la máquina a
menos que la máquina esté bien conectada a
tierra. No operar la máquina con un cordón o
enchufe dañado. No operar la máquina con el uso
de un cordón de extensión.
3. Bajar el mango a la altura deseada de operación
tirando de la palanca de ajuste de la altura del
mango. Soltar la palanca para enganchar el
mango (Figura 6).
FIG. 6
20
Home
Find...
Go To..
UltraShinet Burnisher (06–03)
OPERACIÓN
4. Para comenzar a pulir, oprimir el botón de traba
de seguridad, ubicado al tope del mango, y tirar
de las palancas On/Off. Una vez que la máquina
arranca, soltar el botón de traba de seguridad
(Figura 7).
7. No operar la máquina en el mismo lugar por un
período prolongado ya que puede resultar en
daños al piso.
8. Para maniobrar sobre umbrales y rejillas de piso,
detener la máquina e inclinar hacia atrás sobre las
ruedas posteriores.
PARA SEGURIDAD: Al transportar máquina,
obtenga asistencia al levantar la máquina.
9. Para parar la máquina, soltar las palancas On/Off.
El botón de traba de seguridad se engancha
automáticamente.
10. Al completar el pulido efectuar los siguientes
procedimientos de mantenimiento de la máquina.
MANTENIMIENTO DE LA MAQUINA
FIG. 7
5. Para ajustar la presión de la almohadilla, girar la
perilla de ajuste en sentido contrario a las agujas
del reloj para incrementar la presión sobre la
almohadilla y en el sentido de las agujas del reloj
para disminuir (Figura 8). No ajustar el medidor de
presión de la almohadilla en la zona roja, ya que
puede resultar en daños al motor y al piso.
PARA SEGURIDAD: Al usar la máquina,
permanezca alejado de las almohadillas giratorias.
PARA SU SEGURIDAD: Antes de dejar o reparar la
máquina, desconecte el cable del enchufe de la
pared.
1. Sustituya las almohadillas cuando estén cargadas
de residuos. No utilice nunca almohadillas sucias
durante las operaciones de pulido.
2. Extraer y vaciar la bolsa de polvo después de
cada uso.
3. Limpiar la máquina con un limpiador universal
después de cada uso.
4. Inspeccionar el cordón eléctrico después de cada
uso. Si está gastado o dañado, reemplazar
inmediatamente el cordón.
5. Frotar el cordón eléctrico con un trapo húmedo y
enrollar prolijamente alrededor del gancho para el
cordón y la manija después de cada uso.
6. Inspeccionar periódicamente que todos los pernos
y tuercas estén firmes.
FIG. 8
6. Comenzar a pulir alejándose del cordón y del
tomacorrientes de pared. Usar un movimiento de
patrón de avance y retroceso en forma ”W” o un
movimiento de recorrido directo y retroceso.
PARA SEGURIDAD: Al usar la máquina, no soltar
las empuñaduras del mango hasta que la
almohadilla se detenga completamente.
7. Cada 250 horas de operación, inspeccionar el
motor por desgaste de las escobillas de carbón.
Remplazar las escobillas cuando se hayan
gastado a un largo de 1 cm (3/8 pulg.) o menos.
ADVERTENCIA: No opere con un cordón
eléctrico dañado. No modifique el enchufe.
Desenchufe el cordón eléctrico antes de reparar la
máquina.
NOTA: El interruptor de circuitos de la máquina se
activa bajo condiciones de sobrecarga excesiva del
motor. Si se activa el interruptor de circuitos, reajustar
la presión de la almohadilla, cambiar a una almohadilla
menos agresiva e inspeccionar periódicamente la
almohadilla por acumulación de suciedad. Para
regraduar el interruptor de circuitos, desenchufar el
cordón eléctrico, esperar 15 minutos por lo menos y
oprimir el botón para regraduar ubicado en el mango.
UltraShinet Burnisher (06–03)
Home
Find...
Go To..
21
OPERACIÓN
ALMACENAMIENTO DE LA MAQUINA
1. Desenchufe el cordón eléctrico y extraiga la
almohadilla de la máquina. Enrolle prolijamente el
cordón alrededor del gancho del cordón y el
mango (Figura 9).
2. Almacenar la máquina en un área seca en
posición vertical con el mango vertical o plegado
hacia abajo.
3. Para áreas restringidas de almacenamiento,
pliegue el mango y almacene la máquina según se
muestra (Figura 9).
TRANSPORTE DE LA MAQUINA
1. Desenchufe el cordón eléctrico y extraiga la
almohadilla de la máquina. Enrolle prolijamente el
cordón alrededor del gancho del cordón y el
mango.
2. Cargue la máquina usando una rampa
recomendada de carga o con asistencia adecuada
levante cuidadosamente la máquina.
PARA SEGURIDAD: Al transportar máquina,
obtenga asistencia al levantar la máquina.
3. Asegure la maquina con las bandas de amarre
cuando sea transportada por camión.
ADVERTENCIA: No use al aire libre. No
exponga a la lluvia. Almacene bajo techo.
ARTICULOS RECOMENDADOS A
MANTENER EN STOCK
FIG. 9
ADVERTENCIA: No use al aire libre. No
exponga a la lluvia. Almacene bajo techo.
Referirse a la sección de Lista de Piezas para los
artículos recomendados a mantener en stock. Los
artículos para stock están claramente identificados
con una bala precediendo a la descripción de piezas
según indicado (Figura 10).
FIG. 10
22
Home
Find...
Go To..
UltraShinet Burnisher (06–03)
OPERACIÓN
LOCALIZACION DE FALLAS
PROBLEMA
CAUSA
SOLUCION
La máquina no funciona.
La máquina está desenchufada.
Enchufar la máquina.
La conexión del cordón entre el
mango y la base no está bien firme.
Asegurar una conexión apropiada del
cordón.
Está activado el interruptor de
circuitos.
Regraduar el interruptor de circuitos
en la máquina.
Está activado en interruptor de
circuitos del edificio.
Regraduar el interruptor de circuitos
del edificio.
Cordón eléctrico defectuoso.
Consultar con el Centro de Servicio.
Cableado defectuoso.
Consultar con el Centro de Servicio.
Conmutador de la palanca On/Off
defectuoso.
Consultar con el Centro de Servicio.
Rectificador defectuoso.
Consultar con el Centro de Servicio.
Presión excesiva sobre la
almohadilla.
Ajustar la perilla de presión de la
almohadilla.
Almohadilla muy sucia.
Reemplazar la almohadilla.
Almohadilla incorrecta para la
aplicación
Cambiar a la almohadilla correcta.
Interruptor de circuitos defectuoso.
Consultar con el Centro de Servicio.
Escobillas de carbón gastadas en el
motor.
Consultar con el Centro de Servicio.
El interruptor de circuitos de la
máquina se activa continuamente.
UltraShinet Burnisher (09–02)
Home
Find...
Go To..
23
OPERACIÓN
ESPECIFICACIONES
MODELO
UltraShinet
LONGITUD
800mm (31.5 pulg.)
ANCHO
584mm (23 pulg.)
ALTURA
1194mm (47 pulg.)
ALTURA – MANGO PLEGADO
470mm (18.5 pulg.)
PESO
42 Kg (92 lbs) / 36 Kg (80 lbs) menos el cordón eléctrico
MOTOR IMPULSOR
120V – 1.5 hp 15AMP 60Hz
VELOCIDAD DE LA ALMOHADILLA/CEPILLO
2000 RPM
DIAMETRO DE LA ALMOHADILLA CEPILLO
508mm (20 pulg.)
CLASIFICACION NOMINAL DE DECIBELES EN LOS OIDOS
DEL OPERADOR, BAJO TECHO SOBRE PISO DE BALDOSAS
66dB(A)
LARGO DEL CORDON ELECTRICO
23m (75 pies)
VOLTAJE DE OPERACION
120V / 60 Hz
Las especificaciones pueden cambiar sin aviso previo.
DIMENSIONES DE LA MAQUINA
1194 mm
(47 pulg.)
470 mm
(18.5 pulg.)
800 mm
(31.5 pulg.)
584 mm
(23 pulg.)
24
Home
Find...
Go To..
UltraShinet Burnisher (02–02)
ELECTRICAL DIAGRAMS
DIAGRAMAS ELECTRICAS
120V
MAIN
SWITCH
BLACK
POWER CORD
BLACK
CIRCUIT
BREAKER
ÏÏÏ
ÏÏÏ
WHITE
GREEN
B
L
A
C
K
CORD TO
MOTOR
GROUND TO
HANDLE COVER
GREEN
WHITE
RED
BLACK
BLACK
WHITE
TOP OF
MOTOR
PAD
PRESSURE
METER
UltraShinet Burnisher (01–02)
Home
Find...
Go To..
25
PARTS LIST
LISTA DE PIEZAS
UPPER UNIT
PARTE SUPERIOR
6
5
9
8
7
10
4
47
3
12
2
20
1
21
13
41
11
50
50 51
14
40
51
49
15
16
17
46
18
48
45
44
22
27
43
42
19
31
23
29
24
28
25
26
54
53
31
31
52
29
32
52
30
28
53
33
34
54
53
35
52
31
52
30
53
36
37
38
39
26
Home
Find...
Go To..
UltraShinet Burnisher (06–03)
PARTS LIST
LISTA DE PIEZAS
UPPER UNIT
PARTE SUPERIOR
REF
1
PART #
DESCRIPTION
1000332
ASSEMBLY, HANDLE
1001647
HOUSING, HANDLE FRONT
(PLASTIC)
QTY.
REF
PART #
DESCRIPTION
1
28
612150
SCREW, M6X20 HEXHD
1
1
29
612414
NUT, M6
1
∇ 30
613977
ASSEMBLY, SEAT/GEAR
REPLACEMENT
1
Y
31
613938
KIT, GEAR & PLUNGER
1
Y
32
614023
NUT, M5 NYLOCK
5
Y
33
614024
SCREW, M5X38 HEXHD
1
Y
34
612720
SCREW, M5X1.0X25
2
Y
35
614025
SCREW, M5X20 HEXHD
2
2
612386
HANDLE, LEVELING (PLASTIC)
1
3
610037
HANDLE, RIGHT SWITCH
(PLASTIC)
1
HOUSING, HANDLE REAR
(PLASTIC)
1
4
5
1001648
612141
PIN
3
QTY.
6
1001145
DSWITCH, MOMENTARY SPST
1
7
612466
SCREW, M3X25 SELF TAPPING
2
36
612480
SCREW, M8X60 HEXHD
3
1
37
612419
WASHER, M8 FLAT
3
38
612418
NUT, M8X7.5
3
8
612464
SPRING, SAFETY LOCK BUTTON
9
612461
BUTTON, SAFETY LOCK
1
10
612459
SCREW, M5X30 PANPHL
2
39
612040
BASE, HANDLE MOUNTING
1
∇ 40
612911
DCORD, 14/3X75’ YELLOW W/
STRAIN RELIEF
1
41
602849
DSTRAIN RELIEF
1
42
612469
GROMMET
1
43
603104
HOOK, CORD QUICK–RELEASE
1
44
603108
SPRING
1
45
140239
SCREW, 3/8X1–3/4 SHOULDER
1
46
612770
LABEL, NOBLES HANDLE
1
47
613286
LABEL, WARNING
1
48
130176
DBELT CLIP, STRAIN–RELIEF
(OPTIONAL)
1
11
612865
SCREW, M5X35 PANPHL
3
12
612495
SCREW, M5X20 PANPHL
2
13
610036
HANDLE, LEFT SWITCH
1
14
612864
COVER
1
15
612863
NUT, M4
1
16
612456
WASHER, PLAIN
1
17
612388
SCREW, M4X8 PANPHL
2
18
1001649
ROD, HANDLE
1
19
1000482
TUBE, HANDLE
1
20
1001169
DCIRCUIT BREAKER, 17AMP
1
21
612919
ASM., WIRE #12BLKX100MM
1
49
575569000
SCREW, M5X16 PANPHL
1
22
612920
CORD, HANDLE 14/3X640MM
1
50
140031
WASHER, #10 LOCK
2
23
612436
SEAL
1
51
140297
NUT, M5X.8 HEX
2
24
612432
RETAINER
1
52
612423
WASHER, NYLON
2
25
612430
SPRING
1
53
612422
O–RING, GEAR SEAT
2
26
612862
NUT, M4
1
54
612477
COVER, GEAR
1
27
1000749
COVER, HANDLE
1
Y
∇ ASSEMBLY / CONJUNTO
Y INCLUDED IN ASSEMBLY / INCLUIDO EN EL CONJUNTO
D RECOMMENDED STOCK ITEMS / ARTICULOS RECOMENDADOS
UltraShinet Burnisher (06–03)
Home
Find...
Go To..
27
PARTS LIST
LISTA DE PIEZAS
LOWER UNIT
PARTE INFERIOR
4
74
2
1
78
81
73
5
6
75
72
76
77
2
3
8
71
7
58
59
9
56
55
55
57
70
54
10
11
13
22
61
69 68
53
62
60
12
15
14
16
17
20
19
18
16
15
19
17
15
17
49
63
50
67
20
22
24
25
52
51
53
21
17
23
58
17 18
66
64
65
19
17
16
48
26
47 46
45
30
44
43
37
42
79
27
29
36
35
34
40
28
41
39
80
38
31
32
33
28
Home
Find...
Go To..
UltraShinet Burnisher (09–02)
PARTS LIST
LISTA DE PIEZAS
LOWER UNIT
PARTE INFERIOR
REF
PART #
DESCRIPTION
QTY.
REF
PART #
DESCRIPTION
QTY.
1
613910
STRAP, MOTOR STOP
1
∇ 39
069767094
KIT, BAND REPLACEMENT
1
2
140003
WASHER, 1/4X1 FENDER
2
Y
40
602044000
FASTENER, ADJUSTING SKIRT
1
3
15678
SCREW, M6X1.0X16 HXHDCP
1
41
1005629
DSKIRT, DUST CONTROL
1
4
140350
SCREW, #10X1/2 PANPHL
1
42
1000147
BASE, GREEN
1
5
130040
WIRE TIE
1
43
1001193
AXLE, .5” DIA X 14.72” LG
1
6
1000584
DMOTOR, 2000RPM 1–1/2HP 115V
1
44
103019
CAP, HUB
2
WHEEL, 5”X1.5 GRAY
2
WASHER, 1/2 COMPRESSION
2
22117
DBRUSH, CARBON
4
45
103067
190753
DRECTIFIER
1
46
4252
1001679
CORD, MOTOR
1
47
140063
WASHER, .51X1.25X.25
2
1000483
ASM, WIRE #14X400BLK 1/4FX1/4F
1
48
612773
LABEL, SIDE ULTRASHINE
2
1000484
ASM, WIRE #14X400WHT 1/4FX10R
1
49
1000617
DBAG, FILTER (CLOTH – STD)
1
7
140628
KEY, 3/16X3/16X1.0”
1
1001923
1000469
SEAL, MOTOR
1
DBAG, FILTER (PAPER – OPTION)
(PKG OF 10 BAGS)
1
8
9
1001311
RETAINER, SEAL
1
50
140962
LATCH, SPRING KNURLED
1
10
140028
WASHER, 3/8 FLAT
4
51
1000277
DOOR, BAG
1
52
140706
RIVET, POP 1/8
2
53
1000225
BRACKET, HANDLE SUPPORT
1
54
612040
BRACKET, HANDLE MOUNTING
1
55
140015
WASHER, 5/16 LOCK
8
56
09023
SCREW, M08X1.25X35 HEXHD
4
57
140014
WASHER, 5/16X1–1/2 FENDER
1
58
15675
SCREW, M8X1.25X16 HXHDCP
4
∇ 59
600974
DKNOB, STAR 4 EAR 3/8ID
W/SET SCREW
1
11
140017
12
2949.5
13
1000409
14
140233
WASHER, 3/8 LOCK
4
SCREW, .38–16X.62 HEXHD
4
MOUNT, STUD/PLATE
4
SCREW, 3/8–16X1–3/4 HEXHD
2
15
36643
NUT, 3/8–16 JAM NYLOCK
6
16
140028
WASHER, 3/8 FLAT
6
17
630447
WASHER, M12.7X25.4X.8 NYLON
12
18
611859
BRACKET, LIFT ARM
2
19
600191
SLEEVE, .5ODX.375BX.23L STEEL
6
60
140894
SCREW, SET 10–32X1/4
1
20
140016
WASHER, 1/4 LOCK
2
61
611865
STUD, ADJUSTER
1
21
15678
SCREW, M6X1.0X16 HXHDCP
2
62
630447
WASHER, M12.7X25.4X.8 NYLON
1
22
1001408
CAM, STOP
2
63
140027
WASHER, 5/16 FLAT
3
23
611862
BRACKET, MOTOR
1
64
200001486
SCREW, M8X1.25X16 SKHDCP
2
24
140524
NUT, 1/4–20 KEP
4
65
200101017
NUT, M8X1.25 HXJM
2
25
069760023
WASHER, .77BX1.26DX.03
1
66
1010685
SPRING, EXT. .975X3.75X.112
2
36643
NUT, 3/8–16 JAM NYLOCK
1
BRACKET, SPRING
1
SCREW, M8X1.25X12 SKHDCP
1
Y
∇ 26
605348
DASM., DRIVER PAD 20” W/HUB
1
67
Y∇ 27
25707
ASM., CENTERLOCK
1
68
600194
100101
RING, PAD RETAINER
1
69
200001483
DWASHER, PAD DRIVER LOCK
1
70
1000632
SCREEN, AIR SCOOP
1
DPAD, 20” BURNISH HAIRBLEND
1 CARTON = 5 PADS
1
71
140825
SCREW, #6X1/2 PANPHL
2
72
1000154
COVER, MOTOR GREEN
1
73
1011541
DGAUGE, PAD PRESSURE
1
74
612772
LABEL, PAD PRESSURE
1
75
140000
WASHER, 1/4 FLAT
2
76
15678
SCREW, M6X1.0X16 HXHDCP
2
77
130175
PLUG, DOME .75OD BLACK
2
78
575600
WASHER, .25X1.06 NEOPRENE
2
79
1005645
SHIELD, SKIRT
1
80
140350
SCREW, #10X1/2 PANPHL
6
81
602597
LABEL, WARNING CSA
1
Y28
29
572084000
30
611788
31
25732
WASHER, .36BX1.25DX.93 FLAT
1
32
140015
WASHER, 5/16 LOCK
1
33
140221
SCREW, 5/16–18X1–1/4 HXHDCP
1
34
15678
SCREW, M6X1.0X16 HXHDCP
4
35
140016
WASHER, 1/4 LOCK
4
36
140000
WASHER, 1/4 FLAT
4
37
1000387
CASTER, 2–1/2 SWIVEL
1
38
630613
STRIP, SKID
1
∇ ASSEMBLY / CONJUNTO
Y INCLUDED IN ASSEMBLY / INCLUIDO EN EL CONJUNTO
D RECOMMENDED STOCK ITEMS / ARTICULOS RECOMENDADOS
UltraShinet Burnisher (06–03)
Home
Find...
Go To..
29