1
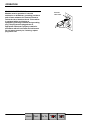
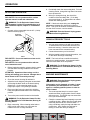
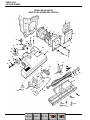
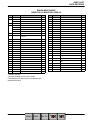
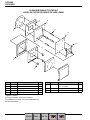
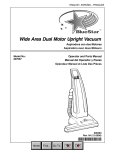
ENGLISH - ESPAÑOL
UV-1600
Lightweight Dual Motor Vacuum
Aspiradora Ligero Del Motor Dual
Model No.:
607446
Operator and Parts Manual
Manual del Operador y Piezas
608268
Rev. 01 (07-05)
Home
Find... Go To..
OPERATION
This manual is furnished with each new model. It
provides necessary operation and maintenance
instructions and an illustrated parts list.
MACHINE DATA
Read this manual completely and understand the
machine before operating or servicing it.
Please fill out at time of installation for future reference.
Use the illustrated Parts Lists to order parts. Before
ordering parts or supplies, be sure to have your
machine model number and serial number handy.
Parts and supplies may be ordered by phone or mail
from any authorized parts and service center,
distributor or from any of the manufacturer’s
subsidiaries.
Model No.Install. Date Serial No.-
This machine will provide excellent service. However,
the best results will be obtained at minimum costs if:
S The machine is operated with reasonable care.
S The machine is maintained regularly - per the
maintenance instructions provided.
S The machine is maintained with manufacturer
supplied or equivalent parts.
Tennant Company
PO Box 1452
Minneapolis, MN 55440
Phone: (800) 553--8033 or (763) 513--2850
PROTECT THE ENVIRONMENT
Please dispose of packaging materials,
old machine components such as
batteries, hazardous fluids such as
antifreeze and oil, in a safe
environmentally way according to your
local waste disposal regulations.
www.castex.com
Copyright E1999, 2005 Tennant Company. All rights reserved.
Printed in U.S.A.
Always remember to recycle.
Castex is a registered United States trademark of Tennant Company.
TABLE OF CONTENTS
(ESPAÑOL ÍNDICE............9)
SAFETY PRECAUTIONS . . . . . . . . . . . . . . . . . . . .
GROUNDING INSTRUCTIONS . . . . . . . . . . .
3
4
SAFETY LABELS . . . . . . . . . . . . . . . . . . . . . . . . . . .
5
SETUP AND OPERATION . . . . . . . . . . . . . . . . . . .
6
USING ACCESSORY TOOLS . . . . . . . . . . . . . . . .
6
MACHINE MAINTENANCE . . . . . . . . . . . . . . . . . .
6
STORING MACHINE . . . . . . . . . . . . . . . . . . . . . . . .
7
RECOMMENDED STOCK ITEMS . . . . . . . . . . . . .
7
TROUBLESHOOTING GUIDE . . . . . . . . . . . . . . . .
8
2
Home
ELECTRICAL DIAGRAMS . . . . . . . . . . . . . . . . . . .
16
PARTS LIST . . . . . . . . . . . . . . . . . . . . . . . . . . . . . . .
BAG HOUSING GROUP . . . . . . . . . . . . . . . . .
BRUSH BASE GROUP . . . . . . . . . . . . . . . . . . .
18
18
20
OPTIONS . . . . . . . . . . . . . . . . . . . . . . . . . . . . . . . . . .
CLEAN AIR EXHAUST FILTER KIT . . . . . . . .
ACCESSORY ATTACHMENT KIT . . . . . . . . .
VACUUM BAGS . . . . . . . . . . . . . . . . . . . . . . . . .
22
22
23
23
Find... Go To..
UV-1600 (07--05)
OPERATION
The following information signals potentially
dangerous conditions to the operator or
equipment:
SAFETY PRECAUTIONS
This machine is intended for commercial use. It is
designed exclusively to pick up dirt, dry debris
and dust in an indoor environment and is not
constructed for any other use. The pick up of any
type of fluid or dangerous/toxic materials is
prohibited. Use only recommended accessories.
All operators must read, understand and practice
the following safety precautions.
The following warning alert symbol and the “FOR
SAFETY” heading are used throughout this manual as
indicated in their description:
WARNING: To warn of hazards or unsafe
practices which could result in severe personal
injury or death.
FOR SAFETY: To identify actions which must be
followed for safe operation of equipment.
Failure to follow these warnings may result in
personal injury, electrical shock, fire or explosion.
WARNING: Fire Or Explosion Hazard:
--
Never Use Flammable Liquids Or Operate
Machine in Or Near Flammable Liquids,
Vapors Or Combustible Dusts.
This machine is not equipped with explosion proof
motors. The electric motors will spark upon start
up and during operation which could cause a flash
fire or explosion if machine is used in an area
where flammable vapors/liquids or combustible
dusts are present.
--
Do Not Pick Up Flammable Or Toxic Materials,
Burning Or Smoking Debris.
WARNING: Electrical Hazard. Do Not Operate
With Damaged Power Cord. Do Not Modify Plug.
Unplug power Cord Before Servicing Machine.
If the supply cord is damaged or broken, it must
be replaced by the manufacturer or it’s service
agent or a similarly qualified person in order to
avoid a hazard.
WARNING: Electrical Shock Hazard.
Do Not Use Outdoors Or On Wet Surfaces. Do Not
Expose to Rain. Store Indoors.
UV-1600 (07--05)
Home
Find... Go To..
FOR SAFETY:
1. Do not operate machine:
-- In flammable or explosive areas.
-- Unless trained and authorized.
-- Unless operator manual is read and
understood.
-- Unless cord is properly grounded.
-- With damaged cord or plug.
-- If not in proper operating condition.
-- In outdoor areas.
-- On wet or damp surfaces.
-- Without bag and/or filters in place.
-- With the use of an extension cord.
2. Before operating machine:
-- Make sure all safety devices are in place
and operate properly.
3. When using machine:
-- Do not pull machine by plug or cord.
-- Do not pull cord around sharp edges or
corners.
-- Do not close doors on cord.
-- Do not unplug by pulling on cord.
-- Do not stretch cord.
-- Do not handle plug with wet hands.
-- Keep cord away from heated surfaces.
-- Do not pick up burning or smoking debris,
such as cigarettes, matches or hot ashes.
-- Report machine damage or faulty
operation immediately.
-- Never allow children to play on or around.
4. Before leaving or servicing machine:
-- Turn machine off.
-- Unplug cord from wall outlet.
5. When servicing machine:
-- Unplug cord from wall outlet.
-- Avoid moving parts. Do not wear loose
jackets, shirts, or sleeves.
-- Use manufacturer supplied or approved
replacement parts.
-- All repairs must be performed by a
qualified service person.
-- Do not modify the machine from its
original design.
3
OPERATION
GROUNDING INSTRUCTIONS
Machine must be grounded. If it should
malfunction or breakdown, grounding provides a
path of least resistance for electrical current to
reduce the risk of electrical shock. This machine
is equipped with a cord having an
equipment--grounding conductor and grounding
plug. The plug must be plugged into an
appropriate outlet that is properly installed in
accordance with all local codes and ordinances.
Do not remove ground pin; if missing, replace
plug before use.
4
Home
Find... Go To..
Grounded
3 Hole Outlet
Ground Pin
UV-1600 (07--05)
OPERATION
SAFETY LABELS
The safety label appears on the machine in the location indicated. Replace label if it is missing or becomes damaged
or illegible.
WARNING LABEL -- LOCATED ON BASE
OF MACHINE.
UV-1600 (07--05)
Home
Find... Go To..
5
OPERATION
SETUP AND OPERATION
8. Periodically check the vacuum bag level. For best
cleaning results, change the bag when it becomes
three--quarters full.
FOR SAFETY: Do not operate machine, unless
operator manual is read and understood.
9. When you change the bag, also check the
condition of the secondary filter. If it is dusty,
remove and clean it. A clogged filter can reduce
airflow and cleaning power.
WARNING: Fire Or Explosion Hazard. Never
Use Flammable Liquids Or Operate Machine in Or
Near Flammable Liquids, Vapors Or Combustible
Dusts.
1. Connect only to a grounded 120 volt A.C. (3 hole)
electrical outlet (Figure 1).
Grounded
3 Hole Outlet
NOTE: If the brush stops during use, unplug the
vacuum and dislodge any obstructions near the
brush. Then, push in the brush reset button located at
the rear of the vacuum, near the wheels.
WARNING: Electrical Hazard. Unplug power
Cord Before Servicing Machine.
USING ACCESSORY TOOLS
1. You can use accessory tools with your vacuum.
To attach these tools, disconnect the hose from
the brush housing. Leave the other end of the
hose connected to the vacuum housing.
2. Connect the accessory tool to the hose.
Ground Pin
3. With the handle locked in the upright position, turn
on the switch and begin vacuuming.
FIG. 1
FOR SAFETY: Do not use machine unless cord is
properly grounded.
FOR SAFETY: Do not operate machine with the
use of extension cords.
2. Before beginning operation, always check to make
sure that there is a bag installed in the vacuum
housing.
ATTENTION: Operation without a bag or with a
full bag will damage your vacuum. Damage due to
these causes is NOT covered by warranty.
3. Close the vacuum housing lid and latch it.
4. Adjust the brush height by tilting the vacuum back
and turning the black knob on the base housing.
Select from 1 for shortest pile carpet to 6 for
longest pile carpet, or any setting in between.
5. Place your right foot on the toe kick to hold the
base, then pull the handle back to the vacuuming
position.
6. Turn on the power switch located on the handle.
WARNING: Fire Or Explosion Hazard. Do Not
Pick Up Flammable Or Toxic Materials, Burning Or
Smoking Debris.
7. Begin vacuuming. When cleaning under beds or
other hard to reach areas, you can lower the
handle to the floor for easy clearance.
6
Home
NOTE: The brush will not run while the handle is
locked in the upright position. An automatic switch
shuts the brush motor off in this position.
WARNING: Fire Or Explosion Hazard. Do Not
Pick Up Flammable Or Toxic Materials, Burning Or
Smoking Debris.
MACHINE MAINTENANCE
WARNING: Electrical Hazard. Unplug power
Cord Before Servicing Machine.
If the supply cord is damaged or broken, it must
be replaced by the manufacturer or it’s service
agent or a similarly qualified person in order to
avoid a hazard.
1. The most important step is to remove carpet
strands and other clogging debris from the brush
after every use. This simple step can extend the
life of your brush bearings.
2. Check the vacuum bag level frequently to prevent
overfilling the bag. Always dispose of paper bags
when they become full, do not reuse them. If
using a cloth bag, empty the bag and shake out
excess dust. Also, inspect the cloth bag for
tearing or holes each time you empty it.
Find... Go To..
UV-1600 (07--05)
OPERATION
3. Check the vacuum hose for clogging material after
every use.
4. Clean the secondary filter once each month. This
filter provides extra vacuum motor protection.
5. Clean the exhaust filter once each month. Press
down on the top of the filter cover and remove the
cover to gain access to the filter.
6. The brush on your vacuum is adjustable for
maximum brush life. When the brush bristles
shorten with wear, you can lower the brush shaft
closer to the carpet and get extended life from the
shorter brush bristles. Follow these steps:
a. Remove the brush plate.
b. Look closely at the two white bearing blocks
and note that a number (1) shows on each
block.
c. Remove the brush assembly from the brush
housing.
d. Hold the brush and rotate each of the two
white bearing blocks until you see the number
(2) on each block (Figure 2).
STORING MACHINE
Store machine in a dry area in the upright position.
ATTENTION: Do not expose to rain. Store
indoors.
RECOMMENDED STOCK ITEMS
Refer to the Parts List section in this manual for
recommended stock items. Stock Items are clearly
identified with a bullet preceding the parts description.
See example below:
FIG. 2
e. Reinstall the brush so the number (2) shows
on each block.
f. Put the brush plate back in place.
UV-1600 (07--05)
Home
Find... Go To..
7
OPERATION
TROUBLESHOOTING GUIDE
PROBLEM
CAUSE
SOLUTION
The vacuum will not pick up dirt.
The vacuum bag is full.
Install a new paper vacuum bag or
empty the cloth bag.
Remove clogs from hose.
Push the hose cuff firmly into the
brush base after cleaning with
attachments.
Hold hose in one hand and turn cuff
with the other hand until it is tightly
threaded onto the hose.
Unplug the machine, then remove
the clog. Push the brush reset button
at the rear of the vacuum.
Remove the filter and clean or replace
it.
Replace the drive belts.
The hose is clogged.
The hose is loose from the brush
base.
One or both hose cuffs are loose.
The brush clogged and caused the
brush circuit breaker to trip.
The secondary filter is clogged.
The vacuum will not run.
The brush drive belts are worn or
broken.
The power cord is not plugged in or
there is a short in the power cord.
The power outlet is not providing
electricity due to a circuit breaker that
has tripped in the building.
The vacuum motor has shut off on
thermal overload due to clogged hose,
vacuum bag, secondary filter or
exhaust filter.
The brush clogged and caused the
brush circuit breaker to trip.
Faulty master switch.
Loose or broken wiring inside the
vacuum.
8
Home
Find... Go To..
Check that the power cord is plugged
in and also inspect it for damage.
Try plugging the machine into another
power outlet.
Check all these locations for clogs.
Unplug the machine, then remove
the clog. Push the brush reset button,
at the rear of the vacuum.
Contact Service Center.
Contact Service Center.
UV-1600 (03--99)
OPERACIÓN
Este manual se incluye en todos los modelos nuevos.
Proporciona la información necesaria para su
utilización y mantenimiento.
Lea todo el manual detenidamente para
comprender la máquina antes de utilizarla o
revisarla.
DATOS DE LA MÁQUINA
Por favor complete en el momento de la instalación,
para referencia futura.
Use la Lista de Piezas incluida en este manual al
ordenar piezas de repuesto. Antes de ordenar piezas
o suministros, asegúrese de tener el número de
modelo y el número de serie de su máquina. Las
piezas y los suministros pueden ordenarse por
teléfono o por correo de cualquier centro autorizado
de piezas y servicios, distribuidor de piezas o de
cualquier subsidiaria del fabricante.
No. de modelo -Fecha de instalación -Nº de Serie--
Esta máquina le proporcionará excelentes resultados.
Sin embargo, los resultados serán óptimos a un coste
mínimo si:
S Utiliza la máquina con un cuidado razonable.
S Realiza las operaciones de mantenimiento de
acuerdo con las instrucciones adjuntas.
S Las operaciones de mantenimiento de la máquina
se realizan con piezas suministradas por el
fabricante o equivalentes.
ÍNDICE
MEDIDAS DE SEGURIDAD . . . . . . . . . . . . . . . . . .
INSTRUCCIONES DE CONEXION
A TIERRA . . . . . . . . . . . . . . . . . . . . . . . . . . . . . .
10
DIAGRAMAS ELECTRICAS . . . . . . . . . . . . . . . . .
16
11
ADHESIVOS DE SEGURIDAD . . . . . . . . . . . . . . .
12
LISTA DE PIEZAS . . . . . . . . . . . . . . . . . . . . . . . . . .
GRUPO DEL ARMAZON DE LA BOLSA . . . .
GRUPO DE LA BASE DEL CEPILLO . . . . . .
18
18
20
PREPARACIÓN Y FUNCIONAMIENTO . . . . . . . .
13
22
USO DE LOS ACCESORIOS . . . . . . . . . . . . . . . . .
13
MANTENIMIENTO DE LA MÁQUINA . . . . . . . . .
14
ALMACENAMIENTO DE LA MÁQUINA . . . . . . .
14
OPCIONES . . . . . . . . . . . . . . . . . . . . . . . . . . . . . . . .
JUEGO DE FILTRO DE ESCAPE DE
AIRE LIMPIO . . . . . . . . . . . . . . . . . . . . . . . . . . .
JUEGO DE ACCESORIOS . . . . . . . . . . . . . . .
BOLSA RECOLECTORA . . . . . . . . . . . . . . . . .
ARTICULOS RECOMENDADOS PARA MANTENER
EN EXISTENCIA . . . . . . . . . . . . . . . . . . . . . . . . . . . . 14
GUÍA PARA RESOLVER PROBLEMAS . . . . . . .
UV-1600 (07--05)
Home
22
23
23
15
Find... Go To..
9
OPERACIÓN
ADVERTENCIA: Peligro choque eléctrico. No
use al aire libre o en superficies húmedas. No
exponga a la lluvia. Almacén bajo techo.
MEDIDAS DE SEGURIDAD
Esta máquina está destinada al uso comercial.
Está diseñada exclusivamente para recoger
suciedad, escombros secos y polvo de interiores
y no debe utilizarse para ningún otro uso. La
recogida de cualquier líquido o polvo
peligroso/tóxico está prohibida. Utilice solamente
los accesorios recomendados.
Todos los operarios deben leer, comprender y
cumplir las siguientes medidas de seguridad.
A lo largo de todo el manual se utilizan los siguientes
símbolos de advertencia y encabezados “PARA SU
SEGURIDAD” descritos a continuación:
ADVERTENCIA: Advierte sobre riesgos o
prácticas inseguras que podrían provocar
lesiones personales graves o fatales.
PARA SU SEGURIDAD: Identifica las operaciones
que debe realizar para una utilización segura del
equipo.
El no cumplimiento de estas advertencias puede
causar lesiones personales, descargas eléctricas,
incendios y explosiones.
ADVERTENCIA: Peligro de incendio o
explosión:
--
Nunca utilice líquidos inflamables ni haga
funcionar la máquina en las proximidades de
líquidos, vapores o polvos inflamables.
La máquina no está equipada con motores a
prueba de explosiones. Los motores eléctricos
producirán chispas tanto durante el arranque y
como durante su utilización que pueden provocar
incendios o explosiones si utiliza la máquina en
presencia de líquidos o vapores inflamables o
partículas combustibles.
--
No recoja materiales tóxicos o inflamables ni
residuos humeantes o ardiendo.
ADVERTENCIA: Peligro eléctrico. No opere
con un cordón eléctrico dañado. No modifique el
enchufe. Desenchufe el cordón eléctrico antes de
reparar la máquina.
Si el cordón del suministro se daña o se rompe,
debe ser reemplazado por el fabricante o su
agente de servicio o una persona similarmente
calificada para evitar un riesgo.
10
Home
La siguiente información indica las condiciones
potencialmente peligrosas para el operario o
equipo:
PARA SU SEGURIDAD:
1. No utilice la máquina:
-- En zonas inflamables o donde puedan
producirse explosiones.
-- Salvo que esté debidamente formado y
autorizado.
-- Salvo haber leído y comprendido el
manual del operario.
-- A menos que el cordón se conecte
apropiadamente a tierra.
-- Con un cordón o enchufe dañados.
-- Si la máquina no funciona correctamente.
-- En áreas al aire libre.
-- Sobre superficies mojadas o húmedas.
-- Sin haber colocado los filtros y/o la bolsa.
-- Con el uso de una extensión de cordón.
2. Antes de operar máquina:
-- Asegúrese de que todos los dispositivos
de seguridad se encuentren en su lugar y
funcionen correctamente.
3. Al utilizar la máquina:
-- No tire de la máquina por el enchufe o el
cordón.
-- Evite pasar el cable por bordes agudos o
esquinas.
-- No cierra las puertas sobre el cordón.
-- No desenchufe tirando del cordón.
-- No estire el cordón.
-- No maneje el enchufe con las manos
húmedas.
-- Mantenga el cordón lejos de las
superficies calientes.
-- No recoja restos ardiendo o humeantes
como cigarrillos, cerillas o cenizas
calientes.
-- Informe inmediatamente de las averías de
la máquina o si el funcionamiento no es
correcto.
-- No permita nunca que los niños jueguen
encima o alrededor de la máquina.
Find... Go To..
UV-1600 (07--05)
OPERACIÓN
4. Antes de abandonar o revisar la máquina:
-- Apague la máquina.
-- Desenchufe cordón del tomacorriente de
la pared.
5. Al revisar la máquina:
-- Desenchufe cordón del tomacorriente de
la pared.
-- Evite las partes en movimiento. No utilice
chaquetas, camisas o mangas sueltas.
-- Utilice repuestos suministrados o
aprobados por el fabricante.
-- Todas las reparaciones deben ser
realizadas por personal técnico
cualificado.
-- No modifique el diseño original de la
máquina.
INSTRUCCIONES DE CONEXION A TIERRA
La máquina debe conectarse a tierra. En caso de
mal funcionamiento o desarreglo, la conexión a
tierra provee un recorrido de menor resistencia
para la corriente eléctrica para reducir el riesgo de
choque eléctrico. Esta máquina está equipada con
un cordón con un conductor de conexión a tierra
del equipo y enchufe de conexión a tierra. El
enchufe debe enchufarse en un tomacorrientes
apropiado correctamente instalado de acuerdo
con todos los códigos y ordenanzas locales. No
extraer la clavija de conexión a tierra; si falta,
reemplazar el enchufe antes de usar.
Enchufe Conectado
a Tierra
(3 Orificios)
Clavija De Conexion
a Tierra
UV-1600 (07--05)
Home
Find... Go To..
11
OPERACIÓN
ADHESIVOS DE SEGURIDAD
La adhesivo de seguridad aparece en la máquina en la localización indicada. Sustituya el adhesivo si se ha
desprendido, o está deteriorado o son ilegible.
ADHESIVO DE ADVERTENCIA – Localizado
en la base de la máquina.
12
Home
Find... Go To..
UV-1600 (07--05)
OPERACIÓN
PREPARACIÓN Y FUNCIONAMIENTO
PARA SEGURIDAD: No opere la máquina a menos
que haya leído y entendido el manual del
operador.
ADVERTENCIA: Peligro de incendio o
explosión. Nunca utilice líquidos inflamables ni
haga funcionar la máquina en las proximidades de
líquidos, vapores o polvos inflamables.
1. Conecte el cable de corriente a un tomacorriente
con conexión a tierra (3 orificios) (Figura 1).
Enchufe Conectado
a Tierra
(3 Orificios)
6. Encienda la aspiradora con el interruptor que está
en la manija de extensión.
ADVERTENCIA: Peligro de incendio o
explosión. No recoja materiales tóxicos o
inflamables ni residuos humeantes o ardiendo.
7. Comience a aspirar. Para limpiar abajo de las
camas o de otros lugares difíciles de alcanzar,
puede bajar la manija al piso.
8. Revise periódicamente el nivel de la bolsa
recolectora. Para obtener mejores resultados de
limpieza, cambie la bolsa cuando se llene hasta
las dos terceras partes de su capacidad.
9. Cuando cambie la bolsa, también revise el estado
del filtro secundario. Si tiene polvo, sáquelo y
límpielo. Los filtros tapados pueden reducir el flujo
de aire y limitar la capacidad de limpieza.
NOTA: Si el cepillo se detiene mientras está usando la
aspiradora, destape la aspiradora y quite cualquier
cosa que esté causando la obstrucción cerca del
cepillo. Luego oprima el botón para restablecer el
funcionamiento del cepillo, que está en la parte
posterior de la aspiradora, cerca de las ruedas.
Clavija De Conexion
a Tierra
USO DE LOS ACCESORIOS
FIG. 1
PARA SEGURIDAD: No utilice la máquina salvo
que el cable eléctrico tenga una toma de tierra que
funcione correctamente.
PARA SEGURIDAD: No opere la máquina con el
uso de un cordón de extensión.
1. Puede usar accesorios con la aspiradora. Para
colocarlos, desconecte la manguera del cuerpo
del cepillo. Deje el otro extremo de la manguera
conectada al cuerpo de la aspiradora.
2. Conecte el aditamento a la manguera.
2. Antes de comenzar a usar este aparato, siempre
asegúrese de tener instalada una bolsa
recolectora.
3. Con la manija de extensión fija en la posición
vertical, encienda la aspiradora con el interruptor y
comience a aspirar.
ATENCIÓN: Si usa esta aspiradora sin una bolsa
recolectora o si la bolsa recolectora está llena, la
aspiradora sufrirá daños. Los daños ocasionados
por esto NO están cubiertos por la garantía.
NOTA: El cepillo no funciona mientras la manija de
extensión esté fija en la posición vertical. Existe un
interruptor automático que apaga el motor del cepillo
cuando la manija de extensión está en esta posición.
3. Cierre la tapa del cuerpo de la aspiradora y cierre
los pestillos.
ADVERTENCIA: Peligro de incendio o
explosión. No recoja materiales tóxicos o
inflamables ni residuos humeantes o ardiendo.
4. Ajuste la altura del cepillo inclinando hacia atrás la
aspiradora y girando la perilla negra que está en la
base del cuerpo. Seleccione desde 1 para las
alfombras de pelo más corto hasta 6 para las
alfombras de pelo más largo, o cualquier valor
intermedio.
5. Coloque el pie derecho en el soporte para
sostener la base y tire de la manija de extensión
hacia atrás hasta la posición de operación.
UV-1600 (07--05)
Home
Find... Go To..
13
OPERACIÓN
MANTENIMIENTO DE LA MÁQUINA
ADVERTENCIA: Peligro eléctrico.
Desenchufe el cordón eléctrico antes de reparar la
máquina.
Si el cordón del suministro se daña o se rompe,
debe ser reemplazado por el fabricante o su
agente de servicio o una persona similarmente
calificada para evitar un riesgo.
1. El paso más importante es quitar, después de
cada uso, los residuos de alfombra y cualquier
otro desperdicio que haya quedado en el cepillo.
Este sencillo paso aumenta la vida de los
rodamientos del cepillo.
2. Revise con frecuencia el nivel de la bolsa
recolectora para evitar que se llene demasiado.
Siempre deseche las bolsas de papel cuando se
llenen y no las vuelva a usar. Si usa una bolsa de
tela, vacíela y sacúdale el exceso de polvo. Cada
vez que vacíe la bolsa de tela revise si tiene
roturas.
3. Revise si hay material atorado dentro de la
manguera de aspiración.
4. Limpie el filtro secundario una vez al mes. Este
filtro es una protección adicional al motor de
aspiración.
5. Limpie el filtro del escape una vez al mes. Oprima
la parte superior de la cubierta del filtro y quite la
cubierta para tener acceso al filtro.
6. El cepillo de su aspiradora es ajustable para
alargar la vida del cepillo. Cuando las cerdas del
cepillo se acortan debido al desgaste, puede bajar
el eje del cepillo acercándolo a la alfombra y así
poder seguir usando el cepillo. Haga lo siguiente:
a. Desmonte la placa soporte del cepillo.
b. Fíjese en los dos bloques de rodamientos y
asegúrese de que se vea el número (1) en
cada bloque.
c. Desmonte el conjunto del cepillo del cuerpo
del cepillo.
d. Sostenga el cepillo y gire cada uno de los
bloques de rodamientos hasta que aparezca
el número (2) en cada uno de ellos (Figura 2).
14
Home
FIG. 2
e. Vuelva a instalar el cepillo de tal forma que
aparezca el número (2) en cada bloque.
f. Vuelva a colocar la placa soporte del cepillo
en su lugar.
ALMACENAMIENTO DE LA MÁQUINA
Almacenar la máquina en un área seca en posición
vertical.
ATENCION: No exponga a la lluvia. Almacene bajo
techo.
ARTICULOS RECOMENDADOS PARA
MANTENER EN EXISTENCIA
Refiérase a la sección de Lista de Piezas para los
artículos recomendados en existencia. Los artículos
en existencia están claramente identificados con una
bala precediendo a la descripción de las piezas. Vea
el ejemplo de abajo:
Find... Go To..
UV-1600 (07--05)
OPERACIÓN
GUÍA PARA RESOLVER PROBLEMAS
PROBLEMA
CAUSA
SOLUCIÓN
La aspiradora no recoge basura.
La bolsa recolectora está llena.
Instale una nueva bolsa de papel o
vacíe la bolsa de tela.
Destape la manguera.
Empuje el puño de la manguera con
firmeza en la base del cepillo después
de limpiar con accesorios.
Sostenga la manguera con una mano
y gire un puño a la vez con la otra
mano hasta que quede apretado
contra la manguera.
Desconecte la máquina, luego
destape el cepillo. Oprima el botón de
restablecer en la parte posterior de la
aspiradora.
Saque el filtro y límpielo o cámbielo.
Cambie las correas de transmisión.
La manguera está tapada.
La manguera no está bien conectada
a la base del cepillo.
Uno o ambos puños están sueltos.
El cepillo se tapó y causó que se
disparara el cortacircuito automático.
El filtro secundario está tapado.
Las correas de transmisión del cepillo
están desgastadas o rotas.
El cable de corriente no está
conectado o tiene un corto circuito.
La aspiradora no funciona.
El tomacorriente no tiene corriente ya
que un cortacircuitos se activó en el
edificio.
El motor de aspiración se paró por
una sobrecarga térmica debida a una
manguera, una bolsa recolectora, un
filtro secundario o un filtro de escape
tapados.
El cepillo se tapó y activó el
cortacircuitos automático.
El interruptor maestro está
defectuoso.
El cableado está suelto o defectuoso
dentro de la aspiradora.
UV-1600 (03--99)
Home
Find... Go To..
Revise que el cable de corriente esté
conectado y asegúrese de que no
esté dañado.
Trate de conectar la máquina en otro
tomacorriente.
Revise si hay alguna obstrucción en
alguno de estos lugares.
Destape la máquina, y saque la
obstrucción. Empuje el botón de
restablecer en la parte posterior de la
aspiradora.
Consulte con el Centro de Servicio.
Consulte con el Centro de Servicio.
15
ELECTRICAL DIAGRAMS
DIAGRAMAS ELECTRICAS
120V WIRING DIAGRAM -DIAGRAMA DE CABLEADO
DE 120V
BLK
GRN
WHT
POWER CORD
18-- 3 X 40’
GRN
GROUND TO
TERMINAL PLATE
TERMINAL
BLOCK
MASTER
SWITCH
BLK
GRN
WHT
TERMINAL
BLOCK
BLK
GRN
BLK
WHT
BLK
WHT
BRUSH
RESET
BRUSH ON/OFF
(AUTOMATIC SWITCH)
BLK
BRUSH
MOTOR
16
Home
Find... Go To..
UV-1600 (07--05)
ELECTRICAL DIAGRAMS
DIAGRAMAS ELECTRICAS
220V WIRING DIAGRAM -DIAGRAMA DE CABLEADO
DE 220V
BRW
GRN/YLW
BLU
POWER CORD
18-- 3 X 40’
GRN/YLW
GROUND TO
TERMINAL PLATE
TERMINAL
BLOCK
BLK
GRN
WHT
MASTER
SWITCH
WHT
TERMINAL
BLOCK
BLK
GRN
BLK
WHT
BLK
WHT
BRUSH
RESET
BRUSH ON/OFF
(AUTOMATIC SWITCH)
BLK
BRUSH
MOTOR
UV-1600 (07--05)
Home
Find... Go To..
17
PARTS LIST
LISTA DE PIEZAS
BAG HOUSING GROUP
GRUPO DEL ARMAZON DE LA BOLSA
6
3
11
7
5
4
1
12
2
56
51
39
6
50
15
13 14
8
16
9
17
47
48
49
54
55
53
10
45
18
46
45
44
43
19
20
52
21
22
38
40
29
29 28
23
24
41
37
25
26
35
35
34
36
32
33
57
18
Home
Find... Go To..
30
31
42
27
UV-1600 (07--05)
PARTS LIST
LISTA DE PIEZAS
BAG HOUSING GROUP
GRUPO DEL ARMAZON DE LA BOLSA
REF
PART #
DESCRIPTION
QTY.
REF
PART #
DESCRIPTION
1
100394
HANDLE, BLUE
2
578005000
DSWITCH, ROCKER ON/OFF 120V
3
*604930
4
5
∇
Y
QTY.
1
29
140027
WASHER, FLAT, 0.35B 0.75D .04
4
1
30
140422
LATCH, SPRING HANDLE
2
DSCREW, M5 X .8 X 10
1
31
140197
SCREW, TRS, 10--24 X 0.38, PHL
2
*605016
DLATCH, LID
1
32
230618
SHAFT, PIVOT
1
602709
COVER, BAG, BLUE
1
33
140946
SCREW, RND, #06--32 X 1.00, SLOT
2
6
606159
DASM, HOSE
1
34
140802
SCREW, PAN, 8--32 X 0.62, PHL
1
7
160471
DCUFF, 1.5 HOSE, 1.5ID TAPER BLK
2
35
605237
GROMMET
2
8
100141
DGASKET, COVER
1
36
130239
CORD 18/3X42” SJT BLK
1
9
611783
DBAG, FILTER PAPER
1 CTN = 100 BAGS
1
37
140330
CLAMP, CABLE, NYL, 1.25D, NATRL
1
38
130040
TIE, CABLE, NY, 0.60L .12W
1
39
140197
SCREW, TRS, 10--24X0.38, PHL
2
40
140546
NUT, 5/16--18 NYLK
2
41
190714
DTOOL, CREVICE
1
42
130761
DBOOT BREAKER -- CLEAR
SILICONE
1
10
100396
HOUSING, BAG, BLUE
1
11
611068
DHINGE, .09PIN 1.06W 0.65L
1
12
140706
DRIVET, BLIND (BAG HSG)
4
600856
RIVET, BLIND (COVER)
3
13
140000
WASHER, FLAT
2
43
140519
NUT, HEX, LOCK, #10--24, KEP
3
14
140142
BUSHING, .19 X .25
1
44
140823
SCREW, TRS, 10--24X0.62, PHL
1
15
231046
PLATE, BAG LOCKOUT
1
45
140264
SCREW, TRS, 8--32X0.25, PHL
2
16
140823
SCREW, TRS, #10--24 X 0.62, PHL
1
46
140879
SCREW, RND, #06--32 X 0.75, SLOT
2
17
140552
NUT, HEX, LOCK, #10--24, NL
1
47
230619.BK
PLATE, TERMINAL BLOCK BLACK
1
18
102530
DFILTER, FOAM, 60 PORE HSNG
1
48
130005
TERMINAL, 3--POS STRIP 25AMP
1
19
140837
SCREW, TRS, #10--24 X 0.62, PHL
1
49
140534
NUT, HEX, LOCK, #06--32, NY
2
20
180634
SCREEN, BAG HSG BLACK
1
50
130166
DCORD GRIP
1
21
180635
SCREEN, BAG HSG W/HALF MOON
1
51
130252
DCORD, 18/3X40’4” YELLOW (120V)
1
22
140552
NUT, HEX, LOCK, #10--24, NL
1
52
190039
TUBE, EXTENSION BLACK
1
23
140534
NUT, HEX, LOCK, #06--32 NY
2
53
140823
SCREW, TRS, #10--24 X 0.62, PHL
2
24
130005
TERMINAL, 3--POS STRIP 25AMP
1
54
140327
DCLAMP, CABLE, NYL, 1.50D
1
25
140304
CLAMP, CABLE, NYL, 0.31D NATRL
1
55
140552
NUT, HEX, LOCK, #10--24, NL
2
26
28990
NUT, 8--32, LOCK NY--INSERT
1
56
160485
ADAPTER, HOSE, STR, 1.50D
1
27
130760AM
DCIRCUITBREAKER 1.5AMP (120V)
1
57
140890
SCREW, TRS, #10--24 X 0.50, PHL
2
28
140221
SCREW, HEX .31--18X1.25
2
∇ ASSEMBLY / CONJUNTO
Y INCLUDED IN ASSEMBLY / INCLUIDO EN EL CONJUNTO
D RECOMMENDED STOCK ITEMS / ARTICULOS RECOMENDADOS PARA
MANTENER EN EXISTENCIA
*LATCH KIT #606226 INCLUDES BOTH 605016 & 604930.
UV-1600 (07--05)
Home
Find... Go To..
19
PARTS LIST
LISTA DE PIEZAS
BRUSH BASE GROUP
GRUPO DE LA BASE DEL CEPILLO
6
1
2
3
36
47
36
48
44
37
43
36
34
7
40
38
46
5
42
41
39
4
35
8
35
9
33
45
10
32
30
14
13
25
11
12
18
16 17
24
15
19
28
29
31
26
27
23
20
21
22
21
20
20
Home
Find... Go To..
UV-1600 (07--05)
PARTS LIST
LISTA DE PIEZAS
BRUSH BASE GROUP
GRUPO DE LA BASE DEL CEPILLO
REF
PART #
DESCRIPTION
PART #
DESCRIPTION
1
100142
DGASKET, VAC COVER
1
2
130988
DMOTOR, VAC 120V
1
∇ 23
701193
DASM., MOTOR / BRACKET 120V
1
Y
24
130398
DMOTOR, BRUSH 120V
190164
DCARBON BRUSH (2/PK)
1
1
Y
25
140066
NUT, 6--32 NYLCK
4
3
100143
4
230919
DGASKET, VAC MOTOR
1
Y
26
230975
BRACKET
1
COVER, VAC MOTOR
1
Y
27
140065
SCREW, FLT, #06--32 X1.75, PHL
240218
4
GROMMET (NOT SHOWN)
3
Y
28
140918
SPACER
4
6023
SCREEN, MOTOR (NOT SHOWN)
1
Y
29
180637
DFILTER, BRUSH MOTOR
2
140874
SCREW, 10--32X3/8 (NOT SHOWN)
2
30
230347
DPULLEY, BRUSH MOTOR
1
PLATE, COVER WHITE
1
31
230754
DCAM, ADJUSTER ROLLER
1
DFILTER, FOAM, SQ, 60 PORE,
EXHAUST
1
32
230349
DBELT, DRIVE, BRUSH, ROUND
2
33
611489
SCREW, TRS, .31--18 X 1.88, PHL
2
5
230625.WH
6
180633
QTY.
REF
QTY.
7
100793
DCOVER, EXHAUST FILTER
1
34
1014918
DWHEEL, RBR, 3”X1” W/BUSHING
2
8
140197
SCREW, TRS, #10--24 X 0.38, PHL
4
35
140027
WASHER, FLAT, 0.35B 0.75D .04
4
701086
DASM., BASE ROLLER BRACKET
1
36
606292
DSWITCH, 20A, 120V
1
∇
Y
9
230753
BRACKET, ROLLER
1
37
130110
STRAIN RELIEF, BUSHING
1
Y
10
605317
ROLLER, SQGE, 1.35OD X 1.48L
1
38
130672
CORD, 18/3X24” BLACK SJTO
1
Y
11
140710
RIVET, AXLE
2
39
605237
GROMMET
1
Y
12
140436
SPRING, TORS, HT ADJUSTMENT
1
40
230756
KNOB, ROLLER
1
Y
13
230769
BRACKET, ROLLER PIVOT
1
41
140825
SCREW, #6X1/2 PANPHL
1
14
140519
NUT, HEX, LOCK, #10--24, KEP
4
42
140947
SCREW, RND, #10--24 X 0.25, SLOT
2
∇ 15
700098
DASM. BRUSH/BEARING/BLOCK
1
614374
BASE, BLUE
1
Y
16
140125
DBEARING
2
∇ 43
44
613280
1
Y
17
230429
DBLOCK, BEARING
2
LABEL, WARNING AC VACUUM
4X3
18
230348
DPULLEY BRUSH
1
45
120044
LABEL, HEIGHT ADJUSTMENT
1
19
230765
DSHOE, CARPET
1
46
1011624
WASHER, FLAT, 0.39B 0.55D .01
1
608061
DECAL, UV-1600
1
07514
WASHER, LOCK, INT #10, SS
4
Y
20
140264
SCREW, TRS, #08--32 X 0.25, PHL
4
47
21
140882
SCREW, FLT, #10--24 X 0.38, PHL
6
48
22
140823
SCREW, TRS, #10--24 X 0.62, PHL
1
∇ ASSEMBLY / CONJUNTO
Y INCLUDED IN ASSEMBLY / INCLUIDO EN EL CONJUNTO
D RECOMMENDED STOCK ITEMS / ARTICULOS RECOMENDADOS PARA
MANTENER EN EXISTENCIA
UV-1600 (07--05)
Home
Find... Go To..
21
OPTIONS
OPCIONES
CLEAN AIR EXHAUST FILTER KIT
JUEGO DE FILTRO DE ESCAPE DE AIRE LIMPIO
2
3
4
1
5
7
3
6
REF
∇
PART #
DESCRIPTION
190951
DKIT, FILTER, EXHAUST
1
GASKET, VAC SPNING
1
PLATE, BACK EXH KIT WHT
Y
1
100142
Y
2
230838.WH
QTY.
REF
PART #
DESCRIPTION
Y
5
900006
DFLITERS, EXHAUST
(1PK = 3 FILTERS)
1
1
Y
6
240239
DKNOBS, 10--24F BK
4
Y
7
230839
DIVIDER WIRE EXH KIT
1
Y
3
102562
DGASKET, FILTER
2
Y
4
140606
STAND--OFF 10--24X.50
4
QTY.
∇ ASSEMBLY / CONJUNTO
Y INCLUDED IN ASSEMBLY / INCLUIDO EN EL CONJUNTO
D RECOMMENDED STOCK ITEMS / ARTICULOS RECOMENDADOS PARA
MANTENER EN EXISTENCIA
22
Home
Find... Go To..
UV-1600 (07--05)
OPTIONS
OPCIONES
ACCESSORY ATTACHMENT KIT
JUEGO DE ACCESORIOS
VACUUM BAGS
BOLSA RECOLECTORA
2
1
1
3
REF
PART #
DESCRIPTION
∇
190713
DKIT, ATTACHMENT
QTY.
1
Y
1
190717
TOOL, RUG/FLOOR
1
Y
2
190715
BRUSH, DUSTING
1
Y
3
190716
TOOL, UPHOSTERY
1
REF
1
N/S
PART #
DESCRIPTION
900034
DBAG, VACUUM, CLOTH
QTY.
1
611783
DBAG, FILTER PAPER
1 CTN = 100 BAGS
1
∇ ASSEMBLY / CONJUNTO
Y
INCLUDED IN ASSEMBLY / INCLUIDO EN EL CONJUNTO
D RECOMMENDED STOCK ITEMS / ARTICULOS RECOMENDADOS PARA
MANTENER EN EXISTENCIA
UV-1600 (07--05)
Home
Find... Go To..
23