1
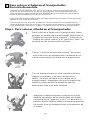
English
Flip Carrier
TM
Owners Manual
Instructions
Visit us
online to view our
instructional videos
and learn more about
our products at
www.infantino.com
IMPORTANT!
KEEP INSTRUCTIONS FOR FUTURE USE.
Read all instructions before assembling and using your carrier. Failure to follow
each instruction can result in serious injury or death to your baby. Keep instructions
and review them before attempting new carrying positions.
8lbs - 32lbs (3.6kgs 14.5kgs)
This box contains: 1 - Carrier 1 - Wonder Cover 2-in-1 Bib
TM
Warnings:
WARNING: FALL HAZARD
Small babies can fall through a leg opening. Follow instructions for use. Only
use this carrier for babies between 8 lbs (3.6 kgs) and 32 lbs (14.5 kgs). Adjust
the leg openings to fit your child’s legs snugly. When fastening the shoulder
straps, keep one hand on the baby at all times. Never leave a baby
unattended in the carrier. The baby MUST be able to sit up on his/her own
before being worn in the backpack position.
WARNING: SUFFOCATION HAZARD
NEVER lean against the baby. ALWAYS make sure there is enough room around
your baby’s face to provide a clear source of air.
WARNING:
• KEEP AWAY from fire and heat sources.
• Your balance may be adversely affected by your movement and that of your baby.
• DO NOT lean forward with the baby in the carrier. DO NOT bend at the waist – only bend at the knees to make sure the baby stays securely in the carrier.
• This carrier is not suitable for use during sporting activities.
• IMPORTANT! Baby must face towards you until he or she can hold head
upright.
• ALWAYS check to assure all buckles, snaps, straps and adjustments are
secure before each use.
• DO NOT use this product if deterioration or problems are detected.
• IMPORTANT! The carrier must be fitted to the user before placing the baby in the carrier for front facing positions.
• DO NOT use this carrier as a child restraint in a motor vehicle. This product will not properly restrain your baby in the event of a crash.
• Never place more than one child in this carrier.
• DO NOT wear more than one carrier at a time.
• DO NOT use in showers, pools or any water environments.
1.
Uso de su babero 2 en 1: Posición de mirando
hacia usted
1.
Coloque el babero entre su pecho y la
cabeza del bebé. El babero es reversible, de
modo que cualquiera de sus lados puede
estar mirando hacia fuera.
2.
Fije el “babero 2 en 1” apretando los dos
“círculos de gancho y lazo” a ambos lados
del babero contra las dos “tiras de fijación
del babero” situadas del lado inferior de las
“correas para los hombros.
61.
(Cualquier lado del babero puede estar
mirando hacia fuera.) Fije el “babero 2 en 1”
apretando los dos “círculos de gancho y lazo”
a ambos lados del babero contra las dos “tiras
de fijación del babero” situadas del lado
inferior de las “correas para los hombros.”
62.
El babero debe entonces doblarse sobre el
soporte de la cabeza que ya está doblado
hacia abajo.
30.
Español
Uso de su babero 2 en 1: Posición de mirando
hacia fuera
Para sacar al bebé del transportador: posición de
mochila
* ¡IMPORTANT! NUNCA se incline contra el bebé en el transportador. SIEMPRE asegúrese de que haya suficiente espacio alrededor del rostro de su bebé para
proporcionar una fuente de aire libre.
61.
Vuelva a un rincón seguro y siéntese
cuidadosamente. Suelte las hebillas de la
“correa del pecho y la espalda” y el “cinturón
de soporte lumbar.”
62.
Quite las “correas para los hombros” y baje
lentamente al bebé de su espalda al rincón
seguro.
63.
Gire y póngase frente al bebé. Afloje ambos
orificios para las piernas. Sosteniendo al niño
con una mano, suelte la “hebilla de soporte
de la cabeza” y la abertura del agujero para
la pierna a un lado del transportador. Saque al
bebé del transportador.
64.
Opcionalmente se recomienda trasladar al
bebé y al transportador a una superficie
plana y nivelada antes de sacar al niño del
transportador.
29.
Helpful Hints:
* How do you know if your baby is at the right height when worn in the front? - You should be able to tilt forward slightly and kiss the top of your child’s head.
* Facing-out Position - Baby Facing Away from You - Once your child is able to hold his or her head up, your baby is ready for a new adventure. This position allows him or her to visually explore their
surroundings while maintaining close contact with you.
* When placing your baby in or taking them out of the carrier, sitting down will make the procedure easier. Until you are familiar with the placement of baby, it is also recommended to do so over a soft
surface.
* It is best to limit the use of your carrier to 10-20 minutes until you and your baby are both completely comfortable in it together.
* When removing your baby from the carrier for a short time, it is useful to leave one side completely attached to eliminate any extra steps when returning the baby to the carrier.
* Backpack Position - Child Facing Forward - When your little one can fully sit up on his or her own, putting them on your back allows you to carry the child comfortably for longer periods of time. In this position your baby is free to check out what is going on around them and still know that you are right there.
* Wearing the carrier closer to your body and higher up on your back (or chest when worn in the front position) will minimize stress to your back and shoulders from prolonged use.
Care Instructions
Machine wash cold, separately, on gentle cycle with mild detergent.
Do NOT bleach. Do NOT use fabric softeners. Wipe clean with cloth or
sponge between machine washings. Drip dry. DO NOT iron.
2.
English
* Facing-in Position - Baby Facing Toward You - Until your child is able to hold his or her head upright, this is the ideal position. It affords your baby lots of close physical contact and attention, while leaving your hands free. In this position. You can entertain and bond with your newborn by talking, touching, playing or just making eye-contact.
Carrier Body Front:
Padded Head
and Back
Support
Head
Support
Buckle/
Tightener
2-in-1 Bib
Attachment
Strips:
Facing-out
(inside carrier
body)
2-in-1 Bib
Attachment
Strip: Facing-in
Shoulder
Strap
Adjuster
Storage Pocket
Hook & Loop
Shoulder Strap
End
3.
Carrier Body Back:
Padded Shoulder
Straps
2-in-1 Bib
Attachment Strips:
Facing-in
Chest/Back
Strap and
Tightener
Side
Closure
Buckle
Leg Opening
Lumbar Support
Strap and
Tightener
4.
Instructions:
Placing baby in your carrier: Facing-in position
* IMPORTANT! Your baby must face toward you until he/she is able to hold head upright.
* When using this carrier in the facing-in position, please fit it to the user before
placing the baby in the carrier.
* Keep one hand on the baby until all the buckles and straps are properly
fastened.
1.
To begin, unfasten the “chest/back strap” and
“lumbar support belt” buckles. Hold the carrier
with the straps facing towards you. (The straps
should form a “V”)
2.
Place your arms through the “shoulder straps”
making sure that the foam padding rests on
your shoulders.
3.
With the “shoulder straps” in place, reach behind
your back to connect the “chest/back buckle.”
If you need assistance, have another person
fasten the buckle and adjust its tightness. On
both sides, pull down on each “shoulder strap”
to tighten, then roll any excess strap in towards
the carrier and secure with the “hook & loop”
fasteners.
5.
English
1
Fasten the “lumbar support belt” around your
waist. Slide the belt around your waist until the
padded area is centered on your back. Pull the
strap to tighten and secure the belt, making sure
the padded support area remains centered. Any
excess strap may be rolled in toward the carrier
and secured with the “hook & loop” fastener.
English
4.
5.
Once the carrier is properly fitted to your body,
completely open either side of the carrier. To
release the “head support buckle,” press in on
the sides of the buckle and pull the two sections
apart.
6.
Open the leg hole area on the same side as the
open “head support buckle” by releasing the “side
closure buckle” located in the leg hole area and
pulling open the “hook & loop.”
7.
Lift the baby facing you. While holding the child
securely, place him or her into carrier through
the opening, ensuring that the baby’s leg goes
through the leg hole on the side which is still
fastened.
6.
8.
While still holding the child securely, close the
open leg hole by reattaching the “hook & loop”
and fastening the buckle. Adjust both leg hole
openings to snugly fit the baby’s legs.
9.
While still supporting the baby’s weight, fasten
the “head support buckle” by inserting the
upper portion of the buckle (on the shoulder
strap) into the lower section (located on the
head support). Push the “side closure buckle”
together until you hear a click. Before releasing
your hold of the baby, ensure that the “side
closure buckle” is locked in place by pulling
down on the buckle.
10.
If necessary, tighten the “shoulder straps” by
pulling forward on the webbing portion at the
base of the strap while gently lifting the baby
by the bottom. When the straps are properly
tightened, you should be able to kiss the top
of your child’s head.
7.
2
Placing your baby in your carrier:
Facing-out position
* When using this carrier in the facing-out position, please fit it to the user before placing the baby in the carrier.
* IMPORTANT! Keep one hand on the baby until all the buckles and straps are
properly fastened.
1.
Fit the carrier to your body as detailed in steps
1-4, 1 PLACING BABY IN YOUR CARRIER:
Facing-in position
2.
Open either side of the carrier as detailed in steps
5 and 6 1 PLACING BABY IN YOUR CARRIER:
Facing-in position
3.
Fold the head support area down. Pick up the
baby facing away from you. While holding the
baby securely, place him or her into the carrier
through the opening, ensuring that the child’s leg
goes through the leg hole which is still fastened.
4.
While still holding the child securely, close the
open leg hole by reattaching the “hook & loop”
and fastening the “side closure buckle”. Adjust
both leg hole openings to snugly fit the baby’s
legs.
8.
English
* WARNING! Your baby must face toward you until he/she is able to hold head
upright.
5.
While still supporting the baby’s weight, fasten
the “head support buckle” by inserting the
upper portion of the buckle (on the shoulder
strap) into the lower section (located on head
support). Push the buckle together until you hear
a click. Before releasing your hold of the child,
ensure that the buckle is locked in place by
pulling down on the buckle.
PLEASE NOTE!
* A smaller baby’s arms should be positioned through
the arm holes.
* A larger child’s arms will rest comfortably over the
“headrest.”
6.
If necessary, tighten the “shoulder straps” by
pulling forward on the webbing portion at the
base of the strap while gently lifting the baby
by the bottom. When the straps are properly
tightened, you should be able to kiss the top
of your child’s head.
* IMPORTANT! The baby should not be leaning
forward.
9.
3
Placing older baby in your carrier:
Backpack position
* IMPORTANT! The baby MUST be able to sit up on his or her own before
being worn in the backpack position.
* For the backpack position, the child is first placed in the carrier and then the
carrier is put on the user. Adjustments of straps and belts for proper fit are
performed while the user is wearing the carrier.
Step 1. Placing baby in the carrier
1.
To place the baby in the carrier, first open
one side of the carrier by releasing the “head
support buckle” and by unfastening the “side
closure buckle” and the “hook & loop” at the
same side leg opening.
2.
Rotate the “lumbar support belt” so that the
padded section is centered in the channel
attached to the base of the carrier.
3.
With the carrier on a safe, flat, level surface with
the straps up, place the baby facing up into
the carrier. Check that the child’s leg extends
through the closed side leg hole opening.
4.
Secure the open leg hole around the baby’s
free leg by attaching the “hook & loop” and
fastening the buckle. Adjust both leg hole
openings to snugly fit the child’s legs.
10.
English
* STOP! First time users, DO NOT attempt to use the carrier in the backpack position without the assistance of a second person. We highly recommend always using
the assistance of a second person.
5.
Fasten the “head support buckle” by inserting
the upper portion of the buckle (on the
shoulder strap) into the lower section (located
on the head support). Push the buckle together
until you hear a click. Ensure that the buckle
is locked in place by trying to pull it apart.
Adjust tightness of “head support buckle” as
necessary.
Step 2. Putting on the carrier: Backpack position
6.
6A.
7.
RECOMMENDED: If another person is available,
have him or her lift the child in the carrier to
the proper height. Slip your arms through the
“shoulder straps” and connect the “chest/back
strap” (located on the “shoulder straps”), and
the “lumbar support belt.” Adjust all straps and
the belt for a proper fit, while your partner
continues to support the weight of the child.
ALTERNATIVE: If it is necessary to put the carrier on
without assistance, set the carrier and baby in a
secure corner (like a couch) so that baby’s back
is supported and the baby is sitting upright. Keep
the straps clear of the baby’s face.
Gently sit in front of the baby close enough for
the child’s legs to wrap around your body.
* IMPORTANT! NEVER lean against the baby. ALWAYS make sure there is enough room around your baby’s
face to provide a clear source of air.
11.
9.
10.
Attach the “lumbar support belt” around your
waist with the buckle, place your arms through
the “shoulder straps” and fasten the “chest/back
buckle” located on the “shoulder straps.”
English
8.
To ensure that your baby is securely on your
back, tighten the “shoulder straps,” the “chest/
back strap” and the “lumbar support belt” as
necessary.
Once the baby is secure, stand slowly. If needed,
use another person to help maintain your balance.
* IMPORTANT! Your balance may be adversely
affected by your movement and that of your baby.
* IMPORTANT! DO NOT lean forward or backward with the baby in the carrier. Do not bend at the waist – only bend at the knees to make sure the baby stays securely in the carrier.
* IMPORTANT! If you feel the baby is not secure,
sit down slowly and carefully and readjust the
“shoulder straps.”
12.
Removing the child from the carrier:
Front position, facing-in/out
* IMPORTANT! When releasing the baby from the carrier, keep at least one hand on the baby at all times.
1.
First of all, loosen both leg holes to make it easier
to pull the baby’s legs out.
2.
Keeping one hand securely on the baby, release
the two “head support buckles” first on the side of
the carrier that you wish to remain closed, then on
the entry/exit side. Release one of the “side closure
buckles” and separate the “hook & loop” to
completely open one side of the carrier.
3.
Holding the baby with both hands, slide him or
her out of the open side of the carrier. Place the
child in a safe location before removing the
carrier from your body.
13.
* IMPORTANT! NEVER lean against the baby. ALWAYS make sure there is enough room around your baby’s face to provide a clear source of air.
61.
Return to a secure corner and sit down
carefully. Unbuckle the “chest/back strap”
and the “lumbar support belt.”
62.
Remove the “shoulder straps” and slowly lower
the baby off your back into the secure corner.
63.
Turn and face the baby. Loosen both leg holes.
While supporting the child with one hand,
release the “head support buckles” on both
sides and the “side closure buckle” on one side
of the carrier. Lift the baby out of carrier.
64.
Alternatively, you may want to move the
baby and carrier to a flat level surface before
extracting the child from the carrier.
14.
English
Removing the child from the carrier: Backpack position
Using your 2-in-1 bib: Facing-in position
1.
Place the bib between your chest and the
baby’s head. The bib is reversible, so either
side can be facing out.
2.
Attach the “2-in-1 bib” by squeezing the two
“hook & loop circles” on either side of the bib
against the two “bib attachment strips” located
on the underneath side of the “shoulder straps.”
Using your 2-in-1 bib: Facing-out position
61.
(Either side of the bib can be facing out.)
Attach the “2-in-1 bib” by squeezing the two
“hook & loop circles” on either side of the bib
against the two “bib attachment strips” located
inside the carrier body on either side, near the
baby’s chest.
62.
The bib should then be folded over the already
folded down head support.
15.
Manual del propietario de
Flip
TM
Español
¡IMPORTANTE!
CONSERVE ESTAS INSTRUCCIONES
PARA UTILIZARLAS MÁS ADELANTE.
Lea todas las instrucciones antes de armar y usar su transportador. ¡ADVERTENCIA!
No seguir todas estas instrucciones puede dar como resultado lesiones graves o la
muerte de su bebé. Conserve las instrucciones y revíselas antes de intentar
posiciones de transporte nuevas.
8lbs - 32lbs (3.6kgs 14.5kgs)
Esta caja contiene: 1 transportador 1 babero Wonder CoverTM 2 en 1
16.
Advertencias:
ADVERTENCIA: PELIGRO DE CAÍDAS
Los niños pequeños pueden caer por una de las aberturas para las piernas.
Siga las instrucciones de uso. Sólo use este transportador para bebés de entre
8 lb (3.6 kg) y 32 lb (14.5 kg). Ajuste las aberturas para las piernas de modo que
se adapten bien a las piernas de su bebé. Al atar las correas de los hombros,
mantenga una mano en el bebé en todo momento. Nunca deje a un bebé
desatendido en el transportador. El bebé DEBE poder sentarse por sí mismo
antes de poderse usar en posición de carrito de la compra.
ADVERTENCIA: RIESGO DE ASFIXIA
NUNCA se apoye contra el bebé. SIEMPRE asegúrese de que haya suficiente
espacio alrededor del rostro de su bebé para proporcionar una fuente de aire
libre.
ADVERTENCIA:
• CONSÉRVELO LEJOS del fuego y fuentes de calor.
• Su equilibrio se puede ver afectado negativamente por su movimiento y el de su hijo.
• No se incline hacia delante con el bebé en el transportador. No se doble por la cintura; sólo doble las rodillas para asegurarse de que el bebé se mantenga fijo en el transportador.
• Este transportador no es adecuado para ser usado durante actividades deportivas.
• ¡IMPORTANTE! El niño debe mirar hacia usted hasta que pueda mantener erguida la cabeza.
• Asegúrese SIEMPRE de que todas las correas y ajustes estén seguros y de que
su bebé esté debidamente colocado en el transportador antes de cada uso.
• NO USE EL PRODUCTO SI SE DETECTAN DETERIOROS O PROBLEMAS.
• ¡IMPORTANTE! El transportador se debe ajustar a la persona que lo usa
antes de colocar al bebé en el transportador en las posiciones de mirando al frente.
• NO use este transportador como fijación para el niño en un vehículo de
motor. Este producto no retendrá debidamente a su hijo en caso de un choque.
• NO coloque más de un niño en el transportador.
• Nunca use más de un transportador a une tiempo.
• NO lo use en las duchas, piscinas o cualquier ambientes de agua.
17.
Sugerencias Útiles:
* Posición frontal - Niño mirando hacia usted - Hasta que el niño pueda
sostener erguida la cabeza, ésta es la posición ideal. Le aporta a su
bebé mucho contacto cercano y atención, al tiempo que le deja
libres las manos a usted. En esta posición, puede divertir a su bebé
y establecer lazos con él hablando, tocándose, jugando o
simplemente mirándose a los ojos.
* ¿Cómo sabe si el bebé está a la altura correcta cuando lo lleva al
frente? - Usted debe poder inclinarse ligeramente y besar la parte
superior de la cabeza de su bebé.
* Posición frontal - Niño mirando hacia fuera - Una vez que el niño
pueda sostener erguida la cabeza, está listo para una nueva
aventura. Esta posición le permite explorar visualmente su entorno
al tiempo que mantiene un estrecho contacto con usted.
* Al cargar o descargar a su bebé en el transportador, sentarse hará
más seguro el procedimiento.
* Al quitar a su bebé del transportador durante un breve tiempo, es útil
dejar un lado totalmente cerrado para eliminar los pasos adicionales
al devolver al bebé al transportador.
* Posición de mochila - Niño mirando hacia delante - Cuando su
pequeño se pueda sentar erguido totalmente por sí mismo, llevarlo
en la espalda le permite transportarlo cómodamente durante
períodos de tiempo más prolongados. En estas posición, su bebé
tiene libertad de revisar lo que está pasando a su alrededor y seguir
sabiendo que usted está allí.
* Llevar el transportador más cerca de su cuerpo y más alto en la
espalda (o en el pecho cuando lo lleve en posición frontal) reducirá
al mínimo la tensión en su espalda y hombros por el uso prolongado.
Instrucciones de Lavado:
Lave a máquina en agua fría, por separado, en ciclo suave y con un
detergente suave. NO use blanqueador. NO use suavizantes de telas.
Límpielo con un paño o esponja entre los lavados a máquina. Deje que
seque escurriendo. NO lo planche.
18.
Español
* Es mejor limitar el uso de su transportador a 10 ó 20 minutos hasta que
usted y su bebé estén totalmente cómodos juntos en él.
Transportador de Frente:
Soporte de la
Cabeza y para la
Espalda
Hebilla del
Soporte de
la Cabeza/
Tensor
Tiras de Fijación
del Babero
2 en 1:
Mirando hacia
Fuera (adentro,
no se muestra)
Bolsillo de
Almacenamiento.
Gancho
y Lazo
Tiras de Fijación
del Babero
2 en 1:
mirando hacia
usted (adentro,
no se muestra)
El Fin de la
Correa del
Hombro
19.
Ajustador de la
Correa Para el
Hombro
Transportador de Atras:
Correa para el
Hombro
Tiras de Fijación
del Babero
2 en 1:
Mirando Hacia
Usted (adentro,
no se muestra)
Pecho/Espalda
y Tensor de
Correa
La Apertura de la
Pierna
Cinturón de
Soporte Lumbar y Tensor
20.
Español
Hebilla
de Cierre
Lateral
Instrucciones:
1
Cómo ponerse el transportador: Posición Mirando
Hacia usted
* ¡IMPORTANTE! El niño ÚNICAMENTE debe llevarse en posición de “mirando
hacia dentro” hasta que pueda sostener erguida la cabeza.
* Al usar este transportador en posición frontal, ajústelo al usuario antes de
colocar al niño en él.
* SIEMPRE mantenga una mano en el bebé hasta que todas las hebillas y correas estén debidamente cerradas.
1.
Para empezar, suelte las hebillas de la “correa
del pecho y la espalda” y el “cinturón de
soporte lumbar”. Sostenga el transportador
con las correas mirando hacia usted. (Las
correas deben formar una “V).
2.
Pase los brazos a través de las “correas de los
hombros”, asegurándose de que el acolchado
de espuma descanse sobre sus hombros.
3.
Con las “correas de los hombros” en su sitio,
extienda los brazos a su espalda para conectar
la “hebilla del pecho y la espalda. Si necesita
ayuda, pida a otra persona que le cierre la
hebilla y ajuste la tensión. A ambos lados, tire
hacia abajo de cada “correa de los hombros”
para apretarla y enrolle la correa sobrante hacia
el transportador, fijándola con los sujetadores de
“gancho y lazo.”
4.
Ajuste el “cinturón de soporte lumbar” alrededor
de su cintura. Deslice el cinturón alrededor de
la cintura hasta que el área acolchada esté
centrada en su espalda. Tire de la correa para
apretarla y cierre el cinturón, cuidando de que
el área de soporte acolchada permanezca
centrada. Los extremos sobrantes de las correas
se pueden enrollar hacia el transportador y fijar
con los sujetadores de “gancho y lazo.”
21.
Una vez que el transportador esté debidamente
ajustado a su cuerpo, abra cualquiera de los
lados del transportador. Para soltar la “hebilla
del soporte de la cabeza”, oprima los lados
de la hebilla y tire de las dos secciones para
separarlas.
6.
Abra el área del orificio para la pierna del
mismo lado que la “hebilla del soporte de la
cabeza” abierta liberando la “hebilla de cierre
lateral” situada en el área del agujero para la
pierna y abriendo el “gancho y lazo.”
7.
Levante al bebé mirando hacia usted.
Sosteniendo al bebé firmemente, colóquelo
en el transportador a través de la abertura,
asegurándose de que la pierna del bebé
pase por el agujero para la pierna del lado
que sigue cerrado.
8.
Sosteniendo al bebé con seguridad, cierre
la abertura para la pierna que está abierta
cerrando de nuevo el “gancho y lazo” y
cerrando la hebilla. Ajuste ambas aberturas
para las piernas de modo que se adapten
bien a las piernas de su bebé.
9.
Siga sosteniendo el peso del bebé y cierre la
“hebilla del soporte de la cabeza” insertando la
porción superior de la hebilla (en la correa para
el hombro) en la sección inferior (situada en el
soporte de la cabeza). Una la “hebilla de cierre
lateral” a presión hasta que escuche un clic.
Antes de soltar al bebé, tire de la “hebilla de
cierre lateral” hacia abajo para asegurarse de
que esté bien cerrada en su sitio.
22.
Español
5.
10.
2
De ser necesario, apriete las “correas de los
hombros” tirando hacia delante de la parte de
la malla en la base de la correa mientras levanta
suavemente al bebé por el trasero. Cuando las
correas estén debidamente apretadas, usted
debe poder besar la parte superior de la cabeza
de su bebé.
Para colocar al bebé en el transportador:
Posición de mirando hacia fuera
* ADVERTENCIA: El niño ÚNICAMENTE debe llevarse en la posición de “mirando hacia dentro” hasta que pueda sostener erguida la cabeza.
* Al usar este transportador en posición mirando hacia fueral, ajústelo al usuario antes de colocar al niño en él.
* ¡IMPORTANTE! SIEMPRE mantenga una mano en el bebé hasta que todas las
hebil las y correas estén debidamente cerradas.
1.
Ajústese el transportador en el cuerpo como se
detalla en las instrucciones del las procedimiento
1-4, 1 PARA COLOCAR AL BEBÉ EN EL
TRANSPORTADOR: Posición de mirando hacia
usted
2.
Abra cualquier lado del transportador como
se detalla en las instrucciones 5 y 6 del
Procedimiento, 1 PARA COLOCAR AL BEBÉ
EN EL TRANSPORTADOR: Posición de mirando
hacia usted
3.
Doble hacia abajo el área del soporte de la
cabeza. Levante al bebé mirando hacia fuera.
Sosteniendo al bebé firmemente, colóquelo
en el transportador a través de la abertura,
asegurándose de que la pierna del bebé pase
por el agujero de la pierna del lado que sigue
cerrado.
23.
4.
5.
Manteniendo al bebé afianzado con seguridad,
cierre la abertura de la pierna abierta cerrando
de nuevo el “gancho y lazo” y cerrando la
“hebilla de cierre lateral”. Ajuste ambas
aberturas para las piernas de modo que se
adapten bien a las piernas de su bebé.
Siga sosteniendo el peso del bebé y cierre la
“hebilla del soporte de la cabeza” insertando la
porción superior de la hebilla (en la correa para
el hombro) en la sección inferior (situada en el
soporte de la cabeza). Una la hebilla a presión
hasta que escuche un clic. Antes de soltar
al bebé, tire de la hebilla hacia abajo para
asegurarse de que esté bien cerrada en su sitio.
* Los brazos de los bebés mayores descansarán có modamente sobre el “soporte para la cabeza.”
6.
Manteniendo el área del soporte de la cabeza
doblada hacia abajo, apriete las “hebillas del
soporte de la cabeza” de modo que la espalda
del bebé esté ajustada contra su pecho.
* ¡IMPORTANTE! El niño NUNCA debe estar inclinado hacia delante en el transportador.
24.
Español
¡TENGA PRESENTE!
* Los brazos de los bebés más pequeños deben
posicionarse a través de los orificios para los brazos.
3
Para colocar al bebé en el transportador:
Posición de mochila
* ¡USUARIOS POR PRIMERA VEZ, ALTO! NO intente usar este transportador en
posición de mochila sin la ayuda de otra persona. Por la seguridad del niño,
recomendamos especialmente que SIEMPRE tenga la ayuda de otra persona
al usar el transportador en posición de mochila.
* ¡IMPORTANTE! El bebé DEBE poder sentarse erguido por sí mismo antes de poder llevarlo en posición de mochila.
* Para la posición de mochila, el bebé se coloca primero en el transportador y después éste se pone en el usuario. Los ajustes de las correas y cinturones para
una adaptación correcta se realizan mientras el usuario lleva el transportador.
Step 1. Para colocar al bebé en el transportador
1.
Para colocar al bebé en el transportador, abra
primero un lateral del transportador liberando la
“hebilla de soporte de la cabeza” y soltando la
“hebilla de cierre lateral” y el “gancho y lazo” de
la abertura de la pierna de ese lado.
2.
Gire el “cinturón de soporte lumbar” de modo
que la sección acojinada esté centrada en el
canal conectado a la base del transportador.
3.
Con el transportador en una superficie plana,
segura y nivelada, con las correas hacia
arriba, coloque al bebé boca arriba en el
transportador. Asegúrese de que la pierna del
bebé se extienda por la abertura para la
pierna del lado que está cerrado.
4.
Asegure la abertura para la pierna que está
abierta alrededor de la pierna libre del bebé
conectando el “gancho y lazo” y cerrando la
hebilla. Ajuste ambas aberturas para las piernas
de modo que se adapten bien a las piernas de
su bebé.
25.
5.
Cierre la “hebilla del soporte de la cabeza”
insertando la porción superior de la hebilla (en
la correa para el hombro) en la sección inferior
(situada en el soporte de la cabeza). Una la
hebilla a presión hasta que escuche un clic.
Tire de la hebilla tratando de separarla para
asegurarse de que esté bien cerrada. Ajuste
la tensión de la “hebilla del soporte para la
cabeza” según sea necesario.
Step 2. Cómo ponerse el transportador:
Posición de mochila
6.
6A.
ALTERNATIVO: Si necesita colocarse el
transportador sin ayuda, ponga al transportador
y al bebé en un rincón seguro (como un sofá) de
modo que la espalda del bebé esté apoyada y
el bebé esté sentado recto. Asegúrese de que
las correas no cubran el rostro del bebé
7.
Siéntese suavemente frente al bebé, lo bastante
cerca para que las piernas del bebé rodeen su
cuerpo
* ¡IMPORTANTE! NUNCA se incline contra el bebé en
el transportador. SIEMPRE asegúrese de que haya
suficiente espacio alrededor del rostro de su bebé
para proporcionar una fuente de aire libre.
26.
Español
RECOMENDADO: Si tiene otra persona
disponible, haga que levante al niño en el
transportador a la altura adecuada. Deslice
sus brazos por las “correas de los hombros” y
conecte la “correa del pecho y la espalda”
(situada en las “correas para los hombros”) y
el “cinturón de soporte lumbar”. Ajuste todas
las correas y el cinturón para una adaptación
adecuada, mientras que su compañero sigue
sosteniendo el peso del niño.
8.
9.
10.
Conecte el “cinturón de soporte lumbar”
alrededor de la cintura con la hebilla, deslice
los brazos por las “correas para los hombros”
y cierre la “hebilla del pecho y espalda” está
situada en las “correas para los hombros”.
Para asegurarse de que su bebé esté seguro
en su espalda, apriete las “correas de los
hombros”, la “correa del pecho y espalda”
y el “cinturón de soporte lumbar” según sea
necesario.
Una vez que el bebé esté seguro, póngase de
pie lentamente. De ser necesario, use a otra
persona para ayudarle a mantener el
equilibrio.
* ¡IMPORTANTE! Tenga cuidado de modo que sus movimientos o los de su bebé no le hagan
perder el equilibrio.
* ¡IMPORTANTE! NUNCA se incline hacia delante ni hacia atrás con el bebé en el transportador.
Inclínese ÚNICAMENTE doblando las rodillas, NUNCA la cintura, para conservar el equilibrio
y asegurarse de que el bebé se mantenga
seguro en el transportador.
* ¡IMPORTANTE! Si siente que el bebé no está
seguro, siéntese lentamente y con cuidado y vuelva a ajustar las “correas para los hombros”.
27.
Para sacar al bebé del transportador: Posición frontal
mirando hacia dentro o hacia fuera
* ¡IMPORTANTE! Al liberar al bebé del transportador, mantenga al menos una
mano en el bebé en todo momento.
Primero que nada, afloje ambas aberturas de
las piernas para que sea más fácil sacar las
piernas del bebé.
2.
Manteniendo una mano firmemente en el bebé,
liberar a los dos “, hebillas de soporte para la
cabeza” por primera vez en el lado de la
compañía que desea permanecer cerrada, a
continuación, sobre la entrada y salida de lado.
Suelte una de las “hebillas de cierre de lado” y
separar el “gancho y lazo” para abrir
completamente una parte de la compañía.
3.
Sosteniendo al bebé con ambas manos,
deslícelo para sacarlo del lado abierto del
transportador. Coloque al bebé en un lugar
seguro antes de quitarse el transportador del
cuerpo.
28.
Español
1.
Designed with
in California
© 2010 Infantino, LLC
4920 Carroll Canyon Road, Suite 200 | San Diego, CA 92121 USA
www.infantino.com
A Step2 Family Company®
Infantino, Ltd. Prospect House Business Center,
High Wycombe HP13 6LA, UK
BEFORE USING THIS CARRIER: Review and save the Instruction Manual for future reference. Please call Infantino at
1-800-840-4916 (for US or Canada) or 00+1 858-457-9797 in Europe with any questions or visit our website www.infantino.com.
Made in China. Complies with safety requirements of ASTM F2236-09a
ANTES DE USAR ESTE TRANSPORTADOR: Revise y guarde el Manual de Instrucciones para consultarlo posteriormente.
Llame a Infantino al 1-800-840-4916 (para los EE.UU. o Canadá) o al 00+1 858-457-9797 en Europa para hacer cualquier pregunta,
o visite nuestro sitio Web en www infantino.com. Hecho en China. Cumple o supera las normas ASTM F2236-09a