1
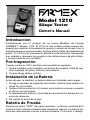
Model 1210
Silage Tester
Owner’s Manual
Introduction
Congratulations on your purchase of a new FARMEX™ Model 1210
Silage Tester. The 1210 is an accurate, portable unit designed for testing the moisture of green and ensiled forages. Using the grain tray provided, it also tests high and low moisture grains.
Your 1210 is a precise electronic instrument. Handle it with reasonable
care and operate it according to the instructions in this booklet, and it
will give you years of reliable use.
Pre-Inspection
When you receive your 1210, immediately check for the following:
1. That the tester is complete with sample bags, log charts, grain tray,
battery and thermometer.
2. That there is no visible damage.
Battery Installation
Before using your tester, the battery must be installed as follows:
1. Turn your tester over so that the back is facing up. Remove the base
by unscrewing the four (4) screws.
2. Remove the protective bag (if any) from the battery and snap the
battery clip on to the terminals.
3. If replacing the battery, make sure to place battery snugly under the
retaining spring.
4. Re-install the back of the case.
Battery Testing
Press “TEST” button on the front panel. The display will read 90.0 (indicating 9 volts) when the battery is fully charged. The battery should be
replaced when the display reads 70.5 (70.5 volts) or below.
Sampling Procedure
It is important to understand that even though the result of a particular
reading may be very accurate, it may be of little or no value unless the
reading is representative of the entire mass being tested. Always take
several samplings in various locations. The greater the variations in
readings, the greater the number of samples that should be tested.
1. Select material considered as typical of the batch.
2. Do not test badly chopped forages.
3. Make sure that the samples are as free from dust and foreign matter
as possible.
4. Take three (3) to five (5) samples at various locations of the batch
and average the results.
5. Thoroughly mix each sample before taking material to fill the sample bag.
6. Do not mix material which is obviously very dry with similar material
where the bulk is much wetter; for example, the layer of forage or
grain on top of a wagon which has travelled some distance.
7. DO NOT DELAY TESTS FOR MORE THAN 30 MINUTES ON
FRESH CHOPPED FORAGE. DO NOT ATTEMPT TESTS ON
MATERIAL WHERE FERMENTATION OR HEATING HAS TAKEN
PLACE OR WHERE MOLD FORMATION HAS STARTED.
Important Silage Testing Notes
and Reminders:
1. Repeated tests on the same sample or a sample left in the tester longer than a normal test duration (1 minute), may result in
false readings.
2. If the sample is too thick (less than 4 turns), or too thin (more
than 5-1/2 turns), it must be rejected, as false readings are inevitable.
3. Remember, green material must be tested within 30 minutes of
chopping and before heating or fermentation has taken place.
4. We recommend the use of only FARMEX™ 1210 sample bags,
which are tested and made to standards which will produce reliable
results.
5. If two decimal points show, one between each digit of the display,
the tester is overloaded. The most likely cause is that the sample is
too wet and outside the operating range of the tester. Check that no
liquid has been squeezed from the sample bag and contaminated
the electrodes in the test chamber. Clean out the sample chamber if
necessary.
2
Test Procedure – Grain
1. Select a representative sample of grain to be tested.
2. Fill clean grain tray with grain. Compact sample by lightly patting and
smooth off level with top.
3. Insert the full tray into the test chamber and center the tray in the
chamber.
4. Apply pressure to the sample by turning the control know clockwise
until the yellow indicator band appears and the lower edge is level
with the knob face.
5. Press the “BATTERY” button to confirm that the battery voltage is
within the working limits. The digital display must read more than
75.0 (7.5 volts) or the battery should be replaced.
6. Press “SAMPLE” button and note log reading from the digital display.
7. Unwind the pressure knob and remove the sample tray. Check the
temperature of the sample using the tester’s thermometer.
8. Refer to the temperature correction table for grains on the log charts.
Apply the temperature correction factor to the log reading according
to the chart. IMPORTANT: APPLY TEMPERATURE CORRECTION
TO LOG READING BEFORE LOOKING UP MOISTURE %.
9. Refer to the appropriate log chart of the grain under test and read
moisture content against CORRECTED log reading.
NOTES:
1. Keep hands away from ends of tet chamber when taking readings, and never place tester on a metal surface when testing or
false readings will result.
2. If the sample of grain is to be held for even a short period before
being tested for moisture content, the grain should be placed in
a tightly closed, air-tight container, such as a zip-lock plastic bag
or a jar.
3. Variations between readings from your 1210 and your local
elevator are inevitable and normal. (Readings from two or more
elevators will vary.) We recommend that you take samples of
grain at different moisture levels to your elevator and note any
variations between your 1210 and your elevator’s readings.
Apply these variations as a correction factor to the appropriate
log charts.
3
Maintenance and Care
1. The FARMEX™ 1210 is a precision-built, electronic instrument. Do not
subject it to prolonged periods of heat, cold or excessive moisture. Never immerse the 1210 in water or leave it out in the rain.
2. Your 1210 must be kept clean. When cleaning is necessary,
wipe the tester with a slightly damp cloth. Make sure to clean the
electrodes in the test chamber. Bearing in mind that your 1210 is
designed to detect moisture, cleaning should be done at least 12
hours before use.
3. If the digital display reads below 75.0 (7.5 volts) when the
“TEST” button is depressed, the battery must be replaced.
(See Battery Installation).
Test Procedure – Silage
1. Prepare tester for use by LIGHTLY unwinding the pressure control knob
counter-clockwise as far as it will go. The indicator mark (a small dot
on the top of the knob) should be pointed towards the display panel.
IMPORTANT: DO NOT OVERWIND!
2. Remove a sample bag from storage compartment in tester and open
with a slicing action of your thumb and forefinger.
3. Select a representative sample of material to be tested (refer to Sampling Procedure). Fill sample bag with as much material as possible,
gently compressing with your fingers.
4. Check that the bag seal is free from material. Pinch end of seal and
draw fingers across to close bag.
5. Make sure that the silage is uniformly packed and flattened in the
bag by gently patting and pressing between your hands. The pack
should be about 3/4” (20mm) thick.
6. Insert the sample pack into the test chamber and position it equally spaced between the two electrodes on the bottom of the test
chamber.
7. Apply pressure to the sample by turning the control knob clockwise,
carefully counting the number of turns. Continue turning and counting until the yellow indicator band in the center of the knob appears
and its lower edge is level with the knob face. This indicates correct
pressure. Stop turning.
a) The number of turns applied should be within the range of 4 to
5-1/2, indicating that the amount of material under test is correct.
REJECT ALL TEST SAMPLES REQUIRING TURNS OUTSIDE
THIS RANGE, OR FALSE READINGS WILL RESULT.
4
b) For optimum accuracy, aim for 4-1/2 to 5 turns by packing the
bags accordingly.
8.Once the correct pressure has been reached, wait 20 to 25 seconds. During this waiting period, press the “BATTERY” button to
confirm that the battery voltage is within the working limits. The
digital display must read more than 75.0 (7.5 volts) or the battery
should be replaced.
9.Press “SAMPLE” button and record the log reading from the digital
display.
10. Unwind the pressure knob and remove the sample bag. Check the
temperature of the sample inside the bag using the tester’s thermometer.
11. Refer to the temperature correction table on the log chart for the
material being tested. Apply the temperature correction factor to the
log reading according to the chart.
IMPORTANT: APPLY TEMPERATURE CORRECTION TO
LOG READING BEFORE LOOKING UP MOISTURE OR DRY
MATTER %.
12. Refer to the proper log chart of the material under test. Read Moisture or Dry Matter content where the CORRECTED log reading and
number of turns intersect.
a) EXAMPLE: When testing fresh green chopped alfalfa, the
“Green Chopped Alfalfa Chart” should be used. If the sample log
reading is 57.4, and the sample temperature is 81˚F (27˚C), first
adjust the log reading for temperature by –3.5. (the temperature
is halfway between a correction of –2 and –5). The corrected log
reading is 57.4 – 3.5 = 53.9. If the number of turns is just under
5, then the moisture content of the sample is about 54.5%.
b) As a helpful guide, all silage log charts for fresh, chopped forage are presented as % MOISTURE. Charts for ensiled silage
are presented as % DRY MATTER.
Warranty and Repair Information
1. THE WARRANTY ON YOUR TESTER IS NOT EFFECTIVE UNLESS YOU PROVIDE PROOF OF PURCHASE.
2. If your 1210 tester should display inaccurate readings or cease to
operate, follow these steps:
a) Review the Operator’s Manual and be sure correct testing procedures are being used.
b) Replace battery.
5
c) Call our Customer Service department toll-free at (800) 821-9542
between 8:30am and 4:30pm EST. Describe your problem to service personnel, so that a determination can be made as to what is
wrong with your tester. If necessary, arrangements can be made
for repair or replacement. Make sure to have your 1210’s serial
number available.
d)If service is required and return authorization has been obtained,
pack the tester carefully and return it to FARMEX™ prepaid.
e) Enclose a brief note describing what is wrong with your tester,
name, address and phone number.
f) Do not return your 1210 without following the above procedure.
There will be a handling charge made on all units returned and
not found to be defective.
g)Repairs will be made free of charge during the warranty period.
After the warranty expires, your tester will be repaired for the cost
of materials, labor and shipping.
Warranty
Your FARMEX™ 1210 is guaranteed to be free from defects in materials
and workmanship for one year from date of retail purchase. This warranty
does not cover the battery or damage resulting from misuse, neglect, accident or improper installation or maintenance. This warranty does not apply
to any product which has been repaired or altered outside our factory.
The foregoing warranty is exclusive and in lieu of all other warranties of
merchantability, fitness for purpose and any other type, whether expressed
or implied. AgraTronix neither assumes nor authorizes anyone to assume
for it any other obligation or liability in connection with its product and will
not be liable for consequential damages.
The accuracy of forage and grain moisture testing is influenced by many
factors beyond the control of the manufacturer of this instrument, and
AgraTronix will not be responsible for the harvesting, storage, conditioning, processing or testing of any grain or forage.
Ask your local retailer for more information on other
FARMEX™ portable moisture testers or call us direct.
PRINTED IN THE U.S.A.
10375 STATE ROUTE 43 • STREETSBORO, OH 44241 USA
(800) 821-9542 • 1 (330) 562-2222
http://www.agratronix.com
0204
1-08
Model 1210
Silage Tester
Owner’s Manual
Introduccíon
Felicitaciones por tu compra de un nuevo Medidor de Forraje
FARMEX™ Modelo 1210. El 1210 es una unidad portátil exacta diseñada para analizar la humedad de granos y acopio de forraje. Use la
bandeja de grano proporcionada, Analíze altas y bajas de humedad del
grano. Tu 1210 es un instrumento electrònico de precisión. Manipulelo
con cuidado y manejelo de acuerdo a las instrucciones de este folleto,
y te dará años de uso confiable.
Pre-Inspección
Cuando recíba su 1210, verifíque de inmediato lo siguiente:
1. Que el medidor este completo con bolsos de muestra, tabla de registro, bandeja de grano, batería y termómetro.
2. Que no tenga daños visibles.
Instalación de la Batería
Antes de usar tu medidor, la batería debe ser instalada como sigue:
1. Ponga su medidor de espaldas cara arriba. Quite la base desatornillando los (4) tornillos.
2. Quitar el bolso protector (si tuviese) de la batería y encaje a presión
el clip en los terminales.
3. Si reemplazas la batería, cerciórate de ajustarla bien debajo del resorte de retenciòn.
4. Re-instale el dorso de la caja.
Batería de Prueba
Presione el botón “TEST” del panel delantero. La lectura mostrará 90.0
(indica 9 volts) cuando la batería esta cargada al máximo. La batería deberia ser reemplazada cuando la lectura muestre (70.5 voltis) o debajo.
Procedimiento de Muestreo
Es importante entender que aún cuando el resultado de una lectura
en particular pueda ser muy exacta, pueda tener valor o no a menos
que la lectura sea representativa de toda la masa que esta siendo examinada. Siempre tome varias pruebas de diversa ubicaciones.
Cuanto mayores son las variaciones en lecturas, mayor es el número
de muestras que deben ser examinadas.
1. Seleccione el material considerado típico de la camada.
2. No analizar forraje mal picado.
3. Cerciórate que las muestras esten libres de polvo y material extraño, como sea posible.
4. Toma tres (3) o cinco (5) pruebas en diversas ubicaciones de la
camada y promedie sus resultados.
5. Mezcle minuciosamente cada prueba antes de llevar material para
llenar la bolsa de prueba.
6. No mezclar material que obviamente es muy seco con material similar donde el grueso es mucho mas húmedo; por ejemplo, la capa de
forraje o grano encima de un vagón que ha viajado cierta distancia.
7. NO DEMORES LA PRUEBA MÁS DE 30 MINUTOS EN FRESCO FORRAJE PICADO. NO INTENTE PRUEBAS EN MATERIAL
DONDE HA OCURRIDO FERMENTACIÓN O CALENTAMIENTO
O DONDE EMPEZÓ FORMACIÓN DE MOHO.
Notas de prueba y recordatorio de enfardado importante:
1. Reiteradas pruebas en la misma muestra o una muestra ìda en la
prueba más larga que la duración de una prueba normal (1 minuto),
puede dar lugar a lecturas falsas.
2. Si la muestra es demasiado gruesa (menos de 4 vueltas), o muy
delgada (más de 5-1/2 vueltas), deben ser rechazadas Inevitablemente como lecturas falsas.
3. Recuerde, el material verde debe ser examinado dentro de los 30
minutos de picado y ántes de calentarlo o que haya empezado la
fermentación.
4. Recomendamos solo el uso de FARMEX™ 1210 muestra de bolso,
los cuales son probados y se hacen a los estándares que produciran resultados confiables.
5. Si se ven dos puntos decimales, uno entre cada digito de la pantalla, el medidor esta sobrecargado. La caùsa màs probable es que
la muestra este muy mojada y fuera del rango de operatiòn del medidor. Verifique que el lìquido no se haya escurrido de la bolsa de
prueba y haya contaminado los electrodos en la càmara de prueba.
De ser necesario limpie el exterior de la càmara de prueba.
8
Anàlisis de la Muestra – Grano
1. Seleccione una muestra representativa de grano para ser examinada.
2. Llenar la bandeja limpia con grano.Compacte la muestra acariciando suavemente a rás de la superficie.
3. Inserte la bandeja llena en la càmara de prueba y centrar la bandeja
en la càmara.
4. Aplicar presión en la muestra dando vueltas la perilla de control
hasta que el indicador de banda amarillo aparece y el borde màs
bajo esta nivelado con su relieve.
5. Oprima el botón “BATTERY” para confirmar que su voltaje esta dentro de los lìmites de trabajo. La pantalla digital debe lecturar màs de
75.0 (7.5 voltios) o la baterìa debera ser cambiada.
6. Oprima el botòn “SAMPLE” y anote una lectura de registro.
7. Desenrrollar la perilla de presiòn y quitar la bandeja de muestra.
Verifìque la temperatura de la muestra usando el medidor de termòmetro.
8. Remìtase a la tabla correctiva de la temperatura para granos en el
fichero. Aplìque el factor correctivo de la temperatura a la lectura del
registro segùn carta. IMPORTANTE: APLICAR LA CORRECCIÒN
DE LA TEMPERATURA A LA LECTURA DEL REGISTRO ANTES
DE FiJARSE EN LA HUMEDAD %.
9. Remitasè al fichero apropiado del grano bajo prueba y lecture el
contenido de humedad contra la lectura corregida del registro.
NOTAS:
1. Mantenga las manos alejadas de lo extremos de la càmara de pruebascuando esta tomando lecturas, y nùnca coloque el medidor sobre una superficie de metal cuando este analizando, u obtendra
lecturas falsas.
2. Si la muestra de grano va a ser nivelada por un corto periodo àntes
de analizar el contenido de humedad, el grano debera sellarse en
un envase hermètico, como ser una bolsa plàstica con cremallera o
un tarro.
3. Variaciones de lectura entre tu 1210 y tus tomas son inevitables y
normales. (Lecturas de dos o màs tomas varìan.)
Recomendamos que tomes muestras de granos en diferentes
niveles de humedad a tus tomas y notes cualquier variaciòn entre
tu 1210 y tus lecturas de tomas. Aplicar esas variaciones como un
factor de correcciòn a los ficheros apropiados.
9
Mantenimiento y Cuidado
1. El FARMEX™ 1210 es un instrumento electrònico de gran precisiòn.
No exponerlo a periodos prolongados de calor, frio o excesiva
humedad. Nùnca sumerjir el 1210 en agua o o dejarlo a la interperie bajo lluvia.
2. Tu 1210 debe conservarse limpio. Cuando necesite limpiarlo,
limpie el medidor con un paño algo hùmedo. Cerciòrese de limpiar
los electrodos en la càmara de prueba.Considerando que tu 1210
esta diseñado para detector la humedad, la limpieza debera hacerse al menos 12 horasàntes de usarse.
3. Si la lectura en la pantalla digital esta debajo de 75.0 (7.5 volts)
cuando se presiona el botòn “TEST” se resiente, y la baterìa
debe ser cambiada. (ver instalaciòn de la baterìa).
Mètodo de Prueba – Ensilage
1. Prepare el medidor para usarlo en LIGHTLY desenrrolle la perilla
de control de presiòn en sentido contrario al de las agujas del reloj.
La marca del indicador (un punto pequeño en la tapa de la perilla)
deberia apuntar hacia el panel de la pantalla.
IMPORTANTE: NO SOBRECARGAR!
2. Quite una bolsa de prueba del acumulador del medidor y abralo con
una acciòn de rebanar de tu pulgar e ìndice.
3. Seleccione una muestra representativa de material para ser
analizado.(Remìtase al procedimiento de muestreo) llene la bolsa
de prueba con tanto material como sea posible, suavemente comprimiendo con tus dedos.
4. Comprobar que el sello de la bolsa este libre de material. Pellizcar
los extremos del sello y dibuje los dedos a travès de cerrar la bolsa.
5. Asegùrese que el fardo este uniformemente empaquetado y aplanado
en la bolsa suavemente acariciando y presionando entre tus manos.
El empaquetado no debe exceder los 3/4” (20mm) de espesor.
6. Coloque la muestra del empaque identro de la càmara de prueba
y colocarlo equidistante entre los dos electrodos en el fondo de la
càmara de prueba.
7. Aplicar presiòn a la prueba girando la perilla en sentido contrario
a las agujas del reloj, cuidadosamente contando el numero de
vueltas.
Continùe girando y contando hasta que el indicador amarillo.
En el cento de la perilla aparezca y su borde màs bajo este nivelado
con la cara de la perilla. Ello indica una presiòn correcta. Detenga
los giros.
10
a) El numero de giros aplicados deberian estar dentro del rango de
4 a 5-1/2, indicando que la cantidad de material bajo prueba es
correcta. RECHAZAR TODOS LOS ANÁLISIS DE PRUEBAS
QUE REQUIEREN GIROS FUERA DE ESTOS RANGOS, O
LAS LECTURAS RESULTARAN FALSAS.
b) Para una exactitud òptima, apunte de 4-1/2 a 5 vueltas por empaque de acuerdo a los bultos.
8. Una vez alcanzada la presión correcta, espere 20 a 25 segundos.
Durante este periodo de espera, oprima el botón “BATTERY” para
confirmar que el voltaje de la bateria esta dentro de los límites de
trabajo. El indicador digital debe leer más de 75.0 (7.5 voltios) o la
batería deberia ser cambiada.
9. Oprima el botón “SAMPLE” y registre la lectura del indicador digital.
10. Desenrrolle el botón de presión y quite el bolso de prueba. Comprobar la temperatura de la muestra dentro del bolso usando el
termómetro del medidor.
11. Remitirse a la tabla de corrección de temperatura en el fichero del
material que esta siendo examinado. Aplicar el factor de la corrección de la temperatura a la lectura del registro según carta.
IMPORTANTE: APLICAR LA CORRECCION DE LA TEMPERATURA A LA LECTURA DEL REGISTRO ANTES DE FIJARSE
EN LA HUMEDAD O MATERIA % SECA.
12. Remitirse al registro adecuado del material bajo prueba. Leer el
contenido de humedad o de material seco donde la lectura CORREGIDA del registro y número de giros se intersecten.
a) EJEMPLO: Al probar la alfalfa verde fresca picada, el “Fichero
de Alfalfa Verde Picada” debería usarse. Si la lectura del registro de la muestra es 57.4, y la temperatura de la muestra es
81°F (27°C), primero ajuste el registro de lectura de la temperatura a –3.5. (la temperatura es intermedia entre una corrección
de –2 y –5).
La lectura corregida del registro es 57.4 – 3.5 = 53.9.
Si el número de giros esta solo debajo de 5, entonces el
contenido de humedad de la muestra esta cerca de 54.5%.
b) Como aporte provechoso, todos los ficheros de acopio para
frescos, forraje picado son presentados como % DE HUMEDAD. Registros para acopios enfardados son presentados
como % MATERIA SECA.
Información de la garantía y la reparación
1. LA GARANTÍA DE TU MEDIDOR NO SE HARÁ EFECTIVA A MENOS QUE PROPORCIONES LA PRUEBA DE COMPRA.
11
2. Si tu medidor 1210 mostrara lecturas incorrectas o dejara de funcionar, siga estos pasos:
a) Revisar el Manual del Operador y estar seguro de que el procedimiento de pruebas esta siendo usado correctamente.
b) Cambie la batería.
c) Llame gratis a nuestro departamento técnico al (800) 821-9542
entre 8:00 a.m.- 4:30 p.m. EST. Descríbe tu problema para evaluar que es lo que esta fallando en tu Medidor. De ser necesario,
se coordinará para su reparación o reemplazo. Asegúrese de
tener a disposición el número de serie 1210.
d) Si se require del servicio y su devolución ha sido autorizada,
embale cuidadosamente el medidor y devuelvalo Prepagado a
FARMEX™.
e) Inclúya una nota breve describiendo el problema de su medidor,
nombre, dirección y número telefónico.
f) No devolver tu 1210 sin seguir el procedimiento visto arriba. Habrán cargos contra las unidades devueltas y libres de defectos.
g) Las reparaciones serán realizadas sin costo alguno durante el
periodo de garantía. Después que ésta expire, tu medidor sera
reparado por el costo del material, mano de obra y envío.
Garantía
Tu FARMEX™ 1210 esta libre de defectos de fabricación y terminación
por un año a partir de la fecha de compra. Esta garantía no cubre la
batería o daños ocasionados por uso erróneo, negligencia, accidente o
instalación o mantenimiento inapropiado. Esta garantía no aplica a ningún
producto que haya sido reparado o alterado fuera de la fábrica.
La garantía precedente es exclusíva y en lugar de todas las otras garantías de mercantibilidad, idoneidad para propósito y cualquier otro tipo,
esté expresada o implicada. AgraTronix tampoco asume o autoriza a nadie a asumir cualquier obligación o responsabilidad con respecto a su
producto y no será responsable de daños como consecuencia.
La exactitud de la prueba de forraje y la humedad del grano es influenciada por muchos factores más alla del control del fabricante de este
instrumento, y AgraTronix no será responsable por la cosecha, almacenamiento, condiciones, procesos o pruebas de cualquier grano o forraje.
Solicíte a su minorista local mayor informaciòn sobre otros
medidores FARMEX™ portàtiles o bien llàmenos directamente.
Hacemos 4 modelos para Grano y Heno.
FABRICADO EN U.S.A.
10375 STATE ROUTE 43 • STREETSBORO, OH 44241 USA
(800) 821-9542 • 1 (330) 562-2222
http://www.agratronix.com
0204
1-08