1
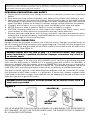
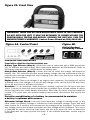
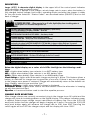
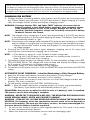
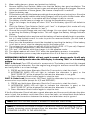
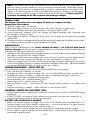
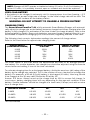
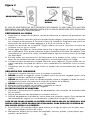
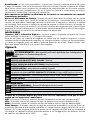
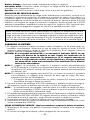
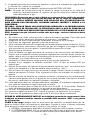
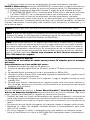
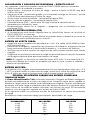
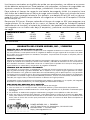
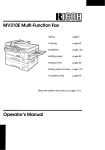
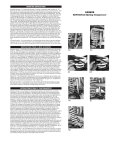
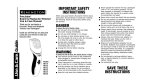
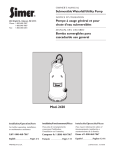
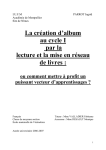
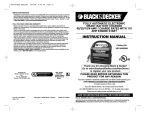
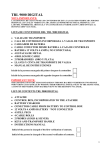
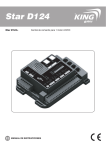
Pro 40
TM
Smart Automatic Battery Charger
OWNER’S MANUAL AND WARRANTY INFORMATION
12 VOLT 2/10/25 AMP WITH 75 AMP ENGINE START
ALTERNATOR VOLTAGE CHECK AND BATTERY
RECONDITION FUNCTIONS
• IMPORTANT SAFETY INSTRUCTIONS •
WARNING – RISK OF EXPLOSIVE GASES
1.WORKING IN THE VICINITY OF A LEAD-ACID BATTERY IS DANGEROUS. BATTERIES
GENERATE EXPLOSIVE GASES DURING NORMAL BATTERY OPERATION. FOR THIS
REASON, IT IS OF UTMOST IMPORTANCE THAT EACH TIME BEFORE USING YOUR
CHARGER, YOU READ THIS MANUAL AND FOLLOW THE INSTRUCTIONS EXACTLY.
2. To reduce risk of battery explosion, follow these instructions and those published by
the battery manufacturer and manufacturer of any equipment you intend to use in
vicinity of battery. Review cautionary markings on these products and on engine.
GENERAL SAFETY
1.Use this charger for charging a LEAD-ACID battery only. It is not intended to supply
power to a low voltage electrical system other than in a starter-motor application. DO
NOT use this battery charger for dry-cell batteries that are commonly used with home
appliances. These batteries may burst and cause injury to persons and damage to
property.
2.Use of an attachment not recommended or sold by the battery charger manufacturer
may result in a risk of fire, electric shock or injury to persons.
3.To reduce risk of damage to electric plug and cord, pull by plug rather than cord when
disconnecting charger.
4.An extension cord should not be used unless absolutely necessary. Use of an improper extension cord could result in a risk of fire and electric shock.
If extension cord must be used, make sure:
a. Pins on plug of extension cord are the same number, size and shape as those of plug on charger.
b. Extension cord is properly wired and in good electrical condition; and
c. Wire size is AWG#14 (14 gauge) to 100 feet and AWG#12 for distances over 100 feet.
5.Do not operate charger with damaged cord or plug – take to a qualified service technician for replacement of the cord or plug immediately.
6.Do not operate charger if it has received a sharp blow, been dropped, or otherwise
damaged in any way; take it to a qualified service technician.
7. Do not disassemble charger; contact a qualified service technician when service or
repair is required. Incorrect reassembly may result in risk of electric shock or fire.
8.To reduce risk of electric shock, unplug charger from outlet before attempting any
maintenance or cleaning. Turning off charger controls will not reduce this risk.
9.Do not operate charger in rain or snow or use when wet.
10.Never charge a frozen battery.
SAVE THESE INSTRUCTIONS:
This manual contains important safety and operating instructions
for the Power Wizard FarmPro™ 40 Battery Charger.
Call 800-866-2161 for customer service.
This device complies with part 15 of the FCC rules. Operation is subject to the following two conditions: (1) this
device may not cause harmful interference, and (2) this device must accept any interference received, including
interference that may cause undesired operation.
PERSONAL PRECAUTIONS AND SAFETY
1. Another person should be close enough to come to your aid when you work near a lead-acid
battery.
2. Fresh water and soap should be nearby in case battery acid contacts skin, clothing or eyes.
3. Wear eye protection and protective clothing. Avoid touching eyes or skin while working
with a battery. If acid particles or corrosion gets into eyes, immediately flood eye with cold
water (Eye Wash Station) for at least 10 minutes and get medical attention immediately.
4. If battery acid contacts skin or clothing, wash immediately with soap and water.
5. NEVER smoke or allow a spark or flame in vicinity of battery or engine.
6. CAUTION: Dropping metal tool or other object onto battery may cause spark, shortcircuit battery or other electrical components and may cause explosion.
7. Remove personal metal items such as rings, bracelets, necklaces and watches when
working with a lead-acid battery. Lead-acid batteries can produce a short-circuit current high enough to cause a severe burn.
POWER CORD CONNECTION
Charger should be grounded to reduce risk of electric shock. Charger is equipped with an
AC cord having grounding conductor and a grounding plug. The plug must be plugged into
a properly installed and grounded 110/120VAC outlet in accordance with all local codes
and ordinances. (See Figure 1.)
DANGER! NEVER alter AC cord or plug – if it will not fit outlet, have proper
outlet installed by a qualified electrician. Improper connection may result in
an electric shock.
This battery charger is for use on a 110/120VAC circuit, and has a grounding plug that
looks like the plug shown in FIGURE 1A. If a properly grounded outlet is not available, a
temporary adapter (like the adapter shown in FIGURE 1B), may be used to connect this
plug to a two-pole receptacle as shown in FIGURE 1B. The temporary adapter should be
used ONLY until a properly grounded outlet can be installed by a qualified electrician.
The green-colored rigid ear or tab extending from adapter must be connected to a properly grounded outlet. Make certain it is grounded. If necessary, replace original outlet
cover plate screw with a longer screw that will secure adapter ground tab to outlet cover
plate and connect to grounded outlet.
DANGER! Before using adapter as shown (FIGURE 1B), be sure the center screw of
outlet plate is grounded.
Figure 1
ADAPTER (B)
GROUNDING PIN (A)
GROUNDING
MEANS
METAL
SCREW
USE OF AN ADAPTER IS NOT ALLOWED IN CANADA. IF A GROUNDING TYPE RECEPTACLE IS
NOT AVAILABLE, DO NOT USE THIS APPLIANCE UNTIL THE PROPER OUTLET IS INSTALLED
BY A QUALIFIED ELECTRICIAN.
–2–
PREPARING TO CHARGE
1. Determine voltage of battery by referring to car owner’s manual.
2. If necessary, remove battery from vehicle to charge, or to clean terminals, always
remove grounded terminal from battery first. Make sure all accessories in the vehicle
are off, so as not to cause an arc.
3. Clean battery terminals. Be careful to keep corrosion from coming in contact with
eyes or skin.
4. Add distilled water in each cell until battery acid reaches manufacturer’s specified
level. This helps purge excessive gas from cells. Do not overfill. For a battery without
cell caps, carefully follow manufacturer’s recharging instructions.
5. Study all battery manufacturers’ precautions such as removing or not removing cell
caps while charging and recommended charging rates.
6. Area around battery should be well-ventilated while battery is being charged. Gas can
be forcefully blown away by using a piece of cardboard or other non-metallic material
such as a fan.
7. Make sure the initial charging rate does not exceed manufacturer’s recommendation.
CHARGER LOCATION
1. Locate charger as far away from battery as cables permit.
2. NEVER place charger directly above battery being charged; gases from battery will
corrode and damage charger.
3. NEVER allow battery acid to drip on charger when reading specific gravity or filling
battery cells with battery acid.
4. NEVER operate charger in a restricted or non-ventilated area.
5. Marine batteries must be removed and charged on shore.
6. Do not set a battery on top of charger.
DC CONNECTION PRECAUTIONS
1. Connect and disconnect DC output clamps only after unplugging AC cord from outlet.
2. Never allow clamps to touch each other.
3. Attach clamps to battery posts and check for secure connection. This will hold clamps
securely on terminals and helps to reduce risk of sparking.
FOLLOW THESE STEPS WHEN BATTERY IS INSTALLED IN VEHICLE. A SPARK
NEAR BATTERY MAY CAUSE BATTERY EXPLOSION. TO REDUCE RISK OF A
SPARK NEAR BATTERY:
1. Position AC and DC cords/cables to reduce risk of damage by hood, door, or other
moving engine parts.
2. Stay clear of fan blades, belts, pulleys and other parts that can cause injury.
3. Check polarity of battery posts. POSITIVE (POS, P, +) battery post usually has larger
diameter than NEGATIVE (NEG, N, –) post.
4. Determine which battery post is grounded (connected) to the chassis. If negative post
is grounded to chassis (as in most vehicles), see (5). If positive post is grounded to
the chassis, see (6).
5. For negative-grounded vehicle, connect POSITIVE (RED) clamp from battery charger
to POSITIVE (POS, P, +) post of battery. Connect NEGATIVE (BLACK) clamp to vehicle
chassis or engine block away from battery. Do not connect clamp to carburetor, fuel
lines, or sheet-metal body parts. Connect to heavy gauge metal part of the frame or
engine block.
6. For positive-grounded vehicle, connect NEGATIVE (BLACK) clip from battery charger to
NEGATIVE (NEG, N, –) post of battery. Connect POSITIVE (RED) clamp to vehicle chassis or
engine block away from battery. Do not connect clamp to carburetor, fuel lines, or sheetmetal body parts. Connect to a heavy gauge metal part of the frame or engine block.
7. When disconnecting charger, disconnect AC cord first. Then remove clamps from vehicle chassis from battery terminal.
8. Refer to operating instructions for length of charge information.
9. Do not charge the battery while the engine is operating.
–3–
FOLLOW THESE STEPS WHEN BATTERY IS INSTALLED OUTSIDE OF VEHICLE. A SPARK NEAR THE BATTERY MAY CAUSE BATTERY EXPLOSION. TO
REDUCE THE RISK OF A SPARK NEAR BATTERY:
1. Check polarity of battery posts for top-mounted battery connectors, the POSITIVE posts
(marked POS, P, +) usually has a larger diameter than the NEGATIVE battery post (marked
NEG, N, –). For side-mounted battery connections, the POSITIVE terminal is RED, the
NEGATIVE terminal is black.
2. Attach a 24-inch (minimum length) 6 AWG insulated battery cable to the NEGATIVE battery post (marked NEG, N, –).
3. Connect the POSITIVE (RED) battery clamp to the POSITIVE battery connector (marked
POS, P, + or RED).
4. Stand as far back from the battery as possible, and do not face battery when making
final connection.
5. Carefully connect the NEGATIVE (BLACK) charger clamp to the free end of the battery
cable connected to the negative terminal.
6. Set the charge rate to appropriate setting according to battery size.
7. When disconnecting charger, always do so in reverse sequence of connecting procedure and break first connection while as far away from battery as practical.
8. A marine (boat) battery must be removed and charged on shore. To charge it on board
requires equipment specially designed for marine use.
NOTE: This equipment has been tested and found to comply with the limits for a
Class B digital device, pursuant to Part 15 of the FCC rules. These limits are designed to provide reasonable protection against harmful interference in a residential
installation. This equipment generates, uses and can radiate radio frequency energy
and, if not installed and used in accordance with the instructions, may cause harmful
interference to radio communications. However, there is no guarantee that interference will not occur in a particular installation. If this equipment does cause harmful
interference to radio or television reception, which can be determined by turning the
equipment off and on, the user is encouraged to try to correct the interference by
one or more of the following measures:
• Reorient or relocate the receiving antenna.
• Increase the separation between equipment and receiver.
• Connect the equipment to an outlet on a circuit different from that to which the receiver is connected.
• Consult the dealer or an experienced radio/TV technician for help.
INTRODUCTION AND FEATURES
Thank you for selecting the Power Wizard FarmPro™ 40 – 2/10/25 Amp 12 Volt Smart
Battery Charger with Alternator Voltage Check and Battery Voltage Check functions. With
proper care and use, it will give you years of dependable service. This battery charger has
a high charge rate of up to 25 amps, and low charge rate of up to 2 amps. It is designed
for charging only 12 volt lead-acid batteries – conventional automotive, maintenance-free,
marine deep cycle and gel – used in cars, trucks, farm equipment, boats, RVs and SUVs, lawn-
mowers/garden tractors, motorcycles, personal watercraft, snowmobiles, ATVs, trucks
and various commercial applications.
Power Wizard FarmPro™ 40 Smart Battery Chargers feature 3-stage, high-efficiency
charging technology, built-in microprocessor control that ensures fast, safe and complete
charge on serviceable batteries (see FIGURE 2).
–4–
Stage One – Rapid Start Charge delivers maximum charging amperage to “wake up” any
serviceable 12 volt battery and allows for quick engine starting in just 5 minutes (based
on a midsize vehicle battery at 50% charge level). When battery reaches a maximum safe
predetermined voltage, the charger will automatically signal a “beep” and move into Stage
2 of the charging process. At the end of Stage 2, the charger will signal a BEEP and move
into Stage 3 charge mode.
Stage Two – Absorption Charge maintains the maximum possible charge at a constant,
safe, predetermined voltage. During the phase, voltage absorption regulation charge, the
charging voltage remains constant, while the actual charging current is reduced to allow
for the maximum proper internal chemical energy transfer.
Stage Three – Top-Off Charge voltage is automatically maintained and reduced to a predetermined level while current is adjusted for a safe, effective battery charge level (stepdown regulation mode); ideal for topping off batteries that have been in storage. At the
conclusion of Stage 3, the unit will BEEP signaling the completion of the charging cycle.
The Automatic Float Charge feature is ideal for maintaining a battery. It automatically
tops off a battery as needed, to keep it fully charged all the time.
Figure 2. Charge Curve
STAGE ONE
BEEP
BEEP
STAGE TWO
STAGE THREE
OFF BEEP
CHARGING
COMPLETE
FEATURES
•
•
•
•
•
•
•
•
•
This unit has three charge rate settings, with a 2/10/25 amp push button charge rate switch:
a) 2 amps: smaller batteries, as in lawn mowers, snowmobiles, motorcycles, etc.
b) 10 amps: middle-sized batteries, such as in small cars
c) 25 amps: automobile batteries and light trucks
Automatic temperature compensation
• Built-in battery reconditioning
Battery type selection
(desulfate)
Digital diagnostics
• Lightweight, high efficiency design
Alternator voltage and battery check
• Internal short circuit protection
Digital display shows charge rate, operating
• Cables and clamps self-stored
mode, fault codes and FUL when charged
• Reverse polarity indicator
1 minute engine start
• Microprocessor control (Digital
3 stage high frequency switch mode
Smart Control) / high frequency
automatic rapid charging
power
Spark-resistant reverse polarity
• Compensates for low AC from
and short circuit protection for user
extension cord use
• Equalization function
–5–
Figure 3A. Front View
WARNINGS: THERE ARE NO USER-SERVICEABLE PARTS IN THIS CHARGER.
DO NOT OPEN THE UNIT! IT MUST BE RETURNED TO POWER WIZARD FOR
PROFESSIONAL TESTING AND REPAIR. OPENING THE UNIT WILL VOID THE
MANUFACTURER’S WARRANTY. Contact Power Wizard at (800) 866-2161.
Figure 4B.
Figure 4A. Control Panel
Digital Readout
Circulating Pattern
CONTROLS AND INDICATORS
From left to right the function buttons are:
Battery Type Selector (Step 1) – Allows the user to select wet, gel or AGM type of battery for efficient and safe charge. Most automotive batteries are wet batteries. Refer to
the battery manufacturer’s specifications for battery type.
Charge Rate Selector (Step 2) – Allows the user to select the charger rate based on
battery size. This selection and the actual battery charge rate are monitored by the microprocessor and the charger will stop charging if the rate is too fast or too slow for the
battery size or condition.
Engine Start – Places the charger in an engine start sequence, this button will not be
activated unless the charger is in the 25 amp charge mode, set the 2/10/25 amps button to 25 amps first to activate this button.
Desulfate – is an automatic mode that once started continues for 24 hours and then
stops. A series of electrical pulses breaks the crystalline form of lead sulfate to return
these chemicals into useful battery electrolyte. More than 24 hours may be needed to
restore. If 5 cycles does not improve battery performance, discontinue and recycle the
battery.
Periodic reconditioning of a battery is recommended to maintain
a battery’s optimum performance.
Alternator Voltage Check – can only check alternator voltage in standby mode. In any
other mode, the battery voltage is checked to check alternator voltage. Press and hold
down button for 5 seconds and release and the voltage will be displayed. To check battery voltage, press and release the button and the voltage will be displayed. This check
is repeated at various electrical load levels and the tests allow the user to determine
if the alternator can keep up with the loads. It can indicate alternator service may be
required.
–6–
INDICATORS
Large (.375”) 3-character digital display in the upper left of the control panel indicates
many conditions and/or status codes:
When AC power is applied to the charger, actual charge rate in amps, when the battery is
fully charged, battery voltage, fault codes, operating modes and when the charger is ready
for the next mode selection. “Status Codes” are described below (FIGURE 5) and on the
back of charger.
AC POWER INDICATOR – When connected to an AC outlet, digital display shows circulating pattern to
indicate power is on. Disconnect charger after use.
FAULT CODES
F01 INTERNAL SHORTED CELL BATTERY – Cannot be charged, bad battery. Replace battery.
EXCESSIVE LOAD ON BATTERY WHILE CHARGING – Check load.
F02 BAD BATTERY CONNECTION – Check battery connection.
BATTERY VOLTAGE TOO LOW TO ACCEPT CHARGE – Have battery checked.
F03 INTERNAL OPEN CELL – Bad battery. Battery needs to be replaced.
SULFATED CONDITION – Battery needs to be reconditioned. See manual.
F04 OVERTIME CONDITION – Battery will not accept a charge after 18 hours of continuoous charging. Battery ha internal damage
and needs to be replaced or BATTERY CHARGE RATE IS SET TOO LOW. Set charger to higher charge rate. See manual.
F05 OVERHEATED CONDITION – Disconnect charger and allow to cool for 30 min., check for ample ventilation.
F06 REVERSE POLARITY
F07 ALTERNATOR OUTPUT IS OUT OF TYPICAL OPERATION RANGE
OPERATION CODES
–– –– –– BATTERY RECONDITIONING – The letters DES will display for the first 3 seconds)
–––
– – – ALTERNATOR VOLTAGE CHECK
000 CHARGER STANDBY
FUL BATTERY FULLY CHARGED
Below the digital display are a series of six LEDs that light on the following conditions:
WET – Lights when battery type selector is on WET battery type.
GEL – Lights when battery type selector is on GEL battery type.
AGM – Lights when battery type selector is on AGM battery type.
Float Charge – Lights when automatic charge monitoring is active. This feature allows a
battery to maintain its charge over long periods of non-use. If there is any loss of power
to the charger once power is restored, charger will automatically return to the default settings. Battery selector type would be “gel.”
Battery Voltage – Lights when battery voltage is displayed.
Alternator Good – Lights when load or not load checks show the alternator is keeping
up with the electrical load.
Equalize – A recessed button used to start the equalize process.
CHARGE RATE SELECTION
After charger clamps are correctly connected, plug in the charger to an AC outlet and the
charger will show a circulating pattern on the digital display. This pattern indicates power
is applied. Select proper charge current rate based on battery size. Press the 2/10/25
amp push button and the charger will begin charging at 2 amps. Pressing the 2/10/25
amp push button again will advance the charge rate to 10A, then 25A. Pressing the
switch again will turn OFF the charger output and the display will show “000”.
–7–
NOTE: The only time the selected charge rate does not display at the full selected rate is when
the battery is nearly full and charging at either step two or three. The display will be showing a
slowing charge rate. To return to 2A, press the 2/10/25 amp button. When the battery is fully
charged, the Charging Complete LED is lit and “FUL” is displayed on the digital display.
CHARGING THE BATTERY
1. Charger displays circulating pattern when battery and AC power are connected properly. Select battery type and press 2/10/25 amp button to begin charging at 2 amps
rate; the charger sounds a beep and displays charging current.
WARNING:If charger displays F02, and lights FAULT indicator, the connection to battery terminals is bad. Clean battery terminals, then reconnect clamps.
If the charger displays an F06, or the charger displays an F06, the red
(positive) and black (negative) clamps are incorrectly connected to battery
terminals. Reverse the clamps.
NOTE: The charger starts charging at 2 amps rate automatically if 2/10/25 amp button
is not pressed within 3 minutes after applying AC power. The Battery Type Selector
will automatically default to “gel”.
NOTE: If the display on the charger varies between F03 and amp rate, the battery is sulfated
and the charger is trying to give it some charge. Please run the desulfation process.
•Charger occasionally sounds a beep and displays 0.0 during self-test or charg
ing stage changes.
2. Pressing the 2/10/25 amp button again advances charging rate to 10 amps and
pressing once more advances charging rate to 25 amps.
NOTE: • If the battery is near full, it will fall back to lower charge rate.
• Pressing the 2/10/25 amp 4 times advances to standby mode; sounds a beep, displays 000 and stops charging.
3. The battery charger displays the charge current. To view the battery voltage, press BATTERY VOLTAGE button. The charger will sound a beep and display the battery voltage
for 5 seconds, then returns to display charge current.
4. The display shows FUL when the battery is fully charged.
5. Disconnect the AC power cord first, then the NEGATIVE clamp and finally the POSITIVE
clamp.
AUTOMATIC FLOAT CHARGING – Ideal for Maintaining a Fully Charged Battery
1.
2.
3.
4.
Keep the AC power and battery connected after battery is fully charged.
The charger monitors the battery and tops it off as needed.
The display shows the current in amps and turns on the Float Charge indicator and
displays FUL when completed.
To view battery voltage, press BATTERY VOLTAGE button.
NOTE: • After AC power interruption, charging restarts at 2 amps rate automatically. The Battery Type Selector will automatically default to “gel.”
EQUALIZING: the process by which the fluid in each of a battery’s cells is equalized.
This process occurs after charging is complete.
WARNING – NEVER TRY TO EQUALIZE A GEL CELL, THE RESULTING EXPLOSION COULD
CAUSE SERIOUS INJURY, DEATH AND PROPERTY DAMAGE.
WARNING – TURN OFF ALL VOLTAGE SENSITIVE DEVICES DURING THE EQUALIZATION
PROCESS. The frequency which the equalization process needs to be run depends on
the use of the battery. The more use the battery receives, the more undercharged it is,
the more times the battery should be equalized.
1. Do not use this mode on sealed or valve regulated batteries. This mode is only meant
for wet (unsealed/vented) batteries.
2. Make sure there are no flammable sources near the recharging sight.
–8–
3. Wear safety glasses, gloves and protective clothing.
4. Remove battery from vehicle. Make sure that the battery has good ventilation. The
process will cause the electrolytes to gas and release hydrogen and oxygen. Because
of the accumulation of these gases, the chance of explosion is realistic.
5. Open the battery cap.
6. Fill the battery with distilled water according to the manufacturers instructions. Since the
batteries may rapidly bubble while being charged, refill only with distilled water after
the equalization process is complete and the voltage is back to normal.
7. The battery should have no charge on it during the equalization process.
8. Plug in the charger, the display will show “000” and the battery type LED will default to
“gel.”
9. Push the Battery Type Selector Switch until “wet” is displayed (this mode will only
work if the battery type selected is “wet”).
10. Choose the correct charge rate and start charge. You can check the battery voltage
by pushing the Battery Voltage button. This will trigger the Battery Voltage indicator
button.
11. Push the Equalize button anytime and the battery will automatically begin to equalize,
but in 2 amp limited current. In order to push the recessed button, you will need a
small pin or ballpoint pen.
12. Every hour the temperature should be checked by touching the battery. If the battery
is too hot to touch, stop the charging and let the battery cool.
13. The voltage rises but does not go over 15.3V to 16.2V (2.55 - 2.7V per cell). Depending on ambient temperature, it will automatically adjust.
14. The “wet” LED flashes while the charger is in the equalize mode.
15. The digital readout will show “FUL” when the equalization process in complete.
16. The equalization process may take anywhere from 2 to 6 hours to complete.
ALTERNATOR VOLTAGE CHECK: will not work in normal charge mode. It will only
work in the stand-by mode when the LED display is showing “000” or a circulating
pattern.
PART 1: No Load (Turn OFF all vehicle’s accessories): The battery must be fully charged
before testing the alternator. Run the engine long enough to achieve normal idle speed
and verify there is a no-load voltage.
1. PRESS and hold down Alternator Check for 5 seconds to start the check.
2. ALTERNATOR GOOD LED will light to indicate the alternator is good, or the
FAULT CODE F07 will be displayed to indicate the alternator is not good.
3. Press Alternator Check button again to stop the test.
PART 2: Under Load (Accessories ON): Next, load the alternator by turning on as many
accessories as possible (except for A/C and DEFROST).
1. PRESS and hold down Alternator Check for 5 seconds to start the check.
2. ALTERNATOR GOOD LED will light to indicate the alternator is good, or the
FAULT CODE F07 will be displayed to indicate the alternator is not good.
3. Press Alternator Check button again to stop the test.
If the first Alternator Check indicates a good alternator and the second indicates the alternator is bad, the problem could stem from: loose fan belts, an intermittent diode failure
or possible bad connections between the battery and alternator and/or ground.
NOTE: BATTERY VOLTAGE button is disabled in Alternator Check mode.
NOTE: If someone has added a number of accessory loads on the charging system,
thereby increasing current demand from the alternator. MAKE SURE THAT THE ALTERNATOR IS RATED TO THE APPLICATION.
–9–
NOTE: This check may not be accurate for every make, manufacturer and model of
vehicle. There is wide variation in user-controlled electrical loads, alternator output
and wiring. Other factors include battery condition, temperature and engine idle
speed. It is recommended to check your alternator when it is known to be operating
properly to verify that this check is valid for your particular vehicle. Check only 12V
systems. Checking 24 or 36V systems will damage charger.
ENGINE START
The Engine Start Function can supply 75 amps for engine starting.
Engine Start Procedure:
1. Set the charge rate to 25 amps.
2. When the digital display shows 25 amps, press the 75 amps engine start.
3.The Digital Display will begin a countdown, starting at 999 to 000.
4.Once countdown reaches 000, the display will begin flashing 000, meaning that
the charger is ready to start.
5.The charger will deliver 75 amps for 5 seconds. The charger will then go into a standby
mode 000.
6.During this time, the charger can manually be set to any charge rate, and after four minutes,
the engine start procedure can be repeated if needed.
MAINTENANCE
With minimal maintenance, the Power Wizard FarmPro™ 40 2/10/25 Amp Smart
Battery Charger will provide years of dependable service. Follow these simple steps to
maintain the charger in optimum condition:
• After each use, clean the battery charger clamps – be sure to remove any battery fluid that
will cause corrosion of the copper clamps.
• Clean the outside case of the charger with a soft cloth and, if necessary, mild soap solution.
• Do not allow liquid to enter the charger. Do not operate when charger is wet.
• Keep the charger cords loosely coiled during storage to prevent damage to the cords.
• Do not use charger if cords or clamps have been damaged in any way – call Power Wizard
toll-free at (800) 866-2161 to replace cords and clamps.
TROUBLESHOOTING – FAULT LED LIT
The following conditions may cause the FAULT CODES to be displayed:
• Poor connection to battery (or frame).
• Charging too fast – decrease charge rate – press 2/10/25 amp button to lower rate.
• Charging too slowly – battery is large and did not complete charging in 24 hours –
press 2/10/25 amp to charge at a faster rate.
• Shorted battery cell – replace battery (F01).
• Open battery cell – replace battery (F03).
• Reverse Polarity (F06) – disconnect AC then reverse clamp locations on battery and
frame.
• Internal overheat in charger – make sure fan is not blocked (F05).
INTERNAL SHORT CELL BATTERY (F01)
• If the battery being charged has an internal shorted cell, the FAULT CODE F01 will be
displayed.
• If FAULT CODE is displayed, Power Wizard recommends you take your battery to a
certified automotive service center for evaluation.
BATTERY NOT ACCEPTING A CHARGE
• Make sure that the charger is plugged into a “live” 110/120VAC outlet and Power LED is lit.
• Unplug charger and check battery connections – ensure that there is a good connection at the battery terminal and/or vehicle chassis.
• Check that the correct charge rate was selected for the battery being charged.
• Ensure that enough charging time was allowed for – check table on next page for approximate charging times.
– 10 –
NOTE: Charger will NOT operate on batteries below 2.0 volts. If a 12 volt battery is
below 2.0 volts, it is probably shorted, open or sulfated and should be replaced.
VERY COLD BATTERY
If the battery to be charged is extremely cold (in temperatures less than freezing – 0˚C
/ 32˚F) it cannot accept a high rate of charge, so the initial charge rate will be slow. The
rate of charge will increase as the battery warms.
WARNING: DO NOT ATTEMPT TO CHARGE A FROZEN BATTERY
CHARGING TIMES
The Power Wizard FarmPro™ 40, a fully automatic Smart Battery Charger, will automatically adjust the charge rate as the battery becomes charged and stops charging when the
battery is fully charged. For estimates of the time it takes to charge a battery, refer to the
following table for details. Deep cycle batteries may need longer charging times. It is recommended to repeat the charging cycle a second time, beginning with the 2 AMP rate.
The following chart converts hydrometer readings into percent of charge values.
Refer to the chart below for approximate charging times.
SPECIFIC GRAVITY
(HYDROMETER READING)
1.265
1.225
1.190
1.155
1.120
PERCENT OF CHARGE
IN BATTERY
100%
75%
50%
25%
0%
PERCENT OF CHARGE
NEEDED BY BATTERY
0%
25%
50%
75%
100%
The times shown in the chart above are approximate and refer to an average automotive battery. For smaller batteries, the charge time should be adjusted using the formula
shown below and adding 1 hour to the time calculated.
To estimate charging time for a discharged battery, divide the amp hour (aH) rating of the
battery by the charge rate selected. This is the number of hours required to recharge the
battery. For example, a 50 aH (12 volt) battery is discharged (10 volts). How long should
it be charged at the 10 amp rate? Divide the 50 aH by 10.
Answer: 5.5 hours. Always round up the charge time by 10% to ensure full charge. In
most cases, battery charging times will vary depending on the age and condition of the
battery. Smaller batteries should be charged at a lower rate (2 amps) and add an extra
hour to charge time.
PERCENT OF CHARGE
2 AMPS
75%
50%
25%
0%
6.5 HRS
12 HRS
NR*
NR*
10 AMPS
1.8 HRS
3 HRS
4.5 HRS
6 HRS
25 AMPS
0.8 HRS
1.4 HRS
2 HRS
2.7 HRS
*Not recommended
– 11 –
POWER WIZARD, INC. / FARMPRO WARRANTY
30 DAY SATISFACTION GUARANTEE
FARMPRO guarantees your complete satisfaction with this battery charger. If
you are not satisfied with this product, you may return the battery charger to
the original place of purchase within 30 days of purchase for a full refund.
Proof of purchase is required for a full refund.
LIMITED WARRANTY
AgraTronix warrants this battery charger to the original purchaser for a period
of two (2) years from the date of purchase, when installed and used in accordance with the enclosed installation instructions. You must retain your
receipt for proof of purchase. This warranty covers defects in materials and
workmanship to the battery charger.
TERMS THAT APPLY TO BOTH THE GUARANTEE AND WARRANTY
Improper installation, misuse, neglect and tampering of any kind are NOT covered under the 30-Day Guarantee or the Limited Warranty. No warranty other
than the above is expressed or implied. Implied warranties of merchantability
and fitness for a particular application are hereby disclaimed unless the law
specifically precludes this disclaimer. The manufacturer and seller shall have
no liability for damages, incidental or consequential, resulting from or caused
by any failure, malfunction or defect of any product.
The sole obligation of AgraTronix shall be limited to repair or replacement, at
its option, of the defective battery charger or part and prepaid return to the
owner.
TO MAKE A WARRANTY CLAIM
1. First disconnect the battery charger from power source.
2. Attach a note with your name, return address, phone number and brief
description of the problem.
3. Pack product carefully in oversized carton with crushed newspaper for
cushioning.
4. Your product should be shipped prepaid and insured against shipping
loss or damage.
5. Before returning product under warranty, you must call Power Wizard, Inc.
/ FarmPro at (800) 866-2161 to obtain a Return Goods Authorization
number and a shipping address for the service center that will process
the return. The RGA number must accompany the returned product.
POWER WIZARD, INC. • FARMPRO
10375 State Route 43, Streetsboro, OH 44241 USA
800-866-2161 • 330-562-2222
http://www.agratronix.com
– 12 –
Pro 40
TM
Cargador de Baterías Rápido
y Automático
MANUAL DEL PROPIETARIO E INFORMACIÒN DE
GARANTÌA 12 VOLTIOS 2/10/25 AMPERIOS INDICE DE
CARGA CON ALTERNADOR DE VOLTAJE Y FUNCIÒN
DE REVISIÒN
• INSTRUCCIONES IMPORTANTES DE SEGURIDAD •
ADVERTENCIA – RIESGO DE GASES EXPLOSÌVOS
1. TRABAJAR CON BATERÌAS DE PLOMO-ACIDO ES PELIGROSO. DURANTE EL
FUNCIONAMIENTO NORMAL LAS BATERÌAS GENERAN GASES EXPLOSÌVOS.
POR ESTA RAZÒN, ES DE SUMA IMPORTANCIA QUE CADA VEZ ÀNTES DE USAR
SU CARGADOR, LEAS ESTE MANUAL Y SIGAS EXACTAMENTE LAS INSTRUCCIONES.
2. Para reducir el riesgo de una explosiòn de la baterìa, siga esta instrucciones y
aquellos publicados por el fabricante de la baterìa y fabricante de cualquier equipo
que vaya a usar junto a la baterìa. Revìse cautelosamente marcas de estos productos y en el motor.
SEGURIDAD GENERAL
1. Use este cargador para cargar solo baterìas de 12 VOLT PLOMO-ACIDO. Se intenta
proveer de energìa a un sistema elèctrico de baja tensiòn que a un arranque de motor. NO use este cargador de baterìa para baterias con celda-seca que se usan con
electrodomèsticos. Estas baterìas pueden explotar y causar lesiones a las personas
y daños a la propiedad.
2. El uso de un accesorio no recomendado o vendido por el fabricante del cargador de
baterìa puede derivar en un riesgo de incendio, descarga eléctrica o lesiones a las
personas.
3. Para reducir el riesgo de daño al enchufe eléctrico y al cordón, jale el enchufe del
cordón cuando desconecte el cargador.
4. No debe usarse cable de extension a menos que sea necesario. El uso inadecuado de
un cable de extensiòn puede derivar en un riesgo de incendio y descarga elèctrica.
Si va a usar el cable de extensiòn, asegùrese que:
a. Los pernos del enchufe del cable de extensiòn son del mismo nùmero, tamaño y forma que los del enchufe del cargador.
b. El cable de extension esta debidamente conectado y en buen estado elèctrico; y
c. El tamaño del cable es AWG#14 (14 calibre) a 100 pies y AWG#12 para distancias
sobre 100 pies.
5. No prenda el cargador con cable o enchufe dañado – tome un servicio tècnico calificado para cambiar de inmediato el cable o el enchufe.
6. No haga funcionar el cargador si ha recibido un golpe fuerte, ha caìdo o de cualquier
manera ha sido dañado llèvelo a un servicio tècnico calificado.
7. No desarme el cargador, contacte un servicio tècnico calificado cuando requiera
una reparaciòn. Su rearmado inadecuado puede derivar en un incendio, descarga o
fuego.
GUARDE ESTA INSTRUCCIONES:
Este manual contiene instrucciones importantes de funcionamiento
y seguridad para el Power Wizard FarmPro™ 40 Cargador de Baterìa.
Llame al 800-866-2161 para servicio de atenciòn al cliente
8. Para reducer el riesgo de una descarga elèctrica, desenchufe el cargador de la
salida àntes de intentar un mantenimiento o limpieza. Apagar los controles no
reduciran este riesgo.
9. No funcione el cargador en lluvia o nieve o cuando el tiempo este hùmedo.
10. Nùnca cargue una baterìa congelada
Este dispositivo cumple con las normas 15 del FCC. Su funcionamiento esta sujeto a dos condiciones: (1) Este
dispositivo no puede causar interferencias perjudiciales, y (2) Este dispositivo debe aceptar cualquier interferencia recibida, incluyendo interferencias que pueden causar operaciones no deseadas.
PERSONAL DE SEGURIDAD Y PRECAUCIONES
1. Otra persona deberia estar lo suficientemente cerca para venire a ayudar cuando se
trabaja cerca de una baterìa Plomo-Àcido.
2. Agua fresca y jabòn se debe tener cerca en caso de contacto de piel con la baterìa,
vestimenta o los ojos.
3. Use protector para los ojos y la ropa. Evite tocarse los ojos o la piel mientras trabaja
con una baterìa. Si partìculas àcidas o corrosiòn entra en sus ojos, llene sus ojos
con agua fria de inmediato (lave el ojo). Por al mènos 10 minutos y consiga atenciòn
mèdica de inmediato.
4. Si el àcido de la baterìa toca su piel o ropa, lave de inmediato con agua y jabòn.
5. NÙNCA fume o permita chispas en las cercanìas de la baterìa o del motor.
6. ADVERTENCIA: Dejar herramientas metàlicas u otros objetos tirados en la baterìa
puede causar chispas, corto circuìto u otros componentes que pueden causar una
explosiòn.
7. Quìte artìculos metàlicos como ser: anillos, pulseras, collares y relojes cuando trabaje con una baterìa de Plomo-Acido. Baterìas de Plomo-Acido pueden producir cortocircuìto de alta tensiòn que pueden causar incendios.
CABLE DE CONEXIÒN
El cargador deberìa estar conectado a tierra para reducir el riesgo de una descarga elèctrica. El cargador está equipado con un cable AC que tiene conductor de tierra y un enchufe trifàsico. El cable debe estar conectado adecuadamente e instalado y conectado a
tierra 110/120VAC con una salida de conformidad con los códigos y regulaciones locales
(Ver Figura 1.)
¡PELIGRO! NÙNCA altere el cable AC ò el enchufe – si èste no encaja, recùrre
a un electricista especializado. Una conexiòn inadecuada puede desencadenar en una descarga elèctrica.
Este cargador de baterías es para usarlo en un circuìto 110/120VAC, y cuenta con un
enchufe de tierra que se parece al enchufe mostrado en la FIGURA 1A. Si una salida con
toma de tierra adecuada no está disponible, un adaptador temporal (como el adaptador
mostrado en la figura 1B), puede ser utilizado para conectar este enchufe a una tòma de
dos polos como se muestra en la FIGURA 1B. El adaptador temporal debe ser usado sólo
hasta que una toma a tierra sèa instalado por un electricista especializado.
La rígida de color verde o cuadriculada se extiende desde el adaptador y debe ser conectado a una toma de salida a tierra. Asegùrese que estè conectado a tierra. Si es
necesario, sustituir la placa de salida original placa con un tornillo más largo que garantizará el adaptador de la toma de tierra cuadriculado por la placa y conectar a la salida
de toma a tierra.
¡PELIGRO! Antes de usar el adaptador visto (FIGURA 1B), asegùrese que el
tornillo central de salida estè conectado a tierra.
– 14 –
Figura 1
ADAPTER (B)
GROUNDING PIN (A)
GROUNDING
MEANS
METAL
SCREW
EL USO DE ADAPTADOR NO ESTA PERMITIDO EN CANADÀ. SI UNA TOMA TIPO NO ESTA
DISPONIBLE, NO USE ESTE APARATO HASTA QUE LA SALIDA APROPIADA ESTE INSTALADO
POR UN ELECTRICISTA ESPECIALIZADO.
PREPARANDO LA CARGA
1. Determine el voltaje de la baterìa, hacienda referencia al manual del propietario del
vehìculo.
2. De ser necesario, retire del vehìculo la baterìa para cargar, o para limpiar los terminales, siempre quìte primero el Terminal a tierra de la baterìa. Asegùrese que todos los
accesorios del vehìculo estan apagados, a fin de no causar un arco.
3. Limpie los terminals de la baterìa. Tenga cuidado de que la corrosion no entre en
contacto con los ojos o la piel.
4. Añadir agua destilada en cada celda hasta que el agua llegue al nivel especificado
por el fabricante. Esto ayuda a depurar el gas excedente de la celda. No rebalse. Para
una baterìa sin tapa en la celda, cuidadosamente siga las instrucciones de recarga
del fabricante.
5. Estudie todas las precauciones del fabricante de la bateria como quitar o no las
tapas de las celdassmientras esta cargando y recomendar ìndices de carga.
6. La baterìa debe encontrarse aireada mientras esta cargando. El gas puede ser extraìdo mediante una pieza de cartòn u otros materiales no metàlicos como un ventilador.
7. Asegùrese que el nivel de carga inicial no exceed las recomendaciones del fabricante.
UBICACIÒN DEL CARGADOR
1. Coloque el cargador tan lejos como los cables lo permitan.
2. NÙNCA coloque el cargador sobre la baterìa que esta siendo cargada; gases de la
baterìa corroeran y dañaran el cargador.
3. NÙNCA permita que el àcido de la bateria gotèe sobre el cargador cuando lee específicamente el peso o llenado de la celda con el àcido de la baterìa.
4. NÙNCA maneje el cargador en un area no ventilada.
5. Baterìas marinas deben ser retiradas y cargadas en tierra.
6. No acomode una baterìa sobre un cargador
DC PRECAUCIONES DE CONEXIÒN
1. Conectar y desconectar DC salidas de abrazaderas solo después de enchufar cable
AC de salida.
2. Nùnca permita que las abrazaderas se toquen entre sì.
3. Adjùnte abrazaderas a la baterìa y revise para una conexiòn segura. Esto mantendra
las abrazaderas seguras en los terminales y reducirà el riesgo de chispas.
SIGA ESTOS PASOS CUANDO LA BATERÌA ESTE INSTALADA EN EL VEHÌCULO. UNA
CHISPA CERCA PUEDE CAUSAR UNA EXPLOSIÒN. PARA REDUCIR EL RIESGO DE
UNA CHISPA CERCA A LA BATERÌA:
1. Posiciòn AC y DC cuerdas/cables para reducer el riesgo de daños por el capò, puertas, u otras piezas móviles del motor.
2. Mantenerse alejado de las palas del ventilador, correas, poleas y otras partes que
pueden causar lesiòn.
– 15 –
3. Verifique la polaridad de la baterìa. POSITIVO (POS, P, +) usualmente tiene un diámetro màs grande que el polo NEGATIVE (NEG, N, –).
4. Determine cuàl polo de la baterìa esta (conectado) a tierra por el chassis. Si el polo
negativo esta conectado a tierra por el chasis (como en la mayoria de los vehìculos),
ver (e). si el polo positivo esta conectado a tierra por el chasis, ver (f).
5. Para vehìculos tierra-negativo, conecte POSITIVO (ROJO) la abrazadera del cargador
de baterìa al polo POSITIVO (POS, P, +) de la baterìa. Conecte NEGATIVO (NEGRO) la
abrazadera al chasis del vehìculo o motor lejos de la baterìa. No conecte la abrazadera al carburador, paso de gasolina, hoja metàlica o partes del cuerpo. Conectar a
metales pesados parte de la estructura o bloque del motor.
6. Para vehìculos tierra-positivo, conecte el clip NEGATIVO (NEGRO) del cargador de
baterìa al polo NEGATIVO (NEG, N, -) DE LA BATERÌA. Conecte la abrazadera POSITIVA
(ROJO), al chasis del vehìculo o bloque del motor lejos de la baterìa. No conecte las
grampas al carburador, paso de gasolina, hoja metàlica o partes del cuerpo. Conectar
a metales pesados parte de la estructura o bloque del motor
7. Cuando desconecte el cargador, desconecte el cable AC primero, quìte las abrazaderas del chasis del vehìculo a la Terminal de la baterìa
8. Consulte el manual de instrucciones para la duración de la carga de información
9. No cargue la baterìa mientras el motor esta funcionando.
SIGA ESTOS PASOS CUANDO LA BATERÌA ESTE INSTALADA EN EL VEHÌCULO. UNA
CHISPA CERCA PUEDE CAUSAR UNA EXPLOSIÒN. PARA REDUCIR EL RIESGO DE
UNA CHISPA CERCA A LA BATERÌA:
1. Compruebe la polaridad de la baterìa para los conectores montados, el polo POSITIVO (marcadoPOS, P, +) usualmente tiene un diámetro màs grande que el polo NEGATIVO (macado NEG, N, –). Para la aconexiòn del lado armado de la baterìa el Terminal
POSITIVO es ROJO, y el Terminal NEGATIVO es negro.
2. Adjunte a 24 pulgadas (longitud mínima) 6 AWG cable de batería con aislamiento al
polo negativo de la batería (marcado NEG, N, -).
3. Conecte la abrazadera POSITIVA (ROJA) al conector de baterìa (marcado POS, P, + o
ROJO).
4. Alejesè de la baterìa, no de la cara a la baterìa cuando realìze la conexión final.
5. Cuidadosamente conecte la abrazadera del cargador NEGATIVO (NEGRO) al extremo
del cable de baterìa conectado al terminal negativo.
6. Establezca el nivel adecuado de carga segùn el tamaño de la baterìa.
7. Al desconectar el cargador, siempre hacerlo en secuencia inversa del procedimiento
de conexión y romper primero la conexión mientras se aleja de la baterìa.
8. Una baterìa marina (bote) debe quitarse y cargarla en tierra. Cargarla a bordo require
de equipos especiales diseñados para uso marino.
NOTA: Este equipo ha sido probado y cumple con los lìmites para un dispositivo
digital de clase B, de conformidad con la parte 15 de la norma FCC. Estos lìmites
estan diseñados para proporcionar una protecciòn rasonable contra intereferencias
en una instalaciòn residencial. Este equipo genera, usa y puede irradiar energìa y
si no se instala y utiliza de acuerdo a las instrucciones puede causar interferencias
perjudiciales para la comunicación por radio. Sin embargo, no hay garantía de que
no ocurran interferencias en una instalación en particular. Si el equipo causa interferencia perjudicial a la recepción de radio o televisión, lo cual puede determinarse
apagándolo y encendiéndolo, se recomienda al usuario tratar de corregir la interferencia por una o varias de las siguientes medidas:
•Reoriente o relocalìze el receptor de la antena.
•Incremente la separaciòn entre el equipo y el receptor.
•Conectar el equipo a una salida o circuìto diferente del que el receptor esta
conectado.
•Consulte a su distribuidor o a un tècnico especializado de radio/TV.
– 16 –
INTRODUCCIÓN Y CARACTERÍSTICAS
Gracias por seleccionar el Power Wizard FarmPro™ 40 – 2/10/25 Amp 12 Volt Smart
Battery Charger con revisor de alternador de voltaje y funciones de revisiòn del voltaje
de la baterìa. Con uso y cuidado apropiado, tendràs años de servicio útil. Este cargador
de baterìa un nivel alto de carga hasta 10 amperios, y un nivel bajo de carga hasta 2
amperios. Esta diseñado para cargar solo baterias de 12 voltios Plomo-Acido de autos
convencionales, libre mantenimiento, ciclo marino profundo y gel usado en carros, camiones, equipos agrícolas, botes, boogies, cortadoras de césped, tractores de jardìn,
motos, motos acuàticas, motos de nieve y varias aplicaciones comerciales.
Power Wizard FarmPro™ 40 Smart Battery Chargers Característica de 3 etapas, de
alta eficiencia de tecnología de carga, una función de control por microprocesador que
garantiza rápidas, seguras y completas cargas de baterías ùtiles (véase la figura 2).
Fase Uno – Carga Ràpida Entrega una carga de amperaje màximo de 12 voltios para
“despertar” cualquier servicio y permite un arranque ràpido de motor en solo 5 minutos
(basados en baterias de vehìculo mediano al 50% de nivel de carga). Cuando la baterìa
alcanza un màximo voltaje predeterminado de seguridad, el cargador indicarà automáticamente un “pitido” y la moverà a la segunda etapa del proceso de carga. Al finalizar la
fase dos, el cargador indicarà con un PITIDO y lo moverà al modo de carga de la fase 3.
Fase Dos – Carga de Absorción Mantiene la máxima carga en una constante, seguro,
predeterminado voltaje. Durante la fase de absorción de regulación de carga del voltaje,
la tensión de carga permanece constante, mientras que la corriente de carga se reduce
para permitir la máxima y adecuada transferencia interna de energía química.
Fase Tres Carga – Màxima de voltaje es automáticamente mantenida y reducida para
pre determinar el nivel de corriente mientras se ajusta y asegura un fectivo nivel de carga
de la baterìa (reducir el modo de regulación); Ideal para el relleno de baterías que han
estado almacenadas. A la conclusión de la fase 3, la unidad de señalarà con un PITIDO
que se completò el ciclo de carga. La caracterìstica del flotador automàtico de carga
es que es ideal para mantener una baterìa, como la baterìa necesita una carga ràpida
automáticamente la mantiene con carga màxima.
Figura 2.
Curva
de Carga
STAGE ONE
BEEP
BEEP
STAGE TWO
STAGE THREE
OFF BEEP
CARACTERÌSTICAS
CHARGING
COMPLETE
• Esta unidad tiene tres tipos de ìndices de carga de ajuste, con unos 2/10/25 amperios botón de empuje tipo interruptor de carga:
a)2 amperios: Baterías pequeñas, como en cortadoras de césped, motos de nieve, motocicletas, etc.
b)10 amperios: Baterìas de tamaño medio, como en pequeños coches
c)25 amperios: Baterìas de automòviles y camiones
• Racondicionamiento de baterìa
• Compensation automàtica de temperatura
• Tipo de selecciòn de baterìa
• Diagnòsticos digitales
• Alternador de voltaje y revisiòn de baterìa
– 17 –
• Muestra pantalla ìndice digital de carga, modo de funcionamiento, còdigo de fallas
cuando se carga FULL
• 1 encendido de motor
• 3 Fase de alta frecuencia interruptor de modo automàtico de cargar ràpida
• Chispa resistente a la polaridad de inversiòn y cortocircuìto de protecciòn para el
usuario
• Racondicionamiento de baterìa (desulfatar)
• Ligero, diseño de alta eficiencia
* Cortocircuìto interno de protecciòn
• Cables y abrazaderas protegidas • Indicador de polaridad inversa control Inteligente / poder de alta frecuencia
• Compensa la baja de AC del cable de extension de uso
• Igualdad de funciòn
Figura 3A. Vista Frontal
ADVERTENCIAS: NO HAY REPUESTOS ÙTILES EN ESTE CARGADOR. NO ABRA
LA UNIDAD! DEBE SER DEVUELTO AL PERSONAL DE PRUEBAS Y REPARACIÒN. ABRIR LA UNIDAD ANULARÀ LA GARANTÌA DEL FABRICANTE. Contacte a Power Wizard al (800) 866-2161.
Figura 4B.
Figura 4A. Panel de Control
Patrón que circula
de la lectura digital
CONTROLES E INDICADORES
De izquierda a derecha la funciòn de los botones son:
Selector del tipo de baterìa (Paso 1) – Permite al usuario seleccionar humedad, gel
o AGM tipo de batería para una carga segura y eficiente. La mayorìa de las baterias de
auto son hùmedas. Remìtase a la batería especificaciones del fabricante para el tipo de
batería.
Selector del ìndice de carga (Paso 2) – Permite al usuario seleccionar el tipo de cargador de baterías basados en su tamaño. Esta selección y el ìndice real de carga de la
batería son supervisados por el microprocesador y el cargador detendrà la carga si el ìndice es demasiado rápido o demasiado lento para el tamaño de la batería o su estado.
Encendido – Ubique el cargador en una secuencia de encendido del motor, este botòn
no se activarà a menos que este en los 25 amperios modo carga, fìje el botòn 2/10/25
amperios a 25 amperios primero para activar este botòn.
– 18 –
Desulfatado – es un modo automático, una vez que comenzó continúa durante 24 horas
y luego se detiene. Una serie de impulsos eléctricos rompe la forma cristalina del sulfato
para volver útiles estos químicos en la batería de electrolito.Más de 24 horas pueden
ser necesarias para restablecerce. Si en 5 ciclos no mejora el rendimiento de la pila,
suspenda el tratamiento y reciclaje de la batería.
Para mantener un òptimo rendimiento de la baterìa se recomienda su reacondicionamiento periòdico.
Revìse el Alternador de Voltaje – Puede revisar el alternador de voltaje solo en modo
de espera. En ningùn otro modo, el voltaje de la batería es controlado para verificar la
tensión del alternador. Mantenga oprimido el botón por 5 segundos y suelte y el voltaje
se mostrará. Para reviser el voltaje de la baterìa, orpima y suelte el botòn y el voltaje se
mostrarà. Este control se repite en los distintos niveles de carga eléctrica y las pruebas
permiten al usuario determinar si el alternador puede mantenerse al día con las cargas.
Puede requerirse un servicio de mantenimiento del alternador.
INDICADORES
Tamaño (.375”) 3-Pantalla Digital en la parte superior izquierda del panel de control
indica muchas condiciones y / o códigos de estado:
Cuando AC Power se conecta al cargador, el ìndice real se carga en amperios, cuando
la batería está completamente cargada, los códigos de fallas, modos de funcionamiento
y cuando el cargador está listo para la próxima selección de modo “Status Codes” son
descritos abajo (FIGURA 5) y al reverso del cargador.
Figura 5.
AC POWER INDICATOR – When connected to an AC outlet, digital display shows circulating pattern to
indicate power is on. Disconnect charger after use.
FAULT CODES
F01 INTERNAL SHORTED CELL BATTERY – Cannot be charged, bad battery. Replace battery.
EXCESSIVE LOAD ON BATTERY WHILE CHARGING – Check load.
F02 BAD BATTERY CONNECTION – Check battery connection.
BATTERY VOLTAGE TOO LOW TO ACCEPT CHARGE – Have battery checked.
F03 INTERNAL OPEN CELL – Bad battery. Battery needs to be replaced.
SULFATED CONDITION – Battery needs to be reconditioned. See manual.
F04 OVERTIME CONDITION – Battery will not accept a charge after 18 hours of continuoous charging. Battery has internal damage and needs to be replaced or BATTERY CHARGE RATE IS SET TOO LOW. Set charger to higher charge rate. See manual.
F05 OVERHEATED CONDITION – Disconnect charger and allow to cool for 30 min., check for ample ventilation.
F06 REVERSE POLARITY
F07 ALTERNATOR OUTPUT IS OUT OF TYPICAL OPERATION RANGE
OPERATION CODES
–– –– –– BATTERY RECONDITIONING – The letters DES will display for the first 3 seconds)
–––
– – – ALTERNATOR VOLTAGE CHECK
000 CHARGER STANDBY
FUL BATTERY FULLY CHARGED
Debajo de la pantalla digital hay una serie de seis indicadores LED que se encienden en las siguientes condiciones:
WET – Enciende cuando el selector de tipo de baterìa esta en tipo de baterìa WET.
GEL – Enciende cuando el selector de tipo de baterìa esta en tipo de baterìa GEL.
AGM – Enciende cuando el selector de tipo de baterìa este en tipo de baterìa AGM.
Float Charge – Enciende cuando la carga de monitoreo automàtico se activa. Esta característica permite a una batería mantener su carga durante largos períodos de no utilización. Si no hay ninguna pérdida de poder por el cargador una vez que se restablezca
la energía, el cargador volverà automàticamente a su configuración por defecto. El tipo
de selector de baterìa serìa “GEL”.
– 19 –
Battery Voltage – Enciende cuando la baterìa de voltaje se muestra..
Alternator Good – Enciende cuando la carga o no carga verifica que el alternador se
mantiene con la carga eléctrica
Equalize – Un botón de receso usado para iniciar el proceso de igualaciòn
SELECCIÒN DEL ÌNDICE DE CARGA
Despuès que las abrazaderas de carga estan debidamente conectadas, enchufe en el
cargador A una toma de salida CA y el cargador le mostrarà un patrón de circulaciòn en
la pantalla digital. Esta pauta indica que la alimentaciòn se conecta. Seleccione una
carga adecuada de corriente basada en el tamaño de batería. Oprima el botòn 2/10/25
amperios y el cargador de carga se iniciarà en 2 amperios. Oprima el botòn de 2/10/25
amperios nuevamente y avanzarà el ìndice de carga 10A, luego con 25A. Oprima el interruptor de nuevo se apagarà el cargador de salida y la pantalla mostrarà “000”.
NOTA: La única vez que el ìndice seleccionado de carga no se muestra en el ìndice
pleno seleccionado es cuando la batería está casi completamente cargada y en la
carga ya sea en el paso dos o tres La pantalla mostrarà un ìndice de carga lento. Para
volver a 2A, oprima el botòn de amperaje 2/10/25. Cuando la baterìa este cargada a
full, la carga completa LED esta encendida y “FUL” se muestra en la pantalla digital.
CARGANDO LA BATERÌA
1. El cargador muestra un patrón circulante cuando la batería y su AC power están conectados correctamente. Seleccione el tipo de baterìa y oprima el botòn 2/10/25
amperios para empezar a cargar el ìndice en 2 amperios; En el cargador suena un
pitido y muestra el cargador de corriente.
PELIGRO: Si el cargador muestra F02, y se enciende el indicador FAULT, la conexión con bornes de la batería es mal. Lìmpie los terminales de la
baterìa, luego reconecte las abrazaderas. Si el cargador muestra un
F06, o la carga muestra un F06, el rojo (positivo) y el negro (negativo)
las abrazaderas estan mal conectadas a los terminales de la baterìa.
Invierta las abrazaderas.
NOTA:El cargador de encendido de carga en 2 amperios asùme automáticamente
2/10/25 amperios si el botón no es presionado dentro de los 3 minutos después
de aplicar el AC power.El selector del tipo de baterìa asumirà automáticamente
por defecto “gel”.
NOTA: Si la pantalla en el cargador varìa entre F03 y un ìndice de amperios, la baterìa
esta sulfatada y el cargador esta tratando de darle algo de carga. Por favor,
ejecùte el proceso de desulfataciòn.
• El Cargador de vez en cuando emite un pitido y muestra 0,0 durante la prueba
automática de carga o Etapa de cambios
2. Presione el botòn de amperaje 2/10/25 nuevamente y adelante el ìndice de carga a
10 amperios y oprima y adelante una vez màs el ìndice de carga a 25 amperios.
NOTA: • Si la baterìa esta casi cargada, caerà de nuevo a un ìndice de carga màs bajo.
• Oprima el amperaje 2/10/25 4 veces adelante a modo en espera; sonarà un
pitido, mostrarà 000 y detendrà la carga.
3. El cargador de baterìa muestra la carga de corriente. Para mirar el voltaje de la baterìa,
oprima el botòn BATTERY VOLTAGE. El cargador emitirà un pitido y mostrarà el voltaje
de la baterìa durante 5 segundos, luego volverà a mostrar la carga de corriente.
4. La pantalla muestra FUL cuando la baterìa esta completamente cargada.
5. Desconecte el cable AC power primeramente, luego la abrazadera NEGATIVA y finalmente la abrazadera POSITIVA.
CARGA AUTOMÀTICA FLOTANTE – Ideal para mantener cargada la baterìa al màximo
1. Mantenga el AC power y la baterìa conectada despuès la baterìa esta cargada al
màximo.
2. El monitor de carga de la baterìa y afines apàguelo de ser necesario.
– 20 –
3. La pantalla muestra la corriente en amperios y retorna al indicador de carga flotante
y muestra FUL cuando se completa..
4. Para mirar el voltaje de la baterìa, oprima el botòn BATTERY VOLTAGE.
NOTA:•Despuès de la interrupciòn de AC power, la carga se retrasa en un ìndie de 2
amperios automaticamente. El selector de tipo de baterìa por defecto asume
automàticamente a “gel.”
IGUALANDO: El proceso por el cual el fluìdo en cada una de las céldas de una batería es igualado. Este proceso sucede después de que la carga es completada.
PELIGRO – NUNCA INTENTE IGUALAR UNA CELDA DE GEL, EL RESULTADO PODRÌA CAUSAR UNA EXPLOSIÒN, LESIONES GRAVES, MUERTE Y DAÑOS A LA
PROPIEDAD.
PELIGRO – APAGAR TODOS LOS DISPOSITIVOS SENSIBLES A LA TENSIÒN DURANTE EL PROCESO DE IGUALACIÒN. LA FRECUENCIA CON LA QUE EL PROCESO DE
IGUALACIÒN TIENE QUE SER EJECUTADO DEPENDE DE LA UTILIZACIÒN DE LA BATERÌA. A mayor uso que la batería recibe, más descarga , cada vèz la batería debe
ser igualada.
1. No utilizar este modo sobre precinto o válvula de baterìa regulada. Este modo esta
solamente hecho para tipos de baterìa (sin precinto / venteadas).
2. Asegúrese de que no haya fuentes inflamables al alcance de la recarga.
3. Use lentes de seguridad, guantes y ropa de protección.
4. Quìte la baterìa del vehìculo. Asegùrese que la baterìa tiene buena ventilaciòn. El proceso causarà los electrolitos y la emisiòn de gas de hidrógeno y de oxígeno. Debido
a la acumulación de estos gases, la posibilidad de explosión es real.
5. Abra la tapa de la baterìa.
6. Llene la baterìa con agua destilada de acuerdo a las instrucciones del fabricante.
Puesto que las baterìas pueden burbujear rápidamente mientras estan siendo cargadas, rellene sólo con agua destilada después de que el proceso de igualación sea
completado y el voltaje volverà a la normalidad.
7. La baterìa no deberìa tener carga durante el proceso de igualaciòn.
8. Enchufe en el cargador, la pantalla mostrarà “000” el tipo de baterìa LED por
defecto“gel.”
9. Oprima el interruptor de selector de tipo de baterìa hasta que “wet” se muestre (este
modo solo trabajarà si el tipo de baterìa seleccionado es “wet”).
10.Elija el ìndice de carga correcta y encienda la carga. Puedes reviser el voltaje de la
baterìa oprimiendo su botòn. Esto dispararà el botòn de indicador de voltaje de la
baterìa.
11.Oprima el botón de Equalize en cualquier momento y la batería se iniciará automáticamente para igualar, pero en 2 amperios de corriente limitada. Para oprimir el botòn
de receso, necesitaràs un pequeño pasador o bolígrafo.
12.La temperature debe ser revisada cada hora y palpada. Si al palparla la baterìa esta
muy caliente, detenga la carga y deje que se enfrìe.
13.El voltaje aumenta, pero no más de 15.3V a 16.2V (2,55 - 2.7V por célda). Dependiendo de la temperatura ambiente, se ajustará automáticamente.
14.La “wet” LED parpadea mientras el cargador se encuentra en modo de equalize.
15.La lectura digital mostrarà “FUL” cuando el proceso de igualación se complete.
16.El proceso de igualaciòn puede tomar entre 2 a 6 horas para completarse.
REVISE EL ALTERNADOR DE VOLTAJE: no trabajarà en modo de carga normal. Solo
trabajarà en modo stand-by cuando la pantalla LED muestre “000” o un patròn
de circulaciòn.
PARTE 1: No carga (Apague todo los accesorios del vehìculo): La baterìa debe ser cargada al màximo àntes de examinar el alternador. Prenda el motor el tiempo suficiente
para alcanzar la velocidad normal y verificar si hay voltaje sin carga.
1. OPRIMA y mantenga el alternador durante 5 segundos para empezar a revisar.
2. El ALTERNADOR GOOD LED se iluminarà para indicar que el alternador es bueno,
o el FAULT CODE F07 se mostrará para indicar que el alternador no es bueno,
– 21 –
3. Oprima el botòn de revision del alternador otra vez para detener la prueba.
PARTE 2: Mènos Carga (Accesorios ENCENDIDOS): A continuación, carga el alternador encendiendo el mayor número posible de accesorios (excepto para A/C y limpiaparabrisas).
1. OPRIMA y mantenga el alternador durante 5 segundos para empezar a revisar.
2. EL ALTERNADOR GOOD LED se iluminarà para indicar que el alternador es bueno,
o el FAULT CODE F07 se mostrará para indicar que el alternador no es bueno,
3. Oprima el botòn de revision del alternador otra vez para detener la prueba
Si el primer alternador check indica que es un buen alternador y el segundo indica que
es un mal alternador, el problema podría derivarse de: correa del ventilador, una falla en
el diodo intermitente o una posible mala conexiòn entre la batería y el alternador y / o
en la toma a tierra.
NOTA: El botòn BATTERY VOLTAGE esta desactivado en modo alternador check.
NOTA: Puede ser que alguien ha añadido una serie de accesorios cargas sobre el
sistema de carga, lo que aumenta la demanda actual del alternador.ASEGURESE
QUE EL ALTERNADOR CLASIFICA SEGÚN LO REQUERIDO.
NOTA: Este control puede no ser exacto para cada marca, el fabricante y el modelo
del vehículo. Aquí una amplia variación en las cargas eléctricas de usuario controlados, de poner alternador de salida y el cableado. Otros factores inclùyen el estado de
la baterìa, temperatura, marcha lenta. Se recomienda reviser su alternador cuando
se conoce que funciona correctamente para verificar que esta revisiòn es valedera
para tu vehìculo particular. Revìse solo sistemas de 12V. Revisar sistemas de
24 o 36V dañarà el cargador.
ENCENDIENDO EL MOTOR
La function de encendido de motor puede proveer 75 ampeios para el arranque
del motor.
Procedimiendos en el encendido del motor:
1. Establezca el ìndice de carga en 25 amperios.
2. Cuando la pantalla digital muestre 25 amps, prima el 75 amps para encender el motor.
3. La pantalla digital empezarà el conteo, empezando en 999 a 000.
4. Una vèz el conteo alcanze 000, la pantalla empezarà a destellar 000, significa que el
cargador esta listo para funcionar.
5. El cargador entregarà 75 amps por 5 segundos. Luego el cargador entrarà en modo
standby 000.
6. Durante este tiempo, manualmente el cargador puede estar listo para cualquier ìndice de carga y después de 4 minutos, el procedimiento de arranque de motor puede
repetirse si es necesario.
MANTENIMIENTO
Con un mantenimiento mìnimo, el Power Wizard FarmPro™ 40 2/10/25 Cargador de
Baterìa de Amperaje Inteligente proporcionarà años de servicio confiable. Siga estos
pasos simples para mantener el cargador en condiciones òptimas.:
• Despuès de cada uso, limpie las abrazaderas del cargador de baterìa – cercioresè de
quitar todo lìquido de la baterìa que causarà corrosiòn en las abrazaderas de cobre.
• Limpie el exterior de la caja con un paño suave, de ser necesario, con una soluciòn de
jabòn.
• No deje que le entre lìquido al cargador. No manipule cuando el cargador estè hùmedo.
• Mantenga los cables del cargador enrollado durante el almacenamiento para evitar
daños en las cuerdas.
• No use el cargador si cables o abrazaderas han sido dañadas de cualquier forma– llame a Power Wizard sin cobrar al (800) 866-2161 reemplaze cables y abrazaderas.
– 22 –
LOCALIZACIÒN Y SOLUCIÒN DE PROBLEMAS – DEFECTO LED LIT
Las siguientes condiciones pueden causar las FAULT CODES para ser mostradas:
• Pobre conexiòn a la baterìa (o armado).
• Carga ràpida – disminuye el ìndice de carga – oprima el botòn 2/10/25 amp para
ìndices màs bajos.
• Carga muy lenta – la baterìa es grande y no completarà la carga en 24 horas – oprima
2/10/25 amp para aumentar el ìndice de carga.
• Cortocircuìto en celda de baterìa – reemplaze la baterìa (F01).
• Abra la celda de la baterìa – reemplaze la baterìa (F03).
• Polaridad inversa (F06) – desconecte AC luego invierta la ubicación de las
abrazaderas en la baterìa y arme.
• Recalentamiento interno en el cargador – asegùrese que la ventiladora no este
bloqueada (F05).
CELDA DE BATERÌA INTERNA (F01)
•
•
Si la batería que está siendo cargada tiene un cortocircuito interno de la célula, el
FAULT CODE F01 se mostrará.
Si FAULT CODE se muestra, Power Wizard recomienda llevar su baterìa a un centro de
servicio automotriz certificado para su revisiòn.
BATERÌA NO ACEPTA CARGA
•
•
•
•
Aseguresè que el cargador este enchufado en “vivo” a la salida 110/120VAC y Power
LED este iluminado.
Desenchufe el cargador y comprobar las conexiones de la batería - asegurarse de que
haya una buena conexión a la terminal de la batería y / o al chasis del vehículo.
Verifìque que el ìndice correcto de carga ha sido seleccionado mientras esta siendo
cargada.
Asegúrese de que tiempo suficiente de carga fuè permitido para la revisiòn de la tabla
de la página siguiente para aproximar tiempos de carga.
NOTA: El cargador no funciona con baterìas menor a2.0 volts. Si una baterìa de 12
Voltios esta debajo de 2 voltios es probable que haya un corte, se abra o sulfatèe y
deberia ser reemplazada.
BATERÌA MUY FRÌA
Si la baterìa a ser cargada esta extremadamente frìa (con temperatures bajo cero – 0˚C
/ 32˚F) no puede recibir un ìndice alto de carga, entonces el ìndice de carga inicial serà
lento. El indice de carga se incrementarà cuando la baterìa vaya calentando.
PELIGRO: NO INTENTAR CARGAR UNA BATERÌA CONGELADA
TIEMPOS DE CARGA
El Power Wizard FarmPro™ 40, un llenado automàtico Cargador de Baterìa Inteligente,
ajustará automáticamente el ìndice de carga como la batería vuelve hacer cargada se
detiene la carga cuando la batería está completamente cargada. Para las estimaciones
de tiempo que toma cargar una batería, para màs detalles remìtase a la siguiente tabla.
Ciclos serios de las baterías pueden necesitar más tiempo de carga. Se recomienda
repetir el ciclo de carga por segunda vez, a partir del ìndice 2 AMP.
En el siguiente cuadro se convierten lecturas de hidròmetros en valores porcentuales
de carga.
Remìtase al cuadro mostrado debajo para tiempos aproximados de carga.
PESO ESPECÌFICO (LECTURA
DE HIDROMETRO)
1.265
1.225
1.190
1.155
1.120
PORCENTAJE DE
EN LA BATERÍA
100%
75%
50%
25%
0%
– 23 –
PORCENTAJE DE CARGA
POR BATERÌA
0%
25%
50%
75%
100%
Los tiempos mostrados en el gráfico de arriba son aproximados y se refieren a un promedio de baterías automotrices. Para baterìas màs pequeñas, el tiempo de carga debe ser
ajustado usando la fòrmula vista debajo y añadiendo 1 hora al tiempo calculado.
Para estimar el tiempo de carga de una batería descargada, dividir los amperios hora
(aH) ìndice de la batería por el ìndice de carga seleccionado. Este es el nùmero de horas
necesarias para recargar la baterìa. Por ejemplo, una baterìa 50 aH (12 volt) es descargada (10 volts). Cuànto tiempo deberìa ser cargado en el ìndice de 10 amperios? Divida
los 50 aH por 10.
Respuesta: 5.5 horas. Siempre redondèe el tiempo de carga un 10% para asegurar una
carga màxima. En la mayoria de los casos, el tiempo de carga de la baterìa varaiarà
dependiendo de la edad y el estado de la baterìa. Las baterìas màs pequeñas deberian
ser cargadas con un ìndice màs bajo (2 amperios) y adicionar una hora extra al tiempo
de carga.
PORCENTAJE DE CARGA
2 AMPS
10 AMPS
25 AMPS
75%
6.5 HRS
1.8 HRS
0.8 HRS
50%
12 HRS
3 HRS
1.4 HRS
25%
NR*
4.5 HRS
2 HRS
0%
NR*
6 HRS
2.7 HRS
*No recomendado
GUARANTÍA DEL POWER WIZARD, INC. / FARMPRO
GARANTÍA DE LA SATISFACCIÓN DE 30 DÍAS
FARMPRO garantia su satisfacción completa con este cargador de batería. Si usted no está satisfecho
con este producto, usted puede volver el cargador de batería al lugar original de la compra en el plazo
de 30 días de la compra para un reembolso completo. La prueba de la compra se requiere para un
reembolso completo.
garantía limitada
AgraTronix autoriza este cargador de batería al comprador original por un período de doce (12) meses
a partir de la fecha de la compra, cuando está instalado y utilizado de acuerdo con las instrucciones
de instalación incluidas. Usted debe conservar su recibo para la prueba de la compra. Esta garantía
cubre defectos en materiales y la ejecución al cargador de batería.
TÉRMINOS QUE SE APLICAN A LA GARANTÍA
La instalación, el uso erróneo, la negligencia y el tratar de forzar incorrectos de la clase no se cubren
bajo la garantía 30-Day o garantía limitada. No se expresa ni se implica ninguna garantía con excepción del antedicho. Las garantías implicadas del merchantability y de la aptitud para un uso particular
se niegan por este medio a menos que la ley imposibilite específicamente esta negación. El fabricante
y el vendedor no tendrán ninguna responsabilidad por daños, fortuito o consecuente, resultando de o
causado por ninguna falta, malfuncionamiento o defecto de ningún producto.
La obligación única de AgraTronix será limitada para reparar o reemplazo, en su opción, del cargador
de batería o la pieza defectuosa y la vuelta pagada por adelantado al dueño.
PARA HACER UNA DEMANDA DE LA GARANTÍA
1. Primero desconecte el cargador de batería de fuente de energía.
2. Una una nota con su remite conocido, número de teléfono y breve descripción del problema.
3. Embale el producto cuidadosamente en cartón de gran tamaño con el periódico machacado para
amortiguar.
4. Su producto se debe enviar pagó por adelantado y aseguró contra pérdida o daño del envío.
5. Antes de volver el producto bajo garantía, usted debe llamar a mago de la energía en (800) 8662161 para obtener un número de vuelta de la autorización de las mercancías y una dirección del
envío para el centro de servicio que procesará la vuelta. El número de RGA debe acompañar el
producto vuelto.
POWER WIZARD, INC. • FARMPRO
10375 State Route 43, Streetsboro, OH 44241 USA
800-866-2161 • 330-562-2222
http://www.agratronix.com
– 24 –