1
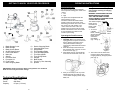
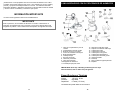
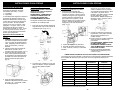
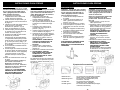
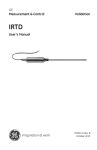
FOOD PREP CENTER
PROCESADOR DE ALIMENTOS
OWNER’S MANUAL
MANUAL DEL PROPIETARIO
Model/Modelo KP81S
120V., 60Hz., 800 Watts
EURO-PRO Operating LLC
Boston, MA, 02465
1 (800) 798-7398
www.euro-pro.com
COPYRIGHT© EURO-PRO OPERATING LLC 2008
IMPORTANT SAFEGUARDS
Read Instruction Manual Before Use
When using electrical appliances, basic safety precautions should always be
followed, including the following:
9. Do not use outdoors.
10. Do not let cord hang over edge of
table or counter or touch hot
surfaces.
11. Keep hands and utensils away
from moving blades or discs
while processing food to reduce
the risk of severe injury to
persons or damage to the food
processor. A scraper may be
used but must be used only when
the food processor is not running.
12. Blades are sharp. Handle
carefully. When handling the
chopper blade always hold it by
the plastic hub.
13. To reduce the risk of injury, never
place cutting blades or discs on
the base without first putting bowl
properly in place.
14. Be certain cover is securely
locked in place before operating
appliance.
15. Never feed food by hand. Always
use food pusher.
16. Do not attempt to by-pass the
cover interlock mechanism.
17. Always operate food processor
with the cover in place.
1. Read all instructions before using
the appliance. It is suggested
that you keep these instructions
in a safe place for future
reference.
2. Your voltage must correspond to
the voltage printed on the bottom
of the appliance.
3. To protect against electrical
shock, do not immerse the motor
housing (base), cord, or plug in
water or other liquid.
4. Close supervision is necessary
when the appliance is used by or
near children.
5. Unplug appliance from outlet
when not in use, before putting
on or taking off parts and before
cleaning.
6. Avoid touching moving parts at
all times.
7. Do not operate the appliance with
a damaged cord or plug, or after
the appliance malfunctions, has
been dropped or damaged in any
manner. Return the appliance to
EURO-PRO Operating LLC for
examination, repair, electrical or
mechanical adjustment.
8. The use of attachments including
canning jars not recommended
by the manufacturer may cause
fire, electric shock or injury to
persons.
Congratulations! As the owner of a new Quad-Blade Food Processor, you are about
to use a very versatile and powerful kitchen appliance that will quickly become an
indispensable item in your kitchen. All our products are engineered to meet the
highest quality standards and are designed to offer the ultimate in ease of operation
and convenience.
IMPORTANT INFORMATION
Please read all the following instructions carefully.
IMPORTANT
For your protection, this Food Processor has a been fitted with a safety interlock
switch. The unit cannot run unless the food processor lid is locked in place. Never
attempt to defeat the food processor lid interlock.
IMPORTANT NOTICE
This appliance has a polarized plug (one blade is wider than the other). To
reduce the risk of electrical shock, this plug will fit in a polarized outlet only
one way. If the plug does not fit fully in the outlet, reverse the plug. If it still
does not fit, contact a qualified electrician. Do not modify the plug in any way.
SAVE THESE INSTRUCTIONS
FOR HOUSEHOLD USE ONLY
1
REV. 06/03C
2
GETTING TO KNOW YOUR FOOD PROCESSOR
OPERATING INSTRUCTIONS
Speed Control Dial
Using The Double Chopping Blade
The food processor speed control dial
has two speeds settings plus "Pulse" and
"Turbo".
1 - Low
2 - High
Always disconnect unit from power
source before cleaning or changing
accessories.
WARNING: USE EXTREME CAUTION
WHEN HANDLING THE BLADES.
THEY ARE EXTREMELY SHARP.
ALWAYS REMOVE CHOPPING BLADE
COVERS BEFORE USING.
The speed can be adjusted while the
food processor is in use.
Use of the Pulse/Turbo button allows
greater control over the texture of the
food being processed. Use "Pulse" when
the unit is in the "Off" position. Use
"Turbo" when the unit is in the "On"
position and you need a burst of power.
Please note that the "Pulse" and "Turbo"
is only intended to be used for short
"bursts" of processing.
The double chopping
blade may be
used with one
Fig. 2
blade or with
two blades.
1. To use as
a double
Double
blade, carefully
slip the separateMain Blade Blade
blade over the
shaft of the
main blade.
(Fig. 2 & Fig. 3)
Operating the Food Processor
1.
2.
3.
4.
5.
6.
7.
8.
9.
10.
11.
Blade Storage Cover
Blade Storage
Blade Access Button
On/Off Speed Control
Pulse/Turbo Button
Main Unit
Spindle
Processor Bowl
Processor Lid
Food Pusher
Main Chopping Blade
12.
13.
14.
15.
16.
17.
18.
19.
20.
21.
22.
Double Chopping Blade
Chopping Blade Cover
Dough Blade
Thin Shredding Blade
Thick Shredding Blade
Thin Slicing Blade
Thick Slicing Blade
Whipper
Blade Holder
French Fry Disc Assembly
Spatula
IMPORTANT: Remove protective blade cover(s) before use. Protective
blade covers to only be used for storage.
Fig. 3
Two Blades
Together
2. Then insert onto the shaft of the
processor bowl. Always hold the
chopping blade by the upper plastic
part. (Fig. 4)
Fig. 1
5. Now you are ready to use any of the
attachments that come with the unit;
i.e. the double chopping blade, dough
blade, etc.
Technical Specifications
Voltage:
Power:
Capacity:
Setting up:
1. CAUTION: Make sure that the unit is
unplugged from the power source and
the the Speed control dial is in the
"Off" position before inserting or
removing any attachments and before
cleaning.
2. Place the food processor bowl onto
the processor body. There is no need
to turn the bowl. (Fig. 1)
3. When fitted correctly, the handle will
fit into the slot at the base of the unit.
Fig. 4
120V., 60Hz.
800 Watts
6 Cups (1.5 Liters)
3
4
OPERATING INSTRUCTIONS
OPERATING INSTRUCTIONS
8. Keep hands and utensils away from
the cutting blade while chopping
food., to reduce the risk of severe
injury to persons or damage to the
food processor. A scraper may be
used, but ONLY when the food
processor is NOT running and has
been unplugged. Never feed food by
hand. Always use the food pusher.
(Fig. 7)
Using The Double Chopping Blade
(Cont.)
3. Place ingredients to be processed in
the bowl.
4. Then holding the processor lid by the
feeding tube, place the processor lid
onto the bowl and turn counter
clockwise to lock the lid in place.
Ensure that the lid tab has "clicked"
into place and that the arrow on the
lid is aligned with the dot on the unit.
(Fig. 5 & Fig. 6)
Fig. 7
Fig. 6
Fig. 5
9.
When finished processing the
ingredients, remove the processor lid
by turning clockwise.
10. Remove the chopping blade first
before removing the processed food.
FOR SAFETY, ALWAYS USE THE
FOOD PUSHER WHEN PUTTING
FOOD INTO THE THE FEEDER TUBE.
NEVER FEED BY HAND.
11. Do NOT leave the appliance
unsupervised when it is in the "ON"
position.
5. Insert food pusher.
6. Plug the processor into a wall outlet.
7. Turn the speed control dial to the
desired speed setting.
PROCESSING EXAMPLES WITH THE DOUBLE CHOPPING BLADE
The processing times indicated below are approximate and also depend on the
quantity of the food to be processed and the degree of fineness you require.
RECOMMENDED
PRODUCT
QUANTITY
OPERATION TIMES
SPEED
Meat*
24.5 oz / 700 gr.
High/Turbo
15 - 30 seconds
Onions
24.5 oz / 700 gr.
Low
15 - 30 seconds
Nuts
21 oz / 600 gr.
High
15 - 30 seconds
Fish*
24.5 oz / 700 gr.
Pulse
15 - 30 seconds
Cheese
24.5 oz / 700 gr.
Pulse
15 - 30 seconds
Liquids (soups)
24.5 oz / 700 gr.
Pulse
20 seconds
Carrots
24.5 oz / 700 gr.
pulse
40-50 seconds
Bread
4 slices
Low
40 - 50 seconds
Apples
24.5 oz / 700 gr.
High
10 - 30 seconds
Parsley
Max 4 bunches
High/Turbo
10 seconds
Mayonnaise
Max 4 cups/1 liter
High
30 seconds
* Always allow food to cool before placing in the bowl.
* Remove all bones before processing.
5
Dough Blade
Slicing & Shredding Blades
CAUTION: Make sure that the unit is
unplugged from the power source and the
operating button is “OFF” before
inserting or removing attachments.
1. Make sure that the blade storage cover
is closed during use.
2. Fit the processor bowl and spindle as
described previously on page 4.
3. Fit the dough blade over the spindle and
press firmly into place. (Fig. 8)
4. Place the ingredients into the bowl.
5. Fit the lid and click into place as
described in the “Setting Up” section
(page 4).
6. Insert food pusher and then plug in the
food processor.
7. Turn the food processor on selecting
high speed. Maximum capacity for
processing dough is based on the
mixture of 21 oz. (600 g.) of flour and
14 oz. (400 g.) of water in order to
obtain 2.2 Lbs. (1 kg.) of dough.
8. Recommended speed for making dough
is high.
9. When it is time to knead the dough,
place speed control dial in the "Off"
position and pulse until the dough is
ready.
10. Remove the blade from the bowl before
removing the dough.
WHEN KNEADING DOUGH, DO NOT
OPERATE THE MACHINE LONGER THAN
20 SECONDS. AFTERWARDS WAIT AT
LEAST 2 MINUTES BEFORE OPERATING
THE MACHINE AGAIN.
FOR SAFETY, ALWAYS LEAVE THE
PUSHER IN PLACE WHILE OPERATING
THE PROCESSOR.
CAUTION: Make sure that the unit is
unplugged from the power source and
the operating button is “OFF” before
inserting or removing attachments.
1. Make sure that the blade storage
cover is closed during use.
2. Place the blade of your choice on
the blade holder. Inserting the longer
tab on the side of the blade first.
(fig. 9)
3. Press the other end of the blade until
it clicks into place. (fig. 10)
4. Fit the processor bowl and spindle
as detailed on the page 4.
5. Using the finger holes in the blade
holder, fit it over the spindle and
press firmly into place as indicated.
(fig. 11)
WARNING: USE EXTREME
CAUTION WHEN HANDLING
BLADES. BLADES ARE SHARP.
6. Fit the lid and click into place as
described in the Setting Up section
(page 4).
7. Plug in the processor.
8. WARNING: USE THE FOOD
PUSHER TO ADD FOOD INTO
THE PROCESSOR BOWL
THROUGH THE FEEDER TUBE.
Do not overload the food processor bowl.
In one operation, you can process a
maximum of 6 cups (1500 ml) of food.
Fig. 9
Fig. 10
Fig. 8
Fig. 11
6
OPERATING INSTRUCTIONS
Whipper Attachment
French Fry Blade Assembly
CAUTION: Make sure that the unit is
unplugged from the power source and
the speed control dial is in the “OFF”
position before inserting or removing
attachments.
CAUTION: Make sure that the unit is
unplugged from the power source and
the speed control dial is in the “OFF”
position before inserting or removing
attachments.
Note: The French Fry Blade is already
assembled to the blade holder. Do not
try to remove it. (Fig. 14)
1. Fit the processor bowl and spindle
as detailed previously.
2. Using the finger holes in the french fry
blade holder, fit it over the spindle and
press firmly into place as indicated.
(Fig. 15)
WARNING: USE EXTREME
CAUTION WHEN HANDLING
BLADES. BLADES ARE SHARP.
4. Fit the lid and click into place as
indicated in Setting Up section
(page 4).
5. Plug in the processor.
6. WARNING: USE THE FOOD
PUSHER TO ADD FOOD INTO THE
PROCESSOR BOWL THROUGH
THE FEEDER TUBE.
Do not overload the bowl. In one
operation, you can process a
maximum 6 cups (1500 ml) of food.
1. Fit the processor bowl on the unit.
2. Insert the whipper and press firmly into
place. (Fig. 13)
3. Place the ingredients into the bowl.
4. Fit the lid and click into place as
described in the “Setting Up” section
(page 4).
5. Insert the food pusher and then plug in
the food processor.
6. Turn the food processor on selecting
high speed.
7. Recommended speed for whipping
is high.
8. Remove the whipper from the bowl
before removing the whipped
ingredients.
FOR SAFETY, ALWAYS LEAVE THE
PUSHER IN PLACE WHILE OPERATING
THE PROCESSOR.
CLEANING & MAINTENANCE
CAUTION: Make sure that the unit is unplugged from power source and control
button is on “OFF” before inserting or removing any attachments and
before cleaning.
•
•
•
•
•
Re-settable Thermal Safety
Device
Never immerse the unit, cord or plug
in water or any other liquid.
Clean the main unit with a damp
cloth only.
Only the stainless steel blades can
be washed in the dishwasher.
All other parts can be cleaned in
warm sudsy water using regular
dishwashing liquid.
If food has spilled over on to the
main unit, use the pointy end of the
spatula to clean the cracks and
crevices of the base under the food
processor bowl. (Fig. 16)
Your Food Processor has been
designed with a unique safety system
which prevents damage to the unit’s
motor and drive system, should you
inadvertently overload your appliance.
The safety system will automatically cut
the electric power to the appliance
when the device senses an overload or
excessive temperature in the motor or
drive system. Should this occur during
use and the appliance stops
functioning, follow the re-setting
procedure below:
1. Turn the “ON/OFF” speed control
to the “OFF” position
2. Unplug the unit from the wall
receptacle.
3. Remove and empty the processor
bowl. Ensure that no food is
jamming the cutting blades or
attachments.
4. Allow the appliance to cool down
for a minimum of 30 minutes.
5. Re-install the processor bowl and
re-plug appliance in the wall outlet.
6. Proceed to use the appliance as
before. Should the appliance still
fail to operate, turn the “ON/OFF”
speed control to the “OFF” position
and unplug from the wall outlet.
Allow the appliance to cool down
for an additional 1 to 2 hours. After
this time has passed, repeat the
restart procedure, steps 5 and 6
above.
Fig. 16
Hints & Tips:
•
Fig. 15
Fig. 13
•
Fig. 14
Processing Examples
•
•
•
THIN SLICING
THICK SLICING
For thin slicing:
-
For coarse slicing:
-
For fine shredding:
-
For coarse shredding: -
FINE SHREDDING
COARSE SHREDDING
The double chopping blade can be
used for chopping meat, fish,
vegetables, cheese, etc. setting
the speed to maximum.
For finer chopping, increase the
length of time you process.
For coarser chopping, use the pulse
button for a few seconds and monitor
food texture.
Pre-cut larger pieces to make them fit
into the feed tube. When chopping
hard foods (e.g. meat, cheese) cut
into 1 “/2.4 cm cubes.
For shredding, place food horizontally
into the feed tube, for slicing place the
food vertically.
Recommended speed level is High
(Cucumbers, raw potatoes, lettuce, carrots)
Recommended speed level is High
(Cabbage, carrots, onions)
Recommended speed level is High
(Carrots, cucumbers, cabbage)
Recommended speed level is High
(Lettuce, carrots, apples)
7
8
Model KP81S
PAUTAS IMPORTANTES DE SEGURIDAD
ONE (1) YEAR LIMITED WARRANTY
EURO-PRO OPERATING LLC warrants this product to be free from defects in material and
workmanship for a period of one (1) year from the date of purchase when utilized for normal
household use.
If your appliance fails to operate properly while in use under normal household conditions within the
warranty period, return the complete appliance and accessories, freight prepaid. For Customer
Service support, call 1 (800) 798-7398 or visit our website www.euro-pro.com. If the appliance is
found to be defective in material or workmanship, EURO-PRO Operating LLC will repair or replace
it free of charge. Proof of purchase date and $12.95 to cover the cost of return shipping and
handling must be included.*
The liability of EURO-PRO Operating LLC is limited solely to the cost of the repair or replacement
of the unit at our option. This warranty does not cover normal wear of parts and does not apply to
any unit that has been tampered with or used for commercial purposes. This limited warranty does
not cover damage caused by misuse, abuse, negligent handling or damage due to faulty packaging
or mishandling in transit.
This warranty is extended to the original purchaser of the unit and excludes all other legal and/or
conventional warranties. The responsibility of EURO-PRO Operating LLC if any, is limited to the
specific obligations expressly assumed by it under the terms of the limited warranty. In no event is
EURO-PRO Operating LLC liable for incidental or consequential damages of any nature
whatsoever. Some states do not permit the exclusion or limitation of incidental or consequential
damages, so the above may not apply to you.
This warranty gives you specific legal rights, and you may also have other rights which vary from
state to state.
*Important: Carefully pack item to avoid damage in shipping. Be sure to include proof of
purchase date and to attach tag to item before packing with your name, complete address
and phone number with a note giving purchase information, model number and what you
believe is the problem with item. We recommend you insure the package (as damage in
shipping is not covered by your warranty). Mark the outside of your package “ATTENTION
CUSTOMER SERVICE”. We are constantly striving to improve our products, therefore the
specifications contained herein are subject to change without notice.
---------------------------------------------------------------------OWNERSHIP REGISTRATION CARD
FOR CANADIAN CONSUMERS ONLY
Please fill out and mail the product registration card within ten (10) days of purchase. The
registration will enable us to contact you in the unlikely event of a product safety notification. By
returning this card you acknowledge to have read and understood the instructions for use, and
warnings set forth in the accompanying instructions.
RETURN TO EURO-PRO OPERATING LLC, 4400 Bois Franc, St-Laurent, QC, H4S 1A7
KP81S
______________________________________________________________________
Appliance model
______________________________________________________________________
Date purchased
Name of store
______________________________________________________________________
Owner’s name
______________________________________________________________________
Address
City
Prov
9
Postal Code
Printed in Turkey
Leer el manual de instrucciones antes de usar
Al usar artefactos eléctricos siempre se deben tomar precauciones básicas de
seguridad, incluyendo las siguientes :
1. Leer todas las instrucciones
cuidadosamente y ver las
ilustraciones antes de usar este
artefacto. Se sugiere conservar
estas instrucciones en un lugar
seguro para referencia futura.
2. Asegurarse que el voltaje indicado en
la placa de especificaciones en la
parte de debajo de la unidad sea
igual al voltaje de la casa.
3. Para evitar choques eléctricos, no
sumergir la base de esta unidad, el
cordón ni el enchufe en agua u otros
líquidos.
4. Se requiere supervisión estrecha
cuando los niños usan cualquier
artefacto o cuando se opere cerca de
ellos.
5. Siempre desenchufar la unidad del
tomacorriente cuando no esté en
uso, antes de instalarle o
desmontarle piezas o accesorios y
antes de limpiarla.
6. Evitar tocar las piezas movible en
todo momento.
7. No operar artefacto alguno que tenga
el cordón o el enchufe dañado o
después que hubiese funcionado mal
o que se hubiese caído o dañado de
cualquier forma. Devolver la unidad
a EURO-PRO Operating LLC para su
revisión, reparación o ajustes
eléctricos o mecánicos.
8. El uso de accesorios no
recomendados por el fabricante,
incluyendo frascos para conservas,
pueden causar incendio, choque
eléctrico o lesiones personales.
9. No usar en exteriores.
10. No permitir que el cordón cuelgue
del borde de la mesa ni que haga
contacto con superficies calientes.
11. Para reducir el riesgo de lesiones
serias o daños a la unidad,
mantener las manos y los
utensilios alejados de la cuchillas o
discos en movimiento. Se puede
usar un rascador o espátula, pero
cuando la unidad esté apagada.
12. Las cuchillas son filosas.
Manipularlas con cuidado. Al
manipular las cuchillas cortadoras
siempre agarrarlas de la parte
plástica.
13. Para reducir el riesgo de lesiones,
nunca colocar las cuchillas o los
discos portahojas en la base si no
se han instalado antes
adecuadamente en posición en el
tazón.
14. Cerciorarse de asegurar la tapa en
posición antes de operar la unidad.
15. Nunca introducir alimentos a
mano, siempre usar el empujador
de alimentos.
16. No intentar burlar el mecanismo de
seguridad de la tapa.
17. Siempre operar el procesador con
la tapa instalada.
AVISO IMPORTANTE
Para reducir el riesgo de choque eléctrico, este artefacto tiene un enchufe
polarizado (una espiga es más ancha que la otra) y entra en un tomacorriente
polarizado sólo en una forma. Si no entra completamente, inviértalo. Si aún
así no entra, llamar a un electricista calificado para que instale un
tomacorriente adecuado. No modificar el enchufe en forma alguna.
CONSERVE ESTAS INSTRUCCIONES
SÓLO PARA USO DOMÉSTICO
10
REV. 06/03C
¡Felicitaciones! Como propietaria del nuevo Procesador de Alimentos con Cuatro
Cuchillas, ahora puede usted usar este nuevo y muy artefacto que es muy versátil y
potente y que pronto será indispensable en su cocina. Los artefactos de EUROPRO están diseñados y fabricados cumpliendo con las más altas normas de calidad
y ofrecen lo último en facilidad y conveniencia para operar.
FAMILIARIZÁNDOSE CON EL PROCESADOR DE ALIMENTOS
INFORMACIÓN IMPORTANTE
Por favor lea las siguientes instrucciones cuidadosamente.
IMPORTANTE
Para su protección, el Procesador de Alimentos con Cuatro Cuchillas tiene un
interruptor de seguridad para que no funcione a menos que la tapa del tazón esté
asegurada en posición. Nunca intente burlar el dispositivo de seguridad de la tapa.
1. Tapa del compartimiento para la
cuchilla
2. Compartimiento para la cuchilla
3. Botón de acceso a la cuchilla
4. Control de velocidad e interruptor
5. Botón pulsador/turbo
6. Unidad principal
7. Eje porta accesorio
8. Tazón del procesador
9. Tapa del procesador
10. Empujador de alimentos
11. Cuchilla principal para cortar
12.
13.
14.
15.
16.
17.
18.
19.
20.
21.
22.
Segunda cuchilla para cortar
Tapa de la cuchilla de doble hoja
Cuchilla para masa
Cuchilla para corte fino
Cuchilla para corte grueso
Cuchilla para rebanado fino
Cuchilla para rebanado grueso
Elemento batidor
Portahoja
Disco cortador de papas para freír
Espátula
IMPORTANTE: Quite la(s) cubierta(s) protectora(s) de las hojas
antes de usarlas; sólo se deben usar para guardar.
Especificaciones Técnicas
Voltaje:
Potencia:
Capacidad:
120 VCA, 60 Hz.
800 Wats
6 Tazas (1.5 Litros)
Las ilustraciones podrían diferir de los accesorios.
11
12
INSTRUCCIONES PARA OPERAR
INSTRUCCIONES PARA OPERAR
Uso de la Segunda Cuchilla
para Cortar
Dial de Control de Velocidad
El control de velocidad para el
procesador de alimentos tiene dos
velocidades más “Pulso” y “Turbo”.
1 – Low (Baja)
2 – High (Alta)
Siempre desenchufar la unidad del
tomacorriente antes de limpiarla o
cambiarle accesorios.
ADVERTENCIA: TENER MUCHO
CUIDADO AL MANIPULAR LAS
CUCHILLAS PORQUE SON
EXTREMADAMENTE FILOSAS.
La segunda cuchilla puede usarse sola o
montada en la cuchilla principal.
La velocidad puede regularse mientras el
procesador de alimentos está en uso.
El botón Pulsador/Turbo permite mayor
control para la textura de los alimentos
que se procesan. El botón pulsador
“Pulse” se usa con el control en “OFF”
(Apagado). La opción “Turbo” se usa
para reforzar la potencia cuando la
unidad está encendida, en “ON”. Tener
en cuenta que las opciones “Pulse” y
“Turbo” son sólo para uso intermitente
durante el procesamiento.
1. Para usar las dos cuchillas, deslizar la
segunda sobre el eje en la punta de la
cuchilla principal. (Figs. 2 y 3)
Operación del Procesador de
Alimentos
Armado:
1. CUIDADO: Cerciorarse que la unidad
esté desenchufada del tomacorriente
y que el control de velocidad esté en
“OFF” (Apagado) antes de insertar o
sacar los accesorios y antes de
limpiarla.
2. Instalar el tazón del procesador de
alimentos en su base. No es
necesario hacer girar el tazón. (Fig. 1)
3. Cuando el tazón encaje bien en la
base, el asa quedará a la derecha y
la protuberancia en la base del tazón
encajará en la ranura de la parte de
atrás de la base del procesador.
(Fig. 2)
3. Colocar los ingredientes en el tazón.
4. Sostener la tapa del tazón del
procesador por el tubo alimentador y
colocarla en el tazón. Girarla contra el
sentido del reloj para que enganche en
posición hasta que la pestaña de la
tapa enganche en posición y que la
flecha se alinee con el punto de guía en
la base. Insertar los alimentos con el
empujador por el tubo alimentador.
(Figs. 5 y 6)
Cuchilla
Principal
Fig. 7
9. Cuando se termine de procesar los
ingredientes, sacar la tapa del tazón
del procesador girándola en el
sentido del reloj.
10. Primero sacar las cuchillas cortadoras
antes de sacar los alimentos ya
procesados.
POR SEGURIDAD, SIEMPRE USAR
EL EMPUJADOR PARA
INTRODUCIR ALIMENTOS EN EL
TUBO ALIMENTADOR. NUNCA LO
HAGA CON LA MANO.
11. No dejar el artefacto desatendido
cuando esté en operación (con el
control en “ON”).
Fig. 6
Fig. 5
Fig. 2
8. Mantener las manos y los utensilios
alejados de las cuchillas mientras
cortan los alimentos, de lo contrario
se producirán lesiones serias o daños
a la unidad. Se puede usar un
rascador, pero sólo cuando la unidad
no esté operando y se haya
desenchufado. Nunca introducir los
alimentos a mano. Siempre usar el
empujador. (Fig. 7)
Uso de la Segunda Cuchilla para
Cortar (Cont.)
Segunda
Cuchilla
5. Insertar el empujador de alimentos.
6 Enchufar la unidad al tomacorriente.
7. Girar el dial de control a la velocidad
deseada.
Fig. 3
EJEMPLOS DE PROCESOS CON LAS DOS CUCHILLAS CORTADORAS
Los tiempos de proceso indicados a continuación son aproximados y también dependen
de la cantidad de alimentos que se procesen así como el grado de finura que se
requiera.
Las dos cuchillas a la vez
2. Al insertar las cuchillas en el eje del
tazón procesador, siempre agarrarlas
de la sección plástica superior.
(Fig. 4)
Fig. 4
Fig. 1
4. Ahora la unidad está lista para
instalarle cualquiera de los accesorios
que trae; p. ej.: la segunda cuchilla,
la cuchilla para masa.
PRODUCTO
CANTIDAD
VELOCIDAD
RECOMENDADA
TIEMPOS DE
OPERACIÓN
Carne*
24.5 Onz. / 700 gr.
Alta/Turbo
15 a 30 segundos
Cebollas
24.5 Onz. / 700 gr.
Baja
15 a 30 segundos
Nueces
21 Onz. / 600 gr.
Alta
15 a 30 segundos
Pescado*
24.5 Onz. / 700 gr.
Pulso
15 a 30 segundos
Queso
24.5 Onz. / 700 gr.
Pulso
15 a 30 segundos
Líquidos (soups)
24.5 Onz. / 700 gr.
Pulso
20 segundos
Zanahorias
24.5 Onz. / 700 gr.
Pulso
40 a 50 segundos
Pan
4 rebanadas
Baja
40 a 50 segundos
Manzanas
24.5 Onz. / 700 gr.
High
10 a 30 segundos
Perejil
Máx 4 atados
Alta/Turbo
10 segundos
Mayonesa
Máx 4 tazas / 1 litro
Alta
30 segundos
* Siempre permitir que los alimentos se enfríen antes de colocarlos en el tazón.
* Eliminar todos los huesos antes de procesar.
13
14
INSTRUCCIONES PARA OPERAR
Cuchilla para Masa
CUIDADO: Cerciorarse que la unidad
esté desenchufada del tomacorriente y
que el control de velocidad esté en
“OFF” (Apagado) antes de instalar o
sacar cualquier accesorio.
1. Asegurarse que la tapa del
compartimiento de la cuchilla esté
cerrado durante la operación.
2. Instalar el tazón del procesador y el
porta accesorio como se describió en
la página 4.
3. Instalar la cuchilla para masa sobre el
porta accesorio y presionarlo
firmemente en posición. (Fig. 8)
4. Echar los ingredientes en el tazón.
5. Instalar la tapa y hacerla enganchar
en posición como se describió en la
sección “Armado” (Pág. 4)
6. Enchufar la unidad al tomacorriente.
7. Encender el procesador
seleccionando la velocidad máxima.
La capacidad máxima para procesar
masa se basa en una mezcla de 600
gr. (21 Onz.) de harina y 400 gr. (14
Onz.) de agua para obtener 1 Kg. (2.2
Lb. de masa).
8. Se recomienda la velocidad máxima
para hacer masa.
9. Cuando llegue el momento de amasar
la mezcla, apagar la unidad poniendo
el dial de control en “OFF” (Apagado)
y hacerla funcionar con el botón
pulsador hasta que la masa quede
lista.
10. Sacar la cuchilla del tazón antes que
la masa.
CUANDO SE AMASE LA MEZCLA,
NO HACER FUNCIONAR LA
MÁQUINA POR MÁS DE 20
SEGUNDOS A LA VEZ. DESPUÉS
ESPERAR AL MENOS 2 MINUTOS
ANTES DE VOLVERLA A
ARRANCAR. POR SEGURIDAD,
SIEMPRE DEJE EL EMPUJADOR
EN POSICIÓN MIENTRAS SE
OPERA EL PROCESADOR.
INSTRUCCIONES PARA OPERAR
Cuchillas para Rebanar y
Picar/Desmenuzar
CUIDADO: Cerciorarse que la unidad
esté desenchufada del tomacorriente y
que el control de velocidad esté en
“OFF” (Apagado) antes de insertar o
sacar los accesorios.
1. Asegurarse que la tapa del
compartimiento de la cuchilla esté
cerrado durante la operación.
2. Colocar la cuchilla deseada en el
disco portacuchilla insertando primero
el extremo con la aleta más larga.
(Fig. 9).
3. Presionar el otro extremo de la
cuchilla hasta que enganche en
posición. (Fig. 10)
4. Instalar el tazón procesador en el eje
como se detalla en la página 4.
5. Agarrando el disco portacuchilla por
los orificios para los dedos, instalarlo
en el eje giratorio y presionarlo
firmemente en posición como se
indica. (Fig. 11).
ADVERTENCIA: TENER MUCHO
CUIDADO AL MANIPULAR LAS
CUCHILLAS PORQUE SON
FILOSAS.
6. Instalar la tapa y asegurarla en
posición. Ver la sección “Armado”
(página 13).
7. Enchufar la unidad al tomacorriente.
8. ADVERTENCIA: USAR EL
EMPUJADOR PARA AGREGAR
ALIMENTOS AL TAZÓN DEL
PROCESADOR POR EL TUBO
ALIMENTADOR.
No sobrecargar el tazón procesador de
alimentos. En una operación se puede
procesar un máximo de 6 tazas (1,5 L)
de alimentos.
Accesorio Batidor
Cuchillas para Papas Fritas
CUIDADO: Cerciorarse que la unidad
esté desenchufada del tomacorriente y
que el control de velocidad esté en
“OFF” (Apagado) antes de instalar o
sacar cualquier accesorio.
1. Instalar el tazón del procesador en
la unidad.
2. Instalar el accesorio batidor en el
tazón y presionar firmemente en
posición. (Fig. 13)
3. Colocar los ingredientes en el tazón.
4. Colocar la tapa en su posición como
se describió en la sección “Armado”
(Pág. 4)
5. Insertar el empujador de alimentos y
enchufar la unidad al tomacorriente.
6. Encender el procesador y
seleccionar la velocidad alta.
7. Se recomienda usar la velocidad
alta para batir.
8. Sacar el accesorio batidor del tazón
antes de sacar los ingredientes ya
batidos.
POR SEGURIDAD, SIEMPRE DEJAR
EL EMPUJADOR EN POSICIÓN
MIENTRAS EL PROCESADOR ESTÁ
OPERANDO.
CUIDADO: Cerciorarse que la unidad
esté desenchufada del tomacorriente
y que el control de velocidad esté en
“OFF” (Apagado) antes de insertar o
sacar los accesorios.
Nota: Las cuchillas para papas fritas
vienen instaladas en el disco
portacuchilla. No trate de sacarlas.
(Fig. 14)
1. Instalar el tazón y el eje como se
indicó previamente.
2. Agarrando el disco portacuchilla para
papas fritas por los orificios para los
dedos, instalarlo en el eje giratorio y
presionarlo firmemente en posición
como se indica. (Fig. 15).
ADVERTENCIA: TENER MUCHO
CUIDADO AL MANIPULAR LAS
CUCHILLAS PORQUE SON
FILOSAS.
3. Instalar la tapa y asegurarla en
posición. Ver la sección “Armado”
(página 4).
4. Enchufar la unidad al tomacorriente.
5. ADVERTENCIA: USAR EL
EMPUJADOR PARA AGREGAR
ALIMENTOS AL TAZÓN DEL
PROCESADOR POR EL TUBO
ALIMENTADOR.
No sobrecargar el tazón procesador
de alimentos. En una operación se
puede procesar un máximo de 6
tazas (1,5L) de alimentos.
Fig. 15
Fig. 13
Fig. 14
Ejemplos de Procesamiento
Rebanado Fino
Fig. 9
Rebanado fino:
Rebanado grueso:
Picadillo fino:
Picadillo grueso:
Fig. 8
Rebanado Grueso
Picadillo Fino
Se recomienda velocidad alta (pepinillos,
papas crudas, lechugas zanahorias).
Se recomienda velocidad alta (coles,
zanahorias, cebollas).
Se recomienda velocidad alta
(zanahorias, coles, pepinillos,).
Se recomienda velocidad alta (lechugas,
manzanas, zanahorias,).
Fig. 11
15
Picadillo Grueso
Fig. 10
16
MANTENIMIENTO Y LIMPIEZA
CUIDADO: Cerciorarse que la unidad esté desenchufada del tomacorriente y que el
control de velocidad esté en “OFF” (Apagado) antes de instalar o desmontar
accesorios o de limpiar la unidad.
• Nunca sumergir la unidad, el cordón ni
el enchufe en agua ni otro líquido.
• Limpiar la base de la unidad
únicamente con un paño húmedo.
• Las cuchillas de acero inoxidable
pueden lavarse en el lavavajillas.
• Todas las otras piezas pueden lavarse
con agua tibia jabonosa, usando
detergente líquido para vajillas.
• Si se hubiesen salpicado alimentos
sobre la base, usar el extremo
puntiagudo de la espátula para limpiar
las ranuras y rendijas de la base
debajo del tazón del procesador de
alimentos. (Fig. 16)
Dispositivo Térmico Reactivable
de Seguridad
Este artefacto está diseñado con un
sistema de seguridad exclusivo que
impide que el motor y el sistema
propulsor de la unidad se dañen si se
sobrecarga inadvertidamente. El sistema
de seguridad cortará automáticamente el
suministro de corriente cuando detecte
una sobrecarga o exceso de temperatura
en el motor o en el sistema propulsor.
Cuando esto ocurra, seguir el
procedimiento a continuación:
1.
2.
3.
4.
Fig. 16
Consejos Prácticos:
5.
• La segunda cuchilla rebanadora
puede usarse en alta velocidad para
carne, pescado, vegetales, queso,
etc.
• Para trozos más finos, aumentar el
tiempo del proceso.
• Para trozos más gruesos, usar el
botón pulsador por algunos segundos
y observar la textura del alimento.
• Precortar las piezas grandes para
que entren por el tubo alimentador.
Para cortar alimentos duros (por
ejemplo: carne, quesos) precortarlos
en cubos de 2,5 cm. (1”).
• Para picar o desmenuzar, insertar los
alimentos horizontalmente por el tubo
alimentador y para cortar en trozos,
insertarlos verticalmente.
6.
Girar el interruptor/control de
velocidad a “OFF” (Apagado).
Desenchufar la unidad del
tomacorriente en la pared.
Retirar el tazón del procesador y
vaciarlo. Cerciorarse que no haya
comida trabando las cuchillas
cortadoras o los accesorios.
Permitir que el artefacto se enfríe por
un mínimo de 30 minutos.
Reinstalar el tazón del procesador y
volver a Enchufar la unidad al
tomacorriente de la pared.
Continuar operando el artefacto igual
que antes; pero si no arranca, volver
a colocar el interruptor / control de
velocidad en “OFF” (Apagado) y
desenchufar el cordón del
tomacorriente. Permitir que el
artefacto se enfríe por 1 ó 2 horas
adicionales. Después repetir el
procedimiento de arranque y los
pasos 5 y 6 precedentes.
Modelo KP81S
GARANTÍA LIMITADA DE UN (1) AÑO
EURO-PRO Operating LLC garantiza que este artefacto no presentará defectos de materiales ni de
fabricación por un (1) año a partir de su fecha de compra cuando se le da uso doméstico normal.
Si este artefacto dejase de funcionar apropiadamente mientras se encuentre en uso normal doméstico
dentro del periodo de garantía, devolverlo completo con sus accesorios y con flete prepagado. Para
Servicio al Cliente, llame al 1 (800) 798-7398 o visite nuestro sitio Web ww.euro-pro.com. Si EURO-PRO
Operating LLC le encontrase algún defecto de material o de fabricación, EURO-PRO Operating LLC lo
reparará o reemplazará sin cargo. El cliente debe incluir el documento que pruebe la fecha de compra y
un cheque por $12.95 para cubrir el costo de manipuleo, reembalaje y flete de retorno al cliente*.
La responsabilidad de EURO-PRO Operating LLC se limita únicamente al costo de la reparación o al
cambio de la unidad completo, a opción de EURO-PRO Operating LLC. Esta garantía no cubre piezas
sujetas a desgaste normal por su uso y no se aplica a artefacto alguno que haya sido alterado,
intervenido físicamente o usado comercialmente. Esta garantía tampoco cubre daños causados por
maltrato, mal uso, negligencia, o daños por empaquetamiento defectuoso o manipulación en tránsito.
Esta garantía se extiende al comprador original de la unidad y excluye toda otra garantía legal y/o
convencional. La responsabilidad de EURO-PRO Operating LLC, si alguna, se limita a las obligaciones
específicas expresamente asumidas bajo los términos de esta garantía limitada. En ningún caso será
EURO-PRO Operating LLC responsable por daños incidentales o consecuenciales, o de ninguna otra
naturaleza. Algunos Estados no permiten la exclusión o la limitación de daños incidentales o
consecuenciales, por lo que lo antedicho podría no aplicarse a usted.
Esta garantía le otorga derechos específicos y también podría tener otros derechos que varían de un
Estado a otro.
* Importante: Empaque la unidad cuidadosamente para evitar que se dañe durante el transporte.
Antes de empaquetar la unidad, asegúrese de rotularla con su nombre completo, dirección y
teléfono, y de incluir una nota con los datos de la compra, modelo, número de serie y una
explicación de lo que usted cree que sea el problema. Recomendamos asegurar el paquete
(porque los daños durante su transporte no están cubiertos por esta garantía). En el exterior del
paquete, además de la dirección arriba indicada, marque “ATTENTION CUSTOMER SERVICE”.
Somos una compañía que se esfuerza constantemente en mejorar sus productos, por lo que las
especificaciones contenidas aquí podrían variar sin aviso.
………………………………………………………………………………………..
TARJETA DE REGISTRO DE PROPIEDAD
PARA CONSUMIDORES CANADIENSES SOLAMENTE
Llene esta tarjeta y remítanosla por correo dentro de los (10) diez días siguientes a la compra. El registro
nos permitirá contactarlo en el poco probable caso de tener que enviarle una notificación de seguridad. Al
enviar esta tarjeta, usted está aceptando haber leído y entendido las instrucciones para el uso y las
advertencias en el instructivo que se acompaña.
REMITIR A: EURO-PRO Operating LLC, 4400 Bois Franc, St-Laurent, QC, H4S 1A7
KP81S
Modelo de la unidad:_________________________________________________________________
Fecha de Compra: _____________Nombre de la Tienda: ___________________________________
Nombre del Comprador:______________________________________________________________
Dirección: _________________________________________________________________________
17
18
Impreso en Turquía