1
Life's Good
@
@
Sii}
DEHU IDIFIE
Please read this manual carefully before operating
your set and retain it for future reference.
MODELS:LD450EAL
P/NO:MFL63261217
LD451EGL
www.lgappliances.com
FOR YOUR RECORDS
Write the model and serial numbers
here:
Model #
Serial #
You can find them on a label on the side of each unit.
Dealer's
Name
Date Purchased
• Stap(e your receipt to this page in the event you need
it to prove date of purchase or for warranty issues.
READ THIS MANUAL
Inside you will find many helpful
and maintain your dehumidifier
preventive care on your part can
of time and money over the life of
hints on how to use
properly. Just a little
save you a great deal
your dehumidifier.
You'll find many answers to common problems in the
chart of troubleshooting tips. If you review our chart of
Troubleshooting
for service at all.
Tips
first, you may not need to call
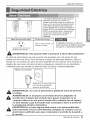
PRECAUTION
• Contact the authorized service technician
for
repair or maintenance
of this unit.
• Contact the installer for installation
of this unit.
• The dehumidifier
is not intended for use by young
children or invalids without supervision.
• Young children
should be supervised
to ensure
that they do not play with the dehumidifier.
• When the power cord is to be replaced, replacement
work shall be performed
by authorized
personnel
only using only genuine replacement parts.
2 Dehumidifier
SafetyPrecautions
Read all instruction
before
using
• To prevent injury to the user or other people and property damage, the following instructions must be followed.
• Incorrect operation due to ignoring instructions will cause harm or damage; the seriousness is classified by the
following indications.
•
,_
WARNING
This symbol indicates the possibility of death or serious injury.
,_
CAUTION
This symbol indicates the possibility of injury or damage to property only.
1
• Meanings of symbols used in this manual are as shown below,
@
Be sure
not to do.
11
•................................................................
O, .................................................................
.....................................................................................
Be sure to follow the instruction,
i!
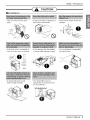
m Installation
• It may cause fire and electric
shock.
@
• It may cause explosion or fire.
-.9@
• It may cause electric shock and
failure.
I ®
[] Operation
• Otherwise, it will cause electric
shock or fire.
• It will cause electric shock or fire.
• It will cause electric shock or fire.
Owner's Manual
3
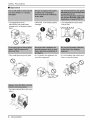
SafetyPrecautions
• It will cause electric shock or fire.
• It will cause electric shock or fire.
• No grounding may cause electric
shock.
• Otherwise it may cause a fire or
an electric shock.
• It may cause fire and electric
shock.
• It may cause electric shock.
• It may cause explosion, fire, and
burn.
• Water may enter the unit and
degrade the insulation. It may
cause an electric shock.
• Since the fan rotates at high
speed during operation, it may
cause injury.
• It will cause machine failure or electric shock.
4 Dehumidifier
Safety Precautions
• Installation
•They are sharp and may cause
injury.
• It may cause failure of appliance or
performance deterioration.
• It may cause electric shock and
damage.
4
@
• It will waste power consumption in
vain and it may cause an accident.
• It may damage the dehumidifier
or cause other damage or injury.
• It is not designed to dehumidify
the entire house.
/ .............
L;,
• It should withstand around
90 Ibs (40kg) of weight.
• The dehumidifier must be
operated in an enclosed area to
be most effective.
Owner's Manual
5
Safety
Precautions
• Operation
• The appearance of the
dehumidifier may deteriorate,
change color, or develop surface
flaws.
• Otherwise, it will cause property
damage.
• Low temperatures could cause
coils to frost.
• It is a general use appliance not
precision equipment.
• It is not sanitary and could cause
illness or personal injury,
,':::_'_-iThinner
• This could injure the pet or plant,
• Operation without filters will cause
failure,
6
Dehumidifier
PriortoOperation
1. Consult an installation specialist for installation.
2. Plug in the power plug properly.
3. Use a dedicated circuit.
4. Do not use an extension cord.
5. Do not start/stop operation by plugging/unplugging the power cord.
6. If the cord/plug is damaged, only replace it with an authorized replacement part.
1. Being exposed to direct airflow for an extended period of time could be hazardous to your
health. Do not expose occupants, pets, or plants to direct airflow for extended periods of time.
2. Ventilate the room when the dehumidifier is used with other heating devices. Otherwise the
oxygen supply may be inadequate.
3. Do not use this dehumidifier for non-specified special purposes (e.g. preserving precision
devices, food, pets, plants, and art objects). Such usage could damage the items.
1. Do not touch the metal parts of the unit when removing the filter. Injuries can occur when
handling sharp metal edges.
2. Do not use water to clean inside the dehumidifier. Exposure to water can destroy the insulation,
leading to possible electric shock.
3. When cleaning the unit, first make sure that the power and breaker are turned off. The fan
rotates at a very high speed during operation. There is a possibility of injury if the unit's power
is accidently turned on while the interior of the unit is being cleaned.
For repair and maintenance, contact your authorized service dealer.
Owner's Manual
7
Instruction
This symbol alerts you to the risk of electric
This symbol
dehumidifier.
This symbol
shock.
alerts you to hazards that could cause harm to the
indicates
special
notes.
WARNING: This appliance should be installed in accordance with national
wiring regulations. This guide acts as a guide to help to explain product
features.
Control
Front Grille
Cabinet
Air Filter
Power Cord
Water Bucket
8
Dehumidifier
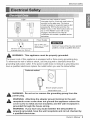
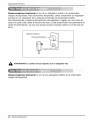
Electrical
Safety
115V~
Power cord may include a current
interrupter device. A test and reset button is
provided on the plug case. The device
should be tested on a periodic basis by first
pressing the TEST button and then the
RESET button. If the TEST button does not
trip or if the RESET button will not stay
engaged, discontinue use of the air
conditioner and contact a qualified service
technician.
Use Wall
Receptacle
Power
_)
Standard
receptacle
delay
Use 15fuse
AMP.or 15
timeAMP.
circuit breaker.
125V, 3-wire
rated
Supply
grounding
15A, 125V
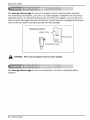
WARNING:
Aluminum house wiring may pose special
problems. Consult a qualified electrician.
AC
This appliance
must be properly
grounded.
The power cord of this appliance is equipped with a three-prong grounding plug.
To minimize the risk of electric shock, use the plug with a standard three-slot
grounding wall power outlet. If the power outlet does not include a grounding slot,
have a qualified electrician replace the outlet before you use the dehumidifier.
Preferred method
Ensure proper ground
exists before use
WARNING: Do not cut or remove the grounding
power plug.
prong from the
WARNING: Attaching the adapter ground terminal to the wall
receptacle cover screw does not ground the appliance unless the
cover screw is metal and not insulated, and the wall receptacle is
grounded through the house wiring.
WARNING: If you have any doubt whether the dehumidifier
is
properly grounded, have the wall receptacle and circuit checked by
a qualified electrician.
Owner's Manual
9
Electrical
Safety
We strongly discourage the use of an adapter due to potential safety hazards.
For temporary connections, use only a UL-listed adapter, available from most local
hardware stores. To disconnect the power cord from the adapter, use one hand on
each to avoid damaging the ground terminal. Avoid frequently unplugging the power
cord as this can lead to eventual ground terminal damage.
Adapter Plug
Temporary method
- Metal Screw
Receptacle Cover
,_
WARNING: Never use the appliance with a broken adapter.
We strongly
hazards.
discourage the use of an extension cord due to potential safety
10 Dehumidifier
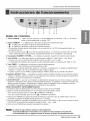
Operating
Instructions
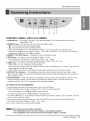
5
CONTROL
1. POWER
PANEL
4
6
1
HAS FOLLOWING
key --- Pressing this key once turns the dehumidifier "ON" and pressing again turns the
dehumidifier "OFF",
2. HUMIDITY keys --- Are used to select the desired humidity setting.
• _ : Used to raise the desired humidity setting.
• @ : Used to lower the desired humidity setting.
• The desired humidity can be selected within a range of 35% to 70% RH in increments of 5%,
• ffyou press the @ key once again at 35%RH, "On" mode is selected. In "On" mode the unit operates
continuously, regardless of humidity conditions,
3. HUMIDITY SETTING display --- Displays the selected humidity setting.
4. SPEED key --- is used to set the fan speed as "High" or "Low",
• Pressing this key changes the fan speed from High ----_
Low ----_
High.
• The selected fan speed is indicated by indicator lights marked "High" and "Low".
5. TIMER key --- It is used to select the type of operation.
• Select either 2 or 4 hr. On/Off for cycled operation.
In this case the unit will run for 2 or 4 hours, and then shut off completely for 2 or 4 hours. The cycle will
repeat until you change the setting.
• When TIMER key is pressed, the TIMER indicator lights shift from 2hr.On/Off to 4hr.On/Off.
6. BUCKET FULL Indicator --- This light glows when the bucket is full and needs to be emptied. It also
glows, when the bucket is not properly positioned. When bucket full indicator light glows, the compressor
and fan will turn "OFF".
7. AUTO RESTART --- Once the power is restored after a power outage, the unit begins to operate at its
previous operation setting. The fan will run by default for 3 minutes. After 3 minutes both fan and
compressor will be ON or OFF depending on the humidity conditions.
TO OPERATE
THE DEHUMIDIFIER:
1. Plug the power cord into the electrical outlet. Press the POWER key.
2. Set the Humidity control anywhere between 35% to 70% for normal operation.
• For less humidity, press the @ HUMIDITY CONTROL key.
• For higher humidity, press the @ HUMIDITY CONTROL key.
3. Press the TIMER key, to set the amount of time for which you want the unit to cycle On and Off. The time
can be set for 2 hours or 4 hours.
4. If you want to change the fan speed, press the FAN SPEED key. Each time the FAN SPEED key is
pressed the fan speed changes as High ---_Low ----_
High.
5. Press the POWER key to stop the unit manually.
Water bucket must be properly installed.
• The dehumidifier will not run if the bucket is not properly installed.
• The dehumidifier shuts off when the desired humidity setting is reached.
Owner's Manual
11
Operating
Instructions
The dehumidifier will turn off automatically when the bucket is full,
or when the bucket is removed or not replaced in the proper
position.
The bucket must be replaced in the proper position for the
dehumidifier to work. The light will be on and the
dehumidifier will not run if the bucket is not in the proper
position,
Water level
control switch
1. Empty the bucket manually.
When the bucket is full, pull out by
grasping the handle and empty it
into a large sink or tub and then
replace it properly.
2. Attach
a length of garden hose to the threaded drain hose
connection to carry water to the drain.
HOSE
CONNECTOR
1. Connect a garden hose to the
threaded drain hose connector.
(Fig1)
Fig1
DRAIN
HOLE
Donot removewhile
COVER
Fig2
operatingthedehumidifier.
2. Remove the drain-hole cover.
It can causewater to drop onthe
(Fig2)
base panor thefloor.
Emptythe bucketwhen the indicator
light turnson.
3. Push hose connector tightly into CONNECTOR
HOSE
It is advisableto carry the
the drain-hole on Rear Grille.
Remove the bucket to ensure the
bucketby supportingit from the
hose connector connecting with
bottomas well as by the handle.
the drain pipe on the drain pan.
Carryingby onlythe handlemay
(Fig3-1,3-2)
causethe handleor bucketcoverto
Fig3-1
DRAIN
break.
PAN
Fig4-1
Fig4-2
4. Press the hose down and make
sure the "Arrow" is pointing upward.
(Fig4-1,4-2)
5.The connection should be resemble
Fig5 when complete.
TAKE OUT
Thehoseattachmentwill
accept a standardgardenhose
fitting.
Donot overtightenthe hosewhen iNSERT
STOPPER
connectingit to the hoseconnector, iNTOSLOT
Fig5
usea rubber washerand tightenby
handfirmly without strippingthe
plasticthreads.
Whenbeingattachedto hoseconnectordrainhoseconnection,
do notbendor kinkthehose.
Thehoseshouldfieflatfromthe dehumidifier
tothedrain.
12 Dehumidifier
Installation
• Use the dehumidifier in a
basement to help prevent
moisture damage.
• Use the dehumidifier in laundry
drying, bathing, and dishwashing
areas which have excessive
moisture.
• Use the dehumidifier to prevent
moisture damage where books
are stored.
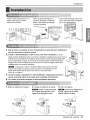
1, Allow at least 12 inches of space on all sides of the unit for good air circulation.
2, Install your dehumidifier
J_
on a floor, table, or shelf. When installing the dehumidifier
on a table or shelf, make sure the table or shelf is strong enough to support the weight
of the dehumidifier with a full bucket, Do not sit or stand on the dehumidifier.
Secure wheels with blocks to prevent unit from falling when installed on a table or shelf.
The height of a table or shelf might provide a better position from
which to handle the bucket and help prevent icing of the coils due to
colder air near the floor (such as in a basement.)
3, Lift the bucket and place it in the dehumidifier, making sure the slots on
the bottom side of the bucket are positioned
correctly.
4, Rollers let you move the dehumidifier easily.
1, Pull out the bucket cover.
2, Brush off the residue in the bucket. 3, Close the cover.
Clean the bucket by
wiping with a cloth dampened
in a mild detergent solution,
_
Push the tabs on the top
of the bucket when installing
the bucket.
Owner's Manual
13
Maintenance
Your dehumidifier is designed to serve you yearround. It needs practically no attention. However,
you should check your dehumidifier annually,
Electrical Shock Hazard
You may want an Authorized Service Center to
perform this annual checkup. (Cost of the inspection
is the owner's responsibility.)
• Disconnect power supply cord from receptacle
before performing any maintenance.
• Be careful when cleaning the coils.
Fins are sharp.
Failure to follow the above precautions could result
in electrical shock or personal injury.
Cleaning the front case, bucket
and cabinet
Clean the front case and the cabinet with a soft
cloth, warm water, and a mild detergent.
Clean the grille with a vacuum attachment or brush.
Do not use bleach or abrasives.
Cleaning
the air filter
-__-_..
1. Remove water bucket from the cabinet,
Pull out the air filter as shown above.
2. Wash air filter with warm water and a mild
detergent. Rinse and dry it.
Replace it in place.
14
Dehumidifier
Maintenance
and Service
The dehumidifier may be operating abnormally when:
• Make sure the dehumidifier plug is pushed
completely into the outlet.
• Check the house fuse or circuit breaker box
and replace the fuse or reset the breaker.
Dehumidifier
does not start
• The dehumidifier automatically turns off
when this occurs. Empty the bucket.
• Make sure the bucket is in the right place.
• Change the humidity set to lower limits.
• When first installed, allow at least 3 or 4
days to maintain the desired dryness.
• Make sure there are no curtains, blinds or
furniture blocking the front or back of the
dehumidifier.
Dehumidifier
does not dry the
air as it should
• Press the '_ Humidity Control button to
lower the humidity.
• Check that all doors, windows and other
openings are securely closed.
• Install the dehumidifier away from the dryer.
The dryer should be vented to the outside.
• The unit will not operate satisfactorily if the
room temperature is below 65°F(18 °C).
• The low temperature model will continuously
)erature of 42°F
Dehumidifier
too much
Frost appears
the coils
runs
on
Fan noise
• Check with your dealer to see if the capacity
_i_s_a_
_d_e_q_u
ate.
• Close all doors and windows to the outside.
• This is normal. Frost will usually disappear
within 60 minutes.
• This is normal.
• Check the hose if one is attached.
Water on floor
• See Removing
Bucket.
and Emptying The Water
Dehumidifier
• Change
the humidity setting.
operates
continuously
• Change
the humidity setting.
Humidity Key not
operates or
Dehumidifier powers
on automatically after
power off
Display show"67,24"
• Keep room temperature
above
32°F(0°C).
• Make sure the dehumidifier powers off,then
contact with LG Customer Information Center.
Owner's Manual
15
PARA SUS REGISTROS
Escribaaqui el eOmerodemodetoy serie:
Modelo
#
Serie #
Puedeencontrarlosen laetiquetasituadaen el lateralde cadaunidad.
Nombre
del distribuidor
Fecha de compra
• Grapesu recibo enesta paginapersi Io necesitapara comprobarla
fechade comprao temas relacionadosconla garantia.
)LEA
ESTE MANUAL
En su interior encontraramuchosconsejos Otilessobre la utilizaci6n
yet mantenimiento adecuado de su deshumidificador. Una simple
atenci6n preventiva per su parte puede ahorrarle mucho tiempo y
dineroa Io largo de lavida de su deshumidificador.
Encontrar_muchas respuestasa los problemasmas comunes en el
cuadro de consejospara la solucidnde problemas.Si en primerlugar
revisa nuestro cuadro de consejospara la solucionde problemas,
es posibleque notenga necesidadde Ilamarat servicioteceico.
PRECAUClON
• Pongase en contacto con un tecnico del servicio
autorizado para las reparaciones o el mantenimiento
de esta unidad.
• Pongase en contacto con un instalador para la
instalaci6n de esta unidad.
• El deshumidificador no esta disehado para que Io
utilicen sin supervisi6n nihos o personas con las
facultades mentales mermadas.
• Debe vigilarse a los nihos para asegurarse de que no
juegan con el deshumidificador.
• Cuando haya que sustituir el cable de alimentacion,
debe realizar el trabajo de sustituci6n personal
autorizado utilizando _nicamente piezas de recambio
originales.
16 Deshumidificador
Precauciones
deseguridad
LEA ESTAS
!NSTRUCC!ONES
ANTES
DE USAR
• Para evitar lesiones al usuario o a otras personas y da_os materiales, debe seguir las siguientes instrucciones.
• El uso incorrecto ocasionado al ignorar las instrucciones puede causar lesiones o daSos. La gravedad se
clasifica mediante las siguientes indicaciones.
,_
ADVERTENCIAeste simbolo indica la posibilidad de muerte o lesiones graves.
-']
!
•
,_
ATENCION
estesmboo
ndoa aposb
dadde esonesodai_ossSomateraes
• A continuacidn se muestran los significados de los simbolos utilizados en este manual.
®
0
• .............................................................................................................................................................................
!...............................................................................................
[] Instalacidn
• Podria producirse un incendio y
una desc.argaelectrica.
• Podda producirse una explosiSn o
incendio.
• Puede causar una descarga
electrica
®
[] Funcionamiento
• De Io contrario, puedeocasionar
un incendio o una descarga
electrica.
• Causara una descarga electrica
o incendio
• Podria producirse una descarga
electrica o incendio.
Manual de usuario
17
Precauciones
de seguridad
• Causara una descarga electrica o
incendio,
• Causara una descarga electrica o
incendio.
• Si no hay toma de tierra, podria
producirse una descarga
electric&
• De Io contrario, puede ocasionarun
incendio o una descarga electric&
• Podria producirse una descarga
electrica o incendio.
• Puede causar una descarga
electrica o incendio.
• El agua podria introducirse en la
unidad y degradar el aislamiento,
Podria producirse una descarga
electric&
• Como el ventilador gira a alta
velocidad durante el
:4
• Podria producirse una explosion,
incendio y quemaduras.
\,\
• Causara fallo de la maquina o descarga electrica.
18
Deshumidificador
funcionamiento, podrian
producirse lesiones.
@,
Precauciones
de seguridad
• Instalacion
• Son afiladas y pueden producir
lesiones.
• Puede causar fallas de aplicaciOn
o deterioro en su rendimiento.
• PodrJa producirse una descarga
electrica o darlos.
• Se gastar,:i el consumo electrico
en vano y puede causar
accidentes.
• PodrJadanarse el
• No esta disenado para enfriar la
casa entera
• El peso a soportar es de
aproximadamente 90 libras
(40 kg).
• Para una mayor eficacia, el
deshumidificador debe utilizarse
en una zona cerrada.
deshumidificador o producir otros
danos o lesiones.
Manual de usuario
19
Precauciones de seguridad
• Funcionamiento
• Podria deteriorarse el aspecto del
deshumidificador, cambiar el
color o producirse desperfectos
en su superficie.
• De Io contrario, se causaran
danos a la propiedad,
• Las bajas temperaturas podrian
producir escarcha en los
serpentines.
2<
j
i,
I'ij
i
I
®
• Esto podria lesionar al animal o
danar la planta.
• La utilizacion sin filtros podria
producir un real funcionamiento.
20
Deshumidificador
• Es un aparato de uso general, no
un equipo de precision.
• No es salubre y podria causar
enfermedades o poner en riesgo
su salud.
AntesdelautilizaciSn
1. Consulte a un especialista en instalaciones para realizar la instalaci6n.
2. Enchufe la clavija correctamente.
3. Utilice un circuito apropiado.
4. No utilice una alargadera.
5. No inicie/detenga el funcionamiento enchufando/desenchufando el cable de alimentaci6n.
6. Si el cable/clavija se dafia, sustitQyalo Qnicamente por una pieza de recambio autorizada.
iiiii
1. La exposici6n a flujo de aire directo durante un largo periodo de tiempo puede ser perjudicial
para su salud. No exponga a personas, animales o plantas al flujo de aire directo durante
largos periodos de tiempo.
2. Ventile la sala cuando el deshumidificador se use con otros aparatos de calefaccion.
De Io contrario, el suministro de oxigeno puede set inadecuado.
3. No utilice este deshumidificador para finalidades no especificadas (p.ej., preservar dispositivos
de precisi6n, alimentos, animales, plantas y objetos de arte). Tal uso podria dafiar estos
elementos.
1. No toque las partes metalicas de la unidad cuando retire el filtro. Podrian producirse lesiones
con los bordes metalicos afilados.
2. No utilice agua para limpiar el interior del deshumidificador. La exposici6n al agua puede
destruir el aislamiento y ocasionar una posible descarga electrica.
3. Cuando limpie la unidad, primero asegerese de que la alimentaci6n y el interruptor estan
apagados. El ventilador gira a una velocidad muy alta durante el funcionamiento. Existe la
posibilidad de lesion si se enciende accidentalmente la alimentacion a la unidad mientras se
esta limpiando su interior.
Para las reparaciones y el mantenimiento, p6ngase en contacto con su distribuidor de servicio
tecnico autorizado.
Manual de usuario
21
InstrucciOn
Este simbolo le avisa del riesgo de descarga electrica.
Este simbolo le avisa de riesgos que pueden producir da_os al
deshumidificador.
Este simbolo indica notas especiales.
ADVERTENCIA: este aparato debe instalarse de acuerdo con la normativa
nacional para instalaciones electricas. Este manual sirve como guia para
ayudar a explicar las caracteristicas del producto.
Carcasa
Filtrode "
Cubetade agua
22
Deshumidificador
Je
alimentaci6n
posterior
Seguridad
el6ctrica
El cable de alimentaci6n puede incluir un
dispositivo interruptor de corriente. La
carcasa del enchufe cuenta con un botdn de
prueba y otro de reinicio. El dispositivo debe
comprobarse peri6dicamente presionando
primero el boton TEST y despues RESET. Si
el boton TEST no se desconecta o si el boton
RESET no permanece activo, suspenda el
uso del aire acondicionado y pongase en
contacto con un tecnico de servicio
cualificado.
115V~
Utilice el enchufe de la pared
@
Consume de Energia
El cableado dom6stico de aluminio
(_
Standard
Lineas
Utilice
un fusible
de 15AMP. o un
Interruptor
de 15AMP.
125V, enchufe
podria ocasionar problemas especiales
Consulte a un electricista calificado.
de 3
de 15A, 125V AC
ADVERTENCIA:
este aparato debe conectarse
a tierra adecuadamente.
El cable de alimentacion de este aparato esta equipado con una clavija de tres
patillas con toma de tierra. Para minimizar el riesgo de descarga electrica, utilice la
clavija con un enchufe con toma de tierra estandar de tres ranuras. Si el enchufe no
dispone de una ranura de toma de tierra, pongase en contacto con un electricista
cualificado para que cambie el enchufe antes de utilizar el deshumidificador.
Metodo recomendado
_
_
seg_rese de que existe una
toma de tierra apropiada
antes de la utilizaci6n.
ADVERTENCIA: no corte ni desmonte la patilla de toma de tierra de
la clavija.
ADVERTENOIA: si incorpora un terminal de tierra adaptador al
tornillo de la cubierta del enchufe de la pared, el aparato no se
conecta a tierra a no set que el tornillo de la cubierta sea de metal y
no est_ aislado y que el enchufe est_ conectado a tierra a tray,s de
la instalaci6n el_ctrica dom_stica.
ADVERTENCIA: si tiene alguna duda sobre si el deshumidificador
esta conectado a tierra correctamente,
p6ngase en contacto con un
electricista cualificado para que compruebe el enchufe de la pared y
el circuito.
Manual de usuano
23
Seguridad el6ctrica
Desaconsejamos totalmente el uso de un adaptador debido a los potenciales
riesgos de seguridad. Para conexiones temporales, utilice Qnicamente un adaptador
incluido en UL, disponible en la mayoria de tiendas de electricidad locales.
Para desenchufar el cable de alimentaci6n del adaptador, hagalo con una mano en
cada uno para evitar dafiar el terminal de tierra. Evite desenchufar frecuentemente el
cable de alimentaci6n, ya que esto podria producir posibles dafios en el terminal de
tierra.
Metodotemporal
Clavijaadaptadora_
-Tornillode metal
Cubierta del enchufe
_k
ADVERTENCIA:
no utilicenuncael aparatoconun adaptador roto.
Desaconsejamos
totalmente
riesgos de seguridad.
24
Deshumidificador
el uso de una alargadera
debido a los potenciales
Instrucciones
defuncionamiento
_':'_i_i_i_ii_i_i_i_i_i_i_i_i_i_i_i_iil
¸ii
¸ii
¸ii¸ii
¸ii
¸ii¸ii
¸ii
¸ii
¸ii¸ii
¸ii
¸ii¸ii
¸ii
¸_i_!_!_!_!_!_!_!_iiiii_iiiiiiii_iiiiii!!_iiiiiiiiiiiiiiiiiiiii
_¸¸
5
PANEL
4
6
1
DE CONTROL
1. Tecla POWER --- si pulsa una vez esta tecla, el deshumidificador se enciende, "ON", y si la vuelve a
pulsar el deshumidificador se apaga, "OFF".
2. Teclas HUMIDITY --- se utilizan para seleccionar el ajuste de humedad deseado.
• @ : se utiliza para aumentar el ajuste de humedad deseado.
• @ : se utiliza para disminuir el ajuste de humedad deseado.
• La humedad deseada puede seleccionarse en un rango del 35% al 70% de humedad relativa, en
incrementos del 5%.
• Si vuelve a pulsar la tecla @ en el 35% de humedad relativa, se selecciona el modo "ON". En modo
"ON" la unidad funciona continuamente, independientemente de las condiciones de humedad.
3. Visualizador
HUMIDITY SETTING --- Se visualiza en pantalla el ajuste de humedad seleccionado.
4. Tecla SPEED --- se utiliza para ajustar la velocidad del ventilador a "High" (alta) o "Low" (baja).
• Si pulsa esta tecla la velocidad del ventilador cambia de High ----Low ----High.
• La velocidad del ventilador seleccionada se indica mediante pilotos con la indicaciOn "High" y "Low".
5. Tecla TIMER --- se utiliza para seleccionar el tipo de funcionamiento.
• Seleccione 2 0 4hr.On/Off para un funcionamiento ciclico.
En este caso, la unidad funcionara durante 2 o 4 horas y, a continuaciOn, se apagara completamente
durante 2 0 4 horas. El ciclo se repetira hasta que cambie el ajuste.
• Cuando se pulsa la tecla TIMER, el piloto indicador TIMER cambia de 2hr.On/Off a 4hr.On/Off
6. Indicador BUCKET FULL --- este piloto se ilumina cuando la cubeta esta Ilena yes necesario vaciarla.
Tambien se ilumina cuando la cubeta no est,:i colocada correctamente. Cuando el piloto de cubeta Ilena
se ilumina, se apaga el compresor y el ventilador.
7. AUTO RESTART --- una vez se reestablece la alimentaciOn despues de un corte de energia, la unidad
comienza a funcionar con los ajustes de funcionamiento previos. El ventilador se pondra en marcha, pot
defecto, durante 3 minutos. Transcurridos 3 minutos, tanto el ventilador como el compresor estaran
encendidos o apagados dependiendo de las condiciones de humedad.
PARA UTILIZAR EL DESHUMIDIFICADOR:
1. Enchufe el cable de alimentacion en la toma electrica. Pulse la tecla POWER.
2. Ajuste el control de humedad de135% a170% para un funcionamiento normal.
• Para menos humedad, pulse la tecla ( @ ) HUMIDITY CONTROL.
• Para una mayor humedad, pulse la tecla ( @ ) HUMIDITY CONTROL.
3. Pulse la tecla TIMER para ajustar el periodo de tiempo en que desea que la unidad realice ciclos de
encendido y apagado. El tiempo puede ajustarse a 2 o 4 horas
4. Si desea cambiar la velocidad del ventilador, pulse la tecla FAN SPEED. Cada vez que se pulsa la tecla
FAN SPEED, la velocidad del ventilador cambia de High ----_
Low ----_
High.
5. Pulse la tecla POWER para detener manualmente la unidad.
La cubeta de agua debera instalarse adecuadamente.
• El deshumidificador
no funcionara si la cubeta no esta instalada correctamente.
• El deshumidificador
se apagara cuando se alcance el ajuste de humedad deseado.
Manual de usuario
25
Instrucciones de funcionamiento
El deshumidificador se apagara automaticamente cuando la cubeta este
Ilena, cuando se retire la cubeta o no se coloque en la posici6n correcta.
La cubeta debe colocarse en la posicion correcta para que el
deshumidificador funcione, El deshumidificador no funcionara y se
encendera el piloto si la cubeta no esta en la posici6n correcta,
Interruptor de control
del nivel de agua
1. Vacie la cubeta manualmente,
2. Conecte un trozo de manguera de jardineria a la conexion roscada
de la manguera de drenaje para oonduoirel agua al desagi.ie.
Cuando la cubeta este Ilena, estire
agarrando el asa y vaciela en un
fregadero grande o bai_eray, a
continuaci6n, vuelva a colocarla
adecuadamente.
CONECTOR
DE
MANGUERA
1. Conecte una manguera de
_ ,4=
_jar_,ner,aal
conector roscado
de la manguera de drenaje.
(Fig.l)
Figl
LACUBIERTA
DEL
ORIFICIO
DEDRENAJE
Fig2
No Io quite mientrasel
deshumificadoresta en
2. Retire la cubierta del orificio de
funcionamiento.Puede provocarque
drenaje.
el aguacaiga al receptaculobaseo
(Fig.2)
al suelo.
3. Empuje firmemente el conector CONECTOR
DE
Vacie la cubetacuandola luz se
de la manguera hacia el orificio
MANGUERA
encienda.
de drenaje de la parrilla posterior.
Retire el recipiente para asegurarse
8e aconsejaIlevar la
de que se realiza la conexi6n de la
cubetaapoyandoladesde abajo
manguera con el conducto de
ademas de ayudarsedel asa.
drenaje de la bandeja de drenaje.
Llevarlosolodel asa puedeprovocar
(Fig.3-1,3-2)
BANDEJA
DE DRENAJE
Fig4-1
queesta o la cubetase rompan.
4. Presione la manguera hacia
abajo y asegQrese de situar
la "Flecha" en la parte superior.
(Fig.4-1,4-2)
5. Realice el Qltimo paso como en
la Fig. 5
Fig4-2
RETIRE
La conexionde la manguera
admitira untamafio de manguerade
Fig5
jardineria estandar.
INSERTE EL TAPON
Nosabre aprietela mangueraal
ENLARANURA
conectarlaa la mangueradel
conector.Utiliceun casquillode
goma y apriete firmementeconla
manosin rayar las roscasplasticas.
At acoplarsea laconexionde larnagueradedrenajedelconectordelamanguera,nodoble
niplieguetamangera.Lamangueradeberiair tumbadadesdeeldeshumificador
aldrenaje.
26
Deshumidificador
InstalaciSn
• Utilice el deshumidificador en un
s6tano para ayudar a evitar
da_os por humedad.
1. Deje al menos
• Utilice el deshumidificador en
zonas de lavaderos, secadoras,
• Use el deshumificador para evitar
que la humedad dane los lugares
en los que guarda libros.
ba_os y lavavajillas que tengan
humedad excesiva.
un espacio de unos 30 centimetros a cada lado de la unidad para
permitir una buena circulacion de aire.
2. Instale
su deshumidificador sobre el suelo, una mesa o estanteria. Cuando
instale el deshumidificador sobre una mesa o estanteria, asegt_resede que la mesa o
_--_
estanteria es suficientemente resistente para soportar el peso del deshumidificador
__.__
con la cubeta Ilena de agua. No se siente ni se apoye sobre el deshumidificador.
J._
Asegure las ruedas con bloques para evitar que la unidad se caiga cuando esta
- _
instalada sobre una mesa o estanteria.
I1
La altura de la mesa o estanteria debe proporcionar una mejor
posici6n para coger la cubeta y ayudar a prevenir la congelaci6n de los
serpentines ocasionada al estar el aire mas frio cerca del suelo
(como en un s6tano).
3. Levante la cubeta y coloquelaen el deshumidificador,asegurandose
de que las
ranuras de la parte inferior de la cubetaestan colocadas correctamente.
4, Las ruedas le permiten desplazar el deshumidificador facilmente.
1, Retire la cubierta de la cubeta.
2, Limpieel residuo de la cubeta.
3, Cierre la cubierta
Limpiela cubeta frotando
con un pano humedecido en una
solucion de detergente suave.
Presione las lengi.ietas de
la parte superior de la cubeta
cuando instale la cubeta.
Manual de usuario
27
Mantenimiento
Este deshumidificador esta disenado para funcionar
en cualquier epoca del ano. Practicamente no
necesita cuidados, No obstante, debe revisar el
deshumidificador anualmente.
Riesgo de descarga electrica
• Desconecte el cable de alimentacion del enchufe
antes de realizar cualquier mantenimiento,
• Tenga cuidado cuando limpie los serpentines.
Las aletas estan afiladas,
Es posible que desee que un centro de servicio
tecnico autorizado realice esta revision anual (los
costes de la revision son responsabilidad del
propietario).
Limpieza del panel frontal,
y carcasa
cubeta
Limpie el panel frontal y la carcasa con un pano
suave, agua tibia y detergente suave.
Limpie la parrilla con un aspirador o cepillo.
No utilice blanqueadores ni abrasivos.
Limpieza del filtro de aire
1. Saque la cubeta de agua de la carcasa.
Retire el filtro de aire como se muestra arriba.
2. Limpie el filtro de aire con agua tibia y un
detergente suave. Enju,:igueloy sequelo.
Vuelva a colocarlo en su sitio.
28
Deshumidificador
Si no sigue las precaucionesanteriores podria
producirseuna descargaelectrica o dar_ospersonales.
Cuidados
ymantenimiento
El deshumidificador puede funcionar de modo anormal cuando:
....
_,
_9_
.....
• AsegOresede quelaclavijadeldeshumidificador
esta
completamente
insertadaenel enchufe.
El
deshumidificador
no seenciende
• Compruebe
losfusibleso elcuadrodelinterruptorautomatico
ycambieel fusibleo vuelvaa conectarelinterruptor.
• Eldeshumidificador
seapagaautomaticamente
cuandoesto
ocurre.Vacielacubeta.
• AsegOrese
de quela cubetaestacolocadacorrectamente.
• Cambieel ajustede humedada unlimiteinferior.
• Cuandoseinstalaporprimeravez,debeesperaral menos3
64 diasparamantenerelnivelde humedaddeseado.
• AsegQrese
de queno haycortinas,persianaso mobiliario
quebloqueanlapartefrontalo posteriordel
deshumidificador.
El
deshumidificador
no secaelaire
comodebiera
• PulselateclaHumidityControl_ paradisminuirta
humedad.
• Compruebe
quetodaslas puertas,ventanasy otras
aberturasestancerradascompletamente.
• tnstateeldeshumidificador
lejosde lasecadora.Lasecadora
debetenersalidaalexterior.
• La unidad no funcionara satisfactoriamente si ta ternperatura
de la habitacion esta pot debajo de los 65°F(18C).
• El modelo de baja temperatura ascendera de manera
continuada hasta 42°F(6°0),
El
deshumidificador
funcionadurante
muchotiempo
Apareoeesoaroha
en losserpentines
El ventiladorhace
ruido
Hayaguaen el
suelo
• Consutte con su distribuidor para comprobar si la capacidad
es adecuada.
• Cierretodaslas puertasyventanascomunicadasconel exterior.
• Esnormal.Normalmente,
laescarchadesaparece
transcurridos60 minutos.
• Es normal.
• Compruebe
lamanguera,encasodequehayaincorporado
una.
• Consuttec6moretirary vaciarlacubetadeagua.
El
deshumidificador
funcionade
maneracontinuada
• Cambieelajustedehumedad.
LateclaHumidity
(Humedad)
nofunciona
oeldeshumidificador
se
enciende
automaticamente
traselapagado
• Mantengalatemperaturadela salapor encimadeO°C(32°F).
Enpantalla"67,24'
• Cambieelajustedehumedad.
• Compruebequeel deshumidificador
sedesconectaydespues
contactecon elCentrode Informaci6nalClientede LG.
Manual de usuario
29
@
GARANTiA
COBERTURA
III,,,,,,,,,,,,,IMITADA
PARA DESHUMIFICADOR
II1,,,,,,,,,,,,,O
EE.UU.
DE LA GARANTIA:
LG Electronics U.S.A., Inc. ("LG") garantiza su deshumificador LG ("producto') contra cualquier defecto en
materiales o mano de obra bajo un uso domestico normal, durante el periodo de garantia indicado mas
adelante, y LG podra reparar o sustituir el producto, bajo su exclusivo criterio. Esta garantia limitada tiene
validez s61o para el comprador minorista original del producto, no puede cederse o transferirse a cualquier
comprador o usuario posterior, y se aplica s61o cuando el producto se haya adquirido a trav6s de un
distribuidor LG autorizado y se haya utilizado en Estado Unidos ("EE.UU.'), incluidos los Territorios de
EE.UU.
Nota: Los productos de sustituci6n o piezas de reparaci6n pueden set nuevos o remanufacturados en
fabrica y tendran garantia para el tiempo restante del periodo original de garantia o noventa (90) dias, el
que sea mas largo. Guarde la factura o el justificante de compra como prueba de la fecha de compra para
la garantia (se le podria pedir que envie una copia a LG o un representante autorizado).
PERIODO DE GARANTiA:
Un (1) a_o a partir de la fecha de
compra original:
Cinco (5) a_os a partir de la fecha de
compra original:
Alcance de
la garantia
Piezas internas / funcionales
de obra
Compresor
Observaci6n
Piezas y mano de obra
Periodo
y mano
$61o piezas. El cliente sera responsable de la
mano de obra o la reparaci6n relacionada
para la sustituci6n de las piezas defectuosas.
COMO SE PRESTA EL SERVIClO: Servicio de reparaciones en taller
Se prestara servicio de reparaciones en taller durante el periodo de garantia. Para obtener el servicio en
garantia, el comprador debera Ilevar o producto al taller o enviarlo a portes pagados a un Servicio
T6cnico Autorizado de LG, en su embalaje original u otro embalaje con igual grado de protecci6n.
ESTA GARANTiA LIMITADA NO CUBRE:
1.
2.
Dafios al producto
causados
por accJdentes,
rayos, viento, fuego, inundaciones
o causas
Dafios o fallos resultantes
instalacidn,
reparacJones
pestes e insectos,
de fuerza mayor.
3.
4.
autorizada
del producto.
Dafios o fallos causados
no
7.
no
8.
por la corrJente
cddigos de fontaneria
Jncorrectos.
Productos
en los que se haya borrado,
cambiado
el nfimero de serie original
eldctrJca,
desdibujado
de f/tbrica.
tensJdn
o
o
Dafios
cosmdticos,
incluidos
arafiazos,
abolladuras
o otros
dafios
en el acabado del producto,
a menos que los dafios sean
resultado
de defectos
de materiales
o mano de obra y se informe
a LG en un plazo de siete (7) dias naturales
a partir de la fecha
de envio.
de un uso Jnadecuado,
abusos,
o mantenJmiento
incorrectos.
Las
reparaciones
incorrectas
incluyen
la utilizacidn
de piezas
homologadas
o especJficadas
por LG.
Dafios o fallos causados por la modificacidn
u alteracidn
5.
6.
Dafios
o falta de elementos
en cualquier
producto
de
exposicidn,
caja abierta, de descuento
o reacondicionado.
Reparaciones
cuando se est_ dando al producto una utilizacidn
diferente del uso dom_stico
normal (por ejemplo,
alquiler, uso
comercial,
oficinas
e instalaciones
recreativas)
o contraria
alas
instrucciones
del manual del propietario
del producto.
ESTA
GARANTIA
EXCLUYE
(?UALQUIER
OTRA
GARANTIA,
EXPRESA
O IMPLICITA,
INCLUIDA
SIN LIMITACION
(_UALQUIER
GARANTIA
DE COMERCIABILIDAD
O ADECUA(]ON
A UN FIN PARTICULAR.
EN EL GRADO
EN QUE
CUALQUIER
GARANTIA
IMPLICITA
SEA REQUERIDA
POR LEY,
ESTA
GARANTIA
SE LIMITARA,
EN SU DURACION
AL
PERIODO
INDICADO
ANTERIORMENTE.
LA REPARACION
O CAMBIO
BAJO
ESTA
GARANTIA
ES LA 1)NICA
SOLUCION
PARA EL CLIENTE.
NI EL FABRICANTE,
NI SUS DISTRIBUIDORES
EN EE.UU.
INCIDENTAL,
(_ONSECUEN(]AL,
INDIRECTO,
ESPECIAL
O
PUNITIVO
LIMITACION,
PI_RDIDAS
DE INGRESOS
O BENEFICIOS,
O CUALQUIER
RESPONSABILIDADES
EXTRA(?ONTRACTUALES
O DE OTRO
TIPO.
En algunos
de duraci6n
proporciona
SERA, N RESPONSABLES
DE
(_UALQUIER
TIPO,
OTRO
DANO
BASADOS
DE NING1)N
DANO
INCLUIDAS
SIN
EN
CONTRATOS,
estados no se permite
la exclusi6n
o la limitaci6n
pot" da_os incidentales
o consecuenciales
durante el periodo
de una garantia
implicita,
pot ello no set,in aplicables
las citadas
limitaciones
o exclusiones.
Esta garantia
le
derechos
legales
especificos,
y quiz_is tenga otros
derechos
que varian
de unos lugares
a otros.
COMO OBTENER SERVIClO DE GARANTiA E INFORMACION ADICIONAL:
Llame al n_mero 1-800-243-0000 o visite nuestro sitio web en www.lg.com.
Si desea ponerse en contacto por correo:Centro de informaci6n al cliente LG (ATT: CIC)
201 James Record Road, Huntsville, AL 35824
WARRANTY
DEIIIHUMZDZFZERIII,,,,,,,,,,,,,ZMZTED
WARRANTYWHAT
THIS
WARRANTY
USA
COVERS:
LG Electronics
U.S.A.,
Inc. ("LG")
warrants
your LG Dehumidifier
("product")
against
defect
in materials
or
workmanship
under normal household
use, during the warranty
period set forth below, LG will, at its option, repair
or replace the product.
This limited
warranty
is valid only to the original
retail purchaser
of the product,
is not
assignable
or transferrable
to any subsequent
purchaser
or user, and applies only when the product
is purchased
through an LG authorized
dealer or distributor
and used within the United States ("U.S.")
including
U.S. Territories.
Note:
Replacement
products
and repair parts may be new or factory-remanufactured
and are warranted
for the
remaining
portion
of the original unit's warranty
period or ninety (90) days, whichever
is longer.
Please retain dated
receipt or delivery ticket as evidence of the Date of Purchase for proof of warranty
(you may be required to submit a
copy to LG or authorized
representative).
WARRANTY
PERIOD:
One (1) year
purchase:
Period
Scope of
Warranty
Any internal
Remark
Parts & labor
from
date
of original
/ functional
Parts
retail
and
Five (5) years
purchase:
Labor
from
date
of original
retail
Compressor
Parts Only. Customer
will be responsible
for any
labor or related service to replace defective
parts.
HOW SERVICE
IS HANDLED:
Carry- In Service
Carry-In
service will be provided
during the warranty
period. To obtain warranty
service, purchaser
must take the
product,
or deliver the product freight
prepaid,
in either its original packaging
or packaging
providing
an equal
degree of protection
to a LG Authorized
Service Center.
THIS
LIMITED
WARRANTY
DOES
NOT COVER:
1.
Damage or failure caused by accidents,
and vermin,
lightning,
wind, fire, floods
of God.
2.
Damage or failure resulting
from misuse, abuse,
improper
installation,
repair or maintenance.
Improper
repair includes use of parts not
approved
or specified by LG.
Damage or failure caused by unauthorized
modification
or alteration
to the product.
Damage or failure caused by incorrect
electrical
current, voltage, or plumbing
codes.
Product where the original factory
serial
numbers
have been removed,
defaced or
changed in any way.
3.
4.
5.
pests
or acts
6.
7.
8.
Cosmetic damage,
including scratches,
dents,
chips or other damage to the finish of the
product,
unless such damage
results from
defects in materials
or workmanship
and is
reported
to LG within seven (7) calendar days
from the date of delivery.
Damage or missing items to any display, open
box, discounted,
or refurbished
product.
Repairs when product
is used in other than
normal and usual household
use (e.g. rental,
commercial
use, offices, or recreational
facilities)
or contrary
to the instructions
outlined in the
owner's manual.
THIS
WARRANTY
IS IN LIEU
OF ANY
OTHER
WARRANTY,
EXPRESS
OR IMPLIED,
INCLUDING
AND
WITHOUT
LIMITATION
TO, ANY WARRANTY
OF MERCHANTABILITY
OR FITNESS
FOR A PARTICULAR
PURPOSE.
TO THE EXTENT
ANY IMPLIED
WARRANTY
IS REQUIRED
BY LAW, THIS WARRANTY
IS LIMITED
IN DURATION
TO THE TERM
PERIOD
EXPRESSED
ABOVE.
REPAIR
OR REPLACEMENT
AS PROVIDED
UNDER
THIS WARRANTY
IS THE EXCLUSIVE
REMEDY
FOR THE
CUSTOMER.
NEITHER
THE
MANUFACTURER
NOR ITS
U.S. DISTRIBUTOR
SHALL
BE LIABLE
FOR ANY
INCIDENTAL
CONSEQUENTIAL,
WITHOUT
LIMITATION
TO, LOST
TORT,
INDIRECT,
REVENUES
SPECIAL
OR PUNITIVE
DAMAGES
OF ANY NATURE,
INCLUDING
AND
OR PROFITS,
OR ANY OTHER
DAMAGE,
WHETHER
BASED IN CONTRACT,
OR OTHER\VISE.
SOME STATES
DO NOT ALLOW
THE EXCLUSION
OR LIMITATION
OF INCIDENTAL
OR CONSEQUENTIAL
DAMAGES
OR
LIMITATIONS
ON HOW LONG AN IMPLIED
WARRANTY
LASTS,
SO THE ABOVE EXCLUSION
OR LIMITATION
MAY NOT
APPLY
TO YOU.
THIS WARRANTY
GIVES YOU SPECIFIC
LEGAL RIGHTS
AND YOU MAY ALSO HAVE OTHER
RIGHTS
THAT
VARY
FROM
HOW
TO OBTAIN
STATE
TO
STATE.
WARRANTY
SERVICE
& ADDITIONAL
Call 1-800-243-0000
or visit our website at www.lq.com.
Mail to: LG Customer
Information
Center (ATTN: CIC)
201 James Record Road, Huntsville,
AL 35824
INFORMATION:
Life's Good
1-800-243-0000
Ill_llR'tt'i.'ilf-,]_
LG ELECTRONICS,INC.
1000 Sylvan Ave.,Engtewood
Cliffs,NJ
07632
www.lgappliances.com