1
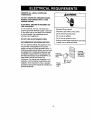
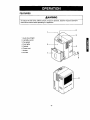
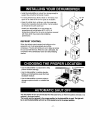
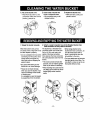
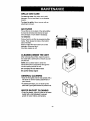
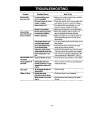
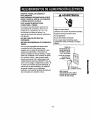
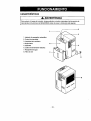
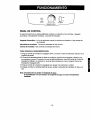
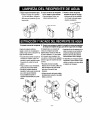
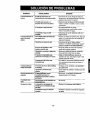
Owner's Manual
Manuel del Propietario
®
DEHUMIDIFIER
DESHUMIDIFICADOR
Model, Modelo 580.53301
/
J
/
Sears, Roebuck and Co., Hoffman Estates, IL 60179 U.S.A.
www.sears.com
TABLE OF CONTENTS ................................ 2
CLEANING THE WATER BUCKET .............. 8
WARRANTY ..................................................
2
REMOVING AND EMPTYING
SAFETY ........................................................
3
THE WATER BUCKET .................................. 8
Important Safety Instructions ...................... 3
ELECTRICAL REQUIREMENTS
MAINTENANCE ............................................
9
Grille and case .........................................
9
Air filter .....................................................
9
.................. 4
OPERATION .................................................
5
Features ...................................................
5
Control Panel ...........................................
6
Cleaning inside the unit ............................ 9
General cleaning ...................................... 9
Water bucket cleaning .............................. 9
INSTALLING YOUR DEHUMIDIFIER .............. 7
Defrost Control .........................................
TROUBLESHOOTING
7
................................ 10
ESPANOL ...................................................
CHOOSING THE PROPER LOCATION .......7
11
MASTER PROTECTION AGREEMENTS...23
AUTOMATIC SHUT OFF .............................. 7
FULL ONE YEAR WARRANTY
ON DEHUMIDIFIER
For one year from the date of purchase, if the Dehumidifier is operated and maintained
according to the owner's instructions furnished with the product, Sears will repair the
Dehumidifier free of charge, if defective in materials or workmanship.
FULL FIVE YEAR WARRANTY ON SEALED
REFRIGERATION SYSTEM
For five years from the date of purchase, when this Dehumidifier is operated and maintained according
to owner's instructions furnished with the product, Sears will repair the sealed refrigeration system
(consisting of refrigerant, connecting tubing, and compressor motor) free of charge, ff defective in
material or workmanship.
WARRANTY SERVICE IS AVAILABLE BY RETURNING UNIT TO THE NEAREST SEARS
SERVICE CENTER IN THE UNITED STATES. CALL 1-800-4-MY-HOME ® FOR NEAREST
SERVICE CENTER TO YOU.
This warranty applies only while this Dehumidifier is used in the United States.
This warranty gives you specific legal rights, and you may also have other rights which vary from state to
state.
Sears, Roebuck and Co., D/817WA, Hoffman Estates, IL 60179 U.S.A.
-2-
IMPORTANT
SAFETY INSTRUCTIONS
The safety instructions below will tell you how to use your dehumidifier to avoid harm to yourself
or damage to your dehumidifier.
FOR YOUR SAFETY
ELECTRICAL INFORMATION
The complete electrical rating of your new
dehumidifier is stated on the serial plate. Refer
to the rating when checking the electrical
requirements.
Do not store or use gasoline or other
flammable vapors and liquids in the vicinity of
this or any other appliance. Read product
labels for flammability and other warnings.
• Be sure the dehumidifier is properly
grounded. To minimize shock and fire
hazards, proper grounding is important. The
power cord is equipped with a three-prong
grounding plug for protection against shock
hazards.
PREVENT ACCIDENTS
To reduce the risk of fire, electrical shock, or
injury to persons when using your
dehumidifier, follow basic precautions,
including the following:
• Your dehumidifier must be used in a properly
grounded wall receptacle. If the wall
receptacle you intend to use is not
adequately grounded or protected by a time
delay fuse or circuit breaker, have a qualified
electrician install the proper receptacle.
• Do not use an extension cord or an
• Be sure the electrical service is adequate for
the model you have chosen.
_
Avoid fire hazard or electric shock.
adapter plug.
Do not use an extension cord or an adapter plug.
Do not remove any prong from the power cord.
Grounding type
wall receptacle
Do not under any
circumstances cut,
remove, or bypass
the grounding prong
from this plug.
Power supplycord m
with 3-prong
groundingplug
\
-3-
OBSERVE ALL LOCAL CODES AND
ORDINANCES.
,AWARNING
DO NOT, UNDER ANY CIRCUMSTANCES,
REMOVE THE POWER SUPPLY CORD
GROUND PRONG.
ELECTRICAL GROUND IS REQUIRED ON
THIS APPLIANCE.
A 115-volt 60 Hz, AC only, 15A fused and
properly grounded electrical supply is required.
A time delay fuse or time delay circuit breaker
is recommended. Use a dedicated circuit,
serving only this appliance.
Electrical Shock Hazard
Plug into a grounded 3 prong outlet.
Do not remove ground prong.
Do not use an adapter.
Do not use an extension cord.
DO NOT USE AN EXTENSION CORD.
RECOMMENDED
GROUNDING
Failure to follow these instructionscan result
in death, fire, or electrical shock.
METHOD
For your personal safety, this appliance must
be grounded. This appliance has a power
supply cord with a 3-prong grounding plug. To
minimize possible shock hazard, the cord must
be plugged into a mating grounding type wall
receptacle and grounded in accordance with
the National Electrical Code (ANSI/NFPA 70)
latest edition and all local codes and
ordinances. If a mating wall receptacle is not
available, it is the personal responsibility and
obligation of the customer to have a properly
grounded 3-preng wall receptacle installed by a
qualified electrician.
-4-
_3-pron._
3--ron-
_
I1_
gro un n
plug
°1_'_
Power _
supply
cord
I
I
_
Ground
prong
grounding
type wall,
recep,acle
FEATURES
AWARNING
To reduce the risk of fire, electric shock, or injury to persons, read the important SAFETY
instructions section before operating this appliance.
2
3
1. Auto shut-off light
2. Humidity control
3. Fan speed
4. Front grille
5. Cabinet
4 ¸
6. Power cord
7. Bucket
8. Air filter
6
-5-
CONTROL
PANEL
Your dehumidifier has a control panel containing an indicator and two controls -Auto Shut-Off, Fan Speed, and Humidity Control.
Auto Shut-Off ---This tamp glows when the bucket fills or is missing.
Fan Speed --- This controls the speed of the airflow.
Humidity Control--- This controls the moisture in the room.
TO OPERATE THE DEHUMIDIFIER:
1. Turn the Humidity Control to Off. Plug the power supply cord intoan electrical outlet.
2. The HumidityControl can be set anywherebetween Off and Max for normal operation.
If you need more dehumidification,
turnthe HumidityControltowardMax. If you need less
dehumidification,
turnthe HumidityControltowardOff.
3. Turn the HumidityControlto Off to stopthe unitmanually.
4. If you wantto controlthe speed of air flow, turnthe Fan Speed towardLow or High.
Note: Be careful not to lose the water bucket.
This dehumidifier doesn't run if the water bucket is not installed properly.
-6-
• Install
the dehumidifier on a level floor strong enough to
support the unit with a full bucket of water.
• For best performance, allow at least 12-18 inches of air
space on all sides of the unit for good air circulation.
• Keep all outside doors, windows, and other openings
closed when operating the dehumidifier. Humid outdoor
air will add to the unit's work load.
• Install your dehumidifier in an area where the
temperature will not fall below 65°F (18°C). At
temperatures below this, the coils can become covered
with frost, which may reduce dehumidifying
performance.
DEFROST
CONTROL
When the defrost control senses frost build-up on the
evaporator coil, it will automatically shut off the
compressor. The fan will continue to run to drew air across
the coil and melt the frost. When the coil is defrosted, the
compressor wilt automatically restart and dehumidifying
resume.
(18"c)
• Use the dehumidifier in a basement to help
prevent moisture damage.
• Use the dehumidifier in cooking, laundry,
bathing, and dishwashing areas that have
excessive moistu re.
• Use the dehumidifier to prevent moisture
damage anywhere books or valuables are
stored.
The dehumidifier will turn off automaticallywhen the bucket is full, or when the bucket is removed or not
replaced in the proper position.
The bucket must be replaced in the proper position for the dehumidifier to work. The light will
be on and the dehumidifier will not run if the bucket is not in the proper position.
-7-
1, Pull out the bucket cover.
• Placethumb at position _) and
pull outward.Placeother hand at
position (_ and pull up.
2. Cleaninside of bucket with
brush or dampenedcloth.
• We recommendusing a mild
detergentsolution.
Blush
I. Empty the bucket manually.
3. Replacethe bucketcover.
• Makesuretabs (_and _are
placedas shown.
of
2. Attach a length of garden hose to the threaded bucket drain
hose connection to carry water to the orein,
When the bucket is full, pull out
The bucket has a threaded hose
• When being attached to the
and empty it into a large sink or tub connection which can be left open.
bucket drain hose connection, be
Drill a 1/4" (6.4 ram) hole in the
sure the hose doesn't kink or
and then replace it properly.
center of the hose connection,
bend. It should lie flat from the
• Do not overtighten the hose when
Once opened, the hose connection dehumidifier to the drain.
connecting it to the bucket. Use a
will continually drain water from the • The hose attachment will accept a
rubber washer and tighten by
bucket.
hand firmly without stripping the
standard garden hose filling. You
•
The nozzle cannot be fixed after
can attach a screw-on cap to use
plastic threads.
puncture. Use an ordinary garden the bucket without a hose.
• Be careful while taking out the
hose cap to reclose if necessary.
bucket as it can cause damage.
• When inserting the bucket into the
• Please do not shake strongly
unit. lifting up the bottom tip of the
when you carry the bucket. It can
bucket lightly makes insertion
cause to breakage of the handle
easily.
or bucket cover.
It is advisable to carry the bucket
by supporting it from the bottom.
-8-
GRILLE AND CASE
To clean the case: Use water and a mild
detergent. Do not use bleach or an abrasive
cleaner.
To clean the grille: Use a vacuum with an
attachment or brush,
AIR FILTER
The air filter is on the back of the dehumidifier.
It should be checked and cleaned at least
every 30 days or more often if necessary.
TO REMOVE:
First pull out the air filter by pressing the filter
hooks. Then release two tabs at the bottom
side of the filter.
Wash air filter with warm water and a mild
detergent. Rinse and dry it.
Once dry, replace in unit.
CLEANING INSIDE THE UNIT
After removing the air filter, clean the coil on
the inside with a soft brush to remove any soft
and wet soil.
NOTE: Do not allow water to enter the
electrical/machine compartment through the
circular opening behind the coil.
Do not spray the coil with a hose.
Be careful! Sharp edges!
GENERAL CLEANING
• Dust the front gdlle and the side panels with a
soft brush or use the dusting attachment of
your vacuum,
• If cabinet paint chips, you can touch up the
paint with a good grade enamel to prevent rust.
WATER BUCKET CLEANING
• Every few weeks, rinse the inside of the water
bucket with a mild detergent to prevent
growth of mold, mildew, and bacteria.
-9-
Problem
Dehumidifier
does not start
Possible Causes
What To Do
The dehumidifier power
cord is unplugged
The fuse is blown or circuit
breaker is tripped,
• Make sure the dehumidifier plug is pushed
completely into the outlet.
• Check the house fuse or circuit breaker box
and replace the fuse or reset the breaker.
Water bucket is full
• The dehumidifier automatically turns off
when this occurs. Empty the bucket.
Bucket is not installed.
• Make sure the bucket is in the right place.
Dehumidifier
Did not allow enough time
• When first installed, allow at least 3 or 4
does not dry the
air as it should
to remove the moisture,
Airflow is restricted.
days to maintain the desired dryness.
• Make sure there are no curtains, blinds or
furniture blocking the front or back of the
dehumidifier.
The Dryness Control may
not be set high enough.
• Turn the Dryness Control knob closer to the
Max position.
Doors and windows may
not be closed tightly,
• Check that all doors, windows and other
openings are securely closed.
Clothesdryermaybeblowing
• install the dehumidifier away from the dryer.
moisture-ladenairintotheroom.
The dryer should be vented to the outside.
Room temperature is too
low.
• The unit will not operate satisfactorily if the
room temperature is below 65°F. (18°C.).
Dehumidifier runs
too much
Doorsandwindowsareopen.
• Close all doors and windows to the outside.
Frost appears on
the coils
Dehumidifier has been
recently turned on or room
temperature is below 65°F.
(WC.).
• This is normal. Frost will usually disappear
within 60 minutes.
Fan noise
Air is moving through the
dehumidifier.
• This is norh_aL
Water on floor
Bucket drain hose
connection may be loose.
- Chock the hose if one is attached
Water bucket is not all the
way in.
• See Removing and Emptying The Water
Bucket.
-10-
iNDICE DE MATERIAS ................................ 11
LIMPIEZA DEL DEClPIENTE DE AGUA ...... 17
GARANTIA .................................................. 11
EXTRACCION Y VACIADO DEL
RECIPIENTE DE AGUA ............................... 17
SEGURIDAD ................................................ 12
MANTENIMIENTO
Importantes instrucciones de seguridad .... 12
...................................... 18
REQUERIMIENTOS DE ALIMENTACION
ELI_CTRICA ................................................ 13
La rejilla y el gabinete .............................. 18
FUNCIONAMIENTO .................................... 14
Limpieza interna de la unidad ................ 18
Caracterfsticas ....................................... 14
Limpieza general ..................................... 18
Panel de control ...................................... 15
Limpieza del recipiente de agua ............. 18
INSTALACI6N DEL DESHUMIDIFICADOR ... 16
SOLUCI6N DE PROBLEMAS .................... 19
Filtro de aire .......................................... 18
Control de descongelamiento ................. 16
SELECCION DEL LUGAR ADECUADO ...16
APAGADO AUTOMATICO .......................... 16
UN ANO DE GARANT|A EN TODAS LAS PARTES DEL
DESHUMIDIFICADOR
Durante un aSo a partir de la compra, si el deshumidificador es usado y mantenido de acuerdo con
las instrucciones del usuario adjuntas o suministradas con el aparato, Sears reparar& el
deshumidificador sin costo alguno si este muestra defectos en los materiales o mano de obra.
ClNCO ANOS DE GARANT|A COMPLETA
REFRIGERACION
EN EL SISTEMA
DE
Durante cinco aSos a partir de la compra, si el deshumidificador es usado y mantenido de acuerdo
con las instrucciones del usuario adjuntas o suministradas con el aparato, Sears reparara el
sistema de refrigeraci6n sellado (el cual consta de refrigerante, los tubos conectores y el motor
compresor) si dste muestra defectos en los materiales o mano de obra.
SE OFRECE SERVICIO DE GARANT|A AL REGRESAR LA UNIDAD AL CENTRO DE
SERVICIO SEARS M._,SCERCANO EN TODOS LOS ESTADOS UNIDOS. LLAME
1-800-4-MY-HOME ® PARA A MAS CERCANO CENTRO DEL SERVIClO A USTED.
Esta garantfas61otiene validez mientrasel deshumidificador se estdusandoen los Estados Unidos.
Esta garantfa le confiere derechos legales especfficos, pero usted podda gozar de otros
derechos que pueden variar de Estado a Estado.
Sears, Roebuck
and Co., D/817WA,
Hoffman
-11 -
Estates,
IL 60179 U.S.A.
IMPORTANTES
INSTRUCCIONES
DE SEGURIDAD
Las instrucciones de seguddad que abajo se enuncian describen c6mo usar el deshumidifieador
y evitar daSos a su persona o al aparato.
POR SU PROPIA SEGURIDAD
INFORMACI6N SOBRE LA
ELECTRICIDAD
No almacene ni use gasolina u otros vapores
o Ifquidos inflamables cerca de este u otros
aparatos domesticos. Lea las etiquetas del
producto para conocer su nivel de
inflamabilidad y otras advertencias.
Los valores completos de la electricidad de su
nuevo deshumidificador aparecen en la placa
del nemero de serie. Refi6rase a dichos
calores al verificar los requerimientos
el_ctricos.
• Cerci6rese de que el deshumidificador est_
adecuadamente conectado a tierra. Para
EVITE ACCIDENTES
Para reducir el desgo de incendio, choque
electrico o daSos corporales al usar su
deshumidificador, siga las precauciones
b,_sicas que se indican a continuaci6n:
reducir al m&ximo el peligro de choques y de
incendio, es importante la correcta conexi6n
a tierra. El cable de alimentacibn est,.
equipado con una clavija dotada de conexi6n
a tierra de 3 terminales para protegerlo
contra el peligro de choques el_ctricos.
• Cerci6rese de que el suministro de energfa
electrica sea adecuado para el modelo que
ha seleccionado.
• Su deshumidificador
adecuadamente conectado a tierra y
enchufado a un contacto de pared apropiado.
Si el contacto de pared que desea utilizar no
est& adecuadamente conectado a tierra o
protegido por un fusible de retardo o por un
disyuntor de circuito, pida que un electricista
calificado le instale un buen contacto de
pared.
Evite el riesgo de incendio
o choque el6ctrico. No use cable el_ctrico
de extensi6n ni adaptadores. No quite
ninguna de las terminales de la elavija del
cable de alimentaci6n el_ctrica.
Toma de corriente
de pared con
conexi6na
tierra.
nmguna
]
lstancia corte, [
quite o evite el uso de _:
la conexi6na tierra de|
esta clavija.
J
Cable de alimentaci6ncon
clavijadotada de conexi6n
a tierra de 3 terminalas.
debe usarse estando
\
-12-
• No use cable el6ctrico de extensi6n ni
adaptadores.
RESPETE TODOS LOS CODIGOS Y
REGLAMENTOS.
BAJO NINGUNA CIRCUNSTANCIA CORTE,
QUITE O EVITE EL USO DE LA CONEXI6N
A TIERRA DE ESTA CLAVIJA.
A ADVER,rENCIA
ESTE APARATO NECESITA SER
CONECTADO A TIERRA.
Se requiere una alimentaci6n el_ctrica CA,
adecuadamente conectada a tierra con un
fusible de 15 A, de 60 Hz y de 115 V. Se
recomienda un fusible de retardo o un
disyuntor de circuito que alimente solamente a
este aparato.
NO USE CABLE ELI_CTRICO DE
EXTENSI6N.
M#TODO RECOMENDADO
TIERRA
Peligrode choqueel_ctrico
Conecteen una conexi6nde paredde 3 terminales
No quite la terminal de conexi6na tierra
No use adaptadores
No usecable el_tdco de extensi6n
DE CONEXlON A
Por su propia segufidad este aparato debe
conectarse a tierra. Este aparato viene
equipado con un cable de alimentaci6n y una
clavija de tres terminales. Para reducir al
maximo el peligro de choque el_ctrico, el cable
debe estar conectado a una conexi6n de pared
con conexi6n a tierra, y esta conexion debe
hacerse de acuerdo con la QItima edici6n del
Si no se siguenestas instrucciones,puede
ocasionarsela muerte,un incendioo un choque
el6ctdco.
Cable de-alimentaci6n con
clavija dotada de
conexibn a tierra
de 3 terminales.
Toma de corriente
de pared con
conexi6n a tierra.
C6digo El_ctrico Nacional (ANSI/NFPA 70), asf
como con los c6digos y reglamentos locales. Si
no existe una conexi6n de pared adecuada, el
cliente tiene ia responsabilidad y la obligaci6n
de mandar instalar, con un electricista
calificado, una conexi6n de pared adecuada de
tres terminales con conexi6n a tierra.
-13-
r_
_,,,_"1
%rrl
-'_.-.J_l_..Jiii
Terminal de
-r_ conexi6n a tierra.
Bajo ninguna
circunstancia corte, quite o
evite el uso de la conexi6n
a tierra de esta clavija.
CARACTERiSTICAS
ADVERTENCIA
Para reducir el riesgo de incendio, choque eLectrico o daSos corporales, lea la seccion de
importantes instruccLones de SEGURIDAD antes de poner a funcionar este aparato.
1. Indicator de apagador automdtico
2. Control de humedad
3. Velocidad del ventilador
4. Rejila frente
5. Gabinete
6. Cable de alimentaci6n eldctdca
7. Recipiente de agua
8. Filtro de aire
-14-
",,
,,=
"1
_
'_"
:
-High
A_to
"LOW
Shut-Off
Humidity
Off"_--'_Max
Control
,
Fan_ Speed
PANEL DE CONTROL
En panel de control de su deshumidificador contiene un indicador y dos controles - Apagado
automdcico, Velocidad del Ventilador, y Control de Humedad.
Apagador Automdtico - La luz se enciende cuando el recipiente es Ilenado o si hay escape de
su contenido.
Velocidad del ventilador - Controla al velocidad det flujo de aire.
Control de humedad - Esto controla la humedad del recinto.
PARA OPERAR EL DESHUMIDIFICADOR:
1. Ponga el control de humedad en apagado (OFF). Enchufe el cable de extensi6n el6ctrica en la
conexi6n de pared.
2. El Control de Humedad puede ser fijado en cualquier posici6n entre Apagado y M_ximo para
una operacibn normal. Si necesita un nivel de deshumidificaci6n mds alto, ponga el Control de
Humedad en Mdximo. Si necesita un nivel de deshumidificaci6n menor, ponga el Control de
Humedad en Apagado (Off).
3. Ponga el control de humedad en Apagado para apagar manualmente la unidad.
4. Si desea controlar la velocidad del flujo de aire, ponga la velocidad del ventilador en bajo o en
alto.
Nota: Cerci6rese de no perder el recipiente de agua.
El humidificador no funcionard sl el recipiente de agua no estd correctamente
Instalado.
-15-
• Instaleel deshumidificador
enunpisonivelado
Iosuficientemente
s61ido
comoparasoportar
la unidadconelrecipiente
tlenodeagua.
• ParaIograrunmaximorendimiento,
dejeun
espaciolibrede12a 18pulgadaentodoel
espacioquecircunde
alaparatoconobjetode
mantenerunabuenacirculaci6n
deaire.
• Mantenga
todaslaspuertas,ventanas
y otras
entradasdeairecerradas
aloperarel
deshumidificador.
ElairehQmedo
delexterior
hardqueelaparatotrabajeenexceso.
• Instalesudeshumidificador
enunazonaen
quelatemperatura
nobajea menosde65°F
(18°C).A menortemperatura,
etserpentfn
del
aparatopodriacubrirsedeescarcha.
PorIotantoel desempeSo
dedehumidifying
se
puedereducir.
65'F
CONTROLDE DESCONGELAMIENTO
Cuando el control de descongelamiento detecta la
formaci6n de escarcha en el serpentfn del
evaporador, automdticamente desconecta el
compresor. El ventilador seguird funcionando para
hacer que el aire pase por el serpentfn y derrita la
escarcha. Cuando se derrite la escarcha, el
compresor arranca de nuevo automdticamente y
comienza a haber deshuimidificaci6n.
_'
(18"c)
65'F
(18'c)
Ii
• Use el deshumidificador en un s6tanopara ayudar a evitar
los daSos que causa la humedad.
• Use et deshumidificador al cocinar,al lavar la ropa, al
baSarsey en lugares en que lava la vajilla en que hay
demasiada humedad.
• Use el deshumidificador para evitar los daSos que causa la
humedad en libros y objetos valiosos almacenados.
Cuando el cubo esta repleto, o ouando el cubo no esta en la posicion apropiada, el Cubo Repleto
ligero prende y la unidad apaga automaticamente.
La cubeta debe set re-ubicado en la posici6n apropiada para que el deshumedecedor
funcione. La luz $erd encendlda y el deshumedecedor no funcionard si la cubeta no estd
en la posicldn aproplada.
-16-
1. Saquela tapadel_cipiente deagua. 2. Limpieel interior del recipiente
• Coloqueel pulgaren la posici6n
_y tirehaoiaafuera coloquela
otra manoen la posici6n_) y tire
haciaarriba
con un cepilloo pa_o hdmedo.
• Recomendamos
utilizaruna
soluoi6njabonosasuave
3. Veulva a colocarla tapa del
recipientede agua en su lugar.
• Aseguresedeque lossalientes
_) y (_est_n colocadosseg_n
muestrala ilustracion.
Los saliente
LOS salienle
_)
I
edo
1. Vaciado manual del recipiente 2. Conecteunamanguerade jardina la conexi6nde rascaparamanguera
de drenajedel mcipiente de agua,para Ilevarel aguahastael desagQe
Cuandoel recipienteest6Ileno,
s_queloy vacfeloen unapalanganao
cubetay luegovuelvaa colocarlo
ensu
lugarde modoadecuado.
Elrecipiente
tieeeunaconexi6n
de
• AsegOresedeque la mangueranose
roscaparamangueraquepuede
elevani se tuerceunavezunidaa la
dejarseabiertaTaladreunofiflcio
de
conexi6ndedrenajedelrecipiente.
6,4mmdedi_metro(1/4")enel centro Deberfairdefarinaplanadesdeel
paramanguera.Una
deshumidificador
hastael desag0e
• Noaprietedemasiadola mangueraal de la conexi6n
conectarlaal recipiente.Utiliceuna
vezabierto,
el orificio
parala manguera . El dispositivo
paramanguerasadmite
arandelade gomay apri_telaa mano drenar_elaguadelrecipiente
de modo manguerasde jardinestdndar.
Puede
continuo.
firrnementesin romperlas tirasde
colocarunatapade roscaparautilizar
• Nopuedecolocarsela boquilla
plastico.
el recipiente
sinmanguera.
• Tengacuidadoal sacarel recipiente, despuesde abrirel orificio.Utiliceuna
puestoque puedecausardafios.
tapade manguerade jardin normal
• Noagiteel recipienteduranteel
paravolvera cerraflosifuera
transporte.Puedecausarla roturadel necesafio.
asao de la tapadel recipiente,
• Laligeraelevaci6nde la puntainferior
Esaconsejabletransportarel
delrecipienteal colocarlo
en la unidad
recipientesosteni_ndolopor la parte
facilitasu inserci6n.
inferior.
-17-
LA REJILLA Y EL GABINETE
Para limpiar el gabinete: Use agua y un
detergente suave. No use blanqueador ni
limpiadores abrasivos.
Para limpiar la rejilla: Use una aspLradoracon
un cono o cepillo.
FILTRO DE AIRE
Et filtro de aire se encuentra en la parte
posterior del deshumidificador. Debe revisarse
y limpiarse cuando menos cada 30 dfas o m&s
frecuentemente si es necesario.
PARA RETIRARLO:
Flexione el filtro en la esquina inferior derecha
y deslice la esquina superior derecha hacia la
izquierda. L._velo con agua jabonosa tibia.
Enju_.guelo y dejelo secar antes de volverlo a
colocar.
LIMPIEZA INTERNA DE LA UNIDAD
DespuOs de quitar el filtro de aire, limpie el
serpentin interno con un cepillo suave para
quitar las partfculas no adheridas o hemedas.
NOTA: No deje que el agua entre en el
compartimiento el_ctrico/mecancio en la
abertura circular situada detras del serpentfn.
No rocie el serpentin con manguera.
LIMPIEZA
GENERAL
• Quite el polvo de la rejilla y de los paneles
laterales con un cepillo suave o use el cepillo
de su aspiradora.
• Si el gabinete se despostilla, puede retocar la
pintura con un esmalte de buena calidad para
evitar que se oxide.
LIMPIEZA
AGUA
DEL RECIPIENTE
DE
• Cada dos o tres semanas, enjuague el
interior del recipiente con detergente suave
para evitar la formaci6n de moho, humedad o
bacterias.
-18-
Problema
Eldeshumidificador
no
arranca.
Solucl6n
Causa poslble
Elcabledealimentacion
del
• Cerci6rese de que la clavija del cable de
deshumidificador
estddesenchufado. alimentacibn del deshumidificador est_ bien
puesta en la conexibn de pared.
El fusible esta quemadoo el
disyuntordel circuitoesta abierto,
• Revise la caja del disyuntor del circuito del
fusible y cambie el fusible o vuelva a cerrar
el disyuntor.
El recipientede agua est_iIleno,
• El deshumidificador se apaga
autom_ticamente cuando estro sucede.
Vacfe el recipiente de agua.
El recipientede agua no esta
instalado.
• Cercibrese de que el recipiente estd en el
lugar correcto.
No ha dejado suficientetiempo para
que seque el aire.
• Cuando se instala pot primera vez, deje que
pasen 3 o 4 dias para que se mantenga la
sequedad deseada.
Hay escasacirculacibnde aim.
• Cercibrese de que no haya cortinas,
persianas o muebles que bloqueen la parte
anterior o posterior del deshumidificador.
El control de sequedadno est4
puestoen posici6nalta.
• Ponga la perilla de control de sequedad
cerca de la posicibn mdxima.
Las puertas y ventanasno estdn bien
cerradas.
• Revise que todas las puertas, ventanas y
otms aberturas est_.n bien cermdas.
El secadorde ropepodriaestar
generandoaim h,',medoen el recinto.
• Instale el deshumidificador lejos de la
secadora de ropa. I_sta debe arrojar el aire
caliente fuara del recinto.
La temperaturadel recinto estd
demasiadobaja.
• La unidad no funcionard satisfactoriamente
si la temperatura del recinto es inferior a
65°F (18°C).
El volumen deaim por deshumidificar
es excesivo.
• Verifique con su vendedor si la capacidad
es la adecuada
Laspuertasy ventanasest=in
abiertas.
• Cierretodas
al exterior.
Se formaescarchaen el
serpentin.
El deshumidificadorha sido
encendidohace poco o la
temperaturedel recinto es inferiora
65°F (18°C).
• Es normal. La escarcha normalmente
desaparecerd en 60 minutos
El ventiladorhace
ruido.
Hay circulacibnde aim alrededordel
deshurnidificador,
• Es normal.
Hay agua en elpiso.
La conexion de la manguera de
drenajeque va al recipientede agua
est_ floja.
• Revise si la manguera estd instalada.
El recipientede agua no est;iblen
colocado,
• Verifique la posicibn correcta del recipiente
de agua.
El deshumidificadorno
seca el aim como
debiera
El deshumidificador
trabajadenmasiado
-19-
las puertas y ventanas que den
o21 o
Master Protection Agreements
Acuerdos de Proteccibn Especializada
Congratulations
on making a smart purchase.
Your new Kenmore ® product is designed and
manufactured for years of dependable operation.
But like all products, it may require preventive
maintenance or repair from time to time.
That's when having a Master Protection Agreement
can save you money and aggravation.
i Enhorabuena! Ha realizadounacompra inteligente.
Su nuevoaparsto Kenmore_ esta dise,_adoy fabdcado
para ofrecerle afios de buen funcionamiento.
Sin embargo, al igual qua todos los produetos, puede
precisar un msntenimiento preventivo o inclusoalguna
reparaci6n de vez en cuando. En esas ocasiones, un
Master Protection Agreement puede ayudarle a ahorrar
dinero e inconvenientes.
Purchase a Maser Protection Agreement now and
protect yOurself from unexpected hassle and
expense.
Adquiera un Maser Protection Agreement ahora, y
protejase a si mismo de molestias y gastos inesperados.
El Master Protection Agreement le ayudard tambien a
prolongar la vida de su nuevo aparsto. Los siguientes
servicios estan incluidos:
The Master Protection Agreement also helps extend
the life of your new product. Here's what's included
in the Agreement:
[]
[_ Expert service by our 12,000 professional
repair specialists
[]
Unlimited service and no charge for parts and
labor on all covered repairs
]"No-lemon"
guarantee - replacement of your
covered product if four or more product failures
occur within twelve months
]Product
replacement
can't be fixed
if your covered product
[]
Annual Preventive Maintenance
request - no extra charge
Check at your
[]
Fast help by phone - phone support from a
Sears technician on products requiring in-home
repair, plus convenient repair scheduling
[]
Power surge protection against electrical
damage due to power fluctuations
[]
Rental reimbursement if repair of your covered
product takes longer than premised
Once you purchase the Agreement, a simple phone
call is all that it takes for you to schedule service.
You can call anytime day or night, or schedule a
service appointment online.
Sears has over 12,000 professional repair
specialists, who have access to over 4.5 million
quality parts and accessories. That's the kind of
professionalism you can count on to help prolong
the life of your new pumhase for years to come.
Purchase your Master Protection Agreement today!
Some limitations and exclusions
apply.
For prices and additional
information
call
1-800-827-6655.
Sears
Installation
Service
For Sears professional installation of home
appliances, garage door openers, water
heaters, and other major home items, in the
U.S.A. call 1-800-4-MY-HOME °
Servicio experto por parte de cualquiera de
nuestros 12.000 t_cnicosprofesionales especialis_s
de Sears.
[] Prestaci6n de servicioe sin limitaciones y sin
cargarle las piezaso la manode obraentodas las
reparacionescubiertaspor el acuerdo.
[] Garantfa seria de sustituci6n de las plazas del
productocubiertopor el acuerdo,sicuatroo mds
plazasse mostrasendefectuosasen un ped_:lode
dote meses.
[] Sustituci6n del producto por otro nuevo, si el
defectuoso no pudieserepararse.
[] Control de mantenimiento anual preventivo,
siempreque Io desee y sin gastoadicionalalguno.
[] Asistencia telef6nica inmediata de untecnico
especialistaan productosque hande ser reparadosa
domicUio,ademds de una programaci6nadecuadade
la reparaci6n.
[] Protecci6n contra subidas de tensi6n que
provoquendafiosel_ctricosdebidos alas
fluctuaciones en el suministro.
]
Reintegro del alquiler si la reparacibndel producto
Ileva mds tiempodel promtetido
Una vez qua haya adquiddoel Agreement,no necesitard
mds queuna simpleIlamadapara solicitarel serviciode
suaparato. Adernds,podr_,hacerloen cualquiermomento
del dis o de la noche,o solicitarunecita pars prestacibn
de serviciosonline.
Sears cuenta con mds de 12.000 tdcnicos profesionales
especialistasen reparaciones,conacceso a rnds de 4,5
millones de piezasde sustituci6ny accesoriosde caiidad.
I_steserd el tipode profesionalidady serviciocon el qua
podrdcontarpara prolongerla vide de su nuevoproducto
por muchosafios, iAdquierahoymismo su Master
ProtectionAgreement!
Se aplicardn slgunas Ilmltaclones y
reatricciones.
Si deaea hacer alguna consults sobra los
preclos u otre Informaci6n adlcional, le rogamoe
llama al tel6fono 1-800-827-6655.
Servicios
de Instalaci6n
Sears
Para solicitar servicios de instalaci6n profesionales
de Sears de electrodom6sticos, mandos de apertura
de puertas de garajes, calentadores de agua y otres
aparatos en los Estados Unidos, puede Ilamar a
1-800-4-MY-HOME
o
- 23 -
Get it fD(ed,at your home or oum!
Your Home
For repair - in your home-of
all major brand appliances,
lawn and garden equipment, or heating and cooling systems,
no matter who made it, no matter who sold it!
For the replacement parts, accessories and
owner's manuals that you need to do-it-yourself.
For Sears professional installation of home appliances
and items like garage door openers and water heaters.
1-800-4-MY-HOME ® (1-800-469-4663)
Cal! anytime,
day or night (U.S.A. and Canada)
www.sears.com
www.sears.ca
Our Home
For repair of carry-in items like vacuums, lawn equipment,
and electronics, call or go on-line for the location of your nearest
Sears Parts & Repair Center.
1-800-488-1222
Call anytime, day or night (U.S.A. only)
www.sears.com
To purchase a protection agreement (U.S.A.)
or maintenance agreement (Canada) on a product serviced by Sears:
1-800-827-6655
(U.S.A.)
Para pedir servicio de reparacidn
a domicilio, y para ordenar piezas:
1-888-SU-HOGAR
_
(1-888-784-6427)
1-800-361-6665 (Canada)
Au Canada
pour service en fran(;ais:
1-800-LE-FOYER
_
(1-800-533-6937)
www.sears.ca
® Registered Trademark / _u Trademark / SMSendce Mark of Sears, Roebuck and Co,
® Marca Registrada / _ Mama de Fdbltca / su Marca de Servicio de Sears, Roebuck and CO.
_,c Marque de ¢ommeme I _o Marque ddpos_te de Sears, Roebuck and Co.
© Sears, Roebuck and Co.
Part NO,: 3828A20315H


![CRRFTSMRN °] - at snowblowerguide.com](http://vs1.manualzilla.com/store/data/006202620_1-711fb90bb2c79d693479b4ac54c29ad0-150x150.png)