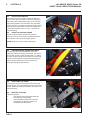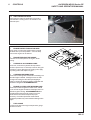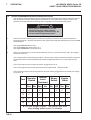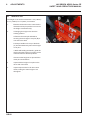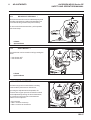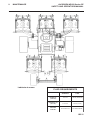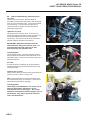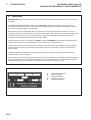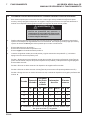
1
24491G-ES (rev.1)
Safety and Operation Manual
Manual de seguridad y funcionamiento
AR 250 Turbo
Series: CE - Engine type: Kubota V1505-TBB-EC-1-S1
Product code: JHAF030
Serie: CE - Motor: Kubota V1505-TBB-EC-1-S1
Código de producto: JHAF030
WARNING: If incorrectly used this machine can cause severe
injury. Those who use and maintain this machine should be
trained in its proper use, warned of its dangers and should
read the entire manual before attempting to set up, operate,
adjust or service the machine.
ADVERTENCIA: Si se usa de forma incorrecta, esta máquina
puede causar graves lesiones. Cualquier persona que use y
mantenga esta máquina deberá estar entrenada en su uso
correcto, instruida de sus peligros y deberá leer el manual
completamente antes de tratar de instalar, operar, ajustar o
revisar la máquina.
GB
English
RJ 100 122003
© 2003, Ransomes Jacobsen Limited. All Rights Reserved
© 2003, Ransomes Jacobsen Limited. Todos los derechos reservados
1
CONTENTS
2
2.1
2.2
2.3
2.3.1
2.3.2
JACOBSEN AR250 Series CE
SAFETY AND OPERATORS MANUAL
CONTENTS
PAGE
INTRODUCTION
IMPORTANT .............................................................. 2
PRODUCT IDENTIFICATION ....................................... 2
GUIDELINES FOR THE DISPOSAL OF SCRAP
PRODUCTS ............................................................... 2
DURING SERVICE LIFE .............................................. 2
END OF SERVICE LIFE ............................................... 2
3
3.1
3.2
3.3
3.4
3.5
3.6
3.7
3.8
3.9
SAFETY INSTRUCTIONS
OPERATING INSTRUCTIONS ..................................... 4
SAFETY SIGNS .......................................................... 4
STARTING THE ENGINE ............................................. 4
DRIVING THE MACHINE ............................................ 4
TRANSPORTING ........................................................ 4
LEAVING THE DRIVING POSITION ............................ 5
SLOPES ..................................................................... 5
BLOCKED CUTTING CYLINDERS .............................. 5
ADJUSTMENTS, LUBRICATION AND
MAINTENANCE ......................................................... 5
4
4.1
4.2
4.3
4.4
4.5
4.6
4.7
4.8
4.9
SPECIFICATIONS
ENGINE SPECIFICATION ............................................ 7
MACHINE SPECIFICATION ........................................ 7
DIMENSIONS ............................................................. 7
VIBRATION LEVEL .................................................... 7
SLOPES ..................................................................... 7
CUTTING UNIT SPECIFICATION ................................ 8
RECOMMENDED LUBRICANTS ................................. 8
CUTTING PERFORMANCE (AREA) ............................ 8
CONFORMITY CERTIFICATES .................................. 9
5
5.1
5.2
DECALS
SAFETY DECALS ..................................................... 11
INSTRUCTION DECALS ............................................ 11
6
6.1
6.2
6.3
6.4
6.5
6.6
6.7
6.8
6.9
6.10
6.11
6.12
6.13
6.14
CONTROLS
STARTER KEY SWITCH ............................................ 12
THROTTLE CONTROL LEVER .................................. 12
STEERING WHEEL RAKE ADJUSTMENT .................. 12
TRACTION FOOT PEDAL ......................................... 12
NEUTRAL LATCH (B) ............................................... 12
SPEED LIMITER ....................................................... 13
PARK BRAKES .......................................................... 13
HYDRAULIC LIFT LEVER ......................................... 13
UNIT COUNTERBALANCE CONTROL ....................... 14
CUTTING UNIT SWITCHES ....................................... 14
UNIT TRANSPORT STOP ......................................... 15
INSTRUMENT PANEL ............................................... 15
HOURMETER ............................................................ 16
BONNET RELEASE KEY ............................................ 16
7
7.1
7.2
OPERATION
DAILY INSPECTION .................................................. 17
OPERATOR PRESENCE AND SAFETY INTERLOCK
SYSTEM ................................................................... 18
OPERATING PROCEDURE ......................................... 19
STARTING THE ENGINE ............................................ 20
DRIVING ................................................................... 20
MOWING .................................................................. 21
TO STOP THE ENGINE .............................................. 21
PUSHING THE MACHINE WITH THE ENGINE
STOPPED ................................................................. 21
7.3
7.4
7.5
7.6
7.7
7.8
CONTENTS
PAGE
8
8.1
8.2
8.3
8.4
8.4.1
8.4.2
8.4.4
8.4.5
8.4.3
8.4.6
8.4.7
8.4.8
8.4.9
ADJUSTMENTS
HEIGHT OF CUT ....................................................... 22
GENERAL INSTRUCTIONS FOR GRAMMER SEATS . 23
SEAT (Grammer GS85/90) ...................................... 25
AIR SUSPENSION SEAT (Grammer MSG75 -521) .. 26
WEIGHT ADJUSTMENT ............................................ 26
FORE/AFT ADJUSTMENT ......................................... 26
SEAT HEATER ........................................................... 27
LUMBAR SUPPORT ................................................. 27
BACKREST EXTENSION ........................................... 27
ARMRESTS .............................................................. 28
ARMREST ADJUSTMENT ........................................ 28
BACKREST ADJUSTMENT ....................................... 28
MAINTENANCE ........................................................ 29
9
9.1
9.2
MAINTENANCE
LUBRICATION AND MAINTENANCE CHART ............ 30
DAILY CHECKS (Every 8 working hours) ............. 32
10
GUARANTEE / SALES & SERVICE ............................ 33
GB-1
2
JACOBSEN AR250 Series CE
SAFETY AND OPERATORS MANUAL
INTRODUCTION
2.1
IMPORTANT
IMPORTANT: This is a precision machine and the service obtained from it depends on the way it is
operated and maintained.
This SAFETY AND OPERATORS MANUAL should be regarded as part of the machine. Suppliers of both
new and second-hand machines are advised to retain documentary evidence that this manual was provided
with the machine.
This machine is designed solely for use in customary grass cutting operations. Use in any other way is
considered as contrary to the intended use. Compliance with and strict adherence to the conditions of
operation, service and repair as specified by the manufacturer, also constitute essential elements of the
intended use.
Before attempting to operate this machine, ALL operators MUST read through this manual and make
themselves thoroughly conversant with Safety Instructions, controls, lubrication and maintenance.
Accident prevention regulations, all other generally recognized regulations on safety and occupational
medicine, and all road traffic regulations shall be observed at all times.
Any arbitrary modifications carried out on this machine may relieve the manufacturer of liability for any
resulting damage or injury.
It is important that during the life of the machine wearing and replaceable parts are disposed of in an
environmentally responsible way using the resources available in the country where it is used. There are
guidelines in this manual for the eventual decommissioning of the mower once it has no further use.
2.2 PRODUCT IDENTIFICATION
B
A
C
D
GB-2
E
A
B
C
D
E
Machine Name
Serial Number
Year of Manufacture
Machine Weight
Engine Power
2
2.3
INTRODUCTION
JACOBSEN AR250 Series CE
SAFETY AND OPERATORS MANUAL
GUIDELINES FOR THE DISPOSAL
OF SCRAP PRODUCTS
into material groups for recycling and
disposal consistent with available facilities.
More common separation types are as
follows:
• Steel
• Non ferrous metals
• Aluminium
• Brass
• Copper
• Plastics
• Identifiable
•
Recyclable
•
Non recyclable
• Not identified
• Rubber
• Electrical & Electronic Components
2.3.1 DURING SERVICE LIFE
Used oil, oil filters and engine coolant are
hazardous materials and should be handled in a safe
and environmentally responsible way.
In the event of a fluid leak, contain the spill to
prevent it entering the ground or drainage system.
Local legislation will dictate how such spills are to
treated.
Following the maintenance procedures laid out in
this manual will ensure that the impact the machine
has on the local environment is controlled.
When it has been identified that a turf care product
has no further functional value and requires disposal,
the following actions should be taken.
•
Items that cannot be separated
economically into different material groups
should be added to the ‘General waste’
area.
•
Do not incinerate waste.
2.3.2 END OF SERVICE LIFE
These guidelines should be used in conjunction with
applicable Health, Safety and Environmental
legislation and use of approved local facilities for
waste disposal and recycling.
•
Position the machine in a suitable location
for any necessary lifting equipment to be
used.
•
Use appropriate tools and Personal
Protective Equipment (PPE) and take
guidance from the technical manuals
applicable to the machine.
•
Remove and store appropriately:
1.
Batteries
2.
Fuel residue
3.
Engine coolant
4.
Oils
•
Disassemble the structure of the machine
referring to the technical manuals where
appropriate. Special attention should be
made for dealing with ‘stored energy’ within
pressurised elements of the machine or
tensioned springs.
•
Any items that still have a useful service
life as second hand components or can be
re-serviced should be separated and
returned to the relevant centre.
•
Other worn out items should be separated
Finally update machinery records to indicate that the
machine has been taken out of service and
scrapped. Provide this serial number to Jacobsen
Warranty department to close off relevant records.
GB-3
3
JACOBSEN AR250 Series CE
SAFETY AND OPERATORS MANUAL
SAFETY INSTRUCTIONS
This safety symbol indicates important safety
messages in this manual. When you see this
symbol, be alert to the possibility of injury, carefully
read the message that follows, and inform other
operators.
•
3.1
•
•
•
•
3.2
•
3.3
•
•
3.4
•
•
•
•
GB-4
OPERATING INSTRUCTIONS
Ensure that the instructions in this book
are read and fully understood.
No person should be allowed to operate
this machine unless they are fully
acquainted with all the controls and the
safety procedures.
Never allow children or people unfamiliar
with these instructions to use this
machine. Local regulations may restrict
the age of the operator.
SAFETY SIGNS
It is essential all safety labels are kept
legible, if they are missing or illegible they
must be replaced. If any part of the
machine is replaced and it originally
carried a safety label, a new label must be
affixed to the replacement part. New
safety labels are obtainable from
Ransomes dealers.
STARTING THE ENGINE
Before starting the engine check that the
brakes are applied, drives are in neutral,
guards are in position and intact, and
bystanders are clear of the machine.
Do not run the engine in a building without
adequate ventilation.
DRIVING THE MACHINE
Before moving the machine, check to
ensure that all parts are in good working
order, paying particular attention to
brakes, tyres, steering and the security of
cutting blades.
Replace faulty silencers, mow only in
daylight or good artificial light
Always observe the Highway Code both on
and off the roads. Keep alert and aware at
all times. Watch out for traffic when
crossing or near roadways.
Stop the blades rotating before crossing
surfaces other than grass.
•
•
•
•
•
•
•
3.5
•
•
•
•
Remember that some people are deaf or
blind and that children and animals can
be unpredictable.
Keep travelling speeds low enough for an
emergency stop to be effective and safe
at all times, in any conditions.
Remove or avoid obstructions in the area
to be cut, thus reducing the possibility of
injury to yourself and/or bystanders.
When reversing, take special care to
ensure that the area behind is clear of
obstructions and/or bystanders. DO
NOT carry passengers.
Keep in mind that the operator or user is
responsible for accidents or hazards
occurring to other people or their
property.
When the machine is to be parked,
stored or left unattended, lower the
cutting means unless the transport locks
are being used.
While mowing, always wear substantial
footwear and long trousers. Do not
operate the equipment when barefoot or
wearing open sandals.
Check the grass catcher frequently for
wear or deterioration. After striking a
foreign object. Inspect. the lawnmower
for damage and make repairs before
restarting and operating the equipment.
If the machine starts to vibrate
abnormally, check immediately.
TRANSPORTING
Ensure that the cutting units are
securely fastened in the transport
position. Do not transport with cutting
mechanism rotating.
Drive the machine with due consideration
of road and surface conditions, inclines
and local undulations.
Sudden decelerating or braking can
cause the rear wheels to lift.
Remember that the stability of the rear of
the machine is reduced as the fuel is
used.
3
3.6
•
•
JACOBSEN AR250 Series CE
SAFETY AND OPERATORS MANUAL
SAFETY INSTRUCTIONS
LEAVING THE DRIVING POSITION
Park the machine on level ground.
Before leaving the driving position, stop the
engine and make sure all moving parts are
stationary. Apply brakes and disengage all
drives. Remove the starter key.
3.7 SLOPES
TAKE EXTRA CARE WHEN WORKING ON
SLOPES
•
Local undulations and sinkage will change
the general slope. Avoid ground conditions
which can cause the machine to slide.
•
Keep machine speeds low on slopes and
during tight turns.
•
Sudden decelerating or braking can cause
the rear wheels to lift. Remember there is
no such thing as a “safe” slope.
•
Travel on grass slopes requires particular
care.
DO NOT USE ON SLOPES GREATER THAN 15°
IMPORTANT: When working on any slope set the
weight transfer, if fitted to its maximum (+) setting.
3.8 BLOCKED CUTTING CYLINDERS
•
Stop the engine and make sure all moving
parts are stationary.
•
Apply brakes and disengage all drives.
•
Release blockages with care. Keep all parts
of the body away from the cutting edge.
Beware of energy in the drive which can
cause rotation when the blockage is released.
•
Keep other people away from the cutting units
as rotation of one cylinder can cause the
others to rotate.
3.9 ADJUSTMENTS, LUBRICATION AND
MAINTENANCE
•
Stop the engine and make sure all moving
parts are stationary.
•
Apply brakes and disengage all drives.
•
Read all the appropriate servicing instructions.
•
Use only the replacement parts supplied by
the original manufacturer.
•
When adjusting the cutting cylinders take
care not to get hands and feet trapped when
rotating cylinders.
•
Make sure that other people are not touching
any cutting units, as rotation of one cylinder
can cause the others to rotate.
•
To reduce the fire hazard, keep the engine,
silencer and battery compartments free of
grass, leaves or excessive grease.
•
Replace worn or damaged parts for safety.
•
•
•
•
•
•
•
•
•
•
•
•
•
•
•
•
•
When working underneath lifted parts or
machines, make sure adequate support Is
provided.
Do not dismantle the machine without
releasing or restraining forces which can
cause parts to move suddenly.
Do not alter engine speed above maximum
quoted in Engine Specification. Do not
change the engine governor settings or
overspeed the engine. Operating the engine
at excessive speed may increase the hazard
of personal injury.
When refuelling, STOP THE ENGINE, DO
NOT SMOKE. Add fuel before starting the
engine, never add fuel while the engine is
running.
Use a funnel when pouring fuel from a can into
the tank.
Do not fill the fuel tank beyond the bottom of
the filler neck.
Replace all fuel tank and container caps
securely.
Store fuel in containers specifically designed
for this purpose.
Refuel outdoors only and do not smoke while
refuelling.
If fuel is spilled, do not attempt to start the
engine but move the machine away from the
area of spillage and avoid creating any source
of ignition until fuel vapours have dissipated.
Allow the engine to cool before storing in any
enclosure.
Never store the equipment with fuel in the
tank inside a building where fumes may reach
an open flame or spark.
If the fuel tank has to be drained, this should
be done outdoors.
Do not spill fuel onto hot components.
When servicing batteries, DO NOT SMOKE,
and keep naked lights away.
Do not place any metal objects across the
terminals.
When Pressure Washing the Mower. Turn
the engine off and remove the starter key.
If the engine has been running, it should be
allowed to cool sufficiently to prevent damage
to the block and exhaust manifold. Never
force water into any electrical components,
the air cleaner or exhaust muffler as water
could enter the engine cylinder and cause
damage.
GB-5
3
SAFETY INSTRUCTIONS
JACOBSEN AR250 Series CE
SAFETY AND OPERATORS MANUAL
DANGER - Indicates an imminently hazardous
situation which, if not avoided, WILL result in death
or serious injury.
IMPORTANT: Transport speed is for highway
use only. Never select transport speed on grass
areas or uneven or unsurfaced roads or tracks.
WARNING - Indicates a potentially hazardous
situation which, if not avoided, COULD result in
death or serious injury.
The operating Instructions for the Cutting Units are
contained in a separate Publication .
CAUTION - Indicates a potentially hazardous
situation which, if not avoided, MAY result in minor
or moderate injury and property damage. It may
also be used to alert against unsafe practices.
WARNING
WARNING
Hydraulic Fluid escaping under pressure
can penetrate skin and do serious
damage. Immediate medical assistance
must be sought.
WARNING
Batteries produce explosive gases and
contain corrosive acid and supply levels
of electrical current high enough to cause
burns.
WARNING
Before releasing transport latches it is
important that all cutting units are fully
raised.
1. Park the machine on level ground.
2. With the engine running at operating
speed raise the cutting units to their
maximum position by operating lift
levers whilst seated in the driving
position.
3. Disengage drives, stop the engine and
make sure all moving parts are
stationary. Apply brakes and remove
the starter key.
4. transport latches can now be released.
GB-6
California Proposition 65
Engine Exhaust, some of its constituents,
and certain vehicle components contain
or emit chemicals known to the state of
California to cause cancer and birth
defects or other reproductive harm.
WARNING
DO NOT USE ON SLOPES GREATER THAN 15°
4
4.1
JACOBSEN AR250 Series CE
SAFETY AND OPERATORS MANUAL
SPECIFICATIONS
ENGINE SPECIFICATION
4.3 DIMENSIONS
Width of cut:
2.5 metres (98in)
Overall width:
2.6 metres(104in)
Overall width:
2.13 metres (84in)
(transport)
Overall height:
1.6 metres (63in)
Overall length:
3.1 metres (122in)
Overall weight of
machine:
1560kg (3432lb)
TYPE:
Kubota 31.3KW (42HP) @ 3000
RPM, 4 cylinder (in line) Turbo
charged Diesel engine, 4 stroke,
water cooled, 1498cc (91.44
cu.in) with 12V electric start.
Model:
V1505-T-E2B-RANUK-3
Maximum Speed: 3000 ± 50 RPM (No load)
Idle Speed:
1500
RPM
Oil Sump Capacity:6.4 litres (11.26 Imp.pints)
Fuel:
No. 2-D Diesel fuel (ASTM D975)
4.2
4.4 VIBRATION LEVEL
The machine was tested for whole body and hand/
arm vibration levels. The operator was seated in the
normal operating postion with both hands on the
steering mechanism. The engine was running and
the cutting device was rotating with the machine
stationary.
MACHINE SPECIFICATION
Frame construction:Heavy duty formed steel chassis
with box section frame rails.
Cutting unit drive: Fixed displacement hydraulic
motors directly coupled to
cutting unit.
Transmission:
Full time 4-wheel drive. Direct
coupled variable displacement
pump to direct coupled 29 cu in
front, 21 cu in rear wheel motors.
Speeds:
Cutting:
0 - 12km/h (0 - 7.5 mph)
FORWARD
Transport:
0 - 14km/h (0 - 8.5mph)
FORWARD
Reverse:
0 - 6.4km/h (0 -4 mph)
Steering:
Hydrostatic power steering, with
adjustable tilt steering wheel.
Ground pressure: 14p.s.i. (1 kg/cm2 )
Brakes:
Fuel Tank
Capacity:
Hydraulic Tank
Capacity:
Battery:
Standard ISO 5349: 1986 Mechanical vibration.
Guidelines for the measurement and the
assessment of human exposure to handtransmitted vibration.
Max LH or RH
AR250 TURBO
SeriesCE
Hand / Arm Acceleration
level
Accelerations m/s
2
X Aeq
Y Aeq
Z Aeq
0.899
0.536
0.546
Dominant Value
0.899
Standard ISO 2631-1: 1985 Evaluation of human
exposure to whole body vibration -- Part 1: General
requirements.
Hydrostatic braking with
mechanical type band parking
brakes, 260mm x 45mm
(10.25in x 1.75in) on front
wheels.
AR250 TURBO
SeriesCE
Whole Body
Acceleration
level
Mean
45.4 litres (10 Imp. galls) 12 US
galls
Floor Location
Seat Location
Accelerations m/s
2
x
y
z
x
y
z
0.0187
0.0218
0.0254
0.021
0.0303
0.025
Accelerations m/s
2
4.5 SLOPES
DO NOT USE ON SLOPES GREATER THAN 15°
The slope 15° was calculated using static stability
measurements according to the requirements of
EN 836.
37.8 litres (8.3 Imp. galls) 10 US
galls
Exide 093 (SAE 500)
TYRE PRESSURES
Front Wheel
Rear Wheel
Product
Tyre Siz e
Tyre Type
Titan Ultra Trac 4pr
AR 250
26.5 x 14.00 - 12
Tyre Pressure
1 4 - 2 0 p si
Tyre Siz e
1.00 - 1.37 bar
Tyre Type
Titan Ultra Trac 4pr
Tyre Pressure
1 4 - 2 0 p si
1.00 - 1.37 bar
20 x 10.00 - 8
GB-7
JACOBSEN AR250 Series CE
SAFETY AND OPERATORS MANUAL
4.6
CUTTING UNIT SPECIFICATION
General: Five 559mm (22in) rotary mulching/side
discharge decks supported by equal ratio
lift arms.
Drive:
Fixed displacement hydraulic motors
directly coupled to cutting unit.
Control: Cutting unit lift lever with automatic shutoff
and safety interlock restart.
Cutting Blades:
Envirodeck
Patent pending twin blades. Lower blade
559mm (22in), upper blade 546mm
(21.5in)
Side Discharge
Low Lift Blade
Construction:
Heavy duty, welded pressed steel.
Height of cut:
Adjustable in 6mm (0.25in) increments
19mm(0.75in) to 133mm(5.25in) no tool
required.
Suspension:
Steerable floating head.
Rear roller:
102mm (4in) diameter smooth roller.
4.7
RECOMMENDED LUBRICANTS
Engine oil:
Should be to MIL-L-2104C or to
A.P.I. Classification SE/SF/SG
grades. [10W-30]
Hydraulic Oil:
To A.P.I. Classification CE/SF
grades
SAE 10W-30
Grease:
Shell Darina R2, or equivilant.
4.8
CUTTING PERFORMANCE (AREA)
2.7 hectares/hr. at 12 km/hr. ( 6.67acres/hr at 7.5
mph)
10% allowance is included for normal overlaps and
turning at the end of each cut.
GB-8
4
SPECIFICATIONS
4.9
CONFORMITY CERTIFICATES
JACOBSEN AR250 Series CE
SAFETY AND OPERATORS MANUAL
EC Declaration of Conformity • Déclaration de Conformité CE •
EG Conformiteits-Declaratie • EG-Konformitatsbescheinigung •
Certificato di Conformità CE • EF Konformitetserklæring •
EU Uppfyllandecertifikat • Ilmoitus yhdenmukaisuudesta ey:n sääntöjen kanss • Declaración de
Conformidad de la CE • Declaração de Conformidade da CE
We the undersigned • Nous, soussignés • Wij, ondergetekenden • Wir, die Unterzeichnenden • Noi sottoscritti Undertegnede •
Undertecknarna • Me allekirjoittaneet • Los abajo firmantes • Nós, abaixo assinados
Ransomes Jacobsen Limited
West Road, Ransomes Europark,
Ipswich, England, IP3 9TT
Declare that the machine Described Below • Certifions que la machine suivante • verklaren dat onderstaand beschreven machine •
erklären, dass die nachfolgend beschriebene Maschine • Dichiariamo che la macchina descritta di seguito • Erklærer, at følgende maskine •
Deklarerar att den maskin som beskrivs nedan • vahvistamme, että alla kuvattu kone • Certificamos que la máquina descrita abajo •
declaramos que a máquina a seguir descrita
Make & Type • Nom & Type • Merk & Type • Marke und Typ • Marca e tipo •
Fabrikat og type • Fabrikat & typ • Malli ja tyyppi • Marca y Tipo • Marca & Tipo .................................................... Jacobsen AR250 Turbo
Category • Modèle • Categorie • Kategorie • Categoria • Kategori • Luokka •
Categoría • Categoria ............................................................................................................................................... Ride on Rotary Mower
Series • Série • Serie • Sarja .................................................................................................................................... CE
Engine • Motor • Moteur • Motore • Moottori ............................................................................................................. Kubota
Type • Typ • Tipo • Tyyppi ........................................................................................................................................ V1505-T-E2B-RAN.UK-1
Net Installed Power • Puissance nette • Netto geïnstalleerd vermogen •
installierte Antriebsleistung • Potenza installata netta • Nettoeffekt installere •
Installerad nettoeffekt • Asennettu nettoteho • Potencia instalada neta •
Potência real instalada ............................................................................................................................................. 31.3 KW
Cutting Width • Largeur de coupe • Maaibreedte • Schnittbreite •
Larghezza di taglio • Klippebredde • Klippbredd • Leikkuuleveys •
Anchura de corte • Largura do corte ...................................................................................................................... 250cm
Complies with the provisions of the following European directives and amendments and the regulations transposing it into national law •
Est conforme aux prescriptions des normes, modifications et règles européennes suivantes • voldoet aan de bepalingen van de volgende
Europese Richtlijnen en Amendementen, alsmede aan de verordeningen die deze omzetten in nationale wetgeving • den Bestimmungen der
folgenden Europa-Richtlinien einschließlich aller Änderungen und Ergänzungen sowie den Vorschriften, die diese in das nationale Recht
umsetzen, entspricht • soddisfa quanto previsto dalle seguenti direttive ed emendamenti europei e dalle normative che li riportano in legge
nazionale • Overholder bestemmelserne i følgende EF-direktiver med ændringer og i de forordninger, hvorved de omsættes til national lov •
Uppfyller kraven i följande europeiska direktiv med tillägg och regler transponerade till nationell lagstiftning • täyttää seuraavana mainittujen
Euroopan direktiivien ja muutosten ja säännösten asettamat edellyt• Cumple las las siguientes regulaciones europeas siguientes
Machinery Safety Directive • Directive de sécurité des machines •
Richtlijn Machineveiligheid • Richtlinie zur Maschinensicherheit •
Direttiva sulla sicurezza del macchinario • Maskinsikkerhedsdirektivet •
Maskinsäkerhetsdirektiv • Koneen turvallisuutta koskeva direktiivi •
Directiva de seguridad de maquinaria • Directiva de segurança de máquinas ...................................................... 98/37/EC
EMC Directive • Directive de compatibilité électromagnétique • EMC Richtlijn •
EMK-Richtlinie • Direttiva EMC • EMC-direktivet • Elektromagnetiskt kompatibilitetsdirektiv •
EMC-direktiivi • Directiva EMC ................................................................................................................................... 89/336/EC
ROPS Directive • Directive de ROPS • ROPS Richtlijn • ROPS-Richtlinie •
Direttiva ROPS • ROPS-direktivet • ROPS direktiv • ROPS-direktiivi • Directiva ROPS ............................................ 86/298/EC
Noise in the Environment Directive • Directiv • Richtlijn Milieulawaa •
Richtlinie zum Umgebungslärm • Direttiva sulla rumorosità nell’ambiente •
Støjemissionsdirektivet • Bullerdirektiv • Melu ympäristöä koskevassa direktiivissä •
Directiva sobre ruido en el ambiente • Directiva Ruído no Ambiente ...................................................................... 2000/14/EC
Measured Sound Power Level • Niveau de puissance sonore assuré •
Gegarandeerd geluidsvermogenniveau • Garantierter Schallleistungspege •
Livello di potenza del suono misurato • Målt lydeffektniveau • Uppmätt ljudfraftsnivå •
Mitattu åånitehon taso • Nivel de Potencia Sonora • Nívelde intensidade de som medido ..................................... 104 dB(A) LWA
Guaranteed Sound Power Level • Niveau de puissance sonore assuré •
Gegarandeerd geluidsvermogenniveau • Garantierter Schallleistungspege •
Livello di potenza del suono misurato • Garanteret lydeffektniveau •
Garanterad ljudtrycksnivå • Taattu äänitehon taso • Nivel Garantizado de Potencia Sonora •
Nível garantido de intensidade sonora .................................................................................................................... 105 dB(A) LWA
GB-9
4
SPECIFICATIONS
JACOBSEN AR250 Series CE
SAFETY AND OPERATORS MANUAL
ÅÅ ÄÞëùóç Óõììüñöùóçò •
Prohlášení o shodì ES • Dikjarazzjoni ta’ Konformità tal-KE • EÜ vastavusavaldus •
Deklaracja zgodnoœci WE • EC Megfelelõsségi nyilatkozat •
Izjava ES o skladnosti • EC Atbilstîbas deklarâcija •
EC Vyhlásenie o zhode • EC Uyum Beyaný
Åìåßò, ïé õðïãñÜöïíôåò •
My, ní•e podepsaní • Ahna hawn ta’t iffirmati • Meie, allakirjutanud • My, nizej podpisani • Alulírott • Spodaj podpisani • Mçs, apakðâ
parakstîjuðies • My, dole podpísaní • Bizler
Ransomes Jacobsen Limited
West Road, Ransomes Europark,
Ipswich, England, IP3 9TT
Äçëþíïõìå ðùò ôï ìç÷Üíçìá ðïõ ÐåñéãñÜöåôáé ÐáñáêÜôù •
Prohlašujeme, •e ní•e popsaný stroj • Niddikjaraw li l-magna deskritta hawn taht • Deklareerime, et allkirjeldatud masin • Deklarujemy, ze
opisana poni¿ej maszyna • Igazoljuk, hogy az alábbi berendezés • Izjavljamo, da je naslednja naprava • Deklarçjam, ka zemâk aprakstîtâ
maðîna • Vyhlasujeme, •e ni•šie uvedené zariadenie • Aþaðýda belirtilen makineyi beyan ederiz
ÌÜñêá & Ôýðïò • Znaèka & typ •
Isem u Ghamla • Mudel & tüüp • Marka i typ • Gyártó és típus • Znamka in tip • Modelis un tips • Model a typ •
Marka ve Türü .......................................................................................................................................................... Jacobsen AR250 Turbo
Êáôçãïñßá •
Kategorie • Kategorija • Kategooria • Kategoria • Kategória • Razred • Kategorija • Kategória •
Kategorisi ................................................................................................................................................................. Ride on Rotary Mower
ÓåéñÜ •
Øada • Serje • Seeria • Seria • Sorozat • Serija • Sçrija • Séria • Seri .................................................................. CE
ÊéíçôÞñáò •
Motor • Magna • Mootor • Silnik • Motor • Motor • Dzinçjs • Motor • Motor .................................................................. Kubota
Ôýðïò •
Typ • Tip • Tüüp • Typ • Típus • Tip • Tips • Typ • Tür ............................................................................................... V1505-T-E2B-RAN.UK-1
ÊáèáñÞ ÅãêáôáóôçìÝíç Éó÷ýò •
Èistý instalovaný výkon • Sahha Netta Installata • Võimsus • Moc (netto) • Nettó telepített teljesítmény •
Neto vgrajena moè • Faktiskâ energoapgâde • Èistý u•itoèný výkon • Net Kurulu Güç ........................................... 31.3 KW
ÐëÜôïò ÊïðÞò •
Délka øezu • Wisa’ tal-Qtugh • Niidulaius • Szerokoœæ koszenia • Vágószélesség • Širina rezanja •
Pïauðanas platums • Šírka záberu • Kesme Geniþliði ................................................................................................. 250cm
Óõììïñöþíåôáé ìå ôéò äéáôÜîåéò ôùí ðáñáêÜôù Åõñùðáúêþí ïäçãéþí êáé ôñïðïðïéÞóåùí êáé ôïõò êáíïíéóìïýò ðïõ ôï ìåôáöÝñïõí
óôïõò ôïðéêïýò íüìïõò •
Vyhovuje ustanovením následujících evropských smìrnic a dodatkù a pøedpisùm pøevádìjícím stroj do vnitrostátního práva • Tikkonforma
mad-dispo¿izzjonijiet tad-direttivi u l-emendi Ewropej segwenti u mar-regolamenti li jimplimentawhom fil-ligi nazzjonali • Vastab järgmiste
Euroopa direktiivide ja paranduste sätetele ning nende riiklikesse seadusandlustesse üleviimise määrustele • Jest zgodna z postanowieniami
nastêpuj¹cych dyrektyw europejskich, poprawek i przepisów przenosz¹cych je na prawo krajowe • Megfelel a következõ európai
elõírásoknak, kiegészítéseknek, valamint az azokat a nemzeti törvénykezésbe iktató szabályoknak • Skladna z doloèbami naslednjih evropskih
direktiv in dopolnitev ter uredb, s katerimi so bile prenesene v nacionalno zakonodajo • Atbilst ðâdu Eiropas Savienîbas direktîvu, to labojumu
un noteikumu, kas nosaka to ievieðanu nacionâlajâ likumdoðanâ, prasîbâm • Spåòa ustanovenia nasledujúcich európskych smerníc a zmien
a predpisov prevádzajúcich tieto ustanovenia do národného práva • Aþaðýdaki Avrupa yönergeleri ve düzeltmeleri ile ulusal yasa
düzenlemelerine ait maddeler ile uyumludur •
Ïäçãßá ÁóöÜëåéáò Ìç÷áíÞìáôïò •
Smìrnice ke strojové bezpeènosti • Direttiva dwar is-Sigurtà tal-Makkinarju • Masinaohutuse direktiiv •
Dyrektywa Maszynowa • Berendezés-biztonsági elõírás • Direktiva o varnosti strojev •
Maðînbûves droðîbas direktîva • Smernica o bezpeènosti strojných zariadení • Makine Güvenlik Yönergesi ......... 98/37/EC
Ïäçãßá ÇÌÓ •
Smìrnice k elektromagnetické kompatibilitì • Direttiva EMC • EMC direktiiv • Dyrektywa EMC • Európai berendezés megfelelõségi elõírás •
Direktiva o elektromagnetni zdru•ljivosti • Elektromagnçtiskâs savietojamîbas direktîva • Smernica o elektromagnetickej kompatibilite •
EMC Yönergesi ......................................................................................................................................................... 89/336/EC
Ïäçãßá ROPS •
Smìrnice k ochrannì pøi pøevr•ení stroje • Direttiva ROPS • ROPS direktiiv • Dyrektywa ROPS • ROPS elõírás •
Direktiva ROPS • ROPS direktîva • Smernica o bezpeènostných konštrukciách • ROPS Yönergesi ........................ 86/298/EC
Ïäçãßá Ðåñéâáëëïíôéêïý Èïñýâïõ •
Smìrnice k hluènosti prostøedí • Direttiva dwar il-Hsejjes fl-Ambjent • Keskkonnamüra taseme direktiiv •
Dyrektywa dotycz¹ca emisji ha³asu do otoczenia • Zajszínt és Környezetvédelmi elõírás • Direktiva o hrupu v okolju •
Direktîva par trokðòu emisiju vidç • Smernica o hluku v •ivotnom prostredí • Çevre Yönergesindeki Gürültü .......... 2000/14/EC
ÌåôñçìÝíï Åðßðåäï Éó÷ýïò ¹÷ïõ •
Mìøená hladina akustického výkonu • Livell Imkejjel tas-Sahha tal-Hoss • Mõõdetud helitugevuse tase •
Zmierzony poziom mocy akustycznej • Mért zajszínt érték • Izmerjena raven zvoène moèi • Mçrîtais skaòas jaudas lîmenis •
Nameraná hladina akustického výkonu • Ölçülen Ses Gücü Seviyesi ...................................................................... 99 dB(A) LWA
ÅããõçìÝíï Åðßðåäï Éó÷ýïò ¹÷ïõ •
Garantovaná hladina akustického výkonu • Livell Garantit tas-Sahha tal-Hoss • Tagatud helitugevuse tase • Gwarantowany poziom mocy
akustycznej • Szavatolt zajszínt érték • Izmerjena raven zvoène moèi • Garantçtais skaòas jaudas lîmenis • Zaruèená hladina akustického
výkonu • Garantili Ses Gücü Seviyesi ..................................................................................................................... 105 dB(A) LWA
GB-10
5
DECALS
5.1
JACOBSEN AR250 Series CE
SAFETY AND OPERATORS MANUAL
SAFETY DECALS
A903491
Read Operator's Manual.
A903489
Keep a Safe Distance from the
Machine.
A903492
Stay Clear of Hot Surfaces.
A903488
Do Not Open or Remove Safety
Shields While the Engine is Running.
A903496
Caution Rotating Blades.
A903493
Avoid Fluid Escaping Under Pressure.
Consult Technical Manual for Service
Procedures.
A903490
Do Not Remove Safety Shields While
Engine is Running.
A911410
Danger of Explosion if the Battery
Terminals are Short Circuited.
A911416
Maximum permitable working slope.
A911434
Caution Diesel Fuel
4153197
Caution, Stop Engine &
Remove the Starter Key
Before Pressure Washing
4153197
4153197
5.2
INSTRUCTION DECALS
Description
A.
B.
C.
D.
E.
F.
G.
H.
I.
J.
K.
L.
M.
Diesel Fuel
Hydraulic Oil
Jacking Point
Cutting Unit Lift
Fwd/Rev Traction Pedal
Cutter Engage
Weight Transfer
Parking Brake
Ignition Switch
Tyre Pressure
CE Approval
Maximum Sound Power Level
Engine Rev's
GB-11
6
CONTROLS
6.1 STARTER KEY SWITCH
The starter key (A) should be turned clockwise to
the 'pre-heat' (No. 2) position to heat the glowplugs
when the green warning lamp goes out, on warning
lamp disply module, turn the starter key clockwise
to the 'start' (No. 3) position to start the engine. After
starting, the key should be released and allowed to
return automatically to the 'on' (No. 1) position for
normal running.
6.2 THROTTLE CONTROL LEVER
The lever (B) should be moved away from the
operator to increase the engine speed and towards
the operator to decrease the engine speed.
NOTE: Engine should be used at full speed.
6.3 STEERING WHEEL RAKE ADJUSTMENT
The steering wheel is adjustable for rake. The
clamping release knob (A) is situated on the side of
the control console on the left hand side. To adjust
turn the clamping knob anticlockwise to release and
pivot the steering wheel backwards and forwards to
obtain desired setting then lock in position by
turning clamping knob clockwise.
6.4 TRACTION FOOT PEDAL
To move the machine forward press the front of the
foot pedal (A). To reverse depress the rear of the foot
pedal. When the pedal is released it will return to its
neutral position.
6.5 NEUTRAL LATCH (B)
Has two functions:
1.
The engine cannot be started when the
Neutral Latch is depressed.
2.
The FWD/REV pedal will not work as
described if the Neutral Latch is not
simultaneously depressed.
GB-12
JACOBSEN AR250 Series CE
SAFETY AND OPERATORS MANUAL
6
CONTROLS
JACOBSEN AR250 Series CE
SAFETY AND OPERATORS MANUAL
6.6
SPEED LIMITER
The speed limiter (A) is operated by pivoting the
lever under the footpedal. When positioned under
the footpedal the machine is limited to cutting
speed, when not under the footpedal transport speed
is availabe.
6.7 PARK BRAKES
Push the pedal forward (A) until it locks to set
parking brake. Release parking brake by pushing the
brake pedal at the same time lever (B) is pulled up.
6.8 HYDRAULIC LIFT LEVER
The cutting units can be raised and lowered by
control lever (A) situated on the right hand side of
the operators seat and can be operated as follows:
To lift: Move the lever backwards and hold in position
until the units are at the required height.
To lower: Move the lever forwards and hold in this
position, the units will lower to ground level. The
lever automatically returns to a neutral position when
released.
NOTE: If any unit is raised out of work then lowered
into work again the blades will not rotate until the
mow foot switch is depressed.
NOTE: The units will only lift and lower when the
engine is running.
GB-13
6
CONTROLS
6.9 UNIT COUNTERBALANCE CONTROL
Cutting unit ground pressure can be varied within
preset limits and is controlled by the handwheel (A)
on the right hand side of the operator's seat located
next to the lift/lower lever. The handwheel is turned
clockwise to reduce the groundweight of the cutting
unit, improving slope climbing ability.
The handwheel is turned anti clockwise to increase
the ground weight of the unit. Increased down
pressure will reduce the likelyhood of cutting unit
bounce when cutting undulating ground. When
cutting level ground the normal setting is midway
way between the maximum and minimum positions.
6.10 CUTTING UNIT SWITCHES
To commence cutting ensure speed limiter is in
mow position and the units have been lowered.
Push bottom of the rocker switch (G) and depress
foot switch (A) Push top of rocker switch to stop
cutter unit rotation. (Cutting units stop rotating
automatically when raised.)
GB-14
JACOBSEN AR250 Series CE
SAFETY AND OPERATORS MANUAL
6
CONTROLS
JACOBSEN AR250 Series CE
SAFETY AND OPERATORS MANUAL
6.11 UNIT TRANSPORT STOP
Depressing the pedal (A) while lifting the cutting
units allows the cutting units to be raised for machine transport.
6.12 INSTRUMENT PANEL
A.
ENGINE PREHEAT INDICATOR LAMP
Colour green, on when the ignition switch is turned
clockwise to the pre-heat position. Once the lamp
goes out the engine can be started.
B.
ENGINE TEMPARATURE GUAGE
Indicates current temparature of engine, whilst
running.
C.
HYDRAULIC OIL WARNING LAMP
Colour red, on when the hydraulic oil temperature
reaches a preset level. If the lamp comes on bring the
machine to a stop, disengage the cutting units, apply
the parking brake and stop the engine.
D.
CHARGING WARNING LAMP
Colour red, on when ignition is switched on and will go out
when the engine is started. If the light comes on while
the engine is running, the fan belt may be slipping or
broken or a fault in the electrical system is indicated and
should be investigated. STOP IMMEDIATELY.
E.
ENGINE OIL PRESSURE WARNING LAMP
Colour red, on when the ignition is switched on, and will
go out once the engine has started. If the light comes on
while the engine is running - STOP IMMEDIATELY as
this indicates that the engine oil pressure is too low.
Check the level of oil in the sump and top up as
necessary. Check the oil pressure sender switch.
Continued operation may cause extensive damage to the
engine.
F.
FUEL GUAGE
Located to the left of the engine temparature guage.
Monitors fuel level.
GB-15
6
CONTROLS
6.13 HOURMETER
Located on the lefthand side of the steering tower,
above the parking brake. (A) Records engine running
hours.
6.14 BONNET RELEASE KEY
Release bonnet by inserting key (A) into base of
latch bracket.
GB-16
JACOBSEN AR250 Series CE
SAFETY AND OPERATORS MANUAL
7
OPERATION
7.1
JACOBSEN AR250 Series CE
SAFETY AND OPERATORS MANUAL
DAILY INSPECTION
CAUTION
The daily inspection should be performed
only when the engine is off and all fluids
are cold. Lower implements to the
ground, engage parking brake, stop
engine and remove ignition key.
1.
Perform a visual inspection of the entire unit, look for signs of wear, loose hardware and missing or
damaged components. Check for fuel and oil leaks to ensure connections are tight and hoses and
tubes are in good condition.
2.
Check the fuel supply, radiator coolant level, crankcase oil level and air cleaner is clean. All fluids
must be at the full mark with the engine cold.
3.
Make sure all cutting units are adjusted to the same height of cut.
4.
Check all tyres for proper inflation.
5.
Test the operator presence and safety interlock system.
GB-17
7
7.2
1.
JACOBSEN AR250 Series CE
SAFETY AND OPERATORS MANUAL
OPERATION
OPERATOR PRESENCE AND SAFETY INTERLOCK SYSTEM
The operator presence & safety interlock system prevents the engine from starting unless the neutral
latch is released, and the mowing device is switched off. The system also stops the engine if the
operator leaves the seat with the mowing device engaged or the neutral latch depressed.
WARNING
Never operate the equipment with the
operator presence & safety interlock
system disengaged or malfunctioning. Do
not disconnect or bypass any switch.
2.
Perform each of the following tests to ensure the operator presence & safety interlock system is
functioning properly. Stop the test and have the system inspected and repaired if any of the tests fail
as listed below:
•
•
•
The engine does not start in test 1;
The engine does start during tests 2 or 3.
The engine continues to run during test 4.
3.
Refer to the chart below for each test and follow the check () marks across the chart. Shut engine
off betwen each test.
Test 1: Represents normal starting procedure. The operator is seated, pedal neutral latch is released,
the operators feet are off the pedals and the mower engagement device is off. The engine should
start.
Test 2: The engine must not start if the mower engage device is on.
Test 3: The engine must not start if the neutral latch is depressed. (Traction Pedal)
Test 4: Start the engine in the normal manner, then turn mower engage device on and lift your weight
off the seat. Test
Operator
Seated
Neutral
Latch
Released
Yes
Yes
No
1
2
3
4
No
Mow er
Sw itch
On
Off
Yes
Engine
Starts
No
Lift your weight off seat. The cutting units must
stop rotating within seven (7) seconds
GB-18
7
OPERATION
7.3
JACOBSEN AR250 Series CE
SAFETY AND OPERATORS MANUAL
OPERATING PROCEDURE
CAUTION
To help prevent injury, always wear safety
glasses, leather work shoes or boots, a
hard hat and ear protection.
1.
Under no circumstances should the engine be started without the operator seated on the tractor.
2.
Do not operate tractor or attachments with loose, damaged or missing components. Whenever
possible mow when grass is dry
3.
First mow in a test area to become thoroughly familiar with the operation of the tractor and control
levers.
4.
Study the area to determine the best and safest operating procedure. Consider the height of the
grass, type of terrain, and condition of the surface. Each condition will require certain adjustments
or precautions.
5.
Never direct discharge of material toward bystanders, nor allow anyone near the machine while in
operation. The owner/operator is responsible for injuries inflicted to bystanders and/or damage to their
property.
CAUTION
Pick up all debris you can find before
mowing. Enter a new area cautiously
Always operate at speeds that allow you to
have complete control of the tractor
6.
Use discretion when mowing near gravel areas (roadway, parking areas, cart paths, etc.). Stones
discharged from the implement may cause serious injuries to bystanders and/or damage the
equipment.
7.
Disengage the drive motors and raise the implements when crossing paths or roads. Look out for
traffic.
8.
Stop and inspect the equipment for damage immediately after striking an obstruction or if the
machine begins to vibrate abnormally. Have the equipment repaired before resuming operation.
WARNING
Before you clean, adjust, or repair this
equipment, always disengage all drives,
lower implements to the ground, engage
parking brake, stop engine and remove
key from ignition switch to prevent injuries.
GB-19
7
JACOBSEN AR250 Series CE
SAFETY AND OPERATORS MANUAL
OPERATION
WARNING
DO NOT USE ON SLOPES GREATER THAN 15°
9.
Slow down and use extra care on hillsides. Read Section 3.7. Use caution when operating near drop
off points.
10.
Never use your hands to clean cutting units. Use a brush to remove grass clippings from blades.
Blades are extremely sharp and can cause serious injuries
OPERATION OF THE
MACHINE
Read the Safety Instructions.
BEFORE OPERATING FOR THE FIRST TIME
•
Check and adjust tyre pressure, if
necessary, to 1 kg/cm2 (14 psi).
•
Add diesel fuel to tank if neccesary.
•
Check engine oil and top-up, if necessary.
•
Check radiator coolant and top-up, if
necessary (50% antifreeze solution).
•
Make sure you understand the information
contained in the previous sections.
7.4 STARTING THE ENGINE
The following procedure is for starting cold engines.
1.
Ensure the FWD/REV pedal is in the
neutral position, the mow switch is off, the
throttle setting is in a mid position and the
parking brake is applied.
2.
Turn the ignition switch to position No.2
and hold until the glow plug light goes off
(5-10 sec.)
3.
Turn ignition key fully clockwise to the
start position and operate the starter motor
until the engine starts (This should only
take a few seconds)
4.
When the engine starts, release the key
immediately and it will return to the RUN
position.
5.
If the engine does not start, preheat the
glow plugs and try again.
GB-20
NOTES:
•
Warm engine - When the engine is warm
because of surrounding temperature or
recent operation, step No.2 of the cold
engine starting procedure may be skipped
(no need to preheat glow plugs).
•
If the engine fails to start after two tries
(with preheat if necessary), wait 20
seconds and try again.
•
The starter motor should never be run
continuously for longer than 30 seconds
or it may fail.
7.5
•
•
•
•
DRIVING
Release brake - Make sure the parking
brake is released before attempting to go
forward or reverse.
Forward - Gently depress the top plate of
the FWD/REV foot pedal to reach desired
ground speed.
Reverse - Gently depress the bottom
plate of the FWD/REV foot pedal to reach
desired ground speed.
To stop - Gently return the FWD/REV foot
pedal to the neutral position.
NOTES:
•
Use complete foot to operate both forward
and reverse.
•
Do not move pedal suddenly–always
operate slowly and smoothly. Never move
pedal violently from forward to reverse or
vice versa.
•
Always keep foot firmly on the foot pedal–
a too relaxed foot control may result in a
jerky motion.
7
OPERATION
JACOBSEN AR250 Series CE
SAFETY AND OPERATORS MANUAL
7.6
1.
MOWING
Lower the units with the cutting unit lift
control.
2.
Ensure speed limiter is in mow position
3.
Engage the cutting mechanism by pushing
on the lower half of cutting unit switch and
operating the floor mounted switch.
3.
Release the parking brake and begin
driving forward.
NOTE: Always set the throttle to full for mowing,
even when the grass is heavy. When the
engine is labouring, reduce forward speed
by easing up on the FWD/REV foot pedal.
7.7
1.
TO STOP THE ENGINE
Disengage power to the cutting units with
the cutting unit switch.
2.
Remove foot from the FWD/REV pedal.
3.
Set the parking brake.
3.
Move the throttle control lever to the
SLOW position.
IMPORTANT: Turbocharged engines should be
allowed to idle for five minutes before switching off.
4.
Turn the ignition key to OFF.
7.8
1.
2.
3.
PUSHING THE MACHINE WITH THE
ENGINE STOPPED
To push, disengage the parking brake.
Turn screw (A) located on the underside of
the transmission pump 1 turn
counterclockwise. Set the steering wheel
so that the rear wheels are pointing
straight ahead.
After pushing, return screw (A) to their
previous positions.
DO NOT exceed the following speeds and distance
when moving the machine in 'Free Wheel'.
Maximum Speed:
Maximum Distance:
1.5 Km/Hr (1 mph)
2Km (1 1/4 miles)
DO NOT allow the machine to free wheel down
slopes even when unloading down ramps.
GB-21
8
8.1
ADJUSTMENTS
HEIGHT OF CUT
The height of cut can be set between: 3/4" (19mm) 5 1/4" (133mm) in 1/4" (6mm) Increments.
1.
Examine the decals on the cutter deck to
determine which pin position is correct for
the height of cut desired.(A)
2.
If changing the height of cut from the
existing position:
a.Remove the cotter pin and washer
securing the two height of cut pins (B) at
one side of the deck.
b.Grasp a handle on the top of the deck
(C) and simultaneously remove the height
of cut pins.
c.While still holding the handle, guide the
deck so that the height of cut pins can be
reinserted into the desired positions.
d.resecure the height of cut pins with the
cotter pins and washers.
3
repeat with the height of cut pins on the
other side of the deck.
4.
repeat steps 2 and 3 for all other cutter
decks, setting the same height of cut
throughout.
GB-22
JACOBSEN AR250 Series CE
SAFETY AND OPERATORS MANUAL
8
ADJUSTMENTS
JACOBSEN AR250 Series CE
SAFETY AND OPERATORS MANUAL
8.2 GENERAL INSTRUCTIONS
FOR GRAMMER SEATS
•The operating instructions must be read in full
before use.
•
The operating instructions must be kept in
the vehicle and always be at hand.
•
The driver’s seat may only be fitted,
serviced and repaired by specialist
personnel,
•
In accordance with national regulations
and the vehicle manufacturer’s fitting
instructions.
•
The national fitting regulations can be
obtained from GRAMMER or from
agencies of the company, or from the
vehicle manufacturer.
•
A correctly functioning and individually
adjusted driver’s seat is essential to your
health.
•
Take adequate care of your seat and have
it serviced regularly to ensure that it
functions correctly.
•
The functional checks are to be carried out
at least as regularly as vehicle services
(see maintenance plan for vehicle).
•
These operating instructions should
always be kept with the driver’s seat. If the
seat is passed on to a third party, it must
be accompanied by the relevant operating
instructions.
Safety instructions
•
•
If you need to connect cables to the
vehicle supply network, strictly observe the
following instructions:
Before you connect a seat switch, seat
heater or compressor, you must obtain the
relevant electrical data for the respective
vehicle with reference to voltage, protection
and the kind of connections from the
manufacturer, from GRAMMER or the
company’s agencies.
DC
Compressor
S eat H eat /
Compressor
12V
10A
20A
24V
10A
15A
48V
10A
10A
Seat Sw itch - Current Carrying Capacity
12V D C
10mA (min.)
250V D C
5A (max.)
•
•
For safety reasons, the installation and
connection to the vehicle supply network
must be carried out by authorized
specialist personnel only.
The seat connections must be protected
independently of other vehicle
components.
Notes Concerning Seat Switch:
Minimum and maximum current carrying capacity for
purely resistive load.
In case of inductive or capacitive load, the
manufacturer must install a protective circuit
breaker for the consumers in the vehicle. If there are
any uncertainties, please ask the vehicle
manufacturer before making connections.
Driver’s seats that have been adjusted incorrectly
have a smaller moving area. To prevent damage to
the driver’s back and to the seat, the seat must be
adjusted for the driver’s weight before use and
before every change of driver.
To prevent injury, no objects should be placed
within the moving area of the driver’s seat.
Before commissioning of the driver’s seat,
possible packaging material has to be
removed from the seat cushion and the backrest
upholstery.
To eliminate any risk of accident, the settings must
be checked to ensure they are correctly engaged
before the vehicle is driven.
Adjustments must not be made while driving.
After removal of the backrest upholstery, the
backrest frame must be supported, for example held
in place, before the backrest adjuster is operated. If
you fail to do so, there is a danger that the backrest
frame may jerk forward and cause injury.
Any changes to the series standard of the seat
(for example fitting parts which are not original
GRAMMER parts) may impair the safety standard to
which it has been tested.
Functions my be impaired, threatening your
safety For this reason, any changes in design of
the seat must be approved by GRAMMER.
During the removal and installation of the driver’s
seat, the corresponding instructions by
the specific vehicle manufacturer must be strictly
observed!
GB-23
8
ADJUSTMENTS
Do not hold onto the covers for lifting the driver’s
seats. If you do so anyway, there is an increased
risk of injury due to loosening or breaking
covers.
Before you remove the driver’s seat, disconnect all
plug-in connections between the seat and the
vehicle supply network. When you replace the plugin connectors, make sure they are tight (dust,
water).
Seatbelts can be retrofitted to the driver’s seat.
Seatbelts may only be fitted on the approval of
the vehicle manufacturer, as they increase the
load in the seat mounting area.
Seatbelts must be fitted in accordance with specific
national regulations and guidelines, and must be
approved by GRAMMER.
Retrofitted seatbelts must be fastened before
driving.
The seat belt must be replaced after an accident.
Where seatbelts are fitted to the driver’s seat, the
seat and seat mounting must be checked
additionally by specialist personnel after an
accident has occurred.
Fasteners must be, checked regularly for tight
seat. If the seat wobbles there may be
loose bolts or other faults.
If you notice that the seat does not function correctly
(for example a defective seat suspension; improper
curvature of the lumbar support or damaged
bellows), contact a specialist workshop
immediately to arrange for repairs to be carried out.
If you fail to do so, your health may be affected and
the risk of accident increased.
Before the vehicle is used, switches that might be in
the seat (for shutting down mechanical equipment
when the driver leaves his/her seat) must be
checked for proper function
If malfunctions are detected, the vehicle must not be
driven.
– INCREASED RISK OF ACCIDENT –
Loads must not be placed on seats with a built
in switch, except for the driver’s weight during
normal use, as the vehicle may otherwise start to
move by itself.
– INCREASED RISK OF ACCIDENT –
GB-24
JACOBSEN AR250 Series CE
SAFETY AND OPERATORS MANUAL
If you take off the weight from the seat while driving,
this will cause the vehicle to stop.
Do not indent the bellows while there is load on the
driver’s seat.
– RISK OF CRUSHING –
Make sure that the interior of drivers seat remains
free of foreign particles or liquids.
The driver’s seat is not watertight and must be
protected against splashes of water!
Any conversion or refitting work on a GRAMMER
driver’s seat must be performed exclusively in
authorised workshops by trained or suitably
qualified personnel and in adherence with the
applicable operating, maintenance and installation
instructions and in compliance with all relevant
national regulations.
Improper installation and assembly bear the risk of
personal injury or property damage and the
proper function of the driver’s seat or mounted parts
can no longer be guaranteed.
Guarantee
GRAMMER can provide no guarantee for damage
resulting from incorrect assembly, use
or repair of the driver’s seats.
Further details on the guarantee granted by
GRAMMER are stated on the invoice or the
delivery note. Warranty claims against GRAMMER
beyond the guarantee obligations described there
are excluded.
8
8.3
ADJUSTMENTS
SEAT
JACOBSEN AR250 Series CE
SAFETY AND OPERATORS MANUAL
(GS85/90)
The seat can be adjusted for operator's weight and
leg reach to provide a comfortable position for
operating the machine.
1.
ADJUSTMENT FOR OPERATOR WEIGHT
To Adjust:
The position of the adjusting knob (A) is on the front
of the seat, in the centre below the seat cushion. By
rotating the knob clockwise the weight capacity is
increased and by rotating the knob anticlockwise the
weight capacity is decreased.
2.
FORE AND AFT ADJUSTMENT
To Adjust:
The position of the adjusting lever is on the right
hand side of the seat below the seat cushion (B). By
moving the lever towards the seat, the seat can be
slid backwards and forwards. When in the desired
position release the lever to locate in one of the pre
set positions.
3.
BACK REST ADJUSTMENT
The back rest has three preset positions
To Adjust:
The position of the release lever is on the left hand
side of the seat back rest (C). Move the lever
upwards to move the upper part of the back rest
forward. Move the lever downwards to move the
upper part of the back rest rearwards.
NOTE:The seat is fitted with a microswitch to sense
operator presence. When the machine is fitted with a
ROPS frame or cab a lap belt is fitted and should be
worn at all times
GB-25
8
ADJUSTMENTS
8.4
AIR SUSPENSION SEAT (Grammer MSG75 -521)
8.4.1
WEIGHT ADJUSTMENT
The seat is adjusted for the driver’s weight by pulling
or pressing the lever for seat weight adjustment and
with the driver sitting on the seat.
The driver’s weight is adjusted correctly when the
arrow is in the middle clear area of the viewing
window.
Within this viewing area, the individual height can be
adjusted to a minimum spring movement.
When the minimum/maximum weight adjustment
has been reached, you can hear it reaching the
upper or lower end stop.
To prevent damage to the health and material, the
setting for the driver’s weight must be checked and
adjusted individually before the vehicle is driven.
In order to avoid compressor damage during weight
adjustment, the compressor must be operated no
longer than 1 minute.
8.4.2
FORE/AFT ADJUSTMENT
The fore/aft adjustment is released by lifting the
locking lever.
WARNING! Risk of accident!
Do not operate the locking lever while driving.
WARNING! Risk of crushing!
Only touch the lever at the indented grip, do
not reach back under the lever.
After the adjustment, the locking lever must latch
into the desired position with an audible click. It
should not be possible to move the driver’s seat into
another position when it is locked.
Do not lift the locking lever with your leg or calf.
GB-26
JACOBSEN AR250 Series CE
SAFETY AND OPERATORS MANUAL
8
8.4.3
ADJUSTMENTS
JACOBSEN AR250 Series CE
SAFETY AND OPERATORS MANUAL
BACKREST EXTENSION * **
The backrest extension can be individually adjusted
by pulling it upwards or pushing it downwards over
the various locking increments up the end stop.
To remove the backrest extension, pull it upwards
over the end stop.
*
**
8.4.4
If Fitted
Optional Extra
SEAT HEATER * **
The seat heater can be turned on/off by pressing the
switch.
1 = seat heater OFF
2 = seat heater ON
*
**
If Fitted
Optional Extra
8.4.5 LUMBAR SUPPORT
The lumbar support increases both the seating
comfort and the performance of the driver.
By turning the adjustment knob upwards, the
curvature in the upper part of the backrest cushion
can be adjusted. By turning the knob downwards,
the curvature in the lower part of the backrest
cushion can be adjusted.
0 = No curvature
1 = Max. curvature at the top
2 = Max. curvature at the bottom
A
A
GB-27
8
ADJUSTMENTS
8.4.6 ARMRESTS * **
The armrests can be folded up if required and the
height individually adjusted.
To adjust the armrests for height, separate the round
cap (see arrow) from the cover, loosen the hexagon
nut (size 13 mm) behind it and adjust the armrests
to the desired position (5-steps) and tighten the nut
again.
Replace the cap onto the nut.
*
**
If Fitted
Optional Extra
8.4.7 ARMREST ADJUSTMENT *
The inclination of the armrests can be modified by
turning the adjustment knob.
When turning the knob to the outside (+) the front
part of the armrest will be lifted, when turning the
knob to inside (-) it will be lowered.
*
**
If Fitted
Optional Extra
8.4.8 BACKREST ADJUSTMENT
Moving the locking lever upwards loosens the
notching of the backrest adjustment.
After the adjustment, the locking lever must latch
into the desired position. It should not be possible to
move the backrest into another position when it is
locked.
For an ergonomic use the backrest can be adjusted
in a range of –5 to +30 degrees (15 steps of 2.5
degrees each).
GB-28
JACOBSEN AR250 Series CE
SAFETY AND OPERATORS MANUAL
8
ADJUSTMENTS
JACOBSEN AR250 Series CE
SAFETY AND OPERATORS MANUAL
8.4.9 MAINTENANCE
Dirt can impair the function of the seat,
so make sure you keep your seat clean!
Upholstery does not need to be removed from
the seat frame for cleaning.
Caution: Take care with the backrest - it may
jerk forward and cause injury!
When cleaning the backrest cushion the
backrest must be held in place when operating
the backrest lever.
Attention: Do not clean the seat with a
pressure washer!
During cleaning the upholstery should not be
soaked through.
Use a standard commercially available
upholstery or plastic cleaning agent. Test first
for compatibility on a small, concealed
area.
DANGER
When the machine is being used off
road, whether cutting grass or not,
the seat belt should only be worn
when a ROPS frame is in place and
deployed.
This rationale is based on the fact
that a seat belt must be worn with a
ROPS to comply with The Machinery
Directive 98/37/EC sections 3.2.2,
Seating & 3.4.3, Rollover.
Ransomes Jacobsen Limited
recommends that a local risk
assessment is completed by the
owner/user of the machine to
determine any exceptions to this seat
belt wearing rule. e.g. use of the
machine next to water or on the
highway.
GB-29
9
JACOBSEN AR250 Series CE
SAFETY AND OPERATORS MANUAL
MAINTENANCE
9.1 LUBRICATION AND MAINTENANCE CHART
B lack bullet points are operator checks and w hite bullet points are w orkshop maintenance procedures
First
50
hours
D aily
Every
50 hours
Every
100
hours
Every
500
hours
E nd
of
S easo n
EN GIN E
C heck Oi l Level
C hange Oi l
C lean Ai r Fi lter Element *
C hange Ai r Fi lter Element *
C hange Oi l Fi lter C artri dge
Replace Fuel Fi lters
MAC H IN E
C heck Interlock System
C heck/Top-up C oolant Level
C heck/D rai n Water Seperator
C heck Tyre Pressure
C heck Hydrauli c Flui d Level
C heck/C lean Engi ne Bay, Bug
Screen & Radi ator
C heck Nuts & Bolts For Ti ghtness
C heck Hydrauli c Fi tti ngs For
Ti ghtness
C heck Battery C ondi ti on
C heck Belt Tensi on
C hange Hydrauli c Oi l & Fi lter
D rai n & C lean Fuel Tank
D rai n & Flush C ooli ng System
C heck Parki ng Brake Adjustment
*Service more often in dirty conditions
Lubricate the Grease Fittings w ith Shell D arina R 2 grease w eekly (SEE C H AR T)
GB-30
9
MAINTENANCE
Lubricate at arrows
JACOBSEN AR250 Series CE
SAFETY AND OPERATORS MANUAL
FLUID REQUIREMENTS
QUANTITY
TYPE
ENGINE OIL
(w ith filter)
6.4 Litres
10W 30 (SE/SF/SG)
HYDRAULIC OIL
(w ith filter)
37.9 Litres
10W 30 (CE-SF)
RADIATOR
COOLANT
5 Litres/6.8 Litres
50% ANTI-FREEZE
GB-31
JACOBSEN AR250 Series CE
SAFETY AND OPERATORS MANUAL
9.2 DAILY CHECKS (Every 8 working hours)
Oil Level.
Check level of oil in sump. Remove dipstick
(Located in area B) wipe and replace and check that
oil is up to the maximum mark. Top up with 10W30
if neccesary(A). It is important that this test is
carried out with the engine cold and the vehicle
parked on level ground.
Hydraulic Oil Level.
Check hydraulic oil level in tank. The level of oil
should be maintained halfway up the sight glass (C).
Top up with10W30 hydraulic oil or equivilent if
neccessary. The oil level should be checked cold
with the machine parked on level ground.
IMPORTANT: Absolute cleanliness must be
observed when filling the hydraulic tank. Oil
must be filtered through a 25 micron filter
before entering the hydraulic tank.
Cooling System.
Check coolant level in expansion tank the coolant
level should be between the marks indicated on the
expansion bottle. Top up if neccessary using a 50%
antifreeze solution.
Air Filter.
If working in dusty conditions the air filter element
should be examined and cleaned/replaced every 8
working hours(D).
Cleaning the air filter.
Remove loose dirt from element with compressed air
working from the "clean" to "dirty" side.
Note: Compressed air must not exceed 6bar, with
the nozzle 50mm away from element. The element
should be replaced after 6 cleanings.
Cooling System.
Check Bug Screen/Radiator & Oil cooler are all
free from dust /debris and there is an uninterupted air flow to the engine. The screen
should be fitted with the mesh facing the rear of
the machine. Any debris should be removed
with a soft hand brush.
GB-32
10
GUARANTEE / SALES & SERVICE
JACOBSEN AR250 Series CE
SAFETY AND OPERATORS MANUAL
GUARANTEE
We GUARANTEE that should any defect in workmanship or material occur in the
goods within TWELVE MONTHS or to a maximum of one thousand hours from the
date of purchase we will repair, or at our option, replace the defective part without
making any charge for labour or for materials, provided that the claim under this
guarantee is made through an authorised Ransomes' Dealer and that the defective
part shall, if we so request, be returned to us or to the Dealer. This guarantee is in
addition to, and does not exclude, any condition or warranty implied by law, except
that we accept no liability in respect of second-hand goods, or in respect of defects
which in our opinion are in any way or to any extent attributable to misuse, lack of
reasonable care or ordinary wear and tear, or to the fitting of spares, replacements, or
extra components which are not supplied or approved by us for the purpose. The
use of non-recommended oil or lubricant nullifies the guarantee.
Damage through transport or normal wear does not come under the guarantee.
SALES & SERVICE
A network of authorised Sales and Service dealers has been established and these
details are available from your supplier.
When service attention, or spares, are required for the machine, within or after the
guarantee period your supplier or any authorised dealer should be contacted.
Always quote the registered number of the machine.
If any damage is apparent when delivery is made, report the details at once to the
supplier of the machine.
KEY NUMBERS. It is recommended that all key numbers are noted here:
Starter Switch :- .......................................................
Diesel tank :- ............................................................
It is also recommended that the machine and engine numbers are recorded.
The machine serial number is located on the registration plate and the engine serial
number can be found under the exhaust maifold above the starter motor.
Machine Number :- ..................................................
Engine Number :- ....................................................
GB-33
JACOBSEN AR250 Series CE
SAFETY AND OPERATORS MANUAL
NOTES
GB-34
1
INDICE
JACOBSEN AR250 Serie CE
MANUAL DE SEGURIDAD Y FUNCIONAMIENTO
INDICE .......................................................... PAGINA
INDICE .......................................................... PAGINA
2
2.1
2.2
2.3
2.3.1
2.3.2
INTRODUCCION .....................................................
IMPORTANTE .........................................................
IDENTIFICACION DEL PRODUCTO .........................
PAUTAS PARA LA ELIMINACION DE DESECHOS ..
DURANTE LA VIDA UTIL ........................................
DESPUES DE LA VIDA UTIL ...................................
2
2
2
3
3
3
3
3.1
3.2
3.3
3.4
3.5
3.6
3.7
3.8
3.9
INSTRUCCIONES DE SEGURIDAD ...........................
INSTRUCCIONES DE OPERACION ..........................
SEÑALES DE SEGURIDAD ......................................
ENCENDIDO DEL MOTOR .......................................
CONDUCCION DE LA MAQUINA ............................
TRANSPORTE ........................................................
ABANDONO DE LA POSICION DE CONDUCCION ...
PENDIENTES ...........................................................
CILINDROS DE CORTE BLOQUEADOS ...................
AJUSTES, LUBRICACION Y MANTENIMIENTO ......
4
4
4
4
4
4
4
5
5
5
4
4.1
4.2
4.3
4.4
4.5
4.6
4.7
4.8
4.9
ESPECIFICACIONES ...............................................
ESPECIFICACIONES DEL MOTOR ..........................
ESPECIFICACIONES DE LA MAQUINA ...................
DIMENSIONES ........................................................
NIVEL DE VIBRACION ............................................
PENDIENTES ...........................................................
ESPECIFICACIONES DE LA UNIDAD DE CORTE .....
LUBRICANTES RECOMENDADOS ..........................
RENDIMIENTO DE CORTE (AREA) ..........................
CERTIFICADOS DE CONFORMIDAD .......................
7
7
7
7
7
7
8
8
8
9
5
5.1
5.2
ADHESIVOS ........................................................... 11
ADHESIVOS DE SEGURIDAD ................................. 11
ADHESIVOS DE INSTRUCCIONES ......................... 11
6
6.1
6.2
6.3
6.4
6.5
6.6
6.7
6.8
6.9
6.10
CONTROLES ......................................................... 12
LLAVE DE ENCENDIDO .......................................... 12
PALANCA DE CONTROL DE ACELERADOR .......... 12
AJUSTE DE INCLINACION DEL VOLANTE ............ 12
PEDAL DE TRACCION ........................................... 12
LENGÜETA DE PUNTO MUERTO (B) ...................... 12
LIMITADOR DE VELOCIDAD ................................. 13
FRENO DE ESTACIONAMIENTO ............................. 13
PALANCA DE ELEVACION HIDRAULICA .............. 13
CONTROL DE CONTRAPESO DE LA UNIDAD ........ 14
INTERRUPTORES DE LAS UNIDADES
DE CORTE ............................................................. 14
PARADA PARA EL TRANSPORTE DE
LAS UNIDADES ..................................................... 15
PANEL DE INSTRUMENTOS ................................... 15
CONTADOR HORARIO ........................................... 16
LLAVE DE LIBERACION DEL CAPO ...................... 16
6.11
6.12
6.13
6.14
7
7.1
7.2
7.3
7.4
7.5
7.6
7.7
7.8
8
8.1
8.2
AJUSTES ............................................................... 22
ALTURA DE CORTE ............................................... 22
INSTRUCCIONES GENERALES
PARA LOS ASIENTOS GRAMMER ........................ 23
8.3
ASIENTO (GRAMMER GS85/90) ............................ 25
8.4
ASIENTO NEUMATICO
(GRAMMER MSG75-521) ...................................... 26
8.4.1 AJUSTE DEL PESO ................................................ 26
8.4..2 AJUSTE LONGITUDINAL ....................................... 26
8.4.3 EXTENSION DEL RESPALDO ................................. 27
8.4.4 CALEFACTOR DEL ASIENTO ................................ 27
8.4.5 SOPORTE LUMBAR .............................................. 27
8.4.6 REPOSABRAZOS .................................................. 28
8.4.7 AJUSTE DEL REPOSABRAZOS ............................. 28
8.4.8 AJUSTE DEL RESPALDO ....................................... 28
8.4.9 MANTENIMIENTO .................................................. 29
9
9.1
9.2
10
MANTENIMIENTO .................................................. 30
CUADRO DE LUBRICACION
Y MANTENIMIENTO .............................................. 30
COMPROBACIONES DIARIAS
(Cada 8 horas de funcionamiento) ................... 32
GARANTIA / VENTAS & SERVICIO ....................... 33
FUNCIONAMIENTO ................................................ 17
INSPECCION DIARIA ............................................. 17
SISTEMA DE CONTROL DE PRESENCIA
DEL OPERARIO E INTERBLOQUEOD
E SEGURIDAD ........................................................ 18
PROCEDIMIENTO DE OPERACION ........................ 19
ENCENDIDO DEL MOTOR ...................................... 20
CONDUCCION ....................................................... 20
SEGADO ................................................................ 21
PARADA DE LA MAQUINA .................................... 21
EMPUJE DE LA MAQUINA CON
EL MOTOR APAGADO .......................................... 21
ES-1
2
JACOBSEN AR250 Serie CE
MANUAL DE SEGURIDAD Y FUNCIONAMIENTO
INTRODUCCION
2.1
IMPORTANTE
IMPORTANTE: Esta máquina es de precisión y el servicio obtenido depende de la forma como se opere y
mantenga.
Este MANUAL DE SEGURIDAD Y DE FUNCIONAMIENTO deberá formar parte de la máquina. Los
proveedores de máquinas nuevas y de segunda mano deberán guardar la evidencia documentaria de que
este manual se ha entregado con la máquina.
Esta máquina está concebida para usar en las operaciones de segado de hierba normales. El uso en
cualquier otra forma se considera contrario al uso intencionado. El cumplimiento y seguimiento estricto de
las condiciones de operación, servicio y reparación, según lo especificado por el fabricante, también
constituyen los elementos esenciales del uso intencionado.
Antes de tratar de operar esta máquina, TODOS los operarios DEBEN leer este manual y familiarizarse a
fondo con las Instrucciones de Seguridad, controles, lubricación y mantenimiento.
Se deberán observar en todo momento las normativas sobre prevención de accidentes, todas las demás
normativas reconocidas en general sobre seguridad y medicina ocupacional, y todas las normativas de
tráfico rodado.
Cualquier modificación arbitraria en esta máquina puede eximir al fabricante de la responsabilidad de
cualquier daño o lesión resultante.
Es importante que durante la vida de la máquina las piezas desgastadas y cambiadas sean desechadas de
un modo reponsable con el medioambiente usando los recursos disponiles en el país donde sea utilizada.
Existen pautas en este manual para la entrega del cortacésped cuando ya no es útil.
2.2
IDENTIFICACION DEL PRODUCTO
A
B
C
D
ES-2
E
A
B
C
D
E
Nombre de la máquina
Número de serie
Año de fabricación
Peso de la máquina
Potencia del motor
2
INTRODUCCION
2.3
JACOBSEN AR250 Serie CE
MANUAL DE SEGURIDAD Y FUNCIONAMIENTO
PAUTAS PARA LA ELIMINACION DE
DESECHOS
•
Desmontar la estructura de la máquina
consultando el manual técnico. Tener
especial cuidado al manejar 'energía
acumulada' en elementos a presión o en
muelles tensados.
•
Los elementos que todavía puedan
utilizarse deben separarse y devolverse al
centro relevante.
•
Otros componentes desgastados deberán
separarse en grupos para reciclarlos y
eliminarlos correctamente según las
instalaciones disponibles. Las
separaciones más habituales son:
• Acero
• Metales no ferrosos
• Aluminio
• Latón
• Cobre
• Plásticos
• Identificables
• Reciclables
• No reciclables
• No identificables
• Goma
• Componentes eléctricos y
electrónicos.
•
Los componentes que no puedan
separarse en grupos deberán añadirse a
la zona de ‘Residuos generales’.
•
No incinerar residuos.
2.3.1 DURANTE LA VIDA UTIL
El aceite, filtros de aceite y refrigerante del motor
usados son materiales peligrosos y deben
manejarse de modo seguro y respetuoso con el
medio ambiente.
Si se produce una fuga de líquido conténgala lo más
posible para impedir que toque el suelo o un
desagüe. La legislación local le dictará cómo tratar
ese tipo de fugas.
Seguir los procedimientos mostrados en este
manual garantizará que el impacto que esta
máquina tenga en el medio ambiente local esté
controlado.
Cuando un producto de cuidado del césped no tenga
más valor funcional y haya que eliminarlo, se deben
realizar las acciones siguientes.
2.3.2 DESPUES DE LA VIDA UTIL
Estas pautas deben utilizarse en conjunto con la
legislación vigente aplicable sobre Sanidad,
seguridad y medioambiente y en instalaciones
locales aprobadas para la eliminación y reciclado de
desechos.
•
Colocar la máquina en un lugar adecuado
para poder utilizar equipos de elevación.
•
Utilizar herramientas adecuadas, equipos
de protección personal (PPE) y consultar
los manuales técnicos de la máquina.
•
Quitar y guardar lo siguiente:
1. Baterías
2. Resíduos de combustible
3. Refrigerante del motor
4. Aceites
Por ultimo, se deben actualizar la
documentación de la máquina para reflejar
que la máquina está fuera de servicio y se ha
desguazado. Proporcione este número de
serie al departamento de garantías de
Jacobsen para cerrar los registros pertinentes.
ES-3
3
JACOBSEN AR250 Serie CE
INSTRUCCIONES DE SEGURIDAD
MANUAL DE SEGURIDAD Y FUNCIONAMIENTO
•
Este símbolo de seguridad indica la inclusión de
mensajes importantes de seguridad en este manual.
Cuando vea este símbolo, esté alerta sobre la
posibilidad de lesión, lea atentamente el mensaje que
le siga, e informe a los demás operarios.
3.1
INSTRUCCIONES DE OPERACION
•
Asegúrese de que se leen y entienden en su
totalidad las instrucciones de este manual.
No permita que ninguna persona opere esta
máquina, a no ser que esté totalmente
familiarizada con la totalidad de los
procedimientos de control y seguridad.
Nunca permita que niños o personas no
familiarizadas con estas instrucciones utilicen
esta máquina. Las reglamentaciones locales
podrán restringir la edad del operador.
•
•
3.2
SEÑALES DE SEGURIDAD
•
Es esencial que todas las etiquetas de
seguridad se mantengan legibles; si se
deterioran, o quedan ilegibles, deberán
reemplazarse. Cuando se cambie cualquier
parte de la máquina que originalmente cuente
con una etiqueta de seguridad, otra etiqueta
nueva se deberá fijar en la pieza de recambio.
Las etiquetas nuevas de seguridad pueden
obtenerse del Departamento de Piezas de
Recambio de Ransomes.
3.3
ENCENDIDO DEL MOTOR
•
Antes de encender el motor, se deberá
comprobar que los frenos estén echados, las
transmisiones en punto muerto, las
protecciones colocadas e intactas y que no
haya personas en las proximidades de la
máquina.
No ponga en funcionamiento el motor en un
local cerrado si el mismo carece de ventilación
apropiada.
•
3.4
CONDUCCION DE LA MAQUINA
•
Antes de utilizar la máquina verifíque que todos
los componentes se encuentran en buen
estado, especialmente frenos, cubiertas,
dirección y seguridad de las cuchillas de corte.
Reemplace los silenciadores defectuosos. Corte
solamente con luz del día o buena luz artificial.
Se deberán observar en todo momento las normas
del código de circulación por carretera, tanto si se
circula por una como si no. Preste atención al
tráfico al cruzar calzadas o cerca de éstas.
Antes de cruzar superficies que no sean
césped, impida que las cuchillas giren.
•
•
•
ES-4
•
•
•
•
•
•
•
•
Se deberá estar siempre atento. Tenga en
cuenta la existencia de personas sordas y
ciegas, así como la impredictibilidad de los
niños y de los animales.
Conduzca siempre a una velocidad lo
suficientemente baja como para que se pueda
efectuar en cualquier momento una parada de
emergencia de manera segura en
cualesquiera condiciones.
Remueva o evite obstáculos en el área a cortar,
reduciendo de esa manera la posibilidad de
lesionar a algún peatón o a Ud mismo.
A la hora de dar marcha atrás preste especial
atención a que la zona situada detrás de Ud
no presente ningún obstáculo ni peatones.
NO lleve pasajeros.
Recuerde que el operario o usuario es
responsable de accidentes o emergencias
que ocurran a otra gente o a su propiedad.
Al aparcar, guardar o dejar la máquina sin
vigilar, baje los mecanismos de corte a
menos que se estén utilizando las trabas de
transporte.
Al segar lleve siempre calzado fuerte y
pantalones largos. No opere el equipo
descalzo ni con sandalias.
Controle frecuentemente si el colector de
césped está desgastado o deteriorado.
Después de dar contra un cuerpo extraño
inspeccione el cortacésped para determinar si
ha sufrido daño y repárelo antes de volver a
encenderlo y utilizarlo.
Si la máquina comenzara a vibrar de modo
anormal, comparobarla inmediatamente.
3.5
TRANSPORTE
•
Asegúrese de que las unidades de corte
estén bien aseguradas en la posición de
transporte. Nunca transporte la máquina con
el mecanismo de corte girando.
Conduzca de acuerdo al estado de la
carretera y capa de afirmado, declives y
ondulaciones del lugar.
Una desacelaración o frenado bruscos
pueden motivar la elevación de las ruedas
traseras.
Recuerde que la estabilidad de la parte
trasera de la máquina se reduce al usar el
consumir combustible.
•
•
•
3.6
ABANDONO DE LA POSICION DE
CONDUCCION
•
•
Aparque la máquina en terreno llano.
Antes de abandonar la posición de
conducción, detenga la máquina y asegúrese
de que todos los componentes móviles estén
totalmente parados. Ponga los frenos y
desactive todas las transmisiones. Quite la
llave de encendido.
3
3.7
JACOBSEN AR250 Serie CE
INSTRUCCIONES DE SEGURIDAD
MANUAL DE SEGURIDAD Y FUNCIONAMIENTO
PENDIENTES
A LA HORA DE OPERAR EN PENDIENTES SE
DEBERA PRESTAR UNA ATENCION ESPECIAL
•
Las ondulaciones y hundimientos cambiarán la
pendiente general.
•
Evite las condiciones de terreno que puedan
hacer que la máquina patine. Mantenga bajas
velocidades en pendientes y curvas cerradas.
•
Una desaceleración o frenado bruscos pueden
tener como consecuencia la elevación de las
ruedas traseras. Recuerde: las pendientes
“seguras” no existen.
•
El movimiento en pendientes de césped
requiere atención especial para evitar vuelcos.
•
•
•
•
NO UTILIZAR EN PENDIENTES MAYORES DE 15°
•
IMPORTANTE: Cuando se trabaje en pendientes
ponga la transferencia de peso, si está instalada, a
su máximo ajuste (+).
•
•
3.8
CILINDROS DE CORTE BLOQUEADOS
•
Pare el motor y asegúrese de que todas las
piezas móviles estén paradas. Ponga el freno y
desactive todas las transmisiones.
Suelte los bloqueos con cuidado. Mantenga
todos los componentes de la carrocería
alejados de la arista cortante.
Tenga cuidado con la energía de la
transmisión, que puede girar al soltar el
bloqueo.
Tenga cuidado de que no haya nadie cerca de
las unidades de corte, ya que la rotación de un
cilindro puede propiciar el giro de los otros.
•
•
•
3.9
AJUSTES, LUBRICACION Y
MANTENIMIENTO
•
Pare el motor y asegúrese de que todas las
piezas móviles estén paradas.
Ponga el freno y desactive todas las
transmisiones.
Lea todas las instrucciones de mantenimiento
pertinentes.
Sólo se deberán utilizar las piezas de recambio
suministradas por el fabricante original.
Al ajustar los cilindros de corte se deberá tener
cuidado de que no se queden atrapados manos
y pies cuando giren dichos cilindros.
Asegúrese de que nadie toque ninguna unidad
de corte, ya que la rotación de un cilindro
puede propiciar el giro de los demás.
Para reducir el peligro de incendio, mantenga
el motor, los silenciadores y los
compartimientos de la batería libres de césped,
hojas o grasa excesiva.
Por motivos de seguridad, reemplace las
piezas desgastadas o dañadas.
•
•
•
•
•
•
•
•
•
•
•
•
•
•
•
•
•
Cuando se esté operando debajo de piezas o
máquinas izadas, verifique que se proporciona
un soporte adecuado.
Nunca desmonte la máquina sin soltar o
contener fuerzas que puedan hacer que las
piezas se muevan repentinamente.
No modifique la velocidad del motor por
encima del máximo dado en las
especificaciones del motor. No altere las
consignas de regulación del motor ni lo haga
funcionar a sobrevelocidad. El operar el
motor a velocidad excesiva podrá aumentar el
peligro de heridas personales.
Cuando reaprovisione combustible, PARE EL
MOTOR Y NO FUME. Añada combustible
antes de encender el motor; nunca agregue
combustible cuando el motor está en marcha.
Utilice un embudo cuando eche combustible
en el depósito desde una lata.
No llene el depósito de combustible más allá
de la parte inferior del tubo de llenado.
Vuelva a colocar las tapas del depósito de
combustible y de todos los contenedores y
asegúrelas.
Guarde el combustible en los contenedores
específicamente diseñados para este fin.
Reabastezca de combustible al aire libre
únicamente y no fume mientras lo hace.
Si se derrama combustible, no intente
encender el motor; aleje la máquina del área
del derrame y evite crear fuentes de ignición
hasta que se hayan disipado los vapores del
combustible.
Deje que el motor se enfríe antes de guardar
la máquina en un recinto.
Nunca guarde el equipo con combustible en
el depósito en un edificio donde los vapores
puedan alcanzar una llama al descubierto o
chispas.
Si es necesario vaciar el depósito de
combustible, esto se deberá hacer al aire
libre.
No derrame combustible sobre componentes
calientes.
NO FUME cuando se realice un servicio en
las baterías y mantenga alejadas las llamas
desnudas.
No coloque ningún objeto de metal sobre los
bornes.
Cuando lave el cortacésped a presión, apague
el motor y saque la llave de encendido. Si el
motor ha estado funcionando, deje que se
enfríe para evitar daños al bloque y al
manguito del escape. No meta nunca agua en
los componentes eléctricos, el filtro de aire o
el silenciador del escape ya que podría entrar
agua en el cilindro del motor y provocar
daños.
ES-5
JACOBSEN AR250 Serie CE
INSTRUCCIONES DE SEGURIDAD
MANUAL DE SEGURIDAD Y FUNCIONAMIENTO
3
PELIGRO - Indica una situación vigente que es
potencialmente peligrosa y que, de no tomarse las
medidas pertinentes, OCASIONARA lesiones
graves o accidentes mortales.
ADVERTENCIA - Indica una situación
potencialmente peligrosa que, de no tomarse las
medidas pertinentes, PODRIA OCASIONAR
lesiones graves o accidentes mortales.
PRECAUCION - Indica una situación potencialmente
peligrosa que, de no tomarse las medidas
pertinentes, PODRIA LLEGAR A OCASIONAR
pequeñas lesiones y desperfectos materiales.
Puede además utilizarse para advertir contra las
prácticas laborales peligrosas.
IMPORTANTE: La velocidad de transporte
corresponde solamente al desplazamiento por
carretera. No seleccione nunca la velocidad de
transporte para desplazarse sobre praderas ni
sobre carreteras o senderos irregulares o sin
capa de rodadura.
Las instrucciones de funcionamiento y manejo de
las unidades de corte pueden encontrarse en una
publicación por separado.
ADVERTENCIA
ADVERTENCIA
El líquido hidráulico que escapa bajo
presión puede penetrar en la piel y causar
lesiones graves. Se deberá obtener
asistencia médica inmediatamente.
Proposición 65 de California
El escape del motor, algunos de sus
componentes y algunos componentes del
vehículo contienen o emiten productos
químicos que en el estado de California se
conoce que producen cáncer, defectos
congénitos y otros daños reproductivos.
ADVERTENCIA
Las baterías producen gases explosivos,
contienen ácidos corrosivos y pueden
producir unos niveles de corriente eléctrica
lo suficientemente altos como para causar
quemaduras.
ADVERTENCIA
Antes de soltar las lengüetas de transporte
es importante levantar todas las unidades
de corte.
1. Aparque la máquina en terreno llano.
2. Con el motor funcionando a velocidad
de trabajo, levante las unidades de corte
al máximo utilizando las palancas de
elevación sentado en la posición de
conducción.
3. Desactive las transmisiones, pare el motor
y asegúrese de que las piezas móviles
estén paradas. Ponga el freno y quite la
llave de encendido.
4. Ahora puede soltar las lengüetas de
transporte.
ES-6
ADVERTENCIA
NO UTILIZAR EN PENDIENTES MAYORES DE 15°
4
JACOBSEN AR250 Serie CE
MANUAL DE SEGURIDAD Y FUNCIONAMIENTO
ESPECIFICACIONES
4.1
ESPECIFICACIONES DEL MOTOR
Tipo:
Modelo:
Velocidad máx.:
Ralentí:
Capacidad de
aceite del cárter:
Combustible:
4.2
4.3
Kubota 31,3 kW a 3000 rpm,
Motor diesel de 4 cilindros en
línea sobrealimentado, 4
recorridos, refrigerado por agua,
1498 cc con encendido eléctrico
de 12V.
V1505-T-E2B-RANUK-3
3000 ± 50 rpm (sin carga)
1500 rpm
Anchura de corte:
Anchura total:
Anchura total:
(transporte)
Altura total:
Longitud:
Peso total de
la máquina:
4.4
6,4 litros
Combustible diesel No. 2-D
(ASTM D975)
Transmisión de la
unidad de corte:
Transmisión:
2,5 metros
2,6 metros
2,13 metros
1,6 metros
3,1 metros
1560 kg
NIVEL DE VIBRACION
La máquina ha sido probada en cuanto a niveles de
vibración en todo el cuerpo, mano y brazo. El
operario estaba sentado en la posición normal de
operación con ambas manos sobre el mecanismo
de dirección. El motor en marcha y la unidad de
corte girando con la máquina estacionada.
ESPECIFICACIONES DE LA MAQUINA
Construcción
del bastidor:
DIMENSIONES
Chasis de acero fresado sólido
con rieles para el bastidor de
sección rectangular.
Motores hidráulicos de
desplazamiento fijo acoplados
directamente a la unidad de
corte.
A las 4 ruedas. Bomba de
desplazamiento variable
acoplada directamente a los
motores de las ruedas (475 cc
delanteras y 343 cc traseras).
Estándar ISO 5349: 1986 Vibración mecánica.
Guias para para la medición y la evaluación de la
exposición humana a la vibración transmitida por las
manos.
Aceleraciones máximas
AR250 TURBO
Serie CE
Nivel de aceleración de la
mano / braz o
iz quierda o derecha (m/s 2)
X Aeq
Y Aeq
Z Aeq
0,899
0,536
0,546
Valor dominante
Velocidades:
Corte:
Transporte:
Marcha atrás:
Dirección:
0,899
Estándar ISO 2631-1: 1985 Evaluación de
exposición humana ante vibración de todo el cuerpo
- Parte 1: Requisitos generales.
0 - 12 km/h DELANTERA
0 - 14 km/h DELANTERA
0 - 6,4km/h
Dirección asistida hidrostática
con volante inclinable ajustable.
Presión al suelo: 1 kg/cm2
Frenos:
Frenada hidrostática con frenos
de estacionamiento mecánicos,
260 x 45 mm en las ruedas
delanteras.
Capacidad del depósito de
combustible:
45,4 litros
Capacidad del depósito
hidráulico:
37,8 litros
Batería:
Exide 093 (SAE 500)
AR250 TURBO
Serie CE
Nivel de
aceleración de
todo el cuerpo
Media
Ubicación en suelo
Aceleraciones m/s
2
Ubicación del asiento
Aceleracionesm/s
2
x
y
z
x
y
z
0,0187
0,0218
0,0254
0,021
0,0303
0,025
4.5 PENDIENTES
NO UTILIZAR EN PENDIENTES MAYORES DE 15º
La pendiente de 15º se ha calculado usando medidas
de estabilidad estática conforme a la normativa EN
836.
Llantas
Identificacion Del
Articulo
Delanteras
Tipo
Llantas
Titan Ultra Trac 4pr
AR 250
26,5 x 14,00 - 12
Traseras
Presiones
1 4 - 2 0 p si
Tipo
1,00 - 1,37 bar
Llantas
Titan Ultra Trac 4pr
Presiones
1 4 - 2 0 p si
1,00 - 1,37 bar
20 x 10,00 - 8
ES-7
4
4.6
ESPECIFICACIONES
JACOBSEN AR250 Serie CE
MANUAL DE SEGURIDAD Y FUNCIONAMIENTO
ESPECIFICACIONES DE LA UNIDAD DE
CORTE
General: Cinco cubiertas compactadoras/de
descarga lateral giratorias de 559 mm
sujetas con brazos de elevación del
mismo radio.
Transmisión:
Motores hidráulicos de desplazamiento fijo
acoplados directamente a la unidad de
corte.
Suspensión:
Cabezal flotante dirigible.
Cuchillas de corte:
Envirodeck
Cuchillas gemelas pendientes de
patentación. Cuchilla inferior 559 mm,
cuchilla superior 546 mm
Descarga lateral
Cuchilla de elevación alta
Control: Palanca de elevación de la unidad de corte
con apagado automático y re-encendido
de interbloqueo de seguridad.
Altura de corte:
Ajustable en incrementos de 6 mm desde
19 mm a 133 mm sin necesidad de
herramienta.
Construcción:
Acero fresado sólido.
Rodillo trasero:
Rodillo suave de 102 mm de diámetro.
4.7
LUBRICANTES RECOMENDADOS
Aceite para
el motor:
Debe ser MIL-L-2104C o
Clasificación A.P.I. grados SE/
SF/SG. [10W-30]
Aceite hidráulico: Clasificación A.P.I. CE/SF
grados SAE 10W-30
Grasa:
4.8
Shell Darina R2, o equivilante.
RENDIMIENTO DE CORTE (AREA)
2,7 hectáreas/h a 12 km/h
Se incluye 10% de margen para superposición
normal y para giros al final de cada corte.
ES-8
4
ESPECIFICACIONES
4.9
CERTIFICADOS DE CONFORMIDAD
JACOBSEN AR250 Serie CE
MANUAL DE SEGURIDAD Y FUNCIONAMIENTO
EC Declaration of Conformity • Déclaration de Conformité CE •
EG Conformiteits-Declaratie • EG-Konformitatsbescheinigung •
Certificato di Conformità CE • EF Konformitetserklæring •
EU Uppfyllandecertifikat • Ilmoitus yhdenmukaisuudesta ey:n sääntöjen kanss • Declaración de
Conformidad de la CE • Declaração de Conformidade da CE
We the undersigned • Nous, soussignés • Wij, ondergetekenden • Wir, die Unterzeichnenden • Noi sottoscritti Undertegnede •
Undertecknarna • Me allekirjoittaneet • Los abajo firmantes • Nós, abaixo assinados
Ransomes Jacobsen Limited
West Road, Ransomes Europark,
Ipswich, England, IP3 9TT
Declare that the machine Described Below • Certifions que la machine suivante • verklaren dat onderstaand beschreven machine •
erklären, dass die nachfolgend beschriebene Maschine • Dichiariamo che la macchina descritta di seguito • Erklærer, at følgende maskine •
Deklarerar att den maskin som beskrivs nedan • vahvistamme, että alla kuvattu kone • Certificamos que la máquina descrita abajo •
declaramos que a máquina a seguir descrita
Make & Type • Nom & Type • Merk & Type • Marke und Typ • Marca e tipo •
Fabrikat og type • Fabrikat & typ • Malli ja tyyppi • Marca y Tipo • Marca & Tipo .................................................... Jacobsen AR250 Turbo
Category • Modèle • Categorie • Kategorie • Categoria • Kategori • Luokka •
Categoría • Categoria ............................................................................................................................................... Ride on Rotary Mower
Series • Série • Serie • Sarja .................................................................................................................................... CE
Engine • Motor • Moteur • Motore • Moottori ............................................................................................................. Kubota
Type • Typ • Tipo • Tyyppi ........................................................................................................................................ V1505-T-E2B-RAN.UK-1
Net Installed Power • Puissance nette • Netto geïnstalleerd vermogen •
installierte Antriebsleistung • Potenza installata netta • Nettoeffekt installere •
Installerad nettoeffekt • Asennettu nettoteho • Potencia instalada neta •
Potência real instalada ............................................................................................................................................. 31.3 KW
Cutting Width • Largeur de coupe • Maaibreedte • Schnittbreite •
Larghezza di taglio • Klippebredde • Klippbredd • Leikkuuleveys •
Anchura de corte • Largura do corte ...................................................................................................................... 250cm
Complies with the provisions of the following European directives and amendments and the regulations transposing it into national law •
Est conforme aux prescriptions des normes, modifications et règles européennes suivantes • voldoet aan de bepalingen van de volgende
Europese Richtlijnen en Amendementen, alsmede aan de verordeningen die deze omzetten in nationale wetgeving • den Bestimmungen der
folgenden Europa-Richtlinien einschließlich aller Änderungen und Ergänzungen sowie den Vorschriften, die diese in das nationale Recht
umsetzen, entspricht • soddisfa quanto previsto dalle seguenti direttive ed emendamenti europei e dalle normative che li riportano in legge
nazionale • Overholder bestemmelserne i følgende EF-direktiver med ændringer og i de forordninger, hvorved de omsættes til national lov •
Uppfyller kraven i följande europeiska direktiv med tillägg och regler transponerade till nationell lagstiftning • täyttää seuraavana mainittujen
Euroopan direktiivien ja muutosten ja säännösten asettamat edellyt• Cumple las las siguientes regulaciones europeas siguientes
Machinery Safety Directive • Directive de sécurité des machines •
Richtlijn Machineveiligheid • Richtlinie zur Maschinensicherheit •
Direttiva sulla sicurezza del macchinario • Maskinsikkerhedsdirektivet •
Maskinsäkerhetsdirektiv • Koneen turvallisuutta koskeva direktiivi •
Directiva de seguridad de maquinaria • Directiva de segurança de máquinas ...................................................... 98/37/EC
EMC Directive • Directive de compatibilité électromagnétique • EMC Richtlijn •
EMK-Richtlinie • Direttiva EMC • EMC-direktivet • Elektromagnetiskt kompatibilitetsdirektiv •
EMC-direktiivi • Directiva EMC ................................................................................................................................... 89/336/EC
ROPS Directive • Directive de ROPS • ROPS Richtlijn • ROPS-Richtlinie •
Direttiva ROPS • ROPS-direktivet • ROPS direktiv • ROPS-direktiivi • Directiva ROPS ............................................ 86/298/EC
Noise in the Environment Directive • Directiv • Richtlijn Milieulawaa •
Richtlinie zum Umgebungslärm • Direttiva sulla rumorosità nell’ambiente •
Støjemissionsdirektivet • Bullerdirektiv • Melu ympäristöä koskevassa direktiivissä •
Directiva sobre ruido en el ambiente • Directiva Ruído no Ambiente ...................................................................... 2000/14/EC
Measured Sound Power Level • Niveau de puissance sonore assuré •
Gegarandeerd geluidsvermogenniveau • Garantierter Schallleistungspege •
Livello di potenza del suono misurato • Målt lydeffektniveau • Uppmätt ljudfraftsnivå •
Mitattu åånitehon taso • Nivel de Potencia Sonora • Nívelde intensidade de som medido ..................................... 104 dB(A) LWA
Guaranteed Sound Power Level • Niveau de puissance sonore assuré •
Gegarandeerd geluidsvermogenniveau • Garantierter Schallleistungspege •
Livello di potenza del suono misurato • Garanteret lydeffektniveau •
Garanterad ljudtrycksnivå • Taattu äänitehon taso • Nivel Garantizado de Potencia Sonora •
Nível garantido de intensidade sonora .................................................................................................................... 105 dB(A) LWA
ES-9
4
ESPECIFICACIONES
JACOBSEN AR250 Serie CE
MANUAL DE SEGURIDAD Y FUNCIONAMIENTO
ÅÅ ÄÞëùóç Óõììüñöùóçò •
Prohlášení o shodì ES • Dikjarazzjoni ta’ Konformità tal-KE • EÜ vastavusavaldus •
Deklaracja zgodnoœci WE • EC Megfelelõsségi nyilatkozat •
Izjava ES o skladnosti • EC Atbilstîbas deklarâcija •
EC Vyhlásenie o zhode • EC Uyum Beyaný
Åìåßò, ïé õðïãñÜöïíôåò •
My, ní•e podepsaní • Ahna hawn ta’t iffirmati • Meie, allakirjutanud • My, nizej podpisani • Alulírott • Spodaj podpisani • Mçs, apakðâ
parakstîjuðies • My, dole podpísaní • Bizler
Ransomes Jacobsen Limited
West Road, Ransomes Europark,
Ipswich, England, IP3 9TT
Äçëþíïõìå ðùò ôï ìç÷Üíçìá ðïõ ÐåñéãñÜöåôáé ÐáñáêÜôù •
Prohlašujeme, •e ní•e popsaný stroj • Niddikjaraw li l-magna deskritta hawn taht • Deklareerime, et allkirjeldatud masin • Deklarujemy, ze
opisana poni¿ej maszyna • Igazoljuk, hogy az alábbi berendezés • Izjavljamo, da je naslednja naprava • Deklarçjam, ka zemâk aprakstîtâ
maðîna • Vyhlasujeme, •e ni•šie uvedené zariadenie • Aþaðýda belirtilen makineyi beyan ederiz
ÌÜñêá & Ôýðïò • Znaèka & typ •
Isem u Ghamla • Mudel & tüüp • Marka i typ • Gyártó és típus • Znamka in tip • Modelis un tips • Model a typ •
Marka ve Türü .......................................................................................................................................................... Jacobsen AR250 Turbo
Êáôçãïñßá •
Kategorie • Kategorija • Kategooria • Kategoria • Kategória • Razred • Kategorija • Kategória •
Kategorisi ................................................................................................................................................................. Ride on Rotary Mower
ÓåéñÜ •
Øada • Serje • Seeria • Seria • Sorozat • Serija • Sçrija • Séria • Seri .................................................................. CE
ÊéíçôÞñáò •
Motor • Magna • Mootor • Silnik • Motor • Motor • Dzinçjs • Motor • Motor .................................................................. Kubota
Ôýðïò •
Typ • Tip • Tüüp • Typ • Típus • Tip • Tips • Typ • Tür ............................................................................................... V1505-T-E2B-RAN.UK-1
ÊáèáñÞ ÅãêáôáóôçìÝíç Éó÷ýò •
Èistý instalovaný výkon • Sahha Netta Installata • Võimsus • Moc (netto) • Nettó telepített teljesítmény •
Neto vgrajena moè • Faktiskâ energoapgâde • Èistý u•itoèný výkon • Net Kurulu Güç ........................................... 31.3 KW
ÐëÜôïò ÊïðÞò •
Délka øezu • Wisa’ tal-Qtugh • Niidulaius • Szerokoœæ koszenia • Vágószélesség • Širina rezanja •
Pïauðanas platums • Šírka záberu • Kesme Geniþliði ................................................................................................. 250cm
Óõììïñöþíåôáé ìå ôéò äéáôÜîåéò ôùí ðáñáêÜôù Åõñùðáúêþí ïäçãéþí êáé ôñïðïðïéÞóåùí êáé ôïõò êáíïíéóìïýò ðïõ ôï ìåôáöÝñïõí
óôïõò ôïðéêïýò íüìïõò •
Vyhovuje ustanovením následujících evropských smìrnic a dodatkù a pøedpisùm pøevádìjícím stroj do vnitrostátního práva • Tikkonforma
mad-dispo¿izzjonijiet tad-direttivi u l-emendi Ewropej segwenti u mar-regolamenti li jimplimentawhom fil-ligi nazzjonali • Vastab järgmiste
Euroopa direktiivide ja paranduste sätetele ning nende riiklikesse seadusandlustesse üleviimise määrustele • Jest zgodna z postanowieniami
nastêpuj¹cych dyrektyw europejskich, poprawek i przepisów przenosz¹cych je na prawo krajowe • Megfelel a következõ európai
elõírásoknak, kiegészítéseknek, valamint az azokat a nemzeti törvénykezésbe iktató szabályoknak • Skladna z doloèbami naslednjih evropskih
direktiv in dopolnitev ter uredb, s katerimi so bile prenesene v nacionalno zakonodajo • Atbilst ðâdu Eiropas Savienîbas direktîvu, to labojumu
un noteikumu, kas nosaka to ievieðanu nacionâlajâ likumdoðanâ, prasîbâm • Spåòa ustanovenia nasledujúcich európskych smerníc a zmien
a predpisov prevádzajúcich tieto ustanovenia do národného práva • Aþaðýdaki Avrupa yönergeleri ve düzeltmeleri ile ulusal yasa
düzenlemelerine ait maddeler ile uyumludur •
Ïäçãßá ÁóöÜëåéáò Ìç÷áíÞìáôïò •
Smìrnice ke strojové bezpeènosti • Direttiva dwar is-Sigurtà tal-Makkinarju • Masinaohutuse direktiiv •
Dyrektywa Maszynowa • Berendezés-biztonsági elõírás • Direktiva o varnosti strojev •
Maðînbûves droðîbas direktîva • Smernica o bezpeènosti strojných zariadení • Makine Güvenlik Yönergesi ......... 98/37/EC
Ïäçãßá ÇÌÓ •
Smìrnice k elektromagnetické kompatibilitì • Direttiva EMC • EMC direktiiv • Dyrektywa EMC • Európai berendezés megfelelõségi elõírás •
Direktiva o elektromagnetni zdru•ljivosti • Elektromagnçtiskâs savietojamîbas direktîva • Smernica o elektromagnetickej kompatibilite •
EMC Yönergesi ......................................................................................................................................................... 89/336/EC
Ïäçãßá ROPS •
Smìrnice k ochrannì pøi pøevr•ení stroje • Direttiva ROPS • ROPS direktiiv • Dyrektywa ROPS • ROPS elõírás •
Direktiva ROPS • ROPS direktîva • Smernica o bezpeènostných konštrukciách • ROPS Yönergesi ........................ 86/298/EC
Ïäçãßá Ðåñéâáëëïíôéêïý Èïñýâïõ •
Smìrnice k hluènosti prostøedí • Direttiva dwar il-Hsejjes fl-Ambjent • Keskkonnamüra taseme direktiiv •
Dyrektywa dotycz¹ca emisji ha³asu do otoczenia • Zajszínt és Környezetvédelmi elõírás • Direktiva o hrupu v okolju •
Direktîva par trokðòu emisiju vidç • Smernica o hluku v •ivotnom prostredí • Çevre Yönergesindeki Gürültü .......... 2000/14/EC
ÌåôñçìÝíï Åðßðåäï Éó÷ýïò ¹÷ïõ •
Mìøená hladina akustického výkonu • Livell Imkejjel tas-Sahha tal-Hoss • Mõõdetud helitugevuse tase •
Zmierzony poziom mocy akustycznej • Mért zajszínt érték • Izmerjena raven zvoène moèi • Mçrîtais skaòas jaudas lîmenis •
Nameraná hladina akustického výkonu • Ölçülen Ses Gücü Seviyesi ...................................................................... 99 dB(A) LWA
ÅããõçìÝíï Åðßðåäï Éó÷ýïò ¹÷ïõ •
Garantovaná hladina akustického výkonu • Livell Garantit tas-Sahha tal-Hoss • Tagatud helitugevuse tase • Gwarantowany poziom mocy
akustycznej • Szavatolt zajszínt érték • Izmerjena raven zvoène moèi • Garantçtais skaòas jaudas lîmenis • Zaruèená hladina akustického
výkonu • Garantili Ses Gücü Seviyesi ..................................................................................................................... 105 dB(A) LWA
ES-10
5
ADHESIVOS
5.1
JACOBSEN AR250 Serie CE
MANUAL DE SEGURIDAD Y FUNCIONAMIENTO
ADHESIVOS DE SEGURIDAD
A903491
Lea el Manual del Operario.
A903489
Manténgase a una distancia segura de
la máquina.
A903492
Manténgase alejado de las superficies
calientes.
A903488
No abra ni quite los protectores de
seguridad con el motor funcionando.
A903496
Precaución: cuchillas girando.
A903493
Evite las fugas de líquido a presión.
Consulte el Manual Técnico para los
procedimientos de mantenimiento.
A903490
No quite los protectores de seguridad
con el motor funcionando.
A911410
Riesgo de explosión si se produce un
cortocircuito en los terminales de la
batería.
A911416
Pendiente máxima permisible de
trabajo.
A911434
Precaución: Combustible diesel.
4153197
Precaución: Pare el motor y
saque la llave de encendido
antes de lavar a presión.
5.2
4153197
4153197
ADHESIVOS DE INSTRUCCIONES
Descripción
A.
B.
C.
D.
E.
F.
G.
H.
I.
J.
K.
L.
M.
Combustible diesel
Aceite hidráulico
Punto de tracción
Elevación de la unidad de corte
Pedal de tracción delantera/trasera
Pedal del cortador
Transferencia de peso
Freno de estacionamiento
Interruptor de encendido
Presión de los neumáticos
Aprobación CE
Nivel máximo de potencia sonora
Revoluciones del motor
ES-11
6
CONTROLES
6.1
JACOBSEN AR250 Serie CE
MANUAL DE SEGURIDAD Y FUNCIONAMIENTO
LLAVE DE ENCENDIDO
La llave de encendido (A) debe girarse a la derecha
hasta la posición de "precalentamiento" (No. 2) para
calentar las bujías de encendido. Cuando la luz
verde de advertencia se apague en la pantalla de
luces de advertencia gire la llave de encendido hasta
la posición "encendido" (No. 3) para poner en
marcha el motor. Cuando lo haya puesto en marcha
suelte la llave y deje que vuelva automáticamente a
la posición "con." (No. 1) para un funcionamiento
normal.
6.2
PALANCA DE CONTROL DE ACELERADOR
La palanca (B) debe alejarse del operario para
aumentar la velocidad del motor y acercarse para
disminuirla.
NOTA: El motor debe utilizarse a máxima velocidad.
6.3
AJUSTE DE INCLINACION DEL VOLANTE
La inclinación del volante es ajustable. La ruleta de
afloje (A) está situada en el lateral del panel de
control del lado izquierdo. Para ajustarla gire la
ruleta a la izquierda e incline el volante hacia delante
y hacia atrás hasta obtener el ajuste deseado.
Después asegúrelo en esa posición girando la ruleta
a la derecha.
6.4
PEDAL DE TRACCION
Para mover la máquina hacia delante pise la parte
delantera del pedal (A). Para moverla hacia atrás
pise la parte trasera del pedal. Cuando suelte el
pedal éste volverá a su posición central.
6.5
LENGÜETA DE PUNTO MUERTO (B)
Tiene dos funciones:
1.
El motor no puede ponerse en marcha
cuando se pisa esta lengüeta.
2.
El pedal de dirección DELANTERA/
TRASERA no funcionará si no se pisa a la
vez la lengüeta de punto muerto.
ES-12
6
6.6
CONTROLES
JACOBSEN AR250 Serie CE
MANUAL DE SEGURIDAD Y FUNCIONAMIENTO
LIMITADOR DE VELOCIDAD
El limitador de velocidad (A) se activa pivotando la
palanca de debajo del pedal. Cuando está bajo el
pedal la máquina está limitada a velocidad de corte,
y cuando no está bajo el pedal está disponible la
velocidad de transporte.
6.7
FRENO DE ESTACIONAMIENTO
Para poner el freno de estacionamiento empuje el
pedal hacia delante (A) hasta que quede bloqueado.
Para soltarlo empuje el pedal del freno al mismo
tiempo que tire de la palanca (B).
6.8
PALANCA DE ELEVACION HIDRAULICA
Las unidades de corte pueden levantarse y bajarse
con la palanca de control (A) situada a la derecha
del asiento del operario y puede activarse del
siguiente modo:
Para levantarlas: Mueva la palanca hacia atrás y
manténgala en esa posición hasta que las unidades
de corte estén a la altura deseada.
Para bajarlas: Mueva la palanca hacia delante y
manténgala en esa posición hasta que las unidades
de corte bajen al suelo. La palanca vuelve
automáticamente a la posición de punto muerto
cuando se suelta.
NOTA: Si se levanta alguna unidad para
desactivarla y luego se baja para activarla las
cuchillas no girarán hasta que se pise el pedal de
segado.
NOTA: Las unidades sólo subirán y bajarán cuando
el motor esté en marcha.
ES-13
6
CONTROLES
6.9
JACOBSEN AR250 Serie CE
MANUAL DE SEGURIDAD Y FUNCIONAMIENTO
CONTROL DE CONTRAPESO DE LA
UNIDAD
La presión al suelo de la unidad de corte puede
variarse dentro de unos límites prefijados y se
controla con la ruleta (A) del lado derecho del
asiento del operario, junto a la palanca de elevación/
descenso. La ruleta se gira a la derecha para reducir
la presión al suelo de la unidad de corte, mejorando
así la capacidad de para subir pendientes, y se gira
a la izquierda para aumentarla. Una mayor presión
al suelo reducirá la posibilidad de que la unidad de
corte rebote al cortar en terreno irregular. Al cortar
en terreno llano el ajuste normal es el punto medio
de las posiciones máxima y mínima.
6.10 INTERRUPTORES DE LAS UNIDADES DE
CORTE
Al comenzar a cortar asegúrese de que el limitador
de velocidad esté en posición de segado y de que
las unidades de corte estén bajadas. Pulse el botón
del interruptor basculante (G) y pise el pedal (A)
Pulse la parte superior del interruptor basculante
para que la unidad de corte deje de girar (las
unidades de corte dejan de girar automáticamente
cuando se levantan).
ES-14
6
CONTROLES
JACOBSEN AR250 Serie CE
MANUAL DE SEGURIDAD Y FUNCIONAMIENTO
6.11 PARADA PARA EL TRANSPORTE DE LAS
UNIDADES
Pisar el pedal (A) al levantar las unidades de corte
permite transportar la máquina.
6.12 PANEL DE INSTRUMENTOS
A. LUZ INDICADORA DE PRECALENTAMIENTO
DEL MOTOR
Luz verde que se enciende cuando el interruptor de
encendido se gira a la derecha hasta la posición de
precalentamiento. El motor puede ponerese en
marcha cuando se apaga la luz.
B. INDICADOR DE TEMPERATURA DEL MOTOR
Indica la temepratura actual del motor cuando éste
está en marcha.
C. LUZ DE ADVERTENCIA DEL ACEITE
HIDRAULICO
Luz roja que se enciende cuando la temperatura del
aceite hidráulico alcanza un nivel predeterminado. Si
se enciende la luz, pare la máquina, desactive las
unidades de corte, ponga el freno de
estacionamiento y apague el motor.
E. LUZ DE ADVERTENCIA DE PRESION DE
ACEITE DEL MOTOR
Luz roja que se enciende cuando se pone en marcha
el encendido y que se apaga cuando se pone en
marcha el motor. Si se enciende la luz cuando el
motor está en funcionamiento PARE
INMEDIATAMENTE, ya que esto indica que la
presión de aceite del motor es demasiado baja.
Compruebe el nivel de aceite del cárter y rellene lo
necesario. Compruebe el interruptor de presión de
aceite. Si se sigue trabajando en estas condiciones
se pueden provocar graves daños al motor.
F. INDICADOR DE COMBUSTIBLE
Está situado a la izquierda del indicador de
temperatura del motor y controla el nivel de
combustible.
D. LUZ DE ADVERTENCIA DE CARGA
Luz roja que se enciende cuando se pone en
marcha el encendido y que se apaga cuando se
pone en marcha el motor. Si se enciende la luz
cuando el motor está en funcionamiento, puede que
la correa del ventilador patine o esté rota o que se
indique un fallo en el sistema eléctrico (fallo que
debe investigarse). PARE INMEDIATAMENTE.
ES-15
6
CONTROLES
JACOBSEN AR250 Serie CE
MANUAL DE SEGURIDAD Y FUNCIONAMIENTO
6.13 CONTADOR HORARIO
Situado a la izquierda de la columna de dirección,
encima del freno de estacionamiento (A). Registra
las horas de funcionamiento del motor.
6.14 LLAVE DE LIBERACION DEL CAPO
Saque el capó instroduciendo la llave (A) en la base
de la abrazadera de la lengüeta.
ES-16
7
FUNCIONAMIENTO
7.1
JACOBSEN AR250 Serie CE
MANUAL DE SEGURIDAD Y FUNCIONAMIENTO
INSPECCION DIARIA
PRECAUCION
La inspección diaria sólo debe realizarse
con el motor apagado y con todos los líquidos
fríos. Baje las unidades al suelo, ponga el
freno de estacionamiento, apague el motor
y quite la llave de encendido.
1.
Realice una inspección visual de toda la unidad, en busca de indicios de desgaste, piezas sueltas y
componentes averiados o ausentes. Compruebe si hay o no fugas de combustible o de aceite para
cerciorarse de la tensión de las conexiones y de que los tubos y mangueras están en buen estado.
2.
Compruebe el suministro de combustible, el nivel de aceite en el cárter y el depurador del aire. Todos los
líquidos deben estar al nivel de la marca de llenado máximo cuando el motor esté frío.
3.
Asegúrese de que las unidades de corte estén ajustadas a la misma altura de corte.
4.
Asegúrese de que los neumáticos estén correctamente inflados.
5.
Pruebe el sistema de control de presencia del operario e interbloqueo de seguridad.
ES-17
7
JACOBSEN AR250 Serie CE
MANUAL DE SEGURIDAD Y FUNCIONAMIENTO
FUNCIONAMIENTO
7.2
SISTEMA DE CONTROL DE PRESENCIA DEL OPERARIO E INTERBLOQUEO DE SEGURIDAD
1.
Este sistema impide poner en marcha el motor a menos que se haya soltado la lengüeta de punto
muerto y se haya apagado el dispositivo de segado. También para el motor si el operario abandona el
asiento con el dispositivo de segado encendido o la lengüeta de punto muerto pisada.
ADVERTENCIA
No opere nunca el equipo si el sistema de
control de presencia del operario e
interbloqueo de seguridad está desactivado
o funciona incorrectamente. No desconecte
ni derive ningún interruptor.
2.
Realice todas las pruebas que siguen para cerciorarse de que el sistema de control de presencia del
operario e interbloqueo de seguridad funciona correctamente. Interrumpa la prueba y haga que revisen y
reparen el sistema si falla alguna de las pruebas que se citan a continuación:
•
•
•
El motor no arranca en la prueba 1.
El motor sí arranca durante las pruebas 2 o 3.
El motor sigue funcionando durante la prueba 4.
3.
Consulte el siguiente cuadro para cada prueba y siga las marcas de comprobación () del mismo.
Apague el motor entre una prueba y otra.
Prueba 1: Representa el procedimiento normal de encendido. El operario está sentado, la lengüeta de
punto muerto soltada, los pies del operario alejados de los pedales y el dispositivo de segado apagado.
El motor debe arrancar.
Prueba 2: El motor no debe arrancar si el dispositivo de segado está encendido.
Prueba 3: El motor no debe arrancar si la lengüeta de punto muerto está pisada (pedal de tracción).
Prueba 4: Ponga el motor en marcha del modo normal, encienda el dispositivo de segado y levántese del
asiento. Prueba
Operario
sentado
Sí
No
Lengüeta
de punto
muerto
soltada
Sí
1
2
3
4
No
Interruptor
de corte
C on.
D esc.
Sí
El motor
arranca
No
Levántese del asiento. Las unidades de corte deben dejar
de girar en siete (7) segundos
ES-18
7
FUNCIONAMIENTO
7.3
JACOBSEN AR250 Serie CE
MANUAL DE SEGURIDAD Y FUNCIONAMIENTO
PROCEDIMIENTO DE OPERACION
PRECAUCION
Lleve siempre gafas de seguridad, zapatos o
botas de trabajo fabricados de cuero, un casco
y protectores de oidos para no lesionarse.
1.
El motor no debe arrancarse bajo ninguna circunstancia si el operario no está sentado en el tractor.
2.
No opere el tractor o los accesorios que tengan componentes sueltos, dañados o perdidos. Siempre que sea
posible corte el césped cuando esté seco.
3.
Siegue primero en una zona de prueba hasta familiarizarse con el funcionamiento del tractor y las palancas
de control.
4.
Estudie la zona para determinar el mejor y más seguro procedimiento de operación. Tenga en cuenta la altura
del césped, el tipo de terreno y el estado de la superficie. Este estado requerirá realizar ciertos ajustes y tomar
precauciones.
5.
No descargue nunca directamente el material hacia los peatones ni deje que nadie se acerque a la máquina
mientras ésta esté en funcionamiento. El propietario/operario es responsable de las lesiones producidas a
los peatones y/o daño a su propiedad.
PRECAUCION
Recoja todos los desechos que haya en el césped
antes de segarlo. Entre en la zona nueva con cuidado.
Trabaje siempre a velocidades que le permitan
controlar totalmente el tractor.
6.
Sea precabido cuando siegue cerca de zonas con grava (carreteras, zonas de estacionamiento, caminos,
etc.). Las piedras que salgan disparadas de la máquina pueden lesionar gravemente a los peatones y/o dañar
el equipo.
7.
Desconecte los motores de accionamiento y levante los accesorios cuando cruce caminos o carreteras.
Controle el tráfico.
8.
Pare y revise el equipo en busca de daños inmediatamente después de haber golpeado algún objeto o si la
máquina comienza a vibrar de forma anormal. Haga que reparen el equipo antes de seguir trabajando.
ADVERTENCIA
Antes de limpiar, ajustar o reparar el equipo desconecte
siempre las transmisione, baje los accesorios al suelo, ponga
el freno de estacionamiento, apague el motor y quite la llave
de encendido para así evitar lesiones.
ES-19
7
JACOBSEN AR250 Serie CE
MANUAL DE SEGURIDAD Y FUNCIONAMIENTO
FUNCIONAMIENTO
ADVERTENCIA
NO UTILIZAR EN PENDIENTES MAYORES DE 15°
9.
Desacelere y tenga más cuidado al trabajar en pendientes. Lea la Sección 3.7. Sea precabido cuando
trabaje cerca de zonas de bajada de pasajeros.
10.
No limpie nunca con sus manos las unidades de corte. Utilice un cepillo para quitar las hierbas de las
cuchillas. Estas están sumamente afiladas y pueden ocasionar graves lesiones.
FUNCIONAMIENTO DE LA
MAQUINA
Lea las Instrucciones de Seguridad.
ANTES DE TRABAJAR POR PRIMERA VEZ
•
Compruebe y ajuste la presión de los
neumáticos, si es necesario, a 1 kg/cm2.
•
Añada combustible diesel al depósito si es
necesario.
•
Compruebe el aceite del motor y rellene si es
necesario.
•
Compruebe el refrigerante del radiador y
rellene si es necesario (solución
anticongelante al 50%).
•
Asegúrese de comprender la información
contenida en las secciones anteriores.
7.4
NOTAS:
•
Motor caliente - Cuando el motor está
caliente debido a la temperatura de alrededor
o funcionamiento reciente, debe saltarse el
paso 2 del procedimiento de encendido de
motor frío (no se necesita precalentar las
bujías de encendido).
•
Si el motor no se pone en marcha tras dos
intentos (con precalentamiento si es
necesario), espere 20 segundos e inténtelo
de nuevo.
•
El motor de arranque no debe nunca
funcionar más de 30 segundos seguidos o
podría fallar.
7.5
CONDUCCION
•
Quite el freno - Asegúrese de quitar el freno
de estacionamiento antes de intentar
desplazarse.
Delantera - Pise suavemente la placa
superior del pedal de dirección DELANTERA/
TRASERA para alcanzar la velocidad
deseada.
Trasera - Pise suavemente la placa inferior
del pedal de dirección DELANTERA/
TRASERA para alcanzar la velocidad
deseada.
Parada - Ponga suavemente el pedal de
dirección DELANTERA/TRASERA en la
posición de punto muerto.
ENCENDIDO DEL MOTOR
•
El siguiente procedimiento se utiliza para encender
motores fríos.
1.
Asegúrese de que el pedal de dirección
DELANTERA/TRASERA esté en punto
muerto, el interruptor de segado apagado, el
ajuste del acelerador en posición media y el
freno de estacionamiento puesto.
2.
Ponga el interruptor de encendido en la
posición 2 y manténgalo hasta que se apague
la luz de la bujía incasdencente (5-10 seg).
3.
Gire la llave de encendido totalmente a la
derecha y active el motor de arranque hasta
que el motor se ponga en marcha (esto sólo
debería tardar unos segundos).
4.
Cuando se ponga el motor en marcha, suelte
inmediatamente la llave y volverá a la posición
de FUNCIONAMIENTO.
5.
Si el motor no se pone en marcha,
precaliente la bujía incasdencente e inténtelo
de nuevo.
ES-20
•
•
NOTAS:
•
Utilice todo el pie al pisar el pedal.
•
No mueva el pedal repentinamente – hágalo
siempre suave y ligeramente. No mueva
nunca el pedal violentamente de dirección
delantera a trasera o viceversa.
•
Mantenga siempre firme el pie en el pedal – el
control con el pie relajado puede provocar un
movimiento irregular.
7
FUNCIONAMIENTO
JACOBSEN AR250 Serie CE
MANUAL DE SEGURIDAD Y FUNCIONAMIENTO
7.6
SEGADO
1.
Baje las unidades de corte con el control de
subida/bajada.
Asegúrese de que el limitador de velocidad
esté en posición de segado.
Active el mecanismo de corte pulsando la
mitad inferior del interruptor de corte y
activando el interruptor del suelo.
Quite el freno de estacionamiento y comience
a desplazarse hacia delante.
2.
3.
4.
NOTA: Ponga siempre el acelerador al máximo para
segar, incluso cuando el césped sea denso. Cuando
el motor esté trabajando reduzca la velocidad
delantera aflojando ligeramente el pedal de dirección
DELANTERA/TRASERA.
7.7
PARADA DE LA MAQUINA
1.
Corte la corriente de las unidades de corte
con el interruptor.
Quite el pie del pedal de dirección
DELANTERA/TRASERA.
Ponga el freno de estacionamiento.
Ponga la palanca del acelerador en la
posición LENTO.
2.
3.
4.
IMPORTANTE: Los motores sobrealimentados
deben dejarse al ralentí durante cinco minutos antes
de apagarlos.
5.
Apague el encendido.
7.8
EMPUJE DE LA MAQUINA CON EL MOTOR
APAGADO
1.
Para empujar quite el freno de
estacionamiento.
Gire el tornillo (A) situado en la parte inferior
de la bomba de la transmisión 1 giro a la
izquierda. Ajuste el volante para que las
ruedas traseras apunten hacia delante.
Después de empujar vuelva a poner el tornillo
(A) en su posición previa.
2.
3.
NO exceda las velocidades y distancias siguientes
al mover la máquina sin utilizar el motor.
Velocidad máxima:
Distancia máxima:
1,5 km/h
2 km
NO mueva la máquina sin utilizar el motor en
pendientes, ni siquiera en rampas de descarga.
ES-21
8
AJUSTES
8.1
JACOBSEN AR250 Serie CE
MANUAL DE SEGURIDAD Y FUNCIONAMIENTO
ALTURA DE CORTE
La altura de corte puede ajustarse de 19 a 133 mm
en incrementos de 6 mm.
1.
Consulte los adhesivos (A) de la cubierta de
corte para determinar las posiciones
correctas de los pasadores para la altura de
corte deseada.
2.
Para cambiar la altura de corte de su posición
existente:
a. Quite el pasador abierto y la arandela que
suejtan los dos pasadores de altura de
corte (B) en un lado de la cubierta.
b. Coja un asa en la parte superior de la
cubierta (C) y al mismo tiempo quite los
pasadores de altura de corte.
c. Con el asa todavía cogida, guíe la cubierta
para que los pasadores de altura de corte
puedan volver a introducirse en las
posiciones deseadas.
d. Vuelva a asegurar los pasadores de altura
de corte con los pasadores abiertos y las
arandelas.
3
Repita estos pasos con los pasadores de
altura de corte del otro lado de la cubierta.
4.
Repita los pasos 2 y 3 para todas las
cubiertas de corte restantes, ajustando la
misma altura de corte en todas ellas.
ES-22
8
AJUSTES
JACOBSEN AR250 Serie CE
MANUAL DE SEGURIDAD Y FUNCIONAMIENTO
8.2
INSTRUCCIONES GENERALES PARA LOS
ASIENTOS GRAMMER
•
Las instrucciones de funcionamiento deben
leerse totalmente antes del uso.
Las instrucciones de funcionamiento deben
guardarse en el vehículo y tenerse siempre a
mano.
El asiento del conductor sólo puede ser
instalado, mantenido y reparado por personal
especializado.
Según los reglamentos nacionales y las
instrucciones de montaje del fabricante del
vehículo.
Los reglamentos nacionales de montaje
pueden obtenerse en GRAMMER o en
agencias de la empresa, o del fabricante del
vehículo.
Para su salud es esencial un asiento
ajustado individualmente y que funcione
correctamente.
Cuide el asiento y haga que lo revisen con
regularidad para garantizar su funcionamiento
correcto.
Las comprobaciones funcionales deben
realizarse con la misma regularidad que las
del vehículo (consulte el plan de
mantenimiento).
Estas instrucciones de funcionamiento deben
estar siempre en el asiento. Si el asiento se
pasa a una tercera parte, debe entregarse
con él las instrucciones de funcionamiento.
•
•
•
•
•
•
•
•
Instrucciones de seguridad
•
Si necesita conectar cables a la red eléctrica
del vehículo, siga las instrucciones
siguientes:
•
Antes de conectar un asiento, un calentador
de asiento o compresor, deberá obtener
primero los datos eléctricos relevantes del
vehículo en cuanto a voltaje, protección y
conexiones del fabricante o de una agencia
de GRAMMER.
CC
C ompresor
C alefacción
del asiento /
C ompresor
12 V
10 A
20 A
24 V
10 A
15 A
48 V
10 A
10 A
Interruptor del asiento –
C apacidad de carga de corriente
12 V C C
250 V C C
10 mA (mín.)
•
•
Por rezones de seguridad, la instalación y la
conexión a la red eléctrica del vehículo debe
ser realizada exclusivamente por personal
especializado.
Las conexiones del asiento deben protegerse
independientemente de otros componentes
del vehículo.
Notas sobre el interruptor del asiento:
Capacidad de carga eléctrica máxima y mínima para
cargas resistivas.
En caso de cargas inductivas o capacitivas, el
fabricante debe instalar un disyuntor de circuito
protector para los consumidores en el vehículo.
Si no se está seguro,, pregunte al fabricante del
vehículo antes de realizar las conexiones.
Los asientos del conductor que hayan sido
ajustados incorrectamente tendrán una zona de
movimiento más pequeña. Para evitar daños a la
espalda del conductor y al asiento, el asiento debe
ajustarse según el peso del conductor antes de
usarlo y antes de los cambios de conductor.
Para evitar heridas, no coloque ningún objeto en
la zona de movimiento del asiento.
Antes de entregar el asiento, hay que quitar
cualquier material de embalaje que haya en el
asiento.
Para evitar el riesgo de un accidente, los ajustes
deberán ser comprobados para garantizar que estén
bien realizados antes de conducir el vehículo.
Los ajustes no deben realizarse mientras se
conduce.
Después de quitar la tapicería del respaldo, el
marco de éste debe estar sujeto antes de activar el
ajustador. Si no lo hace, existe el peligro de que el
marco del respaldo se incline hacia delante y le
produzca heridas.
Cualquier cambio al aisento (por ejemplo poner
piezas no originales de GRAMMER) puede reducir el
estándar de seguridad para el que ha sido probado.
La seguridad de las funciones puede verse
reducida, poniendo en peligro su seguridad. Por
esta razón, cualquier cambio realizado al
asiento debe ser aprobado por GRAMMER.
Durante el desmontaje e instalación del asiento,
deben seguirse las instrucciones correspondientes
entregadas por el fabricante del vehículo.
5 A (máx.)
ES-23
8
AJUSTES
JACOBSEN AR250 Serie CE
MANUAL DE SEGURIDAD Y FUNCIONAMIENTO
No se apoye en las cubiertas al levantar el asiento.
Si lo hace, existe un mayor riesgo de accidente
debido a cubiertas flojas o rotas.
Antes de quitar el asiento, desconecte las
conexiones entre éste y la red eléctrica del vehículo.
Cuando vuelva a conectar loas conectores,
asegúrese de que este bien colocados (polvo, agua).
– MAYOR RIESGO DE ACCIDENTE –
No deben colocarse cargas en asientos con
interruptores incorporados, salvo el peso del
conductor durante el uso normal, ya que de otro
modo el vehículo podría ponerse en movimiento
accidentalmente.
– MAYOR RIESGO DE ACCIDENTE –
Los cinturones de seguridad pueden colocarse en el
asiento. Los cinturones de seguridad sólo pueden
ser colocados con la aprobación del fabricante
del vehículo, ya que aumentan la carga en la zona
de montaje del asiento.
Los asientos deben ser colocados según los
reglamentos nacionales específicos, y deben estar
aprobados por GRAMMER.
Los cinturones de seguridad colocados deben
abrocharse antes de conducir.
El cinturón de seguridad debe cambiarse
después de un accidente.
Cuando el cinturón de seguridad esté instalado en el
asiento del conductor, el asiento y el montaje del
asiento deben ser comprobados adicionalmente
por personal especializado si se produce un
accidente.
Los fijadores deben ser comprobados con
regularidad. Si el asiento se balancea, puede que
haya pernos sueltos u otros fallos.
Si nota que el asiento no funciona correctamente
(por ejemplo suspensión defectuosa, inclinación
incorrecta del soporte lumbar o muelles dañados),
póngase en contacto con un taller
especializado inmediatamente para que realicen
las reparaciones pertinentes.
Si no lo hace, su salud puede verse perjudicada y
puede aumentar el riesgo de accidente.
Antes de usar el vehículo, debe comprobarse el
correcto funcionamiento de los interruptores del
asiento (apagado del equipo mecánico cuando el
conductor abandona el asiento).
Si se detecta un funcionamiento incorrecto, no
deberá conducirse el vehículo.
ES-24
Si se levanta durante la conducción, el vehículo se
detendrá.
No dente los muelles cuando hay carga en el
asiento.
– RIESGO DE APLASTAMIENTO –
Asegúrese de que el interior del asiento
permanezca libre de partículas o líquidos
extraños.
El asiento no es impermeable y debe protegerse
del agua.
Cualquier trabajo de conversión o de montaje en una
asiento GRAMMER debe ser realizado
exclusivamente en talleres autorizados y por
personal formado o especializado y siguiendo
las instrucciones de funcionamiento, mantenimiento
e instalación que siguen los reglamentos nacionales
relevantes.
Una instalación o montaje incorrectos pueden
provocar heridas personales o daños a la
propiedad y no se podrá garantizar el
funcionamiento correcto del asiento o las piezas de
montaje.
Garantía
GRAMMER no puede ofrecer garantía por daños
provocados por un montaje, uso o repación
incorrectos de los asientos.
Pueden encontrarse más detalles sobre la garantía
dada por GRAMMER en la factura o la nota de
entrega. Quedan excluidas las reclamaciones de
garantía a GRAMMER que vayan más allá de las
obligaciones descritas.
8
8.3
AJUSTES
JACOBSEN AR250 Serie CE
MANUAL DE SEGURIDAD Y FUNCIONAMIENTO
ASIENTO (Grammer GS85/90)
El asiento puede ajustarse para el peso del operario
y la altura de las piernas para proporcionar una
posición cómoda al operar la máquina.
1.
AJUSTE PARA EL PESO DEL OPERARIO
Para ajustar:
La palanca de ajuste (A) está situada en la parte
central delantera del asiento, bajo el cojín del
asiento. Girar la palanca a la derecha aumenta la
capacidad de peso y girrarla a la izquierda la
disminuye.
2.
AJUSTE LONGITUDINAL
Para ajustar:
La palanca de ajuste (B) está situada al lado
derecho del asiento, bajo el cojín del asiento. Mover
la palanca hacia el asiento permite deslizar éste
hacia atrás y hacia delante. Cuando el asiento esté
en la posición deseada suelte la palanca para
dejarla colocada en una de las posiciones prefijadas.
3.
AJUSTE DEL RESPALDO TRASERO
El respaldo trasero tiene tres tres posiciones
prefijadas.
Para ajustar:
La palanca de liberación (C) está a la izquierda del
respaldo trasero. Suba la palanca para mover la
parte superior del respaldo trasero hacia delante y
bájela para moverla hacia atrás.
NOTA: El asiento va equipado con un
microinterruptor para detectar la presencia del
operario. Cuando la máquina va equipada con
sistema de protección antivuelvo (ROPS) o con
cabina hay un cinturón de seguridad que debe
llevarse en todo momento.
ES-25
8
AJUSTES
JACOBSEN AR250 Serie CE
MANUAL DE SEGURIDAD Y FUNCIONAMIENTO
8.4
ASIENTO NEUMATICO (Grammer MSG75-521)
8.4.1
AJUSTE DEL PESO
El asiento se ajusta al peso del conductor subiendo
o bajando la palanca de ajuste de peso del asiento y
con el conductor sentado en el asiento.
El peso del conductor está ajustado correctamente
cuando la flecha está en la zona media de la
ventana de visualización.
Dentro de esta ventana de visualización, la altura
individual puede ajustarse a un movimiento mínimo
del muelle.
Cuando se haya alcanzado el ajuste de peso
mínimo/máximo, podrá oír cómo alcanza el tope
superior o inferior.
Para evitar daños a la salud y al material, el ajuste
del peso del conductor debe comprobarse y
ajustarse individualmente antes de conducir el
vehículo.
Para evitar daños al compresor durante el ajuste de
peso, éste debe operarse durante no más de 1
minuto.
8.4.2 AJUSTE LONGITUDINAL
El ajuste longitudinal se suelta levantando la
palanca de fijación.
ADVERTENCIA: Riesgo de accidente.
No opere la palanca de fijación mientras
conduce.
ADVERTENCIA: Riesgo de aplastamiento.
Toque la palanca sólo en la empuñadura
dentada, no la coja por la parte inferior.
Después del ajuste, la palanca de fijación debe
quedar bloqueada en la posición deseada por medio
de un clic sonoro. No debería ser posible mover el
asiento del conductor a otra posición cuando la
palanca esté bloqueada.
No levante la palanca de fijación con la pierna o el
muslo.
ES-26
8
8.4.3
AJUSTES
JACOBSEN AR250 Serie CE
MANUAL DE SEGURIDAD Y FUNCIONAMIENTO
EXTENSION DEL RESPALDO * **
La extensión del respaldo puede ajustarse
individualmente tirando hacia arriba o empujando
hacia abajo por los distintos incrementos hasta el
tope.
Para quitar la extensión del respaldo, tire hacia
arriba sobre el tope.
*
**
Si está instalado
Extra opcional
8.4.4
CALEFACTOR DEL ASIENTO * **
El calefactor del asiento puede encenderse o
apagarse pulsando el botón.
1 = Calefactor apagado
2 = Calefactor encendido
*
**
Si está instalado
Extra opcional
8.4.5 SOPORTE LUMBAR
El soporte lumbar aumenta la comodidad del asiento
y el rendimiento del conductor.
La curvatura de la parte superior del respaldo puede
ajustarse girando el pomo de ajuste hacia arriba. La
curvatura de la parte inferior del respaldo puede
ajustarse girando el pomo de ajuste hacia abajo.
0 = Sin curvatura
1 = Máx. curvatura en la parte superior
2 = Máx. curvatura en la parte inferior
A
ES-27
8
AJUSTES
JACOBSEN AR250 Serie CE
MANUAL DE SEGURIDAD Y FUNCIONAMIENTO
8.4.6 REPOSABRAZOS * **
El reposabrazos puede plegarse hacia arriba si es
necesario y se puede ajustar su altura.
Para ajustar la altura del reposabrazos, separe el
sombrerete circular (ver la flecha) de la cubierta,
afloje la tuerca hexagonal (13 mm) que hay detrás y
ajuste el reposabrazos en la posición deseada (5
pasos) y apriete la tuerca de nuevo.
Vuelva a poner el sombrerete sobre la tuerca.
*
**
Si está instalado
Extra opcional
8.4.7 AJUSTE DEL REPOSABRAZOS *
La inclinación del reposabrazos puede modificarse
girando el pomo de ajuste.
Cuando gire el pomo hacia fuera (+), la parte frontal
del reposabrazos se levantará, y cuando lo gire
hacia dentro (-) se bajará.
*
**
Si está instalado
Extra opcional
8.4.8 AJUSTE DEL RESPALDO
Mover la palanca de fijación hacia arriba afloja la
ranura de ajuste del respaldo.
Después del ajuste, la palanca de fijación debe
quedar bloqueada en la posición deseada. No
debería ser posible mover el reposabrazos a otra
posición cuando la palanca esté bloqueada.
Para un uso ergonómico, el reposabrazos puede
ajustarse de –5 a +30 grados (15 pasos de 2,5
grados cada uno).
ES-28
8
AJUSTES
JACOBSEN AR250 Serie CE
MANUAL DE SEGURIDAD Y FUNCIONAMIENTO
8.4.9 MANTENIMIENTO
La suciedad puede reducir la funcionalidad del
asiento, así que asegúrese de mantenerlo limpio.
No hace falta quitar la tapicería del marco del
asiento durante la limpieza del mismo.
Precaución: Tenga cuidado con el respaldo –
podría inclinarse hacia delante y producirle
heridas.
Cuando limpie la colchoneta del respaldo, éste
debe sujetarse al operar la palanca del
respaldo.
Atención: No limpie el asiento con un limpiador a
presión.
Durante la limpieza, la tapicería no deberá mojarse
demasiado.
Utilice un limpiador para tapicerías o plásticos
comercial. Pruebe primero la compatibilidad en
una zona pequeña y oculta.
PELIGRO
Cuando se utilice la máquina fuera de
carretera, independientemente de si se
corta césped o no, sólo deberá llevarse
puesto el cinturón de seguridad si la
máquina tiene instalada laprotección
antivuelco.
Esta recomendación se basa en el hecho de
que el cinturón de seguridad debe llevarse
puesto cuando la máquina tiene protección
antivuelco para cumplir con la Directiva
sobre maquinaria 98/37/CE, seccione 3.2.2,
Asiento y 3.4.3, Vuelco.
Ransomes Jacobsen Limited aconseja al
propietario/operador de la máquina realizar
un análisis de riesgo local para determinar
posibles excepciones a esta regla de
colocación del cinturón de seguridad, por
ejemplo el uso de la máquina junto a agua
o en autopista.
ES-29
9
JACOBSEN AR250 Serie CE
MANUAL DE SEGURIDAD Y FUNCIONAMIENTO
MANTENIMIENTO
9.1 CUADRO DE LUBRICACION Y MANTENIMIENTO
Los puntos negros son comprobaciones del operario y los blancos son procedimientos de mantenimiento
en taller
P rimeras
50
horas
D iariamente
C ad a
50 horas
C ad a
100
horas
C ad a
500
horas
Fin de
temporada
MOTOR
C omprobar el ni vel de acei te
C ambi ar el acei te
Li mpi ar el elemento del fi ltro de
ai re *
C ambi ar el elemento del fi ltro de
ai re *
C ambi ar el cartucho del fi ltro de
acei te
C ambi ar los fi ltros de combusti ble
MAQU IN A
C omprobar el si stema de
i nterbloqueo
C omprobar/rellenar el ni vel de
refri gerante
C omprobar/vaci ar el separador de
agua
C omprobar la presi ón de los
neumáti cos
C omprobar el ni vel de líqui do
hi dráuli co
C omprobar/li mpi ar la compuerta
del motor, la pantalla protectoray el
radi ador
C omprobar la tensi ón de las
tuercas y pernos
C omprobar la tensi ón de los
accesori os hi dráuli cos
C omprobar el estado de la batería
C omprobar la tensi ón de la correa
C ambi ar el acei te hi dráuli co y el
fi ltro
Vaci ar y li mpi ar el depósi to de
combusti ble
Vaci ar y lavar el si stema de
refri geraci ón
C omprobar el ajuste del freno de
estaci onami ento
*R evisar más a menudo en ambientes sucios
Lubricar los accesorios de engrase semanalmente con grasa S hell D arina R 2 (VE R C U AD R O)
ES-30
9
MANTENIMIENTO
Lubrique en los lugares
indicados por las flechas
JACOBSEN AR250 Serie CE
MANUAL DE SEGURIDAD Y FUNCIONAMIENTO
REQUISITOS DE LIQUIDOS
CANTIDAD
TIPO
ACEITE DEL MOTOR
(con filtro)
6,4 litros
10W30 (SE-SF-SG)
ACEITE HIDRAULICO
(con filtro)
37,9 litros
10W30 (CE-SF)
REFRIGERANTE
DEL RADIADOR
5 litros/6,8 litros
ANTICONGELANTE
A L 50%
ES-31
9
MANTENIMIENTO
9.2
JACOBSEN AR250 Serie CE
MANUAL DE SEGURIDAD Y FUNCIONAMIENTO
COMPROBACIONES DIARIAS
(Cada 8 horas de funcionamiento)
Nivel de aceite
Compruebe el nivel de aceite en el cárter. Saque la
varilla del aceite (Situada en la zona B), límpiela,
vuelva a colocarla y asegúrese de que el aceite llega
a la marca máxima. Rellene con 10W30 si es
necesario (A). Es importante realizar esta prueba
con el motor frío y el vehículo estacionado en terreno
llano.
Nivel del aceite hidráulico
Compruebe el nivel de aceite hidráulico en el
depósito. El nivel de aceite debe estar por la mitad
del tubo transparente (C). Rellene con aceite
hidráulico 10W30 o equivalente si es necesario. El
nivel de aceite debe comprobarse con el motor frío y
el vehículo estacionado en terreno llano.
IMPORTANTE: Al llenar el depósito hidráulico
debe tenerse muy en cuenta la limpieza. El
aceite debe filtrarse por un filtro de 25
micrones antes de que entre en el depósito
hidráulico.
Sistema de refrigeración
Compruebe el nivel de refrigerante en el depósito de
expansión. El nivel debe estar entre las marcas
indicadas en la botella de expansión. Rellene si es
necesario utilizando una solución anticongelante al
50%.
Filtro de aire
Si trabaja en ambientes polvorientos deberá revisar,
limpiar y/o cambiar el elemento del filtro de aire (D)
cada 8 horas de funcionamiento.
Limpieza del filtro de aire
Quite la suciedad suelta en el elemento con aire
comprimido yendo del lado más limpio al más sucio.
NOTA: El aire comprimido no debe superar 6 baras
con la boquilla alejada 50 mm del elemento. El
elemento debe cambiarse tras 6 operaciones de
limpieza.
Sistema de refrigeración
Asegúrese de que la pantalla protectora y el
refrigerador del radiador y de aceite estén limpios de
polvo/suciedad y de que haya un flujo ininterrumpido
de aire al motor. La pantalla debe montarse con la
malla mirando a la parte trasera de la máquina. La
suciedad debe quitarse con un cepillo manual de
cerdas finas.
ES-32
10
GARANTIA / VENTAS & SERVICIO
JACOBSEN AR250 Serie CE
MANUAL DE SEGURIDAD Y FUNCIONAMIENTO
GARANTIA
GARANTIZAMOS que en el supuesto de que surgiera algún defecto de mano de obra o
material en la mercancía dentro del plazo de DOCE MESES o hasta un máximo de mil
horas a contar desde la fecha de compra, repararemos o reemplazaremos, según
juzguemos conveniente, el componente defectuoso sin cargo alguno por mano de
obra o materiales, siempre y cuando la reclamación bajo la presente garantía se efectúe
a través de un representante oficial de Ransomes y que se nos devuelva el
componente defectuoso si así lo solicitamos, ya sea a nosotros directamente o al
representante. La presente garantía se suma a, sin excluirlos, cualesquiera términos o
garantías implícitas en la ley, exceptuando que no aceptamos responsabilidad por
mercancía de segunda mano, ni por defectos que, según nuestro criterio, sean
atribuibles al mal uso, falta de cuidado razonable o al desgaste normal; así mismo,
tampoco nos responsabilizamos del ajuste de recambios, repuestos o componentes
extras que no hubieran sido suministrados o aprobados por nosotros para el fin en
cuestión. La garantía quedará anulada si se utilizan aceites o lubricantes no
recomendados.
La garantía no cubre los daños que se puedan ocasionar durante el transporte de la
máquina o los motivados por el desgaste normal.
VENTAS & SERVICIO
Se ha establecido una red de representantes oficiales de venta y servicio, cuyos detalles
pueden obtenerse de su suministrador.
Deberá ponerse en contacto con su suministrador o con cualesquiera representantes
oficiales cuando se precise efectuar un servicio a la máquina o se requieran piezas de
repuesto, ya sea dentro del plazo de la garantía o tras su finalización. Debe citar siempre
el número de registro de la máquina.
Si en el momento de la entrega se observa algún daño, deberá informar inmediatamente
del mismo al suministrador de la máquina.
NUMEROS DE REFERENCIA. Se recomienda anotar aquí todos los números de
referencia:
Interruptor del Motor de Arranque: .............................................
Depósito de combustible diesel: .................................................
También se recomienda anotar los números de la máquina y del motor.
El número de serie de la máquina se encuentra en la placa de la matrícula y el número
de serie del motor está debajo del colector de escape, sobre el motor de arranque.
Número de la máquina: ...................................................................
Número del motor: ...........................................................................
ES-33
JACOBSEN AR250 Serie CE
MANUAL DE SEGURIDAD Y FUNCIONAMIENTO
NOTAS
ES-34
GB
English
World Class Quality, Performance and Support
Equipment from Ransomes Jacobsen Limited is built to
exacting standards ensured by ISO 9001 registration at
all our manufacturing locations. A worldwide dealer
network and factory-trained technicians backed by
Ransomes Jacobsen Parts Xpress provide reliable,
high-quality product support.
Calidad, Rendimiento y Asistencia de Clase Mundial
El equipo de Ransomes Jacobsen Limited está
construido exactamente conforme a las normas
establecidas por el registro de la ISO 9001 en todas
nuestras plantas de fabricación. Una red mundial de
distribuidores y técnicos capacitados en fábrica y
respaldados por Ransomes Jacobsen Parts Xpress
que ofrece asistencia de producto segura y de alta
calidad.
BOB-CAT
BUNTON
CUSHMAN
JACOBSEN
Ransomes Jacobsen Limited
West Road, Ransomes Europark, Ipswich, IP3 9TT, Inglaterra
Número de registro de empresa inglesa 1070731
www.ransomesjacobsen.com
RANSOMES
RYAN
E-Z-GO