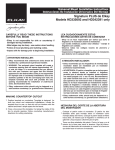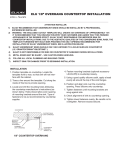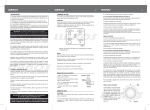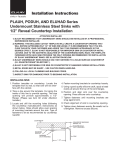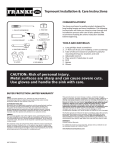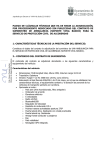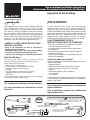
1
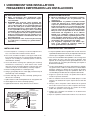
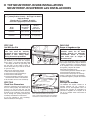
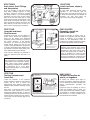
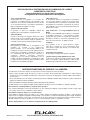
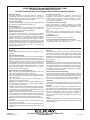
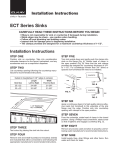
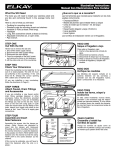
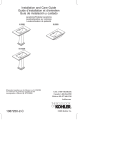
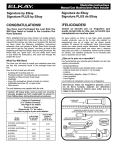
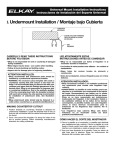
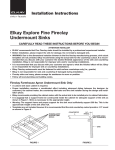
Universal Mount Installation Instructions
Instrucciones De Instalación Universales Del Montaje
Signature PLUS de Elkay
¡FELICIDADES!
We're delighted that you have chosen our quality product, and
we're confident that it will prove to be one of the best
values-for-the-money you have ever received. We feel that we
have made the following installation instructions extremely
clear and simple to follow. Read them through once now to
get the "big picture", and then go back to the beginning and
start the actual, step-by-step procedure. We would wish you
"good luck", but you really won't need it—just follow the
instructions, and you'll sail through the project like a pro!
CAREFULLY READ THESE INSTRUCTIONS
BEFORE YOU BEGIN
• Elkay is not responsible for sink or countertop if
damaged during installation.
• Metal edges may be sharp - use caution when handling.
• Follow all local plumbing and building codes.
• Inspect sink for damage prior to beginning installation.
What You Will Need
The tools you will need to install your stainless steel sink
are few and commonly found in the average home tool box.
Here is a list of what you will need:
• Silicone caulk for mounting sink rim
• Plumbers putty for mounting faucet and strainers
• Yardstick or Ruler (at least 3-feet long).
• Flashlight
• Long, thin screwdriver (shank at least six inches).
• Adjustable wrenches for connecting plumbing.
• Pipe wrench.
The sink fasteners are supplied with the sink and are designed
for a maximim coutertop thickness of 3/4".
For undermount installations follow Section I.
For top mount/drop-in installations follow
Section II.
Es para nostros un honor el que haya usted escogido
nuestro producto, que es de la más alta calidad. Le
aseguramos que es el mejor que su dinero puede comprar.
El manual de instalación tiene instrucciones claras que usted
puede seguir fácilmente. Primero léalo cuidadosamente para
darse una mejor idea y después vaya paso por paso. Le
deseamos mucha suerte aunque en verdad, con nuestros
productos no la necesita para que su proyecto sea un éxito.
LEA DETENIDAMENTE ESTAS
INSTRUCCIONES ANTES DE COMENZAR
• Elkay no es responsable por el fregadero ni el mostrador
si se dañan durante la instalación.
• Los bordes metálicos pueden ser filosos; tenga cuidado
al manipularlos.
• Siga todas las disposiciones de los códigos de plomería
y construcción locales.
• Verifique que el fregadero no esté dañado antes de
comenzar la instalación.
¿Que es lo que va a necesitar?
Las herramientas que necesita para instalarlo son las más
usadas comunmente.
• Empaques/Silicón
• Masilla de plomero para instalar llaves y céspol
• Cinta de medir (por lo menos 1 mt. de largo)
• Linterna
• Desarmador delgado y largo (15.24cm.)
• Llave ajustable
• Llave Inglesa
Los sujetadores del fregadero se suministran con el fregadero
y están diseñados para mostradores de 3/4" (19.05mm) de
espesor como máximo.
Para el fregaderos empotrados las instalaciones
siguen la Sección I.
Para mount/drop-in superior las instalaciones
siguen la Sección II.
1
FLASHLIGHT
LINTERNA
2
3
4
5
6
7
8
9 10
11 12
LONG THIN SCREWDRIVER
DESARMADOR DELGADO Y LARGO
ADJUSTABLE
WRENCHES
LLAVE AJUSTABL
CAULK GUN/SILICONE CAULK
PISTOLA PARA SELLADOR/
SELLADOR DE SILICONA
PIPE WRENCH
LLAVE INGLESA
25
26
27 28 29
30 31 32
33 34
YARDSTICK OR RULE AT LEAST 3 FEET LONG
CINTA DE MEDIR (POR LO MENOS 1 MT DE LARGO)
PLUMBERS PUTTY
MASILLA DE PLOMERO
35
I UNDERMOUNT SINK INSTALLATIONS
FREGADEROS EMPOTRADOS LAS INSTALACIONES
ATTENTION INSTALLER:
ATENCIÓN INSTALADOR:
1)
1)
2)
3)
Elkay recommends that undermount sinks
should be installed by a professional experienced installer.
WARNING: The enclosed cutout template will
create a countertop overhang of approximately
1/8" of sink rim ledge. It is recommended that you
discuss this with your customer and agree that
this finished appearance is the desired effect. Elkay
is not responsible for improper sink or countertop
installations. Due to the aesthetic qualities of the
the converging bowl radii, the template furnished
with each sink provides the only opening recommended for installation of undermount sinks. See
illustration below.
Elkay undermount sinks should only be fastened
to a solid surface countertop (i.e. granite/Corian®/
Silestone®)
2)
3)
Elkay recomienda que los fregaderos empotrados sean instalados por un profesional con
experiencia.
ADVERTENCIA: La plantilla recortable incluida
creará una abertura en la cubierta que dejará
expuesta aproximadamente 1/8" (3.2mm) del
borde del fregadero. Se recomienda que hable
sobre este tema con su cliente y se aseguren de
que este aspecto de acabado es el efecto deseado.
Elkay no se hace responsable de las instalaciones
inadecuadas del fregadero ni de la cubierta.
Debido a las cualidades estéticas de los radios
convergentes del tazón, la plantilla provista con
cada fregadero proporciona la única abertura
recomendada para la instalación de fregaderos
empotrados. Vea la ilustración más abajo.
Los fregaderos empotrados solo deben sujetarse a una cubierta de superficie sólida (es
decir, granito/Corian(MR)/Silestone(MR)).
INSTALLING SINK
INSTALACIÓN DEL FREGADERO
1. Position template on countertop. Locate the template front to
rear, so that sink will not interfere with the cabinet.
1. Coloque la plantilla sobre la superficie del mesado. Posicione
la plantilla de adelante hacia atrás y de izquierda a derecha, de
tal forma que el fregadero no interfiera con el armario.
2. Trace a line around the template. Cut along the inside of this
line to provide opening. This size opening will provide approximately an 1/8" overhang of countertop. (Please see item #2
under Attention Installer.)
2. Trace una I ínea alrededor de la plantilla. Corte a lo largo de la
parte interna de esta I ínea para hacer la abertura. Esta
apertura de la talla proporcionará aproximadamente a una
proyección de 1/8" (3.175mm) del countertop. (Ver el punto 2
de Atención Instalador.)
3. Localice el lugar donde se har án los orificios para los sujetadores y perfore como se indica a continuación. Los orificios deben
permitir la separaci ón uniforme de los soportes de montaje
alrededor del fregadero. El tipo de sujetadores debe ser el
recomendado por el fabricante de la superficie del mesado.
3. Locate and drill the mounting holes (following the countertop
manufacturer’s instructions) as shown below. Holes should
allow even spacing of mounting brackets around the sink. Type
of fasteners to be as recommended by countertop supplier.
4. Fasten mounting brackets to countertop loosely.
5. Using a good quality silicone caulk, apply a bead evenly all
around the top of the sink flanges.
6. Position and align sink over the countertop opening. Press
silicone onto countertop.
4. Asegure los soportes de montaje a la superficie del mesado sin
mesado sin ajustarlos totalmente.
5. Utilice un sellador de silicona de buena calidad. Aplique un cordón
uniforme todo alrededor de la parte superior de los bordes del
fregadero.
7. Tighten fasteners until mounting brackets are snug against sink.
8. Check alignment of sink to countertop opening.
9. Tighten down fasteners evenly. Remove excess silicone.
6. Coloque y alinee el fregadero sobre la abertura de la superficie
del mesado. Presione la silicona contra la superficie del mesado.
7. Asegure los sujetadores hasta que los soportes de montaje
queden bien ajustados contra el fregadero.
COUNTERTOP /
SUPERFICIE DEL MESADO
8. Verifique que el fregadero esté alineado con la abertura de la
superficie del mesado.
SILICONE CAULK
(NOT FURNISHED) /
SELLADOR DE SILICONA
(NO SUMINISTRADO)
MOUNTING
BRACKET
(NOT FURNISHED) /
SOPORTE DE
MONTAJE
(NO SUMINISTRADO)
FASTENERS
(NOT FURNISHED) /
SUJETADOR
(NO SUMINISTRADO)
9. Ajuste los sujetadores uniformemente. Retire el exceso de silicona.
SINK / FREGADERO
1/8" (APPROX.)
OVERHANG
1/8" (3.2mm)
PROYECCIONES
(APROXIMADAS)
2
II TOP MOUNT/DROP-IN SINK INSTALLATIONS
MOUNT/DROP-IN SUPERIOR LAS INSTALACIONES
Cutout in Countertop
(11/2" [3.8mm] Radius Corners) – See Page 5 for details
Corte en el tope
(Esquina de 11/2" [3.8mm] de radio) –
Consulte la página 5 para más detalles
Model
Modelo
Left-to-Right
De izquierda
a derecha
Front-to-Back
Desde el
frente a la
parte de atrás
HD320907
323/8" (82.2cm)
213/8" (54.3cm)
HD322425
243/8" (62.0cm)
213/8" (54.3cm)
STEP ONE
Out With the Old
PASO UNO
Saque el fregadero viejo
1
Caution: All heavy sinks, such as
cast iron, must be securely
propped up from underneath to
prevent it from falling down
during disconnect procedures.
Advertencia: Todos los fregaderos
pesados como los de fierro
fundido, deberán ser detenidos
fuertemente desde el interior
para evitar que se caigan al
desconectarlos.
Taking out the old sink really isn't too hard a
job, because you can leave the "toughest
nuts" in place — the faucet and drain outlet
— and simply lift them out right along with
the sink itself. (It also makes it easier to
remove those parts if you want to use them
on your new sink.)
Here's how to remove the old sink:
1. Shut off the water supply valves.
2. Disconnect the water supply fittings.
3. Disconnect the drain fittings.
4. From the underside of the sink, loosen
and remove the frame or rim fasteners.
5. Lift the entire sink out of the countertop.
STEP TWO
Check Your Dimensions
Check the countertop cut-out opening to be
sure it is sized properly. The easiest way to
do this is to set the new sink into the
opening to see if it fits. The sink rim must set
uniformly on the countertop. If the sink does
not fit, enlarge the opening following the
countertop manufacturer’s instructions.
(If you are installing a new countertop,
follow the directions on Page 5.)
No es muy complicado sacar el fregadero
viejo porque usted puede dejar las llaverías
y tubería conectados, e inclusive utilizarlas
en el fregadero nuevo, unicamente levante
el fregadero y sáquelo del mueble.
2
TH
ID
W
NC
/A
HO
LENGTH / LARGO
1-1/2" RADIUS ON
ALL 4 CORNERS
1-1/2" RADIO EN LAS 4 ESQUINAS
NOTE: FOR NEW COUNTER TOP SEE PAGE 5
NOTA: Sl ESTA USTED INSTALANDO UNA CUBIERTA
NUEVA SIGA LAS INSTRUCCIONES DE LA PAGINA 5
3
Para quitar el fregadero viejo:
1.Cierre la llave general de entrada de agua.
2.Desconecte las tuberías y llaves.
3.Desconecte el céspol que va al drenaje.
4.Afloje y remueva el marco del fregadero.
5.Levante el fregadero y sáquelo del mueble.
PASO DOS
Verifique las medidas
Las Medidas del espacio cortado en la
cubierta deberán ser las correctas y
coincidir con las del fregadero nuevo. La
manera mas sencilla de verificarlas es
presentar el fregadero en el espacio en el
que se va a instalar. Hacer correcciones si
es necesario.
STEP THREE
Attch faucet, Drain Fittings
and Accessories
3
PASO TRES
Instale las llaves, céspol y
accesorios
PLUMBERS PUTTY
MASILLA DE PLOMERO
Si está usted instalando nuevas llaves,
triturador u otro accesorio siga las
instruc-ciones que trae ese producto. Si va
a utilizar las mismas llaves use masilla de
plomeria. Es más fácil hacer las
conecciones antes de fijar el fregadero.
If you are installing a new faucet and/or
drain fitting, garbage disposer or other
accessory, follow the directions provided
with these products. If you are re-installing
the fittings you had on the old sink, mount
them on the new sink using putty or caulk
under the faucet base and top flange of the
drain. Attach your supply riser tubes to the
faucet at this time. (These connections are
more difficult to make after the sink is in
place.) Trim to fit supply pipe connections.
STEP FOUR
Assemble and Insert
Sink Fasteners
4
Assemble the screws into the clamps as
shown. (Note: Screws are designed to
insert into the clamps with backward
threading, so that in mounting, they will turn
the normal direction.) It will simplify
mounting if you insert and position the
clamps before putting the sink into the
counter. Locate the fasteners in the position
as shown. Hand tighten each fastener onto
the channel so that the clamp "teeth" point
is the same direction as the channel.
CHANNEL
SPEED
SCREW
CANAL
TORNILLO DE
AJUSTE
Ponga los tornillos de ajuste como se
muestra en el grabado. Será más sencillo
montar el fregadero si los tornillos se
colocan en las abrazaderas antes de
ponerlos en el mueble. Coloque los tornillos
de manera que queden dentro del canal.
BACKWARD
THREAD
ROSCA
IZQUIERDA
TURN "SPEED SCREW" CLOCKWISE
TO HAND TIGHTEN
CLAMP
APRIETE HACIA LA DERECHA PARA
ASEGURAR LOS TORNILLOS
ABRAZADERA
(If the cut-out is undersize, you will have to
insert the fasteners after the sink is in
place.)
NOTE: The hardware provided with this
sink is designed for standard 3/4" thick
countertops. If the countertop is thicker,
Elkay offers longer screws available
for purchase. Hardware Kit #LK363 is
for countertops up to 1-1/2" thick.
Hardware Kit #LK463 is for countertops
up to 2-1/2" thick.
STEP FIVE
Position Fasteners and
Insert Sink
Locate the fasteners in the positions
shown. (Number of fasteners vary between
models, but be sure to locate one
approximately in the middle of each side.)
Distribute other fasteners uniformly around
the sink.
Now place a continuous bead of caulk
around the entire perimeter of the rim,
between the channel and edge, to serve as
a watertight seal. Pick up the sink and set it
square into the countertop cut-out opening.
Line up the front rim with the edge of the
countertop.
5
BOTTOM VIEW
VISTA DESDE ABAJO
CHANNEL
CANAL
CHANNEL
CANAL
CAULK AROUND THE RIM OF
THE SINK OUTSIDE OF CHANNEL
FASTENERS
ABRAZADERAS
PASO CUATRO
Ensamble y instalé los
tornillos de ajuste
FASTENER
ABRAZADERA
SINK RIM
MARCO DEL
FREGADERO
PONGA UNA CAPA DE EMPAQUE EN TODO EL
MARCO DEL FREGADERO ENTRE EL CANAL Y EL
BORDE, PARA QUE SIRVA DE SELLADOR.
POSITION THE FASTENERS IN THE
CHANNELS UNIFORMLY AROUND SINK
COLOQUE EL FREGADERO EN EL MUEBLE, ASEGÚRESE QUE ESTÉ DERECHO
Y EL MARCO COINCIDA CON LA LINEA DEL BORDE DE LA CUBIERTA.
4
NOTA: la tornillería suministrada con este
fregadero está diseñada para mostradores estándar de 3/4" de espesor. Si el
mostrador es más grueso, Elkay ofrece
tornillos más largos para la compra. El
juego de tornillería N.º LK363 es para
mostradores de hasta 1-1/2" de espesor.
El juego de tornillería N.º LK463 es para
mostradores de hasta 2-1/2" de espesor.
PASO CINCO
Coloque los tornillos de
ajuste y el fregadero
El número de tornillos varía según el
modelo de fregadero. Asegúrese que haya
uno en medio de cada lado. Distribuya los
demás uniformemente alrededor del
fregadero.
Ponga una capa de empaque en todo el
marco del fregadero entre el canal y el
borde, para que sirva de sellador. Coloque
el fregadero en el mueble, asegúrese que
esté derecho y el marco coincida con la
linea del borde de la cubierta.
STEP SIX
Engage and Tighten Fasteners
SINK
FREGADERO
6
With your flashlight and long screwdriver,
get under the sink to tighten the fasteners.
First twist the clamps so their teeth swing
under the counter. Next, push the screw
upward to engage the clamp flange with the
channel and tighten. Begin with the
fasteners located in the middle of each
side, tighten the remaining fasteners until
the entire rim is sealed with no gaps. It may
be necessary to slide a fastener to a
different position to compensate for an
uneven counter. (Be careful not to
over-tighten. It is only necessary to draw
the rim down snugly to the counter.)
SINK
FREGADERO
COUNTER TOP
CUBIERTA
COUNTER TOP
TOP
COUNTER
CUBIERTA
CUBIERTA
DROP INTO CUT OUT WITH
CLAMP PARALLEL TO
CHANNEL
COLOQUE EL FREGADERO EN
LA APRETURA DE LA CUBIERTA
CON LAS ABRAZADERAS
PARELAS AL CANAL
3
TURN CLOCKWISE
TO TIGHTEN
APRIETE HACIA LA
DERECHA PARA
ASEGURAR
COUNTER TOP
CUBIERTA
ROTATE CLAMP
90° TO CHANNEL
AJUSTE LA
ABRAZADERA A
90° DEL CANAL
SCREW DRIVER
DESARMADOR
PASO SIETE
Conecte llaverías y drenaje
7
Siguiendo el orden opuesto del PASO 1
...conecte los tubos de drenaje, luego las
llaves de paso y posteriormente abra la
llave general del agua. Verifique que no
haya fugas:
1) en la llavería y llaves de paso y 2) en las
conecciones. Llene el fregadero de agua y
verifique que no haya fugas y goteras en la
conexión del drenaje. Vacíe el fregadero y
apriete las conexiones que gotéen.
In reverse order of STEP ONE...connect the
drain trap fittings, connect the faucet supply
fittings and turn on the water supply. Check for
possible leaks at these locations:
(1) Supply riser tubes to faucet, and (2) Supply
riser tubes to shut-off valves (or, lower
connections). Next fill the sink bowl with water
and check for possible leaks around the drain
flange(s). This would show up as dripping into
the cabinet below. Release water from sink
and check for possible leaks at drain
connections. Tighten any joints which leak.
FOR NEW COUNTERTOP
INSTALLATIONS ONLY
Follow countertop manufacturer’s directions
for cutting countertop. NOTE: If the
countertop has not yet been anchored to the
cabinets, you will find it much easier to
make the cutout and install the sink first,
while it is in an “easier-to-work” position.
SOLO PARA NUEVAS
INSTALACIONES DE
MOSTRADORES
1
1.
COUNTERTOP
CUBIERTA
TRACE COMPLETELY AROUND EDGE OF SINK
MARQUE COMPLETAMENTE TO EL CONTORNO
DEL FREGADERO
STEP ONE
Locate sink cutout by truning sink upside
down and position so bowl compartments
are located directly over the sink cabinet.
position sink, front to reat, so that rim will fit
flat on top surface and that sink
compartments will fit into the cabinet without
interfering with cabinet. Using the sink as a
template, trace completely around the edge
of the sink.
2
2.
DRAW SECOND
LINE INSIDE SINK
OUTLINE (CUT LINE)
CUT LINE
LINEA DE CORTE
TRACE UNA
SEGUNDA LINEA
DENTRO DE LA
PRIMERA. ESTÁ
SERÁ LA LINEA
DE CORTE.
1-1/2" RADIUS
38.1 mm RADIO
5/16"
5/16"
STEP TWO
Draw a second line 5/16" inside the trace of
the sink. This will produce a cutout opening
that will have an overall dimension of 5/8"
less than the sink. Use this line to cut your
coutertop. Check your cutout by setting the
sink in the opening. Adjust opening if
needed to make sink fit.
Utilize la linterna para alumbrar por debajo
del fregadero, con el desarmador voltée las
abrazaderas para que los dientes de éstas
queden por debajo del mueble como se
indica
en
la
ilustración.
Empiece
atornil-lando los tornillos colocados en medio
de cada lado. Termine de apretar los demás
hasta que no quede ningun espacio sin
sellar. Es posible que tenga que mover algun
tornillo de lugar para nivelar el fregadero.
Tenga cuidado de no apretar demasiado.
NOTA: para su comodidad, Elkay tiene
un destornillador extralargo diseñado
especialmente, pieza núm. LK350,
disponible para la compra.
NOTE: For your convenience, Elkay has a
specially designed extra long screwdriver part #LK350 - available for purchase.
STEP SEVEN
Connect Faucet Supplies
and Drain Fittings
PASO SEIS
Apriete los tornillos de ajuste
7.93 mm
7.93
mm
1-1/2" RADIUS
AT CORNERS
38.1 mm DE RADIO
EN LAS ESQUINAS
5
Siga las instrucciones del fabricante del
mostrador para realizar el corte. NOTA: si
todavía no se ancló el mostrador a los
gabinetes, será más fácil realizar el corte e
instalar el fregadero primero, mientras se
encuentra en una posición “más fácil para
trabajar”.
PASO UNO
Ubique la abertura del fregadero
colocándolo boca abajo y de manera tal que
los compartimientos para tazones estén
ubicados directamente sobre el gabinete del
fregadero. Coloque el fregadero, mirando
hacia atrás, de manera que el borde apoye
sobre la superficie superior y que los
compartimientos del fregadero encajen en
el gabinete sin obstaculizarlo. Utilice el
fregadero como una plantilla y marque una
línea alrededor del borde del fregadero.
PASO DOS
Trace una segunda línea 5/16" adentro de la
línea del fregadero. Esto generará una
abertura recortable que tendrá un tamaño
total de 5/8" menos que el fregadero. Utilice
esta línea para cortar el mostrador. Verifique
el corte colocando el fregadero en la abertura.
Si fuera necesario, ajuste la abertura para
hacer que el fregadero encaje correctamente.
EXPLICACIÓN DE LA PROTECCIÓN PARA EL COMPRADOR DE LA SERIE
SIGNATURE PLUS DE ELKAY
Garantía limitada de por vida de todos los modelos
de fregaderos de acero inoxidable de la serie Signature
¿Qué está garantizado?
Se garantiza que su fregadero y los tornillos de
colocación no tendrán defectos de materiales ni de
fabricación. Si encontrara cualquier defecto que resulte
en un mal funcionamiento o mal aspecto del producto,
Elkay reemplazará el fregadero sin cargo.
¿Quién recibe el beneficio?
La garantía se aplica al comprador original del
fregadero de la serie Signature o Signature PLUS.
¿Qué hará Elkay?
Cuando se devuelva un fregadero defectuoso, Elkay
proporcionará un nuevo fregadero (del mismo modelo),
ya sea a través del comercio donde el fregadero fue
comprado o directamente desde la fábrica de Elkay.
¿Qué excepciones hay?
Esta garantía no tendrá valor si el fregadero no fue
instalado
de
acuerdo
a
las
instrucciones
propor-cionadas, o si ha sido dañado debido a una
instalación mal hecha o abusiva. Esta garantía tampoco
tendrá valor si el fregadero es dañado por el mal uso o
uso inapropiado del producto (como exponerlo a
sustancias
químicas
corrosivas,
soluciones
fotográficas, etc.), por factores ambientales o por un
cuidado y limpieza inapropiados. La garantía no cubre
los gastos de mano de obra y/o daños resultantes de la
instalación de la unidad de reemplazo.
¿Qué debo hacer?
Si encuentra un defecto en el fregadero comuníquese
con el comercio donde lo compró. Si el comercio tiene
una unidad del mismo modelo para reemplazarlo, retire
el fregadero de la instalación y devuélvalo al comercio
para cambiarlo. En ese momento deberá presentar una
prueba de la compra.
¿Hay limitaciones a la responsabilidad legal de
Elkay?
La única responsabilidad legal de Elkay es reemplazar
un fregadero defectuoso, y esta garantía no cubre
ningún daño que pueda ser causado por el producto.
(En algunos estados no se permite esta limitación, por
lo que tal vez la misma no se aplique a usted).
Y también Esta garantía le da a usted derechos legales
espec-íficos. Además de éstos, usted puede tener
otros derechos legales (de acuerdo a los estatutos del
estado donde vive).
¿Hay alguna otra garantía?
No hay ninguna otra garantía explícita o implícita.
¿Cuánto dura la garantía limitada de por vida?
La protección aquí mencionada seguirá siendo válida
para el comprador original durante la vida útil del
producto bajo condiciones de uso residencial normal.
INSTRUCCIONES PARA EL CUIDADO Y LA LIMPIEZA
A continuación le ofrecemos algunos consejos para conservar el aspecto de nuevo de la pila.
• Quite el agua y enjuague luego de cada uso y seque con un paño. Nunca permita que el detergente se seque sobre las
superficies de acero inoxidable. (Actualmente, la mayoría de las marcas de detergente contienen aditivos que tienden a
ser corrosivos.)
• No se recomienda el uso de estopa de acero porque estos materiales pueden dejar virutas en la pila lo dándole un
aspecto de oxidación al acero inoxidable.
• Quite las esterillas, alfombras húmedas o paños para platos de la superficie.
Se debe emplear sumo cuidado al limpiar las pilas Signature de Elkay en acero inoxidable con acabado espejado.
Para mantener el acabado brilloso y espejado de la superficie
Use solamente detergente suave para lavar platos con una esponja para limpiar y luego enjuague a fondo. Luego seque
con un paño suave. No use un limpiador o paño abrasivo.
Para limpiar la parte de abajo y los costados del bol
Recomendamos limpiar la parte de abajo y los costados del bol del fregadero Signature de Elkay y toda superficie
expuesta de los fregaderos Signature PLUS de Elkay con un producto convencional de limpieza para el hogar. Asegúrese
de frotar hacia adelante y hacia atrás en la dirección de las líneas del grano de la pila para eliminar cualquier mancha y
difundir cualquier rayón que se produzca con el uso normal. Enjuague a fondo y seque bien con toalla.
Si tiene algún problema con el cuidado o la limpieza, llame al 1-800-223-5529.
IMPRESSO EN LOS E.E.U.U.
2222 Camden Court, Oak Brook, Illinois 60523 USA
SIGNATURE BY ELKAY and SIGNATURE PLUS BY ELKAY
STRAIGHT-TALK BUYER PROTECTION
Limited Lifetime Warranty on all Signature Series Stainless Steel Sink Models
What is Warranted?
Your sink is warranted to be free from defects in materials and
workmanship. Should any defect be found which would result in
the product being unsuitable in function or appearance, Elkay will
furnish you with a replacement sink at no charge.
Who Gets The Benefit?
The terms of the warranty are extended to the original purchaser
of the Signature and Signature PLUS Series sink.
What Will Elkay Do?
For any defective sink returned, Elkay will provide a replacement
sink (of the same model), either through the store where the
product was purchased or directly through Elkay.
What Are The Exceptions?
This warranty will be voided if the sink has not been installed
according to the instructions provided in a residential application, or
if it has been damaged due to mishandling or abuse in installation.
Damage from the use of optional Elkay accessories, abusive
treatment, normal wear including dents and scratches, misuse or
improper applications of the product (such as exposure to corrosive
chemicals, photographic solutions, etc.) environmental factors, and
improper care and cleaning will also invalidate this warranty. No
labor charges and/or damages incurred in the replacement
installation will be allowed.
What Do You Have To Do?
If a defect is found in the sink, contact the store where you
purchased it. If the store has a replacement unit (of the same
model) in stock, remove the sink from its installation, and return it
to the store for exchange. It will be necessary to show
proof-of-purchase at that time.
Any Limitations On Elkay's Liability?
Elkay's only liability is to replace a defective sink, and this
warranty will not cover any damages which might be caused by
the product. (Some states do not allow such limitation, so this
reference may not apply to you.)
And This warranty gives you specific legal rights, and in addition to
these, you may have other legal rights (according to the statutes
of your state).
Any Other Warranties?
There are no other warranties expressed or implied.
How Long Is The Limited Lifetime Warranty Valid For?
The above protection will continue for a lifetime of normal
residential use to the original owner of the sink.
Use and Care Hints
Satin Finish
Regular cleaning is important to maintain the appearance of your
Elkay sink.
Easy Cleaning Instructions
Rinsing is the most important part of sink care. An Elkay stainless
steel sink finish will retain its original bright appearance if the sink is
rinsed thoroughly after each use. “Thorough” rinsing can be done by
running the water throughout the sink for a few minutes after each
use. Typically, a rinse and towel drying after each use takes care of
most everyday clean ups. For everyday cleaning we recommend
using Elkay’s Stainless Butler Stainless Steel Cleaner + Polisher.
The non-abrasive formula is safe and effective for day to day
cleaning. Your sink will shine like new!
Recommendations for Proper Maintenance
• Do... Use only a mild liquid dishwashing detergent with a soft
sponge to clean and then thoroughly rinse the sink.
• Do... Rinse thoroughly after each use. “Thorough” rinsing can be
done by running water for a few minutes and rubbing the cleaned
area with a sponge.
• Do... Towel dry after each use to prevent mineral deposits from
building up on the surface of the sink.
• Do Not... Allow liquid soap or other household cleansers to dry on
the surface of the sink. Most brands contain chemical additives
which will affect the original finish.
• Do Not... Use solutions of chlorine bleach and water in the sink.
Chlorides, which are found in most soaps, detergents, bleaches,
and cleansers, are very aggressive to stainless steel. If left on the
sink too long they can cause surface pitting.
• Do Not... Use a steel wool pad to clean your sink. Steel wool pads
have a tendency to break apart and small particles of steel can
become embedded in the surface of the sink. The steel particles will
rust and will give the appearance that the sink itself is rusting.
• Do Not... Use abrasive cleansers or abrasive pads as it will scratch
the surface.
• Do Not... Leave wet sponges, cloths, or cleaning pads on the sink.
This can lead to surface rust.
Following these recommendations for the care and cleaning of your
stainless steel sink will insure that it will provide you with many years
of service.
©2008 Elkay
PRINTED IN U.S.A.
Chlorides
Today, chlorides are found in most all soap, detergents, bleaches
and cleansers; chlorides can be oppressive to stainless steel.
However, chlorides are very water soluable. Therefore, THOROUGH
RINSING of your sink after each use to remove any chloride residue
and a weekly scouring is all that is required to keep your sink looking
bright and shiny.
Water Quality
The quality of your water can affect your sink’s appearance. If your
water has a high iron content, a brown surface stain can form on the
sink giving the appearance of rust. Additionally, in areas with a high
concentration of minerals, or with over-softened water, a white film
may develop on the sink. To combat these problems, we suggest
that the sink be towel dried after use.
Discoloration, Rust and Possible Pitting
Wet sponges, cloths, cleaning pads and rubber mats left on the sink
can lead to discoloration. Steel wool pads should never be used to
clean your sink as they leave small iron particles in the grain lines
which rust and can damage the sink. Continued usage in this
manner may eventually lead to the sink itself rusting and pitting.
Liquid Soap
Do not allow concentrated liquid detergent to dry on your sink. Most
brands contain chemical additives which will affect the original finish.
Spotting
The quality of your water can affect your sink’s appearance. In areas
with hard water, a brown surface stain can form on the sink giving the
appearance of rust. This phenomena also occurs in water with high
iron content. Additionally, in areas with a high concentration of
minerals, or with oversoftened water, a white film may develop on
the sink. To combat this problem, we suggest that the sink be towel
dried after use.
Foods
Heavy salt concentration or foods containing high levels of salt
should not be allowed to dry onto the sink surface. Rinse your sink
thoroughly after use.
2222 Camden Court, Oak Brook, Illinois 60523 USA
www.elkayusa.com
(7/08) 74180118