1
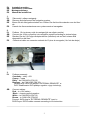
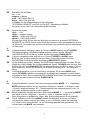
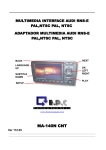
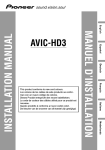
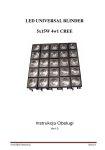
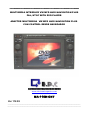
____________________________________________________________________________
MULTIMEDIA INTERFACE VW MFD AUDI NAVIGATION PLUS
PAL, NTSC WITH DVD PLAYER
ADAPTER MULTIMEDIA VW MFD AUDI NAVIGATION PLUS
CON CONTROL DESDE NAVEGADOR
www.electronicapunto.com
MA-110N-CNT
Ver 112.05
________________________________________________________________________________
_________________________________________________________________________________
__________________________________________________________________________________
__________________________________________________________________________________
2
PL
GB
DE
ES
1.
PL
GB
DE
ES
2.
PL
GB
DE
ES
3.
PL
GB
Instrukcja montażu
Installation/ connection:
Montageanleitung:
Manual de instalacion:
Zdemontuj i odłącz nawigację .
Remove and disconnect the navigation system.
Bauen Sie die Navigationseinheit aus. Ziehen Sie die Anschlussstecker von der Navi
ab.
Usando las llaves extractoras saca y desconecta el navegador
Podłacz 10-cio pinowy wtyk do nawigacji jak na zdjęciu poniżej.
Connect the 10-pin connector into navigation system according to picture below.
Stecken Sie den 10-Poligen Adapterstecker (Interface) wie auf den unteren Bild
dargestellt an die Navi .
Conecta el cable con conector redondo de 10 pins al navegador (Ver foto de abajo)
Podłącz przewody:
Czerwony – stały +12V.
Czarny – masa
Biały – do CAN HIGH (PIN 13)
Brązowy – do CAN LOW (PIN 26)
Podłącz wtyk JACK do wejścia “EXTERNAL REMONTE” w
DVD. Okablowanie DVD podłącz zgodnie z jego instrukcją.
Connect cables:
Red – to +12V battery.
Black – chassis ground negative
White – to CAN HIGH (PIN 13)
Brown – to CAN LOW (PIN 26)
Connect JACK plug to “EXTERNAL REMONTE” input in
DVD-Player. DVD’s cables connect according to his instruction.
________________________________________________________________________
3
_________________________________________________________________________
DE
Schließen Sie die Kabel:.
rot - +12V
schwarz -> Masse
wieß – CAN HIGH (PIN 13)
braun – CAN LOW (PIN 26)
Schließen sie den Klinkenstecker mit dem Eingang
"EXTERNAL REMOTE" am DVD an. Die DVD -Verkablung schließen
Sie genau so an, wie in der Beschreibung beschrieben.
ES
Conecta los cables:
Rojo - +12V
Negro – negativo (masa)
Blanco – CAN HIGH (PIN 13)
Marron - CAN LOW (PIN26)
El cable tipo JACK (El que sale del interface) se conecta a la entrada" EXTERNAL
REMONTE" de DVD(o sea en lugar donde se conecta el cable prolongador de sensor
de infrarojos ) Los cables de conexion de DVD hay que conectar segun la descripcion
del fabricante.
4.
PL
GB
DE
ES
Podłącz zasilanie nawigacji i włącz ją. W menu AUDIO wybierz opcję TV/VIDEO.
Zamontuj nawigację. Na ekranie będzie widoczny obraz z tunera. Dla AUDI
NAVIGATION PLUS wystarczy wybrać źródło przyciskiem RADIO/CD/TV.
Connect navigation power and turn it on. Chose TV/VIDEO in AUDIO menu.
Build the navi. It will be seen picture from tuner on the navi screen. For AUDI
NAVIGATION PLUS chose video by pressing RADIO/CD/TV button.
Ist die Spannung am Navi, Adapter und DVD-Player angeschlossen, schalten Sie die
Geräte ein. Dann wählen Sie im Menü Audio die Option TV/VIDEO oder bei Audi Plus
drücken Sie die Taste RADIO/CD/TV. Sie bekommen dann ein Bild zu sehen. Falls es
nicht möglich ist, ziehen Sie kurzzeitig die Adapter Sicherung raus – es erfolgt ein
Reset.
Conecta alimentacion y pon a funcionar el navegador. En el menu AUDIO elige
opcion TV/VIDEO. Instala el navegador.En la pantalla del navegador va estar visible
la imagen de DVD. En navegadores AUDI NAVIGATION PLUS (DX) solo basta elegir
la fuente devideo pulsando la tecla RADIO/CD/TV.
5.
PL
Wyreguluj jasność, kontrast i kolor za pomocą przycisków MODE, + , - . Naciskanie
MODE powoduje wejście w tryby regulacji w kolejności : jasność -> kontrast -> kolor
-> jasność poprzez klawisze + i - . Każda regulacja jest dostępna przez 10 sek. Po
tym czasie następuje wyjście z trybu regulacji.
GB Adjust brightness, contrast and colour with a switch MODE, + , - . By pressing MODE
can adjust of order : Brightnes -> contrast -> color -> brightnes trought + , Each of regulation is posibble for 10sec. After this time adjustment is not available.
DE
Durch Drücken auf die Taste MODE können Sie Helligkeit, Kontrast und Farbe
nacheinander wählen und mit den Tasten + und - einstellen. Wenn Sie innerhalb
von 10 sec keine Taste drücken, ist die Einstellung beendet und gespeichert. Sie
müssen dann mit MODE neu anfangen.
__________________________________________________________________________
4
ES
.
6.
PL
GB
DE
Puedes regular el brillo,contraste y saturacion (color) usando botones MODE, + , - .
Pulsando MODE el Adaptador multimedia entra en el modo de regulacion de
diguiente forma : brillo -> contraste -> saturacion(color)-> brillo usando + i - . Cada
regulacion esta disponible solo 10 secundos. Despues el interface sale
automaticamente del modo de regulacion.
Aby zaprogramować kody rozkazów dla danego modelu urządzenia naciśnij
jednocześnie + i - . Na ekranie monitora pojawi się niebieski ekran . Ilość
przyciśnięć + określa programowany kod (patrz poniżej), np. dwa naciśnięcia określą
kod 02 czyli zestaw kodów dla DVD MP410U. Wyjście z trybu
programowania następuje poprzez naciśnięcie - , adapter wraca do normalnej pracy.
Zestaw kodów jest przechowywany w nieulotnej pamięci, fabrycznie kod jest
ustawiony na 01.
Nr kodu
Obsługiwane urządzenie
1
2
3
4
5
6
DVD PHANTOM DVD300B
DVD MP410U/ DVP-1000M
DVD NESA 1002/ NESA 2007/ CANVA D05
BOSCHMANN SLD65
HDD PLAYER MEDIABANK 820
The program order’s codes for stated model press + and - at the same time.
Monitor’s screen will be blue then. Number of + pressing determine programming
code (see below) , fo example two pushes determine 02 code, that is code for DVD
MP410U. Output from programming procedure succeed trought - press,
the adapter backs to normal operation. Code’s kit is keeping in solid memory, factory
code is 01.
Code number
Operating device
1
2
3
4
5
6
DVD PHANTOM DVD300B
DVD MP410U/ DVP-1000M
DVD NESA 1002 /NESA 2007DVD/ CANVA D05
BOSCHMANN SLD65
HDD PLAYER MEDIABANK 820
Der Adapter und der DVD-Player sind auf einander abgestimmt. Sie können es aber
manuell auf ein anderes gerät umschalten. Da zu drücken Sie gleichzeitig die Tasten
+ und -, das Bild wird dann Blau. Durch Drücken der Taste + verändern Sie die
Programmierung zB 2x auf DVD MP410U. Die Einstellung wird durch
drücken der Taste - gespeichert.
Code number
Operating device
1
DVD PHANTOM DVD300B
5
2
3
4
5
6
ES
GB
DE
ES
HDD PLAYER MEDIABANK 820
Para programar el codigo de comandos para modelo de DVD elegido tienes que
pulsar A la vez + i - . La pantalla de navegador se pondra en color azul . Cada
pulsacion de simbolo + significa codigo programado .p.ej dos pulsaciones significan
codigo 02 o sea te lo deja programado para DVD MP410U. Para salir de modo de
programacion pulsa simbolo de - , y el adaptador multimedia volvera a
funcionamiento normal. .
Lo que has programado queda en la memoria interna de interface y no hay que
programarlo despues de desconectar la bateria. De fabrica el interface viene con
codigo 01.
1
2
3
4
5
6
7.
PL
DVD MP410U/ DVP-1000M
DVD NESA 1002/ NESA 2007DVD/ CANVA D05
BOSCHMANN SLD65
DVD PHANTOM DVD300B
DVD MP410U/ DVP-1000M
DVD NESA 1002/ NESA 2007DVD/ CANVA D05
BOSCHMANN SLD65
.
HDD PLAYER MEDIABANK 820
Część rozkazów jest dostępna z nawigacji (patrz rysunek poniżej) Pozostałe
rozkazy dal DVD sa dostępne z oryginalnego pilota poprzez odbiornik
podczerwieni
Some of tuner commands are available from head unit (see picture below).
Rest of orders controling DVD’s are available from original remonte
trough IR receiver.
Ein Teil der Befehle ist bedienbar vom Navi (schaue, Bild unten). Der Rest der
Befehle zum DVD sind mit der originalen Ferbedienung bedienbar ,
über Infrarotauge.
Una parte de comandos esta disponible usando las teclas del navegador (Ver la foto
de abajo) El resto de comandos estan disponibles usando el mando a distancia
________________________________________________________________________
________________________________________________________________________
6
_______________________________________________________________________________
_________________________________________________________________________________
7
_______________________________________________________________________________
________________________________________________________________________________
8
PL
1.
2.
GB
1.
2.
DE
1.
2.
ES
1.
2.
UWAGA!!
Przy podłaczaniu adaptera wymagana jest minimalna znajomość podstaw
elektroniki
Za uszkodzenia spowodowane złą instalacją lub błędami w połaczeniach
elektrycznych lub szkody spowodowane z obu tych powodów producent nie ponosi
odpowiedzialności
ATTENTION!!
Connect this interface only if you possess concerning knowledge about electronics.
For damages caused by wrong mounting /installation or mistakes of electrical
connection and damages caused by both reasons we are not aliable.
ACHTUNG!!
Schließen Sie diesen Adapter (Interface) nur an wenn Sie über entsprechende
Fachkenntnisse Verfügen !!!
Für Schäden die durch Einbau oder Anschlussfehler und für Folgeschäden
übernehmen wir keine Haftung.
ATENCION !! OJO !! CUIDADO !!
La conexion de interface exige conocimientos basicos de electronica.
El fabricante no se responsabiliza de los daños producidos por la incorecta
instalacion de interface. Si no eres persona mañosa ACUDE A UN TALLER DE
CAR AUDIO.
__________________________________________________________________________
9
__________________________________________________________________________
www.electronicapunto.com
Telefono de atencion de cliente:
España . 91-1516719
Polonia. 0048 5449167
(Ten en cuenta que no siempre tenemos a nuestro interprete disponible con lo cual si
tienes alguna duda escribenos un correo electronico al [email protected])
Si no tienes a nadie que te lo instale – acuda a unos especialistas. Pida hoy cita a
http://www.todonavegadores.com/
Tel.679 18 28 56
_____________________________________________________________________
10