1
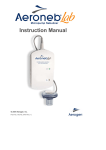
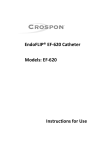
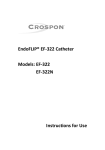
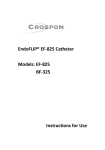
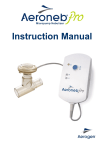
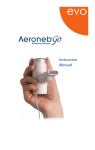
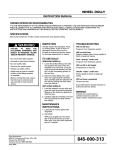
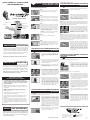
OPEN & READ ALL INSTRUCTIONS
BEFORE OPERATING!
QUICK START INSTRUCTION
GUIDE BEGINS HERE
Continued from previous column
TO OPERATE BATTERY POWERED CONTROLLER
Model #7090
TO ASSEMBLE NEBULIZER UNIT
3.
STEP 1
Before you begin, run the Medication Cup
under hot water, then tap the cup slightly.
Quick Start Card
Medication Cup Cap
Ventilation Holes
Mouthpiece
Medication Cup
(with OnQ® Aerosol
Generator)
Nebulizer Body
4. Turn on the unit by pressing the "on/off" button
on the Battery Powered Controller. The green
light on the Battery Powered Controller will
light up. Visually verify that aerosol is coming
out of the mouthpiece or mask to indicate that
the device is functioning properly.
STEP 2
Connect the Medication Cup (containing the
OnQ® Aerosol Generator) to the Nebulizer Body.
NOTE: Make sure the Aeroneb Go is unplugged
before you add medication to the Medication
Cup.
STEP 3
Fill the Medication Cup with the prescribed
nebulizer medication. Never pour more than
6 mL into the cup. The continuous line on
the inside surface of the cup indicates the
maximum filling level. (When the medication
cup contains medication, the cup should
remain in an upright position).
NOTE: (1) If you are using batteries and the green light is flashing, your batteries are low. You may finish your treatment, and then replace the three “AA”
batteries. (2) If the green light only comes on while depressing the button,
immediately replace the three “AA” batteries.
5. Place the mouthpiece between your teeth, with
your lips firmly sealed around the mouth piece.
If you use an aerosol mask, place the mask over
your mouth and nose. Breathe in and out slowly
through your mouth until aerosol formation
stops. Do not cover ventilation holes.
NOTE: Aerosol mask is not provided.
CAUTION: To avoid damage to the nebulizer
unit, do not use a syringe with needle.
STEP 4
Securely place Cap on Medication Cup.
Battery Powered Controller
AC/DC Controller
AC/DC Adapter
with detachable power cord
with attached power cord
with attached power cord
IMPORTANT ATTENTION
Thank you for purchasing the Aeroneb Go Micropump
Nebulizer from evo Medical Solutions! To optimize the
NOTE: (1) The Battery Powered Controller is designed to shut off after 16
minutes. If medication still remains in the cup, press the “on/off” button on
the Battery Powered Controller to continue your treatment. (2) Battery life
is dependent upon not only the number of treatments per day, but also the
length of each treatment. It is recommended that you always have a spare
set of new batteries available to you.
STEP 5
Attach Mouthpiece or Mask Connector and
mask to Nebulizer Body. NOTE: Masks are an
optional accessory and may be purchased
through evo Medical Solutions or your
Aeroneb® Go dealer.
6.
TO OPERATE AC/DC POWERED CONTROLLER
Model #7030
performance and life expectancy of your Aeroneb Go device,
Connect the nebulizer cable to the Aeroneb® Go
Battery Powered Controller.
Press the "on/off" button on the Battery Powered
Controller again to turn the nebulizer off.
Disconnect the cable from the Nebulizer Unit by
sliding the cable straight down the handset,
disassemble Nebulizer Unit and rinse Nebulizer
Unit Parts after each use. Wipe dry the connector
end of the cable after each use. Clean the
Nebulizer Unit and associated parts daily.
Do NOT remove the retaining ring under the
medication cup.
follow the cleaning instructions carefully as instructed on
page 11 of your Aeroneb Go Instruction Manual.
Retain this card with your device for future reference.
IMPORTANT CAUTION
As with any mechanical device, this product may become
1. Insert the AC Powered Controller cable
connector into the back of the Nebulizer Unit
by sliding the cable straight up the nebulizer
body.
2. Plug the AC Powered Controller into a standard
AC electrical outlet using the appropriate outlet
adapter. The green light on the AC Powered
Controller will light up.
TO OPERATE BATTERY POWERED CONTROLLER
WITH AN AC/DC ADAPTER
Model #7090
NOTE: This model has 2 modes of operation: Battery Powered Controller
only OR AC/DC with Battery Powered Controller.
1. Plug the AC adapter into a standard AC
electrical outlet, a green light on the adapter
indicates that the AC adapter is turned on.
Plug the AC cable into the Control Module,
indicated by the Input Symbol (See
Classifications and Markings chart in manual).
3. Visually verify that aerosol is coming out of the
mouthpiece or mask to indicate that the device
is functioning properly.
unusable due to an electrical outage, battery depletion, or
mechanical failure. We recommend that you have spare batteries and have a backup device available to you.
If this product is being used to treat a life threatening
condition, a backup device is necessary.
IMPORTANT CLEANING
INFORMATION FOR ALL MODELS
To optimize the performance and life expectancy of
your Aeroneb Go device, follow the cleaning instructions
carefully as instructed on page 11 of your Aeroneb Go
Instruction Manual.
4. Place the mouthpiece between your teeth, with
your lips firmly sealed around the mouthpiece.
If you use an aerosol mask, place the mask over
your mouth and nose. Breathe in and out slowly
through your mouth until aerosol formation
stops. Do not cover the ventilation holes during
use. NOTE: Aerosol mask is not provided.
5. Unplug the AC Powered Controller from the
wall to turn it off. Disconnect the cable from the
Nebulizer Unit by sliding the cable straight
down the handset, disassemble Nebulizer Unit
and rinse Nebulizer unit Parts after each use.
Wipe dry the Connector end of the cable after
each use. Clean the nebulizer unit and
associated parts daily. Do NOT remove the
retaining ring under the medication cup.
NOTE: Removal and the improper insertion of the retaining ring
from the underside of the medication cup may cause the unit to leak
or malfunction.
NOTE: Please read all instructions before using. Refer to your
Aeroneb® Go Nebulizer Instruction Manual for more complete
cleaning instructions.
To order replacement parts or accessories, visit your local home
medical equipment dealer or pharmacy.
If you have any questions or problems regarding your Aeroneb® Go
nebulizer, contact your local home medical equipment dealer or
pharmacy.
TO OPERATE BATTERY POWERED CONTROLLER
Model #7090
NOTE: This model has 2 modes of operation: Battery Powered Controller
only OR AC/DC with Battery Powered Controller.
1.
Turn the Battery Powered Controller upside
down. Slide the battery cover in the direction of
the arrow to remove the lid. Put in three (3) "AA"
disposable alkaline or lithium batteries,
matching them to the plus (+) and minus (-)
markings inside the Battery Powered Controller.
Replace the cover on the Battery Powered
Controller and slide the cover until it locks in
place. You can expect at least three (3) hours of
operation from a new set of disposable
batteries, (up to five (5) hours from high
performance batteries).
2.
Insert the nebulizer cable connector into the
back of the Nebulizer Unit. Slide the cable
straight up the nebulizer body.
Your Aeroneb® Go was tested and inspected at the factory and is a
premium device that has a life expectancy of at least one year (730
treatments) with proper care and cleaning. Lack of proper care and
cleaning, disassembly of the retaining ring or misuse will void the
warranty.
BEFORE ANY OPERATION
Before you begin any operation, continue to the
Quick Start Instruction Guide read throughly and
follow the operating instructions that apply to
your specific model.
Cable
AC Adapter
NOTE: The AC/DC Adapter does not charge batteries.
2.
Turn on the unit by pressing the "on/off" button
on the Battery Powered Controller. The green
light on the Battery Powered Controller will light
up. Visually verify that aerosol is coming out of
the mouthpiece or mask to indicate that the
device is functioning properly.
3. Place the mouthpiece between your teeth, with
your lips firmly sealed around the mouthpiece.
If you use an aerosol mask, place the mask over
your mouth and nose. Breathe in and out slowly
through your mouth until aerosol formation
stops. Do not cover the ventilation holes during
use. NOTE: Aerosol mask is not provided.
4. Press the "on/off" button on the Battery
Powered Controller again to turn the nebulizer
off.
5.
Disconnect the cable from the Nebulizer Unit
by sliding the cable straight down the handset,
disassemble Nebulizer Unit and rinse Nebulizer
Unit Parts after each use. Wipe dry the
connector end of the cable after each use.
Clean the Nebulizer Unit and associated
parts daily. Do NOT remove the retaining ring
under the medication cup.
Aerogen and Aeroneb are registered
trademarks of Aerogen, Ireland Ltd.
Continued on next column
©2007 evo Medical Solutions
P/N 22262 Rev E
Rx Only
Aerogen (Ireland) Limited,
Galway Business Park,
Dangan,
Galway.
www.aerogen.com
¡ABRA & LEYO TODAS las
INSTRUCCIONES ANTES DE OPERAR!
LA GUÍA DE INSTRUCCIONES DE
INICIO RÁPIDO COMIENZA AQUÍ
Continuado de la columna anterior
PARA FUNCIONAMIENTO CON UN CONTROLADOR
A PILA
Model #7090
PARA ARMAR LA UNIDAD NEBULIZADORA
PASO 1
Antes de comenzar, enjuague la taza para
medicamento con agua caliente, luego
golpee suavemente la taza.
Tarjeta de inicio rápido
Tapa de taza para medicamento
Orificios de ventilación
Cuerpo del nebulizador
NOTA: asegúrese que Aeroneb Go esté
desenchufado antes de agregar el
medicamento a la taza.
Controlador a pila
Controlador CA/CC
Adaptador CA/CC
con cable integrado
con cable integrado
PASO 3
Llene la taza para medicamento con el
medicamento para nebulización prescrito.
Nunca vierta más de 6 mL en la taza. La línea
continua en la superficie interna de la taza
indica el nivel máximo de llenado. (Cuando
la taza para medicamento contiene
medicamento, ésta debe permanecer en
posición vertical).
¡Gracias por comprar el Aeroneb Va a Micropump Nebulizador del evo Soluciones Médicas! Para optimizar el desem-
Conecte el cable del nebulizador al controlador
a pila Aeroneb®Go.
NOTA: (1)si está usando pilas y la luz verde parpadea, las pilas tienen poca
carga. Puede finalizar su tratamiento y luego reemplazar las tres pilas “AA”.
(2) si la luz verde sólo aparece cuando presiona el botón, reemplace las tres
pilas “AA” inmediatamente.
5. Coloque la boquilla entre sus dientes, con sus
labios firmemente sellados alrededor de la
boquilla. Si usa una máscara para nebulización,
coloque la máscara sobre la boca y la nariz.
Respire lentamente por la boca hasta que cese
la formación de aerosol. No cubra los orificios de
ventilación. NOTA: no se proporciona máscara
para nebulización.
PASO 4
Tape firmemente la taza para medicamento.
PRECAUCIÓN IMPORTANTE
3.
4. Encienda la unidad presionando el botón
"on/off" ubicado en el controlador a pila. La luz
verde del controlador se encenderá. Verifique
visualmente que salga aerosol desde la boquilla
o máscara, lo cual indica que el dispositivo está
funcionando adecuadamente.
PRECAUCIÓN: para evitar dañar la unidad
nebulizadora, no use una jeringa con aguja.
con cable desmontable
Inserte el conector del cable del nebulizador en
la parte posterior de la unidad nebulizadora.
Deslice el cable hacia arriba sobre el cuerpo del
nebulizador.
PASO 2
Conecte al cuerpo del nebulizador a la taza
para medicamento (que contiene al Generador
OnQ®).
Boquilla
Taza para medicamento
(incluye generador de
aerosol OnQ®)
2.
PASO 5
Conecte la boquilla o el conector de la máscara
y la máscara, al cuerpo del nebulizador.
NOTA: las máscaras son accesorios opcionales y
pueden comprarse a través de evo Medical
Solutionso su representante de Aeroneb® Go.
NOTA: (1) el controlador a pila está diseñado para apagarse luego de 16 minutos. Si todavía queda medicamento en la taza, presione el botón “on/off”
del controlador para continuar la nebulización. (2) La vida de la pila depende
no sólo de la cantidad de nebulizaciones por día sino también de la duración
de cada nebulización. Se recomienda que usted siempre tenga disponible
un juego de pilas de repuesto.
6.
peño y la esperanza de vida de su Aeroneb Vayan dispositivo,
siga las instrucciones de limpieza con cuidado como instruido en la página 11 de su Aeroneb Va Manual de Instrucción.
Guarde esta tarjeta con su dispositivo para referencia futura.
PRECAUCIÓN IMPORTANTE
PARA FUNCIONAMIENTO CON CONTROLADOR
ALIMENTADO POR CA/CC
Model #7030
1. Inserte el conector del cable del controlador de
CA en la parte posterior del la unidad
nebulizadora deslizando el cable hacia arriba
sobre el cuerpo del nebulizador.
Presione nuevamente el botón "on/off" del
controlador a pila para apagar el nebulizador.
Desconecte el cable de la unidad nebulizadora
deslizando el cable hacia abajo, desarme la
unidad nebulizadora y enjuague las piezas de
ésta después de cada uso. NO quite el anillo de
retención debajo de la taza para medicamento.
Seque el extremo conector del cable luego de
cada uso. Limpie diariamente la unidad
nebulizadora y las piezas asociadas. NO quite el
anillo de retención debajo de la taza para
medicamento.
PARA FUNCIONAMIENTO CON CONTROLADOR
A PILA CON ADAPTADOR PARA CA/CC
Model #7090
Al igual que cualquier dispositivo mecánico, este producto
no podrá utilizarse en caso de apagón, pila agotada o falla
mecánica. Recomendamos que tenga pilas de repuesto y un
dispositivo de respaldo disponibles. Si este producto se usa
para tratar una afección potencialmente mortal, es necesario
contar con un dispositivo de respaldo.
INFORMACIÓN IMPORTANTE PARA LA LIMPIEZA
DE TODOS LOS MODELOS
Para optimizar el rendimiento y la duración prevista de
su dispositivo Aeroneb Go, siga cuidadosamente las instrucciones de limpieza según se indica en la página 11
del Manual de instrucciones de Aeroneb Go.
NOTA: quitar e insertar de manera incorrecta el anillo de retención del lado inferior de la taza para medicamento puede
causar pérdidas o malfuncionamiento.
NOTA: lea todas las instrucciones antes de usar. Consulte el
Manual de instrucciones del Nebulizador Aeroneb® Go para
obtener instrucciones más detalladas de limpieza.
Para pedir piezas de repuesto o accesorios, visite a su representante local de equipos médicos domésticos o farmacia local.
Si tiene preguntas o problemas relacionados con su nebulizador Aeroneb® Go, comuníquese con su representante local
de equipos médicos domésticos o con su farmacia local.
Su Aeroneb® Go fue evaluado e inspeccionado en la fábrica y es
un dispositivo superior que, con el cuidado y la limpieza adecuados, tiene una duración prevista de al menos un año (730 nebulizaciones). La ausencia de limpieza y cuidado adecuados, el
desmontaje del anillo de retención o
ANTES DE CUALQUIER OPERACION
Antes que empiece cualquier operación, continúe a la Guía Rápida de la Instrucción del
Comienzo leyó pormente y sigue las instrucciones operadoras que aplican a su modelo específico.
2. Enchufe el controlador de CA en una toma de
corriente eléctrica estándar usando el
adaptador adecuado. La luz verde sobre del
controlador se encenderá.
NOTA: este modelo tiene 2 modos de funcionamiento: con alimentación
solamente a pila, O BIEN, mediante CA/CC con controlador a pila.
1. Enchufe el adaptador CA en una toma de
corriente eléctrica estándar, una luz verde en el
adaptador indica que el adaptador CA está
encendido. Enchufe el cable de CA en el
módulo de control, indicado por el símbolo
‘Input’ (Entrada). (Consulte la tabla de
clasificaciones y símbolos en el manual).
3. Verifique visualmente que salga aerosol desde
la boquilla o máscara, lo cual indica que el
dispositivo está funcionando correctamente.
4. Coloque la boquilla entre sus dientes, con sus
labios firmemente sellados alrededor de la
boquilla. Si usa una máscara para nebulización,
coloque la máscara sobre la boca y la nariz.
Respire lentamente por la boca hasta que cese
la formación de aerosol. No cubra los orificios
de ventilación durante el uso. NOTA: no se pro
porcion máscara para nebulización.
5. Desconecte de la pared el controlador
alimentado por corriente alterna (CA), para
apagarlo. Desconecte el cable de la unidad
nebulizadora deslizando el cable hacia abajo,
desarme la unidad nebulizadora y enjuague las
piezas de ésta después de cada uso. Seque el
extremo conector del cable luego de cada uso.
Limpie diariamente la unidad nebulizadora y las
piezas asociadas. NO quite el anillo de retención
-debajo de la taza para medicamento.
Cable
Adaptador AC
NOTA: el adaptador CA/CC no carga pilas.
2.
Encienda la unidad presionando el botón
"on/off" en el controlador a pila. La luz verde en
el controlador se encenderá. Verifique
visualmente que sale aerosol por la boquilla o
máscara, lo cual indica que el dispositivo funciona
correctamente.
3. Coloque la boquilla entre sus dientes, con sus
labios firmemente sellados, alrededor de la
boquilla. Si usa una máscara para nebulización,
coloque la máscara sobre la boca y la nariz.
Respire lentamente por la boca hasta que cese
la formación de aerosol. No cubra los orificios de
ventilación durante el uso. NOTA: no se pro
porcion máscara para nebulización.
4. Presione nuevamente el botón "on/off" del
controlador a pila para apagar el nebulizador.
PARA FUNCIONAMIENTO CON UN CONTROLADOR
A PILA
Model #7090
NOTA: este modelo tiene 2 modos de funcionamiento: con alimentación
solamente a pila, O BIEN, mediante CA/CC con controlador a pila.
5.
Desconecte el cable de la unidad nebulizadora
deslizándolo hacia abajo, desarme la unidad
nebulizadora y enjuague las piezas de ésta
después de cada uso. NO quite el anillo de
retención debajo de la taza para medicamento.
Seque el extremo conector del cable luego de
cada uso. Limpie diariamente la unidad
nebulizadora y las piezas asociadas.
1. Dé vuelta el controlador a pila. Deslice en la
dirección de la flecha la cubierta del recinto para
las pilas, para quitar la tapa. Coloque allí tres (3) pilas
alcalinas "AA" o de litio desechables; haga coincidir
los signos más (+) y menos (-) que se encuentran
en el interior del controlador a pila. Vuelva a colocar
la cubierta sobre el controlador y deslícela hasta
que se trabe en su lugar. Puede anticipar un
funcionamiento de al menos tres (3) horas con un
juego nuevo de pilas desechables, (hasta cinco (5)
horas con pilas de alto rendimiento).
Aerogen and Aeroneb are registered
trademarks of Aerogen, Ireland Ltd.
Continuado a próxima columna
©2007 evo Medical Solutions
Rx Only
Aerogen (Ireland) Limited,
Galway Business Park,
Dangan,
Galway.
www.aerogen.com