1
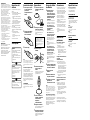
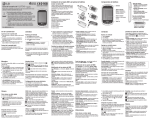
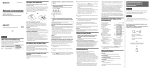
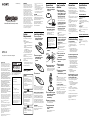
3-220-493-11 (1)
Operating Instructions
Manual de instrucciones (no verso)
WARNING
This equipment has been tested and
found to comply with the limits for a
Class B digital device, pursuant to Part
15 of the FCC Rules. These limits are
designed to provide reasonable
protection against harmful interference
in a residential installation. This
equipment generates, uses, and can
radiate radio frequency energy and, if
not installed and used in accordance
with the instructions, may cause harmful
interference to radio communications.
However, there is no guarantee that
interference will not occur in a particular
installation. If this equipment does cause
harmful interference to radio or
television reception, which can be
determined by turning the equipment
off and on, the user is encouraged to try
to correct the interference by one or
more of the following measures:
System
Requirements
EMK-01
Sony Corporation © 2000 Printed in Philippines
Notice to Users
2000 Sony Electronics Inc. All rights
reserved. This manual and the software
described herein, in whole or in part,
may not be reproduced, translated, or
reduced to any machine-readable form
without prior written approval.
SONY ELECTRONICS INC. PROVIDES
NO WARRANTY WITH REGARD TO
THIS MANUAL, THE SOFTWARE, OR
OTHER INFORMATION CONTAINED
HEREIN AND HEREBY EXPRESSLY
DISCLAIMS ANY IMPLIED
WARRANTIES OF MERCHANTBILITY
OR FITNESS WITH REGARD TO THIS
MANUAL, THE SOFTWARE, OR SUCH
OTHER INFORMATION. IN NO
EVENT SHALL SONY ELECTRONICS
INC. BE LIABLE FOR ANY
INCIDENTAL, CONSEQUENTIAL, OR
SPECIAL DAMAGES, WHETHER
BASED ON TORT, CONTRACT, OR
OTHERWISE, ARISING OUT OF OR IN
CONNECTION WITH THIS MANUAL,
THE SOFTWARE, OR OTHER
INFORMATION CONTAINED HEREIN
OR THE USE THEREOF.
Sony Electronics Inc. reserves the right to
make any modification to this manual or
the information contained herein at any
time without notice. The software
described herein is governed by the
terms of a separate usage license
agreement.
You are cautioned that any changes or
modifications not expressly approved in
this manual could void your authority to
operate this equipment.
Sony, eMarker, and the eMarker logo are
trademarks of Sony Corporation.
Windows and the Windows 98 logo are
registered trademarks of Microsoft
Corporation.
All other trademarks are trademarks of
their respective owners.
To use eMarker, the following are
required:
• IBM-compatible PC
– Pentium 133 MHz (200 MHz or
faster)*
– 32MBytes of RAM (64MBytes or
greater)*
– 3MBytes of available hard disk
space (5MBytes)*
– SVGA (800 × 600) (XGA (1024 ×
768))* monitor with 256 colors
• U.S.-Version Windows 98 or
Windows 98 SE (Second Edition)
• USB port
• Internet access (e.g. modem or
Ethernet) with speed of 28.8kbps or
greater
• Internet browser
– Internet Explorer 4.0 or newer, or
– Netscape Navigator 4.0 or newer
— Reorient or relocate the receiving
antenna.
— Increase the separation between the
equipment and receiver.
— Connect the equipment into an outlet
on a circuit different from that to
which the receiver is connected.
— Consult the dealer or an experienced
radio/TV technician for help.
Preparations
1 Connect the eMarker
Cradle to the USB port
of your PC.
KEEP OUT OF REACH OF SMALL
CHILDREN. RISK OF CHOKING IF
SWALLOWED. BATTERY MAY CAUSE
DEATH IF SWALLOWED.
A black circle appears on the
display in falling down “Sand
Clock” animation movement.
DO NOT USE WHILE DRIVING OR
OPERATING DANGEROUS
EQUIPMENT. ALWAYS USE IN A
SAFE ENVIRONMENT.
To eMark a song from a
registered radio station
Press the e button once.
2
Inserting a battery
1 Turn to open the
Trade Name: SONY
Model No.: EMK-01
Responsible Party: Sony Electronics
Inc.
Download and install
the eMarker software.
Address:
1 Sony Drive
Park Ridge, NJ 07656
v
Telephone No.: (201) 930-6972
Step 2
This device complies with Part 15 of
the FCC Rules. Operation is subject
to the following two conditions: (1)
This device may not cause harmful
interference, and (2) this device must
accept any interference received,
including interference that may
cause undesired operation.
Take your eMarker to where you
listen to the radio and eMark
your favorite songs by pressing
the e button on your eMarker
while listening to radio.
• During housework
• In a commuter train
• On a street
Step 3
v
Go home and check out the
songs that you have eMarked on
the web site.
Hold the e button pressed for two
seconds.
“ROAM” flashes onthe lower
display of the eMarker.
Note
Be sure to check the availability of
this feature on the web site.
2
4
Plug the eMarker into
the eMarker Cradle.
In some cases, you can plug the
eMarker directly into the USB
port on your PC as well.
Close the lid.
Step 1
Start by setting up your eMarker.
• Insert a battery.
• Download and install the
eMarker software to your PC.
• Register your eMarker on the
web site.
See “Inserting a battery” and
“Preparations.”
To eMark a song that you
heard on a radio station
outside your normal
listening area
Take off the cap of the
eMarker.
Place the supplied
CR2025 battery with
the + side facing
upward.
Turn on your PC and
establish internet
connection.
3
Take off the cap of the
eMarker.
4
Plug the eMarker
into the eMarker
Cradle.
5
Continue the operation
following the
instructions on your PC.
Note
The eMarker can hold up to 10 eMarks at
once. If you try to register an 11th
eMark, all 10 black circles will flash to
indicate that it is full and the 11th eMark
will not be registered.
To cancel an eMark
Note
All your eMarks will be erased when
you open the battery compartment. Be
sure to upload your eMarks to the
eMarker web site before opening the lid.
When to replace the battery
Under normal conditions of use, the
battery will last approximately 6
months. When the battery becomes
weak, the LCD indications become
dimmer. Replace the battery with a
Sony CR2025 or Duracell DL-2025
lithium battery. Use of another battery
may present a risk of fire or explosion.
WARNING
Battery may explode if mistreated.
Do not recharge, disassemble or
dispose of in fire.
5
6
Your PC will recognize
the eMarker and install
the device driver
automaticaly.
Resister your eMarker.
Follow the registering procedure
on the eMarker web site.
7
Unplug the eMarker
from the eMarker
Cradle.
Be sure to attach the cap to the
eMarker after use.
Precautions
Specifications
• The eMarker is a precision
instrument. Never disassemble.
• Keep the eMarker away from
extremely high temperatures (above
60°C [140 °F]) and humidity.
Never leave the eMarker inside the
car.
• When using outdoors, never let the
eMarker become wet with rain or
salt water.
• When the eMarker or the connector
become soiled, wipe them with a
dry cloth.
• Do not pull the cable when
disconnecting the cable of the
eMarker cradle from your PC.
Always grip the plug when
disconnecting to prevent damage.
• Do not try to pull the cap off
without pushing the two buttons on
the cap.
Supplied accessories
Press the CANCEL button on the rear
of the eMarker with the tip of a pen or
sharp object.
Each time you press the CANCEL
button, an eMark is canceled from the
latest one entered, and one black
circle on the display disappears.
Operating Instructions (1)
eMarker cradle (1)
CR2025 lithium battery (1)
eMarker (EMK-T01)
Power requirement
CR2025 lithium battery
Battery life
Approx. 6 months (assuming
eMarking ten times a day, including
one data transfer)
Output
USB connector
Dimensions
Approx. 1 5/16 × 3 3/4 × 21/32 in.
(32.4 × 94.2 × 16.1 mm) (w/h/d)
Mass
Approx. 0.9 oz. (26 g)
eMarker cradle (EMK-C01)
Be sure to check the availability of
this feature on the web site.
If you don’t see the “e” logo in
the Task Tray (at the lower
bottom right hand corner) after
installation, then start the
eMarker software by going
through the Start, Programs, and
eMarker menus.
3
3
Press the e button twice.
“TV” flashes on the lower display
of the eMarker.
Note
Note
battery compartment
lid using a coin, etc.
2
To eMark a song from a
registered TV channel
Follow the downloading and
installing procedure on the
eMarker web site
http://www.eMarker.com.
Quick glance
Declaration of Conformity
when you hear a song
that you like on one of
your registered radio
stations/TV channels.
CAUTION
* Recommended values
If you have any questions about this
product, go to the eMarker web site:
http://www.eMarker.com.
How to use the
eMarker
1 Press the e button
Input/output
Troubleshooting
You cannot eMark.
• The battery is not set properly.
t Set the battery properly.
• Ten eMarks have already been
made.
t Cancel the eMarks and try
eMarking again or upload your
eMarks to the web site to clear
the memory in the terminal.
The eMarker application will
not launch automatically.
• Installation failed or the shortcut for
the application has been erased.
t Create a shortcut for the tsr.exe
file in the folder in which the
application is installed, and
move it to the Startup Folder by
going through Start Menu and
selecting Program Folder.
• The tsr.exe file for the application
may be erased.
t Download and install the
application again.
Nothing happens on your PC
when you plug the eMarker
into the eMarker Cradle.
• The “e” logo does not appear on the
Task Tray (at lower right-hand
corner of screen).
t Launch the eMarker application
by going through the folder in
which the application is
installed.
• Check to see if your USB port is
active by switching it with another
device (e.g. a USB mouse).
If the above-mentioned remedies do
not help improve the situation, go to
the eMarker web site for more
information
(http://www.eMarker.com).
USB connectors
Dimensions
Approx. 3 1/4 × 1 3/16 × 2 5 /8 in.
(79.6 × 28.6 × 64.6 mm) (w/h/d)
Mass
Approx. 2.8 oz. (80 g)
ADVERTENCIA
Este equipo ha sido probado y se ha
comprobado que cumple con los límites
para dispositivos digitales de Clase B, de
acuerdo con la Parte 15 de las Normas de
la FCC. Estos límites han sido diseñados
para proporcionar una protección
razonable contra interferencias
perjudiciales en una instalación
residencial. Este equipo genera, utiliza,
y puede radiar energía de
radiofrecuencia y, si no se instala y
utiliza de acuerdo con las instrucciones,
puede causar interferencias perjudiciales
en las radiocomunicaciones. Sin
embargo, no existe ninguna garantía de
que tales interferencias no se produzcan
en una instalación particular. Si este
equipo causa interferencias perjudiciales,
lo cual podrá determinarse
desconectando y volviendo a conectar su
alimentación, se ruega que el usuario
corrija las interferencias tomando una o
más de las medidas siguientes:
— Reorientación o reubicación de la
antena receptora.
— Aumento de la separación entre el
equipo y el receptor.
— Conexión del equipo a un
tomacorriente diferente del utilizado
por el receptor.
— Solicitud de ayuda al proveedor o a
un técnico de radio/televisión
experimentado.
PRECAUCIÓN
MANTENGA ESTA UNIDAD FUERA
DEL ALCANCE DE NIÑOS
PEQUEÑOS. SI SE TRAGA LA PILA,
EXISTE EL RIESGO DE MUERTE.
NO UTILICE ESTA UNIDAD
MIENTRAS CONDUZCA O CUANDO
MANEJE EQUIPOS PELIGROSOS.
UTILÍCELA SIEMPRE EN UN
ENTORNO SEGURO.
Requisitos del
sistema
Para utilizar eMarker se requiere lo
siguiente:
• PC compatible con IBM
– Pentium de 133 MHz (200 MHz o
de mayor velocidad)*
– 32 Mbytes de RAM (64 Mbytes o
más)*
– 3 Mbytes de espacio disponible en
el disco duro (5 MB)*
– Monitor SVGA (800 x 600) (XGA
(1024 x 768))* con 256 colores
• Windows 98, versión U.S. o
Windows 98 SE (Second Edition)
• Puerto USB
• Acceso a Internet (p. ej., módem o
Ethernet) con velocidad de 28,8 kbps
o más
• Examinador de Internet
– Internet Explorer 4.0 o más
reciente, o
– Netscape Navigator 4.0 o más
reciente
Inserción de la pila
1 Gire la tapa de la pila
Preparativos
1 Conecte el soporte del
con una moneda, etc.
para abrir el
compartimiento de la
misma.
eMarker al puerto USB
de su PC.
2
2
Paso 2
Lleve su eMarker al lugar donde
esté escuchando la radio y
“eMarke” sus canciones favoritas
presionando la tecla e de su
eMarker durante la escucha.
• En casa
• En un tren
• En la calle
Paso 3
v
Cuando vuelva a casa, compruebe
las canciones que haya
“eMarcado” en el sitio Web.
Descargue e instale el
software del eMarker.
Inserte la pila CR2025
suministrada con la
cara + hacia arriba.
Presione una vez la tecla e.
Para “eMarcar” una
canción de un canal de
televisión registrado
Nota
Si no puede ver el logotipo “e”
en la bandeja de tareas (de la
esquina inferior derecha)
después de la instalación, ejecute
el software pasando a través de
los menús Start, Programs, y
eMarker.
3
v
Para “eMarcar” una
canción de una emisora
de radiodifusión
registrada
Siga el procedimiento de descarga
e instalación del sitio Web de
eMarker
http://www.eMarker.com.
Vista rápida
Comience instalando su eMaker.
• Insértele una pila.
• Descargue e instale el software
de eMarker en su PC.
• Registre su eMarker en el sitio
Web.
Consulte “Inserción de la pila” y
“Preparativos”.
cuando oiga una
canción que desee de
una de sus emisoras de
radiodifusión/canal de
televisión que haya
registrado.
En el visualizador aparecerá un
círculo negro con movimiento
descendente de “reloj de arena”.
* Valores recomendados
Paso 1
Forma de utilizar
el eMarker
1 Presione la tecla e
Cierre la tapa.
3
Todas sus “eMarcas” se borrarán cuando
abra el compartimiento de la pila.
Cerciórese de cargar sus “eMarcas” en el
sitio Web de eMarker antes de abrir la
tapa.
Cuándo reemplazar la pila
En condiciones normales de
utilización, la pila durará
aproximadamente 6 meses. Cuando
la pila se debilite, las indicaciones del
visualizador de cristal líquido serán
difíciles de ver. Reemplace la pila por
otra de litio CR2025 Sony o DL-2025
Duracell. La utilización de otra pila
podría suponer el riesgo de incendio o
explosión.
Enchufe el eMarker en
el soporte para el
mismo.
En algunos casos, podrá enchufar
el eMarker directamente en el
puerto USB de su PC.
ADVERTENCIA
La pila puede explotar si la maltrata.
No recargue, desarme, ni tire la pila al
fuego.
No es posible “eMarcar”.
2
Conecte la alimentación
de su PC y establezca la
conexión con Internet.
3
Quite la tapa del
eMarker.
4
Enchufe el eMarker en
el soporte del mismo.
5
Continúe la operación
siguiendo las
instrucciones de su PC.
Nota
El eMarker podrá almacenar hasta 10
“eMarcas” a la vez. Si trata de registrar
la 11.a “eMarca”, todos los 10 círculos
negros parpadearán para indicar que la
memoria está llena y que tal “eMarca”
no se registrará.
5
6
Su PC reconocerá el
eMarker e instalará el
controlador del
dispositivo
automáticamente.
Registre su eMarker.
Siga el procedimiento de registro
del sitio Web de eMarker.
7
Desenchufe el eMarker
del soporte del mismo.
Cerciórese de colocar la tapa en el
eMarker después de haberlo
utilizado.
Accesorios suministrados
Cerciórese de comprobar la
disponibilidad de esta función en el
sitio Web.
Cerciórese de comprobar la
disponibilidad de esta función en el
sitio Web.
4
• El eMarker es un instrumento de
precisión. No lo desarme nunca.
• Mantenga el eMarker alejado de
temperaturas extremadamente altas
(más de 60°C) y de la humedad.
No deje nunca el eMarker en el
interior de un automóvil.
• Cuando utilice el eMarker en
exteriores, no permita que se
humedezca con la lluvia ni con el
agua del mar.
• Cuando el eMarker o su conector se
ensucie, frótelo con un paño seco.
• Para desconectar el eMarker de su
PC, no tire del cable de su cable.
Para evitar daños, tire siempre del
conector.
• No intente tirar de la tapa sin
presionar los dos botones de la
misma.
Solución de
problemas
Mantenga presionada la tecla e
durante dos segundos.
En el visualizador inferior del
eMarker parpadeará “ROAM”.
Nota
Nota
Especificaciones
Presione dos veces la tecla e.
En el visualizador inferior del
eMarker parpadeará “TV”.
Nota
Para “eMarcar” una
canción de una emisora
de radiodifusión que
oiga fuera de su área
normal de escucha
Quite la tapa del
eMarker.
Precauciones
Para cancelar una “eMarca”
Presione la tecla CANCEL de la parte
posterior del eMarker con la punta de
un bolígrafo o un objeto puntiagudo.
Cada vez que presione la tecla
CANCEL, se cancelará una “eMarca”
desde la última introducida, y
desaparecerá un círculo negro del
visualizador.
• La pila no está insertada
correctamente.
t Insértela adecuadamente.
• Ya ha realizado 10 “eMarcas”.
t Cancele las “eMarcas” y trate de
volver a realizar otras o
descargue las “eMarcas” del sitio
Web para borrar la memoria del
terminal.
La aplicación del eMarker no
se ejecuta
automáticamente.
• La instalación falló o el acceso
directo para la aplicación se borró.
t Cree un acceso directo para el
archivo tsr.exe en la carpeta en la
que instaló la aplicación, y
muévalo hasta la carpeta Startup
pasando a través de Start Menu
y seleccionando Program Fólder.
• El archivo tsr.exe para la aplicación
puede haberse borrado.
t Vualva a descargar e instalar la
aplicación.
No sucede nada en su PC al
enchufar el eMarker en su
soporte.
• El logotipo “e” no aparece en la
bandeja de tareas (de la esquina
inferior derecha de la pantalla).
t Ejecute la aplicación del eMarker
pasando a través de la carpeta en
la que haya instalado la
aplicación.
• Compruebe si su puerto USB está
activo conectándole otro dispositivo
(p. ej., un ratón USB).
Si las soluciones mencionadas no
ayudan a mejorar la situación, busque
más información en el sitio Web de
eMarker (http://www.eMarker.com).
Manual de instrucciones (1)
Soporte del eMarker (1)
Pila de litio CR2025 (1)
eMarker (EMK-T01)
Alimentación
Pila de litio CR2025
Duración de la pila
Aprox. 6 meses (suponiendo que se
realice diez “eMarcas” al día,
incluyendo una transferencia de
dtos)
Salida
Conector USB
Dimensiones
Aprox. 32,4 x 94,2 x 16,1 mm
(an/al/prf)
Masa
Aprox. 26 g
Soporte del eMarker
(EMK-C01)
Entrada/salida
Conectores USB
Dimensiones
Aprox. 79,6 x 28,6 x 64,6 mm
(an/al/prf)
Masa
Aprox. 80 g