1
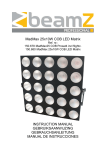
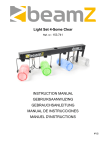
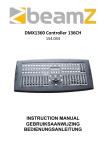
DMX-192S controller
192 channel
Ref. nr.: 154.060
INSTRUCTION MANUAL
GEBRUIKSAANWIJZING
GEBRAUCHSANLEITUNG
MANUAL DE INSTRUCCIONES
ENGLISH
Congratulations to the purchase of this Beamz light effect. Please read this manual thoroughly prior to using the unit in
order to benefit fully from all features.
Read the manual prior to using the unit. Follow the instructions in order not to invalidate the warranty. Take all precautions
to avoid fire and/or electrical shock. Repairs must only be carried out by a qualified technician in order to avoid electrical
shock. Keep the manual for future reference.
- Prior to using the unit, please ask advice from a
specialist. When the unit is switched on for the first time,
some smell may occur. This is normal and will disappear
after a while.
- The unit contains voltage carrying parts. Therefore do
NOT open the housing.
- Do not place metal objects or pour liquids into the unit
This may cause electrical shock and malfunction.
- Do not place the unit near heat sources such as
radiators, etc. Do not place the unit on a vibrating
surface. Do not cover the ventilation holes.
- The unit is not suitable for continuous use.
- Be careful with the mains lead and do not damage it. A
faulty or damaged mains lead can cause electrical shock
and malfunction.
- When unplugging the unit from a mains outlet, always
pull the plug, never the lead.
- Do not plug or unplug the unit with wet hands.
- If the plug and/or the mains lead are damaged, they
need to be replaced by a qualified technician.
- If the unit is damaged to such an extent that internal
parts are visible, do NOT plug the unit into a mains outlet
and DO NOT switch the unit on. Contact your dealer. Do
NOT connect the unit to a rheostat or dimmer.
- To avoid fire and shock hazard, do not expose the unit to
rain and moisture.
- All repairs should be carried out by a qualified technician
only.
- Connect the unit to an earthed mains outlet
(220-240Vac/50Hz) protected by a 10-16A fuse.
- During a thunderstorm or if the unit will not be used for a
longer period of time, unplug it from the mains. The rule
is: Unplug it from the mains when not in use.
- If the unit has not been used for a longer period of time,
condensation may occur. Let the unit reach room
temperature before you switch it on. Never use the unit
in humid rooms or outdoors.
- During operation, the housing becomes very hot. Do not
touch it during operation and immediately after.
- To prevent accidents in companies, you must follow the
applicable guide lines and follow the instructions.
- Secure the unit with an extra safety chain if the unit is
ceiling mount. Use a truss system with clamps. Make
sure nobody stands in the mounting area. Mount the
effect at least 50cm away from inflammable material and
leave at least 1 meter space on every side to ensure
sufficient cooling.
- This unit contains high intensity LEDs. Do not look into
the LED light to prevent damage to your eyes.
- Do not repeatedly switch the fixture on and off. This
shortens the life time.
- Keep the unit out of the reach of children. Do not leave
the unit unattended.
- Do not use cleaning sprays to clean switches. The
residues of these sprays cause deposits of dust and
grease. In case of malfunction, always seek advice from
a specialist.
- Only operate the unit with clean hands.
- Do not force the controls.
- If the unit has fallen, always have it checked by a
qualified technician before you switch the unit on again.
- Do not use chemicals to clean the unit. They damage the
varnish. Only clean the unit with a dry cloth.
- Keep away from electronic equipment that may cause
interference.
- Only use original spares for repairs, otherwise serious
damage and/or dangerous radiation may occur.
- Switch the unit off prior to unplugging it from the mains
and/or other equipment. Unplug all leads and cables
prior to moving the unit.
- Make sure that the mains lead cannot be damaged when
people walk on it. Check the mains lead before every
use for damages and faults!
- The mains voltage is 220-240Vac/50Hz. Check if power
outlet match. If you travel, make sure that the mains
voltage of the country is suitable for this unit.
- Keep the original packing material so that you can
transport the unit in safe conditions
This mark attracts the attention of the user to high voltages that are present inside the housing and that are of
sufficient magnitude to cause a shock hazard.
This mark attracts the attention of the user to important instructions that are contained in the manual and that he
should read and adhere to.
DO NOT LOOK DIRECTLY INTO THE LENS. This can damage your eyes. Persons who are subject to epileptic
attacks should be aware of the effects that this light effect may have on them.
The unit has been certified CE. It is prohibited to make any changes to the unit. They would invalidate the CE certificate
and their guarantee!
NOTE: To make sure that the unit will function normally, it must be used in rooms with a temperature between 5°C/41°F
and 35°C/95°F.
NEDERLANDS
Hartelijk dank voor de aanschaf van dit Beamz lichteffect. Neemt U a.u.b. een paar momenten de tijd om deze handleiding
zorgvuldig te lezen, aangezien wij graag willen dat u onze producten snel en volledig gebruikt.
Lees deze handleiding eerst door alvorens het product te gebruiken. Volg de instructies op anders zou de garantie wel
eens kunnen vervallen. Neem ook altijd alle veiligheidsmaatregelen om brand en/of een elektrische schok te voorkomen.
Tevens is het ook raadzaam om reparaties / modificaties e.d. over te laten aan gekwalificeerd personeel om een
elektrische schok te voorkomen. Bewaar deze handleiding ook voor toekomstig gebruik.
- Bewaar de verpakking zodat u indien het apparaat defect
is, dit in de originele verpakking kunt opsturen om
beschadigingen te voorkomen.
- Voordat het apparaat in werking wordt gesteld, altijd eerst
een deskundige raadplegen. Bij het voor de eerste keer
inschakelen kan een bepaalde reuk optreden. Dit is
normaal en verdwijnt na een poos.
- In het apparaat bevinden zich onder spanning staande
onderdelen; open daarom NOOIT dit apparaat.
- Plaats geen metalen objecten en mors geen vloeistof in
het effect. Dit kan leiden tot elektrische schokken of
defecten.
- Toestel niet opstellen in de buurt van warmtebronnen zoals
radiatoren etc. en niet op een vibrerende onder- grond
plaatsen. Dek ventilatieopeningen nooit af.
- Het apparaat is niet geschikt voor continu gebruik.
- Wees voorzichtig met het netsnoer en beschadig deze niet.
Als het snoer kapot of beschadigd is, kan dit leiden tot
elektrische schokken of defecten.
- Als u de stekker uit het stopcontact neemt, trek dan niet
aan het snoer, maar aan de stekker.
- Om brand of elektrische schok te voorkomen, dient u dit
apparaat niet bloot te stellen aan regen of vocht.
- Verwijder of plaats een stekker nooit met natte handen
resp. uit en in het stopcontact.
- Indien zowel de stekker en/of netsnoer als snoeringang in
het apparaat beschadigd zijn dient dit door een vakman
hersteld te worden.
- Indien het apparaat zo beschadigd is dat inwendige
(onder)delen zichtbaar zijn mag de stekker NOOIT in het
stopcontact worden geplaatst en het apparaat NOOIT
worden ingeschakeld. Neem in dit geval contact op met de
dealer.
- Sluit het apparaat nooit op een dimmer aan.
- Reparatie aan het apparaat dient te geschieden door een
vakman of een deskundige.
- Sluit het apparaat alleen aan op een 220-240VAC / 50Hz
(geaard) stopcontact, verbonden met een 10-16A
meterkastgroep.
- Bij onweer altijd de stekker uit het stopcontact halen, zo
ook wanneer het apparaat voor een langere tijd niet
gebruikt wordt. Stelregel: Bij geen gebruik stekker
verwijderen.
- Als u het apparaat lang niet gebruikt heeft en het weer wil
gebruiken kan er condens ontstaan; laat het apparaat
-
-
-
-
-
-
-
-
-
eerst op kamertemperatuur komen alvorens het weer in
werking te stellen.
Apparaat nooit in vochtige ruimten en buiten gebruiken.
De behuizing wordt zeer warm, raak deze dan ook niet
aan bij gebruik en direct na gebruik..
Om ongevallen in bedrijven te voorkomen moet rekening
worden gehouden met de daarvoor geldende richtlijnen
en moeten de aanwijzingen/waarschuwingen worden
gevolgd.
Zorg voor een extra veiligheidsketting als het apparaat
op hoogte wordt gehangen. Gebruik een truss-systeem
met clamps . Ga nooit onder het apparaat staan bij
ophanging. Monteer minimaal 50 cm van brandbare
objecten en laat tenminste 1meter vrij aan weerszijden
voor een deugdelijke ventilatie.
Dit apparaat bezit een high intensity LED; kijk nooit in de
LED om oogbeschadigingen te voorkomen.
Het apparaat buiten bereik van kinderen houden.
Bovendien mag het apparaat nooit onbeheerd gelaten
worden
Gebruik geen schoonmaakspray om de schakelaars te
reinigen. Restanten van deze spray zorgen ervoor dat
smeer en stof ophopen. Raadpleeg bij storing te allen
tijde een deskundige.
Zorg dat uw handen schoon zijn tijdens het gebruik.
Gebruik geen overmatige kracht bij het bedienen van het
apparaat.
Bij een ongeval met dit product altijd eerst een deskundige raadplegen alvorens opnieuw te gebruiken.
Tracht het apparaat niet schoon te maken met
chemische oplossingen. Dit kan de lak beschadigen.
Gebruik een droge doek om schoon te maken.
Blijf uit de buurt van elektronische apparatuur die
bromstoringen zouden kunnen veroorzaken.
Bij reparatie dienen altijd originele onderdelen te worden
gebruikt om onherstelbare beschadigingen en/of
ontoelaatbare straling te voorkomen.
Schakel eerst het toestel uit voordat u het netsnoer
verwijdert. Verwijder netsnoer en aansluitsnoeren
voordat u dit product gaat verplaatsen.
Zorg ervoor dat het netsnoer niet beschadigd/defect kan
raken wanneer mensen erover heen lopen. Het netsnoer
vóór ieder gebruik controleren op breuken/defecten!
In Nederland/België is de netspanning 220-240Vac/50Hz.
Indien u reist (en u neemt het apparaat mee) informeer
dan naar de netspanning in het land waar u verblijft.
Deze markering wordt weergegeven om u erop attent te maken dat een levensgevaarlijke spanning in het product
aanwezig is en dat bij aanraking van deze delen een elektrische schok wordt verkregen.
Deze instructiemarkering wordt weergegeven om u erop te wijzen dat de instructie zeer belangrijk is om te lezen en/of
op te volgen.
KIJK NOOIT DIRECT IN DE LENS. Dit kan uw ogen beschadigen. Daarnaast dienen epileptici rekening te houden
met de effecten die dit toestel creëert.
Dit apparaat is CE goedgekeurd ; er mogen geen veranderingen modificaties worden doorgevoerd ; deze kunnen de CE
status te niet doen met alle gevolgen van dien. Tevens vervalt de garantie!
OPMERKING: Om zeker te zijn van een correcte werking, dient u dit apparaat in een ruimte te gebruiken waar de
temperatuur tussen de 5°C/41°F en 35°C/95°F ligt.
DEUTSCH
Vielen Dank für den Kauf dieses Beamz gerat. Nehmen Sie sich einen Augenblick Zeit, um diese Anleitung sorgfältig
durchzulesen, damit sie die Möglichkeiten, die unser Produkt bietet, sofort voll ausnutzen können. Lesen Sie erst die
Anleitung vollständig vor der ersten Inbetriebnahme durch. Befolgen Sie die Anweisung, da sonst jeglicher
Garantieanspruch verfällt. Treffen Sie stets alle Sicherheits-vorkehrungen um Feuer und/oder Stromschlag zu vermeiden.
Reparaturen dürfen nur von qualifiziertem Fachpersonal ausgeführt werden, um Stromschlag zu vermeiden. Bewahren
Sie diese Anleitung für spätere Bezugnahme auf.
- Bewahren Sie die Verpackung auf, um das Gerät im
Bedarfsfall sicher transportieren zu können.
- Bevor das Gerät in Betrieb genommen wird, muss es erst
von einem Fachmann überprüft werden. Bei der ersten
Benutzung kann etwas Geruch auftreten. Das ist normal
und verschwindet nach einer Weile
- Das Gerät enthält unter Spannung stehende Teile. Daher
NIEMALS das Gehäuse öffnen.
- Keine Metallgegenstände oder Flüssigkeiten ins Gerät
dringen lassen. Sie können zu Stromschlag und Defekten
führen.
- Gerät nicht in der Nähe von Wärmequellen wie
Heizkörpern aufstellen. Nicht auf eine vibrierende
Oberfläche stellen. Niemals die Belüftungsschlitze
abdecken.
- Das Gerät ist nicht für Dauerbetrieb geeignet.
- Gehen Sie vorsichtig mit dem Netzkabel um und
beschädigen Sie es nicht. Eine beschädigte Netzschnur
kann zu Stromschlag und Defekten führen.
- Wenn Sie das Gerät vom Netz trennen, immer am Stecker
ziehen, niemals an der Schnur.
- Um Feuer und Stromschlag zu vermeiden, das Gerät vor
Regen und Feuchtigkeit schützen.
- Den Stecker nie mit nassen Händen in eine Netzsteckdose
stecken oder abziehen.
- Wenn sowohl der Stecker und/oder die Netzschnur bzw.
der Kabeleintritt ins Gerät beschädigt sind, müssen sie
von einem Fachmann repariert werden.
- Wenn das Gerät so beschädigt ist, dass Innenteile sichtbar
sind, darf der Stecker NICHT in eine Steckdose gesteckt
werden und das Gerät darf NICHT eingeschaltet werden.
Wenden Sie sich in dem Fall an Ihren Fachhändler. Das
Gerät darf nicht an einen Dimmer angeschlossen werden.
- Reparaturen dürfen nur von einem Fachmann oder
Sachverständigen ausgeführt werden.
- Das Gerät nur an eine geerdete 10-16A Netzsteckdose mit
220-240V AC/50Hz Spannung anschließen.
- Bei Gewitter oder längerem Nichtgebrauch den
Netzstecker abziehen. Die Regel gilt: Bei Nichtgebrauch
Netzstecker abziehen.
- Wenn das Gerät längere Zeit nicht benutzt wurde, kann
sich Kondenswasser gebildet haben. Lassen Sie das
Gerät erst auf Zimmertemperatur kommen, bevor Sie es
einschalten. Das Gerät nicht in feuchten Räumen oder im
Freien benutzen.
- Das Gehäuse wird sehr warm. Während des Betriebs und
gleich danach nicht das Gehäuse anfassen.
- Um Unfällen in der Öffentlichkeit vorzubeugen, müssen
die geltenden Richtlinien beachtet und die
Anweisungen/Warnungen befolgt werden.
- Wenn das Gerät an der Decke befestigt werden soll,
muss es mit einer zusätzlichen Sicherheitskette
abgesichert werden. Benutzen Sie ein Traversen system
mit Haken. Während der Montage darf sich niemand im
Bereich darunter aufhalten. Das Gerät muss mindestens
50cm von brennbaren Materialien entfernt angebracht
werden. Lassen Sie einen Mindestabstand von 1m an
jeder Seite des Geräts frei, um ausreichende Kühlung zu
gewährleisten.
- Das Gerät besitzt eine hochintensive LED. Niemals
direkt in die LED blicken, um die Augen nicht zu
beschädigen.
- Niemals das Gerät kurz hintereinander ein- und
ausschalten. Dadurch verkürzt sich die Lebensdauer
erheblich.
- Das Gerät außerhalb der Reichweite von Kindern halten.
Das Gerät niemals unbeaufsichtigt lassen.
- Die Regler nicht mit Reinigungssprays reinigen. Diese
hinterlassen Rückstände, die zu Staub- und
Fettansammlungen führen. Bei Störungen immer einen
Fachmann um Rat fragen.
- Das Gerät nur mit sauberen Händen bedienen.
- Das Gerät nicht mit Gewalt bedienen.
- Nach einem Unfall mit dem Gerät immer erst einen
Fachmann um Rat fragen, bevor Sie es wieder
einschalten.
- Keine chemischen Reinigungsmittel benutzen, die den
Lack beschädigen. Das Gerät nur mit einem trockenen
Tuch abwischen.
- Nicht in der Nähe von elektronischen Geräten benutzen,
die Brummstörungen verursachen können.
- Bei Reparaturen nur die Original-Ersatzteile verwenden,
um starke Schäden und/oder gefährliche Strahlungen zu
vermeiden.
- Bevor Sie das Netz- und/oder Anschlusskabel abziehen,
erst das Gerät ausschalten. Netz- und Anschlusskabel
abziehen, bevor Sie das Gerät umstellen.
- Sorgen Sie dafür, dass das Netzkabel nicht beschädigt
werden kann, wenn Menschen darüber laufen. Das
Netzkabel vor jedem Einsatz auf Brüche/Schadstellen
überprüfen.
- In Deutschland beträgt die Netzspannung 220-240V AC /
50Hz. Wenn Sie das Gerät auf Reisen mitnehmen,
prüfen Sie, ob die örtliche Netzspannung den
Anforderungen des Geräts entspricht.
Dieses Zeichen weist den Benutzer darauf hin, dass lebensgefährliche Spannungen im Gerät anliegen, die bei
Berührung einen Stromschlag verursachen.
Dieses Zeichen lenkt die Aufmerksamkeit des Benutzers auf wichtige Hinweise in der Anleitung hin, die unbedingt
eingehalten werden müssen.
NIEMALS DIREKT IN DIE LINSE BLICKEN. Dies kann Ihre Augen verletzen. Epileptiker müssen die
Auswirkungen berücksichtigen, die die Effekte dieses gerat auf ihre Gesundheit haben können.
Das Gerät ist CE geprüft. Daher dürfen KEINE Veränderungen vorgenommen werden. Außerdem verfällt bei
Veränderungen am Gerät jeglicher Garantieanspruch!
HINWEIS: Um einen einwandfreien Betrieb zu gewährleisten, muss die Raumtemperatur zwischen 5° und 35°C
liegen.
ESPAÑOL
Enhorabuena por la compra de este efecto de luces Beamz. Por favor lea atentamente este manual antes de usar el
aparato para disfrutar al completo de sus prestaciones.
Seguir las instrucciones le permite no invalidar la garantía. Tome todas las precauciones para evitar que se produzca fuego
o una descarga eléctrica. Las reparaciones solo deben llevarse a cabo por técnicos cualificados para evitar descargas
eléctricas. Guarde el manual para futuras consultas.
- Antes de usar el aparato, por favor pida consejo a un
profesional. Cuando el aparato se enciende por
primera vez, suele sentirse cierto olor. Esto es normal
y desaparece al poco tiempo.
- Este aparato contiene piezas que llevan voltaje. Por lo
tanto NO abra la carcasa.
- No coloque objetos metálicos o vierta líquidos dentro
del aparato Podría producir descargas eléctricas y
fallos en el funcionamiento.
- No coloque el aparato cerca de fuentes de calor tipo
radiadores, etc. No coloque el aparato en superficies
vibratorias. No tape los agujeros de ventilación.
- Este aparato no está preparado para un uso
continuado.
- Tenga cuidado con el cable de alimentación y no lo
dañe. Un daño o defecto en el cable de alimentación
puede producir una descarga eléctrica o fallo en el
funcionamiento.
- Cuando desconecte el aparato de la toma de corriente,
siempre tire de la clavija, nunca del cable.
- No enchufe o desenchufe el aparato con las manos
mojadas.
- Si la clavija y/o el cable de alimentación están
dañados, necesitan reemplazarse por un técnico
cualificado.
- Si el aparato está dañado de modo que puedan verse
sus partes internas, NO conecte el aparato a la toma
de corriente y NO lo encienda. Contacte con su
distribuidor. NO conecte el aparato a un reostato o
dimmer.
- Para evitar un fuego o peligro de descarga, no
exponga el aparato a la lluvia y a la humedad.
- Todas las reparaciones deben llevarse a cabo
exclusivamente por técnicos cualificados.
- Conecte el aparato a una toma de corriente con toma
de tierra (220-240Vca/50Hz) protegida por un fusible
de 10-16A.
- Durante una tormenta o si el aparato no va a usarse
durante un periodo largo de tiempo, desconéctelo de
la toma de corriente. La regla es: Desconéctelo si no
lo va a usar.
- Si el aparato no se ha usado en mucho tiempo puede
producirse condensación. Deje el aparato a
temperatura ambiente antes de encenderlo. Nunca
utilice el aparato en ambientes húmedos o en el
exterior.
- Durante el funcionamiento, la carcasa se calienta
muchísimo. No la toque durante el funcionamiento o
inmediatamente después.
- Para prevenir accidentes en las empresas, debe seguir
las directrices aplicables y seguir las instrucciones.
- Asegure el aparato con una cadena de seguridad extra
si el aparato se monta en un techo. Utilice un sistema de
truss con ganchos. Asegúrese de que nadie permanece
en el área de montaje. Monte el efecto a una distancia
de al menos 50cm de materiales inflamables y deje un
espacio de al menos 1 metro a cada lado para permitir
que haya suficiente ventilación.
- Este aparato contiene LEDs de alta luminosidad. No
mire a la luz del LED para evitar daños en su vista.
- No lo apague y encienda repetidamente. Esto acorta su
tiempo de vida.
- Mantenga el aparato fuera del alcance de los niños. No
deje el aparato sin vigilancia.
- No utilice sprays limpiadores para limpiar los
interruptores. Los residuos de estos sprays producen
depósitos de polvo y grasa. En caso de mal
funcionamiento, siempre consulte a un profesional.
- Solo maneje el aparato con las manos limpias.
- No fuerce los controles.
- Si el aparato se ha caído, siempre haga que lo verifique
un técnico cualificado antes de encenderlo otra vez.
- NO utilice productos químicos para limpiar el aparato.
Dañan el barniz. Tan solo límpielo con un trapo seco.
- Manténgalo lejos de equipos electrónicos ya que
pueden producir interferencias.
- Solo utilice recambios originales para las reparaciones,
de otro modo pueden producirse daños serios y/o
radiaciones peligrosas.
- Apague el aparato antes de desconectarlo de la toma de
corriente y/o de otros equipos. Desconecte todos los
cables y conexiones antes de mover el aparato.
- Asegúrese de que el cable de alimentación no puede
dañarse cuando la gente lo pise. Compruebe el cable de
alimentación antes de cada uso por si hay daños o
defectos.
- El voltaje de funcionamiento es 220-240Vca/50Hz.
Compruebe que la toma de corriente coincide. Si tiene
que viajar, asegúrese de que el voltaje del país es el
adecuado para este aparato.
- Guarde el embalaje original para poder transportar el
aparato en condiciones seguras.
Esta señal advierte al usuario de la presencia de alto voltaje en el interior de la carcasa y que es de la suficiente
magnitud como para producir una descarga eléctrica.
Esta señal advierte al usuario de que el manual contiene instrucciones importantes que han de leerse y seguirse al
pie de la letra.
NO MIRE DIRECTAMENTE A LA S LENTES. Puede dañarle la vista. Las personas propensas a tener ataques
epilépticos deben tener en cuenta los efectos que este efecto de luces puede tener en ellos. Este aparato ha obtenido el
certificado CE. Está prohibido hacer cambios en el aparato. ¡Invalidaría el certificado CE y su garantía!
NOTA: Para asegurarse de que el aparato funcione correctamente, debe usarse en ambientes a una temperatura de
entre 5°C/41°F y 35°C/95°F.
General Description
This DMX operator running light control is designed for digital control of various light effects such as running lights and
projectors. It can control up to 12 different light effect units of 16 channels each. The unit features an easily programmable
memory which can store up to 240 different light effect scenes. It can be set to automatic operation or music control via the
built-in microphone. The digital DMX-512 control operates with “addresses” for individual control of the connected light
units. The outgoing addresses are pre-set to: light effect 1 – start address 1, light effect 2 – start address 17, light effect 3 –
start address 33, light effect 4 – start address 49, light effect 5 – start address 65, light effect 6 – start address 81, light effect
7 – start address 97, light effect 8 – start address 113, light effect 9 – start address 129, light effect 10 – start address 145,
light effect 11 – start address 161 and light effect 12 has start address 177. Thus, every light effect can be digitally
controlled by max. 16 channels provided that the ‘receiving’ start addresses of the individual light effect units are identical to
the ones stated above (1, 17, 33, etc.). The slider controls set the light intensity of the lamps and projectors but also the
position of the mirrors, colour and gobo wheels.
Functions and Controls
1.
2.
3.
4.
5.
6.
7.
8.
9.
10.
11.
12.
13.
14.
15.
Selection keys for 16 light effect units.
Memory keys to store the scenes (max. 8 x 30).
LED Display.
Selection keys of the memory banks.
Selection keys of the running light patterns.
Activation key of the programming mode.
Pattern storage key or MIDI setting.
Key to switch into AUTO MODE or remove scenes.
Selection key for MUSIC/BANK copy. Allows to select music controlled operation or set scenes and running light
patterns.
BLACKOUT key, switches all outputs off.
TAP SYNC/DISPLAY key to set the rhythm or to change various settings. This appears on the LED display.
FADE TIME slider control to set the fading time between different light effect units.
SPEED slider control to set the speed of the running light.
PAGE SELECT, this key selects if the slider controls act on light effects 1 to 8(page A) or 9 to 16 (page B).
Slider controls 1 to 8 allow to adjust the light intensity from 0 to 100%. The digital output value goes from 0 to 255.
Rear panel connections
The rear panel features three connectors and one slider control. The connectors are: one 5-pin DIN connector for MIDI IN,
a switch to invert the polarity of the DMX output signal, a 3-pin DMX output connector (XLR type) and a small connector for
the power supply (9 – 12Vdc). N.B.! The small centre pin is positive. Use an appropriate mains adapter which supplies at
least 9Vdc/300mA.
LED DISPLAY
The display shows light green, easy to read symbols that indicate following functions:
1.
2.
3.
4.
5.
6.
7.
The first figure indicates the selected running light pattern (CHASE) (1 – 6)
The second figure shows which one of the 8 scenes has been selected.
The third and fourth figure shows which one of the 30 memory banks is active.
In AUTO MODE, a light dot is displayed in the bottom right corner.
The MUSIC MODE (music-control) is shown by a dot on the top right side of the display.
The BLACKOUT MODE is indicated by a flashing dot in the upper left corner.
In programming mode, a flashing dot appears on the bottom left side of the display.
PROGRAMMING OF THE VARIOUS FUNCTIONS
Programming of the running light scenes
1.
2.
3.
4.
5.
6.
7.
8.
9.
10.
Make sure that all units to be controlled, are connected and set to the correct DMX start addresses.
Keep the program key (6) more than 2 seconds pressed to activate the programming mode. The green dot in the left
bottom corner should flash and continue to flash during the programming process.
Select the required unit via one of the SCANNER keys. Up to 16 channels per unit are available, 1 to 8 on page A and
9 to 16 on page B. Press the PAGE SELECT key until the LED next to the row 1 to 8 (PAGE A) lights up.
Set the desired light intensity, position of the mirror, colour or gobo via the slider controls. If required, press PAGE
SELECT to program a second set of 8 settings if the connected unit offers more than 8 channels.
To store these settings, press the MIDI/ADD or MIDI/REC key.
Select now with the BANK arrow keys (4) the requested memory bank where you want to store this scene. N.B. The
unit features a memory of 30 banks of which each can contain 8 scenes.
Press now one of the scene keys (2) and the settings will be stored. You can control this on the display. The second
figure indicates the scene number and the last two figures show the number of the selected memory bank. To confirm
the setting, the LED’s and the display flash a few times.
HINT: Please note the scene and bank numbers. It is difficult to search when all 240 memory locations are occupied.
Repeat steps 3 to 7 to program other scenes. N.B.! Switch the already programmed units off via the SCANNER keys
(1) otherwise the settings will be transferred.
To leave the programming mode, press the PROGRAM key until the flashing dot disappears. After the programming
mode, the unit switches automatically into BLACKOUT mode. Press the BLACKOUT key to switch this mode off.
CHANGE OF ALREADY PROGRAMMED SCENES
1)
2)
3)
4)
5)
6)
7)
This function allows you to change already set scenes.
Press the PROGRAM key as described above.
Select the requested bank number via the BANK arrow keys (use your notes !).
Select now the requested scene via the correct scene key.
Make the new settings via the slider controls.
Press the MIDI/REC (or MIDI/ADD) key and then the scene key (see point 4) to store the new settings.
Attention! Select the correct scene key otherwise you will overwrite by mistake the settings of a scene that you did
NOT want to change.
COPYING OF SETTINGS
1)
2)
This function allows to copy settings from one unit to another unit. This features is easy and time saving especially for
the programming of running lights.
Press the SCANNER key of the unit from which you want to copy the settings and press at the same time the key
from the unit into which you want to copy the settings. Release both keys. The settings have been transferred.
COPYING SCENES
1)
2)
3)
4)
5)
6)
7)
8)
This function allows you to copy the settings from an already programmed scene to a new scene.
Switch the programming mode on by pressing the PROGRAM key until the green dot in the bottom left corner is
flashing.
Select the required memory bank via the BANK arrow keys which contains the scene that you wish to copy.
Press the correct scene key.
Select now via the BANK arrow keys the memory bank into which you wish to store the copied scene.
Press now the MIDI/REC (MIDI/ADD) key and afterwards the SCENE key containing the number of the scene into
which you wish to store the copied settings.
To confirm the copy, the LED’s and the display flash a few times.
Switch the program mode off by pressing the PROGRAM key.
CLEARING A SCENE
1)
2)
3)
4)
This function allows to reset all 16 DMX channels in a scene.
Switch the programming mode on and select via the BANK arrow keys the memory bank that contains the scene to
be removed.
Keep the AUTO/DEL key pressed while pushing the relevant scene key.
The LED’s flash to confirm and the scene is erased.
CLEARING (RESET) ALL SCENES (CAUTION !)
1)
2)
3)
4)
This allows you to erase all programmed scenes at once.
Press the PROGRAM key and then the BANK down arrow key. Keep both keys pressed.
Switch now the unit off by unplugging the connector of the power supply. Release both keys.
Power the unit on again.
DUPLICATION OF A MEMORY BANK
1)
2)
3)
4)
5)
6)
7)
This function allows you to transfer at once all 8 programmed scenes from a memory bank into another memory
bank.
Switch the programming mode on by pressing the PROGRAM key until the PROG LED is flashing on the display.
Select the memory bank you wish to copy via the arrow keys.
Press the MIDI/REC (MIDI/ADD) key once.
Select now via the arrow keys the number of the memory bank into which you want to copy.
Press the MUSIC/BANK-COPY (9) key once. The display flashes to confirm.
Switch the programming mode off by pressing the PROGRAM key for 2 seconds. The BLACKOUT mode that is
switched on automatically, can be switched off by the BLACKOUT key.
ERASING A MEMORY BANK
1)
2)
3)
4)
5)
6)
This function allows to clear all 8 programmed scenes in a memory bank.
Switch the programming mode on by pressing the PROGRAM key until the PROG LED is flashing on the display.
Keep the AUTO/DEL pressed while pressing the MUSIC/BANK-COPY key.
Release both keys at the same time.
The display flashes to confirm.
Leave the programming mode by pressing the PROGRAM key for 2 seconds. The BLACKOUT mode that is switched
on automatically, can be switched off by the BLACKOUT key.
PROGRAMMING OF RUNNING LIGHT FUNCTIONS
Attention ! You first need to program scenes into the memory banks before you can use the running light functions.
1)
2)
3)
4)
5)
6)
7)
8)
This function allows you to play 240 different scenes in a sequence.
Switch the programming mode on by pressing the PROGRAM key until the PROG LED is flashing on the display.
Select one of the six running light patterns via the CHASE keys (5).
Select the requested scene in one of the memory banks (BANK up/down + SCENE keys).
Press the MIDI/REC (MIDI/ADD) key to confirm the selection.
You can set up to 240 steps in each of these six running light programs.
Repeat the steps 3 to 5 until you have reached the desired effect.
Switch the programming mode off by pressing the PROGRAM key for 2 seconds.
CHANGING A RUNNING LIGHT PATTERN
ADDITION OF STEPS
1)
2)
3)
4)
5)
6)
7)
8)
Activate the programming mode by pressing the PROGRAM key for 2 seconds. The PROG LED is flashing on the
display.
Select the running light program via the CHASE keys (1-6) to which you wish to add one or more scenes (steps).
Press the TAP SYNC/DISPLAY key once. The STEP LED will light up on the display.
Select the step number via the BANK arrow keys behind which you wish to insert a new scene.
Program a new scene as described in the section PROGRAMMING OF RUNNING LIGHT SCENES.
Press the MIDI/REC (MIDI/ADD) key and the step sequence number on the display increases by 1.
Press once again the MIDI/REC (MIDI/ADD) key and the scene will be added.
Press the TAP SYNC/DISPLAY key and then the PROGRAM key in order to leave the program mode.
CLEARING A STEP (SCENE)
1)
2)
3)
4)
5)
6)
Activate the programming mode by pressing the PROGRAM key until the PROG LED on the display is flashing.
Choose the running light program via one of the CHASE keys from which you want to remove a step (scene).
Press the TAP SYNC/DISPLAY key once.
Use the BANK up/down keys to choose the step number (scene) to be cleared.
Press the AUTO/DEL key once. The scene is cleared and the display flashes to confirm.
Press the TAP SYNC/DISPLAY and then the PROGRAM key to leave the programming mode.
CLEARING A RUNNING LIGHT PATTERN (CHASE)
1)
Keep the desired CHASE key (1-6) pressed and press at the same time the AUTO/DEL key once.
CLEARING ALL RUNNING LIGHT PATTERNS
1)
2)
Keep the AUTO/DEL key pressed and switch the power supply off by unplugging the power connector on the rear side.
Release the AUTO/DEL key and switch the power supply on again.
PLAYING THE PROGRAMMED SCENES
Manual Operation
1)
2)
After having switched on the power supply, always start the DMX operator in the manual mode.
Check if the indicator LEDs MUSIC TRIGGER and AUTO TRIGGER on the display are switched off. If necessary,
press the MUSIC/BANK-COPY and AUTO/DEL keys to switch them off.
3) Select the desired memory bank via the BANK arrow keys and press the SCENE keys (2).
Automatic Play
1)
2)
3)
4)
5)
This function allows you to play in cycle all scenes that are programmed in a memory bank.
Press the AUTO/DEL key to activate the automatic play mode. The AUTO TRIGGER LED on the display must light up.
Select the desired memory bank via the BANK arrow keys. The scenes are now played in sequence.
The SPEED and FADE controls are used to set the speed and the fading time.
During automatic play you can at any time chose another memory bank via the BANK arrow keys.
MUSIC CONTROL
1)
Switch the music-control on via the MUSIC/BANK-COPY key. The built-in microphone reacts to the rhythm of the
music.
2) Select the desired memory bank via the BANK arrow keys.
3) Press the MUSIC/BANK-COPY key to switch the music controlled mode off.
USE OF RUNNING LIGHT PATTERNS
MANUAL OPERATION
1)
2)
3)
Prior to running light patterns you need to program scenes !
This function enables you to play scenes manually in random sequence.
In this mode the effect is controlled by the FADE slider control and not by the stored values. Only if the FADE control is
set to 0 (completely set down), the programmed patterns will be run.
4) Select a running light program via the CHASE keys.
5) Press the TAP-SYNC/DISPLAY key and browse through the memory via the BANK arrow keys.
AUTOMATIC RUN
1)
2)
3)
4)
Press the AUTO/DEL key. The AUTO TRIGGER LED on the display must light up.
Select a running light program via one of the CHASE keys.
Adjust the light effects via the SPEED and FADE controls until you are satisfied.
By tapping three times on the TAP SYNC key to the rhythm of the music, the setting of the SPEED control is overrun
and replaced by the rhythm of the music.
5) Switch this mode off by pressing the AUTO/DEL key.
MUSIC CONTROL
1)
2)
3)
4)
Press the MUSIC/BANK-COPY key. The MUSIC TRIGGER LED must light up.
Select a running light pattern via one of the CHASE keys.
The built-in microphone controls now the running of the patterns.
Switch this mode off by pressing the MUSIC/BANK-COPY key.
MIDI CONTROL
1)
2)
3)
Switch this protocol on by pressing the MIDI/REC key for 3 seconds.
Select the required MIDI bank via the BANK arrow keys.
Switch this mode off by pressing the MIDI/REC key for 3 seconds.
Specifications
MIDI input
5-pin DIN
Power Supply 220-240Vac/50Hz - 10W
Dimensions
482 x 132 x 70mm
Weight
2.0kg
www.tronios.com
Copyright © 2012 by TRONIOS the Netherlands
CE Declaration of Conformity
Importer:
Tel :
Fax :
TRONIOS BV
Bedrijvenpark Twente 415
7602 KM - ALMELO
0031546589299
0031546589298
The Netherlands
Product number:
154.060
Product Description:
DMX 192S Controller 192 Channel
Regulatory Requirement:
EN 60065
EN 55013
EN 55020
EN 61000-3-2/-3-3
The product meets the requirements stated in the above mentioned Standards.
17-02-2011
Signature :