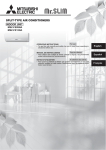
1
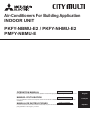
Air-Conditioners For Building Application
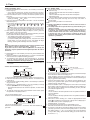
INDOOR UNIT
PKFY-NBMU-E2 / PKFY-NHMU-E2
PMFY-NBMU-E
OPERATION MANUAL
FOR USER
For safe and correct use, please read this operation manual thoroughly before operating the air-conditioner unit.
MANUEL D’UTILISATION
POUR L’UTILISATEUR
Pour une utilisation correcte sans risques, veuillez lire le manuel d’utilisation en entier avant de vous servir du
climatiseur.
MANUAL DE INSTRUCCIONES
English
Français
PARA EL USUARIO
/HDHVWHPDQXDOGHLQVWUXFFLRQHVKDVWDHO¿QDODQWHVGHSRQHUHQPDUFKDODXQLGDGGHDLUHDFRQGLFLRQDGR
para garantizar un uso seguro y correcto.
Español
Contents
1. Safety Precautions ............................................................................. 2
2. Parts Names....................................................................................... 2
6FUHHQ&RQ¿JXUDWLRQ.......................................................................... 6
4. Setting the Day of the Week and Time ............................................... 6
5. Operation............................................................................................ 6
6. Timer................................................................................................... 8
7. Other Functions ...............................................................................11
8. Function Selection .......................................................................... 12
9. Emergency operation for wireless remote-controller ...................... 16
10. Care and Cleaning.......................................................................... 16
11. Trouble Shooting............................................................................. 17
6SHFL¿FDWLRQV ................................................................................. 19
Note:
The phrase “Wired remote controller” in this operation manual refers to the PAR-21MAA.
If you need any information for the other remote controller, please refer to the instruction book included in these box.
1. Safety Precautions
Before installing the unit, make sure you read all the “Safety
Precautions”.
The “Safety Precautions” provide very important points regarding safety. Make sure you follow them.
Please report to or take consent by the supply authority before connection to the system.
Symbols used in the text
Warning:
Describes precautions that should be observed to prevent danger
of injury or death to the user.
Caution:
Describes precautions that should be observed to prevent damage
to the unit.
Symbols used in the illustrations
: Indicates a part which must be grounded.
Warning:
• For appliances not accessible to the general public.
• The unit must not be installed by the user. Ask the dealer or an
authorized company to install the unit. If the unit is installed imSURSHUO\ZDWHUOHDNDJHHOHFWULFVKRFNRU¿UHPD\UHVXOW
• Do not stand on, or place any items on the unit.
• Do not splash water over the unit and do not touch the unit with
wet hands. An electric shock may result.
• Do not spray combustible gas close to the unit. Fire may result.
• Do not place a gas heater or any other open-flame appliance
where it will be exposed to the air discharged from the unit. Incomplete combustion may result.
• Do not remove the front panel or the fan guard from the outdoor
unit when it is running.
• Never repair the unit or transfer it to another site by yourself.
• When you notice exceptionally abnormal noise or vibration, stop
operation, turn off the power switch, and contact your dealer.
1HYHULQVHUW¿QJHUVVWLFNVHWFLQWRWKHLQWDNHVRURXWOHWV
• If you detect odd smells, stop using the unit, turn off the power
switch and consult your dealer. Otherwise, a breakdown, electric
VKRFNRU¿UHPD\UHVXOW
7KLVDLUFRQGLWLRQHULV127LQWHQGHGIRUXVHE\FKLOGUHQRULQ¿UP
persons without supervision.
• Young children must be supervised to ensure that they do not
play with the air conditioner.
• If the refrigeration gas blows out or leaks, stop the operation of
the air conditioner, thoroughly ventilate the room, and contact
your dealer.
• When installing or relocating, or servicing the air conditioner, use
RQO\WKHVSHFL¿HGUHIULJHUDQW5$WRFKDUJHWKHUHIULJHUDQW
lines. Do not mix it with any other refrigerant and do not allow air
to remain in the lines.
If air is mixed with the refrigerant, then it can be the cause of
abnormal high pressure in the refrigerant line, and may result in
an explosion and other hazards.
7KHXVHRIDQ\UHIULJHUDQWRWKHUWKDQWKDWVSHFL¿HGIRUWKH
system will cause mechanical failure or system malfunction or
unit breakdown. In the worst case, this could lead to a serious
impediment to securing product safety.
Caution:
• Do not use any sharp object to push the buttons, as this may
damage the remote controller.
• Never block or cover the indoor or outdoor unit’s intakes or outlets.
• Never wipe the remote controller with benzene, thinner chemical
rags, etc.
• Do not operate the unit for a long time in high humidity, e.g. leaving a door or window open. In the cooling mode, if the unit is opHUDWHGLQDURRPZLWKKLJKKXPLGLW\5+RUPRUHIRUDORQJ
time, water condensed in the air conditioner may drop and wet or
damage furniture, etc.
• Do not touch the upper air outlet vane or the lower air outlet
damper during operation. Otherwise, condensation may form and
the unit may stop operating.
Disposing of the unit
When you need to dispose of the unit, consult your dealer.
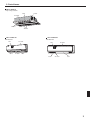
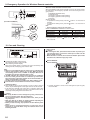
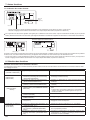
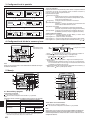
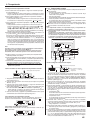
2. Parts Names
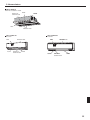
Indoor Unit
Fan speed
Vane
Steps
Auto swing
Louver
Filter
Filter cleaning indication
PKFY-P·NBMU-E2
4 speed
4 steps
PKFY-P·NHMU-E2
3 speed+ Auto*
5 steps
PMFY-P·NBMU-E
4 speed
4 steps
Manual
Normal
100 hr
Manual
Normal
100 hr
Manual
Normal
100 hr
* This operation is available only using the remote controller
that is able to set its Fan speed setting "Auto".
2
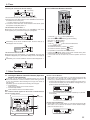
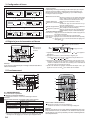
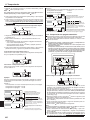
2. Parts Names
PMFY-P·NBMU-E
1-way Ceiling Cassette
Vane
Louver
Air outlet
Filter
Air inlet
PKFY-P·NBMU-E2
Wall Mounted
Filter
Louver
PKFY-P·NHMU-E2
Wall Mounted
Air intake
Air outlet
Air intake
Filter
Vane
Louver
Air outlet
Vane
3
2. Parts Names
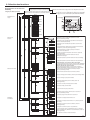
Wired Remote-Controller
Display Section
“Sensor” indication
Day-of-Week
Displayed when the remote controller
sensor is used.
Shows the current day of the week.
For purposes of this explanation, all parts of the display are
shown. During actual operation,
only the relevant items will be
displayed.
Time/Timer Display
“Locking function” indicator
Shows the current time, unless the simple or Auto
Off timer is set.
If the simple or Auto Off timer is set, shows the
time remaining.
Indicates that remote controller buttons have been locked.
“Clean The Filter” indicator
,GHQWL¿HVWKHFXUUHQWRSHUDWLRQ
Comes on when it is time to clean
WKH¿OWHU
Shows the operating mode, etc.
* Multi-language display is supported.
Timer indicators
The indicator comes on if the corresponding timer is set.
“Centrally Controlled” indicator
Indicates that operation of the
remote controller has been prohibited by a master controller.
Fan Speed indicator
Shows the selected fan speed.
“Timer is Off” indicator
Indicates that the timer is off.
Temperature Setting
Shows the target temperature.
$LUÀRZXSGRZQGLUHFWLRQLQGLFDWRU
Room Temperature display
The indicator
RIWKHDLUÀRZ
Shows the room temperature. The room
temperature display range is 8–39°C,
46-102°F. The display blinks if the temperature is less than 8°C, 46°F or 39°C,
102°F or more.
shows the direction
“One Hour Only” indicator
'LVSOD\HGLIWKHDLUÀRZLVVHWWR/RZDQG
downward during COOL or DRY mode.
(Operation varies according to model.)
The indicator goes off after one hour
ZKHQWKHDLUÀRZGLUHFWLRQDOVRFKDQJHV
Ventilation indicator
Appears when the unit is running in
Ventilation mode.
Louver display
Indicates the action of the swing louver.
Does not appear if the louver is stationary.
(Power On indicator)
Indicates that the power is on.
Operation Section
ON/OFF button
Temperature set buttons
Down
Fan Speed button
Up
Timer Menu button
(Timer monitor/Timer set button)
Filter
button
(<Enter> button)
Operation mode button
(Back button)
Test Run button
Set Time buttons
Check button (Clear button)
Back
Ahead
$LUÀRZ8S'RZQEXWWRQ
Timer On/Off button
(Set Day button)
Louver button
Operation button)
(
Opening
the door
To return operation
number
Ventilation button
( Operation button)
Built-in temperature sensor
To go to next operation number
Note:
“PLEASE WAIT” message
This message is displayed for approximately 3 minutes when power is supplied to the indoor unit or when the unit is recovering from a power failure.
Operation mode blinking display
When multiple indoor units are connected to a single outdoor unit and an operation mode is selected for one indoor unit that is different from the current
operation mode of another indoor unit, the operation mode display blinks. Select the same operation mode of the other indoor unit.
“NOT AVAILABLE” message
This message is displayed if a button is pressed to operate a function that the indoor unit does not have.
When the same remote controller is used to operate multiple indoor units, this message is displayed if the main indoor unit is not equipped with the
selected function.
Room temperature display
The indoor unit temperature sensors or the remote controller temperature sensor can be selected to measure the room temperature. The indoor unit
temperature sensors are the initial setting. When the indoor unit temperature sensors are selected to measure the room temperature, the room temperature measured at the main indoor unit is displayed on the remote controller that operates multiple indoor units.
2. Parts Names
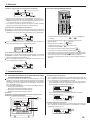
Wireless Remote-Controller
Transmission area
Transmission indicator
Remote controller display
Timer indicator
* For explanation purposes, all of the items
that appear in the display are shown.
* All items are displayed when the Reset
button is pressed.
ON/OFF button
Operation areas
Temperature set buttons
Fan Speed button (Changes fan speed)
Timer Off button
Timer On button
$LUÀRZEXWWRQ&KDQJHVXSGRZQDLUÀRZGLUHFWLRQ
Hour button
Minute button
Mode button (Changes operation mode)
Set Time button (Sets the time)
Check button
Test Run button
When using the wireless remote controller, point it towards the receiver on the indoor unit.
If the remote controller is operated within approximately two minutes after power is supplied
to the indoor unit, the indoor unit may beep twice as the unit is performing the initial automatic
check.
The indoor unit beeps to confirm that the signal transmitted from the remote controller has
been received. Signals can be received up to approximately 23ft.(7m) in a direct line from the
LQGRRUXQLWLQDQDUHDWRWKHOHIWDQGULJKWRIWKHXQLW+RZHYHULOOXPLQDWLRQVXFKDVÀXRUHVcent lights and strong light can affect the ability of the indoor unit to receive signals.
If the operation lamp near the receiver on the indoor unit is blinking, the unit needs to be inspected. Consult your dealer for service.
Handle the remote controller carefully! Do not drop the remote controller or subject it to strong
shocks. In addition, do not get the remote controller wet or leave it in a location with high humidity.
To avoid misplacing the remote controller, install the holder included with the remote controller
on a wall and be sure to always place the remote controller in the holder after use.
/RXYHUEXWWRQ&KDQJHVOHIWULJKWDLUÀRZGLUHFWLRQ
Reset button
Battery installation/replacement
1. Remove the top cover, insert two AAA batteries, and then install the top cover.
1
2
Top cover
3
Two AAA batteries
Insert the negative (–)
HQGRIHDFKEDWWHU\¿UVW
Install the batteries in
the correct directions
(+, –)!
2. Press the Reset button.
Press the Reset button
with an object that has
a narrow end.
5
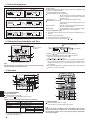
6FUHHQ&RQ¿JXUDWLRQ
Set Day/Time
Function Selection of remote controller
TIME SUN
Standard Control Screens
ÛF
ÛF
ON
OFF
Timer Monitor
Timer Setup
SUN MON TUE WED THU FRI SAT
MON
TIMER
OFF
ÛF
WEEKLY
WEEKLY
<Screen Types>
For details on setting the language for the remote controller display, refer
to section 8. Function Selection.
The initial language setting is English.
Function Selection of remote controller:
Set the functions and ranges available to the
remote controller (timer functions, operating
restrictions, etc.)
Set Day/Time:
Set the current day of the week or time.
Standard Control Screens:
View and set the air conditioning system’s operating status.
Timer Monitor:
View the currently set timer (weekly timer, simple timer or Auto Off timer).
Timer Setup:
Set the operation of any of the timers (weekly
timer, simple timer or Auto Off timer).
<How to change the screen>
: Hold down both the Mode button and the Timer On/Off button for 2
seconds.
: Press the Timer Menu button.
: Press the Operation mode (Back) button.
: Press either of the Set Time buttons ( or ).
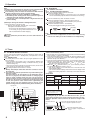
6HWWLQJWKH'D\RIWKH:HHNDQG7LPH
Day of the Week Setting
Day of the Week &
Time display
TIME SUN
Time Setting
TIME SUN
ÛF
ÛF
TEMP.
MENU
BACK
MONITOR/SET
PAR-21MAA
ON/OFF
ON/OFF
FILTER
DAY
CLOCK
CHECK TEST
OPERATION
CLEAR
Note:
The day and time will not appear if clock use has been disabled at
Function Selection of remote controller.
1. Press the or
Set Time button to show display .
2. Press the Timer On/Off (Set Day) button to set the day.
* Each press advances the day shown at :
Sun
Mon
...
Fri
Sat.
3. Press the appropriate Set Time button as necessary to set the time.
* As you hold the button down, the time (at ZLOO LQFUHPHQW ¿UVW LQ
one-minute intervals, then in ten-minute intervals, and then in onehour intervals.
4. After making the appropriate settings at Steps 2 and 3, press the Filter
button to lock in the values.
5. Operation
ÛF
ÛF
ÛF
5.1. Turning ON/OFF
<To Start Operation>
Press the ON/OFF button .
• The ON lamp and the display area come on.
Note:
When the unit is restarted, initial settings are as follows.
Remote Controller settings
Mode
Temperature setting
Fan speed
$LUÀRZXSGRZQ
Last operation mode
Last set temperature
Last set fan speed
COOL or DRY
Mode HEAT
FAN
Horiz. outlet *1
Last setting *2
Horiz. outlet *1
*1 Last setting might be applied depending on the type of the indoor unit.
,QFDVHRIWKHODVWVHWWLQJLVVZLQJDLUÀRZPLJKWEH'RZQZDUGGHSHQGLQJ
on the type of the indoor unit.
6
<To Stop Operation>
Press the ON/OFF button again.
• The ON lamp and the display area go dark.
Note:
Even if you press the ON/OFF button immediately after shutting
down the operation is progress, the air conditioner will not start
for about three minutes. This is to prevent the internal components
from being damaged.
5. Operation
5.2. Mode select
) button and select the op-
Press the operation mode (
eration mode .
Cooling mode
Drying mode
Fan mode
Heating mode
Automatic (cooling/heating) mode
Automatic operation
According to a set temperature, cooling operation starts if the room
temperature is too hot and heating operation starts if the room temperature is too cold.
During automatic operation, if the room temperature changes and
remains 1.5°C, 3°F or more above the set temperature for 3 minutes,
the air conditioner switches to cooling mode. In the same way, if the
room temperature remains 1.5°C, 3°F or more below the set temperature for 3 minutes, the air conditioner switches to heating mode.
Cooling mode
3 minutes (switches from
heating to cooling)
Set temperature +1.5°C, +3°F
Set temperature
Set temperature -1.5°C, -3°F
Note:
The number of available fan speeds depends on the type of unit connected.
Note also that some units do not provide an “Auto” setting.
In the following cases, the actual fan speed generated by the unit will differ
from the speed shown the remote controller display.
1. While the display is showing “STAND BY” or “DEFROST”.
2. When the temperature of the heat exchanger is low in the heating mode.
HJLPPHGLDWHO\DIWHUKHDWLQJRSHUDWLRQVWDUWV
3. In HEAT mode, when room temperature is higher than the temperature
setting.
:KHQWKHXQLWLVLQ'5<PRGH
Ŷ$XWRPDWLFIDQVSHHGVHWWLQJ)RUZLUHOHVVUHPRWHFRQWUROOHU
It is necessary to set for wireless remote controller only when
automatic fan speed is not set at default setting.
It is not necessary to set for wired remote controller with automatic
fan speed at default setting.
Press the SET button with something sharp at the end.
Operate when display of remote controller is off.
MODEL SELECT blinks and Model No. is lighted .
button.
Press the AUTO STOP
blinks and setting No. is lighted .
(Setting No.01: without automatic fan speed )
buttons to set the setting No.02.
Press the temp.
(Setting No.02:with automatic fan speed )
button and operIf you mistook the operation, press the ON/OFF
ate again from procedure .
Press the SET button with something sharp at the end.
MODEL SELECT and Model No. are lighted for 3 seconds, then turned off.
3 minutes (switches from cooling to heating )
Because the room temperature is automatically adjusted in order to
PDLQWDLQD¿[HGHIIHFWLYHWHPSHUDWXUHFRROLQJRSHUDWLRQLVSHUIRUPHG
a few degrees warmer and heating operation is performed a few degrees cooler than the set room temperature once the temperature is
reached (automatic energy-saving operation).
MODEL SELECT
ON/OFF
TEMP
5.3. Temperature setting
To decrease the room temperature:
Press
button to set the desired temperature.
The selected temperature is displayed at .
MODE
FAN
AUTO STOP
VANE
AUTO START
CHECK LOUVER
To increase the room temperature:
button to set the desired temperature.
Press
The selected temperature is displayed at .
TEST RUN
• Available temperature ranges are as follows:
Cooling/Drying:
19 - 30°C, 67 - 87 °F
Heating:
17 - 28°C, 63 - 83 °F
Automatic:
19 - 28°C, 67 - 83 °F
• The display blinks either 8°C - 39°C, 46°F - 102°F to inform you if the
room temperature is lower or higher than the displayed temperature.
)DQVSHHGVHWWLQJ
Press the Fan Speed button as many times as necessary while the
system is running.
• Each press changes the force. The currently selected speed is
shown at .
• The change sequence, and the available settings are as follows.
FAN SPEED
4-speed
Speed 2
Speed 3
Auto
RESET
CLOCK
7R&KDQJHWKH$LUÀRZ¶V8S'RZQ'LUHFWLRQ!
:LWKWKHXQLWUXQQLQJSUHVVWKH$LUÀRZ8S'RZQEXWWRQ as necessary.
• Each press changes the direction. The current direction is shown at .
• The change sequence, and the available settings, are as follows.
$LUÀRZ
Display
Swing
Auto
1
2
3
5
4
5 steps
model*1
Swing
Speed 4
h
min
$LUÀRZGLUHFWLRQVHWWLQJ
Display
Speed 1
SET
4 steps
model
1
(Horiz.)
2
3
4
+
Auto *
3-speed
Speed 1
Speed 2
Speed 3
Auto
+
Auto *
Speed 1
Speed 2
Speed 3
Speed 4
4-speed
model
* Note that during swing operation, the directional indication on the
screen does not change in sync with the directional vanes on the unit.
* Some models do not support directional settings.
*1. For MA remote controller only, other remote controllers display the
same as 4 steps model.
*2. PKFY-P·NBMU-E2 has no swing display.
$LUÀRZGLUHFWLRQVHWWLQJ$XWR!
COOL / FAN / DRY: Setting 1 (Horizontal), HEAT: Setting 5 (Downward 5)
* For MA remote controller only.
Automatic fan speed setting is necessary for wireless remote controller.
7
5. Operation
Note:
Available directions depend on the type of unit connected. Note
also that some units do not provide an “Auto” setting.
In the following cases, the actual air direction will differ from the
direction indicated on the remote controller display.
1. While the display is showing “STAND BY” or “DEFROST”.
,PPHGLDWHO\ DIWHU VWDUWLQJ KHDWHU PRGH ZKLOH WKH V\VWHP LV
ZDLWLQJIRUWKHPRGHFKDQJHWRWDNHHIIHFW
3. In heat mode, when room temperature is higher than the temperature setting.
>0DQXDO@7R&KDQJHWKH$LUÀRZ¶V/HIW5LJKW'LUHFWLRQ!
* The louver button cannot be used.
• Stop the unit operation, hold the lever of the louver,
and adjust to the desired direction.
* Do not set to the inside direction when the unit is
in the cooling or drying mode because there is a
risk of condensation and water dripping.
5.6. Ventillation
For LOSSNAY combination
5.6.1. For Wired Remote-controller
To run the ventilator together with the indoor unit:
Press the ON/OFF button .
• The Vent indication appears on the screen (at ). The ventilator
will now automatically operate whenever the indoor unit is running.
To run the ventilator only when the indoor unit is off:
Press the Ventilation button while the indoor unit is off.
• The On lamp (at ) and the Vent indication (at ) come on.
To change the ventilator force:
Press the Ventilation button as necessary.
• Each press toggles the setting as shown below.
No display
(Stop)
(Low)
Caution:
When you operate the process above, be sure to take measures to
avoid falls.
(High)
(OFF)
Note:
:LWKVRPHPRGHOFRQ¿JXUDWLRQVWKHIDQRQWKHLQGRRUXQLWPD\
come on even when you set the ventilator to run independently.
6. Timer
6.1. For Wired Remote-controller
You can use Function Selection of remote controller to select which of
three types of timer to use: Weekly timer, Simple timer or Auto
Off timer.
6.1.1. Weekly Timer
The weekly timer can be used to set up to eight operations for each
day of the week.
• Each operation may consist of any of the following: ON/OFF time
together with a temperature setting, or ON/OFF time only, or temperature setting only.
• When the current time reaches a time set at this timer, the air conditioner carries out the action set by the timer.
Time setting resolution for this timer is 1 minute.
Note:
*1. Weekly Timer/Simple Timer/Auto Off Timer cannot be used at
the same time.
*2. The weekly timer will not operate when any of the following conditions is in effect.
The timer feature is off; the system is in an malfunction state; a
test run is in progress; the remote controller is undergoing selfcheck or remote controller check; the user is in the process of
setting a function; the user is in the process of setting the timer;
the user is in the process of setting the current day of the week
RU WLPH WKH V\VWHP LV XQGHU FHQWUDO FRQWURO 6SHFLILFDOO\ WKH
V\VWHP ZLOO QRW FDUU\ RXW RSHUDWLRQV XQLW RQ XQLW RII RU WHPSHUDWXUHVHWWLQJWKDWDUHSURKLELWHGGXULQJWKHVHFRQGLWLRQV
<How to Set the Weekly Timer>
1. Be sure that you are at a standard control screen, and that the weekly
timer indicator is shown in the display.
2. Press the Timer Menu button , so that the “Set Up” appears on the
screen (at ). (Note that each press of the button toggles the display
between “Set Up” and “Monitor”.)
3. Press the Timer On/Off (Set Day) button to set the day. Each press
advances the display at to the next setting, in the following sequence: “Sun Mon Tues Wed Thurs Fri Sat” “Sun” ... “Fri” “Sat”
“Sun Mon Tues Wed Thurs Fri Sat”...
4. Press the
or
Operation button ( or ) as necessary to select
the appropriate operation number (1 to 8) .
* Your inputs at Steps 3 and 4 will select one of the cells from the
matrix illustrated below.
(The remote-controller display at left shows how the display would
appear when setting Operation 1 for Sunday to the values indicated
below.)
Setup Matrix
Op No.
No. 1
No. 2
Sunday
• 8:30
• ON
• 73°F
• 10:00
• OFF
Monday
• 10:00
• OFF
…
• 10:00
• OFF
Saturday
• 10:00
• OFF
…
No. 8
Operation No.
Day Setting
<Operation 1 settings for Sunday>
Start the air conditioner at 8:30, with
the temperature set to 73 °F
SUN
ON
ÛF
WEEKLY
TEMP.
MENU
BACK
PAR-21MAA
MONITOR/SET
ON/OFF
ON/OFF
FILTER
DAY
CHECK TEST
OPERATION
CLOCK
CLEAR
<Operation 2 settings for every day>
Turn off the air conditioner at 10:00.
Note:
By setting the day to “Sun Mon Tues Wed Thurs Fri Sat”, you can
set the same operation to be carried out at the same time every day.
([DPSOH2SHUDWLRQDERYHZKLFKLVWKHVDPHIRUDOOGD\VRIWKH
ZHHN
Shows the selected operation (ON or OFF)
* Does not appear if operation is not set.
Shows the time setting
SUN
ON
ÛF
WEEKLY
Shows the temperature setting
* Does not appear if temperature is
not set.
6. Timer
<Setting the Weekly Timer>
5. Press the appropriate Set Time button as necessary to set the desired time (at ).
$V\RXKROGWKHEXWWRQGRZQWKHWLPH¿UVWLQFUHPHQWVLQPLQXWHLQtervals, then in ten-minute intervals, and then in one-hour intervals.
6. Press the ON/OFF button to select the desired operation (ON or
OFF) at .
* Each press changes the next setting, in the following sequence: No
“ON” “OFF”
display (no setting)
7. Press the appropriate Temperature set button to set the desired
temperature (at ).
* Each press changes the setting, in the following sequence: No display (no setting)
75
77
...
84
87
53
...
73
No display.
(Available range: The range for the setting is 12°C, 54°F to 30°C,
86°F. The actual range over which the temperature can be controlled, however, will vary according to the type of the connected unit.)
8. After making the appropriate settings at Steps 5, 6 and 7, press the
Filter button to lock in the values.
To clear the currently set values for the selected operation, press and
quickly release the Check (Clear) button once.
* The displayed time setting will change to “—:—”, and the On/Off
and temperature settings will all disappear.
(To clear all weekly timer settings at once, hold down the Check
(Clear) button for two seconds or more. The display will begin
blinking, indicating that all settings have been cleared.)
6.1.2. Simple Timer
You can set the simple timer in any of 3 ways.
• Start time only:
The air conditioner starts when the set time has elapsed.
• Stop time only:
The air conditioner stops when the set time has elapsed.
• Start & stop times:
The air conditioner starts and stops at the respective elapsed times.
The simple timer (start and stop) can be set only once within a
72-hour period.
The time setting is made in hour increments.
Note:
*1. Weekly Timer/Simple Timer/Auto Off Timer cannot be used at
the same time.
*2. The simple timer will not operate when any of the following conditions is in effect.
The timer is off; the system is in malfunction state; a test run is
in progress; the remote controller is undergoing self-check or
remote controller check; the user is in the process of selecting
a function; the user is in the process of setting the timer; the
V\VWHPLVXQGHUFHQWUDOFRQWURO8QGHUWKHVHFRQGLWLRQV2Q2II
RSHUDWLRQLVSURKLELWHG
Note:
Your new entries will be cancelled if you press the Operation mode
%DFNEXWWRQ before pressing the Filter button .
If you have set two or more different operations for exactly the
same time, only the operation with the highest Operation No. will be
carried out.
Hr
SIMPLE
TEMP.
MENU
BACK
5HSHDW6WHSVWRDVQHFHVVDU\WR¿OODVPDQ\RIWKHDYDLODEOHFHOOV
as you wish.
10. Press the Operation mode (Back) button to return to the standard
control screen and complete the setting procedure.
11. To activate the timer, press the Timer On/Off button , so that the
“Timer Off” indication disappears from the screen. Be sure that the
“Timer Off” indication is no longer displayed.
* If there are no timer settings, the “Timer Off” indication will blink on
the screen.
ON
AFTER
PAR-21MAA
MONITOR/SET
ON/OFF
ON/OFF
FILTER
DAY
CHECK TEST
OPERATION
CLOCK
CLEAR
<How to Set the Simple Timer>
Timer Setting
<How to View the Weekly Timer Settings>
Hr
Action (On or Off)
ON
AFTER
Timer Settings
* “— —” is displayed if there is no
setting.
SIMPLE
SUN
TIMER
ON
OFF
ÛF
WEEKLY
1. Be sure that the weekly timer indicator is visible on the screen (at ).
2. Press the Timer Menu button so that “Monitor” is indicated on the
screen (at ).
3. Press the Timer On/Off (Set Day) button as necessary to select the
day you wish to view.
4. Press the
or
Operation button ( or ) as necessary to change
the timer operation shown on the display (at ).
* Each press will advance to the next timer operation, in order of time
setting.
5. To close the monitor and return to the standard control screen, press
the Operation mode (Back) button .
<To Turn Off the Weekly Timer>
Press the Timer On/Off button so that “Timer Off” appears at
.
TIME SUN
ÛF
ÛF
WEEKLY
<To Turn On the Weekly Timer>
Press the Timer On/Off button so that the “Timer Off” indication (at
goes dark.
TIME SUN
ÛF
ÛF
WEEKLY
)
1. Be sure that you are at a standard control screen, and that the simple
timer indicator is visible in the display (at ).
When something other than the Simple Timer is displayed, set it to
SIMPLE TIMER using the function selection of remote controller (see
8.[4]–3 (3)) timer function setting.
2. Press the Timer Menu button , so that the “Set Up” appears on the
screen (at ). (Note that each press of the button toggles the display
between “Set Up” and “Monitor”.)
3. Press the ON/OFF button to display the current ON or OFF simple
timer setting. Press the button once to display the time remaining to
ON, and then again to display the time remaining to OFF. (The ON/
OFF indication appears at ).
• “ON” timer:
7KHDLUFRQGLWLRQHUZLOOVWDUWRSHUDWLRQZKHQWKHVSHFL¿HGQXPEHURI
hours has elapsed.
• “OFF” timer:
7KHDLUFRQGLWLRQHUZLOOVWRSRSHUDWLRQZKHQWKHVSHFL¿HGQXPEHURI
hours has elapsed.
4. With “ON” or “OFF” showing at : Press the appropriate Set Time
button as necessary to set the hours to ON (if “ON” is displayed) or
the hours to OFF (if “OFF” is displayed) at .
• Available Range: 1 to 72 hours
5. To set both the ON and OFF times, repeat Steps 3 and 4.
* Note that ON and OFF times cannot be set to the same value.
6. To clear the current ON or OFF setting: Display the ON or OFF setting
(see step 3) and then press the Check (Clear) button so that the
time setting clears to “—” at . (If you want to use only an ON setting
or only an OFF setting, be sure that the setting you do not wish to use
is shown as “—”.)
9
6. Timer
7. After completing steps 3 to 6 above, press the Filter
button to
lock in the value.
Note:
Your new settings will be cancelled if you press the Operation mode
%DFNEXWWRQ before pressing the Filter
button .
Example 2:
Start the timer with OFF time set earlier than ON time
ON Setting : 5 hours
OFF Setting: 2 hours
Hr
AFTER OFF
8. Press the Operation mode (Back) button to return to the standard
control screen.
9. Press the Timer On/Off button to start the timer countdown. When
the timer is running, the timer value is visible on the display. Be sure
that the timer value is visible and appropriate.
At Timer Start
ÛF
ÛF
Display shows the timer’s OFF setting (hours
remaining to OFF).
SIMPLE
Hr
At 3 hours after timer start
ON
AFTER
Display changes to show the timer’s ON setting
(hours remaining to ON).
The time displayed is ON setting (5 hours) – OFF
setting (2 hours) = 3 hours.
SIMPLE
<Viewing the Current Simple Timer Settings>
Timer Setting
At 5 hours after timer start
ÛF
TIMER
Hr
The air conditioner comes on and will continue to
run until it is turned off.
ÛF
ON
SIMPLE
AFTER OFF
SIMPLE
1. Be sure that the simple timer indicator is visible on the screen (at ).
2. Press the Timer Menu button , so that the “Monitor” appears on the
screen (at ).
• If the ON or OFF simple timer is running, the current timer value will
appear at .
• If ON and OFF values have both been set, the 2 values appear alternately.
3. Press the Operation mode (Back) button to close the monitor display and return to the standard control screen.
<To Turn Off the Simple Timer...>
Press the Timer On/Off button so that the timer setting no longer appears on the screen (at ).
6.1.3. Auto Off Timer
This timer begins countdown when the air conditioner starts and shuts
the air conditioner off when the set time has elapsed.
Available settings run from 30 minutes to 4 hours in 30-minute intervals.
Note:
*1. Weekly Timer/Simple Timer/Auto Off Timer cannot be used at
the same time.
*2. The Auto Off timer will not operate when any of the following conditions is in effect.
The timer is off; the system is in malfunction state; a test run is
in progress; the remote controller is undergoing self-check or
remote controller check; the user is in the process of selecting
a function; the user is in the process of setting the timer; the
V\VWHPLVXQGHUFHQWUDOFRQWURO8QGHUWKHVHFRQGLWLRQV2Q2II
RSHUDWLRQLVSURKLELWHG
AFTER
OFF
ÛF
ÛF
SIMPLE
AUTO OFF
TEMP.
<To Turn On the Simple Timer...>
Press the Timer On/Off button so that the timer setting becomes visible at .
MENU
BACK
PAR-21MAA
Hr
MONITOR/SET
ON/OFF
ON/OFF
FILTER
DAY
CLOCK
CHECK TEST
OPERATION
CLEAR
ON
AFTER
ÛF
ÛF
SIMPLE
<How to Set the Auto Off Timer>
Examples
If ON and OFF times have both been set at the simple timer, operation
and display are as indicated below.
Timer Setting
AFTER
Example 1:
Start the timer with ON time set earlier than OFF time
ON Setting : 3 hours
OFF Setting : 7 hours
Hr
ON
AFTER
At Timer Start
SIMPLE
Display shows the timer’s ON setting (hours
remaining to ON).
At 3 hours after timer start
Hr
AFTER OFF
ÛF
ÛF
SIMPLE
Display changes to show the timer’s OFF setting (hours remaining to OFF).
The time displayed is OFF setting (7 hours) –
ON setting (3 hours) = 4 hours.
At 7 hours after timer start
SIMPLE
The air conditioner goes off and will remain off
until it is restarted.
OFF
AUTO OFF
1. Be sure that you are at a standard control screen, and that the Auto
Off timer indicator is visible in the display (at ).
When something other than the Auto Off Timer is displayed, set it to
AUTO OFF TIMER using the function selection of remote controller (see
8.[4]–3 (3)) timer function setting.
2. Hold down the Timer Menu button for 3 seconds so that the “Set
Up” appears on the screen (at ).
(Note that each press of the button toggles the display between “Set
Up” and “Monitor”.)
3. Press the appropriate Set Time button as necessary to set the OFF
time (at ).
4. Press the Filter button to lock in the setting.
Note:
<RXUHQWU\ZLOOEHFDQFHOOHGLI\RXSUHVVWKH2SHUDWLRQPRGH%DFN
button before pressing the Filter button .
5. Press the Operation mode (Back) button to complete the setting
procedure and return to the standard control screen.
6. If the air conditioner is already running, the timer starts countdown
immediately. Be sure to check that the timer setting appears correctly on the display.
6. Timer
<Checking the Current Auto Off Timer Setting>
6.2. For Wireless Remote-controller
Timer Setting
TIMER
AFTER
OFF
F
AUTO OFF
1. Be sure that the “Auto Off” is visible on the screen (at ).
2. Hold down the Timer Menu button for 3 seconds so that “Monitor”
is indicated on the screen (at ).
• The timer remaining to shutdown appears at .
3. To close the monitor and return to the standard control screen, press
the Operation mode (Back) button .
<To Turn Off the Auto Off Timer...>
Hold down the Timer On/Off button for 3 seconds so that “Timer
Off” appears (at ) and the timer value (at ) disappears.
Press the
ÛF
ÛF
AUTO OFF
Alternatively, turn off the air conditioner itself. The timer value (at )
will disappear from the screen.
AUTO STOP
or
AUTO START
button (TIMER SET).
• Time can be set while the following symbol is blinking.
OFF timer : is blinking.
ON timer : is blinking.
min
h
Use the
and
buttons to set the desired time.
Canceling the timer.
AUTO STOP
button.
To cancel the OFF timer, press the
To cancel the ON timer, press the
AUTO OFF
<To Turn On the Auto Off Timer...>
Hold down the Timer On/Off button for 3 seconds. The “Timer Off”
indication disappears (at ), and the timer setting comes on the display (at
).
Alternatively, turn on the air conditioner. The timer value will appear at .
AFTER
AUTO START
button.
• It is possible to combine both OFF and ON timers.
• Pressing the
ON/OFF button of the remote controller during timer
mode to stop the unit will cancel the timers.
• If the current time has not been set, the timer operation cannot be
used.
OFF
ÛF
ÛF
AUTO OFF
7. Other Functions
/RFNLQJWKH5HPRWH&RQWUROOHU%XWWRQV2SHUDWLRQ
IXQFWLRQOLPLWFRQWUROOHU
If you wish, you can lock the remote controller buttons. You can use
the Function Selection of remote controller to select which type of lock
to use. (For information about selecting the lock type, see section 8,
item [4]–2 (1)).
6SHFL¿FDOO\\RXFDQXVHHLWKHURIWKHIROORZLQJWZRORFNW\SHV
Lock All Buttons:
Locks all of the buttons on the remote controller.
Lock All Except ON/OFF:
Locks all buttons other than the ON/OFF button.
Note:
The “Locked” indicator appears on the screen to indicate that buttons are currently locked.
<How to Lock the Buttons>
1. While holding down the Filter button , press and hold down the ON/
OFF button for 2 seconds. The “Locked” indication appears on the
screen (at ), indicating that the lock is now engaged.
* If locking has been disabled in Function Selection of remote controller, the screen will display the “Not Available” message when you
press the buttons as described above.
ÛF
FUNCTION
ÛF
• If you press a locked button, the “Locked” indication (at ) will blink
on the display.
Lock Indicator
ÛF
FUNCTION
ÛF
TIME SUN
FUNCTION
ÛF
ÛF
TEMP.
MENU
BACK
PAR-21MAA
MONITOR/SET
ON/OFF
ON/OFF
FILTER
DAY
CLOCK
<How to Unlock the Buttons>
1. While holding down the Filter button , press and hold down the ON/
OFF button for 2 seconds—so that the “Locked” indication disappears from the screen (at ).
CHECK TEST
OPERATION
CLEAR
ÛF
ÛF
11
7. Other Functions
7.2. Error Codes indication
ERROR CODE
ON lamp
(Blinking)
ON/OFF
Error Code
Unit No.
If you have entered contact number to be called in the event of a problem, the screen displays this number.
(You can set this up under Function Selection of remote controller. For information, refer to section 8.)
If the ON lamp and error code are both blinking: This means that the air conditioner is out of order and operation has been stopped (and cannot
resume). Take note of the indicated unit number and error code, then switch off the power to the air conditioner and call your dealer or servicer.
When the Check button is pressed:
CALL:XXXX
XXX:XXX
ERROR CODE
ÛF
ÛF
ON/OFF
ON/OFF
Error Code
If only the error code is blinking (while the ON lamp remains lit): Operation is continuing, but there may be a problem with the system. In this case,
you should note down the error code and then call your dealer or servicer for advice.
* If you have entered contact number to be called in the event of a problem, push the Check button to display it on the screen. (You can set this up
under Function Selection of remote controller. For information, refer to section 8.)
)XQFWLRQ6HOHFWLRQ
Function selection of remote controller
The setting of the following remote controller functions can be changed using the remote controller function selection mode. Change the setting when
needed.
Item 1
1.Change Language
(“CHANGE LANGUAGE”)
Item 2
Language setting to display
Item 3 (Setting content)
• Display in multiple languages is possible
2.Function limit
(“FUNCTION SELECTION”)
(1) Operation function limit setting (operation lock)
(“LOCKING FUNCTION”)
• Setting the range of operation limit (operation locking functiion)
(2) Use of automatic mode setting (“SELECT
AUTO MODE”)
• Setting the use or non-use of “automatic” operation mode
(3) Temperature range limit setting (“LIMIT TEMP
FUNCTION”)
• Setting the temperature adjustable range (maximum, minimum)
(1) Remote controller main/sub setting (“CONTROLLER MAIN/SUB”)
• Selecting main or sub remote controller
* When two remote controllers are connected to one group,
one controller must be set to sub.
(2) Use of clock setting (“CLOCK”)
(3) Timer function setting (“WEEKLY TIMER”)
• Setting the use or non-use of clock function
• Setting the timer type
(4) Contact number setting for error situation
(“CALL.”)
• Contact number display in case of error
• Setting the telephone number
(1) Temperature display °C/°F setting (“TEMP
MODE °C/°F”)
• Setting the temperature unit (°C or °F) to display
(2) Suction air temperature display setting (“ROOM
TEMP DISP SELECT”)
(3) Automatic cooling/heating display setting
(“AUTO MODE DISP C/H”)
• Setting the use or non-use of the display of indoor (suction)
air temperature
• Setting the use or non-use of the display of “Cooling” or
“Heating” display during operation with automatic mode
3.Operation mode selection
(“MODE SELECTION”)
4.Display change
(“DISP MODE SETTING”)
12
)XQFWLRQ6HOHFWLRQ
>)XQFWLRQVHOHFWLRQÀRZFKDUW@
Setting language (English)
Normal display
(Display when the air conditioner is not running)
Hold down the
button and press the
Hold down the
button and press the
Remote controller function selection mode
Item 1
Change
Language
button for 2 seconds.
Press the operation mode button.
Press the TIMER MENU button.
Press the TIMER ON/OFF button.
button for 2 seconds.
Item 2
English
Dot display
German
Spanish
TEMP.
Russian
MENU
BACK
Italian
MONITOR/SET
PAR-21MAA
ON/OFF
ON/OFF
FILTER
DAY
CLOCK
CHECK TEST
OPERATION
CLEAR
Chinese
French
Japanese
Item 3
Function
selection
OFF
Operation lock setting is not used.
(Initial setting value)
no1
Operation lock setting is except On/Off button.
no2
Operation lock setting is All buttons.
ON
The automatic mode is displayed when the operation
mode is selected. (Initial setting value)
OFF
The automatic mode is not displayed when the operation mode
is selected.
OFF
The temperature range limit is not active. (Initial setting value)
The temperature range can be changed on cooling/dry mode.
The temperature range can be changed on heating mode.
The temperature range can be changed on automatic mode.
$XWRPDWLF¿OWHUHOHYDWLRQSDQHOXSGRZQRSHUDWLRQPRGH
Not necessary to set this mode. Refer to OPERATION MANUAL of
Optional Parts (Panel) for details on operation.
)L[HGDLUÀRZGLUHFWLRQPRGH
Not necessary to set this mode. Refer to OPERATION MANUAL of
indoor unit for details on operation.
The remote controller will be the main controller. (Initial setting value)
Mode
selection
The remote controller will be the sub controller.
ON
The clock function can be used. (Initial setting value)
OFF
The clock function can not be used.
Weekly timer can be used. (Initial setting value)
Auto off timer can be used.
Simple timer can be used.
Timer mode can not be used.
Display
mode setting
OFF
The set contact numbers are not displayed in case of error.
(Initial setting value)
CALL-
The set contact numbers are displayed in case of error.
ÛC
The temperature unit °C is used.
ÛF
The temperature unit °F is used. (Initial setting value)
ON
Room air temperature is displayed. (Initial setting value)
OFF
Room air temperature is not displayed.
ON
OFF
One of “Automatic cooling” and “Automatic heating” is displayed under the automatic mode is running. (Initial setting
value)
Only “Automatic” is displayed under the automatic mode.
13
)XQFWLRQ6HOHFWLRQ
[Detailed setting]
[4]–1. CHANGE LANGUAGE setting
The language that appears on the dot display can be selected.
• Press the [ MENU] button to change the language.
English (GB), German (D), Spanish (E), Russian (RU),
Italian (I), Chinese (CH), French (F), Japanese (JP)
Refer to the dot display table.
[4]–2. Function limit
(1) Operation function limit setting (operation locking function)
• To switch the setting, press the [ ON/OFF] button .
no1 :Operation lock setting is made on all buttons other than
the [ ON/OFF] button.
no2 :Operation lock setting is made on all buttons.
OFF (Initial setting value): Operation lock setting is not made.
* To make the operation lock setting valid on the normal screen, it
is necessary to press buttons (Press and hold down the [FILTER]
and [ ON/OFF] buttons at the same time for two seconds.) on
the normal screen after the above setting is made.
(2) Use of automatic mode setting
When the remote controller is connected to the unit that has automatic operation mode, the following settings can be made.
• To switch the setting, press the [ ON/OFF] button .
ON (Initial setting value):
The automatic mode is displayed when the operation mode is
selected.
OFF:
The automatic mode is not displayed when the operation
mode is selected.
(3) Temperature range limit setting
After this setting is made, the temperature can be changed within
the set range.
• To switch the setting, press the [ ON/OFF] button .
LIMIT TEMP COOL MODE:
The temperature range can be changed on cooling/dry mode.
LIMIT TEMP HEAT MODE:
The temperature range can be changed on heating mode.
LIMIT TEMP AUTO MODE:
The temperature range can be changed on automatic mode.
OFF (initial setting): The temperature range limit is not active.
* When the setting, other than OFF, is made, the temperature
range limit setting on cooling, heating and automatic mode is
made at the same time. However, the range cannot be limited
when the set temperature range has not changed.
• To increase or decrease the temperature, press the
[ TEMP. ( ) or ( )] button .
• To switch the upper limit setting and the lower limit setting, press
the [
] button . The selected setting will blink and the temperature can be set.
• Settable range
Cooling/Dry mode:
Lower limit: 19°C~30°C, 67°F~87°F
Upper limit: 30°C~19°C, 87°F~67°F
Heating mode:
Lower limit: 17°C~28°C, 63°F~83°F
Upper limit: 28°C~17°C, 83°F~63°F
Automatic mode:
Lower limit: 19°C~28°C, 67°F~83°F
Upper limit: 28°C~19°C, 83°F~67°F
[4]–3. Operation mode selection setting
(1) Remote controller main/sub setting
• To switch the setting, press the [ ON/OFF] button .
Main: The controller will be the main controller.
The controller will be the sub controller.
Sub:
(2) Use of clock setting
• To switch the setting, press the [ ON/OFF] button .
The clock function can be used.
ON:
The clock function cannot be used.
OFF:
(3) Timer function setting
• To switch the setting, press the [ ON/OFF] button (Choose
one of the following.).
WEEKLY TIMER (initial setting value):
The weekly timer can be used.
AUTO OFF TIMER:
The auto off timer can be used.
SIMPLE TIMER:
The simple timer can be used.
TIMER MODE OFF:
The timer mode cannot be used.
* When the use of clock setting is OFF, the “WEEKLY TIMER” cannot be used.
(4) Contact number setting for error situation
• To switch the setting, press the [ ON/OFF] button .
CALL OFF:
The set contact numbers are not displayed in case of error.
CALL **** *** ****:
The set contact numbers are displayed in case of error.
CALL_:
The contact number can be set when the display is as shown
above.
• Setting the contact numbers
To set the contact numbers, follow the following procedures.
Move the blinking cursor to set numbers. Press the [ TEMP.
( ) and ( )] button to move the cursor to the right (left).
Press the [ CLOCK ( ) and ( )] button to set the numbers.
[4]–4. Display change setting
(1) Temperature display °C/°F setting
• To switch the setting, press the [ ON/OFF] button .
°C: The temperature unit °C is used.
°F: The temperature unit °F is used.
(2) Room air temperature display setting
• To switch the setting, press the [ ON/OFF] button .
ON : The room air temperature is displayed.
OFF: The room air temperature is not displayed.
(3) Automatic cooling/heating display setting
• To switch the setting, press the [ ON/OFF] button .
ON:
One of “Automatic cooling” and “Automatic heating” is displayed under the automatic mode is running.
OFF:
Only “Automatic” is displayed under the automatic mode.
)XQFWLRQ6HOHFWLRQ
[Dot display table]
Selecting language
English
German
Spanish
Russian
Italian
Chinese
French
Japanese
English
German
Spanish
Russian
Italian
Chinese
French
Japanese
Waiting for start-up
Operation mode
Cool
Dry
Heat
Auto
Auto(Cool)
Auto(Heat)
Fan
Ventilation
Stand by
(Hot adjust)
Defrost
Set temperature
Fan speed
Not use button
Check (Error)
Test run
Self check
Unit function selection
Setting of ventilation
Selecting language
CHANGE LANGUAGE
Function selection
Operation function limit setting
Use of automatic mode setting
Temperature range limit setting
Limit temperature cooling/day
mode
Limit temperature heating mode
Limit temperature auto mode
Operation mode selection
Remote controller setting MAIN
Remote controller setting SUB
Use of clock setting
Setting the day of the week and
time
Timer set
Timer monitor
Weekly timer
Timer mode off
Auto off timer
Simple timer
Contact number setting of error
situation
Display change
Temperature display °C/°F setting
Air inlet temperature display setting
Automatic cooling/heating display
setting
15
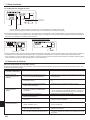
9. Emergency Operation for Wireless Remote-controller
)RU3.)<3Â1+08(
When the remote-controller cannot be used
When the batteries of the remote controller run out or the remote controller malfunctions, the emergency operation can be done using the emergency buttons.
DEFROST/STAND BY lamp
Operation lamp
Emergency operation switch (heating)
Emergency operation switch (cooling)
Receiver
Starting operation
button for more than 2
• To operate the cooling mode, press the
seconds.
• To operate the heating mode, press the
button for more than 2
seconds.
Note:
• Details of emergency mode are as shown below.
Details of EMERGENCY MODE are as shown below.
Operation mode
Set temperature
Fan speed
$LUÀRZGLUHFWLRQ
COOL
24°C, 75°F
High
Horizontal
Stopping operation
• To stop operation, press the
than 2 seconds.
button or the
HEAT
24°C, 75°F
High
Downward 4 (5)
button for more
&DUHDQG&OHDQLQJ
ÛF
ÛF
TEMP.
FILTER
Filter removal
Caution:
,QUHPRYLQJWKH¿OWHUSUHFDXWLRQVPXVWEHWDNHQWRSURWHFW\RXU
eyes from dust. Also, if you have to climb up on a stool to do the
job, be careful not to fall.
:KHQWKH¿OWHULVUHPRYHGGRQRWWRXFKWKHPHWDOOLFSDUWVLQVLGH
the indoor unit, otherwise injury may result.
ON/OFF
,QGLFDWHVWKDWWKH¿OWHUQHHGVFOHDQLQJ
$VNDXWKRUL]HGSHRSOHWRFOHDQWKH¿OWHU
When resetting “FILTER” display
When the [FILTER] button is pressed two times successively after
FOHDQLQJWKH¿OWHUWKHGLVSOD\JRHVRIIDQGLVUHVHW
PKFY-P·NBMU-E2
PKFY-P·NHMU-E2
Note:
When 2 or more different types of indoor unit are controlled, the
cleaning period differs with the type of filter. When the master
XQLWFOHDQLQJSHULRGDUULYHV³),/7(5´LVGLVSOD\HG:KHQWKH¿Oter display goes off, the cumulative time is reset.
“FILTER” indicates the cleaning period when the air conditioner
was used under general indoor air conditions by criteria time.
Since the degree of dirtiness depends on the environmental conGLWLRQVFOHDQWKH¿OWHUDFFRUGLQJO\
7KH¿OWHUFOHDQLQJSHULRGFXPXODWLYHWLPHGLIIHUVZLWKWKHPRGHO
This indication is not available for wireless remote controller.
&OHDQLQJWKH¿OWHUV
&OHDQWKH¿OWHUVXVLQJDYDFXXPFOHDQHU,I\RXGRQRWKDYHDYDFXXP
FOHDQHUWDSWKH¿OWHUVDJDLQVWDVROLGREMHFWWRNQRFNRIIGLUWDQGGXVW
,I WKH ¿OWHUV DUH HVSHFLDOO\ GLUW\ ZDVK WKHP LQ OXNHZDUP ZDWHU 7DNH
FDUH WR ULQVH RII DQ\ GHWHUJHQW WKRURXJKO\ DQG DOORZ WKH ¿OWHUV WR GU\
completely before putting them back into the unit.
Caution:
'RQRWGU\WKH¿OWHUVLQGLUHFWVXQOLJKWRUE\XVLQJDKHDWVRXUFH
such as an electric heater: this may warp them.
'R QRW ZDVK WKH ¿OWHUV LQ KRW ZDWHU DERYH °C, ) DV WKLV
may warp them.
0DNH VXUH WKDW WKH DLU ¿OWHUV DUH DOZD\V LQVWDOOHG 2SHUDWLQJ WKH
XQLWZLWKRXWDLU¿OWHUVFDQFDXVHPDOIXQFWLRQ
• Before you start cleaning, stop operation and turn OFF the power
supply.
• Indoor units are equipped with filters to remove the dust of
VXFNHGLQ DLU &OHDQ WKH ¿OWHUV XVLQJ WKH PHWKRGV VKRZQ LQ WKH
following sketches.
16
Pull both the bottom corners of the intake grille to open the grille,
WKHQOLIWWKH¿OWHU
&DUHDQG&OHDQLQJ
PMFY-P·NBMU-E
Pressing the PUSH button on the outer side of the intake grille
causes the intake grille to open.
$¿OWHUZLWKDQLQWDNHJULOOHRQLWFDQEHUHPRYHGE\SXOOLQJWKH¿OWHU
forward.
11. Trouble Shooting
Having trouble?
Air conditioner does not heat or cool well.
When heating operation starts, warm air does not blow from the indoor
unit soon.
During heating mode, the air conditioner stops before the set room
temperature is reached.
$LUÀRZ GLUHFWLRQ FKDQJHV GXULQJ RSHUDWLRQ RU DLUÀRZ GLUHFWLRQ FDQQRW
be set.
:KHQWKHDLUÀRZGLUHFWLRQLVFKDQJHGWKHYDQHVDOZD\VPRYHXSDQG
GRZQSDVWWKHVHWSRVLWLRQEHIRUH¿QDOO\VWRSSLQJDWWKHSRVLWLRQ
$ÀRZLQJZDWHUVRXQGRURFFDVLRQDOKLVVLQJVRXQGLVKHDUG
A cracking or creaking sound is heard.
The room has an unpleasant odor.
A white mist or vapor is emitted from the indoor unit.
Here is the solution. (Unit is operating normally.)
&OHDQWKH¿OWHU$LUÀRZLVUHGXFHGZKHQWKH¿OWHULVGLUW\RUFORJJHG
Check the temperature adjustment and adjust the set temperature.
Make sure that there is plenty of space around the outdoor unit. Is the
indoor unit air intake or outlet blocked?
Has a door or window been left open?
:DUPDLUGRHVQRWEORZXQWLOWKHLQGRRUXQLWKDVVXI¿FLHQWO\ZDUPHGXS
When the outdoor temperature is low and the humidity is high, frost
may form on the outdoor unit. If this occurs, the outdoor unit performs a
defrosting operation. Normal operation should begin after approximately10 minutes.
During cooling mode, the vanes automatically move to the horizontal
GRZQSRVLWLRQDIWHUKRXUZKHQWKHGRZQKRUL]RQWDODLUÀRZGLUHFWLRQ
is selected. This is to prevent water from forming and dripping from the
vanes.
During heating mode, the vanes automatically move to the horizontal
DLUÀRZGLUHFWLRQZKHQWKHDLUÀRZWHPSHUDWXUHLVORZRUGXULQJGHIURVWing mode.
:KHQWKHDLUÀRZGLUHFWLRQLVFKDQJHGWKHYDQHVPRYHWRWKHVHWSRVLtion after detecting the base position.
7KHVHVRXQGVFDQEHKHDUGZKHQUHIULJHUDQWLVÀRZLQJLQWKHDLUFRQGLWLRQHURUZKHQWKHUHIULJHUDQWÀRZLVFKDQJLQJ
These sounds can be heard when parts rub against each due to expansion and contraction from temperature changes.
The indoor unit draws in air that contains gases produced from the
walls, carpeting, and furniture as well as odors trapped in clothing, and
then blows this air back into the room.
If the indoor temperature and the humidity are high, this condition may
occur when operation starts.
'XULQJGHIURVWLQJPRGHFRRODLUÀRZPD\EORZGRZQDQGDSSHDUOLNHD
mist.
17
11. Trouble Shooting
Having trouble?
Water or vapor is emitted from the outdoor unit.
The operation indicator does not appear in the remote controller display.
The air conditioner does not operate even though the ON/OFF button
is pressed. The operation mode display on the remote controller disappears.
” appears in the remote controller display.
“
When restarting the air conditioner soon after stopping it, it does not
operate even though the ON/OFF button is pressed.
Air conditioner operates without the ON/OFF button being pressed.
Air conditioner stops without the ON/OFF button being pressed.
Remote controller timer operation cannot be set.
“PLEASE WAIT” appears in the remote controller display.
An error code appears in the remote controller display.
Draining water or motor rotation sound is heard.
1RLVHLVORXGHUWKDQVSHFL¿FDWLRQV
Here is the solution. (Unit is operating normally.)
During cooling mode, water may form and drip from the cool pipes and
joints.
During heating mode, water may form and drip from the heat exchanger.
During defrosting mode, water on the heat exchanger evaporates and
water vapor may be emitted.
Turn on the power switch. “
” will appear in the remote controller
display.
Is the power switch of the indoor unit turned off? Turn on the power
switch.
During central control, “
” appears in the remote controller display
and air conditioner operation cannot be started or stopped using the
remote controller.
Wait approximately three minutes.
(Operation has stopped to protect the air conditioner.)
Is the on timer set?
Press the ON/OFF button to stop operation.
Is the air conditioner connected to a central remote controller?
Consult the concerned people who control the air conditioner.
Does “
” appear in the remote controller display?
Consult the concerned people who control the air conditioner.
Has the auto recovery feature from power failures been set?
Press the ON/OFF button to stop operation.
Is the off timer set?
Press the ON/OFF button to restart operation.
Is the air conditioner connected to a central remote controller?
Consult the concerned people who control the air conditioner.
Does “
” appear in the remote controller display?
Consult the concerned people who control the air conditioner.
Are timer settings invalid?
If the timer can be set, WEEKLY , SIMPLE or AUTO OFF appears in the
remote controller display.
The initial settings are being performed. Wait approximately 3 minutes.
The protection devices have operated to protect the air conditioner.
Do not attempt to repair this equipment by yourself.
Turn off the power switch immediately and consult your dealer. Be sure
to provide the dealer with the model name and information that appeared
in the remote controller display.
When cooling operation stops, the drain pump operates and then stops.
Wait approximately 3 minutes.
The indoor operation sound level is affected by the acoustics of the particular room as shown in the following table and will be higher than the
QRLVHVSHFL¿FDWLRQZKLFKZDVPHDVXUHGLQDQHFKRIUHHURRP
Location
examples
Noise levels
Nothing appears in the wireless remote controller display, the display
is faint, or signals are not received by the indoor unit unless the remote controller is close.
The operation lamp near the receiver for the wireless remote controller on the indoor unit is blinking.
Warm air blows from the indoor unit intermittently when heating mode
is off or during fan mode.
High sound-absorbing rooms
Broadcasting
studio, music
room, etc.
3 to 7 dB
Normal rooms
Low sound-absorbing rooms
Reception
room, hotel
lobby, etc.
6 to 10 dB
2I¿FHKRWHO
room
9 to 13 dB
The batteries are low.
Replace the batteries and press the Reset button.
If nothing appears even after the batteries are replaced, make sure that
the batteries are installed in the correct directions (+, –).
The self diagnosis function has operated to protect the air conditioner.
Do not attempt to repair this equipment by yourself.
Turn off the power switch immediately and consult your dealer. Be sure
to provide the dealer with the model name.
When another indoor unit is operating in heating mode, the control valve
opens and closes occasionally to maintain stability in the air conditioning
system. This operation will stop after a while.
* If this will cause an undesirable rise in the room temperature in small
rooms, etc., stop the operation of the indoor unit temporarily.
6SHFL¿FDWLRQV
PKFY Series
Model
Power source
Capacity
Dimension
Net weight
)DQ$LUÀRZUDWH
(Low-Middle2-Middle1-High)
Noise level
(Low-Middle2-Middle1-High)
Cooling <BTU/h>
Heating <BTU/h>
H
<inch>
W
<inch>
D
<inch>
<Ibs>
DRY
<CFM>
WET
<CFM>
<dB(A)>
PKFY-P06NBMU-E2
PKFY-P08NHMU-E2
6,000
6,700
8,000
9,000
32-1/8
8-7/8
22
170-180-200-210
160-170-180-190
32-33-35-36
PKFY-P12NHMU-E2 PKFY-P15NHMU-E2
Single 208/230V 60Hz
12,000
15,000
13,500
17,000
11-5/8
35-3/8
9-13/16
29
320-370-405
290-335-365
34-39-43
PKFY-P18NHMU-E2
18,000
20,000
320-370-425
290-335-380
36-41-45
PMFY Series
Model
Power source
PMFY-P06NBMU-E
Capacity
Dimension (Grille)
Net weight (Grille)
)DQ$LUÀRZUDWH
(Low-Middle2-Middle1-High)
Noise level
(Low-Middle2-Middle1-High)
Cooling <BTU/h>
Heating <BTU/h>
H
<inch>
W
<inch>
D
<inch>
<Ibs>
DRY
<CFM>
WET
<CFM>
<dB(A)>
PMFY-P15NBMU-E
230-250-280-300
200-220-250-270
PMFY-P08NBMU-E
PMFY-P12NBMU-E
Single 208/230V 60Hz
8,000
12,000
9,000
13,500
9-1/16 (1-3/16)
33-5/8 (39-3/8)
1/-9/16 (18-1/2)
31 (7)
250-280-300-320
220-250-270-290
27-30-33-35
32-34-36-37
33-35-37-39
6,000
6,700
15,000
17,000
270-300-340-370
240-270-310-340
1. Cooling/Heating capacity indicates the maximum value at operation under the following condition.
Coolong : Indoor 27°C DB, 81°F DB/19°C WB, 67°F WB, Outdoor 35°C DB, 95°F DB
Heating : Indoor 20°C DB, 68°F DB, Outdoor 7°C DB, 45°F DB/ 6°C WB, 43°F WB
Range of application
The range of working temperatures for both the indoor and outdoor units of the series Y is as below.
Caution:
The use of your air conditioner outside the range of working temperature and humidity can result in serious failure.
Mode
Indoor unit
Cooling
Heating
&&Û)Û):%
&&Û)Û)'%
PUHY
±&&Û)Û)'%
–20°C - 15.5°C, –Û)Û):%
Outdoor unit
PURY
±&&Û)Û)'%
–20°C - 15.5°C, –Û)Û):%
PUMY
±&&Û)Û)'%
±&&Û)Û):%
1RWH$VDQDSSOLFDEOHKXPLGLW\VWDQGDUGIRUERWKLQGRRUVDQGRXWGRRUVZHUHFRPPHQGXVHZLWKLQDUDQJHRIUHODWLYHKXPLGLW\
Warning:
,IWKHDLUFRQGLWLRQHURSHUDWHVEXWGRHVQRWFRRORUKHDWGHSHQGLQJRQPRGHOWKHURRPFRQVXOW\RXUGHDOHUVLQFHWKHUHPD\EHDUHIULJHUDQW
leak. Be sure to ask the service representative whether there is refrigerant leakage or not when repairs are carried out.
The refrigerant charged in the air conditioner is safe. Refrigerant normally does not leak, however, if refrigerant gas leaks indoors, and comes
LQWRFRQWDFWZLWKWKH¿UHRIDIDQKHDWHUVSDFHKHDWHUVWRYHHWFKDUPIXOVXEVWDQFHVZLOOEHJHQHUDWHG
19
Index
1. Consignes de sécurité ...................................................................... 20
2. Nomenclature ................................................................................... 20
&RQ¿JXUDWLRQG¶pFUDQ ....................................................................... 24
5pJOHUOHMRXUGHODVHPDLQHHWO¶KHXUH ............................................. 24
5. Fonctionnement................................................................................ 24
6. Minuterie........................................................................................... 26
7. Autres fonctions .............................................................................. 29
8. Sélection des fonctions................................................................... 30
)RQFWLRQQHPHQWG¶XUJHQFHGHODWpOpFRPPDQGHVDQV¿O ............... 34
10. Entretien et nettoyage .................................................................... 34
11. Guide de dépannage ...................................................................... 35
6SpFL¿FDWLRQVWHFKQLTXHV ............................................................... 37
Remarque :
Dans le présent manuel d’utilisation, l’expression “Télécommande filaire” fait référence au modèle PAR-21MAA.
Pour toute information relative à un autre modèle de télécommande, reportez-vous au livret d’instructions fourni dans la boîte de cette dernière.
1. Consignes de sécurité
Avant d’installer le climatiseur, lire attentivement toutes les
“Consignes de sécurité”.
Le “Consignes de sécurité” reprennent des points très
importants concernant la sécurité. Veillez bien à les suivre.
Veuillez consulter ou obtenir la permission votre compagnie
d’électricité avant de connecter votre système.
Symboles utilisés dans le texte
Avertissement:
Précautions à suivre pour éviter tout danger de blessure ou de
décès de l’utilisateur.
Précaution:
Décrit les précautions qui doivent être prises pour éviter d’endommager l’appareil.
Symboles utilisés dans les illustrations
: Indique un élément qui doit être mis à la terre.
Avertissement:
• Pour les appareils qui ne sont pas accessibles au public.
• Cet appareil ne doit pas être installé par l’utilisateur. Demander
au revendeur ou à une société agréée de l’installer. Si l’appareil n’
est pas correctement installé il peut y avoir un risque de fuite d’
eau, d’électrocution ou d’incendie.
• Ne pas marcher sur l’appareil ni y déposer des objets.
• Ne jamais éclabousser l’appareil ni le toucher avec des mains humides. Il pourrait en résulter un risque d’électrocution.
• Ne pas vaporiser de gaz inflammable à proximité de l’appareil
sous risque d’incendie.
• Ne pas placer de chauffage au gaz ou tout autre appareil fonctionnant
DYHFXQHÀDPPHYLYHOjRLOVHUDLWH[SRVpjO¶pFKDSSHPHQWG¶DLUGX
climatiseur. Cela risquerait de provoquer une mauvaise combustion.
• Ne pas retirer la face avant ou la protection du ventilateur de l’appareil extérieur pendant son fonctionnement.
• Ne jamais réparer ou déménager personnellement l’appareil.
• Si vous remarquez des vibrations ou des bruits particulièrement
anormaux, arrêter l’appareil, éteindre l’interrupteur et prendre
contact avec le revendeur.
• Ne jamais mettre des doigts, des bâtons, etc. dans les entrées et
sorties d’air.
• Si vous sentez des odeurs étranges, arrêter l’appareil, le mettre
hors tension et contacter le revendeur. Si vous ne procédez pas
de cette façon, il pourrait y avoir risque de panne, d’électrocution
ou d’incendie.
• Ne JAMAIS laisser des enfants ou des personnes handicapées
utiliser le climatiseur sans surveillance.
• Toujours surveiller que les jeunes enfants ne jouent pas avec le
climatiseur.
• Si le gaz de réfrigérant fuit, arrêter le fonctionnement du climatiseur, aérer convenablement la pièce et prendre contact avec le
revendeur.
• Lors de l’installation, du déplacement ou de l’entretien du climaWLVHXU Q¶XWLOLVH] TXH OH UpIULJpUDQW VSpFL¿p 5$ SRXU UHPSOLU
les tuyaux de réfrigérant. Ne pas le mélanger avec un autre réfrigérant et faire le vide d’air dans les tuyaux.
Si du réfrigérant est mélangé avec de l’air, cela peut provoquer
des pointes de pression dans les tuyaux de réfrigérant et entraîner une explosion et d’autres risques.
L’utilisation d’un réfrigérant différent de celui spécifié pour le
climatiseur peut entraîner des défaillances mécaniques, des dysfonctionnements du système ou une panne de l’appareil. Dans le
pire des cas, cela peut entraîner un obstacle à la mise en sécurité
du produit.
Précaution:
• Ne pas utiliser d’objet pointu pour enfoncer les boutons car cela
risquerait d’endommager la commande à distance.
• Ne jamais obstruer les entrées et sorties des appareils extérieurs
et intérieurs.
• Ne jamais nettoyer la télécommande avec du benzène, un chiffon
imbibé de diluant, etc.
• Ne pas laisser l’appareil fonctionner pendant une période prolongée
dans des conditions humides, par exemple avec une porte ou une
fenêtre ouverte. En mode de refroidissement, si l’appareil fonctionne
ORQJWHPSVGDQVXQHSLqFHKXPLGH5+GHRXSOXVO¶HDXFRQdensée à l’intérieur du climatiseur risque de tacher ou d’abîmer les
meubles, etc.
• Ne pas toucher l’ailette de sortie d’air supérieure ni le registre de
sortie d’air inférieur pendant le fonctionnement d’appareil. De la
condensation risquerait de se former d’appareil pourrait s’arrêter
de fonctionner.
5DQJHPHQWGHO¶DSSDUHLO
/RUVTXHYRXVGHYH]UDQJHUO¶DSSDUHLOYHXLOOH]FRQVXOWHUYRWUHUHYHQGHXU
2. Nomenclature
Unité interne
Vitesse du ventilateur
Modes
Ailette
Auto avec
variation
Louvre
Filtre
Témoin de nettoyage du
¿OWUH
PKFY-P·NBMU-E2
4 Vitesses
4 modes
PKFY-P·NHMU-E2
3 Vitesses+ Auto*
5 modes
PMFY-P·NBMU-E
4 Vitesses
4 modes
Manuel
Normal
Manuel
Normal
Manuel
Normal
KHXUHV
KHXUHV
KHXUHV
* &HWWHRSpUDWLRQQ¶HVWSRVVLEOHTX¶jO¶DLGHGHODWpOpFRPPDQGH
qui permet de régler la vitesse du ventilateur sur “Auto”.
20
2. Nomenclature
PMFY-P·NBMU-E
Plafonnier à Cassette 1 volets
Grille de reIRXOHPHQWG¶DLU
Air outlet
Ailette
Vane
Louvre
Louver
Filter
Filtre
$GPLVVLRQG¶DLU
Air inlet
3.)<3Â1+08(
Fixé au Mur
PKFY-P·NBMU-E2
Fixé au Mur
Filtre
Filter
$GPLVVLRQG¶DLU
Air intake
Vane
Louver Grille
Airde
outlet
reAilette
Louvre
IRXOHPHQWG¶DLU
Filtre
Filter
Louver
Louvre
$GPLVVLRQG¶DLU
Air intake
Air outlet
Grille
de reIRXOHPHQWG¶DLU
Vane
Ailette
21
2. Nomenclature
3RXUODWpOpFRPPDQGHj¿O
6HFWLRQGHO¶DI¿FKDJH
Témoin “Capteur”
6¶DI¿FKHORUVGHO¶XWLOLVDWLRQGXFDSWHXU
de la télécommande.
Jour de la semaine
Indique le jour de la semaine.
3RXU GHV EXWV H[SOLFDWLIV WRXV OHV
pOpPHQWVGHO¶DI¿FKDJHVRQWDI¿FKpV
/RUV GH O¶XWLOLVDWLRQ GH O¶DSSDUHLO VHXOV
OHVpOpPHQWVXWLOLVpVVHURQWDI¿FKpV
$I¿FKDJHKHXUHSURJUDPPDWHXU
Indicateur “Fonction de blocage”
$I¿FKHO¶KHXUHjPRLQVTXHOHSURJUDPPDWHXU
simple ou arrêt auto soit activé.
Si le programmateur simple ou arrêt auto est en
DFWLYpO¶DI¿FKDJHLQGLTXHOHWHPSVUHVWDQW
,QGLTXHTXHOHVERXWRQVGHODFRPPDQGHjGLVWDQFHRQWpWpEORTXpV
³7pPRLQ³1HWWR\HUOH¿OWUH´
Indique l’opération en cours
6¶DOOXPHTXDQGLOHVWWHPSVGHQHWWR\HUOH¿OWUH
0RQWUHOHPRGHGHIRWLRQQHPHQWHWF
OHVDI¿FKDJHVSHXYHQWrWUHHQ
plusieurs langues.
Témoins du programmateur
&HWpPRLQV¶DOOXPHTXDQGOHSURJUDPPDteur correspondant est en fonction.
Témoin “Commande centrale”
Indique que le fonctionnement de la
commande à distance a été désactivée par une commande maîtresse.
Témoin de vitesse du ventilateur
Montre la vitesse sélectionnée pour le ventilateur.
7pPRLQGHGLUHFWLRQGXÀX[G¶DLU
vertical
Témoin “Programmateur éteint”
Indique que le programmateur est éteint.
Ce témoin
indique dans quelle diUHFWLRQVRXIÀHO¶DLUVRUWDQW
Témoin “une heure seulement”
5pJODJHGHWHPSpUDWXUH
,QGLTXHODWHPSpUDWXUHVRXKDLWpH
6¶DI¿FKHVLOHFRXUDQWG¶DLUHVWUpJOp
VXUIDLEOHHWGHVFHQGDQWHQPRGH
)52,'RX6(&/¶RSpUDWLRQYDULHHQ
fonction du modèle.)
/HWpPRLQV¶pWHLQWDXERXWG¶XQHKHXUHHW
jFHPRPHQWOjOHÀX[G¶DLUFKDQJHaussi.
$I¿FKDJHGHWHPSpUDWXUHDPELDQWH
'RQQH OD WHPSpUDWXUH DPELDQWH /D SODJH
G¶DI¿FKDJH GH OD WHPSpUDWXUH GH OD SLqFH
HVW FRPSULVH HQWUH ± & )
/¶DI¿FKDJH FOLJQRWH VL OD WHPSpUDWXUH GHVFHQGDXGHVVRXVGH&)RXPRQWH
DXGHVVXVGH&)
Témoin de ventilation
$SSDUDvWTXDQGO¶XQLWpIRQFWLRQQHHQ
mode Ventilation.
$I¿FKDJHGXORXYUH
0RQWUHO¶DFWLRQGHODJULOOHGHWUDQVIHUW
1¶DSSDUDvWSDVVLODJULOOHUHVWHVWDWLRQnaire.
7pPRLQGHPDUFKH
,QGLTXHTXHO¶DSSDUHLOHVWHQPDUFKH
Section de commandes
Bouton ON/OFF
Boutons de réglage de température
Baisser
Bouton de vitesse du
ventilateur
Monter
Bouton de menu du
programmateur (Bouton de
contrôle/réglage minuterie)
%RXWRQGX¿OWUH
(Bouton )
Bouton de mode de
fonctionnement
%RXWRQG¶HQWUpH
Bouton de test de fonctionnement
%RXWRQ&KHFN
ERXWRQG¶HIIDFHPHQW
%RXWRQVGHUpJODJHKRUDLUH
Reculer
Avancer
Bouton de ventilation
montante/descendante
%RXWRQPDUFKHDUUrWGX
programmateur
(Bouton de réglage de la date)
Bouton de louvre
(Bouton opération
Ouvrir la
porte.
)
pour la précédente
opération
Bouton de ventilation
(ERXWRQRSpUDWLRQ )
Capteur de température intégré
SRXUO¶RSpUDWLRQVXLYDQWH
5HPDUTXH
Message “PLEASE WAIT” (VEUILLEZ PATIENTER)
&HPHVVDJHV¶DI¿FKHSHQGDQWPLQXWHVHQYLURQORUVTXHO¶DSSDUHLOLQWpULHXUHVWDOLPHQWpRXVXLWHjXQHFRXSXUHG¶pOHFWULFLWp
(FUDQFOLJQRWDQWDI¿FKDQWOHPRGHGHIRQFWLRQQHPHQW
Lorsque plusieurs appareils intérieurs sont connectés à un seul appareil extérieur et que le mode de fonctionnement sélectionne pour un appareil intérieur ne
FRUUHVSRQGSDVjFHOXLG¶XQDXWUHDSSDUHLOLQWpULHXUO¶pFUDQDI¿FKDQWOHPRGHGHIRQFWLRQQHPHQWFOLJQRWH6pOHFWLRQQHUOHPrPHPRGHGHIRQFWLRQQHPHQWSRXU
tous les appareils intérieurs.
Message “NOT AVAILABLE” (NON DISPONIBLE)
&HPHVVDJHV¶DI¿FKHTXDQGYRXVDSSX\H]VXUXQHWRXFKHSRXUODQFHUXQHIRQFWLRQTXLHVWLQGLVSRQLEOHSRXUFHWDSSDUHLOLQWpULHXU
/RUVTX¶XQHWpOpFRPPDQGHXQLTXHHVWXWLOLVpHSRXUIDLUHIRQFWLRQQHUSOXVLHXUVDSSDUHLOVLQWpULHXUVFHPHVVDJHV¶DI¿FKHVLO¶DSSDUHLOLQWpULHXUSULQFLSDOQHGLVSRVH
pas de la fonction sélectionnée.
$I¿FKDJHGHODWHPSpUDWXUHGHODSLqFH
3RXUPHVXUHUODWHPSpUDWXUHGHODSLqFHLOHVWSRVVLEOHG¶XWLOLVHUVRLWOHVFDSWHXUVG¶DSSDUHLOLQWpULHXUVRLWOHFDSWHXUGHODWpOpFRPPDQGH3DUGpIDXWODWHPSpUDWXUHHVW
PHVXUpHSDUOHVFDSWHXUVG¶DSSDUHLOLQWpULHXU/RUVTXHF¶HVWOHFDVODWHPSpUDWXUHGHODSLqFHPHVXUpHDXQLYHDXG¶DSSDUHLOLQWpULHXUSULQFLSDOHVWDI¿FKpHVXUODWpOpFRPmande utilisée pour le fonctionnement des différents appareils intérieurs.
22
2. Nomenclature
3RXUODWpOpFRPPDQGHVDQV¿O
Zone de transmission
Témoin de transmission
eFUDQG¶DI¿FKDJHGHODWpOpFRPPDQGH
Témoin de la minuterie
$GHV¿QVGHFODUL¿FDWLRQWRXVOHVpOpPHQWVTXLDSSDUDLVVHQWVXUO¶pFUDQG
DI¿FKDJHVRQWLOOXVWUpV
* Tous les éléments sont illustrés lorsque la
WRXFKH³5HVHW´5pLQLWLDOLVHUHVWVROOLFLWpH
Zones de fonctionnement
Bouton ON/OFF
Boutons de réglage de température
Bouton “Timer Off” (Arrêt de la minuterie)
Bouton de vitesse du ventilateur
0RGL¿HODYLWHVVHGXYHQWLODWHXU
%RXWRQ³7LPHU2Q´0DUFKHGHODPLQXWHULH
%RXWRQ³$LUÀRZ´'pELWG¶DLU0RGL¿HODGLUHFWLRQ
KDXWHEDVVHGXGpELWG¶DLU
Bouton “Hour” (Heure)
Bouton “Minute”
%RXWRQGHPRGH0RGL¿HOHPRGHGHIRQFWLRQQHPHQW
%RXWRQGHUpJODJHKRUDLUH3HUPHWGHUpJOHUO¶KHXUH
%RXWRQ&KHFN
Bouton de test de fonctionnement
%RXWRQGHORXYUH0RGL¿HODGLUHFWLRQJDXFKHGURLWH
GXGpELWG¶DLU
Bouton “Reset” (Réinitialiser)
,QVHUWLRQUHPSODFHPHQWGHODSLOH
3RXUXWLOLVHUODWpOpFRPPDQGHVDQV¿OSRLQWH]ODYHUVOHUpFHSWHXUGHO¶DSSDUHLOLQWpULHXU
6LODWpOpFRPPDQGHHVWXWLOLVpHGDQVOHVGHX[PLQXWHVTXLVXLYHQWO¶DOLPHQWDWLRQGHO¶DSSDUHLO
LQWpULHXUO¶DSSDUHLOSHXWpPHWWUHGHX[ELSVVXFFHVVLIVLQGLTXDQWTXHOHFRQWU{OHDXWRPDWLTXH
initial est en cours.
/¶DSSDUHLOLQWpULHXUpPHWGHVELSVSRXUFRQ¿UPHUTXHOHVLJQDOWUDQVPLVSDUODWpOpFRPPDQGHDpWp
UHoX/HVVLJQDX[SHXYHQWrWUHUHoXVMXVTX¶jIWPqWUHVHQYLURQHQOLJQHGURLWHjSDUWLUGH
O¶DSSDUHLOLQWpULHXUHWGDQVXQH]RQHGHYHUVODJDXFKHRXODGURLWHGHO¶DSSDUHLO&HSHQGDQW
XQHOXPLqUHYLYHRXÀXRUHVFHQWHSHXWJrQHUODUpFHSWLRQGHVLJQDX[GHO¶DSSDUHLOLQWpULHXU
/¶DSSDUHLO GRLW rWUH FRQWU{Op VL OH YR\DQW G¶RSpUDWLRQ SUqV GX UpFHSWHXU GH O¶XQLWp LQWpULHXUH
clignote. Consultez votre revendeur pour le service.
0DQLSXOH]ODWpOpFRPPDQGHDYHFSUpFDXWLRQ1HODIDLWHVSDVWRPEHUHWQHOXLLQÀLJH]SDVGH
FKRFVYLROHQWV'HSOXVpYLWH]GHPRXLOOHUODWpOpFRPPDQGHHWQHODODLVVH]SDVGDQVXQHQGURLWKXPLGH
3RXUpYLWHUGHFKHUFKHUODWpOpFRPPDQGHSODFH]OHVXSSRUWIRXUQLDYHFODWpOpFRPPDQGHVXU
XQPXUHWYHLOOH]jUHSODFHUODWpOpFRPPDQGHGDQVOHVXSSRUWDSUqVFKDTXHXWLOLVDWLRQ
5HWLUH]OHFRXYHUFOHVXSpULHXULQVpUH]GHX[
SLOHV$$$SXLVUHSRVHUOHFRXYHUFOH
1
2
Couvercle
supérieur
3
Deux piles AAA
,QVpUH]G¶DERUGOHS{OH
± QpJDWLI GH FKDTXH
pile. Insérez les piles en
respectant la polarité
LQGLTXpH±
$SSX\H]VXUODWRXFKH³5HVHW´5pLQLWLDOLVHU
$SSX\H] VXU OD WRXFKH
“Reset” (Réinitialiser)
DYHFXQREMHWGRQWO¶H[trémité est étroite.
23
&RQ¿JXUDWLRQG¶pFUDQ
<Types d’écrans>
/HSDUDPpWUDJHGHODODQJXHG¶DI¿FKDJHSHXWrWUHPRGL¿pSRXUTXHOHIUDQoDLV
devienne la langue par défaut en sélectionnant la fonction appropriée sur la
WpOpFRPPDQGH9R\H]ODVHFWLRQSDUDJUDSKH>@SRXUPRGL¿HUODODQJXH
/DODQJXHGHEDVHHVWO¶$QJODLV
5qJOHGDWHKHXUH
Sélection des fonctions
TIME SUN
Filtres de contrôle standards
ÛF
ÛF
ON
OFF
&RQ¿JXUDWLRQGXSURJUDPPDWHXU
Moniteur du programmateur
SUN MON TUE WED THU FRI SAT
MON
TIMER
OFF
ÛF
WEEKLY
WEEKLY
Sélection des fonctions:
5qJOH OHV IRQFWLRQV HW OHV SODJHV GLVSRQLEOHV
pour la télécommande (fonctions du programPDWHXUUHVWULFWLRQVGHIRQFWLRQQHPHQWHWF
5pJOHUGDWHKHXUH:
5qJOHOHMRXUGHODVHPDLQHHWO¶KHXUH
Écrans de contrôle standards:
Visualise et règle le fonctionnement du système de conditionnement.
Moniteur du programmateur: $I¿FKHOHSURJUDPPDWHXUHQSODFHKHEGRPDGDLUHVLPSOHRXDUUrWDXWRPDWLTXH
&RQ¿JXUDWLRQGXSURJUDPPDWHXU: Règle le fonctionnement des programmateurs
KHEGRPDGDLUHVLPSOHRXDUUrWDXWRPDWLTXH
<Comment changer d’écran>
Pour aller à : $SSX\HUVXUOHVERXWRQV0RGHHW2Q2IIGXSURJUDPPDteur durant 2 secondes.
Pour aller à : $SSX\H]VXUOHERXWRQ0HQXGXSURJUDPPDWHXU
Pour aller à : $SSX\H]VXUOHERXWRQ0RGHGHIRQFWLRQQHPHQW(QWUpH.
Pour aller à : $SSX\H]VXUO¶XQRXO¶DXWUHGHVERXWRQVGHUpJODJHKR).
raire ( ou
5pJOHUOHMRXUGHODVHPDLQHHWO¶KHXUH
Réglage du jour de la semaine
$I¿FKDJHGXMRXU
de la semaine et
GHO¶KHXUH
TIME SUN
ON/OFF
MENU
PAR-21MAA
MONITOR/SET
5pJODJHGHO¶KHXUH
ÛF
ÛF
TEMP.
BACK
TIME SUN
ON/OFF
FILTER
DAY
CHECK TEST
OPERATION
CLOCK
CLEAR
5HPDUTXH
Le jour et l’heure n’apparaîtront pas si l’horloge a été déconnectée dans la
sélection des fonctions.
1. $SSX\H]VXUOHERXWRQGHUpJODJHKRUDLUH
ou
SRXUDSSHOHUO
DI¿FKDJH .
2. $SSX\H]VXUOHERXWRQ Timer On/Off pour régler le jour.
* ¬FKDTXHIRLVTXHYRXVDSSX\H]YRXVDYDQFH]OHMRXUDI¿FKpHQ :
Dim
Lun
...
Ven
Sam.
3. $SSX\H]VXUOHERXWRQGHUpJODJHFRUUHVSRQGDQWD¿QGHUpJOHUO¶KHXUH
* /RUVTXH YRXV DSSX\H] VXU OH ERXWRQ OH UpJODJH KRUDLUH j ) augPHQWH WRXW G¶DERUG HQ LQWHUYDOOH G¶XQH PLQXWH SXLV HQ LQWHUYDOOH GH
PLQXWHVSXLVHQLQWHUYDOOHG¶XQHKHXUH
4. $SUqVDYRLUHIIHFWXpOHVUpJODJHVQpFHVVDLUHVGHVpWDSHVHWDSSX\H]VXUOHERXWRQ Filter pour valider ces informations.
5. Fonctionnement
ÛF
ÛF
ÛF
5.1. 0$5&+($55(7
<Pour commencer l’opération>
$SSX\H]VXUOHERXWRQ212)) .
• /HWpPRLQGHPDUFKHHWOD]RQHG¶DI¿FKDJHV¶DOOXPHQW
5HPDUTXH:
Quand l’unité est relancée, les réglages de base sont les suivants.
Réglages de télécommande
Mode
Réglage de température
Vitesse de ventilateur
Air montant/descendant
Dernier réglage
Dernier réglage
Dernier réglage
COOL or DRY 6RUWLHKRUL] *1
Dernier réglage *2
Mode HEAT
6RUWLHKRUL] *1
FAN
/DGHUQLqUHFRQ¿JXUDWLRQSHXWrWUHDSSOLTXpHVHORQOHW\SHG¶DSSDUHLOLQWpULHXU
'DQVOHFDVROHEDODQFHPHQWFRUUHVSRQGDXGHUQLHUUpJODJHOHÀX[G
DLUSHXW
rWUHGLULJpYHUVOHEDVUpJODJHHQIRQFWLRQGXW\SHGHO
DSSDUHLOLQWpULHXU
<Pour arrêter le fonctionnement>
$SSX\H]GHQRXYHDXVXUOHERXWRQ212))
.
• /HWpPRLQGHPDUFKHHWOD]RQHG¶DI¿FKDJHV¶pWHLJQHQW.
5HPDUTXH:
0rPH VL YRXV DSSX\H] VXU OH ERXWRQ 212)) LPPpGLDWHPHQW DSUqV DYRLU
arrêté la fonction en cours, le climatiseur ne se remettra en route que trois
minutes plus tard. Ceci est une précaution pour éviter l’endommagement de
tout composant interne.
5. Fonctionnement
5.2. Choix du mode
) $SSX\HU VXU OD WRXFKH GX PRGH GH IRQFWLRQQHPHQW (
SRXUVpOHFWLRQQHUOHPRGHGHIRQFWLRQQHPHQWVRXKDLWp
.
Mode de refroidissement
0RGHGHDVVqFKHPHQW
2. Lorsque la température de l’échangeur thermique est basse en mode de chauffage.
SDUH[LPPpGLDWHPHQWDSUqVOHODQFHPHQWGHO¶RSpUDWLRQGHFKDXIIDJH
(QPRGH&+$8))$*(TXDQGODWHPSpUDWXUHDPELDQWHGDQVODSLqFH
est supérieure à la température réglée.
4
XDQGO¶XQLWpHVWHQPRGH6(&
0RGHGHVRXIÀHULH
0RGHGHFKDXIIDJH
0RGHDXWRPDWLTXHUHIURLGLVVHPHQWFKDXIIDJH
Fonctionnement automatique
(Q IRQFWLRQ GH OD WHPSpUDWXUH Gp¿QLH SUpDODEOHPHQW O¶RSpUDWLRQ GH UHIURLGLVVHPHQWGpEXWHUDVLODWHPSpUDWXUHGHODSLqFHHVWWURSpOHYpHjO¶LQYHUVHO
RSpUDWLRQGHFKDXIIDJHGpEXWHUDVLODWHPSpUDWXUHGHODSLqFHHVWWURSEDVVH
(Q PRGH GH IRQFWLRQQHPHQW DXWRPDWLTXH OH FOLPDWLVHXU SDVVHUD HQ PRGH
GHUHIURLGLVVHPHQWVLODWHPSpUDWXUHGHODSLqFHYDULHHWDI¿FKH&°F
RXSOXVDXGHVVXVGHODWHPSpUDWXUHGp¿QLHSHQGDQWPLQXWHV'HODPrPH
IDoRQ OH FOLPDWLVHXU SDVVHUD HQ PRGH GH FKDXIIDJH VL OD WHPSpUDWXUH GH OD
SLqFHDI¿FKH&°FRXSOXVDXGHVVRXVGHODWHPSpUDWXUHGp¿QLHSHQdant 3 minutes.
Mode de refroidissement
5HPDUTXH:
Le nombre de ventilateurs disponible dépend du type d’unité connectée.
Notez aussi que certaines unités ne permettent que le réglage “Auto”.
Dans les cas suivants, la vitesse de ventilation actuelle générée par l’unité
différera de la vitesse indiquée au niveau de la commande à distance.
1. 4XDQGO¶DI¿FKDJHLQGLTXH³$77(17(´RX³'(*,95(´
3 minutes (passage du mode de
FKDXIIDJHDXPRGHGHUHIURLGLVVHment)
7HPSpUDWXUHGp¿QLH&3°F
Ŷ5pJODJHDXWRPDWLTXHGHODYLWHVVHGXYHQWLODWHXUSRXUWpOpFRPPDQGHVDQV¿O
,OIDXWUpJOHUODWpOpFRPPDQGHVDQV¿OXQLTXHPHQWORUVTXHODYLWHVVHGXYHQWLODWHXU
Q¶HVWSDVDXWRPDWLTXHPHQWUpJOpHSDUGpIDXW
,OQ¶HVWSDVQpFHVVDLUHGHUpJOHUODYLWHVVHDXWRPDWLTXHGXYHQWLODWHXUSDUGpIDXW
VXUODWpOpFRPPDQGHDYHF¿O
$SSX\HUVXUOHERXWRQ6(7jO¶DLGHG¶XQREMHWSRLQWX
,QWHUYHQLUORUVTXHO¶DI¿FKDJHGHODWpOpFRPPDQGHHVWpWHLQW
MODEL SELECT FOLJQRWHHWOH1RGHPRGqOHHVWDOOXPp.
.
$SSX\HUVXUODWRXFKH$8726723
FOLJQRWHHWOH1RGHFRQ¿JXUDWLRQHVWDOOXPp.
&RQ¿JXUDWLRQ1RVDQVYLWHVVHDXWRPDWLTXHGXYHQWLODWHXU
SRXUUpJOHUODFRQ¿JXUDWLRQ1R
$SSX\HUVXUOHVWRXFKHVWHPS.
&RQ¿JXUDWLRQ1RDYHFYLWHVVHDXWRPDWLTXHGXYHQWLODWHXU
6L O¶RSpUDWLRQ HVW HUURQpH DSSX\HU VXU OD WRXFKH 212))
commencer à partir du point .
7HPSpUDWXUHGp¿QLH
7HPSpUDWXUHGp¿QLH&3°F
et re-
$SSX\HUVXUOHERXWRQ6(7jO¶DLGHG¶XQREMHWSRLQWX
MODEL SELECT HWOH1RGHPRGqOHV¶DOOXPHSHQGDQWVHFRQGHVSXLVV¶pWHLQW
3 minutes (passage du mode de
refroidissement au modeGHFKDXIIDJH
La température de la pièce étant ajustée automatiquement de façon
j UHVWHU VWDEOH O¶RSpUDWLRQ GH UHIURLGLVVHPHQW VH PHW HQ PDUFKH j
TXHOTXHV GHJUpV DXGHVVXV HW O¶RSpUDWLRQ GH FKDXIIDJH j TXHOTXHV
GHJUpV DXGHVVRXV GH OD WHPSpUDWXUH Gp¿QLH ORUVTXH FHWWH GHUQLqUH
HVWDWWHLQWHIRQFWLRQDXWRPDWLTXHG¶pFRQRPLHG¶pQHUJLH
MODEL SELECT
ON/OFF
TEMP
5.3. 5pJODJHGHODWHPSpUDWXUH
Pour réduire la température ambiante:
$SSX\HUVXUOHERXWRQ
pour sélectionner la température désirée.
/DWHPSpUDWXUHVpOHFWLRQQpHHVWDI¿FKpH.
MODE
FAN
AUTO STOP
VANE
AUTO START
CHECK LOUVER
• Plages de températures à votre disposition:
5DIUDLFKLVVHPHQWHW$VVqFKHPHQW &)
&KDXIIDJH
&)
Automatique
&)
• 8 &)RX39 &)FOLJQRWHVXUO¶DI¿FKDJHSRXULQGLTXHUTXH
la temérature de la pièFH HVW SOXV EDVVH RX SOXV élevée que la tempéUDWXUHDI¿FKée.
5pJODJHGHODYLWHVVHGXYHQWLODWHXU
4 vitesses
+
Speed
2 2
Vitesses
Speed
3 3
Vitesses
Vitesses 1
Vitesses 2
Vitesses 3
Vitesses 2
Vitesses 3
$I¿FKDJH
Bascule
Swing
Modèle 5
modes *1
Auto
Bascule
Swing
1
1
(Horiz.)
2
2
3
5
4
3
4
Auto
Auto
Auto *
Vitesses 1
<3RXUFKDQJHUODGLUHFWLRQGHO¶DLUPRQWDQWGHVFHQGDQW>
4XDQGO¶XQLWpHVWHQIRQFWLRQDSSX\H]VXUOHERXWRQ de ventilation
montante/descendante autant de fois que nécessaire.
• ¬FKDTXHIRLVTXHYRXVDSSX\H]VXUOHERXWRQYRXVFKDQJH]ODGLUHFWLRQ/DGLUHFWLRQDFWXHOOHHVWDI¿FKpHVXU.
• /DVpTXHQFHGHFKDQJHPHQWHWOHVUpJODJHVGLVSRQLEOHVVRQWOHVVXLYDQWV
modes
Speed 4 4
Vitesses
Auto *
3 vitesses
+
CLOCK
5.5. 5pJODJHGHODGLUHFWLRQGXGpELWG¶DLU
Modèle 4
$I¿FKDJH
Speed
11
Vitesses
RESET
DéELWG¶DLU
$SSX\H]VXUOHERXWRQGHYLWHVVHGXYHQWLODWHXU autant de fois que
nécessaire alors que le système est en fonction.
• ¬ FKDTXH IRLV TXH YRXV DSSX\H] VXU OH ERXWRQ YRXV FKDQJH] OD
force. La vitesse actuelle est indiquée en .
• /DVpTXHQFHGHFKDQJHPHQWHWOHVUpJODJHVGLVSRQLEOHVVRQWOHVVXLYDQWV
Vitesse du
ventilateur
SET
h
min
TEST RUN
Pour augmenter la température ambiante:
$SSX\HUVXUOHERXWRQ
pour sélectionner la température désirée.
/DWHPSpUDWXUHVpOHFWLRQQpHHVWDI¿FKpH.
Vitesses 4
Modèle 4
vitesses
* 1RWH]TXHORUVGHO¶RSpUDWLRQGHEDVFXOHPHQWO¶LQGLFDWLRQGLUHFWLRQQHOOH
jO¶pFUDQQHFKDQJHSDVHQV\QFKURQLVDWLRQDYHFOHVDLOHWWHVGHO¶XQLWp
&HUWDLQVPRGqOHVQ¶DFFHSWHQWSDVOHVUpJODJHVGLUHFWLRQQHOV
8QLTXHPHQWSRXUODWpOpFRPPDQGH0$O
DI¿FKDJHGHO
DXWUHWpOp
commande est similaire au modèle à 4 étapes.
3.)<3Â1%08(Q
DDXFXQH[SRVLWLRQGXEDVFXOH
5pJODJHGHODGLUHFWLRQGXGpELWG¶DLU$XWR!
&22/)$1'5<5pJODJH+RUL]RQWDO+($75pJODJH9HUV
OHEDV
* Uniquement pour la télécommande MA. Le réglage de vitesse de
YHQWLODWHXUDXWRPDWLTXHHVWQpFHVVDLUHSRXUODWpOpFRPPDQGHVDQV¿O
25
5. Fonctionnement
5HPDUTXH:
Les directions disponibles dépendent du type d’unités connectées. Notez
aussi que certaines unités ne permettent que le réglage “Auto”.
Dans les cas suivants, la direction actuelle de l’air différera de la direction
indiquée au niveau de la commande à distance.
4XDQGO¶DI¿FKDJHLQGLTXH³$77(17(´RX³'(*,95(´
,PPpGLDWHPHQWDSUqVOHGpPDUUDJHGXPRGH&+$8))$*(DORUVTXHOH
V\VWqPHDWWHQGTXHOHFKDQJHPHQWGHPRGHVHIDVVH
3. En mode chauffage, quand la température ambiante dans la pièce est
supérieure à la température réglée.
<[Manuel@3RXUPRGL¿HUODGLUHFWLRQJDXFKHGURLWHGXÀX[G¶DLU!
,OHVWLPSRVVLEOHG¶XWLOLVHUOHERXWRQGXGpÀHFWHXU.
• $UUrWHU O¶DSSDUHLO PDLQWHQLU OH GpIOHFWHXU GH
O
DSSDUHLOHWDMXVWHUODGLUHFWLRQVRXKDLWpH
* 1HSDVUpJOHUODGLUHFWLRQLQWHUQHORUVTXHO¶DSSDUHLO
HVWHQPRGHUHIURLGLVVHPHQWRXGpVKXPLGL¿FDWLRQ
FDULO\DXQULVTXHGHFRQGHQVDWLRQRXG
pJRXWWHPHQW
Précaution:
Lorsque vous suivez le processus ci-dessus, prenez des précautions
pour éviter toute chute.
5.6. Ventilation
Pour les appareils combinés LOSSNAY
5.6.1. 3RXUODWpOpFRPPDQGHj¿O
3RXUODQFHUOHYHQWLODWHXUFRQMRLQWHPHQWjO¶XQLWpLQWpULHXUH:
$SSX\H]VXUOHERXWRQ212))
.
• 4XDQG O¶LQGLFDWLRQ GH YHQWLODWLRQ DSSDUDvW j O¶pFUDQ HQ ). Le ventilateur sera
GpVRUPDLVODQFpDXWRPDWLTXHPHQWjFKDTXHIRLVTXHO¶XQLWpLQWpULHXUHGpPDUUHUD
3RXUODQFHUOHYHQWLODWHXUXQLTXHPHQWTXDQGO¶XQLWpLQWpULHXUHHVWpWHLQWH:
$SSX\H]VXUOHERXWRQGHYHQWLODWLRQTXDQGO¶XQLWpLQWpULHXUHHVWpWHLQWH
• Le témoin ON (en HWO¶LQGLFDWLRQGHYHQWLODWLRQHQV¶DOOXPHQW
&KDQJHUODIRUFHGXYHQWLODWHXU:
$SSX\H]VXUOHERXWRQGHYHQWLODWLRQ autant que nécessaire
• ¬FKDTXHIRLVTXHYRXVDSSX\H]VXUOHERXWRQYRXVFKDQJH]OH
réglage comme indiqué ci-dessous.
No
display
3DVG¶DI¿FKDJH
(Stop)
)DLEOH
(Low)
(Forte)
(High)
(OFF)
5HPDUTXH
'DQVFHUWDLQHVFRQ¿JXUDWLRQVOHYHQWLODWHXUGHO¶XQLWpLQWpULHXUH
peut s’allumer même quand vous demandez au ventilateur de
fonctionner indépendamment.
6. Minuterie
6.1. 3RXUODWpOpFRPPDQGHj¿O
Vous pouvez utiliser la sélection des fonctions pour sélectionner le type
GHSURJUDPPDWHXUHQWUHOHVWURLVGLVSRQLEOHV
+HEGRPDGDLUH
6LPSOHRX Arrêt auto.
6.1.1. Minuterie hebdomadaire
/H SURJUDPPDWHXU KHEGRPDGDLUH SHXW VHUYLU j UpJOHU OHV KXLW RSpUDWLRQVSRXUFKDTXHMRXUGHODVHPDLQH
• &KDTXH RSpUDWLRQ SHUPHW O¶XQH RX O¶DXWUH GHV IRQFWLRQV VXLYDQWHV
3URJUDPPDWHXU 0DUFKH$UUrW DYHF XQ UpJODJH GH WHPSpUDWXUH RX
SURJUDPPDWHXU0DUFKH$UUrWVHXOHPHQWRXUpJODJHGHWHPSpUDWXUH
seulement.
• ¬O¶KHXUHGLWHOHFRQGLWLRQQHXUG¶DLUHIIHFWXHO¶DFWLRQSURJUDPPpH
/DSUpFLVLRQKRUDLUHGHFHSURJUDPPDWHXUHVWGHPLQXWH
5HPDUTXH:
*1. /HV SURJUDPPDWHXUV KHEGRPDGDLUHVLPSOH$UUrW DXWR QH SHXvent être utilisés en même temps.
*2. Le programmateur hebdomadaire ne fonctionne pas dans les
conditions suivantes.
La fonction de temporisateur est désactivée; le système est dans
un état anormal; une exécution de test est en cours; la télécommande est soumise à un auto-diagnostic ou à un diagnostic exWHUQHO¶XWLOLVDWHXUHVWHQWUDLQGHGp¿QLUXQHIRQFWLRQO¶XWLOLVDWHXU
est en train de régler le temporisateur; l’utilisateur est en train de
régler l’heure ou le jour de la semaine; le système est sous comPDQGHFHQWUDOLVpH3UpFLVpPHQWOHV\VWqPHQ¶H[pFXWHSDVOHV
RSpUDWLRQVDOOXPDJHH[WLQFWLRQRXUpJODJHGHODWHPSpUDWXUH
GpVDFWLYpHVGDQVFHVVLWXDWLRQV
<Comment régler le programmateur hebdomadaire>
1. $VVXUH]YRXVTXHYRXVrWHVVXUO¶pFUDQGHFRQWU{OHVWDQGDUGHWTXH
OHWpPRLQGXSURJUDPPDWHXUKHEGRPDGDLUHLV¶DI¿FKH
2. $SSX\H]VXUOHERXWRQ0HQXGXSURJUDPPDWHXU
GHPDQLqUHjFHTXHOH
³5pJODJH´DSSDUDLVVHjO¶pFUDQHQ
1RWH]TX¶jFKDTXHIRLVTXHYRXVDSSX\H]VXUOHERXWRQYRXVSDVVH]GH³5pJODJH´j³0RQLWHXU´PRQLWHXU
3. $SSX\H] VXU OH ERXWRQ 2Q2II GX SURJUDPPDWHXU pour régler le
MRXU¬FKDTXHIRLVTXHYRXVDSSX\H]YRXVFKDQJH]OHUpJODJHHQ
selon la séquence suivante : “Dim Lun Mar Mer Jeu Ven Sam” “Dim”
...
“Ven”
“Sam”
“Dim Lun Mar Mer Jeu Ven Sam”...
4. $SSX\H]VXUOHERXWRQ ou G¶RSpUDWLRQ ou autant de fois que
QpFHVVDLUHSRXUVpOHFWLRQQHUOHQXPpURG¶RSpUDWLRQDSSURSULpj.
* 9RVFKRL[DX[pWDSHVHWVpOHFWLRQQHURQWO¶XQHGHVFHOOXOHVGHOD
PDWULFHDI¿FKpHFLGHVVRXV
O¶DI¿FKDJHGHODFRPPDQGHjGLVWDQFHjJDXFKHPRQWUHFRPPHQW
O¶DI¿FKDJHGHYUDLWDSSDUDvWUHORUVGXUpJODJHGHO¶RSpUDWLRQSRXU
GLPDQFKHDX[YDOHXUVLQGLTXpHVFLGHVVRXV
Matrice de réglage
1G¶RS
No. 1
No. 2
Sunday
• 8:30
• ON
• 73°F
• 10:00
• OFF
Monday
• 10:00
• OFF
…
• 10:00
• OFF
Saturday
• 10:00
• OFF
…
No. 8
N°
de fonctionnement
Operation
No.
du jour
Day Setting
Réglage
5pJODJHGHO¶RSpUDWLRQSRXUGLPDQFKH!
'pPDUUHUOHFRQGLWLRQQHXUG¶DLUjDYHF
la température à 73 °F.
SUN
ON
ÛF
WEEKLY
TEMP.
MENU
BACK
PAR-21MAA
MONITOR/SET
ON/OFF
ON/OFF
FILTER
DAY
CHECK TEST
OPERATION
CLOCK
CLEAR
5HPDUTXH:
En réglant le jour sur “Dim Lun Mar Mer Jeu Ven Sam”, vous pouvez régler la même opération à effectuer au même moment tous les
MRXUV([HPSOH/¶RSpUDWLRQFLGHVVXVTXLHVWODPrPHSRXUWRXV
OHVMRXUVGHODVHPDLQH
$I¿FKHO¶RSpUDWLRQFKRLVLH0DUFKHRX$UUrW
1¶DSSDUDvWSDVVLO¶RSpUDWLRQQ¶HVWSDVUpJOpH
$I¿FKHOHUpJODJH
GHO¶KHXUH
SUN
ON
ÛF
WEEKLY
26
5pJODJHGHO¶RSpUDWLRQSRXUWRXVOHVMRXUV!
eWHLQGUHOHFRQGLWLRQQHXUG¶DLUj
$I¿FKHOHUpJODJHGHODWHPSpUDWXUH
1¶DSSDUDvW SDV VL OD WHPSpUDWXUH Q
est pas réglée.
6. Minuterie
<5pJOHUOHSURJUDPPDWHXUKHEGRPDGDLUH>
5. $SSX\H]VXUOHERXWRQGHUpJODJHGHO¶KHXUH approprié autant de
IRLVTXHQpFHVVDLUHSRXUUpJOHUO¶KHXUHFKRLVLHHQ).
* 4XDQG YRXV PDLQWHQH] OH ERXWRQ DSSX\p O¶KHXUH DXJPHQWHUD G¶DERUG
WRXWHVOHVPLQXWHVSXLVWRXWHVOHVPLQXWHVSXLVWRXWHVOHVKHXUHV
6. $SSX\H] VXU OH ERXWRQ 212)) SRXU VpOHFWLRQQHU O¶RSpUDWLRQ
FKRLVLH0DUFKHRX$UUrWPDUFKHRXDUUrWHQ.
¬FKDTXHIRLVTXHYRXVDSSX\H]YRXVSDVVH]DXUpJODJHVXLYDQW
VHORQODVpTXHQFHVXLYDQWHDXFXQDI¿FKDJHSDVGpUpJODJH
“MARCHE”
“ARRET”
7. $SSX\H]VXUOHERXWRQGHUpJODJHGHWHPSpUDWXUH approprié pour
UpJOHUODWHPSpUDWXUHFKRLVLHHQ).
* ¬FKDTXHIRLVTXHYRXVDSSX\H]YRXVFKDQJH]OHUpJODJHVHORQOD
VpTXHQFHVXLYDQWHDXFXQDI¿FKDJHSDVGHUpJODJH
75
77
...
...
SDVG¶DI¿FKDJH
84
87
53
73
3ODJHGLVSRQLEOH/DSODJHGLVSRQLEOHSRXUFHUpJODJHYDGH&)j
&)/DSODJHUpHOOHDXGHOjGHODTXHOOHODWHPSpUDWXUHSHXWrWUH
conWU{OpHWRXWHIRLVSHXWFKDQJHUHQIRQFWLRQGXW\SHG¶XQLWpFRQQHFWpH
8. $SUqV DYRLU HIIHFWXp OHV UpJODJHV QpFHVVDLUHV GHV pWDSHV HW DSSX\H]VXUOHERXWRQ Filter pour valider ces informations.
3RXU HIIDFHU OHV YDOHXUV DFWXHOOHV GH O¶RSpUDWLRQ FKRLVLH DSSX\H] HW
UHOkFKH]UDSLGHPHQWOHERXWRQ&KHFN&OHDUXQHIRLV
* /H UpJODJH GX WHPSV DIILFKp GHYLHQW ³²²´ HW OHV UpJODJHV GH
WHPSpUDWXUHHW2Q2IIV¶pWHLJQHQWWRXV
3RXUHIIDFHUWRXVOHVUpJODJHVGXSURJUDPPDWHXUKHEGRPDGDLUH
G¶XQFRXSDSSX\H]VXUOHERXWRQ&KHFN&OHDUSHQGDQW
secondes ou plus. /¶DI¿FKDJHFRPPHQFHjFOLJQRWHULQGLTXDQWTXH
tous les réglages ont été effacés.)
5HPDUTXH
Vos nouvelles informations seront effacées si vous appuyez sur le
bouton 0RGHGHIRQFWLRQQHPHQW(QWUpHDYDQWG¶DSSX\HUVXUOH
bouton Filter .
Si vous avez réglé deux opérations différentes ou plus pour le même temps
exactement, seule l’opération ayant le n °le plus élevé sera effectuée.
6.1.2. Minuterie simple
9RXVSRXYH]UpJOHUOHSURJUDPPDWHXUVLPSOHGHWURLVPDQLqUHVSRVVLEOH
• Heure de démarrage uniquement:
/HFRQGLWLRQQHXUG¶DLUGpPDUUHTXDQGOHWHPSVLQGLTXpV¶HVWpFRXOp.
• +HXUHG¶DUUrWXQLTXHPHQW:
/HFRQGLWLRQQHXUG¶DLUV¶DUUrWHTXDQGOHWHPSVLQGLTXpV¶HVWpFRXOp
• +RUDLUHVGHPDUFKHG¶DUUrW:
/HFRQGLWLRQQHXUG¶DLUGpPDUUHHWV¶DUUrWHTXDQGOHVWHPSVLQGLTXpV
se sont écoulés.
Le programmateur simple (démarrage et arrêt) peut être régler une
IRLVVHXOHPHQWVXUXQHSpULRGHGHKHXUHV
/HUpJODJHVHIDLWKHXUHSDUKHXUH
5HPDUTXH:
*1. /HV SURJUDPPDWHXUV KHEGRPDGDLUHVLPSOH$UUrW DXWR QH SHXvent être utilisés en même temps.
*2. Le programmateur simple n’opérera pas quand l’une des
conditions suivantes est en fonction.
La fonction programmateur est éteinte; anomalie du système;
un test est en cours; la commande à distance effectue un autotest ou un diagnostic; l’utilisateur est en train de sélectionner
une fonction; l’utilisateur est en train de régler le programmaWHXUOHV\VWqPHHVWVRXVFRQWU{OHFHQWUDO'DQVFHVFRQGLWLRQVO¶RSpUDWLRQ0DUFKH$UUrWHVWGpVDFWLYpH
Hr
SIMPLE
TEMP.
MENU
BACK
9. Répétez les étapes 3 à 8 autant de fois que nécessaire pour remplir
OHVFHOOXOHVGLVSRQLEOHVTXHYRXVVRXKDLWH]
10.$SSX\H]VXUOHERXWRQ Mode de fonctionnement (Retour) pour reveQLUjO¶pFUDQGHFRQWU{OHVWDQGDUGHWWHUPLQHUODSURFpGXUHGHUpJODJH
11.3RXUDFWLYHUOHSURJUDPPDWHXU DSSX\H] VXU OH ERXWRQ 7LPHU 2Q2II
SURJUDPPDWHXU 0DUFKHDUUrW GH PDQLqUH j FH TXH O¶LQGLFDWLRQ
³7LPHU2II´DUUrWSURJUDPPDWHXUGLVSDUDLVVHGHO¶pFUDQVeillez à ce
TXHO¶LQGLFDWLRQ³7LPHU2II´QHV¶DI¿FKHSOXV
* 6L OH SURJUDPPDWHXU Q¶HVW SDV UpJOp O¶LQGLFDWHXU © 7LPHU 2II ª
FOLJQRWHVXUO¶pFUDQ
<Comment visualiser les réglages du programmateur hebdomadaire>
ON
AFTER
PAR-21MAA
MONITOR/SET
ON/OFF
ON/OFF
FILTER
DAY
CHECK TEST
OPERATION
CLOCK
CLEAR
<Comment régler le programmateur simple>
Réglage du programmateur
Hr
ON
AFTER
Réglage du programmateur
SIMPLE
$FWLRQ0DUFKHRX$UUrW
³ ²²´V¶DI¿FKHV¶LOQ¶\
a pas de réglage.
SUN
TIMER
ON
OFF
ÛF
WEEKLY
1. $VVXUH]YRXV TXH O¶LQGLFDWLRQ GX SURJUDPPDWHXU KHEGRPDGDLUH DSSDUDLVVHjO¶pFUDQHQ).
2. $SSX\H]VXUOHERXWRQ0HQXGXSURJUDPPDWHXU
GHPDQLqUHjFH
TXHO¶pFUDQDI¿FKH³0RQLWHXU´HQ).
3. $SSX\H] VXU OH ERXWRQ 0DUFKH$UUrW GX SURJUDPPDWHXU WDQW TX¶LO
IDXWSRXUFKRLVLUOHMRXU
4. $SSX\H]VXUOHERXWRQ ou G¶RSpUDWLRQ ou autant que nécesVDLUHSRXUFKDQJHUO¶RSpUDWLRQGXSURJUDPPDWHXUjO¶DI¿FKDJHHQ).
* ¬FKDTXHIRLVTXHYRXVDSSX\H]YRXVSDVVH]jO¶RSpUDWLRQGXSURJUDPPDWHXUVXLYDQWHGDQVO¶RUGUHGXUpJODJHKRUDLUH
5. 3RXU IHUPHU OH PRQLWHXU HW UHWRXUQHU j O¶pFUDQ GH FRQWU{OH VWDQGDUG
DSSX\H]VXUOHERXWRQ0RGHGHIRQFWLRQQHPHQW(QWUpH.
<Pour éteindre le programmateur hebdomadaire>
$SSX\H]VXUOHERXWRQ0DUFKH$UUrWGXSURJUDPPDWHXUGHPDQLqUHj
FHTXHO¶LQGLFDWLRQ³DUUrWSURJUDPPDWHXU´DSSDUDLVVHHQ .
TIME SUN
ÛF
ÛF
WEEKLY
<Pour allumer le programmateur hebdomadaire>
$SSX\H]VXUOHERXWRQ0DUFKH$UUrWGXSURJUDPPDWHXUGHPDQLqUHj
FHTXHO¶LQGLFDWLRQ³DUUrWSURJUDPPDWHXU´V¶pWHLJQHHQ .
TIME SUN
ÛF
ÛF
1. $VVXUH]YRXV TXH YRXV rWHV VXU XQ pFUDQ GH FRQWU{OH VWDQGDUG HW
TXHOHWpPRLQGXSURJUDPPDWHXUVLPSOHV¶DI¿FKHHQ).
/RUVTXHTX¶XQHIRQFWLRQDXWUHTXHOHWHPSRULVDWHXUVLPSOHHVWDI¿FKpH
réglez la télécommande sur SIMPLE TIMER en utilisant le paramètre
GHIRQFWLRQWHPSRULVDWHXUGHODVpOHFWLRQGHVIRQFWLRQVYRLU>@
2. $SSX\H] VXU OH ERXWRQ 0HQX GH PDQLqUH j FH TXH OH ³5pJODJH´
DSSDUDLVVH j O¶pFUDQ HQ 1RWH] TX¶j FKDTXH IRLV TXH YRXV DSSX\H]VXUOHERXWRQYRXVSDVVH]GH³5pJODJH´j³0RQLWHXU´
3. $SSX\H] VXU OH ERXWRQ 212)) SRXU DI¿FKHU OH UpJODJH GX SURJUDPPDWHXU VLPSOH 0DUFKH RX $UUrW PDUFKH RX DUUrW $SSX\H]
XQH IRLV VXU OH ERXWRQ SRXU DI¿FKHU OH WHPSV UHVWDQW VXU 0DUFKH HW
XQH IRLV HQFRUH SRXU DI¿FKHU OH WHPSV UHVWDQW VXU $UUrW O¶LQGLFDWLRQ
0DUFKH$UUrWDSSDUDvWHQ).
• 3URJUDPPDWHXU³0DUFKH´:
/H FRQGLWLRQQHXU G¶DLU GpPDUUH TXDQG OH QRPEUH G¶KHXUHV LQGLTXp
V¶HVWpFRXOp
• Programmateur “Arrêt”:
/H FRQGLWLRQQHXU G¶DLU V¶DUUrWH TXDQG OH QRPEUH G¶KHXUHV LQGLTXp
V¶HVWpFRXOp
4. $YHFO¶LQGLFDWLRQ³0DUFKH´RX³$UUrW´HQ$SSX\H]VXUOHERXWRQGHUpJODJH
G¶KHXUH DSSURSULp DXWDQW GH IRLV TXH QpFHVVDLUH SRXU UpJOHU O¶KHXUH VXU
0DUFKHVL³0DUFKH´V¶DI¿FKHRXVXU$UUrWVL³$UUrW´V¶DI¿FKHHQ).
• 3ODJHGLVSRQLEOHjKHXUHV
5. 3RXUUpJOHUjODIRLVSRXU0DUFKHHWSRXU$UUrWUpSpWHUOHVpWDSHVHW
* 1RWH]TXHOHVWHPSVSRXU0DUFKHHW$UUrWQHSHXYHQWDYRLUODPrPHYDOHXU
6. 3RXU HIIDFHU OH UpJODJH 0DUFKH RX $UUrW DFWXHO $I¿FKHU OH UpJODJH
0DUFKH RX $UUrW YRLU pWDSH SXLV DSSX\HU VXU OH ERXWRQ &KHFN
(Clear) de manière à ce que le réglage passe à “—” en . (Si vous
VRXKDLWH] XWLOLVHU XQ UpJODJH 0DUFKH RX$UUrW XQLTXHPHQW DVVXUH]
YRXVTXHOHUpJODJHGRQWYRXVQHYRXOH]SDVHVWELHQVXU³²´
WEEKLY
27
6. Minuterie
7. $SUqVDYRLUHIIHFWXpOHVpWDSHVjDSSX\H]VXUOHERXWRQ Filter
pour valider ces informations.
5HPDUTXH:
Vos nouvelles informations seront effacées si vous appuyez sur le
bouton 0RGHGHIRQFWLRQQHPHQW(QWUpHDYDQWG¶DSSX\HUVXUOH
bouton Filter .
Example 2:
/DQFHUOHSURJUDPPDWHXUDYHFO¶KHXUHG¶DUUrWUpJOpHDYDQWO¶KHXUHGHGpPDUUDJH
5pJODJH0DUFKH : 5 KHXUHV
Réglage Arrêt
: 2 KHXUHV
Au démarrage du programmateur
Hr
AFTER OFF
$I¿FKHOHUpJODJHG¶DUUrWGXSURJUDPPDWHXUOHV
KHXUHVUHVWDQWDYDQWO¶DUUrW
ÛF
ÛF
SIMPLE
8. $SSX\H] VXU OH ERXWRQ Mode de fonctionnement (Entrée) pour reWRXUQHUjO¶pFUDQGHFRQWU{OHVWDQGDUG
9. $SSX\H]VXUOHERXWRQ0DUFKH$UUrWGXSURJUDPPDWHXU pour lancer
OHFRPSWHjUHERXUV3HQGDQWTXHOHSURJUDPPHV¶H[pFXWHO¶DI¿FKDJH
LQGLTXHO¶pWDWGXSURJUDPPDWHXUVeillez à ce que la valeur du programmateur soit visible et convenable.
Hr
KHXUHVDSUqVOHGpPDUUDJHGXSURJUDPPDWHXU
ON
AFTER
O¶$I¿FKDJHFKDQJHSRXUPRQWUHUOHUpJODJH
GHGpPDUUDJHGXSURJUDPPDWHXUOHVKHXUHV
restant avant le démarrage).
/¶DI¿FKDJHLQGLTXHO¶KRUDLUHGHODPDQLqUHVXLYDQWH0$5&+(KHXUHV±$55Ç7KHXUHV
KHXUHV
SIMPLE
<$I¿FKHUOHVUpJODJHVDFWXHOVGXSURJUDPPDWHXUVLPSOH>
Réglage du programmateur
KHXUHVDSUqVOHGpPDUUDJHGXSURgrammateur
ÛF
ÛF
SIMPLE
TIMER
Hr
/HFOLPDWLVHXUV¶DOOXPHHWIRQFWLRQQHMXVTX¶jFH
TX¶LOVRLWpWHLQW
ON
AFTER OFF
SIMPLE
1. $VVXUH]YRXVTXHO¶LQGLFDWLRQGXSURJUDPPDWHXUVLPSOHDSSDUDLVVHj
O¶pFUDQVXU).
2. $SSX\H]VXUOHERXWRQ0HQX
GHPDQLqUHjFHTXHOH³0RQLWHXU´DSSDUDLVVHjO¶pFUDQHQ).
• 6L OH SURJUDPPDWHXU VLPSOH 0DUFKH RX $UUrW HVW HQ IRQFWLRQ VRQ
état actuel apparaîtra en .
• 6L OHV YDOHXUV 0DUFKH HW $UUrW RQW pWp UpJOpHV WRXWHV OHV GHX[ OHV
deux valeurs apparaîtront alternativement.
3. $SSX\H]VXUOHERXWRQ Mode de fonctionnement (Entrée) pour ferPHUOHPRQLWHXUHWUHWRXUQHUjO¶pFUDQGHFRQWU{OHVWDQGDUG
<Pour éteindre le programmateur simple...>
6.1.3. 0LQXWHULH³$XWR2II´$UUrWDXWR
&HSURJUDPPDWHXUFRPPHQFHOHFRPSWHjUHERXUVDXGpPDUUDJHGXFRQGLWLRQQHXUG¶DLUHWpWHLQWOHFRQGLWLRQQHXUTXDQGOHWHPSVLQGLTXpV¶HVWpFRXOp
OHVUpJODJHVSRVVLEOHVYRQWGHPLQXWHVjKHXUHVSDUWUDQFKHVGH
30 minutes.
5HPDUTXH:
*1. /HV SURJUDPPDWHXUV KHEGRPDGDLUHVLPSOH$UUrW DXWR QH SHXvent être utilisés en même temps.
*2. Le programmateur Arrêt Auto n’opérera pas quand l’une des
conditions suivantes est en fonction.
La fonction programmateur est éteinte; anomalie du système; un
test est en cours; la commande à distance effectue un auto-test ou
un diagnostic; l’utilisateur est en train de sélectionner une fonction; l’utilisateur est en train de régler le programmateur; le système est sous contrôle central. 6RXVFHVFRQGLWLRQVO¶RSpUDWLRQ
0DUFKH$UUrWHVWGpVDFWLYpH
$SSX\H]VXUOHERXWRQ0DUFKH$UUrWGXSURJUDPPDWHXUGHPDQLqUHj
FHTXHOHUpJODJHGXSURJUDPPDWHXUQ¶DSSDUDLVVHSOXVjO¶pFUDQHQ).
AFTER
OFF
ÛF
AUTO OFF
ÛF
TEMP.
SIMPLE
<Pour lancer le programmateur simple...>
MENU
$SSX\H]VXUOHERXWRQ0DUFKH$UUrWGXSURJUDPPDWHXUGHPDQLqUHj
ce que le réglage du programmateur apparaisse en .
Hr
BACK
PAR-21MAA
MONITOR/SET
ON/OFF
ON/OFF
FILTER
DAY
CLOCK
CHECK TEST
OPERATION
CLEAR
ON
AFTER
ÛF
<Comment régler le programmateur Arrêt Auto>
ÛF
SIMPLE
Réglage du programmateur
Examples
6LOHVKRUDLUHVGHPDUFKHHWG¶DUUrWRQWpWpUpJOpVSRXUOHSURJUDPPDWHXUVLPSOH
O¶RSpUDWLRQHWO¶DI¿FKDJHVRQWFRPPHLQGLTXpVFRPPHFLGHVVRXV
Example 1:
/DQFHUOHSURJUDPPDWHXUDYHFO¶KHXUHGHGpPDUUDJHUpJOpHDYDQWO¶KHXUHG¶DUUrW
5pJODJH0DUFKHKHXUHV
Réglage Arrêt : 7 KHXUHV
Hr
ON
AFTER
Au démarrage du programmateur
SIMPLE
$I¿FKHOHUpJODJHGHGpPDUUDJHGXSURJUDPPDWHXUOHVKHXUHVUHVWDQWDYDQWOHGpPDUUDJH
KHXUHVDSUqVOHGpPDUUDJHGXSURJUDPPDWHXU
Hr
AFTER OFF
ÛF
ÛF
SIMPLE
SIMPLE
O¶$I¿FKDJHFKDQJHSRXUPRQWUHUOHUpJODJHG¶DUUrWGX
SURJUDPPDWHXUOHVKHXUHVUHVWDQWDYDQWO¶DUUrW
/¶DIILFKDJH LQGLTXH O¶KRUDLUH GH OD PDQLqUH
VXLYDQWH $55Ç7 KHXUHV ± 0$5&+( KHXUHV KHXUHV
KHXUHVDSUqVOHGpPDUUDJHGXSURgrammateur
/HFRQGLWLRQQHXUG¶DLUV¶pWHLQWHWUHVWHUDpWHLQW
MXVTX¶jFHTXHTXHOTX¶XQOHUHODQFH
AFTER
OFF
AUTO OFF
1. $VVXUH]YRXVTXHYRXVrWHVVXUXQpFUDQGHFRQWU{OHVWDQGDUGHWTXH
OHWpPRLQGXSURJUDPPDWHXU$UUrW$XWRV¶DI¿FKHHQ).
/RUVTXHTX¶XQHIRQFWLRQDXWUHTXHOHWHPSRULVDWHXUjH[WLQFWLRQDXWRPDWLTXHHVW
DI¿FKpHUpJOH]ODWpOpFRPPDQGHVXU$8722))7,0(5HQXWLOLVDQWOHSDUDPqWUH
GHIRQFWLRQWHPSRULVDWHXUGHODVpOHFWLRQGHVIRQFWLRQVYRLU>@±
2. $SSX\H] VXU OH ERXWRQ 0HQX GX SURJUDPPDWHXU pendant 3 secRQGHVGHPDQLqUHjFHTXHOH³5pJODJH´DSSDUDLVVHjO¶pFUDQHQ
).
1RWH]TX¶jFKDTXHIRLVTXHYRXVDSSX\H]VXUOHERXWRQYRXVSDVVH]
de “Réglage” à “Moniteur”.)
3. $SSX\H]VXUOHERXWRQGHUpJODJHG¶KHXUH approprié autant de fois
TXHQpFHVVDLUHSRXUUpJOHUO¶KHXUHG¶DUUrWHQ).
4. $SSX\H]VXUOHERXWRQ Filter pour enregistrer le réglage.
5HPDUTXH:
Vos informations seront effacées si vous appuyez sur le bouton 0RGHGHIRQFWLRQQHPHQW(QWUpHDYDQWG¶DSSX\HUVXUOHERXWRQ
Filter .
5. $SSX\H]VXUOHERXWRQ Mode de fonctionnement (Entrée) pour terminer la procédure de UpJODJHHWUHWRXUQHUjO¶pFUDQGHFRQWU{OHVWDQGDUG
6. 6L OH FRQGLWLRQQHXU G¶DLU HVW GpMj HQ IRQFWLRQ OH SURJUDPPDWHXU GpPDUUH OH FRPSWH j UHERXUV LPPpGLDWHPHQW 9HLOOH] j YpUL¿HU TXH OH
réglage du programmateur apparaisse correctement à l’écran.
6. Minuterie
<9pUL¿HUOHUpJODJHDFWXHOGXSURJUDPPDWHXU$UUrW$XWR>
3RXUODWpOpFRPPDQGHVDQV¿O
Réglage du programmateur
TIMER
AFTER
OFF
F
AUTO OFF
1. $VVXUH]YRXVTXHO¶LQGLFDWLRQ³$UUrW$XWR´DSSDUDLVVHjO¶pFUDQVXU).
2. $SSX\H] VXU OH ERXWRQ 0HQX GX SURJUDPPDWHXU pendant 3 secondesGHPDQLqUHjFHTXH³0RQLWHXU´DSSDUDLVVHjO¶pFUDQHQ).
• /HWHPSVUHVWDQWDYDQWO¶H[WLQFWLRQDSSDUDvWHQ.
3. 3RXU IHUPHU OH PRQLWHXU HW UHWRXUQHU j O¶pFUDQ GH FRQWU{OH VWDQGDUG
DSSX\H]VXUOHERXWRQ0RGHGHIRQFWLRQQHPHQW(QWUpH.
<Pour éteindre le programmateur Arrêt Auto...>
$SSX\H]VXUOHERXWRQ0DUFKH$UUrWGXSURJUDPPDWHXU pendant 3
secondesGHPDQLqUHjFHTXHO¶LQGLFDWLRQ³$UUrWSURJUDPPDWHXU´DSparaisse en et que la valeur du programmateur (en ) disparaisse.
3RXVVHUOHERXWRQDUUrWRXPDUFKH
minuteur).
ÛF
ÛF
AUTO OFF
6LQRQ LO HVW SRVVLEOH G¶pWHLQGUH OH FRQGLWLRQQHXU G¶DLU OXLPrPH /D
valeur du programmateur (en GLVSDUDvWUDGHO¶pFUDQ
AUTO STOP
ou
AUTO START
) (Réglage du
9RXVSRXYH]UpJOHUO¶KHXUHORUVTXHOHV\PEROHVXLYDQWFOLJQRWH
0LQXWHXUG¶DUUrW
clignote.
clignote.
0LQXWHXUGHPLVHHQPDUFKH
min
h
8WLOLVHUOHVERXWRQV
et
SRXUUpJOHUO¶KHXUH
Annuler le minuteur.
AUTO STOP
.
3RXUDQQXOHUOHPLQXWHXUG¶DUUrWSRXVVHUOHERXWRQ
3RXUDQQXOHUOHPLQXWHXUGHPDUFKHSRXVVHUOHERXWRQ AUTO START .
AUTO OFF
<Pour démarrer le programmateur Arrêt Auto...>
$SSX\H]VXUOHERXWRQ0DUFKH$UUrWGXSURJUDPPDWHXU pendant 3
secondes /¶LQGLFDWLRQ ³$UUrW SURJUDPPDWHXU´ GLVSDUDvW HQ HW OH
réglage du programmateur apparaît (en ).
6LQRQLOHVWSRVVLEOHG¶DOOXPHUOHFRQGLWLRQQHXUG¶DLUOXLPrPH/DYDOeur du programmateur apparaît en .
AFTER
LOHVWSRVVLEOHGHFRPELQHUOHVPLQXWHXUVPDUFKHHWDUUrW21HW2))
• 6LO¶RQSRXVVHOHERXWRQPDUFKHDUUrW ON/OFF de la télécommande
DORUVTXHOHPLQXWHXUHVWDFWLIO¶DSSDUHLODQQXOHUDOHVPLQXWHXUV
• 6LO¶KRUORJHQ¶DSDVpWpPLVHjO¶KHXUHLOQ¶HVWSDVSRVVLEOHG¶XWLOLVHUOH
minuteur.
OFF
ÛF
ÛF
AUTO OFF
7. Autres fonctions
7.1. 9HUURXLOOHUOHVERXWRQVGHODWpOpFRPPDQGHOLPLWH
GHIRQFWLRQQHPHQWG¶RSpUDWLRQ
9RXV SRXYH] YHUURXLOOH] OHV ERXWRQV GH OD WpOpFRPPDQGH VL YRXV OH
VRXKDLWH]9RXVSRXYH]XWLOLVHUODVpOHFWLRQGHIRQFWLRQGHODWpOpFRPmande pour sélectionner le type de verrouillage.(Pour de plus amples
LQIRUPDWLRQV VXU FRPPHQW VpOHFWLRQQHU FH YHUURXLOODJH YR\H] OD VHFWLRQSDUDJUDSKH>@
9RXVSRXYH]XWLOLVHUVSpFL¿TXHPHQWO¶XQRXO¶DXWUHGHVYHUURXLOODJHVFLGHVVRXV
%ORFDJHGHWRXVOHVERXWRQV:
%ORTXHWRXVOHVERXWRQVGHODWpOpFRPPDQGH
%ORFDJHGHWRXWVDXI212))0DUFKH$UUrW:
%ORTXHWRXVOHVERXWRQVDXWUHVTXH212))
5HPDUTXH:
L’indicateur “verrouillé” apparaît à l’écran pour indiquer que les
boutons sont actuellement bloqués.
<Comment bloquer les boutons>
1. 7RXWHQSUHVVDQWOHERXWRQ)LOWHUPDLQWHQH]DSSX\pOHERXWRQ21
OFF SHQGDQWVHFRQGHV/¶LQGLFDWHXU³YHUURXLOOp´DSSDUDvWjO¶pFUDQ
(en LQGLTXDQWTXHOHYHUURXLOODJHHVWHQFOHQFKp
* 6L OH YHUURXLOODJH D pWp GpVDFWLYp SRXU OD VpOHFWLRQ GHV IRQFWLRQV
O¶pFUDQDI¿FKHUDOHPHVVDJH³LQGLVSRQLEOH´TXDQGYRXVDSSX\H]VXU
OHVERXWRQVGHODPDQLqUHLQGLTXpHFLGHVVXV
ÛF
• 6LYRXVDSSX\H]VXUXQERXWRQEORTXpO¶LQGLFDWLRQ³9HUURXLOOp´
(en FOLJQRWHUDjO¶pFUDQ
ÛF
Indicateurs de
EORFDJH
TIME SUN
FUNCTION
ÛF
ÛF
TEMP.
MENU
BACK
PAR-21MAA
MONITOR/SET
ON/OFF
ON/OFF
FUNCTION
ÛF
<Comment débloquer les boutons>
1. 7RXWHQSUHVVDQWOHERXWRQ)LOWHUPDLQWHQH]DSSX\pOHERXWRQ21
OFF SHQGDQWVHFRQGHVGHPDQLqUHjFHTXHO¶LQGLFDWLRQ³YHUURXLOOp´
GLVSDUDLVVHGHO¶pFUDQHQ).
FILTER
DAY
CLOCK
FUNCTION
ÛF
CHECK TEST
OPERATION
ÛF
ÛF
CLEAR
29
7. Autres fonctions
7.2. Indication des codes d’erreur
ERROR CODE
Témoin de
PDUFKH
(Clignotant)
ON/OFF
&RGHG¶HUUHXU
1RG¶XQLWp
6LYRXVDYH]HQWUpXQQXPpURGHWpOpSKRQHjDSSHOHUHQFDVGHSUREOqPHO¶pFUDQDI¿FKHFHQXPpUR9RXVSRXYH]
HIIHFWXHUFHUpJODJHVRXVODVpOHFWLRQGHVIRQFWLRQV3RXUGHSOXVDPSOHVLQIRUPDWLRQVUHSRUWH]YRXVVHFWLRQ
6L OH YR\DQW 21 HW OH FRGH G¶HUUHXU FOLJQRWHQW &HOD VLJQL¿H TXH OH FRQGLWLRQQHXU G¶DLU HVW KRUV VHUYLFH HW TXH OH IRQFWLRQQHPHQW HVW DUUrWp HW TX¶LO QH SHXW rWUH
UHODQFp1RWH]OHQXPpURG¶XQLWpHWOHFRGHG¶HUUHXUSXLVpWHLJQH]O¶DOLPHQWDWLRQGXFRQGLWLRQQHXUHWDSSHOH]YRWUHIRXUQLVVHXURXYRWUHWHFKQLFLHQGHPDLQWHQDQFH
4XDQGRQDSSXLHVXUOHERXWRQ&KHFN:
CALL:XXXX
XXX:XXX
ERROR CODE
ÛF
ÛF
ON/OFF
ON/OFF
&RGHG¶HUUHXU
6LVHXOOHFRGHG¶HUUHXUFOLJQRWHDORUVTXHOHWpPRLQGHPDUFKHUHVWHDOOXPp/¶RSpUDWLRQFRQWLQXHPDLVLOVHSHXWTXHOHV\VWqPHDLWXQSUREOqPH
'DQVFHFDVYRXVGHYH]QRWHUOHFRGHG¶HUUHXUSXLVDSSHOHUYRWUHIRXUQLVVHXURXYRWUHWHFKQLFLHQSRXUOXLGHPDQGHUVRQDYLV
* 6LYRXVDYH]HQWUpXQQXPpURGHWpOpSKRQHjDSSHOHUHQFDVGHSUREOqPHDSSX\H]VXUOHERXWRQ&KHFNSRXUO¶DI¿FKHUjO¶pFUDQ9RXVSRXYH]HIIHFWXHUFHUpJODJHVRXVODVpOHFWLRQGHVIRQFWLRQV3RXUGHSOXVDPSOHVLQIRUPDWLRQVUHSRUWH]YRXVVHFWLRQ
6pOHFWLRQGHVIRQFWLRQV
Sélection des fonctions de la commande à distance
/HUpJODJHGHVIRQFWLRQVGHODFRPPDQGHVXLYDQWHVSHXWrWUHPRGL¿pjO¶DLGHGXPRGHGHVpOHFWLRQGHVIRQFWLRQVGHODFRPPDQGHjGLVWDQFH0RGL¿H]OHUpJODJHDXEHVRLQ
Elément 1
Elément 2
Item 3 (contenu de réglage)
1.0RGL¿FDWLRQGHODODQJXH 5pJODJHGHVODQJXHVG¶DI¿FKDJH
• /¶DI¿FKDJHHQSOXVLHXUVODQJXHVHVWSRVVLEOH
(“CHANGE LANGUAGE”)
2.Limitation des fonctions
(“SELECTION
FONCTIONS”)
3.Sélection des modes
(“SELECTION DU
MODE”)
(1) Réglage de la limitation des fonctions de fonctionnement (verrouillage de fonctionnement)
(“BLOCAGE FONCTIONS”)
(2) Utilisation du réglage du mode automatique
(“SELECTION DU MODE AUTO”)
• Activation ou désactivation du mode de fonctionnement “automatique”
(3) Réglage de la limitation de la plage de températures (“LIMITATION TEMPERATURE”)
• 5pJODJH GH OD SODJH GH WHPSpUDWXUHV DMXVWDEOH PD[LPXP
minimum)
(1) Réglage de la commande à distance principale/secondaire (“TELCOMMANDE MAITRE/
ESCLAVE”)
• Sélection de la commande à distance principale ou secondaire
* Lorsque deux commandes à distance sont connectées à un
JURXSHO¶XQHGHVGHX[GRLWrWUHUpJOpHHQWDQWTXHFRPmande secondaire.
• $FWLYDWLRQRXGpVDFWLYDWLRQGHODIRQFWLRQG¶KRUORJH
(2) 8WLOLVDWLRQGXUpJODJHGHO¶KRUORJH³$)),CHAGE HORLOGE”)
(3) Réglage de la fonction de minuterie (“PROG
HEBDO MADAIRE”)
(4) 5pJODJHGXQXPpURjFRQWDFWHUHQFDVG¶HUreur (“CALL.”)
4.0RGL¿FDWLRQGHO¶DI¿FKDJH
(“AFFICHAGE
SOUS MENU”)
30
(1) 5pJODJHGHO¶DI¿FKDJHGHODWHPSpUDWXUH&)
(“TEMPERATURE °C/°F”)
(2) 5pJODJHGHO¶DI¿FKDJHGHODWHPSpUDWXUHGH
O¶DLUG¶DVSLUDWLRQ³7(03(5$785($0%,ANTE”)
(3) 5pJODJHGHO¶DI¿FKDJHGXUHIURLGLVVHPHQW
FKDXIIDJHDXWRPDWLTXH³$)),&+$*($872
F/C”)
• Réglage de la plage de limitation de fonctionnement (fonction
GHEORFDJHGXIRQFWLRQQHPHQW
• Réglage du type de minuterie
• $I¿FKDJHGXQXPpURjFRQWDFWHUHQFDVG¶HUUHXUU
• 5pJODJHGXQXPpURGHWpOpSKRQH
• 5pJODJHGHO¶XQLWpGHWHPSpUDWXUH&RX)jDI¿FKHU
• $
FWLYDWLRQ RX GpVDFWLYDWLRQ GH O¶DI¿FKDJH GH OD WHPSpUDWXUH
GHO¶DLUG¶DVSLUDWLRQLQWpULHXU
• $FWLYDWLRQ RX GpVDFWLYDWLRQ GH O¶DIILFKDJH ³&RROLQJ´ 5HIURLGLVVHPHQW RX ³+HDWLQJ´ &KDXIIDJH SHQGDQW OH IRQFtionnement en mode automatique
Sélection des fonctions
[Organigramme de sélection des
fonctions]
Langue par défaut (Anglais)
$I¿FKDJHQRUPDO
Normal display
(Display when the air conditioner is not running)
DI¿FKDJHORUVTXHOHFOLPDWLVHXUQHIRQFWLRQQHSDV
Hold down theHQIRQFpHHWDSSX\H]VXUODWRXFKH
button and press the
button
fordeux
2 seconds.
0DLQWHQH]ODWRXFKH
secondes.
pendant
Mode
de sélection
des fonctions
la commande
Remote
controller
function de
selection
modeà distance
Elément
Item
1 1
0RGL¿FDWLRQGHOD
langue
0DLQWHQH]ODWRXFKHHQIRQFpHHWDSSX\H]VXUODWRXFKH pendant deux secondes.
Hold down the
button and press the
button for 2 seconds.
$SSX\H]VXUODWRXFKH³RSHUDWLRQPRGH´PRGHGHIRQFWLRQQHPHQW
Press the operation mode button.
$SSX\H]VXUODWRXFKH³7,0(50(18´0(18'(/$0,187(5,(
Press the TIMER MENU button.
Press the TIMER ON/OFF button.
$SSX\H]VXUODWRXFKH³7,0(5212))´0,187(5,(0$5&+($55(7
Item 2
English
Dot display
German
Spanish
TEMP.
Russian
MENU
BACK
Italian
PAR-21MAA
MONITOR/SET
ON/OFF
ON/OFF
FILTER
DAY
CLOCK
CHECK TEST
OPERATION
CLEAR
Chinese
French
Japanese
Item 3
Sélection des
fonctions
OFF
Le paramétrage de verrouillage des opérations est inactif.
(Valeur de paramétrage initiale)
no1
Le paramétrage de verrouillage des opérations est actif sauf pour
OHVWRXFKH³2Q2II´0DUFKH$UUrW
no2
Le paramétrage de verrouillage des opérations concerne toutes
OHVWRXFKHV
ON
/HPRGHDXWRPDWLTXHV¶DI¿FKHORUVTXHOHPRGHGHIRQFWLRQQHPHQW
est sélectionné. (Valeur de paramétrage initiale)
OFF
/HPRGHDXWRPDWLTXHQHV¶DI¿FKHSDVORUVTXHOHPRGHGH
fonctionnement est sélectionné.
OFF
Les limites de la plage de température sont inactives. (Valeur de
paramétrage initiale)
/DSODJHGHWHPSpUDWXUHSHXWrWUHPRGL¿pHHQPRGHGH
UHIURLGLVVHPHQWVpFKDJH
/DSODJHGHWHPSpUDWXUHSHXWrWUHPRGL¿pHHQPRGHGHFKDXIIDJH
/DSODJHGHWHPSpUDWXUHSHXWrWUHPRGL¿pHHQPRGHDXWRPDWLTXH
0RGHG¶RSpUDWLRQGXSDQQHDXGX¿OWUHDXWRPDWLTXH
,OQ¶HVWSDVQpFHVVDLUHGHUpJOHUFHPRGH9HXLOOH]FRQVXOWHUOH0$18(/
'¶23e5$7,21GHVSDUWLHVRSWLRQQHOOHVSDQQHDXSRXUSOXVGHGpWDLOV
0RGHGHGLUHFWLRQGXFRXUDQWG¶DLU¿[H
,OQ¶HVWSDVQpFHVVDLUHGHUpJOHUFHPRGH9HXLOOH]FRQVXOWHUOH
0$18(/'¶23e5$7,21GHO¶DSSDUHLOLQWpULHXUSRXUSOXVGHGpWDLOV
La télécommande deviendra alors la commande principale.
(Valeur de paramétrage initiale)
Sélection des modes
La télécommande deviendra alors la commande auxiliaire.
ON
/DIRQFWLRQKRUORJHSHXWrWUHXWLOLVpH9DOHXUGHSDUDPpWUDJHLQLWLDOH
OFF
/DIRQFWLRQKRUORJHQHSHXWSDVrWUHXWLOLVpH
/DPLQXWHULHKHEGRPDGDLUHSHXWrWUHXWLOLVpH9DOHXUGH
paramétrage initiale)
La minuterie “Auto off” (Arrêt auto) peut être utilisée.
La minuterie simple peut être utilisée.
Le mode minuterie ne peut pas être utilisé.
0RGL¿FDWLRQ
GHO¶DI¿FKDJH
OFF
/HVQXPpURVSURJUDPPpVQHV¶DI¿FKHQWSDVHQFDVG¶HUUHXU
(Valeur de paramétrage initiale)
CALL-
/HVQXPpURVSURJUDPPpVV¶DI¿FKHQWHQFDVG¶HUUHXU
ÛC
/DWHPSpUDWXUHGHO¶DSSDUHLOHVWDI¿FKpHHQ&
ÛF
/DWHPSpUDWXUHGHO¶DSSDUHLOHVWDI¿FKpHHQ)9DOHXUGHSDUDPptrage initiale)
ON
/DWHPSpUDWXUHGHO¶DLUGHODSLqFHHVWDI¿FKpH9DOHXUGH
paramétrage initiale)
OFF
/DWHPSpUDWXUHGHO¶DLUGHODSLqFHQ¶HVWSDVDI¿FKpH
ON
OFF
Le mode “Automatic cooling” (refroidissement auto) ou “Automatic
KHDWLQJ´FKDXIIDJHDXWRV¶DI¿FKHHQPRGHDXWRPDWLTXH9DOHXUGH
paramétrage initiale)
6HXO³$XWRPDWLF´V¶DI¿FKHHQPRGHDXWRPDWLTXH
31
6pOHFWLRQGHVIRQFWLRQV
[5pJODJHGpWDLOOp]
>@±5pJODJH&+$1*(/$1*8$*(0RGL¿FDWLRQGHODODQJXH
/DODQJXHG¶DI¿FKDJHGHO¶pFUDQjSL[HOVSHXWrWUHVpOHFWLRQQpH
$SSX\H] VXU OD WRXFKH > 0(18@ SRXU PRGL¿HU OD ODQJXH
$QJODLV*%$OOHPDQG'(VSDJQRO( 5XVVH58
,WDOLHQ,&KLQRLV&+)UDQoDLV) Japonais (JP)
&RQVXOWH]OHWDEOHDXG¶DI¿FKDJHSDUSRLQW
>@±Limitation des fonctions
(1) Réglage de la limitation des fonctions de fonctionnement (fonction
GHEORFDJHGXIRQFWLRQQHPHQW)
• 3RXUFRPPXWHUOHUpJODJHDSSX\H]VXUODWRXFKH> 212))@.
no1 :Le réglage du verrouillage de fonctionnement est appliqué
jWRXWHVOHVWRXFKHVDXWUHVTXHODWRXFKH> 212))@
no2 :Le réglage du verrouillage de fonctionnement est
DSSOLTXpjWRXWHVOHVWRXFKHV
OFF (valeur de réglage initial):
/HUpJODJHGXYHUURXLOODJHGHIRQFWLRQQHPHQWQ¶HVWSDVDSSOLTXp
* Pour appliquer le réglage du verrouillage de fonctionnement à
O¶pFUDQQRUPDOLOHVWQpFHVVDLUHG¶DSSX\HUVXUOHVWRXFKHV$SSX\H]
VLPXOWDQpPHQWVXUOHVWRXFKHV>),/7(5@HW> 212))@HQPrPH
WHPSVHWOHVPDLQWHQLUHQIRQFpHVSHQGDQWGHX[VHFRQGHVVXUO
écran normal après avoir effectué le réglage ci-dessus.
(2) Utilisation du réglage du mode automatique
/RUVTXH OD FRPPDQGH j GLVWDQFH HVW FRQQHFWpH j O¶DSSDUHLO GLVSRVDQWGXPRGHGHIRQFWLRQQHPHQWDXWRPDWLTXHOHVUpJODJHVVXLYants peuvent être effectués.
• 3RXUFRPPXWHUOHUpJODJHDSSX\H]VXUODWRXFKH> 212))@.
ON (valeur de réglage initial):
/H PRGH DXWRPDWLTXH V¶DI¿FKH ORUVTXH FH PRGH GH IRQFtionnement est sélectionné.
OFF:
/H PRGH DXWRPDWLTXH QH V¶DI¿FKH SDV ORUVTXH FH PRGH GH
fonctionnement est sélectionné.
(3) Réglage de la limitation de la plage de températures
8QH IRLV FH UpJODJH HIIHFWXp OD WHPSpUDWXUH SHXW rWUH PRGL¿pH
GDQVODSODJHGp¿QLH
• 3RXUFRPPXWHUOHUpJODJHDSSX\H]VXUODWRXFKH> 212))@.
LIMITE TEMP MODE FROID:
/H PRGH GH OD SODJH GH WHPSpUDWXUHV SHXW rWUH PRGL¿p HQ
PRGHUHIURLGLVVHPHQWGpVKXPLGL¿FDWLRQ
LIMITE TEMP MODE CHAUD:
/H PRGH GH OD SODJH GH WHPSpUDWXUHV SHXW rWUH PRGL¿p HQ
PRGHFKDXIIDJH
LIMITE TEMP MODE AUTO:
/H PRGH GH OD SODJH GH WHPSpUDWXUHV SHXW rWUH PRGL¿p HQ
mode automatique.
OFF (programmation initiale):
/DOLPLWDWLRQGHODSODJHGHWHPSpUDWXUHVQ¶HVWSDVDFWLYH
* /RUVTX¶XQUpJODJHDXWUHTXH2))HVWVpOHFWLRQQpOHUpJODJHGHODOLPLWDWLRQGHODSODJHGHWHPSpUDWXUHVGHVPRGHVUHIURLGLVVHPHQWFKDXIIDJHHW
DXWRPDWLTXHV¶HIIHFWXHHQPrPHWHPSV7RXWHIRLVODSODJHQHSHXWSDV
rWUHOLPLWpHORUVTXHODSODJHGHWHPSpUDWXUHVUpJOpHQ¶DSDVpWpPRGL¿pH
• 3RXUDXJPHQWHURXGLPLQXHUODWHPSpUDWXUHDSSX\H]VXUODWRXFKH> TEMP. ( ) ou( @.
• 3RXU FRPPXWHU HQWUH OH UpJODJH PD[LPDO HW PLQLPDO DSSX\H]
VXUODWRXFKH> @. Le réglage sélectionné clignote et la température peut être réglée.
• 3ODJHUpJODEOH
0RGHUHIURLGLVVHPHQWGpVKXPLGL¿FDWLRQ:
Limite inférieure&a&)a)
Limite supérieure&a&)a)
0RGHFKDXIIDJH:
Limite inférieure&a&)a)
Limite supérieure&a&)a)
Mode automatique:
Limite inférieure&a&)a)
Limite supérieure&a&)a)
32
>@±Réglage de la sélection des modes de fonctionnement
(1) Réglage de la commande à distance principale/secondaire
• 3RXUFRPPXWHUOHUpJODJHDSSX\H]VXUODWRXFKH> 212))@.
Maitre: La commande devient la commande principale.
Esclave: La commande devient la commande secondaire.
(2) 8WLOLVDWLRQGXUpJODJHGHO¶KRUORJH
• 3RXUFRPPXWHUOHUpJODJHDSSX\H]VXUODWRXFKH> 212))@.
ON:
/DIRQFWLRQG¶KRUORJHSHXWrWUHXWLOLVpH
OFF:
/DIRQFWLRQG¶KRUORJHQHSHXWSDVrWUHXWLOLVpH
(3) Réglage de la fonction de minuterie
• 3RXU FRPPXWHU OH UpJODJH DSSX\H] VXU OD WRXFKH > 212))@ &KRLVLVVH]O¶XQHGHVIRQFWLRQVVXLYDQWHV
PROG HEBDO MADAIRE (Valeur de réglage initial):
/DPLQXWHULHKHEGRPDGDLUHSHXWrWUHXWLOLVpH
PROG HORAIRE ARRET AUTO:
/¶DUUrWGLIIpUpDXWRPDWLTXHSHXWrWUHXWLOLVp
PROG HORAIRE SIMPLIFIE:
La minuterie simple peut être utilisée.
PROG HORAIRE INACTIF:
Le mode de minuterie ne peut pas être utilisé.
* /RUVTXHO¶XWLOLVDWLRQGXUpJODJHGHO¶KRUORJHHVWGp¿QLHVXU2))
la fonction “PROG HEBDO MADAIRE” ne peut pas être utilisée.
(4) 5pJODJHGXQXPpURjFRQWDFWHUHQFDVG¶HUUHXU
• 3RXUFRPPXWHUOHUpJODJHDSSX\H]VXUODWRXFKH> 212))@.
CALL OFF:
/HVQXPpURVjFRQWDFWHUGp¿QLVQHV¶DI¿FKHQWSDVHQFDVG¶HUUHXU
CALL **** *** ****:
/HVQXPpURVjFRQWDFWHUGp¿QLVV¶DI¿FKHQWHQFDVG¶HUUHXU
CALL_:
/H QXPpUR GH FRQWDFW SHXW rWUH UpJOp TXDQG O¶DI¿FKDJH HVW
indiqué comme ci-dessus.
• Réglage des numéros à contacter
3RXUUpJOHUOHVQXPpURVjFRQWDFWHUHIIHFWXH]ODSURFpGXUHVXLYDQWH
'pSODFH] OH FXUVHXU FOLJQRWDQW SRXU UpJOHU OHV QRPEUHV $SSX\H]VXUODWRXFKH> TEMP. ( ) and ( @ pour déplacer
OH FXUVHXU YHUV OD GURLWH JDXFKH $SSX\H] VXU OD WRXFKH >
CLOCK ( ) and ( @ pour régler les numéros.
>@±5pJODJHGHO¶DI¿FKDJH
(1) 5pJODJHGHO¶DI¿FKDJHGHODWHPSpUDWXUH&)
• 3RXUFRPPXWHUOHUpJODJHDSSX\H]VXUODWRXFKH> 212))@.
°C: /¶XQLWpGHWHPSpUDWXUH&HVWXWLOLVpH
°F: /¶XQLWpGHWHPSpUDWXUH)HVWXWLOLVpH
(2) 5pJODJHGHO¶DI¿FKDJHGHODWHPSpUDWXUHGHODSLqFH
• 3RXUFRPPXWHUOHUpJODJHDSSX\H]VXUODWRXFKH> 212))@.
ON : /DWHPSpUDWXUHGHO¶DLUG¶DVSLUDWLRQV¶DI¿FKH
OFF: /DWHPSpUDWXUHGHO¶DLUG¶DVSLUDWLRQQHV¶DI¿FKHSDV
(3) 5pJODJHGHO¶DI¿FKDJHGXUHIURLGLVVHPHQWFKDXIIDJHDXWRPDWLTXH
• 3RXUFRPPXWHUOHUpJODJHDSSX\H]VXUODWRXFKH> 212))@.
ON:
/¶XQHGHVIRQFWLRQV³$XWRPDWLFFRROLQJ´5HIURLGLVVHPHQW
DXWRPDWLTXHRX³$XWRPDWLFKHDWLQJ´&KDXIIDJHDXWRPDWLTXH
V¶DI¿FKHHQPRGHDXWRPDWLTXH
OFF:
6HXOHODIRQFWLRQ³$XWRPDWLF´$XWRPDWLTXHV¶DI¿FKHHQPRGH
automatique.
6pOHFWLRQGHVIRQFWLRQV
[7DEOHDXG¶DI¿FKDJHSDUSRLQW]
Langue par défaut
(QJOLVK
*HUPDQ
6SDQLVK
5XVVLDQ
,WDOLDQ
&KLQHVH
)UHQFK
-DSDQHVH
(QJOLVK
*HUPDQ
6SDQLVK
5XVVLDQ
,WDOLDQ
&KLQHVH
)UHQFK
-DSDQHVH
Attendre le démarrage
Attendre le
démarrage
Refroidissement
$VVqFKHPHQW
&KDXIIDJH
Automatique
Automatique
Automatique
(Refroidissement)
6RXIÀHULH
Ventilation
Attente
3UpFKDXIIDJH
Dégivrage
7HPSpUDWXUHGp¿QLH
Vitesse du ventilateur
7RXFKHLQGLVSRQLEOH
Contrôle (Erreur)
0DUFKHG¶HVVDL
Auto-contrôle
Sélection des fonctions
Réglage de la ventilation
Langue par défaut
0RGL¿FDWLRQGHODODQJXH
Sélection des fonctions
Blocage des fonctions
Sélection du mode automatique
Limites de la plage de température
Limites de température mode
refroidissement
Limites de température mode
FKDXIIDJH
Limites de température mode auto
Sélection du mode de fonctionnement
Réglage télécommande PRINCIPALE
Réglage télécommande AUXILIAIRE
5pJODJHGHO¶KRUORJH
5pJODJHMRXUKHXUH
Réglage minuterie
Contrôle minuterie
0LQXWHULHKHEGRPDGDLUH
Mode de minuterie “off” (Arrêt)
Minuterie “Auto Off” (Arrêt auto)
Minuterie simple
Paramétrage des numéros en
VLWXDWLRQG¶HUUHXU
0RGL¿FDWLRQGHO¶DI¿FKDJH
5pJODJHGHO¶DI¿FKDJHGHODWHPpérature en °C/°F
5pJODJHGHO¶DI¿FKDJHGHODWHPSpUDWXUHGHO¶DLUGHODSLqFH
5pJODJHGHO¶DI¿FKDJHUHIURLGLVVHPHQWFKDXIIDJHDXWRPDWLTXH
33
)RQFWLRQQHPHQWG¶XUJHQFHGHODWpOpFRPPDQGHVDQV¿O
Pour3.)<3Â1+08(
Lorsqu’il n’est pas possible d’utiliser la télécommande
Lorsque les piles de la télécommande sont usées ou lorsque la télécommande
QHIRQFWLRQQHSDVFRUUHFWHPHQWYRXVSRXYH]DFWLYHUOHPRGHGHIRQFWLRQQHPHQW
G¶XUJHQFHjO¶DLGHGHVWRXFKHVG¶XUJHQFHVLWXpHV
Témoin DEFROST/STAND BY (dégivrage/veilleuse)
Témoin de fonctionnement
QWHUUXSWHXUGHIRQFWLRQQHPHQWG¶XUJHQFHFKDXIIDJH
,QWHUUXSWHXUGHIRQFWLRQQHPHQWG¶XUJHQFHUHIURLGLVVHPHQW
Capteur
2SpUDWLRQGHPLVHHQPDUFKH
$SSX\H]SOXVGHVHFRQGHVVXUODWRXFKH pour utiliser le mode
de refroidissement.
$SSX\H]SOXVGHVHFRQGHVVXUODWRXFKH pour utiliser le mode
GHFKDXIIDJH
5HPDUTXH
• Les détails concernant le mode d’urgence sont tels qu’indiqués ci-dessous.
/HVGpWDLOVFRQFHUQDQWOHPRGHGHUHIURLGLVVHPHQWG¶XUJHQFHVRQWWHOV
TX¶LQGLTXpVFLGHVVRXV
Mode de fonctionnement Refroidissement (COOL)
Température programmée
&)
Vitesse de ventilation
(OHYpH+LJK
6HQVGHODVRXIÀHULH
Horizontal
&KDXIIDJH+($7
&)
(OHYpH+LJK
9HUVOHEDV
Pour arrêter le fonctionnement
• 3RXUDUUrWHUO¶DSSDUHLODSSX\HUplus de 2 secondesVXUODWRXFKH
RXVXUODWRXFKH .
10. Entretien et nettoyage
ÛF
ÛF
TEMP.
FILTER
ON/OFF
$I¿FKHTX¶LOIDXWQHWWR\HUOH¿OWUH
/HQHWWR\DJHGX¿OWUHGRLWrWUHFRQ¿pjGXSHUVRQQHOTXDOL¿p
3RXUUpLQLWLDOLVHUO¶DI¿FKDJH³),/7(5´¿OWUH
6LYRXVDSSX\H]GHX[IRLVVXFFHVVLYHVVXUODWRXFKH>),/7(5@¿OWUH
DSUqVDYRLUQHWWR\pOH¿OWUHO¶DI¿FKDJHV¶pWHLQWSXLVHVWUpLQLWLDOLVp
5HPDUTXH
6L GHX[ W\SHV G¶DSSDUHLOV LQWpULHXUV RX SOXV VRQW FRQWU{OpV OD
période entre les nettoyages dépend du type de filtre. Si vous
GHYH] QHWWR\HU OH ILOWUH GH O¶DSSDUHLO SULQFLSDO ³),/7(5´ ILOWUH
V¶DI¿FKH6LO¶DI¿FKDJHV¶pWHLQWODSpULRGHFXPXOpHHVWUpLQLWLDOLVpH
³),/7(5´¿OWUHLQGLTXHODSpULRGHHQWUHOHVQHWWR\DJHVHQKHXUH
si le climatiseur est utilisé dans des conditions d’air intérieur normales. Toutefois, le degré d’encrassement du filtre dépend des
conditions environnementales ; nettoyez-le donc en conséquence.
La période cumulée avant le nettoyage du filtre varie selon les
modèles.
&HWWHLQGLFDWLRQHVWLQGLVSRQLEOHSRXUODWpOpFRPPDQGHVDQV¿O
1HWWR\DJHGHV¿OWUHV
1HWWR\HUOHV¿OWUHVDYHFXQDVSLUDWHXU6LYRXVQHSRVVpGH]SDVG¶DVSLUDWHXUEDWWUHOHV¿OWUHVFRQWUHXQREMHWGXUD¿QGHOHVVHFRXHUHWGH
retirer toutes les saletés et la poussière.
6LOHV¿OWUHVVRQWSDUWLFXOLqUHPHQWVDOHVOHVODYHUjO¶HDXWLqGH9HLOOHU
jULQFHUVRLJQHXVHPHQWWRXWHWUDFHGHGpWHUJHQWHWODLVVHUVpFKHUOHV
¿OWUHVFRPSOqWHPHQWDYDQWGHOHVUHPRQWHUGDQVOHFOLPDWLVHXU
Précaution:
1HMDPDLVODLVVHUVpFKHUOHV¿OWUHVDXVROHLOQLOHVVpFKHUHQXWLlisant une source de chaleur comme un chauffage électrique :
vous risqueriez de les déformer.
• 1HMDPDLVODYHUOHV¿OWUHVjO¶HDXFKDXGHDXGHVVXVGH&)
car vous risqueriez de les faire gondoler.
9HLOOHUjFHTXHOHV¿OWUHVjDLUVRLHQWWRXMRXUVHQSODFH/DPLVH
HQPDUFKHGHO¶DSSDUHLODORUVTXHOHV¿OWUHVVRQWUHWLUpVSRXUUDLW
en effet être à l’origine d’un mauvais fonctionnement.
• Avant de commencer le nettoyage, arrêter l’appareil et couper l’
alimentation.
/HVDSSDUHLOVLQWpULHXUVVRQWpTXLSpVGH¿OWUHVVHUYDQWjH[WUDLUH
OHVSRXVVLqUHVGHO¶DLUDVSLUp1HWWR\HUOHV¿OWUHVVHORQOHVPpWKodes illustrées ci-après.
5HWUDLWGX¿OWUH
Précaution:
/RUVGXUHWUDLWGX¿OWUHVHSURWpJHUOHV\HX[GHODSRXVVLqUH6L
vous devez monter sur le rebord d’une fenêtre pour effectuer
l’opération, attention de ne pas tomber.
8QHIRLVOH¿OWUHUHWLUpQHSDVWRXFKHUOHVSLqFHVPpWDOOLTXHVLQternes de l’appareil intérieur sous peine de blessure.
PKFY-P·NBMU-E2
3.)<3Â1+08(
7LUH] VXU OHV GHX[ FRLQV LQIpULHXUV GH OD JULOOH G¶DVSLUDWLRQ SRXU
RXYULUODJULOOHSXLVOHYH]OH¿OWUH
10. Entretien et nettoyage
PMFY-P·NBMU-E
$SSX\HUVXUODWRXFKH386+VXUOHERUGH[WHUQHGHODJULOOHG¶HQWUpHSHUPHWG¶RXYULUFHWWHGHUQLqUH
3RXUUHWLUHUXQ¿OWUHFRPSRUWDQWXQHJULOOHG¶HQWUpHWLUHUOH¿OWUHYHUV
O¶DYDQW
*XLGHGHGpSDQQDJH
(QFDVGHSUREOqPH
/HFOLPDWLVHXUQHFKDXIIHQLQHUHIURLGLWFRUUHFWHPHQW
9RLFLODVROXWLRQ/¶DSSDUHLOIRQFWLRQQHQRUPDOHPHQW
1HWWR\H]OH¿OWUH/HGpELWG¶DLUHVWUpGXLWORUVTXHOH¿OWUHHVWVDOHRXFROPDWp
&RQWU{OH]ODWHPSpUDWXUHHWDMXVWH]ODWHPSpUDWXUHGp¿QLHHQFRQVpTXHQFH
$VVXUH]YRXVTX¶LO\DVXI¿VDPPHQWG¶HVSDFHDXWRXUGHO¶DSSDUHLOH[WpULHXU
/¶DGPLVVLRQRXODVRUWLHG¶DLUGHO¶DSSDUHLOLQWpULHXUHVWHOOHEORTXpH"
8QHSRUWHRXXQHIHQrWUHDWHOOHpWpODLVVpHRXYHUWH"
'HO¶DLUFKDXGHVWH[SXOVpXQLTXHPHQWORUVTXHO¶DSSDUHLOLQWpULHXUHVW
/RUVTXHO¶RSpUDWLRQGHFKDXIIDJHGpEXWHGHO¶DLUFKDXGQ¶HVWSDVH[VXI¿VDPPHQWFKDXG
SXOVpLPPpGLDWHPHQWGHO¶DSSDUHLOLQWpULHXU
/RUVTXHODWHPSpUDWXUHH[WpULHXUHHVWEDVVHHWO¶KXPLGLWpGHO¶DLULPSRUWDQWHGX
(QPRGHGHFKDXIIDJHOHFOLPDWLVHXUV¶DUUrWHDYDQWTXHODWHPSpUDWXUH
JLYUHSHXWVHIRUPHUVXUO¶DSSDUHLOH[WpULHXU'DQVFHFDVO¶DSSDUHLOH[WpULHXU
Gp¿QLHSRXUODSLqFHVRLWDWWHLQWH
SURFqGHjXQHRSpUDWLRQGHGpJLYUDJH8QIRQFWLRQQHPHQWQRUPDOGHO¶DSSDUHLO
GHYUDLWGpEXWHUDXERXWGHPLQXWHVHQYLURQ
/DGLUHFWLRQGXGpELWG¶DLUYDULHSHQGDQWO¶RSpUDWLRQRXODGLUHFWLRQQH
(QPRGHGHUHIURLGLVVHPHQWOHVDLOHWWHVVHSODFHQWDXWRPDWLTXHPHQW
HQSRVLWLRQKRUL]RQWDOHEDVVHDXERXWG¶XQHKHXUHORUVTX¶XQH
SHXWrWUHGp¿QLH
GLUHFWLRQGHGpELWG¶DLUEDVVHKRUL]RQWDOHHVWVpOHFWLRQQpH&HFLpYLWH
ODIRUPDWLRQG¶HDXVXUOHVDLOHWWHVHWSUpYLHQWWRXWVXLQWHPHQW
(QPRGHGHFKDXIIDJHOHVDLOHWWHVVHSODFHQWDXWRPDWLTXHPHQWHQ
SRVLWLRQKRUL]RQWDOHORUVTXHODWHPSpUDWXUHGXGpELWG¶DLUHVWEDVVHRX
pendant le mode de dégivrage.
/RUVTXHODGLUHFWLRQGXGpELWG¶DLUHVWPRGL¿pHOHVDLOHWWHVVHGpSODFHQW
/RUVTXHODGLUHFWLRQGXGpELWG¶DLUHVWPRGL¿pHOHVDLOHWWHVVHSODFHQW
WRXMRXUVYHUVOHKDXWHWYHUVOHEDVDXGHOjGHODSRVLWLRQGpWHUPLQpH
VXUODSRVLWLRQGpWHUPLQpHDSUqVrWUHSDVVpHVSDUODSRVLWLRQGHEDVH
DYDQWGHV¶DUUrWHUVXUODSRVLWLRQVRXKDLWpH
&HVEUXLWVSHXYHQWrWUHSHUoXVORUVTXHOHUpIULJpUDQWFLUFXOHGDQVOH
8QEUXLWG¶HDXTXLUXLVVHOOHRXSOXVUDUHPHQWXQVRXIÀHSHXWrWUHSHUoX
FOLPDWLVHXURXORUVTXHOHÀX[GXUpIULJpUDQWDpWpPRGL¿p
Un craquement ou un grincement peut être perçu.
&HVEUXLWVSHXYHQWrWUHSHUoXVORUVTXHOHVSLqFHVGXFOLPDWLVHXUIURWWHQW
OHVXQHVFRQWUHOHVDXWUHVHQUDLVRQGHO¶H[SDQVLRQHWGHODFRQWUDFWLRQ
qui résultent des variations de température.
/DSLqFHDXQHRGHXUGpVDJUpDEOH
/¶DSSDUHLOLQWpULHXUDVSLUHGHO¶DLUTXLFRQWLHQWGHVJD]SURGXLWVSDUOHV
PXUVOHVPRTXHWWHVHWOHVPHXEOHVDLQVLTXHGHVRGHXUVYpKLFXOpHV
SDUOHVYrWHPHQWVSXLVLOOHVH[SXOVHjQRXYHDXGDQVODSLqFH
6LODWHPSpUDWXUHLQWpULHXUHHWO¶KXPLGLWpGHO¶DLUVRQWpOHYpHVFHWWHVLWX8QHEXpHRXYDSHXUEODQFKHVRUWGHO¶DSSDUHLOLQWpULHXU
DWLRQSHXWVHSURGXLUHHQGpEXWG¶RSpUDWLRQ
(QPRGHGHGpJLYUDJHGHO¶DLUIURLGSHXWrWUHH[SXOVpHWDYRLUO¶DSSDUHQFHGHODEXpH.
35
*XLGHGHGpSDQQDJH
(QFDVGHSUREOqPH
'HO¶HDXRXGHODYDSHXUVRUWGHO¶DSSDUHLOH[WpULHXU
9RLFLODVROXWLRQ/¶DSSDUHLOIRQFWLRQQHQRUPDOHPHQW
(QPRGHGHUHIURLGLVVHPHQWGHO¶HDXSHXWVHIRUPHUHWVXLQWHUGHV
tuyaux et des raccords froids.
(QPRGHGHFKDXIIDJHGHO¶HDXSHXWVHIRUPHUHWVXLQWHUGHO¶pFKDQJHXUWKHUPLTXH
(QPRGHGHGpJLYUDJHO¶HDXSUpVHQWVXUO¶pFKDQJHXUWKHUPLTXH
V¶pYDSRUHSURYRTXDQWDLQVLXQHpPLVVLRQGHYDSHXUG¶HDX
/HWpPRLQGHIRQFWLRQQHPHQWQ¶DSSDUDvWSDVVXUO¶pFUDQGHODWpOpFRPPDQGH
” DSSDUDvWUDVXUO¶pFUDQGHODWpOp0HWWH]O¶DSSDUHLOVRXVWHQVLRQ/HVLJQH “
commande.
/¶DOLPHQWDWLRQG¶DSSDUHLOLQWpULHXUHVWHOOHpWHLQWH"$OOXPH]O¶DSSDUHLO
/HFOLPDWLVHXUQHIRQFWLRQQHSDVPrPHORUVTXHO¶RQDSSXLHVXUOHERXWRQ21
2))/¶DI¿FKDJHGXPRGHGHIRQFWLRQQHPHQWGLVSDUDvWGHODWpOpFRPPDQGH
” DSSDUDvWVXUO¶pFUDQGHODWpOpFRPPDQGH
Le signe “
Lorsque le climatiseur est redémarré immédiatement après avoir été
pWHLQWVRQIRQFWLRQQHPHQWHVWEORTXpPrPHVLODWRXFKH³212))´
0DUFKH$UUrWHVWVROOLFLWpH
/HFOLPDWLVHXUIRQFWLRQQHVDQVTXHODWRXFKH³212))´0DUFKH$UUrW
soit sollicitée.
” DSSDUDvWVXUO¶pFUDQGHOD
/RUVGXFRQWU{OHFHQWUDOLVpOHVLJQH “
télécommande et le fonctionnement du climatiseur ne peut être lancé ou
DUUrWpjO¶DLGHGHODWpOpFRPPDQGH
3DWLHQWH] WURLV PLQXWHV HQYLURQ /H IRQFWLRQQHPHQW V¶HVW DUUrWp SRXU
protéger le climatiseur.)
/DIRQFWLRQGHPDUFKHGHODPLQXWHULHDWHOOHpWpUpJOpH"
$SSX\H]VXUODWRXFKH³212))´0DUFKH$UUrWSRXUO¶DUUrWHU
/HFOLPDWLVHXUHVWLOUHOLpjXQHWpOpFRPPDQGHFHQWUDOLVpH"
9HXLOOH]FRQVXOWHUOHVSHUVRQQHVUHVSRQVDEOHVGXFRQWU{OHGXFOLPDWLVHXU
Le signe “
” DSSDUDvWLOVXUO¶pFUDQGHODWpOpFRPPDQGH"
9HXLOOH]FRQVXOWHUOHVSHUVRQQHVUHVSRQVDEOHVGXFRQWU{OHGXFOLPDWLVHXU
/DIRQFWLRQGHUHFRXYUHPHQWDXWRHQFDVGHFRXSXUHG¶pOHFWULFLWpDWHOOHpWpUpJOpH"
$SSX\H]VXUODWRXFKH³212))´0DUFKH$UUrWSRXUO¶DUUrWHU
/DIRQFWLRQG¶DUUrWGHODPLQXWHULHDWHOOHpWpUpJOpH"
/HFOLPDWLVHXUV¶DUUrWHVDQVTXHODWRXFKH³212))´0DUFKH$UUrWVRLW
$SSX\H]VXUODWRXFKH³212))´0DUFKH$UUrWSRXUUHODQFHUO¶RSpUDWLRQ
sollicitée.
/HFOLPDWLVHXUHVWLOUHOLpjXQHWpOpFRPPDQGHFHQWUDOLVpH"
9HXLOOH]FRQVXOWHUOHVSHUVRQQHVUHVSRQVDEOHVGXFRQWU{OHGXFOLPDWLVHXU
Le signe “
” DSSDUDvWLOVXUO¶pFUDQGHODWpOpFRPPDQGH"
9HXLOOH]FRQVXOWHUOHVSHUVRQQHVUHVSRQVDEOHVGXFRQWU{OHGXFOLPDWLVHXU
/HVSDUDPpWUDJHVGHODPLQXWHULHVRQWLOVLQYDOLGHV"
Le fonctionnement de la minuterie de la télécommande ne peut pas
6L OD PLQXWHULH SHXW rWUH UpJOpH OHV VLJQHV WEEKLY SIMPLE ou
être réglé.
AUTO OFF GRLYHQWDSSDUDvWUHVXUO¶pFUDQGHODWpOpFRPPDQGH
Le message “PLEASE WAIT” (VEUILLEZ PATIENTER) apparaît sur
/HV SDUDPpWUDJHV LQLWLDX[ VRQW HQ FRXUV G¶H[pFXWLRQ 3DWLHQWH] PLQutes environ.
O¶pFUDQGHODWpOpFRPPDQGH
Les dispositifs de protection ont fonctionné pour protéger le climatiseur.
8QFRGHG¶HUUHXUDSSDUDvWVXUO¶pFUDQGHODWpOpFRPPDQGH
1¶HVVD\H]SDVGHUpSDUHUFHWDSSDUHLOYRXVPrPH
0HWWH] O¶DSSDUHLO KRUV WHQVLRQ LPPpGLDWHPHQW HW FRQVXOWH] YRWUH UHYHQdeur. Vous devrez fournir au revendeur le nom du modèle et les informaWLRQVTXLDSSDUDLVVHQWVXUO¶pFUDQGHODWpOpFRPPDQGH
$O¶DUUrWGHO¶RSpUDWLRQGHUHIURLGLVVHPHQWODSRPSHGHYLGDQJHVHPHW
8QEUXLWGHJRXWWHjJRXWWHRXGHPRWHXUTXLWRXUQHSHXWrWUHSHUoX
HQPDUFKHSXLVV¶DUUrWH3DWLHQWH]PLQXWHVHQYLURQ
/HEUXLWSHUoXHVWVXSpULHXUDX[FDUDFWpULVWLTXHVVRQRUHV
/HQLYHDXVRQRUHGXIRQFWLRQQHPHQWHQLQWpULHXUHVWDIIHFWpSDUO¶DFRXVWLTXHGHODSLqFHHQ
TXHVWLRQFRPPHLQGLTXpGDQVOHWDEOHDXFLGHVVRXV,OVHUDSOXVpOHYpTXHOHVFDUDFWpULVWLTXHV
VRQRUHVQRPLQDOHVFDUFHVGHUQLqUHVVRQWPHVXUpHVGDQVXQHSLqFHVDQVpFKR
Exemples de
pièce
Niveaux sonores
5LHQ Q¶DSSDUDvW VXU O¶pFUDQ GH OD WpOpFRPPDQGH VDQV ¿O O¶pFUDQ HVW
ÀRX RX O¶DSSDUHLO LQWpULHXU QH UHoRLW DXFXQ VLJQDO VDXI VL OD WpOpFRPmande est éteinte.
Le témoin de fonctionnement situé près du récepteur de la télécomPDQGHVDQV¿OVXUO¶DSSDUHLOLQWpULHXUFOLJQRWH
/¶DSSDUHLOLQWpULHXUSURGXLWGHO¶DLUFKDXGGHPDQLqUHLQWHUPLWWHQWHORUVTXHOHPRGHGHFKDXIIDJHHVWGpVDFWLYpRXORUVTXHOHPRGHGHVRXIÀHULHHVWDFWLYp
36
Pièces présentant
XQHDEVRUSWLRQ
SKRQLTXHpOHYpH
Studio de radioGLIIXVLRQVDOOH
GHPXVLTXHHWF
3 à 7 dB
Pièces présentant
XQHDEVRUSWLRQ
SKRQLTXHQRUPDOH
Salle de récepWLRQHQWUpH
G¶K{WHOHWF
6 à 10 dB
Pièces présentant
XQHDEVRUSWLRQ
SKRQLTXHIDLEOH
%XUHDXFKDPEUHG¶K{WHO
9 à 13 dB
/HVSLOHVVRQWIDLEOHV
5HPSODFH]OHVSLOHVHWDSSX\H]VXUODWRXFKH³5HVHW´5pLQLWLDOLVHU
6L ULHQ Q¶DSSDUDvW VXLWH DX UHPSODFHPHQW GHV SLOHV DVVXUH]YRXV TXH
OHVSLOHVVRQWLQVpUpHVFRQIRUPpPHQWjODSRODULWpLQGLTXpH±
/DIRQFWLRQG¶DXWRGLDJQRVWLFDIRQFWLRQQpSRXUSURWpJHUOHFOLPDWLVHXU
1¶HVVD\H]SDVGHUpSDUHUFHWDSSDUHLOYRXVPrPH0HWWH]O¶DSSDUHLO
KRUVWHQVLRQLPPpGLDWHPHQWHWFRQVXOWH]YRWUHUHYHQGHXU9HXLOOH]
fournir au revendeur le nom du modèle.
/RUVTX¶XQDXWUHDSSDUHLOLQWpULHXUIRQFWLRQQHHQPRGHFKDXIIDJHOD
YDOYHGHFRQWU{OHV¶RXYUHHWVHUHIHUPHUpJXOLqUHPHQWD¿QGHPDLQWHQLU
ODVWDELOLWpGXV\VWqPHGHFOLPDWLVDWLRQ&HWWHRSpUDWLRQV¶DUUrWHDXERXWG
un certain temps.
* 6L FHOD SURYRTXDLW XQH DXJPHQWDWLRQ LQGpVLUDEOH GH OD WHPSpUDWXUH
SDU H[HPSOH GDQV GH SHWLWHV SLqFHV VXVSHQGH] WHPSRUDLUHPHQW OH
IRQFWLRQQHPHQWG¶DSSDUHLO
6SpFL¿FDWLRQVWHFKQLTXHV
Série PKFY
PKFY-P06NBMU-E2
Modèle
$OLPHQWDWLRQGHO¶DSSDUHLO
Poids net
Refroidissement%78K!
&KDXIIDJH%78K!
HauteurLQFK!
LargeurLQFK!
ProfondeurLQFK!
,EV!
'pELWGHODVRXIÀHULH
)DLEOH0R\HQ0R\HQ(OHYp
6(&&)0!
+80,'(&)0!
32-1/8
8-7/8
22
170-180-200-210
160-170-180-190
1LYHDXGHEUXLW
)DLEOH0R\HQ0R\HQ(OHYp
G%$!
32-33-35-36
Capacité
Dimensions
6000
6700
PKFY-P08NHMU-E2 PKFY-P12NHMU-E2 PKFY-P15NHMU-E2
0RQRSKDVq 208/230V 60Hz
8000
12000
15000
9000
13500
17000
11-5/8
35-3/8
9-13/16
29
320-370-405
290-335-365
PKFY-P18NHMU-E2
34-39-43
36-41-45
18000
20000
320-370-425
290-335-380
Série PMFY
PMFY-P06NBMU-E
Refroidissement%78K!
&KDXIIDJH%78K!
HauteurLQFK!
LargeurLQFK!
ProfondeurLQFK!
,EV!
6(&&)0!
+80,'(&)0!
230-250-280-300
200-220-250-270
PMFY-P08NBMU-E
PMFY-P12NBMU-E
0RQRSKDVq 208/230V 60Hz
8000
12000
9000
13500
9-1/16 (1-3/16)
33-5/8 (39-3/8)
1/-9/16 (18-1/2)
31 (7)
250-280-300-320
220-250-270-290
G%$!
27-30-33-35
32-34-36-37
Modèle
$OLPHQWDWLRQGHO¶DSSDUHLO
Capacité
Dimensions (Grille)
Poids net (Grille)
'pELWGHODVRXIÀHULH
)DLEOH0R\HQ0R\HQ(OHYp
1LYHDXGHEUXLW
)DLEOH0R\HQ0R\HQ(OHYp
6000
6700
PMFY-P15NBMU-E
33-35-37-39
15000
17000
270-300-340-370
240-270-310-340
1. /DFDSDFLWpGHUHIURLGLVVHPHQWFKDXIIDJHLQGLTXHODYDOHXUPD[LPDOHORUVTXHO¶DSSDUHLOIRQFWLRQQHGDQVOHVFRQGLWLRQVVXLYDQWHV
Refroidissement : appareil intérieur&'%)'%&:%):%appareil extérieur&'%)'%
&KDXIIDJH : appareil intérieur&'%)'%appareil extérieur&'%)'%&:%):%
Plage d’applications
La plage des températures de fonctionnement pour les appareils intérieurs et extérieurs de série Y est celle indiquée ci-dessous.
Précaution:
L’utilisation du climatiseur en dehors de cette plage de températures de fonctionnement et de taux d’humidité peut provoquer des dégâts
importants.
Mode
appareil intérieur
Refroidissement
&KDXIIDJH
&&Û)Û):%
&&Û)Û)'%
appareil extérieur
PUHY
±&&Û)Û)'%
PURY
±&&Û)Û)'%
±&&±Û)Û):% ±&&±Û)Û):%
PUMY
±&&Û)Û)'%
±&&Û)Û):%
5HPDUTXH
7DQWSRXUOHVDSSDUHLOVLQWpULHXUVTX¶H[WpULHXUVQRXVUHFRPPDQGRQVXQHXWLOLVDWLRQDYHFXQWDX[G¶KXPLGLWpUHODWLYHFRPSULVHQWUHHW
Avertissement:
6LOHFOLPDWLVHXUIRQFWLRQQHVDQVUHIURLGLURXVDQVFKDXIIHUODSLqFHHQIRQFWLRQGXPRGqOHFRQWDFWHUOHUHYHQGHXUFDULOSRXUUDLWDORUV\DYRLUXQHIXLWH
de gaz réfrigérant. Toujours demander au représentant du service technique s’il n’y a pas de fuite de réfrigérant après une intervention technique.
Le réfrigérant présent dans le climatiseur est sûr et normalement il ne doit pas y avoir de fuite. Néanmoins, en cas de fuite à l’intérieur, si le gaz réfrigérant
entre en contact avec la partie chauffante d’un chauffage à ventilation, d’un chauffage d’appoint, d’un poêle, etc., il dégagera des substances toxiques.
37
Contenido
1. Medidas de Seguridad...................................................................... 38
2. Nombres de las piezas ..................................................................... 38
&RQ¿JXUDFLyQGHODSDQWDOOD ............................................................. 42
&RQ¿JXUDFLyQGHGtDGHODVHPDQD\KRUD....................................... 42
5. Manejo.............................................................................................. 42
6. Temporizador.................................................................................... 44
7. Otras funciones .............................................................................. 47
6HOHFFLyQGHIXQFLyQ ...................................................................... 48
9. Funcionamiento de emergencia del controlador remoto inalámbrico .................. 52
0DQWHQLPLHQWR\OLPSLH]D ............................................................... 52
/RFDOL]DFLyQGHIDOORV...................................................................... 53
(VSHFL¿FDFLRQHV............................................................................. 55
Nota:
En este manual de instrucciones, la frase “Controlador remoto cableado” se refiere a PAR-21MAA.
Si necesita más información sobre el otro controlador remoto, consulte el libro de instrucciones que se incluye en esta caja.
1. Medidas de Seguridad
Antes de instalar la unidad, asegúrese de haber leído el
capítulo de “Medidas de seguridad”.
Las “Medidas de seguridad” señalan aspectos muy importantes sobre seguridad. Es importante que se cumplan todos.
Antes de conectar el sistema, informe al servicio de suministro o pídale permiso para efectuar la conexión.
Símbolos utilizados en el texto
Atención:
Describe precauciones que deben tenerse en cuenta para evitar el
riesgo de lesiones o muerte del usuario.
Cuidado:
Describe las precauciones que se deben tener para evitar daños en
la unidad.
Símbolos utilizados en las ilustraciones
: Indica una pieza que debe estar conectada a tierra.
Atención:
• Para aplicaciones que no están disponibles para el público general.
• La unidad no debe ser instalada por el usuario. Pida a su
distribuidor o a una empresa debidamente autorizada que se lo
instale. La incorrecta instalación de la unidad puede dar lugar a
goteo de agua, descarga eléctrica o fuego.
• No se suba encima ni coloque objetos sobre la unidad.
• No vierta agua sobre la unidad ni la toque con las manos
húmedas. Puede producirse una descarga eléctrica.
• No rocíe gases combustibles en las proximidades de la unidad.
Puede haber riesgo de incendio.
• No coloque calentadores de gas o cualquier otro aparato de
llama abierta expuestos a la corriente de aire descargada por la
unidad. Puede dar lugar a una combustión incompleta.
• No extraiga el panel frontal del ventilador de la unidad exterior
mientras esté en funcionamiento.
• No intente reparar la unidad ni la cambie de lugar usted mismo.
• Cuando note ruidos o vibraciones que no sean normales, pare la
unidad, desconecte la fuente de alimentación y póngase en contacto con su proveedor.
• No inserte nunca dedos, palos, etc. en las tomas o salidas de
aire.
• Si detecta olores raros pare la unidad, desconecte el interruptor de red y consulte con su distribuidor. De lo contrario puede
haber una rotura, una descarga eléctrica o fuego.
• Este aparato de aire acondicionado NO debe ser utilizado por
niños ni por personas inválidas sin el control de una persona
adulta.
• Los niños pequeños deben estar vigilados por personas adultas
para impedir que jueguen con el equipo de aire acondicionado.
• Si se producen fugas de gas refrigerante, pare la unidad, ventile
bien la habitación y avise a su proveedor.
• Cuando instale, mueva o revise el equipo de aire acondicionado,
utilice solo el refrigerante indicado (R410A) para cargar los tubos
del refrigerante. No lo mezcle con otro tipo de refrigerante y vacíe
completamente de aire los tubos.
Si el aire se mezcla con el refrigerante, podría producir una tensión anormalmente alta en el tubo del refrigerante y ocasionar
una explosión u otros peligros.
Usar un refrigerante distinto al indicado para el sistema provocará un fallo mecánico, un funcionamiento defectuoso del sistema
o la avería de la unidad. En el peor de los casos, podría suponer
un grave impedimento para garantizar la seguridad del producto.
Cuidado:
• No utilice objetos puntiagudos para apretar los botones ya que
podría dañarse el controlador remoto.
• No bloquee ni cubra nunca las tomas y salidas de las unidades
interior y exterior.
• No limpie el controlador remoto con gasolina, trapos químicos, etc.
• No utilice la unidad durante mucho rato en ambientes húmedos,
p.ej. con una puerta o ventana abierta. Si la unidad funciona en
modo de enfriamiento en un lugar con mucha humedad (80% o
más) durante mucho rato, la condensación del acondicionador
de aire podría caer y mojar o dañar los muebles, etc.
• 1RWRTXHHOGHÀHFWRUGHODVDOLGDGHDLUHVXSHULRUQLODFRPSXHUWD
de la salida de aire inferior durante el funcionamiento. De lo
contrario podría caer la condensación y la unidad podría detenerse.
Eliminación de la unidad
Cuando deba eliminar la unidad, consulte con su distribuidor.
2. Nombres de las piezas
Unidad interior
Velocidad del ventilador
Pasos
'HÀHFWRU
2VFLODFLyQ
automática
Rejilla
Filtro
,QGLFDFLyQGHOLPSLH]DGH¿OWUR
PKFY-P·NBMU-E2
4 velocidades
4 pasos
3 velocidades + Auto*
5 pasos
PKFY-P·NHMU-E2
PMFY-P·NBMU-E
4 velocidades
4 pasos
Manual
Normal
100 KRUDV
Manual
Normal
100 KRUDV
Manual
Normal
100 KRUDV
(VWDRSHUDFLyQHVWi~QLFDPHQWHGLVSRQLEOHXWLOL]DQGRHOFRQWURODGRUUHPRWR
FRQHOTXHVHSRGUiSRQHUODYHORFLGDGGHOYHQWLODGRUHQODRSFLyQ³$XWR´
38
2. Nombres de las piezas
PMFY-P·NBMU-E
0RGHORHPSRWUDGRHQWHFKRGHGLUHFFLRQHV
'HÀHFWRU
Vane
Rejilla
Louver
Salida
aire
Airdeoutlet
Filtro
Filter
Entrada
de aire
Air inlet
PKFY-P·NBMU-E2
PKFY-P·NHMU-E2
Modelo montado en pared
Filtro
Filter
Air intakede aire
Entrada
Modelo montado en pared
Filter
Filtro
Air intake
Entrada
de aire
Vane
Louver Salida
Air outlet
Rejilla
de aire 'HÀHFWRU
Rejilla
Louver
Salida
de aire
Air outlet
'HÀHFWRU
Vane
39
2. Nombres de las piezas
Para controlador remoto cableado
Sección de pantalla
Indicador “Sensor”
Día de la semana
Aparece cuando se utiliza el sensor
del mando a distancia.
0XHVWUDHOGtDGHODVHPDQDDFWXDO
Por cuestiones de claridad, se
muestran todos los componentes de la pantalla. Durante el
funcionamiento real, solo se ven
los elementos relevantes.
Pantalla Time/Timer
Indicador “bloqueo de función”
0XHVWUDODKRUDDFWXDODPHQRVTXHVHKD\DFRQ¿JXrado el temporizador simple o de apagado automátiFRHQFX\RFDVRPXHVWUDHOWLHPSRUHVWDQWH
,QGLFDTXHVHKDQEORTXHDGRORV
botones del mando a distancia.
Indicador “Clean The Filter”
,GHQWL¿FDHOIXQFLRQDPLHQWR
,GHQWL¿HVWKHFXUUHQWRSHUDWLRQ
actual.
Se enciende cuando debe limpiarse
HO¿OWUR
6KRZVWKHRSHUDWLQJPRGHHWF
Muestra
el modo de funciona 0XOWLODQJXDJH
GLVSOD\ LV VXSmiento,
etc.
ported. YLVXDOL]DFLyQ HQ P~OWL* AdPLWH
ples idiomas.
Indicadores del temporizador
(OLQGLFDGRUVHHQFLHQGHVLVHKD
FRQ¿JXUDGRHOWHPSRUL]DGRUFRUrespondiente.
³&HQWUDOO\&RQWUROOHG´LQGLFDWRU
Indicador
“Centrally Controlled”
,QGLFDWHV WKDW RSHUDWLRQ RI WKH
,QGLFDTXHHOPDQGRSULQFLSDOKD
UHPRWH FRQWUROOHU
KDV EHHQ SURdesactivado
el funcionamiento
del
KLELWHGE\DPDVWHUFRQWUROOHU
mando
a distancia.
Indicador “Timer Is Off”
³7LPHULV2II´LQGLFDWRU
Indica que el temporizador está
,QGLFDWHVWKDWWKHWLPHULVRII
desactivado.
Indicador de velocidad del ventilador
Indicador de dirección arriba/abajo
GHOÀXMRGHDLUH
El indicador
PXHVWUD OD GLUHFFLyQ
GHFLUFXODFLyQGHODLUHGHVDOLGD
Indicador “One Hour Only”
&RQ¿JXUDFLyQGHWHPSHUDWXUD
Temperature Setting
6KRZVWKHWDUJHWWHPSHUDWXUH
Muestra
la temperatura objetivo.
$SDUHFHFXDQGRODFLUFXODFLyQGHODLUH
VHKD¿MDGRHQGpELORKDFLDDEDMR
durante el modo COOL o DRY. (El funcLRQDPLHQWRYDUtDVHJ~QHOPRGHOR
(OLQGLFDGRUVHDSDJDGHVSXpVGHXQD
KRUDPRPHQWRHQTXHFDPELDWDPELpQ
ODGLUHFFLyQGHFLUFXODFLyQGHODLUH
Pantalla de temperatura ambiente
Muestra la temperatura ambiente. El rango
de temperatura ambiente que muestra la
pantalla va de 8 - 39 °C, 46-102 °F.
La pantalla parpadea si la temperatura no llega
a 8 °C, 46 °F o supera los 39 °C, 102 °F.
Muestra la velocidad del ventilador
seleccionada.
Indicador de ventilación
Aparece cuando la unidad funciona en
PRGR9HQWLODFLyQ
Pantalla de rejilla
,QGLFDODDFFLyQGHODUHMLOODEDVFXODQWH
1RDSDUHFHVLODUHMLOODVHHQFXHQWUD¿MD
(Indicador Power On)
Indica que está encendido.
Sección de control
%RWyQ212))
Botones de ajuste de temperatura
'RZQ$EDMR
%RWyQ)DQ6SHHG
Up $UULED
%RWyQ7LPHU0HQX
ERWyQ0RQLWRU6HW
%RWyQ
Filter
(%RWyQ %RWyQ0RGRGHIXQFLRQDPLHQWR
EDFNDWUiV
%RWyQ7HVW5XQ
Botones Set Time
%RWyQ&KHFNERWyQ&OHDU
Back $WUiV
$KHDG$GHODQWH
%RWyQ$LUÀRZ8S'RZQ
%RWyQ7LPHU2Q2II
ERWyQ6HW'D\
%RWyQ/RXYHU
( %RWyQ Operation
Apertura de
la puerta.
$OQ~PHURGHIXQFLRnamiento anterior.
%RWyQ9HQWLODWLRQ
(ERWyQ 2SHUDWLRQ
Sensor de temperatura integrado
$OQ~PHURGHIXQFLRQDmiento posterior.
Nota:
0HQVDMH³3/($6(:$,7´325)$925(63(5(
(VWHPHQVDMHDSDUHFHGXUDQWHDSUR[PLQXWRVFXDQGRODXQLGDGLQWHULRUUHFLEHDOLPHQWDFLyQRFXDQGRODXQLGDGVHHVWiUHFXSHUDQGRGHXQDFDtGDGHWHQVLyQ
Pantalla del modo de funcionamiento parpadeando
&XDQGRYDULDVXQLGDGHVLQWHULRUHVHVWiQFRQHFWDGDVDXQD~QLFDXQLGDGH[WHULRU\HQXQDGHGLFKDVXQLGDGHVLQWHULRUHVHVWiVHOHFFLRQDGRXQPRGRGH
funcionamiento distinto al de otra, la pantalla del modo de funcionamiento parpadea. Seleccione el mismo modo de funcionamiento en ambas unidades.
0HQVDMH³127$9$,/$%/(´12',6321,%/(
(VWHPHQVDMHDSDUHFHVLVHSXOVDXQERWyQSDUDDFWLYDUXQDIXQFLyQTXHODXQLGDGLQWHULRUQRSUHVHQWD
Cuando se utiliza el mismo controlador remoto para varias unidades interiores, este mensaje aparece si la unidad interior principal no está equiSDGDFRQODIXQFLyQVHOHFFLRQDGD
Pantalla de temperatura ambiente
Existe la posibilidad de seleccionar los sensores de temperatura de la unidad interior o del controlador remoto para medir la temperatura ambiHQWH3RUGHIHFWRHVWiQVHOHFFLRQDGRVORVVHQVRUHVGHWHPSHUDWXUDGHODXQLGDGLQWHULRU6LpVWRVVHVHOHFFLRQDQSDUDPHGLUODWHPSHUDWXUDDPbiente, la temperatura ambiente medida en la unidad interior principal aparece en el controlador remoto que controla varias unidades interiores.
40
2. Nombres de las piezas
Para controlador remoto inalámbrico
ÈUHDGHWUDQVPLVLyQ
,QGLFDGRUGHWUDQVPLVLyQ
Pantalla del controlador remoto
,QGLFDGRU7LPHU7HPSRUL]DGRU
*Por cuestiones de claridad, se muestran todos los
elementos que pueden aparecer en la pantalla.
$OSXOVDUHOERWyQ5HVHW5HVWDEOHFHUDSDUHFHQ
todos los elementos en pantalla.
%RWyQ212))
Áreas de funcionamiento
Botones de ajuste de temperatura
%RWyQ)DQ6SHHGFDPELDODYHORFLGDGGHOYHQWLODGRU
%RWyQ7LPHU2II'HVDFWLYDUWHPSRUL]DGRU
%RWyQ7LPHU2Q$FWLYDUWHPSRUL]DGRU
%RWyQ$LUÀRZ)OXMRGHDLUHFDPELDKDFLDDUULEDR
DEDMRODGLUHFFLyQGHOÀXMR
%RWyQ+RXU+RUD
%RWyQ0LQXWH0LQXWR
%RWyQ0RGHFDPELDHOPRGRGHIXQFLRQDPLHQWR
%RWyQ6HW7LPHDMXVWDODKRUD
%RWyQ&KHFN
%RWyQ7HVW5XQ
&XDQGRXWLOLFHHOFRQWURODGRUUHPRWRLQDOiPEULFRDSXQWHKDFLDHOUHFHSWRUGHODXQLGDGLQWHULRU
6LHOFRQWURODGRUUHPRWRVHXWLOL]DXQRVGRVPLQXWRVGHVSXpVGHHQFHQGHUODXQLGDGLQWHULRU
HVWDSXHGHSLWDUGRVYHFHV\DTXHHVWDUiUHDOL]DQGRODFRPSUREDFLyQDXWRPiWLFDLQLFLDO
/DXQLGDGLQWHULRUSLWDUiSDUDFRQ¿UPDUTXHKDUHFLELGRODVHxDOWUDQVPLWLGDGHVGHHOFRQWURODGRUUHPRWR/DXQLGDGLQWHULRUSXHGHUHFLELUVHxDOHVHPLWLGDVDXQPi[LPRGHIWPHWURV
HQOtQHDUHFWDHQXQUDQJRGHDGHUHFKDHL]TXLHUGDGHODXQLGDG6LQHPEDUJRFLHUWRV
VLVWHPDVGHLOXPLQDFLyQFRQÀXRUHVFHQWHVROXFHVIXHUWHVSXHGHQDIHFWDUDODFDSDFLGDGGH
UHFHSFLyQGHVHxDOGHODXQLGDGLQWHULRU
Si la luz de funcionamiento situada cerca del receptor de la unidad interior parpadea, será necHVDULRLQVSHFFLRQDUODXQLGDG3DUDHOVHUYLFLRWpFQLFRFRQVXOWHDVXGLVWULEXLGRU
Trate el controlador remoto con cuidado. Procure que no se le caiga ni sufra golpes. Además,
QRORPRMHQLORGHMHHQXQOXJDUFRQXQDOWRJUDGRGHKXPHGDG
Para impedir que el controlador remoto se pierda, instale el soporte incluido con el controlador
UHPRWRHQXQDSDUHG\DVHJ~UHVHGHFRORFDUHOPDQGRHQVXVRSRUWHWUDVVXXVR
%RWyQ/RXYHUFDPELDDGHUHFKDL]TXLHUGDODGLUHFFLyQGHOÀXMRGHDLUH
%RWyQ5HVHW5HVWDEOHFHU
Instalación/sustitución de pilas
1. Retire la cubierta superior, inserte dos pilas
$$$\YXHOYDDFRORFDUODFXELHUWD
1
2
3
Cubierta
superior
Dos pilas AAA
Inserte las pilas comenzando por el polo
QHJDWLYR±$OLQVHUWDU
las pilas, respete la poODULGDG±
3XOVHHOERWyQ5HVHW5HVWDEOHFHU
3XOVH HO ERWyQ 5HVHW
5HVWDEOHFHU FRQ XQ
objeto terminado en
punta.
41
&RQ¿JXUDFLyQGHODSDQWDOOD
<Tipos de pantallas>
6HOHFFLyQGH)XQFLyQ
&RQ¿J5HORM
TIME SUN
Pantallas Standard Control
ÛF
ÛF
ON
OFF
Visualizar Temporizad
Temporizador
SUN MON TUE WED THU FRI SAT
MON
TIMER
OFF
ÛF
WEEKLY
WEEKLY
(ODMXVWHGHLGLRPDGHODSDQWDOODVHSXHGHFDPELDUDHVSDxROXWLOL]DQGR
OD VHOHFFLyQ GH IXQFLyQ GHO FRQWURODGRU UHPRWR &RQVXOWH OD VHFFLyQ punto [4]-1 para cambiar el ajuste de idioma.
(ODMXVWHLQLFLDOHVLQJOpV
6HOHFFLyQGH)XQFLyQ
FRQ¿JXUHODVIXQFLRQHV\UDQJRVGLVSRQLEOHVSDUDHO
mando a distancia (funciones de temporizador, restricFLRQHVGHIXQFLRQDPLHQWRHWF
&RQ¿J5HORM: FRQ¿JXUHHOGtDGHODVHPDQDXKRUDDFWXDO
Pantallas Standard Control:
visualicH\FRQ¿JXUHHOHVWDGRGHIXQFLRQDPLHQWRGHO
sistema de acondicionamiento de aire.
Visualizar Temporizad:
YLVXDOLFHHOWHPSRUL]DGRUFRQ¿JXUDGRDFWXDOPHQWH
VHPDQDOWHPSRUL]DGRUVLPSOHRDSDJDGRDXWRPiWLFR.
Temporizador: FRQ¿JXUHHOIXQFLRQDPLHQWRGHFXDOTXLHUDGHORVWHPSRUL]DGRUHVVHPDQDOVLPSOHRDSDJDGRDXWRPiWLFR
<Cómo cambiar la pantalla>
Para dirigirse a PDQWHQJD SXOVDGR HO ERWyQ 0RGH \ HO ERWyQ 7LPHU
2Q2IIGXUDQWHVHJXQGRV
Para dirigirse a SUHVLRQHHOERWyQ7LPHU0HQX
Para dirigirse a : SUHVLRQHHOERWyQ0RGRGHIXQFLRQDPLHQWREDFNDWUiV
Para dirigirse a : presione cualquiera de los botones Set Time ( o &RQ¿JXUDFLyQGHGtDGHODVHPDQD\KRUD
&RQ¿JXUDFLyQGHOGtDGHODVHPDQD
9LVXDOL]DFLyQGHGtD
GHODVHPDQD\KRUD
TIME SUN
&RQ¿JXUDFLyQGHODKRUD
TIME SUN
ÛF
ÛF
TEMP.
MENU
BACK
PAR-21MAA
MONITOR/SET
ON/OFF
ON/OFF
FILTER
DAY
CLOCK
CHECK TEST
OPERATION
CLEAR
Nota:
El día y la hora no aparecerán si se ha desactivado la utilización del reloj en
la Selección de Función.
1. Pulse o
GHOERWyQ6HW7LPH para que muestre el indicador .
2. 3XOVHHOERWyQ7LPHU2Q2II6HW'D\SDUD¿MDUHOGtD
&
DGDSXOVDFLyQDYDQ]DHOGtDTXHVHPXHVWUDHQ:
Sun
Mon
...
Fri
Sat.
3. 3XOVHHOERWyQ6HW7LPHDSURSLDGRVHJ~QVHDQHFHVDULRSDUDFRQ¿JXUDUODKRUD
* 0LHQWUDVPDQWLHQHSXOVDGRHOERWyQODKRUDHQDYDQ]DUiSULPero en intervalos de un minuto, luego en intervalos de diez minutos
\GHVSXpVHQLQWHUYDORVGHXQDKRUD
'HVSXpVGHUHDOL]DUODVFRQ¿JXUDFLRQHVDSURSLDGDVHQORV3DVRV\
SXOVHHOERWyQ Filter SDUD¿MDUORVYDORUHV
5. Manejo
ÛF
ÛF
5.1. Encendido y apagado
<Para poner en marcha>
3XOVHHOERWyQ212))
.
• Se encienden la lámpara de encendido \ODSDQWDOOD
Nota:
&XDQGRVHUHLQLFLDODXQLGDGODVFRQ¿JXUDFLRQHVLQLFLDOHVVRQODVVLJXLHQWHV
ÛF
&RQ¿JXUDFLRQHVGHO0DQGRDGLVWDQFLD
Modo
ÒOWLPRYDORUFRQ¿JXUDGR
&RQ¿JXUDFLyQGHODWHPSHUDWXUD ÒOWLPRYDORUFRQ¿JXUDGR
Velocidad del ventilador
ÒOWLPRYDORUFRQ¿JXUDGR
COOL o DRY
6DOLGDKRUL] *1
&LUFXODFLyQGHODLUHKDFLD
$UULED$EDMR
HEAT
Último valor
Modo
FRQ¿JXUDGR *2
FAN
6DOLGDKRUL] *1
*1 (VSRVLEOHTXHVHDSOLTXHHO~OWLPRDMXVWHHQIXQFLyQGHODXQLGDGLQWHULRU
*2 (QFDVRGHTXHOD~OWLPDFRQ¿JXUDFLyQVHDRVFLODQWHHOÀXMRGHODLUHSXHGHVHU
descendente 4 dependiendo del tipo de la unidad interior.
42
<Para detener el funcionamiento>
3XOVHGHQXHYRHOERWyQ212))
.
• Se oscurecen la lámpara de encendido \ODSDQWDOOD
Nota:
Aunque pulse una vez más el botón de encendido ON/OFF inmediatamente
después de apagar el aparato, el acondicionador de aire no se pondrá en
PDUFKDKDVWDSDVDGRVWUHVPLQXWRV(VWRWLHQHFRPR¿QHYLWDUGDxRVHQORV
componentes internos.
5. Manejo
5.2. Selección de modo
\VHOHF-
3XOVHHOERWyQGHPRGRVGHIXQFLRQDPLHQWR (
cione el modo de funcionamiento .
Modo de enfriamiento
Modo secado
Modo de ventilador
0RGRGHFDOHIDFFLyQ
0RGRDXWRPiWLFRHQIULDPLHQWRFDOHIDFFLyQ
Funcionamiento automático
De acuerdo con la temperatura ajustada, el funcionamiento de refrigerDFLyQFRPHQ]DUiVLODWHPSHUDWXUDGHODVDODHVGHPDVLDGRDOWD(OPRGR
GHFDOHIDFFLyQFRPHQ]DUiVLODWHPSHUDWXUDGHODVDODHVGHPDVLDGREDMD
Durante el funcionamiento automático, si la temperatura de la sala
FDPELD\SHUPDQHFH&)RPiVSRUHQFLPDGHODWHPSHUDWXUD
ajustada durante 3 minutos, el acondicionador de aire cambiará a
PRGRGHUHIULJHUDFLyQ$VLPLVPRVLODWHPSHUDWXUDSHUPDQHFH&
3°F o más por debajo de la temperatura ajustada durante 3 minutos,
el acondicionador de aire cambiDUiDPRGRGHFDOHIDFFLyQ
Modo de enfriamiento
3 minutos (cambio de
FDOHIDFFLyQDUHIULJHUDFLyQ
Nota:
El número de velocidades del ventilador disponibles depende del tipo de unidad
conectada. Recuerde, además, que algunas unidades no ofrecen ajuste “Auto”.
En los siguientes casos, la velocidad real del ventilador generada por la un
dad diferirá de la velocidad mostrada en la pantalla del mando a distancia.
1. Mientras la pantalla muestra “STAND BY” (CALENTANDO) o “DEFROST”
(DESCONGELACIÓN).
2. Cuando la temperatura del intercambiador de calor es baja en modo de calefacción (por
ejemplo, inmediatamente después de que se active el modo de calefacción).
3. En modo HEAT, cuando la temperatura ambiente de la habitación es suSHULRUDOYDORUGHFRQ¿JXUDFLyQGHODWHPSHUDWXUD
4. Cuando la unidad esté en modo DRY.
Ŷ Ajuste automático de la velocidad del ventilador (controlador remoto
inalámbrico)
(ODMXVWHVHKDGHHIHFWXDUHQHOFRQWURODGRUUHPRWRLQDOiPEULFRVRORFXDQGRHO
ventilador no está ajustado a la velocidad predeterminada.
(O DMXVWH QR VH KD GH HIHFWXDU HQ HO FRQWURODGRU UHPRWR FDEOHDGR FXDQGR HO
ventilador está ajustado a la velocidad predeterminada.
3XOVHHOERWyQ6(7FRQXQREMHWRD¿ODGR
&RQWLQ~HODRSHUDFLyQFXDQGRVHDSDJXHODSDQWDOODGHOFRQWURODGRUUHPRWR
MODEL SELECT SDUSDGHD\VHLOXPLQDHOQGHPRGHOR .
.
3XOVHHOERWyQ$8726723
SDUSDGHD\VHLOXPLQDHOQGHDMXVWH.
Temperatura ajustada +1,5°C, +3°F
Temperatura ajustada
Temperatura ajustada -1,5°C, -3°F
PLQXWRVFDPELRGHUHIULJHUDFLyQ
DFDOHIDFFLyQ
(DMXVWHQVLQYHQWLODGRUHQYHORFLGDGDXWRPiWLFD
Pulse los botones TEMP
SDUDSRQHUHOQGHDMXVWH
QDMXVWHFRQYHQWLODGRUHQYHORFLGDGDXWRPiWLFD
6L VH KD HTXLYRFDGR DO HIHFWXDU OD RSHUDFLyQ SXOVH HO ERWyQ 212))
\
vuelva a empezar desde el procedimiento .
3XOVHHOERWyQ6(7FRQXQREMHWRD¿ODGR
MODEL SELECT \HOQGHPRGHORVHLOXPLQDQGXUDQWHVHJXQGRV\DFRQWLQXDFLyQ
se apagan.
Como la temperatura ambiente se ajusta automáticamente para manWHQHUXQDWHPSHUDWXUDHIHFWLYD¿MDHOPRGRGHUHIULJHUDFLyQVHDFWLYD
XQ SDU GH JUDGRV SRU HQFLPD GH OD WHPSHUDWXUD DMXVWDGD \ HO PRGR
GHFDOHIDFFLyQXQSDUGHJUDGRVSRUGHEDMRXQDYH]DOFDQ]DGDGLFKD
temperatura PRGRDXWRPiWLFRGHDKRUURGHHQHUJtD
MODEL SELECT
ON/OFF
TEMP
5.3. Ajuste de la temperatura
Para disminuir la temperatura de la habitación:
3XOVHHOERWyQ
SDUD¿MDUODWHPSHUDWXUDGHVHDGD
En el visor aparecerá la temperatura seleccionada .
MODE
5.4. Ajuste de la velocidad del ventilador
3XOVHHOERWyQ)DQ6SHHG tantas veces como sea necesario con el
sistema en funcionamiento.
• &DGDSXOVDFLyQFDPELDODSRWHQFLD/DYHORFLGDGVHOHFFLRQDGD actualmente se muestra en .
• /DVHFXHQFLDGHFDPELR\ODVFRQ¿JXUDFLRQHVGLVSRQLEOHVVRQODVVLJXLHQWHV
Velocidad del
ventilador
4 velocidades
+
Pantalla
Velocidad
Speed 1 1
Velocidad
2 Speed
Velocidad
3 Speed
Velocidad
4 Auto
Auto
Speed
2
3
4
Auto *
3 velocidades
+
Velocidad 1
Velocidad 2
Velocidad 3
Auto
Auto *
Velocidad 1
Velocidad 2
Velocidad 3
Velocidad 4
Modelo de 4
velocidades
AUTO STOP
VANE
AUTO START
CHECK LOUVER
SET
h
min
TEST RUN
Para aumentar la temperatura de la habitación:
SDUD¿MDUODWHPSHUDWXUDGHVHDGD
3XOVHHOERWyQ
En el visor aparecerá la temperatura seleccionada .
• Las gamas de ajuste de temperaturas disponibles son las siguientes:
(QIULDPLHQWR\VHFDGR: 19 - 30°C, 67 - 87 °F
&DOHIDFFLyQ:
17 - 28°C, 63 - 83 °F
Automático:
19 - 28°C, 67 - 83 °F
• La pantalla parpadea 8 °C - 39 °C, 46 °F - 102 °F para informar si la
WHPSHUDWXUDGHODKDELWDFLyQHVLQIHULRURVXSHULRUDODTXHVHYLVXDOL]D
FAN
RESET
CLOCK
5.5. $MXVWHGHODGLUHFFLyQGHOÀXMRGHDLUH
<Para cambiar la dirección de circulación del aire hacia Arriba/Abajo>
&RQODXQLGDGHQIXQFLRQDPLHQWRSXOVHHOERWyQ$LUÀRZ8S'RZQ tantas veces como sea necesario.
• &DGDSXOVDFLyQFDPELDODGLUHFFLyQ/DGLUHFFLyQDFWXDOVHPXHVWUDHQ.
• /DVHFXHQFLDGHFDPELR\ODVFRQ¿JXUDFLRQHVGLVSRQLEOHVVRQODVVLJXLHQWHV
Flujo de aire
Pantalla
2VFLODFLyQ
Swing Auto
1
Swing
2VFLODFLyQ
1
2
3
5
4
Modelo de 5
pasos*1
Modelo de 4
pasos
2
3
4
(Horiz.)
+RUL]
* 5HFXHUGH TXH GXUDQWH HO IXQFLRQDPLHQWR RVFLODQWH 6ZLQJ OD LQGLFDFLyQGLUHFFLRQDOHQODSDQWDOODQRFDPELDHQVLQFURQL]DFLyQFRQORV
álabes direccionales en la unidad.
$OJXQRVPRGHORVQRDGPLWHQFRQ¿JXUDFLRQHVGLUHFFLRQDOHV
*1. Únicamente para el control remoto MA, otro control remoto mostrará
lo mismo que el modelo de 4 pasos.
*2. 3.)<3Â1%08(QRWLHQHQLQJ~QGHVSOLHJXHGHRVFLODFLyQ
$MXVWHGHODGLUHFWLyQGHOÀXMRGHDLUH$XWR!
&22/)$1'5<&RQ¿JXUDFLyQ+RUL]RQWDO+($7&RQ¿JXUDFLyQ+DFLDDEDMR
* 6yORSDUDHOFRQWURODGRUUHPRWR0$6HQHFHVLWDSRQHUODYHORFLGDGGHO
ventilador en automático para poder utilizar el controlador remoto inalámbrico.
43
5. Manejo
Nota:
Las direcciones disponibles dependen del tipo de unidad conectada. RecuHUGHDGHPiVTXHDOJXQDVXQLGDGHVQRRIUHFHQXQDFRQ¿JXUDFLyQ³$XWR´
En los siguientes casos, la dirección real del aire diferirá de la dirección
indicada en la pantalla del mando a distancia.
1. Mientras la pantalla muestra “STAND BY” (CALENTANDO) o “DEFROST”
(DESCONGELACIÓN).
2. Inmediatamente después de iniciar el modo calentador (durante la
espera para la realización del cambio).
3. En modo calentador, cuando la temperatura ambiente de la sala sea
VXSHULRUDODFRQ¿JXUDFLyQGHODWHPSHUDWXUD
>0DQXDO@3DUDFDPELDUODGLUHFFLyQGHOÀXMRGHODLUHDODGHUHFKDRL]TXLHUGD!
1RHVSRVLEOHXWLOL]DUHOERWyQGHODVUHMLOODV.
• Detenga el funcionamiento de la unidad, sujete la
SDODQFDGHODVUHMLOODV\DMXVWHODGLUHFFLyQGHVHDGD
1R VH GHEH DMXVWDU FRQ OD GLUHFFLyQ KDFLD
el interior si la unidad se encuentra en el
PRGR GH HQIULDPLHQWR R VHFDGR \D TXH H[LVWH HO ULHVJR GH
FRQGHQVDFLyQ\GHJRWHRGHDJXD
Cuidado:
Al realizar el procedimiento anterior, asegúrese de tomar las
medidas necesarias para evitar caídas.
5.6. Ventilación
Para combinación LOSSNAY
5.6.1. Para controlador remoto cableado
3DUDKDFHUIXQFLRQDUHOUHQRYDGRUGHDLUHMXQWRFRQODXQLGDGLQWHULRU:
3XOVHHOERWyQ212))
.
• El indicador Vent aparece en la pantalla (en $KRUDHOUHQRYDGRUGH
aire funcionará automáticamente cuando funcione la unidad interior.
3DUDKDFHUIXQFLRQDUVyORHOUHQRYDGRUGHDLUHFXDQGRODXQLGDGLQWHULRUQRHVWpIXQFLRQDQGR:
3XOVHHOERWyQ9HQWLODWLRQ mientras la unidad interior se encuentre apagada.
• /D OiPSDUD GH HQFHQGLGR 2Q HQ \ HO LQGLFDGRU GH 9HQWLODFLyQHQVHHQFHQGHUiQ
Para cambiar la potencia del renovador de aire:
3XOVHHOERWyQ9HQWLODWLRQ VHJ~QVHDQHFHVDULR
• &DGDSXOVDFLyQFDPELDODFRQ¿JXUDFLyQVHJ~QVHPXHVWUDDFRQWLQXDFLyQ
Sin
indicador
No display
(Stop)
$OWD
(High)
%DMD
(Low)
(OFF)
Nota:
En las configuraciones de algunos modelos, el ventilador en
OD XQLGDG LQWHULRU SXHGH DFWLYDUVH DXQ FXDQGR VH FRQ¿JXUH HO
renovador de aire para que funcione independientemente.
6. Temporizador
6.1. Para controlador remoto cableado
3XHGHXWLOL]DUOD6HOHFFLyQGH)XQFLyQSDUDVHOHFFLRQDUFXiOGHORVWUHV
tipos de temporizador utilizar: temporizador semanal, temporizador
simple o temporizador automático.
6.1.1. Temporizador semanal
(OWHPSRUL]DGRUVHPDQDOSXHGHXWLOL]DUVHSDUDFRQ¿JXUDUKDVWDRFKR
IXQFLRQHVSDUDFDGDGtDGHODVHPDQD
• &DGDIXQFLyQSXHGHFRQVLVWLUHQFXDOTXLHUDGHODVVLJXLHQWHVKRUDGH
HQFHQGLGR\DSDJDGRMXQWRDXQDFRQ¿JXUDFLyQGHODWHPSHUDWXUDVyOR
KRUDGHHQFHQGLGR\DSDJDGRRVyORFRQ¿JXUDFLyQGHODWHPSHUDWXUD
• &XDQGRODKRUDDFWXDODOFDQ]DODKRUDFRQ¿JXUDGDHQHVWHWHPSRUL]DGRUHO
DFRQGLFLRQDGRUGHDLUHUHDOL]DODDFFLyQFRQ¿JXUDGDSRUHOWHPSRUL]DGRU
(OWLHPSRQHFHVDULRSDUDODFRQ¿JXUDFLyQGHODKRUDSDUDHVWHWHPSRrizador es de 1 minuto.
Nota:
*1. El temporizador semanal, el temporizador simple y el temporizador automático no pueden utilizarse al mismo tiempo.
*2. El temporizador semanal no funcionará si se da alguna de las siguientes
condiciones.
La función de temporizador está desactivada; el sistema se encuentra en un estado
anómalo; hay una sesión de prueba en curso; se está llevando a cabo una autoprueEDRXQDSUXHEDGHOPDQGRDGLVWDQFLDHOXVXDULRHVWiFRQ¿JXUDQGRXQDIXQFLyQHO
XVXDULRHVWiFRQ¿JXUDQGRHOWHPSRUL]DGRUHOXVXDULRHVWiFRQ¿JXUDQGRHOGtDDFWXDO
de la semana o la hora; el sistema se encuentra bajo el control central. (En concreto,
el sistema no llevará a cabo operaciones (encendido o apagado de la unidad, con¿JXUDFLyQGHODWHPSHUDWXUDTXHHVWpQGHVDFWLYDGDVFXDQGRVHSURGX]FDQHVWDV
condiciones.)
<&yPRFRQ¿JXUDUHOWHPSRUL]DGRUVHPDQDO>
1. $VHJ~UHVHGHTXHVHHQFXHQWUDHQODSDQWDOODGHFRQWUROHVWiQGDU\GH
que el indicador del temporizador semanal se muestra en la pantalla.
2. 3XOVHHOERWyQ7LPHU0HQX
GHPRGRTXHDSDUH]FDHQODSDQWDOOD³6HW
8S´HQ 5HFXHUGHTXHFDGDSXOVDFLyQGHOERWyQFDPELDODSDQWDOOD
HQWUH³6HW8S´\³0RQLWRU´
3. 3XOVH HO ERWyQ 7LPHU 2Q2II 6HW 'D\ SDUD FRQ¿JXUDU HO GtD &DGD SXOVDFLyQDYDQ]DODSDQWDOOD DODSUy[LPDFRQ¿JXUDFLyQHQODVHFXHQFLDTXH
VHLQGLFDDFRQWLQXDFLyQ³6XQ0RQ7XHV:HG7KXUV)UL6DW´ ³6XQ´ ...
'RPLQJR/XQHV0DUWHV0LpUFROHV-XHYHV9LHUQHV6iEDGR 'RPLQJR
³)UL´ ³6DW´ ³6XQ0RQ7XHV:HG7KXUV)UL6DW´9LHUQHV Sábado
'RPLQJR/XQHV0DUWHV0LpUFROHV-XHYHV9LHUQHV6iEDGR
4. 3XOVHHOERWyQ
o
Operation ( o VHJ~QVHDQHFHVDULRSDUD
VHOHFFLRQDUHOQ~PHURGHRSHUDFLyQDSURSLDGRD.
/
DLQIRUPDFLyQLQWURGXFLGDHQORV3DVRV\VHOHFFLRQDUiXQDGH
ODVFHOGDVGHODPDWUL]LOXVWUDGDDFRQWLQXDFLyQ
(La pantalla del mando a distancia en la izquierda muestra
FyPRVHPRVWUDUtDODSDQWDOODFXDQGRVHFRQ¿JXUD2SHUDFLyQ
SDUDHOGRPLQJRFRQORVYDORUHVLQGLFDGRVDFRQWLQXDFLyQ
0DWUL]GHFRQ¿JXUDFLyQ
N° de op.
No. 1
No. 2
6XQGD\
• 8:30
• ON
• 73°F
• 10:00
• OFF
0RQGD\
• 10:00
• OFF
…
• 10:00
• OFF
6DWXUGD\
• 10:00
• OFF
…
No. 8
N°
de Funcionamiento.
Operation
No.
'D\6HWWLQJ
&RQ¿JXUDFLyQGHOGtD
9DORUHVGH2SHUDFLyQSDUDHOGRPLQJR!
Iniciar el funcionamiento del acondicionador de
DLUHDODVFRQODWHPSHUDWXUD¿MDGDHQ)
9DORUHVGH2SHUDFLyQSDUDWRGRVORVGtDV!
Apagar el acondicionador de aire a las 10:00.
Nota:
SUN
ON
ÛF
WEEKLY
TEMP.
MENU
BACK
PAR-21MAA
MONITOR/SET
ON/OFF
ON/OFF
FILTER
DAY
CHECK TEST
OPERATION
CLOCK
CLEAR
&RQ¿JXUDQGRHOGtDD³6XQ0RQ7XHV:HG7KXUV)UL6DW´SXHGHFRQ¿JXUDU
la misma operación a la misma hora todos los días.
(Por ejemplo: la Operación 2 arriba mencionada es la misma para todos los
días de la semana).
0XHVWUDODFRQ¿JXUDFLyQ
GHODKRUD
0XHVWUDODRSHUDFLyQVHOHFFLRQDGDHQFHQGLGRRDSDJDGR
* 1RDSDUHFHVLQRVHKDFRQ¿JXUDGRODRSHUDFLyQ
SUN
ON
ÛF
WEEKLY
44
0XHVWUDODWHPSHUDWXUD¿MDGD
* 1RDSDUHFHVLQRVHKD¿MDGRODWHPperatura.
6. Temporizador
&RQ¿JXUDFLyQGHOWHPSRUL]DGRUVHPDQDO!
6.1.2. Temporizador simple
3XOVHHOERWyQ6HW7LPHDSURSLDGRVHJ~QVHDQHFHVDULRSDUD¿MDU
ODKRUDGHVHDGDHQ
* 'XUDQWHVXSXOVDFLyQODKRUDDYDQ]DSULPHURHQLQWHUYDORVGHXQPLQXWR
OXHJRHQLQWHUYDORVGHGLH]PLQXWRV\¿QDOPHQWHHQLQWHUYDORVGHXQDKRUD
3XOVHHOERWyQ212))
SDUDVHOHFFLRQDUODRSHUDFLyQGHVHDGD
HQFHQGLGRRDSDJDGRHQ.
&
DGDSXOVDFLyQFDPELDDOVLJXLHQWHYDORUHQODVHFXHQFLDTXHVHLQGLFD
DFRQWLQXDFLyQVLQLQGLFDFLyQVLQFRQ¿JXUDFLyQ ³21´ ³2))´
3XOVHHOERWyQ6HW7HPSHUDWXUHDSURSLDGRSDUD¿MDUODWHPSHUDWXUD
deseada (en &
DGDSXOVDFLyQFDPELDODFRQ¿JXUDFLyQHQODVHFXHQFLDTXHVH
LQGLFDDFRQWLQXDFLyQVLQLQGLFDFLyQVLQFRQ¿JXUDFLyQ
75
77
...
84
87
53
...
73
VLQLQGLFDFLyQ
5DQJRGLVSRQLEOHHOUDQJRGHFRQ¿JXUDFLyQHVGH&)D
30 °C, 86 °F. El rango real de control de temperatura, sin embargo,
YDULDUiVHJ~QHOWLSRGHXQLGDGFRQHFWDGD
'HVSXpVGHUHDOL]DUODVFRQ¿JXUDFLRQHVDSURSLDGDVHQORV3DVRV
\SXOVHHOERWyQ Filter para guardar los valores.
3DUDERUUDUORVYDORUHVDFWXDOPHQWHFRQ¿JXUDGRVSDUDODRSHUDFLyQVHOHFFLRQDGDSXOVH\VXHOWHUiSLGDPHQWHHOERWyQ&KHFN&OHDU una vez.
(
O YDORU GH OD KRUD PRVWUDGD FDPELDUi D ³²²´ \ GHVDSDUHFHUiQ
WDQWR ORV YDORUHV GH HQFHQGLGRDSDJDGR FRPR HO GH WHPSHUDWXUD
3DUDERUUDUWRGDVODVFRQ¿JXUDFLRQHVGHOWHPSRUL]DGRUVHPDQDOGH
XQDYH]PDQWHQJDSXOVDGRHOERWyQ&KHFN&OHDU durante dos o
más segundos. La pantalla empezará a parpadear, indicando que se
KDQERUUDGRWRGRVORVDMXVWHV
Nota:
Sus datos nuevos se cancelarán si pulsa el botón Modo de funcionamiento
(back (atrás)) antes de pulsar el botón Filter .
6LKDFRQ¿JXUDGRGRVRPiVRSHUDFLRQHVGLIHUHQWHVSDUDODPLVPDKRUD
exactamente, sólo se realizará la operación con el número más elevado.
5HSLWDORV3DVRVDVHJ~QVHDQHFHVDULRSDUDFRPSOHWDUWDQWDV
celdas disponibles como desee.
3XOVHHOERWyQ0RGRGHIXQFLRQDPLHQWREDFNDWUiV para regreVDUDODSDQWDOODGHFRQWUROHVWiQGDU\FRPSOHWDUHOSURFHGLPLHQWRGH
FRQ¿JXUDFLyQ
3DUDDFWLYDUHOWHPSRUL]DGRUSXOVHHOERWyQ7LPHU2Q2II, de
PRGRTXHHOLQGLFDGRU³7LPHU2II´GHVDSDUH]FDGHODSDQWDOOD
Asegúrese de que ya no se muestre el indicador “Timer Off”.
6LQRKD\DMXVWHVGHOWHPSRUL]DGRUHOLQGLFDGRU³7LPHU2II´SDUpadeará en la pantalla.
&yPRYLVXDOL]DUORVYDORUHV¿MDGRVGHOWHPSRUL]DGRUVHPDQDO!
9DORUHV¿MDGRVGHOWHPSRUL]DGRU
SUN
TIMER
ON
OFF
ÛF
WEEKLY
1. $VHJ~UHVHGHTXHVHPXHVWUDHQODSDQWDOODHOLQGLFDGRUGHOWHPSRULzador semanal (en 2. 3XOVHHOERWyQ7LPHU0HQX de modo que se indique en la pantalla
³0RQLWRU´HQ
3. 3XOVHHOERWyQ7LPHU2Q2II6HW'D\ VHJ~QVHDQHFHVDULRSDUD
VHOHFFLRQDUHOGtDTXHGHVHDYLVXDOL]DU
4. 3XOVHHOERWyQ2SHUDWLRQ o
( o VHJ~QVHDQHFHVDULRSDUDFDPbiar el funcionamiento del temporizador mostrado en la pantalla (en * &DGD SXOVDFLyQ DYDQ]DUi D OD SUy[LPD RSHUDFLyQ GHO WHPSRUL]DGRUHQHORUGHQGHFRQ¿JXUDFLyQGHODKRUD
5. 3DUDFHUUDUHOPRQLWRU\UHJUHVDUDODSDQWDOOD6WDQGDUG&RQWUROSXOVH
HOERWyQ0RGRGHIXQFLRQDPLHQWREDFNDWUiVGH.
<Para desactivar el temporizador semanal>
3XOVHHOERWyQ7LPHU2Q2IIGHPRGRTXHDSDUH]FD³7LPHU2II´HQ
3UHVVWKH7LPHU2Q2IIEXWWRQVRWKDW³7LPHU2II´DSSHDUVDW .
TIME SUN
ÛF
ÛF
WEEKLY
<Para activar el temporizador semanal>
3XOVHHOERWyQ7LPHU2Q2IIGHPRGRTXHHOLQGLFDGRU³7LPHU2II´HQ
VHRVFXUH]FD
TIME SUN
ÛF
ÛF
WEEKLY
3XHGHFRQ¿JXUDUHOWHPSRUL]DGRUVLPSOHGHFXDOTXLHUDGHODVWUHVIRUmas siguientes.
• 6yORKRUDGHSXHVWDHQPDUFKD:
HO DFRQGLFLRQDGRU GH DLUH FRPHQ]DUi D IXQFLRQDU FXDQGR KD\D
WUDQVFXUULGRHOWLHPSR¿MDGR
• 6yORKRUDGHSDUDGD:
HODFRQGLFLRQDGRUGHDLUHVHGHWHQGUiFXDQGRKD\DWUDQVFXUULGRHOWLHPSR¿MDGR
• +RUDVGHSXHVWDHQPDUFKD\GHSDUDGD:
HODFRQGLFLRQDGRUGHDLUHFRPLHQ]DDIXQFLRQDU\VHGHWLHQHFXDQGR
KD\DQWUDQVFXUULGRODVKRUDVUHVSHFWLYDV
(OWHPSRUL]DGRUVLPSOHSXHVWDHQPDUFKD\SDUDGDSXHGHFRQ¿JXUDUVHVyORXQDYH]HQXQSHULRGRGHKRUDV/DFRQ¿JXUDFLyQGHOD
KRUDVHUHDOL]DHQDXPHQWRVGHXQDKRUD.
Nota:
*1. El temporizador semanal, el temporizador simple y el temporizador automático no pueden utilizarse al mismo tiempo.
*2. El temporizador simple no funcionará si se da cualquiera de las condiciones siguientes.
El temporizador está desactivado, el sistema está en estado anómalo, está realizándose una prueba de funcionamiento, el mando a distancia está realizando
una autoevaluación o diagnóstico, el usuario está seleccionando una función
R FRQ¿JXUDQGR HO WHPSRUL]DGRU HO VLVWHPD HVWi EDMR FRQWURO FHQWUDO (Q HVWDV
condiciones, la operación de encendido y apagado está deshabilitada).
Hr
ON
AFTER
SIMPLE
TEMP.
MENU
BACK
PAR-21MAA
MONITOR/SET
ON/OFF
ON/OFF
FILTER
DAY
CHECK TEST
OPERATION
CLOCK
CLEAR
<&yPRFRQ¿JXUDUHOWHPSRUL]DGRUVLPSOH>
&RQ¿JXUDFLyQGHOWHPSRUL]DGRU
Hr
ON
AFTER
SIMPLE
$FFLyQHQFHQGLGRRDSDJDGR
6HPXHVWUD³²²´VLQRKD\
FRQ¿JXUDFLyQ
$VHJ~UHVHGHTXHVHHQFXHQWUDHQXQDSDQWDOODGHFRQWUROHVWiQGDU\
de que el indicador de temporizador simple se muestra en la pantalla
(en &XDQGRDSDUH]FDXQDLQGLFDFLyQGLVWLQWDGHODGHOWHPSRUL]DGRU VLPSOH FiPELHOR D 6,03/( 7,0(5 7(0325,=$'25 6,03/(
XWLOL]DQGR OD VHOHFFLyQ Q GH IXQFLRQHV GHO WHPSRUL]DGRU GHO PDQGR D
GLVWDQFLDYpDVH>@
3XOVHHOERWyQ7LPHU0HQX , de modo que aparezca en la pantalla
³6HW 8S´ HQ 5HFXHUGH TXH FDGD SXOVDFLyQ GHO ERWyQ FDPELD OD
SDQWDOODHQWUH³6HW8S´\³0RQLWRU´
3XOVHHOERWyQ212))
SDUDPRVWUDUORVYDORUHVFRQ¿JXUDGRVDFWXDOHVGHHQFHQGLGRRDSDJDGRGHOWHPSRUL]DGRUVLPSOH3XOVHHOERWyQ
XQD YH] SDUD YHU HO WLHPSR UHVWDQWH KDVWD HO HQFHQGLGR \ OXHJR GH
QXHYRSDUDYHUHOWLHPSRUHVWDQWHKDVWDHODSDJDGR(OLQGLFDGRU21
OFF aparece en 7
HPSRUL]DGRU³21´
H
ODFRQGLFLRQDGRUGHDLUHFRPHQ]DUiDIXQFLRQDUFXDQGRKD\DWUDQVFXUULGRHOQ~PHURGHKRUDVHVSHFL¿FDGR
7HPSRUL]DGRU³2))´
H
ODFRQGLFLRQDGRUGHDLUHVHGHWHQGUiFXDQGRKD\DWUDQVFXUULGRHO
Q~PHURGHKRUDVHVSHFL¿FDGR
40RVWUDQGR ³21´ X ³2))´ HQ SXOVH HO ERWyQ 6HW 7LPH apropiado
VHJ~QVHDQHFHVDULRSDUD¿MDUODVKRUDVKDVWDHOHQFHQGLGRVLVHPXHVWUD
³21´RODVKRUDVKDVWDHODSDJDGRVLVHPXHVWUD³2))´HQ.
5DQJRGLVSRQLEOHDKRUDV
5. 3DUD¿MDUODVKRUDVKDVWDHOHQFHQGLGR\HODSDJDGRUHSLWDORV3DVRV\
5
HFXHUGHTXHODVKRUDVGHHQFHQGLGR\DSDJDGRQRSXHGHQ¿MDUVH
en el mismo valor.
3DUDERUUDUODFRQ¿JXUDFLyQGHHQFHQGLGRRDSDJDGRDFWXDO0XHVWUH
HOYDORUFRQ¿JXUDGRGHHQFHQGLGRRDSDJDGRYpDVHHOSDVR\OXHJR
SXOVHHOERWyQ&KHFN&OHDUSDUDERUUDUODFRQ¿JXUDFLyQGHODKRUD
D³²´HQ6LGHVHDXWLOL]DUVyORXQYDORUGHFRQ¿JXUDFLyQGHHQFHQGLGRRXQDFRQ¿JXUDFLyQGHDSDJDGRDVHJ~UHVHGHTXHODFRQ¿JXUDFLyQTXHQRGHVHDXWLOL]DUVHPXHVWUDFRPR³²´
45
6. Temporizador
7. 'HVSXpVGHFRPSOHWDUORV3DVRV\DUULEDPHQFLRQDGRVSXOVHHO
ERWyQ Filter SDUD¿MDUHOYDORU
Nota:
6XVFRQ¿JXUDFLRQHVQXHYDVVHFDQFHODUiQVLSXOVDHOERWyQ0RGRGHIXQFLRFilter .
namiento (back (atrás)) antes de pulsar el botón
Ejemplo 2:
,QLFLHHOWHPSRUL]DGRUFRQODKRUDGHDSDJDGR¿MDGDPiVWHPSUDQRTXHODGHHQFHQGLGR
&RQ¿JXUDFLyQGHHQFHQGLGR
KRUDV
&RQ¿JXUDFLyQGHDSDJDGR KRUDV
Hr
AFTER OFF
8. 3XOVHHOERWyQ0RGRGHIXQFLRQDPLHQWREDFNDWUiV para regresar
a la pantalla de control estándar.
9. 3XOVHHOERWyQ7LPHU2Q2II para iniciar la cuenta atrás del temporizador. Cuando el temporizador está funcionando, su valor es visible
en la pantalla. Asegúrese de que el valor del temporizador sea visible y apropiado.
Al inicio del temporizador
ÛF
ÛF
La pantalla muestra el valor de apagado del
WHPSRUL]DGRUODVKRUDVUHVWDQWHVSDUDHO
DSDJDGR
SIMPLE
Hr
KRUDVGHVSXpVGHOLQLFLRGHOWHPSRUL]DGRU
ON
AFTER
La pantalla cambia para mostrar el valor de
HQFHQGLGRGHOWHPSRUL]DGRUODVKRUDVUHVWDQWHVSDUDHOHQFHQGLGR
/DKRUDLQGLFDGDHVHOYDORUFRQ¿JXUDGRGH
HQFHQGLGRKRUDV³HOYDORU´FRQ¿JXUDGRGH
DSDJDGRKRUDV KRUDV
SIMPLE
<9LVXDOL]DFLyQGHODVFRQ¿JXUDFLRQHVDFWXDOHVGHOWHPSRUL]DGRUVLPSOH>
&RQ¿JXUDFLyQGHOWHPSRUL]DGRU
KRUDVGHVSXpVGHOLQLFLRGHOWHPSRUL]DGRU
ÛF
ÛF
TIMER
Hr
ON
(ODFRQGLFLRQDGRUGHDLUHVHDFWLYD\FRQWLQ~D
IXQFLRQDQGRKDVWDTXHDOJXLHQORDSDJXH
SIMPLE
AFTER OFF
SIMPLE
6.1.3. Temporizador de apagado automático
$VHJ~UHVHGHTXHHOLQGLFDGRUGHOWHPSRUL]DGRUVLPSOHHVWiYLVLEOHHQ
la pantalla (en 3XOVHHOERWyQ7LPHU0HQX
SDUDTXHDSDUH]FD³0RQLWRU´HQOD
pantalla (en • Si el temporizador simple de encendido o apagado está funcionando, su valor actual aparecerá en .
6LVHKDQ¿MDGRDPERVYDORUHVHQFHQGLGR\DSDJDGRDSDUHFHQ
alternativamente ambos valores.
3XOVHHOERWyQ0RGRGHIXQFLRQDPLHQWREDFNDWUiV para cerrar la
SDQWDOODGHOPRQLWRU\UHJUHVDUDODSDQWDOODGHFRQWUROHVWiQGDU
<Para desactivar el temporizador simple...>
3XOVHHOERWyQ7LPHU2Q2IISDUDTXHODFRQ¿JXUDFLyQGHOWHPSRUL]DGRU\DQRDSDUH]FDHQODSDQWDOODHQ
Este temporizador comienza la cuenta atrás cuando el acondicionador de aire comienza
DIXQFLRQDU\DSDJDHODFRQGLFLRQDGRUFXDQGRKD\DWUDQVFXUULGRHOWLHPSR¿MDGR
/RVYDORUHVGLVSRQLEOHVDEDUFDQGHVGHPLQXWRVDKRUDVHQLQWHUvalos de 30 minutos.
Nota:
*1. El temporizador semanal, el temporizador simple y el temporizador automático no pueden utilizarse al mismo tiempo.
*2. El temporizador Auto Off no funcionará si se dan cualquiera de las
siguientes condiciones.
El temporizador está desactivado, el sistema está en estado anómalo, está realizándose una prueba de funcionamiento, el mando a distancia está realizando
una autoevaluación o diagnóstico, el usuario está seleccionando una función
RFRQ¿JXUDQGRHOWHPSRUL]DGRUHOVLVWHPDHVWiEDMRFRQWUROFHQWUDO(En estas
condiciones, la operación de encendido y apagado está deshabilitada).
AFTER
OFF
ÛF
ÛF
AUTO OFF
SIMPLE
<Para iniciar el temporizador simple…>
3XOVHHOERWyQ7LPHU2Q2IISDUDTXHODFRQ¿JXUDFLyQGHOWHPSRUL]Ddor sea visible en .
Hr
TEMP.
MENU
BACK
PAR-21MAA
MONITOR/SET
ON/OFF
ON/OFF
FILTER
DAY
CLOCK
CHECK TEST
OPERATION
CLEAR
ON
AFTER
ÛF
ÛF
SIMPLE
Ejemplos
6LVHKDQFRQ¿JXUDGRODVKRUDVGHHQFHQGLGR\DSDJDGRHQHOWHPSRUL]DGRUVLPSOHHOIXQFLRQDPLHQWR\ODSDQWDOODVRQVHJ~QVHLQGLFDD
FRQWLQXDFLyQ
Ejemplo 1:
,QLFLHHOWHPSRUL]DGRUFRQODKRUDGHHQFHQGLGR¿MDGDPiVWHPSUDQRTXHODGHDSDJDGR
&RQ¿JXUDFLyQGHHQFHQGLGRKRUDV
&RQ¿JXUDFLyQGHDSDJDGR KRUDV
Hr
ON
AFTER
Al inicio del temporizador
SIMPLE
/DSDQWDOODPXHVWUDODFRQ¿JXUDFLyQGH
HQFHQGLGRGHOWHPSRUL]DGRUODVKRUDV
UHVWDQWHVSDUDOOHJDUDOHQFHQGLGR
KRUDVGHVSXpVGHOLQLFLRGHOWHPSRUL]DGRU
Hr
AFTER OFF
ÛF
ÛF
SIMPLE
SIMPLE
La pantalla cambia para mostrar el valor de
DSDJDGRGHOWHPSRUL]DGRUODVKRUDVUHVWDQWHVSDUDHODSDJDGR
/DKRUDPRVWUDGDHVHOYDORUFRQ¿JXUDGRGH
DSDJDGRKRUDV³HOYDORU´FRQ¿JXUDGRGH
HQFHQGLGRKRUDV KRUDV
KRUDVGHVSXpVGHOLQLFLRGHOWHPSRrizador
(ODFRQGLFLRQDGRUGHDLUHVHGHVDFWLYD\
SHUPDQHFHDVtKDVWDTXHDOJXLHQORUHLQLFLH
46
<&yPRFRQ¿JXUDUHOWHPSRUL]DGRUGHDSDJDGRDXWRPiWLFR>
&RQ¿JXUDFLyQGHOWHPSRUL]DGRU
AFTER
OFF
AUTO OFF
1. $VHJ~UHVH GH TXH XVWHG VH HQFXHQWUH HQ XQD SDQWDOOD GH FRQWURO
HVWiQGDU\TXHHOLQGLFDGRUGHOWHPSRUL]DGRUGHDSDJDGRDXWRPiWLFR
Auto Off se muestre en la pantalla (en &XDQGR DSDUH]FD XQD LQGLFDFLyQ GLVWLQWD GH OD GHO WHPSRUL]DGRU GH
apagado automático, cámbielo a AUTO OFF TIMER (TEMPORIZADOR
'($3$*$'2$8720È7,&2XWLOL]DQGRODVHOHFFLyQGHIXQFLRQHVGH
ODFRQ¿JXUDFLyQGHIXQFLRQHVGHOWHPSRUL]DGRUGHOPDQGRDGLVWDQFLD
YpDVH>@±
2. 0DQWHQJDSXOVDGRHOERWyQ7LPHU0HQX
durante 3 segundos, para
TXHDSDUH]FD³6HW8S´HQODSDQWDOODHQ
5HFXHUGHTXHFDGDSXOVDFLyQGHOERWyQFDPELDODSDQWDOODHQWUH³6HW
8S´\³0RQLWRU´
3. 3XOVHHOERWyQ6HW7LPHDSURSLDGRVHJ~QVHDQHFHVDULRSDUDFRQ¿JXUDUODKRUDGHDSDJDGRHQ
4. 3XOVHHOERWyQ Filter SDUD¿MDUODFRQ¿JXUDFLyQ
Nota:
Los datos introducidos se cancelarán si pulsa el botón Modo de funcionamiento (back (atrás)) antes de pulsar el botón
Filter .
5. 3XOVH HO ERWyQ 0RGR GH IXQFLRQDPLHQWR EDFN DWUiV para comSOHWDU HO SURFHGLPLHQWR GH FRQ¿JXUDFLyQ \ UHJUHVDU D OD SDQWDOOD GH
control estándar.
6. 6LHODFRQGLFLRQDGRUGHDLUH\DHVWiIXQFLRQDQGRHOWHPSRUL]DGRUFRPLHQza inmediatamente la cuenta atrás. Asegúrese de comprobar que el
YDORU¿MDGRGHOWHPSRUL]DGRUDSDUHFHFRUUHFWDPHQWHHQODSDQWDOOD
6. Temporizador
&RPSUREDFLyQGHODFRQ¿JXUDFLyQDFWXDOGHOWHPSRUL]DGRUGHDSDJDGRDXWRPiWLFR!
6.2. Para controlador remoto inalámbrico
&RQ¿JXUDFLyQGHOWHPSRUL]DGRU
TIMER
AFTER
OFF
F
AUTO OFF
$VHJ~UHVHGHTXH³$XWR2II´HVWpYLVLEOHHQODSDQWDOODHQ
0DQWHQJDSXOVDGRHOERWyQ7LPHU0HQX
durante 3 segundos, para
TXHVHLQGLTXHHQODSDQWDOOD³0RQLWRU´HQ
• El tiempo restante para el apagado aparece en .
3DUDFHUUDUHOPRQLWRU\UHJUHVDUDODSDQWDOOD6WDQGDUG&RQWUROSXOVH
HOERWyQ0RGRGHIXQFLRQDPLHQWREDFNDWUiVGH.
<Para desactivar temporizador de apagado automático...>
0DQWHQJDSXOVDGRHOERWyQ7LPHU2Q2II durante 3 segundos para
TXHDSDUH]FD³7LPHU2II´HQ\GHVDSDUH]FDHOYDORUGHOWHPSRULzador (en 3UHVLRQHHOERWyQ AUTO STOP o
ÛF
ÛF
AUTO OFF
Alternativamente, desconecte el acondicionador de aire. El valor del
temporizador (en GHVDSDUHFHUiGHODSDQWDOOD
AUTO START
7,0(56(7
6HSXHGH¿MDUODKRUDPLHQWUDVSDUSDGHHHOVtPERORVLJXLHQWH
Temporizador de apagado : Parpadea .
Temporizador de encendido : Parpadea .
h
min
Use los botones
\
SDUD¿MDUODKRUDGHVHDGD
&DQFHODFLyQGHOWHPSRUL]DGRU
AUTO STOP
.
3DUDFDQFHODUHOWHPSRUL]DGRUGHDSDJDGRSUHVLRQHHOERWyQ
3DUDFDQFHODUHOWHPSRUL]DGRUGHHQFHQGLGRSUHVLRQHHOERWyQ AUTO START .
AUTO OFF
<Para iniciar el temporizador de apagado automático...>
0DQWHQJDSXOVDGRHOERWyQ7LPHU2Q2II durante 3 segundos.
'HVDSDUHFHODLQGLFDFLyQ³7LPHU2II´HQ\ODFRQ¿JXUDFLyQGHO
temporizador aparece en la pantalla (en Alternativamente, encienda el acondicionador de aire. El valor del
temporizador aparecerá en .
AFTER
• Es posible combinar el temporizador de encendido con el de apagado.
$O SUHVLRQDU HO ERWyQ 212)) GHO PDQGR D GLVWDQFLD GXUDQWH HO
modo de temporizador para parar la unidad se cancelarán los temporizadores.
6LQRKDDMXVWDGRODKRUDDFWXDOQRSRGUiXWLOL]DUODIXQFLyQGHOWHPporizador.
OFF
ÛF
ÛF
AUTO OFF
7. Otras funciones
7.1. Bloqueo de los botones del mando a distancia
(límite de función de Operación)
Si lo desea, puede bloquear los botones del mando a distancia. Puede
XWLOL]DUODVHOHFFLyQGHIXQFLRQHVGHOPDQGRDGLVWDQFLDSDUDHOHJLUHO
WLSRGHEORTXHRTXHGHVHDXVDU3DUDPiVLQIRUPDFLyQVREUHVHOHFFLyQGHOWLSRGHEORTXHRFRQVXOWHODVHFFLyQSXQWR>@
(VSHFt¿FDPHQWHSXHGHXWLOL]DUFXDOTXLHUDGHORVGRVWLSRVGHEORTXHR
TXHVHLQGLFDQDFRQWLQXDFLyQ
Bloquear todos los botones:
bloquea todos los botones en el mando a distancia.
%ORTXHDUWRGRH[FHSWR212))HQFHQGLGRDSDJDGR:
EORTXHDWRGRVORVERWRQHVH[FHSWRHOERWyQ212))
Nota:
Aparece en la pantalla el indicador “Locked” (bloqueado) para indicar que
los botones están bloqueados en este momento.
Indicador
de bloqueo
TIME SUN
FUNCTION
ÛF
ÛF
TEMP.
MENU
BACK
PAR-21MAA
MONITOR/SET
ON/OFF
ON/OFF
ÛF
FUNCTION
ÛF
6
LSXOVDXQERWyQEORTXHDGRSDUSDGHDUiHQODSDQWDOODHOLQGLFDGRU
³/RFNHG´HQ
ÛF
FUNCTION
ÛF
<Cómo desbloquear los botones>
0LHQWUDVSXOVDHOERWyQ)LOWHUSXOVH\PDQWHQJDSXOVDGRHOERWyQ
212))
GXUDQWHVHJXQGRVSDUDTXHHOLQGLFDGRU³/RFNHG´GHVDparezca de la pantalla (en FILTER
DAY
CLOCK
<Cómo bloquear los botones>
0LHQWUDVSXOVDHOERWyQ)LOWHUSXOVH\PDQWHQJDSXOVDGRHOERWyQ
212))
durante 2 segundos. Aparece en la pantalla el indicador
³/RFNHG´HQLQGLFDQGRTXHHVWiDFWLYDGRHOEORTXHR
6
LHOEORTXHRVHKDGHVKDELOLWDGRHQ)XQFWLRQ6HOHFWLRQODSDQWDOOD
PRVWUDUiHOPHQVDMH³1RW$YDLODEOH´QRGLVSRQLEOHFXDQGRSXOVH
ORVERWRQHVVHJ~QVHGHVFULEHDQWHULRUPHQWH
CHECK TEST
OPERATION
ÛF
ÛF
CLEAR
47
7. Otras funciones
7.2. Indicación de códigos de error
ERROR CODE
ON/OFF
Lámpara ON
SDUSDGHDQGR
&yGLJRGHHUURU
1XQLGDG
6LKDLQWURGXFLGRXQQ~PHURWHOHIyQLFRDOFXDOOODPDUHQFDVRGHSUREOHPDVODSDQWDOODPRVWUDUiHVWH
Q~PHUR3XHGHFRQ¿JXUDUORHQOD6HOHFFLyQGH)XQFLyQ3DUDPiVLQIRUPDFLyQFRQVXOWHODVHFFLyQ
6LSDUSDGHDQODOiPSDUD21\HOFyGLJRGHHUURUHVWRVLJQL¿FDTXHHODFRQGLFLRQDGRUGHDLUHHVWiHVWURSHDGR\VXIXQFLRQDPLHQWRVHKDGHWHQLGR
\QRSXHGHUHDQXGDUVH7RPHQRWDGHOQ~PHURGHXQLGDGLQGLFDGR\GHOFyGLJRGHHUURUOXHJRGHVFRQHFWHODDOLPHQWDFLyQGHODFRQGLFLRQDGRUGH
DLUH\OODPHDVXGLVWULEXLGRURSURYHHGRUGHVHUYLFLRWpFQLFR
&XDQGRVHSXOVDHOERWyQ&KHFN
CALL:XXXX
XXX:XXX
ERROR CODE
ÛF
ÛF
ON/OFF
ON/OFF
&yGLJRGHHUURU
6LVRORSDUSDGHDHOFyGLJRGHHUURUPLHQWUDVODOiPSDUD21SHUPDQHFHHQFHQGLGDFRQWLQ~DHOIXQFLRQDPLHQWRSHURSXHGHH[LVWLUXQSUREOHPDHQ
HOVLVWHPD(QHVWHFDVRGHEHDQRWDUHOFyGLJRGHHUURU\OXHJROODPDUDVXGLVWULEXLGRURSURYHHGRUGHVHUYLFLRWpFQLFRSDUDDVHVRUDPLHQWR
6LKDLQWURGXFLGRXQQ~PHURGHWHOpIRQRDOFXDOOODPDUHQFDVRGHSUREOHPDVSXOVHHOERWyQ&KHFNSDUDPRVWUDUORHQODSDQWDOOD3XHGHFRQ¿JXUDUORHQOD6HOHFFLyQGH)XQFLyQ3DUDPiVLQIRUPDFLyQFRQVXOWHODVHFFLyQ
8. Selección de función
Selección de funciones del controlador remoto
(ODMXVWHGHODVVLJXLHQWHVIXQFLRQHVGHOFRQWURODGRUUHPRWRVHSXHGHFDPELDUXWLOL]DQGRHOPRGR6HOHFFLyQGHIXQFLyQGHOFRQWURODGRUUHPRWR&DPbie el ajuste cuando sea necesario.
Ítem 1
Ítem 2
ËWHP&RQWHQLGRGHDMXVWH
1. Cambio de idioma
Ajuste del idioma que aparece en el indicador
• El indicador puede aparecer en distintos idiomas
³&+$1*(/$1*8$*(´
/tPLWHGHIXQFLRQHV
³6(/(&&,Ï1'()81&,Ï1(6´
6HOHFFLyQGHPRGR
³6(/(&&,Ï1'(
02'2´
4. Cambio de indicador
³02675$502'2´
48
$MXVWHGHOOtPLWHGHIXQFLRQHVEORTXHRGH
IXQFLRQHV³)81&,Ï1%/248($'$´
• $MXVWH GHO UDQJR GH OtPLWH GH IXQFLRQDPLHQWR EORTXHR GH
IXQFLRQDPLHQWR
8VRGHODMXVWHGHPRGRDXWRPiWLFR³6(/(&&,Ï102'2$872´
• $MXVWHGHOXVRRQRGHOPRGRGHIXQFLRQDPLHQWR³DXWRPiWLFR´
$MXVWHGHOOtPLWHGHUDQJRGHWHPSHUDWXUD
³/,0,77(03&216,*1$´
• $MXVWHGHOUDQJRGHWHPSHUDWXUDPi[LPRPtQLPR
$MXVWHGHOFRQWURODGRUUHPRWRSULQFLSDO
VHFXQGDULR³&21752/35,1&,3$/6(&81'$5,2´
• 6HOHFFLyQGHOFRQWURODGRUUHPRWRSULQFLSDORVHFXQGDULR
8VRGHODMXVWHGHOUHORM³5(/2-´
$MXVWHGHODIXQFLyQGHWHPSRUL]DGRU³7(0325,=$'256(0$1$/´
$MXVWHGHQ~PHURGHFRQWDFWRHQFDVRGHHUURU³&$//´
• $MXVWHGHOXVRRQRGHODIXQFLyQGHUHORM
• Ajuste del tipo de temporizador
• ,QGLFDGRUGHOQ~PHURGHFRQWDFWRHQFDVRGHHUURU
• $MXVWHGHOQ~PHURGHWHOpIRQR
$MXVWHGHOLQGLFDGRUGHWHPSHUDWXUD&)
³7(03*5$'26&)´
• $
MXVWHGHODXQLGDGGHWHPSHUDWXUD&R)TXHGHEHDSDrecer en el indicador
Ajuste del indicador de temperatura del aire de
DVSLUDFLyQ³02675$57(03´
$MXVWHGHOLQGLFDGRUGHUHIULJHUDFLyQFDOHIDFFLyQDXWRPiWLFD³02675$5)&(1$872´
• $MXVWH GHO XVR R QR GHO LQGLFDGRU GH WHPSHUDWXUD GHO DLUH
DVSLUDFLyQGHOLQWHULRU
• $MXVWHGHOXVRRQRGHOLQGLFDGRUGH³&RROLQJ´5HIULJHUDFLyQ
R³+HDWLQJ´&DOHIDFFLyQGXUDQWHHOIXQFLRQDPLHQWRHQPRGR
automático
* Si se conectan dos controladores remotos a un grupo, uno
de los controladores debe seleccionarse como secundario.
8. Selección de función
>'LDJUDPDGHÀXMRGHVHOHFFLyQGHIXQFLyQ@
,GLRPDDMXVWDGRLQJOpV
Indicador
normal (Indicador que aparece cuando
Normal display
(Display when the air conditioner is not running)
HODFRQGLFLRQDGRUGHDLUHHVWiDSDJDGR
0DQWHQJDSXOVDGRHOERWyQ
and
\SUHVLRQHHOERWyQ
durante
segundos.
Hold down the
button
press the
button
for dos
2 seconds.
0DQWHQJDSXOVDGRHOERWyQ
\SUHVLRQHHOERWyQ
Hold down the
button
and press the durante
buttondos
forsegundos.
2 seconds.
0RGRGHVHOHFFLyQGHIXQFLyQGHOFRQWURODGRUUHPRWR
Remote controller function selection mode
Ítem1
Item 1
Cambio de
idioma
3XOVHHOERWyQGHPRGRGHIXQFLRQDPLHQWR
Press the operation mode button.
3XOVHHOERWyQ7,0(50(180(1Ò'(7(0325,=$'25
Press the TIMER MENU button.
3XOVHHOERWyQ7,0(5212))$&7,9$5'(6$&7,9$5
Press the TIMER ON/OFF button.
7(0325,=$'25
Ítem2
Item 2
Indicador de
Dot
display
puntos
English
German
Spanish
TEMP.
Russian
MENU
BACK
Italian
PAR-21MAA
MONITOR/SET
ON/OFF
ON/OFF
FILTER
DAY
CLOCK
CHECK TEST
OPERATION
CLEAR
Chinese
French
Japanese
Item 3
6HOHFFLyQGH
IXQFLyQ
OFF
no1
(ODMXVWHGHIXQFLyQEORTXHDGDQRVHXWLOL]D
YDORUGHDMXVWHLQLFLDO
(OEORTXHRGHIXQFLRQDPLHQWRHVWiDMXVWDGRH[FHSWRSDUDORVERWyQ
2Q2IIHQFHQGLGR\DSDJDGR
no2
El bloqueo de funcionamiento está ajustado para todos los botones.
ON
El modo automático aparece al seleccionar el modo de
IXQFLRQDPLHQWRYDORUGHDMXVWHLQLFLDO
OFF
OFF
El modo automático no aparece al seleccionar el modo de
funcionamiento.
(OOtPLWHGHUDQJRGHWHPSHUDWXUDQRHVWiDFWLYRYDORUGHDMXVWH
LQLFLDO
(OUDQJRGHWHPSHUDWXUDVHSXHGHFDPELDUHQPRGRGHUHIULJHUDFLyQ
secado.
El rango de temperatura se puede cambiar en modo de secado.
El rango de temperatura se puede cambiar en modo automático.
0RGRGHIXQFLRQDPLHQWRDUULEDDEDMRSDUDSDQHOGHHOHYDFLyQGHO¿OWURDXWRPiWLFR
1RHVQHFHVDULRDMXVWDUHVWHPRGR3DUDPiVLQIRUPDFLyQVREUHHOIXQFLRQDPLHQWRFRQVXOWHHO0$18$/'(,16758&&,21(6GHSLH]DVRSFLRQDOHVSDQHO
0RGRGHFLUFXODFLyQGHODLUHHQGLUHFFLyQ¿MD
1RHVQHFHVDULRDMXVWDUHVWHPRGR3DUDPiVLQIRUPDFLyQVREUHHOIXQFLRQamiento, consulte el MANUAL DE INSTRUCCIONES de la unidad interior.
6HOHFFLyQGH
modo
El controlador remoto será el controlador principal (valor de ajuste
LQLFLDO
El controlador remoto será el controlador secundario.
ON
6HSXHGHXWLOL]DUODIXQFLyQGHUHORMYDORUGHDMXVWHLQLFLDO
OFF
/DIXQFLyQGHUHORMQRVHSXHGHXWLOL]DU
6HSXHGHXWLOL]DUHOWHPSRUL]DGRUVHPDQDOYDORUGHDMXVWHLQLFLDO
Se puede utilizar el temporizador de apagado automático.
Se puede utilizar el temporizador simple.
No se puede utilizar el modo de temporizador.
OFF
CALL-
Cambio de
indicador
ÛC
ÛF
ON
OFF
ON
/RVQ~PHURVGHFRQWDFWRDMXVWDGRVQRDSDUHFHQHQFDVRGHHUURU
YDORUGHDMXVWHLQLFLDO
/RVQ~PHURVGHFRQWDFWRDMXVWDGRVDSDUHFHQHQFDVRGHHUURU
Se utiliza la unidad de temperatura °C.
6HXWLOL]DODXQLGDGGHWHPSHUDWXUD)YDORUGHDMXVWHLQLFLDO
$SDUHFHODWHPSHUDWXUDGHODLUHGHODKDELWDFLyQYDORUGHDMXVWH
LQLFLDO
1RDSDUHFHODWHPSHUDWXUDGHODLUHGHODKDELWDFLyQ
³$XWRPDWLFFRROLQJ´5HIULJHUDFLyQDXWRPiWLFDR³$XWRPDWLFKHDWLQJ´
&DOHIDFFLyQDXWRPiWLFDDSDUHFHFXDQGRHVWiHQIXQFLRQDPLHQWRHO
PRGRDXWRPiWLFRYDORUGHDMXVWHLQLFLDO
OFF
(QHOPRGRDXWRPiWLFRVyORDSDUHFH³$XWRPDWLF´$XWRPiWLFR
49
8. Selección de función
[Ajuste detallado]
>@±$MXVWHGHVHOHFFLyQGH0RGRGHIXQFLRQDPLHQWR
[4]–1. Ajuste de Cambio de idioma
Se puede seleccionar el idioma que aparece en el indicador de puntos.
3UHVLRQHHOERWyQ> MENU] para cambiar el idioma.
,QJOpV*%$OHPiQ'(VSDxRO(5XVR58
,WDOLDQR,&KLQR&+)UDQFpV)-DSRQpV-3
Consulte la tabla del indicador de puntos.
$MXVWHGHOFRQWURODGRUUHPRWRSULQFLSDOVHFXQGDULR
3DUDFDPELDUHODMXVWHSUHVLRQHHOERWyQ> 212))@.
Principal:
El controlador será el principal.
Secundario:
El controlador será el secundario.
>@±/tPLWHGHIXQFLRQHV
$MXVWHGHOOtPLWHGHIXQFLRQHVEORTXHRGHIXQFLRQHV
3DUDFDPELDUHODMXVWHSUHVLRQHHOERWyQ> 212))@.
no1: Se realiza el ajuste de bloqueo de funcionamiento en
WRGRVORVERWRQHVVDOYRHQHOERWyQ> 212))@
no2: Se realiza el ajuste de bloqueo de funcionamiento en
todos los botones.
2))9DORUGHODMXVWHLQLFLDO
No se realiza el bloqueo de funcionamiento.
* Para que el bloqueo de funcionamiento sea válido en la pantalla
QRUPDOKD\TXHSUHVLRQDUORVERWRQHV3UHVLRQH\PDQWHQJDSXOVDGRVDODYH]ORVERWRQHV>),/7(5@\> 212))@GXUDQWHGRV
VHJXQGRVHQODSDQWDOODQRUPDOXQDYH]TXHVHKDUHDOL]DGRHO
ajuste anterior.
8VRGHODMXVWHGHPRGRDXWRPiWLFR
Cuando se conecta el controlador remoto a la unidad que tiene
ajustado el modo funcionamiento automático, se pueden realizar
los siguientes ajustes.
3DUDFDPELDUHODMXVWHSUHVLRQHHOERWyQ> 212))@.
219DORUGHODMXVWHLQLFLDO
Aparece el modo automático cuando se selecciona el modo de
funcionamiento.
OFF:
No aparece el modo automático cuando se selecciona el modo
de funcionamiento.
$MXVWHGHOOtPLWHGHUDQJRGHWHPSHUDWXUD
Una vez que se realiza el ajuste, se puede cambiar la temperatura
dentro del rango establecido.
3DUDFDPELDUHODMXVWHSUHVLRQHHOERWyQ> 212))@.
LIMIT TEMP MODO FRÍO:
El rango de temperatura se puede cambiar en modo refrigerDFLyQVHFDGR
LIMIT TEMP MODO CALOR:
(OUDQJRGHWHPSHUDWXUDVHSXHGHFDPELDUHQPRGRFDOHIDFFLyQ
LIMIT TEMP MODO AUTO:
El rango de temperatura se puede cambiar en modo automático.
2))DMXVWHLQLFLDO
1RHVWiDFWLYRHOOtPLWHGHUDQJRGHWHPSHUDWXUD
&
XDQGRVHDMXVWDXQDSRVLFLyQGLVWLQWDGHODGHGHVDFWLYDFLyQ
2))VHDMXVWDDODYH]HOOtPLWHGHUDQJRGHWHPSHUDWXUDHQ
PRGRUHIULJHUDFLyQFDOHIDFFLyQ\DXWRPiWLFR1RREVWDQWHQR
VHSXHGHOLPLWDUHOUDQJRFXDQGRQRKDFDPELDGRHOUDQJRGH
temperatura establecido.
3
DUDGLVPLQXLURDXPHQWDUODWHPSHUDWXUDSUHVLRQHHOERWyQ
[ TEMP. ( R @.
3DUDFDPELDUHODMXVWHGHOtPLWHVXSHULRU\HODMXVWHGHOtPLWH
LQIHULRUSUHVLRQHHOERWyQ [
] . El ajuste seleccionado parSDGHDUi\ODWHPSHUDWXUDSRGUiDMXVWDUVH
• Rango ajustable
0RGR5HIULJHUDFLyQ6HFDGR
/tPLWHLQIHULRU&D& °F a 87 °F
/tPLWHVXSHULRU&D& °F a 67 °F
0RGR&DOHIDFFLyQ
/tPLWHLQIHULRU&D& °F a 83 °F
/tPLWHVXSHULRU&D& °F a 63 °F
Modo Automático:
/tPLWHLQIHULRU&D& °F a 83 °F
/tPLWHVXSHULRU&D& °F a 67 °F
50
8VRGHODMXVWHGHOUHORM
3DUDFDPELDUHODMXVWHSUHVLRQHHOERWyQ> 212))@ .
21
6HSXHGHXVDUODIXQFLyQGHUHORM
2))
1RVHSXHGHXVDUODIXQFLyQGHUHORM
$MXVWHGHODIXQFLyQGHWHPSRUL]DGRU
3DUD FDPELDU HO DMXVWH SUHVLRQH HO ERWyQ > 212))@ (Elija
XQDGHODVVLJXLHQWHVIXQFLRQHV
7 (0325,=$'25 6(0$1$/ 9DORU GHO DMXVWH LQLFLDO
Se puede usar el temporizador semanal.
APAGADO AUTOMÁTICO:
6HSXHGHXVDUHOWHPSRUL]DGRUGHGHVDFWLYDFLyQDXWRPiWLFD
TEMPORIZADOR SIMPLE:
Se puede usar el temporizador simple.
TEMPORIZADOR APAGADO:
No se puede usar el modo temporizador.
&
XDQGRHOXVRGHODMXVWHGHUHORMHVWiGHVDFWLYDGR2))QRVH
SXHGHXVDUHO³7(0325,=$'256(0$1$/´
$MXVWHGHQ~PHURGHFRQWDFWRHQFDVRGHHUURU
3DUDFDPELDUHODMXVWHSUHVLRQHHOERWyQ> 212))@.
CALL OFF:
/RVQ~PHURVGHFRQWDFWRHVWDEOHFLGRVQRDSDUHFHQHQHO
indicador en caso de error.
CALL **** *** ****:
/RVQ~PHURVGHFRQWDFWRHVWDEOHFLGRVDSDUHFHQHQHOLQGLFDdor en caso de error.
CALL_:
(
O Q~PHUR GH FRQWDFWR VH SXHGH DMXVWDU FXDQGR OD SDQWDOOD
DSDUHFHVHJ~QVHPXHVWUDDUULED
$MXVWHGHORVQ~PHURVGHFRQWDFWR
3
DUDDMXVWDUORVQ~PHURVGHFRQWDFWRSURFHGDGHOVLJXLHQWH
PRGR0XHYDHOFXUVRUSDUSDGHDQWHSDUDDMXVWDUORVQ~PHURV
3UHVLRQHHOERWyQ> TEMP. ( \ @ para mover el cursor
DODGHUHFKDL]TXLHUGD3UHVLRQHHOERWyQ> CLOCK ( \ @
5HORMSDUDDMXVWDUORVQ~PHURV
[4]–4. Ajuste del cambio de indicador
$MXVWHGHOLQGLFDGRUGHWHPSHUDWXUD&)
3DUDFDPELDUHODMXVWHSUHVLRQHHOERWyQ> 212))@.
°C: Se utiliza la unidad de temperatura en °C.
°F: Se utiliza la unidad de temperatura en °F.
$MXVWHGHOLQGLFDGRUGHWHPSHUDWXUDGHODLUHDPELHQWH
3DUDFDPELDUHODMXVWHSUHVLRQHHOERWyQ> 212))@.
21$SDUHFHODWHPSHUDWXUDGHODLUHGHDVSLUDFLyQ
2))1RDSDUHFHODWHPSHUDWXUDGHODLUHGHDVSLUDFLyQ
$MXVWHGHOLQGLFDGRUGHUHIULJHUDFLyQFDOHIDFFLyQDXWRPiWLFD
3DUDFDPELDUHODMXVWHSUHVLRQHHOERWyQ> 212))@.
ON:
$SDUHFHODSRVLFLyQ³$XWRPDWLFFRROLQJ´5HIULJHUDFLyQDXWRPiWLFDR³$XWRPDWLFKHDWLQJ´&DOHIDFFLyQDXWRPiWLFDHQHO
modo automático.
OFF:
6yORDSDUHFHODSRVLFLyQ³$XWRPDWLF´$XWRPiWLFRHQHOPRGR
automático.
8. Selección de función
[Tabla del indicador de puntos]
Idioma ajustado
(QJOLVK
*HUPDQ
6SDQLVK
5XVVLDQ
,WDOLDQ
&KLQHVH
)UHQFK
-DSDQHVH
(QJOLVK
*HUPDQ
6SDQLVK
5XVVLDQ
,WDOLDQ
&KLQHVH
)UHQFK
-DSDQHVH
Tiempo
de espera de arranque
:DLWLQJIRUVWDUWXS
Modo
de
Operation
mode
funcionamiento
Enfriamiento
Cool
Secado
'U\
&DOHIDFFLyQ
Heat
Automático
Auto
Automático
$XWR&RRO
(QIULDPLHQWR
Automático
$XWR+HDW
&DOHIDFFLyQ
Ventilador
Fan
9HQWLODFLyQ
Ventilation
Espera
6WDQGE\
FDOHQWDQGR
+RWDGMXVW
'HVFRQJHODFLyQ
Defrost
Temperatura
ajustada
Set temperature
Velocidad
del ventilador
Fan speed
%RWyQQRGLVSRQLEOH
Not use button
&RPSUREDFLyQHUURU
&KHFN(UURU
Prueba
de funcionamiento
Test run
$XWRUHYLVLyQ
6HOIFKHFN
6HOHFFLyQGHIXQFLyQHQODXQLGDG
Unit function selection
$MXVWHGHYHQWLODFLyQ
Setting of ventilation
Idioma ajustado
Cambio de idioma
6HOHFFLyQGHIXQFLyQ
$MXVWHGHOtPLWHGHIXQFLRQDPLHQWR
GHXQDRSHUDFLyQ
8WLOL]DFLyQGHODMXVWHGHPRGR
automático
$MXVWHGHOtPLWHGHUDQJRGH
temperatura
/tPLWHGHWHPSHUDWXUDPRGRUHIULJHUDFLyQGtD
/tPLWHGHWHPSHUDWXUDPRGRGH
FDOHIDFFLyQ
/tPLWHGHWHPSHUDWXUDPRGR
automático
6HOHFFLyQGH0RGRGHIXQFLRQDPLHQWR
Ajuste de controlador remoto MAIN
35,1&,3$/
Ajuste de controlador remoto SUB
6(&81'$5,2
8WLOL]DFLyQGHODMXVWHGHOUHORM
$MXVWHGHOGtDGHODVHPDQD\OD
KRUD
Ajuste del temporizador
9LVXDOL]DFLyQGHOWHPSRUL]DGRU
Temporizador semanal
Modo de temporizador apagado
Temporizador de apagado automático
Temporizador simple
$MXVWHGHQ~PHURGHFRQWDFWRHQ
FDVRGHDYHUtD
&DPELRGHLQGLFDFLyQ
$MXVWHGHYLVXDOL]DFLyQGHWHPSHUDWXUD
&)
$MXVWHGHYLVXDOL]DFLyQGHODWHPSHUDWXra de entrada de aire
$MXVWHGHYLVXDOL]DFLyQGHUHIULJHUDFLyQ
FDOHIDFFLyQDXWRPiWLFD
51
9. Funcionamiento de emergencia del controlador remoto inalámbrico
(Para PKFY-P·NHMU-E2)
Cuando no puede utilizar el controlador remoto
&XDQGRVHDJRWHQODVSLODVGHOFRQWURODGRUUHPRWRRpVWHWHQJDDOJ~Q
fallo, puede llevar a cabo el funcionamiento de emergencia mediante los
botones de emergencia que se encuentran del controlador.
/X]'()526767$1'%<'(6&21*(/$&,Ï15(6(59$
Luz de funcionamiento
,QWHUUXSWRUGHIXQFLRQDPLHQWRGHHPHUJHQFLDFDOHIDFFLyQ
,QWHUUXSWRUGHIXQFLRQDPLHQWRGHHPHUJHQFLDUHIULJHUDFLyQ
Receptor
Inicio del funcionamiento
• Para poner en funcionamiento el modo de enfriamiento, mantenga
DSUHWDGRHOERWyQ durante más de 2 segundos.
• 3DUD SRQHU HQ IXQFLRQDPLHQWR HO PRGR GH FDOHIDFFLyQ PDQWHQJD
DSUHWDGRHOERWyQ durante más de 2 segundos.
Nota:
• Los detalles correspondientes al modo de emergencia aparecen a continuación.
/RVGHWDOOHVFRUUHVSRQGLHQWHVDO02'2'((0(5*(1&,$DSDUHFHQDFRQWLQXDFLyQ
Modo de funcionamiento
Temperatura
Velocidad del ventilador
'LUHFFLyQGHOÀXMRGHDLUH
5()5,*(5$&,Ï1
24°C, 75 °F
Alta
Horizontal
Parada del funcionamiento
3DUDGHWHQHUHOIXQFLRQDPLHQWRSXOVHHOERWyQ
durante más de 2 segundos.
&$/()$&&,Ï1
24°C, 75 °F
Alta
+DFLDDEDMR
RHOERWyQ
10. Mantenimiento y limpieza
ÛF
ÛF
TEMP.
FILTER
5HWLUDGDGHO¿OWUR
Cuidado:
$OUHWLUDUHO¿OWURWHQJDFXLGDGRGHSURWHJHUVHORVRMRVGHOSROYR
Asimismo, si para hacerlo tiene que subirse a un taburete, tenga
cuidado de no caerse.
8QDYH]UHWLUDGRHO¿OWURQRWRTXHODVSDUWHVPHWiOLFDVTXHKD\
en la unidad interior, ya que puede causarle heridas.
ON/OFF
,QGLFDTXHHO¿OWURQHFHVLWDXQDOLPSLH]D
/LPSLHHO¿OWUR
&XDQGRUHVWDEOH]FDHOLQGLFDGRU³),/7(5´)LOWUR
&XDQGRSUHVLRQDHOERWyQ>),/7(5@)LOWURGRVYHFHVVXFHVLYDPHQWHGHVSXpV
GHKDEHUOLPSLDGRHO¿OWURHOLQGLFDGRUVHDSDJDUi\VHUHVWDEOHFHUi
PKFY-P·NBMU-E2
PKFY-P·NHMU-E2
Nota:
Cuando se controlan dos o más tipos diferentes de unidad interior, el periRGRGHOLPSLH]DGL¿HUHFRQHOWLSRGH¿OWUR&XDQGROOHJDHOPRPHQWRGH
limpiar la unidad principal, aparece “FILTER” (Filtro). Cuando se apague
HOLQGLFDGRUGHO¿OWURHOWLHPSRDFXPXODGRVHUHDMXVWDUi
“FILTER” (Filtro) indica el periodo de limpieza en que se usó el acondicionador de aire bajo las condiciones generales de aire interior
por tiempo. Ya que el grado de suciedad depende de las condiciones
DPELHQWDOHVOLPSLHHO¿OWURGHDFXHUGRFRQODVFLUFXQVWDQFLDV
(OSHULRGRDFXPXODGRGHOLPSLH]DGHO¿OWURGL¿HUHVHJ~QHOPRGHOR
Esta indicación no está disponible en el controlador remoto inalámbrico.
/LPSLH]DGHORV¿OWURV
/LPSLHORV¿OWURVFRQD\XGDGHXQDDVSLUDGRUD6LQRWLHQHDVSLUDGRUD
JROSHHVXDYHPHQWHORV¿OWURVFRQWUDXQREMHWRVyOLGRSDUDGHVSUHQGHU
HOSROYR\ODVXFLHGDG
• 6L ORV ¿OWURV HVWiQ HVSHFLDOPHQWH VXFLRV OiYHORV FRQ DJXD WLELD 7HQJD
FXLGDGRGHDFODUDUELHQFXDOTXLHUUHVWRGHGHWHUJHQWH\GHMHTXHORV¿OWURV
se sequen completamente antes de volver a ponerlos en la unidad.
Cuidado:
1RVHTXHORV¿OWURVFRORFiQGRORVDOVRORFRQXQDIXHQWHGHFDORU
como el de una estufa eléctrica; podrían deformarse.
• 1RODYHORV¿OWURVHQDJXDFDOLHQWHPiVGH&)\DTXHVHGHIRUmarían.
• &HUFLyUHVHGHTXHORV¿OWURVHVWiQVLHPSUHLQVWDODGRV(OIXQFLRQDPLHQWR
GHODXQLGDGVLQ¿OWURVSXHGHSURYRFDUXQPDOIXQFLRQDPLHQWR
• Antes de empezar la limpieza, apague la fuente de alimentación.
/DVXQLGDGHVLQWHULRUHVHVWiQHTXLSDGDVFRQXQ¿OWURTXHHOLPLQD
HO SROYR GHO DLUH DVSLUDGR /LPSLH HO ¿OWUR XVDQGR ORV PpWRGRV
indicados en las ilustraciones siguientes.
52
7LUHKDFLDDIXHUDGHORVGRVERWRQHVVLWXDGRVHQODVHVTXLQDVGH
ODUHMLOODGHHQWUDGD\OHYDQWHHO¿OWUR
10. Mantenimiento y limpieza
PMFY-P·NBMU-E
3XOVDQGRHOERWyQ386+GHSDUWHH[WHUQDGHODUHMLOODGHDGPLVLyQ
pVWDVHDEULUá.
8QILOWURTXHWHQJDXQDUHMLOODGHDGPLVLyQVHSXHGHH[WUDHUWLUDQGR
de pO
11. Localización de fallos
¿Problemas?
El acondicionador de aire no calienta o refrigera bien.
$TXtWLHQHODVROXFLyQ/DXQLGDGIXQFLRQDQRUPDOPHQWH
/LPSLHHO¿OWURHOÀXMRGHDLUHVHUHGXFHFXDQGRHO¿OWURHVWiVXFLRRDWDVFDGR
&RPSUXHEHHODMXVWHGHWHPSHUDWXUD\PRGL¿TXHODWHPSHUDWXUDDMXVWDGD
$VHJ~UHVHGHTXHKD\HVSDFLRVX¿FLHQWHDOUHGHGRUGHODXQLGDGH[WHULRU
¿Está bloqueada la entrada o la salida de aire de la unidad interior?
¿Ha dejado abierta una puerta o ventana?
&XDQGRFRPLHQ]DHOPRGRGHFDOHIDFFLyQDOSULQFLSLRQRVDOHDLUHFDOLente de la unidad interior.
'XUDQWHHOPRGRGHFDOHIDFFLyQHODFRQGLFLRQDGRUGHDLUHVHGHWLHQH
DQWHVGHDOFDQ]DUODWHPSHUDWXUDDMXVWDGDSDUDODKDELWDFLyQ
(ODLUHFDOLHQWHQRHPSLH]DDVDOLUKDVWDTXHODXQLGDGLQWHULRUVHKD
FDOHQWDGRORVX¿FLHQWH
&XDQGRODWHPSHUDWXUDH[WHULRUHVEDMD\ODKXPHGDGHVDOWDSXHGHIRUPDUVHHVFDUFKDHQODXQLGDGH[WHULRU6LHVWRVXFHGHODXQLGDGH[WHULRU
LQLFLDUiODRSHUDFLyQGHGHVFRQJHODFLyQ8QDYH]WUDQVFXUULGRVXQRV
minutos, se reanudará el funcionamiento normal.
'XUDQWHHOPRGRGHUHIULJHUDFLyQORVGHÀHFWRUHVVHPXHYHQDXWRPiWLFDPHQWHDODSRVLFLyQKRUL]RQWDOLQIHULRUWUDVKRUDFXDQGRVHKDVHOHFFLRQDGRODGLUHFFLyQGHÀXMRGHDLUHLQIHULRUKRUL]RQWDO'HHVWDIRUPD
VHHYLWDTXHVHDFXPXOHDJXD\FDLJDGHVGHORVGHÀHFWRUHV
/DGLUHFFLyQGHODLUHFDPELDGXUDQWHHOIXQFLRQDPLHQWRRQRHVSRVLEOH
FDPELDUODGLUHFFLyQGHOÀXMRGHDLUH
'XUDQWHHOPRGRGHFDOHIDFFLyQORVGHÀHFWRUHVVHPXHYHQDXWRPiWLFDPHQWHDODSRVLFLyQGHÀXMRGHDLUHKRUL]RQWDOVLODWHPSHUDWXUDGHOÀXMR
GHDLUHHVEDMDRGXUDQWHHOPRGRGHGHVFRQJHODFLyQ
&XDQGRFDPELDODGLUHFFLyQGHOÀXMRGHDLUHORVGHÀHFWRUHVVLHPSUHVH
PXHYHQDUULED\DEDMRDQWHVGHGHWHQHUVHHQODSRVLFLyQDMXVWDGD
6HR\HXQVRQLGRGHDJXDÀX\HQGRRHQRFDVLRQHVXQDHVSHFLHGH
silbido.
6HR\HXQWUDTXHWHRRXQFKLUULGR
+D\XQRORUGHVDJUDGDEOHHQODVDOD
/DXQLGDGLQWHULRUH[SXOVDXQYDKRRKXPREODQFR
&XDQGRFDPELDODGLUHFFLyQGHOÀXMRGHDLUHORVGHÀHFWRUHVVHPXHYHQD
ODSRVLFLyQDMXVWDGDWUDVKDEHUGHWHFWDGRODSRVLFLyQEDVH
(VWRVVRQLGRVVHSXHGHQRtUFXDQGRHOUHIULJHUDQWHÀX\HSRUHODFRQGLFLRQDGRUGHDLUHRFXDQGRFDPELDHOÀXMRGHOUHIULJHUDQWH
(VWRVUXLGRVVHR\HQFXDQGRODVSLH]DVUR]DQHQWUHVtGHELGRDODH[SDQVLyQ\FRQWUDFFLyQSURYRFDGDVSRUORVFDPELRVGHWHPSHUDWXUD
(VWRVUXLGRVVHR\HQFXDQGRODVSLH]DVUR]DQHQWUHVtGHELGRDODH[SDQVLyQ\FRQWUDFFLyQSURYRFDGDVSRUORVFDPELRVGHWHPSHUDWXUD
6LODWHPSHUDWXUD\ODKXPHGDGGHODXQLGDGLQWHULRUVRQDOWDVHVWRSXede suceder inmediatamente tras encender el acondicionador de aire.
'XUDQWHHOPRGRGHGHVFRQJHODFLyQHODLUHIUtRSXHGHVDOLUKDFLDDEDMR
FRQODDSDULHQFLDGHYDKR
53
11. Localización de fallos
¿Problemas?
La unidad exterior expulsa agua o vapor.
$TXtWLHQHODVROXFLyQ/DXQLGDGIXQFLRQDQRUPDOPHQWH
'XUDQWHHOPRGRGHUHIULJHUDFLyQSXHGHDFXPXODUVHDJXD\JRWHDUGH
ODVWXEHUtDV\MXQWDVGHUHIULJHUDFLyQ
'XUDQWHHOPRGRGHFDOHIDFFLyQSXHGHDFXPXODUVHDJXD\JRWHDUGHO
intercambiador de calor.
'XUDQWHHOPRGRGHGHVFRQJHODFLyQHODJXDGHOLQWHUFDPELDGRUGHFDORU
se evapora, por lo que se emite vapor de agua.
(OLQGLFDGRUGHRSHUDFLyQQRDSDUHFHHQODSDQWDOODGHOFRQWURODGRU
remoto.
(O DFRQGLFLRQDGRU GH DLUH QR IXQFLRQD VLTXLHUD SXOVDQGR HO ERWyQ 21
OFF. La pantalla del modo de funcionamiento del controlador remoto
desaparece.
´
En la pantalla del controlador remoto aparece ³
Encienda el equipo. En la pantalla del controlador remoto aparecerá el
indicador³ ´
¿Está desconectado el interruptor de red de la unidad interior? Conecte
el interruptor de red.
$OUHLQLFLDUHODFRQGLFLRQDGRUGHDLUHSRFRGHVSXpVGHDSDJDUORQR
IXQFLRQDDOSXOVDUHOERWyQ212))(1&(1','2$3$*$'2
(ODFRQGLFLRQDGRUGHDLUHIXQFLRQDVLQKDEHUSXOVDGRHOERWyQ212))
(1&(1','2$3$*$'2
(ODFRQGLFLRQDGRUGHDLUHVHGHWLHQHVLQKDEHUSXOVDGRHOERWyQ212))
(1&(1','2$3$*$'2
No es posible ajustar el funcionamiento del temporizador del controlador
remoto.
(QODSDQWDOODGHOFRQWURODGRUUHPRWRDSDUHFH³3/($6(:$,7´325
)$925(63(5(
(QODSDQWDOODGHOFRQWURODGRUUHPRWRDSDUHFHXQFyGLJRGHHUURU
6HR\HXQUXLGRGHGUHQDMHGHDJXDRURWDFLyQGHPRWRU
(OUXLGRHVPD\RUGHORLQGLFDGRHQODVHVSHFL¿FDFLRQHV
Durante el control central,³
´aparece en la pantalla del controlador
remoto. El funcionamiento del acondicionador de aire no se puede iniciar
ni detener con el controlador remoto.
Espere unos tres minutos.
((OIXQFLRQDPLHQWRVHKDGHWHQLGRSDUDSURWHJHUHODFRQGLFLRQDGRUGHDLUH
¿Está ajustado el temporizador de encendido?
3XOVHHOERWyQ212))(1&(1','2$3$*$'2SDUDGHWHQHUHOIXQFLRQDPLHQWR
¿El acondicionador de aire está conectado a un controlador remoto central?
Consulte a la persona encargada de controlar el acondicionador de aire.
´en la pantalla del controlador remoto?
¿Aparece³
Consulte a la persona encargada de controlar el acondicionador de aire.
¢6HKDDMXVWDGRODIXQFLyQGHDXWRUHFXSHUDFLyQSDUDFDtGDVGHWHQVLyQ"
3XOVHHOERWyQ212))(1&(1','2$3$*$'2SDUDGHtener el funcionamiento.
¿Está ajustado el temporizador de apagado?
3XOVHHOERWyQ212))(1&(1','2$3$*$'2SDUDUHLQLFLDUHOIXQFLRQDPLHQWR
¿El acondicionador de aire está conectado a un controlador remoto central?
Consulte a la persona encargada de controlar el acondicionador de aire.
¿Aparece³
´en la pantalla del controlador remoto?
Consulte a la persona encargada de controlar el acondicionador de aire.
¿Los ajustes del temporizador no son válidos?
Si el temporizador se puede ajustar, WEEKLY , SIMPLE o AUTO OFF
aparecerán en la pantalla del controlador remoto.
6HKDQUHDOL]DGRORVDMXVWHVLQLFLDOHV(VSHUHXQRVPLQXWRV
/RVGLVSRVLWLYRVGHSURWHFFLyQVHKDQDFWLYDGRSDUDSURWHJHUHODFRQGLFLRQDGRUGHDLUH.
No intente reparar el equipo usted mismo.
$SDJXHLQPHGLDWDPHQWHHODFRQGLFLRQDGRUGHDLUH\SyQJDVHHQFRQWDFWRFRQ
VXGLVWULEXLGRU$VHJ~UHVHGHLQGLFDUDOGLVWULEXLGRUHOQRPEUHGHOPRGHOR\OD
LQIRUPDFLyQTXHDSDUHFtDHQODSDQWDOODGHOFRQWURODGRUUHPRWR
&XDQGRVHGHWLHQHHOIXQFLRQDPLHQWRGHUHIULJHUDFLyQODERPEDGHGUHQDMHVHDFWLYD\OXHJRVHGHWLHQH(VSHUHXQRVPLQXWRV
(OQLYHOGHUXLGRGHVHUYLFLRHQLQWHULRUHVVHYHDIHFWDGRSRUODDF~VWLFD
GHDFXHUGRFRQODVLJXLHQWHWDEOD\VHUiVXSHULRUDODHVSHFL¿FDFLyQGH
ruido, la cual fue medida en una sala sin eco.
Salas de alta
absorbencia del Salas normales
sonido
Ejemplos de
lugares
Niveles de ruido
No aparece nada en la pantalla del controlador remoto inalámbrico, las
LQGLFDFLRQHVDSHQDVVHYHQRODXQLGDGLQWHULRUQRUHFLEHODVVHxDOHVD
PHQRVTXHHOFRQWURODGRUUHPRWRHVWpPX\FHUFD
La luz de funcionamiento situada junto al receptor del controlador
remoto inalámbrico de la unidad interior parpadea.
Cuando el modo de calentamiento está apagado o durante el modo
GH YHQWLODFLyQ VDOH DLUH FDOLHQWH GH OD XQLGDG LQWHULRU GH IRUPD LQWHUmitente.
54
Salas de baja
absorbencia del
sonido
Estudio de radiotrans6DODGHUHFHSFLyQKDOO 2¿FLQDKDELWDFLyQ
PLVLyQ VDODV GH PH]GHXQKRWHOHWF
GHKRWHO
clas, etc.
3 a 7 dB
6 a 10 dB
9 a 13 dB
Las pilas apenas tienen carga.
6XVWLW~\DODV\SXOVHHOERWyQ5HVHW5HVWDEOHFLPLHQWR
6LODVLWXDFLyQQRFDPELDDOVXVWLWXLUODVSLODVDVHJ~UHVHGHTXHHVWiQ
FRORFDGDVFRQODSRODULGDGFRUUHFWD±
/DIXQFLyQGHDXWRGLDJQyVWLFRVHKDDFWLYDGRSDUDSURWHJHUHODFRQGLcionador de aire.
No intente reparar el equipo usted mismo.
$SDJXHLQPHGLDWDPHQWHHODFRQGLFLRQDGRUGHDLUH\SyQJDVHHQFRQWDFWRFRQ
VXGLVWULEXLGRU$VHJ~UHVHGHLQGLFDUDOGLVWULEXLGRUHOQRPEUHGHOPRGHOR
Cuando otra unidad interior está funcionando en modo de calentamienWRODYiOYXODGHPDQGRVHDEUH\VHFLHUUDGHYH]HQFXDQGRSDUDPDQWHQHU OD HVWDELOLGDG GHO VLVWHPD GH DLUH DFRQGLFLRQDGR (VWD RSHUDFLyQ
se detiene al cabo de un rato.
* Si ello provoca un aumento inadmisible en la temperatura ambiente de
VDODVSHTXHxDVHWFGHWHQJDODXQLGDGLQWHULRUWHPSRUDOPHQWH
12. (VSHFL¿FDFLRQHV
Serie PKFY
PKFY-P06NBMU-E2
Modelo
$OLPHQWDFLyQ
5HIULJHUDFLyQ%78K!
&DOHIDFFLyQ%78K!
$OWXUDLQFK!
$QFKRLQFK!
'LPHQVLyQ
3URIXQGLGDGLQFK!
Peso neto
,EV!
5pJLPHQGHÀXMRGHDLUHGHOYHQWLODGRU 6(&2&)0!
+Ò0('2&)0!
EDMRPHGLRPHGLRDOWR
Nivel de ruido
G%$!
EDMRPHGLRPHGLRDOWR
Capacidad
6000
6700
22
170-180-200-210
160-170-180-190
PKFY-P08NHMU-E2 PKFY-P12NHMU-E2 PKFY-P15NHMU-E2 PKFY-P18NHMU-E2
0RQRIDVH9+]
8000
12000
15000
18000
9000
13500
17000
20000
29
320-370-405
320-370-425
290-335-365
290-335-380
32-33-35-36
34-39-43
36-41-45
Serie PMFY
PMFY-P06NBMU-E
Modelo
$OLPHQWDFLyQ
5HIULJHUDFLyQ%78K!
&DOHIDFFLyQ%78K!
$OWXUDLQFK!
'LPHQVLyQ3DQHO
$QFKRLQFK!
3URIXQGLGDGLQFK!
3HVRQHWR3DQHO
,EV!
5pJLPHQGHÀXMRGHDLUHGHOYHQWLODGRU 6(&2&)0!
+Ò0('2&)0!
EDMRPHGLRPHGLRDOWR
Nivel de ruido
G%$!
EDMRPHGLRPHGLRDOWR
Capacidad
PMFY-P15NBMU-E
230-250-280-300
200-220-250-270
PMFY-P08NBMU-E
PMFY-P12NBMU-E
0RQRIDVH9+]
8000
12000
9000
13500
250-280-300-320
220-250-270-290
27-30-33-35
32-34-36-37
33-35-37-39
6000
6700
15000
17000
270-300-340-370
240-270-310-340
1. /DFDSDFLGDGGHOPRGRUHIULJHUDFLyQFDOHIDFFLyQLQGLFDHOYDORUPi[LPRGHOIXQFLRQDPLHQWREDMRODVVLJXLHQWHVFRQGLFLRQHV
5HIULJHUDFLyQ : Interior&'%)'%&:%):%Exterior 35°C DB, 95°F DB
&DOHIDFFLyQ : Interior 20°C DB, 68°F DB, Exterior&'%)'%&:%):%
Margen de aplicación
(OPDUJHQGHWHPSHUDWXUDVGHWUDEDMRGHODVHULH<WDQWRGHODXQLGDGLQWHULRUFRPRGHODH[WHULRUHVHOTXHVHLQGLFDDFRQWLQXDFLyQ
Cuidado:
El uso del acondicionador de aire fuera de estos márgenes de temperatura y humedad puede dar lugar a serias averías.
Modo
Unidad interior
Enfriamiento
&DOHIDFFLyQ
&&Û)Û):%
&&Û)Û)'%
PUHY
±&&Û)Û)'%
–20°C - 15,5°C, –Û)Û):%
Unidad exterior
PURY
±&&Û)Û)'%
–20°C - 15,5°C, –Û)Û):%
PUMY
±&&Û)Û)'%
±&&Û)Û):%
Nota:Como humedad estándar aplicable, recomendamos un margen entre el 30 y el 80% de humedad relativa, tanto para la unidad exterior
como para la interior.
Atención:
Si el acondicionador de aire funciona pero no genera fresco ni calefacción en la habitación (dependiendo del modelo), consulte con su
distribuidor ya que puede tratarse de una fuga de refrigerante. Debe preguntar al responsable del mantenimiento si existe o no una fuga de
refrigerante cuando se lleve a cabo la reparación.
El refrigerante cargado en el acondicionador de aire es seguro y normalmente no tiene fugas. No obstante, si existe pérdida de gas
refrigerante en el interior y entra en contacto con las llamas del calentador de un ventilador, calentador, horno o aparato similar, se generarán
sustancias nocivas.
55
This product is designed and intended for use in the residential,
commercial and light-industrial environment.
Please be sure to put the contact address/telephone number on
this manual before handing it to the customer.
HEAD OFFICE: TOKYO BLDG., 2-7-3, MARUNOUCHI, CHIYODA-KU, TOKYO 100-8310, JAPAN
BG79U634H05
Printed in Japan