1
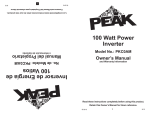
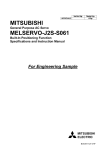
1
P/N XXXXX, 05/10
Retain this Owner’s Manual for future reference.
Read these instructions completely before using this product.
and Warranty Information
Owner’s Manual
Model No.: PKC0AY
1200 Watt Power
Inverter
Inversor de Energía
de 1200 Vatios
No. de Modelo: PKC0AY
Manual del Propietario
e Información de Garantía
Lea completamente estas instrucciones antes de usar este producto.
Conserve este Manual del Propietario para referencia futura.
P/N XXXXX, 05/10
1
ÍNDICE
PRECAUCIONES DE SEGURIDAD................................................................................................. 2
Seguridad del Inversor de Energía.......................................................................................... 2
INTRODUCCIÓN.............................................................................................................................. 3
CARACTERÍSTICAS........................................................................................................................ 3
Operación.................................................................................................................................... 4
Determinación de Consumo de Energía.................................................................................. 4
Fuente de Energía................................................................................................................... 5
Determinación de la Capacidad de la Batería y Tiempo de Operación................................... 5
Posicionamiento del Inversor de Energía................................................................................ 5
Conexión a la Fuente de Energía............................................................................................ 6
Conexión a una Batería de 12 voltios o 12 voltios CC con los Cables Suministrados.... 6
Alambrado Fijo a la Fuente de Energía................................................................................... 6
Determinación de la Longitud y Calibre Apropiados....................................................... 6
Instalación de los Cables................................................................................................ 6
Operación de la Salida de Energía USB.................................................................................. 7
Operación del Interruptor Remoto........................................................................................... 7
Indicador de Vatiaje de Potencia de Salida.............................................................................. 8
Conexión de una Carga al Inversor de Energía....................................................................... 8
Uso de la Batería............................................................................................................ 8
Características de Protección.................................................................................................. 8
Problemas Comunes............................................................................................................... 9
Cuidados y Mantenimiento..................................................................................................... 9
Almacenaje.............................................................................................................................. 9
Limpieza.................................................................................................................................. 9
Descarte.................................................................................................................................. 9
Especificaciones.................................................................................................................... 10
Resolución de Problemas.................................................................................................. 11
GARANTÍA LIMITADA.................................................................................................................... 12
Para Obtener Servicio............................................................................................................ 12
PRECAUCIONES DE SEGURIDAD
Este símbolo de alerta de seguridad indica que está presente un peligro potencial de lesión
personal. Este símbolo es usualmente usado con la palabra de señalamiento (por ejemplo,
ADVERTENCIA) la cual designa el grado o nivel de seriedad del peligro.
La palabra de señalamiento ADVERTENCIA indica una situación peligrosa que, si no se evita, puede
resultar en la muerte o en lesiones serias.
La palabra de señalamiento AVISO indica una situación que puede causarle daño al producto, otra
propiedad personal y/o al medio ambiente, o causar que el producto funcione de manera incorrecta.
La combinación del símbolo de alerta de seguridad y la palabra de señalamiento es usada en
mensajes de seguridad a lo largo de este manual y etiquetas de seguridad en este producto.
ADVERTENCIA Todos los mensajes de seguridad que siguen tiene niveles de seguridad de
ADVERTENCIA. El no cumplir puede resultar en la muerte o en lesiones serias.
Seguridad del Inversor de Energía
• Este producto contiene plomo y/o compuestos con plomo, químicos conocidos en el Estado de
California como causantes de cáncer y daños al sistema reproductivo. Lávese las manos después
de manipularlos.
• MANTENGA EL INVERSOR DE ENERGÍA Y SUS ACCESORIOS FUERA DEL ALCANCE DE
LOS NIÑOS.
• No use el Inversor de Energía con dispositivos médicos. No ha sido probado para aplicaciones
médicas.
• No deje el vehículo desatendido mientras usa el Inversor de Energía.
• No opere el Inversor de Energía si los cables de la batería están dañados. Reemplace
inmediatamente los cables dañados.
• Cuando use el Inversor, mantenga el Inversor de Energía, los cables de la batería y el cable
del interruptor remoto alejados de los controles mecánicos del vehículo y sus componentes en
rotación.
• No intente conectar el Inversor de Energía a la batería del vehículo mientras el motor esté
encendido.
• No modifique de manera ninguna los cables de la batería.
• No opere el Inversor de Energía si ha recibido un golpe fuerte, se ha caído al suelo, o se ha
dañado de cualquiera otra manera.
• This product contains lead and/or lead compounds, chemicals known to the state of California to
cause cancer and reproductive harm. Wash hands after handling.
• KEEP THE POWER INVERTER AND ITS ACCESSORIES OUT OF THE REACH OF CHILDREN.
• Do not use the Power Inverter with medical devices. It is not tested for medical applications.
• Do not leave the vehicle unattended while using the Power Inverter.
• Do not operate the Power Inverter if the battery cables are damaged. Replace damaged battery
cables immediately.
• Keep the Power Inverter, battery cables and remote switch cable away from the vehicle’s
mechanical controls and rotating components when using the Inverter.
• Do not attempt to connect the Power Inverter to the battery of the vehicle while the engine is
operating.
• Do not modify the Inverter’s battery cables in any way.
• Do not operate the Power Inverter if it has received a sharp blow, been dropped or been damaged
in any other way.
• Do not disassemble the Power Inverter. There are no serviceable components within the Inverter.
2
Power Inverter Safety
All safety messages that follow have WARNING level hazards. Failure to
comply could result in death or serious injury.
This safety alert symbol indicates that a potential personal injury hazard is present. The symbol
is usually used with a signal word (e.g., WARNING) which designates the degree or level of hazard
seriousness.
The signal word WARNING indicates a hazardous situation which, if not avoided, could result in
death or serious injury.
The signal word NOTICE indicates a situation which can cause damage to the product, other
personal property and/or to the environment, or cause the product to operate improperly.
The combination of the safety alert symbol and signal word is used in safety messages throughout
this manual and on safety labels on this product.
SAFETY PRECAUTIONS
SAFETY PRECAUTIONS................................................................................................................. 2
Power Inverter Safety............................................................................................................... 2
INTRODUCTION.............................................................................................................................. 3
FEATURES....................................................................................................................................... 3
Operation..................................................................................................................................... 4
Determining Power Consumption............................................................................................ 4
Power Source........................................................................................................................... 5
Determining Battery Capacity and Operating Time................................................................. 5
Positioning of Power Inverter................................................................................................... 5
Connecting to Power Source................................................................................................... 6
Connecting to 12-volt Battery or 12-volt DC Using Supplied Cables.............................. 6
Solid Wiring to Power Source.................................................................................................. 6
Determining Proper Cable Length and Gauge................................................................ 6
Installing Cables.............................................................................................................. 6
USB Power Outlet Operation................................................................................................... 7
Remote Switch Operation........................................................................................................ 7
Power Output Wattage Indicator.............................................................................................. 8
Connecting a Load to the Power Inverter................................................................................. 8
Battery Use..................................................................................................................... 8
Protective Features.................................................................................................................. 8
Common Problems.................................................................................................................. 9
Care and Maintenance............................................................................................................ 9
Storage.................................................................................................................................... 9
Cleaning................................................................................................................................... 9
Disposal................................................................................................................................... 9
Specifications.......................................................................................................................... 10
Troubleshooting.................................................................................................................... 11
LIMITED WARRANTY.................................................................................................................... 12
To Obtain Service.................................................................................................................. 12
CONTENTS
2
3
Legend
1. Remote Switch
2. Remote Switch ON/OFF Button
3. Remote Switch Fault LED Indicator
4. Remote Switch Power LED Indicator
5. Cooling Fans
6. Red Positive (+) Screw Connector
7. Black Negative (-) Screw Connector
8. Red Positive (+) Battery Cable
11
9. Black Negative (-) Battery Cable
10. Power Output Wattage Indicator
11. North American Standard 110/120-volt AC
Receptacles (2)
12. ON/OFF Switch
13. Remote Switch Outlet Connection
14. USB Power Outlet
15. FAULT/POWER Indicator
16. Remote Switch Connector
10
12
9
13
15 14
7
6
16
8
• No desarme el Inversor de Energía. No hay componentes reemplazables dentro del Inversor.
• NO instale u opere el Inversor de Energía en áreas designadas como PROTEGIDAS DE
IGNICIÓN. El Inversor NO HA SIDO APROBADO para áreas protegidas de ignición.
• Siempre gire el interruptor de ON/OFF y el botón de ON/OFF del interruptor remoto a la posición
OFF y desconecte los cables de batería de la batería o fuente de energía cuando no esté siendo
usado con el fin de evitar drenar la batería.
• No exponga el Inversor a productos inflamables, agua, lluvia o nieve.
• Use el Inversor sólo en áreas ventiladas apropiadamente.
• Siempre remueva el enchufe del aparato de la toma de corriente CA antes de trabajar en el
aparato.
• No inserte objetos extraños dentro de las tomas de corriente CA.
INTRODUCCIÓN
Este Inversor de Energía se puede usar como fuente de alimentación y fuente de reserva para
electrodomésticos y alimentar equipos recreativos con los requisitos de energía normales de hasta
1200 vatios continuos usando una conexión de energía de 12 voltios.
• Cuando use el Inversor de Energía en un vehículo, consulte el manual del propietario del vehículo
para obtener la capacidad de energía máxima y la salida recomendada.
• Lea y comprenda este Manual de Instrucciones antes de usar el Inversor de Energía.
• Instale y opere el Inversor de Energía sólo como se describe en este Manual de Instrucciones.
CARACTERÍSTICAS
F
ON
/ OF
Compact design for safer use, transport and storage
Connects to a 12-volt battery or power source
Two North American Standard 110/120-volt AC receptacles
LED operation indicator
ON/OFF switch
Remote switch
USB port
Load output indication
Low voltage alarm
Low voltage shutdown
Overload protection
High input voltage protection
Thermal protection
Mounting brackets for solid mounting
3
4
5
2
1
INV
ERT
ER
ON
H
MO
TE
SW
ITC
RE
•
•
•
•
•
•
•
•
•
•
•
•
•
•
•
•
•
•
•
•
•
•
•
•
•
•
•
•
Diseño compacto para uso, transporte y almacenaje seguros
Se conecta a una batería de 12 voltios o fuente de energía
Dos receptáculos de 110/120 voltios CA de Estándar Norteamericano
Indicador de operación LED
Interruptor de ON/OFF
Interruptor Remoto
Puerto USB
Indicación de carga de salida
Alarma de bajo voltaje
Apagado de bajo voltaje
Protección de sobre carga
Protección contra voltaje de entrada alto
Protección térmica
oportes de montaje para montaje fijo
S
3
4
5
2
1
RE
MO
TE
INV
ERT
ON
ER
SW
ITC
H
ON
/ OF
F
FEATURES
16
This Power Inverter can be used to supply power and emergency backup power for household
appliances and power recreational equipment with a normal power requirement of up to 1200
continuous watts using a 12-volt power connection.
• When using the Power Inverter in a vehicle, check the vehicle’s owner’s manual for maximum
power rating and recommended output.
• Read and understand this Instruction Manual before using the Power Inverter.
• Install and operate the Power Inverter only as described in this Instruction Manual.
INTRODUCTION
• Do NOT install or operate the Power Inverter in areas designated as IGNITION PROTECTED.
The Inverter is NOT APPROVED for ignition protected areas.
• Always turn the Inverter ON/OFF switch and remote switch ON/OFF button to the OFF position
and disconnect the battery cables from the battery or power source when not in use to avoid
draining the battery.
• Do not expose the Inverter to flammables, water, rain or snow.
• Use the Inverter in properly ventilated areas only.
• Always remove the appliance plug from the AC receptacle before working on the appliance.
• Do not insert foreign objects into the AC receptacles.
15 14
6
8
7
13
9
12
11
10
Leyenda
1. Interruptor Remoto
2. Botón de ON/OFF del Interruptor Remoto
3. Indicador LED de Falla del Interruptor
Remoto
4. Indicador LED de Energía del Interruptor
Remoto
Ventiladores de Enfriamiento
Tornillo Conector del Positivo (+) Rojo
Tornillo Conector del Negativo (–) Negro
Cable de Batería Positivo (+) Rojo
5.
6.
7.
8.
9. Cable de Batería Negativo (–) Negro
10. Indicador de Vatiaje de Potencia de Salida
11. Receptáculos de 110/120 voltios CA de
Estándar Norteamericano (2)
12. Interruptor de ON/OFF
13. Conexión de Tomacorriente del Interruptor
Remoto
14. Salida de Energía USB
15. Indicador de FALLA/ENERGÍA
16. Conector del Interruptor Remoto
3
OPERACIÓN
El Inversor de Energía convierte voltaje de entrada de 12 voltios CC (corriente continua) a energía de
110/120 voltios, 60 Hz CA (corriente alterna).
El Inversor produce una “onda senoidal modificada.” La onda senoidal modificada es adecuada para
la mayoría de los electrodomésticos de corriente CA y dispositivos electrónicos personales.
Pueda que los siguientes dispositivos no trabajen con una onda senoidal modificada:
• Fotocopiadoras, impresoras láser, discos duros óptico-magnéticos
• Algunas computadoras portátiles
• Luces de arco haluro de metal (MHI)
• Algunas luces fluorescentes con balastros electrónicos
• Herramientas motorizadas que usan energía de estado sólido
• Ventiladores y herramientas motorizadas que usan controles de velocidad variable
• Algunos hornos y estufas de aglomerados con control por microprocesador
• Radios y relojes digitales
• Maquinas de coser con control de velocidad por microprocesador
• Electrónica que modula señales de frecuencia radial en la línea CA
• Sistemas de automatización doméstica X-10
• Concentradores de oxígeno y otros equipos médicos
La mayoría de los cargadores de baterías se pueden conectar al receptáculo de CA. Los cargadores
de baterías que usan transformadores separados o cargadores que se enchufan en el receptáculo
CA para proporcionar salida de bajo voltaje CC a CA deben trabajar. Sin embargo, cargadores de
baterías para baterías de níquel cadmio se pueden dañar si son enchufados en el Inversor.
Los siguientes electrodomésticos o dispositivos se pueden dañar si son enchufados en el
Inversor:
• Electrodomésticos pequeños operados a batería que se puede enchufar directamente al
receptáculo CA, tales como linternas, afeitadoras inalámbricas y cepillos de dientes.
• Ciertos cargadores de baterías para paquetes de baterías de herramientas inalámbricas.
Estos cargadores se pueden identificar por una etiqueta de advertencia que dice que voltajes
peligrosos están presentes en los terminales de la batería.
AVISO Monitoree la temperatura del cargador de baterías durante 10 minutos. Si el
cargador de baterías se calienta de forma anormal, desconéctelo inmediatamente del Inversor
de Energía.
Si usted no está seguro de enchufar algún electrodoméstico o aparato en el Inversor, contacte al
fabricante o consulte el manual del propietario del dispositivo.
Determinación de Consumo de Energía
ADVERTENCIA PELIGRO DE FUEGO
No opere con este Inversor electrodomésticos de alto voltaje o equipos que produzcan calor,
tales como secadores de cabello, planchas, calentadores y tostadoras.
AVISO Asegúrese de que el consumo de energía total del dispositivo que se este usando
sea inferior a la capacidad del Inversor.
El fabricante suministra con este producto una etiqueta con la información de consumo de energía
en vatios o amperios. Si el consumo de energía del aparato no se indica en vatios, pero en amperios
CA, multiplique el valor de amperios CA por 120 (voltios CA) para determinar el vatiaje.
AVISO Cuando encienda un electrodoméstico o aparato, el necesitará para arrancar el
doble del vatiaje clasificado del electrodoméstico o dispositivo. Esto se conoce como la
“carga de arranque” o “carga máxima.” Para determinar la carga de arranque o la carga
máxima, multiplique el vatiaje clasificado por dos. Si ésta excede el incremento súbito del
Inversor (2400 vatios [0.1 seg.]), no opere el electrodoméstico o aparato con el Inversor.
El Inversor de Energía puede operar un aparato de carga resistente o un aparato de carga inductiva.
La operación de un aparato resistente es la más fácil para el Inversor. Sin embargo, el Inversor no
operará aparatos de carga resistente grandes, tales como estufas eléctrica o calentadores. La carga
resistente requiere un vatiaje más alto de el que produce el Inversor.
Los televisores y estéreos son aparatos de carga inductiva (aparatos con una bobina o
transformador). Ellos podrán necesitar más corriente de operación que un aparato de carga
resistente con la misma capacidad de vatiaje.
4
When you turn on an appliance or device, it will require twice the rated wattage
of the appliance or device to start. This is known as the “starting load” or “peak load.” To
determine the starting load or peak load, multiply the rated wattage by two. If this exceeds the
peak surge output of the Inverter (2400 watts [0.1 sec]), do not operate the appliance or device
with the Inverter.
The Power Inverter can operate a resistive load device or an inductive load device.
Operating a resistive load device is the easiest for the Inverter. However, the Inverter will not operate
larger resistive load devices such as electric stoves and heaters. Their resistive load requires higher
wattage than the Inverter can produce.
TVs and stereos are inductive load devices (devices with a coil or transformer). They may require
more current to operate than a resistive load device of the same wattage rating.
Ensure that total power consumption of the device being used is less than the
rating of the Inverter.
The manufacturer provides a label with power consumption information in watts or amps for their
product. If the item’s power consumption is not indicated in watts, but in amps AC, multiply the amp
AC value by 120 (AC volts) to determine the wattage.
FIRE HAZARD
Do not operate high wattage appliances or equipment that will produce heat, such as hair
dryers, irons, heaters and toasters, with this Inverter.
Determining Power Consumption
Monitor the temperature of the battery charger for about 10 minutes. If the battery
charger becomes abnormally warm, disconnect it from the Power Inverter immediately.
If you are unsure about powering any appliance or device with the Inverter, contact the manufacturer
or consult the owner’s manual of the device.
• C
ertain battery chargers for cordless tool battery packs. These chargers can be identified by a
warning label stating dangerous voltages are present at the battery terminalss.
The following appliances or devices could be damaged if plugged into the Inverter:
• Small battery operated appliances that can be plugged directly into the AC receptacle such as
flashlights, cordless razors and toothbrushes.
Most battery chargers can be connected to the AC receptacle. Battery chargers that use separate
transformers or chargers that plug into the AC receptacle to supply a low-voltage DC-to-AC output
should work. However, battery chargers for small nickel-cadmium batteries can be damaged if plugged
into the Inverter.
The Power Inverter converts 12-volt DC (direct current) input voltage to 110/120-volt, 60 Hz AC
(alternating current) power.
The Inverter produces a “modified sine wave.” The modified sine wave is suitable for most AC
powered appliances and personal electronic devices.
The following devices may not work with a modified sine wave:
• Photocopiers, laser printers, magneto-optical hard drives
• Some laptops
• Metal halide arc (MHI) lights
• Some fluorescent lights with electronic ballasts
• Power tools that use solid-state power
• Fans and power tools that use variable speed controls
• Some new furnaces and pellet stoves with microprocessor control
• Digital radios and clocks
• Sewing machines with speed/microprocessor control
• Electronics that modulate radio frequency signals on the AC line
• X-10 home automation systems
• Oxygen concentrators and other medical equipment
OPERATION
4
5
FIRE HAZARDS
• Do not place the Inverter near flammable materials or in any location that may accumulate
flammable fumes or gases such as the battery compartment of your vehicle or engine
compartment of your boat.
• Do not expose the Inverter to extreme heat or flames. The surrounding air temperature
should be between 32° and 104°F (0° and 40°C). Do not place the Inverter on or near a
heating vent or any equipment which is generating heat above room temperature. Do not
place the Inverter in direct sunlight.
Position the Power Inverter on a reasonably flat surface. DO NOT place on or under the vehicle
seats. Allow at least 3 in. (76 mm) of clearance around the Inverter to allow for airflow. Always use
the Inverter where there is adequate ventilation. Do not block ventilation slots or the cooling fans.
Install the Inverter as close to the DC power source as possible. It is more efficient to use longer AC
wiring than DC wiring.
If desired, the Power Inverter can be solidly mounted to a base using the mounting brackets.
If installed in a vehicle, it is recommended that the Inverter be shock mounted using
a rubber isolation pad between the Inverter and the base.
The Inverter can be mounted on a vertical surface, on a horizontal surface or under a horizontal
surface. Install the Inverter so that the receptacles and the ON/OFF switch are accessible.
Do not install the Inverter on a vertical surface where the cooling fans are facing up
or down.
Positioning of Power Inverter
Use conservative estimates when selecting a battery. The number of amp-hours you expect to use
should be 50% of the battery’s rated amp-hours.
There is no accurate conversion formula for converting CCA (cold cranking amps)
into battery amp-hours. There are too many variations between battery manufacturers to
have a standard formula. To determine the amp-hours for your battery, contact the battery
manufacturer.
To increase the operating time, the amp-hour rating must be increased. Either choose a battery with
a higher amp-hour rating, or connect multiple batteries together in parallel. If the 12-volt DC battery
has a rating of 200 amp-hours, connecting two 12-volt DC batteries, each having a 200 amp-hour
rating in a parallel arrangement, would increase the amp-hour rating to 400 amp-hours, doubling the
time of operation.
1050 (example of total wattage) ÷ 120 (AC volts) = 8.75 amps
200 (amp-hour rating of DC battery) ÷ 10 (always use 10) = 20 amp-hours @ 120 volts AC
20 (amp-hours @ 120 volts AC) ÷ 8.75 (amps) = 2.3 hours of operating time
To determine your battery capacity, you will need to know the wattage of each appliance and/or tool
that will be simultaneously powered by the Inverter. Keep in mind to add 15% to the wattage of each
appliance and/or tool due to efficiency loss using the Inverter. Once you have determined the total
wattage, use the following formula to determine the battery capacity in amp-hours and the operating
time between charges. For this example, we will use a 12-volt DC battery rated at 200 amp-hours.
Determining Battery Capacity and Operating Time
Do not exceed the maximum input voltage of 15 volts DC. The Inverter could be
damaged.
The Power Inverter is for 12-volt battery systems only. A 6-volt battery system will
not provide adequate input voltage and a 24-volt battery system will damage the Inverter.
The Power Inverter can be connected to a 12-volt battery, multiple 12-volt batteries connected in
parallel for heavy-duty installations or a regulated 12-volt DC power source. The power source must
provide between 10.5 and 15 volts DC and must be able to provide sufficient current (in amperes) to
operate multiple devices.
Power Source
The following is a list of typical wattages of various appliances (the below wattage ratings are
estimates only):
• 19" color TV
100 watts
• Power drill
400 watts
• Computer system
400 watts
• 8-cup coffeemaker
600 watts
• Microwave oven
900 watts
La siguiente es una lista de vatiajes típicos de diferentes electrodomésticos ( las clasificaciones de
vatiaje indicadas abajo son sólo estimados):
• TV a colores de 19"
100 vatios
• Taladro eléctrico
400 vatios
• Computadora
400 vatios
• Cafetera de 8 tazas
600 vatios
• Horno microondas
900 vatios
Fuente de Energía
El Inversor de Energía puede ser conectado a una batería de 12 voltios, múltiples baterías de 12
voltios conectadas en paralelo para instalaciones de trabajo pesado o a una fuente de energía
regulada de 12 voltios CC. La fuente de energía debe suministrar entre 10.5 y 15 voltios CC y
deberá ser capaz de suministrar corriente suficiente (en amperios) para operar múltiples dispositivos.
AVISO No exceda el voltaje de entrada máximo de 15 voltios CC. El Inversor se puede
dañar.
AVISO El Inversor de Energía es para sistemas de batería de 12 voltios únicamente. Un
sistema de batería de 6 voltios no suministrará voltaje de entrada adecuado y un sistema de
batería de 24 voltios dañará el Inversor.
Determinación de la Capacidad de la Batería y Tiempo de Operación
Para determinar la capacidad de su batería, usted necesita saber el vatiaje de cada electrodoméstico
y/o herramienta que será operada simultáneamente por el Inversor. Tenga en cuenta que se debe
agregar el 15% al vatiaje de cada electrodoméstico y/o herramienta por causa de la pérdida de
eficiencia al usar el Inversor. Una vez determinado el vatiaje total, use la siguiente fórmula para
determinar la capacidad de la batería en amperios-hora y el tiempo de operación entre cargadas.
Para este ejemplo, usaremos una batería de 12 voltios CC con una capacidad de 200 amperios-hora.
1050 (ejemplo del vatiaje total) ÷ 120 (voltios CA volts) = 8,75 amperios
200 (capacidad de amperios-hora de la batería CC) ÷ 10 (siempre use 10) = 20 amperios-hora @
120 voltios CA
20 (amperios-hora @ 120 voltios CA) ÷ 8,75 (amperios) = 2,3 horas de tiempo de operación
Para aumentar el tiempo de operación, la capacidad de amperios-hora tiene que ser aumentada.
Seleccione una batería con una capacidad de amperios-hora más alta o conecte múltiples baterías
en paralelo. Si la batería de 12 voltios CC tiene una capacidad de 200 amperios-hora, al conectar
dos baterías de 12 voltios CC, cada una con capacidad de 200 amperios-hora conectadas en
paralelo, aumentará la capacidad a 400 amperios-hora, doblando el tiempo de operación.
Use estimados conservadores al seleccionar una batería. El número de amperios-hora que usted
espera usar deberá ser el 50% de la capacidad de la batería en amperios-hora.
AVISO No hay una fórmula de conversión precisa para convertir CCA (amperios de
arranque en frío) en amperios-hora de batería. Hay demasiadas variaciones entre los
fabricantes de baterías para tener una formula estándar. Para determinar el amperaje-hora de
su batería, póngase en contacto con el fabricante.
Posicionamiento del Inversor de Energía
Posicione el Inversor de Energía sobre una superficie razonablemente plana. NO lo posicione sobre
o debajo de los asientos del vehículo. Deje por lo menos 3 pul. (76 mm) de espacio libre alrededor
del Inversor para permitir el flujo de aire. Siempre use el Inversor donde haya ventilación adecuada.
No bloquee las ranuras de ventilación o los ventiladores de enfriamiento.
Instale el Inversor tan cerca como sea posible a la fuente de energía CC. Es más eficiente usar
cables CA más largos que cables CC.
Si así lo desea, el Inversor de Energía se puede montar sólidamente a una base usando los soportes
de montaje.
AVISO Si lo instala en un vehículo, se recomienda que el Inversor sea montado usando una
almohadilla de caucho aislante entre el Inversor y la base.
El Inversor se puede montar sobre una superficie vertical, horizontal o debajo de una superficie
horizontal. Instale el Inversor de modo que los receptáculos y el interruptor de ON/OFF queden
accesibles.
AVISO No instale el Inversor sobre una superficie vertical donde los ventiladores de
enfriamiento queden de cara hacia arriba o hacia abajo.
ADVERTENCIA PELIGROS DE FUEGO
• No coloque el Inversor cerca de materiales inflamables o en cualquier ubicación donde se
acumulen gases inflamables tales como el compartimiento de baterías de su vehículo o el
compartimiento del motor de su bote.
• No exponga el Inversor a calor extremo o llamas. La temperatura del aire circundante
deberá estar entre 32° y 104°F (0° y 40°C). No coloque el Inversor sobre o cerca de una
salida de calefacción o de cualquier equipo que esté generando calor más arriba de la
temperatura ambiente. No coloque el Inversor directamente bajo la luz solar.
5
ADVERTENCIA PELIGRO DE ELECTROCUCIÓN
No opere el Inversor si está mojado. No permita que el Inversor entre en contacto con agua,
humedad u otros líquidos, con el aparato que se está operando o con la fuente de energía.
Conexión a la Fuente de Energía
ADVERTENCIA PELIGRO DE INCENDIO
No conecte el Inversor a un Vehículo Recreativo (RV) o al sistema de distribución CA de
la casa, a un circuito de carga CA o donde el conductor neutro esté conectado al terminal
negativo de una fuente de energía CC. El conectarlo a estos circuitos podrá causarle daños al
Inversor y/o crear una chispa.
AVISO No lo use en sistemas eléctricos de tierra positiva. El conectar el Inversor a un
sistema eléctrico de tierra positiva dañará el Inversor. Sólo use el Inversor de Energía en
sistemas eléctricos de tierra negativa. Si tiene duda, consulte con el distribuidor de su
vehículo o lea el manual del propietario del vehículo.
Conexión a una Batería de 12 voltios o 12 voltios CC con los Cables Suministrados
El Inversor de Energía está equipado con dos conectores de tornillo para sujetar los cables al
Inversor. El rojo es positivo (+) y el negro es el negativo (–).
1. Oprima el interruptor de ON/OFF y el botón del interruptor remoto ON/OFF a la posición OFF.
2. Remueva la tapa del conector de tornillo del positivo rojo (+), la arandela plana y la arandela de
seguridad.
3. Deslice la arandela de seguridad, luego el cable positivo (+), luego la arandela plana, en el
espárrago del tornillo rojo positivo (+). Apriete seguramente la tapa del conector del tornillo.
4. Remueva la tapa del conector de tornillo del negativo negro (–), la arandela plana y la arandela
de seguridad.
5. Deslice la arandela de seguridad, luego el cable negativo negro (–), luego la arandela plana, en
el espárrago del tornillo negro negativo (–). Apriete seguramente la tapa del conector del tornillo.
6. Conecte seguramente el cable positivo rojo (+) al terminal positivo (+) de la batería o fuente de
energía.
7. C
onecte seguramente el cable negativo negro (–) al terminal negativo (–) de la batería o fuente
de energía.
Alambrado Fijo a la Fuente de Energía
El Inversor de Energía se puede alambrar sólidamente a la fuente de energía CC. Se debe instalar
un fusible de 300 amperios ANL o un disyuntor CC para proteger el circuito.
Determinación de la Longitud y Calibre Apropiados
Mida la distancia entre el Inversor de Energía y la fuente de energía. Consulte las
ESPECIFICACIONES para obtener el calibre del cable que se debe usar. El usar cables
excesivamente largos o de calibre insuficiente reducirá la energía de la batería. También, el uso de
cables inapropiados reducirá el tiempo de operación de la batería.
AVISO Use únicamente cables de cobre para conectar el Inversor de Energía a la fuente de
energía. No use cables de aluminio. Los cables de aluminio tienen aproximadamente 1/3 más
de resistencia que los cables de cobre del mismo tamaño.
AVISO Use solamente conectores de cable del tamaño apropiado para conectar los cables
al Inversor y a la fuente de energía. Asegúrese de que los conectores de los cables sean
instalados apropiadamente en los extremos de los cables.
Instalación de los Cables
1. Oprima el interruptor de ON/OFF y el botón del interruptor remoto ON/OFF a la posición OFF.
2. Instale el fusible de 300 amperios ANL o el disyuntor CC en el terminal positivo (+) de la fuente
de energía. Retire el fusible del porta fusible antes de instalar el porta fusible o apague el
disyuntor. Si el porta fusible o el disyuntor no pueden ser instalados en el terminal, use un
pedazo de cable corto del calibre recomendado para conectar el porta fusible o el disyuntor en el
terminal. Identifique este cable como el positivo (+).
3. Asegure el otro extremo del porta fusible o disyuntor al cable positivo (+). Conecte el cable
positivo (+) al conector de tornillo positivo rojo en el Inversor. Coloque las arandelas entre el
conector del cable y el conector de tornillo. Apriete seguramente el conector de tornillo.
4. Conecte el cable negativo entre el terminal negativo (–) de la fuente de energía y el conector de
tornillo negativo negro (–) en el Inversor. Coloque las arandelas entre el conector del cable y el
conector de tornillo. Apriete seguramente el conector de tornillo.
ADVERTENCIA PELIGRO DE INCENDIO
Verifique que todas las conexiones están seguras. Una conexión floja podrá causarle daños
al Inversor y/o crear una chispa.
5. Verifique que el cable positivo (+) esté conectado entre el terminal positivo (+) de la fuente
de energía y el conector de tornillo positivo (+) en el Inversor. También, verifique que el cable
negativo (–) esté conectado entre el terminal negativo (–) de la fuente de energía y el conector
de tornillo negativo negro (–) en el Inversor.
Installing Cables
1. Press the ON/OFF switch and remote switch ON/OFF button to the OFF position.
2. Install the 300-amp ANL fuse or DC circuit breaker onto the positive (+) terminal of the power
source. Remove the fuse from the fuse holder before installing the fuse holder or turn off the
circuit breaker. If the fuse holder or circuit breaker cannot be installed onto the terminal, use a
short length of the recommended cable gauge to connect the fuse holder or circuit breaker to the
terminal. Identify this cable as positive (+).
3. Secure the remaining end of the fuse holder or circuit breaker to the positive (+) cable. Connect
the positive (+) cable to the red positive screw connector on the Inverter. Position the washers
between the cable connector and the screw connector. Tighten the screw connector securely.
4. Connect the negative cable between the negative (-) terminal of the power source and the black
negative (-) screw connector on the Inverter. Position the washers between the cable connector
and the screw connector. Tighten the screw connector securely.
FIRE HAZARD
Verify that all connections are secured. A loose connection may cause damage to the Inverter
and/or create a spark.
5. Verify that the positive (+) cable is connected between the positive (+) terminal of the power
source and the red positive (+) screw connector on the Inverter. Also, verify that the negative (-)
cable is connected between the negative (-) terminal of the power source and the black
negative (-) screw connector on the Inverter.
If the cables are not connected correctly, the Power Inverter will be damaged.
6
Determining Proper Cable Length and Gauge
Measure the distance between the Power Inverter and the power source. Refer to SPECIFICATIONS
for the proper cable gauge to use. Using excessively long or insufficient gauge cables will cause low
battery power. Also, using improper cables will reduce battery operation time.
Only use copper cables to connect the Power Inverter to the power source. Do not
use aluminum cables. Aluminum cables have approximately 1/3 more resistance than copper
cables of the same size.
Only use proper size cable connectors to connect the cables to the Inverter and
power source. Be sure the cable connectors are properly installed onto the ends of the cables.
The Power Inverter can be solid wired to the DC power source. A 300-amp ANL fuse or DC circuit
breaker should be installed to protect the circuit.
Solid Wiring to Power Source
FIRE HAZARD
Do not connect the Inverter to RV or household AC distribution wiring, to an AC load circuit
or where the neutral conductor is connected to the negative terminal of a DC power source.
Connecting to these circuits could cause damage to the Inverter and/or create a spark.
Do not use with positive ground electrical systems. Connecting the Inverter to a
positive ground electrical system will damage the Inverter. Only use the Power Inverter on
negative ground electrical systems. If in doubt, check with your vehicle dealer or consult the
vehicle’s owner’s manual.
Connecting to 12-volt Battery or 12-volt DC Using Supplied Cables
The Power Inverter is equipped with two screw connectors to attach the cable leads to the Inverter.
The red is positive (+) and the black is negative (-).
1. Press the ON/OFF switch and remote switch ON/OFF button to the OFF position.
2. Remove the red positive (+) screw connector cap, the flat washer and the lock washer.
3. Slide the lock washer, then the red positive (+) cable lead, then the flat washer, onto the red
positive (+) screw connector stud. Tighten the screw connector cap securely.
4. Remove the black negative (-) screw connector cap, the flat washer and the lock washer.
5. Slide the lock washer, then the black negative (-) cable lead, then the flat washer, onto the black
negative (-) screw connector stud. Tighten the screw connector cap securely.
6. Securely connect the red positive (+) cable lead to the positive (+) terminal of the battery or
power source.
7. Securely connect the black negative (-) cable lead to the negative (-) terminal of the battery or
power source.
Connecting to Power Source
ELECTROCUTION HAZARD
Do not operate the Inverter if it is wet. Do not allow water, moisture or other liquids to come in
contact with the Inverter, the device being operated or the power source.
6
7
The Inverter ON/OFF switch must be in the OFF position when using the remote
switch. If the Inverter ON/OFF switch is in the ON position, the remote switch will not
operate.
1. Make sure the Inverter ON/OFF switch is in the OFF position.
2. Plug in the remote switch connector into the remote switch outlet connection on the Inverter.
3. Press the remote switch ON/OFF button. The green light on the remote switch and on the
Inverter should be lit.
4. Once the Inverter is turned on using the remote switch, the Inverter operation will be controlled
using the remote switch.
5. Turn the Inverter off using the remote switch before disconnecting the remote switch connector
from the Inverter.
AVISO Si los cables no están correctamente conectados, el Inversor de Energía se dañará.
6. Instale el fusible en el porta fusible y encienda el disyuntor.
1
3
4
2
Remote Switch Operation
The USB power outlet is an unswitched outlet. Whenever the Inverter is connected
to a battery, there will be power to the USB outlet. The ON/OFF switch or the remote switch
ON/OFF button does not need to be turned on to have power at the USB outlet.
The USB power outlet does not support data communications. The outlet has a
maximum of 5 volts/500mA.
1. Plug the USB-powered device into the USB power outlet.
2. Make sure the Inverter is correctly connected to the battery.
3. Turn on the Inverter using the ON/OFF switch or the remote switch ON/OFF button.
4. Turn on the USB-powered device.
5. When shutting down, turn off the USB device first, then turn the Inverter off.
6. Unplug the USB device from the USB power outlet.
6
5
2
7
2
USB Power Outlet Operation
Legend
1. Battery Charging Source
2. 12-volt Batteries
3. 300-amp ANL Fuse
4. Power Inverter
5. Negative (-) Cable (see SPECIFICATIONS for cable requirements)
6. Positive (+) Cable (see SPECIFICATIONS for cable requirements)
7. Additional Batteries Connected in Parallel Circuit
Leyenda
1. Fuente de Carga de las Baterías
2. Baterías de 12 voltios
3. Fusible de 300 amperios ANL
4. Inversor de Energía
5. Cable Negativo (–) (consulte las ESPECIFICACIONES para obtener los requisitos de cable)
6. Cable Positivo (+) (consulte las ESPECIFICACIONES para obtener los requisitos de cable)
7. Baterías Adicionales Conectadas en Circuito Paralelo
Operación de la Salida de Energía USB
2
7
5
2
6
AVISO La salida de energía USB no apoya las comunicaciones de datos. La salida tiene un
máximo de 5 voltios/500mA.
1. Enchufe el dispositivo USB-energizado dentro de la salida de energía USB.
2. Asegúrese de que el Inversor esté conectado correctamente a la batería.
3. Encienda el Inversor usando el interruptor de ON/OFF o el botón ON/OFF del interruptor remoto.
4. Encienda el dispositivo accionado por USB.
5. Al apagar, apague primero el dispositivo USB, luego apague el Inversor.
6. Desenchufe el dispositivo USB de la salida de energía USB.
AVISO La salida de energía USB es una salida sin interruptor. Siempre que el Inversor esté
conectado a una batería, habrá energía en la salida USB. El interruptor ON/OFF o el botón ON/
OFF del interruptor remoto no necesitan estar encendidos para que haya energía en la salida
USB.
Operación del Interruptor Remoto
2
4
3
1
6. Install the fuse in the fuse holder or turn on the circuit breaker.
AVISO El interruptor ON/OFF del Inversor tiene que estar en la posición OFF cuando se usa
el interruptor remoto. Si el interruptor ON/OFF está en la posición ON, el interruptor remoto
no operará.
1. Asegúrese de que el interruptor ON/OFF del Inversor está en la posición OFF.
2. Enchufe el conector del interruptor remoto en la toma del interruptor remoto en el Inversor.
3. Oprima el botón ON/OFF del interruptor remoto. La luz verde en el interruptor remoto y en el
Inversor deberán estar encendidas.
4. Una vez que el Inversor ha sido encendido usando el interruptor remoto, la operación del
Inversor será controlada usando el interruptor remoto.
5. Apague el Inversor usando el interruptor remoto antes de desconectar el conector del interruptor
remoto del Inversor.
7
Indicador de Vatiaje de Potencia de Salida
El Inversor está equipado con un indicador de vatiaje de potencia de salida que indica cuanto
vatiaje está siendo usado. El indicador de potencia de salida tiene diez luces separadas, cuando se
prenden, cada una representa aproximadamente 120 vatios de salida. Si el dispositivo que usted
esta alimentando requiere aproximadamente 650 vatios, cinco de las luces indicadoras rojas estarán
encendidas.
Use estas luces como referencia para no sobrecargar el Inversor. Este Inversor puede ser
sobrecargado fácilmente cuando se usan ambos tomacorrientes de 110/120 voltios CA. Si el
primer dispositivo que usted esta alimentando muestra siete luces encendidas en el indicador
(aproximadamente 840 vatios) y el siguiente dispositivo que usted quiere alimentar requiere
aproximadamente 600 vatios, usted no lo puede enchufar porque sobrecargará el Inversor. Use este
indicador de potencia de salida como guía al alimentar sus dispositivos.
Conexión de una Carga al Inversor de Energía
Sólo conecte los electrodomésticos al Inversor de Energía después de que el Inversor haya sido
conectado apropiadamente a la fuente de energía.
1. Oprima el interruptor de ON/OFF o el botón ON/OFF del interruptor remoto a la posición ON.
El indicador de energía LED verde en el Inversor y/o en el interruptor remoto se prenderá de
manera continua, indicando que la unidad está funcionando.
2. Enchufe el electrodoméstico o aparato en el receptáculo de 110/120 voltios CA.
3. Prenda el aparato. Si suena una alarma o si se prenden las luces de falla LED rojas durante un
tiempo prolongado, el voltaje de la fuente de energía es muy bajo o la corriente que el aparato
está demandando es demasiado alta.
AVISO Monitoree la temperatura del aparato durante los primeros 10 minutos de operación
para ver si se está calentando. Si la temperatura del aparato se torna demasiado caliente, es
una indicación de que el aparato no se debe usar con este Inversor.
4. Cuando apague, primero apague la energía del electrodoméstico o del aparato.
5. Retire el enchufe de energía del receptáculo de 110/120 voltios CA del Inversor.
6. Gire el interruptor de ON/OFF del Inversor o el botón ON/OFF del interruptor remoto a la
posición OFF.
7. Desconecte los cables de batería de la batería o fuente de energía.
8. Desconecte los cables de los conectores de tornillo.
9. Coloque las arandelas y las tapas del conector de tornillo en los espárragos.
Uso de la Batería
Se recomienda que, si usted está usando una batería vehicular, usted debe operar el motor durante
15 minutos cada hora para recargar la batería.
El Inversor de Energía se puede usar con el motor encendido o apagado. Sin embargo, no se debe
usar mientras el motor está siendo arrancado, ya que el voltaje cae substancialmente durante la
arrancada.
El Inversor consume muy poca corriente de la batería mientras no está suministrando energía a un
aparato. Típicamente, este Inversor de Energía consume menos de 1,5 amperios. Se recomienda
que usted desconecte el Inversor de la batería cuando no esté siendo usado.
Características de Protección
Alarma de Bajo Voltaje (Luz roja en el Inversor y en el interruptor remoto encendidas) - Este
estado no es dañino para el Inversor, pero podrá dañar la fuente de energía. Una alarma suena
cuando el voltaje de entrada cae a 10.5 voltios y el Inversor se apaga cuando el voltaje de entrada
cae a 10.0 voltios. Cuando se suministra energía amplia, el Inversor entonces se puede volver a
encender.
Protección de Sobre-Voltaje (LED rojo en el Inversor e interruptor remoto encendidos) - El
Inversor se apagará automáticamente cuando el voltaje de entrada exceda los 15 voltios.
Protección de Sobre Carga (LED rojo en el Inversor y en el interruptor remoto encendidos)
El Inversor se apagará automáticamente si el consumo continuo excede su máxima capacidad de
vatiaje. Cuando el Inversor se encuentra cerca, o al máximo de salida, una alarma sonará. Cuando
la alarma suena, usted tiene que desconectar el(los) dispositivo(s) del Inversor para bajar la salida
del Inversor a un nivel aceptable. Si usted continua usando el Inversor cerca o al máximo de salida,
eventualmente se calentará y se apagará.
Si usted excede la salida máxima del Inversor, la alarma sonará y el Inversor se apagará
automáticamente. El indicador rojo de falla en el Inversor se encenderá y ambos ventiladores
funcionarán. El Inversor tiene que ser reinicializado después de una condición de sobrecarga.
8
Overload Protection (Red LED on Inverter and remote switch will light)
The Inverter will automatically shut down if the continuous draw exceeds its maximum wattage rating.
When the Inverter is at or near maximum output, an alarm will sound. When the alarm sounds you
need to disconnect the device(s) from the Inverter to bring the Inverter output down to an acceptable
level. If you continue to use the Inverter at or near the maximum output, it will eventually overheat
and shut down.
If you exceed the maximum Inverter output, the alarm will sound and the Inverter will automatically
shut down. The red fault indicator on the Inverter will light and both fans will run. The Inverter must
be reset after an overload condition.
Low Voltage Alarm (Red LED on Inverter and remote switch will light) - This state is not harmful
to the Inverter, but could damage the power source. An audible alarm sounds when the input voltage
drops to 10.5 volts and the Inverter shuts off when the input voltage drops to 10.0 volts. When ample
power is supplied, the Inverter may then be turned back on.
Over-Voltage Protection (Red LED on Inverter and remote switch will light) - The Inverter will
automatically shut down when the input voltage exceeds 15 volts DC.
Protective Features
Monitor the temperature of the device for the first 10 minutes of operation to
determine its temperature. If the temperature of the device becomes excessively hot, it is an
indication that the device should not be used with this Inverter.
4. When shutting down, first turn the power of the appliance or device off.
5. Remove the power plug from the Inverter’s 110/120-volt AC receptacle.
6. Turn the Inverter’s ON/OFF switch or remote switch ON/OFF button to the OFF position.
7. Disconnect the cable leads from the battery or power source.
8. Disconnect the cable leads from the screw connectors.
9. Place the washers and screw connector caps back onto the studs.
Battery Use
It is recommended that, if you are using a vehicle battery, you run the engine for 15 minutes every
hour in order to recharge the battery.
The Power Inverter may be used with the engine on or off. However, it may not operate while the
engine is being started, as battery voltage can drop substantially during starting.
The Inverter draws little current from the battery when it is not supplying power to a load. Typically,
this Power Inverter draws less than 1.5 amps. It is recommended that you disconnect the Inverter
from the battery when not in use.
Only connect appliances to the Power Inverter after the Inverter is properly connected to the power
source.
1. Press the ON/OFF switch or remote switch ON/OFF button to the ON position. The green LED
power indicator on the Inverter and/or remote switch will light continuously, indicating that the unit
is functioning.
2. Plug the appliance or device into the 110/120-volt AC receptacle.
3. Switch on the device. If an audible alarm sounds or the red LED fault indicator lights up for a
protracted period of time, then either the power source voltage is too low or the current being
drawn by the device is too great.
Connecting a Load to the Power Inverter
The Inverter is equipped with a power output wattage indicator which displays how much wattage is
currently being used. The output indicator has ten separate red lights, with each one representing
approximately 120 watts of output when lit. If the device you are powering requires approximately
650 watts, five of the red indicator lights will be lit.
Use these lights as a reference so you do not overload the Inverter. This Inverter can be easily
overloaded when using both 110/120-volt AC outlets. If the first device you are powering shows
seven lights on the indicator are lit (approximately 840 watts) and the next device you want to power
requires approximately 600 watts, you cannot plug that device in because it will overload the Inverter.
Use this output indicator as a guide when powering your devices.
Power Output Wattage Indicator
8
9
The Power Inverter is designed to provide years of service. Because the Inverter and
cables contain lead, they should be recycled or safely disposed of at a local recycling
center. Examples of places that will accept items like this are: county or municipal
recycling drop-off centers or scrap metal dealers.
Disposal
Do not clean or wipe the Power Inverter with solvents or chemical materials. If necessary, remove dirt
or stains using a soft cloth dampened with a mild detergent solution.
Cleaning
Store this Power Inverter in a cool, dry area and keep it away from direct sunlight, heat, excessive
humidity and dampness. Storage temperature should be between -4°F and 185°F (-20°C and 85°C)
with the humidity between 10% and 90%.
Storage
CARE AND MAINTENANCE
Power tools will start but will not continue to run - Some induction motors (motors without
brushes) may require 2 to 6 times their wattage rating in order to start up. If the power tool runs
only momentarily when power is applied, try to leave the power tool on while quickly and repeatedly
turning the Inverter on and off.
Buzzing in audio systems - Some inexpensive stereo systems will emit a buzzing sound from their
speakers when operating from the Inverter. This is because the power supply in the device does not
adequately filter the modified sine wave produced by the Inverter.
Television interference - The Inverter is shielded and filtered to minimize interference with TV
signals. In some cases, especially with weak TV signals, some interference may be visible. Try the
following corrective measures:
• Position the Inverter as far away as possible from the television, the antenna and the antenna
cable.
• Adjust the orientation of the Inverter, the antenna cable and the TV power cable to minimize
interference.
• Use high-quality, shielded antenna cable.
Operating a microwave - The power rating used with microwave ovens is the “cooking power” which
qualifies as the power being “delivered” to the food being microwaved. The actual operating power
requirement rating is higher than the cooking power rating. This is usually referenced on the back of
the microwave. If the operating power requirement cannot be found on the back of the microwave,
check the owner’s manual or contact the manufacturer.
Common Problems
To Reset the Inverter
1. Turn off the Inverter using the ON/OFF switch on the Inverter or the remote switch ON/OFF
button, depending upon how the Inverter was controlled.
2. Unplug all the devices from the Inverter.
3. Before turning Inverter back on, verify the total wattage of the devices being powered.
4. Turn the Inverter back on using the ON/OFF switch on the Inverter or the remote switch ON/OFF
button.
Temperature Protection
The Inverter is equipped with two cooling fans. Depending upon the load output and the temperature
of the Inverter, the cooling fans will turn on and off as required to cool the Inverter if needed.
If the temperature reaches approximately 149°F (65°C) the Inverter will shut down automatically. Turn
off the Inverter and allow it to cool for a minimum of 15 minutes. Before starting up again verify the
total wattage of the devices being powered.
Para reinicializar el Inversor
1. Apague el Inversor usando el interruptor ON/OFF en el Inversor o el botón ON/OFF del
interruptor remoto, dependiendo de como estaba siendo controlado el Inversor.
2. Desenchufe todos los aparatos conectados al Inversor.
3. Antes de encender de nuevo el Inversor, verifique el vatiaje total de los dispositivos que serán
alimentados.
4. Encienda de nuevo el Inversor usando el interruptor de ON/OFF en el Inversor o el botón ON/
OFF del interruptor remoto.
Protección de Temperatura
El Inversor está equipado con dos ventiladores. Dependiendo de la carga de salida y de la
temperatura del Inversor, los ventiladores se encenderán y se apagarán como sea necesario para
enfriar el Inversor.
Si la temperatura alcanza aproximadamente 149°F (65°C) el Inversor se apagará automáticamente.
Apague el Inversor y déjelo que se enfríe durante un mínimo de 15 minutos. Antes de arrancarlo de
nuevo, verifique el vatiaje total de los dispositivos que serán alimentados.
Problemas Comunes
Las herramientas motorizadas arrancarán pero no continuarán funcionando - Algunos
motores de inducción (motores sin escobillas) podrán necesitar de 2 a 6 veces más vatiaje para que
arranquen. Si la herramienta motorizada trabaja momentáneamente cuando se le aplica energía,
trate de dejar la herramienta prendida mientras que repetidamente prende y apaga el Inversor.
Zumbido en los sistemas de audio - Algunos sistemas estéreo baratos emitirán un zumbido por
los parlante cuando son operados en el Inversor. Esto es causado por que la fuente de energía del
aparato no filtra adecuadamente la onda senoidal modificada producida por el Inversor.
Interferencia con la televisión - El Inversor es blindado y filtrado para minimizar la interferencia con
las señales de televisión. En algunos casos, especialmente con señales de televisión débiles, se
puede ver alguna interferencia. Trate las siguientes medidas correctivas:
• Coloque el Inversor tal lejos como sea posible de la televisión, antena y del cable de la antena.
• Ajuste la orientación del Inversor, del cable de la antena y el cable de energía de la televisión para
minimizar la interferencia.
• Use cable de antena blindado de alta calidad.
Operación de un microonda - La capacidad de energía usada en los hornos microonda es la
“potencia de cocción” que califica como la energía que se esta “entregando” a los alimentos que
se están cocinando en el microondas. La capacidad requerida de energía de operación es más
alta que la capacidad de energía para cocinar. Esto es usualmente mencionado en la parte trasera
del microondas. Si no puede ubicar el requisito de energía de operación en la parte trasera del
microonda, consulte el manual del propietario o póngase en contacto con el fabricante.
CUIDADOS Y MANTENIMIENTO
Almacenaje
Almacene este Inversor de Energía en una área fría y seca, alejado de la luz solar directa, el calor y
la humedad excesiva. La temperatura de almacenaje debe ser entre –4°F y 185°F (–20°C y 85°C)
con una humedad entre el 10% y el 90%.
Limpieza
No limpie o le pase un trapo con disolventes o materiales químicos al Inversor de Energía. Si es
necesario, remueva la mugre o la manchas con un trapo suave humedecido en una solución de
detergente suave.
Descarte
El Inversor de Energía fue diseñado para proporcionarle años de servicio. Puesto que el
Inversor y los cables contienen plomo, ellos deberán ser reciclados o descartados
seguramente en un centro de reciclaje local. Ejemplos de lugares que aceptan artículos
como estos son: centros de reciclaje del condado o municipales o distribuidores de
chatarra.
9
ESPECIFICACIONES
Puerto USB
Energía Continua Máxima
Incremento Súbito de Salida
Eficiencia
Consumo de Corriente Máximo
Formato de Señal/Salida
Temperatura de Trabajo
Temperatura de Almacenaje
Humedad del Aire de Almacenaje
Fusible CC Requerido para Instalación de
Alambrado Fijo
Cables Suministrados
Requisitos del Cable @ 6 pies (1.8 m)
Requisitos del Cable @ 10 pies (3.0 m)*
16.
17.
18.
Voltaje de Entrada CC
Voltaje de Salida CA
Capacidad de Salida de Corriente
Consumo de Corriente sin Carga
Receptáculos CA
1.
2.
3.
4.
5.
6.
7.
8.
9.
10.
11.
12.
13.
14.
15.
10
10.5-15V
105-125V
12.5A
≤ 1.5A
Dos de 110/120V CA Receptáculos
Estándar Norteamericanos
5 voltios/500 mA
1200 Vatios
2400 Vatios (0.1 seg.)
≥ 85%
≤ 104A a 1200 Vatios
Onda Senoidal Modificada 60Hz ± 3Hz
50°F a 86°F (10°C a 30°C)
-4°F a 185°F (-20°C a 85°C)
10%-90%
300 ANL
2 pies (61 cm) #4 AWG (1 conjunto)
#2 AWG (Calibre de Cable Americano)
00 AWG (Calibre de Cable Americano)
* Para requisitos de cable mayores de 10 pies, consulte a un electricista licenciado.
* For cable requirements greater than 10 ft, consult a licensed electrician.
1.
2.
3.
4.
5.
DC Input Voltage
AC Output Voltage
Current Output Rating
No Load Current Draw
AC Receptacles
6.
7.
8.
9.
10.
11.
12.
13.
14.
15.
16.
17.
18.
USB Port
Maximum Continuous Power
Peak Surge Output
Efficiency
Max. Current Consumption
Signal Format/Output
Working Temperature
Storage Temperature
Storage Air Humidity
DC Fuse Requirement for Solid Wired Installation
Supplied Cables
Cable Requirement @ 6 ft (1.8 m)
Cable Requirement @ 10 ft (3.0 m)*
105-125V
12.5A
≤ 1.5A
Two 110/120V AC North American
Standard Receptacles
5 volts/500 mA
1200W
2400 Watts (0.1 Sec)
≥ 85%
≤ 104A at 1200W
Modified Sine Wave 60Hz ± 3Hz
50°F to 86°F (10°C to 30°C)
-4°F to 185°F (-20°C to 85°C)
10%-90%
300 ANL
2 ft (61 cm) #4 AWG (1 set)
#2 AWG
00 AWG
10.5-15V
SPECIFICATIONS
10
11
RESOLUCIÓN DE PROBLEMAS
Problema
Bajo voltaje de
salida
Alarma de
batería baja
sonando en
todo momento
No hay salida
de energía
Battery voltage below
10 volts
Recharge or replace battery.
Equipment being
operated draws too
much power
Reduce load; DO NOT exceed maximum rating for the
Inverter.
Inverter in thermal
shutdown condition
Allow Inverter to cool down. Ensure there is adequate
ventilation around the Inverter. Ensure that load is no more
than its maximum rating for continuous operation.
Low output
voltage
Inverter is overloaded
Do not exceed maximum load rating for the Inverter.
Input voltage is below
10.5 volts
Keep input voltage above 10.5 volts to maintain regulation.
Low battery
alarm on all
the time
Poor battery condition
with low input voltage
Replace battery.
Inadequate power or
excessive voltage drops
Check condition of battery cables and cable leads. Clean or
replace as necessary.
No power
output
Inverter not fully warmed Turn the Inverter power switch off and then on again until the
up
Inverter powers your appliance. Repeat as necessary to get
your appliance started.
Situación
Acción
Deje que el Inversor se enfríe. Asegúrese de que hay
ventilación adecuada al rededor del Inversor. Asegúrese de
que la carga no sea mayor que la capacidad máxima para
operación continua.
El Inversor se encuentra
en condiciones de
apagado térmico
Reduzca la carga, NO EXCEDA la capacidad de carga
máxima del Inversor.
El equipo que se está
operando consume
demasiada corriente
Recargue o reemplace la batería.
Voltaje de la batería por
debajo de 10 voltios
Ponga el interruptor de energía del Inversor en la posición
apagada y luego préndalo de nuevo hasta que el Inversor
prenda su electrodoméstico. Repita si es necesario hasta
iniciar su electrodoméstico.
El Inversor no
ha calentado
completamente
Verifique la condición de los cables de batería y las
puntas de los cables. Límpielos o reemplácelos como sea
necesario.
Energía inadecuada
o caídas de voltaje
excesivas
Reemplace la batería.
Mala condición de la
batería con bajo voltaje
de salida
Mantenga el voltaje de entrada por encima de 10.5 voltios
para mantener la regulación.
Voltaje de entrada
inferior a 10.5 voltios
No exceda la capacidad de carga máxima del Inversor.
Inversor sobrecargado
Problem
Situation
Action
TROUBLESHOOTING
11
GARANTÍA LIMITADA
12
El fabricante le garantiza al consumidor original, o comprador, que el Inversor de Energía PEAK®
PKC0AY de 1200 Vatios estará libre de defectos en material y mano de obra durante noventa (90)
días a partir de la fecha de venta al comprador original. El fabricante por la presente excluye y
renuncia a cualquier otra garantía, expresa o implícita, más allá de aquellas garantías especificadas
anteriormente. El fabricante excluye cualquier garantía implícita de comerciabilidad o de aptitud para
un propósito en particular.
SI SU INVERSOR DE ENERGÍA PEAK® TIENE UN MAL FUNCIONAMIENTO DEBIDO A UN
DEFECTO EN MATERIAL O MANO DE OBRA DENTRO DE LOS NOVENTA (90) DÍAS DEL
PERÍODO DE GARANTÍA, EL FABRICANTE A SU ELECCIÓN LO REPARARÁ O CAMBIARÁ.
EL FABRICANTE, SIN EMBARGO, NO SERÁ RESPONSABLE POR NINGÚN DAÑO A SU
PRODUCTO DEBIDO A CUALQUIER CAUSA QUE NO SE DEBA A DEFECTOS EN MATERIAL
O MANO DE OBRA, INCLUYENDO SIN LIMITACIONES: NO SEGUIR LAS INSTRUCCIONES
DE USO, MAL USO, REPARACIONES EFECTUADAS POR PERSONAS NO AUTORIZADAS,
MAL MANEJO, MODIFICACIONES, DESGASTE NORMAL, ACCIDENTES O SOBRECARGA. LA
REPARACIÓN O REEMPLAZO SEGÚN ESTA GARANTÍA ES EL REMEDIO EXCLUSIVO DEL
CLIENTE. EL FABRICANTE NO SERÁ RESPONSABLE POR NINGÚN DAÑO INCIDENTAL,
CONSECUENTE O PUNITIVO POR QUEBRANTO DE CUALQUIER GARANTÍA EXPRESA O
IMPLÍCITA DE ESTE PRODUCTO O BASADO EN CUALQUIERA OTRA CAUSA O RECLAMO.
Para Obtener Servicio
1. Antes de retornar este producto por cualquier razón, por favor llame al teléfono gratis
(800) 477-5847.
2. No regrese para servicio su producto PEAK® al lugar de compra. Envíe la unidad, con porte
prepagado y asegurado, junto con una copia del recibo de venta original y un número telefónico
a la dirección mostrada a continuación. Empaque la unidad apropiadamente, ya que no somos
responsables por ningún daño causado durante el envío.
Old World Industries, Inc.
c/o Technical Services
4065 Commercial Avenue
Northbrook, IL 60062
3. Se requiere una copia del recibo original para servicio de garantía. Si no presenta un recibo, la
fecha de fabricación será usada como la fecha de compra.
© 2010 Old World Industries, Inc., Northbrook, IL 60062
FABRICADO EN CHINA
www.peakauto.com
© 2010 Old World Industries, Inc., Northbrook, IL 60062
MADE IN CHINA
www.peakauto.com
To Obtain Service:
1. Before returning this product for any reason, please call toll free (800) 477-5847.
2. Do not return your PEAK® product to the place of purchase for service. Send your unit, postage
prepaid and insured, along with a copy of the original sales receipt and a phone number to the
address below. Pack your unit properly, as we are not responsible for any damage caused during
shipping.
Old World Industries, Inc.
c/o Technical Services
4065 Commercial Avenue
Northbrook, IL 60062
3. A copy of the original receipt is required for warranty service. If no receipt is provided, the unit
manufacturer’s date will be used as the date of purchase.
Manufacturer warrants to the original consumer, or purchaser, that the PEAK® PKC0AY 1200 Watt
Power Inverter will be free from defects in material and workmanship for ninety (90) days from the
date of sale to the original purchaser. Manufacturer hereby excludes and disclaims any and all other
warranties, expressed or implied, beyond those warranties specified above. Manufacturer excludes
any implied warranty of merchantability or fitness for a particular purpose.
IF YOUR PEAK® POWER INVERTER MALFUNCTIONS DUE TO A DEFECT IN MATERIALS AND
WORKMANSHIP WITHIN THE NINETY (90) DAY WARRANTY PERIOD, MANUFACTURER WILL,
AT ITS ELECTION REPAIR OR REPLACE IT. MANUFACTURER SHALL NOT, HOWEVER, BE
RESPONSIBLE FOR ANY DAMAGE TO YOUR PRODUCT DUE TO ANY CAUSE OTHER THAN
DEFECTS IN MATERIAL OR WORKMANSHIP, INCLUDING WITHOUT LIMITATION: FAILURE TO
FOLLOW INSTRUCTIONS FOR USE; MISUSE; REPAIRS BY AN UNAUTHORIZED PERSON;
MISHANDLING; MODIFICATIONS; NORMAL WEAR AND TEAR; ACCIDENT OR OVERLOAD.
REPAIR OR REPLACEMENT AS PROVIDED UNDER THIS WARRANTY IS THE EXCLUSIVE
REMEDY OF THE CONSUMER. MANUFACTURER SHALL NOT BE LIABLE FOR ANY
INCIDENTAL, CONSEQUENTIAL OR PUNITIVE DAMAGES FOR BREACH OF ANY EXPRESSED
OR IMPLIED WARRANTY ON THIS PRODUCT OR BASED ON ANY OTHER CAUSE OR CLAIM.
LIMITED WARRANTY
12