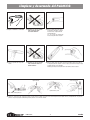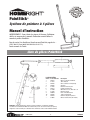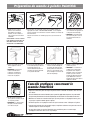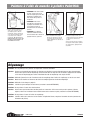
1
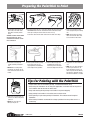
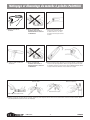
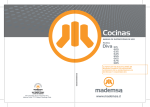
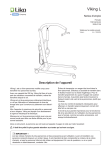
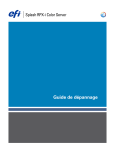
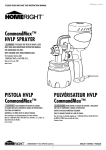
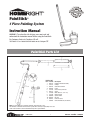
PaintStick®
5 Piece Painting System
Instruction Manual
WARNING: To reduce the risk of injury, user must read and
understand the instruction manual before using the PaintStick®.
For Customer Service in Canada or US call:
763-780-5115 or 1-800-264-5442 8:00 am to 5:00 pm CST.
PaintStick Parts List
PARTS LIST
Item
1
2
3
4
5
6
7
8
9
10
11
—
Part No.
805275
815155
805291
805995
817295
805277
817300
817296
806010
805266
805263
820436
Description
PaintStick Handle Assembly
O-Rings
Valve Kit for Fill Port
Frame
Inner End Cap and Seal
Spacer
Roller Cover-9”, 3/8” nap
Outer End Cap
Spatter Shield
Fill Tube
Paint Can Cover
Instruction Manual (not shown)
NOTE: Use only PaintStick® or PaintStick® EZ-Twist® perforated roller covers.
The PaintStick or PaintStick EZ-Twist will not operate with a normal (non-perforated) roller cover.
**Call 1-800-264-5442 to order the C800798 Tune-up Kit for your PaintStick.
PAINTSTICK®
© 2010 PN C820436 REV B 3/10
1
ENGLISH • ESPAÑOL • FRANÇAIS
Preparing the PaintStick to Paint
1. Inspect roller cover for lint. For
best results, rinse roller cover
with water and let dry before
using.
2. E nsure the outer end cap is in the open positon by depressing PUSH
TO REMOVE side of the tab. Assemble the roller cover to the roller
frame by inserting the frame inside the inner end cap.
3. Lock end cap onto the roller
frame by depressing the locking
tab.
Push roller cover onto the roller frame until the roller cover stops.
• NOTE: Pull gently on the roller
cover to ensure the roller cover
is secured to the roller frame.
5. A ttach spatter shield by sliding
it over outer end cap and
clipping forked end onto roller
frame. Adjust to any position.
7. S nap paint can cover onto paint
can.
WARNING: DO NOT REMOVE INNER
OR OUTER END CAPS WITH A
SCREWDRIVER! DAMAGE TO END
CAPS CAN OCCUR.
4. Insert roller assembly into
handle assembly and tighten
nut.
•N
OTE: When inserting frame,
into handle, the washer on the
frame will not be flush with the
handle.
6. Insert fill tube through hole
in bottom side of paint can
cover and push in until tight
and to the ridge of the fill tube.
•N
OTE: The can cover will not fit
on some paint containers. To
fill the PaintStick, omit the can
cover and place fill tube directly
into container. Hold the fill tube
with hand to stabilize as needed.
Tips for Painting with the PaintStick
• Inspect roller cover for lint before painting. If needed wash before using.
• When using the PaintStick for the first paint application, it will take most of the paint in
the PaintStick tube to saturate the roller cover.
• Keep roller moving while pushing inner handle in to prevent dripping.
• Stop pushing inner handle in if the roller starts to skid or slide.
8. If you have a square paint can,
rest the can cover on top of the
paint can.
•N
OTE: Can cover will rest
loosely on top of can.
• When painting in tight areas partially fill PaintStick. This reduces overall length of
PaintStick.
• When leaving PaintStick unattended for a longer period of time wrap roller cover in a
plastic bag.
PAINTSTICK®
2
ENGLISH
Painting with the PaintStick
•N
OTE: Make sure the fill tube
is opposite from where you are
standing when filling to properly
seat the valve.
•N
OTE: You may notice
petroleum jelly within the
PaintStick handle. This is
necessary and will help in its
operation and will not affect the
paint.
1. H
old the PaintStick at a 45°
angle and place the fill port
over the fill tube. Gently push
the PaintStick down until it
bottoms on the fill tube. DO NOT
KEEP PAINTSTICK ON FILL TUBE
FOR LONGER THAN 1 MINUTE
AT A TIME.
•N
OTE: If inner handle is difficult
to pull out, hold the black knob
and twist inner handle, then pull.
2. P ull inner handle all the
way back to draw paint into
PaintStick. Lift PaintStick slowly
off fill tube.
3. P ush inner handle to feed paint
into the roller cover and start
painting.
If you are getting a dot pattern
when painting apply more paint.
If the roller is sliding apply less
paint.
Troubleshooting
Problem: Air is drawn into the PaintStick instead of paint.
Solution: Slowly push handle in to expel air. Remove and reinsert PaintStick on fill tube. Be sure fill tube is fully seated in valve
body. If necessary apply petroleum jelly to fill tube which makes it easier to seat fill tube and valve body.
Problem: Difficult to insert or remove fill tube from port.
Solution: Put petroleum jelly in fill port opening and/or fill tube.
Problem: Handle is difficult to move in and out.
Solution: Lubricate inner tube o-rings (see CLEANING section).
Problem: Paint leaks out end cap.
Solution: Make sure end caps are flush with end on roller cover. If they are ok, remove end caps and reseal with petroleum
jelly (see CLEANING section).
Problem: Paint leaks out of fill port.
Solution: Lubricate valve port with petroleum jelly. If this doesn’t work, replace valve kit (see parts drawing).
PAINTSTICK®
3
ENGLISH
Cleaning and Disassembling the PaintStick
NOTE: If painting with
an oil based paint
use manufacturer’s
recommended cleaning
solvent instead of warm
water in the following
steps. Follow manufacturer’s
directions for using mineral
spirits and disposal.
1. R
eturn paint from PaintStick to
paint can by holding PaintStick
at a 45° angle and push
PaintStick fill port onto fill tube
until it bottoms on fill tube.
Push inner handle in until it
stops.
2. Remove paint from roller
assembly by holding finger over
fill port and pulling inner handle
back. Repeat previous step.
3. Clean PaintStick by submerging
PaintStick in warm water so
the roller cover and fill port are
covered. Pull inner handle back
and push forward several times.
4. Remove roller frame by
unscrewing nut on end of roller
frame.
5. Insert paint can cover and fill
tube into PaintStick fill port.
Place in warm water and flush
fill tube by pulling inner handle
back and pushing forward
several times. Remove paint
can cover and fill tube from
PaintStick.
6. Place PaintStick into clean
warm water and flush fill port
by plugging end of PaintStick
with finger and pulling inner
handle back and pushing forward
several times.
•N
OTE: If you cannot separate,
set PaintStick on floor, put your
foot on collar and roll to loosen.
8. Depress the PUSH TO REMOVE
tab. It will snap to remove the
outer end cap.
7. Separate inner and outer
handles by quickly pulling apart.
PAINTSTICK®
4
• NOTE: For best performance, also
clean Fill Tube.
ENGLISH
Cleaning and Disassembling the PaintStick
9. Remove the roller cover from
the frame.
10. D
O NOT REMOVE INNER END
CAP WITH A SCREWDRIVER!
DAMAGE TO THE INNER END
CAP CAN OCCUR.
11. Remove inner end cap from
roller cover by inserting the
frame at an angle into the
inner end cap about 1”.
Pull gently towards you to
remove cap.
12. Remove spacer from roller
cover.
13. DO NOT REMOVE OUTER END
CAP WITH A SCREWDRIVER!
DAMAGE TO THE OUTER END
CAP CAN OCCUR.
14. Remove outer end cap from roller cover by inserting the frame inside
the roller cover at a slightly cocked angle. Then gently push to snap
off the outer end cap with the frame.
Optional Method–Remove outer end cap from roller cover using your
fingers.
Fillport
Outer end cap
Inner end cap and seal
Inner handle o-ring
15. Clean roller assembly components in warm water. Lubricate inner handle o-rings, outer end cap, and inner end cap with petroleum jelly.
Put a small amount of petroleum jelly into the fill port.
PAINTSTICK®
5
ENGLISH
Assembling the PaintStick
1. Insert the outer end cap on the
roller cover.
2. Insert the spacer inside roller
cover.
3. Insert the inner end cap on
roller cover.
4. Ensure the outer end cap is in
the open position by depressing
PUSH TO REMOVE side of the
tab. Assemble the roller cover
to the roller frame by inserting
the frame inside the inner end
cap.
Push roller cover onto the roller
frame until the roller cover
stops.
5. L ock the outer end cap onto the
roller frame by depressing the
locking tab.
6. Insert the inner handle inside
the outer handle and push
together.
•N
OTE: Do not allow the inner
handle o-rings to come out of
their groove when inserting.
Damage can result.
7. A ssemble roller assembly onto
PaintStick handle assembly
and tighten nut. All parts must
be thoroughly dry prior to
reassembly.
•N
OTE: Ensure o-rings are
lubricated with petroleum jelly
prior to assembly.
PAINTSTICK®
6
ENGLISH
PaintStick®
Sistema de pintura de 5 piezas
Manual de instrucciones
ADVERTENCIA: Para reducir el riesgo de lesiones, el usuario debe leer
y entender el manual de instrucciones antes de usar el PaintStick®.
Para comunicarse con el departamento de servicio al cliente en
Canadá o Estados Unidos, llame a los teléfonos:
763-780-5115 ó 1-800-264-5442 8:00 a. m. a 5:00 p. m.
(hora del Centro de EE. UU.).
Lista de piezas del PaintStick
LISTA DE PIEZAS
Artículo Pieza n.º Descripción
1
805275
Conjunto de manija del PaintStick
2
815155
Anillos “O”
3
805291
Juego de válvulas para el orificio de llenado
4
805995Armadura
5
817295
Tapilla interna y sello
6
805277Separador
7817300
Rodillo, pelo de 23 cm (9 pulg.), 1 cm (3/8 pulg.)
8
817296
Tapilla externa
9
806010
Protector contra salpicaduras
10
805266
Tubo de llenado
11
805263
Tapa de la lata de pintura
—
820436
Manual de instrucciones (no se muestra)
NOTA: Use únicamente rodillos perforados PaintStick® o PaintStick® EZ-TWIST®.
El PaintStick o el PaintStick EZ-TWIST no funcionarán con rodillos normales (no perforados).
**Para hacer pedidos del juego de renovación C800798 para su PaintStick, llame al 1-800-264-5442.
PAINTSTICK®
7
ESPAÑOL
Preparación del PaintStick para pintar
1. Examine el rodillo para ver
si tiene pelusa. Para obtener
óptimos resultados enjuague el
rodillo en agua y déjelo secar
antes de usarlo.
2. Asegúrese de que la tapilla externa esté en la posición abierta; para
ello presione el lado “PRESIONAR PARA SACAR” de la lengüeta. Instale
el rodillo en la armadura del rodillo introduciendo la armadura en la
tapilla interna.
3. Trabe la tapilla externa
en la armadura del rodillo
presionando la lengüeta de
bloqueo.
Empuje el rodillo en la armadura hasta que se detenga.
• NOTA: Jale suavemente el
rodillo para asegurarse de que
esté bien fijo en la armadura del
rodillo.
5. Fije el protector contra
salpicaduras deslizándolo sobre
la tapilla externa y coloque
el extremo horquillado en la
armadura del rodillo. Ajústelo
en la posición deseada.
7. Cierre la lata de pintura con la
tapa de la misma.
ADVERTENCIA: ¡NO QUITE LAS
TAPILLAS INTERNAS O EXTERNAS
CON UN ATORNILLADOR! ESO
PODRÍA DAÑARLAS.
4. Introduzca el conjunto del
rodillo en el conjunto de la
manija y apriete la tuerca.
• NOTA: Al insertar la armadura
en la manija, la arandela de la
manija no quedará al ras con la
manija.
6. Introduzca el tubo de llenado a
través del agujero que está en
la parte inferior de la tapa de la
lata de pintura; empújelo hasta
que esté bien apretado y hasta
el reborde del tubo.
• NOTA: La tapa de la lata no se
ajustará en algunos envases de
pintura. En ese caso, para llenar
el PaintStick omita la tapa de la
lata y coloque el tubo de llenado
directamente en el envase.
Sujete el tubo de llenado con la
mano para
estabilizarlo según sea necesario.
Sugerencias para pintar con el
PaintStick
• A ntes de pintar, inspeccione el rodillo para ver si tiene pelusa. Si es necesario, lávelo antes del uso.
• Cuando se usa el PaintStick para la primera aplicación de pintura, se necesitará casi toda la
pintura en el tubo del PaintStick para saturar el rodillo.
8. Si la lata de pintura es
cuadrada, ponga la tapa de
la lata encima de la lata de
pintura.
• Mueva el rodillo constantemente mientras empuja la manija interna hacia adentro para evitar
que gotee.
• NOTA: La tapa quedará floja
sobre la lata.
• Cuando se pinta en áreas estrechas, llene el PaintStick parcialmente. Eso reducirá la
longitud total del PaintStick.
• Deje de empujar la manija interna hacia adentro si el rodillo empieza a patinar o deslizarse.
• Si se va a dejar el PaintStick sin usar durante un tiempo largo, envuelva el rodillo con una
bolsa de plástico.
PAINTSTICK®
8
ESPAÑOL
Pintando con el PaintStick
•N
OTA: Al llenar, asegúrese de
que el tubo de llenado esté
opuesto al lugar donde usted
está parado, a fin de asentar
correctamente la válvula.
•N
OTA: Quizás note que hay
grasa de petróleo dentro de
la manija del PaintStick. Esto
es necesario y ayudará con su
funcionamiento sin afectar la
pintura.
1. Sostenga el PaintStick en un ángulo
de 45 grados y coloque el orificio
de llenado sobre el tubo de llenado.
Empuje suavemente el PaintStick
hacia abajo, hasta que su parte
inferior toque el tubo de llenado. NO
MANTENGA EL PAINTSTICK SOBRE
EL TUBO DE LLENADO POR MÁS DE
UN MINUTO CADA VEZ.
•N
OTA: Si la manija interior
es difícil de tirar hacia fuera,
sostenga la perilla negra y gire la
manija interior, luego tire.
2. Tire de la manija interna
completamente hacia atrás para
llenar con pintura el PaintStick.
Saque el PaintStick lentamente del
tubo de llenado.
3. Empuje la manija interna para llenar
de pintura el rodillo y comience a
pintar.
Si se le forma un patrón de puntos
al pintar, aplique más pintura. Si el
rodillo está deslizándose, aplique
menos pintura.
Detección de problemas
Problema: Entra aire dentro del PaintStick en lugar de pintura.
Solución:
Empuje lentamente la manija para sacar el aire. Quite y vuelva a introducir el PaintStick en el tubo de llenado.
Asegúrese de que este tubo esté completamente asentado en la válvula. Si es necesario, aplique grasa de petróleo al
tubo de llenado para facilitar asentar el tubo y la válvula.
Problema: Es difícil introducir o quitar el tubo de llenado del orificio de llenado.
Solución:
Ponga grasa de petróleo en la abertura del orificio de llenado y/o en el tubo de llenado.
Problema: Es difícil mover la manija hacia adentro o hacia afuera.
Solución: Lubrique los anillos ‘O’ internos (vea la sección de limpieza).
Problema: La pintura se sale por la tapilla.
Solución: Asegúrese de que las tapillas están al ras con el extremo del rodillo. Si lo están, entonces quítelas y séllelas de nuevo
con grasa de petróleo (vea sección de limpieza).
Problema: La pintura se sale del orificio de llenado.
Solución:
Lubrique el orificio de la válvula con grasa de petróleo. Si esto no da resultado, reemplace el juego de válvulas (vea el
esquema de las partes).
PAINTSTICK®
9
ESPAÑOL
Limpieza y desarmado del PaintStick
NOTA: Si se pinta con
una pintura de aceite,
use los solventes de
limpieza recomendados
por el fabricante en vez de
usar agua caliente en los
pasos siguientes. Siga las
instrucciones del fabricante
para el uso de soluciones
minerales recomendadas
y para la manera de
desecharlas.
1. Devuelva la pintura que sobra en
el PaintStick a la lata de pintura,
sosteniendo el PaintStick en un
ángulo de 45 grados y empujando
el orificio de llenado del PaintStick
sobre el tubo de llenado hasta que
toque el fondo de éste. Empuje la
manija interna hacia adentro hasta
que se detenga.
2. Retire la pintura del conjunto del
rodillo sosteniendo el dedo sobre
el orificio de llenado y tirando de la
manija interna hacia atrás. Repita el
paso anterior.
3. Limpie el PaintStick sumergiéndolo
en agua caliente, de manera que el
rodillo y el orificio de llenado estén
cubiertos. Tire de la manija interna
hacia atrás y empuje hacia adelante
varias veces.
4. Quite la armadura del rodillo
destornillando la tuerca situada en
el extremo de la misma.
5. Insert paint can cover and fill
tube into PaintStick fill port.
Place in warm water and flush
fill tube by pulling inner handle
back and pushing forward
several times. Remove paint
can cover and fill tube from
PaintStick.
6. Coloque el PaintStick en agua
caliente limpia y lave el orificio de
llenado cubriendo el extremo del
PaintStick con el dedo y tirando
de la manija interna hacia atrás y
empujando hacia adelante varias
veces.
•N
OTA: Si no las puede separar,
coloque el PaintStick en el suelo,
ponga el pie sobre el collarín y ruédelo
para aflojar.
8. P resione la lengüeta “PRESIONAR
PARA SACAR” y se abrirá para retirar
la tapilla externa.
7. Separe las manijas interior y exterior
tirando de ellas rápidamente para
apartarlas.
PAINTSTICK®
10
• NOTA: Para obtener el mejor
rendimiento, limpie también el tubo
de llenado.
ESPAÑOL
Limpieza y desarmado del PaintStick
9. Saque el rodillo de la armadura.
10. ¡NO QUITE LA TAPILLA INTERNA
CON UN ATORNILLADOR!
ESO PODRÍA DAÑARLA.
11. Retire la tapilla interna del rodillo
insertando la armadura en ángulo
hacia dentro de la tapilla interna
aproximadamente
2,5 cm (1 pulg.). Tire suavemente
hacia usted para retirar la tapilla.
12. Quite el separador del cuerpo del
rodillo.
13. ¡NO QUITE LA TAPILLA EXTERNA
CON UN ATORNILLADOR! ESO
PODRÍA DAÑARLA.
14. Quite la tapilla externa del rodillo metiendo la armadura dentro del rodillo en
un ángulo ligeramente ladeado, entonces empuje suavemente hasta que salga
la tapilla externa con la armadura.
Método opcional: quite la tapilla externa del rodillo usando los dedos.
orificio de llenado
tapilla externa
tapilla interna y sello
anillo ‘O’ de la manija interna
14. Limpie los componentes del conjunto del rodillo con agua caliente. Lubrique los anillos en ‘O’ de la manija interna, la tapilla externa y la tapilla interna con grasa de
petróleo. Ponga una pequeña cantidad de grasa de petróleo en el orificio de llenado.
PAINTSTICK®
11
ESPAÑOL
Armado del PaintStick
1. Introduzca la tapilla externa en el
rodillo.
2. Introduzca el separador dentro del
rodillo.
3. Introduzca la tapilla interna en el
rodillo.
4. Asegúrese de que la tapilla
externa esté en la posición
abierta; para ello presione el
lado “PRESIONAR PARA SACAR”
de la lengüeta. Instale el rodillo
en la armadura del rodillo
introduciendo la armadura en la
tapilla interna.
Empuje el rodillo en la
armadura hasta que se
detenga.
5. Trabe la tapilla en la armadura del
rodillo presionando la lengüeta de
bloqueo.
6. Introduzca la manija interna dentro
de la manija externa y empújelas
juntas.
•N
OTA: No permita que los anillos en
‘O’ de la manija interna se salgan
fuera de sus ranuras cuando se unen
las manijas ya que se podrían dañar.
7. Arme el conjunto del rodillo en el
conjunto de la manija del PaintStick
y apriete la tuerca. Todas las partes
deben estar completamente secas
antes de armarlas de nuevo.
•N
OTA: Antes de armar, asegúrese de
que los anillos “O” estén lubricados
con grasa de petróleo.
PAINTSTICK®
12
ESPAÑOL
PaintStick®
Système de peinture à 5 pièces
Manuel d’instruction
AVERTISSEMENT : Pour réduire les risques de blessure, l’utilisateur
doit lire et comprendre le manuel d’instruction avant d’utiliser le
manche à peindre PaintStick®.
Pour le service à la clientèle au Canada ou aux États-Unis, appelez le :
(763) 780-5115 ou (800) 264-5442 de 8 h à 17 h,
heure normale du Centre.
Liste de pièces PaintStick
LISTE DE PIÈCES
ArticleNo de référence
1
805275
2
815155
3
805286
4805995
5
817295
6
805277
7817300
8
817296
9
806010
10
805266
11
805263
—
820436
Description
Manche à peindre PaintStick
Joints toriques
Valve et orifice de remplissage
Armature
Bouchon interne et joint
Cylindre d’écartement
Manchon de 23 cm, fibres de 1 cm
Bouchon externe
Écran antiéclaboussures
Tube de remplissage
Couvercle du pot de peinture
Manuel d’instruction (non illustré)
REMARQUE : Utilisez uniquement les manchons perforés PaintStick® ou PaintStick® EZ-TWIST®.
Le PaintStick et le PaintStick EZ-TWIST ne fonctionneront pas avec un manchon normal (non perforé).
**Appelez le 1-800-264-5442 pour commander votre ensemble de remise à neuf PaintStick C800798.
PAINTSTICK®
13
FRANÇAIS
Préparation du manche à peindre PaintStick
1. V érifiez qu’il n’y a pas de
peluches sur le manchon.
Pour obtenir les meilleurs
résultats, rincez le rouleau à
l’eau et laissez-le sécher avant
l’utilisation.
2. A ssurez-vous que le bouchon externe est en position ouverte en
appuyant sur le côté « APPUYER POUR RETIRER » de la languette.
Fixez le manchon sur l’armature en insérant l’armature à l’intérieur du
bouchon interne.
Poussez le manchon sur l’armature jusqu’à ce que le manchon se
bloque.
AVERTISSEMENT : NE PAS SE SERVIR
D’UN TOURNEVIS POUR RETIRER LES
BOUCHONS INTERNE ET EXTERNE
AU RISQUE DE LES ENDOMMAGER !
4. Insérez l’ensemble de rouleau
dans la poignée et serrez
l’écrou.
• REMARQUE : Lorsque vous
insérez l’armature dans
la poignée, la rondelle de
l’armature ne sera pas de
niveau avec la poignée.
5. F ixez l’écran antiéclaboussures
en le faisant glisser par-dessus
le bouchon externe et en
fixant l’extrémité fourchue sur
l’armature du rouleau. Ajústelo
en la posición deseada.
6. Insérez le tube de remplissage
à travers le trou aménagé sur
le dessous du couvercle pour
pot de peinture et enfoncez-le
jusqu’à ce qu’il soit bien serré
et qu’il atteigne les nervures du
tube de remplissage.
3. V errouillez le bouchon externe
sur le manchon en appuyant sur
la languette de verrouillage.
• REMARQUE : Tirez doucement
sur le manchon pour s’assurer
qu’il est fermement fixé sur
l’armature.
7. M
ettez le couvercle pour pot de
peinture en place.
• REMARQUE : Le couvercle ne
s’adapte pas à certains pots
de peinture. Pour remplir le
PaintStick, laissez le couvercle
de côté et placez le tube de
remplissage directement dans
le pot. Maintenez le tube de
remplissage d’une main pour le
stabiliser au besoin.
Conseils pratiques concernant le
manche PaintStick
• Inspectez le manchon pour tout signe de peluche avant l’utilisation. Au besoin, lavez-le avant
de l’utiliser.
8. S i votre pot de peinture est
carré, posez le couvercle du pot
sur le pot de peinture.
• REMARQUE : Le couvercle doit
être posé, sans être enfoncé,
sur le dessus du pot.
• L ors de l’utilisation du manche PaintStick pour la première application de peinture, la quasi totalité
de la peinture présente dans le tube de remplissage sera nécessaire à la saturation du manchon.
• Maintenez le rouleau en mouvement lorsque que vous poussez sur la poignée interne, pour
ne pas que la peinture tombe goutte à goutte.
• Arrêtez de pousser sur la poignée interne dès que le rouleau se met à déraper ou à glisser.
• Lorsque vous peignez dans des endroits exigus, remplissez seulement une partie du manche
PaintStick pour en réduire la longueur.
• Si vous devez laisser le manche PaintStick sans surveillance pour un certain temps,
enveloppez le manchon dans un sac en plastique.
PAINTSTICK®
14
FRANÇAIS
Peinture à l’aide du manche à peindre PaintStick
•R
EMARQUE : Pour bien installer
la valve, assurez-vous que le
tube de remplissage est du côté
opposé de l’endroit où vous
vous trouvez lorsque vous le
remplissez.
•R
EMARQUE : Vous verrez
1. Tenez le manche PaintStick à un
angle de 45° et placez l’orifice
de remplissage sur le tube de
remplissage. Poussez doucement
sur le manche PaintStick jusqu’à
ce qu’il bute contre le tube de
remplissage. NE LAISSEZ PAS LE
MANCHE PAINTSTICK SUR LE TUBE
DE REMPLISSAGE PENDANT PLUS
D’UNE MINUTE À LA FOIS.
peut-être de la vaseline dans
la poignée du PaintStick. Ceci
est nécessaire et aide au
fonctionnement sans affecter la
peinture.
•R
EMARQUE : Si la poignée
intérieure est difficile à retirer,
tenez le bouton noir et tournez la
poignée intérieure, puis tirez.
2. Tirez complètement la poignée
interne pour alimenter le manche
en peinture. Relevez lentement le
manche PaintStick hors du tube de
remplissage.
3. Poussez la poignée interne vers
l’intérieur du manche pour alimenter
le manchon et commencez à
peindre.
S i vous voyez un motif à pois lorsque
vous peignez, mettez plus de peinture.
Si le rouleau glisse, appliquez moins
de peinture.
Dépannage
Problème :De l’air plutôt que de la peinture est aspiré dans le manche PaintStick.
Solution : Poussez sur la poignée pour expulser l’air. Retirez puis réinsérez le manche PaintStick dans le tube de remplissage.
Assurez-vous que le tube de remplissage est bien installé dans le corps de valve. Au besoin, appliquez de la vaseline
sur le tube de remplissage pour faciliter l’installation du tube de remplissage et du corps de valve.
Problème :Difficultés éprouvées lors de l’insertion du tube de remplissage dans l’orifice de remplissage, ou lors de son retrait
Solution : Mettez de la vaseline sur l’ouverture de l’orifice de remplissage et/ou du tube de remplissage.
Problème :Difficultés à faire bouger la poignée.
Solution : Lubrifiez les joints toriques du tube interne (consultez la section NETTOYAGE).
Problème :De la peinture s’écoule du ou des bouchons.
Solution : Assurez-vous que les bouchons sont bien posés sur le manchon. S’ils le sont, mais que de la peinture s’écoule
toujours, retirez-les et enduisez-les de vaseline avant de les remettre en place (consultez la section NETTOYAGE).
Problème :De la peinture s’écoule de l’orifice de remplissage.
Solution : Lubrifiez l’orifice de la valve avec de la vaseline. Si l’opération échoue, remplacez l’ensemble de valve (consultez les
illustrations de pièces).
PAINTSTICK®
15
FRANÇAIS
Nettoyage et démontage du manche à peindre PaintStick
REMARQUE : Si vous vous
servez de peinture à l’huile,
suivez les recommandations
du fabricant de peinture quant
au solvant à utiliser pour le
nettoyage du rouleau, plutôt
que d’utiliser l’eau tiède dont il
est fait mention dans les étapes
qui suivent. Si vous utilisez de
l’essence minérale, conformezvous aux recommandations
quant à son utilisation et sa
mise au rebut.
1. Pour reverser la peinture contenue
dans le manche PaintStick dans le
pot, tenez le manche à un angle
de 45° et poussez l’orifice de
remplissage du manche sur le tube
de remplissage jusqu’à ce qu’il
bute sur ce dernier. Poussez sur la
poignée interne jusqu’à ce qu’elle
se bloque.
2. Retirez la peinture du rouleau
en bouchant du doigt l’orifice de
remplissage et en tirant sur la
poignée interne. Répétez l’étape
précédente.
3. Pour nettoyer le manche à peindre
PaintStick, submergez-le d’eau
tiède de sorte que le manchon
et l’orifice de remplissage soient
bien immergés. Tirez et poussez à
plusieurs reprises sur la poignée
interne.
4. Retirez l’armature du rouleau en
dévissant l’écrou sur l’extrémité de
l’armature.
5. Insert paint can cover and fill
tube into PaintStick fill port.
Place in warm water and flush
fill tube by pulling inner handle
back and pushing forward
several times. Remove paint
can cover and fill tube from
PaintStick.
6. Mettez le manche PaintStick dans
de l’eau tiède propre et rincez
l’orifice de remplissage en bouchant
l’extrémité du manche avec le doigt
et en tirant et en poussant sur la
poignée interne à plusieurs reprises.
•R
EMARQUE : Si la séparation est
difficile, posez le PaintStick sur le
sol, mettez le pied sur le collet et
faites-le rouler afin de le desserrer.
8. Appuyez sur la languette
« APPUYER POUR RETIRER ».
Son déclic permet d’enlever le
bouchon externe.
7. Séparez la poignée interne de la
poignée externe en tirant d’un seul
coup.
PAINTSTICK®
16
•R
EMARQUE : Pour de meilleurs
résultats, nettoyez également le tube
de remplissage.
FRANÇAIS
Nettoyage et démontage du manche à peindre PaintStick
9. Retirez le manchon de
l’armature.
10. NE PAS SE SERVIR D’UN
TOURNEVIS POUR RETIRER LE
BOUCHON INTERNE AU RISQUE DE
L’ENDOMMAGER.
11. Retirez le bouchon interne du
manchon en y insérant l’armature
de biais à environ 2,5 cm. Tirez
doucement vers vous pour retirer le
bouchon.
12. Retirez le cylindre d’écartement
du manchon.
13. NE PAS SE SERVIR D’UN
TOURNEVIS POUR RETIRER LE
BOUCHON EXTERNE AU RISQUE DE
L’ENDOMMAGER.
14. Retirez le bouchon externe du manchon en insérant l’armature à l’intérieur du
manchon à un angle légèrement de travers, puis appuyez doucement à l’aide
de l’armature pour faire sortir le bouchon externe. Méthode alternative–Retirez
le bouchon externe du manchon en vous servant de vos doigts.
Orifice de remplissage
Bouchon externe
Bouchon interne et joint
Joint torique de la poignée interne
15. Nettoyez les éléments du rouleau dans de l’eau tiède. Lubrifiez les joints toriques du manche interne et les bouchons interne et externe à l’aide de vaseline. Mettez
une petite quantité de vaseline sur l’orifice de remplissage.
PAINTSTICK®
17
FRANÇAIS
Assemblage du manche à peindre PaintStick
1. Insérez le bouchon externe dans le
manchon.
2. Logez le cylindre d’écartement à
l’intérieur du manchon.
3. Insérez le bouchon interne dans le
manchon.
4. Assurez-vous que le bouchon
externe est en position ouverte
en appuyant sur le côté
« APPUYER POUR RETIRER »
de la languette. Fixez le
manchon sur l’armature en
insérant l’armature à l’intérieur
du bouchon interne.
Poussez le manchon sur
l’armature jusqu’à ce que le
manchon se bloque.
5. Verrouillez le bouchon externe sur
le manchon en appuyant sur la
languette de verrouillage.
6. Insérez la poignée interne à
l’intérieur de la poignée externe et
poussez-les d’un coup.
•R
EMARQUE : Ne laissez pas
les joints toriques de la poignée
interne sortir de leurs nervures
lors de l’insertion, au risque de les
endommager.
7. Fixez le rouleau sur le manche
PaintStick et serrez l’écrou.
Toutes les pièces doivent être
complètement sèches avant le
remontage du manche.
•R
EMARQUE : Vérifiez que les joints
toriques sont lubrifiés avec de la
vaseline avant le montage.
PAINTSTICK®
18
FRANÇAIS
Two Year Limited Warranty
HomeRight warrants this product for two years following date of purchase against any defects in material or workmanship. Any product believed
defective within the warranty period should be returned postage paid with proof of purchase to HomeRight, 1661 94th Lane N.E., Minneapolis, MN
55449-4324, (763-780-5115), Attention: Service Department.
HomeRight will repair or replace defective product at no charge, and return postage paid to you. Your name, address, and a description of problem
should be included in the box. This warranty does not cover accessories or damage resulting from improper use, negligence, accidents or normal wear
and tear.
ANY IMPLIED WARRANTY OF MERCHANTABILITY OR FITNESS FOR A PARTICULAR PURPOSE IS LIMITED TO TWO YEARS FOLLOWING DATE OF
PURCHASE.
RESPONSIBILITY IS LIMITED TO THE REPAIR OR REPLACEMENT FOR DEFECTS IN MATERIAL OR WORKMANSHIP. HOMERIGHT SHALL NOT IN ANY
EVENT BE LIABLE FOR ANY INCIDENTAL OR CONSEQUENTIAL DAMAGES OF ANY KIND, WHETHER FOR BREACH OF THE WARRANTY OR ANY OTHER
REASON.
Some states do not allow a limitation on how long implied warranties last or the exclusion of incidental or consequential damages, so the above
limitation and exclusion may not apply to you.
This warranty gives you specific legal rights, and you may also have other rights which vary from state to state.
If you cannot obtain parts and accessories at your local retail dealer, then call or write: HomeRight, 1661 94th Lane N.E., Minneapolis, Minnesota 554494324, Phone (763) 780-5115 or 1-800-264-5442, 8:00 a.m. to 5:00 p.m. CST.
Dos años de garantía limitada
HomeRight garantiza este producto por dos años desde de la fecha de compra, contra cualquier defecto de sus materiales o de fabricación. Cualquier
producto que se crea esté defectuoso dentro del periodo de garantía, se debe devolver con porte pagado con el recibo de compra a HomeRight, 1661
94th Lane NE, Minneapolis, MN 55449-4324. Tel: 763-780-5115 con atención al Service Department.
HomeRight reparerá o reemplazará el producto defectuoso sin costo a usted y se lo enviará por correo con porte pagado. Se debe incluir en la caja
su nombre, dirección y descripción del problema. Esta garantía no cubre accesorios o daños que resulten del uso inadecuado, por descuido, accidentes
o desgaste normal.
CUALQUIER GARANTÍA IMPLÍCITA DE COMERCIABILIDAD O DE IDONEIDAD PARA UN PROPÓSITO PARTICULAR ESTÁ LIMITADA A DOS AÑOS DESDE LA
FECHA DE SU COMPRA.
LA RESPONSABILIDAD ESTÁ LIMITADA A LA REPARACIÓN O REEMPLAZO POR DEFECTO DE SUS MATERIALES O MANO DE OBRA FABRICACIÓN.
HOMERIGHT NO SERÁ, DE NINGUNA MANERA, RESPONSABLE POR CUALQUIER DAÑO INCIDENTAL O CONSECUENTE DE CLASE ALGUNA, YA SEA POR
INCUMPLIMIENTO DE LA GARANTÍA O POR ALGUNA OTRA RAZÓN.
Algunos estados no permiten límites sobre la duración de las garantías implícitas o sobre la exclusión de daños incidentales o consecuentes, por esa
razón la limitación y exclusión que se ofrecen anteriormente pueden no ser pertinentes en su caso.
Esta garantía le da derechos legales especificos y usted puede tener otros derechos que pueden variar según cada estado.
Si usted no puede obtener partes y accesorios de su distribuidor local, por favor llámenos o escribanos a: HomeRight, 1661 94th Lane NE, Minneapolis,
MN 55449-4324. Tel: 763-780-5115 ó 1-800-264-5442 8:00 a. m. a 5:00 p. m. (hora del Centro de EE. UU.).
Garantie limitée de deux ans
La Société HomeRight garantit ce produit, pendant une période de deux ans après la date d’achat, contre tout vice de matériaux et de main-d’œuvre.
Veuillez renvoyer port payé et accompagné d’une preuve d’achat, pendant la période de garantie, tout produit jugé défectueux, à la Société HomeRight,
1661 94th Lane N. E., Minneapolis, MN 55449-4324, États-Unis (763 780-5115), Attention : Service Department.
La Société HomeRight procédera aux réparations nécessaires ou au remplacement sans frais et vous renverra l’outil port payé. Veuillez joindre à votre
envoi vos nom et adresse, ainsi qu’une description du problème. La présente garantie ne s’étend pas aux accessoires et ne couvre pas les dommages
résultant d’un mauvais usage, de négligence, d’accidents ou d’une usure normale.
TOUTE GARANTIE IMPLICITE DE COMMERCIALISATION OU D’ADAPTATION À UN USAGE PARTICULIER EST LIMITÉE À DEUX ANS APRÈS LA DATE
D’ACHAT.
LA RESPONSABILITÉ DE LA SOCIÉTÉ SE LIMITE AUX RÉPARATIONS OU AU REMPLACEMENT SUITE À DES DÉFECTUOSITÉS ÉVENTUELLES DE
MATÉRIAUX OU DE MAIN-D’ŒUVRE. LA SOCIÉTÉ HOMERIGHT NE POURRA ÊTRE TENUE RESPONSABLE POUR QUELQUE RAISON QUE CE SOIT DES
DOMMAGES DIRECTS OU INDIRECTS DE QUELQUE NATURE QUE CE SOIT.
Certaines provinces peuvent ne pas permettre la limitation de durée de garanties implicites ni l’exclusion des dommages directs ou indirects. Il se
peut donc que la limitation et l’exclusion ci-dessus ne s’appliquent pas à votre cas particulier.
La présente garantie vous accorde des recours juridiques particuliers et il se peut que vous jouissiez d’autres recours, qui peuvent varier d’une
province à l’autre.
Si vous avez du mal à vous procurer pièces ou accessoires chez votre détaillant habituel, veuillez nous écrire ou nous téléphoner : HomeRight, 1661 94th
Lane N. E., Minneapolis, MN 55449-4324 États-Unis (763) 780-5115 ou (800) 264-5442 de 8 h à 17 h, heure normale du Centre.
HomeRight®
HomeRight®
HomeRight®
1661 94th Lane N.E.
Minneapolis, Minnesota 55449-4324
Phone 763-780-5115
Customer Service Line 1-800-264-5442
8:00 a.m. to 5:00 p.m. CST
1661 94th Lane N. E.
Minneapolis, MN 55449-4324
Tel: 763-780-5115
Servicio al cliente: 1-800-264-5442
8:00 a. m. a 5:00 p. m.
(hora del Centro de EE. UU.)
1661 94th Lane N. E.
Minneapolis, MN 55449-4324
Tél. : 763-780-5115
Service à la clientèle : 1-800-264-5442
8 h à 17 h, heure normale du Centre
Manufactured by HomeRight® www.homeright.com
© 2010 PN C820436 REV B 3/10
Printed in China