1
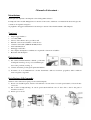
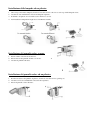
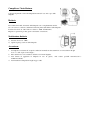
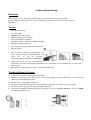
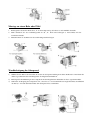
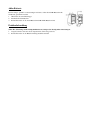
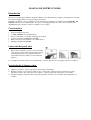
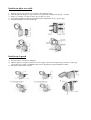
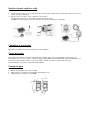
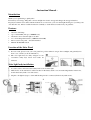
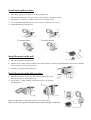
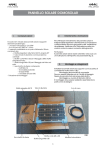
IT
DE
ES
GB
Malga Sensor
0609
Manual Use
- Manuale di istruzioni Introduzione
Grazie per aver acquistato una lampada solare della gamma Solarjet !
La lampada solare modello Malga Sensor è un articolo innovativo, fabbricato con materiali di alta tecnologia, che
consentono il risparmio energetico.
Vi preghiamo di leggere attentamente le istruzioni per ottenere il buon funzionamento della lampada.
Vantaggi
•
•
•
•
•
•
•
•
•
Ampio raggio luminoso
1 x 1 Watt LED
Sensore di movimento attivo per 30 secondi
Pannello solare monocristallino con 4m di cavo
3 batterie ricaricabili (1300mAh Ni-Mh) incluse
Lente stabilizzata UV
Montaggio facilissimo
Set completo di lampada e combinatore con pannello solare monocristallino
Resistente alle intemperie
Posizionamento
1) Per ottenere un funzionamento ottimale, posizionare
la lampada in un luogo dove possa accumulare piu
luce solare possibile (vedi fig. 1).
2) Caricare le batterie per due giorni prima dell’utilizzo.
3) Il numero di ore di illuminazione è inoltre determinato dalla sua locazione geografica, dalle condizioni
meteorologiche e stagionali.
Installazione della lampada
Svitare le viti a rimuovere la parte posteriore della lampada;
1) Forare con 4 buchi la parete, inserire i 4 listelli che si trovano dietro la scatola porta batterie, e fissare il tutto
con le viti;
2) Far scorrere la lampada lungo la scatola porta batteria dall’alto verso il basso fino a che le due parti si
incastrino tra di loro
3) Fissare poi con le viti
Installazione della lampada ad un pilastro
1.
2.
3.
4.
Una volta posizionata la lampada, inserire la vite ad L nel foro che si trova sul corpo della lampada solare;
Avvitare la vite a farfalla fino a fissare la lampada al pilastro;
Il diametro del pilastro non dovrebbe essere inferiore a 3,5 cm;
Non installare la lampada in luoghi dove è facilmente urtabile;
Installazione del pannello solare a muro
1. Forare il muro e inserire le viti nei fori;
2. Fissare la base del pannello al muro con le viti;
3. Avvitare il pannello alla base;
1
2
Installazione del pannello solare ad un pilastro
1. Posizionare la base del pannello al pilastro, inserire la vite ad L nel foro predisposto;
2. Avvitare con la vite a farfalla fino a fissare bene al pilastro;
3. Fissare il pannello solare alla base;
Completare l’installazione
Collegare il pannello solare alla lampada inserendo il cavo nel corpo della
lampada
Batterie
In condizioni normali, le batterie della lampada sono completamente cariche.
Se cosí non fosse, caricare totalmente le batterie prima dell’utilizzo della lampada.
Lasciare il bottone su “ON” nelle ore di luce e “OFF” all’imbrunire.
Ripetere l’operazione per due giorni e le batterie si ricaricano.
Sostituzione batterie
1) Lasciare il tasto su “OFF”;
2) Aprire la parte posteriore della lampada
Avvertenze
1. La lampada è resistente all’ acqua in condizioni normali, ma fare attenzione a non lasciarla in luoghi
dove c´e` dell’ acqua come il bagno;
2. Fare attenzione a non sostituire le batterie con le mani bagnate;
3. Non tentate di aggiustare la lampada in caso di guasto, onde evitare possibili manomissioni e
malfunzionamenti.
4. Non installare la lampada in luoghi troppo caldi;
- Gebrauchsanweisung Einleitung
Wir bedanken uns, dass Sie sich entschlossen haben eine Solarlampe bei Solarjet zu beziehen.
Das Modell Malga Sensor ist eine innovative Solarlampe, ausgestattet mit neuen, hochtechnologischen
Materialien!
Vorteile
•
•
•
•
•
•
•
•
•
Attraktive Wandlampe
1 x 1 Watt LED
100.000 Stunden Lebensdauer
Mit Bewegungsmelder zu 30 Sek.
Solarpaneel inklusive 4m Kabel
Aufladbarer Akku – 3 Batterien (1300mAh Ni-Mh)
Einfache und schnelle Montage
Set komplett mit Lampe und Kristall-Solarpaneel
Wetterbeständig
1. Um der Lampe optimale Voraussetzungen zu
bieten, platzieren Sie die Solarzellenfläche an
einem
Ort,
wo
Sie
die
maximale
Sonneneinstrahlung sammeln kann (Siehe Bild)
2. Achten Sie darauf, dass die Solarzellenfläche
nicht durch eine andere Lichtquelle beeinträchtigt wird. Andernfalls wird bei Dämmerung das Licht nicht
funktionieren
3. Bitte laden Sie die Batterien zwei Tage vor der Inbetriebnahme auf.
Wandinstallation der Lampe
1)
2)
3)
4)
5)
6)
Entfernen sie das hintere Befestigungsteil der Lampe
Wählen Sie die Wand oder die Stelle an der Sie die Lampe anbringen möchten. Bohren Sie 4 Löcher durch die
dafür vorgesehenen Bohrungslöchern.
Bringen Sie die 3 mitgelieferten Dübel an.
Fixieren Sie den Befestigungsteil mit den 3 mitgelieferten Schrauben an die dafür vorgesehene Stelle
Installieren Sie den Korpus der Lampe an den Befestigungsteil.
Stellen Sie den Winkel des Bewegungsmelders der Lampe sowie den “DISTANZ SENSOR ” und den “TIMER”
nach Ihren Bedürfnissen ein.
Montage an einem Rohr oder Pfahl
1. Befestigen Sie das Teil in Form eines „L“ an der Lampe und positionieren es an dem Pfahl oder Rohr.
2. Dann schrauben Sie das Verbindungsstück an die „L“- Form und befestigen es zum Schluss mit der
Verschlussschraube.
3. Danach können sie das Paneel an das Verbindungsstück befestigen.
Wandbefestigung des Solarpaneel
1)
2)
3)
Wählen Sie die Wand oder die Stelle an der Sie das Solarpaneel anbringen möchten. Bohren Sie 4 mal durch die
dafür vorgesehenen Löcher und bringen Sie die mitgelieferten Dübel an.
Befestigen Sie die Halterung an das Solarpaneel mit den mitgelieferten Schrauben an den vorgesehenen Platz.
Stellen Sie die Neigung des Solarpaneels ein, sodass das es soviel Sonnenlicht wie möglich bezieht, anschließend
das Teil „U“- mit dem Schrauben unter dem Solarpaneel fest verschließen.
Akku Batterie
Um der Lampe optimale Voraussetzungen zu bieten, sollten die Ni-Mh Batterien alle
12 Monate gewechselt werden.
1. Öffnen Sie die Verschlusskappe
2. Wechseln Sie die Batterien
3. Kontrollieren Sie ob die neuen Batterien Ni-Mh Akku Batterien sind.
Problembehandlung
Sollte Ihre Solarlampe nicht richtig funktionieren, befolgen Sie die folgenden Anweisungen:
1. Vergewissern Sie sich dass das Solarpaneel der Sonne ausgesetzt ist.
2. Kontrollieren Sie ob die Batterien richtig installiert wurden.
-MANUAL DE INSTRUCCIONESIntroducción
Gracias por comprar una unidad de calidad. La lámpara solar alimentada por energía solar. El panel convierte la
luz solar en energía eléctrica y carga la energía en las pilas.
Utilizada con cuidado y en concordancia con las instrucciones explicadas a continuación, su LÁMPARA DE
JARDÍN debería proporcionarle muchos años de uso sin ningún problema. Por favor, lea las instrucciones
detenidamente para obtener los mejores resultados de su compra.
Características
•
•
•
•
•
•
Atractiva lámpara de pared.
1x LED (100.000 horas de iluminación)
Sensores automáticos encienden la lámpara al atardecer
3x pilas recargables (1300mAh AA Ni-Mh)
Panel solar mono cristal-4 metros de cable incluidos
Interruptor manual AUTO/OFF
Colocación del panel solar
1) Para el mejor resultado, por favor colocar el panel
solar en una posición donde pueda tomar luz solar
directamente al panel solar y generalmente sin
estar cubierta ni en la sombra. (Como muestra la
figura 1).
2) La lámpara solar debe dejarse en carga durante 2 soleados días antes de conseguir los mejores resultados.
Instalación de la lámpara solar
1. Quitar los tornillos y sacar la tapa trasera de las pilas de la lámpara.
2. Realizar 4 agujeros en la pared, basándose en los cuatro tubos que hay en la tapa trasera de las pilas,
introducir los tubos que sobresalen en los agujeros, y fijar la tapa trasera de las pilas con tornillos;
3. Desliza la lámpara solar hacia abajo hasta que el pasador de dentro esté conectado, fijar la lámpara con
tornillos.
Instalar en pilar o en valla
1.
2.
3.
4.
5.
Insertar el poste en forma de L en el agujero de la lámpara solar.
Girar la tuerca de mariposa a la posición correcta para fijar la lámpara en el pilar o la valla;
El grosor del pilar o la valla es mejor que sea más de 3.5 cm.
No instalar la lámpara donde la gente pueda herirse fácilmente en caso de que caiga.
Instalar la lámpara a un nivel horizontal.
Instalar en la pared
1) Sacar el panel solar y la base del panel.
2) Hacer 2 agujeros en la pared, basándose en los agujeros de la base del panel, luego inserte los tubos que
sobresalen en los agujeros. Finalmente fije la base del panel en la pared mediante tornillos;
3) Enrosque el panel solar a la base.
Instalar el panel en pilar o valla
1. Coja la base del panel, el poste en forma de L y monte la pieza fijándola en la pared, introduzca el poste en el
agujero de la base del panel;
2. Fije el soporte a la valla o poste y apriételo con la tuerca
Asegúrese de que el grosor de la valla o el pilar es más de 3,5cm.;
Asegúrese de que el panel solar está instalado donde la luz solar directa es suficiente.
Completar la instalación
Introducir el enchufe a la toma de la parte trasera de la lámpara.
Carga de la pilas
En condiciones normales, las pilas están totalmente cargadas dentro de la propia lámpara, usted puede verlo
directamente. Si no es así, por favor, cargue las pilas completamente antes de utilizarlas: mueva el interruptor a la
posición de “ON” durante el día y a la posición “OFF”, cuando anochezca, repetir 2 días (16 horas
aproximadamente), las pilas se cargarán completamente.
Cambio de pilas
1. Mueva el interruptor a la posición “OFF”
2. Mire el punto 3 del apartado: Instalación de la lámpara solar.
3. Cambie las pilas, 3 piezas 1.2 v Ni-MH.
Problemas de encendido
1)
2)
3)
4)
Asegúrese de que el interruptor está en la posición “ON”.
Asegúrese de que el panel no está roto.
Asegúrese de que el panel está instalado en un lugar donde la luz solar directa es suficiente.
Asegúrese de que el panel no está contaminado por ningún limpiador mediante un paño. Tenga muchísimo
cuidado en no rayar el panel.
Guía de seguridad
1. La lámpara solar es a prueba de agua en condiciones normales, pero por favor, asegúrese de que no esté
expuesta siempre a gran cantidad de agua, o en lugares húmedos, como el baño.
2. Asegúrese de que no tiene las manos mojadas cuando realice el cambio de pilas.
3. Asegúrese de no reconstruir la lámpara solar estando asolas, para evitar cualquier fallo o calambre.
4. Asegúrese de que la lámpara solar no está colocada donde la temperatura es demasiado alta.
5. Por favor, tengan en cuenta que la capacidad de recarga de las pilas Ni-MH es menor bajo temperaturas bajas
extremas.
- Instruction Manual Introduction
Thank you for purchasing a quality unit!
Powered by solar energy. The panel converts sunlight into electric energy and charges the energy in batteries.
Properly used and in accordance with the instructions set out below, your solar shed light should gives you many years
of trouble free use. Please read the instructions carefully to obtain the best results from your purchase.
Features
Attractive wall lamp
1pc x 1 Watt LED (life up to 100.000 hours)
Automatic sensor turns the light on at dusk
3 x solar rechargeable batteries (1300mAh AA Ni-Mh)
Mono-crystal solar panel – 4m cable included
Manual AUTO/OFF switch
•
•
•
•
•
•
Location of the Solar Panel
1) For best result, please locate your solar panel in a position where it can get direct sunlight, and generally free
from cover or shade (as shown in Picture 1).
2) The solar light must be fully charged for two
consecutive sunny days before best results are
achieved.
Solar light body installation
1. Loose the screws and remove the battery back cover from the light;
2. Drill 4 holes on the wall based on the four tubes in the battery back cover, insert the bulged tubes in the holes,
and fix the battery back cover with screws;
3. Slip the solar light body up to down until the hasp inside is connected, fix the body with screws;
1
2
3
4
Install on the pillar or fence
1. Insert the L type pole into the hole on the solar light body;
2. Twist the butterfly nut to a proper position to fix the light on the pillar or fence;
3. The thickness of the fence or pillar is better to be more than 3,5cm;
4. Do not install the light where people can be easily to be hurt in case of drop;
5. Install the light in horizontal level;
Install the panel on the wall
1) Take the solar panel and panel base
2) Drill two holes on the wall based in the holes in the panel base, then insert the bulged tubes into the holes. Finally
fix the panel base on the wall by screws;
3) Twist the solar panel on the panel base;
Install the panel on the pillar or fence
1. Take the panel base, L type pole and wall mount fix piece, insert
the pole into the hole on the panel base;
2. fix the fence or pillar with the wall mount fix piece by twisting
the butterfly nut;
Make sure the thickness of the pillar of fence is more than 3,5cm;
make sure the solar panel is installed where direct sunlight is sufficient;
Complete the installation
Insert the wire plug into the socket on the bottom of the solar light body;
Turn check the following data for the sense range;
Battery charge
In normal condition, the batteries inside the solar light are fully charged, you can see it directly. If not, please fully
charge the batteries before using: turn the switch “ON” for sunny daytime and turn it “OFF” when darkness
comes, repeating for 2 days (about 16 hours), and the batteries would be fully charged.
Battery replacement
Turn the switch “OFF”;
See 3 solar light body installations;
Replace the batteries with 3pcs 1.2v Ni-MH batteries;
Problem solving
•
Make sure the switch is turn to “ON”;
•
Make sure the panel is not broken;
•
Make sure the panel is installed in places where direct sunlight is sufficient;
•
Make sure the panel is not polluted by soft cloth. Do not use solvents. Take extreme care not to scratch the
clear cover.
Safety guide
The solar light is water proof on normal condition, but please makes sure it is not always exposed to a lot of water,
or some moist places, like bathroom.
Make sure your hands are not wet when replacing the batteries.
Make sure not to reconstruct the solar light by yourself, to avoid any possible malfunction, fire or electronic
shock.
Make sure the solar light is not installed where the temperature is too high.
Please notice that the Ni-MH batteries recharge capacity would decline under extreme low temperature.
[email protected]
www.solarjet.it