1
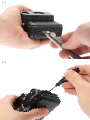
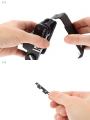
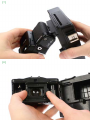
[1]
[2]
[3]
[4]
[5]
[6]
[7]
[8]
[9]
[ 10 ]
(I)
(R)
( J)
(K)
(D)
(E)
(G)
(H)
(F)
(B)
(C)
(A)
(M)
(O)
(N)
[ 11 ]
(Q)
[ 12 ]
(P)
[ 13 ]
[ 14 ]
[ 15 ]
10 Instruction for Use
17 Gebrauchsanweisung
25 Mode d’ emploi
33 Manual de instrucciones
42 Istruzioni per l’ uso
49
58
63
INSTRUCTIONS FOR USE
Felicitations on your purchase of the Lomo LC‑A Instant
Back+! Attached to your Lomo LC‑A this is the world’s
first amateur program automatic instant photography
system with long & multiple exposure settings and a
fully expandable range of accessories. Please read
the following manual carefully to be sure you install
your Instant Back correctly and get the most amazing
pictures out of it.
Installing the Lomo LC‑A
Instant Back+
The Lomo LC‑A Instant Back+ works with both the
Lomo LC‑A and the Lomo LC‑A+. First you need to
prepare your camera for its new instant clothes:
20
1.Take a pair of tweezers and peel off the leather on
your Lomo LC‑A at its right side (image 1). Peel it off
until you see the 4 screws fixing the back door.
2.Unscrew the 4 screws using the enclosed screw‑
driver [A] (image 2).
3.Take off the Lomo LC‑A’s original back door
(image 3).
4.Now take the enclosed hinge [B] and screw it on the
camera with the enclosed 4 screws [C]
(images 4+5).
5.Glue back the leather (image 6).
6.Attach the Instant Back [D] to the Lomo LC‑A. Start
with the right side and click the Instant Back into
place (image 7).
7.With the Lomo LC‑A’s back open, insert the cor‑
rection lens [E] in the chamber right on top of the
camera’s real lens. The long ear of the correction
lens needs to be on the right side. Close the back
and the correction lens will be fixed (image 8).
8.Screw the metal stand [F] into the camera’s tripod
screw mount (image 9).
9.Slide the cold shoe adapter [G] into the Lomo
LC‑A’s hot shoe and attach the viewfinder [H]
(image 10).
10.Your Lomo LC‑A Instant Back+ is now ready to
rumble!
Shooting photos
With the Instant Back in place and the correction lens
properly fixed you are only seconds away from your
first shot. Here we go:
1.Insert two CR2 batteries (2x3V) into the Instant
Back’s battery compartment [I].
2.Turn on the Lomo LC‑A Instant Back+ by switching
the on/off switch [J] to ON.
3.Insert a new Fujifilm Instax Mini film.
4.Press the film ejection button [K] once to eject the
protection dark slide inside the film pack.
5.Set the ASA dial [M] of your Lomo LC‑A to ASA
200. This is the standard setting for using the Lomo
LC‑A Instant Back+. To make your image brighter or
darker you can adjust the ASA-settings to a higher
or lower level.
6.Cock the camera’s shutter by pulling the MX-switch
[N] at the bottom of the Lomo LC‑A+. If you are
using a Lomo LC‑A you need to – just like shooting
normally – manually wind on the film advance spool
[O] for each shot. This can be a bit tricky as parts
of the Instant Back cover the spool. But with a little
practice it’s an enjoyable exercise.
7.Set the focus (according to the Instant Back’s
distance-chart) and shoot.
21
8.Press the film ejection button, grab the picture and
wait until the picture is fully exposed. Congratula‑
tions to your first Lomo LC‑A instant photograph!
Focusing
The Lomo LC‑A Instant Back+ and its correction
lens let you get extremely close to your subjects. For
sharp-as-a-knife shots you need to set the focus of
your Lomo LC‑A according to the following chart (also
printed on your Instant Back):
0.8m becomes 0.55m
1.5m becomes 0.8m
3m becomes 1.5m
For everything above set to infinity
Shooting tips
22
The Lomo LC‑A’s accessories (Wide-Angle lens, Fish‑
eye lens, Tunnelvision lens and the Splitzer) are fully
compatible with the Instant Back. These are the bee’s
knees in combination with the Instant Back. Go and try
them out!
Don’t forget to set the distance setting according to
the Instant Back’s distance-chart. For shooting with the
Wide-Angle lens focus according to the lenses distance
settings.
Have a go at long and multiple exposures.
Adjust the ASA-settings on the camera for more control
over your image. For indoor shots and shot in normal
daylight set the ASA to 200 (standard setting). If you are
outside in bright sunlight set it to ASA 400 and if you
are outdoors at night or in environments with very few
light sources set the ASA to 100.
When using a flash take care that it’s not too strong as
this will overexpose your image. If you can’t adjust the
intensity of your flash you can cover it with some sheets
of paper. For using a flash slide it into the Lomo LC‑A’s
hot shoe while you use the external viewfinder via the
Instant Back’s cold shoe on the right hand side.
However, the automatic exposure setting of the Lomo LC‑A
always measures the light correctly so that you don’t really
need a flash. Long exposures work magical with Instax film
and you should definitely try them.
After shooting
You’ll need to finish the entire pack of Instax film before
removing the Instant Back. Turn the power switch to
OFF to save your batteries. Remove the correction lens
from your camera and keep it in a safe place. If you’re
not going to use the Back for a while, then remove the
batteries to keep them as fresh as possible. Again, be
sure to turn the power switch to OFF after you’re fin‑
ished. Otherwise, the film may accidentally eject if you
place the camera onto a table or into a bag.
Making your original Lomo LC‑A
back door interchangeable
The Lomo LC‑A’s original back door and the Instant
Back can be replaced within seconds. To make your
back door ready for quick interchanging go through the
following steps:
1.Take the Lomo LC‑A’s back door and use the pliers
to remove the metal pin [P] that holds the door joint [Q]
(image 11).
2.Remove the door joint (image 12).
3.Re-insert the metal pin (image 13).
23
4.Now your camera’s back door can be easily at‑
tached to the Lomo LC‑A and is fully interchange‑
able with the Lomo LC‑A Instant Back+
(images 14+15).
Film Format
The Lomo LC‑A Instant Back+ uses Fujifilm Instax Mini
film. 10 shots are included in every package. This film
is available for purchase from www.lomography.com
and major photography retailers. Do not attempt to load
the Lomo LC‑A Instant Back+ with any film other than
Fujifilm Instax Mini film.
Troubleshooting
I pressed the Lomo LC‑A shutter and there is no response!
If you are using a Lomo LC‑A+ check if you’ve
cocked the shutter by pulling the MX switch [N] on
the bottom of the camera. If you are using a Lomo
LC‑A wind on the film advance spool [O] on the
right hand side of the camera.
I ejected the film and my picture is totally dark!
Check the batteries of your Lomo LC‑A. For doing
so press the shutter and see if the two LED lights
inside the camera’s viewfinder are lit. If not at least
one is lit you should exchange your batteries.
My image is totally blurred and out of focus!
Check if you’ve installed the correction lens [E]
properly and set the camera’s focus correctly.
24
My image is slightly under- or overexposed.
Try turning ASA dial [M] on the camera to 100 and
shoot again to get a brighter image. Turn the dial to
ASA 400 to get a darker image.
I shot an image but the Instant Back was turned OFF.
Did I shoot a picture or not?
Yes. The picture is waiting for you inside the Instant
Back. Just turn the Instant Back ON, press the but‑
ton and eject your masterpiece.
I cannot take the back off by pulling up the rewinding knob
of my Lomo LC‑A!
Don’t forget to screw off the metal stand before
taking off the back.
I cannot take out the door joint pin of my original Lomo
LC‑A back door.
Try to use pliers and turn the pin while taking it out.
With a little patience it will work out.
My flash doesn’t work on the Instant Back!
Insert your flash onto the original hot shoe of the
camera. The so-called cold shoe of the Instant Back
is only for attaching the external viewfinder and
doesn’t work with a flash.
The film counter on the Lomo LC‑A doesn’t turn!
Of course it doesn’t. It’s only for 35mm roll film and
not for Instax Mini film. Please see the film counter
[R] on the Instant Back for counting your shots.
Can I use the Instant Back with my original Lomo LC‑A?
Yes. However, the Lomo LC‑A Instant Back+ was
not specifically designed for the use with original
Lomo LC‑A’s. As they have no MX-button you need
to manually wind on the film advance spool which is
partly covered by the Instant Back. Instant multiple
exposures are only possible with the Lomo LC‑A+.
25
Care & Warranty
Only clean the lenses with proper lens solution and a
soft cloth. Never force the lens on or off the lens holder,
as it can break. When it’s not in use, be sure to cover
the lenses. Your Lomo LC‑A Instant Back+ includes
a 2-year warranty against any manufacturer defects.
In the event of a defect, the Lomographic Society will
repair or replace the item at our discretion. For warranty
service, please contact your closest Lomographic
Office.
26
Gebrauchsanleitung
Herzlichen Glückwünsch zum Kauf deines Lomo LC‑A
Instant Back+! In Verbindung mit deiner Lomo LC‑A ist
es das welterste für den Amateurbereich geschaffene
Sofortbildkamera-System mit Programmautomatik,
Lang- und Mehrfachbelichtungsoptionen und einem er‑
weiterbaren Arsenal an Zubehör. Bitte lies die folgende
Gebrauchsanleitung aufmerksam, um sicher zu gehen,
dass du das Instant Back richtig montierst und die
bestmöglichen Fotos damit fabrizierst.
Installation des Lomo LC‑A
Instant Back+
Das Lomo LC‑A Instant Back+ funktioniert sowohl
mit der Lomo LC‑A als auch mit der Lomo LC‑A+. Als
erstes musst du deine Kamera für ihr neues SofortbildRückenteil vorbereiten:
1.Nimm eine Pinzette und schiebe das Leder auf der
rechten Seite der Lomo LC‑A so weit zur Seite, bis
die 4 Schrauben zum Vorschein kommen (siehe
Bild 1).
2.Schraube die 4 Schrauben mithilfe des beigelegten
Schraubenziehers ab [A] (Bild 2).
3.Entferne nun das originale Rückenteil deiner Lomo
LC‑A (Bild 3).
4.Nun nimmst du das beigelegte Scharnier [B] und
schraubst es mittels der 4 beigelegten Schrauben
[C] an die Kamera an (Bilder 4+5).
5.Klebe das Leder wieder an das Gehäuse der Kamera
(Bild 6).
6.Befestige das Instant Back [D] an der Lomo LC‑A.
Die jeweils rechte Seite der Kamera und des Instant
Back rasten mit einem “Klick” ineinander ein (Bild 7).
27
7.Füge nun die Korrekturlinse [E] in die Innenkammer
der Lomo LC‑A ein (die Kamera muss dafür geöffnet
sein). Das längere Ende der Korrekturlinse muss
auf der rechten Seite platziert sein. Sobald du das
Instant Back schließt, ist die Korrekturlinse fixiert
(Bild 8).
8.Schraube den Metallständer [F] in das Stativgewin‑
de auf der Unterseite der Kamera (Bild 9).
9.Schiebe den Sucher-Adapter [G] in den BlitzschuhAnschluss der Kamera und befestige den externen
Sucher [H] (Bild 10).
10.Dein Lomo LC‑A Instant Back+ ist nun einsatzfähig!
Fotos schieSSen
Sobald das Instant Back auf der Lomo LC‑A montiert
und die Korrekturlinse richtig in der Kamera platziert ist,
bist du nur noch wenige Sekunden von deinem ersten
Foto entfernt. Los geht’s:
1.Lege zwei CR2-Batterien (2x3V) in das Batterie‑
fach [I] des Instant Back.
2.Schalte das Lomo LC-A Instant Back+ ein, indem
du den ON/OFF-Schalter [J] auf ON stellst.
3.Lege eine neue Packung Fujifilm Instax Mini Film ein.
4.Drücke den Filmausgabe-Knopf [K] auf dem Instant
Back einmal, um die Schutzfolie des Films auszu‑
werfen.
5.Stelle die Filmempfindlichkeit (ASA-Zahl) [M] auf
deiner Lomo LC‑A auf ASA 200. Dies ist die Stan‑
dardeinstellung, um die schönsten Fotos mit dem
Lomo LC‑A Instant Back+ zu erhalten. Um deine
Fotos ein wenig heller oder dunkler zu gestalten
kannst du die ASA-Zahl höher oder niedriger ein‑
stellen (mehr dazu siehe unten).
28
6.Spanne den Verschluss der Kamera indem du
den MX-Knopf [N] auf der Unterseite der Lomo
LC‑A+ zur Seite schiebst. Falls du eine Lomo LC‑A
benutzt, musst du das Aufziehrädchen [O] auf der
rechten Seite der Kamera bis zum Anschlag drehen.
Da Teile des Instant Back dieses Rädchen etwas
verdecken, kann dies am Anfang etwas schwer fal‑
len. Aber sobald du den Dreh raus hast, ist es ganz
einfach.
7.Stelle die Distanz auf der Kamera ein (mithilfe der
Distanzeinstellungen des Instant Back) und schieße
dein erstes Foto.
8.Drücke den Filmausgabe-Knopf, schnapp dir das
Bildchen und warte bis das Foto komplett entwi‑
ckelt ist. Gratulation zu deinem ersten Lomo LC‑A
Sofortbild!
Distanz einstellen:
Das Lomo LC‑A Instant Back+ und die Korrekturlin‑
se lassen dich außergewöhnlich nahe an dein Motiv
herangehen. Um messerscharfe Aufnahmen zu erzielen
musst du die Distanz auf der Kamera mithilfe der
folgenden Tabelle festlegen (diese ist auch auf dem
Instant Back abgedruckt):
0.8m wird zu 0.55m
1.5m wird zu 0.8m
3m wird zu 1.5m
Für alle Distanzen darüber stelle den Fokus auf
Unendlichkeit
29
Tipps zum Fotografieren
Sämtliche Spezialobjektive der Lomo LC‑A (die WideAngle Lens, Fisheye Lens, Tunnelvision Lens und der
Splitzer) sind mit dem Instant Back kompatibel. Diese
Linsen fabrizieren ziemlich bahnbrechende Fotos, wes‑
wegen du sie auf jeden Fall ausprobieren solltest.
Vergiss nicht, stets die Entfernung mithilfe der Instant
Back-Distanztabelle festzulegen.
Probiere Langzeit- und Mehrfachbelichtungen aus.
Passe die ASA-Einstellungen auf der Kamera an, um
mehr Kontrolle über dein Bild zu erhalten. Für Fotos in
Innenräumen und bei normalem Tageslicht stelle die
Kamera auf ASA 200 (die Standardeinstellung). Falls
du Fotos in sehr hellem Sonnenlicht schießt, stelle die
Kamera auf ASA 400. Wenn du in Umgebungen mit
sehr wenigen Lichtquellen fotografierst (z.B. nachts
auf einer einsamen Landstraße), dann ist ASA 100 die
richtige Wahl.
Beim Fotografieren mit Blitz solltest du aufpassen, dass
der Blitz nicht zu stark ist. Dann werden deine Fotos
nämlich überbelichtet sein. Wenn du die Intensität dei‑
nes Blitzes nicht manuell einstellen kannst, dann decke
ihn am besten mit ein paar Blättern Papier ab, um das
Licht zu dämpfen. Verwende einen Blitz stets in Verbin‑
dung mit dem Blitzschuh-Anschluss der Lomo LC‑A.
Den externen Sucher kannst du am Anschluss auf der
oberen rechten Seite des Instant Back befestigen.
Allerdings belichtet die Lomo LC‑A mittels ihrer Pro‑
grammautomatik ohnehin automatisch, sodass du nicht
wirklich einen Blitz benötigst. Langzeitbelichtungen
funktionieren super in Kombination mit Instax-Film und
sind meistens schöner und natürlicher, als das Ganze
mit einem Blitz künstlich auszuleuchten.
30
Nach dem Fotografieren
Bevor du das Instant Back von der Kamera löst, musst
du alle 10 Fotos der Instax-Packung verschießen.
Schalte den ON/OFF-Schalter auf OFF um Batterien zu
sparen. Nimm die Korrekturlinse aus der Kamera heraus
und verwahre sie an einem sicheren Ort. Entferne die
Batterien aus dem Instant Back, falls du es eine Weile
nicht benutzen wirst. Nochmals: versichere dich, dass
du den Schalter auf OFF gestellt hast, sobald du fertig
bist. Sonst läufst du Gefahr, dass du unabsichtlich den
Filmausgabe-Knopf drückst und so wertvolle Bilder
verloren gehen.
So machst du das Lomo LC‑ARückenteil auswechselbar
Das originale Rückenteil der Lomo LC‑A und das
Instant Back können kinderleicht ausgetauscht werden.
Folge diesen Schritten, um das Lomo LC‑A-Rückenteil
dafür vorzubereiten:
1.Nimm das Rückenteil der Lomo LC‑A und entferne
mit einer Zange den Metallkolben [P], der das
Scharnier [Q] hält (Bild 11).
2.Entferne das Scharnier (Bild 12).
3.Füge den Metallkolben wieder ein (Bild 13).
4.Nun kann das Rückenteil ganz leicht an der Lomo
LC‑A befestigt werden. Du kannst nun ohne Prob‑
leme zwischen dem Rückenteil der Lomo LC‑A und
dem Instant Back wechseln (Bilder 14+15).
31
Filmformat
Das Lomo LC‑A Instant Back+ benutzt Fujifilm Instax
Mini Film. In jeder Packung sind 10 Bilder enthalten.
Du kannst den Film auf www.lomography.com und im
Kamerafachhandel kaufen. Verwende mit dem Lomo
LC‑A Instant Back+ keinen anderen Film als den Fujifilm
Instax Mini Film.
Troubleshooting
Ich drücke den Auslöser der Lomo LC‑A und nichts
passiert!
Benutzt du die Lomo LC‑A+, dann vergewissere
dich, dass du den MX-Knopf [N] auf der Unterseite
der Kamera gedrückt hast. Benutzt du die Lomo
LC‑A, dann drehe das Film-Aufziehrädchen [O] auf
der rechten Seite der Kamera bis zum Anschlag.
Ich habe den Film ausgeworfen und mein Bild ist
komplett schwarz!
Überprüfe die Batterien deiner Lomo LC‑A. Betätige
dafür den Auslöser, schaue durch den Sucher und
prüfe, ob die beiden roten LED-Lämpchen aufleuch‑
ten. Falls keines der beiden Lichter leuchtet, solltest
du die Batterien der Kamera wechseln.
Mein Foto ist total unscharf und verschwommen!
Überprüfe, ob die Korrekturlinse [E] richtig in der
Kamera befestigt ist und du die Entfernung in Ab‑
stimmung mit der Distanztabelle des Instant Back
richtig eingestellt hast.
32
Mein Foto ist ein wenig unter- oder überbelichtet.
Stelle die ASA-Einstellung [M] auf der Kamera auf
ASA 100, um länger zu belichten und ein helleres
Bild zu bekommen. Stelle die Kamera auf ASA 400,
um ein dunkleres Bild zu erhalten.
Ich habe ein Foto gemacht während das Instant Back
ausgeschaltet war. Habe ich nun ein Foto geschossen
oder nicht?
Ja. Die Aufnahme wartet auf dich innerhalb des
Instant Back. Schalte das Instant Back auf ON,
drücke den Filmauswerf-Knopf und sag hallo zu
deinem Foto.
Ich ziehe den Filmrückspulknopf in die Höhe, aber das
Instant Back lässt sich nicht entfernen.
Um das Instant Back zu entfernen, musst du auch
den Metallständer auf der Unterseite der Kamera
abschrauben.
Ich schaffe es nicht, den Metallkolben des Lomo LC‑ARückenteils zu entfernen.
Benutze dafür eine Zange und versuche, den Kol‑
ben zu drehen während du ihn herausziehst. Mit ein
bisschen Geduld wird das schon klappen.
Mein Blitz funktioniert nicht auf dem Instant Back!
Du musst den Blitz an den Blitzschuh-Anschluss
der Kamera anschließen. Die Anschlüsse auf dem
Instant Back sind nur zur Befestigung des externen
Suchers geeignet.
Der Filmzähler auf der Lomo LC‑A bewegt sich nicht!
Natürlich nicht. Dieser Filmzähler ist nur für 35mmFilm und nicht für Instax Mini-Film. Benutze den
Filmzähler [R] auf dem Instant Back, um zu sehen,
wieviele Sofortbilder du schon geschossen hast.
33
Kann ich das Instant Back mit meiner originalen Lomo
LC‑A benutzen?
Ja! Allerdings wurde das Lomo LC‑A Instant Back
nicht speziell für diese Kamera entworfen. Da diese
keinen MX-Knopf hat, musst du den Auslöser
spannen indem du das Aufziehrädchen drehst.
Mehrfachbelichtungen in Kombination mit dem
Instant Back funktionieren allerdings nur mit der
Lomo LC‑A+.
Reinigung & Garantie
Reinige die Linsen nur mit einer speziellen Reinigungs‑
lösung und einem weichen Tuch. Die Korrekturlinse
niemals gewaltsam aufsetzen oder abnehmen, da sie
dabei kaputt gehen könnte. Achte darauf, die Korrek‑
turlinse abzudecken, wenn du sie nicht benutzt. Dein
Lomo LC‑A Instant Back+ hat eine 2-jährige Garantie
auf Produktionsfehler. Im Falle eines Defekts repariert
oder ersetzt die Lomographische Gesellschaft den
Artikel nach eigenem Ermessen. Im Garantiefall wende
dich bitte an die nächste Lomographische Botschaft.
34
Instructions d’utilisation
Nous vous félicitons pour l’achat de votre Lomo LC‑A
Instant Back+ ! En l’associant à votre Lomo LC‑A vous
obtiendrez le premier système amateur de photogra‑
phie au monde qui dispose de réglages d’exposition
longue et multiple ainsi qu’une gamme d’accessoi‑
res totalement expansible. Merci de bien vouloir lire
attentivement ce livret d’utilisation afin de vous assurer
que votre Instant Back est assemblé correctement et
que vous puissiez ainsi en tirer les meilleures photos
possibles.
Assemblage du Lomo LC‑A Instant
Back+
Le Lomo LC‑A Instant Back+ fonctionne avec le Lomo
LC‑A et le Lomo LC‑A+. La première chose à faire est
de préparer votre appareil photo à endosser ses nou‑
veaux habits de lumière :
1.Munissez-vous d’une pince à épiler et retirez minu‑
tieusement le cuir se situant sur la droite de votre
Lomo LC‑A (image 1). Otez le cuir jusqu’à ce que
vous aperceviez les 4 vis qui maintiennent la trappe
arrière.
2.Enlevez les 4 vis en utilisant le tournevis fourni [A]
(image 2).
3.Veuillez retirer la trappe arrière originale de votre
Lomo LC‑A (image 3).
4.Maintenant, munissez-vous de la charnière qui est
incluse dans la boite [B], et fixez-la sur l’appareil
photo à l’aide des 4 vis [C] (images 4+5).
5.Recollez le cuir sur l’appareil (image 6).
6.Fixez l’Instant Back [D] sur le Lomo LC‑A. Veuillez
commencer par la droite et mettez en place l’Instant
35
Back en le faisant cliquer dans sa position définitive
(image 7).
7.En laissant la trappe arrière du Lomo LC‑A ouverte,
veuillez insérer la lentille de correction [E] dans la
chambre située en haut à droite de l’objectif réel de
l’appareil. Le long anneau de la lentille de correction
doit se situer impérativement sur la droite. Veuillez
refermer la trappe, celle-ci servira à maintenir la
lentille de correction dans sa position définitive
(image 8).
8.Veuillez visser le support en métal [F] dans le pas
de vis servant à fixer le trépied à l’appareil photo
(image 9).
9.Faites glisser l’adaptateur “ cold shoe ” [G] dans le
“ hot shoe ” du Lomo LC‑A et fixez ainsi le viseur
externe [H] (image 10).
10.Votre Lomo LC‑A Instant Back+ est prêt à l’emploi !
Prendre des photos
L’Instant Back est en position et la lentille de correction
a été installée avec succès ? Alors vous n’êtes plus
qu’à quelques secondes de votre premier cliché. Et
voici la façon pour procéder :
36
1.Insérez deux piles de type CR2 (2x3V) dans le com‑
partiment prévu à cet effet dans l’Instant Back [I].
2.Mettez en route le Lomo LC‑A Instant Back+ en
positionnant le bouton on/off [J] sur ON.
3.Insérez une pellicule Fujifilm Instax Mini neuve.
4.Appuyez une fois sur le bouton d’éjection [K] de la
pellicule afin de faire rentrer la protection en plasti‑
que noire à l’intérieur de l’emballage de la pellicule.
5.Veuillez positionner le réglage ASA [M]de votre
Lomo LC‑A sur ASA 200. L’ASA 200 est le réglage
standard pour utiliser le Lomo LC‑A Instant Back+.
Afin d’obtenir une image plus claire ou plus foncée,
veuillez ajuster le réglage ASA à une valeur supé‑
rieure ou inférieure.
6.Veuillez armer le déclencheur de l’appareil en
tirant sur la mollette MX [M] qui se trouve sous le
dessous du Lomo LC‑A+. Si vous utilisez un Lomo
LC‑A, vous devez simplement – comme vous le
faites d’habitude – embobiner le film manuellement
pour chaque prise de vue en utilisant la mollette
prévue [O] à cet effet. Ca peut se révéler de temps
à autre délicat car l’Instant Back couvre en partie la
mollette. Mais avec un peu d’entraînement cela peut
devenir un exercice agréable.
7.Réglez la mise au point (en respectant le tableau
des distances de l’Instant Back) et prenez la photo.
8.Appuyez sur le bouton d’éjection de la pellicule,
prenez la photo et attendez qu’elle soit complète‑
ment exposée. Félicitations, vous venez de prendre
votre première photographie instantanée Lomo LC !
Mise au point
Le Lomo LC‑A Instant Back+ associé à sa lentille de
correction vous permettent d’aller au plus proche de
vos sujets. Pour des clichés plus clair que l’éclair, vous
devez régler la mise au point de votre Lomo LC‑A
en suivant le tableau ci-joint (celui-ci est également
imprimé sur l’Instant Back) :
0,8m corresponde à 0,55m
1,5m correspondent à 0,8m
3m correspondent à 1.5m
Pour tout ce qui se situe au dessus, veuillez régler
sur “ infini ”
37
Trucs et astuces
Les accessoires Lomo LC‑A (objectifs à grand-angle,
Fisheye, Tunnnelvision et Splitzer) sont entièrement
compatibles avec l’Instant Back. C’est la crème de la
crème à combiner avec votre Instant Back. Alors n’hé‑
sitez pas à les tester !
N’oubliez-pas de régler la distance de prise de vue
en concordance avec le tableau de distance fourni
avec l’Instant Back. Si vous prenez des clichés avec
l’objectif grand-angle, veuillez vous baser alors sur les
distances de l’objectif traditionnel.
N’hésitez-pas à essayer les expositions multiples et
longues.
Ajustez le réglage ASA sur votre appareil afin de contrô‑
ler au mieux la qualité de vos images. Pour les clichés
effectués en intérieur ou par temps clair, veuillez régler
l’ASA sur 200 (réglage standard). Pour des clichés par
temps très ensoleillé, veuillez ajuster le réglage sur
ASA400, pour des clichés en extérieur et de nuit ou
dans des environnements disposant de peu de lumino‑
sité, veuillez-vous positionner sur ASA100.
Si vous utilisez un flash, assurez-vous qu’il ne soit pas
trop puissant car il risque de surexposer votre photo.
Si vous ne pouvez ajuster l’intensité de votre flash,
vous pouvez le couvrir avec quelques feuilles de papier
blanc. Vous pouvez fixer un flash sur le Lomo LC‑A en
utilisant le “ hot shoe ”. Vous pouvez également ajouter
le viseur en le fixant au “ cold shoe ” qui se trouve sur
l’Instant Back (sur la droite de celui-ci).
Cependant, veuillez noter que le réglage automatique
d’exposition du Lomo LC‑A mesure avec exactitude
l’intensité de la lumière et de ce fait il n’est pas réel‑
lement nécessaire d’utiliser un flash. Les expositions
longues disposent d’un rendu exceptionnel avec les
pellicules Instax, alors n’hésitez pas à les tester !
38
Après les prises de vue
Vous devez impérativement terminer la pellicule Instax
avant de pouvoir retirer l’Instant Back. Veuillez position‑
ner le bouton d’alimentation sur OFF afin d’économiser
vos batteries. Retirez la lentille de correction de votre
appareil photo, et placez-la dans un endroit sur. Si
vous ne comptez pas utiliser le Back avant un petit
moment, veuillez retirer les batteries afin de conser‑
ver leur fraicheur. Assurez-vous une nouvelle fois que
l’alimentation a été coupée (OFF) une fois que vous
avez terminé. En effet, il se pourrait que la pellicule soit
éjectée accidentellement si vous placez l’appareil sur
une table ou dans un sac.
Rendre interchangeable la trappe
arrière originale de votre Lomo
LC‑A
La trappe arrière originale de votre Lomo LC‑A et
l’Instant Back peuvent être remplacés en l’espace
de quelques secondes. Afin de préparer votre trappe
arrière à un changement rapide, merci de bien vouloir
respecter les étapes suivantes :
1.Veuillez saisir la trappe arrière du Lomo LC‑A et
utilisez une pince afin de retirer la barrette en métal
[P] qui maintient l’articulation de la trappe [Q] en
place (image 1).
2.Retirez l’articulation de la porte (image 12).
3.Réinsérez la barrette en métal (image 13).
4.La trappe arrière de l’appareil photo peut main‑
tenant être fixée facilement à votre Lomo LC‑A et
ainsi s’interchanger avec le Lomo LC‑A Instant
Back+ (images 14+15).
39
Format de la pellicule
Le Lomo LC‑A Instant Back+ s’utilise avec une pellicule
Fujifilm Instax Mini. 10 clichés sont inclus par embal‑
lage. Cette pellicule est disponible à l’achat sur www.
lomography.com et chez la plupart des grands distribu‑
teurs photo. N’essayez pas d’insérer une autre pellicule
photo que le Fujifilm Instax Mini dans votre Lomo LC‑A
Instant Back+.
Dépannage
J’ai appuyé sur le déclencheur du Lomo LC‑A et il n’y a
aucune réaction !
Si vous utilisez le Lomo LC‑A+, veuillez verifier
que vous avez bien armé le déclencheur en tirant
sur le bouton MX [N] qui se trouve en dessous de
l’appareil. Si vous utilisez le Lomo LC‑A, veuillez
embobiner la pellicule en utilisant la mollette se
trouvant [O] sur le côté droit de l’appareil.
J’ai éjecté la pellicule et mes clichés sont complète‑
ment noirs !
Vérifiez les batteries de votre Lomo LC‑A. Pour ce
faire, veuillez appuyer sur le déclencheur, et regar‑
dez si les deux LED qui se trouvent à l’intérieur du
viseur sont allumées. Si aucune des deux ne l’est,
vous devriez changer les batteries.
Mes images sont complètement floues ou sans mise
au point !
Vérifiez si la lentille de correction [E] a été position‑
née et installée correctement. Veuillez ensuite régler
correctement la mise au point de l’appareil photo.
40
Mes images sont légèrement sous ou surexposées.
Essayez de régler l’ASA [M] de votre appareil sur
100 et prenez de nouvelles photos afin d’obtenir
des clichés plus clairs. Veuillez régler l’ASA sur 400
afin d’obtenir des images plus sombre.
J’ai pris une photo, mais l’Instant Back était éteint
(position sur OFF). La photo a t’elle quand même été
prise ?
Oui. La photo n’attend plus que vous dans l’Instant
Back. Veuillez tout simplement allumer l’Instant
Back (position sur ON), appuyez ensuite sur le
bouton afin d’éjecter votre chef d’oeuvre.
Je n’arrive pas à retirer la trappe arrière en actionnant le
bouton pour rembobiner la pellicule sur mon Lomo LC‑A!
N’oubliez pas de dévisser la barrette en métal avant
de vouloir enlever la trappe arrière de votre appareil.
Je n’arrive pas à retirer l’articulation de la porte sur la
trappe arrière originale de mon Lomo LC‑A.
Utilisez une pince à épiler et faites tourner l’articula‑
tion tout en la retirant délicatement. Avec un peu de
patience, cela devrait fonctionner.
Mon flash ne fonctionne pas sur l’Instant Back !
Insérez votre flash sur le “ hot shoe ” original de
l’appareil photo. À l’inverse, le “ cold shoe ” de l’Ins‑
tant Back ne doit être utilisé que pour pouvoir fixer
le viseur externe et ne fonctionne pas avec le flash.
Le compteur de prises de vue sur le Lomo LC‑A ne
défile pas !
Bien entendu il ne défile pas. Celui-ci est prévu
pour fonctionner uniquement avec les pellicules de
35mm et non pour les films Instax Mini. Afin de voir
le nombre de cliché déjà pris, veuillez consulter le
compteur [R] qui se situe sur l’Instant Back.
41
Puis-je utiliser l’Instant Back sur mon Lomo LC‑A
original ?
Oui. Cependant, veuillez noter que le Lomo LC‑A
Instant Back+ n’a pas été développé spécifique‑
ment pour fonctionner avec le Lomo LC‑A original.
En effet, il ne dispose pas du bouton MX, et vous
devez ainsi embobiner manuellement la pellicule en
utilisant la mollette qui est partiellement recouverte
par l’Instant Back. Les expositions multiples instan‑
tanées ne sont possibles qu’avec le Lomo LC‑A+.
Garantie & soin
Veuillez nettoyer la lentille uniquement avec une solu‑
tion de nettoyage et un chiffon doux appropriés. Ne for‑
cez jamais sur la lentille ou sur son support, car ceux-ci
pourraient se briser. Veuillez protéger la lentille si vous
ne vous en servez pas. Votre Lomo LC‑A Instant Back+
dispose d’une garantie de 2 ans contre tous les vices
de fabrication. Dans le cas d’un vice, la Lomographic
Society s’engage à réparer ou à remplacer l’objet à sa
seule discrétion. Pour faire jouer votre garantie, merci
de prendre contact avec le réprésentant Lomo le plus
proche de votre domicile.
42
Instrucciones de uso
¡Le felicitamos por la compra del Lomo LC-A Instant
Back+! Acoplado a tu Lomo LC-A es el primer pro‑
grama amateur automático mundial con sistema de
fotografía instantánea con ajustes de larga y múltiple
exposición y una completa y extensa variedad de
accesorios. Por favor, lee el siguiente manual aten‑
tamente para estar seguro de que instalas tu Instant
Back correctamente y puedas obtener las fotos más
impresionantes con él.
Instalación del Lomo LC-A Instant
Back+
El Lomo LC-A Instant Back+ funciona tanto con el
Lomo LC-A como con el Lomo LC-A+. Primero necesi‑
tarás preparar tu cámara para su nueva prenda.
1 Toma un par de tenazas y quita el cuero del lado
derecho de tu Lomo LC-A (imagen 1). Sepáralo has‑
ta que veas las 4 roscas que fijan la tapa trasera.
2.Desatornilla los 4 tornillos usando el desatornillador
incluido [A] (imagen 2).
3.Quita la tapa trasera original de la Lomo LC-A
(imagen 3).
4.Ahora toma la bisagra incluida [B] y atorníllala en la
cámara con los 4 tornillos incluidos [C] (imágenes 4
y 5).
5.Pega el cuero de nuevo (imagen 6).
6.Acopla el Instant Back (D) a la Lomo LC-A. Empieza
por el lado derecho y coloca el Instant back en su
lugar (imagen 7).
7.Con la parte de atrás de la Lomo LC-A abierto,
coloca la lente de corrección [E] en la cámara arriba
a la derecha de la cámara real de la lente. La larga
43
abertura de la lente de corrección necesita estar en
el lado correcto (imagen 8).
8.Atornilla el soporte de metal [F] en la rosca de mon‑
tura del trípode de la cámara (imagen 9).
9.Desliza el adaptador de la zapata [G] en la zapata
de la Lomo LC-A y acopla el visor [H] (imagen 10).
10.¡Tu Lomo LC-A Instant Back+ está lista para sonar!
Hacer fotos
Con el Instant Back en su lugar y la lente de corrección
colocada apropiadamente sólo necesitas unos segun‑
dos para hacer tu primera foto. ¡Allá vamos!
44
1.Coloca dos pilas CR2 (2x3V) en el compartimento
de baterías del Instant Back [I].
2.Enciende la Lomo LC-A Instant Back+ colocando el
interruptor on/off [J] en ON.
3.Coloca un nuevo carrete Fujifilm Instax Mini.
4.Aprieta una vez el botón de expulsión [K] del carrete
para quitar la protección oscura de la diapositiva
dentro del paquete de la película.
5.Ajusta el ASA de tu Lomo LC-A a 200 ASA. Éste es
el ajuste estándar para usar el Lomo LC-A Instant
Back+. Para aclarar u oscurecer tu fotografía pue‑
des ajustar el ASA a niveles superiores o inferiores.
6.Monta el obturador de la cámara tirando del inte‑
rruptor [N] que hay en la parte inferior de la Lomo
LC-A+. Si estás usando una Lomo LC-A necesita‑
rás (como haces para hacer la foto normalmente)
bobinar manualmente el carrete para avanzar la
película [O] después de cada fotografía. Esto puede
ser un poco difícil si una parte del Instant Back está
cubriendo la bobina. Pero con un poco de práctica
será un agradable ejercicio.
7.Enfoca (de acuerdo al cuadro de distancias del
Instant Back) y dispara.
8.Aprieta el botón de expulsión del carrete, agarra
la fotografía y espera hasta que esté totalmente
expuesta. ¡Felicidades por tu primera fotografía
instantánea de tu Lomo LC-A!
Enfocar
El Lomo LC-A Instant Back+ y su lente de corrección
te permiten acercarte mucho a los objetos de tus
fotografías. Para poder hacer fotos extremadamente
nítidas necesitarás colocar el foco de tu Lomo LC-A de
acuerdo a la siguiente tabla:
0.8m se convierten en 0.55m
1.5m se convierten en 08m
3m se convierten en 1.5m
Para cualquier otra cosa, poner en infinito
Trucos para hacer fotos
Los accesorios de la Lomo LC-A (gran angular, de ojo
de pez, de visión de túnel y de objetivo partido) son to‑
talmente compatibles con el Instant Back. Son lo mejor
en combinación con el Instant Back. ¡Ve y pruébalos!
No te olvides de poner la distancia en relación con la
tabla de distancias del Instant Back. Para hacer fotos
con el gran angular enfoca de acuerdo a las especifica‑
ciones de distancia del objetivo.
Usa exposiciones largas y múltiples.
Ajusta el ASA de la cámara para tener más control so‑
bre las fotografías. Para fotografías de interior o de luz
diurna normal, coloca el ASA en 200 (ajuste normal). Si
estás fuera y hay mucha luz coloca el ASA en 400 y si
estás fuera por la noche o en situaciones de poca luz,
45
coloca el ASA en 100.
Cuando uses flash asegúrate de que no sea muy
potente para no sobreexponer tus fotografías. Si no
puedes ajustar la intensidad del flash puedes cubrirlo
con una hoja de papel. Para usar el flash colócalo en la
zapata de la Lomo LC-A mientras usas el visor externo
por la zapata del Instant Back en el lado derecho.
De todas formas los ajustes de exposición automática
de la Lomo LC-A permiten siempre mediciones correc‑
tas de la luz así que no necesitarás un flash. Exposicio‑
nes prolongadas funcionan de maravilla con películas
Instax y deberías probarlas definitivamente.
Después de hacer fotos
Necesitarás terminar el carrete entero de la película
Instax antes de poder quitar el Instant Back. Pon el
interruptor en OFF para mantener tus pilas. Quita el
objetivo de corrección de tu cámara y guárdalo en
un lugar seguro. Si no vas a usar el Back durante un
tiempo, quita también las pilas y guárdalas en un sitio
lo más fresco posible. De nuevo, asegúrate de que el
interruptor principal está en OFF después de haber
terminado. De lo contrario el carrete podría ser expul‑
sado accidentalmente al dejar la cámara en una mesa o
meterla en una bolsa.
Hacer tu tapa trasera original
Lomo LC-A intercambiable
La tapa trasera original de la Lomo LC-A y el Instant
Back pueden ser cambiados en segundos. Para dejar
tu tapa trasera lista para un rápido intercambio sigue
estos pasos:
46
1.Toma la tapa trasera de la Lomo LC-A y usa los
alicates para quitar el clavo de metal [P] que sujeta
la unión de la puerta [Q] (imagen 11).
2.Quita la unión de la puerta (imagen 12).
3.Pon de nuevo el clavo de metal (imagen 13).
4.Ahora la tapa trasera de tu cámara puede ser acop‑
lada fácilmente a la Lomo LC-A y es completamente
intercambiable con el Lomo LC-A Instant Back+
(imágenes 14+15).
Tipo de película
Lomo LC-A Instant Back+ usa una película Fujifilm
Instax Mini. En cada carrete vienen 10 fotografías. La
película está disponible para su compra en www.lomo‑
graphy.com y en la mayoría de las tiendas de fotografía.
No intentes cargar la Lomo LC-A Instant Back+ con
otra película que no sea la Fujifilm Instax Mini.
Problemas al hacer fotos
¡Presiono el obturador de la Lomo LC-A y no responde!
Si estás usando la Lomo LC-A+ comprueba si no
has montado el obturador al estirar el interruptor
MX [N] en la parte de debajo de la cámara. Si estás
usando una Lomo LC-A bobina la película [O] con la
bobina al lado derecho de la cámara.
¡He expulsado el carrete y mi fotografía está completa‑
mente negra!
Comprueba las baterías de tu Lomo LC-A. Aprieta
el obturador y mira si las dos LEDs dentro del visor
de la cámara están iluminadas. Si no hay al menos
una iluminada deberías cambiar tus pilas.
47
¡Mi fotografía está completamente borrosa y desenfocada!
Comprueba que tienes instalada correctamente
la lente de corrección [E] y ajusta el objetivo de la
cámara.
Mi fotografía está ligeramente sub- o sobreexpuesta.
Intenta poner el círculo indicador del ASA [M] de la
cámara en 100 y haz la foto de nuevo a ver si la foto
tiene más luz. Pon el círculo indicador del ASA en
400 para obtener una fotografía más oscura.
He hecho una foto pero el Instant Back estaba en OFF.
¿He hecho la foto o no?
Sí. La fotografía está esperándote dentro del Instant
Back. Pon el interruptor del Instant Back en On,
aprieta el botón y expulsa tu obra maestra.
¡No puedo quitar la parte de atrás estirando de la
palanca de rebobinado de mi Lomo LC-A!
No te olvides de desenroscar el soporte de metal
antes de quitar la parte de atrás.
No puedo quitar el clavo de sujeción de la puerta de la
tapa lateral original de mi Lomo LC-A.
Intenta usar alicantes y gira el clavo mientras lo
quitas. Con un poco de paciencia funcionará.
¡Mi flash no funciona en el Instant Back!
Pon tu flash en la zapata original de la cámara. La
zapata del Instant Back es sólo para poner el visor
externo y no funciona con un flash.
48
¡El contador de fotografías de la Lomo LC-A no gira!
Por supuesto que no. Sólo funciona con un carrete
de 35mm y no funcionará con uno Instax Mini. Por
favor, mira el contador [R] del Instant Back para tus
fotos.
¿Puedo usar el Instant Back con mi Lomo LC-A original?
Sí. Por supuesto, el Lomo LC-A Instant Back+ no ha
sido diseñado específicamente para usarlo con una
Lomo LC-A original. Así que como no hay un botón
MX necesitarás avanzar manualmente la película
con la bobina que está parcialmente cubierta con el
Instant Back. Las exposiciones múltiples sólo serán
posibles con una Lomo LC-A+.
Cuidado y garantía
Limpia las lentes sólo con soluciones apropiadas para
lentes y un paño suave. Nunca fuerces las lentes ni los
objetivos pues se pueden romper. Si no los vas a usar,
asegúrate de guardarlos bien y de cubrir las lentes. Tu
Lomo LC-A Instant Back+ incluye 2 años de garantía
para defectos de fábrica. En caso de tener un defecto,
la Lomographic Society lo reparará o remplazará la
parte a su discreción. Para el servicio de garantía, por
favor, ponte en contacto con tu ofician de Lomographic
más cercana.
49
Instruzioni per l’uso
Complimenti per aver acquistato il dorso Instant Back+
per Lomo LC-A! Questo dispositivo è il primo sistema
fotografico istantaneo ed automatico amatoriale al
mondo e dispone di modalità per esposizioni lunghe e
multiple e di una vasta gamma di accessori. Si consiglia
un’attenta lettura del presente manuale d’istruzioni per
accertarsi che l’installazione del dorso Instant Back+
sia corretta per realizzare con esso incredibili fotografie.
Installazione del dorso Instant
Back+ per Lomo LC-A
Il dorso Instant Back+ è compatibile con le fotocamere
Lomo LC-A e Lomo LC-A+. Innanzitutto, preparate la
vostra fotocamera per la sua nuova veste istantanea:
52
1.Con un paio di pinzette sollevate il rivestimento in
pelle sul lato destro della vostra Lomo LC-A (figura 1).
Rimuovetelo finché le quatto viti che fissano lo
sportellino posteriore non saranno visibili.
2.Svitate le quattro viti utilizzando l’apposito cacciavi‑
te compreso nella confezione [A] (figura 2).
3.Rimuovete lo sportellino posteriore originale dalla
vostra fotocamera Lomo LC-A (figura 3).
4.Ora prendete il cardine incluso nella confezione [B]
ed assicuratelo alla fotocamera con le quattro viti
appositamente fornite [C] (immagini 4 e 5).
5.Riposizionate il rivestimento in pelle fissandolo con
della colla (figura 6).
6.Agganciate il dorso Instant Back [D] alla Lomo LC-A.
Cominciate dalla parte destra ed assicuratevi che si
posizioni fermamente con uno scatto (figura 7).
7.Tenendo aperta la parte posteriore della LC-A, inse‑
rite la lente di correzione [E] nell’apposito alloggia‑
mento sopra l’obiettivo della fotocamera. Il prolun‑
gamento della lente di correzione deve trovarsi sul
lato destro. Chiudendo il dorso la lente di correzione
si posizionerà in maniera stabile (figura 8).
8.Avvitate il supporto metallico [F] nell’apposito attac‑
co per treppiede (figura 9).
9.Inserite l’adattatore cold shoe [G] sull’hot shoe della
Lomo LC-A ed agganciate il mirino [H] (figura 10).
10.Il vostro dorso Instant Back+ è pronto all’azione!
Realizzazione di istantanee
Una volta collocato il dorso Instant Back e la lente di
correzione siete pronti a scattare la vostra prima foto‑
grafia. Ecco come fare:
1.Inserite due pile CR2 da 3 volt nell’apposito vano
batterie [I] del dorso Instant Back.
2.Accendete il dorso Instant Back+ posizionando il
pulsante di accensione [J] su ON.
3.Inserite una nuova pellicola Fujifilm Instax Mini.
4.Premete il pulsante di espulsione [K] una volta per
far fuoriuscire la diapositiva nera di protezione della
pellicola.
5.Impostate gli ASA a 200: questo è il valore standard per
l’utilizzo del dorso Instant Back+ con la Lomo LC-A.
Tuttavia, per rendere le vostre immagini più o meno
luminose potete aumentare o ridurre il valore impostato.
6.Alzate l’otturatore tirando la levetta MX [N] situ‑
ata alla base della Lomo LC-A+. Se utilizzare una
Lomo LC-A ruotate, come al solito, il rocchetto di
avanzamento [O] manuale della pellicola prima di
ogni scatto. Questa operazione potrebbe risultare
più complessa poiché il dorso Instant Back copre
parzialmente il rocchetto ma, una volta presa la
mano, non sarà certamente un problema.
53
7.Mettere a fuoco seguendo le indicazioni fornite dalla
tabella delle distanze del dorso Instant Back e scattate.
8.Premete il bottone di espulsione, estraete la
fotografia ed aspettate che sia completamente
esposta. Congratulazioni, avete realizzato la vostra
prima istantanea con Lomo LC-A!
Messa a fuoco
Grazie al dorso Instant Back+ per Lomo LC-A e alla
lente di correzione potrete avvicinarvi molto ai vostri
soggetti. Per una messa a fuoco impeccabile seguite le
seguenti indicazioni (presenti anche sul dorso Instant
Back):
0,8m diventano 0,55 m
1,5m diventano 0,8 m
3m diventano 1,5 m
Per distanza superiori utilizzare l’impostazione
“infinity”
Suggerimenti
Gli accessori Lomography per LC-A (obiettivi grandan‑
golari, Fisheye, Tunnelvision e Splitzer) sono perfetta‑
mente compatibili e danno ottimi risultati con il dorso
Instant Back. Provateli anche voi!
Non dimenticate di impostare la distanza secondo i
valori indicati dall’apposita tabella per il dorso Instant
Back. Per scatti con il grandangolo seguite le imposta‑
zioni della distanza specifiche per questo obiettivo.
Provate ad effettuare esposizioni lunghe e multiple.
Per un maggiore controllo sulle vostre immagini
54
impostate gli ASA. Per scatti al chiuso e in condizioni
normali di luminosità si consiglia di impostare un valore
di 200 ASA (impostazione standard). Per spazi esterni e
con forte illuminazione si consiglia un valore di 400 ASA
mentre per scatti notturni o con luce scarsa il valore
raccomandato è di 100 ASA.
Accertatevi, quando utilizzare il flash, che esso non
emetta una luce troppo forte altrimenti le vostre imma‑
gini potrebbero risultare sovraesposte. Se l’intensità
della luce non è regolabile, coprite il flash con dei fogli
di carta. Per utilizzare il flash inseritelo nell’attacco hot
shoe della Lomo LC-A mentre il mirino esterno andrà
agganciato all’attacco cold shoe sulla destra del dorso
Instant Back.
Si noti, tuttavia, che il dispositivo di impostazione
automatica dell’esposizione della Lomo LC-A misura
sempre correttamente la quantità di luce senza che
vi sia, quindi, un reale bisogno di utilizzare il flash. Le
esposizioni lunghe con pellicola Instax possono produr‑
re dei veri capolavori: provate anche voi.
Dopo aver scattato
Prima di poter rimuovere il dorso Instant Back dovrete
aver terminato la pellicola Instax. Spegnete la fotoca‑
mera per non consumare le batterie. Estraete la lente
correttiva dalla fotocamera e conservatela in un luogo
sicuro. Se pensate di lasciare il dorso inutilizzato a lun‑
go rimuovete le batterie perché restino ben funzionanti.
Una volta finito, accertatevi ancora che il pulsante di
accensione sia posizionato su OFF altrimenti la pellicola
rischierebbe di essere accidentalmente espulsa quando
la fotocamera viene collocata sopra un tavolo o in una
borsa.
55
Sostituzione dello sportellino
posteriore originale della Lomo LC-A
Lo sportellino posteriore originale e il dorso Instant
Back possono essere sostituiti nel giro di qualche se‑
condo. Preparatevi a rimuovere lo sportellino posteriore
in poche semplici mosse:
1.Utilizzando un paio di pinzette rimuovete il perno
metallico [P] che fissa la giuntura dello sportello
posteriore [Q] della Lomo LC-A (figura 11).
2.Rimuovete la giuntura dello sportello (figura 12).
3.Reinserite il perno metallico (figura 13).
4.Ora potete facilmente fissare lo sportello posteriore
alla Lomo LC-A sostituendo il dorso Instant Back+
(figure 14 e 15).
Formato della pellicola
Il dorso Instant Back+ per Lomo LC-A è compatibile con
pellicola Fujifilm Instax Mini. Dieci scatti sono inclusi
in ogni confezione. Per acquistare questa pellicola
consultare il sito www.lomography.com o rivolgetevi ai
maggiori rivenditori di materiale fotografico. Non cercare
di inserire una pellicola diversa nel dorso Instant Back+.
Risoluzione dei problemi
56
Ho premuto l’otturatore della Lomo LC-A ma non è
successo niente!
Se si sta usando una LC-A+ verificare di aver
sollevato l’otturatore tirando la leva MX [N] collocata
alla base della fotocamera. Con la LC-A, invece, far
avanzare il rocchetto della pellicola [O] sulla destra
della fotocamera.
Ho espulso la pellicola e l’immagine che ho ottenuto è
completamente nera.
Controllate che le batterie della LC-A siano funzio‑
nanti. Premete l’otturatore e verificate che i due LED
nel mirino siano illuminati. Se almeno una delle due
spie non è illuminata le pile vanno cambiate.
Le mie immagini sono completamente sfuocate e
mosse!
Verificate di aver installato correttamente la lente di
correzione [E] e di aver impostato adeguatamente la
messa a fuoco della fotocamera.
Le mie immagini risultano leggermente sovraesposte o
sottoesposte.
Provate ad impostare il valore degli ASA [M] su 100
per ottenere un’immagine più luminosa e scattate
nuovamente. Per istantanee più scure impostate gli
ASA su 400.
Ho scattato un’istantanea con il dorso Instant Back
spento. Ho effettivamente fatto la foto o no?
Sì, l’istantanea vi aspetta nel dorso Instant Back.
Accendete il dorso e premete il pulsante di espul‑
sione per estrarre il vostro capolavoro.
Non riesco ad estrarre il dorso sollevando la manovella
di riavvolgimento della LC-A!
Non dimenticate di svitare il supporto metallico
prima di estrarre il dorso.
Non riesco ad estrarre il perno metallico dal giunto dello
sportellino posteriore originale della Lomo LC-A.
Provate a ruotare il perno mentre lo estraete con
delle pinzette, con un po’ di pazienza dovreste
avere successo.
57
Il mio flash non funziona sul dorso Instant Back!
Inserite il flash nell’attacco hot shoe originale della
fotocamera. Il cosiddetto attacco “cold shoe” del
dorso serve ad attaccare solamente il mirino ester‑
no e non è adatto al flash.
L’indicatore contascatti sulla Lomo LC-A non gira!
Ovvio, è fatto solo per pellicola da 35 mm e non per
la Instax Mini. Per contare gli scatti fate riferimento
all’apposito indicatore [R] sul dorso Instant Back.
Posso usare il dorso Instant Back con la mia Lomo
LC-A originale?
Sì, ma il dorso Instant Back+ non è stato progettato
specificamente per essere usato con la LC-A. Sic‑
come quest’ultima non dispone di una levetta MX,
dovrete ruotare manualmente il rocchetto di avanza‑
mento della pellicola che risulterà in parte coperto
dal dorso Instant Back. Le esposizioni multiple
Instant possono essere realizzate esclusivamente
con la Lomo LC-A+.
Manutenzione e garanzia
Per la pulizia delle lenti utilizzare esclusivamente un’ap‑
posita soluzione detergente e un panno morbido. Non
esercitare una pressione eccessiva quando si posiziona
o si rimuove la lente dall’apposito supporto altrimenti
essa potrebbe rompersi. Coprire le lenti quando non
si utilizzano. Il dorso Instant Back+ per Lomo LC-A ha
due anni di garanzia contro i difetti di fabbricazione. In
caso di difetto, la Lomographic Society provvederà a
riparare o sostituire, a propria discrezione, l’articolo in
questione. Contattare la sede di Lomography più vicina
per usufruire del servizio di garanzia.
58
59
60
61
62
63
64
65
68
69
70
71
72
73
74
75
76
77
78
79
80
Join the Lomographic Community at
www.lomography.com
www.lomography.jp
www.lomographyasia.com
www.lomography.co.kr
www.lomography.cn
and dive into a world of millions of pictures.
LOMOGRAPHIC SOCIETY OFFICES
EUROPE
Lomographic Society Intl.
Hollergasse 41
A-1150 Vienna
T: +43-1-89944 0
F: +43-1-89944 22
[email protected]
JAPAN
Lomographic Society Japan
4-24-8 Minamiaoyama, 3F
Minato-ku, Tokyo, 107-0062
T: +81-3-6418 7867
F: +81-3-6418 7893
[email protected]
USA
Lomographic Society USA
41W 8th street
New York, NY 10011
T: +1-212-529 43 53
F: +1-212-529 43 60
[email protected]
HONG KONG
Lomographic Society Asia Pacific
G/F No.2, Po Yan Street, Sheung Wan
Hong Kong
T: +852-2525 5417
F: +852-2525 5467
[email protected]
KOREA
Lomographic Society Korea
1F 362-14, Seogyo-dong Mapo-gu
121-838 Seoul, South Korea
T: +82-2-522 0255
F: +82-2-523 0255
www.lomography.co.kr
www.lomography.com