1
CPAP 20e
CLICK 2
CPAP unit
Aparato CPAP
CPAP 20e
WM 27320
CLICK 2
WM 27330
Description of the equipment and instructions for use
Descripción del aparato e instrucciones de manejo
English
4
Español
52
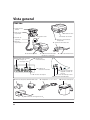
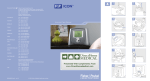
Overview
English
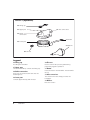
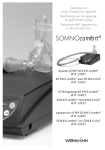
CPAP 20e
1 Head gear
2 Mask
8 Air inlet
9 Supply connection
7 Serial interface
10 Unit plaque
3 Exhalation system
4 Breathing hose
11 Power supply
5 Unit outlet
13 Humidifier activated
6 Humidifier connection
12 Power supply cable
15 Maintenance symbol
14 Softstart time
16 Change filter symbol
18 On/off switch
(stand-by)
17 Therapy pressure
21 Bacteria filter
22 Humidifier
25 O2 connection valve
4
Overview
19 Softstart button
20 Humidifier button
23 DC adapter 12 - 24 V
24 Carry case
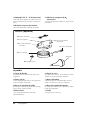
Legend
1 Head gear (Accessories)
14 Softstart time
Helps locate the mask correctly and securely.
This symbol appears when the softstart time is set
or the softstart is activated.
2 Mask (Accessories)
The mask is used to provide the patient with air at
the required therapy pressure.
3 Exhalation system (Accessories)
Exhalation air containing carbon dioxide is
diverted here during the therapy.
4 Breathing hose
The air flows through the breathing hose to the
mask.
5 Unit outlet
15 Maintenance symbol
This symbol appears every 10,000 operating
hours. The unit must then be serviced.
16 Change filter symbol
This symbol appears every 250 operating hours.
The fine filter must then be changed.
17 Therapy pressure
The therapy pressure is shown in hPa
(hectoPascal). 1 hPa = 1 mbar ≈ 1 cm H2O.
The air flows from here via the breathing hose
and mask to the patient.
18 On/off switch (stand-by)
6 Humidifier connection
19 Softstart button
Used to connect the CLICK 2 humidifier (supplied
as an accessory).
Activates the softstart or sets the softstart time
(5 - 30 minutes in 5 minute increments)
7 Serial interface
20 Humidifier button
Used exclusively to connect to devices for
visualization and evaluation of therapy data.
Activates the humidifier or sets the humidifier
level (6 levels).
8 Air inlet
21 Bacteria filter (Accessories)
Securely positions the coarse and fine dust filters.
Used to protect the patient from bacteria,
particularly if the unit is being used by a number
of patients.
9 Supply connection
This is the connection for the external power
supply or DC adapter.
10 Unit plaque
Provides information about the unit, e.g. serial
number and year built.
11 Power supply
Used to supply power to the unit.
12 Power supply cable
Connects the power supply to the power supply.
13 Humidifier activated
This symbol appears when the humidifier is in
operation. The current humidity level is displayed.
Switches the therapy unit on and off.
22 Humidifier (Optional)
Used to heat and humidify the air flow created by
the therapy unit.
23 DC adapter 12 - 24 V (Accessories)
For operating the therapy unit via a DC socket
(12 - 24 V).
24 Carry case (Accessories)
For carrying the therapy unit.
25 O2 connection valve (Accessories)
For introducing oxygen into the mask.
Overview
5
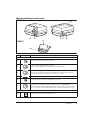
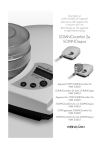
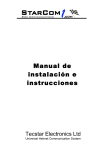
CLICK 2 (optional)
26 Filling cap
27 Upper part
32 Inlet connections
28 Outlet
connections
31 Heater
29 Lower part
33 Bellows
30 Closures
Legend
26 Filling cap
30 Closures
For filling the humidifier.
Used to shut off the pressure gland during
preparatory hygienic operations.
27 Upper part
Closes the humidifier, contains the filling cap.
31 Heater
28 Outlet connections
Heats the water in the humidifier. This humidifies
the air.
From here the moistened air flows into the
breathing hose.
29 Lower part
Contains approximately 280 ml water.
32 Inlet connections
The air flows from the therapy unit into the
humidifier.
33 Bellows
Dries the CLICK 2.
6
Overview
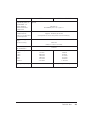
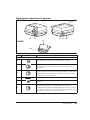
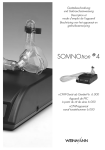
Special markings on the unit
CPAP 20e
34
39
35
36 37
38
41
CLICK 2
40
Symbol
Meaning
CPAP 20e:
34
Unit outlet: air escapes with 4 - 20 hPa
35
Please use the appropriate User Guide!
Connector for respiratory humidifier CLICK 2 WM 27330.
36
Please use the appropriate User Guide!
Connection for power supply WM 24480 or DC adapter WM 24469, to
operate the therapy units using a DC socket (12 - 24 V)
37
DC voltage
38
Unit inlet: allows air at room temperature to enter
39
Please use the appropriate User Guide!
Connection for setting the therapy parameters with SOMNOadjust
WM 23930 and SOMNOsupport WM 23975 by specialist staff or to control
the O2 connection valve, WM 24042. Max. current consumption 163 mA.
CLICK 2 (optional):
40
Unit is hot! Do not touch the heater rod.
Overview
7
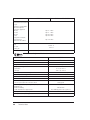
Symbol
41
Meaning
Do not use the humidifier on patients whose airways have been bypassed
Unit plaques
Year built
Level of protection from electric shock: Unit type B
Do not dispose of the unit as household waste
Please use the appropriate User Guide!
SN
Unit serial number
Type of protection from electric shock: Unit of protection class II
Markings on the packaging
Symbol
Permitted temperature for storage: -20˚C to + 70˚C
-20
% 0-95
8
Meaning
Overview
Permitted humidity for storage: max. 95 % relative humidity.
Contents
1.
1.1
1.2
1.3
1.4
2.
2.1
2.2
2.3
3.
3.1
3.2
3.3
3.4
4.
4.1
4.2
4.3
4.4
4.5
4.6
5.
5.1
5.2
5.3
5.4
5.5
Description of unit . . . . . . . . . . . . . 10
Intended use CPAP 20e . . . . . . . . 10
Intended use CLICK 2 . . . . . . . . . . 10
Functional description CPAP 20e. . 11
Functional description CLICK 2 . . . 11
Safety Instructions . . . . . . . . . . . . . 12
Safety instructions . . . . . . . . . . . . 12
Contraindications . . . . . . . . . . . . . 14
Side effects. . . . . . . . . . . . . . . . . . 15
Set up of equipment . . . . . . . . . . . . 16
Setting up and connecting the
CPAP 20e . . . . . . . . . . . . . . . . . . . 16
Filling and connecting the
CLICK 2 . . . . . . . . . . . . . . . . . . . . 17
Breathing mask. . . . . . . . . . . . . . . 18
Connect other accessories . . . . . . 19
Operation . . . . . . . . . . . . . . . . . . . . 20
CPAP 20e startup . . . . . . . . . . . . . 20
CLICK 2 setting. . . . . . . . . . . . . . . 21
Softstart setting . . . . . . . . . . . . . . 22
After usage. . . . . . . . . . . . . . . . . . 23
Read off therapy duration. . . . . . . 23
Traveling with therapy units . . . . . 24
Hygienic preparation . . . . . . . . . . . 25
Intervals . . . . . . . . . . . . . . . . . . . . 25
Cleaning CPAP 20e. . . . . . . . . . . . 25
Cleaning CLICK 2 . . . . . . . . . . . . . 27
Descaling CLICK 2 . . . . . . . . . . . . 29
Disinfection CPAP 20e . . . . . . . . . 29
5.6
5.7
5.8
6.
6.1
6.2
6.3
7.
7.1
7.2
8.
8.1
8.2
9.
Disinfection CLICK 2 . . . . . . . . . . 30
Multiple patient use CPAP 20e . . . 30
Multiple patient use CLICK 2 . . . . 31
Functional check . . . . . . . . . . . . . . .32
Intervals . . . . . . . . . . . . . . . . . . . . 32
Function check of CPAP 20e . . . . 32
Function check of CLICK 2 . . . . . . 33
Malfunctions and Rectification . . . .34
CPAP 20e . . . . . . . . . . . . . . . . . . 34
CLICK 2 . . . . . . . . . . . . . . . . . . . . 35
Maintenance . . . . . . . . . . . . . . . . . .37
Intervals . . . . . . . . . . . . . . . . . . . . 37
Maintenance includes the
following: . . . . . . . . . . . . . . . . . . 37
Disposal . . . . . . . . . . . . . . . . . . . . . .37
10.
10.1
10.2
10.3
10.4
11.
11.1
11.2
11.3
12.
Scope of supply . . . . . . . . . . . . . . . .38
Standard scope of supply . . . . . . . 38
Accessories . . . . . . . . . . . . . . . . . 38
Replacement parts CPAP 20e . . . . 41
Replacement parts CLICK 2 . . . . . 41
Technical data . . . . . . . . . . . . . . . . .42
Specifications . . . . . . . . . . . . . . . . 42
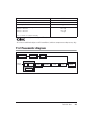
Pneumatic diagram . . . . . . . . . . . 45
Safety distances . . . . . . . . . . . . . . 46
Warranty . . . . . . . . . . . . . . . . . . . . .47
13.
Index . . . . . . . . . . . . . . . . . . . . . . . .48
14.
Declaration of Conformity . . . . . . .49
Contents
9
1. Description of unit
1.1 Intended use CPAP 20e
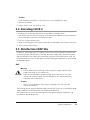
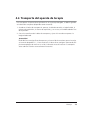
CPAP 20e is a CPAP unit (CPAP = Continuous Positive Airway Pressure) used to treat sleeprelated breathing disorders in patients from the age of 12 years.
No special knowledge or training is required in order to use the unit. All that is required is
instruction by a clinic or a medical practitioner.
Caution!
CPAP 20e can only reliably prevent airway closure when the CPAP pressure prescribed
by a doctor for the specific patient has been calculated, e.g. in a sleep laboratory.
CPAP 20e is not designed for life support.
Only use the unit for the purposes described below.
1.2 Intended use CLICK 2
The CLICK 2 humidifier is an optional accessory for the Weinmann CPAP 20e therapy unit.
The CLICK 2 humidifier is used to heat the air flow created by the CPAP 20e and to increase
its humidity. This will prevent the patient's upper airways drying out during the therapy.
CLICK 2 can only be used with the CPAP 20e therapy unit. Operation with third-party
devices is not permitted.
Only use the unit for the purposes described below.
10
Description of unit
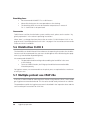
1.3 Functional description CPAP 20e
CPAP 20e operates according to the principle of an electrically driven flow generator, with
the pressure level being controlled electronically.
•
A fan draws in ambient air via a filter and conveys it to the unit outlet.
From here the air flows through the breathing hose and the mask to the
patient.
•
A pressure sensor measures the upcoming pressure at the unit outlet and
shows this on the display. The microprocessor-controlled flow generator
controls the pressure to the set value and reduces fluctuations in pressure
caused by breathing.
•
A softstart automatic system is installed to help the patient fall asleep
more easily. When the unit is switched on, the CPAP pressure starts at
the initial pressure selected by the doctor and is then slowly increased to
the setpoint pressure selected. The time of the pressure increase can be
adjusted between 5 and 30 minutes in 5-minute increments.
•
The therapy parameters are adjusted using the SOMNOadjust remote
control system or the SOMNOsupport evaluation program.
•
CPAP 20e automatically saves all settings in the event of a power failure.
This means that the unit does not need to be reset when power is
restored.
1.4 Functional description CLICK 2
The humidifier works on the so-called overflow principle. The air coming from the therapy
unit is conveyed across the surface of a heated water tank, increasing the relative humidity
and the temperature of the air flow. The amount of humidity released can be adjusted using the buttons on the Weinmann therapy unit. The output of the heater rods and consequently the temperature of the water in the humidifier chamber is controlled electronically
by the Weinmann unit.
The water level can be checked at any time through the window in the humidifier chamber.
Description of unit
11
2. Safety Instructions
Please read these operating instructions through carefully. They form part of the equipment and should be available at all times.
For your own safety, the safety of your patients, and to comply with the requirements of
EU Directive 93/42 EEC, please observe the following points.
2.1 Safety instructions
Operating the unit
Caution!
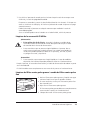
• The power supply supplied allows the unit to be operated at voltages between 115 V and 230 V. Check that your supply voltage falls within this
range. With a 12 V DC or 24 V DC supply, use the WM 24469 DC adapter available as an accessory.
•
CPAP 20e must be connected to an easily accessible socket so that the
mains plug can be quickly removed in the event of a power failure.
•
Do not cover the unit or power supply. Do not use in the vicinity of a
heater or in direct sunlight. The unit may overheat, resulting in insufficient therapy delivery and damage to the unit.
•
Maintain a safe distance between the CPAP 20e and equipment that
emits HF radiation (e.g. mobile phones). This unit may otherwise malfunction (see page 46). If CPAP 20e interferes with other equipment (e.g.
a radio), put the CPAP 20e further away from the equipment.
Caution!
• Do not use the therapy unit or humidifier if the unit is malfunctioning,
parts are damaged and/or the contact between the humidifier and the
heater rod is damp.
12
•
The performance of the humidifier can be affected if it is used outside
the permitted temperature range.
•
Observe the operating instructions for your mask.
•
Please observe the section „5. Hygienic preparation" on page 25 to
avoid infection or bacterial contamination.
Safety Instructions
Transport/Accessories/Spare Parts/Repair
Caution!
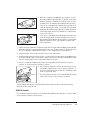
• Do not transport (or tilt) the CPAP 20e with the humidifier installed. Tilting might cause water remaining in the humidifier to run into the
CPAP 20e and damage it.
•
Only have checks and repair work carried out by Weinmann or specialist
staff.
•
Malfunctions and a lack of biocompatibility may result if third-party articles are used. Please bear in mind that in these cases any warranty entitlement and liability shall lapse where the accessories recommended in
the instructions for use or original spare parts are not utilized.
Caution!
• Modifications to the CPAP 20e and CLICK 2 are not permitted.
•
Third-party masks may only be used after being approved by Weinmann.
Using unapproved masks may result in unsuccessful therapy.
•
Please make sure that the accessories you use are complete and are suitable for the therapy. This particularly applies to the exhalation system.
The CO2 content of the exhaled air may otherwise adversely affect your
breathing.
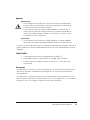
Oxygen supply
Warning!
• There is a risk of fire! Do not smoke or use open fires if oxygen is being
used during therapy. The oxygen may be deposited in clothing, bed linen
or in your hair and can only be removed by thorough ventilation.
Caution!
• An oxygen supply is only permitted if the WM 24042 O2 connection valve
is used.
•
As regards oxygen, please make sure you observe the safety instructions
included in the instructions for your oxygen system.
Safety Instructions
13
2.2 Contraindications
The CPAP 20e should not be used with certain diseases or only with particular caution. In
each case the decision whether to use CPAP 20e for therapy lies with the doctor in charge.
These include:
•
cardiac decompensation
•
severe heart arrhythmia
•
severe hypotension, particularly in conjunction with intravascular volume
depletion
•
severe epistaxis
•
high risk of barotrauma
•
ventilatory insufficiency due to a cause other than OSA
•
nocturnal hypoxemia due to a cause other than OSA (obesity
hypoventilation syndrome)
•
pneumothorax or pneumomediastinum
•
pneumo-encephalus
•
head injury
•
status after brain operation and surgical procedure performed on
hypophysis or on middle or inner ear
•
acute inflammation of the sinuses (sinusitis), middle ear inflammation
(otitis media) or perforated eardrum
•
dehydration
Threatening situations were not observed with CPAP 20e.
14
Safety Instructions
2.3 Side effects
When using CPAP 20e the following undesirable side effects may occur during short-term
and long-term usage:
•
pressure points on the face caused by the mask and the forehead padding
•
reddening of facial skin
•
nasal congestion
•
dry nose
•
dry mouth in morning
•
feeling of pressure in the sinuses
•
irritation of conjunctiva of eyes
•
gastrointestinal insufflation
(“wind”)
•
nosebleeds
Safety Instructions
15
3. Set up of equipment
3.1 Setting up and connecting the CPAP 20e
1. Set up the unit on a flat surface, e.g. a bedside cabinet or on the floor next to the bed.
Caution!
Do not cover the unit or power supply. Do not use in the vicinity of a heater or in direct
sunlight. The unit may overheat, resulting in insufficient therapy delivery and damage to
the unit.
2. Plug the power supply cable into the supply connection of the CPAP 20e. Then plug the
power supply into a socket outlet (using the power supply cable).
The power supply automatically determines the appropriate mains voltage (115 V - 230 V).
Power
supply
If the CPAP 20e is to be operated with a voltage of
12 or 24 V DC, connect the WM 24469 DC adapter
(available as an option) instead of the power supply.
DC adapter
On the display „0“ appears to show it is ready for use.
3. Plug the breathing hose into the unit outlet.
Note:
The device automatically compensates for differences
in air pressure (e.g. as a result of great altitude).
16
Set up of equipment
3.2 Filling and connecting the CLICK 2
Before using for the first time
Before using for the first time, rinse the humidifier with copious amounts of water (see "5.
Hygienic preparation" on page 25).
Filling the humidifier
Caution!
• Do not fill the humidifier when it is connected to the therapy unit and do
not overfill above the maximum level, otherwise water may enter the
therapy unit. This can damage the unit.
•
Do not fill the humidifier with hot water as this might damage the housing and heating rod resulting in incorrect operation and insufficient therapy delivery.
Note
• The use of aromatic additives, such as eucalyptus oil, may damage the
plastic parts of the humidifier.
1. Open the filling cap of the humidifier.
2. Fill the humidifier up to the mark with distilled water. If
no distilled water is available, low calcium boiled water
can be used instead (but not as a rule!). Check that the
heater rod does not scale up (see "5.4 Descaling
CLICK 2" on page 29).
Fill level mark
3. Firmly close the humidifier with the filling cap.
26
4. After filling, check that the humidifier is not leaking.
Run your finger over the bottom of the humidifier or
place the humidifier on a piece of kitchen paper. Any
escaping water will then be easy to spot.
Set up of equipment
17
Adapting the humidifier
1. If necessary, release the corrugated tubing from the
therapy unit.
2. Click the humidifier into position from the front onto
the sleep apnea unit. The inlet connection and the heating rod must be directed towards to the sleep apnea
unit. Take care to engage the lock.
3. Connect the corrugated tube to the outlet connections
of the humidifier.
Locking catch
4. To release the humidifier, press the locking catch and
withdraw it off the unit.
3.3 Breathing mask
Fitting the mask
1. Adjust the forehead support of the mask (if present).
2. Connect the headgear to the mask.
3. Position the mask.
4. Adjust the headgear so that the bulge of the mask only results in low pressure to prevent
pressure points on the face.
Note
For further instructions, please refer to the operating instructions for the relevant mask.
Warning!
Full-face masks must be equipped with an emergency exhalation valve so that you
can breathe through nose or mouth in the event of any device failure. Full-face masks
without an emergency exhalation valve may not be used!
External exhalation system
No exhalation system is integrated in some masks. In order for the used, carbon dioxide
(CO2)-enriched air to be able to escape, an external exhalation system is required on these
masks. Follow the instructions for use of your exhaled air system.
18
Set up of equipment
Warning!
Without an exhalation system the CO2 concentration would rise to critical values in
the mask and hose, thus hindering your breathing. Risk of suffocation!
– Fit the external exhalation system between the breathing mask and the breathing tube.
3.4 Connect other accessories
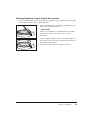
Bacteria filter
If the CPAP 20e is to be used by several patients (e.g. in a
hospital), a bacteria filter should be used to protect against
infection. It is inserted between the breathing tube and the
device outlet port. Using a bacteria filter can reduce the
pressure and flow rate.
Oxygen supply
For safety reasons (risk of fire) the direct introduction of
oxygen into the breathing hose or the mask without any
special protective device is not permitted. However, the
supply of up to 4 l/min oxygen to the breathing mask is
possible when using the WM 24042 oxygen connection
valve.
An oxygen concentrator (e.g. Oxymat), liquid oxygen or an oxygen cylinder with a suitable
pressure reducer may be used. This application must be prescribed by the patient’s doctor.
To prevent oxygen entering the therapy unit, the CPAP 20e automatically generates a therapy pressure of at least 5 hPa when an oxygen connection valve is attached. You must always follow the safety instructions for handling oxygen as well as the operating instructions
for the oxygen valve and the oxygen unit used.
Set up of equipment
19
4. Operation
4.1 CPAP 20e startup
Put on the mask
1. Put on the mask as described in Section “3.3 Breathing
mask” on page 18.
2. Connect the breathing hose to the mask (plug cone).
3. Feed the breathing hose away from your head.
Warning! Risk of injury!
Never place the breathing hose around your neck.
Switch on the device
1. Press the on/off switch.
The therapy period will appear for approx. 3 seconds in the display. The flow generator
starts to convey air through the breathing hose.
If softstart has been preselected, the softstart display will then light up and the softstart
time will appear in the display.
CPAP 20e is now ready for operation.
Note:
If the device is not used for 15 minutes, it will automatically switch off (only if the
therapy pressure is higher than 6hPa).
20
Operation
4.2 CLICK 2 setting
Switching on the humidifier
1. Fill up the humidifier and set up as described in “3.2 Filling and connecting the CLICK 2”
on page 17.
2. Switch on the therapy unit.
3. Press the humidifier button
of the therapy unit. The
humidifier symbol
and the humidification level display (level 4 in this case) are shown in the display of the
therapy unit.
Humidifier button
Setting the heating level
1. Make sure your therapy unit is switched on.
2. Press the humidifier button
for approx. 3 seconds
until the number and the humidifier symbol
start to
flash.
3. Release the humidifier button
.
4. Now select the heating level (1-6) using the on/off
switch (+) or the softstart button (-).
Humidifier button
The displayed value is saved after 4 seconds.
Which is the best setting for you will depend on the room temperature and the air humidity. The optimum setting will therefore vary depending on the time of year. Under normal
conditions heating level 3 is sufficient.
If the temperature is 23 °C and air humidity 70 %, a humidity of 100 % can be reached
with heating level 6 and a flow rate of 20 l/min.
If your airways are dry when you wake up, the heating level is too low. Select a higher
setting.
If condensation forms in the breathing hose during a night therapy session, the heating
level is too high. Choose a lower heating level.
Operation
21
Switching off the humidifier
There are two ways of switching off the humidifier:
•
Press the humidifier button
of the sleep apnea unit. The humidifier
symbol
in the display of the sleep apnea unit goes out. The therapy
unit remains switched on.
•
Press the on/off switch on your therapy unit. The humidifier and the therapy unit are both switched off.
When you switch the therapy unit on again, the humidifier is also
switched on automatically and runs at the heating level of the previous
therapy session.
Automatic switch-off at low levels
If the therapy unit detects that there is not enough liquid in the humidifier, it switches the
humidifier off within 15 minutes. The humidifier symbol
in the display goes out.
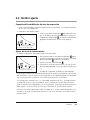
4.3 Softstart setting
The softstart time can be selected in 5-minute increments up to a maximum of 30 minutes.
Proceed as follows:
1. Switch on CPAP 20e and press the softstart button
display for the softstart time flashes.
. Hold the button down until the
2. Now select the softstart time (5-30 minutes in 5-minute increments) using the on/off
switch (+) or the softstart button (-).
If a button is not pressed for 4 seconds, the displayed softstart time will be saved and
the display stops flashing.
The softstart settings are saved when the unit is switched off. Whenever CPAP 20e is
started up, it automatically starts in softstart mode if this was switched on.
Softstart can be switched on and off at any time by pressing the softstart button
22
Operation
.
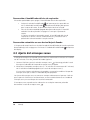
4.4 After usage
1. Remove the headgear with the mask.
2. Push the on/off switch to switch the device off.
The daily therapy duration of the last session is shown
on the display. Then “0“ appears.
3. Remove the tube connection and the exhalation system
from the mask.
4. Clean the mask and the exhalation system(see "5.
Hygienic preparation" on page 25).
Note:
CPAP 20e and the power supply consume approx. 4
watt in standby mode .The unit does not have a mains
switch. To save electricity you can remove the power
plug from the outlet socket during the day. It is therefore advisable to connect the unit to a readily accessible
socket. The stored values and settings will not be lost.
5. Clean the humidifier (see "5. Hygienic preparation" on
page 25).
4.5 Read off therapy duration
CPAP 20e saves the data from 366 days and the associated therapy duration. You can
display the following values:
•
Total therapy duration in hours
•
Average therapy duration per day
•
Therapy duration of current day including date
Note:
A therapy day always starts and ends at 12 noon. Data recorded between midnight and
12 noon is allocated to the previous day.
The total therapy duration is shown for a few seconds when the unit is switched on. When
switching off the therapy duration for the current day is displayed.
To read off further data, proceed as follows:
Operation
23
1. When switching off the unit hold down the on/off switch for approx. 4 seconds until
the average therapy duration per day is displayed.
2. Release the on/off switch. The average therapy duration per day and the total therapy
duration are each displayed for 5 seconds. The current date and the therapy duration
for the day then flash up alternately.
3. The daily therapy duration for previous days can now be displayed.
Press the softstart button until the required date appears in the display.
You can also simply press and hold the softstart button, releasing it when the desired
date is displayed.
Use the on/off switch in the same way to return to the current date.
If a button is not pressed for 10 seconds, the total operating time will appear for 3 seconds.
Then “0“ appears.
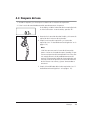
4.6 Traveling with therapy units
To transport the therapy unit over long distances, it should be packed in the carry case
(available as an accessory).
1. Place the unit, the power supply, the power cable, the breathing hose, the mask incl.
exhalation system and, if necessary, the humidifier in the carry case.
2. Close the zips of the carry case and adjust the shoulder strap to the correct length.
Caution!
Please do not forget to take spare filters and the operating instructions with you, as well
as the DC adapter if necessary. If you want to take the therapy unit as hand luggage in
an aircraft, you should find out any formalities necessary from the airline before
departure.
24
Operation
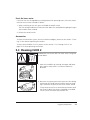
5. Hygienic preparation
5.1 Intervals
•
Clean the mask and exhalation system every day in accordance with the
operating instructions.
•
Check the filters regularly:
– clean the coarse dust filter once a week and replace it at least every 6 months.
– change the fine filter depending on the level of soiling, however at least every
250 hours or once a month (filter change indicator).
•
Regularly wipe clean the housing of the CPAP 20e and the power supply.
•
The breathing hose should be cleaned according to the level of soiling,
however at least once a month. Replace it every 12 months.
•
Wash the headgear in accordance with the accompanying instructions
for usage.
•
Clean the humidifier every day.
5.2 Cleaning CPAP 20e
Cleaning the breathing hose
1. Detach the breathing hose from the unit and from the exhalation system.
2. Clean the corrugated hose so no residues remain with a small amount of detergent in
warm water. Rinse the inside of the hose thoroughly.
3. Then rinse thoroughly both inside and outside using clean, warm water.
Caution!
4. Shake the hose thoroughly.
5. Hang up the hose and allow to drip to prevent moisture from getting into the CPAP 20e.
The breathing hose is dried completely with the help of the CPAP 20e .
6. Plug the breathing hose into the unit outlet.
7. To start the drying process, press at the same time the softstart button (CPAP 20e
switched off) and the on/off switch.
The unit will now switch on and dry the breathing hose (this takes 30 minutes). The remaining time is displayed. It switches off automatically at the end of the drying process.
Hygienic preparation
25
You can interrupt the process at any time by pressing the on/off switch.
If the breathing hose is still damp in places after drying, start the drying process again.
Cleaning the CPAP 20e housing
Warning!
• Electric shock! Before cleaning, remove the power supply cable from the
supply connection of the therapy unit.
•
Make sure no liquid gets into the housing. Never immerse the unit in disinfectant or any other liquid. This can damage the unit and consequently
endanger users and patients.
Caution!
• Make sure no liquid gets into the pressure glands. This may cause the
unit to malfunction.
Wipe down the unit, the power supply and the power supply cable with a damp, soft cloth.
The CPAP 20e must be completely dry before starting up.
Cleaning the coarse dust filter/changing the fine filter
1. Remove the coarse dust filter and clean under fresh
running water until no residues remain.
2. Replace the fine filter if necessary, as it cannot be
cleaned.
3. Let the coarse dust filter dry.
Before start up, the coarse dust filter must be
completely dry.
4. Replace the coarse dust filter.
Clear the filter change indicator
When switching on the unit, press and hold the on/off switch.
– The total therapy duration is displayed.
– The change filter sign appears.
– Do not release the button until the filter change indicator goes blank.
26
Hygienic preparation
Reset the hours meter
If the fine filter was changed due to soiling before 250 operating hours, the hours meter
must be reset to zero. Proceed as follows:
1. When switching on the unit, press and hold the on/off switch.
The filter change indicator will come on after about five seconds before going off again
after another three seconds.
2. Release the on/off switch.
Accessories
To clean the exhalation system, the mask and the headgear, please see the section "Cleaning" in the relevant operating instructions.
To clean the humidifier CLICK 2, please see the section “5.3 Cleaning CLICK 2” on
page 27 of these operating instructions.
5.3 Cleaning CLICK 2
Do not touch the heater rod. The metal takes a long time
to cool down.
1. Open the humidifier by twisting the upper and lower
parts against each other in an counter-clockwise
direction.
2. No water must penetrate into the pressure line during
cleaning or this could lead to incorrect pressure readings. Therefore the pressure line must remain sealed.
To seal the pressure line at the outlet-connections push
the silicone tube of the closure (supplied as standard
CLICK 2) over the end of the pressure line.
Hygienic preparation
27
To seal the pressure line at the inlet connections, push
the thin end of the closure by a slight rotational movement into the seal of the pressure line.
Clean the upper and lower parts with lukewarm water to
which a little detergent has been added. We recommend cleaning the housing parts once a week in the
upper tray of the dishwasher at a maximum temperature of 65 °C.
3. Then rinse the parts in clean water.
4. Vigorously shake the lower part to remove any water that may have entered the heater
rod contact. Dry the parts thoroughly with a soft cloth. The heater rod contact must be
dry.
5. Check whether the pressure measurement tube is still correctly fitted in the upper part.
If necessary reinsert it.
6. Fit the upper and lower parts together such that the
marks are aligned. Turn the upper and lower parts
against each other clockwise as far as they will go.
Marks
7. Remove the closure. The humidifier is now ready for use
again.
For hygiene reasons, we recommend that the plastic parts are replaced after a maximum
of two years use.
CLICK 2 drying
If water penetrates into the pressure line, then dry CLICK 2 as follows:
1. Push the bellows included in the delivery, as illustrated,
onto the end of the pressure line at the outlet connectors.
Caution!
The bellows must only be used for drying the humidifier. During drying CLICK 2 must
not be connected to the therapy unit. Otherwise the unit could be damaged.
2. Press the bellows together so that any moisture is blown out.
28
Hygienic preparation
Caution!
Keep the bellows pressed in so that moisture is not sucked back in again.
3. Remove the bellows.
4. Repeat steps 1. to 3. two or three times.
5.4 Descaling CLICK 2
If the lower part of the housing and the heater rod are covered in scale:
1. Pour about 150 ml of normal vinegar (5% solution without additives) into the lower part
of the humidifier and leave to stand for one hour.
2. Pour the vinegar solution away.
3. Wipe the housing parts with a clean cloth and rinse thoroughly several times with water.
4. Then carefully wipe all parts.
5.5 Disinfection CPAP 20e
If necessary, for example after an infectious illness or if the unit has become unusually contaminated, you can also disinfect the housing, the power supply cable, the breathing hose,
and the humidifier. Please observe the operating instructions for the disinfectant used. We
recommend that you wear suitable gloves when disinfecting the equipment (e.g. household
or disposable gloves).
Unit
Warning!
• Electric shock! Before cleaning, remove the power supply cable from the
supply connection of the therapy unit.
•
Make sure no liquid gets into the housing. Never immerse the unit in disinfectant or any other liquid. This can damage the unit and consequently
endanger users and patients.
Caution!
• Make sure no liquid gets into the pressure glands. This may cause the
unit to malfunction.
The housing, power supply and power supply cable of the CPAP 20e are cleaned by being
simply wiped over with disinfectant. We recommend TERRALIN.
We recommend that you wear suitable gloves when disinfecting the equipment (e.g.
household or disposable gloves).
Hygienic preparation
29
Breathing hose
•
We recommend GIGASEPT FF as a disinfectant.
•
When disinfecting use the same procedure as for cleaning.
•
The breathing hose must not be heated to temperatures in excess of
70 °C. Sterilization is not permitted.
Accessories
To disinfect or sterilize the exhalation systems and the mask, please see the section "Hygienic preparation" in the relevant operating instructions.
When there is a change of patient please refer to section “5.6 Disinfection CLICK 2” on
page 30 and “5.8 Multiple patient use CLICK 2” on page 31 for instructions on how to disinfect the CLICK 2 humidifier.
5.6 Disinfection CLICK 2
The humidifier can be disinfected. Please observe the operating instructions for the disinfectant used. We recommend that you wear suitable gloves when disinfecting the equipment (e.g. household or disposable gloves).
We recommend GIGASEPT FF.
•
The procedure for dismantling and assembling the humidifier is the same
as for cleaning.
•
To ensure full disinfection, the filling cap should also be removed and disinfected separately.
For hygiene reasons, we recommend that the plastic parts are replaced after a maximum
of two years use.
5.7 Multiple patient use CPAP 20e
If the unit is to be utilized for another patient without using a bacteria filter, it must undergo a hygiene treatment beforehand. This has to be carried out by Weinmann or a dealer.
The procedure used for the hygiene treatment is described in the inspection sheet and the
service and repair instructions for CPAP 20e.
30
Hygienic preparation
5.8 Multiple patient use CLICK 2
If CLICK 2 is to be utilized for another patient without using a bacteria filter, it must undergo a hygiene treatment beforehand. This should be carried out by an authorized dealer.
The procedure used for the hygiene treatment when there is a change in patient is
described in the service and repair instructions for the CPAP 20e.
Hygienic preparation
31
6. Functional check
6.1 Intervals
Carry out a functional check on the CPAP 20e and the CLICK 2 at least every 6 months.
If you find a defect during the functional check, do not use the unit until the defect has
been remedied.
6.2 Function check of CPAP 20e
1. Assemble CPAP 20e with the breathing hose, exhalation system, mask and power supply cable ready for operation.
2. Push the on/off switch to switch the device on. If Softstart is switched on, switch it off
with the softstart button. The fan conveys air through the breathing hose to the mask
and the current pressure in hPa is shown in the display.
3. Close the opening of the mask, e.g. using your thumb or hand.
Compare the pressure shown on the display with the CPAP pressure prescribed. There
should only be a divergence of max. ±1.0 hPa.
4. Press the softstart button to switch on softstart. The softstart display appears and the
display shows the softstart time.
The pressure increases slowly and reaches the CPAP pressure after the time selected.
The CPAP pressure is then shown on the display.
5. Switch off the unit using the on/off switch.
If the values or functions are not satisfactory, please send in the unit for repair to the dealer
or the manufacturer.
32
Functional check
6.3 Function check of CLICK 2
1. Carry out a visual inspection of the plastic housing.
If cracks/damage or severe soiling is evident, the plastic parts or seals must be replaced.
2. Fill the humidifier up to the mark with water.
3. Check whether the humidifier is leaking.
4. Empty the water.
5. Now pour in about 50 ml of water.
6. Connect the humidifier to the therapy unit.
7. Switch on the therapy unit.
8. Switch the humidifier on by pressing the humidifier button
on the therapy unit.
9. Set heater level 6 on the therapy unit.
10.Check whether the humidifier is getting warmer.
If the water has not heated up after 15 minutes, send the humidifier and the therapy unit
for repair to the dealer or the manufacturer.
Functional check
33
7. Malfunctions and Rectification
If there are defects that cannot be rectified at once, please contact Weinmann or your dealer immediately to have the unit repaired. To prevent greater damage, stop using the unit.
7.1 CPAP 20e
Malfunction
No running noise,
standby/status display
not illuminated.
Cause
No supply voltage
available
Unit is running but does Filter soiled
not reach CPAP pressure
Mask not airtight
level selected.
Filter change indicator
lights up.
Filter soiled
Rectification
Check power supply cable is securely connected.
Check function of outlet by connecting another
piece of equipment (e.g. a lamp).
Clean/change filter (5.2, page 25).
Adjust headgear so that mask is airtight.
Replace mask if defective.
Clean/change filter (5.2, page 25).
Error message
“Err E“, “Err b“, “Err c“, Problems with electronics
Disconnect power and reconnect.
“Err A“, “Err H“ or
or program “crashed”
“Err S“ in display.
Service indicator
lights up.
Unit must be checked or serviced by Weinmann
or a dealer as soon as possible.
Water in the pressure
measurement port
The pressure
There is no pressure or measurement tube is
incorrect pressure to the incorrectly fitted in the
mask.
upper part.
No mains voltage
available at the therapy
unit.
34
Malfunctions and Rectification
Dry the pressure measurement line, see page 28.
Push the pressure measurement tube on to the
correct connecting piece, see 5.3.
Check mains cable is securely connected. Check
function of outlet by connecting another piece of
equipment (e.g. a lamp).
7.2 CLICK 2
Malfunction
Cause
Humidifier is not
Humidifier does not warm activated.
up.
Electronics defect
The heater rod seal is
defective.
Rectification
Switch on the air humidifier, see 4.2, page 21.
Send the humidifier and the therapy unit to
your dealer for repair.
Replace the seal, see page 35.
The humidifier is leaking. The seal on the underside
Replace the seal, see page 35.
of the housing is leaking.
Cracks in lower part
Replace the lower part.
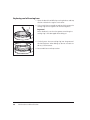
Replacing the heater rod seal
1. Remove the heater rod from the lower part of the housing by turning counter-clockwise.
2. Using a small, clean screwdriver, carefully prise out the
seal.
Important!
Take care to ensure that the groove in which the seal
fits is not damaged.
3. Carefully press the new sealing ring into the groove on
the heater rod. Under no circumstances use a tool.
4. Fit the new heater rod.
Malfunctions and Rectification
35
Replacing seal of housing base
1. Open the breath humidifier by turning the base and top
section anticlockwise against each other.
Sealing ring
2. Take a small clean screwdriver and carefully remove the
sealing ring from the groove of the housing base.
Important!
Make absolutely sure that the groove containing the
sealing ring is not damaged when doing so.
3. Carefully press the new sealing ring into the groove of
the housing base. When doing so, do not use tools under any circumstances.
4. Reassemble base and top section.
36
Malfunctions and Rectification
8. Maintenance
Regular maintenance should be carried out as a preventive measure. Please adhere to the
stipulated intervals.
8.1 Intervals
•
Every 10,000 operating hours (maintenance symbol appears in display)
•
Every 4 years at the latest (see maintenance sticker on rear of unit)
8.2 Maintenance includes the following:
•
Filter change
•
Hygienic preparation of the unit and fan unit
•
Complete function test
9. Disposal
Do not dispose of the unit with domestic waste. For proper disposal of the device and
its components, please contact a certified waste disposal site for electronic goods.
Ask your Environmental Officer or local council for the address. Appliance packaging
(cardboard and inserts) may be disposed of in the paper recycling bin.
Maintenance
37
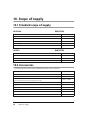
10. Scope of supply
10.1 Standard scope of supply
CPAP 20e
WM 27320
Parts
Order number
CPAP 20e basic unit
WM
27321
Breathing hose
WM
24445
Power supply
WM
24480
Power supply cable
WM
24133
Instructions for use CPAP 20e + CLICK 2 GB
WM
66101
CLICK 2
WM 27330
Parts
Order number
CLICK 2 basic unit
WM
27331
Closures, complete and packed
WM
24020
Bellows
WM
24394
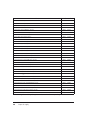
10.2 Accessories
The following accessories can be ordered separately when required.
Parts
Order number
CLICK 2 humidifier
WM
27330
SOMNOadjust remote adjust device (only for trained medical and engineering staff)
WM
23930
SOMNOsupport evaluation software
(only for trained medical and engineering staff)
WM
23975
Oxygen valve
WM
24042
DC adapter (12-24 V)
WM
24469
Bacteria filter
WM
24476
Carry case
WM
27335
Set of 10 breathing hoses
WM
15689
Silentflow
WM
23600
38
Scope of supply
Parts
Order number
Sound absorber, complete (alternative exhalation system)
WM
23685
SOMNOmask, size S
WM
25110
SOMNOmask, size M
WM
25120
SOMNOmask, size L
WM
25130
SOMNOmask, size S, blue
WM
25210
SOMNOmask, size M, blue
WM
25220
SOMNOmask, size L, blue
WM
25230
SOMNOplus, size S
WM
25710
SOMNOplus, size M
WM
25720
SOMNOplus, size L
WM
25730
SOMNOcap‚ size M, blue
WM
23673
SOMNOcap‚ size L, blue
WM
23674
SOMNOcap‚ size M, white
WM
23686
SOMNOcap‚ size L, white
WM
23687
SOMNOstrap, blue
WM
23695
SOMNOstrap, white
WM
23177
SOMNOstrap extra
WM
25250
JOYCEstrap
WM
26290
JOYCEstrap EXTRA, 3 pcs.
WM
26291
JOYCEstrap EXTRA, 4 pcs.
WM
26292
JOYCEcap
WM
26293
JOYCE vented, size S
WM
26110
JOYCE vented, size M
WM
26120
JOYCE vented, size L
WM
26130
JOYCE vented, size XL
WM
26140
JOYCE vented 40 hPa, size S
WM
26111
JOYCE vented 40 hPa, size M
WM
26121
JOYCE vented 40 hPa, size L
WM
26131
JOYCE vented 40 hPa, size XL
WM
26141
JOYCE GEL vented, size S
WM
26112
JOYCE GEL vented, size M
WM
26122
JOYCE GEL vented, size L
WM
26132
JOYCE non vented, size S
WM
26160
Scope of supply
39
Parts
Order number
JOYCE non vented, size M
WM
26170
JOYCE non vented, size L
WM
26180
JOYCE non vented, size XL
WM
26190
JOYCE non vented 40 hPa, size S
WM
26161
JOYCE non vented 40 hPa, size M
WM
26171
JOYCE non vented 40 hPa, size L
WM
26181
JOYCE non vented 40 hPa, size XL
WM
26191
JOYCE GEL non vented, size S
WM
26162
JOYCE GEL non vented, size M
WM
26172
JOYCE GEL non vented, size L
WM
26182
JOYCE Full Face vented, size S
WM
26410
JOYCE Full Face vented, size M
WM
26420
JOYCE Full Face vented, size L
WM
26430
JOYCE Full Face vented, size XL
WM
26440
JOYCE Full Face vented 40 hPa, size S
WM
26411
JOYCE Full Face vented 40 hPa, size M
WM
26421
JOYCE Full Face vented 40 hPa, size L
WM
26431
JOYCE Full Face vented 40 hPa, size XL
WM
26441
JOYCE Full Face GEL vented, size S
WM
26412
JOYCE Full Face GEL vented, size M
WM
26422
JOYCE Full Face GEL vented, size L
WM
26432
JOYCE Full Faceplus vented 40 hPa, size S
WM
26413
JOYCE Full Faceplus vented 40 hPa, size M
WM
26423
JOYCE Full Faceplus vented 40 hPa, size L
WM
26433
JOYCE Full Faceplus vented 40 hPa, size XL
WM
26443
JOYCE Full Face non vented 40 hPa, size S
WM
26461
JOYCE Full Face non vented 40 hPa, size M
WM
26471
JOYCE Full Face non vented 40 hPa, size L
WM
26481
JOYCE Full Face non vented 40 hPa, size XL
WM
26491
JOYCE Full Face GEL non vented, size S
WM
26462
JOYCE Full Face GEL non vented, size M
WM
26472
JOYCE Full Face GEL non vented, size L
WM
26482
When using other mask systems, please observe the relevant operating instructions.
40
Scope of supply
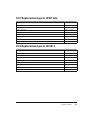
10.3 Replacement parts CPAP 20e
Parts
Order number
Breathing hose
WM
24445
Set of 10 breathing hoses
WM
15689
Coarse dust filter
WM
24481
Set of 2 coarse dust filters
WM
15321
Fine dust filter, packed
WM
24401
Set of 12 fine filters
WM
15668
Power supply
WM
24480
Power supply cable
WM
24133
10.4 Replacement parts CLICK 2
Parts
Order number
Housing top section, complete
WM
27339
Lower part of housing
WM
27333
Seal for lower part of housing
WM1145/143
Heater
WM
24264
Filling cap
WM
24378
Seal, heater
WM 1145/19
Closures, complete and packed
WM
24020
Bellows
WM
24394
Scope of supply
41
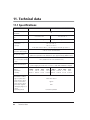
11. Technical data
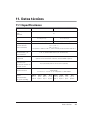
11.1 Specifications
CPAP 20e
CPAP 20e with CLICK 2
Product class as per
93/42/EEC
IIa
Dimensions WxHxD in
cm
21 x 9.8 x 18.5
21 x 14 x 31.3
Weight
approx. 1.25 kg
approx. 1.5 kg (without water)
Temperature range
– operation
– storage
+5 °C to +35 °C
–20 °C to +70 °C
If the unit runs at +40 °C , the air output can heat up to 42 °C.
Adm. humidity for
operation and storage
Air pressure range
≤ 95 % rF (no condensation)
600 - 1100 hPa (automatic altitude compensation)
(allows for operation in an altitude of up to approximately 4000 meters)
Diameter of breathing
hose connection (mask)
in mm
Electrical connection
Power consumption
during
– operation
– standby
Classification as per
prEN 60601-1:2004
– type of protection
from electric shock
– level of protection
from electric shock
– protection against
damaging ingress of
water
– operating mode
42
Technical data
19.5 (suitable for 22 mm standard cone)
115-230 V AC +10/-15 %, 50–60 Hz with WM 24480
power supply or 12-24 V DC -15/+25 % with WM 24469 DC adapter
230 V
0.1 A
0.02 A
115 V
0.2 A
0.03 A
24 V
0.8 A
0.2 A
12 V
230 V
115 V 24 V
1.6 A 0.14 A 0.28 A 1.3 A
0.24 A 0.02 A 0.03 A 0.2 A
Protection class II
Type B
IPX1
Constant operation
12 V
4.0 A
0.24 A
CPAP 20e
Electromagnetic
compatibility (EMC) as
per EN 60601-1-2
– radio shielding
– radio interference
suppression
Mean sound pressure
level/operation at
distance of 1m from unit
in patient position
Test parameters and limit values can be obtained from the manufacturer if
required.
EN 55011 B
EN 61000-4 parts 2 to 6, part 11
≤ approx. 30 dB (A) at 10 hPa
(corresponds to an acoustic power level of 38 dB (A) )
CPAP operating pressure
range
Pressure accuracy
4 to 20 hPa
± 0.8 hPa
(1mbar = 1 hPa ≈ 1cm H2O)
Max. CPAP pressure
with malfunction
Flow at max. speed at:
20 hPa
15 hPa
10 hPa
5 hPa
0 hPa
Tolerance
Heating of respiratory
air
CPAP 20e with CLICK 2
< 30 hPa
85 l/min
100 l/min
120 l/min
140 l/min
155 l/min
± 10 l/min
80 l/min
95 l/min
115 l/min
135 l/min
150 l/min
± 10 l/min
2.5 °C
depending on heating level
Technical data
43
CPAP 20e
Short-term constant
pressure level measured
as per
prEN ISO 17510:2004
when therapeutic
pressure is applied:
20 hPa
15 hPa
10 hPa
5 hPa
Long-term constant
pressure level
prEN 17510-1:2004
CPAP 20e with CLICK 2
Δp ≤ 1.3 hPa
Δp ≤ 1.1 hPa
Δp ≤ 0.8 hPa
Δp ≤ 0.6 hPa
Δp = 0.2 hPa
Fine filter separation
level
to 1 μm
to 0.3 μm
Fine filter service life
≥ 99.5 %
≥ 85 %
≥ 250 hours with normal room air
Subject to design modifications.
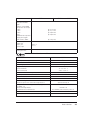
CLICK 2
Product class as per 93/42/EEC
Dimensions WxHxD in mm
Weight (without water)
Temperature range
– operation
– storage
Humid operation and storage
Ambient pressure range
II a
120 x 97 x 157
250 g
+5 °C to +35 °C
–20 °C to +70 °C
≤ 95 % relative humidity
600 to 1100 hPa
Electrical connection
30 V DC
Power consumption
20 VA
Classification as per EN 60601-1
– level of protection from electric shock
Electromagnetic compatibility (EMC) as per
EN 60601-1-2
– Radio shielding
– radio interference suppression
Unit type B
EN 55011 B
IEC 1000-4, parts 2 to 6, part 11
Max. permitted fill quantity
280 ml
Max. permitted operating pressure
30 hPa
44
Technical data
CLICK 2
Max. permitted flow (free-flowing)
160 l/min
Max. mask temperature
37 °C
Gas leakage at 30 hPa
negligible
Humidifier output at heating level 6:
Flowrate = 20 l/min
Flowrate = 30 l/min
Flowrate = 40 l/min
14.1 mg/l
10.3 mg/l
8.0 mg/l
at 23 °C and 65 % relative humidity
Subject to design modifications.
All values established subject to ATPD conditions (ambient temperature and pressure, dry).
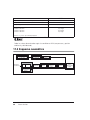
11.2 Pneumatic diagram
O2 pressure source
(max. 1.5 bar)
Ambient
air inlet
Filter
Flow regulator
to max. 4 l/min
Fan
Optional
humidifier
Optional
O2 valve
Optional
bacteria filter
Breathing tube
1.8 m
Exhalation
system
Patient mask
(nasal or
full-face)
Pressure sensor for
patient pressure
Technical data
45
11.3 Safety distances
Recommended safety distances between portable and mobile
HF telecommunications equipment (e.g. mobile phones) and
CPAP 20e or CLICK 2
Safety distance dependent on transmission frequency
Nominal output of
HF equipment
in m
in W
46
150 kHz - 80 MHz
80 MHz - 800 MHz
800 MHz – 2.5 GHz
0.01
0.12
0.12
0.24
0.1
0.37
0.37
0.74
1
1.17
1.17
2.34
10
3.69
3.69
7.38
100
11.67
11.67
23.33
Technical data
12. Warranty
•
Weinmann offers a warranty that the product, when used in accordance with
requirements, will remain free from defects for a period of two years from date
of purchase. For products whose durability is clearly indicated as less than two
years, the warranty expires on the expiration date indicated on the packaging or
in the user’s manual.
•
Claims against the warranty can be made only when accompanied by the sales
receipt, which must show salesperson and date of purchase.
•
We offer no warranty in the case of:
– Disregard of usage instructions
– Operating errors
– Improper use or handling
– Third-party intervention by non-authorized persons for the purpose of device
repair
– Acts of God, e.g., lightning strikes, etc.
– Transport damage as a result of improper packaging of returned items
– Lack of maintenance
– Operational and normal wear and tear, which includes, for example, the
following components.
– Filter
– Batteries and recheargable batteries
– Articles for one-time usage, etc.
– Failure to use original spare parts.
•
Weinmann is not liable for consequential harm caused by a defect if it is not
based on intention or gross negligence. Weinmann is also not liable for minor
physical injury to life or limb resulting from negligence.
•
Weinmann reserves the right to decide whether to eliminate defects, to deliver
a defect-free item or to reduce the purchase price by a reasonable amount.
•
If Weinmann rejects a claim against the warranty, it assumes no expense for
transport between customer and manufacturer.
•
Implied warranty claims remain unaffected by these changes.
Warranty
47
13. Index
Keyword:
A
Accessories
C
Cleaning
CLICK 2
D
Disinfection
Drying
E
Exhalation system:
F
Filter
Functional check
H
Humidifier
I
Inspection
M
Malfunctions
Mask
R
Replacement parts
S
Safety instructions
Side effects
Softstart
Standby mode
T
Traveling
W
Warranty
48
Index
page:
38
25
17, 21, 42
25, 29
25
18, 23, 25, 32, 39
25, 34, 41, 44
32
13, 19, 29, 38, 42
13
34
18, 20, 23
41
12, 13
15
11, 20, 22, 32
23
24
47
14. Declaration of Conformity
Declaration of Conformity
49
50
Declaration of Conformity
Vista general
Español
CPAP 20e
1 Cintas para la
cabeza
2 Máscara de
respiración
8 Entrada de aire
10 Placa de características
del aparato
11 Fuente de alimentación
4 Tubo de
respiración
5 Salida del aparato
13 Humidificador activado
14 Tiempo de
arranque suave
6 Conexión humidificador
del aire de respiración
12 Cable de alimentación
15 Símbolo de
mantenimiento
16 Símbolo de
sustitución del filtro
17 Presión de terapia
21 Filtro de bacterias 22 Humidificador
18 Tecla de encendido/
apagado (estado de
espera)
19 Tecla de arranque suave
20 Tecla del humidificador
23 Adaptador CC 12 - 24 V
25 Válvula de emergencia de O2
52
9 Entrada de tensión
7 Interfaz serial
3 Sistema de
espiración
24 Bolsa de transporte
Leyenda
1 Cintas para la cabeza (Accesorios)
12 Cable de alimentación
Sirve para colocar la máscara de respiración de
forma correcta y segura.
Sirve para conectar la fuente de alimentación a la
red eléctrica.
2 Máscara de respiración (Accesorios)
13 Humidificador activado
A través de la máscara de respiración se suministra
al paciente el aire de respiración con la presión de
terapia necesaria.
Este símbolo se indica cuando el humidificador
está en marcha. Se mostrará el nivel de
humidificación ajustado.
3 Sistema de espiración (Accesorios)
14 Tiempo de arranque suave
Por aquí sale el aire de espiración rico en dióxido
de carbono durante la terapia.
Este símbolo aparece cuando el tiempo de
arranque suave se regula o el arranque suave está
activado.
4 Tubo de respiración
A través del tubo de respiración, el aire fluye hacia
la máscara.
5 Salida del aparato
Desde aquí, el aire de respiración fluye a través del
tubo de respiración y la máscara de respiración
hasta el paciente.
6 Conexión humidificador del aire de
respiración
Sirve para conectar al humidificador del aire de
respiración CLICK 2 (disponible como accesorio).
7 Interfaz serial
Sirve exclusivamente para conectar a aparatos
para indicación y evaluación de los datos de
terapia.
8 Entrada de aire
Sirve para colocar de manera segura el filtro
contra polvo grueso y contra polvo fino.
9 Entrada de tensión
Permite conectar la fuente de alimentación
externa o el adaptador CC al aparato.
10 Placa de características del aparato
Proporciona información sobre el aparato, como
por ejemplo el número de serie y el año de
fabricación.
11 Fuente de alimentación
Sirve para suministrar tensión al aparato.
15 Símbolo de mantenimiento
Este símbolo aparece después de 10.000 horas de
servicio. Cuando se dé el caso, deberá procederse
al mantenimiento del aparato.
16 Símbolo de sustitución del filtro
Este símbolo aparece después de 250 horas de
servicio. Cuando se dé el caso, el filtro contra polvo
fino deberá cambiarse.
17 Presión de terapia
La presión de terapia se indica en hPa
(hectopascales). 1 hPa = 1mbar ≈ 1 cm H2O)
18 Tecla de encendido/apagado (estado de
espera)
Sirve para encender y apagar el aparato de
terapia.
19 Tecla de arranque suave
Sirve para activar el arranque suave o regular el
tiempo de arranque suave (5 - 30 minutos en
incrementos de 5 minutos).
20 Tecla del humidificador
Sirve para activar el humidificador o regular el
nivel de humidificación (6 niveles).
21 Filtro de bacterias (Accesorios)
Sirve para proteger al paciente frente a las
bacterias, sobre todo en caso de que el aparato lo
utilicen varios pacientes.
22 Humidificador (opcional)
Sirve para calentar o humedecer el flujo de aire
producido por el aparato de terapia.
Vista general
53
23 Adaptador CC 12 - 24 V (Accesorios)
Sirve para que el aparato de terapia funcione a
través de una toma de corriente continua (12 24 V).
25 Válvula de emergencia de O2
(Accesorios)
Sirve para proporcionar oxígeno a la máscara de
respiración.
24 Bolsa de transporte (Accesorios)
Sirve para transportar el aparato de terapia.
CLICK 2 (opcional)
26 Tapón de llenado
27 Parte superior
32 Racor de empalmede entrada
28 Racor de empalmede salida
31 Barra calentadora
29 Parte inferior
33 Fuelle
30 Tapón de cierre
Leyenda
26 Tapón de llenado
30 Tapón de cierre
Sirve para llenar el humidificador del aire de
respiración.
Sirve para cerrar el racor de medición de presión
durante el acondicionamiento higiénico.
27 Parte superior
31 Barra calentadora
Cierra el humidificador del aire de respiración,
contiene el tapón de llenado.
Calienta el agua en el humidificador. De este
modo, se humedece el aire de respiración.
28 Racor de empalme-de salida
32 Racor de empalme-de entrada
Desde aquí, el aire de respiración humedecido
fluye a través del tubo flexible.
Por aquí fluye el aire desde el aparato de terapia
hasta el humidificador.
29 Parte inferior
33 Fuelle
Tiene capacidad para 280 ml de agua
aproximadamente.
Sirve para secar el CLICK 2.
54
Vista general
Señalización especial en el aparato
CPAP 20e
34
35
39
36
37
38
41
CLICK 2
40
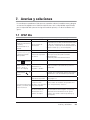
Símbolo
Significado
CPAP 20e:
34
Salida del aparato: Salida del aire ambiental a 4 - 20 hPa
35
¡Tenga en cuenta el manual de instrucciones!
Conexión para el humidificador del aire de respiración CLICK 2
WM 27330.
36
¡Tenga en cuenta el manual de instrucciones!
Conexión para la fuente de alimentación WM 24480 o el adaptador
CC WM 24469, sirve para utilizar el aparato a través de una toma
de corriente (12 - 24 V) continua.
37
Tensión continua
38
Entrada del aparato: Entrada de aire ambiental a temperatura
ambiente
39
¡Tenga en cuenta el manual de instrucciones!
Conexión para el ajuste de los parámetros de la terapia con
SOMNOadjust WM 23930 y SOMNOsupport WM 23975, consulte
al personal especializado o controle la válvula de emergencia de O2
WM 24042. Consumo de corriente máx. 163 mA.
Vista general
55
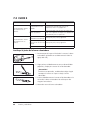
Símbolo
Significado
CLICK 2 (opcional):
40
¡El aparato se ha calentado! No toque la barra calentadora.
41
No utilizar el humidificador del aire de respiración con pacientes a
los que se haya practicado una derivación coronaria.
Placa identificativa del aparato
Símbolo
Significado
Año de fabricación
Grado de protección contra descarga eléctrica: Aparato del tipo B
No elimine el aparato tirándolo a la basura doméstica
¡Tenga en cuenta el manual de instrucciones correspondiente!
SN
Número de serie del aparato
Tipo de protección contra descarga eléctrica: Aparato con la clase de
protección II
Indicaciones sobre el embalaje
Símbolo
Temperatura admisible de almacenamiento: de -20˚C a +70˚C
-20
% 0-95
56
Significado
Vista general
Humedad atmosférica admisible de almacenamiento: 95% máximo de
humedad relativa.
Indice
1.
1.1
1.2
1.3
1.4
2.
2.1
2.2
2.3
3.
3.1
3.2
3.3
3.4
4.
4.1
4.2
4.3
4.4
4.5
4.6
5.
5.1
5.2
5.3
5.4
5.5
Descripción del aparato . . . . . . . . . 58
Finalidad de uso CPAP 20e . . . . . . 58
Finalidad de uso CLICK 2. . . . . . . . 58
Descripción del funcionamiento
CPAP 20e . . . . . . . . . . . . . . . . . . . 59
Descripción del funcionamiento
CLICK 2 . . . . . . . . . . . . . . . . . . . . 59
Disposiciones de seguridad . . . . . . 60
Indicaciones de seguridad . . . . . . . 60
Contraindicaciones . . . . . . . . . . . . 62
Efectos secundarios . . . . . . . . . . . 63
Montaje del aparato . . . . . . . . . . . . 64
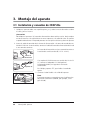
Instalación y conexión de
CPAP 20e . . . . . . . . . . . . . . . . . . . 64
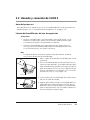
Llenado y conexión de CLICK 2 . . . 65
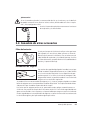
Máscara de respiración . . . . . . . . . 66
Conexión de otros accesorios . . . . 67
Manejo . . . . . . . . . . . . . . . . . . . . . . 68
Puesta en marcha del CPAP 20e . . 68
CLICK 2 ajuste . . . . . . . . . . . . . . . 69
Ajuste del arranque suave. . . . . . . 70
Después del uso . . . . . . . . . . . . . . 71
Consulta de la duración del
tratamiento . . . . . . . . . . . . . . . . . 72
Transporte del aparato de terapia . 73
Acondicionamiento higiénico . . . . . 74
Plazos . . . . . . . . . . . . . . . . . . . . . . 74
Limpieza CPAP 20e . . . . . . . . . . . . 74
Limpieza CLICK 2 . . . . . . . . . . . . . 76
Descalcificación de CLICK 2. . . . . . 78
Desinfección CPAP 20e . . . . . . . . . 78
5.6
5.7
5.8
6.
6.1
6.2
7.
7.1
7.2
8.
8.1
8.2
9.
Desinfección CLICK 2 . . . . . . . . . . 80
Cambio de paciente CPAP 20e . . . 80
Cambio de paciente CLICK 2 . . . . 80
Control del funcionamiento . . . . . .81
Plazos . . . . . . . . . . . . . . . . . . . . . 81
Controles de funcionamiento
CPAP 20e . . . . . . . . . . . . . . . . . . . 81
Controles de funcionamiento
CLICK 2 . . . . . . . . . . . . . . . . . . . . 82
Averías y soluciones . . . . . . . . . . . .83
CPAP 20e . . . . . . . . . . . . . . . . . . . 83
CLICK 2 . . . . . . . . . . . . . . . . . . . . 84
Mantenimiento . . . . . . . . . . . . . . . .86
Plazos . . . . . . . . . . . . . . . . . . . . . 86
Extensión del mantenimiento . . . . 86
Eliminación . . . . . . . . . . . . . . . . . . .86
10.
10.1
10.2
10.3
10.4
11.
11.1
11.2
11.3
12.
Volumen de suministro . . . . . . . . . .87
Volumen de suministro de serie . . 87
Accesorios . . . . . . . . . . . . . . . . . . 87
Piezas de repuesto CPAP 20e . . . . 90
Piezas de repuesto CLICK 2 . . . . . 90
Datos técnicos . . . . . . . . . . . . . . . . .91
Especificaciones . . . . . . . . . . . . . . 91
Esquema neumático. . . . . . . . . . . 94
Distancias de protección. . . . . . . . 95
Garantía . . . . . . . . . . . . . . . . . . . . .96
13.
Índice alfabético . . . . . . . . . . . . . . .97
14.
Declaración de conformidad . . . . . .98
6.3
Indice
57
1. Descripción del aparato
1.1 Finalidad de uso CPAP 20e
CPAP 20e es un aparato CPAP (CPAP = Continuous Positive Airway Pressure = presión
positiva continua en las vías respiratorias) para tratar las alteraciones respiratorias asociadas
al sueño apto para pacientes mayores de 12 años.
No se requiere ningún cursillo o formación particular para emplear el aparato. Tan sólo se
debería llevar a cabo una introducción por parte de una clínica o un especialista medicotécnico.
¡Precaución!
• CPAP 20e sólo previene eficazmente la obstrucción de las vías respiratorias si la presión CPAP específica del paciente prescrita por el médico ha
sido determinada, por ejemplo, en un instituto del sueño.
•
CPAP 20e no está indicado para el uso en situaciones de soporte vital.
•
Utilice el aparato exclusivamente para el fin que se menciona aquí.
1.2 Finalidad de uso CLICK 2
El humidificador del aire de respiración CLICK 2 es un accesorio opcional del aparato de terapia Weinmann CPAP 20e.
El humidificador del aire de respiración CLICK 2 se emplea para CPAP 20e calentar el flujo
de aire generado y concentrar la humedad. De esta manera, previene que las vías respiratorias superiores del paciente se sequen durante la terapia.
CLICK 2 funciona exclusivamente con el aparato de terapia CPAP 20e. No se permite su uso
junto con otros aparatos.
Utilice el aparato exclusivamente para el fin que se describe aquí.
58
Descripción del aparato
1.3 Descripción del funcionamiento CPAP 20e
CPAP 20e funciona según el principio de un generador de flujo accionado eléctricamente,
cuyo nivel de presión constante se regula electrónicamente.
•
Un ventilador aspira el aire ambiental a través de un filtro y lo impulsa
hacia la salida del aparato. Desde aquí, el aire circula por el tubo y por la
máscara de respiración hacia el paciente.
•
Un sensor de presión mide la presión acumulada en la salida del aparato
y se indica en el display. El generador de flujo controlado por microprocesador regula la presión al nivel ajustado y reduce las fluctuaciones de
la presión provocadas por la respiración.
•
El sistema incorpora un dispositivo automático de arranque suave que facilita la fase de adormecimiento. La presión CPAP empieza al conectar el
aparato con la presión inicial ajustada por el médico y va aumentando
lentamente hasta la presión nominal ajustada. La duración del incremento de la presión puede ser ajustada entre 5 y 30 minutos en incrementos
de 5 minutos.
•
El ajuste de los parámetros del tratamiento se realiza mediante el ajuste
remoto SOMNOadjust por parte del personal especializado o mediante
el programa de evaluación SOMNOsupport.
•
Si se interrumpe el suministro de corriente, CPAP 20e guarda automáticamente todos los ajustes. Una vez reestablecida la alimentación, no será
necesario volver a realizar los ajustes del aparato.
1.4 Descripción del funcionamiento CLICK 2
El humidificador del aire de respiración funciona según el llamado principio de rebose. El
aire proveniente del aparato de terapia se canaliza por la superficie de una reserva de agua
caliente. De este modo, se incrementan la humedad relativa y la temperatura del flujo de
aire. La emisión de humedad se puede regular individualmente por medio de las teclas del
aparato de terapia Weinmann. El rendimiento de la barra calentadora, y en consecuencia
la temperatura del agua en la cámara del humidificador, se regula electrónicamente desde
el aparato de terapia Weinmann.
Gracias a al cámara transparente del humidificador, es posible controlar en todo momento
el nivel del agua.
Descripción del aparato
59
2. Disposiciones de seguridad
Lea con atención este manual de instrucciones. Forma parte del aparato que se describe y
debe estar disponible en todo momento.
Por su propia seguridad personal, así como por la de sus pacientes, y para cumplir con los
requisitos estipulados en la Directiva 93/42 CEE, debe cumplir las siguientes indicaciones
de seguridad:
2.1 Indicaciones de seguridad
Funcionamiento del aparato
¡Precaución!
• El aparato se puede emplear con tensiones de 115 V a 230 V con el dispositivo de red incorporado. Asegúrese de que la tensión de suministro
de red es compatible con estos valores. Para el funcionamiento con
12 V CC o 24 V CC, utilice el adaptador CC WM 24469 disponible como
accesorio.
•
El CPAP 20e debe estar enchufado en una toma de corriente fácilmente
accesible, de manera que, en caso de avería, se pueda desconectar rápidamente el enchufe de la red eléctrica.
•
No coloque el aparato ni la fuente de alimentación sobre colchas o telas.
No lo emplee en zonas cercanas a la calefacción o en zonas expuestas a
la radiación solar. El aparato se podría sobrecalentar. Ello puede provocar
una terapia insuficiente y dañar el aparato.
•
Mantenga una distancia de seguridad entre el CPAP 20e y los aparatos
que emitan radiaciones de AF (por ejemplo, teléfonos móviles). De lo
contrario, pueden producirse fallos en el funcionamiento (consultar
Página 95.) En caso de que CPAP 20e alterara el funcionamiento de otros
aparatos (por ejemplo, una radio), mantenga el CPAP 20e alejado de
dicho aparato.
¡Precaución!
• No utilice el aparato de terapia ni el humidificador del aire de respiración
si el aparato no funciona correctamente, si tiene piezas dañadas y/o si el
humidificador del aire de respiración está mojado en el contacto de la
barra calentadora.
60
Disposiciones de seguridad
•
La potencia del humidificador del aire de respiración puede variar si el
aparato se utiliza en temperaturas ambiente fuera de las permitidas.
•
Tenga en cuenta el manual de instrucciones de la máscara de respiración.
•
Para evitar una infección o una contaminación bacteriana, tenga en
cuenta el apartado “5. Acondicionamiento higiénico” en la página 74.
Transporte / Accesorios / Piezas de recambio / Reparación
¡Precaución!
• No transporte ni vuelque el CPAP 20e con el humidificador del aire de
respiración montado. Si queda en posición inclinada, el agua residual del
humidificador del aire de respiración puede introducirse en el CPAP 20e,
causando daños en este último.
•
Únicamente debe dejar que realicen las inspecciones y los trabajos de
reparación el fabricante Weinmann o el personal experto.
•
Si se utilizan artículos de otros fabricantes pueden producirse fallos en el
funcionamiento y problemas por falta de biocompatibilidad. Tenga en
cuenta que en estos casos perderá cualquier derecho de garantía o de indemnización si no utiliza los accesorios recomendados en el manual de
instrucciones ni las piezas de repuesto originales.
¡Precaución!
• No está permitido modificar el CPAP 20e ni el CLICK 2.
•
Sólo pueden utilizarse máscaras de otros fabricantes con la autorización
previa del fabricante Weinmann. Si se utilizan máscaras no autorizadas
se pone en peligro el éxito de la terapia.
•
Cerciórese de que los accesorios utilizados sean indicados para la terapia
y estén completos. Esto es aplicable sobre todo para el sistema de espiración. De lo contrario, puede obstruir el contenido de CO2 en el aire de
espiración.
Introducción de oxígeno
¡Advertencia!
• Si se utiliza oxígeno durante la terapia, está prohibido fumar y encender
fuego. Existe peligro de incendio. El oxígeno puede acumularse en la
ropa, en la ropa de cama o en el cabello. Sólo puede eliminarse el oxígeno mediante una ventilación exhaustiva.
Disposiciones de seguridad
61
¡Precaución!
• La introducción de oxígeno sólo está permitida utilizando la válvula de
emergencia de O2 WM 24042.
•
Referente al oxígeno, observe detenidamente las indicaciones de seguridad contenidas en el manual de utilización su sistema de introducción de
oxígeno.
2.2 Contraindicaciones
En algunas enfermedades, el CPAP 20e no debe utilizarse o sólo debe utilizarse teniendo
una precaución especial. En cada caso individual, la decisión de efectuar una terapia con el
CPAP 20e debe tomarla el médico que realiza la terapia.
Entre ellas se cuentan:
•
Descompensación cardiaca
•
Trastornos graves del ritmo cardiaco
•
Hipotonía grave, especialmente en combinación con depleción de volumen intravascular
•
Epistaxis grave
•
Riesgo alto de barotrauma
•
Insuficiencia respiratoria cuya causa no sea la apnea obstructiva del
sueño (AOS)
•
Hipoxemia nocturna cuya génesis no sea la AOS (adiposidad-síndrome de
hipoventilación)
•
Neumotórax o neumomediastino
•
Neumoencéfalo
•
Trauma craneal
•
Estado posterior a una operación cerebral, así como tras una intervención
quirúrgica en la hipófisis o en el oído medio o interno
•
Inflamación aguda de los senos paranasales (sinusitis), inflamación del
oído medio (otitis media) o perforación del tímpano
•
Deshidratación
No se han observado situaciones de peligro con el CPAP 20e.
62
Disposiciones de seguridad
2.3 Efectos secundarios
Si se utiliza el CPAP 20e durante periodos cortos y largos pueden aparecer los siguientes
efectos secundarios no deseados:
•
zonas de presión de la máscara de respiración y de la almohadilla frontal
en la cara;
•
enrojecimientos de la piel de la cara;
•
nariz tapada;
•
sequedad en la nariz;
•
sequedad de boca matutina;
•
sensación de presión en los senos paranasales;
•
irritaciones de la conjuntiva en los ojos;
•
insuflación de aire gastrointestinal ("Flatulencia")
•
sangrado de la nariz.
Disposiciones de seguridad
63
3. Montaje del aparato
3.1 Instalación y conexión de CPAP 20e
1. Coloque el aparato sobre una superficie plana, p. ej. sobre la mesita de noche o sobre
el suelo, junto a la cama.
¡Precaución!
No coloque el aparato ni la fuente de alimentación sobre colchas o telas. No lo emplee
en zonas cercanas a la calefacción o en zonas expuestas a la radiación solar. El aparato
se podría sobrecalentar. Ello puede provocar una terapia insuficiente y dañar el aparato.
2. Inserte el cable de conexión de la fuente de alimentación a la toma de entrada de tensión del CPAP 20e. A continuación, conecte el cable de fuente de alimentación de la red
a una toma de corriente.
La fuente de alimentación se ajusta automáticamente a
la tensión de suministro de red (115 V - 230 V).
Fuente de
alimentación
Adaptador CC
Si se emplea el CPAP 20e con una tensión de 12 o 24 V
CC, conecte el adaptador CC WM opcional
incorporado 24469, en lugar de la fuente de
alimentación.
En el display aparece “0”, que indica el estado de
espera.
3. Conecte el tubo flexible a la salida del aparato.
Nota:
El aparato compensa automáticamente las diferencias
de presión atmosférica (debido, por ejemplo, a una
gran altitud).
64
Montaje del aparato
3.2 Llenado y conexión de CLICK 2
Antes del primer uso
Antes del primer uso, se debe lavar una vez el humidificador del aire de respiración con
abundante agua (vea “5. Acondicionamiento higiénico“ en la página 74).
Llenado del humidificador del aire de respiración
¡Precaución!
• No llene el humidificador si está conectado al aparato de terapia y no sobrepase el nivel de carga máxima. De lo contrario, podría penetrar agua
en el aparato de terapia. Ello puede dañar el aparato.
•
No llene el humidificador del aire de respiración con agua caliente. La
carcasa y la barra calentadora pueden dañarse. Ello puede provocar fallos
en el funcionamiento y una terapia insuficiente.
Nota
• El empleo de aditivos aromáticos, como el aceite de eucalipto, puede dañar las piezas de plástico del humidificador.
1. Abra el tapón de llenado del humidificador del aire de
respiración.
2. Llene el humidificador del aire de respiración hasta la
marca con agua destilada. Si no dispone de agua destilada, excepcionalmente puede utilizar agua hervida con
poco contenido en cal. En este caso, asegúrese de que
la barra calentadora no se calcifique (vea “5.4 Descalcificación de CLICK 2“ en la página 78).
Marcado
3. Cierre firmemente el humidificador del aire de respiración con el tapón de llenado.
26
4. Después del llenado, verifique la estanqueidad del humidificador del aire de respiración. Para ello, pase el
dedo por la parte inferior o deposite el humidificador
sobre un paño de cocina. De este modo se detecta fácilmente cualquier escape de agua.
Montaje del aparato
65
Adaptación del humidificador del aire de respiración
1. Si se da el caso, extraiga el tubo flexible ondulado del aparato de terapia.
2. Una el humidificador del aire de respiración al aparato
para la apnea del sueño por la parte delantera.
A la vez, el racor de empalme de entrada y la barra calentadora deben estar orientadas al aparato para la apnea del sueño.
Cerciórese de que el sistema de bloqueo esté activado.
Tecla de bloqueo
3. Conecte el tubo flexible ondulado al racor de empalme
de salida del humidificador del aire de respiración.
4. Para desconectar el humidificador, presione la tecla de
bloqueo y sáquelo del aparato.
3.3 Máscara de respiración
Aplicación de la máscara de respiración
1. Ajuste el soporte frontal de la máscara de respiración (si éste está presente).
2. Conecte a la máscara la capucha o las cintaspara la cabeza.
3. Aplique la máscara.
4. Ajuste la capucha y las cintas para la cabeza de tal forma que el reborde de la máscara
sólo ejerza una ligera presión, a fin de evitar zonas de presión en la cara.
Nota:
Para el resto del procedimiento, consulte las instrucciones de uso de la máscara de respiración correspondiente.
¡Advertencia!
Las máscaras nasales y bucales deben venir equipadas con una válvula de espiración
de emergencia; de este modo, en caso de avería del aparato, podría respirar por la
nariz o la boca. ¡No deben emplearse máscaras nasales y bucales que no dispongan
de válvula de espiración de seguridad!
Sistema externode espiración
Algunas máscaras no incorporan un sistema de espiración. A fin de eliminar el aire usado,
que contiene dióxido de carbono (CO2), es necesario que estas máscaras contengan un sistema de espiración externo. Debe tener en cuenta el manual de instrucciones de la máscara.
66
Montaje del aparato
¡Advertencia!
Sin un sistema de espiración, la concentración de CO2 en la máscara y en el tubo flexible podría aumentar hasta alcanzar valores críticos, dificultando con ello su respiración. ¡Existe peligro de asfixia!
– Instale el sistema de espiración externo entre la máscara
de respiración y el tubo flexible.
3.4 Conexión de otros accesorios
Filtro de bacterias
Si está previsto que el CPAP 20e lo utilicen varios pacientes
(por ejemplo, en una clínica), debe utilizarse un filtro de
bacterias para prevenir infecciones. Éste se coloca entre el
tubo flexible de respiración y la salida del aparato. Si utiliza
un filtro de bacterias, pueden disminuir la estabilidad de la
presión y la potencia de flujo.
Introducción de oxígeno
Por motivos de seguridad (peligro de incendio) no está permitido introducir oxígeno directamente en el tubo flexible
ni en la máscara de respiración sin un dispositivo de protección especial. Si se utiliza la válvula de emergencia de
oxígeno WM 24042, es posible introducir hasta 4 l/min de
oxígeno en la máscara de respiración.
Se puede utilizar un concentrador de oxígeno (p. ej., Oxymat), oxígeno líquido o una bombona de oxígeno con el correspondiente reductor de presión. Esta aplicación debe haber
sido prescrita por el médico responsable de la terapia.
Para evitar que el oxígeno penetre en el aparato de terapia aplique automáticamente a
CPAP 20e una presión de terapia de 5 hPa como mínimo si la válvula de seguridad de oxígeno está enchufada. A este respecto, es imprescindible que tenga en cuenta las indicaciones de seguridad para la manipulación de oxígeno, así como el manual de instrucciones de
la válvula de oxígeno y del aparato de oxígeno que utilice.
Montaje del aparato
67
4. Manejo
4.1 Puesta en marcha del CPAP 20e
Aplicación de la máscara
1. Coloque la máscara como se describe en el apartado
„3.3 Máscara de respiración“ en la página 66.
2. Una el tubo flexible a la máscara de respiración (cono
de conexión).
3. Desvíe el tubo flexible de la cabeza.
¡Advertencia! ¡Riesgo de lesión!
Nunca coloque el tubo flexible alrededor del cuello.
Conexión el aparato
1. Pulse la tecla de encendido/apagado.
La duración de la terapia se indica en el display durante unos 3 segundos. El generador de
flujo empieza a impeler aire a través de tubo flexible.
Si está preseleccionado el arranque suave, a continuación se ilumina el indicador de
arranque suave y se visualiza el tiempo de arranque suave en el display.
Ahora el CPAP 20e ya está listo para funcionar.
Nota:
Si el aparato permanece 15 minutos sin utilizarse, se apaga automáticamente (sólo con
una presión de terapia superior a 6 hPa).
68
Manejo
4.2 CLICK 2 ajuste
Conexión del humidificador del aire de respiración
1. Llene el humidificador y ajústelo según descrito en el apartado „3.2 Llenado y conexión
de CLICK 2“ en la página 65.
2. Encienda el aparato de terapia.
3. Pulse la tecla del humidificador
del aparato de terapia. En el display del aparato de terapia se muestra el
símbolo del humidificador , así como la indicación del
grado de humidificación (en este caso grado 4).
Tecla del humidificador
Ajuste del nivel de calentamiento
1. Asegúrese de que el aparato de terapia está conectado.
2. Mantenga pulsada la tecla del humidificador
durante aprox. 3 segundos, hasta que el número y el símbolo
del humidificador
empiecen a parpadear.
3. Suelte la tecla del humidificador
Tecla del humidificador
.
4. Seleccione el nivel de calentamiento (1-6) con la tecla
de encendido/apagado (+) o la tecla de arranque suave
(-).
Al cabo de 4 segundos se adopta el valor indicado.
El ajuste que le resulte más favorable dependerá de la temperatura ambiente y de la humedad atmosférica. Por este motivo, el ajuste óptimo variará dependiendo de la estación del
año. En circunstancias "normales" el nivel de calentamiento 3 es suficiente.
Si la temperatura asciende a 23°˚C y la humedad atmosférica al 70%, se puede alcanzar
un caudal de 20 l/min y una humedad de 100% mediante el nivel de calentamiento 6.
Si por la mañana tiene sequedad en las vías respiratorias, la potencia de calentamiento se
debe regular a un nivel inferior. En este caso, seleccione un nivel de ajuste superior.
Si durante una noche de terapia el agua se condensa en el tubo flexible ondulado, se ha
ajustado un nivel de calentamiento excesivo. En ese caso, seleccione un nivel de calentamiento inferior.
Manejo
69
Desconexión el humidificador del aire de respiración
Existen dos posibilidades para apagar el humidificador del aire de respiración :
•
Presione la tecla del humidificador
del aparato para la apnea del sueño. El símbolo del humidificador
desaparece del display del aparato
para la apnea del sueño. El aparato de terapia continua activado.
•
Pulse la tecla de encendido/apagado del aparato de terapia. El humidificador del aire de respiración se apagará a la vez que el aparato de
terapia.
Si vuelve a encender el aparato de terapia, el humidificador del aire de
respiración se volverá a activar automáticamente y funcionará con la
potencia de calentamiento de la terapia anterior.
Desconexión automática en caso de nivel bajo de llenado
Si el aparato de terapia localiza un nivel de llenado del humidificador del aire de respiración
demasiado bajo, éste se apaga tras 15 minutos. El símbolo del humidificador desaparece
del display.
4.3 Ajuste del arranque suave
El tiempo de arranque suave puede ajustarse hasta un máximo de 30 minutos en incrementos de 5 minutos. Para ello, proceda del modo siguiente:
1. Conecte CPAP 20e y pulse la tecla de arranque suave
. Mantenga pulsada la tecla
hasta que el indicador del tiempo de arranque suave parpadee.
2. Seleccione el tiempo de arranque suave (5 - 30 minutos en incrementos de 5 minutos)
con la tecla de encendido/apagado (+) o la tecla de arranque suave (-).
Si no se pulsa ninguna tecla durante 4 segundos, se memoriza también el tiempo de
arranque suave que se indica. El indicador deja de parpadear.
Los ajustes del arranque suave se conservan aunque se desconecte el aparato. Cada vez
que se pone el CPAP 20e en funcionamiento, arranca automáticamente en el modo de
arranque suave, en caso de que éste estuviera conectado.
El arranque suave se puede activar o desactivar en cualquier momento pulsando
brevemente la tecla de arranque suave
.
70
Manejo
4.4 Después del uso
1. Guarde la capucha y las cintas para la cabeza con la máscara de respiración.
2. Pulse la tecla de conexión/desconexión para desconectar el aparato.
En el display se indica la duración de la terapia diaria de
la última utilización. A continuación, aparece "0".
3. Desenchufe la conexión de tubo flexible y el sistema de
espiración de la máscara de respiración.
4. Limpie la máscara de respiración y el sistema de
espiración (vea “5. Acondicionamiento higiénico“ en la
página 74).
Nota:
CPAP 20e consume con la fuente de alimentación
aprox. 4 vatios en el modo de espera (Standby). El aparato no está provisto de interruptor de línea. Para ahorrar energía, durante el día puede desconectar del
enchufe el conector del cable de alimentación de red.
Para ello, enchufe el aparato a una toma de corriente
de fácil acceso. Los valores y ajustes almacenados se
conservan.
5. Limpie el humidificador del aire de respiración (vea “5.
Acondicionamiento higiénico“ en la página 74).
Manejo
71
4.5 Consulta de la duración del tratamiento
El CPAP 20e almacena los datos de 366 días y la correspondiente duración del tratamiento.
Puede consultar los siguientes valores:
•
duración total de la terapia en horas
•
duración media diaria de la terapia
•
duración de la terapia del día actual con indicación de la fecha
Nota:
Un día de terapia empieza y termina a las 12 del mediodía. Los datos registrados desde
las 0 (medianoche) hasta las 12 (mediodía) se asignan al día natural anterior.
La duración total de la terapia se indica durante algunos segundos al conectar el aparato. Al
desconectarlo se indicará la duración de la terapia diaria.
Para consultar los otros datos, proceda de la siguiente forma:
1. Al desconectar el aparato, mantenga pulsada la tecla de encendido/apagado durante
4 segundos aprox., hasta que la duración media de la terapia diaria se muestre en el
display.
2. Suelte la tecla de encendido/apagado. Ahora se indica la duración media y la duración
total de la terapia diaria durante 5 segundos. Posteriormente, se alternarán la fecha
actual y la duración de la terapia diaria correspondiente.
3. Sólo puede visualizar la duración de la terapia diaria de los días anteriores.
Pulse la tecla de arranque suave las veces que haga falta hasta que se visualice la fecha
deseada en el display.
O simplemente puede mantener pulsada la tecla de arranque suave. Cuando se visualice
la fecha deseada, suelte la tecla.
Proceda del mismo modo con la tecla de encendido/apagado para volver a la fecha
actual.
Si no se pulsa ninguna tecla en un lapso de 10 segundos, se visualiza durante 3 segundos
el tiempo de funcionamiento. Posteriormente se muestra "0" en el display.
72
Manejo
4.6 Transporte del aparato de terapia
Para transportar el aparato de terapia durante un trayecto prolongado, se debería guardar
en la bolsa de transporte (disponible como accesorio).
1. Guarde en la bolsa de transporte el aparato, el cable de conexión, el tubo flexible, la
máscara de respiración, el sistema de espiración y, en su caso, el humidificador del aire
de respiración.
2. Cierre las cremalleras de la bolsa de transporte y ajuste el tirante de transporte a la
longitud adecuada.
¡Precaución!
No olvide llevar consigo filtros de repuesto y el manual de instrucciones para el manejo,
así como el adaptador CC, si fuera necesario. Si desea llevar consigo el aparato de terapia como equipaje de mano en un avión, infórmese antes del vuelo en su compañía
aérea sobre los trámites eventualmente necesarios.
Manejo
73
5. Acondicionamiento higiénico
5.1 Plazos
•
Limpie la máscara de respiración y el sistema de espiración diariamente
como se describe en el manual de instrucciones.
•
Revise regularmente los filtros:
– debe limpiar el filtro contra polvo grueso una vez a la semana y sustituirlo
como mínimo cada 6 meses.
– sustituya el filtro contra polvo fino según el grado de suciedad, pero como
máximo al cabo de 250 horas o un mes (indicador de cambio de filtro).
•
Limpie regularmente la carcasa del CPAP 20e y la fuente de alimentación.
•
Limpie y cambie el tubo flexible de respiración dependiendo el grado de
suciedad, pero como mínimo límpielo una vez al mes y sustitúyalo cada
12 meses.
•
Limpie la capucha y las cintas para la cabeza como indican el manual de
uso correspondiente.
•
Limpie el humidificador del aire de respiración diariamente.
5.2 Limpieza CPAP 20e
Limpieza del tubo flexible
1. Desconecte el tubo flexible del aparato y del sistema de espiración.
2. Limpie el tubo flexible ondulado sin que queden restos en agua caliente con un poco de
agente de lavado. Limpie a fondo el interior del tubo flexible.
3. A continuación, aclare el interior y el exterior con abundante agua caliente.
¡Precaución!
4. Sacuda enérgicamente el tubo flexible de respiración.
5. Tienda el tubo flexible de respiración y deje que se escurra por completo, para evitar que
penetre humedad en el CPAP 20e.
El tubo flexible se seca por completo por medio de CPAP 20e.
6. Conecte el tubo flexible a la salida del aparato.
74
Acondicionamiento higiénico
7. Para iniciar el proceso de secado, pulse al mismo tiempo la tecla de arranque suave
CPAP 20e y la tecla de apagado/encendido.
El aparato se encenderá y secará el tubo flexible (duración: 30 minutos). El tiempo restante se visualizará en el display. Al finalizar el proceso de secado el aparato se apaga
automáticamente.
Puede interrumpir el proceso en cualquier momento por medio de la tecla de
encendido/apagado.
Si tras el secado quedan zonas húmedas en el tubo flexible, reinicie el proceso.
Limpieza de la carcasa del CPAP 20e
¡Advertencia!
• Existe peligro de shock eléctrico. Antes de la limpieza no olvide desconectar de la toma de entrada de tensión del aparato de terapia el cable
de conexión de la fuente de alimentación.
•
Preste atención a que no penetre ningún líquido en el aparato. No sumerja nunca el aparato en un desinfectante ni en ningún otro líquido. De
lo contrario pueden producirse daños en el aparato y, con ello, se pone
en peligro al usuario y al paciente.
¡Precaución!
• Preste atención a que no penetre ningún líquido en el racor de medición
de presión. De lo contrario pueden producirse fallos en el funcionamiento.
Limpie el aparato, la fuente de alimentación y el cable de alimentación de redcon un paño
suave humedecido.
El CPAP 20e debe estar completamente seco antes de la puesta en funcionamiento.
Limpieza del filtro contra polvo grueso / cambio del filtro contra polvo
fino
1. Retire el filtro contra polvo grueso y límpielo con agua
corriente limpia hasta que no queden residuos.
2. En caso necesario, sustituya el filtro contra polvo fino.
No se puede lavar.
3. Deje secar el filtro contra polvo grueso.
El filtro contra polvo grueso debe estar completamente
seco antes de la puesta en funcionamiento.
4. Coloque de nuevo el filtro contra polvo grueso.
Acondicionamiento higiénico
75
Para apagar el indicador de sustitución de filtro
Mantenga pulsada la tecla de encendido/apagado para encender el aparato:
– En primer lugar, se indicará la duración total de la terapia.
– A continuación, aparece el indicador de sustitución de filtro.
– No suelte la tecla hasta que el indicador de sustitución de filtro haya
desaparecido.
Reajustar el contador de horas
Si, a causa de la suciedad, se cambia el filtro contra polvo fino antes de llegar a las 250
horas de servicio, el contador de horas deberá ponerse a cero. Para ello, proceda del modo
siguiente:
1. Mantenga pulsada la tecla de encendido/apagado para encender el aparato.
Tras cinco segundos aprox. se ilumina el indicador de sustitución de filtro. Tres segundos
despuésvolverá a desaparecer.
2. Suelte la tecla de encendido/apagado.
Accesorios
Para la limpieza del sistema de espiración, de la máscara de respiración, de la capucha y de
las cintas para la cabeza , tenga en cuenta el apartado "Limpieza" en el manual de instrucciones correspondiente .
Para la limpieza del humidificador del aire de respiración CLICK 2, tenga en cuenta el apartado „5.3 Limpieza CLICK 2“ en la página 76 de este manual de instrucciones.
5.3 Limpieza CLICK 2
No toque la barra calentadora. El metal tarda mucho tiempo en enfriarse.
1. Abra el humidificador del aire de respiración girando la
parte superior contra la inferior en sentido contrario al
de las agujas del reloj.
76
Acondicionamiento higiénico
2. Durante la limpieza no debe penetrar agua en el conducto de medición de la presión, ya que de lo contrario
podrían producirse mediciones erróneas. Para evitarlo,
se debe cerrar el conducto de medición de la presión:
Para cerrar el conducto de medición de la presión en el
racor de empalme de salida , inserte por el extremo del
conducto de medición de la presión el tubo flexible de
silicona del tapón de cierre (incluido en el volumen de
suministro CLICK 2).
Para cerrar el conducto de medición de la presión en el
racor de empalme de entrada, introduzca en la junta
del conducto de medición de la presión el extremo delgado del tapón de cierre, ejecutando un ligero movimiento giratorio.
Limpie las partes superior e inferior con agua tibia a la que habrá añadido un poco de producto de limpieza. Le recomendamos que limpie una vez por semana las piezas de la carcasa en la bandeja superior del lavavajillas, a una temperatura máxima de 65 ˚C.
3. A continuación, aclare las piezas de la carcasa con agua limpia.
4. Sacuda enérgicamente la parte inferior, a fin de eliminar el agua que haya podido entrar
en el contacto de la barra calentadora. Seque a conciencia las piezas utilizando un paño
suave. El contacto de la barra calentadora debe estar seco.
5. Revise si el tubo de medición de presión está montado correctamente en la parte
superior. En caso necesario, vuélvalo a insertar.
6. Una las partes superior e inferior de forma que las marcas queden superpuestas. Gire las partes superior e inferior una contra otra hasta el tope en sentido contrario
al de las agujas del reloj
Marcas
7. Retire los tapones de cierre. El humidificador del aire de
respiración vuelve a estar listo para funcionar.
Como medida de higiene, le recomendamos que cambie las piezas de plástico como
máximo tras dos años de uso.
CLICK 2 Secado
En caso de que penetrara agua en el conducto de medición de la presión, el CLICK 2 debe
secarse como se indica a continuación:
Acondicionamiento higiénico
77
1. Coloque el fuelle suministrado en el extremo del conducto de medición de la presión, en el racor de empalme de salida, como ilustra la figura.
¡Advertencia!
El fuelle debe usarse exclusivamente para secar el humidificador del aire de respiración. Durante el secado el CLICK 2 no debe estar conectado al aparato de terapia. De
lo contrario, el aparato de terapia podría dañarse.
2. Comprima el fuelle para que la humedad se elimine.
¡Precaución!
Mantenga el fuelle presionado para que la humedad no vuelva a aparecer.
3. Retire el fuelle.
4. Repita el procedimiento 1. hasta 3. dos o tres veces.
5.4 Descalcificación de CLICK 2
Si la parte inferior de la carcasa y la barra calentadora están calcificadas:
1. Vierta aprox. 150 ml de vinagre para uso doméstico puro (solución al 5%, sin aditivos)
en la parte inferior del humidificador del aire de respiración, y déjelo actuar durante una
hora.
2. Vacíe la solución de vinagre.
3. Limpie las partes de la carcasa con un trapo limpio y aclárelas varias veces a fondo con
agua.
4. A continuación, seque cuidadosamente todas las piezas.
5.5 Desinfección CPAP 20e
En caso necesario, por ejemplo después de una enfermedad infecciosa o de un ensuciamiento
extraordinario, también puede desinfectar la carcasa, la fuente de alimentación, el cable de
conexión a la red eléctrica, el tubo flexible y humidificador del aire de respiración. Tener en
cuenta el manual de instrucciones del agente desinfectante utilizado. Se recomienda llevar
guantes adecuados (p. ej., guantes para fregar o guantes desechables) para la desinfección.
78
Acondicionamiento higiénico
Aparato
¡Advertencia!
• Existe peligro de shock eléctrico. Antes de la limpieza no olvide desconectar el cable de conexión de la fuente de alimentación de la toma de
entrada de tensión del aparato de terapia.
•
Preste atención a que no penetre ningún líquido en el aparato. No sumerja nunca el aparato en un desinfectante ni en ningún otro líquido. De
lo contrario pueden producirse daños en el aparato y, con ello, se pone
en peligro al usuario y al paciente.
¡Precaución!
• Preste atención a que no penetre ningún líquido en el racor de medición
de presión. De lo contrario pueden producirse fallos en el funcionamiento.
La carcasa, la fuente de alimentación y el cable de alimentación de la red del CPAP 20e se
limpian mediante un simple frotado de desinfección. Para ello recomendamos el uso de
TERRALIN.
Tubo flexible
•
Como agente desinfectante recomendamos GIGASEPT FF.
•
El procedimiento para la desinfección es análogo al de la limpieza.
•
El tubo flexible no se debería calentar a más de 70 ˚C. No se permite la
esterilización.
Accesorios
Para desinfectar o esterilizar el sistema de espiración y la máscara de respiración, preste
atención al apartado "Acondicionamiento higiénico" en el manual de instrucciones
correspondiente.
Para desinfectar y cambiar de paciente el humidificador del aire de respiración CLICK 2
preste atención al apartado „5.6 Desinfección CLICK 2“ en la página 80 y „5.8 Cambio de
paciente CLICK 2“ en la página 80 de este manual de instrucciones.
Acondicionamiento higiénico
79
5.6 Desinfección CLICK 2
Puede desinfectar el humidificador del aire de respiración. Tener en cuenta el manual de
instrucciones del agente desinfectante utilizado. Se recomienda llevar guantes adecuados
(p. ej., guantes para fregar o guantes desechables) para la desinfección.
Nosotros recomendamos utilizar GIGASEPT FF.
•
El procedimiento para el desmontaje y el montaje del humidificador del
aire de respiración es idéntico al de la limpieza.
•
Para garantizar una desinfección impecable retire también el tapón de
llenado y desinféctelo separadamente.
Como medida de higiene, le recomendamos que cambie las piezas de plástico como
máximo tras dos años de uso.
5.7 Cambio de paciente CPAP 20e
En caso de que deba utilizarse el aparato para otro paciente sin filtro de bacterias, previamente será preciso acondicionarlo higiénicamente. Esta operación deberá ser realizada por
el fabricante Weinmann o por un distribuidor especializado.
El procedimiento para el acondicionamiento higiénico se describe tanto en la hoja de
inspección como en el manual de mantenimiento del CPAP 20e.
5.8 Cambio de paciente CLICK 2
En caso de que el CLICK 2 deba utilizarse para otro paciente sin filtro de bacterias, previamente será preciso acondicionarlo higiénicamente. Este procedimiento debería llevarlo a
cabo una persona especializada que esté autorizada para ello.
El procedimiento para el acondicionamiento higiénico durante un cambio de paciente se
puede consultar en el manual de mantenimiento del CPAP 20e.
80
Acondicionamiento higiénico
6. Control del funcionamiento
6.1 Plazos
Tanto para CPAP 20e como para CLICK 2 realice un control de funcionamiento cada seis
meses como mínimo.
Si se descubrieran fallos en el control de funcionamiento, no utilice el aparato hasta que
las averías se hayan reparado.
6.2 Controles de funcionamiento CPAP 20e
1. Monte el CPAP 20e dispuesto para funcionar con el tubo flexible, el sistema de
espiración, la máscara de respiración y el cable de alimentación de red.
2. Pulse la tecla de conexión/desconexión para conectar el aparato. En caso de que el
arranque suave esté conectado, desconéctelo mediante la tecla de arranque suave. El
ventilador impulsa el aire hacia la máscara de respiración a través del tubo flexible. En el
display se indicará la presión momentánea en hPa.
3. Obture la abertura de la máscara de respiración, p. ej., con el pulgar o la mano.
Compare la presión indicada en el display con la presión CPAP prescrita. La desviación
máxima admisible es de ±1,0 hPa.
4. A continuación, pulse la tecla de arranque suave para activar el arranque suave. El indicador de arranque suave aparece y el tiempo de arranque suave se indica en el display.
La presión aumenta lentamente y una vez transcurrido el tiempo ajustado alcanza la presión CPAP. A continuación, la presión CPAP se indica en el display.
5. Encienda el aparato con el interruptor de encendido/apagado.
En caso de que no se cumplan los valores o las funciones aquí descritos, envíe el aparato al
distribuidor o al fabricante para su reparación.
Control del funcionamiento
81
6.3 Controles de funcionamiento CLICK 2
1. Realice una comprobación visual de la carcasa de plástico.
En caso de fisuras/desperfectos y suciedad intensa, será preciso sustituir las piezas de
plástico.
2. Llene el humidificador del aire de respiración hasta la marca con agua.
3. Compruebe que el humidificador del aire de respiración queda sellado.
4. Vacíe el agua.
5. Ahora vierta 50 ml de agua aprox.
6. Adapte el humidificador del aire de respiración sobre el aparato de terapia.
7. Encienda el aparato de terapia.
8. Encienda el humidificador del aire de respiración pulsando la tecla del humidificador
en el aparato de terapia.
9. Ajuste el nivel de calentamiento 6 en el aparato de terapia.
10.Compruebe si el humidificador del aire de respiración se calienta.
Si el agua no se ha calentado al cabo de 15 minutos, devuelva el humidificador del aire de
respiración junto con el aparato de terapia al distribuidor o al fabricante para su reparación.
82
Control del funcionamiento
7. Averías y soluciones
En caso de que se produzcan fallos que no se puedan subsanar inmediatamente, póngase
en contacto enseguida con el fabricante Weinmann o con su distribuidor especializado,
para la reparación del aparato. No siga utilizando el aparato, a fin de evitar daños más
graves.
7.1 CPAP 20e
Avería
Causa del fallo
No se escucha ruido de
marcha, las indicaciones
No hay tensión de
de espera y
alimentación
funcionamiento no se
iluminan.
Filtros sucios
El aparato funciona, pero
no alcanza la presión
Máscara de respiración
CPAP ajustada.
no estanca
Indicación para el cambio
Filtros sucios
de filtro
se ilumina.
Subsanación del fallo
Compruebe que el cable de alimentación de red y
el cable de conexión tienen un contacto seguro.
Si es preciso, compruebe el funcionamiento de la
toma de tensión (p.ej. con una lámpara).
Limpie o sustituya los filtros (5.2, página 74).
Ajuste la capucha y las cintas para la cabeza de
forma que la máscara quede asentada
herméticamente.
Sustituir la posible máscara defectuosa.
Limpie o sustituya los filtros (5.2, página 74).
Aviso de fallo
Problemas en el sistema
"Err E", "Err b", "Err c",
Soltar la conexión a la red eléctrica y volver a
electrónico o el
"Err A", "Err H" o
establecerla.
programa "da fallo"
"Err S" en el display.
La indicación para el
mantenimiento
se
ilumina.
Encargar una comprobación urgente del aparato
a Weinmann o a un distribuidor especializado.
Agua en el conducto de Seque el conducto de medición de la presión,
medición de la presión. véase página 77.
El tubo de medición de la
presión no se ha
Inserte el tubo de medición de la presión en el
No se forma presión en la montado correctamente racor correspondiente, véase 5.3
máscara, o se forma una en la parte superior.
presión incorrecta.
Compruebe que el cable de alimentación de red
No existe tensión de
alimentación en el
aparato de terapia.
esté conectado de forma segura. Si es preciso,
compruebe el funcionamiento de la caja de
enchufe, conectando a ella otro aparato (p.ej.
una lámpara).
Averías y soluciones
83
7.2 CLICK 2
Avería
El humidificador del aire
de respiración no se
calienta.
Causa del fallo
Subsanación del fallo
El humidificador del aire
Conexión del humidificador del aire de
de respiración no está
respiración, véase 4.2, página 69.
activado.
Avería electrónica.
Envíe el humidificador del aire de respiración
junto con el aparato de terapia a su distribuidor
especializado para su reparación.
La junta de la barra
Sustituya la junta, véase página 84.
calentadora está dañada.
El humidificador del aire
de respiración no es
estanco.
La junta de la parte
inferior de la carcasa está Sustituya la junta, véase página 85.
dañada.
Fisuras en la parte inferior Sustituya la parte inferior.
Sustituya la junta de la barra calentadora
1. Desenrosque de la parte inferior de la carcasa la barra
calentadora, girándola en sentido contrario al de las
agujas del reloj.
2. Haga palanca cuidadosamente con un destornillador
pequeño y limpio para extraer el anillo obturador.
¡Precaución!
Durante esta operación, no debe dañar bajo ningún
concepto la ranura en la que se aloja el anillo
obturador.
3. Inserte cuidadosamente el nuevo anillo obturador en la
ranura de la barra calentadora. No utilice para ello
ninguna herramienta.
4. Monte de nuevo la barra calentadora.
84
Averías y soluciones
Sustituya la junta de la parte inferior de la carcasa
1. Abra el humidificador del aire de respiración, girando la parte superior contra la inferior
en sentido contrario al de las agujas del reloj.
2. Saque cuidadosamente el anillo obturador de la ranura
de la parte inferior del aparato.
¡Precaución!
Durante esta operación, no debe dañar bajo ningún
concepto la ranura en la que se aloja el anillo
obturador.
3. Inserte cuidadosamente el nuevo anillo obturador en la
ranura de la parte inferior del aparato. No utilice para
ello ninguna herramienta.
4. Monte de nuevo las partes superior e inferior.
Averías y soluciones
85
8. Mantenimiento
Como medida preventiva se debe realizar un mantenimiento regular. Observe para ello los
plazos que se citan.
8.1 Plazos
•
Cada 10.000 horas de servicio (aparece en el display el símbolo de
mantenimiento)
•
Cada cuatro años como máximo (consulte las etiquetas de mantenimiento colocadas en la parte trasera del aparato)
8.2 Extensión del mantenimiento
•
Sustitución de los filtros
•
Acondicionamiento higiénico del aparato y la caja del ventilador.
•
Comprobación completa de la capacidad funcional
9. Eliminación
No elimine el aparato tirándolo a la basura doméstica. Para la eliminación correcta
del aparato, diríjase a una empresa de reciclaje de electrónica autorizada y certificada. Pregunte la dirección a su delegado de medio ambiente o en su ayuntamiento.
El embalaje del aparato (el cartón y las piezas interiores) puede eliminarlo en el reciclaje de papel.
86
Mantenimiento
10. Volumen de suministro
10.1 Volumen de suministro de serie
CPAP 20e
WM 27320
Piezas
Número de pedido
CPAP 20e aparato básico
WM
27321
Tubo flexible de respiración (tubo flexible ondulado)
WM
24445
Fuente de alimentación
WM
24480
Cable de alimentación de red
WM
24133
Manual de instrucciones CPAP 20e + CLICK 2
WM
66101
CLICK 2
WM 27330
Piezas
Número de pedido
CLICK 2 aparato básico
WM
27331
Tapones de cierre, completo, envasados
WM
24020
Fuelle
WM
24394
10.2 Accesorios
Los siguientes accesorios se pueden pedir por separado en caso de necesidad.
Piezas
Número de pedido
Humidificador del aire de respiración CLICK 2
WM
27330
Ajuste remoto SOMNOadjust (sólo para personal médico y técnico especializado)
WM
23930
Software de valoración SOMNOsupport (sólo para personal médico y técnico
especializado)
WM
23975
Válvula de seguridad de oxígeno
WM
24042
Adaptador CC 12-24V
WM
24469
Filtro de bacterias
WM
24476
Bolsa de transporte
WM
27335
Conjunto de 10 tubos flexibles de respiración
WM
15689
Silentflow
WM
23600
Silenciador completo (sistema de espiración alternativo)
WM
23685
Volumen de suministro
87
Piezas
Número de pedido
SOMNOmask, talla S
WM
25110
SOMNOmask, talla M
WM
25120
SOMNOmask, talla L
WM
25130
SOMNOmask, talla S, azul
WM
25210
SOMNOmask, talla M, azul
WM
25220
SOMNOmask, talla L, azul
WM
25230
SOMNOplus, talla S
WM
25710
SOMNOplus, talla M
WM
25720
SOMNOplus, talla L
WM
25730
SOMNOcap‚ talla M, azul
WM
23673
SOMNOcap‚ talla L, azul
WM
23674
SOMNOcap‚ talla M, blanco
WM
23686
SOMNOcap‚ talla L, blanco
WM
23687
SOMNOstrap, azul
WM
23695
SOMNOstrap, blanco
WM
23177
SOMNOstrap extra
WM
25250
JOYCEstrap
WM
26290
JOYCEstrap EXTRA, 3 paquetes
WM
26291
JOYCEstrap EXTRA, 4 paquetes
WM
26292
JOYCEcap
WM
26293
JOYCE vented, talla S
WM
26110
JOYCE vented, talla M
WM
26120
JOYCE vented, talla L
WM
26130
JOYCE vented, talla XL
WM
26140
JOYCE vented 40 hPa, talla S
WM
26111
JOYCE vented 40 hPa, talla M
WM
26121
JOYCE vented 40 hPa, talla L
WM
26131
JOYCE vented 40 hPa, talla XL
WM
26141
JOYCE GEL vented, talla S
WM
26112
JOYCE GEL vented, talla M
WM
26122
JOYCE GEL vented, talla L
WM
26132
JOYCE non vented, talla S
WM
26160
JOYCE non vented, talla M
WM
26170
88
Volumen de suministro
Piezas
Número de pedido
JOYCE non vented, talla L
WM
26180
JOYCE non vented, talla XL
WM
26190
JOYCE non vented 40 hPa, talla S
WM
26161
JOYCE non vented 40 hPa, talla M
WM
26171
JOYCE non vented 40 hPa, talla L
WM
26181
JOYCE non vented 40 hPa, talla XL
WM
26191
JOYCE GEL non vented, talla S
WM
26162
JOYCE GEL non vented, talla M
WM
26172
JOYCE GEL non vented, talla L
WM
26182
JOYCE Full Face vented, talla S
WM
26410
JOYCE Full Face vented, talla M
WM
26420
JOYCE Full Face vented, talla L
WM
26430
JOYCE Full Face vented, talla XL
WM
26440
JOYCE Full Face vented 40 hPa, talla S
WM
26411
JOYCE Full Face vented 40 hPa, talla M
WM
26421
JOYCE Full Face vented 40 hPa, talla L
WM
26431
JOYCE Full Face vented 40 hPa, talla XL
WM
26441
JOYCE Full Face GEL vented, talla S
WM
26412
JOYCE Full Face GEL vented, talla M
WM
26422
JOYCE Full Face GEL vented, talla L
WM
26432
JOYCE Full Faceplus vented 40 hPa, talla S
WM
26413
JOYCE Full Faceplus vented 40 hPa, talla M
WM
26423
JOYCE Full Faceplus vented 40 hPa, talla L
WM
26433
JOYCE Full Faceplus vented 40 hPa, talla XL
WM
26443
JOYCE Full Face non vented 40 hPa, talla S
WM
26461
JOYCE Full Face non vented 40 hPa, talla M
WM
26471
JOYCE Full Face non vented 40 hPa, talla L
WM
26481
JOYCE Full Face non vented 40 hPa, talla XL
WM
26491
JOYCE Full Face GEL non vented, talla S
WM
26462
JOYCE Full Face GEL non vented, talla M
WM
26472
JOYCE Full Face GEL non vented, talla L
WM
26482
Si utiliza otros sistemas de máscara de respiración, tenga en cuenta el correspondiente
manual de instrucciones.
Volumen de suministro
89
10.3 Piezas de repuesto CPAP 20e
Piezas
Número de pedido
Tubo flexible de respiración
WM
24445
Conjunto de 10 tubos flexibles de respiración
WM
15689
Filtro contra polvo grueso
WM
24481
Set 2 filtros contra polvo grueso
WM
15321
Filtro contra polvo fino, envasado
WM
24401
Conjunto de 12 filtroscontra polvo fino
WM
15668
Fuente de alimentación
WM
24480
Cable de alimentación de red
WM
24133
10.4 Piezas de repuesto CLICK 2
Piezas
Número de pedido
Parte superior de la carcasa, montada
WM
27339
Parte inferior de la carcasa
WM
27333
Junta de la parte inferior de la carcasa
WM 1145/143
Barra calentadora
WM
24264
Tapón de llenado
WM
24378
Junta, barra calentadora
WM 1145/19
Tapones de cierre, completo, envasados
WM
24020
Fuelle
WM
24394
90
Volumen de suministro
11. Datos técnicos
11.1 Especificaciones
CPAP 20e
Clase de producto
según
93/42/CEE
CPAP 20e con CLICK 2
IIa
Dimensiones AnxAlxP en
cm
21 x 9,8 x 18,5
21 x 14 x 31,3
Peso
aprox. 1,25 kg
1,5 kg aprox. (sin agua)
Margen de temperatura
– Funcionamiento
– Almacenamiento
+5 ˚C a +35 ˚C
–20 ˚C a +70 ˚C
Si el aparato se utiliza a +40 ˚C, el aire emitido puede alcanzar hasta 42 ˚C.
Humedad admisible de
funcionamiento y de
almacenamiento
Margen de aire
comprimido
≤ 95 % de humedad relativa (sin condensación)
600 - 1100 hPa (adaptación automática a la altitud)
(permite el funcionamiento a alturas de hasta 4000 m aprox.)
Tubo flexible de
respiración (a la
máscara) de conexión de
diámetro en mm
Conexión eléctrica
Consumo de corriente
durante
– funcionamiento
– la espera (Standby)
19,5 (adecuado para 22 mm de cono estándar)
115-230 V AC +10/-15 %, 50–60 Hz con fuente de alimentación
WM 24480
o 12-24 V CC -15/+25 % con adaptador CC WM 24469
230 V
0,1 A
0,02 A
115 V
0,2 A
0,03 A
24 V
0,8 A
0,2 A
12 V
230 V
1,6 A 0,14 A
0,24 A 0,02 A
115 V
0,28 A
0,03 A
24 V
1,3 A
0,2 A
12 V
2,6 A
0,24 A
Datos técnicos
91
CPAP 20e
Clasificación según
prEN 60601-1:2004
– Clase de protección
contra descarga
eléctrica
– Grado de protección
contra descarga
eléctrica
– Protección contra la
penetración perjudicial
de agua
– Modo operativo
Compatibilidad
electromagnética (CEM)
según EN 60601-1-2
– Protección
antiparasitaria
– Inmunidad a las
interferencias
Nivel de intensidad
acústica/funcionamiento
medio a 1m de distancia
del aparato en la
posicióndel paciente
CPAP 20e con CLICK 2
Clase de protección II
Tipo B
IPX1
Funcionamiento continuo
Los parámetros de comprobación y los valores límite pueden solicitarse al
fabricante en caso necesario.
EN 55011 B
EN 61000-4 Partes 2 a 6, Parte 11
≤aprox. 30 dB (A) con 10 hPa
(corresponde a un nivel de potencia acústica de 38 dB (A) )
Campo de presión de
trabajo CPAP
Precisión de la presión
4 hasta 20 hPa
±0,8 hPa
(1mbar = 1 hPa ≈ 1cm H2O)
Presión CPAP máx. en
caso de avería
< 30 hPa
Flujo con el número de
revoluciones máx. a:
20 hPa
15 hPa
10 hPa
5 hPa
0 hPa
Tolerancia
85 l/min
100 l/min
120 l/min
140 l/min
155 l/min
10 l/min
80 l/min
95 l/min
115 l/min
135 l/min
150 l/min
±10 l/min
Calentamiento del aire
de respiración
2,5 ˚C (rendimiento cardiaco
reposado)
en función del nivel de calentamiento
92
Datos técnicos
CPAP 20e
Estabilidad de presión a
corto plazo medida
según
prEN ISO 17510:2004
para presión de terapia:
20 hPa
15 hPa
10 hPa
5 hPa
Estabilidad de la presión
a largo plazo según
prEN 17510-1:2004:
Grado de separación
defiltro fino
hasta 1 μm
hasta 0,3 μm
Duración del filtro
contra polvo fino
CPAP 20e con CLICK 2
Δp ≤ 1,3 hPa
Δp ≤ 1,1 hPa
Δp ≤ 0,8 hPa
Δp ≤ 0,6 hPa
Δp = 0,2 hPa
≥ 99,5 %
≥ 85 %
≥ 250 horas con aire ambiental normal
Reservado el derecho a modificaciones constructivas.
CLICK 2
Clase de producto según 93/42/CEE
Dimensiones AnchoxAltoxProfundo en mm
Peso (sin agua)
Margen de temperatura
– Funcionamiento
– Almacenamiento
Humedad funcionamiento y almacenamiento
Gama de presión ambiental
II a
120 x 97 x 157
250 g
+5 ˚C a +35 ˚C
–20 ˚C a +70 ˚C
≤95 % de humedad relativa
de 600 a 1100 hPa
Conexión eléctrica
30 V CC
Consumo eléctrico
20 VA
Clasificación según EN 60601-1
– Grado de protección contra descarga eléctrica
Aparato del tipo B
Compatibilidad electromagnética (CEM) según la
EN 60601-1-2
– Protección antiparásita
– Inmunidad a las interferencias
EN 55011 B
IEC 1000-4, Parte 2 hasta 6, Parte 11
Cantidad de llenado máxima admisible
280 ml
Presión de funcionamiento máxima admisible
30 hPa
Datos técnicos
93
CLICK 2
Flujo máximo admisible (con flujo de salida libre)
160 l/min
Temperatura máxima de la máscara
37 ˚C
Escape de gas a 30 hPa
no mensurable
Emisión del humidificador en el nivel de calentamiento 6:
Caudal = 20 l/min
Caudal = 30 l/min
Caudal = 40 l/min
14,1 mg/l
10,3 mg/l
8,0 mg/l
para 23° C y 65% de humedad relativa
Reservado el derecho a modificaciones constructivas.
Todos los valores determinados según las condiciones ATPD (temperatura y presión
ambiental y deshidratado).
11.2 Esquema neumático
Fuente de presión deO2
(1,5 bar máx.)
Entrada del
aire ambiental
Filtros
Ventilador
Sensor de presión
para la presión del
paciente
94
Datos técnicos
Regulador de flujo
hasta 4 l/min máx.
opcional
Humidificador
opcional
Válvula de O2
opcional
Filtro de
bacterias
Tubo flexiblede
respiración
1,8 m
Sistema
externode
espiración
Máscara del
paciente
(máscara nasal
o facial)
11.3 Distancias de protección
Distancias de seguridad recomendadas entre aparatos de telecomunicación de
AF portátiles y móviles (por ejemplo, teléfono móvil) y el
CPAP 20e y el CLICK 2
Potencia nominal
del aparato de AF
Distancia de seguridad en función de la frecuencia de emisión
en m
en W
150 kHz - 80 MHz
80 MHz -800 MHz
800 MHz – 2,5 GHz
0,01
0,12
0,12
0,24
0,1
0,37
0,37
0,74
1
1,17
1,17
2,34
10
3,69
3,69
7,38
100
11,67
11,67
23,33
Datos técnicos
95
12. Garantía
96
•
Weinmann garantiza, durante un periodo de dos años a partir de la fecha
de compra, que el producto está libre de defectos si se utiliza conforme
a las prescripciones. En caso de productos que, conforme a su denominación, tengan un periodo de durabilidad inferior a dos años, la garantía
expira al alcanzarse la fecha de caducidad indicada en el embalaje o en
las instrucciones de uso.
•
Para reclamar la garantía es condición indispensable la presentación de un
comprobante de compra en el que se identifique al vendedor y se indique
la fecha de compra.
•
Weinmann rechazará cualquier reclamación de garantía en caso de:
– no observación de las instrucciones de uso
– errores de manejo
– uso o tratamiento incorrectos
– intervención ajena por parte de personas no autorizadas en el aparato con
fines de reparación
– fuerza mayor, como p. ej. rayos, etc
– daños durante el transporte debidos a un embalaje deficiente en caso de
devoluciones
– omisión del mantenimiento
– deterioro inherente al uso y desgaste normal.
Este desgaste afecta, por ejemplo, a los siguientes componentes:
– filtros
– baterías y acumuladores
– artículos de un solo uso, etc.
– no-utilización de piezas de repuesto originales.
•
Weinmann no se hará responsable de daños consecuenciales al defecto
en caso de que éstos no sean debidos a premeditación o a negligencia
grave, o en caso de perjuicios a la vida o la integridad corporal de las personas debidos a negligencia leve.
•
Weinmann se reserva el derecho, a su discreción, de optar por reparar el defecto, suministrar un artículo libre de defectos o rebajar proporcionalmente
el precio de compra.
•
En caso de rechazo de una reclamación de garantía, no asumimos los
costes del transporte de ida y vuelta.
•
Estas condiciones no afectan a los derechos de garantía legales.
Garantía
13. Índice alfabético
Palabra clave:
A
Accesorios
Arranque suave
Averías
C
CLICK 2
Control del funcionamiento
D
Desinfección
E
Efectos secundarios
F
Filtros
G
Garantía
H
Humidificador del aire de respiración
I
Indicaciones de seguridad
Inspección
L
Limpieza
M
Máscara de respiración
Modo de espera
P
Piezas de repuesto
S
Secado
Sistema de espiración
V
Viajar
Página:
87
59, 68, 70, 81
83
65, 69, 91
81
74, 78
63
74, 83, 90, 93
96
61, 67, 78, 87, 91
60, 62
61
74
66, 68, 71
71
90
74
66, 71, 74, 81, 87
73
Índice alfabético
97
14. Declaración de conformidad
98
Declaración de conformidad
Declaración de conformidad
99
Center
for Production, Logistics, Service
Weinmann
Geräte für Medizin GmbH+Co.KG
Siebenstücken 14
D-24558 Henstedt-Ulzburg
T: +49-(0)4193-88 91-0
F: +49-(0)4193-88 91-450
WM 66101c - 06.08
Weinmann
Geräte für Medizin GmbH+Co.KG
P.O. Box 540268 • D-22502 Hamburg
Kronsaalsweg 40 • D-22525 Hamburg
E: [email protected]
www.weinmann.de
T: +49-(0)40-5 47 02-0
F: +49-(0)40-5 47 02-461