1
ITEM#BH1310109902
WARNING
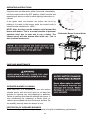
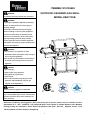
OUTDOOR 5 BURNER GAS GRILL
For Outdoor Use Only (outside any enclosure)
MODEL #BG1755B
WARNING
1. Improper installation, adjustment, alteration,
service or maintenance can cause injury or
property damage.
2. Read this instruction manual thoroughly
before installing or servicing this equipment.
3. Failure to follow these instructions could
result in fire or explosion, which could cause
property damage, personal injury or death.
4. This instruction manual contains important
information necessary for proper assembly and
safe use this appliance.
WARNING
1. Do not store or use gasoline or other
flammable vapors and liquids in the vicinity of
this or any other appliance.
2. An LP tank not connected for use should not
be stored in the vicinity of this or any other
appliance.
DANGER
If you smell gas:
1. Shut off gas to the appliance.
2. Extinguish any open flames.
3. Open the lid.
4. If the odor continues, keep away from the
appliance and immediately call your gas
supplier or fire department.
DANGER
Never operate this appliance unattended.
Save these instructions for future reference.
If you are assembling this unit for someone else,
give this manual to him or her to read save for
future reference.
Questions, Problems, missing parts? Don’t return the grill to stores, please call our customer service
department at 1 - 855 - CHANTS - US (1-855-242-6887) from 8:00am to 5:00pm Eastern time, Monday
through Friday for assistance. Chant Kitchen Equipment (H.K.)Ltd / Suit 706, Rightful Centre, 11-12
Tak Hing Street, Jordan, Kowloon, HongKong
1
DANGER
!WARNING
If you smell gas:
1. Do not store or use gasoline or other
flammable liquids or vapors in the
vicinity of this or any other appliance.
1. Shut off gas to the appliance
2. Extinguish any open flame
3. Open lid
4. If odor continues, keep away from the
appliance and immediately call your
gas supplier or your fire department.
2. An LP cylinder not connected for use
should not be stored in the vicinity of
this or any other appliance.
Always read and understand the WARNINGS and INSTRUCTIONS that are contained in this
manual before attempting to use this gas barbecue grill to prevent possible bodily injury or
property damage.
Always keep this manual for convenient future reference.
2
TABLE OF CONTENTS
Cover …………….…………………………………….………...….………….………….…. ………1
Table of contents…………………………………….………...….………….………….…. ………3
Safety Information…………………………………….………...….………….………….…. ………4
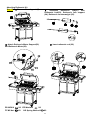
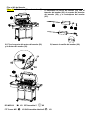
Exploded View……………….………………………………………………………………………..6
Parts list….……………..…..….……...…...................……………....………………..7
Hardware Contents……………………………………………………………….……………………8
Assembly Instructions……………………..……………….………………………………………..9
Operating Rotisserie Instructions…………….……………………………………………… ….18
Operation Instructions…………………………….……...………………………….....................21
L.P. Tank information…………….............................................................................................23
Care and Maintenance……………………………….………………………………………………29
Troubleshooting …………………………………………………………………..….……………...32
Warranty………………………………………………………………………………………………..34
3
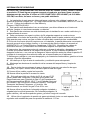
SAFETY INFORMATION
Please read and understand this entire manual before attempting to assemble, operate
or install the product. If you have any questions regarding the product, please call our
customer service at 1-855-CHANTS-US(1-855-242-6887) from 8:00am to 5:00pm Eastern
time, Monday through Friday for assistance.
1. The installation of this appliance must conform with local codes or, in the absence of local
codes, with either the National Fuel Gas Code, ANSI Z223.1/NFPA 54, or Natural Gas and
Propane Installation Code, CSA/CGA-B149.1.
2. This grill is intended for use outdoors and should not be used in a building, garage or any
other enclosed or covered area.
3. This outdoor grill is not intended for installation in or on recreation vehicles and/or boats.
4. A minimum clearance of 24 inches from combustible constructions to the sides of the grill and
24 inches from the back of the grill to combustible constructions must be maintained.
This outdoor cooking gas appliance must not be placed under overhead combustible
construction.
5. The use of an electrical source requires that when installed, the grill must be electrically
grounded in accordance with local codes or, in the absence of local codes, with ANSI/NFPA 70,
or the Canadian Electrical Code, CSA C22.1. Keep electrical supply cords and the fuel supply
hose away from heated surfaces.
6. Inspect the hoses before each use for excessive abrasion or wear, or cuts that may affect
safe operation of the grill. If there is evidence of excessive abrasion or wear, or the hose is cut,
it must be replaced prior to the grill being put into operation. The replacement hose assembly
must be those specified by the manufacturer.
7. Keep your grill in an area clear and free from combustible materials, gasoline and other
flammable vapors and liquids.
8. DO NOT obstruct the flow of combustion and ventilation air to this appliance.
9. Keep the ventilation openings of the tank enclosure free and clear from debris.
10. Check all gas connections for leaks with a soapy water solution and brush. Never use an
open flame to check for leaks.
11. Never use charcoal in the grill.
12. Never use the grill in windy areas.
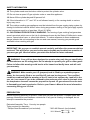
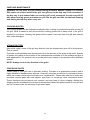
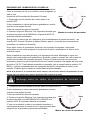
13. Only a 20 lb. LP-gas cylinder is allowed. The cylinder must
be constructed and marked in accordance with the
Specifications for LP Gas Cylinders of the U.S. Department of
Transportation (D.O.T.) or the National Standard of Canada,
CAN/CSA-B339, Cylinders, Spheres and Tubes for
Transportation of Dangerous Goods; and Commission.
A 20 lb. LP-Gas cylinder’s dimensions are:
14. Never use the grill without the drip tray installed and hung under the burner box. Without the
drip tray, hot grease and debris could leak downward and produce a fire hazard.
15. Use only the gas pressure regulator supplied with this appliance. This regulator is set for an
outlet pressure of 11.0 wc.
4
SAFETY INFORMATION
16. The cylinder used must include a collar to protect the cylinder valve.
17. Do not store a spare LP-gas cylinder under or near this appliance.
18. Never fill the cylinder beyond 80 percent full.
19. If the information in “17” and “18” is not followed exactly, a fire causing death or serious
injury may occur.
20. The outdoor cooking gas appliance must be isolated from the gas supply piping system by
closing its individual manual shutoff valve during any pressure testing of the gas supply system
at test pressures equal to or less than 1/2 psi (3.5 KPa).
21. CALIFORNIA PROPOSITION 65 WARNING: The burning of gas cooking fuel generates
some byproducts which are on the list of substances known by the State of California to cause
cancer, reproductive harm, or other birth defects. To reduce exposure to these substances,
always operate this unit according to the use and care manual, ensuring you provide good
ventilation when cooking with gas.
IMPORTANT: We urge you to read this manual carefully and follow the recommendations
enclosed. This will ensure you receive the most enjoyable and trouble-free operation of
your new gas grill. We also advise you retain this manual for future reference.
WARNING: Your grill has been designed to operate using only the gas specified by
the manufacturer on the rating plate. Do not attempt to operate your grill on other gases.
Failure to follow this warning could lead to a fire hazard and bodily harm and will void
your warranty.
WARNING: Make certain your LP (propane) tank is filled by a reputable propane
dealer. An incorrectly filled or an overfilled LP tank can be dangerous. The overfilled
condition combined with the warming of the LP tank (a hot summer day, tank left in the
sun, etc.) can cause LP gas to be released by the pressure relief valve on the tank since
the temperature increase causes the propane to expand. LP gas released from the tank
is flammable and can be explosive. Refer to your Owner’s Manual for more information
concerning filling your LP tank.
PREPARATION
Before beginning assembly of product, make sure all parts are present. Compare parts with
package contents list and hardware contents list. If any part is missing or damaged, do not
attempt to assemble the product.
Estimated Assembly Time: 1 hour by two people
Tools required for assembly:
* Phillips Head Screwdriver (not included);
* M10-M6 Wrench 1pc(included)
HH. Wrench
5
X1
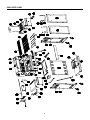
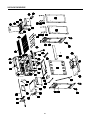
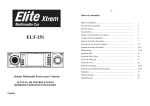
EXPLODED VIEW
6
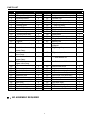
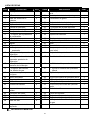
PARTS LIST
PART
1
2
3
4
5
6
7
8
9
10
11
12
13
14
15
16
17
18
19
20
21
22
23
24
25
26
27
28
29
DESCRIPTION
※Lid Assy.
※Temperature gauge
Lid handle bezel
Lid handle
Warming rack
Cooking grate
Heat tent A
Heat tent B
※Firebox assy.
QTY
1
1
2
1
1
2
2
1
1
1
6
6
1
3
PART
30
31
32
33
34
35
36
37
38
39
40
41
42
43
※ Infrared
searing
burner Assy.
※Infrared rear burner
cover Assy.
※
Infrared
rear
burner Assy.
※Manifold
& gas valve Assy.
1
44
※Left Leg Assy.
※Left side panel
Caster
Baffle plate bracket
Rear panel
Bottom panel Assy.
Magnet
Bottom bar
Upper front door brace(with
magnet)
Right Leg Assy.
1
45
Right side panel
1
1
46
※ Side burner lid
1
1
47
※ Side burner lid axis
1
Regulator and hose Assy.
1
1
1
1
2
1
1
4
1
6
1
48
49
50
51
52
53
54
55
56
57
Side burner trivet
1
1
1
1
1
2
2
1
1
1
※Control panel Assy.
※Knob bezel
Knob
※Igniter
※ Tube burner Assy.
Rotisserie motor
Bracket of motor
Rotisserie rod
Rotisserie fork
Rotisserie fork support
Rotisserie counterweight
Tool hook
Side shelf handle
Handle bezel
Left side shelf Assy.
※ :NO ASSEMBLY REQUIRED
7
DESCRIPTION
Left side shelf front panel Assy.
Left grease tray slide way
Grease cup
Grease tray assembly
Right grease tray slide way
Side burner shelf Assy.
※Side burner tray
※Side burner Assy.
Side burner front panel Assy.
Screw sleeve
Door handle
Left door Assy.
Right door Assy.
※Gas tank gauge Assy.
QTY
1
1
1
1
1
1
1
4
1
1
1
2
1
1
1
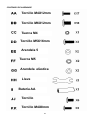
HARDWARE CONTENTS
8
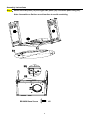
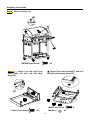
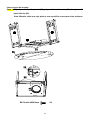
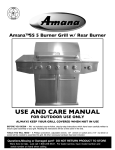
Assembly instructions
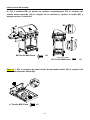
Step 1:Attach left side panel (36) and right side panel (45) on bottom panel assy.(40).
Note: Assemble on flat box or soft surface to avoid scratching
BB M6X12mm Screw
X6
9
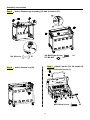
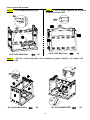
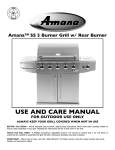
Assembly instructions
Step 2:
Step 3 :Attach Upper front door brace(with
magnet)(43).
Attach Rear panel (39).
AA M4X12mm Screw
AA M4X12mm Screw
X4
X4
Step 4 :Attach Left/right grease tray slide way (31)/(34) and baffle plate bracket (38).
AA M4X12mm Screw
X4
AA M4X12mm Screw
10
X2
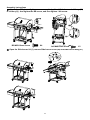
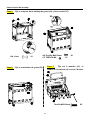
Assembly instructions
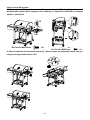
Step 5 :Attach Grease tray assembly (33) and 4 Casters (37).
HH. Wrench
X1
AA M4X12mm Screw
CC M4 NUT
X1
X1
Step 7 :Attach 5 knobs (12), lid handle (4)
with 2 Lid handle bezels (3).
Step 6 :Attach Grease cup(32).
M6X16mm Screw
11
X2
Assembly instructions
Step 8:Attach Lid Assy. (1).
BB M6X12mm Screw
X4
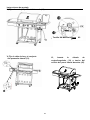
Step 9: Ⅰ, Attach Left side shelf front
panel Assy. (30) with Left side shelf
Assy.(29).
JJ M5X10 mm Screw
Ⅱ, Attach Side shelf handle(27) and tool
hook(26) with Handle bezel(28).
M6X16 mm Screw
Masher 6
X2
X3
12
X2
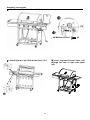
Assembly instructions
Ⅲ, Attach 4pcs BB, do not tighten screws completely. Attach Left side shelf Assy.(29) to
Lid Assy.(1). And tighten the BB screw, and then tighten 1 AA screw.
BB M6X12mm Screw
X4
AA M4X12mm Screw
Step 10: Ⅰ, Attach Side burner front panel Assy.(52) to Side burner shelf Assy.(49).
JJ M5X10 mm Screw
X3
13
X1
Assembly instructions
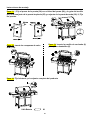
Ⅱ, Attach 4pcs BB, do not tighten screws completely. Attach Side burner shelf Assy.(49)
to Lid Assy.(1). And tighten the BB screw, and then tighten 1 AA screw.
BB M6X12mm Screw
X4
AA M4X12mm Screw
X1
Ⅲ, Open the Side burner lid (1), remove Side burner trivet (48) and Side burner Assy.(51)
14
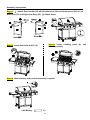
Assembly instructions
Ⅳ, Attach knob (12) to Knob bezel (11).
KK M4X8mm Screw
Ⅴ, Attach light wire and Side burner Assy. (51).
15
X2
Ⅵ,Insert regulator/Control Valve (19)
through the hole of right side panel
(45).
Assembly instructions
Step 11: Ⅰ, Attach Door handle (54) with Handle bezel (28) and Screw sleeve(53) in Left
door Assy.(55) and Right door Assy.(56). Ⅱ, Attach doors
Step13: Insert Cooking grate (6) and
Warming rack(5).
Step 12: Insert Heat tents A+B (7+8).
Step 14: Attach battery and product assembly complete.
II AA Battery
X1
16
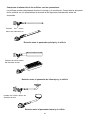
Attaching Rotisserie Kit
Step 15: Ⅰ,Remove Warming rack(5).
Ⅱ, Assemble Rotisserie rod(22) with
Rotisserie fork(23), Rotisserie fork support
(24), Rotisserie counterweight (25).
Ⅳ, Insert rotisserie rod (22).
Ⅲ, Attach Rotisserie Motor Support(22)
and Rotisserie Motor(20).
DD M5X16
FF M5 Nut
X2
X2
EE Washer5
X2
GG Spring Washer5
X2
17
OPERATING ROTISSERIE INSTRUCTIONS
Operating Rotisserie
WARNING: When using electrical appliances, basic safety precautions should always be used,
including the following:
1. Always attach Rotisserie to grill first, then plug cord into a grounded outlet. To disconnect, turn Rotisserie
“OFF” then remove plug from outlet.
2. Most grill surfaces and accessories are hot during and after cooking. Use caution around grill, wear flame
retardant BBQ mitt.
3. Do not use accessory attachments on Rotisserie not supplied by the manufacturer. This may cause injures.
Do not use this appliance for other than intended use .
4. Never cover bottom of your grill bowl with aluminum foil, sand or any grease absorbent substance.
5. Should a grease fire occur, turn burners to
(OFF) position,
(a) LP gas tank valve “CLOSED” or
(b) NG main valve “OFF”
Leave lid CLOSED until fire is out
6. To protect against electrical shock, do NOT immerse electrical cord, plug or motor in water or expose to rain.
Protect electrical elements from burners, hot grill surfaces and grease.
7. Do NOT operate rotisserie with a damaged cord or plug, or if the rotisserie malfunctions or has been
damaged in any manner.
8. Do NOT let children operate grill or rotisserie, and do NOT let children play nearby.
9.Unplug rotisserie motor from electrical outlet when not in use and before cleaning. Allow to cool before adding
or removing parts.
10. When rotisserie cooking, place a drip pan of some sort under the food to be cooked. This will capture the
drippings and keep grill clean of excess grease which could cause a fire. Use caution when moving a drip pan
containing hot oils.
11. The motor is set for 120VAC,50/60 Hz current.
12. This rotisserie is for use outdoors only and with this grill only.
CAUTION: If burner flame goes out during operation, immediately turn the gas
(OFF) and open
lid to let the gas clear for about 5 minutes before re-lighting.
WARNING: Keep rotisserie motor electric cord away from the heated surface of the grill.
WARNING: The rotisserie motor must be electrically grounded in accordance with local codes or,
in the absence of local codes, with the National Electric Code, ANSI/NFPA 70-1990.
WARNING: Keep any electrical supply cord and the fuel supply hose away from any heated
surface.
Rotisserie Cooking Tips
1. Meats (except for poultry and ground meats) should be brought to room temperature prior to Cooking.
2. Use cooking string to tie around the uneven shaped meat or poultry.
3. Place a disposable aluminum drip pan directly under the food and on top of the heat plates.
4. Food preparation steps are the same for rotisserie cooking as they are for regular grilling.
5. If meat or poultry is too large or does not rotate properly on the rotisserie, the meat should be removed
from the rotisserie and cooked another way.
18
OPERATING ROTISSERIE INSTRUCTIONS
WARNING: Do NOT operate the Rotisserie with a damaged cord or plug, or if the Rotisserie malfunctions or has
been damaged in any manner. Call our Customer Care at 1-855-CHANTS-US
(1-855-242-6887) for replacement.
WARNING: The power supply cord has a 3-prong grounded plug. For your personal safety do not remove the
grounding prong. It must be plugged into a mating 3-prong grounding type receptacle, grounded in accordance with
the National Electrical Codes and Local codes and ordinances.
WARNING: If an extension cord is used, it must be properly grounded and suitable for use with outdoor
Appliances. Keep the extension cord connection dry, off the ground and out of the reach of children.
WARNING: When rotisserie motor is not in use, remove and store it in a dry indoor area.
WARNING: OUTDOOR USE ONLY. DO NOT EXPOSE TO RAIN.
CAUTION: Risk of Electric Shock. Keep Extension cord connection dry and off the ground
WARNING: Use only on properly grounded outlet.
1. To protect against electric shock, do not immerse cord or plugs in water or other liquid;
2. Unplug from the outlet when not in use and before cleaning. Allow to cool before putting
on or taking off parts;
3. Do not operate any outdoor cooking gas appliance with a damaged cord, plug, or after
the appliance malfunctions or has been damaged in any manner. Contact the
manufacturer for repair;
4. Do not let the cord hang over the edge of table or touch hot surfaces;
5. Do not use an outdoor cooking gas appliance for purposes other than intended;
6. When connecting, first connect plug to the outdoor cooking gas appliance then plug
appliance into the outlet;
7. Use only a Ground Fault Interrupter (GFI) protected circuit with this outdoor cooking gas
appliance;
8. Never remove the grounding plug or use with an adapter of 2 prongs;
9. Use only extension cords with a 3 prong grounding plug, rated for the power of the
equipment, and approved for outdoor use with a W-A marking.
19
OPERATING ROTISSERIE INSTRUCTIONS
WARNING: USE ONLY ON PROPERLY
GROUNDED OULTET.
Attaching Meat or Poultry
1.
Attach rotisserie motor per “Attaching Rotisserie Kit”
instructions. (See page 17)
2.
Insert and secure rotisserie counterweight and
Rotisserie handle onto rotisserie rod( Fig. 10)
3.
Insert one rotisserie fork onto rotisserie rod
(Fig. 11 )
4.
Push rotisserie rod through the middle of the food
And insert the food evenly into the prongs of the
Rotisserie fork (Fig. 12 )
5.
Center food on rotisserie rod. Tighten rotisserie fork.
6.
Insert remaining rotisserie for onto rotisserie rod
And insert rotisserie fork prongs into food. Tighten
Rotisserie fork (Fig. 13 )
7.
Insert rotisserie rod into rotisserie motor and place
Other end of rotisserie rod into groves on bottom
bowl (Fig. 14 and 15 ).
8.
Turn rotisserie motor “ON” to test food placement.
Note: Heavy side of meat or poultry should rotate down towards the bottom bowl. Adjust counterweight if needed for a
proper balance. If meat or poultry still does not rotate properly, remove food and remount food for a proper balance.
9.
Light grill per “SEARING BURNER & ROTISSERIE BURNER LIGHTING” lighting instructions. (See page 28)
10. After grill is lit and temperature is set, keep lid closed.
20
OPERATING INSTRUCTIONS
L.P. GAS INSTALLATION
Gas grills that are set to operate with L.P. gas come with a high capacity hose and regulator assembly.
(Note: Only use the pressure regulator and hose assembly supplied with the grill or a
replacement pressure regulator and hose assembly specified by the manufacturer). This
assembly is designed to connect directly to a standard 20 lb. L.P. cylinder. L.P. cylinders are not
included with the grill. L.P. cylinders can be purchased separately at an independent dealer.
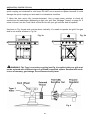
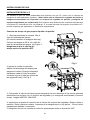
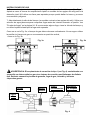
Connecting a Liquid Propane Gas Tank to the Grill:
Fig. 1
1. Open the doors of the cabinet. Turn the
stopper of the tank tray (counter-clockwise). Place
a 20 Ib. tank with foot ring into the tank tray.
See Fig. 1.
Make sure the tank valve is in the
OFF position.
Fig. 2
2. Tighten the retention screw in front
of the tank tray to secure the tank.
Push the tank tray to the end and lock
it by turning the stopper back
(clockwise). See Fig. 2.
3. Check the tank valve to ensure it has proper external mating threads to fit the hose and
regulator assembly provided (Type 1 connection per ANSI Z21.58b-2002).
4. Inspect the valve connection port of the regulator assembly. Look for damage or debris.
Remove any debris. Inspect hose for damage. Never use damaged or plugged equipment.
5.Make sure all burner knobs are in the OFF position.
21
OPERATING INSTRUCTIONS
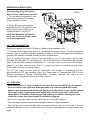
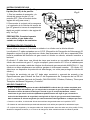
6. Connect the hose and regulator assembly to the tank valve(See Fig. 2)Hand tighten the
quick coupling nut clockwise to a full stop. DO NOT use a wrench to tighten because it could
damage the quick coupling nut and result in a hazardous condition.
7. Open the tank valve fully (counterclockwise). Use a soapy water solution to check all
connections for leaks before attempting to light your grill. See “Leakage Testing" on page 24. If
a leak is found, turn the Tank Valve off and do not use your grill until the leak is repaired.
As shown in Fig. 3a gas tank must be place vertically. It is unsafe to operate the grill if the gas
tank is not vertical as show in Fig. 3b.
Fig. 3a
Fig. 3b
WARNING: The Type I connective coupling (see Fig. 4) supplied with your grill must
not be replaced with a different type of grill/tank connection system. Removal will result
in loss of warranty, gas leakage, fire and severe bodily harm.
Fig. 4
22
OPERATING INSTRUCTIONS
Disconnecting A Liquid Propane
Gas (LP Gas) Tank From Your Grill:
1. Turn the burner knobs and LP gas
tank valve to the full OFF position.
(Turn clockwise to close.)
Fig. 5
2. Detach the hose and regulator
assembly from the LP gas tank valve
by turning the quick coupling nut
counterclockwise. See Fig. 5.
CAUTION: When the appliance is
not in use, the gas must be turned
off at the supply tank.
L.P. TANK INFORMATION
Never use a dented or rusted L.P. tank or cylinder with a damaged valve.
L.P. cylinders are equipped with an O.P.D. (Overfilling Prevention Device). The device shuts off
the flow of gas to a cylinder after 80% capacity is reached. This limits the potential for release of
gas when the cylinder is heated, averting a fire or possible injury.
The L.P. cylinder must have a shut-off valve terminating in an L.P. gas supply cylinder outlet
specified, as applicable, for connection No. 510 in the standard for compressed gas cylinder
valve outlet and inlet connection ANSI/CGA-V-1. Cylinders must not be stored in a building,
garage, or any other enclosed area. (The L.P. cylinder must have an overfill protection device
and a collar to protect the cylinder valve.)
The L.P. gas supply cylinder must be constructed and marked in accordance with the
specifications for L.P. gas cylinders of the U.S. Department of Transportation (DOT) or the
National Standard of Canada, CAN/CAS-B339, “Cylinders, Spheres and Tubes for the
Transportation of Dangerous Goods and Commission.”
L.P. TANK USE
• When turning the L.P. tank on, make sure to open the valve SLOWLY two (2) complete
turns to ensure proper gas flow. Most gas tanks now come equipped with a leak
detector mechanism internal to the tank. When gas is allowed to escape rapidly it shuts
off the gas supply. Opening the valve rapidly may simulate a gas leak, causing the
safety device to activate, restricting gas flow causing low flames. Opening the valve
slowly will ensure this safety feature is not falsely triggered.
• When not in use, gas supply cylinder valve is to be in the “OFF” position.
• The tank supply system must be stored upright to allow for vapor withdrawal.
• The regulator and hose assembly must be inspected before each use of the grill. If there is
excessive abrasion or wear or if the hose is cut, it must be replaced prior to the grill being used
again.
23
OPERATING INSTRUCTIONS
• Cylinders must be stored outdoors out of the reach of children and must not be stored in a
building, garage or any other enclosed
area.
WARNING
• Only a qualified gas supplier should refill
the L.P. tank.
DO NOT store a spare L.P. gas cylinder under
or near the grill. Never fill the cylinder beyond
80% full.
• Place dust cap on cylinder valve outlet
whenever the cylinder is not in use. If this information is not followed exactly, a fire
Only install the type of dust cap on the causing death or serious injury may occur.
cylinder valve outlet that is provided
with the cylinder valve. Other types of caps or plugs may result in leakage of propane.
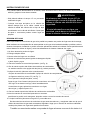
LEAKAGE CHECK
Although all gas connections on the grill are leak tested prior to shipment, a complete gas
tightness check must be performed at the installation site due to possible shifting during
shipment, installation or excessive pressure unknowingly being applied to the unit. Periodically
check the whole system for leaks and immediately check the system if the smell of gas is
detected.
1. Do not smoke while leak testing.
Fig. 6
2. Extinguish all open flames.
3. Never leak test with an open flame.
4. Mix a solution of equal parts mild detergent
or liquid soap and water.
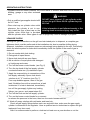
5. Turn off the burner control knobs. (see Fig. 6)
6. Turn the top knob of the fuel supply cylinder
counterclockwise two (2) rotations to open.
7. Apply the soap solution to connections of the
fuel supply assembly. Spoon leak check
solution at all: ”X” locations (see Fig. 7).
Fig. 7
If no soap bubbles appear, there is no gas
leak. If bubbles form at the connections, a leak
is detected. If a leak is detected, immediately
turn off the gas supply, tighten any leaking
fittings, turn gas on, and repeat steps 5-6.
8. Turn off the knob on the fuel supply cylinder.
9. Turn on the burner control knobs for a moment
to release the pressure in the hose, then turn the control knobs back off.
10. Wash off soapy solution with cold water and towel dry.
Check all gas supply fittings before each use and each time, make sure the gas supply
cylinder is connected to the regulator. Have a qualified service technician to replace the grill
leak parts if any time need.
Also it is recommended to perform a leak test at least once a year whether or not the
24
OPERATING INSTRUCTIONS
L.P. gas supply cylinder has been disconnected.
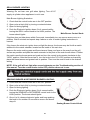
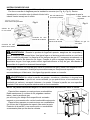
Please refer to diagram for proper installation (see Fig. 8 and Fig. 9). Visually check the
connection between the burner venture pipe and orifice. Make sure the burner venture pipe fits
over the orifice.
Rotisserie burner soft
pipe connection
Fig. 8
WARNING When leak testing this appliance, make sure to test and tighten all loose
connections. A slight leak in the system can result in a low flame or hazardous condition. Most
L.P. gas tanks now come equipped with a leak detector mechanism internal to the tank. When
gas is allowed to escape rapidly, it shuts off the gas supply. A leak may significantly reduce the
gas flow, making the grill difficult to light or causing low flames.
If you cannot stop a gas leak, turn off the gas supply and call your local gas company. If
necessary, replace the faulty part with the manufacturer’s recommended replacement part. A
slight leak could cause a fire.
WARNING Do not use the grill in garages, breezeways, sheds or any enclosed area.
Never operate the grill in enclosed areas as this could lead to a carbon monoxide buildup,
which could result in injury or death. Place the grill on a level surface. Avoid moving the grill
while it is in operation.
NOTE: The grill will operate best if it is not facing directly into the wind.
Clearance to combustible construction:
A minimum of 24 in. from the sides and
back must be maintained from the gas
grill above and below the cooking surface
to adjacent vertical combustible construction.
Clearance to non-combustible construction:
A minimum of 24 in. clearance from the back
of the grill to non-combustible construction
is required for the lid to fully open.
25
Fig. 9
OPERATING INSTRUCTIONS
Storage of an outdoor gas cooking appliance indoor is permissible only if the cylinder is
disconnected and removed from the appliance.
WARNING Heat and smoke exhaust out of the
back of the grill hood opening. Make sure not to have the
grill back facing your home or anything that could be
damaged by heat or smoke.
Heat&
Smoke
Exhaust
GENERAL RULES
Do not leave the grill unattended while cooking!
1. Make sure the grill has been leak tested and is properly located.
2. Light the grill burners using the instructions
provided in this manual.
3. Turn the control knobs to desired temperature
- High or Low - and preheat the grill for 10 minutes
before cooking.
4. Adjust heat settings to meet your cooking needs for
desired results.
5. Allow grill to cool down, wipe off any splatters or
grease and clean the drip tray as needed.
6. Do not put a cover on the grill while it is still hot as it
could start a fire.
BEFORE AND AFTER LIGHTING
1. Ensure your grill is located on a level surface.
2. Keep the gas grill area clean and free from combustible materials, gasoline, and other
flammable vapors and liquids.
3. Ensure nothing is obstructing the flow of combustion and ventilation air.
4. Ensure the ventilation of the cylinder enclosure is free and clear of debris.
5. Visually check burner flames.
WARNING Check the gas supply line for cuts, wear or abrasion.
Always keep your face and body as far away from the grill as possible when lighting.
26
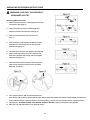
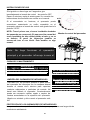
Checking orifices alignment with burners
Orifices may shift during assembly and movement. Check the orifices alignment with the
burners according to the following illustrations before lighting.
Main Burner and Orifice Relationship
Searing Burner and Orifice Relationship
Side Burner and Orifice Relationship
27
GRILL BURNER LIGHTING
Warning: Do not lean over grill when lighting. Turn off LP
supply at cylinder when appliance is not in use.
Main Burner Lighting Illustration:
1. Check that the control knobs are in the OFF position.
2. Open valve at tank fully by turning counterclockwise.
3. Open lid during lighting.
4. Push the Electronic Ignition down 3 to 4 seconds while
turning the GRILL control knob to the HIGH position. The
burner should ignite.
Main Burner Control Knob
If ignition does not take place within 5 seconds, immediately turn the control knob to the OFF
position. Wait 5 minutes and repeat step 4 above or refer to match lighting instructions in
manual.
If by chance the electronic igniter does not light the burner, the burner may be lit with a match
attached to the match extender, located on the inside of the cart door.
Remove the main cooking grate and flame tamers. Keep your face as far away from the grill
surface as possible and pass the match extender to the ports of the main burner tubes. Position
the match near the burner ports and push and turn the control knob counter-clockwise to the
“HIGH” position. After the burner has lit, turn the knob to the "LP LOW" position and carefully
place the flame tamers and grates back in position. Then turn the control knob to the desired
setting.
NOTE: If the grill will not light after several attempts see the Troubleshooting section of
this manual. Turn the control knobs to the OFF position when not in use.
SEARING BURNER & ROTISSERIE BURNER LIGHTING:
1. Check that the control knobs are in the OFF position.
2. Open valve at tank fully by turning counterclockwise.
3. Open lid during lighting.
4. Push the Electronic Ignition down 3 to 4 seconds while
turning the SEARING or ROTISSERIE control knob to the
HIGH position. The burner should ignite.
5. Once it is lit, release electronic igniter and keep pushing
the knob in for another 15 seconds to ensure the burner
stays lit.
Searing Burner Control Knob
28
OPERATING INSTRUCTIONS
If ignition does not take place within 5 seconds, immediately
turn the control knob to the OFF position. Wait 5 minutes and
repeat step 4 above or refer to match lighting instructions in
manual.
If the igniter does not function, the burner can be lit by
holding a lit match to the burner while the control knob is
turned counter-clockwise to “HIGH.”
NOTE: After the first use the stainless steel around the
burner will darken. This is a normal reaction of premium
stainless steel due to heat and is not a defect. The
infrared panel will also darken after initial use. This is
also a normal occurrence.
Rotisserie Burner Control Knob
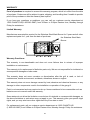
CARE AND MAINTENANCE
INFRARED BURNER CLEANING
After each use, it is necessary to burn the bottom
infrared burner with the hood open for at least five
minutes to vaporize any food drippings or particles.
Failure to perform this step will damage the burner. It
may occasionally be necessary to brush, blow, or
vacuum accumulated ash from the burner surface. Do
so carefully and only when the burner is cool.
PROTECTION OF INFRARED BURNERS
The burners of your grill are designed to provide a long life of satisfactory performance.
29
CARE AND MAINTENANCE
However, there are steps you must take to prevent cracking of the burner's ceramic surfaces,
which will cause the burners to malfunction. The following are the most common causes of
cracks and the steps you must take to avoid them. Damage caused by failure to follow these
steps is not covered by your grill warranty.
IMPACT WITH HARD OBJECTS - Never allow hard objects to strike the ceramic. You should
take particular care when inserting or removing cooking grids and accessories into or from the
grill. If objects such as these fall onto ceramic, it is likely to crack the ceramic.
IMPAIRED VENTILATION OF HOT AIR FROM GRILL - In order for the burners to function
properly, hot air created by the burners must have a way to escape. The burners may become
deprived of oxygen, causing them to backfire, especially if the burner output is set at HIGH. If
this occurs repeatedly, the burners may crack. This is the reason your grill was designed with
ventilation louvers. These design features give the hot air an escape route. Accordingly, never
operate your grill with very little or no open space at the cooking surface (the cooking grids
provide sufficient space). Also, never cover the ventilation louvers with foil or other materials
that prevent air flow. Specifically, do not cover the entire surface with foil, a large pan, etc.
GENERAL MAINTENANCE
- Keep outdoor cooking gas appliance area clear and free from combustible materials, gasoline
and other flammable vapors and liquids.
- Do not obstruct the flow of combustion and ventilation air.
- Keep the ventilation openings of the cylinder enclosure free and clear from debris.
- Visually check the burners.
GENERAL CLEANING
IMPORTANT: Before cleaning, make sure all controls are off and the grill is cool. Always follow
label instructions on cleaning products.
For routine cleaning, wash with soap and water using a soft cloth or sponge. Rinse with clean
water and dry at once with a soft, lint-free cloth to avoid spots and streaks.
To avoid scratching the surface, do not use steel wool to clean the grill.
Use a vinyl grill cover to protect finish from weather.
DRIP TRAY
The drip tray should be cleaned periodically to prevent heavy buildup of debris.
NOTE: Allow the drip tray to cool before attempting to clean.
30
CARE AND MAINTENANCE
Important: Do not leave the grill outside during inclement weather unless it is covered.
Rain water can collect inside of the grill, the grill cart or the drip tray if left uncovered. If
the drip tray is not cleaned after use and the grill is left uncovered, the drip tray will fill
with water causing grease and water to spill into the grill cart. We recommend cleaning
and storing the drip tray after every use.
COOKING GRATES
The cooking grates can be cleaned immediately after cooking is completed and after turning off
the grill. Wear a barbecue mitt and scrub the cooking grates with a damp cloth. If the grill is
allowed to cool down, cleaning the grates will be easier if removed from the grill and cleaned
with a mild detergent.
STAINLESS STEEL
After initial usage, areas of the grill may discolor from the intense heat given off by the burners.
This is normal.
Purchase a mild stainless steel cleaner and rub in the direction of the grain of the metal. Specks
of grease can gather on the surface of the stainless steel and bake on to the surface and give a
worn appearance. For removal, use a non-abrasive oven cleaner in conjunction with a stainless
cleaner.
NOTE: Always scrub in the direction of the grain.
PORCELAIN PARTS
Certain parts of your grill have a porcelain coating. Porcelain is a glass-based product and is
highly durable to standard wear and tear. However, porcelain is sensitive to concussive blows,
which can create interlaced micro-fractures or “spider-webs.” Please take care not to strike any
porcelain covered parts with solid objects, drop them, or create any other concussive blows.
These interlaced micro-fractures are common and may lead to minor chipping. Neither the
chipping nor the interlaced micro-fractures will adversely affect the performance of your grill and
are not covered under the warranty for porcelain parts.
31
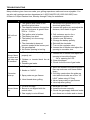
TROUBLESHOOTING
Many solutions given here can make your grilling experience safer and more enjoyable. You
can also call customer service department at 1-855-CHANTS-US(1-855-242-6887) from
8:00am to 5:00pm Eastern time, Monday through Friday for assistance.
PROBLEM
Grill will not
light.
Burner flame
is yellow and
gas odor can
be smelled.
POSSIBLE CAUSE
1. The ignition wire came off the
electrical igniter/valve.
2. The distance between the ignition
pin and the burner is greater than
5/32 in. - 3/16 in.
3. The ignition wire is broken.
4. The battery has died.
5. The battery is in the wrong
polarity.
6. The electrode tip does not
produce sparks at the burner port.
7. No gas supplied.
8. Air shutter opening is too big.
3. Call customer service for a
replacement ignition wire.
4. Install a new AA battery.
5. Change the battery polarity.
6. Reinstall the electrode.
7. Turn on the regulator valve.
8. Loosen the air shutter and adjust the
opening to a smaller size.
1. The air shutter opening is not
1. Loosen the air shutter and adjust the
properly set.
opening to have blue flames.
1/4 in. opening for LPG.
2. Spiders or insects block the air
2. Clean blockages.
shutter.
3. Check for the source of gas leaks.
3. Possible gas leaks.
1. Grilling fatty meats.
1. Move the meats to the warming rack if
flare up continues until flame settles
down.
2. Grill fatty meats when the grids are
cold while the knobs are on the “LP
LOW” (when using LP Gas)
3. Never spray water on gas flames.
4. Hood up when grilling.
2. Knobs on “HIGH”.
Excessive
flare-up.
CORRECTIVE ACTION
1. Reconnect the ignition wire to the
electrical igniter/valve.
2. Loosen the ignition pin and adjust the
distance, then fasten it again.
3. Spray water on gas flames.
4. Hood closed when grilling.
1. LP tank is empty.
Burner blows 2. Burner is not aligned with the
out.
control valve.
3. Gas supply is not sufficient.
32
1. Refill the LP Tank.
2. Install the burner correctly.
3. Check the gas supply hose and make
sure there are no leaks and no knots.
TROUBLESHOOTING
PROBLEM
POSSIBLE CAUSE
CORRECTIVE ACTION
Low heat
with the knob 1. Ports are blocked.
in “HIGH”
2. LP tank has run out.
position.
Low heat,
LP gas.
1. Clear ports of any obstructions.
2. Refill the LP tank.
The propane regulator assembly
incorporates an excess flow device
designed to supply the grill with
sufficient gas flow. Rapid changes in
pressure can trigger the excess flow
device, providing a low flame and
low temperature.
33
Please follow these instructions:
1. Make sure all burners are “OFF”.
2. Open the tank valve and wait 5
minutes.
3. Light the burner one at a time
following the lighting instructions listed
on the door liner
WARRANTY
Proof of purchase is required to access this warranty program, which is in effect from the date
of purchase. Customers will be subject to parts, shipping, and handling fees if unable to provide
proof of the purchase or after the warranty has expired.
If you have any questions or problems, you can call our customer service department at
1-855-CHANTS-US(1-855-242-6887) from 8:00am to 5:00pm Eastern time, Monday through
Friday for assistance.
Limited Warranty
Manufacturer warrants this product for the Stainless Steel Main Burner for 5 years and all other
replacement parts for 1 year from the date of purchase.
the Stainless Steel Main
Burner
Warranty Provisions:
This warranty is non-transferable and does not cover failures due to misuse of improper
installation or maintenance.
This warranty is for replacement of defective parts only. We are not responsible for incidental or
consequential damages or labor costs.
This warranty does not cover corrosion or discoloration after the grill is used, or lack of
maintenance, hostile environment, accidents, alterations, abuse or neglect.
This warranty does not cover damage caused by heat, abrasive and chemical cleaners, or any
damage to other components used in the installation or operation of the gas grill.
Paint is not warranted and may require touch-up. Items considered to be consumable such as
batteries are not covered under this warranty.
Some states do not allow the limitation or exclusion of incidental or consequential damages, so
the above limitations or exclusions may not apply to you. This warranty gives you specific legal
rights, and you may also have other rights that vary from state to state.
For replacement parts, call our customer service department at 1-855-CHANTS-US
(1-855-242-6887) from 8:00am to 5:00pm Eastern time, Monday through Friday for assistance.
34
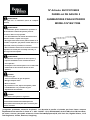
Nº Artículo: BH1310109902
PARRILLA DE GAS DE 5
ADVERTENCIA:
QUEMADORES PARA EXTERIOR
Sólo para uso en exteriores (fuera de cualquier
carcasa)
MODELO Nº BG1755B
ADVERTENCIA:
1. La instalación, ajuste, modificación, reparación o
mantenimiento inadecuados pueden provocar
lesiones o daños en la propiedad.
2. Lea detenidamente este manual de instrucciones
antes de instalar o reparar este equipo.
3. No seguir estas instrucciones podría resultar en un
incendio o explosión, que podrían causar daños en la
propiedad, lesiones personales o la muerte.
4. Este manual de instrucciones contiene información
importante necesaria para el montaje correcto y el
uso seguro de este aparato.
ADVERTENCIA:
1. No almacene ni use gasolina ni otros vapores y
líquidos inflamables en las cercanías de este u
otros aparatos.
2. Un tanque LP sin conectar para el uso no debe estar
almacenado en las cercanías de este ni otros
aparatos.
PELIGRO
Si nota olor a gas:
1. Corte el suministro de gas del aparato.
2. Extinga cualquier llama.
3. Abra la cubierta.
4. Si permanece el olor, aléjese del aparato y llame
inmediatamente a su proveedor de gas o
departamento de incendios.
PELIGRO
Nunca utilice este aparato sin vigilancia.
Conserve estas instrucciones para futuras consultas.
Si está usted montando esta unidad para otra
persona,dele este manual para que lo conserve para
futuras consultas.
¿Preguntas, problemas, ausencia de piezas? No devuelva la parrilla a la tienda, por favor llame a nuestro
departamento de atención al cliente al 1 - 855 - CHANT - US (1-855-242-6887) de 8:00 AM a 5:00 PM, hora Este,
35 Equipment(H.K.)Ltd / Suit 706, Rightful Centre, 11-12
de lunes a viernes, para pedir asistencia. Chant Kitchen
Tak Hing Street, Jordan, Kowloon, HongKong
PELIGRO
!ADVERTENCIA
Si nota olor a gas:
1. No almacene ni use gasolina ni otros
vapores o líquidos inflamables en las
cercanías de este u otros aparatos.
1. Corte el suministro de gas del aparato
2. Extinga cualquier llama
3. Abra la cubierta
4. Si permanece el olor, aléjese del
aparato y llame inmediatamente a su
proveedor de gas o departamento de
incendios.
2. Un cilindro LP sin conectar para el uso
no debe estar almacenado en las
cercanías de este ni otros aparatos.
Siempre lea y comprenda las ADVERTENCIAS e INSTRUCCIONES contenidas en este
manual antes de tratar de utilizar esta parrilla barbacoa de gas para evitar posibles lesiones
corporales o daños en la propiedad.
Conserve siempre este manual para futuras consultas.
36
TABLA DE CONTENIDOS
Cubierta
…………….…………………………………….………...….………….……. .…….…. 35
Tabla de contenidos…………………………….………...….………….…………………. ….…. 37
Información deSeguridad…………………….………...….………….…………………….…. …38
Vistadedespiece…….…………………………………….………...….………….……. .…….….40
Listadepiezas……….…………………………………….………...….………….……. .…….…. 41
ContenidodeHardware………………………………….………...….………….……. .…….…. 42
Instrucciones dmontaje……………………………….………...….………….……. .…….…. 43
Instrucciones deusodelasador……………………….………...….………….……. .…….…. 52
Instrucciones de uso………………………………….………...….………….……. . .…….…. 55
InformacióndelTanqueLP…………………………….………...….………….……. . .…….…. 57
Cuidados ymantenimiento………………………….………...….………….……. . .…….…. 63
Solución de problemas ………………………….………...….………….……. . .…….…. … 66
Garantía……….…………………………………….………...….………….……. . ………….….68
37
INFORMACIÓN DE SEGURIDAD
Por favor, lea y comprenda todo este manual antes de intentar montar, utilizar o instalar
el producto. Si tiene alguna pregunta respecto al producto, por favor llame a nuestro
departamento de atención al cliente al 1-855-CHANT-US(1-855-242-6887) de 8:00 AM a
5:00 PM, hora Este, de lunes a viernes, para pedir asistencia.
1. La instalación de este aparato debe realizarse conforme a los códigos locales o, en
ausencia de dichos códigos, con el Código Nacional de Gas Combustible, ANSI Z223.1/NFPA
54, o el Código de Instalación de Gas Natural y
Propano, CSA/CGA-B149.1.
2. Esta parrilla está destinada al uso en exteriores y no debe utilizarse en el interior de
edificios, garajes ni otras áreas cerradas o cubiertas.
3. Esta parrilla de exteriores no está destinada para la instalación en o sobre vehículos y/o
embarcaciones de recreo.
4. Debe mantenerse un espacio mínimo de 24 pulgadas respecto a construcciones
combustibles a los lados de la parrilla y de 24 pulgadas desde la parte posterior de la parrilla.
Este aparato para cocinar con gas no debe colocarse bajo construcciones combustibles.
5. El uso de una fuente eléctrica requiere que, al instalarse, la parrilla deba estar conectada a
tierra de acuerdo a los códigos locales, o, en ausencia de dichos códigos, de acuerdo al
ANSI/NFPA 70, o el Código Eléctrico Canadiense, CSA C22.1. Mantenga los cables de
suministro eléctrico y el suministro de combustible alejados de superficies calientes.
6. Inspeccione las mangueras antes de cada uso en busca de abrasión o desgaste excesivos,
o cortes que puedan afectar al uso seguro de la parrilla. Si hay evidencia de abrasión o
desgaste excesivos, o un corte en la manguera, debe sustituirse antes de utilizar la parrilla. El
montaje de la manguera de sustitución debe ser el especificado por el fabricante.
7. Mantenga su parrilla en una zona despejada y sin materiales combustibles, gasolina ni otros
vapores o líquidos inflamables.
8. NO obstruya el flujo de aire de combustión y ventilación para este aparato.
9. Mantenga las aberturas de ventilación de la carcasa del tanque libres y limpias de
residuos.
10. Revise todas las conexiones de gas en busca de fugas con una solución de agua
jabonosa y un cepillo. Nunca utilice una llama para revisar las fugas.
11. Nunca utilice carbón vegetal en la parrilla.
12. Nunca utilice la parrilla en zonas con viento.
13. Sólo está permitido un cilindro de 20 lb. de gas LP. El
cilindro debe estar construido y marcado de acuerdo a las
Especificaciones para Cilindros de Gas LP del Departamento
de Transportes de los EE.UU. (D.O.T.) o el Estándar Nacional
de Canadá, CAN CSA-B339, Cilindros, Esferas y Tubos para
Transporte de Bienes Peligrosos; y Comisión. Las
dimensiones de un cilindro de gas LP de 20 lb. son:
14. Nunca utilice la parrilla sin la bandeja antigoteo instalada y
colgada bajo la caja del quemador. Sin la bandeja antigoteo, la
grasa caliente y los residuos podrían gotear y producir riesgo de incendio.
15. Utilice sólo el regulador de presión de gas suministrado junto con este aparato. Este
regulador está establecido para una presión de salida de 11.0 wc.
38
INFORMACIÓN DE SEGURIDAD
16. El cilindro utilizado debe incluir un collar para proteger la válvula del cilindro.
17. No almacene un cilindro de gas LP de repuesto bajo o cerca de este aparato.
18. Nunca rellene el cilindro más del 80 %
19. Si la información en "17" y "18" no se sigue con exactitud, podría ocurrir un incendio
causante de la muerte o lesiones graves.
20. El aparato para cocinar con gas en exteriores debe estar aislado del sistema de tuberías
del suministro de gas, mediante el cierre de la válvula manual individual durante cualquier
prueba de presión del sistema de suministro de gas con presiones de prueba iguales o
inferiores a 1/2 psi (3.5 KPa).
21. ADVERTENCIA DE PROPOSICIÓN 65 DE CALIFORNIA: El quemado de combustible
para cocinar con gas genera algunos subproductos que se encuentran en la lista de sustancias
del Estado de California conocidas por causar cáncer, daños reproductivos u otros defectos
congénitos. Para reducir la exposición a estas sustancias, utilice siempre esta unidad de
acuerdo al manual de uso y cuidados, asegurando la correcta ventilación cuando cocina con gas.
IMPORTANTE: Le recomendamos encarecidamente que lea este manual detenidamente
y siga las recomendaciones incluidas. Esto garantizará que obtenga el funcionamiento
más placentero y sin problemas de su nueva parrilla de gas. También le aconsejamos
que guarde este manual para futura consulta.
ADVERTENCIA: Su parrilla ha sido diseñada para funcionar sólo con el gas
especificado por el fabricante en la placa de clasificación. No trate de utilizar su parrilla
con otros gases.
No seguir esta advertencia podría llevar a un riesgo de incendio y lesiones corporales y
anulará su garantía.
ADVERTENCIA: Cerciórese de que su tanque LP (propano) se rellene por un
distribuidor reputado de propano. Un tanque LP rellenado incorrectamente o
sobrecargado puede ser peligroso. La condición de sobrecarga en combinación con el
calentamiento del tanque LP (en un día de verano, dejar el tanque expuesto al sol, etc.),
puede causar que el gas LP se libere por la válvula de liberación de presión del tanque,
ya que el aumento de temperatura hace que el propano se expanda. El gas LP liberado
del tanque es inflamable y puede ser explosivo. Consulte el Manual del Propietario para
más información acerca del rellenado de su tanque LP.
PREPARACIÓN
Antes de comenzar a montar el producto, asegúrese de que estén presentes todas las piezas.
Compare las piezas con la lista de contenido del embalaje y la lista de contenidos de hardware.
Si alguna pieza falta o está dañada, no intente montar el producto.
Tiempo estimado de montaje: 1 hora por 2 personas
Herramientas necesarias para el montaje:
*Destornillador de Estrella (no incluido);
*1 Llave M10-M6 (incluida)
39
HH Llave
X1
VISTA DE DESPIECE
40
LISTA DE PIEZAS
PIEZA
DESCRIPCIÓN
CANT.
PIEZA
DESCRIPCIÓN
CANT.
1
※Conjunto de la Cubierta
1
30
onjunto del panel frontal del estante lateral
uierdo
1
2
3
※Termómetro
Bisel del tirador de la
cubierta
Tirador de cubierta
Rejilla calentadora
Parrilla de cocinado
Campana de calor A
Campana de calor B
※Conjunto de la plataforma
de combustión
※Conjunto del panel de control
※Bisel del mando
Mando
※Encendedor
※ Conjunto del tubo del
quemador
※Conjunto del quemador de
infrarrojos
※Conjunto de la cubierta del
quemador posterior de
infrarrojos
※Conjunto del quemador
posterior de infrarrojos
※Conjunto del colector
y la válvula de gas
1
2
31
32
Carril izquierdo de la bandeja de grasa
1
1
1
1
2
2
1
1
33
34
35
36
37
38
Conjunto de la bandeja de grasa
1
6
6
1
3
39
40
41
42
43
1
4
5
6
7
8
9
10
11
12
13
14
15
16
17
18
Contenedor de grasa
Carril derecho de la bandeja de grasa
※Conjunto de la pata izquierda
※Panel lateral izquierdo
Rueda
Soporte del deflector
1
1
1
1
4
1
1
1
2
1
1
44
Panel posterior
Conjunto del panel inferior
Imán
Barra inferior
Apoyo superior de la puerta frontal
(con imán)
Conjunto de la pata derecha
1
45
Panel lateral derecho
1
1
46
1
1
47
※ Cubierta del quemador lateral
※
※ Eje de la cubierta del quemador
lateral
Rejilla del quemador lateral
1
1
1
1
1
1
19
Conjunto de regulador y
manguera
1
48
20
21
22
23
Motor del asador
Soporte del motor
Varilla del asador
Tenedor del asador
1
1
1
2
49
50
51
52
Conjunto del estante del quemador lateral
24
Soporte del tenedor del
asador
1
53
Guía de tornillo
2
25
26
27
28
Contrapeso del asador
1
4
1
6
54
55
56
57
Pomo de la puerta
Conjunto de la puerta izquierda
Conjunto de la puerta derecha
※Conjunto del medidor del tanque
de gas
2
1
1
1
29
Gancho para utensilios
Asa del estante lateral
Bisel del asa
Conjunto del estante lateral
izquierdo
1
※ :NO NECESITA MONTAJE
41
※Bandeja del quemador lateral
※Conjunto del quemador lateral
Conjunto del panel frontal del quemador
lateral
1
CONTENIDO DE HARDWARE
Tornillo M4X12mm
Tornillo M6X12mm
Tuerca M4
Tornillo M5X16mm
Arandela 5
Tuerca M5
Arandela elástica
Llave
Batería AA
Tornillo
Tornillo M4X8mm
42
Instrucciones de montaje
Paso 1 : Fije el panel lateral izquierdo (36) y el panel lateral derecho (45) al conjunto del
panel inferior (40).
Nota: Móntelo sobre una caja plana o una superficie suave para evitar arañazos
BB Tornillo M6X12mm
X6
43
Instrucciones de montaje
Paso 2:
Paso 3_: Fije el apoyo superior de la puerta
frontal (con imán) (43).
Fije el panel posterior (39).
AA Tornillo M4X12mm
AA Tornillo M4X12mm
X4
X4
Paso 4 : Fije los carriles izq./dcho de la bandeja de grasa (31)/(34) y el soporte del
deflector (38).
AA Tornillo M4X12mm
X4
AA Tornillo M4X12mm
44
X2
Instrucciones de montaje
Paso 5_ : Fije el conjunto de la bandeja de grasa (33) y las 4 ruedas (37).
HH. Llave
X1
AA Tornillo M4X12mm
CC TUERCA M4
X1
X1
Paso 7_: Fije los 5 mandos (12), el
tirador de la cubierta (4) con los 2 biseles
Paso 6_ : Fije el contenedor de grasa (32).
Tornillo M6X16mm
45
X2
Instrucciones de montaje
Paso 8 : Fije el Conjunto de la cubierta (1).
BB Tornillo M6X12mm
X4
Paso 9: I, Fije el conjunto del panel
frontal del estante lateral izquierdo (30)
con el conjunto del estante lateral
izquierdo (29).
JJ Tornillo M5X10 mm
II, Fije el asa del estante lateral (27) y el
gancho para utensilios (26) con el bisel
del asa (28).
Tornillo M6X16 mm
Arandela 6
X2
X3
46
X2
Instrucciones de montaje
III, Fije 4 unidades BB, no apriete los tornillos completamente. Fije el conjunto del
estante lateral izquierdo (29) al conjunto de la cubierta (1). Apriete el tornillo BB, y
después apriete 1 tornillo AA.
BB Tornillo M6X12mm
X4
AA Tornillo M4X12mm
X1
Paso 10: I, Fije el conjunto del panel frontal del quemador lateral (52) al conjunto del
estante del quemador lateral (49).
JJ Tornillo M5X10 mm
X3
47
Instrucciones de montaje
II, Fije 4 unidades BB, no apriete los tornillos completamente. Fije el conjunto del estante
del quemador lateral (49) al conjunto de la cubierta (1). Apriete el tornillo BB, y después
apriete 1 tornillo AA.
BB Tornillo M6X12mm
X4
AA Tornillo M4X12mm
X1
III, Abra la cubierta del quemador lateral (1), retire la rejilla del quemador lateral (48) y el
conjunto del quemador lateral (51).
48
Instrucciones de montaje
IV, Fije el mando (12) al bisel del mando (11).
Tornillo KK M4X8mm
V, Fije el cable de luz y el conjunto
del quemador lateral (51).
X2
VI,
Inserte
la
válvula
de
control/regulador (19) a través del
orificio del panel lateral derecho (45).
49
Instrucciones de montaje
Paso 11: I, Fije el pomo de la puerta (54) con el bisel del pomo (28) y la guía del tornillo
(53) en el conjunto de la puerta izquierda (55) y conjunto de la puerta derecha (56). II, Fije
las puertas
Paso 13: Inserte la parrilla de cocinado (6)
y la rejilla calentadora (5).
Paso 12: Inserte las campanas de calor
A+B (7+8).
Paso 14: Fije la batería y el conjunto completo del producto
II AA Batería
X1
50
Fijar el Kit del Asador
Paso 15: I, Retire la rejilla calentadora (5).
II, Ensamble la varilla del asador (22) con el
tenedor del asador (23), el soporte del tenedor
del asador (24), y el contrapeso del asador
(25).
IV, Inserte la varilla del asador (22).
III, Fije el soporte del motor del asador (22)
y el motor del asador (20).
DD M5X16
FF Tuerca M5
X2
EE Arandela 5
X2
X2 GG Arandela elástica5
51
X2
INSTRUCCIONES DE USO DEL ASADOR
Funcionamiento del Asador
ADVERTENCIA: Al utilizar aparatos eléctricos, siempre se deben tomas las precauciones básicas
de seguridad, incluyendo las siguientes:
1. Siempre conecte primero el asador a la parrilla, y después conecte el cable a una toma de corriente con toma
de tierra. Para desconectarlo, apague el asador ("OFF") y después extraiga el enchufe de la toma de corriente.
2. La mayor parte de las superficies de la parrilla y los accesorios se calientan durante y después del uso.
Tenga cuidado alrededor de la parrilla, utilice una manopla ignífuga.
3. No utilice accesorios en el asador que no estén suministrados por el fabricante. Pueden causar lesiones. No
utilice este aparato para otro uso diferente del previsto.
4. Nunca cubra la parte inferior del plato de la parrilla con papel de aluminio, arena ni sustancias absorbentes
de grasa.
5. En caso de quemarse la grasa, ponga los quemadores en la posición OFF,
(a) la válvula del tanque de gas LP en "CERRADA" o
(b) la válvula principal NG en "OFF"
Deje la cubierta CERRADA hasta que el fuego se extinga
6. Para protección frente a descargas eléctricas, NO sumerja en agua el cable eléctrico, el enchufe ni el motor,
ni los exponga a la lluvia. Proteja los elementos eléctricos de los quemadores, superficies calientes y grasa.
7. NO utilice el asador con un cable o enchufe dañado, ni si el asador no funciona correctamente o ha sido
dañado de alguna manera.
8. NO deje que los niños utilicen la parrilla ni el asador, y no deje que los niños jueguen en las proximidades.
9. Desconecte el motor del asador de la toma de corriente cuando no se utilice y antes de limpiarlo. Permita que
se enfríe antes de añadir o retirar piezas.
10. Cuando cocine con el asador, coloque una bandeja recoge-gotas bajo los alimentos a cocinar. Ésta
recogerá las gotas y mantendrá la parrilla limpia del exceso de grasa que podría causar un incendio. Tenga
cuidado al mover una bandeja recoge-gotas que contenga aceites calientes.
11. El motor está establecido para una corriente de 120V CA, 50/60 Hz.
12. Este asador es sólo para uso en exteriores y sólo con esta parrilla.
PRECAUCIÓN: Si la llama del quemador se apaga durante el funcionamiento, cierre
inmediatamente el gas (OFF) y abra la cubierta durante 5 minutos para permitir que el gas salga antes
de volver a encenderla.
ADVERTENCIA: Mantenga el cable eléctrico del motor del asador alejado de la superficie caliente de
la parrilla.
ADVERTENCIA: El motor del asador debe tener toma de tierra de acuerdo a los códigos locales o,
en ausencia de dichos códigos, al Código Nacional Eléctrico, ANSI/NFPA 70-1990.
ADVERTENCIA: Mantenga cualquier cable de suministro eléctrico y la manguera de suministro de
gas alejados de cualquier superficie caliente.
Consejos para cocinar con el asador
1. La carne (excepto las aves y la carne picada) deberá estar a temperatura ambiente antes de cocinarse.
2. Utilice una cuerda para atar alrededor de las carnes o aves con una forma irregular.
3. Coloque una bandeja recoge-gotas de aluminio desechable directamente bajo los alimentos y sobre las
placas calentadoras.
4. Los pasos de preparación de los alimentos son los mismos para el asador que para la parrilla habitual.
5. Si la carne o el ave es demasiado grande o no gira adecuadamente en el asador, deberá retirarse del
asador y cocinarse de otro modo.
52
INSTRUCCIONES DE USO DEL ASADOR
ADVERTENCIA: NO utilice el asador con un cable o enchufe dañado, ni si el asador no funciona correctamente o
ha sido dañado de alguna manera. Llame a nuestro servicio de Atención al Cliente al 1-855-CHANT-US (1-855-242-6887)
para sustituirlo.
ADVERTENCIA: El cable de suministro eléctrico tiene un enchufe con 3 clavijas y toma de tierra. Por su seguridad
personal no retire la clavija de toma de tierra. Debe conectarse en un receptáculo de tipo de 3 clavijas, con toma de
tierra de acuerdo a los Códigos Nacionales Eléctricos y códigos Locales y ordenanzas.
ADVERTENCIA: Si se utiliza un cable alargador, debe estar correctamente conectado a tierra y ser apto para
utilizar con aparatos de exterior. Mantenga la conexión del alargador seca, sobre el suelo y fuera del alcance de los
niños.
ADVERTENCIA: Cuando no se utilice el motor del asador, retírelo y guárdelo en una zona seca
y cubierta.
ADVERTENCIA: USO EXCLUSIVO EN EXTERIORES. NO EXPONER A LA LLUVIA.
PRECAUCIÓN: Riesgo de Descarga Eléctrica. Mantenga la conexión del cable alargador seca y sobre el suelo
ADVERTENCIA: Uso exclusivo con el tomacorriente puesto a tierra.
1. Para protección frente a descargas eléctricas, no sumerja el cable ni los enchufes en
agua u otro líquido;
2. Desconéctelo de la toma de corriente cuando no lo use y antes de limpiarlo. Deje que se
enfríe antes de colocar un tanque o extraer piezas;
3. No utilice ningún aparato de cocina con gas en exteriores con un cable o enchufe
dañados, ni con un mal funcionamiento del aparato, ni si ha sufrido daños. Contacte con el
fabricante para repararlo;
4. No deje que el cable cuelgue sobre el borde de la superficie ni toque superficies
calientes;
5. No utilice ningún aparato de cocina con gas en exteriores para otros fines que los
previstos;
6. Al conectarlo, primero conecte el enchufe al aparato y después conecte el aparato a la
toma de corriente;
7. Utilice sólo un circuito protegido con Interruptor de Falla a Tierra (GFI) con este aparato
para cocinar a gas en exteriores.
8. Nunca retire la conexión a tierra ni utilice un adaptador de 2 clavijas;
9. Utilice sólo cables alargadores con enchufe de 3 clavijas con toma de tierra, clasificado
para la potencia del equipo, y aprobado para el uso en exteriores con la marca W-A.
53
INSTRUCCIONES DE USO DEL ASADOR
ADVERTENCIA: UTILIZAR EXCLUSIVAMENTE CON
UNA TOMA DE CORRIENTE CONECTADA A TIERRA.
Colocar carne o aves
1. Fijar el motor del asador según las instrucciones "Fijar el Kit del Asador"
(Ver página 17)
2. Inserte y asegure el contrapeso del asador y
el mando del asador en la varilla del asador (Fig. 10)
3. Inserte un tenedor de asado en la varilla del asador
(Fig. 11 )
4. Presione la varilla del asador a través del centro del alimento
E inserte el alimento de manera uniforme en los pinchos del
Tenedor de asado (Fig. 12)
5. Centre el alimento en la varilla del asador. Apriete el tenedor de asado.
6. Inserte el otro tenedor de asado en la varilla del asador
E inserte los pinchos del tenedor en el alimento. Apriete
el tenedor de asado (Fig. 13)
7. Inserte la varilla del asador en el motor del asador y coloque
el otro extremo de la varilla en las muescas del plato inferior
(Fig. 14 y 15 ).
8. Ponga el motor del asador en "ON" para comprobar la colocación del alimento.
Nota: La cara pesada de la carne o el ave debería girar hacia el plato inferior. Ajuste el contrapeso si es necesario para un
equilibrio adecuado. Si la carne o ave sigue sin girar correctamente, retire el alimento y vuelva a colocarlo para un
equilibrio correcto.
9. Encienda la parrilla según las instrucciones de encendido "ENCENDIDO DEL QUEMADOR DE INFRARROJOS Y DEL
QUEMADOR DEL ASADOR" (Ver página 28)
10. Tras haberse encendido la parrilla y establecido la temperatura, mantenga la cubierta cerrada.
54
INSTRUCCIONES DE USO
INSTALACIÓN DE GAS L.P.
Las parrillas de gas que estén establecidas para funcionar con gas L.P. vienen con un conjunto de
manguera de alta capacidad y regulador. ( Nota: Utilice sólo el conjunto de regulador de presión y
manguera suministrado con la parrilla o el conjunto de regulador de presión y manguera de
repuesto especificado por el fabricante). Este conjunto está diseñado para conectarse directamente
a un cilindro L.P. estándar de 20 lb. Los cilindros L.P. no están incluidos con la parrilla. Los cilindros L.P.
pueden comprarse por separado a un distribuidor independiente.
Conectar un tanque de gas propano líquido a la parrilla:
Fig. 1
1. Abra las puertas de la carcasa. Gire el
tope de la bandeja del tanque
(en sentido contrario a las agujas del reloj).
Coloque un tanque de 20 lb. con anillo de
base en la bandeja del tanque. Ver Figura 1.
Asegúrese de que la válvula del
tanque esté en la posición OFF.
Fig. 2
2. Apriete el tornillo de retención
delante de la bandeja del tanque para
asegurar el mismo. Empuje la bandeja
del tanque hasta el final y bloquéela
volviendo a girar el tope (en sentido de
las agujas del reloj). Ver Fig. 2.
3. Compruebe la válvula del tanque para asegurarse de que disponga de las roscas externas
adecuadas que encajen con el conjunto del regulador y la manguera suministrado (Conexión
de tipo 1 según ANSI Z21.58b-2002).
4. Inspeccione el puerto de conexión de la válvula del conjunto del regulador. Busque daños o
residuos. Retire cualquier residuo. Inspeccione la manguera por si hay daños. Nunca utilice
equipamiento dañado o conectado.
5. Asegúrese de que los mandos de todos los quemadores estén en la posición OFF.
55
INSTRUCCIONES DE USO
6. Conecte el conjunto de la manguera y el regulador a la válvula del tanque (Ver Fig. 2).
Apriete a mano la tuerca de acoplamiento rápido en sentido de las agujas del reloj para una
detención total. NO utilice una llave para apretarla porque podría dañar la tuerca y provocar
una condición peligrosa.
7. Abra totalmente la válvula del tanque (en sentido contrario a las agujas del reloj). Utilice una
solución de agua jabonosa para comprobar fugas antes de intentar encender su parrilla. Vea
"Prueba de fugas" en la página 24. Si se encuentra alguna fuga, cierre la válvula del tanque y
no utilice la parrilla hasta que la fuga esté reparada.
Como se ve en la Fig. 3a, el tanque de gas debe colocarse verticalmente. No es seguro utilizar
la parrilla si el tanque de gas no se encuentra en posición vertical,
como en la Fig. 3b.
Fig. 3a
Fig. 3b
ADVERTENCIA: El acoplamiento de conexión de tipo I (ver Fig. 4) suministrado con
su parrilla no debe sustituirse por otro sistema de conexión parrilla/tanque de distinto
tipo. Retirarlo causará la pérdida de garantía, fuga de gas, incendio y lesiones
corporales graves.
Rueda
Rosca
Exterio
Tuerca
Termosensible
Regulador
de Propano
Válvul
a Tipo
Fig. 4
56
INSTRUCCIONES DE USO
Desconectar un tanque de Gas Propano
Líquido (Gas LP) de su parrilla:
Fig. 5
1. Gire los mandos de quemador y la
válvula del tanque de gas LP a la
posición OFF. (Gire en sentido de las
agujas del reloj para cerrar.)
2. Desconecte el conjunto de la manguera
y el regulador de la válvula del tanque de
gas LP, girando la tuerca de acoplamiento
rápido en sentido contrario a las agujas del
reloj. Ver Fig.5.
PRECAUCIÓN: Cuando el aparato
no se utilice, el gas debe estar
cortado en el tanque de suministro.
INFORMACIÓN DEL TANQUE L.P.
Nunca utilice un tanque L.P. abollado u oxidado ni un cilindro con la válvula dañada.
Los cilindros L.P. están equipados con un O.P.D. (Dispositivo de Prevención de Sobrecarga). El
dispositivo corta el flujo de gas hacia un cilindro tras alcanzarse el 80% de su capacidad. Esto
limita la posibilidad de liberación de gas cuando el cilindro se caliente, evitando incendios o
lesiones.
El cilindro L.P. debe tener una válvula de cierre que termine en una salida especificada del
cilindro de suministro de gas L.P., según se aplique, para conexión Nº 510 en el estándar para
la conexión de entrada y salida de válvulas de cilindros de gas comprimido ANSI/CGA-V-1. Los
cilindros no deben almacenarse en edificios, garajes ni otras zonas cerradas. (El cilindro L.P.
debe tener un dispositivo de protección de sobrecarga y un collar para proteger la válvula del
cilindro.)
El cilindro de suministro de gas L.P. debe estar construido y marcado de acuerdo a las
Especificaciones para Cilindros de Gas LP del Departamento de Transportes de los EE.UU.
(D.O.T.) o el Estándar Nacional de Canadá, CAN CSA-B339, "Cilindros, Esferas y Tubos para
Transporte de Bienes Peligrosos y Comisión".
USO DEL TANQUE L.P.
• Al abrir el tanque L.P., asegúrese de abrir LENTAMENTE la válvula dos (2) vueltas completas para
garantizar el flujo adecuado de gas. La mayoría de los tanques de gas incorporan actualmente un
mecanismo interno de detección de fugas. Cuando el gas se escapa rápidamente, corta el
suministro de gas. Abrir la válvula rápidamente podría simular una fuga de gas, causando la
activación del dispositivo de seguridad, restringiendo el flujo de gas y provocando llamas bajas.
Abrir lentamente la válvula asegurará que esta característica de seguridad no se dispare por error.
• Cuando no se utilice, la válvula del cilindro de suministro de gas debe estar en la posición "OFF".
• El sistema de suministro del tanque debe almacenarse hacia arriba para permitir la retirada del vapor.
• El conjunto del regulador y la manguera debe ser inspeccionado antes de cada uso de la parrilla. Si hay
abrasión o desgaste excesivos, o un corte en la manguera, debe sustituirse antes de utilizar la parrilla.
57
INSTRUCCIONES DE USO
• Los cilindros deben almacenarse en el exterior, fuera del alcance de los niños y no deben almacenarse en
edificios, garajes ni otras áreas cerradas.
ADVERTENCIA
• Sólo deberá rellenar el tanque L.P. un proveedor
cualificado de gas.
• Coloque una tapa anti-polvo en la válvula del
cilindro siempre que no se utilice. Instale en la
válvula de salida del cilindro sólo el tipo de tapa
suministrado con la válvula del cilindro. Otros tipos
de tapas o conectores pueden causar fugas de
propano.
No almacene un cilindro de gas L.P. de
repuesto bajo o cerca de la parrilla. Nunca
rellene el cilindro más allá del 80% de su
capacidad.
Si esta información no se sigue con
exactitud, puede darse un incendio que
cause la muerte o lesiones graves.
REVISIÓN DE FUGAS
Pese a que todas las conexiones de gas en la parrilla han pasado una prueba de fuga antes de la entrega,
debe realizarse una comprobación de estanqueidad en el lugar de la instalación debido a posibles vuelcos
durante el transporte, instalación o presión excesiva aplicada sin saberlo a la unidad. Revise periódicamente
todo el sistema en busca de fugas y revise inmediatamente el sistema si detecta olor a gas.
CERRADO
1. No fume durante la prueba de fugas.
Fig. 6
2. Extinga cualquier llama.
3. Nunca revise las fugas con una llama.
4. Mezcle una solución de partes iguales de detergente líquido
ALTO
o jabón líquido y agua.
BAJO
5. Cierre los mandos de control del quemador. (ver Fig. 6)
6. Gire el mando superior del cilindro de suministro de combustible
en sentido contrario a las agujas del reloj dos (2) vueltas para abrirlo.
7. Aplique la solución jabonosa a las conexiones del
conjunto de suministro de combustible. Aplique la solución de comprobación
de fugas en todos los: puntos "X" (ver Fig. 7).
Fig. 7
Si no aparecen burbujas de jabón, no hay
fugas de gas. Si se forman burbujas en las conexiones, se ha detectado
una fuga. Si se detecta una fuga, cierre inmediatamente
el suministro de gas, apriete las conexiones con fugas,
abra el gas, y repita los pasos 5-6.
8. Cierre el mando superior del cilindro de suministro de combustible
9. Abra los mandos de control del quemador un momento
para liberar la presión en la manguera, después vuelva a cerrar los mandos de control.
10. Limpie la solución jabonosa con agua fría y una toalla seca.
Revise todas las conexiones de suministro de gas antes de cada uso, y asegúrese cada vez de que el
cilindro de suministro de gas esté conectado al regulador. Haga que un técnico de servicios cualificado
sustituya las piezas con fugas de la parrilla si lo necesita.
También se recomienda realizar una prueba de fugas al menos una vez al año tanto si el
58
INSTRUCCIONES DE USO
el cilindro de suministro de gas L.P. ha sido desconectado como si no.
Por favor consulte el diagrama para la instalación correcta (ver Fig. 8 y Fig. 9). Revise
visualmente la conexión entre la tubería Venturi del quemador y el orificio. Asegúrese de que la
del tubo blando del
Tubo Venturi del
tubería Venturi encaje en el orificio.
quemador posterior
Tubo Venturi del quemador
quemador
Fig. 8
Fig. 9
Válvula de gas
LP con orificio
Conexión de tubo
blando de la válvula
Conexión de tubo
Conexión
de
tubo
blando de la válvula
Back burner soft pipe connection
Quemador lateral
Válvula de gas LP
Conexión
con orificio
Quemadores Principales
blando de la válvula
ADVERTENCIA Durante la prueba de fugas del aparato, asegúrese de comprobar y
apretar todas las conexiones flojas. Una ligera fuga en el sistema puede resultar en una llama
baja o condición peligrosa. La mayoría de los tanques de gas L.P. incorporan actualmente un
mecanismo interno de detección de fugas. Cuando el gas se escapa rápidamente, corta el
suministro de gas. Una fuga puede reducir significativamente el flujo de gas, dificultando el
encendido de la parrilla o causando llamas bajas.
Si no puede detener una fuga de gas, cierre el suministro de gas y llame a su compañía local
de gas. Si fuera necesario, sustituya la pieza defectuosa por otra pieza de repuesto
recomendada por el fabricante. Una ligera fuga podría causar un incendio.
ADVERTENCIA No utilice la parrilla en garajes, corredores, cobertizos ni ninguna área
cerrada. Nunca utilice la parrilla en zonas cerradas ya que podría llevar a la acumulación de
monóxido de carbono, causando lesiones o la muerte. Coloque la parrilla en una superficie
nivelada. Evite mover la parrilla mientras está en funcionamiento.
NOTA: La parrilla funcionará mejor si no está orientada directamente hacia el viento.
Espacio libre respecto a construcciones combustibles:
Debe mantenerse un mínimo de 24 pulgadas a ambos
lados y tras la parrilla de gas
por encima y por debajo de la superficie de cocinado
respecto a una construcción vertical combustible adyacente.
Espacio libre respecto a construcciones no combustibles:
Un mínimo de 24 pulgadas de espacio libre entre la parte
Posterior de la parrilla y una construcción no combustible
es necesario para que se abra la cubierta.
59
INSTRUCCIONES DE USO
El almacenamiento en interiores de un aparato de cocina con gas para exteriores sólo está
permitido si el cilindro está desconectado y extraído del aparato.
ADVERTENCIA El calor y el humo salen de la
parte posterior de la abertura de la campana de la
parrilla. Asegúrese de que la parte posterior de la parrilla
no esté dirigida hacia su hogar ni hacia nada que pueda
dañarse por el calor o el humo.
Heat&de
Salida
Smoke
calor
y
Exhaust
humo
REGLAS GENERALES
¡No deje la parrilla sin vigilancia mientras cocina!
1. Asegúrese de que la parrilla haya superado la prueba de fugas y esté colocada
correctamente.
2. Encienda los quemadores según las instrucciones de este manual.
3. Gire los mandos de control a la temperatura deseada
- Alta o Baja - y precaliente la parrilla unos 10
minutos antes de cocinar.
4. Ajuste la temperatura según los requisitos de
preparación para los resultados deseados.
5. Permita que la parrilla se enfríe, limpie las
salpicaduras o grasa y la bandeja antigoteo según
necesite.
6. No coloque una cubierta sobre la parrilla mientras
esté caliente ya que podría provocar un incendio.
No encienda la luz del horno cuando sienta olor a gas.
ANTES Y DESPUÉS DEL ENCENDIDO
1. Asegúrese de que su parrilla esté colocada sobre una superficie nivelada.
2. Mantenga limpia la zona de la parrilla de gas y libre de materiales combustibles,
gasolina y otros vapores y líquidos inflamables.
3. Asegúrese de que nada obstruya el flujo de aire de combustión y ventilación.
4. Asegúrese de que la ventilación de la carcasa del cilindro esté despejada y limpia de
residuos.
5. Revise visualmente las llamas del quemador.
ADVERTENCIA Compruebe la línea de suministro de gas en busca de cortes, desgaste
o abrasión.
Mantenga siempre su cara y su cuerpo tan alejados como sea posible de la parrilla al
encenderla.
60
Comprobar la alineación de los orificios con los quemadores
Los orificios pueden desplazarse durante el montaje y el movimiento. Compruebe la alineación
de los orificios con los quemadores de acuerdo a las siguientes ilustraciones antes del
encendido.
Pasador del orificio
dentro del obturador de
Relación entre el quemador principal y el orificio
Pasador del orificio dentro
del obturador de aire
Relación entre el quemador de infrarrojos y el orificio
Pasador del orificio dentro del
obturador de aire
Relación entre el quemador lateral y el orificio
61
ENCENDIDO DEL QUEMADOR DE LA PARRILLA
Advertencia: No se incline sobre la parrilla al encenderla.
Corte el suministro de LP en el cilindro cuando el aparato no
esté en uso.
Ilustración del Encendido del Quemador Principal:
CERRADO
ALTO
BAJO
1. Compruebe que los mandos de control estén en la
posición OFF.
2. Abra totalmente la válvula del tanque girándola en sentido
contrario a las agujas del reloj.
3. Abra la cubierta durante el encendido.
4. Presione la Ignición Eléctrica 3 o 4 segundos mientras gira
el mando de control de la PARRILLA a la posición ALTA. El
quemador debería encenderse.
Mando de control del quemador
Si la ignición no tiene lugar en 5 segundos, gire inmediatamente el mando de control ala
posición OFF. Espere 5 minutos y repita el anterior paso 4 o consulte las instrucciones de
encendido con cerillos en el manual.
Si por algún motivo el encendedor electrónico no enciende el quemador, éste puede
encenderse con un cerillo acoplado a la extensión de cerillo, localizada en el interior de la
puerta del carrito.
Retire la parrilla de cocinado principal y los supresores de llama. Mantenga su rostro tan
alejado como sea posible de la superficie de la parrilla y pase el extensor de cerillo hacia los
puertos de los tubos del quemador principal. Coloque el cerillo cerca de los puertos del
quemador y presione y gire el mando de control en sentido contrario a las agujas del reloj hasta
la posición "ALTA". Tras haberse encendido el quemador, gire el mando hasta la posición "LP
BAJO" y coloque cuidadosamente los supresores de llama y las parrillas de nuevo en su
posición. Después gire el mando de control hasta el ajuste deseado.
NOTA: Si la parrilla no se enciende tras varios intentos, vea la sección Solución de problemas de este
manual. Gire los mandos de control a la posición OFF cuando lo la utilice.
Mantenga todos los cables de suministro de corriente y
ENCENDIDO DEL QUEMADOR DE INFRARROJOS Y DEL QUEMADOR DEL ASADOR:
Compruebe que
que los
los mandos
mandos de
de control
control estén
estén en
en la
la posición OFF.
1. Compruebe
CERRADO
2. Abra totalmente la válvula del tanque girándola en sentido
contrario a las agujas del reloj.
3. Abra la cubierta durante el encendido.
4. Presione la Ignición Eléctrica 3 o 4 segundos mientras gira
el mando de control de INFRARROJOS o ASADOR a la
posición ALTA. El quemador debería encenderse.
ALTO
BAJO
5. Una vez encendido, suelte el encendedor electrónico y
mantenga presionado el mando unos 15 segundos más para
asegurar que el quemador permanezca encendido.
Mando de control del quemador
62
INSTRUCCIONES DE USO
Si la ignición no tiene lugar en 5 segundos, gire
inmediatamente el mando de control ala posición OFF.
Espere 5 minutos y repita el anterior paso 4 o consulte las
instrucciones de encendido con cerillos en el manual.
Si el encendedor no funciona, el quemador puede
encenderse sosteniendo un cerillo encendido en el
quemador mientras el mando de control esté girado hacia la
posición "ALTA".
NOTA: Tras el primer uso, el acero inoxidable alrededor
del quemador se oscurecerá. Es una reacción normal del
acero inoxidable de alta calidad debido al calor y no es
un defecto. El panel de infrarrojos también se
oscurecerá tras el uso inicial. Esto también es algo
normal.
Nota:
No
haga
funcionar
el
CERRADO
ALTO
BAJO
Mando de control del quemador
quemador
principal y el quemador infrarrojo trasero al
CUIDADOS Y MANTENIMIENTO
ADVERTENCIA
LA CAMPANA NO DEBERÁ ESTAR CERRADA
DURANTE
LARGOS
PERÍODOS
SI
EL
QUEMADOR DE INFRARROJOS ESTÁ EN USO.
LIMPIEZA DEL QUEMADOR DE INFRARROJOS
Tras cada uso, es necesario quemar la parte inferior
del quemador de infrarrojos con la campana abierta
durante al menos cinco minutos para vaporizar
cualquier salpicadura o partículas de comida. No
hacer esto dañará el quemador. Ocasionalmente
puede ser necesario cepillar, soplar o aspirar las
cenizas acumuladas en la superficie del quemador.
Hágalo con cuidado y sólo cuando el quemador esté
frío.
EVITE DAÑAR CON AGUA EL
QUEMADOR DE INFRARROJOS
No permita nunca que el agua
entre en contacto con el
quemador de infrarrojos, ya
que provocaría daños. El daño
causado por el agua no está
cubierto por su garantía.
PROTECCIÓN DE LOS QUEMADORES DE INFRARROJOS
Los quemadores de su parrilla están diseñados para proporcionar una larga vida de
rendimiento satisfactorio.
63
CUIDADOS Y MANTENIMIENTO
Sin embargo, hay pasos que debe seguir para evitar romper las superficies cerámicas del
quemador, lo que causaría que los quemadores fallen. Lo siguiente son las causas más
comunes de rotura y los pasos a seguir para evitarlas. Los daños causados por no seguir
estos pasos no están cubiertos por la garantía de su parrilla.
IMPACTOS CON OBJETOS DUROS - Nunca permita que objetos duros golpeen la cerámica.
Deberá tener un cuidado especial al insertar o extraer rejillas y accesorios en la parrilla. Si
objetos de este tipo caen sobre la cerámica, es probable que la rompa.
OBSTRUCCIÓN EN LA VENTILACIÓN DEL AIRE CALIENTE DE LA PARRILLA - Para que
los quemadores funcionen adecuadamente, el aire caliente originado en los quemadores debe
tener una vía de escape. Los quemadores pueden quedarse sin oxígeno, causando el retorno
de la llama, especialmente si la salida del quemador está en ALTA. Si esto ocurre varias veces,
los quemadores podrían romperse. Ésta es la razón por la que su parrilla cuenta con rendijas
de ventilación. Este diseño le da al aire caliente un camino de escape. En consecuencia, nunca
utilice su parrilla con muy poco o sin espacio abierto en la superficie de cocinado (la rejilla de
cocinado proporciona el espacio suficiente). Tampoco cubra nunca las rendijas de ventilación
con papeles o materiales que impidan el flujo de aire. Especialmente, no cubra completamente
la superficie con un papel, una bandeja grande, etc.
MANTENIMIENTO GENERAL
- Mantenga limpia la zona del aparato para cocinar con gas y libre de materiales combustibles,
gasolina y otros vapores y líquidos inflamables.
- No obstruya el flujo de aire de combustión y de ventilación.
- Mantenga las aberturas de ventilación de la carcasa del cilindro libres y limpias de residuos.
- Revise visualmente los quemadores.
Normal: Llamas azules suaves
Ajuste incorrecto: Llamas azules
fuertes – demasiado aire
Mala combustión: Llamas amarillas
onduladas – demasiado poco aire
LIMPIEZA GENERAL
IMPORTANTE: Antes de la limpieza, asegúrese de que todos los controles estén cerrados y la
parrilla fría. Siga siempre las instrucciones de la etiqueta de los productos de limpieza.
Para la limpieza cotidiana, limpie con agua y jabón utilizando un paño suave o esponja. Aclare
con agua limpia y séquelo con un paño suave y sin pelusa para evitar manchas y rayas.
Para evitar arañar la superficie, no utilice estropajos para limpiar la parrilla.
Utilice una cubierta de vinilo para proteger el acabado a la intemperie.
BANDEJA ANTIGOTEO
La bandeja antigoteo deberá limpiarse periódicamente para evitar la acumulación pesada de
residuos.
NOTA: Deje enfriar la bandeja antigoteo antes de limpiarla.
64
CUIDADOS Y MANTENIMIENTO
Importante: No deje la parrilla en el exterior en caso de mal tiempo a menos que esté
cubierta. El agua de lluvia puede entrar en la parrilla, en el carrito o en la bandeja
antigoteo si se deja sin cubrir. Si la bandeja antigoteo no se limpia tras el uso y la parrilla
queda al descubierto, la bandeja se llenará de agua causando que el agua y la grasa se
derramen dentro del carrito. Recomendamos limpiar y guardar la bandeja antigoteo tras
cada uso.
REJILLAS DE COCINA
Las rejillas pueden limpiarse inmediatamente tras terminar de cocinar y tras apagar la parrilla.
Lleve una manopla ignífuga y frote las rejillas con un paño húmedo. Si deja enfriar la parrilla,
será más fácil limpiar las rejillas si la retira de la parrilla y la limpia con un detergente suave.
ACERO INOXIDABLE
Tras el uso inicial, zonas de la parrilla pueden perder color por el intenso calor procedente de
los quemadores. Esto es normal.
Adquiera un limpiador suave para acero inoxidable y frote en el sentido del grano del metal.
Pueden acumularse manchas de grasa en la superficie del acero inoxidable y quemarse en la
superficie, dando un aspecto desgastado. Para eliminarlas, utilice un limpiador de hornos no
abrasivo junto con un limpiador de acero inoxidable.
NOTA: Frote siempre en la dirección del grano.
PIEZAS DE PORCELANA
Ciertas piezas de su parrilla tienen un revestimiento de porcelana. La porcelana es un producto
basado en vidrio y es muy resistente al desgaste habitual. Sin embargo, la porcelana es
sensible a los golpes, lo que puede crear micro-fracturas entrelazadas o "telas de araña". Por
favor, tenga cuidado de no golpear ninguna pieza cubierta de porcelana con objetos sólidos, de
no dejarlas caer, ni de crear otros golpes. Estas microfracturas entrelazadas son comunes y
pueden crear pequeñas astillas. Ni las astillas ni las micro-fracturas entrelazadas afectarán
negativamente al rendimiento de su parrilla y no están cubiertas por la garantía de las piezas
de porcelana.
65
SOLUCIÓN DE PROBLEMAS
Muchas soluciones dadas aquí pueden hacer más segura y más placentera su experiencia con
la parrilla. Usted
puede también llamar al departamento de servicio al cliente al
1-855-CHANTS-US(1-855-242-6887) de 8:00am a 5:00pm, hora Este, de lunes a viernes para
pedir asistencia.
PROBLEMA
La parrilla no
se enciende.
POSIBLE CAUSA
1. El cable de ignición sale del
encendedor eléctrico/válvula.
2. La distancia entre el vástago de
ignición y el quemador es mayor
de 5/32 pulgadas - 3/16 pulgadas.
3. El cable de ignición está roto.
4. La batería se ha agotado.
5. La batería se encuentra con la
polaridad incorrecta.
6. La punta del electrodo no produce
chispas en el puerto del
quemador.
7. No se recibe gas.
8. La abertura del obturador de aire
es demasiado grande.
1. El obturador de aire no está bien
ajustado.
La llama del
quemador es
amarilla y
2. Arañas o insectos bloquean el
puede
obturador.
sentirse el
3. Posibles fugas de gas.
olor a gas.
1. Cocinar carnes grasientas.
2. Mandos en "ALTA".
Llamas
excesivas.
3. Agua pulverizada sobre las llamas
de gas.
4. Campana cerrada mientras de
cocina.
El quemador
se apaga.
1. El tanque LP está vacío.
2. El quemador no está alineado con
la válvula de control.
3. El suministro de gas no es
suficiente.
66
ACCIÓN CORRECTIVA
1. Vuelva a conectar el cable de ignición
al encendedor eléctrico/válvula.
2. Suelte el vástago de ignición y ajuste
la distancia, después vuélvalo a
apretar.
3. Llame al servicio al cliente para una
sustitución del cable de ignición
4. Instale una nueva batería AA.
5. Cambie la polaridad de la batería.
6. Vuelva a instalar el electrodo.
7. Abra la válvula del regulador.
8. Afloje el obturador de aire y ajuste la
abertura a un tamaño menor.
1. Afloje el obturador de aire y ajuste la
abertura para conseguir llamas
azules.
abertura de 1/4 pulgadas para
LPG.
2. Limpie los obstáculos.
3. Compruebe la fuente de fugas de
gas.
1. Mueva la carne a la rejilla calentadora
si las llamas continúan hasta que
éstas disminuyan.
2. Cocine las carnes grasientas cuando
las rejillas estén frías mientras los
mandos están en "LP BAJO" (cuando
use gas LP)
3. Nunca pulverice agua sobre las
llamas de gas.
4. Levante la campana mientras de
cocina.
1. Rellene el tanque LP.
2. Instale el quemador correctamente.
3. Revise la manguera de suministro de
gas y asegúrese de que no haya
fugas ni enredos.
SOLUCIÓN DE PROBLEMAS
PROBLEMA
POSIBLE CAUSA
ACCIÓN CORRECTIVA
Poco calor
con el
mando en la
posición
"ALTO".
1. Los puertos están bloqueados.
2. El tanque LP se ha agotado.
1. Limpie los puertos de cualquier
obstrucción.
2. Rellene el tanque LP.
Poco calor,
gas LP.
El conjunto del regulador de propano
incorpora un dispositivo de exceso
de flujo diseñado para suministrar a
la parrilla el flujo de gas suficiente.
Los cambios rápidos de presión
pueden disparar el dispositivo,
produciendo una llama baja y poca
temperatura.
Por favor, siga estas instrucciones:
1. Asegúrese de que todos los
quemadores estén en "OFF".
2. Abra la válvula del tanque y espere 5
minutos.
3. Encienda el quemador siguiendo las
instrucciones de encendido indicadas
en el forro de la puerta.
67
GARANTÍA
La prueba de compra es necesaria para acceder este programa de garantía, que tiene efecto
desde la fecha de compra. Los clientes estarán sujetos a las tarifas de piezas, envíos y
manipulación si no es posible proporcionar una prueba de compra o tras expirar la garantía.
Si tiene alguna pregunta o problema, puede llamar a nuestro departamento de atención al
cliente al 1-855-CHANT-US(1-855-242-6887) de 8:00 AM a 5:00 PM, hora Este, de lunes a
viernes, para pedir asistencia.
Garantía limitada
El fabricante garantiza este producto por el Quemador Principal de Acero Inoxidable durante 5
años y todas las demás piezas de sustitución durante
el Quemador Principal
1 año desde la fecha de compra.
de Acero Inoxidable
Disposiciones de la garantía:
Esta garantía es intransferible y no cubre fallos debidos al mal uso de una instalación o
mantenimiento incorrectos.
Esta garantía es sólo para la sustitución de piezas defectuosas. No somos responsables de
daños o gastos de mano de obra incidentales o consecuentes.
Esta garantía no cubre la corrosión o decoloración tras haberse utilizado la parrilla, o la falta de
mantenimiento, entornos hostiles, accidentes, alteraciones, abuso o negligencia.
Esta garantía no cubre daños causados por el calor, limpiadores abrasivos y químicos, o
cualquier daño causado a otros componentes utilizados en la instalación o funcionamiento de
la parrilla de gas.
La pintura no está garantizada y puede necesitar retoques. Los elementos considerados
consumibles, como las baterías, no están cubiertos por esta garantía.
Algunos estados no permiten la exclusión o limitación de los daños incidentales o
consecuentes, de forma que las anteriores limitaciones o exclusiones pueden no aplicársele.
Esta garantía le da derechos legales específicos, y usted puede tener también otros derechos
que varían dependiendo del estado.
Para las piezas de sustitución, llame al departamento de servicio al cliente al
1-855-CHANTS-US(1-855-242-6887) de 8:00am a 5:00pm, hora Este, de lunes a viernes para
pedir asistencia.
68