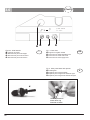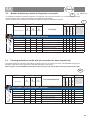
1
Istruzioni per l'uso Operating instructions Manual de Instrucciones Italiano English Español Hygrotherm plus 502.0901.j 2013-07 Index: 15 I Indice Pagina 1.0Introduzione 1.1 Indicazioni sulle istruzioni per l'uso..........................4 1.2 Breve descrizione.....................................................6 1.3Funzione..................................................................6 1.4 Spiegazione dei simboli...........................................8 2.0 Istruzione per la sicurezza..................................10 2.1 Istruzioni importanti per il mantenimento dello stato igienico delle unità di lavaggio ad acqua calda............................................................11 3.0 Installazione e messa in funzione 3.1Dotazione...............................................................16 3.2Presentazione................................................ 18 - 21 3.3Allacciamenti..........................................................22 3.3.1 Allacciamenti elettrico............................................22 3.3.2 Allacciamenti compensazione di potenziale...........22 3.3.3 Allacciamenti dell'acqua.........................................22 3.3.4 Allacciamenti della manopola lavaggio..................22 3.4 Messa in funzione..................................................24 4.0Comando 4.1 Selezione dei livelli di temperatura.........................26 4.2 Descrizione dei tipi d'esercizio...............................27 4.2.1 Procedimento termico per la riduzione dei germi................................................................27 4.2.2 Modo di lavaggio....................................................27 4.2.3 Modo a risparmio energetico..................................29 5.0 Istruzioni per la pulizia e manutenzione 5.1 Note generali sulla pulizia e disinfezione...............30 5.2 Prodotti consigliati per la disinfezione degli strumenti................................................................32 5.3 Prodotti consigliati per la disinfezione delle superfici..................................................................32 5.4 Metodo di pulizia per pistola di irrigazione con puntale..................................................................35 6.0 Manutenzione e servizio 6.1 Controllo del funzionamento..................................37 6.2 Controllo visivo.......................................................38 6.3 Controllo elettrico...................................................38 6.4 Decalcificazione.....................................................38 6.5 Cambio del filtro.....................................................39 7.0 Eliminazione dei disturbi di funzionamento......................................................46 8.0 Accessori e pezzi di ricambio 8.1Accessori................................................................49 8.2 Pezzi di ricambio....................................................49 9.0 Dati tecnici ...........................................................52 10.0Smaltimento..........................................................55 11.0 Notes on EMC................................................. 56-58 General Standard Terms and Conditions 2 UK Table of contents Page 1.0Introduction 1.1 Notes on operating instructions................................5 1.2 Intended use............................................................7 1.3Function...................................................................7 1.4 Explanation of symbols............................................9 2.0 Safety advice........................................................12 2.1 Advice for the user for maintaining hygienic status......................................................................13 3.0 Installation and start-up 3.1 Standard delivery...................................................17 3.2Illustrations..................................................... 18 - 21 3.3Connections...........................................................23 3.3.1 Electrical connection..............................................23 3.3.2 Equipotentiality connection....................................23 3.3.3 Water connection...................................................23 3.3.4 Connecting the irrigation handle............................23 3.4Start-up..................................................................25 4.0Operation 4.1 Adjusting temperatures..........................................26 4.2 Description of operating modes.............................28 4.2.1 Thermal process for reducing bacterial count........28 4.2.2 Irrigation mode.......................................................28 4.2.3 Energy saving mode..............................................29 5.0Cleaning 5.1 General information on cleaning and disinfection.......31 5.2 Recommended instrument disinfectants................33 5.3 Recommended surface disinfectants.....................33 5.4 Cleaning method for handle with jet connection for water irrigation tip..............................................35 6.0 Maintenance and service 6.1 Functional test........................................................40 6.2 Visual inspection....................................................41 6.3 Electrical test..........................................................41 6.4 Decalcification........................................................41 6.5 Replacement of filter..............................................42 7.0 Trouble shooting..................................................47 8.0 Accessories and spare parts 8.1Accessories............................................................50 8.2 Spare parts.............................................................50 9.0 Technical specifications......................................53 Índice E Página 1.0Introducción 1.1 Indicaciones acerca de este Manual de Instrucciones..........................................5 1.2 Descripción breve....................................................7 1.3Funcionamiento........................................................7 1.4 Explicación de los símbolos.....................................9 2.0 2.1 Instrucciones de seguridad................................14 Indicaciones importantes para mantener el estado higiénico de las unidades de lavado de agua caliente.....................................................15 3.0 Colocación y puesta en funcionamiento 3.1 Volumen de suministro...........................................17 3.2 Gráficos.......................................................... 18 - 21 3.3Conexiones............................................................23 3.3.1 Conexión eléctrica..................................................23 3.3.2 Conexión para equipotencial..................................23 3.3.3 Acometida de agua................................................23 3.3.4 Conexión del irrigador............................................23 3.4 Puesta en funcionamiento......................................25 4.0Manejo 4.1 Selección de los niveles de temperatura...............26 4.2 Descripción de los modos de funcionamiento........28 4.2.1 Proceso térmico para la reducción de gérmenes....28 4.2.2 Modo de irrigación..................................................28 4.4.4 Modo de ahorro de energia....................................29 5.0 Recomendaciones para la limpieza y el cuidado del aparato 5.1 Recomendaciones básicas para la limpieza y desinfección del aparato.......................31 5.2 Desinfectantes recomendados para instrumentos...........................................................34 5.3 Desinfectantes recomendados para superficies..............................................................34 5.4 Método de limpieza para la pistola de irrigación con la conexión jet.................................................36 6.0 6.1 6.2 6.3 6.4 6.5 Mantenimiento y servicio técnico Prueba funcional....................................................43 Inspección visual....................................................44 Inspección eléctrica................................................44 Descalcificación.....................................................44 Cambio de filtro......................................................45 7.0 Subsanación de fallos funcionales....................48 10.0Disposal................................................................55 8.0 Lista de accesorios y piezas de recambio 8.1Accesorios..............................................................51 8.2 Piezas de recambio................................................51 11.0 Notes on EMC................................................. 56-58 9.0 10.0Eliminación...........................................................55 General Standard Terms and Conditions Datos técnicos......................................................54 11.0 Notes on EMC................................................. 56-58 General Standard Terms and Conditions 3 1.0 I 1.0Introduzione 1.1 Indicazioni sulle istruzioni per l'uso Le presenti istruzioni per l’uso contengono importanti indicazioni che vi metteranno in grado di usare il Hygrotherm plus in modo sicuro, appropriato ed effettivo. Pertanto, esse non sono dirette soltanto alle persone da addestrare e adibirne all’uso, bensì anche come opera di consultazione. Grazie ad esse si possono evitare i pericoli nonché ridurre le spese di riparazione e i periodi di non funzionamento. Inoltre, fanno aumentare l’affida-bilità e la durata dell’apparecchio. Per tali ragioni, le istruzioni per l’uso vanno tenute sempre a portata di mano vicino all’apparecchio. Prima di mettere in esercizio l’apparecchio per la prima volta, leggete il capitolo “Istruzioni per la sicurezza” in modo che siate preparati alle eventuali situazioni di pericolo. Durante il lavoro, sarebbe troppo tardi. In linea di massima, è valido quanto segue: Il modo migliore di proteggersi contro gli incidenti è quello di lavorare con attenzione e prudenza! La sicurezza di funzionamento e l’efficacia dell’apparecchio non dipendono soltanto dalla vostra capacità, ma anche dalla cura e manutenzione del Hygrotherm plus. Per tale ragione è indispensabile che si eseguano regolarmente i lavori di pulizia e manutenzione. I lavori maggiori di manutenzione e riparazione devono essere eseguiti soltanto da un esperto autorizzato dalla ATMOS. In caso di riparazioni, vi preghiamo di esigere soltanto l’uso di pezzi di ricambio originali. In tal modo avrete la garanzia che la sicurezza di funzionamento, l’efficacia e il valore del vostro apparecchio rimarranno immutati. L’apparecchio Hygrotherm plus è munito del contras-se- gno CE-0124 in conformità alla Direttiva UE della commissione sui prodotti tecnico-sanitari 93/42/CEE e soddisfa i requisiti fondamentali dell’Annesso I di tale Direttiva. Il sistema di controllo della qualità applicato presso la ATMOS è certificato secondo le norme internazionali EN ISO 9001 e EN 46001. ATMOS MedizinTechnik GmbH & Co. KG Ludwig-Kegel-Str. 16 79853 Lenzkirch Deutschland Telefon: + (49) 7653 689-0 Fax: + (49) 7653 689-190 + (49) 7653 689-493 (Service Center) e-mail:[email protected] Internet:http://www.atmosmed.de 4 Per la riproduzione - anche parziale - delle istruzioni per l’uso occorre l’autorizzazione scritta della ATMOS. Abbreviazioni / simboli contenuti nelle presenti istruzioni per l’uso: Indicazione di un elenco • Suddivisione di un elenco/operazione. Si deve rispettare l'ordine consigliato! Contrassegno di indicazioni particolarmente importanti! Descrizione dell'effetto di un'operazione. 1.0 E UK 1.0Introduction 1.0Introducción These operating instructions contain important notes on Este Manual de Instrucciones contiene indicaciones 1.1 Notes on operating instructions how to operate the Hygrotherm plus safely, correctly and effectively. Therefore, they are intended not only for new operating personnel to be instructed in its use, but also for use as a reference manual. They help to avoid risks, and also to reduce repair costs and down-time. Furthermore, reliability and service-life of the equipment will be increased. For these reasons these operating instructions must always be kept available near the appliance. Prior to first use please peruse the chapter “Safety advice”, in order to be prepared for any possible dangerous situations. It would be too late during in actual use. The basic principles are: Judicious and careful work provides best protection against accidents! Operational safety and readiness for use depend not only on your capabilities, but also on care and maintenance given to the Hygrotherm plus. For this reason regular cleaning and service work are a must. Major maintenance and repair work may be carried out only by expert personnel authorised by ATMOS. In case of repairs you should insist that original spare parts only are used. You will then have the warranty that operational safety, readiness for work and the value of your appliance will be preserved. 1.1 Recomendaciones básicas: La mejor forma de prevenir los accidentes es trabajar con cuidado y precaución! La seguridad de servicio y la funcionalidad de su aparato Hygrotherm plus no dependen únicamente de sus conocimientos profesionales, sino también del manteni-miento y cuidado del aparato. Por esta razón resultan indispensables la limpieza y el mantenimiento periódicos del aparato. Los trabajos de mantenimiento y reparación de mayor alcance deben ser realizados siempre por un técnico autorizado por ATMOS. Cuando tenga que encargar una reparación insista en que se utilicen exclusivamente piezas de recambio originales ATMOS, ya que entonces tendrá Ud. la garantía de que se conserve la seguridad de servicio y la funcionalidad, así como el valor de su aparato. El producto Hygrotherm plus lleva el identificativo CE- 0124 de la CE según la directiva UE del Consejo para Productos Medicinales 93/42/CEE y cumple los requi-sitos básicos del anexo I de esta directiva. The quality management system applied at ATMOS has been certified according to international standards EN ISO 9001 and EN 46001. importantes para el manejo seguro, correcto y eficaz del Hygrotherm plus. Por esta razón este Manual no sirve únicamente al personal de manejo nuevo o que desea familiarizarse con su funcionamiento, sino que debe servir también como manual de consulta. Ayuda a prevenir los riesgos y reducir los costes de reparación y los tiempos de parada. Aumenta además la fiabilidad y la vida útil del aparato. Por ello debe guardar el Manual de Instrucciones siempre cerca del aparato. Lea el capítulo «Instrucciones de seguridad» antes de poner en marcha por primera vez el aparato para estar preparado para eventuales situaciones de riesgo, y no cuando el aparato ya está en marcha, ya que entonces podría ser demasiado tarde. The product Hygrotherm plus bears CE Marking CE-0124 according to the EEC guideline of the council for medical products 93/42/EEC and meets the basic requirements of this guideline. Indicaciones acerca de este Manual de Instrucciones El sistema de calidad utilizado por ATMOS está certificado según las normas internacionales EN ISO 9001 y EN 46001. Reprints, also in extracts, only with written permission by ATMOS. Este Manual sólo puede reproducirse, incluso parcialmente, con la autorización por escrito de ATMOS. Abbreviations / symbols in these operating instructions: Indicating a list • Subdivision of a list/activity The recommended sequence must be followed in each case! Indicating particularly important advice! Describing the effect of an activity. Abreviaturas/símbolos utilizados en este Manual de Instrucciones Simbolo que antecede a una enumeración • Simbolo que antecede a una subdivisión de una enumeración/actividad Hay que seguir siempre la secuencia recomendada! Identificación de instrucciones especialmente importantes Descripción del efecto de una actividad. 5 1.0 I 1.2 Breve desrcizione Funzioni principali: Compatto e facilità d’uso nell’’irrigazione del condotto uditivo Applicazione: Per applicazioni sull’uomo Specifiche di funzionamento: Getto d’acqua per l’irrigazione dell’orecchio alla temperatura corporea (37°) con un flusso a 400 ml/min per la rimozione del cerume Applicazioni: Canale uditivo Durata dell’applicazione:Per applicazione a breve termine Ambienti d’uso : Cliniche e ambulatori ORL e di foniatria. L’utilizzo dei dispositivi d’irrigazione ATMOS puo’ essere eseguita solo da personale qualificato. Controindicazioni: Non applicare a vie respiratorie e canali uditivi infettati. 1.3Funzionamento Azionando l'interruttore centrale ( , figrua 1) si attiva automaticamente il procedimento per la riduzione del tenore di germi (vedi paragrafo 4.2.1). In seguito, cambio automatico nel modo di lavaggio. Con acqua di 37°C e una quantità di flusso di almeno 400 ml/ min. si può procedere ai lavaggi. 6 1.0 E UK 1.2 Intended use Main function: A user-friendly compact device for the irrigation of the auditory canal Application: For the application on humans Specifications of the main functions: Produces a jet of water for the ear irrigation at body temperature (37°C) with a flow rate of 400 ml/min for the removal of cerumen Application organ: Auditory canal to the drumhead Duration of application: For the short-term application on patients Application environment:Application environments are clinics and practices of ENT physicians and phoniatricians. The therapy with the ATMOS irrigation devices may only be performed by trained staff. Contraindications: Do not apply to an infected resp. contaminated auditory canal. 1.2 Descripción breve Función Ppal.: Un equipo fácil de usar para la irrigación del canal auditivo Aplicación : Para la aplicación en humanos Especificaciones del las Funciones Principales: Produce un chorro de agua para la irrigación del oído a temperatura corporal (37ºC) con un flujo de 400 ml/min para la extracción del serúmen Órganos de aplicación: Canal auditivo hacia tambor Duración de la aplicación: Para aplicación corta en pacientes Ambitos de aplicación: Aplicación en clínicas y consultas de Otorrinos y Foniatras. La terapia con los equipos de irrigación ATMOS solo debe llevarse a cabo por personal debidamente formado. Contraindicaciones: No aplicar en canal auditivo contaminado o infectado 1.3Function 1.3Funcionamiento Operating the main switch ( , fig. 1) automatically Cuando se pulsa el interruptor principal ( , fig. 1) se activates the thermal process for reducing bacterial count (see section 4.2.1) . Then, automatic change into the irrigation mode. Here, irrigations with water warmed up to 37°C and a flow of at least 400 ml/min can be effected. activa automáticamente el proceso para la reducción de gérmenes (ver apartado 4.2.1). Después se pasa automáticamente al modo de irrigación, que puede realizarse con agua tibia a 37 ºC y un caudal mínimo de 400 ml/min, para efectuar irrigaciones. 7 1.0 I 1.4 Spiegazione dei simboli Osservare le istruzioni per l’uso! Secondo ISO/7000/0434 DIN 30600/1008 IEC 348 Apparecchi tipo B secondo IEC 417 Fusibile secondo IEC 417/5016, DIN 30600/0186 °C • • Temperatura in gradi centigradi Riscaldamento attivati Riscaldamento disattivati (modo a risparmio energetico) Allacciamento equipotenziale DIN 30600 495, ISO 417 5021 Allacciamento acqua di scarico Allacciamento dell’acqua 8 1.0 E UK 1.4 °C • • Explanation of symbols 1.4 Explicación de los símbolos Pay attention to operating instructions ! as to ISO /7000/0434 DIN 30600/1008 IEC 348 Observar el Manual de Instrucciones! según ISO/7000/0434 DIN 30600/1008 IEC 348 Type B equipment as to IEC 417 Tipo de aparato B según IEC 417 Fuse as to IEC 417/5016, DIN 30600/0186 Fusible según IEC 417/5016, DIN 30600/0186 Temperature in degree centigrade Heating ON Heating OFF (energy saving mode) °C • • Temperatura en grados Celsius Calentamiento CON Calentamiento DESC (modo de ahorro de energía) Equipotentiality DIN 30600 495, ISO 417 5021 Conexión para equipotencial DIN 30600 495, ISO 417 5021 Connection for waste water Empalme para agua de salida Connection for water Empalme para agua 9 2.0 I UK E 2.0 Istruzioni per la sicurezza Page 12 - 13 Página 14 - 15 a pericoli di esplosione o in ambienti ricchi di ossigeno. Il Hygrotherm plus è conforme alla norma IEC 601/EN 60601 e fa parte delle seguenti categorie: • VDE-Class I • Class IIa (CEE 93/42). Per le attrezzature supplementari che vengono allacciate alle interfacce analogiche e digitali dell’apparecchio si richiede la prova che corrispondono alle loro relative specifiche EN (p.e. EN 60950 per apparecchi di elaborazione dei dati e EN 60601 per apparecchi elettrici tecnico-sanitari). Inoltre, tutte le configurazioni devono soddisfare la norma di sistema EN 60601-1-1. Chi allaccia apparecchi supplementari al componente di entrata dei segnali o a quello di uscita dei segnali, è configuratore di sistema per cui si assume la responsabilità che la norma di sistema EN 60601-1-1 sia rispettata. Per ulteriori informazioni rivolgetevi al vostro rivenditore locale o al servizio di assistenza tecnica. L’apparecchio va allacciato soltanto ad una presa con contatto di terra installata in modo regolamentare. Per utenti nell’area economica europea: Il Hygrotherm plus deve essere sottoposto annualmente ad un controllo tecnico di sicurezza ad opera di un esperto autorizzato o di un tecnico del servizio di assistenza tecnica. Il Hygrotherm plus deve essere utilizzato, con funzionamento sorvegliato, soltanto da personale specializzato che sia stato autorizzato dalla ATMOS e sia stato istruito nell’uso (IEC 601-1/EN 60601-1). La tensione di rete indicata nella targhetta identificativa deve concordare con i valori della rete di alimentazione. Prima di ogni uso, assicuratevi che il funzionamento sia sicuro e che lo stato dell’apparecchio sia regolare. Sostituire immediatamente i cavi danneggiati! Corretta assegnazione degli allacciamenti specifici per un paese in occasione del montaggio: verde/giallo: conduttore di protezione (PE) blu: conduttore neutrale (N) nero o marrone: fase (L) E 'essenziale prendere in considerazione i requisiti specifici del paese per il collegamento di apparecchiature mediche alla fornitura di acqua potabile pubblica. In caso di dubbio, si prega di contattare il vostro distributore ATMOS locale. L’area di comando deve essere tale che l’utente possa Nel procedimento termico per la riduzione del tenore di germi, l’acqua calda è condotta attraverso il manipolo di lavaggio. Si prega di non staccare la manopola dal supporto né di spruzzare dell’acqua! Le parti metalliche possono scottare! Prima di spruzzare l’acqua, l’utente ne deve controllare la temperatura (visualizzazione)! contaminato. Utilizzare l’ugello dell’acqua calda solamente con la punta del tubo flessibile inserita! Nell’introdurre l’ugello, attenzione al pericolo di lesioni della membrana del timpano! Per motivi igienici, le punte dell’ugello vanno cambiate dopo ogni paziente. In tal modo si inibisce anche uno sviluppo retrogrado di germi nel dispositivo d’acqua calda. Da utilizzare solamente per il lavaggio del canale uditivo! La ATMOS non si assume nessuna responsabilità per danni estingue in caso di modifiche del prodotto da parte del cliente o da parte di terzi, per esempio in caso di trasformazione di qualsiasi genere, uso di accessori estranei, rimozione delle placche contenenti avvertimenti e indicazioni, nonché in caso di applicazioni non corrispondenti all’uso a cui l’apparecchio è destinato. NOTA BENE Alla fine dell’esercizio dell’ambulatorio, spegnete l’interruttore centrale e chiudete il rubinetto dell’alimentazione dell’acqua. L’ ATMOS Hygrotherm plus può essere utilizzato solo in ambienti adibiti per scopi medici, ma non in aree soggette 10 alle persone o cose se • non si fa uso di componenti originali ATMOS, • non si rispettano le indicazioni per l’utilizzo delle presenti istruzioni per l’uso, • persone non autorizzate dalla ATMOS hanno eseguito il montaggio, nuove regolazioni, modifiche, amplia menti e riparazioni. La validità dell’acclusa dichiarazione di conformità CE si vederla e raggiungere bene. Assicuratevi che la superficie di installazione sia sufficientemente stabile. Non mettete l’ugello di lavaggio in contatto con materiale E‘ necessario installare un monitor con trasformatore medicale di isolamento con perdita a terra o similari in conformità alle norme EN 60601-1 se richiesto, nel caso in cui diversi dispositivi sono connessi ad una stessa presa. Il trasformatore deve corrispondere al consumo totale di tutti i dispositivi collegati. Il flusso deve essere controllato dopo l'accensione o almeno una volta al giorno con una tazza di misurazione. La quantità di 500 ml / min non può essere superata. Il getto d'acqua deve essere dritto. 2.0 I 2.1 Istruzioni importanti per il mantenimento dello stato igienico delle unità di lavaggio ad acqua calda Per sciogliere il cerume nel canale uditivo e per stimolare l’organo dell’equilibrio la ATMOS offre le unità ad acqua calda Hygrotherm plus (37 °C) e Variotherm plus (20 – 47 °C). Tali unità riscaldano alla temperatura selezionata l’acqua potabile dell’alimentazione idrica domestica. Con tali temperature, in caso di inosservanza delle seguenti istruzioni per l’uso, si può avere un aumento del tenore di germi nell’acqua di lavaggio, la qual cosa a sua volta può causare pregiudizi alla salute dei pazienti sensibili. Condizioni per la messa in funzione L’acqua disponibile nella rete idrica domestica deve corrispondere almeno alle norme internazioni dell’OMS e/o alle norme nazionali relative all’acqua potabile. Allacciamento Prima di allacciare l’unità ATMOS si deve fare scorrere acqua fresca per circa 1 minuto attraverso l’attacco a parete.* Fare attenzione all’igiene durante l’installazione! Prima di avvitarli, disinfettare i raccordi filettati con alcool al 70%.* Eseguire i lavori di manutenzione nei componenti conduttori d’acqua facendo uso di guanti monouso.* Anteriormente alla prima messa in funzione, eseguire per almeno 3 volte una marcia di spurgo termica.* * Tali interventi saranno eseguiti da un tecnico del servizio assistenza autorizzato dalla ATMOS Funzionamento corrente Prima del funzionamento in ambulatorio, accendere l’unità e attendere finché sia terminata la marcia di spurgo termica. Dopo lunghi periodi d’inutilizzo dell’apparecchio (fine settimana, ferie ecc.), attendere finché sia terminata la marcia di spurgo termica e ripeterla due volte. Si consiglia di spegnere e riaccendere l’apparecchio ogni 2 ore, al più tardi dopo 4 ore, per avviare il modo di spurgo termico. Sostituzione e disinfezione delle parti venute in contatto con il paziente cosi‘ come le connessioni d’irrigazione. (prevenzione e azione contro i germi). Prima dell’applicazione, spruzzare un poco d’acqua e controllare la temperatura. Manutenzione Attenzione all’igiene nel ricambio del filtro per materie solide (vedi Messa in funzione). (Smaltire il filtro e pulire accuratamente il vetro del filtro). Durante la sostituzione, evitare il contatto con le parti contaminate. Eseguire la depurazione termica dopo ogni intervento di manutenzione. Si consiglia di fare eseguire a intervalli regolari misurazioni del tenore di germi dell’acqua nell’entrata ed uscita dell’unità. 11 2.0 2.0 Safety advice UK The Hygrotherm plus unit is produced according to IEC 601/EN 60601 and listed in the following classes: • VDE Class of protection 1 • Class IIa (EEC 93/42). The appliance may be connected only to a socket outlet with earthing contact installed according to the rules of the trade. The Hygrotherm plus may be used in supervised operation by qualified personnel only which has been authorised by ATMOS and which has been trained for operating the appliance (IEC 601-1/EN 60601-1). The mains voltage specified on the type plate must correspond with the data of the power supply system. Make sure prior to every application of the equipment that it is technically safe and in proper condition. Damaged leads must be replaced immediately! Correct configuration in assembly of country-specific connections green/yellow: blue: black resp. brown: protective conductor (PE) neutral conductor (N) phase (L) It is essential that the country-specific requirements for connection of medical equipment to the public drinking water supply are considered. When in doubt, please contact your local ATMOS partner. Additional equipment, which is to be connected to the analog and digital interfaces of the appliance, must provably meet the requirements of relevant EN specifi-cations (for inst. EN 60950 for data processing equipment and EN 60601 for electrical medical appliances). Furthermore, all configurations must satisfy system specification EN 606011-1. Whoever connects additional equipment to the signal input or signal output section is a system configuration operator and as such responsible for meeting the requirements of system specification EN 60601-1-1. In case of further questions please contact your local specialist supplier or the technical service. Application of the warm water jet only with tube tip put on ! Caution to be paid to avoid injury to eardrum when introducing the jet ! For hygienic reasons jet connections must be changed after each patient. This prevents also retrograde germination of the warm water system. Use only for irrigation of auditory canal ! The irrigation jet must not get into contact with contaminated material. ATMOS is not liable for personal injury and damage to the operator. Pay attention to sufficient stability of the place of installation. In the thermal process for reducing bacterial count hot The validity for the enclosed certificate of conformity ex- Página 14 - 15 property if • no original ATMOS parts are being used, • the advice for use in these operating instructions is not being observed, • assembly, new settings, alterations, extensions and repairs have been carried out by personnel not autho rised by ATMOS. The control panel must be well visible to and in reach of E pires if the customer himself or a third party mani-pulates the appliance, e.g. with modifications of any kind, by installing non-authorized accessories, removing danger and information signs as well as in case of inappropriate applications. water is being ducted through the irrigation handle. Please do not take the handle from its holder or spray water! Metal parts can be hot! Prior to spraying, the water temperature must be checked by the user! Switch off main switch after finishing work in practice and close water cock of water supply. The Hygrotherm plus may be operated only in rooms used 12 for medical purposes, but not in areas subject to explosion hazards and in oxygen rich environments. Please note: A medical insulating transformer with earth leakage monitor or any similar safety system acc. to EN 60 601-1 is required, if several devices are connected over one common power supply. The transformer must correspond to the power consumption of all the devices to be connected. The flow rate has to be checked after switch on or at least once a day with a measuring cup. The quantity of 500 ml/min may not be exceeded. The water jet has to be straight. 2.0 2.1 Important instructions for the maintenance of the hygiene status of warm water irrigation units UK For loosening cerumen in the auditory meatus and for the stimulation of the labyrinthine system, ATMOS offers the warm water units Hygrotherm plus (37°C) and Variotherm plus (20° - 47°C). These units heat the drinking water which comes from the household connection to the preselected temperature. Should the following operating instructions not be adhered to, this can lead an increased number of germs in the rinsing water at these temperatures which can in turn lead to sensitive patients being subjected an impairment of their health. Requirement for taking into use The water which is provided by the household connection must at least meet the WHO guidelines or the country-specific guiedelines for drinking water. Connection Fresh water must flow through the wall connection for a period of approx. 1 minute prior to the unit being connected.* Ensure that the installation is hygienically carried out! Before screwing them into place, disinfect threaded connections with 70 % alcohol.* When carrying out maintenance work on parts which come into contact with the water, wear disposable gloves.* Carry out thermal cleaning at least 3 times before commissioning.* * This work is carried out by the ATMOS service technician. Running operation Before commencing with surgery operation, switch on the unit and await the thermal cleaning process. After the device had been standing still for longer period (at weekend, during holidays, etc.) await the thermal cleaning process and repeat. We recommend that the device be switched off and on every 2 hours, but after 4 hours at the latest so as to start the thermal cleaning mode. Exchange and disinfection required for contact parts such as the jet connection after each patient (prevention of retrograde germifi cation). Before use spray off water and check the temperature. Service Ensure that the suspended particle filter is hygienically changed (see commissioning) (dipose of filter and carefully clean the filter glass). Ensure that no contact is made with the contaminated parts. Carry out thermal cleaning after each service. We recommend that the number of germs in the water be regularly determined at the input and output of the unit. In the case of a complaint, it must be proven by means of measuring whether these are "water germs" or "skin germs". 13 2.0 E 2.0 Instrucciones de seguridad El aparato Hygrotherm plus está configurado según las Para los accesorios adicionales que se conectan a las interfaces analógicas y digitales del aparato debe aportarse la prueba documental de que cumplen las especificaciones EN correspondientes (p.ej. EN 60950 para aparatos con proceso de datos y EN 60601 para aparatos electromedicinales). Todas las configuraciones deben cumplir la Norma EN 60601-1-1 para sistemas. Quien conecta aparatos adicionales a la entrada y salida de señales se convierte en configurador de sistemas y responde por lo tanto de que se cumpla la Norma EN 60601-1-1 para sistemas. Para consultas pónganse en contacto con su distribuidor local o con nuestro servicio técnico. normas IEC 601/EN 60601 y pertenece a las siguientes clases: Clase de protección VDE 1 Class IIa (CEE 93/42). El aparato debe conectarse siempre a una base de enchufe Schuko correctamente instalada. Para usuarios del EEE (Espacio Económico Europeo): Someter anualmente el Hygrotherm plus a una inspección de los elementos de seguridad con arreglo a las indicaciones de este manual de instrucciones. La boquilla de irrigación no debe entrar en contacto con material contaminado. El aparato Hygrotherm plus debe ser utilizado exclusiva- mente bajo vigilancia y por personal técnico autorizado por ATMOS e instruido en su manejo (IEC 601-EN 60601-1). Usar la tobera del agua caliente sólo con la punta de la La tensión de red indicada en la placa de características Cuidado: peligro de lesionarse el tímpano al introducir la debe coincidir con los valores de la red de alimentación. Antes de utilizar el aparato cerciórese de su seguridad funcional y estado correcto. Sustituya de inmediato todos los cables dañados! manguera puesta! tobera! Por motivos de higiene se tienen que cambiar las puntas de las toberas después de cada paciente. Con ello se evita también una germinación retrógrada de la instalación del agua caliente. Realizar la conexión eléctrica con arreglo a la normativa específica de cada país: verde/amarillo: conductor de protección (PE) azul:neutro (N) negro o marrón: fase (L) Deben considerarse los requisitos específicos de cada país para la conexión de equipos médicos para el suministro público de agua potable. En caso de duda, póngase en contacto con su representante ATMOS. Usar sólo para el lavado del conducto auditivo! ATMOS no responde de daños personales o materiales cuando • no se han utilizado piezas originales ATMOS, • no se han observado las instrucciones de uso de este Manual de Instrucciones, • el montaje, la inclusión de nuevas piezas, las modifi caciones, ampliaciones y reparaciones no han sido realizadas por personas autorizadas por ATMOS. La validez de la declaración de conformidad de la C.E. ad- junta caduca si se efectúan modificaciones en el producto por parte del cliente o de terceros, por ej., modificaciones de cualquier tipo, el usar accesorios ajenos, el retirar las placas de aviso e indicación, así como el uso no adecuado del aparato. El usuario debe tener un buen acceso al tablero de mando. Cuide de que la superficie de colocación sea suficientemente estable. En el proceso térmico para la reducción de gérmenes fluye agua caliente por el irrigador. Por lo tanto, no debe sacarse el irrigador del portairrigador ni hacerse salir agua! Las piezas metálicas pueden estar calientes! Antes de hacer salir agua del irrigador debe comprobarse la temperatura del agua (indicación)! Cuando cierre la consulta desconecte el interruptor principal y cierre el grifo de agua. El Hygrotherm plus debe utilizarse únicamente en locales para uso médico y nunca en zonas con riesgo de explosión y medio ambiente rico en oxígeno. 14 I Por favor tome nota: Transformador térmico tipo médico con toma de tierra Monitor o sistema similar seguro según normativa EN 60601-1, si se conectan varios aparatos en una conexión común. El transformador debe corresponder con el consumo de todos los aparatos a conectar. El flujo debe comprobarse al encender el equipo o almenos una vez al día con un vaso de medición. La cantidad de 500 ml/min. no debe superarse. El chorro de agua debe ser recto y continuo. 2.0 E 2.1 Indicaciones importantes para mantener el estado higiénico de las unidades de lavado de agua caliente Para diluir el cerumen en el conducto auditivo y para estimular el órgno del equilibrio, ATMOS ofrece las unidades de agua caliente Hygrotherm plus 831°C) y Voriotherm plus (20°-47°C). Estas unidades calientan el agua potable tomada del empalme doméstico a la temperatura correspondiente preseleccionada. Con estas temperaturas del agua, al no observarse las indicaciones siguientes, puede generarse una mayor cantidad de gérmenes en el agua de lavado, lo que en pacientes sensibles puede originar menoscabos en la salud. Condiciones previas para la puesta en servicio El agua de alimentación del empalme doméstico tiene que cumplir por lo menos con las normas internacionales de la OMS o con las normas específicas de los países para el agua potable. Empalme Antes de empalmar la unidad ATMOS se tiene que dejar salir agua del empalme doméstico por lo menos durante un minuto.* Observar la higiene durante la instalación! Desinfectar con alcohol de 70% los empalmes roscados antes de atornillarlos.* Efectuar los trabajos de mantenimiento en las piezas conductoras de agua con guantes desechables.* Antes de la puesta en servicio, efectuar por los menos 3 veces un proceso de limpieza térmica.* * Estos trabajos son efectuados por un técnico de servicio postventa autorizado por ATMOS. En Marcha Antes del servicio práctico, conmutar la unidad y esperar el proceso de limpieza térmica. Después de puestas de fuera de servicio de mayor duración (fin de semana, vacaciones), esperar el proceso de limpieza térmica y repetirlo 2 veces. Nosotros recomendamos desconmutar y conmutar el aparato cada 2 horas, pero a más tardar después de 4 horas, para iniciar el modo de limpieza térmica. Desinfectar inmediatamente después de cada paciente las piezas de contacto, p. ej., la pieza de prolongación de la tobera en el autoclave (impedir la germinación retrógrada). Antes de la aplicación, rociar agua y controlar la temperatura. Servicio Observar la higiene al cambiar el filtro de materia sólida (ver puesta en servicio), (desabastecer el filtro y limpiar esmeradamente el vidrio del filtro). Al efectuar el cambio se tiene que evitar el contacto con piezas contaminadas. Efectuar la limpieza térmica después de cada servicio. Recomendamos hacer efectuar regularmente una medición de la cantidad de gérmenes en el agua en la entrada y en la salida de la unidad. En caso de reclamación, se tiene que verificar mediante medición si se trata de „gérmenes del agua“ o de „gérmenes de la piel“. 15 3.0 I 3.0 Installazione e messa in funzione 3.1 Dotazione Quantità 1 1 1 3 1 1 2 1 1 1 1 2 1 1 1 2 1 1 1 16 Apparecchio di base Hygrotherm plus Manopola di lavaggio Tubo doppio Attaccatura d’ugello corta, diritta (80 mm) Protezione antispruzzo Beccuccio di gomma per la protezione antispruzzo Guarnizioni a 3 fori Punte di tubo da mettere sull’attaccatura dell’ugello (30 pezzi) Raccordo a vite G3/4l-G1/4a Dado di premistoppa G3/4 Filtro d’acqua completo Guarnizione (per G1/4a) 13x18x1 Riduzione G1/4a-G3/4a (filtro G1/4 su tubo d’acqua G3/4) Tubo d’arrivo G3/4l, 3 m Tubo di scarico G1/4l, 3 m Guarnizioni (per G1/4l) 10x15x1 Cartone di 455 x 340 x 250 mm Imbottitura per cartoni Istruzioni per l’uso 3.0 E UK 3.0 Colocación y puesta en funcionamiento 3.0 Installation and start-up 3.1 Standard delivery Quantity 1 1 1 3 1 1 2 1 1 1 1 2 1 1 1 2 1 1 1 Hygrotherm plus basic unit Irrigation handle Double-barrelled hose Jet connection short, straight (80 mm) Splash protection Rubber bush for splash protection Three-holes gasket Hose tips for jet connection (30 Stk) G3/4i-G1/4a-screwing (water-tap G3/4 on filter G1/4) Cap nut G3/4 Water filter complete Gasket (f.G1/4a) 13x18x1 G1/4a-G3/4a-reducer (filter G1/4 on water hose G3/4) Water supply hose G3/4i, L = 3 m Waste water hose G1/4i, L = 3 m Gasket (f. G1/4i) 10x15x1 Cardboard 455 x 340 x 250 mm Padding for cardboard Operating instructions 3.1 Volumen de suministro Cantidad 1 1 1 3 1 1 2 1 1 1 1 2 1 1 1 2 1 1 1 Unidad básica Hygrotherm plus Irrigador Manguera doble Empalme corto de boquilla, recto (80 mm) Protección contra salpicaduras Manguito de goma antisalpicaduras Juntas de tres orificios Punta de manguera para conexión al rácor de boquilla (30 unidades) Rácor G3/4i-G1/4a (grifo de agua G 3/4 en filtro G1/4) Tuerca de rácor G 3/4 Filtro de agua completo Junta (para G1/4a) 13x18x1 Reductor G1/4a-G3/4a (filtro G1/4 en manguera de agua G3/4) Manguera de alimentación de agua G3/4i, 3 m Manguera de salida de agua G1/4i, 3 m Junta (para G1/4i) 10x15x1 Cartón 455 x 340 x 250 mm Acolchado caja Manual de Instrucciones 17 3.0 3.2Presentazione 3.2Illustrations 3.2 Gráficos 37 Hygrotherm plus — Figura 1. Vista frontale Interruttore centrale Tasto di AVVIO/ARRESTO del riscaldamento (modo a resparmio energetico) risoluzione 1°C), visualizzazione del valore reale Visualizzazione della temperatura (a 2 cifre, I Fig. 1. Front view UK Fig. 1. Vista frontal E Main switch Key switch f. heating ON/OFF (energy saving mode) Temperature display (two-figure number, resolution 1°C), current value indication Interruptor principal Pulsador para CON/DESC calentamiento (modo de ahorro de energia) Display para indicación de la temperatura (número de dos cifras, resolución 1ºC), indicación de valor real 18 3.0 F 14 AH Figura 2. Vista posteriore Targhetta di identificazione Connettore con scomparto fusibile Allacciamento equipotenziale I Fig. 2. Rear view Type plate Unit plug with fuse compartment Equipotentiality connection UK Fig. 2. Vista parte posterior del aparato E Placa de características Clavija de enchufe con compartimiento para fusible Conexión para equipotencial 19 3.0 p = +2000...+6000hPa t= +7...+19,5°C Figura 3. Vista laterale Supporto manopola Allacciamento per il tubo doppio Allacciamento per il tubo di scarico Fig. 3. Side view Support for irrigation handle Connection for double-barrelled hose Connection for waste water hose Connection for water supply hose I Allacciamento per il tubo d'arrivo Fig. 3. Vista parte lateral del aparato Portairrigador Empalme para manguera doble Empalme para manguera de salida de agua Empalme para manguera de entrada de agua * 20 Anello di pressione Press down ring Presionar la anilla UK E 3.0 Figura 4. Manopola di lavaggio Manopola Allacciamento per il tubo doppio Guarnizione a 3 fori Vite zigrinata Leva di disinnesto I Punteria delle valvole Attaccatura dell'ugello Protezione antispruzzo Calotta di tenuta Tubo doppio ! Il tubo dello spruzzatore deve essere cambiato dopo ogni paziente. ! The sprayer tube must be exchanged after each patient. ! El tubo del pulverizador debe cambiarse después de cada paciente. Fig. 4. Irrigation handle Handle Connection for double-barrelled hose Three-holes gasket Knurled screw Release lever UK Valve plunger Jet connection Splash protection Cap Double-barrelled hose Fig. 4. Irrigador Irrigador Empalme de manguera doble Junta de tres orificios E Tornillo moleteado Palanca de activación Empujador de válvula Suplemento de boquilla Protección contra salpicaduras Tapón hermético Manguera doble 21 3.0 I 3.3.3Allacciamento dell'acqua Guarnizioni di scarico Drainage fittings Juego de desagüe Requisiti strutturali: • Rubinetto dell'acqua con filettatura esterna G3/4". • Acqua potabile! • Pressione iniziale dell'acqua: +2000...+6000 hPa. • Temperatura di entrata: +7...+19,5°C (consigliata), tutta via almeno 0,5°C al di sotto del valore minimo di stimolazione a freddo desiderato. • Guarnizioni di scarico (art. no. 502.0880.0) Allacciamento all’alimentazione d’acqua o allo scarico dell’acqua: • I requisti di connessione specifiche del paese per il collegamento alla rete idrica pubblica devono essere rispettati. Per rispettare le regole secondo la norma EN 1717, è necessaria una separazione dell’acqua pressurizzata con il troppo pieno. Pertanto, ATMOS raccomanda di installare l'unità di separazione acqua ATMOS Aqua Clean, REF 502.1200.0 tra la rete idrica e il dispositivo, al fine di soddisfare i requisiti di connessione secondo EN 1717. • Prima di collegare l’apparecchio all’approvvigionamento idrico, se ne deve sciacquare la conduttura d’alimentazione aprendo il rubinetto dell’acqua per un minuto e assi curandosi che l’acqua esca liberamente. • Allacciate il filtro al rubinetto mediante l’adattatore e la guarnizione • Disponete gli anelli di guarnizione nei dadi a cappello del tubo di alimentazione dell’acqua • Avvitate i dadi con l’attacco del filtro e con l’allacciamento dell’apparecchio (, figura 3). • Disponete gli anelli di guarnizione nei dadi a cappello del tubo di scarico dell’acqua • Avvitate i dadi con l’allacciamento dell’apparecchio (, figura 3) e con le guarnizioni di scarico • Il sistema idraulico non è fornito di protezione Figura 5. Fig. 5. 3.3Allacciamenti 3.3.1Allacciamento elettrico anticalcare. Per quanto riguarda acqua potabile con una durezza di 14-21 °d resp. 2.5-3.8 mol/m³ (= acqua dura) e fino a 21 °d resp. 3.8 mol/m³ (acqua molto dura) è necessario utilizzare un sistema di protezione anticalcare. Inoltre, raccomandiamo l‘uso del nostro dipositivo di prezione anticalcare galvanico (REF 502.0995.0). Per informazioni sulla durezza dell‘acqua, potete contattare il Vostro fornitore locale. E‘ raccomandato un impianto idraulico installato dal Vostro idraulico. Contattare il vostro fornitore dell´acqua e/o l´idraulico. Durezza dell´acqua Milli mole/litro °dH 1 (blanda) ≤1,3 ≤7,3 2 (media) 1,3 - 2,5 7,3 - 14 3 (dura) 2,5 - 3,8 14 - 21,3 4 (molto dura) >3,8 >21,3 non richiesto sistema die protrzione da calcificazione richiesto sistema die protezione da calcificazione In base alla norma VDE 0107 ovvero VDE 0100, i locali utilizzati a scopo medico devono essere dotati di un interruttore di sicurezza per mancanza di corrente (interruttore di sicurezza F1) con una corrente mancante nominale di <0,03 A. L’installazione va effettuata secondo la norma VDE 0107. Quando l’apparecchio è in stato di riposo, chiudere il ! rubinetto dell’acqua! Collegate il cavo di rete con l’attacco alla rete (, figura 2). 3.3.4Allacciamento della manopola di lavaggio Collegate il connettore di rete ad una presa con contatto Avvitate il “tubo doppio” (, figura 4) ), con la “guarnizione a di terra installata in modo regolamentare. 3.3.2 Allacciamento equipotenziale Allacciamento per la compensazione potenziale (, figura 2). Il cavo di raccordo è in vendita presso la ATMOS (vedi paragrafo 8.0). tre fori” inserita (, figura 4) sull’allacciamento dell’apparecchio (, figura 3). Utilizzare soltanto “guarnizioni a tre fori” perché altrimenti si ha un malfunzionamento dell’apparecchio! Avvitare la manopola di lavaggio, con la “guarnizione a tre fori” inserita, sull’estremità libera del tubo doppio. Aprite il rubinetto dell’acqua. Controllate se tutti i raccordi 22 sono ermetici. 3.0 3.3Connections UK 3.3.1Electrical connection According to the directions of VDE 0107 and VDE 0100, medically used rooms have to be equipped with a leakage current protective circuit (FI protective circuit) with a nominal leakage current of < 0.03 A. Installation must correspond with VDE 0107. Connect the power cable to the socket on the unit 3.3.1Conexión eléctrica De acuerdo a las directrices VDE 0107 y VDE 0100, las salas de uso médico deben estar equipadas con un circuito de protección para las fugas de corriente (Circuito de protección F1) con una intensidad nominal inferior a 0,03 A. La instalación debe ser acorde a VDE 0107. (,fig. 2). Conecte el cable a la base de enchufe (, fig. 2). Insert the power plug in a correctly installed socket with Enchufe la clavija en una base de enchufe Schuko correc- 3.3.2 Equipotentiality connection 3.3.2 Conexión para equipotencial Conexión para equipotencial (, fig. 2). earthing contact. Connection for potential compensation (, fig. 2). Connecting cable available from ATMOS (see section 8.0). Local requirements: • • • • • Water-tap with G3/4" external thread. Drinking-water! Input water pressure: +2000...+6000 hPa. Feed temperature: +7...+19.5°C (recommended), but at least 0.5°C below the required lowest cold stimulation value. Drainage fittings (Art.No. 502.0880.0) Connection to water supply and waste water: • The country-specific connection requirements for the connection to the public water network have to be observed. To comply with the rules according to EN 1717, an unpressurized water separation with over flow is required. Therefore, ATMOS recommends to install the water separation unit ATMOS Aqua Clean, REF 502.1200.0 between the water supply and the device in order to meet the connection requirements according to EN 1717. • Prior to connecting the unit to the water supply the feeding line must be flushed clean by opening the water tap for a minute and arranging free draining of the tap water. • Connect the filter unit to the water-tap by means of adaptor and gasket. • Insert the gaskets in the cap nuts of the water supply hose. • Join the nuts with the filter connection and the unit connection (, fig. 3). • Insert the gaskets in the cap nuts of the waste water hose • Join the nuts with the unit connection (, fig. 3) and the drainage fittings. • The water system is not equipped with any calcification protection. For drinking water with a water hardness of 14-21°d resp. 2.5-3.8 mmol/l (= hard water) and up from 21°d resp. up from 3.8 mmol/l (= very hard water) a calcification protection system is required. Please contact your local water supplier and/or plumber. Water hardness Millimol per litre °dH 1 (soft) ≤1.3 ≤7.3 2 (medium) 1.3 - 2.5 7.3 - 14 3 (hard) 2.5 - 3.8 14 - 21.3 4 (very hard) >3.8 >21.3 El usuario debe aportar lo siguiente: • Grifo de agua con rosca exterior G 3/4". • Agua potable! • Presión de entrada del agua: +2000 ... +6000 hPa. • Temperatura de entrada: +7 ... +19,5ºC (temperatura recomendada), pero como mínimo 0,5 ºC por debajo del valor inferior de estimulación en frío deseado. • Juego de desagüe (nº art. 502.0880.0) Empalme para entrada o salida de agua: • Deben tenerse en cuenta los requisitos de conexión específicos de cada país para la conexión a la red de agua pública. Para cumplir la normativa EN 1717, se requiere una separación de agua presurizada con rebosadero. Por lo tanto, ATMOS recomienda la instalación del a ATMOS Aqua Clean, REF 502.1200.0 entre la toma de agua y el equipo con el fin de cumplir con los requisitos de conexión de acuerdo a la normativa EN 1717. • Antes de empalmar el aparato a la alimentación de agua, se tiene que enjuagar la tubería de alimentación abriendo el grifo del agua por unos minutos y garantizando la salida libre del agua de la tubería. • Conecte la unidad de filtrado al grifo con ayuda del adaptador y la junta. • Coloque las juntas anulares en las tuercas de rácor de la manguera de entrada de agua. • Atornille las tuercas de la conexión del filtro y del aparato (, fig. 3). • Coloque las juntas anulares en las tuercas de rácor de la manguera de salida de agua. • Atornille las tuercas de la conexión del aparato (, fig. 3) y del desagüe. • El sistema de agua no está equipado con ningún protector para la cal. Para beber agua con una dureza de 14-21ºd, 2.5-3.8 mol/m3 (agua dura) y desde 21ºd, 3,8 mol/m3 (agua muy dura) se necesita un sistema de protección de cal. Póngase en contacto con la Cía. De aguas o su fontanero. Calcification protection system is required 3.3.4Connecting the irrigation handle Insert a "three-holes gasket" (, fig. 4) in the double barrelled hose and screw it ( , fig. 4) on the unit connection (, fig. 3). Only use "three-holes gaskets" as otherwise correct function of the unit is not guaranteed! ATMOS le facilita el cable de conexión (ver punto 8.0). 3.3.3Acometida de agua Calcification protection system is not required Close the water cock when the unit is not in use! tamente instalada. 3.3.3Water connection ! E 3.3Conexiones Dureza del agua Mil./litro °dH 1 (blanda) ≤1,3 ≤7,3 2 (media) 1,3 - 2,5 7,3 - 14 3 (dura) 2,5 - 3,8 14 - 21,3 4 (muy dura) >3,8 >21,3 No se requiere Sist. De descalcificación Se requiere Sist. De descalcificación Cierre el grifo de agua cuando el aparato no esté en funcionamiento! ! 3.3.4Conexión del irrigador Atornille la „manguera doble“ (, fig. 4) con la „junta de tres orificios“ ( , fig. 4) insertada a la conexión del aparato (, fig. 3). Utilice siempre „juntas de tres orificios“, ya que de lo contrario el aparato no funcionaría correctamente! Insert a "three-holes gasket" in the irrigation handle and Atornille el irrigador con la „junta de tres orificios“ en el Open the water-tap. Abra el grifo de agua. screw it on the free end of the double-barrelled hose. Check whether all connections are tight. extremo libre de la manguera doble. Compruebe si todas las uniones son estancas. 23 3.0 I 3.4 Messa in funzione Posizionare la manopola nel supporto in modo tale che l’ugello indichi in direzione del lato posteriore dell’apparecchio. Accendere l'apparecchio (, figura 1). Test automatico di visualizzazione con seguenza digitale di cifre “8 8” e segnale di allarme acustico. Attivazione automatica del procedimento termico per la riduzione dei germi. Durata: 5 minuti. Commutazione automatica nel modo di lavaggio (37°C). In caso di mancato uso del modo di lavaggio entro 5 minuti 24 (la manopola non viene presa dal supporto), commutazione automatica nel modo a risparmio energetico. 3.0 E UK 3.4Start-up 3.4 Puesta en funcionamento Insert the handle in its holder; the jet must point to reverse Suspenda el irrigador en el portairrigador de tal forma side of the unit. Switch on the unit (, fig. 1). que la boquilla de irrigación apunte en dirección a la parte posterior del aparato. Conecte el aparato (, fig. 1). Automatic display test with digital numbers " 8 8 " and audible signal. Realice un test automático de indicación con secuencia Automatic activation of the thermal process for reducing bacterial count. Duration: 5 min. digital de cifras «8 8» y alarma acústica. Activación automática del proceso térmico para la reduc ción de gérmenes: duración : 5 minutos. Automatic change into the irrigation mode (37°C). Cambio automático al modo de irrigación (37 ºC). When the irrigation mode is not used (handle is not removed Cuando el modo de irrigación no se utiliza durante 5 mi- from its support) the unit automatically changes into the energy saving mode after 5 min. nutos (sin retirar el irrigador del portairrigador) el aparato cambia automáticamente al modo de ahorro de energia. 25 4.0 I 4.0Comando Prima dell’accensione, accertarsi che la manopoli si trovi nel suo supporto (l’ugello di lavaggio deve indicare in direzione del lato posteriore dell’apparecchio). 4.1 Selezione dei livelli di temperatura Azionando l’interruttore centrale si attiva automaticamente il procedimento per la riduzione del tenore di germi, quindi l’attivazione automatica del livello di temperatura “modo di lavaggio” (37°C). UK 4.0Operation Before switching on the unit, make sure that the handle is in its holder (jet must show to reverse side of the unit). 4.1 Selecting temperature level After operating the main switch, automatic activation of the thermal process for reducing bacterial count, then automatic activation of the temperature level "irrigation mode" (37°C). 4.0Manejo E Antes de conectar el aparato debe comprobarse que el irrigador esté suspendido en el portairrigador (la boquilla de irrigación debe apuntar en dirección a la parte posterior del aparato). 4.1 Selección de los niveles de temperatura Después de activar el interrptor principal se activa 26 automáticamente el proceso para la reducción de gérmenes y seguidamente se activa automáticamente el nivel de temperatura para „modo de irrigación“ (37 ºC). 4.0 I 4.2 Descrizione dei tipi d'esercizio 4.2.1Procedimento termico per la riduzione dei germi Scopo: Riduzione del tenore di germi nel circuito d’acqua calda, in caso di penetrazione di germi nel sistema. Attivazione: Dopo ogni accensione dell'unità di trattamento. Condizione per l’avviamento del corretto procedimento termico per la riduzione del tenore di germi: • il manipolo di lavaggio deve essere inserito nel portamanipolo (l’ugello indica in direzione del retro dell’apparecchio). In caso contrario viene emesso un segnale di avvertimento acustico (che viene emesso ugual mente se il manipolo viene estratto durante il procedimento termico per la riduzione del tenore di germi). Addizionale visualizzazione del codice d’errore “F0” (che si spegne riponendo il manipolo nel supporto). • Nel procedimento termico per la riduzione dei germi l’acqua calda viene condotta attraverso il manipolo di lavaggio. Non si estragga il manipolo dal supporto né si spruzzi dell’acqua! • • Gli elementi metallici del manipolo e del tubo flessibile doppio diventano scottanti! Evitare di toccarli durante il procedimento termico per la riduzione dei germi! Durante il procedimento termico per la riduzione dei germi, nel primo segmento dell’indicatore della temperatura viene visualizzata una ‘d’ e sul secondo segmento la durata rimanente. Quindi si ha un raffreddamento a 37 °C e il cambio automatico nel modo a risparmio energetico. 4.2.2Modo di lavaggio Scopo: Lavaggi del canale uditivo. Caratteristiche: Temperatura: 37°C, impostata stabilmente. Flusso d'acqua: almeno 400 ml/min., dopo avere girato la vite di limitazione situata nella leva di disinnesto della manopola (, figura 4). Attivazione: Attivazione automatica alla fine del procedimento termico per la riduzione del tenore di germi e prendendo la manopola. In caso di non utilizzo del modo di lavaggio (la manopola resta nel supporto) il Hygrotherm plus si commuta dopo 5 minuti nel modo a risparmio energetico. Riattivazione del modo di lavaggio prendendo la manopola dal supporto o azionando uno dei tasti dell’unità di regolazione della temperatura. 27 4.0 E UK 4.2 Description of modes 4.2.1Thermal process for reducing bacterial count 4.2 Descripción de los modos de funcionamiento 4.2.1Proceso térmico para la reducción de gérmenes Purpose: Reduction of bacteria count in warm water circuit in case germs have invaded the system. Objeto: Reducción de los gérmenes en el circuito del agua caliente, en caso de que hayan penetrado gérmenes en el sistema. Activation: Each time after switching on. Condition for starting the correct thermal process for reducing bacterial count: • The irrigation handle must be inserted in the holder on the side (jet pointing to reverse side of the unit). If not, a warning signal is given (sounds also when the handle is taken out during the thermal cleaning procedure). Additionally, the error code "F0" is shown (disappears when handle is returned). Activación: Después de la conmutación de la unidad de tratamiento. Condición previa para el arranque del proceso térmico correcto para la reducción de gérmenes: • La empuñadura de lavado tiene que estar puesta en el soporte para la empuñadura (la tobera se encuentra indicando hacia la parte posterior del aparato). En caso contrario suena una señal de alarma (suena también si se retira la empuñadura durante el proceso térmico para la reducción de gérmenes). Además, indicación del código de avería „F0“ (se apaga al poner la empuñadura en el soporte). • In the thermal process for reducing bacterial count, hot water is passing through the irrigation handle. Please do not take handle from its holder or splash off water! • Metal parts of the irrigation handle and of the double barrelled hose are getting hot! Please do not touch during thermal cleaning procedure! • During the thermal process for reducing bacterial count, the temperature display shows a 'd' on the first segment and the remaining time (in minutes) on the second segment. Thereafter cooling down to 37°C and automatic change into irrigation mode. • En el proceso térmico para la reducción de gérmenes fluye agua caliente por la empuñadura de lavado. ¡No retirar la empuñadura del soporte o chorrear con agua! • • ¡Las piezas de metal de la empuñadura y la manguera de dos vías se calientan! ¡No tocarlas durante el proceso térmico para la reducción de gérmenes! Durante el proceso térmico para la reducción de gérmenes en la visualización de la temperatura se visualiza en el primer segmento una ‘d’ y el tiempo restante en el segundo segmento. A continuación enfriamiento a 37°C y cambio automático al modo de ahorro de energía. 4.2.2Irrigation mode Purpose: Rinsing of the auditory canal. Properties: Temperature: 37°C, permanently set. Water flow: at least 400 ml/min., after turning open the limit screw at the release lever of the handle (, fig. 4). Activation: Automatically after completion of thermal cleaning procedure and taking out the handle. When the irrigation mode is not used (handle remains in holder) the Hygrotherm plus changes into the energy saving mode after 5 min. Reactivation of irrigation mode by taking the handle out of the holder or activating a key on the temperature control unit. 28 4.2.2Modo de irrigación Objeto: Para irrigaciones del conducto auditivo. Propiedades: Temperatura: 37°C, ajuste fijo. Caudal de agua: mínimo 400 ml/min después de haber aflojado el tornillo limitador de la palan ca del irrigador (, fig. 4). Activación: Automática una vez que finaliza el proceso térmico para la reducción de gérmenes y se retira el irrigador. Cuando no se utiliza el modo de irrigación (el irrigador permanece dentro del portairrigador) el aparato Hygrotherm plus cambia al cabo de 5 minutos al modo de ahorro de energia. El modo de irrigación se reactiva sacando el irrigador del portairrigador o pulsando una tecla de la unidad de regulación de temperatura. 4.0 I 4.2.3Modo a risparmio energetico Scopo: Riduzione del consumo di energia. Attivazione: Azionamento del tasto di “inserzione/disinserzione del riscaldamento” (, figura 1). Il riscaldamento viene disinserito. Dopo che l’apparecchio non è stato utilizzato per cinque minuti. UK 4.2.3Energy saving mode Purpose: Reduction of energy consumption. Activation: Actuation of key "heating on/off" (, fig. 1). Heating is switched off. After five minutes of non-use of the unit. E 4.2.3Modo de ahorro de energia Objeto: Reducción del consumo de energía. Activación: Pulse la tecla „CON/DESC Calentamiento“ (, fig. 1). Se desconecta el calentamiento. Ello cuando el aparato no se ha utilizado durante cinco minutos. 29 5.0 I 5.0 Istruzioni per la pulizia e manutenzione 5.1 Note generali sulla pulizia e disinfezione Se il puntale viene a contatto con il paziente deve essere disinfettanti dopo ogni utilizzo. I connettori del tubo devono essere sostituiti dopo ogni utilizzo. Le superfici del Hygrotherm plus sono resistenti alla maggior parte dei disinfettanti per superfici. Tuttavia, non utilizzare – disinfettanti con acidi organici o anorganici concentrati perché possono provocare danni di corrosione, – disinfettanti con cloramidi, derivati fenolici o tensioattivi anionici perché possono causare distacchi di tensione nei materiali plastici utilizzati. Per la pulizia e la disinfezione si possono utilizzare anche spray o panni disinfettanti. Disinserite l’apparecchio azionando l’interruttore centrale prima di iniziare l’operazione di pulizia o di disinfezione. Pulite la superficie dell’apparecchio strofinandola con un panno inumidito con detersivo o con disinfettante. Evitate di fare penetrare del liquido nell’apparecchio. Sono adatti allo scopo tutti i detersivi e disinfettanti riportanti al paragrafo 5.3. Liquido versato deve essere immediatamente asci ugato Osservate in linea di massima le istruzioni per l’uso del produttore del disinfettante, specialmente le indicazioni relative alla concentrazione. Le misure descritte per la pulizia e la disinfezione non sono sostitutive delle relative disposizioni valide per l’esercizio. 30 5.0 E UK 5.0 Cleaning 5.0 Recomendaciones para la limpieza y el cuidado del aparato 5.1 General information on cleaning disinfection 5.1 The jet connection which comes into contact with the patient must be disinfected after each use. The hose tips must be exchanged after each use. La conexión jet que entra en contacto con el paciente debe desinfectante después de cada uso. Las puntas de silicona deben sustituirse después de cada uso. The surfaces of the Hygrotherm plus resist most of the common surface disinfectants. Las superficies del aparato Hygrotherm plus son resistentes a la mayoría de desinfectantes! However, do not use No deben utilizarse – disinfectants containing concentrated organic or anorganic acids or bases, since these may cause corrosion damages; – disinfectants containing chloramides, phenol derivatives or anionic tensides, since these may cause stress cracks in the plastic material used for the housing of the unit. – to. – For cleaning and disinfection, you may also use disinfectant sprays or disinfectant tissues. Para la limpieza y desinfección pueden utilizarse también sprays o toallas desinfectantes. Switch off the unit by the main switch before starting cleaning and disinfection. Wipe the unit surface with a cloth moistened with a cleaning or disinfecting solution. Make sure that no liquid penetrates the unit. You may use all cleansers and disinfectants listed in section 5.3. Spilled liquid must immediately be dry wiped. El líquido derramado debe limpiarse Always observe the instructions for use by the manufacturer of the disinfectants, above all, concentration specifications. The above measures for cleaning and disinfecting do not replace the respective precautions for operating the unit. Recomendaciones básicas para la limpieza y desinfección del aparato Desinfectantes con ácidos orgánicos o inorgánicos concentrados, ya que podrían corroer el exterior del aparaDesinfectantes con cloramidas, derivados fenólicos o tensioactivos aniónicos, ya que podrían provocar tensofisuración en los materiales sintéticos del aparato. Desconecte el interruptor principal del aparato antes de proceder a limpiarlo o desinfectarlo. Limpie la superficie del aparato con un paño humedecido con detergente o desinfectante, cuidando de que no penetre líquido en el aparato. Puede utilizar todos los detergentes y desinfectantes indicados en el punto 5.3. inmediatamente Debe observar siempre las instrucciones de uso del fabricante del desinfectante, sobre todo con respecto a las concentraciones de empleo. Las medidas de limpieza y desinfección antes descritas no presuponen la omisión de las instrucciones de funcionamiento del aparato. 31 5.0 I 5.2 E Disinfettanti consigliati per gli strumenti Disinfettante Contenuto Korsolex basic Bode chemie, Hamburg (Concentrazione) Sekusept aktiv (Concentrazione) succinic acid dialdehyde dimethoxy tetrahydrofurane corrosion inhibitors NTA Tensioattivi non ionici enzimi conservanti Ingredienti Dismozon pur Hamburg (Concentrazione) Green & Clean SK (Concentrazione) 11.0 g 3.0 g 5-15 g < 5g (in 100 g ) bis(sulfate) Schülke & Mayr, Norderstedt Manufattura hexahydrate Pentakalium bis(peroxymonosulfate) Ecolab, Düsseldorf Dr. Weigert, Hamburg Metasys, Rum (Austria) Bode Chemie, 80 g alkyl-dimethyl-benzyl-ammonium chloride <1 g dialkyl-dimethyl-ammonium chloride Alkyldimethylethylbenzylammoniumchlorid Schülke & Mayr, Norder- 45.0 g Se si utilizzano disifettanti conteneti aldehyde o amine,possono portare cambiamenti di colore alle parti disinfettate 32 magnesium monoperoxyphthalate 15.2 g 19.7 g sodiumpercarbonate, phosphonates non-ionic tensides Page 35 Página 36 Produttore Glutaral (ethylene-dioxy)dimethanol tensides, salts, corrosion inhibitors Strumenti automatici Neodisher MediClean forte (Application concentrate) Difettanti per apparecchi (100 g) Gigasept FF new (Concentrazione) Perform stedt UK 5.0 UK E Página 36 5.2 Recommended disinfectants Recommended instrument disinfectants Ingredients (in 100 g) Korsolex basic Glutaral (Application concentrate) (ethylene-dioxy)dimethanol tensides, salts, corrosion inhibitors 15.2 g 19.7 g Manufacturer Bode Chemie, Hamburg Sekusept aktiv sodiumpercarbonate, phosphonates (Application concentrate) non-ionic tensides Ecolab, Düsseldorf Gigasept FF new succinic acid dialdehyde (Application concentrate) dimethoxy tetrahydrofurane corrosion inhibitors Schülke & Mayr, Norderstedt Instruments, automatic Neodisher MediClean NTA forte non-ionic tensides (Application concentrate)enzymes preserving agents 11.0 g 3.0 g Machine disinfection Ingredients 5-15 g < 5g (in 100 g) Dr. Weigert, Hamburg Manufacturer Dismozon pur magnesium monoperoxyphthalate (Application concentrate) hexahydrate 80 g Bode Chemie, Hamburg Green & Clean SK alkyl-dimethyl-benzyl-ammonium chloride (Application concentrate) dialkyl-dimethyl-ammonium chloride Alkyldimethylethylbenzylammoniumchlorid Metasys, Rum (Austria) Perform <1 g Pentakalium bis(peroxymonosulfate)- bis(sulfate) 45.0 g Schülke & Mayr, Norderstedt If using aldehyde-containing or amine-containing disinfectants at the same object, this may result in discolourations. 33 5.0 E 5.2 Desinfectantes recomendados Desinfectantes recomendados para instrumentos Desinfectante Componentes Korsolex basic Glutaral (Application concentrate) (ethylene-dioxy)dimethanol tensides, salts, corrosion inhibitors (en 100 g) 15.2 g 19.7 g Fabricante Bode Chemie, Hamburg Sekusept aktiv sodiumpercarbonate, phosphonates (Application concentrate) non-ionic tensides Ecolab, Düsseldorf Gigasept FF new succinic acid dialdehyde (Application concentrate) dimethoxy tetrahydrofurane corrosion inhibitors Schülke & Mayr, Norderstedt Instrumental, automático Neodisher MediClean NTA forte Tensioactivos no-iónicos (Application concentrate)enzimas agentes conservantes 11.0 g 3.0 g 5-15 g < 5g Dr. Weigert, Hamburg Desinfectantes recomendados para superficies Desinfectante Componentes TERRALIN (concentrado) Cloruro de benzalconio Fenoxipropanoles (en 100 g) 20,0 g 35,0 g Fabricante Schülke & Mayr, Nordersted Dismozon pur magnesium monoperoxyphthalate (Application concentrate) hexahydrate 80 g Bode Chemie, Hamburg Green & Clean SK alkyl-dimethyl-benzyl-ammonium chloride (Application concentrate) dialkyl-dimethyl-ammonium chloride Alkyldimethylethylbenzylammoniumchlorid Metasys, Rum (Austria) <1 g Perform Pentakalium bis(peroxymonosulfate)- bis(sulfate) 34 Schülke & Mayr, Norderstedt 5.0 5.3 Metodo di pulizia per pistola di irrigazione con puntale E Página 35 Le applicazioni Variotherm e ATMOS Hygrotherm sono utilizzati, in accordo con le istruzioni, con connettori tubo (monouso). Questi connettori devono essere eliminati dopo ogni applicazione sul paziente. Quando si utilizza il tubo ATMOS si raccomanda la pulizia e di seguito la disinfezione del piano. Hinweise S Wer Monatlich D Reinigung Desinfektion Sterilisation Wöchentlich R Wann Täglich Aufzubereitende Teile Wie Nach jeder Anwendung Was I Mit der Aufbereitung vertrautes u. geschultes Personal, mit entsprechender fachlicher Ausbildung (mit wasserlöslichem Folienstift Verantwortlichen eintragen) Ohrspülung / Thermische Nystagmusreizung Ohrspültulpe X X Manuelle Reinigung und Desinfektion Handgriff X X Wischreinigung und -desinfektion Düsenansatz X X Wischreinigung und -desinfektion X Spritzschutz Schlauchspitze (Einmalartikel) X X Wischreinigung und -desinfektion X Wechsel nach jeder Anwendung X Spülansatz X Wechsel nach jeder Anwendung; Reinigung und Desinfektion X X Hygienefilter 5.3 X X SieheGebrauchsanweisungHygienefilter X Cleaning method for handle with jet connection for water irrigation tip The ATMOS appliances Variotherm and ATMOS Hygrotherm are used, according to the rules, with disposable hose tips (disposables). These tips must be disposed off after each application to the patient. When using the hose tips ATMOS recommends a reprocessing in line with the below cleaning and disinfection plan. UK S Recommendations Who Monthly D Disinfection Sterilisation Weekly C Cleaning When Daily Reusable parts How NAfter each procedure What Qualifiedandtrained staff who are familiar with reprocessing. (Pleasefillinthe responsible person -> use a water-based overhead marker) Ear irrigation / Thermal nystagmus stimulation Ear irrigation bowl X X Manual cleaning and disinfection Handle X X Wipe cleaning and wipe disinfection Jet connection X X Wipe cleaning and wipe disinfection X Splash protection X X X X Wipe cleaning and wipe disinfection X Hose tip (disposable) Exchange after each application X Rinsing attachment Exchange after each application Manual cleaning and disinfection X Hygienefilter X X Seeoperatinginstructionsforhygienefilter X 35 5.0 5.4 Método de limpieza para la pistola de irrigación con la conexión jet E La aplicación y el uso de los equipos ATMOS Variotherm y Hygrotherm deben estar usados de acuerdo a la normativa, con puntas de silicona desechables. Estas puntas deben ser cambiadas y desechadas después de cada aplicación y paciente. Cuando se utilizan las puntas de silicona, ATMOS, recomienda un reproceso acorde con el siguiente plan de limpieza y desinfección. Esterilizacion Recomendaciones Quién mensual Desinfeccion S semanal C Limpieza D Cuando cada día Partes reutilizables Como Después de cada uso Qué Irrigación de oído / Estimulación térmica Bol de lavado X X Limpieza y desinfección manual Empuñadura X X Limpieza y desinfección en seco Conexión Jet X X Limpieza y desinfección en seco X Protecc. Antisalpicaduras X X X Limpieza y desinfección en seco X Punta silicona (desech.) Desechar despues de cada uso X Elemento de lavado Cambiar después de cada aplicación Limpieza manual y desinfección X Filtro higiénico 36 X X X Ver Manual Instrucciones X Personalcualificado familiarizado con reproceso. (Anotar persona responsable -> Usar rotulador borrable 6.0 I 6.0 Manutenzione e servizio UK E Page 40 - 42 Página 43 - 45 Se necessario, l’utente deve procedere subito alla decalcificazione e al cambio del filtro (vedi 6.4, 6.5). Controllo tecnico di sicurezza 6.1 Controllo del funzionamento Controllo Accendere e spegnere più volte l’apparecchio. Corretto funzionamento della spia luminosa di rete e della valvola magnetica. Attivazione automatica del procedimento termico per la riduzione dei germi. Chiudere il rubinetto centrale dell’acqua e osservare l’indicatore della temperatura. Errori "F1" (= niente acqua). Indicatore. Nel primo secondo seguente all’accensione, tutti gli indicatori ottici e acustici emettono il loro segnale (specialmente il test di segmento “8 8”). Misurare la temperatura dell'acqua spruzzata a 37°C. Il valore può divergere di non oltre ± 0,5° ± ½ digit, cioè in totale di 1°C. Sono però tipici i valori migliori di ± 0,5°C. Questa misurazione è critica ! Le termosonde o i termometri troppo grandi, a causa della loro forte deviazione di calore, della loro inerzia e della loro non puntiforme bensì larga sensibilità alla temperatura, sono causa di misurazioni errate. Sono adatti gli apparecchi con sonda a immersione, con una precisione di 0,3°C e con una risoluzione di 0,1°C od oltre. Dopo l’impostazione della temperatura deve trascorrere almeno 1 minuto, in modo che il tubo doppio della manopola sia temperato correttamente. 37 6.0 I 6.2 Controllo visivo Controllo Controllare se l’apparecchio presenta danni esterni (danni nei cavi, tubi, filtro e manopola di lavaggio). Controllare se il sistema di tubi presenta segni di difetti di ermeticità (gocce, macchie d’acqua, residui di ' corrosione ecc.). Dopo avere separato l’apparecchio dall’alimentazione di rete e con la cassa aperta, controllare se l’apparecchio presenta danni interni, difetti di ermeticità, corrosione e depositi (calcare ecc.). Chiudere e avvitare nuovamente la cassa, collegare nuovamente il cavo di rete. Controllare che i fusibili abbiano il corretto valore e la corretta caratteristica di fusione. Controllare che le diciture siano complete e leggibili. 6.3 Controllo elettrico Controllo Misurazione della resistenza dei conduttori con contatto di terrra secondo VDE 0751 (0,3 Ohm al massimo). Misurazione e confronto con il “valore misurato per primo” della corrente di derivazione dell’apparecchio secondo VDE 0751 (misurato durante l’esercizio). Il valore misurato per primo non deve essere superato per più del 50%. 6.4 Decalcificazione Se nella zona di utilizzo dell’apparecchio l’acqua corrente è nota per il suo alto contenuto calcareo, si dovrebbe eseguire una decalcificazione preventiva: • • • • • • • • 38 Documentazione della valutazione e dei controlli secondo VDE 0751. Chiudere il rubinetto dell’acqua. Smontare eventualmente il filtro in caso di montaggio verticale nel rubinetto dell’acqua. Svitare il bicchiere a vite del filtro. Riempire il bicchiere a vite con circa 100 ml di decalcificante a base di acido acetico, citrico o lattico (p.e. Citrosteril della ditta Fresenius). Avvitare nuovamente il vetro a vite. Montare eventualmente di nuovo verticalmente il filtro. Aprire di nuovo il rubinetto dell’acqua. Accendere l’apparecchio. Nel procedimento termico per la riduzione dei germi si attiva poi la decalcificazione automatica. Se, dopo l’accensione, l’apparecchio è stato utilizzato per 5 minuti nel procedimento termico per la riduzione dei germi, i canali dell’acqua sono decalcificati e depurati nonché sufficientemente risciacquati. Il Hygrotherm plus può essere di nuovo utilizzato pienamente. Se le condotte dell’acqua sono fortemente calcificate, è eventualmente necessario modificare leggermente il modo di procedere facendo agire più a lungo il decalcificante. 6.0 I 6.5 Cambio del filtro Se la guarnizione del filtro è molto sporca (colore scuro), procedere nel modo seguente alla sostituzione dell’elemento filtrante: • Chiudere il rubinetto dell’acqua d’entrata. • Accendere brevemente l’apparecchio per ridurre la pressione esistente nella cassa del filtro. • Se appare il messaggio “F1”, spegnere l’apparecchio. • Svitare in senso antiorario dalla cassa del filtro (, figuro 6) il recipiente di plexiglas (, figuro 6). • Rimuovere l'elemento filtrante(, figuro 6) e sostituirlo con uno nuovo (art. no. 502.0891.0). L’elemento filtrante non deve venire in contatto con oggetti contaminati, per inibire la penetrazione di germi nel sistema dell’acqua. Figuro 6. Filtro dell'acqua Cassa del filtro Cartuccia da filtro Guarnizione Recipiente di plexiglas 39 6.0 UK 6.0 Maintenance and service E Página 45 - 47 Decalcification and change of filter (see sections 6.4, 6.5) should be carried out immediately by the user when required. Saftey-technical inspection 6.1 Functional test Test Switch unit several times on and off. Correct function of mains pilot lamp and solenoid valve (clacking). Automatic activation of thermal process for reducing bacterial count. Shut-off main water tap and observe temperature indication. After a few seconds error signal will appear "F1" (= no water). Testing the displays. All optical and audible indicators issue their signal during the first second after switching on (in particular segmental test "8 8 "). Measure temperature of water splashed off at 37°. The value may not deviate more than ± 0,5° ± 1/2 digit, i.e. 1°C in total. Typically, however, values are better than ± 0,5°C. This measurement is critical ! Measuring probes or thermometers which are too large may cause faulty measurements because of substantial heat removal, inertia, and because their temperature sensitivity is not localised on a point but spread over a larger surface. Instruments whith an immersion probe, a precision of 0.3°C and a resolution of 0.1°C or better are suitable. After setting the temperature 1 minute at least should be waited in order that the double-barrelled hose to the handle attains correct temperature. 40 6.0 UK 6.2 Visual inspection Test Check unit for external damage (damage to cables, hoses, filter and irrigation handle). Check hose system for external indications for leaks (drops, water spots, corrosion deposits etc.). Inspect unit, insulated from power supply and with open housing, for internal damage, leaks, corrosion, and deposits (mineral scale). Close housing again and tighten screws, connect mains cable again. Check fuses for correct protection value and melting characteristics. Check sign plates and inscriptions for completeness and readability. 6.3 Electrical test Test Measure protective conductor resistance according to VDE 0751 (max. 0.3 Ohm). Measurement and comparison with "first value measured" of unit leakage current according to VDE 0751 (measured during operation). The "value measured first" may not be exceeded by more than 50%. 6.4 Documentation and recording of evaluation and tests according to VDE 0751. Decalcification If the tap water in the area, where the unit is used, is known for mineral precipitation, preventive decalcification should be carried out: • Close water tap. • If applicable, dismantle filter when mounted vertically at water tap. • Unscrew screwed glass of filter. • Fill screwed glass with approx. 100 ml of decalcifier on acetic / citric, or lactic acid base (for inst. Citrosteril, by Fresenius). • Screw glass on again. • Install filter vertically again, if applicable. • Open water tap again. • Switch on the unit. Decalcification now takes place automatically in the thermal process for reducing bacterial count. If after switching-on the unit has been in the decontamination mode for 5 minutes the water passages have been decalcified and cleaned, and also sufficiently flushed. The Hygrotherm plus is again fully ready for operation. When water passages are heavily calcified, a modified procedure may become necessary, with a prolonged reaction period for the decalcifier. 41 6.0 UK 6.5 Replacement of filter When the filter cartridge is very dirty (dark colour) the filter cartridge is to be exchanged as follows: • Close water tap of supply. • Switch on unit to reduce pressure in the filter body. • Switch off unit after appearance of "F 1". • Unscrew Plexiglass cup (, fig. 6) from filter body (, fig. 6) by turning anti-clockwise. • Extract filter cartridge (, fig. 6) and replace by new one (Art.No. 502.0891.0). The filter element must not come into contact with Fig. 6. Water filter Filter body Filter cartridge Sealing ring Plexiglass cup 42 contaminated objects in order to prevent the ingress of germs into the water system. 6.0 E 6.0 Mantenimiento y servicio técnico El usuario puede descalcificar el aparato o sustituir el filtro (ver 6.4, 6.5) si resulta necesario. Control técnico de seguridad 6.1 Prueba functional Prueba Conectar y desconectar el aparato varias veces. Funcionamiento correcto del piloto de control de la red y de la válvula magnética (chasquido). Activación automática del proceso térmico para la reducción de gérmenes. Cerrar el grifo principal de agua y vigilar el display de temperaturas. Al cabo de pocos segundos sale el mensaje de incidencia „F1“ (=no hay agua). Test de display Todas las indicaciones ópticas y acústicas emiten su señal durante el primer segundo después de la conexión (especialmente test de segmento „8 8“). . Medir si la temperatura del agua que sale del irrigador está a 37°C. El valor no debe desviarse en ± 0,5º ± 1/2 dígito, es decir en total 1 ºC. Habitualmente la desviación suele ser no obstante inferior a ± 0,5ºC. Esta medición es decisiva ! Por su elevada disipación del calor, su inercia y su sensibilidad a la temperatura, ya que la medición no se efectúa en un punto sino en una gran superficie, las sondas térmicas o termómetros arrojan mediciones erróneas. Resultan más adecuados los aparatos con sondas de inmersión, que ofrecen una precisión de 0,3 ºC y una resolución de 0,1 ºC o más. Después de haber ajustado la temperatura tiene que transcurrir como mínimo 1 minuto, para que la manguera doble del irrigador quede correctamente atemperada. 43 6.0 E 6.2 Inspección visual Comprobación Comprobar el aparato para detectar daños en su exterior (daños en cables, mangueras, filtro o irrigador). Comprobar el sistema de mangueras para detectar indicios externos de inestanqueidad (gotas, manchas de agua, residuos de corrosión, etc.). Desconectar el aparato y abrir la caja para revisar su interior con el fin de detectar daños, inestanqueidades, corrosión e incrustaciones (calcáreas, etc.). Volver a cerrar la caja y atornillarla, conectar el aparato nuevamente a la red. Comprobar si el fusible es del amperaje y tipo de respuesta adecuados. Comprobar si todas las rotulaciones están completas y son legibles. 6.3 Inspección eléctrica Comprobación Medir la resistencia del conductor de protección según VDE 0751 (máx. 0,3 ohmios). Medición y contraste con el „primer valor medido“ de corriente de fuga según VDE 0751 (medido durante el funcionamiento). No se debe rebasar en más de un 50% este primer valor medido. 6.4 Documentación de la evaluación y de las inspecciones según VDE 0751. Descalcificación Si se sabe que en el área geográfica donde se utiliza este aparato el agua es muy dura, debe realizarse una descalcificación preventiva: • Cerrar el grifo de agua. • Desmontar eventualmente el filtro si está montado verticalmente en el grifo de agua. • Desenroscar la copa del filtro. • Llenar la copa con aprox. 100 ml de descalcificador a base de ácido acético/cítrico o láctico (p.ej. Citrosteril, firma Fresenius). • Enroscar nuevamente la copa. • Volver a montar el filtro, eventualmente de nuevo en posición vertical. • Abrir nuevamente el grifo de agua. • Conectar el aparato. Durante el proceso térmico para la reducción de gérmenes se descalcifica ahora automáticamente. Si el aparato ha estado en funcionamiento por 5 minutos después de su conmutación en el proceso térmico para la reducción de gérmenes, las vías de conducción de agua han sido descalcificadas y limpiadas y suficientemente enjuagadas. El aparato Hygrotherm plus está nuevamente a punto de empleo. Si las vías de agua muestran fuertes incrustaciones calcáreas, será eventualmente necesario dejar actuar el descalcificador durante más tiempo. 44 6.0 E 6.5 Cambio de filtro Cuando el cartucho filtrante está muy sucio (coloración oscura) debe sustituirse el elemento de filtración proce diendo como sigue: • Cerrar el grifo de agua de entrada. • Conectar brevemente el aparato para reducir la presión en la caja del filtro. • Cuando sale en el display «F 1» desconectar el aparato. • Desenroscar la copa de plexiglás (, fig. 6) de la caja del filtro (, fig. 6) en sentido antihorario. • Retirar el elemento de filtración (, fig. 6) y sustituirlo por otro nuevo (art. nº 502.0891.0). El elemento filtrante no debe entrar en contacto con ob- jetos sucios para evitar la penetración de gérmenes en el sistema del agua. Fig. 6. Filtro de agua Caja del filtro Cartucho filtrante Junta Copa de plexiglás 45 7.0 D UK 7.0 Eliminazione dei disturbi di funzionamento E Page 49 Página 50 Errori nell'indicazione della temperatura "F0" La manopla non si trova nel sup- "F1" Niente acqua (pressione dell'acqua < 0,5 bar • Riporre il manipolo nel supporto in modo che il procedi mento termico per la riduzione dei germi possa iniziare (l’attaccatura dell’ugello deve indicare in direzione del lato posteriore dell’apparecchio). • Sostituire la manopola (art. no. 502.0963.0) • Controllare se l’alimentazione di acqua fornisce una pressione di almeno 2 bar (il rubinetto dell’acqua è aperto?). • Il filtro è sporco? 46 "F2" -5V manca (tensione di alimentazione sulla piastrina di comando) "F3" Rottura dell'NTC di sicurezza "F4" Il tagliacircuito non scatta (49°C-comparatore) "F5" Rottura dell'NTC di regolazione "F6" Diversa posizione dell'interruttore nel supporto della manopola "F7" Temperatura troppo alta (>48°C), visualizzazione solo nel modo di lavaggio, non nel procedimento termico per la riduzione dei germi! "F8" Cortocircuito dell'NTC di regolazione "F9" Niente riscaldamento (interruttore di sovratemperatura), relais semiconduttore o regolatore guasto • Informarne il tecnico del servizio assistenza. • Informarne il tecnico del servizio assistenza. • Far controllare il tagliacircuito ( dispositivo di controllo della temperatura) dal tecnico del servizio assistenza. • Informarne il tecnico del servizio assistenza. • La manopola deve trovarsi stabilmente nel suo supporto. • Altrimenti, informarne il tecnico del servizio assistenza. • Se questo messaggio non scompare dopo breve tempo, informarne il tecnico del servizio assistenza. • Controllo della termosonda dell’NTC di regolazione da parte del tecnico del servizio assistenza. • Chiamare il tecnico del servizio assistenza, eventualmente è scattato l’interruttore di sovratemperatura interno. Se non è possibile eliminare gli errori in base alla soprastante tabella, si prega di informarne il servizio di assistenza tecnica oppure di inviarvi l’apparechio per farlo riparare. Non tentate di riparare voi stessi l’apparecchio! 7.0 UK E 7.0 Trouble-shooting Página 50 Error in temperature display "F0" Handle is not in its support • Insert handle in its support to allow thermal process for reducing bacterial count to start (jet connection must show to the back of the unit. • Replace handle (Art.No. 502.0963.0) "F1" No water (water pressure < 0,5 bar • Check, whether the water supply delivers a pressure of at least 2 bar (did you open the water-tap?). • Filter clogged? "F2" -5V is missing (supply voltage on the control board) "F3" Break of the safety NTC "F4" Safety switching does not react (49°C comparator) "F5" Break of the regulating NTC "F6" Different switch settings in the handle holder "F7" Temperature too high (>48°C), display only in the irrigation mode but not in the thermal cleaning procedure "F8" Short-circuit of the regulating NTC "F9" No heating performance (excess temperature switch), def. semi-conductor relay or regulator) • Inform service staff. • Inform service staff. • Have safety switching (temperature controller) checked by the service staff. • Inform service staff. • Handle must be correctly inserted in its support. • Inform service staff. • If error does not disappear after a short moment inform service staff. • Have temperature feeler of the regulating NTC checked by the service staff. • Inform service staff (internal excess temperature switch might have released). If, nevertheless, the errors cannot be removed inform the ATMOS service staff. Do not start any attempts to repair the unit yourself! 47 7.0 E 7.0 Subsanación de fallos funcionales Fallo en la indicación de temperatura "F0" El irrigador no se encuentra dentro del portairrigador • Poner la empuñadura en el soporte para que pueda iniciarse el proceso térmico para la reducción de gérmenes (la boquilla debe apuntar hacia el lado posterior del aparato). "F1" No entra agua (presión del agua < 0,5 bar) • Sustituir el irrigador (nº art. 502.0963.0). • Comprobar si el agua entra con una presión de 2 bar como mínimo (está abierto el grifo de agua?). • Está sucio el filtro? "F2" Fallo en corriente de - 5V (tensión de alimentación en la placa de control) "F3" Rotura del NTC de seguridad "F4" No se activa la conexión de se-guridad (comparador 49 ºC). "F5" Rotura del NTC de regulación "F6" La posición del irrigador varía en el portairrigador • Informar al servicio técnico. • Informar al servicio técnico. • Hacer comprobar la conexión de seguridad (guarda temperaturas por el servicio técnico). • Informar al servicio técnico. • El irrigador debe estar firmemente sujeto en el portairrigador • Si no fuese así informar al servicio técnico. 48 "F7" Temperatura demasiado elevada (>48ºC), indicación únicamente en modo de irrigación. No en el proceso térmico para la reducción de gér-menes! "F8" Cortocircuito del NTC de regulación "F9" Sin potencia de calentamiento (interruptor de protección contra sobretemperatura), relé de semiconductor o regulador defectuosos • Si este mensaje no se apaga al cabo de unos instantes hay que avisar al servicio técnico. • El servicio técnico debe examinar la sonda térmica del NTC de regulación. • Informar al servicio técnico, ya que puede que se haya activado el interruptor de protección contra sobretemperatInfoura. Si los fallos no pueden subsanarse con ayuda de las recomendaciones de este esquema, rogamos avise al servicio técnico o envíe el aparato para ser reparado. No intente repararlo Ud. mismo! 8.0 I 8.0 Accessori e pezzi di ricambio 8.1 Accessori 8.2 Descrizione UK E Page 52 Página 53 Codice Attaccatura d'ugello extralunga, diritta (110 mm)............................................................................................508.0429.0 Prolunga del tubo di entrata G3/4a-G3/4i, 1,5 m............................................................................................501.0315.6 Guarnizioni di scarico secondo DIN 1988.......................................................................................................502.0880.0 Cavo di connessione per la compensazione equipotenziale, l = 5m..............................................................008.0596.0 Pezzi di ricambio Descrizione Codice Hygrotherm plus, apparecchio di base, 220-240 V c.a., 50/60 Hz...............................................................502.0901.0 Hygrotherm plus, apparecchio di base, 110-127 V c.a., 50/60 Hz.............................................................................502.0901.1 Manopola di lavaggio 4+..............................................................................................................................................502.0963.0 Tubo doppio..................................................................................................................................................................510.0412.0 Attaccatura d’ugello corta, diritta, (80 mm)...................................................................................................................508.0427.0 Protezione antispruzzo.................................................................................................................................................501.0331.0 Beccuccio di gomma per la protezione antispruzzo.....................................................................................................501.0331.1 Guarnizione a 3 fori......................................................................................................................................................501.0320.0 Punte di tubo da montare sull’attaccatura d’ugello (30 pezzi)......................................................................................502.0844.0 G3/4a-G3/4l, L = 3 m....................................................................................................................................................502.0768.1 Dado a cappello G3/4 (ordinare addizionalmente).......................................................................................................052.0035.1 Filtro dell’acqua completo.............................................................................................................................................502.0890.0 Elemento filtrante per il filtro dell’acqua........................................................................................................................502.0891.0 Guarnizione (per G1/4a) 13x18x1................................................................................................................................055.0018.0 Riduzione G1/4a-G3/4a (filtro G1/4 su tubo dell’acqua G3/4)......................................................................................502.0724.1 Tubo di entrata con raccordo G3/4l, 3 m......................................................................................................................501.0315.7 Guarnizione (per G1/4) 10x15x1..................................................................................................................................055.0003.0 Cavo di allacciamento alla rete con presa con contatto di terra (Germania), l = 3 m...................................................507.0859.0 Cavo di allacciamento alla rete con connettore britannico BS 1363A (UK), l = 2,5 m..................................................008.0762.0 Fusibile F 8 A (rapido) 250 V potenza tagliacircuito H (1500 A)...................................................................................008.0767.0 Fusibile per tensione speciale (110-127 V c.a.); F 15A (rapido) potenza tagliacircuito 10 kA...................................... 008.0766.0 Foglio frontale Hygrotherm plus ................................................................................................................................060.0362.0 Istruzioni per l’uso........................................................................................................................................................502.0901.j 49 8.0 UK 8.0 Accessories and spare parts E Página 53 8.1 Accessories Description Article-No. Jet connection extra long, straight (110 mm)..................................................................................................508.0429.0 Extension of supply hose G3/4a-G3/4i, L =1,5 m...........................................................................................501.0315.6 Drainage fittings as to DIN 1988.....................................................................................................................502.0880.0 Connecting cable for the equipotential compensation, L = 5m.......................................................................008.0596.0 8.2 Spare parts Beschreibung Hygrotherm plus, basic unit, 220-240 V AC, 50/60 Hz.................................................................................502.0901.0 Hygrotherm plus, basic unit, 110-127 V AC, 50/60 Hz.................................................................................502.0901.1 Irrigation handle 4+.........................................................................................................................................502.0963.0 Double-barrelled hose....................................................................................................................................510.0412.0 Jet connection short, straight (80mm)............................................................................................................508.0427.0 Splash protection............................................................................................................................................501.0331.0 Rubber bush for splash protection..................................................................................................................501.0331.1 Three-holes gasket.........................................................................................................................................501.0320.0 Hose tips for jet connection (30 pcs.).............................................................................................................502.0844.0 G3/4a-G3/4i, L = 3 m......................................................................................................................................502.0768.1 Cap nut G3/4 (to be included in order)...........................................................................................................052.0035.1 Water filter complete.......................................................................................................................................502.0890.0 Filter element for water filter...........................................................................................................................502.0891.0 Gasket (for G1/4a) 13x18x1...........................................................................................................................055.0018.0 G1/4a-G3/4a reducer (filter G1/4 to water hose G3/4)...................................................................................502.0724.1 Supply hose with connection G3/4i, L = 3 m...................................................................................................501.0315.7 Gasket (für G1/4i) 10x15x1.............................................................................................................................055.0003.0 Power cable with protective contact socket (Germany), L = 3m.....................................................................507.0859.0 Power cable with British plug BS1363A (UK), L = 2,5m..................................................................................008.0762.0 Fuse F 8 A (quick-acting) 250 V breaking capacity H (1500 A)......................................................................008.0767.0 Fuse for special voltage (110-127VAC): F 15A (quick-acting) breaking capacity 10kA.................................. 008.0766.0 Front foil Hygrotherm plus ...........................................................................................................................060.0362.0 Operating instructions.....................................................................................................................................502.0901.i 50 Article-No. 8.0 E 8.0 Lista de accesorios y piezas de recambio 8.1 Accesorios Descripción N° artículo Suplemento de boquilla extralargo, recto.......................................................................................................508.0429.0 Alargue para manguera de entrada de agua G3/4a-G3/4i, 1,5 m..................................................................501.0315.6 Juego desagüe según DIN 1988....................................................................................................................502.0880.0 Conexión para equipotencial, 5 m..................................................................................................................008.0596.0 8.2 Piezas de recambio Descripción Hygrotherm plus, unidad básica, 220-240 V CA, 50/60 Hz.........................................................................502.0901.0 Hygrotherm plus, unidad básica, 110-127 V CA, 50/60 Hz.........................................................................502.0901.1 Irrigador 4+.....................................................................................................................................................502.0963.0 Manguera doble..............................................................................................................................................510.0412.0 Suplemento de boquilla corto, recto (80 mm).................................................................................................508.0427.0 Protección contra salpicaduras.......................................................................................................................501.0331.0 Manguito de goma antisalpicaduras...............................................................................................................501.0331.1 Junta de tres orificios......................................................................................................................................501.0320.0 Puntas de manguera para conexión al rácor de boquilla (30 unidades)........................................................502.0844.0 G3/4a-G3/4i, L 0 3 m......................................................................................................................................502.0768.1 Tuerca de rácor G3/4 (incluida en el pedido)..................................................................................................052.0035.1 Filtro de agua completo..................................................................................................................................502.0890.0 Elemento de filtración para filtro de agua.......................................................................................................502.0891.0 Junta (para G1/4a) 13x18x1...........................................................................................................................055.0018.0 Reductor G1/4a-G3/4a (filtro G1/4 para manguera de agua G3/4)................................................................502.0724.1 Manguera de entrada con empalme G4/4i, 3 m.............................................................................................501.0315.7 Junta (para G1/4i) 10x15x1............................................................................................................................055.0003.0 Cable de conexión a red con clavija de enchufo Schuko, 3 m.......................................................................507.0859.0 Fusible F 8 A (rápido) 250 V de poder de desconexión H (1500 A)................................................................008.0767.0 Fusible para tensión especial (110-127 V CA); F 15A (rápido) poder de desconexión 10kA......................... 008.0766.0 Lámina frontal Hygrotherm plus ..................................................................................................................060.0362.0 Instrucciones de manejo.................................................................................................................................502.0901.j N° articulo 51 9.0 I 9.0 Dati tecnici Tensione UK E 220-240V~±10%50/60Hz Tensionespeciale:100-127V~±10%50/60Hz Page 55 Página 56 Corrente assorbita 6,8 A (220 - 240 V~); 14,8 A (100 - 127 V~) Cavo di alimentazione elettrica 3m Potenza assorbita 1500 W Modi d’esercizio - Procedimento termico per la riduzione del tenore di germi -Mododilavaggio(flussod’acqua:0-450ml/minutoatemperatura37°C); - Riscaldamento spento (modo a risparmio energetico) Temperatura dell’acqua 37°C Indicazione temperatura Precisione di ± 0,5 s ± 1 ½ cifra Temperatura d’entrata dell’acqua +7…+36,5 °C Qualità dell’acqua Acqua potabile Pressione +2000 hPa (2 bar) – max: +6000 hPa (6bar) Raccordi - Allacciamento alla rete con cavo condotto esternamente - Compensazione equipotenziale - Alimentazione d’acqua - Scarico dell’acqua -Raccordoperiltuboflessibiledoppio Durata d’esercizio Esercizio continuo Fusibili F 8 A (per 220 - 240 V~); F 15 A (per 110 - 127 V~) Resistenza conduttore di terra Corrente di derivazione a terra Corrente di derivazione a cassa Corrente di derivazione a paziente max. 0,1 Ω max. 0,5 mA max. 0,1 mA max. 0,1 mA Condizioni ambientali Trasporto/magazzinaggio: Esercizio -20…+50°C;5…90%diumiditàdell’ariasenzacondensazione; pressione dell’aria: 700...1060 hPa +10…+35°C;20…80%diumiditàdell’ariasenzacondensazione; pressione dell’aria: 700...1060 hPa Dimensioni alt./largh./prof. 14,5 x 37 x 32 cm Peso 5,5 kg Classe di protezione (EN 60601-1) I Grado di protezione Tipo B Tipo di protezione IPX0 Classificazioneconformeall’annessoIX Direttiva CE 93/42/CEE IIa Marcatura CE CE 0124 Norme applicate EN 60601-1: 1990 + A1: 1993 + A2:1995 EN 60601-1-2: 1993 (CEM / EMC) Codice UMDNS 12-305 Codice GMDN 35152 Codice articolo 502.0901.0 52 Validità dei dati tecnici: 13.06.2000 9.0 UK E 9.0 Technicalspecifications Voltage range 220-240V~±10%50/60Hz Specialvoltage: 100-127V~±10%50/60Hz Current input 6.8 A (220 - 240 V~) 14.8 A (100 - 127 V~) Power cable 3m Power consumption 1500 W Operating modes - Thermal process for reducing bacterial count -Irrigationmode(waterflow0-450ml/minat37°C) - Heating off (energy saving mode) Water temperature 37°C Temperature indication Accuracy ± 0.5 °C ± ½ digit Feed temperature of the water +7...+36.5°C Water quality Drinking-water Operating pressure at least: +2000 hPa (2 bar), max: +6000 hPa (6 bar) Connections - Power connection - Equipotential equalization - Water supply G 3/4" external thread - Water drainage G 1/4" external thread - Connection for double-barrelled hose Operating time Continuous operation Fuses quick-acting 8 A (220-240 V~) quick-acting 15 A (110-127 V~) Protective earth conductor resistance 0.1 Ω max. Earth leakage current 0.5 mA max. Enclosure leakage current 0.1 mA max. Patient leakage current 0.1 mA max. Ambient conditions Transport/storage Página 56 -20...+50°C;5...90%humiditywithoutcondensing, air pressure 700...1060 hPa Operation +10...+35°C;20...80%humiditywithoutcondensing, air pressure 700...1060 hPa Dimensions HxWxD 14.5 x 37 x 32 cm Weight approx. 5.5 kg Protection class (EN 60601-1) I Degree of protection Type B Classificationacc.toAnnexIX EEC directions 93/42/EEC IIa CE marking CE 0124 Rules applied EN 60601-1: 1990 + A1:1993 + A2:1995 EN 60601-1-2: 1993 (EMV / EMC) UMDNS-Code 12-305 GMDN-Code 35152 Reference-No. 502.0901.0 IssueoftheTechnicalSpecifications:13.06.2000 53 9.0 E 9.0 Características técnicas Régimen de tensión 220-240V~±10%50/60Hz Tensiónespecial:100-127V~±10%50/60Hz Toma de corriente 6,8 A (220-240 V~); 14,8 A (100-127 V~) Cable a la red 3m Toma de potencia 1500 W Tipos de servicio - Proceso térmico para la reducción de gérmenes -Mododelavado(flujodeagua:0-450ml/mina37°C) - Calefacción desconectada (modo de ahorro de energía) Temperatura del agua 37°C Indicación de la temperatura Exactitud de la indicación ± 0,5 s ± ½ Digit Temperatura de entrada del agua 7°C...36,5°C Calidad del agua Agua potable Presión de servicio min: 2000 hPa (2 bar); máx: +6000 hPa (6 bar) Empalmes - Empalme a la red (caja de enchufe para aparatos de funcionamiento en frío) - Conexión para equipotencial - Entrada de agua - Salida de agua - Empalme para la manguera doble Tiempo de servicio Servicio continuo Fusibles F 8 A (para 220-240 V~); F 15A (para 110-127 V~) Resistencia del conductor protector (puesto a tierra) Corriente a tierra Corriente a tierra de la carcasa Corriente a tierra para los pacientes máx. 0,1Ω máx. 0,5 mA máx. 0,1 mA máx. 0,1 mA Condiciones del entorno Transporte/almacenaje Servicio -20...+50°C;5...90%dehumedadambientesincondensación; presión del aire 700...1060 hPa +10...+35°C;20...80%dehumedadambientesincondensación; presión del aire 700...1060 hPa Clase e protección (EN 60601-1) I Grado de protección Tipo B Categoría de protección IPX0 ClasificaciónsegúnelanexoIX Norma de la C.E. 93/42/C.E.E. Ila Denominación CE CE 0124 Normas aplicadas EN 60601-1: 1990 + A1:1993 + A2: 1995 EN 60601-1-2: 1993 (EMV/EMC) Código UMDNS 12-305 Código GMDN 35152 N° de pedido: 502.0901.0 54 Estado de las características técnicas: 13.06.2000 10.0 UK I 10.0 Smaltimento 10.0 Disposal L’imballaggio di cartone o di PE espanso può essere Packaging material, cardboard and/or PE foam, can be fully Il Hygrotherm plus non contiene prodotti pericolosi. The Hygrotherm plus does not contain any hazardous Il materiale della cassa è completamente riciclabile. The material of the housing can be recycled completely. Si devono smaltire in modo regolamentare i componenti The component parts of the Hygrotherm plus must be dis- completamente riciclato oppure restituito al fornitore per l’ulteriore uso. del Hygrotherm plus e si devono separare accuratamente i materiali. Le schede elettroniche devono essere sottoposte ad un processo di riciclaggio appropriato. Le punte di tubo utilizzate che non si possono più disinfettare vanno gettate subito nel secchio delle immondizie. recycled or returned to your supplier for further use. goods. posed off correctly and the materials are to be separated carefully. The electronics circuit boards must be fed into the appro priate recycling process. Used hose tips, which no longer can be disinfected, are to be disposed into the domestic waste immediately. 10.0 Eliminación E El embalaje de cartón o espuma PE es totalmente reci clable y puede devolverse al proveedor para su reutilización. El aparato Hygrotherm plus no contiene materiales peligrosos. El material de la caja es totalmente reciclable. Los componentes del Hygrotherm plus deben eliminarse correctamente clasificando cuidadosamente los materiales. Las placas de circuito electrónico deben reciclarse. Las puntas de manguera usadas que ya no pueden desinfectarse deben tirarse inmediatamente a la basura. 55 11.0 Notes on EMC ■MedicalelectricalequipmentissubjecttospecialprecautionswithregardtoEMCandmustbeinstalledacc. to following EMC notes. ■PortableandmobileHFcommunicationfacilitiescaninfluencemedicalelectricalequipment. ■Theuseofotheraccessories,otherconvertersandcablesthanstatedmayleadtoanincreasedemission or a reduced interference immunity of the equipment or system. 11.1 Guidelines and Manufacturer´s Declaration - Emissions TheATMOSHygrothermplusisintendedforuseintheelectromagneticenvironmentspecifiedbelow.Thecustomeror user of the ATMOS Hygrotherm plusshould ensure that it is used in such an environment. Emissions Test Compliance Electromagnetic Environment - Guidance RF Emissions CISPR 11 Group 1 The ATMOS Hygrotherm plususes RF energy only for its internal function. Therefore, its RF emissions are very low and are not likely to cause any interference in nearby electronic equipment. RF Emissions CISPR 11 Class B Harmonics IEC 61000-3-2 Class B Flicker IEC 61000-3-3 is conform The ATMOS Hygrotherm plus is suitable for use in all establishments, including domestic, and those directly connected to the public low-voltage power supply network that supplies buildings used for domestic purposes. The device may not be used directly next to other devices or piled up with other devices. If operation next to or piled with other devices is necessary, please watch the device to check its intended operation in this arrangement. 11.2 Guidelines and Manufacturer´s Declaration - Immunity TheATMOSHygrothermplusisintendedforuseintheelectromagneticenvironmentspecifiedbelow.Thecustomer or user of the ATMOS Hygrotherm plusshould ensure that it is used in such an environment. IEC 60601Test Level Compliance Level ESD IEC 61000-4-2 ± 6 kV Contact ± 6 kV Contact ± 8 kV Air ± 8 kV Air EFT IEC 61000-4-4 ± 2 kV Mains ± 2 kV Mains ± 1 kV I/Os Inapplicable Surges IEC 61000-4-5 ± 1 kV Differential ± 2 kV Differential ± 1 kV Common ± 1 kV Common Power Frequency 50/60 Hz Magneticfield IEC 61000-4-8 3 A/m Inapplicable Immunity Test 56 Electromagnetic Environment - Guidance Floors should be wood, concrete, orceramistile.Iffloorsaresynthetic, the relative humidity should be atleast30%. Mains power quality should be that of a typical commercial or hospital environment. Mains power quality should be that of a typical commercial or hospital environment. Powerfrequencymagneticfields should be that of a typical commercial or hospital environment. 11.0 Notes on EMC Immunity Test IEC 60601Test Level Compliance Level Voltage Dips / Dropout < 5 % UT IEC 61000-4-11 (> 95 % Dip of the UT) for 0.5 Cycle 70% UT (30 % Dip of the UT) for 25 Cycles < 5 % UT Mains power quality should be that (> 95 % Einbruch der UT) of a typical commercial or hospital environment. If the user of the für 0,5 Periode ATMOS Hygrotherm plus demands continued function even in case of 40 % UT interruptions of the energy supply, (60% Einbruch der UT) für 5 Perioden it is recommended to supply the ATMOS Hygrotherm plus from an 70% UT uninterruptible current supply or a battery. (30 % Einbruch der UT) für 25 Perioden < 5 % UT (>95 % Dip of the UT) for 5 s < 5 % UT (>95 % Einbruch der UT) für 5 s 40 % UT (60% Dip of the UT) for 5 Cycles NOTE Electromagnetic Environment - Guidance UT is the mains alternating current prior to application of the test levels. 11.3 Guidelines and Manufacturer´s Declaration - Immunity The ATMOS Hygrotherm plus is intended for use in the electromagnetic environment specified below. The customer or user of the ATMOS Hygrotherm plusshould ensure that it is used in such an environment. Immunity Test IEC 60601Test Level Conducted RF IEC 61000-4-6 3 Veff 150 kHz to 80 MHz Radiated RF IEC 61000-4-3 3 V/m 80 MHz to 2.5 GHz Compliance Level Electromagnetic Environment Guidance 3V Portable and mobile communications equipment should be separated from the ATMOS Hygrotherm plus incl. the cables by no less than the distances calculated/ listed below. 3 V/m Recommended distances: d = (3,5 / V1) * √(P) d = (3,5 / E1) * √(P) 80-800 MHz d = (7 / E1) * √(P) 0,8-2,5 GHz where „P“ is the max. power in watts (W) and D is the recommended separation distance in meters (m). Field strengths from fixed transmitters, as determined by an electromagnetic site (a) survey, should be less than the compliance level (b). Interference may occur in the vicinity of equipment containing following symbol. 57 11.0 Notes on EMC NOTE 1 With 80 MHz and 800 MHz the higher frequency range applies. NOTE 2 These guidelines might not be applicable in any case. The propagation of electromagnetic sizes is influenced by absorptions and reflections of buildings, objects and people. a The field strength of stationary transmitters, such as base stations of cellular phones and mobile terrain radio equipment, amateur radio transmitters, cbm broadcast and TV stations cannot be predestined exactly. To determine the electromagnetic environment in regard to stationary transmitters, a study of the location is to be considered. If the measured field strength at the location where the ATMOS Hygrotherm plus is used exceeds the above compliance level, the ATMOS Hygrotherm plus is to be observed to verify the intended use. If abnormal performance characteristics are noted, additional measures might be necessary, e. g. a changed arrangement or another location for the device. b Within the frequency range of 150 kHz to 80 MHz the field strength is to be below 3 V/m. 11.4 Recommended separations between portable and mobile RF Communications equipment and the ATMOS Hygrotherm plus The ATMOS Hygrotherm plus is intended for use in electromagnetic environment in which radiated disturbances are controlled. The customer or user of the ATMOS Hygrotherm plus can help prevent electromagnetic interference by maintaining a minimum distance between portable and mobile RF Communications equipment and the ATMOS Hygrotherm plus as stated below, according to the maximum output power of the communications equipment. Separation distance, depending on transmit-frequency m Nominal output of the transmitter 150 kHz bis 80 MHz 80 MHz bis 800 MHz 800 MHz bis 2,5 GHz d = [ 3,5 / 3] √P d = [ 3,5 / 3] √P d = [ 7,0 / 3] √P 0.01 0.12 0.12 0.24 0.1 0.37 0.37 0.74 W 1 1.2 1.2 2.4 10 3.69 3.69 7.38 100 11.66 11.66 23.32 For transmitters for which the maximum nominal output isn´t indicated in the above table, the recommended separation distance d in meters (m) can be determined using the equation belonging to the respective column whereas P is the maximum nominal output of the transmitter in watts (W) acc. to manufacturer´s specification. NOTE 1 With 80 MHz and 800 MHz the higher frequency range applies. NOTE 2 These guidelines are not applicable in any case. The propagation of electromagnetic sizes is influenced by absorptions and reflections of buildings, objects and people. 58 ATMOS General terms and conditions MedizinTechnik 1. General: case. Should the delivery delay be caused by a culpable infringement is limited to damage which is regarded as typical for tthat case. This Our General Standard Terms and Conditions apply exclusively. Client’s of non-substantial contractual duties, our client is also entitled to claim also applies in the case of our culpable infringement of substantial terms and conditions which are contrary to or deviate from our General a one-off damage compen-sation worth 3 percentage points of the contractual duties The indispensable conditions of German Liability Standard Terms and Conditions are not recognised unless their validity delivery value of the goods for each week’s delay, up to a maximum Law remain unaffected thereby. is explicitly confirmed in writing. Our General Standard Terms and which is no higher than 15 percentage points of the delivery value of Conditions also apply even if we deliver to clients without reservation, the goods - For second-hand equipment, the period of warranty shall be reduced to a period of twelve months. in the knowledge of the client’s contrary terms and conditions. Our General Standard Terms and Conditions also apply to all future business with that client. 7. Delivery - Familiarisation In the case of the delivery of devices for the medico-technical industry which require assembly and/or familiarisation for the final customer using 10. Reservation of Ownership We retain ownership of our goods until the receipt of all payments arising from the business relationship, including all demands arising 2. Proposal - Order Confirmation specialist trade personnel (such as Ear, Nose and Throat Apparatus and from installation orders, subsequent orders, repairs, accessory deliveries Our proposals are subject to change without notice unless otherwise Suction Units), we reserve the right to deliver the goods exclusively to and replacement orders. Should we have agreed upon payment on the stated in our order confirmation. Each order is only accepted by us the relevant specialist traders. Should the trader not carry out assembly basis of cheque and bill transactions, the ownership reservation applies following our written order confirmation. and/or familiarisation for the final customer, this is carried out by us. In until the cheque received byus has been paid in, and does not expire such cases, we reserve the right to charge the client for the additionally through our credit upon receiving the client’s cheque. In the case of 3. Orders created costs. Our specialist traders operate a recording system so a breach of contract by the client, especially payment arrears, we are Every order requires an exact description of all of our product’s details. that, if necessary, our products can be traced to the final customer. The entitled to repossess our goods. Repossession of our goods repre-sents We assume no liability for errors and damage caused by inaccurate or specialist trader undertakes to immediately report to us all events and a withdrawal from the contract, unless explicitly declared in writing by incomplete ordering details. risks which must be reported in connection with our products. us. We have the right to utilise the product after its repossession, whilst 4. Prices 8. Passage of Risk - Packaging deducting appropriate utilisation costs.The client is responsible for the income form such use is balanced against the client’s arrears, after Unless otherwise stated in the order confirmation, our prices in the Unless otherwise stated in our order confirmation, delivery is agreed order confirmation are ex factory prices and exclude packaging and ex factory. The risk of the goods’ damage or loss is therefore transferred be necessary, the client must carry these out punctually at his own cost. value added tax. Packaging is charged separately at cost price in the to the client as soon as the goods leave the factory or the client is in Our client is entitled to sell the goods he has bought from us in a proper handling the goods with care. Should maintenance and inspection work invoice. Value added tax is charged separately in the invoice according default of acceptance of the goods. This also applies to cases where we sale transaction. However, he must immediately assign all outstanding to the legal rate on the invoice date. We reserve the right to change confirm prepaid carriage. Transport packaging and all other packaging claims to the value of the final invoice sum (including value added tax) prices appropriately should price reductions or increases, especially according to the packaging regulations is not returnable. Our client is of our claims to his customers or third parties. The client is entitled to due to wage settlements, changes in the price of materials or currency responsible for disposing the packaging at its own cost. Our deliveries are collect this claim even after such assignment. Our right to collect the fluctuations, be incurred. Proof of such changes will be provided for the insured by us at the client’s expense unless explicitly otherwise agreed. claim ourselves remains unaffected thereby.We undertake to release client on request. No insurance is arranged in the case of goods which are collected by the securities to which we are entitled if requested to do so by the our clients. In the case of transport damage, claims are only handled if client should the realisable value of the our securities be more than 10 5. Payment Conditions - Balancing the client receives confirmation of any damage, reduced weight or loss percentage points higher than the outstanding claims. We reserve the Unless otherwise stated in the order confirmation, our invoices by the shipping company before accepting the delivery. right to choose the securities to be released. 9. Warranty 11. Plans and Illustrations are payable with a 3% discount within 10 days (except for repair and assembly services) or within 21 days from the invoice date net cash; money receipts is decisive for complying with this term. We are entitled The client is responsible for examining the delivered goods We retain ownership of and copyrights to all plans, illustrations, to charge interest after the due date at a rate 2% above the relevant immediately after receiving them to determine any eventual deficiencies calculations and other documents which are attached to our proposals. basic interest rate of the German Federal Bank. Should the client have or delivery errors, and to report these immediately. Should the client The client must receive explicit written permission before passing these payment arrears, we are entitled to charge interest on arrears at a rate fulfil this examining and reporting responsibility, and should payment on to third parties. Imitating our legally patented products is forbidden 5% above the relevant basic interest rate of the German Federal Bank. conditions be fulfilled, we shall be liable to the client within the scope and will be prosecuted. Should we be able to prove higher damages due to arrears, we are also of legal regulations. Our period of warranty shall in all cases be two entitled to claim these. The client only has the right to balance invoices years. Our client can make use of the warranty as follows, so long as against its own claims should such claims be confirmed in a court of he can provide first buyer proof (in the form of an invoice or delivery Our central office is the place of performance for all disputes in law or recognised by us. The client does not have the right of retention note) and provided that the product still has the original, unchanged connection with these General Standard Terms and Conditions and due to disputed counterclaims. serial number: 6. Delivery Periods Fulfilment of our delivery duties requires the punctual and proper 12. Jurisdiction and Place of Performance the contracts closed with clients under them. This jurisdiction excludes a. We choose whether to fulfil our guarantee by providing repair other jurisdiction relating to persons or subject-matter. Furthermore, our services free of charge - either on the client’s premises or in our factory client is not entitled to bring charges against us in another court should - or replacing the product. We can also provide these guarantee he file counter-charges, carry out counterbalancing or declare retention. fulfilment of the client’s duties. The right to defense on the grounds of an services through an authorised company; We, however, are entitled to bring charges against our client at their general place of jurisdiction or at another relevant court recognised by unfulfilled contract is reserved.Should the client default in accepting the b. Should a product be returned to us, the client agrees to send goods delivery or breach other cooperation duties, we are entitled either the product in its original or similar packaging, offering the same German or foreign law.Unless otherwise stated in the order confirmation, to withdraw from the contract or claim compensation for any increased protection as the original packaging, to our address or any address our central office is the place of performance. costs incurred up to that time without setting a further deadline. The right notified by us. to make further claims is reserved. Furthermore, in such cases, the risk c. Our guarantee ceases to apply if changes of any kind have been of coin-cidental destruction or a coincidental deterioration in the quality made to our product, unless such changes have been made by us Lenzkirch, September 2008 of the delivered goods is transferred to the client in the case of default or a company authorised by us, or have been previously agreed ATMOS MedizinTechnik GmbH & Co. KG in accepting such goods or payment arrears. Acts of God or stoppages upon in writing by us. Our guarantee also ceases to apply if third 79853 Lenzkirch/Germany (due to insufficient supplies of material, industrial disputes etc.) entitle parties have carried out repairs to our products or replaced parts us either to demand an appropriate extension of delivery periods or to thereof. This applies regardless of the fact whether these measures partly or entirely dissolve the delivery contract. This does not give the individually or collectively led to a deficiency of the product; client the right to claim damages. We have fulfilled delivery periods if the d. We accept no responsibility for damage defects caused by delivery goods have left our factory or the client has been informed of - operational wear and tear; the goods’ readiness for delivery within such delivery periods. Delivery - incorrect installation or incorrect or insufficient maintenance; periods stipulated by the client are not recognisedby us unless they - incorrect operation of the product (in contradiction to the operating instructions form part of our order confirmation. We adhere to legal terms and delivered with the product); - improper use or operating faults; - conditions in cases where, as a result of an undue delay in the delivery inappropriate or negligent handling and care, especially with respect for which we are liable, the client is entitled to claim that his interests to dirt, lime, suction of fluids, inappropriate cleaning and sterilisation; in a continued fulfilment of the contract have ceased. We also adhere - using accessories and/or replacementpartswhich are not explicitly to legal terms and conditions should a delay in delivery be caused by approved; deliberate or grossly negligent action by us or our representatives for - incorrect assembly and/or initial operation by the client or third which we are responsible. We are also responsible for such actions by parties; - the client’s negligence in handling the product; - unacceptable our representatives or agents. Should the delivery delay not be caused operating conditions, such as humidity, temperatures, the power supply, by our deliberate infringement of contractual duties for which we are vibrations. responsible, our liability is limited to damage which is regarded as typical - accidents, acts of God, especially lightening, water, fire, public for that case. We are liable according to the legal terms and conditions if unrest and insufficient ventilation. We are not liable for damage to and in so far as the delivery delay for which we are responsible is caused other objects apart from our product itself, except in thecase of any by an infringement of a substantial contractual duty. In such cases, our deliberate or grossly negligent actions by us or our representatives or liability is also limited to damage which is regardedas typical for that agents. Should no deliberate breach of contract be claimed, our liability This document is copyrighted. Duplication, translations, microfilming and savings on electronic systems, particularly for commercialpurposes are illegal without prior agreement of the manufacturer. All compiled data are based on manufacturers instructions. All logos, product names and designations used in this document are property of the respective manufacturer. We do not take over any warranty and liability in the case of missing inscriptions. Subject to modifications and amendments.