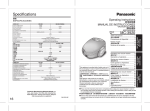
1
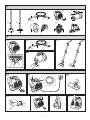
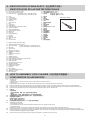
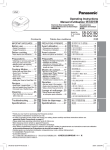
Operating Instructions ՠΈკبऐ MANUAL DE INSTRUCCIONES Vacuum Cleaner ྑ҂࿎ወ ASPIRADORA Model No. ܔ༚. No. Model MC-CL481 MC-CL483 We would recommend that you carefully study these Operating Instructions before attempting to operate the unit, and that you note the Important Safety Instructions. Keep pages 3 and 8 open when reading this manual, to make easier identify the different parts of the product. ϛ྿༶ՠΈ͵҂࿎ወ˄ۯçӎ݀ᙰї̦ஆኍᜄ͵ՠΈკبऐçٍ֝ิࡍ࠲څϰθݤΖé ັኍᜄ͵˿̱ईçቂݡᚯᕀෆ୷3ࡘ֝୷8ࡘç̤ӧࣆ˝ؤ᎗̴͵҂࿎ወˀωڅ௱˝é Os recomendamos que estudiar cuidadosamente estas instrucciones antes de intentar operar la unidad, y en la que la nota Instrucciones de seguridad importantes. Guardar las páginas 3 y 8 abiertos en el momento de leer este manual, para hacer más fácil identificar las diferentes partes del producto. TABLE OF CONTENTS / ΒᎩ/ INDICE Page / ࡘ/ Página C) How to operate your cleaner ................................................... 5 ՠΈ̅٘ ..................................................................................... 5 Cómo utilizar su aspiradora .................................................... 5 D) Maintenance and Servicing ..................................................... 6 ႖ᚼ ٘̅څ.................................................................................. 6 Mantenimiento y Reparación ................................................... 6 • Specifications ............................................................................. 9 थ .............................................................................................. 9 Especificaciones ........................................................................ 9 Page / ࡘ/ Página • Important safety instructions for the user ............................... 2 • ႍݎழ̅٘ .............................................................................. 2 • Advertencias Importantes para la seguridad del usuario ....... 2 A) Identification of main parts .................................................... 4 ώ̠࠲ྒྷέϐၴ ......................................................................... 4 Identificación de las partes principales................................ 4 B) How to assemble your cleaner ............................................... 4 ϩъ༬ਏ͵҂࿎ወ ..................................................................... 4 Cómo montar su aspiradora .................................................. 4 IMPORTANT SAFETY INSTRUCTIONS FOR THE USER / ႍݎழ̅٘ / ADVERTENCIAS IMPORTANTES PARA LA SEGURIDAD DEL USUARIO Before using the vacuum cleaner, please observe these basic precautions. WARNING: To reduce the risk of fire, electric shock, or injury. ϛՠΈ͵҂࿎ወ˄ۯçቂ᎙Ϯ੫͵ิٍڅො。 ᙲѿ: ʅࡒљ࡙Ꮄϩ̒Ԕçᙯྑ֍ෲé Antes de usar la aspiradora, por favor tome estas precauciones básicas. ADVERTENCIA: para reducir el riesgo de fuego, descarga eléctrica o lesión. • This appliance is not intended for use by infirm persons (including children) with reduced physical, sensory or mental capabilities, or lack of experience and knowledge, unless they have been given supervision or instruction concerning use of the appliance by a person responsible for their safety. Children should be supervised to ensure that they do not play with the appliance. • Do not use the appliance if the power cord or plug is damaged or faulty. • This appliance is provided with a flexible cord and if this becomes damaged, it must be repaired by an Authorized Service Centre or a qualified person in order to avoid any hazard. • Unplug from the socket outlet when not in use and before cleaning the appliance or undertaking maintenance operations • Turn off the appliance before removing the plug. Do not pull on the power cord, always pull on the plug body itself • Do not handle plug or vacuum cleaner with wet hands. • Do not use wet filters after wash, make sure they are completely dry to avoid damaging the cleaner. • Do not vacuum flammable or combustible substances, neither use in areas where they may be present. • Do not vacuum hot ash, embers or large and sharp objects. • Do not vacuum water or other liquids. • Keep the vacuum cleaner away from heat sources such as radiators, fires, direct sunlight, etc. • This vacuum cleaner is fitted with a thermal cut-out device which automatically turns off the cleaner to prevent overheating of the motor. When this happens, disconnect the cleaner from the socket outlet and check the dust compartment and filters as they may be full or clogged with fine dust. Check for any other obstructions in the hose or tube. After removing the obstruction, leave the cleaner to cool down until the thermal cut-out resets after approximately 60 minutes. • If a trouble occurs (burning smell, for example), immediately stop the cleaner and unplug the power cord. (The motor is euipped with an overheat protector, but an external cause may get the cleaner overheated. Do not use it in such condition, because otherwise a fire or electric shock may result.) Immediately contact your local dealer. • • • • • • • • • • • • • Аୖ܈ˀቲϑԾᝃèึ႖Њদఄڗçদ̢ᝁႪډᗱڗՠΈă̹ݨձഭĄé ਜڅ̨ێϰθၥᚼʇൃˆ̨ᘖ܈ୖءՠΈቲັڅၥໂႪݤΖéͬᄕၥໂձഭ̤ᇨ̨ۙˀઆୖັ܈Ͽټմé ቂˢՠΈ๒ᖣݮᄑྑڅກሉ֝ಎᏄçϩྑشກሉ֝ಎᏄ๒ᖣഛ·ݮᄑçቂˢՠΈАྑወé Аྑወಐբྑڅກሉçϩش௫Ͽ๒ᖣéͬ͠ෞᛲੁخڅˁ˼ϑथڅӒீʇ࢝ࡹç̤ᒽѡഛ·ήъφᎴé ັˀՠΈçଢᆹྑወн႖ࡹྑወईçቂಎࣚ،ʔྑກሉé ،ʔಎᏄ˄ۯçቂᘖАྑወéቂͬෞݡಎᏄ௱˝çˀͅྑກሉʔé ቂˢΈٔ̑˿څՠΈಎᏄ֝Аྑወé ቂˢՠΈࢊଢཬڅ݉ޥᔔႏçᇨۙཬᔔႏҭθਧ௬ç̤ᒽѡ๒ᖣé ˀͅ҂ʉؤጣͅጣٶቚçˀͅϛؤጣٶጣጜ֠ٶూՠΈé ˀͅ҂ʉᇋОçኝᔚཛྷʩϲኆٶڅᝃé ˀͅ҂ʉ̑յ̨ଜᝃé આ҂࿎ወჯᕺᇋກçϩᇋयè̒èδࣈڈയé А҂࿎ወմЊᇋ˞ᔄ༬çັਡསይіཬᇋईç͠вᘖé ັᇋ˞ᔄ༬૨ईçᔄෆྑກಎࣚçᐔދО࿎˝ྊ֝ཬᔔႏç়ͅြО࿎ᄑᗊٶéᐔދ҂࿎ၹၹʥͅЊᄑᗊٶé ଢਜᄑᗊ݉˄ٶçѤ۹҂࿎ጆڈսᇋ˞ᔄ༬ࡍ๙ׇçʩ߾ϛ60˝ᙾ͇ͤé ϩشഛ·ᖆăգϩጜ֎څཤĄቂΙչਪ̋ՠΈ҂࿎ወՔ̞આྑກሉಎࣚʖ،ʔé ăਡསዥЊཬᇋۙᚼ༬çє়ͅϖ͚դڅϖজ௫Ͽઘٷéࠝᙝᚯརᕣ௫Ͽ̒Ԕᙯྑڅഛ·éĄቂ௦Ⴊੁخঔኁੌާཀé • Este aparato no está habilitado para personas (incluyendo niños) con capacidades físicas, sensoriales o mentales reducidas o falta de experiencia y conocimiento a menos que se use con la supervisión o bajo la vigilancia de una persona responsable. Por la seguridad de los niños, se debe evitar que jueguen con el aparato. No use el aparato si el cable o el enchufe están dañados o defectuosos. Este aparato está provisto de un cable eléctrico el cual, en caso de estar dañado, deberá ser reparado por un Servicio Técnico Autorizado o una persona cualificada a fin de evitar posibles daños. Desenchufe la aspiradora de la toma de corriente cuando no la utilice y antes de limpiarla o cuando realice cualquier servicio de mantenimiento. Apague el aparato antes de desenchufarlo. Al desenchufarlo, no tire del cable eléctrico sino del enchufe. No coja el enchufe ni la aspiradora con las manos mojadas. No use los filtros húmedos después de haberlos lavado, asegúrese de que están completamente secos para evitar dañar la aspiradora. No aspire sustancias inflamables o combustibles ni use la aspiradora en zonas donde pueda haber dichas sustancias. No aspire cenizas incandescentes, ascuas ni objetos grandes o cortantes. No aspire agua ni cualquier otro líquido. Mantenga la aspiradora apartada de focos de calor tales como radiadores, fuegos, la luz directa del sol, etc. Esta aspiradora está equipada con un interruptor térmico que apaga la aspiradora automáticamente para evitar que el motor se recaliente. Cuando esto ocurra, desenchufe la aspiradora de la toma de corriente y compruebe el contenedor de polvo y los filtros ya que podrían estar llenos u obstruidos por polvo. Compruebe también cualquier otra obstrucción bien en la manguera o en el tubo. Después de eliminar el atasco, deje que la aspiradora se enfríe durante aproximadamente 60 minutos hasta que el interruptor térmico se reinicie. Si se produce un problema (olor a quemado, por ejemplo), pare inmediatamente la aspiradora de polvo y desconecte el cable eléctrico. (El motor de la aspiradora está provisto de un protector témico, aunque agentes externos pueden causar un sobrecalentamiento de la aspiradora. En lal caso, no utilice la aspiradora ya que podria ocasionar un incendio o corto circuito.) Inmediatemente contacte con su Servicio Técnico. • • • • • • • • • • • • 2 A M I E D N Q J H G C(a) I O P H F L C(b) R K V X A S B U T W B B-1 B-2 E I G B-4 D H H I F B-3 2 L K 1 C C-1 C-2 C-3 M O X MA MIN A B C-4 C-5 C-6 N 3 C-7 A - IDENTIFICATION OF MAIN PARTS / ώ̠࠲ྒྷέϐၴ / IDENTIFICACION DE LAS PARTES PRINCIPALES A) Ionizer nozzle (Only MC-CL483) B) Floor nozzle (Only MC-CL481) C) Extension wand (a) Extension wand - metal (MC-CL483) (b) Extension wand - plastic (MC-CL481) D) Hose E) Curved wand F) Connection pipe G) Suction regulator H) Projection I) Hose supporter J) Plug K) Crevice tool L) Dusting brush M) Switch knob button (Only MC-CL483) N) Cord rewind button O) ON/OFF Switch button P) Dust compartment buckle Q) Filter knob R) Hose inlet S) Dust compartment T) Pre-filter U) Filter unit V) Slider supporter W) Slider X) Pre-motor filter A) B) C) D) E) F) G) H) I) J) K) L) M) N) O) P) Q) R) S) T) U) V) W) X) ࠸ᕺʫ҂ၹᏄ (͑ࡏ MC-CL483) ϚؼΈ҂ᅃ (͑ࡏ MC-CL481) ۃףၹ (a) ۃףၹ - ᛇ (MC-CL483) (b) ۃףၹ - ณመ (MC-CL481) ҂࿎ၹ ᛯၹ TAIWAN ONLY (͔ᝰ) ોၹ ҂ʎቇዲወ J) Plug / ಎᏄ / Enchufe ̵ለ ҂࿎ၹڅો௱ ಎᏄ ᑧᄐΈ҂ᅃ О࿎ջ ૱ᕣ (͑ࡏ MC-CL483) ૈሉ ෆᘖ ࿎ୣ֤އׇ ཬᔔ૱ᕣ ҂࿎ၹಎʉʥ ࿎ୣ ྗ-ཬᔔወ ཬᔔወ ຊނ́ؼ ຊؼ ۯਡསཬᔔወ A) Cepillo ionizador (Sólo MC-CL483) B) Cepillo de suelo (Sólo MC-CL481) C) Tubo de Extensión (a) Tubo de extensión - metal (MC-CL483) (b) Tubo de Extensión - plástico (MC-CL481) D) Manguera E) Tubo curvado F) Manguito de conexión G) Regulador de aspiración H) Saliente I) Soporte de la manguera J) Enchufe K) Boquilla rinconera L) Cepillo para el polvo M) Botón regulador de potencia (Sólo MC-CL483) N) Botón de recogida de cable O) Botón interruptor P) Asa del contenedor de polvo Q) Regulador del filtro R) Entrada de la manguera S) Contenedor de polvo T) Pre-filtro U) Filtro principal V) Apoyo del mecanismo de asa W) Mecanismo de asa X) Filtro pre-motor B - HOW TO ASSEMBLE YOUR CLEANER / ϩъ༬ਏ͵҂࿎ወ / COMO MONTAR SU ASPIRADORA B-1 B-2 B-3 B-4 B-1 B-2 B-3 B-4 B-1 B-2 B-3 B-4 Cleaning tools • Crevice tool Crevice tool is use for cleaning crevices, corners, base boards and between cushions. • Dusting brush Dusting brush is use for furniture, venetian blinds and bookshelves and have to be attached onto the crevice tool. Insert the curved wand and connection pipe into the hose supporter at each end of the hose until the projection clicks into the hole of the attachment. Insert the connection pipe into the hose inlet and turn it clockwise until it locks in place. To disconnect the hose, turn it counter-clockwise and then remove. Insert the curved wand into the upper end of the extension wand and the floor nozzle to the other end. ଢʴմ • ᑧᄐΈ҂ᅃ ՠΈءଢಟᇋወèᑧᄐèԵ༉èᚼᐹ֝ؼᜂ࿒څᑧᄐയé • О࿎ջ ΈءଢࣂմèΏ༎ഫèऐᙘയڅᑧᄐईèϰ༬ءᑧᄐ҂ᅃۯڅၸé આ҂࿎ၹો௱̵څለᛯၹોၹ˲څಎʉçڈսഛ̴నڅᑶࡗé આોၹಎʉ҂࿎ወʉʥé ෝई̅Ϗӕᕣçڈսׇ֤̋é ݞʔईçਁई̅Ϗӕᕣç،ʔé આۃףၹᛯၹોၹ˲څಎʉç͐ɿၸಎʉϚؼΈ҂ᅃၹé Herramientas de Limpieza • Herramienta para rincones La herramienta para rincones se usa para limpiar hendiduras, rincones, rodapiés y entre cojines. • Cepillo para el polvo El cepillo para el polvo se usa para los muebles, las persianas y las estanterías y se tiene que sujetar a la boquilla rinconera. Inserte el tubo curvado y el manguito de conexión en el soporte de la manguera a cada extremo de la misma hasta que el saliente encaje en el agujero. Inserte el manguito de conexión en la entrada de la manguera y gírelo en el sentido de las agujas del reloj hasta que encaje. Para extraer la manguera, gírela en sentido contrario a las agujas del reloj y sáquela. Inserte el tubo corvado en el extremo superior del tubo de extensión y el cepillo de suelo al otro lado. 4 C - HOW TO OPERATE YOUR CLEANER / ՠΈ̅٘ / COMO UTILIZAR SU ASPIRADORA C-1 C-2 C-3 C-4 C-5 C-6 C-7 Pull out the power cord and put the plug into the socket outlet. ON/OFF switch button (O) To start or stop the cleaner, press the button. Switch knob button (M) To increase or reduce the power, turn the button. (Only MC-CL483) Switching between carpet or flooring Flooring : Press lever A Carpet : Press lever B The curved wand is attached with manual suction regulator, which allow you to briefly reduce the suction power. Cord rewind button (N) After you finish vacuuming, remove the plug from the wall socket and press the button to rewind back the power cord. When rewinding the power cord, always hold the plug so that it does not become damaged or stricking you. NOTE: In case it is impossible to rewind the power cord, pull out the power cord and press the button again. Storage position Insert the nozzle holder straight in the nozzle supporter on the under side of the main body. Park position For short breaks during vacuuming, insert the nozzle holder straight to the nozzle supporter on the rear side of the main body. NOTE: When you use park position, please turn off the power first to prevent from heating up. IMPORTANT: To obtain the good performance of the vacuum cleaner, we encourage you to rotate the filter knob (Q) for two complete cycles each time after finish vacuuming. C-1 C-2 C-3 C-4 C-5 C-6 C-7 આྑກሉ̴ç݉આಎᏄಎʉྑກಎࣚ˗é ෆᘖ(O) ૨ਪ̋҂࿎ወçቂݞෆᘖé ૱ᕣ ᅎ̷˳ྑກçᐇᕣ૱ᕣé (ࡏ MC-CL483) Ϛ್֝Ϛ˞څؼಘ ϚؼíݞA˿އ Ϛ್íݞB˿އ ᛯၹۉЊ҂ʎቇዲወçήࡒљ҂ʎé ૈሉ(N) ՠΈ˄݉çઆಎᏄྑກಎࣚ،̴ç݉ૈݞሉçՠྑກሉૈʉéັྑກሉෆּૈʉईçૈקሉڅˁ͛ݞʔé ቂ˿ಎᏄçՠಎᏄˀ໌սጆԾЪ๒ᖣé ٍิí ϩྑشກሉˀ়ૈʉईçቂઆྑກሉ̴ç݉κૈݞሉé Ѓ؟уʫ ϛ҂࿎ወסڅ௱çઆ҂ᅃڈܓނಎʉս҂࿎ወڅ҂ᅃ̀˗é ਪ؟уʫ ࠝഡईᆝਪՠΈçલͅѧΈঔΊނЃ؟ၹ˫̷ڈۃၹçϛ҂࿎ወڅਵ݉̅é ࠲ӷí ັՠΈঔΊނϬ؟ईçෞηᘖྑກ̤Տཬᇋé ࡍ࠲ොí ʅՠ҂࿎ወᐻધӧϧڅይіःشçӎ݀ᙰӶЏՠΈҭ҂࿎ወ݉çᐇᕣཬᔔ૱ᕣ(Q)ʆé C-1 C-2 C-3 C-4 C-5 C-6 C-7 Saque el cable eléctrico y enchúfelo en la toma de corriente. Botón Interruptor (O) Para poner en marcha o parar la aspiradora, presione este botón. Botón regulador de potencia (M) Para aumentar o disminuir la potencia, gire este botón. (Sólo MC-CL483) Selector de limpieza para alfombra o suelo Para Suelos: Posición A Para Alfombras: Posición B El tubo curvado incorpora un regulador manual de aspiración que le permite reducir momentáneamente la potencia de aspiración. Botón de Recogida de Cable (N) Después de haber terminado la limpieza, desenchufe la aspiradora de la toma de corriente y presione el botón para recoger el cable. Mientras esté recogiendo el cable, sujete el enchufe para evitar que se dañe o que le golpee. NOTA: En caso de no poder recoger el cable eléctrico, tire del cable y presione el botón de nuevo. Posición de almacenamiento Inserte la fijación de la tobera directamente en el soporte de la misma en la cara inferior del cuerpo principal. Posición de aparcamiento En caso de interrupciones momentáneas durante la limpieza, inserte la fijación de la tobera directamente en el soporte de la misma en la parte posterior del cuerpo principal. NOTA: Cuando se use la posición de aparcamiento, apague la aspiradora para evitar que se recaliente. PORTANTE: Para obtener máximo rendimiento de la aspiradora, le aconsejamos que gire el regulador del filtro (Q) dos ciclos completos cada vez que finalice una limpieza. 5 D - MAINTENANCE AND SERVICING / ႖ᚼ ٘̅څ/ MANTENIMIENTO Y REPARACION CAUTION • • • • The plug must be removed from the socket outlet before cleaning or maintaining the appliance. To avoid injury, keep your fingers and hands away from the rotary brush. DO NOT use hot air or hot surface to dry filter. Keep at room temperature for approximately 24 hours. IMPORTANT : Before re-installing the pre-motor filter, make sure it is completely dry to avoid damaging the cleaner. ٍิ • • • • ۙኚଢۯ˄ޥçͬෞᘖྑກՔ،ʔಎᏄé ۙ˿֝ݤ˿ݡႪ૱ᕣջڅඣᕺç̤ᒽѡ௫Ͽ֍ෲé ˀͅΈᇋयԓᇋٶڅᝃઆཬᔔወҿਧéཬ؟ᔔወçۙݡϛਧಪܯڅຉ˗çʩ߾24ʯईé ࡍ࠲ොíϛࡍ๙༬ཬᔔወۯçੁͬᇨۙཬᔔወҭθਧ௬é PRECAUCION • • • • Antes de usar o realizar un servicio de mantenimiento del aparato, desenchúfelo de la toma de corriente. Para evitar lesionarse, mantenga los dedos y manos alejados de la cepillo rotatorio. Para secar los filtros, NO USE aire caliente ni superficies calientes. Manténgalos a temperatura ambiente durante aproximadamente 24 horas. IMPORTANTE: antes de volver a instalar los filtros lavables, asegúrese de que están completamente secos para evitar dañar la aspiradora. How to empty the dust compartment IMPORTANT: Empty the dust compartment when it is full or the suction power seems to be bad. NOTE: When vacuuming fine dust, such as powder or similar, there may be a loss of suction power. If this happens, empty the dust compartment and check for possible dust trapped on the filters. D-1 D-2 D-3 D-4 D-5 D-6 Push the dust compartment buckle and pull up the dust compartment from the main body. Rotate the slider for 5 times. Pull out the filter assembly from the dust compartment. Empty the dust compartment. Place back the filter assembly into the dust compartment. NOTE: Be sure to use the cleaner with the filter assembly at the dust compartment. Set the dust compartment into the main body. Return dust compartment buckle to an original position. (Press until it "clicks") Maintaining the filter assembly D-7 Unlock the Pre-filter and pull it up as illustrated. D-8 Remove the dust accumulated in the filter unit by tapping it against a hard surface lightly. NOTE: Don't clean the filter unit by brush or clean it with water. D-9 Reinstall the filter unit as per reverse procedure. Floor nozzle D - 10 Inspect once a month. Using an old toothbrush or similar tool, clean any dirt or lint from the brush. Ionizer nozzle D - 11 Inspect once a month • Remove the dust stick at the rotary brush, brush and roller portion. • Take out the rotary brush and remove the dust stick on it. (1) Using tool like key or similiar, insert to the screw groove and rotate anti-clock wise, switch “ ” to “ ” and remove rotary brush cover. (2) Take out the rotary brush. (3) Remove the dust stick at the rotary brush. After wash the rotary brush with water, use a dry cloth to absorb the water. Dry it at the open air completely. (4) Remove the dust stick at the groove of support shaft. (5) Fix back the rotary brush as original position by inserting from support shaft (B side) (6) Fix the rotary brush cover. Use tool like key or similiar, insert to screw groove and rotate clock wise, switch “ ” to “ ”. Vacuum cleaner body D - 12 Wipe with the soft cloth soaked with water. Maintaining the Pre-motor filter D - 13 Push the dust compartment buckle and pull up the dust compartment from the main body. D - 14 Remove the filter. D - 15 Wash gently with water and then allow to dry in a shaded location. D - 16 Replace to its original location. NOTE: Make sure you remember to replace the filter. If the filter is not install, it will cause motor failure. Do not wash the filter in a washing machine or dry it with a dryer or other source of hot air. What to do if your cleaner does not work Check that the appliance is correctly plugged in and that the socket outlet is working. In case that the thermal cut-off device has operated, wait until it resets after approximately 60 minutes. If after having checked the mentioned points, the cleaner does not work, take it to an Authorized Service Centre to be repaired. What to do it the suction performance reduces • Stop the cleaner and unplug from the socket outlet. • Check whether the wands, hose and accessories are blocked or not. If they are blocked, remove the obstruction. • Check that the dust compartment is full. If it is full, empty it. • Check that filter is blocked with dust. If it is blocked with dust, clean it first. 6 ϩъଢڐ࿎ୣ Cómo vaciar el contenedor de polvo ࡍ࠲ොí ັ࿎ୣြО࿎݉҂࿎ʎᕣࣛईçͬෞଢਜ࿎ୣé IMPORTANTE: Vacíe el contenedor de polvo cuando esté lleno o cuando la potencia de aspiración no sea buena. ٍิí ັՠΈ҂࿎ወईഛЊО࿎ಟ̴ϩগٷᘞѓগٶٷçՋ়ͅዘࠔљ҂ʎ̸়é NOTA: Si se desea aspirar polvo muy fino, tal como sustancias polvizas o similares, puede ቂଢڐ࿎ୣ֝ᐔཬދᔔወé ocurrir que se reduzca la potencia de aspiración. Si esto ocurre, vacíe el contenedor de polvo y compruebe si hay polvo obstruyendo los filtros. D - 1 ݞᇶᏄΖ̅Ϗຊ݉çʔ࿎ୣ֤އׇç̴࿎ୣé D - 2 ӕᕣຊؼ5Џé D - 1 Empuje el asa del contenedor de polvo y extráigalo del cuerpo principal. D - 3 ̴ཬᔔወ༬ਏé D - 2 Gire el mecanismo del asa 5 veces. D - 4 ଢڐ࿎ୣé D - 3 Extraiga el filtro principal del contenedor de polvo. D - 5 આཬᔔወ༬ਏ༬ϗ࿎ୣé D - 4 Vacíe el contenedor de polvo. ٍิí D - 5 Vuelva a colocar el filtro principal en el contenedor de polvo. ᇨۙཬᔔወ༬ਏʶ༬ϛ࿎ୣ݉çʽͅՠΈé NOTA: D - 6 આ࿎ୣ༬ϛጆᝃʖçઆ࿎ୣ֤އׇ༬ϛࢎуé Asegúrese de que usa la aspiradora con el filtro principal en el contenedor ăݞʔгഛ̴“న”ᑶĄ de polvo. D - 6 Ajuste el contenedor de polvo en el cuerpo principal. Coloque el asa del ཬᔔወۙڅኚ contenedor de polvo en su posición original. (Presione hasta oír un “clic”) D - 7 ༲ෆྗཬᔔወ̴֝ϩΖé D - 8 ଢਜጼ႟ϛཬᔔወ˗څО࿎çઆཬᔔወˬᕣწწڅဓͮé Mantenimiento del Filtro principal ٍิí D - 7 Abra el Pre-filtro y extráigalo tal y como aparece en la ilustración. ˀͅΈջʫ̑ଢཬޥᔔወé D - 8 Extraiga el polvo acumulado en el filtro principal golpeándolo ligeramente D - 9 ਁϏധһࡍ๙ϰ༬ཬᔔወé contra una superficie dura. NOTA: ϚؼΈ҂ᅃ No limpie el filtro principal con un cepillo ni con agua. D - 10 Ӷࡵ̈ᐔދɿЏé D - 9 Coloque de nuevo el filtro principal repitiendo el procedimiento anterior al revés. આջʫʖᓭڅۉೃڬሉഽയçΈᕅ̗ջയଢਜé ࠸ᕺʫ҂ၹᏄ D - 11 Ӷࡵ̈ᐔދɿЏé • ଢਜٔϛ૱ᕣջçջʫ֝ဲቮʖڅО࿎é • ̴૱ᕣջçଢਜٔʖڅО࿎é (1) Έᕭ㌚ѓڅʴմçϛᒙുᆦਁई૱ᕣ“ ”г“ ”̴݉૱ᕣջé (2) ̴૱ᕣջé (3) ଢਜٔʖО࿎څ૱ᕣջç݉Έ̑ଢޥçκΈਧͦઆ̑α҂ਧé ؟ϛᛏˮڅϚ̅çᇨۙಪਧ૱ᕣջé (4) ଢਜٔϛ́ᆊණʖڅО࿎é (5) ́ᆊණ(Bᘄ)çݞ༬ਅ૱ᕣջࢎդڅу (6) ݞ༬ਅ૱ᕣջႶçΈᕭ㌚ѓڅʴմçϛᒙുᆦෝई૱ᕣ“ ”г“ ” ̴݉૱ᕣջé ҂࿎ጆᝃ D - 12 Έٔ̑څͦᐈݠé D - 13 ݞᇶᏄΖ̅Ϗຊ݉çʔ࿎ୣ֤އׇç̴࿎ୣé D - 14 ̴ཬᔔႏé D - 15 Έ̑წწڅԅޥç݉ϛఁଙழಪਧé D - 16 ϰ༬ϗࢎդڅуé ٍิí ቂੁͬՠΈཬᔔႏçѵ۲௫Ͽਡསݮᄑé ቂˢΈޥоጆޥ။ཬᔔႏçʜˢΈҀ࡙ጆҀਧཬᔔႏé ັਡསˀᕣई ᐔ̠ދᝃݶѵᇨಎϧϛྑກಎࣚʖç֝ྑກಎࣚݶѵይіઘé ϩݶشᇋ˞ᔄ༬૨çቂയսᇋ˞ᔄ༬ࡍ๙çʩ߾60˝ᙾ͇ͤé ϩʶᐔ̤ދʖ౧ᓮç҂࿎ወˑˀ়ઘይіçቂઆ͠ઙսᛲੁخڅˁ˼႖ࡹé ັ҂ʎ̸়ࡒљई • ਪ̋རі҂࿎ወçྑກಎࣚ،ʔಎᏄé • ᐔދ҂ᅃè҂࿎ၹ֝ਏέݶѵЊᄑᗊۈٶฒéϩЊቂ̴é • ᐔދ࿎ୣݶѵጼ႟ြО࿎éϩЊଢਜਧଷé • ᐔཬދᔔݶѵۈฒéϩЊቂηଢਜཬᔔወé Cepillo de suelo D - 10 Compruebe el estado del cepillo una vez al mes. Limpie el cepillo con un cepillo de dientes viejo o algo similar para eliminar cualquier suciedad o pelusa. Cepillo ionizador D – 11 Compruebe el estado del cepillo una vez al mes • Extraiga el polvo acumulado en el cepillo rotatorio, la brocha y el rodillo. • Saque el cepillo rotatorio y extraiga el polvo acumulado en el mismo. (1) Usando como herramienta una llave o algo similar, insértela en la ranura del tornillo y gírela en sentido contrario a las agujas del reloj, cambiando su posición de “ ” a “ ” y extraiga el cobertor del cepillo rotatorio. (2) Extraiga el cepillo rotatorio. (3) Extraiga el polvo acumulado en el cepillo rotatorio. Después de lavarlo con agua, use un paño seco para absorber el agua. Deje que se seque completamente al aire. (4) Extraiga el polvo acumulado en la ranura del mango. (5) Coloque de nuevo el cepillo rotatorio en su posición original insertándolo desde el mango (lado B) (6) Coloque de nuevo el cobertor del cepillo rotatorio. Usando una llave o algo similar, insértela en la ranura del tornillo y gírela en sentido de las agujas del reloj, cambiando su posición de “ ” a “ ”. Cuerpo de la aspiradora D - 12 Limpie la aspiradora con un paño suave mojado en agua. Mantenimiento del filtro pre-motor D - 13 Presione el asa del contenedor de polvo y extraiga el contenedor del cuerpo principal. D - 14 Extraiga el filtro. D - 15 Lávelo ligeramente con agua y déjelo secar a la sombra. D - 16 Devuelva el filtro a su posición original. NOTA: Asegúrese de que reemplaza el filtro. Si no se instala el filtro, se producirá un fallo en el motor. No lave el filtro en la lavadora ni lo seque con un secador ni con cualquier otro foco de aire caliente. Qué hacer si la aspiradora no funciona Compruebe que la aspiradora está correctamente enchufada y que la toma de corriente funciona. En caso de que el interruptor térmico se haya activado, espere unos 60 minutos hasta que se reinicie. Si después de haber comprobado los puntos indicados la aspiradora no funciona, llévela a un Servicio Técnico Autorizado para que sea reparada. Qué hacer cuando la potencia de aspiración es reducida • Pare la aspiradora y desenchúfela de la toma de corriente. • Compruebe que los tubos, la manguera y los accesorios no estén obstruidos. Si están obstruidos, elimine el atasco. • Compruebe que el contenedor de polvo no esté lleno. Si está lleno, vacíelo. • Compruebe que el filtro no esté obstruido con polvo. Si lo está, límpielo. 7 D D-1 D-2 D-3 D-4 2 •• ••••••• 1 D-5 D-6 D-7 D-8 1 2 •• ••••••• 1 D-9 D-11 Brush 刷子 Cepillo Rotary brush 旋轉刷 Cepillo rotatorio D-10 Screw Groove 螺絲槽 Ranura de tornillo Rotary brush cover 旋轉刷蓋 Cobertor del cepillo rotatorio Roller 滾輪 Rodillo Support shaft (A side) 撐軸 (A 邊) Mango (lado A) Support shaft (B side) 撐軸 (B 邊) Mango (lado B) D-12 D-13 2 •• ••••••• 1 D-14 D-15 D-16 8 Groove 支撐軸 Ranura SPECIFICATIONS / थ/ ESPECIFICACIONES SPECIFICATIONS MC-CL483 MC-CL481 MC-CL481 (TAIWAN) Input power (Max) 1800W 1500W 1250 - 1400W Input power (IEC) 1500W 1250W Power control Rotary - Cord rewind O Dimensions (W x L x H) 290mm x 425mm x 317mm Net weight 5.1 kg 5.0 kg Cord length 5.0m Extension wands Floor nozzle Metal x 2 Plastic x 2 Ionizer 2-Step Crevice tool √ Dusting brush √ थ ͔ᝰ ᎕ʉ̸ୋజʩ ᎕ʉ̸ୋઘ MC-CL483 MC-CL481 ɿে᎕ʉ̸ୋ 1800΅ 1500΅ ᖄׇषযྑ̸ୋ 1500΅ ྑກેտ ૱ᕣ O ˵ʮਣ^ᅜ^ۃ 290mm x 425mm x 317mm 5.1 kg 5.0 kg ྑກሉܿۃ ۃףၹ Ϛؼ҂ᅃ 5.0m ᛇx2 ณመ x 2 ࠸ᕺʫ҂ၹᏄ 2-ᐒ҂ᅃ ᑧᄐΈ҂ᅃ √ О࿎ջ √ ESPECIFICACIONES MC-CL483 MC-CL481 Potencia de Entrada (Máxima) 1800W 1500W Potencia de Entrada (IEC) 1500W Control de potencia MC-CL481 (TAIWAN) 1250 - 1400W 1250W Rotatorio - Recogida de cable O Dimensiones (A x L x AI) Peso Neto 1250 - 1400΅ 1250΅ ૈሉ ଷࡍ MC-CL481ă͔ᝰĄ 290mm x 425mm x 317mm 5.1 kg 5.0 kg Longitud del cable 5.0m Tubo de extensión Metal x 2 Cepillo de suelo Ionizador Plástico x 2 2-Pasos Boquilla Rinconera √ Cepillo para el polvo √ 9 MEMO 10 MEMO 11 FOR TAIWAN ONLY / ͑ࡏ͔ᝰ / SÓLO PARA TAIWAN Ⴭ · ˚ ௫ ୖ ʥ ͍ Ϛ ൂ Ϛ ൂ ྑ ੌ íਡդпՙؾʔჍ௫Њࡏ˚͍ ѥíਡդпՙჍ ੌ í͔ྑؾወቘڜαЊࡏ˚͍ ғ í͔̻ፐˁ֝ͥ݀˘ཕ 57 ༚ ғ í͔̻ፐˁ֝ͥ࢝ʲཕ 579 ༚ ༽ íă02Ą2223-5121 Panasonic Manufacturing Malaysia Berhad (6100-K) No.3, Jalan Sesiku 15/2, Shah Alam Industrial Site, 40200 Shah Alam, Selangor Darul Ehsan, Malaysia. http://www.panasonic.co.jp/global/ Printed in Malaysia V01Z6210G