1
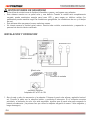
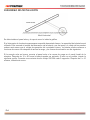
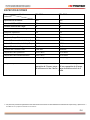
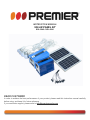
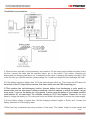
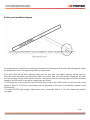
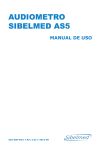
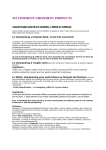
MANUAL DE INSTRUCCIONES
KIT DE PANEL SOLAR
SOL-5040, SOL-5041
ESTIMADO CLIENTE
Con el fin de que obtenga el mayor desempeño de su producto, por favor lea este manual de
instrucciones cuidadosamente antes de comenzar a utilizarlo, y guárdelo para su futura referencia.
Si necesita soporte adicional, no dude en escribir a: [email protected]
LÍNEAS DE SERVICIO AL CLIENTE PREMIER
Venezuela:
Panamá:
Sitio Web:
E-mail:
0800 – ELECTRIC (353-2874)
300-5185
www.premiermundo.com
[email protected]
NOTA
Nos reservamos el derecho de modificar las especificaciones, características y/u operación de este
producto sin previo aviso, con el fin de continuar las mejoras y desarrollo del mismo.
P-1
INSTRUCCIONES DE SEGURIDAD
•
•
•
•
Evite utilizar la unidad cerca de líquidos inflamables o gases y en lugares muy calientes.
Este sistema cuenta con un panel solar y una batería. Cuando la unidad está completamente
cargada, puede suministrar energía para luces LED y para cargar un teléfono celular (los
parámetros pueden cambiar según las condiciones geográficas, las condiciones de uso y el tiempo
de uso).
Este sistema debe cargarse al menos cada tres meses.
No intente reparar la unidad usted mismo. Remita toda revisión, mantenimiento y reparación a
personal de servicio técnico calificado.
INSTALACIÓN Y OPERACIÓN
Bombillos LED
Teléfono móvil
Panel solar
Conector de entrada
Accesorio opcional
Adaptador AC a DC de 14V
1. Abra la caja y retire los accesorios y la máquina. Coloque el panel solar afuera y apúntelo hacia el
sol. Conecte el cable con la máquina interior y encienda el interruptor. Si el voltímetro muestra
actividad y el indicador de color rojo está encendido, significa que el panel solar está cargando la
batería normalmente. (La primera vez que utilice la máquina cárguela al menos 3 días seguidos y
luego descargue).
P-2
2. Si el voltaje de la batería es mayor a 10.5V, el indicador de carga estará encendido. Luego conecte
la lámpara LED en la ranura de salida DC de la máquina. También puede conectar el teléfono móvil
en el conector USB.
3. Esta máquina tiene una función anti descarga (prevención de descarga de la batería), así que debe
asegurarse de que el panel solar esté siempre conectado a la máquina para asegurar que la batería
obtenga más energía. Si usted utiliza la batería por un período prolongado, causará que la batería
reduzca el voltaje (indicador de carga apagado, ninguna salida de carga; el voltímetro muestra 10V).
Si esto sucede, utilice el panel solar para cargar la batería por 10 horas continuas y reinicie la
máquina para recuperar el suministro de energía.
4. Si el voltaje de la batería es mayor a 14V, el indicador de carga comenzará a parpadear lo cual
significa que la batería ha estado en estado de carga flotante.
5. Hemos considerado plenamente las condiciones de uso de los usuarios. Los cables del panel solar y
la lámpara LED son lo suficientemente largos, así que es importante que no los alargue más ni los
modifique de ninguna manera. Si aún requiere cambiarlos, asegúrese que el cable de conexión del
panel solar no será menor de 0.5mm2 y que el cable de lámpara LED no sea menor de 0.3mm2.
Todos los cables de conexión tienen sus polos positivo y negativo, y es importante distinguirlos.
Nota:
1. El sistema carga la bateria solo cuando el sistema esta encendido
2. Cuando la unidad esta en modo de carga, el LED se encendera. Una vez la bateria esta
completamente cargada, la luz LED se tornara de color rojo.
RESOLUCIÓN DE PROBLEMAS
•
•
•
Si el indicador del panel solar está apagado verifique si el panel solar está apuntando hacia el sol, si
el interruptor está encendido, si la batería está en plena capacidad, y si la conexión al panel solar es
correcta.
No hay carga de salida y el indicador de carga está apagado. Verifique el voltaje de la batería, si el
voltímetro está marcando menos de 10V, y en caso de ser así, cargue la batería por 10 horas
continuas y luego la puede utilizar.
No hay salida de carga y el indicador de carga está encendido. Verifique la conexión de la carga e
intente de nuevo. Verifíquese una sobrecarga, un cortocircuito, y desconecte la carga por un minuto
e intente de nuevo.
MANTENIMIENTO
•
•
•
El sistema debe utilizarse en interiores. No exponga la máquina a los rayos directos del sol niega
coloque en lugares húmedos. Si la máquina recibe agua por accidente, apague el interruptor de
inmediato y seque el agua.
Si no va a utilizar la máquina por un período prolongado apáguela y cargue la batería al menos cada
mes (el voltaje debe ser mayor a 14V).
No permita que la batería reduzca su voltaje, ya que esto reduce su vida útil. Si la batería ha
descendido bastante su voltaje, cárguela al menos 2 días.
P-3
DIAGRAMA DE INSTALACIÓN
Panel Solar
Nivel Horizontal
Se debe instalar el panel solar y el soporte como lo indica la gráfica.
Si el interruptor de la máquina permanece encendido demasiado tiempo, la capacidad de la batería será
utilizada. Esto causará un estado de hibernación de la batería y en ese punto, el voltaje de los paneles
solares será menor que el voltaje de operación del controlador interno. La batería puede comenzar a
funcionar de nuevo sólo después de activar la carga, y las formas de activación son las siguientes:
Si la energía solar es buena, conecte el panel solar a la ranura de carga en el panel frontal de la
máquina. Después de 10 o 20 horas la batería puede ser activada. Si esto no es posible, intente la
siguiente opción: Conectar una corriente de alto voltaje 20V/30A cada 2 segundos. Después de 5 o 10
minutos, inténtelo de nuevo.
P-4
ESPECIFICACIONES
Modelo
SOL-5041
SOL-5040
Capacidad de la Batería
4AH
7AH
Potencia del Panel Solar
6W
12W
Corriente Nominal de Carga
2A
2A
Corriente Nominal de Descarga
2A
2A
Voltaje de Operación
12V
12V
Voltaje del Panel Solar
≤25V
≤25V
Voltaje de Carga Flotante
14V
14V
Parámetro
Punto de Desconexión de Voltaje Bajo 10.5V
10.5V
Punto de Reconexión de Voltaje Bajo
11.5V
11.5V
Ninguna Pérdida de Carga
≤8mA
≤8mA
Corriente de Conector USB
≤ mA 500
≤ mA 500
Temperatura de Operación
-10ºC~40ºC
-10ºC~40ºC
Temperatura de Almacenamiento
-15ºC~50ºC
-15ºC~50ºC
Requisitos de Humedad
≤90%, ninguna condensación ≤90%, ninguna condensación
Tiempo de Operación del Sistema
4 luces LED de 3W con
4 luces LED: 2 de 3W y 2 de
operación de 3 horas; carga 5W con operación de 4 horas;
de teléfono móvil de 4 horas carga de teléfono móvil de 6
horas
•
Las personas y/o Marcas registradas en este manual de instrucciones no están afiliadas a Premier Electric Japan Corp. y aparecen en
este Manual con propósitos ilustrativos únicamente
P-5
INSTRUCTION MANUAL
SOLAR PANEL KIT
SOL-5040 / SOL-5041
DEAR CUSTOMER
In order to achieve the best performance of your product, please read this instruction manual carefully
before using, and keep it for future reference.
If you need extra support, please write to [email protected]
PREMIER CUSTOMER SERVICE
Venezuela:
Panama:
Website
E-mail:
0800 – ELECTRIC (353-2874)
300-5185
www.premiermundo.com
[email protected]
NOTE
This unit may be submitted to changes in specifications, characteristics and/or operation without prior
notice to the user, in order to continue improving and developing its technology.
P-1
1.Safety:
1.1 Avoid using the machine under such conditions as having flammable or explosive or erosive gas and
too hot places
1.2 This system equips with solar panel and battery. Under the condition of fully charged, it can supply
power for LED lights and charge the mobile.(the parameters differ according to the different
geographical, using condition and using time)
1.3 This system must be charged every three months.
Solar Power Light System
Model SOL-5041
SOL-5040
Parameter
Battery Capacity
4AH
7AH
Solar Panel Power
6W
12W
Rated Charging Current
2A
2A
Rated Discharging Current
2A
2A
Rated Working Voltage
12V
12V
Solar Panel Voltage
≤25V
≤25V
Float Charging Voltage
14V
14V
Low Voltage Disconnecting Point 10.5V
10.5V
Low Voltage Reconnecting Point 11.5V
11.5V
No Load Loss
≤8mA
≤8mA
USB Port Current
≤ mA 500
≤ mA 500
Working Temperature
-10 ~40
-10 ~40
Storage Temperature
-15 ~50
-15 ~50
Humidity Requirement
≤90%,no condensation
≤90%,no condensation
System Working Time
4pcs 3W LED lights working for 4pcs 3W/2pcs 5W/2pcs LED lights
3hours, charging mobile for 4hours working for 4hours, charging mobi
le for 6hours
P-2
2.Installation and operation:
2.1Open the box and take out the accessory and machine. Put the solar panel outside and make it face
the sun: connect the cable with the machine indoor, put on the switch. If the cattery voltmeter has
display and red charging indicator is on, it means the solar panel is charging the battery normally.(If this
is the first time you use this machine, please charge for 3 continuous days and then discharge the load)
2.2If the battery voltage is higher than 10.5V,the load indicator will be on. Then insert the LED lamp into
the socket of the DC output on the machine. And insert mobile into the USB connecting port.
2.3This machine has anti-discharging function (prevent battery from discharging to solar panel),.so
please make sure the solar panel is always connected with the machine to assure the battery can get
more power. If you use the battery for a long period. It would cause the battery to low voltage condition
(load indicator off, no load output. The voltmeter showing at 10V).If this happens. Please use the solar
panel to charge the battery for 10 continuous hours and restart the machine to recover the power supply.
2.4If the battery voltage is higher than 14V,the charging indicator begins to flicker, and it means the
battery has been in float charging state.
2.5We have fully considered the using condition of the users. The cables’ length for solar panels and
P-3
LED lamp are ling enough ,so please do not lengthen them or change them at random. But if you have
to change them or change them at random. But if you have to change them. Please make sure the area
of the cable connection solar panel is not less than 0.5MM²,while for LED lamp, not less than 0.3mm
².All the connection cables have negative and positive part, please distinguish them.
Attention:
2. The system charges for the battery only when the switch is on.
2. When the unit is in charge mode, the LED is on, when it is charged full, the red LED flickers.
3.Breakdown and disposal
3.1 Solar panel indicator off: Please check whether the solar panel is facing the sun; whether the
machine switch is on; whether the battery is in full capacity state; whether the connecting of the solar
panel is short-circuit or reversed.
3.2 No load output and the load indicator off: Please check whether the batter is in low voltage, whether
the voltmeter showing is less than 10V and if it so, please charge the battery for 10 continuous hours
and then use it.
3.3 No load output, load indicator on: please check whether there is bad connection of the load, then
connect again. Check whether the load is overloaded, short-circuit, and disconnect the load for 1 minute
the connect again.
4.Maintenance
4.1 This system should be used indoor. Please do not expose do not expose the machine onto sunshine
and wet places .If there is water inside by accident, please turn off the switch and dry the water inside
and then you can use it.
4.2 If you are going not to use this machine for long, please turn off the power switch and charge the
battery every month (battery voltage higher than 14V)
4.3 Please do not make the battery in the state of low voltage. Otherwise it will shorten the using time of
the battery. After on time of low voltage, please charge over 2days and then it.
P-4
5.Solar panel installation diagram
Customers have to install the connecting part between the solar panel & bracket; the referring part inside
the dotted line circle is the supporting base for solar panels
If the DIP switch on the main machine stays open for long time, the battery capacity will be used up.
They will cause the battery at hibernation state, and at this time, the solar panels voltage will be lower
than the working voltage of the inside controller. the battery can start working again only after activation
charging, and the ways of activation charging are as follows
1.If the sunshine is good, please insert the solar panel plug to the LOAD socket on the front side of the
machine. After 10 to 20 hours, the battery can be activated. If this watt is not feasible, please try the
following one;
2.Connect 20V/30A high-voltage, high-current every 2 seconds. After 5 to 10 mins, please use method
one again.
P-5