1
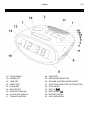
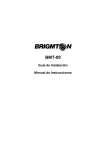
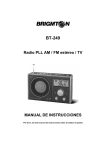
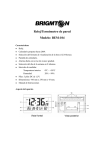
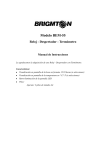
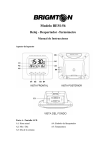
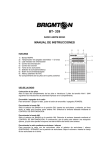
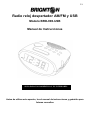
P. 1
Radio reloj despertador AM/FM y USB
Modelo BRD-900-USB
Manual de Instrucciones
SÓLO PARA USO DOMÉSTICO Y EN INTERIORES
Antes de utilizar este aparato, lea el manual de instrucciones y guárdelo para
futuras consultas
P. 2
SITUACIÓN DE LOS CONTROLES
1. ANTENA FM
2. AJUSTE DE LA ALARMA
3. AJUSTE DE LA HORA
4. APAGADO AUTOMÁTICO
5. AJUSTE DE LAS HORAS
6. AJUSTE DE LOS MINUTOS
7. CONTROL DE FUNCIÓN DE CABEZADA
8. PANTALLA LED DEL RELOJ
9. CONTROL DE SINTONIZACIÓN
10. TOMA USB
11. SELECTOR AM/FM/USB
12. CONTROL DE VOLUMEN y ALARMA
ENCENDIDO / APAGADO
13. SELECTOR DE FUNCIÓN
(AUTOMÁTICO/APAGADO/ENCENDIDO)
14. REPRODUCCIÓN/PAUSA
15. PISTA SIGUIENTE
16. PISTA ANTERIOR
17. TAPA DEL COMPARTIMENTO DE LA PILA
18. INDICADOR DE FUNCIÓN AUTOMÁTICA
(AUTO)
P. 3
AJUSTE DE LA HORA ACTUAL
1. Ajuste el Selector de Función (13) en posición de apagado (OFF). Conecte el cable de
alimentación a la red eléctrica. La pantalla del reloj parpadeará indicando una interrupción de
la alimentación. La hora visualizada es incorrecta.
2. Para ajustar la hora correcta, pulse el botón de Ajuste de la Hora (3) simultáneamente con el
botón de Ajuste de las Horas (5) o de Ajuste de los Minutos (6) hasta que se visualice la hora
correcta.
3. Abra la tapa del compartimento de la pila (17) situada en la parte posterior del aparato e
introduzca una pila 6LR61 (o equivalente) de 9 voltios. La finalidad de esta pila es guardar la
información referente a la hora de la alarma y mantener el reloj en funcionamiento en caso
de desconexión de la red eléctrica o interrupción de la alimentación. Si esto ocurre, el reloj se
mantendrá en hora pero no se visualizará en la pantalla.
NOTA: cuando el aparato funcione sólo con la pila, el reloj únicamente permanecerá en hora
durante un corto periodo de tiempo. Por lo tanto, es importante que la alimentación se reanude
tan pronto como sea posible.
REPRODUCCIÓN USB
1. Abra la tapa del compartimento de la toma USB y conecte el reproductor MP3 (o dispositivo
USB) a la toma USB (10) situada en la parte superior del aparato.
2. Ajuste el selector AM/FM/USB (11) en posición “USB”.
3. Para iniciar la reproducción, pulse el botón de Reproducción/Pausa (14).
4. Para seleccionar la pista deseada, pulse el botón de Pista Siguiente
(15) o Pista Anterior
(16).
Nota:
- En el compartimento USB, introduzca solamente el dispositivo USB. Objetos distintos al
dispositivo USB pueden dañar el mecanismo.
- No fuerce la tapa más allá de lo permitido por el mecanismo.
- Para evitar que la suciedad y el polvo se introduzcan en el mecanismo, mantenga la tapa
cerrada cuando no utilice el dispositivo USB.
- No conecte la toma USB directamente al ordenador, ya que podría dañar el aparato.
Es posible que este aparato no admita todos los dispositivos USB. Algunas versiones USB
antiguas puede que no funcionen en este aparato.
P. 4
FUNCIONAMIENTO DE LA RADIO
Para recepción en AM, este aparato utiliza una antena direccional interna. Gire el aparato para
conseguir una mejor recepción. Para recepción en FM, el cable de la antena FM (1) situado en la
parte posterior del aparato debe estar completamente desenrollado.
1.
2.
3.
4.
5.
Para encender la radio, sitúe el Selector de Función (13) en posición de encendido (ON).
Seleccione la banda deseada con el Selector de Banda (11).
Ajuste el volumen al nivel deseado mediante el Control de Volumen (12).
Para seleccionar la emisora deseada, gire el Control de Sintonización (9).
Para apagar la radio, sitúe el Selector de Función (13) en posición de apagado (OFF). Si la
radio no se apaga es posible que se haya pulsado accidentalmente el botón de Apagado
Automático (4). Para cancelar esta función, pulse una vez el botón de Función de Cabezada
(7).
AJUSTE DE LA HORA DE LA ALARMA
1. Pulse el botón de Ajuste de la Alarma (2) y al mismo tiempo pulse el botón de Ajuste de las
Horas (5) o de Ajuste de los Minutos (6) hasta visualizar la hora deseada para la alarma.
2. Para comprobar la hora de la alarma, pulse el botón de Ajuste de la Alarma (2) y en la
pantalla se visualizará la hora preajustada para la alarma.
DESPERTAR CON LA RADIO
Una vez seleccionada la emisora deseada y ajustado el nivel de volumen deseado, lleve a cabo
las siguientes operaciones:
1. Siga las instrucciones anteriormente explicadas en el apartado de “AJUSTE DE LA HORA
DE LA ALARMA”.
2. Una vez seleccionada la hora deseada para la alarma, ajuste el Selector de Función (13) en
posición de funcionamiento automático (AUTO).
3. La radio se encenderá automáticamente a la hora preajustada para la alarma.
4. La alarma se puede parar temporalmente durante 9 minutos pulsando una vez el botón de
Función de Cabezada (7).
Para parar la alarma, pulse el botón de Ajuste de la Alarma (2).
5. La alarma volverá a activarse transcurridas 24 horas, a menos que sitúe el Selector de
Función (13) en posición de apagado (OFF).
P. 5
DESPERTAR CON LA ALARMA
1. Siga las instrucciones anteriormente explicadas en el apartado de “AJUSTE DE LA HORA
DE LA ALARMA”.
2. Una vez seleccionada la hora deseada para la alarma, sitúe el Selector de Función (13) en
posición de funcionamiento automático (AUTO).
3. Para seleccionar la función de despertador con sonido de la alarma, gire completamente el
Control de Volumen y Alarma Encendido/Apagado (12) en el sentido de las agujas del reloj.
4. El sonido de la alarma se activará automáticamente al cumplirse la hora preajustada.
5. La alarma se puede parar temporalmente durante 9 minutos pulsando una vez el botón de
Función de Cabezada (7).
Para parar la alarma, pulse el botón de Ajuste de la Alarma (2).
6. La alarma volverá a activarse transcurridas 24 horas, a menos que sitúe el Selector de
Función (13) en posición de apagado (OFF).
DESPERTAR CON EL DISPOSITIVO USB
1. Siga las instrucciones anteriormente explicadas en el apartado de “AJUSTE DE LA HORA
DE LA ALARMA”.
2. Una vez seleccionada la hora deseada para la alarma, sitúe el Selector de Función (13) en
posición de funcionamiento automático (AUTO) y el Selector AM/FM/USB en posición USB.
3. Ajuste el volumen al nivel deseado con el Control de Volumen (12).
4. El reproductor MP3 (o dispositivo USB) se encenderá automáticamente al cumplirse la hora
preajustada para la alarma.
5. La alarma se puede parar temporalmente durante 9 minutos pulsando una vez el botón de
Función de Cabezada (7).
6. Para parar la alarma, pulse el botón de Ajuste de la Alarma (ALARM SET) (2).
7. La alarma volverá a activarse transcurridas 24 horas, a menos que sitúe el Selector de
Función (13) en posición de apagado (OFF).
APAGADO AUTOMÁTICO DE LA RADIO / USB
La radio o reproductor MP3 (dispositivo USB) puede ajustarse para que se apague
automáticamente transcurrido un periodo de tiempo desde 1 minuto hasta 1 hora y 59 minutos,
realizando las siguientes operaciones:
Seleccione la emisora de radio deseada (para apagado automático de la RADIO).
Con todos los controles preseleccionados para “DESPERTAR CON LA RADIO” / “DESPERTAR
CON EL DISPOSITIVO USB” o el Selector de Función (13) en posición de apagado (OFF), pulse
el botón de Apagado Automático (4) y el botón de Ajuste de los Minutos (6) o Ajuste de las Horas
P. 6
(5) hasta que en la pantalla se visualice el tiempo deseado para el apagado automático de la
radio o del reproductor MP3 (o dispositivo USB). La reproducción continuará hasta el apagado
automático. Si desea apagar la radio o el reproductor MP3 (o dispositivo USB) antes de que
transcurra el tiempo preajustado para el apagado automático, pulse una vez el botón de Función
de Cabezada (7).
PRECAUCIONES
1. Para garantizar una ventilación adecuada, deje libre una distancia mínima alrededor del
aparato. No cubra las aberturas de ventilación con objetos como periódicos, manteles,
cortinas, etc.
2. No coloque el aparato en librerías o estanterías cerradas sin una ventilación adecuada.
3. No coloque encima del aparato objetos que emitan llamas (por ej.: velas encendidas).
4. No exponga el aparato a gotas ni salpicaduras ni coloque encima objetos que contengan
líquidos (por Ej.: vasos).
5. La etiqueta identificativa está situada en la parte inferior de la caja del aparato.
6. Para desconectar completamente el aparato, desenchúfelo de la toma de la red eléctrica.
7. Cuando deseche la pila, preste atención a los aspectos medioambientales.
8. No utilice el aparato en condiciones climáticas extremas
9. La sustitución inadecuada de la pila conlleva riesgo de explosión. Cambie la pila por otra del
mismo tipo o equivalente.
10. Las pilas no deben quedar expuestas a un calor excesivo como luz solar directa, fuego o
similares.
11. El compartimento USB sólo sirve para conectar dispositivos USB. No admite conexión con un
cable alargador USB y no ha sido diseñado para conexión directa al ordenador.
P. 7
LIMPIEZA
Limpie la caja con un paño suave humedecido con agua o detergente neutro. No utilice
productos químicos como alcohol, bencina o disolventes ya que podrían dañar el acabado.
Antes de efectuar la limpieza, asegúrese de desconectar el cable de alimentación de la toma de
la red eléctrica.
ESPECIFICACIONES TÉCNICAS
Voltaje nominal:
230V~ 50Hz
Pila (para mantenimiento de la hora): 1 pila de 9 V, tamaño 006P / PP3 / IEC 6F22 (no incluida)
Frecuencias de radio:
AM: 530 – 1600 kHz
FM: 88 – 108 MHz
Interfaz:
USB Versión 2.0
Debido a la mejora continua del producto, el diseño y las especificaciones pueden cambiar sin previo aviso
KVFESA S. COOP.
MIGUEL SERVET, 7
46015 VALENCIA
ESPAÑA
English
P. 8
AM/FM ALARM Clock Radio with USB Port
Model BRD-900-USB
Instruction Manual
FOR HOUSEHOLD AND INDOOR USE ONLY
Please read these instructions before use and retain for future reference
English
P. 9
LOCATION OF CONTROLS
19.
20.
21.
22.
23.
24.
25.
26.
27.
FM ANTENNA
ALARM SET
TIME SET
SLEEP SET
HOUR SET
MINUTE SET
SNOOZE CONTROL
CLOCK LED DISPLAY
TUNING CONTROL
28.
29.
30.
31.
32.
33.
USB PORT
AM/FM/USB SELECTOR
VOLUME CONTROL-BUZZ ON/OFF
FUNCTION SELECTOR (AUTO/OFF/ON)
PLAY/PAUSE
SKIP UP
34. SKIP DOWN
35. BATTERY DOOR
36. AUTO INDICATOR
English
P. 10
REAL TIME SETTING
4. Set the Function Selector (13) to”OFF”. Connect the mains lead to the power supply. The
clock display will flash on and off indicating a power interruption and that the displayed time is
incorrect.
5. To set the correct time, press the Time Set Button (3) and Hour Set Button (5), or Minute Set
Button (6), together, until the correct time is displayed.
6. Open the Battery Door (17) at the backside of the unit and put in a 6LR61 (or equivalent)
9-volt battery. The purpose of this battery is to store the information relating to alarm time and
to keep the clock functioning in the event of disconnection from the mains supply or power
interruption. Should this occur, the clock would continue to keep time, but will not display.
PLEASE NOTE: When operating from battery only, the clock will only remain accurate for a short
period of time. It is important that the mains supply is restored as soon as possible.
USB PLAYBACK
5. Open the USB lid and connect your MP3 player (or USB mass storage device) directly to
“USB PORT” (10) on the top panel.
6. Set “AM/FM/USB Selector” (11) to “USB” position.
7. Press “Play/Pause” (14) for playback function.
8. Press “SKIP UP
” (15) or “SKIP DOWN
” (16) to select your favorite track for playback.
Note :
- Do not put anything other than a USB drive into the compartment. Other objects may damage
the USB mechanism.
- Do not force the lid to open further than the mechanism allows.
- Keep the lid closed when not in use to prevent dirt and dust from entering the mechanism.
- The USB socket must not be connected to the computer directly, for that may damage the unit.
This unit might not support all the USB devices. Some old version USB devices can’t operate in
this unit.
RADIO OPERATION
For AM reception this unit uses an internal directional aerial, rotate the unit for best reception. For
FM reception, the wire FM Antenna (1) on the back of the unit should be fully unwound.
6. To turn the radio on, set the Function Selector (13) to the “ON” position.
7. Set the Waveband Selector (11) to the required waveband.
8. Adjust the Volume Control (12) to the desired listening level.
English
P. 11
9. Turn the Tuning Control (9) to the frequency of desired station.
10. To turn off the radio, set the Function Selector (13) to ”OFF”. If the radio does not switch off
this may be caused by inadvertent operation of the Sleep Set Button (4). To cancel this, press
the Snooze Button (7) once.
ALARM TIME SETTING
3. Press the Alarm Set Button (2) and simultaneously press the Hour Set Button (5) or Minute
Set Button (6) as appropriate until the required alarm time is reached.
4. To double check the alarm time, simply press the Alarm Set Button (2) then the display will
show the pre-set alarm time.
WAKE TO RADIO
Having selected your desired station and adjusted the desired listening level, proceed as follows:
6. Follow the instructions for “ALARM TIME SETTING” above.
7. When the desired alarm time has been selected, set the Function Selector (13) to the “AUTO”
position.
8. The radio will switch on automatically at the pre-set alarm time.
9. The alarm can be temporarily stopped for 9 minutes by pressing the Snooze Button (7) once.
To stop the alarm, press the Alarm Set button (2).
10. The alarm will activate again after 24 hours unless the Function Selector (13) is set to “OFF”.
WAKE TO BUZZER
7. Follow the instructions for “ALARM TIME SETTING” above.
8. When the desired alarm time has been selected, set the Function Selector (13) to the “AUTO
position.
9. Turn the Volume Control – Buzz On / Off (12) fully clockwise to select the BUZZ function.
10. The alarm tone will switch on automatically at the pre-set alarm time.
11. The alarm can be temporarily stopped for 9 minutes by pressing the Snooze Button (7) once.
To stop the alarm, press the Alarm Set button (2).
12. The alarm will activate again after 24 hours unless the Function Selector (13) is set to “OFF”
WAKE TO USB
1. Follow the instructions for “ALARM TIME SETTING” above.
2. When the desired alarm time has been selected, set the Function Selector (13) to the “AUTO”
position and set the AM/FM/USB Selector to the “USB” position.
3. Adjust the Volume Control (12) to desired volume level.
English
P. 12
4. The MP3 player (or USB mass storage device) will switch on automatically at the pre-set
alarm time.
5. The alarm can be temporarily stopped for 9 minutes by pressing the Snooze Button (7) once.
To stop the alarm, press the Alarm Set button (2).
6. The alarm will activate again after 24 hours unless the Function Selector (13) is set to “OFF”
SLEEP TO RADIO / USB
The radio or MP3 player (USB mass storage device) can be set to switch off automatically after a
period of time from 1 minute to 1 hour and 59 minutes, by following this procedure:Select your favorite radio station (for SLEEP to RADIO).
With all the controls pre-set in the “WAKE TO RADIO” / “WAKE TO USB”, or the Function
Selector (13) in the “OFF” position, depress the Sleep Set Button (4) and the Minute Set Button
(6), or Hour Set Button (5) until the display shows the exact sleep time you wish the radio or MP3
player (USB mass storage device) to continue to play before switch off. To switch off the radio or
MP3 player (USB mass storage device) before the end of the registered sleep time period,
simply press the Snooze Button (7) once.
CAUTION
12. Ensure minimum distances around the apparatus for sufficient ventilation. The ventilation
should not be impeded by covering the ventilation openings with items, such as newspapers,
table-cloths, curtains, etc.
13. Do not place the apparatus in closed bookcases or racks without proper ventilation.
14. No naked flame sources, such as lighted candles, should be placed on the apparatus.
15. It shall not be exposed to dripping or splashing and that no objects filled with liquids, such as
vases, shall be placed on the apparatus.
16. Marking plate is located at bottom enclosure of the apparatus.
17. Where the mains plug or an appliance coupler is used as the disconnect device, the
disconnect device shall remain readily operable.
18. Attention should be drawn to the environmental aspects of battery disposal.
19. The use of apparatus in moderate climates.
20. Danger of explosion if battery is incorrectly replaced. Replace only with the same or
equivalent type.
21. Batteries shall not be exposed to excessive heat such as sunshine, fire or the like.
22. The USB plot is for playing the USB devices only. It does not support connection with USB
extension cable and is not designed for communication with computer directly.
English
P. 13
CLEANING
Clean the cabinet with a soft cloth moistened with water or mild detergent. Do not use solvents
such as alcohol, benzene or thinner, as they may damage the cabinet finish. Make sure to
disconnect the mains lead from the supply before cleaning.
TECHNICAL SPECIFICATION
Rated voltage
230V~ 50Hz
Battery (for Clock Back-up) 1x9V Battery Size 006P / PP3 / IEC 6F22 (not included)
Radio frequency
AM 530 – 1600 kHz
FM 88 – 108 MHz
Interface
USB Version 2.0
Due to continuous product development, design and specifications are subject to change without notice.
KVFESA S. COOP.
MIGUEL SERVET, 7
46015 VALENCIA
ESPAÑA