1
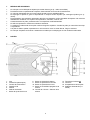
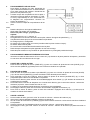
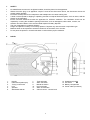
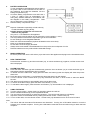
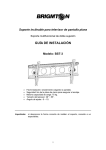
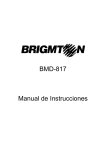
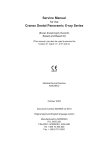
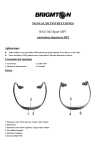
Radio con despertador
Modelo BT-237
Manual de Instrucciones
SÓLO PARA USO DOMÉSTICO Y EN INTERIORES
Lea este manual de instrucciones antes de utilizar el aparato y guárdelo para
futuras consultas
1.
MEDIDAS DE SEGURIDAD
•
•
•
•
•
•
No coloque encima del aparato objetos que emitan llamas (por ej.: velas encendidas).
Para desconectar completamente el aparato, desenchúfelo de la toma de la red eléctrica.
Un volumen demasiado alto en los auriculares puede provocar pérdida auditiva.
No exponga el aparato a gotas o salpicaduras ni coloque encima objetos que contengan líquidos (por ej.:
vasos).
Para garantizar una ventilación adecuada, deje libre una distancia mínima alrededor del aparato. No cubra las
aberturas de ventilación con objetos como periódicos, manteles, cortinas, etc.
Cuando deseche las pilas, preste atención a los aspectos medioambientales.
No utilice el aparato en condiciones climáticas extremas.
La sustitución inadecuada de las pilas conlleva riesgo de explosión. Cambie las pilas por otras del mismo tipo
o equivalente.
Las pilas no deben quedar expuestas a un calor excesivo como luz solar directa, fuego o similares.
No coloque el aparato en librerías o estanterías cerradas que no dispongan de una ventilación adecuada.
2.
PARTES
•
•
•
•
1.
2.
3.
4.
5.
6.
7.
Asa
Antena FM (telescópica)
Control de sintonización
Pantalla LCD
Altavoz
Selector de banda
Botón de ajuste de la hora
8.
9.
10.
11.
Botón de ajuste de la alarma
Botón de ajuste de los minutos
Botón de ajuste de las horas
Botón de encendido/ apagado de la
alarma
12. Control de volumen - Selector de la
alarma
2
13.
14.
15.
16.
Toma de auriculares
Toma AC
Compartimento de las pilas
Cable de alimentación (no
visible)
3.
3.1
3.2
FUNCIONAMIENTO DE LAS PILAS
Para utilizar el aparato con pilas, asegúrese de
que el cable de alimentación AC no esté insertado
en la parte posterior del aparato e introduzca las
pilas en el compartimento (15).
Levante la tapa del compartimento de las pilas e
introduzca 4 pilas al alcalinas, de tamaño “C” /UM2/ LR14 (o equivalentes) de 1,5 V, de acuerdo con
el diagrama del compartimento. Observe los
signos de polaridad (+/ -).
Vuelva a colocar la tapa del compartimento de las
pilas.
Nota:
•
Deseche las pilas en los lugares habilitados al
efecto para que puedan ser recicladas.
•
NO tire las pilas al fuego, ya que podrían
explotar.
•
Utilice sólo pilas de 1,5 V y tamaño “C”.
•
Para garantizar una correcta colocación de las pilas, observe los signos de polaridad (+ y -).
•
Use pilas del mismo tipo que las recomendadas o equivalente.
•
No recargue pilas no recargables.
•
No mezcle nunca pilas viejas con nuevas (cambie todas las pilas al mismo tiempo).
•
No intente desmontar las pilas.
•
No cortocircuite los terminales de alimentación de las pilas.
•
Retire siempre del aparato las pilas agotadas. No las eche al fuego.
•
Retire las pilas cuando no vaya a utilizar el aparato durante un prolongado periodo de tiempo.
4.
FUNCIONAMIENTO MEDIANTE ENERGÍA ELÉCTRICA
Introduzca el cable de alimentación AC en la toma AC (14) situada en la parte posterior del aparato y enchúfelo
en una toma de la red eléctrica de su hogar.
5.
AJUSTE DE LA HORA ACTUAL
Pulse el botón de ajuste de la hora (TIME SET) (7) junto con el botón de ajuste de las horas (HOUR) (10) o
de los minutos (MINUTE) (9) hasta que la hora correcta se visualice en la pantalla.
6.
6.1
FUNCIÓN DE ALARMA
Pulse el botón de ajuste de la alarma (ALARM SET) (8) junto con el botón de ajuste de las horas (HOUR)
(10) o de los minutos (MINUTE) (9) hasta visualizar la hora deseada para la alarma.
Para comprobar la hora de la alarma, pulse el botón de ajuste de la alarma (ALARM SET) (8). La hora
preajustada para la alarma se visualizará en la pantalla.
Para activar la alarma, pulse el botón de encendido/apagado de la alarma (11). (El símbolo de la alarma se
visualizará en la pantalla).
Para seleccionar la función de despertar con el sonido de la alarma, gire el control de volumen - selector de
la alarma (12) hacia “menos” hasta escuchar un “clic”.
La alarma se encenderá automáticamente al cumplirse la hora preajustada.
Para apagar la alarma, pulse una vez el botón de encendido / apagado de la alarma (11).
Para volver a activar la alarma, pulse el botón de encendido / apagado de la alarma (11) hasta que se
visualice el símbolo de la alarma.
6.2
6.3
6.4
6.5
6.6
6.7
7.
7.1
7.2
7.3
7.4
7.5
USO DE LA RADIO
Para encender la radio, gire hacia “más” el control de volumen - selector de la alarma (12).
Seleccione la banda deseada mediante el selector de banda (6).
Gire el control de sintonización (TUNING) (3) para seleccionar la frecuencia. La frecuencia actual se visualizará
en la pantalla.
Ajuste el volumen al nivel deseado girando el control de volumen - selector de la alarma (12).
Para apagar la radio, gire hacia “menos” el control de volumen - selector de la alarma (12) hasta escuchar un
“clic”.
3
Nota
•
La antena interna AM y la externa FM son direccionales. Si sintoniza una emisora en FM extienda o mueva la
antena (2) para mejorar la recepción. Si sintoniza una emisora en AM gire el aparato para obtener una mejor
recepción.
8.
USO DE AURICULARES (no incluidos)
Este aparato dispone de toma de auriculares para poder escuchar la radio sin molestar a los demás. Conecte
la clavija de los auriculares de 3,5mm en el punto marcado con el símbolo ‘ ’. Baje el volumen al mínimo y
después ajústelo al nivel deseado. Un sonido demasiado alto puede provocar pérdida auditiva. Cuando los
auriculares estén conectados, el sonido procedente de los altavoces se anulará.
9.
CUIDADOS y MANTENIMIENTO
Limpie la cubierta exterior con un paño suave. Si la cubierta está muy sucia, desenchufe el aparato de la
toma de la red eléctrica y use un paño humedecido con agua y una solución limpiadora de jabón neutro. Deje
que el aparato se seque antes de volver a utilizarlo.
10.
ESPECIFICACIONES TÉCNICAS
Voltaje nominal
230 V~ 50 Hz
Pilas
4 pilas de 1,5 V y tamaño “C”/UM-2/LR14 (no incluidas)
Frecuencias de radio
AM: 530 - 1600 kHz
FM: 88 - 108 MHz
Debido a la continua mejora del producto, el diseño y las especificaciones pueden cambiar sin previo aviso.
KVFESA S. COOP.
MIGUEL SERVET, 7
46015 VALENCIA
ESPAÑA
4
Portable Radio with Alarm Clock
Model BT-237
Instruction Manual
FOR HOUSEHOLD AND INDOOR USE ONLY
Please read these instructions before use and retain for future reference
6
1.
SAFETY
•
•
•
•
•
•
•
No naked flame sources such as lighted candles, should be placed on the apparatus.
Where the mains plug or an appliance coupler is used as the disconnect device, the disconnect device will
remain readily operable.
Excessive sound pressure from earphones and headphones can cause hearing loss.
It shall not be exposed to dripping or splashing and that no objects filled with liquids, such as vases, shall be
placed on the apparatus.
Ensure minimum distances around the apparatus for sufficient ventilation. The ventilation should not be
impeded by covering the ventilation openings with items, such as newspapers, table-cloths, curtains, etc.
Attention should be drawn to the environmental aspects of battery disposal.
The use of apparatus in moderate climates.
Danger of explosion if battery is incorrectly replaced. Replace only with the same or equivalent type.
Batteries shall not be exposed to excessive heat such as sunshine, fire or the like.
Do not place the product in closed bookcases or racks without proper ventilation.
3.
PARTS
•
•
•
1.
2.
3.
4.
5.
6.
Handle
FM antenna (telescopic)
Tuning control knob
LCD
Speaker
Waveband selector
7.
8.
9.
10.
11.
12.
Time set button
Alarm set button
Minute set button
Hour set button
Alarm on/off button
Volume control - buzzer knob
7
13.
14.
15.
16.
Headphone jack
AC socket
Battery compartment
Power cable (not shown)
3.
3.3
3.4
BATTERY OPERATION
To use the appliance with batteries ensure that the
AC power cord is NOT inserted into the back of
the appliance and install the batteries into the
battery compartment (15).
Lift off the battery compartment cover and insert 4
x Size “C” /UM-2/ LR14 (or equipvalent) 1.5V
heavy-duty alkaline batteries in accordance with
the diagram in the battery compartment. Take
care to observe the correct polarity (+/ -).
Refit the battery compartment cover.
Note
•
Dispose of batteries responsibly at local authority
household waste recycling facility.
•
DO NOT dispose of batteries in a fire as the
batteries may explode.
•
Only use ‘C’ 1.5V batteries in this appliance.
•
Be sure to insert correctly taking care to observe the correct polarity (+ and -).
•
Use only batteries of the same or equivalent type as recommended.
•
Do not recharge non-rechargeable batteries.
•
Never mix old and new batteries (replace all batteries at the same time).
•
Never try to dismantle batteries.
•
Do not short circuit the supply terminals.
•
Always remove exhausted or dead batteries from the product, do not dispose of in fire.
•
Remove batteries from the product before extended storage.
4.
MAINS OPERATION
Fit the AC power cord into the AC socket (14) at the back of the appliance and plug into the household socket.
5.
REAL TIME SETTING
Press the time set button (7) and hour set button (10), or minute set button (9), together, until the correct clock
time is displayed.
6.
6.8
6.12
6.13
6.14
ALARM FUNCTION
Press the alarm set button (8) and simultaneously press the hour set button (10) or minute set button (9) as
appropriate until the required alarm time is reached.
To double check the alarm time, simply press the alarm set button (8) then the display will show the pre-set
alarm time.
Press the alarm on/off button (11) to activate the alarm (the alarm icon will display).
Turn the volume control –buzzer knob (12) fully downward until hear a “click” sound to select the BUZZ
function.
The alarm tone will switch on automatically at the pre-set alarm time.
To switch off the alarm simply press the alarm on/off button (11) once.
To activate the alarm again, press the alarm on/off button (11) until the alarm icon is displayed.
7.
7.6
7.7
7.8
7.9
7.10
USING THE RADIO
Turn the volume control – buzzer knob (12) upward to switch the radio on.
Set the waveband selector (6) to the required waveband.
Turn the tuning control knob (3) to select the frequency. The current radio frequency will display.
Adjust the volume to the desired level by rotating the volume control – buzzer knob (12).
To turn off the radio, turn the volume control – buzzer knob (12) downward until a “click” sound is heard.
6.9
6.10
6.11
Note
•
The built-in AM and the external FM antennas are directional. If tuning into a FM station extend or move the
antenna (2) for a better reception. If tuning into a AM station rotate the whole unit after tuning to obtain the best
reception.
8
8.
USING HEADPHONES (not included)
A headphone jack has been provided so that the set can be used without disturbing others. Plug in the 3.5mm
headphones at the point marked ‘ ’. Turn the listening volume to the lowest setting before adjusting the
volume up to your chosen level. Excessive sound pressure from earphones and headphones can cause
hearing loss. The speakers will not operate when headphones are fitted.
9.
CARE AND MAINTENANCE
Wipe external surfaces with a soft cloth. If the casing is very dirty, unplug from the mains supply and use a
damp cloth soaked in a weak solution of washing up liquid and water. Allow to dry thoroughly before reusing.
10.
TECHNICAL SPECIFICATION
Rated voltage
Batteries
Radio frequency
230V~ 50Hz
4 x 1.5V Battery size “C”/UM-2/LR14 (not included)
AM 530 – 1600 kHz
FM 88 – 108 MHz
Due to continuous product development, design and specifications are subject to change without notice.
KVFESA S. COOP.
MIGUEL SERVET, 7
46015 VALENCIA
ESPAÑA
9