1
INSTRUCTION MANUAL
9. Connecttheexteriorsideoftheremaininggrommetto
thegrommetonthelidofthereservoirwithalengthof
½"tubing.
10. Optional:Reducereturnflowrelatednoisefrom
reservoirbyconnectingtheinteriorsideofthe
grommettoalengthof½"tubinglongenoughtoend
justabovethebottomofthereservoir.
11. Attach6to48bucketswithtubingtotheoutletsnear
thebottomofthecontrollerbucket.Note:Ifaneven
numberofoutletsisleftunused,connectthemto
eachotherwithapieceoftubing.Foraloneoutlet
leftunused,putashortpieceoftubingonitandcrimp
itshut,preferablywithaziptie.Anevendistribution
ofbucketsperoutletdecreasesfill/draintimeand
increasesthesystem’seffi
ciency.
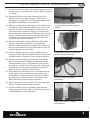
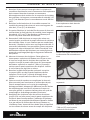
Install straight connectors
symmetrically around container
and lid
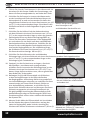
12. Measurethebuckets’height.Slidetheupperfloat
switchesupordownthepolesinthecontroller
bucketsothatthestopfortheupperfloatswitchisat
least3inchesbelowthetopofthebucket.Aruleror
measuringtapemaybehelpful.
13. Plugthesystem’spowercordintoapowersource.
ThegreenLEDonthefrontrightmarked“DrainCycle”
shouldcomeon.Thetimerissettodrainbydefault.
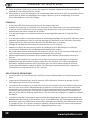
Submersible pump directly below
barbed straight connector
14. Testthesystembyfillingthereservoirwithregular
water(nonutrientsormedia).Setthetimertothe
desiredfill/draincycle.Tosetfilltimes,pulloutthe
increments–whichare15minuteseach–withapen
orfingernail.Letthesystemcompleteonefilland
draincycleforadurationof30minutes.
15. Fillbucketswithmediauptooneinchbelowthetop
ofthebucket.WerecommendusingHydrotonfor
itsbeneficialaerationproperties.Besuretochoose
mediathatwon’tfloatorsoak.RinsemediainpH
balancedwaterpriortofillingthebuckets.
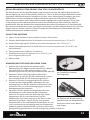
Unused outlets connected
with tubing
16. Placetransplantsnolessthan3"fromthetopofthe
bucket,toallowwatertofeedtheroots.
17. Setdrainandfillcyclesasneeded.Largerbuckets
requirelongerfilltimes.Afterthefillcycle,thesystem
willdefaultbacktothedraincycle.
Upper float switch 3" below
top of bucket
3