1
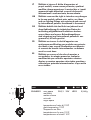
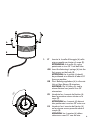
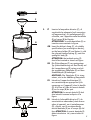
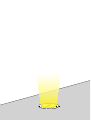
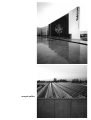
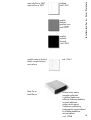
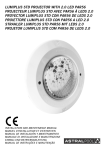
Viabizzuno progettiamo la luce For m istruzioni di montaggio installing instructions Al v al in e Gebrauchsanweisung instructions de montage instrucciones de montaje m44 12V IT AVVERTENZE: All’atto dell’installazione, ed ogni volta che si interviene sulla lampada, assicurarsi che sia stata tolta la tensione di alimentazione. Le operazioni di installazione e collegamento alla rete elettrica devono essere effettuate esclusivamente da personale qualificato. GB WARNING: When installing fixture and during unkeep take care that the mains voltage is switched off. The operations of installation and connection to power mains should be done by skilled personnel only. DE HINWEISE: Während der Installation und bei allen nachfolgenden Arbeiten auf der Lampe sollte sichergestellt werden, daß die Versorgungsspannung vorher abgenommen wurde. Die Arbeiten zur Installation und zum Anschluss an das Stromnetz sind von Fachpersonal durchzuführen. FR AVVERTISSEMENTS: Lors de l’installation et à chaque fois que l’on fait un entretien sur la lampe, s’assurer que la tension d’alimentation ait été coupée. Les opérations d’installation et de branchement au réseau électrique doivent être effectuées par un personnel qualifié. ES ADVERTENCIA: Durante la instalación, y cada ve que se interviene sobre la lámpara, asegurarse que la alimentación haya sido desconectada. Las operaciones de instalación y conexión a la red eléctrica tienen que ser efectuadas exclusivamente por personal cualificado. IT ATTENZIONE: La sicurezza dell’apparecchio è garantita solo rispettando queste istruzioni sia in fase di installazione che di impiego. GB WARNING: Fitting safety is only guaranteed if the following instructionsare strictly observed both during installation and use. DE ACHTUNG: Für die Sicherheit des Geräts kann nur dann die Garantie übernommen werden, wenn die in den vorliegenden Anweisungen enthaltenen Hinweise sowohl bei der Installation als auch beim Betrieb beachtet werden. FR ATTENTION: La sécurité de l’appareil n’est assurée que lorsque les consignes portées sont respectées, tant lors de l’installation que durant l’utilisation de l’appareil. ES ATENCIÓN: La seguridad del aparato está garantizada sólo si se respetan estas instrucciones durante la fase de instalación y de empleo. 2 SDM-110511-06142-3 IT garanzia GB warranty DE garantie FR garantie ES garantía IT La presente garanzia è valida 24 mesi se timbrata e datata dal rivenditore autorizzato Viabizzuno. Il periodo di garanzia è di 2 anni a partire dalla data della timbratura e decade in caso di uso improprio, manomissione o cancellatura della data, perdita o illeggibilità del presente libretto di istruzioni. GB The warranty covers 24 months if stamped and dated by the authorised Viabizzuno dealer. The 24 months warranty shall no apply in case of wrong use, altered or deleted date, or if this instructions booklet gets lost or becomes unreadable. DE Die Garantie gilt 24 Monate nur, wenn sie von dem zugelassenen Verkäufer Viabizzuno gestempelt wird. Die Garantie gilt 2 Jahr seit dem Stempeldatum und verfällt bei unberechtigten Gebrauch, Manipulation des Datums, Verlust oder Unlesbarkeit von den Gebrauchsanweisungen. FR La durée de la garantie est de 24 mois si elle est marquée par le distributer autorisé Viabizzuno. La garantie est valable 2 ans depuis le jour où elle a été marquée et échoit en cas d’usage impropre, alteration ou effacement de la date, e si le carnet d’instructions est perdu ou est indéchiffrable. ES Esta garantìa es valida por 24 meses sòlo si està datada y sellada por el revendedor autorizado Viabizzuno. El período de garantía es de 2 años a partir de la fecha del sello, y decae en caso de empleo impropio, alteración o borrado de la fecha, pérdida o ilegibilidad del presente manual de instrucciones 3 IT Viabizzuno si riserva il diritto di apportare ai propri modelli, senza nessun preavviso, qualsiasi modifica ritenga opportuna. le nostre idee e i nostri apparecchi sono depositati e coperti da brevetti internazionali. uomo avvisato, mezzo salvato. GB Viabizzuno reserves the right to introduce any changes to its own models, without prior notice. our ideas and our lighting fittings are registered and covered by international patents. forewarned is forearmed. DE Viabizzuno bahält sich das Recht vor jederzeit und ohne Ankündigung die technischen Daten der im Katalog abgebildetem Produkte zu ändern. unsere Ideen und unsere Beleuchtungskörper sind eingetragt und international patentiert. wer gewarnt ist, ist halb gerettet FR Viabizzuno se réserve le droit d’apporter une quelconque modification aux produits sans préavis. nos ideés et nos corps d’illumination sont déposés et couverts de brevets internationales. un homme averti en vaut deux. ES Viabizzuno se reserva el derecho de aportar a sus modelos, sin ningùn preavviso, cualquier modificación que considere oportuna. nuestros diseños y nuestros aparatos están todos provistos y cubiertos por patentes internacionales. el que avisa no es traidor. 0,3 m 0,5 m T K AT K A L A T K AT K L 0,3 m 0,5 m K T A K T A 0,3 m 0,5 m 121 100 Ø90 m44 F6.044.01 12V K T A K T A nero opaco GU5,3 mat black mattes schwarz noir mât negro opaco 35W temperatura sul vetro di 110°C glass temperature 110°C Temperatur am Glas température sur le verre 110°C temperatura en el cristal 110°C L IP67 HRGS ® ® ® 0,56 Kg ® ® ® 4 2,5 15 F6.044.81 borchia tonda alluminio anodizzato opaco anodised mat aluminium round bezel runde Abdeckung aus eloxirtem matter Aluminium enjoliveur rond anodizé mât aluminium borde redondo aluminio anodizado opaco F6.044.82 borchia quadrata alluminio anodizzato opaco anodised mat aluminium square bezel quadratische Abdeckung aus eloxirtem matter Aluminium enjoliveur carré anodizé mât aluminium borde cuadrado aluminio anodizado opaco F6.044.84 borchia quadrata alluminio anodizzato opaco vetro quadrato anodised mat aluminium square bezel square glass quadratische Abdeckung aus eloxirtem matter Quadratisches Glas Aluminium enjoliveur carré anodizé mât aluminium Verre carré borde cuadrado aluminio anodizado opaco cristal cuadrado Ø100 2 15 Ø75 100 2 15 100 Ø75 100 60 100 60 5 A B 90 ° 1. IT Inserire le 4 molle di fissaggio (A) nella prima scanalatura situata sul corpo (B). ATTENZIONE: le 4 molle (A) vanno posizionate a circa 90° l’una dall’altra. GB Insert the fastening 4 springs (A) into the first groove on the body (B). ATTENTION: the 4 springs (A should be positioned at a distance of about 90° from one another. DE Die 4 Befestigungsfedern (A) in die erste Nut auf dem Körper (B) einsetzen. ACHTUNG: Die 4 Federn (A) sind in einem Abstand von jeweils circa 90° einzusetzen. FR Introduire les 4 ressorts de fixation (A) dans la première rainure située sur le corps (B). ATTENTION: les 4 ressorts (A) doivent être positionnés à environ 90° entre eux. ES Introducir los 4 resortes de fijación (A) en la primera ranura presente sobre el cuerpo (B). ATENCIÓN: los 4 resortes (A) deben colocarse a unos 90º uno del otro. 6 E C D B 2. IT Inserire la lampadina dicroica (C), di caratteristiche adeguate [vedi marcatura sull’apparecchio], sul portalampada (D) e fissarla, con l’apposita molla dentellata (E) sul corpo (B) del faretto. ATTENZIONE: la molla dentellata (E) va inserita come mostrato in figura. GB Insert the dichroic lamp (C), of suitable specifications [see markings on device], on the lamp holder (D) and fasten it, with the relevant toothed spring (E), onto the spotlight’s body (B). ATTENTION: the toothed spring (E) should be inserted as shown on figure. DE Die Dichroitlampe (C) von geeignetem Typ [siehe Markierung auf dem Gerät] auf die Lampenfassung (D) setzen und mit der zugehörigen Zahnfeder (E) auf dem Strahlerkörper (B) befestigen. ACHTUNG: Die Zahnfeder (E) ist einzusetzen, wie in der Abbildung dargestellt. FR Introduire l’ampoule dichroïque (C), aux caractéristiques appropriées [voir marquage sur l’appareil], dans la douille (D) et la fixer à l’aide du ressort dentelé (E) sur le corps (B) du spot. ATTENTION: le ressort dentelé (E) doit être introduit comme indiqué sur la figure. ES Introducir la bombilla dicroica (C), de características adecuadas [véase marca sobre el aparato], en el portalámparas (D) y fijarla, con el correspondiente resorte dentado (E) en el cuerpo (B) del foco.ATENCIÓN: el resorte dentado (E) debe introducirse tal y como indica la figura. 7 3. F IT Collegare, con giunzione adatta al luogo di installazione, i cavi di alimentazione del trasformatore con i cavi (F) predisposti sul faretto. GB Connect the transformer’s power cables, with connection suitable to the installation site, to the cables (F) on the spotlight. DE Die Stromkabel des Transformators mit Hilfe einer für den Installationsort geeigneten Verbindung an die auf dem Strahler vorhandenen Kabel (F) anschließen. FR Brancher, avec un raccord approprié au lieu d’installation, les câbles d’alimentation du transformateur avec les câbles (F) prévus sur le spot. ES Conectar, utlizando acoplamientos adecuados según el lugar de instalación, los cables de alimentación del transformador a los cables (F) que se encuentran sobre el foco. IP67 8 4. 20° G 355° 20° IT Inserie il corpo (B) nella cassaforma precedentemente montata e orientare il faretto (G) a piacimento. Assicurarsi che il pressacavo non sia ancora serrato. ATTENZIONE: eseguire l’orientamento a faretto spento. GB Insert the body (B) into the previously fitted wallbox and direct the spotlight (G) according to one’s requirements. Make sure that the lead retainer has not been tightened yet. ATTENTION: direct the spotlight when it is off. DE Den Körper (B) in die zuvor montierte Schalung einsetzen und den Strahler (G) nach Belieben ausrichten. Sicherstellen, dass die Kabelklemme noch nicht angezogen ist. ACHTUNG: Die Ausrichtung muss bei ausgeschaltetem Strahler erfolgen. FR Introduire le corps (B) dans la boîte précédemment montée et orienter le spot (G). Vérifier que le presse-fil n’est pas encore serré. ATTENTION: orienter le spot lorsqu’il est éteint. ES Introducir el cuerpo (B) en el encofrado previamente montado y orientar el foco (G) según se desee. Asegurarse de que el prensacable no esté todavía apretado. ATENCIÓN: efectuar la orientación con foco apagado. 20° B 9 5. L H IT Accendere il faretto per verificare l’orientamento del fascio luminoso. Trovata la giusta posizione, stringere la ghiera (H) infilando un cacciavite nell’apposito foro (L) e serrare il grano (M). GB Turn on the spotlight to check how the light beam was directed. Once in the right position, tighten the ring nut (H) by introducing a screwdriver into the relative hole (L) and tightening the dowel (M). DE Den Strahler einschalten, um die Ausrichtung des Lichtstrahls zu überprüfen. Nach Einstellung der richtigen Position durch Einführen eines Schraubenziehers in das vorgesehene Loch (L) und Anziehen des Stiftes (M) die Ringmutter (H) festschrauben. FR Allumer le spot pour vérifier l’orientation du faisceau lumineux. Une fois la position souhaitée atteinte, serrer l’embout (H) en introduisant un tournevis dans le trou (L) puis serrer le goujon (M). ES Encender el foco para comprobar la orientación del haz del luz. Una vez encontrada la posición correcta, apretar la tuerca (H) introduciendo un destornillador en el orificio al efecto (L) y apretar el pasador (M). M L 10 6. IT Accendere il faretto ed attendere almeno 5 minuti per evitare possibili condense all’interno di esso. GB Turn on the spotlight and wait for at least 5 minutes, in order to avoid any possible condensate formation inside the spotlight. DE Den Strahler einschalten und mindestens 5 Minuten warten, damit sich kein Kondensat im Inneren des Strahlers bildet. FR Allumer le spot et attendre au moins 5 minutes pour éviter la condensation à l’intérieur du spot. ES Encender el foco y esperar por lo menos 5 minutos para evitar posibles condensaciones en el interior del foco. 11 7. OK IT Spegnere il faretto ed estrarlo dalla cassaforma. Assicurarsi che sul filetto della borchia (N) e su quello del corpo (B) non ci siano impurità, quindi serrare energicamente fino a fine corsa la borchia. ATTENZIONE se la borchia non viene serrata in maniera corretta non è garantita la protezione IP. Non rimuovere l’olio presente sull’or di tenuta; garantisce un miglior funzionamento dello stesso in fase di manutenzione. Reinserire il faretto nell’apposita sede. In fase di manutenzione, lo svitamento della borchia potrebbe risultare difficoltoso. E’ possibile aiutarsi con un cacciavite grazie ai fori (O) disposti sul bordo esterno. NO Q R E 12 GB Turn off the spotlight and remove it from the wallbox. make sure there is no debris in the threads of either the bezel (N) or the body of the fitting (B), then screw the bezel on firmly as far as it will go. PLEASE NOTE if the bezel is not screwed on correctly, the IP protection cannot be guaranteed. Do not remove the oil from the O-ring; this ensures that it works more effectively during maintenance. During maintenance unscrewing the boss may be difficult. If necessary, make use of a screwdriver thanks to the holes (O) on the lamp’s outer edge. DE Den Strahler ausschalten und aus der Schalung nehmen. Sich vergewissern, dass auf dem Gewinde der Abdeckung (N) und dem des Lampenkörpers (B) keine Verunreinigungen sind, dann die Abdeckung kräftig bis zum Anschlag anziehen. ACHTUNG: Wenn die Abdeckung nicht richtig festgezogen wird, ist die IP-Schutzart nicht garantiert. Das Öl auf dem Dichtring nicht entfernen, es gewährleistet ein besseres Funktionieren bei der Wartung. Den Strahler wieder einsetzen.Bei der Wartung kann sich das Abschrauben des Beschlags als schwierig herausstellen. Es kann mit Hilfe eines Schraubenziehers anhand der auf dem Außenrand angebrachten Löcher (O) erleichtert werden. 13 FR ES Eteindre le spot et l’extraire de la boîte. s’assurer de l’absence de saletés sur le filetage de la garniture (N) et sur celui du corps (B) puis serrer énergiquement jusqu’à ce que la garniture soit en fin de course. ATTENTION: en cas de mauvais serrage de la garniture, la protection IP n’est pas garantie. ne pas éliminer l’huile présente sur le joint torique de tenue: elle permet un meilleur fonctionnement lors des opérations d’entretien. Visser la garniture et serrer le presse-fil. Durant la phase d’entretien, dévisser la garniture peut se révéler difficile. Il est possible de s’aider d’un tournevis à introduire dans les trous (O) disposés sur le bord externe. Apagar el foco y extraerlo del encofrado. Después de asegurarse de que no halla impurezas ni en el borde del embellecedor (N) ni en el del cuerpo (B), cerrar enérgicamente el embellecedor hasta el tope. ATENCIÓN: la protección IP no se garantiza si el embellecedor no se cierra correctamente. No eliminar el aceite del anillo de estanqueidad or; garantiza un mejor funcionamiento del mismo durante el mantenimiento. Enroscar el resalto elegido y apretar el prensacable. Durante el mantenimiento, podría ser difícil enroscar el resalto. Es posible ayudarse con un destornillador gracias a los orificios (O) situados sobre el borde exterior. 14 15 IT smaltimento dell’apparecchio GB equipment disposal entsorgung des geräts FR elimination de l’appareil 0,5 m ES IT L ® 0,3 m DE eliminación del aparato A fine vita l’apparecchio di illuminazione un rifiuto che rientra nella categoria Raee (Rifiuto di Apparecchiatura Elettrica ed Elettronica), pertanto non deve essere smaltito come un rifiuto municipale misto ma deve essere smaltito correttamente per evitare danni all’ambiente, alle persone e agli animali, ed evitare lo spreco di materiali riciclabili. E’ possibile consegnare il vecchio apparecchio al venditore nel momento in cui si acquista un nuovo apparecchio di illuminazione, oppure portare l’apparecchio nelle aree pubbliche di raccolta predisposte dalle amministrazioni comunali, o depositarlo negli appositi contenitori. GB At the end of the its life cycle, the light fixture should be considered as a Weee (Waste of electrical and electronic equipment) category waste, therefore it should be disposed of not as generic municipal waste, but properly in order to avoid damages to the environment, people and animals, and to avoid any waste of recyclable materials.When ordering a new light fixture, the customer may give back his/her old one to the seller, or bring it to the public collection sites arranged by the municipal authorities, or simply put it in special collection containers. DE Am Ende der Lebensdauer ist das Gerät als Elektro- und Elektronik-Altgerät (ElektroG) zu behandeln und darf daher nicht zum Restmüll gegeben, sondern muss korrekt entsorgt werden, um die Schädigung von Umwelt, Personen und Tieren sowie die Verschwendung recycelbarer Materialien zu vermeiden. Das ausgediente Gerät kann beim Kauf eines neuen Gerätes beim Händler abgegeben oder zu einer öffentlichen Sammelstelle gebracht bzw. in den dafür vorgesehenen Behältern deponiert werden. FR A la fin de sa durée de vie, l’appareil d’éclairage est un déchet qui entre dans la catégorie DEEE (Déchets des Equipements Electriques et Electroniques) ; il ne doit donc pas être éliminé comme un déchet municipal mixte mais correctement pour éviter tout dommage à l’environnement, aux personnes et aux animaux, et éviter le gaspillage de matériaux recyclables. Il est possible de remettre le vieil appareil au vendeur lorsque l’on achète un nouvel appareil d’éclairage, ou de porter l’appareil dans les aires publiques de collecte prévues par les administrations communales, ou de le déposer dans les contenants prévus à cet effet. ES Al final de su vida, el aparato de iluminación es un residuo que está incluido en la categoría Raee (Residuo de aparatos eléctricos y electrónicos), por lo tanto no tiene que eliminarse como un residuo urbano mixto, sino que tiene que eliminarse de forma correcta para evitar daños al medio ambiente, a las personas y los animales, y para evitar el derroche de materiales reciclables. ® Es posible entregare el aparato antiguo al vendedor en el momento en qué se compre un aparato de iluminación nuevo, o bien llevar el aparato a la zona públicas de recogida preparadas por las administraciones municipales, o depositarlo en los contenedores al efecto. 16 0,3 m IT Apparecchi idonei al montaggio diretto su superfici normalmente infiammabili GB Luminaries suitable for direct mounting on ®flamable surfaces DE Geeignet fuer direkt Einbau auf entzuenlichen Oberflaechen FR Appareil predisposè à un montage direct sur une superficie normalment inflamable ES Aparatos adecuados para el montaje directo sobre superficies normalmente inflamables 0,5 m K KIT T A T A L ® indice marcature GB marking index DE Kennzeichnenverzeichniss FR index de marquage ES indice de marcado IT GB DE FR ES Trasformatore escluso Transformer not included Trafo nicht mitgeliefert Sans transformsateur Transformador excluido K TIT K T A IP67 0,3 m L A A K T A HRGS ® Apparecchio totalmente protetto contro la polvere e stagno all’immersione. GB Dust-tight and watertight. DE Gerät staubdicht und geschützt gegen das Untertauchen. FR Appareil totalement protégé contre la poussière et étanche. ES Aparato totalmente protegido contra el polvo y estanco a la sumersión. T 0,5 m classe 3 (alimentazione effettuata con bassissima tensione di sicurezza; sono escluse tensioni superiori a 50 V- 50Hz. Messa a terra non prevista. ® GB class 3 (very low safety supply tension; not to be used over 50V50Hz. Earthing excluded). DE Klasse 3 (Versorgung mit Niederspannung. Spannung Höher als 50v-50 Hz.sind völling ausgeschlossen. Schutzerdund nicht vorgeschriben). FR class 3 (alimentation de sècuritè à basse tension. ne doit en aucun cas êntre utilisèe pour des tensions supèrieures à 50V-50Hz. Mise à la terre: excluse). ES Clase 3 (alimentación realizada con voltaje bajísimo de seguridad; ® ® voltajes superiores a 50V-50Hz quedan excluidos. Puesta a tierra no prevista). IT K L IT lampadina ad alogeni con riflettore dicroico autoprotetto GB halogen lamp with self-protected dichroic reflector DE Halogenlampe mit selbstgeschütztem Dichroit-Reflektor. FR lampe à halogènes avec réflecteur dichroïque autoprotégé ES Lámpara halógena con reflector dicroico de auto-protección. IT ® prodotto conforme alle direttive europee GB produced in compliance with EC directives DE Gebaut gemaeß EG-Vorschriften FR produit conforme aux Directives de la Comunautè Européenne ES Producto conforme con las directivas europeas 17 chi siamo Viabizzuno strada principale della frazione Bizzuno in provincia di ravenna dove tra la casa del popolo e la parrocchia, al n°17, sono nato il ventuno luglio millenovecentocinquantacinque. mn Viabizzuno raccoglie attorno a sé esperienza, conoscenza e ricerca per poter meglio esprimere il proprio ‘modo di fare luce’. il pensiero progettuale di Viabizzuno si identifica in una pagina bianca. due linee di prodotti complementari occupano questo spazio esplorandolo, dilatandolo: si incrociano forti della propria identità, due anime rappresentate dalle collezioni For m e Alvaline. inoltre sviluppa e realizza apparecchi di illuminazione speciali e su misura. è fondamentale che il progetto sia stimolante e che l’ interlocutore sia preparato a una progettazione complessa, che richiede tempo progettiamo la luce a 360°. e impegno. Viabizzuno is the name of the main road of the small village Bizzuno, located in the province of ravenna, where I was born on the 21st of july 1955 at n°17, between the “casa del popolo” and the local parish church. mn Viabizzuno channels together experience, knowledge and research to express its “way of making light” as best as possible. Viabizzuno planning concepts are exalted when posed before a blank page; two complementary product lines occupy the space by exploring it and expanding it. they entwine together without vanishing thanks to their clear-cut identity. distinct yet complementary just like the two souls represented by the two Viabizzuno collections For m and Alvaline. it designs and produces special and custom-made lighting equipment too. it is essential that the project is stimulating and that the other party is prepared for a complex design process, requiring time and commitment. we design ligh at 360°. energia pulita For m For m divide lo spazio verticalmente: equilibrata, razionale, rigorosa. il corpo illuminante evolve nella sua funzione di fare luce: il suo uso é sempre più flessibile e la sua capacità di fondersi con l’architettura ne fa un vero materiale da costruzione, attraverso un design non invasivo, non mimetico, non sfacciatamente decorativo. i corpi illuminanti si ritraggono nelle pareti, a filo intonaco, a scomparsa, nascosti alla vista lasciando piena soggettività alla luce. il grigio dei materiali come cemento, alluminio, acciaio é il colore della collezione For m. For m divides space vertically. it is balanced, rational and rigorous. the lighting element is an evolution in the way that light is shed: its way of being used becomes evermore flexible and its capacity of blending with the surrounding architecture makes it a true building material, thanks to its nonintrusive yet non-mimetic design, which is not brazenly decorative. the recessed lighting elements retract into the wall, grazing against the plaster to hide away from sight and leave the whole scene to the light. the gray of materials like cement, aluminium, and steel is the 20 colour of the For m collection. italiano cod.19091 italiano cod.19091 english english français français ÛÒÒÍËÈ flÁ˚Í cod.19092 cod.19092 english español english deutsch español cod.19093 deutsch cod.19093 cartella colori e finiture folder sample finishes and colours la letteratura For m - For m literature manuale For m 2007/2008 manual For mmanuale 2007/2008 For m 2007 Katalogen Formanual m 2007/2008 For m 2007 cod. 19941 cartella colori e finiture folder sample finishes cod. 19941 libro For m book For m libro For m book For m Buch For m autore mario nanni progetto editoriale e grafico Viabizzuno edito da Viabizzunoeditore autore mario nanni seconda edizione progetto editoriale author mario nanni e grafico Viabizzuno Viabizzuno publishing edito project da Viabizzunoedito and graphics edited seconda edizione by Viabizzunoeditore author mario nanni second edition Viabizzuno publishing 21 cod. 15248 and graphics project edi Al v al in e Alvaline attraversa lo spazio diagonalmente: dinamica, irriverente, ironica, giocosa. inizia il gesto, dove si muovono gli sguardi, dove la materia si fonde mescolandosi alla luce, si originano così colore e forma, che vivono per se stesse e per l’emozione che li circonda. il blu della notte é il suo colore. Alvaline cuts through space diagonally with dynamism, irreverence, irony and playfulness. its gesture is marked by the shifting of glances, by the blending of matter with light thus giving life to colour and form which live a life of their own with the emotions surrounding 22 them. midnight blue is its colour. italiano cod.19091 italiano cod.16162-2 english english français français volumi Alvaline Alvaline volumes vol.1 E27 cod.00285 vol.9 clv2 cod.00284 vol.2 h2o cod.00283 vol.10 tulp cod.00290 vol.3 bamboo cod.00289 vol.11 fileau cod.14564 vol.4 alva1 cod.00291 vol.13 UpOGalleggio cod.15215 vol.5 clv1 cod.00286 vol.14 steelon cod.17904 vol.6 biblio cod.00288 vol.18 toccami cod.17777 vol.7 mon amour cod.00282 vol.19 la DOdò cod.17779 vol.8 emma vol.20 plag in cod.17778 ÛÒÒÍËÈ flÁ˚Í cod.16164-2 cod.19092 english español english deutsch español cod.16166-2 deutsch cod.19093 la letteratura Alvaline - Alvaline literature manuale Alvaline 2007 manual Alvaline 2007 cod. 19941 cartella colori e finiture folder sample finishes and colours autore mario nanni cod.00287 progetto editoriale e grafico Viabizzuno cod. 19941 edito da Viabizzunoeditore seconda edizione 23 srl 40010 bentivoglio bologna italia t+39 0518908011 f+390518908089 www.viabizzuno.com [email protected] Viabizzuno 10 via romagnoli