1
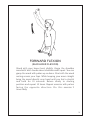
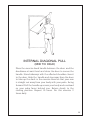
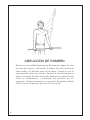
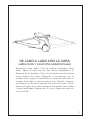
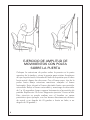
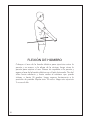
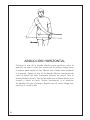
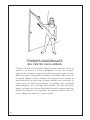
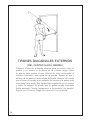
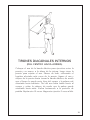
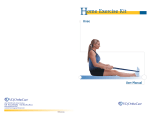
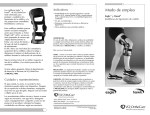
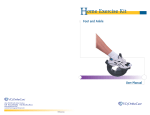
Home Exercise Kit
Shoulder
User Manual
18011 Mitchell South, Irvine, CA 92614
Call 800.266.6969 Fax 800.821.8012
www.vqorthocare.com
[email protected]
VQO15033002
VQ OrthoCare Exercise Kit
Shoulder Kit
Items included in your kit:
• Wand
• Pulley with Handles
• Exercise Band Kit
• 2 Handles
• Blue, Green, Red
Rubber Bands
• Strap with Loop
• Pouch
• Towel
VQ OrthoCare is not liable for any misuse or misunderstanding of the exercise product or
operating manual. Please call your local representative if any additional assistance is required
regarding this product and its operating instructions.
Caution: Consult with your therapist or physician before starting any rehabilitation
or exercise program. The products in this exercise kit are not to be used by children
without adult supervision.
Caution: This product contains natural rubber latex which may cause allergic reactions. As with all
natural rubber products, keep this product away from grease, oil or excessive heat.
Disclaimer: Equipment and supplies illustrated and specified are subject to modification consistent
with product availability or other factors.
VQ OrthoCare
18011 Mitchell South, Irvine, CA 92614-6007
800.266.6969 • Fax 800.821.8012
www.vqorthocare.com • [email protected]
The publishers acknowledge that the illustrations used in this publication on pages 2,3,4,5,6,7,
9,10,11,12,13,14,16,17,18,19 are the copyrighted property of VHI Inc.
This operating manual is proprietary and confidential. No part of this document may be reproduced or
transmitted in any form or by any means, electronic or mechanical, including photocopy, recording
or information storage and retrieval system, without permission in writing from VQ OrthoCare.
VQ OrthoCare is a service mark of VisionQuest Industries, Inc. © 2005
Quick Reference Exercise Listing
Shoulder
Shoulder Pendulum (Shoulder Warm-Up) . . . . . . . . . . . . . . . . . . . . . .2
Forward Flexion (Shoulder Flexion) . . . . . . . . . . . . . . . . . . . . . . . . . . .3
Shoulder Abduction . . . . . . . . . . . . . . . . . . . . . . . . . . . . . . . . . . . . . .4
External Rotation . . . . . . . . . . . . . . . . . . . . . . . . . . . . . . . . . . . . . . . .5
Hand Behind Back . . . . . . . . . . . . . . . . . . . . . . . . . . . . . . . . . . . . . . . .6
Side to Side with Wand (Horizontal Abduction/Adduction) . . . . . . . .7
Over-the-Door Pulley Range of Motion . . . . . . . . . . . . . . . . . . . . . . .8
External Rotation . . . . . . . . . . . . . . . . . . . . . . . . . . . . . . . . . . . . . . . .9
Internal Rotation . . . . . . . . . . . . . . . . . . . . . . . . . . . . . . . . . . . . . . . .10
Shoulder Extension . . . . . . . . . . . . . . . . . . . . . . . . . . . . . . . . . . . . . .11
Shoulder Flexion . . . . . . . . . . . . . . . . . . . . . . . . . . . . . . . . . . . . . . . .12
Shoulder Adduction . . . . . . . . . . . . . . . . . . . . . . . . . . . . . . . . . . . . .13
Horizontal Abduction . . . . . . . . . . . . . . . . . . . . . . . . . . . . . . . . . . . .14
Shoulder Forward Press . . . . . . . . . . . . . . . . . . . . . . . . . . . . . . . . . .15
Diagonal Pull (mid to high) . . . . . . . . . . . . . . . . . . . . . . . . . . . . . . . .16
External Diagonal Pull (high to low) . . . . . . . . . . . . . . . . . . . . . . . . .17
External Diagonal Pull (mid to high) . . . . . . . . . . . . . . . . . . . . . . . .18
Internal Diagonal Pull (mid to high) . . . . . . . . . . . . . . . . . . . . . . . . .19
SHOULDER PENDULUM EXERCISE
(SHOULDER WARM UP)
Stand with your knees bent slightly. Bend forward at the
waist so that your involved arm is hanging straight down
toward the floor. Let your involved arm hang and swing
freely in front of you. Shift your weight from side to side
allowing your arm to swing slowly from side to side. Relax.
Again let your involved arm hang in front of you. Shift your
weight so that your arm makes a circular motion (start
going in a clockwise direction). Repeat this motion in the
opposite (counter clockwise) direction. Do this exercise
3 times daily.
2
FORWARD FLEXION
(SHOULDER FLEXION)
Stand with your knees bent slightly. Grasp the shoulder
wand with both hands about shoulder width apart. You can
grasp the wand with palms up or down. Start with the wand
resting across your hips. While keeping your arms straight
bring the wand directly over head until you feel a stretch
and hold for 10 seconds. Return slowly to starting
position and repeat 10 times. Repeat exercise with palms
facing the opposite direction. Do this exercise 3
times daily.
3
SHOULDER ABDUCTION
Stand with your knees bent slightly. Grasp the wand with
both hands. Grasp the wand with your palm up on the
injured side and with your palm down on the uninjured
side. Start with the wand resting across your hips. Push the
wand directly out to the side with the injured side (palm
down) until you feel a stretch and hold for 10 seconds.
Return slowly to the starting position. Repeat 10 times. Do
this exercise 3 times daily.
4
EXTERNAL ROTATION
Lie on your back. Grasp the wand with both hands. Grasp
the wand with your palm up on the injured side and with
your palm down on the uninjured side. Bend both elbows
90 degrees. Keep the elbow of the injured shoulder arm at
your side locked at your side. With the arm of the uninjured
shoulder, push the wand upward and toward the injured
side out as far as you can. Tolerate until you feel a stretch
and hold for 10 seconds. Return slowly to the starting
position. Repeat 10 times. Do this exercise 3 times daily.
5
HAND BEHIND BACK
Stand with your knees bent slightly. Hold towel or wand the
way you would hold a towel to dry off your back. The hand
on the side of the uninjured shoulder should be at the top
of the wand with the hand on the side of the injured
shoulder at the bottom of the wand. Use the uninjured
arm to slowly pull the injured arm up your back as far as
you can tolerate and hold for 10 seconds. Return slowly to
the starting position. Repeat 10 times. Do this exercise
3 times daily.
6
SIDE TO SIDE WITH WAND
(HORIZONTAL ABDUCTION/ADDUCTION)
Lie on your back. With palms facing downward, grasp the
wand with both hands shoulder width apart. Bring the
wand up so your arms are straight out in front of your
chest. Leading with the uninjured shoulder, push the wand
across your body so that your injured shoulder is moving
towards the floor. Then pull back across your body. Do not
allow your trunk to twist. You can alternate the grip on the
wand with palms facing up then palms facing down. Repeat
10 times. Do this exercise 3 times daily.
7
OVER-THE-DOOR PULLEY
RANGE OF MOTION EXERCISE
Place the over-the-door pulley frame at the top of the
doorjamb and close the door to secure. Make sure the
pulley is placed on the side of the door that pulls toward
you. Grab both handles. Using the uninjured arm, pull
downward while you keep the injured arm relaxed. This will
raise the affected arm into an extended position. Relax the
extended arm and hold the extension for 5-10 seconds
and return slowly to the starting position. Repeat 10 times.
Do this exercise 3 times daily. This exercise can be
performed in multiple positions of the shoulder. (For
example: You can have your arms directly in front of you, at
a 45 degree angle or out to your side at a 90 degree angle).
8
EXTERNAL ROTATION
Place the exercise band handle between the door and the
doorframe about waist level and close the door to secure
the handle. Stand sideways with your injured shoulder
away from the door. Roll up a towel and place it between
your side and upper arm just above your elbow. Grab the
handle on the exercise band and make sure your elbow
remains bent at 90 degrees as shown in the picture. Rotate
your arm outward away from your body keeping your elbow
close to your side and return slowly to the starting
position. Repeat 10 times. Do this exercise 3 times daily.
9
INTERNAL ROTATION
Place the exercise band handle between the door and the
doorframe about waist level and close the door to secure
the handle. Stand sideways with your injured shoulder
closest to the door. Place a small towel roll between your
side and upper arm just above your elbow. Grab the
handle of the exercise band and make sure your elbow
remains bent at 90 degrees as shown in the picture. Rotate
your arm inward across your body keeping your elbow
close to your side and return slowly to the starting
position. Repeat 10 times. Do this exercise 3 times daily.
10
SHOULDER EXTENSION
Place the exercise band handle between the door and the
doorframe about waist level and close the door to secure
the handle. Stand facing the door with the injured arm
extended and grab the exercise band with your palm facing
the floor. Keep your arm straight. Pull the handle down and
back as far as you can tolerate or just beyond your body as
shown and return slowly to the starting position. Repeat 10
times. Do this exercise 3 times daily.
11
SHOULDER FLEXION
Place the exercise band handle between the door and the
doorframe about waist level and close the door to secure
the handle. Stand facing away from the door and grab the
handle of the exercise band with the injured side. Pull the
tubing forward and upward as tolerated or to 90 degrees
then return slowly to the starting position. Repeat 10
times. Do this exercise 3 times daily.
12
SHOULDER ADDUCTION
Place the exercise band handle between the door and the
doorframe about waist level and close the door to secure
the handle. Stand with your injured shoulder closest to the
door and grab the handle of the exercise band with
your arm 45 degrees from your side. Pull the band down
and towards your side to the buttock. Return slowly to
the starting position. Repeat 10 times. Do this exercise
3 times daily.
13
HORIZONTAL ABDUCTION
Place the exercise band handle between the door and the
doorframe just above waist level and close the door to
secure the handle. Stand with the uninjured side facing the
door. Grab the handle of the exercise band with the arm on
your injured side straight out in front of you. Keep your arm
parallel to the floor. Pull your arm across your body and
out to the side. Return slowly to the starting position.
Do not rotate your body. Repeat 10 times. Do this exercise
3 times daily.
14
SHOULDER FORWARD PRESS
Place the exercise band handle between the door and the
doorframe about shoulder level and close the door to
secure the handle. Stand facing away from the door and
grasp the handle with your arm at your side and elbow bent
as shown. Push the handle out in front of you until your
arm is straight. Return slowly to the starting position.
Repeat 10 times. Do this exercise 3 times daily.
15
DIAGONAL PULL
(MID TO HIGH)
Place the exercise band handle between the door and the
doorframe about 6" from the top of the door and close the
door to secure the handle. Stand sideways with the injured
shoulder closest to the door. Grab the handle and step
away from the door to take up the slack in the exercise
band so that your arm is straight out to your side with your
elbow at shoulder height and your palm is facing forward
with your thumb up. Pull the handle downward and across
your body toward the opposite hip. Return slowly to the
starting position. Repeat 10 times. Do this exercise 3
times daily.
16
EXTERNAL DIAGONAL PULL
(HIGH TO LOW)
Place the exercise band handle between the door and the
doorframe about 6" from the top of the door and close the
door to secure the handle. Stand sideways with the injured
shoulder farthest away from the door. Grab the handle and
step away from the door to take up the slack in the
exercise band so that your arm is straight across your body
above your shoulder with the palm facing backward. Pull
the handle downward and away from your body toward the
opposite hip. Return slowly to starting the position. Repeat
10 times. Do this exercise 3 times daily.
17
EXTERNAL DIAGONAL PULL
(MID TO HIGH)
Place the exercise band handle between the door and the
doorframe at waist level and close the door to secure the
handle. Stand sideways with the injured shoulder farthest
away from the door. Grab the handle and step away from
the door to take up the slack in the exercise band so that
your arm is straight across your body with your palm facing
backward. Pull the handle up and across your body and
overhead so your palm is now facing forward. Return
slowly to the starting position. Repeat 10 times. Do this
exercise 3 times daily.
18
INTERNAL DIAGONAL PULL
(MID TO HIGH)
Place the exercise band handle between the door and the
doorframe at waist level and close the door to secure the
handle. Stand sideways with the affected shoulder closest
to the door. Grab the handle and step away from the door
to take up the slack in the exercise band so that your arm
is straight out away from your body with your palm facing
forward. Pull the handle up across your body and overhead
so your palm faces behind you. Return slowly to the
starting position. Repeat 10 times. Do this exercise 3
times daily.
19
NOTES
NOTES
VQ OrthoCare kit de ejercicios
Kit de ejercicios de hombro
Artículos contenidos en el kit:
• Vara
• Polea con asas
• Kit de bandas elásticas
para ejercicio
• 2 asas
• Bandas elásticas azul,
verde y roja
• Tira con presilla
• Bolsa
• Toalla
VQ OrthoCare no se hará responsable de ningún uso incorrecto o mala interpretación del producto
para ejercicio o manual de instrucciones. Si necesita asistencia adicional respecto a este producto y
sus instrucciones de manejo, llame a su representante local.
Armado de la vara: Presione el botón del tubo metálico que se extiende desde la mitad más larga de
la vara para ejercicios, e introduzca el tubo en la otra mitad de la vara. Gire la vara hasta que sus
componentes enganchen entre sí y estén firmemente conectados.
Advertencia: Antes de iniciar cualquier programa de rehabilitación o de ejercicios, consulte con su
terapeuta o médico. Los productos de este kit para ejercicios no deben ser usados por niños sin la
supervisión de un adulto.
Advertencia: Este producto contiene látex de caucho natural, el cual puede ocasionar reacciones
alérgicas. Como en el caso de cualquier artículo de caucho natural, mantenga este producto al
resguardo de grasa, aceite o altas temperaturas.
Descargo de responsabilidad: El equipo y los suministros que se ilustran y especifican están
sujetos a modificaciones consecuentes con la disponibilidad del producto u otros factores.
VQ OrthoCare
18011 Mitchell South, Irvine, CA 92614-6007
800.266.6969 • Fax 800.821.8012
www.vqorthocare.com • [email protected]
Los editores reconocen que las ilustraciones que aparecen en las páginas 2,3,4,5,6,7,9,10,11,
12,13,14,16,17,18 y 19 de esta publicación son propiedad intelectual de VHI Inc.
Este manual de instrucciones está patentado y es confidencial. Ninguna parte de este documento puede ser
reproducida ni transmitida de ninguna forma ni por ningún medio, electrónico o mecánico, sea por fotocopia,
en sistemas de registro o de almacenamiento y recuperación de información, sin el permiso por escrito de
VQ OrthoCare.
VQ OrthoCare es una marca servicio de VisionQuest Industries, Inc. © 2005
Lista de consulta rápida
Ejercicios de hombro
Calentamiento de hombro con movimiento de péndulo. . . . . . . . . . .2
Flexión anterior de hombro . . . . . . . . . . . . . . . . . . . . . . . . . . . . . . . . .3
Abducción de hombro . . . . . . . . . . . . . . . . . . . . . . . . . . . . . . . . . . . . .4
Rotación externa . . . . . . . . . . . . . . . . . . . . . . . . . . . . . . . . . . . . . . . . . .5
Manos detrás de la espalda . . . . . . . . . . . . . . . . . . . . . . . . . . . . . . . . .6
De lado a lado con la vara (abducción y aducción horizontales) . . . .7
Amplitud de movimientos con polea sobre la puerta . . . . . . . . . . . . .8
Rotación externa . . . . . . . . . . . . . . . . . . . . . . . . . . . . . . . . . . . . . . . . . .9
Rotación interna . . . . . . . . . . . . . . . . . . . . . . . . . . . . . . . . . . . . . . . . .10
Extensión de hombro . . . . . . . . . . . . . . . . . . . . . . . . . . . . . . . . . . . . .11
Flexión de hombro . . . . . . . . . . . . . . . . . . . . . . . . . . . . . . . . . . . . . . .12
Aducción de hombro . . . . . . . . . . . . . . . . . . . . . . . . . . . . . . . . . . . . . .13
Abducción horizontal . . . . . . . . . . . . . . . . . . . . . . . . . . . . . . . . . . . . .14
Empuje anterior de hombro . . . . . . . . . . . . . . . . . . . . . . . . . . . . . . . .15
Tirones diagonales (del centro hacia arriba) . . . . . . . . . . . . . . . . . . . .16
Tirones diagonales externos (de arriba a abajo) . . . . . . . . . . . . . . . . .17
Tirones diagonales externos (del centro hacia arriba) . . . . . . . . . . . .18
Tirones diagonales internos (del centro hacia arriba) . . . . . . . . . . . .19
EJERCICIO DE CALENTAMIENTO
DE HOMBRO CON
MOVIMIENTO DE PÉNDULO
Párese con las rodillas ligeramente flexionadas. Doble la
cintura hacia adelante de modo que el brazo afectado quede
recto y colgando hacia el piso. Deje que el brazo afectado
cuelgue y se balancee libremente delante del cuerpo. Desplace
el peso de un lado al otro mientras balancea el brazo
lentamente en sentido lateral. Relájese. Vuelva a dejar el brazo
afectado colgando delante de usted. Desplace su peso de
modo que el brazo haga un movimiento circular (empiece en el
sentido de las agujas del reloj). Repita este movimiento en
sentido contrario al de las agujas del reloj. Haga este ejercicio
3 veces al día.
2
FLEXIÓN ANTERIOR DE HOMBRO
Párese con las rodillas ligeramente flexionadas. Agarre la vara
con las dos manos, alineando éstas con los hombros. Puede
agarrar la vara con las palmas orientadas tanto hacia arriba
como hacia abajo. Comience con la vara apoyada sobre las
caderas. Dejando rectos los brazos, lleve la vara directamente
sobre la cabeza hasta sentir un estirón; mantenga esta
posición por 10 segundos. Vuelva lentamente a la posición de
partida y repita el ejercicio 10 veces. Vuelva a hacer el ejercicio
con las palmas orientadas en la dirección opuesta. Haga este
ejercicio 3 veces al día.
3
ABDUCCIÓN DE HOMBRO
Párese con las rodillas ligeramente flexionadas. Agarre la vara
con las dos manos, orientando la palma del lado lesionado
hacia arriba y la del lado sano hacia abajo. Comience con la
vara apoyada sobre las caderas. Empuje la vara directamente
hacia el costado del lado lesionado (palma hacia abajo) hasta
sentir un estiramiento, y mantenga esa posición por 10
segundos. Vuelva lentamente a la posición de partida. Repita
esto 10 veces. Haga este ejercicio 3 veces al día.
4
ROTACIÓN EXTERNA
Recuéstese boca arriba. Agarre la vara con las dos manos,
orientando la palma del lado lesionado hacia arriba y la del
lado sano hacia abajo. Doble los codos en ángulo recto
(90 grados). Mantenga el codo del brazo con el hombro
lesionado inmóvil a un costado. Con el brazo del hombro sano,
empuje la vara hacia arriba y hacia el lado lesionado al máximo
que pueda tolerar, hasta sentir un estiramiento; mantenga esa
posición por 10 segundos. Vuelva lentamente a la posición de
partida. Repita esto 10 veces. Haga este ejercicio 3 veces al día.
5
MANOS DETRÁS DE LA ESPALDA
Párese con las rodillas ligeramente flexionadas. Sostenga una
toalla o la vara como lo haría si estuviera secándose la
espalda. La mano del brazo con el hombro sano debe estar en
la parte superior de la vara; la del hombro lesionado debe estar
en la parte inferior. Use el brazo sano para subir lentamente el
brazo lesionado por la espalda al máximo que pueda tolerar;
mantenga esta posición por 10 segundos. Vuelva lentamente a
la posición de partida. Repita esto 10 veces. Haga este
ejercicio 3 veces al día.
6
DE LADO A LADO CON LA VARA
(ABDUCCIÓN Y ADUCCIÓN HORIZONTALES)
Recuéstese boca arriba. Con las palmas orientadas hacia
abajo, agarre la vara con las dos manos separadas a la
distancia de los hombros. Eleve la vara hasta tener los brazos
rectos delante del tórax. Dirigiendo el movimiento con el
hombro sano, empuje la vara sobre el cuerpo de modo que el
hombro lesionado se mueva hacia el piso. Efectúe el mismo
movimiento en dirección opuesta. No tuerza el tronco. Puede
alternar el agarre de la vara orientando las palmas hacia arriba
y luego hacia abajo. Repita esto 10 veces. Haga este ejercicio
3 veces al día.
7
EJERCICIO DE AMPLITUD DE
MOVIMIENTOS CON POLEA
SOBRE LA PUERTA
Coloque la estructura de polea sobre la puerta en la parte
superior de la jamba y cierre la puerta para sujetar. Asegúrese
de que la polea esté colocada del lado de la puerta que se abre
hacia usted. Agarre las dos asas. Con el brazo sano, tire de la
polea hacia abajo mientras mantiene relajado el brazo
lesionado. Esto elevará el brazo afectado hasta una posición
extendida. Relaje el brazo extendido y mantenga la extensión
de 5 a 10 segundos; luego, regrese lentamente a la posición de
partida. Repita esto 10 veces. Haga este ejercicio 3 veces al día.
Este ejercicio se puede realizar con el hombro en varias
posiciones (por ejemplo, con los brazos directamente delante
de usted, a un ángulo de 45 grados o hacia un lado, a un
ángulo de 90 grados.)
8
ROTACIÓN EXTERNA
Coloque el asa de la banda elástica para ejercicios entre la
puerta y su marco, a la altura de la cintura; luego cierre la
puerta para sujetar el asa. Párese de lado, colocando el
hombro lesionado más lejos de la puerta. Enrolle una toalla y
colóquesela entre el costado y el brazo, justo encima del codo.
Agarre el asa de la banda elástica cerciorándose de mantener
el codo en ángulo recto (90 grados), tal como se ilustra en la
figura. Gire el brazo hacia afuera alejándolo del cuerpo,
manteniendo el codo cerca del costado; luego regrese
lentamente a la posición de partida. Repita esto 10 veces. Haga
este ejercicio 3 veces al día.
9
ROTACIÓN INTERNA
Coloque el asa de la banda elástica para ejercicios entre la
puerta y su marco, a la altura de la cintura; luego cierre
la puerta para sujetar el asa. Párese de lado, colocando el
hombro lesionado más cerca de la puerta. Colóquese una
toalla pequeña entre el costado y el brazo, justo encima del
codo. Agarre el asa de la banda elástica cerciorándose de
mantener el codo en ángulo recto (90 grados), tal como se
ilustra en la figura. Gire el brazo hacia adentro frente al cuerpo,
manteniendo el codo cerca del costado; luego regrese
lentamente a la posición de partida. Repita esto 10 veces. Haga
este ejercicio 3 veces al día.
10
EXTENSIÓN DE HOMBRO
Coloque el asa de la banda elástica para ejercicios entre la
puerta y su marco, a la altura de la cintura; luego cierre
la puerta para sujetar el asa. Párese mirando a la puerta con
el brazo lesionado extendido, y agarre la banda elástica
orientando la palma hacia el piso.
Mientras mantiene recto el brazo, tire del asa hacia abajo y
hacia atrás al máximo que pueda tolerar, o un poco más allá del
cuerpo (como se ilustra) y vuelva lentamente a la posición de
partida. Repita esto 10 veces. Haga este ejercicio 3 veces al día.
11
FLEXIÓN DE HOMBRO
Coloque el asa de la banda elástica para ejercicios entre la
puerta y su marco, a la altura de la cintura; luego cierre la
puerta para sujetar el asa. Párese de espaldas a la puerta y
agarre el asa de la banda elástica con el lado lesionado. Tire del
tubo hacia adelante y hacia arriba al máximo que pueda
tolerar, o hasta 90 grados, luego regrese lentamente a la
posición de partida. Repita esto 10 veces. Haga este ejercicio
3 veces al día.
12
ADUCCIÓN DE HOMBRO
Coloque el asa de la banda elástica para ejercicios entre la
puerta y su marco, a la altura de la cintura; luego cierre la
puerta para sujetar el asa. Párese colocando el hombro
lesionado más cerca de la puerta, y agarre el asa de la banda
elástica con el brazo a 45 grados respecto al costado. Tire de
la banda hacia abajo en dirección del costado y la nalga. Vuelva
lentamente a la posición de partida. Repita esto 10 veces. Haga
este ejercicio 3 veces al día.
13
ABDUCCIÓN HORIZONTAL
Coloque el asa de la banda elástica para ejercicios entre la
puerta y su marco, justo por encima de la cintura; luego cierre
la puerta para sujetar el asa. Párese con el lado sano mirando
a la puerta. Agarre el asa de la banda elástica manteniendo
recto el brazo del lado lesionado delante de usted. Deje el
brazo paralelo al piso. Tire de la banda con el brazo frente a su
cuerpo y hacia un lado. Vuelva lentamente a la posición
de partida. No gire el cuerpo. Repita esto 10 veces. Haga este
ejercicio 3 veces al día.
14
EMPUJE ANTERIOR DE HOMBRO
Coloque el asa de la banda elástica para ejercicios entre la
puerta y su marco, a la altura del hombro; luego cierre la
puerta para sujetar el asa. Párese de espaldas a la puerta y
agarre el asa con el brazo a un costado y el codo doblado, tal
como se ilustra. Empuje el asa hacia delante hasta que esté
frente a usted y el brazo esté recto. Vuelva lentamente a la
posición de partida. Repita esto 10 veces. Haga este ejercicio
3 veces al día.
15
TIRONES DIAGONALES
(DEL CENTRO HACIA ARRIBA)
Coloque el asa de la banda elástica para ejercicios entre la
puerta y su marco, a unas 6 pulgadas (15 cm) de la parte
superior de la puerta; luego cierre la puerta para sujetar el asa.
Párese de lado, colocando el hombro lesionado más cerca de
la puerta. Agarre el asa y aléjese de la puerta hasta tensar la
banda elástica, de modo que el brazo quede recto a un lado, el
codo esté a la altura del hombro y la palma esté orientada
hacia adelante con el pulgar hacia arriba. Tire del asa hacia
abajo y delante del cuerpo llevándola hacia la cadera opuesta.
Vuelva lentamente a la posición de partida. Repita esto 10
veces. Haga este ejercicio 3 veces al día.
16
TIRONES DIAGONALES EXTERNOS
(DE ARRIBA A ABAJO)
Coloque el asa de la banda elástica para ejercicios entre la
puerta y su marco, a unas 6 pulgadas (15 cm) de la parte
superior de la puerta; luego cierre la puerta para sujetar el asa.
Párese de lado, colocando el hombro lesionado más lejos de la
puerta. Agarre el asa y aléjese de la puerta hasta tensar la
banda elástica, de modo que el brazo le quede recto delante
del cuerpo, por encima del hombro, y la palma esté orientada
hacia atrás. Tire del asa hacia abajo alejándola del cuerpo, en
dirección de la cadera opuesta. Vuelva lentamente a la posición
de partida. Repita esto 10 veces. Haga este ejercicio 3 veces
al día.
17
TIRONES DIAGONALES EXTERNOS
(DEL CENTRO HACIA ARRIBA)
Coloque el asa de la banda elástica para ejercicios entre la
puerta y su marco, a la altura de la cintura; luego cierre
la puerta para sujetar el asa. Párese de lado, colocando el
hombro lesionado más lejos de la puerta. Agarre el asa y
aléjese de la puerta hasta tensar la banda elástica, de modo
que el brazo le quede recto delante del cuerpo y la palma esté
orientada hacia atrás. Tire del asa hacia arriba frente al cuerpo
y sobre la cabeza, de modo que la palma quede orientada
hacia adelante. Vuelva lentamente a la posición de partida.
Repita esto 10 veces. Haga este ejercicio 3 veces al día.
18
TIRONES DIAGONALES INTERNOS
(DEL CENTRO HACIA ARRIBA)
Coloque el asa de la banda elástica para ejercicios entre la
puerta y su marco, a la altura de la cintura; luego cierre la
puerta para sujetar el asa. Párese de lado, colocando el
hombro afectado más cerca de la puerta. Agarre el asa y
aléjese de la puerta hasta tensar la banda elástica, de modo
que el brazo le quede recto lejos del cuerpo y la palma esté
orientada hacia adelante. Tire del asa hacia arriba frente al
cuerpo y sobre la cabeza, de modo que la palma quede
orientada hacia atrás. Vuelva lentamente a la posición de
partida. Repita esto 10 veces. Haga este ejercicio 3 veces al día.
19
NOTAS
NOTAS
NOTAS
Home Exercise Kit
Shoulder
User Manual
18011 Mitchell South, Irvine, CA 92614
Call 800.266.6969 Fax 800.821.8012
www.vqorthocare.com
[email protected]
VQO15033002