1
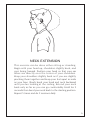
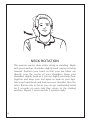
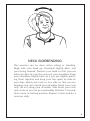
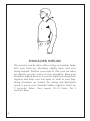
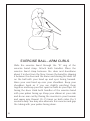
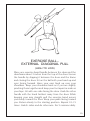
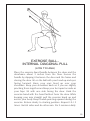
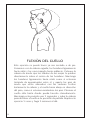
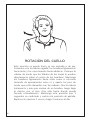
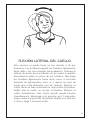
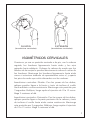
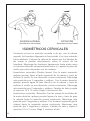
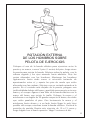
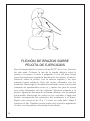
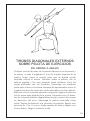
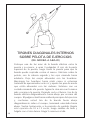
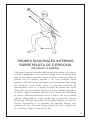
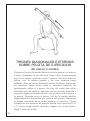
Home Exercise Kit
Cervical
User Manual
18011 Mitchell South, Irvine, CA 92614
Call 800.266.6969 Fax 800.821.8012
www.vqorthocare.com
[email protected]
VQO15032602
VQ OrthoCare Exercise Kit
Cervical Kit
Items included in your kit:
• Exercise Ball
(see inflation instructions on
back page)
• Backnobber®II
• Air Pump
• Exercise Band Kit
• 2 Handles
• Blue, Green, Red
Rubber Bands
• Strap with Loop
• Pouch
• Towel
VQ OrthoCare is not liable for any misuse or misunderstanding of the exercise product or
operating manual. Please call your local representative if any additional assistance is required
regarding this product and its operating instructions.
Caution: Consult with your therapist or physician before starting any rehabilitation
or exercise program. The products in this exercise kit are not to be used by children
without adult supervision.
Caution: This product contains natural rubber latex which may cause allergic reactions. As with all
natural rubber products, keep this product away from grease, oil or excessive heat.
Disclaimer: Equipment and supplies illustrated and specified are subject to modification
consistent with product availability or other factors.
VQ OrthoCare
18011 Mitchell South, Irvine, CA 92614-6007
800.266.6969 • Fax 800.821.8012
www.vqorthocare.com • [email protected]
The publishers acknowledge that the illustrations used in this publication on pages 2,3,4,5,6,
7,8,9,10,11,12,13,14,15,16 are the copyrighted property of VHI Inc.
Backnobber is a registered trademark of The Pressure Positive Company.
This operating manual is proprietary and confidential. No part of this document may be reproduced or
transmitted in any form or by any means, electronic or mechanical, including photocopy, recording
or information storage and retrieval system, without permission in writing from VQ OrthoCare.
VQ OrthoCare is a service mark of VisionQuest Industries, Inc. © 2005
Quick Reference Exercise Listing
Cervical
Neck Flexion . . . . . . . . . . . . . . . . . . . . . . . . . . . . . . . . . . . . . . . . . . . . .2
Neck Extension . . . . . . . . . . . . . . . . . . . . . . . . . . . . . . . . . . . . . . . . . . .3
Neck Rotation . . . . . . . . . . . . . . . . . . . . . . . . . . . . . . . . . . . . . . . . . . . .4
Neck Sidebending . . . . . . . . . . . . . . . . . . . . . . . . . . . . . . . . . . . . . . . . .5
Shoulder Shrugs . . . . . . . . . . . . . . . . . . . . . . . . . . . . . . . . . . . . . . . . . .6
Cervical Isometrics
Flexion and Extension . . . . . . . . . . . . . . . . . . . . . . . . . . . . . . . . . . .7
Sidebending and Rotation . . . . . . . . . . . . . . . . . . . . . . . . . . . . . . . .8
Exercise Ball – Neck Rotation . . . . . . . . . . . . . . . . . . . . . . . . . . . . . . . . .9
Trunk Rotation . . . . . . . . . . . . . . . . . . . . . . . . . . . . . . . . . . . . . . . . . . .10
Exercise Ball – Shoulder External Rotation . . . . . . . . . . . . . . . . . . . . .11
Exercise Ball – Arm Curls . . . . . . . . . . . . . . . . . . . . . . . . . . . . . . . . . . .12
Exercise Ball External Diagonal Pulls (High to Low) . . . . . . . . . . . . . .13
Exercise Ball Internal Diagonal Pulls (High to Low) . . . . . . . . . . . . . .14
Exercise Ball Internal Diagonal Pull (Low to High) . . . . . . . . . . . . . . .15
Exercise Ball External Diagonal Pull (Low to High) . . . . . . . . . . . . . . .16
NECK FLEXION
This exercise can be done either sitting or standing. Begin
with your head up, shoulders slightly back, and eyes
facing forward. Position your head so that your ear lobes
are directly over the center of your shoulders. Keep your
shoulders slightly back as if you are slightly pinching them
together and keep your feet apart as wide as your hips.
Slowly bend your head and neck downward toward the
floor as if you are looking at your feet. Flex your neck only
as far as you can go comfortably. Hold for 3 seconds then
bend your neck back to the starting position. Repeat 5
times and do 3 sessions daily.
2
NECK EXTENSION
This exercise can be done either sitting or standing.
Begin with your head up, shoulders slightly back, and
eyes facing forward. Position your head so that your ear
lobes are directly over the center of your shoulders.
Keep your shoulders slightly back as if you are slightly
pinching them together and keep your feet apart as wide
as your hips. Slowly bend your head and neck backward
until you are looking at the ceiling. Extend your neck
back only as far as you can go comfortably. Hold for 3
seconds then bend your neck back to the starting position.
Repeat 5 times and do 3 sessions daily.
3
NECK ROTATION
This exercise can be done either sitting or standing. Begin
with your head up, shoulders slightly back, and eyes facing
forward. Position your head so that your ear lobes are
directly over the center of your shoulders. Keep your
shoulders slightly back as if you are slightly pinching them
together and keep your feet apart as wide as your hips.
Turn your head slowly and look over one shoulder, then the
other. Rotate only as far as you can go comfortably. Hold
for 3 seconds on each side then return to the starting
position. Repeat 5 times and do 3 sessions daily.
4
NECK SIDEBENDING
This exercise can be done either sitting or standing.
Begin with your head up, shoulders slightly back, and
eyes facing forward. Position your head so that your ear
lobes are directly over the center of your shoulders. Keep
your shoulders slightly back as if you are slightly pinching them together and keep your feet apart as wide as
your hips. Bend your neck to one side so that you are
bringing your ear toward your shoulder. Bend your neck
only, do not shrug your shoulder. Side bend your neck
only as far as you can go comfortably. Hold for 3 seconds
then return to starting position. Repeat 5 times and do 3
sessions daily.
5
SHOULDER SHRUGS
This exercise can be done either sitting or standing. Begin
with your head up, shoulders slightly back, and eyes
facing forward. Position your head so that your ear lobes
are directly over the center of your shoulders. Keep your
shoulders slightly back as if you are slightly pinching them
together and keep your feet apart as wide as your hips.
Shrug shoulders up toward the ceiling and backwards
trying to pinch your shoulder blades together. Hold for
3 seconds. Relax, then repeat 10 - 15 times. Do 3
sessions daily.
6
FLEXION
(Cervical Isometrics)
EXTENSION
(Cervical Isometrics)
CERVICAL ISOMETRICS
Begin either sitting or standing with your head up,
shoulders slightly back, and eyes facing forward. Position
your head so that your ear lobes are directly over the
center of your shoulders. Keep your shoulders slightly back
as if you are slightly pinching them together and keep your
feet apart as wide as your hips.
Cervical Isometrics– Flexion: Using the fingertips of your
hand, apply light pressure to your forehead and resist
bending your head forward. Hold for 3 seconds. Relax then
repeat 10-15 times. Do 3 sessions daily.
Cervical Isometrics– Extension: Using the fingertips of your
hand apply light pressure to the back of your head and
resist bending your head backward. Hold for 3 seconds.
Relax then repeat 10-15 times. Do 3 sessions daily.
7
SIDEBENDING
(Cervical Isometrics)
ROTATION
(Cervical Isometrics)
CERVICAL ISOMETRICS
Begin either sitting or standing with your head up,
shoulders slightly back, and eyes facing forward. Position
your head so that your ear lobes are directly over the
center of your shoulders. Keep your shoulders slightly back
as if you are slightly pinching them together and keep your
feet apart as wide as your hips.
Cervical Isometrics– Sidebending: Using your left hand apply
light pressure to the left side of your head and resist bending
your head to that side. Hold for 3 seconds. Relax. Using your
right hand apply light pressure to the right side of your head
and resist bending your head to that side. Hold for 3
seconds. Relax. Alternate sides and repeat 10-15 times.
Do 3 sessions daily.
Cervical Isometrics– Rotation: Using the fingertips of your
right hand apply light pressure to the side of your forehead
and resist rotating your head toward the right side. Hold for
3 seconds. Relax. Using your left hand, resist rotating your
head toward the left side. Hold for 3 seconds. Relax.
Alternate sides repeat 10-15 times. Do 3 sessions daily.
8
EXERCISE BALL– NECK ROTATION
Sit on the ball with your head up, shoulders slightly back,
and eyes facing forward. Position your head so that your
ear lobes are directly over the center of your shoulders.
Keep your shoulders slightly back as if you are slightly
pinching them together and keep your feet apart as wide as
your hips. Slowly rotate your head to one side then the
other. Remember to keep your eyes level and maintain
good posture. Repeat rotation 10-15 times to each side.
Do 3 sessions daily.
9
TRUNK ROTATION
Sit on a chair or ball with your head up, shoulders slightly
back, and eyes facing forward. Position your head so that
your ear lobes are directly over the center of your
shoulders. Slightly pinch your shoulder blades together.
Arms can be crossed over your chest or out to your sides.
Slowly rotate your trunk to each side while keeping your
head and neck facing forward. It may be helpful, once you
are in the starting position, to visually pick a spot on the
wall in front of you and rotate trunk while keeping your
head and neck straight and stare at the spot on the wall so
you do not move your head at all. Do not force the
rotation so far that your neck or head rotates with your
trunk. Slowly return to the starting position. Repeat 10-15
times. Do 3 sessions daily.
10
EXERCISE BALL–
SHOULDER EXTERNAL ROTATION
Place the exercise band handle between the door and the
doorframe about 3 feet from the floor and closing the door
to secure the band. Sit on the ball with your head up and
eyes facing forward. Have your ears lined up over your
shoulders. Keep your shoulders back as if you are slightly
pinching them together and keep your feet apart as wide as
your hips. Sit with one side facing the door. On the side
farthest away from the door, place a folded towel under the
arm and squeeze it gently between the arm and body. Grip
the exercise band handle in the hand of the arm holding the
towel. Hold your hand and forearm at a 90 degree angle
parallel to the floor. Slowly rotate your hand and forearm
out to the side as far as possible away from your body,
putting tension on the exercise band. Return to the starting
position. Repeat 10-15 times then alternate and do the
opposite arm. Do 3 sessions daily.
11
EXERCISE BALL– ARM CURLS
Slide the exercise band through the “D” ring of the
exercise band strap. Attach both handles. Place the
exercise band strap between the door and doorframe
about 2 inches from the floor. Secure the band by slipping
it between the door and the frame and closing the door. Sit
on the ball with your head up and eyes facing forward.
Have your ears lined up over your shoulders. Keep your
shoulders back as if you are slightly pinching them
together and keep your feet apart as wide as your hips. Sit
facing the door. Grab both handles of the exercise band
with your palms facing up. Keep your elbows at your side
and do an arm curl by flexing the muscles in your forearm
and upper arm. Repeat 10-15 times on both sides. Do 3
sessions daily. You may also alternate this exercise and grip
the tubing with your palms facing down.
12
EXERCISE BALL–
EXTERNAL DIAGONAL PULL
(HIGH TO LOW)
Place one exercise band handle between the door and the
doorframe about 2 inches from the top of the door. Secure
the handle by slipping it between the door and the frame
and closing the door. Sit on the ball with your head up and
eyes facing forward. Have your ears lined up over your
shoulders. Keep your shoulders back as if you are slightly
pinching them together and keep your feet apart as wide as
your hips. Sit with one side facing the door. Grab the other
handle with the hand farthest away from the door. While
keeping your arm straight pull the exercise band across
your body toward the floor. Keep your palm facing toward
you. Return slowly to the starting position. Repeat 10-15
times. Switch sides and do other arm. Do 3 sessions daily.
13
EXERCISE BALL– INTERNAL
DIAGONAL PULL (HIGH TO LOW)
Place the exercise band handle between the door and the
doorframe about 2 inches from the top of the door. Secure
the handle by slipping it between the door and the frame
and closing the door. Sit on the ball with your head up and
eyes facing forward. Have your ears lined up over your
shoulders. Keep your shoulders back as if you are slightly
pinching them together and keep your feet apart as wide as
your hips. Sit with one side facing the door. Grab the other
handle with the hand closest to the door. While keeping
your arm straight pull the exercise band downward across
your body. Your thumb will be up at the beginning of the
exercise and, as you pull downward across your body, the
thumb will end up in the down position. Return slowly to
the starting position. Repeat 10-15 times. Switch sides and
do other arm. Do 3 sessions daily.
14
EXERCISE BALL–
INTERNAL DIAGONAL PULL
(LOW TO HIGH)
Place the exercise band handle between the door and the
doorframe about 2 inches from the floor. Secure the
handle by slipping it between the door and the frame and
closing the door. Sit on the ball with your head up and eyes
facing forward. Have your ears lined up over your
shoulders. Keep your shoulders back as if you are slightly
pinching them together and keep your feet apart as wide as
your hips. Sit with one side facing the door. Grab the
exercise band with the hand farthest from the door. While
keeping your arm straight pull the exercise band up and
across your body. Keep thumb pointing upward during the
exercise. Return slowly to starting position. Repeat 10-15
times. Switch sides and do other arm. Do 3 sessions daily.
15
EXERCISE BALL
EXTERNAL DIAGONAL PULL
(LOW TO HIGH)
Place the exercise band handle between the door and the
doorframe about 2 inches from the floor. Secure the
handle by slipping it between the door and the frame and
closing the door. Sit on the ball with your head up and eyes
facing forward. Have your ears lined up over your
shoulders. Keep your shoulders back as if you are slightly
pinching them together and keep your feet apart as wide as
your hips. Sit with one side facing the door. Grab the
exercise band with the hand closest to the door.
While keeping your arm straight pull the exercise band up
and across your body. Keep thumb pointing upward during
the exercise. Return slowly to starting position. Repeat
10-15 times. Switch sides and do other arm. Do 3
sessions daily.
16
Please refer to the
Backnobber®II Exercise book
for specific exercises and instruction.
Instructions for inflating exercise ball
Step 1: Attach short white fill tube to end of air pump.
Step 2: Insert tip of white fill tube directly into the exercise ball.
Step 3: Using the air pump, inflate the exercise ball until the desired level
of firmness is attained. Note: The exercise balls may be “under” inflated to
give a soft feel or “over” inflated for a firm feel.
Step 4: When inflation is complete, quickly remove the air pump from
the exercise ball and insert the long white plug, pushing until flush with
the ball surface.
Figure 4a: Long white plug
Figure 4b: Completed inflated exercise ball
with plug flush with ball surface.
Optional Inflation Method
If desired, an alternative air pump such as a bicycle pump or compressor
pump can be used to inflate the exercise ball.
NOTES
VQ OrthoCare kit de ejercicios
Kit de ejercicios cervicales
Artículos contenidos en el kit:
• Pelota de ejercicios
(en la contraportada
encontrará las instrucciones de
inflado)
• Aparato para masaje
Backnobber®II
• Bomba de aire
• Kit de bandas elásticas para
ejercicio
• 2 asas
• Bandas elásticas azul,
verde y roja
• Tira con presilla
• Bolsa
• Toalla
VQ OrthoCare no se hará responsable de ningún uso incorrecto o mala interpretación del producto
para ejercicio o manual de instrucciones. Si necesita asistencia adicional respecto a este producto y
sus instrucciones de manejo, llame a su representante local.
Advertencia: Antes de iniciar cualquier programa de rehabilitación o de ejercicios, consulte con su
terapeuta o médico. Los productos de este kit para ejercicios no deben ser usados por niños sin la
supervisión de un adulto.
Advertencia: Este producto contiene látex de caucho natural, el cual puede ocasionar reacciones
alérgicas. Como en el caso de cualquier artículo de caucho natural, mantenga este producto al
resguardo de grasa, aceite o altas temperaturas.
Descargo de responsabilidad: El equipo y los suministros que se ilustran y especifican están sujetos a modificaciones consecuentes con la disponibilidad del producto u otros factores.
VQ OrthoCare
18011 Mitchell South, Irvine, CA 92614-6007
800.266.6969 • Fax 800.821.8012
www.vqorthocare.com • [email protected]
Los editores reconocen que las ilustraciones que aparecen en las páginas 2,3,4,5,6,7,8,9,10,
11,12,13,14,15 y 16 de esta publicación son propiedad intelectual de VHI Inc.
Backnobber es una marca registrada de The Pressure Positive Company.
Este manual de instrucciones está patentado y es confidencial. Ninguna parte de este documento puede ser
reproducida ni transmitida de ninguna forma ni por ningún medio, electrónico o mecánico, sea por fotocopia,
en sistemas de registro o de almacenamiento y recuperación de información, sin el permiso por escrito de
VQ OrthoCare.
VQ OrthoCare es una una marca servicio de VisionQuest Industries, Inc. © 2005
Lista de consulta rápida
Ejercicios cervicales
Flexión del cuello . . . . . . . . . . . . . . . . . . . . . . . . . . . . . . . . . . . . . . . . .2
Extensión del cuello . . . . . . . . . . . . . . . . . . . . . . . . . . . . . . . . . . . . . . .3
Rotación del cuello . . . . . . . . . . . . . . . . . . . . . . . . . . . . . . . . . . . . . . . .4
Flexión lateral del cuello . . . . . . . . . . . . . . . . . . . . . . . . . . . . . . . . . . . .5
Encogimiento de hombros . . . . . . . . . . . . . . . . . . . . . . . . . . . . . . . . . .6
Isométricos cervicales
Flexión y extensión . . . . . . . . . . . . . . . . . . . . . . . . . . . . . . . . . . . . .7
Flexión lateral y rotación . . . . . . . . . . . . . . . . . . . . . . . . . . . . . . . .8
Rotación del cuello sobre pelota de ejercicios . . . . . . . . . . . . . . . . . .9
Rotación del tronco . . . . . . . . . . . . . . . . . . . . . . . . . . . . . . . . . . . . . . .10
Rotación externa de los hombros sobre pelota de ejercicios
. . . . .11
Flexión de brazos sobre pelota de ejercicios . . . . . . . . . . . . . . . . . . .12
Tirones diagonales externos sobre pelota de ejercicios
(de arriba a abajo) . . . . . . . . . . . . . . . . . . . . . . . . . . . . . . . . . . . . . . . .13
Tirones diagonales internos sobre pelota de ejercicios
(de arriba a abajo) . . . . . . . . . . . . . . . . . . . . . . . . . . . . . . . . . . . . . . . .14
Tirones diagonales internos sobre pelota de ejercicios
(de abajo a arriba) . . . . . . . . . . . . . . . . . . . . . . . . . . . . . . . . . . . . . . . .15
Tirones diagonales externos sobre pelota de ejercicios
(de abajo a arriba) . . . . . . . . . . . . . . . . . . . . . . . . . . . . . . . . . . . . . . . .16
FLEXIÓN DEL CUELLO
Este ejercicio se puede hacer ya sea sentado o de pie.
Comience con la cabeza erguida, los hombros ligeramente
hacia atrás y los ojos mirando hacia adelante. Coloque la
cabeza de modo que los lóbulos de las orejas le queden
directamente sobre el centro de los hombros. Mantenga
los hombros ligeramente hacia atrás como si estuviera
tratando de aproximarlos entre sí, y aparte los pies de
modo que estén alineados con las caderas. Incline
lentamente la cabeza y el cuello hacia abajo en dirección
del piso, como si estuviera mirándose los pies. Flexione el
cuello sólo hasta donde pueda hacerlo cómodamente.
Mantenga esta posición por 3 segundos y suba la cabeza
para devolver el cuello a su posición de partida. Repita este
ejercicio 5 veces y haga 3 sesiones al día.
2
EXTENSIÓN DEL CUELLO
Este ejercicio se puede hacer ya sea sentado o de pie.
Comience con la cabeza erguida, los hombros ligeramente
hacia atrás y los ojos mirando hacia adelante. Coloque la
cabeza de modo que los lóbulos de las orejas le queden
directamente sobre el centro de los hombros. Mantenga
los hombros ligeramente hacia atrás como si estuviera
tratando de aproximarlos entre sí, y aparte los pies de
modo que estén alineados con las caderas. Incline
lentamente la cabeza y el cuello hacia atrás hasta que esté
mirando al techo. Extienda el cuello hacia atrás sólo hasta
donde pueda hacerlo cómodamente. Mantenga esta
posición por 3 segundos y baje la cabeza para devolver el
cuello a su posición de partida. Repita este ejercicio
5 veces y haga 3 sesiones al día.
3
ROTACIÓN DEL CUELLO
Este ejercicio se puede hacer ya sea sentado o de pie.
Comience con la cabeza erguida, los hombros ligeramente
hacia atrás y los ojos mirando hacia adelante. Coloque la
cabeza de modo que los lóbulos de las orejas le queden
directamente sobre el centro de los hombros. Mantenga
los hombros ligeramente hacia atrás como si estuviera
tratando de aproximarlos entre sí, y aparte los pies de
modo que estén alineados con las caderas. Gire la cabeza
lentamente y mire por encima de un hombro, luego haga
lo mismo con el otro. Gire sólo hasta donde pueda
hacerlo cómodamente. Mantenga esta posición por 3
segundos en cada lado y vuelva a la posición de partida.
Repita este ejercicio 5 veces y haga 3 sesiones al día.
4
FLEXIÓN LATERAL DEL CUELLO
Este ejercicio se puede hacer ya sea sentado o de pie.
Comience con la cabeza erguida, los hombros ligeramente
hacia atrás y los ojos mirando hacia adelante. Coloque la
cabeza de modo que los lóbulos de las orejas le queden
directamente sobre el centro de los hombros. Mantenga
los hombros ligeramente hacia atrás como si estuviera
tratando de aproximarlos entre sí, y aparte los pies de
modo que estén alineados con las caderas. Flexione el
cuello hacia un lado acercando la oreja hacia el hombro.
Doble sólo el cuello; no encoja el hombro. Flexione el
cuello lateralmente sólo hasta donde pueda hacerlo
cómodamente. Mantenga esta posición por 3 segundos,
luego vuelva a la posición de partida. Repita este ejercicio
5 veces y haga 3 sesiones al día.
5
ENCOGIMIENTO DE HOMBROS
Este ejercicio se puede hacer ya sea sentado o de pie.
Comience con la cabeza erguida, los hombros ligeramente
hacia atrás y los ojos mirando hacia adelante. Coloque la
cabeza de modo que los lóbulos de las orejas le queden
directamente sobre el centro de los hombros. Mantenga
los hombros ligeramente hacia atrás como si estuviera
tratando de aproximarlos entre sí, y aparte los pies de
modo que estén alineados con las caderas. Eleve los
hombros hacia el techo y hacia atrás, intentando
aproximar los omóplatos entre sí. Mantenga esta posición
por 3 segundos. Relájese, luego repita el ejercicio de 10 a
15 veces. Haga 3 sesiones al día.
6
FLEXIÓN
(Isométricos cervicales)
EXTENSIÓN
(Isométricos cervicales)
ISOMÉTRICOS CERVICALES
Comience ya sea en posición sentada o de pie, con la cabeza
erguida, los hombros ligeramente hacia atrás y los ojos
mirando hacia adelante. Coloque la cabeza de modo que los
lóbulos de las orejas le queden directamente sobre el centro de
los hombros. Mantenga los hombros ligeramente hacia atrás
como si estuviera tratando de aproximarlos entre sí, y aparte
los pies de modo que estén alineados con las caderas.
Isométricos cervicales– Flexión: Con las yemas de los dedos,
aplique presión ligera a la frente y trate de inclinar el cuello
hacia adelante contra resistencia. Mantenga esta posición por
3 segundos. Relájese, luego repita el ejercicio de 10 a 15 veces.
Haga 3 sesiones al día.
Isométricos cervicales– Extensión: Con las yemas de los dedos,
aplique presión ligera a la parte posterior de la cabeza y trate
de inclinar el cuello hacia atrás contra resistencia. Mantenga
esta posición por 3 segundos. Relájese, luego repita el ejercicio
de 10 a 15 veces. Haga 3 sesiones al día.
7
FLEXIÓN LATERAL
(Isométricos cervicales)
ROTACIÓN
(Isométricos cervicales)
ISOMÉTRICOS CERVICALES
Comience ya sea en posición sentada o de pie, con la cabeza
erguida, los hombros ligeramente hacia atrás y los ojos mirando
hacia adelante. Coloque la cabeza de modo que los lóbulos de
las orejas le queden directamente sobre el centro de los
hombros. Mantenga los hombros ligeramente hacia atrás como
si estuviera tratando de aproximarlos entre sí, y aparte los pies de
modo que estén alineados con las caderas.
Isométricos cervicales– Flexión lateral: Con la mano izquierda,
aplique presión ligera al lado izquierdo de la cabeza y trate de
inclinar el cuello en esa dirección contra resistencia. Mantenga
esta posición por 3 segundos y relájese. Con la mano derecha,
aplique presión ligera al lado derecho de la cabeza y trate de
inclinar el cuello en esa dirección contra resistencia. Mantenga
esta posición por 3 segundos y relájese. Cambie de lado y repita
el ejercicio 10 ó 15 veces. Haga 3 sesiones al día.
Isométricos cervicales– Rotación: Con las yemas de los dedos de
la mano derecha, aplique presión ligera a la sien y trate de girar
la cabeza hacia la derecha contra resistencia. Mantenga esta
posición por 3 segundos y relájese. Con la mano izquierda, gire la
cabeza hacia la izquierda contra resistencia. Mantenga esta
posición por 3 segundos y relájese. Cambie de lado y repita el
ejercicio 10 ó 15 veces. Haga 3 sesiones al día.
8
ROTACIÓN DEL CUELLO SOBRE
PELOTA DE EJERCICIOS
Siéntese sobre la pelota, con la cabeza erguida, los hombros
ligeramente hacia atrás y los ojos mirando hacia adelante.
Coloque la cabeza de modo que los lóbulos de las orejas le
queden directamente sobre el centro de los hombros.
Mantenga los hombros ligeramente hacia atrás como si
estuviera tratando de aproximarlos entre sí, y aparte los pies de
modo que estén alineados con las caderas. Lentamente, gire la
cabeza de un lado a otro. No olvide fijar la vista y conservar una
buena postura. Repita la rotación de 10 a 15 veces hacia cada
lado. Haga 3 sesiones al día.
9
ROTACIÓN DEL TRONCO
Siéntese sobre una silla o pelota, con la cabeza erguida, los
hombros ligeramente hacia atrás y los ojos mirando hacia
adelante. Coloque la cabeza de modo que los lóbulos de las
orejas le queden directamente sobre el centro de los hombros.
Trate de aproximar los omóplatos entre sí ligeramente. Puede
cruzar los brazos sobre el pecho o ponerlos a los costados.
Lentamente, gire el tronco a cada lado mientras mantiene la
cabeza y el cuello hacia adelante. Para ayudarle a no mover la
cabeza en absoluto, quizás le resulte útil, una vez que esté en
la posición de partida, escoger visualmente un punto en la
pared frente a usted para fijar la vista en él mientras gira el
tronco con la cabeza y el cuello rectos. No fuerce la rotación al
punto de que el cuello y la cabeza tengan que girar junto con
el tronco. Vuelva lentamente a la posición de partida. Repita
este ejercicio de 10 a 15 veces. Haga 3 sesiones al día.
10
ROTACIÓN EXTERNA
DE LOS HOMBROS SOBRE
PELOTA DE EJERCICIOS
Coloque el asa de la banda elástica para ejercicios entre la
puerta y su marco, a unos 3 pies (1 metro) del piso; luego cierre
la puerta para sujetar la banda. Siéntese sobre la pelota, con la
cabeza erguida y los ojos mirando hacia adelante. Deje las
orejas alineadas con los hombros. Mantenga los hombros
ligeramente hacia atrás como si estuviera tratando de
aproximarlos entre sí, y aparte los pies de modo que estén
alineados con las caderas. Siéntese con un costado mirando a la
puerta. En el costado más alejado de la puerta, póngase una
toalla doblada debajo del brazo y apriétela suavemente entre ese
brazo y el cuerpo. Agarre el asa libre de la banda elástica con la
mano del brazo que sujeta la toalla. Coloque la mano y el
antebrazo a un ángulo de 90 grados respecto al brazo, de modo
que estén paralelos al piso. Gire lentamente la mano y el
antebrazo hacia afuera y a un lado hasta llegar lo más lejos
posible del cuerpo, mientras tensa la banda elástica. Vuelva a la
posición de partida. Repita este ejercicio de 10 a 15 veces y
luego hágalo con el brazo opuesto. Haga 3 sesiones al día.
11
FLEXIÓN DE BRAZOS SOBRE
PELOTA DE EJERCICIOS
Pase la banda elástica a través del anillo "D" de su tira. Conecte
las dos asas. Coloque la tira de la banda elástica entre la
puerta y su marco, a unas 2 pulgadas (5 cm) del piso; luego
cierre la puerta para sujetar la banda entre la puerta y el marco.
Siéntese sobre la pelota, con la cabeza erguida y los ojos
mirando hacia adelante. Deje las orejas alineadas con los
hombros. Mantenga los hombros hacia atrás como si estuviera
tratando de aproximarlos entre sí, y aparte los pies de modo
que estén alineados con las caderas. Siéntese mirando a la
puerta. Agarre las dos asas de la banda elástica, con las palmas
hacia arriba. Mantenga los codos en los costados y haga una
flexión contrayendo los músculos del antebrazo y el brazo.
Repita este ejercicio de 10 a 15 veces en cada lado. Haga 3
sesiones al día. También puede variar este ejercicio agarrando
el tubo con las palmas orientadas hacia abajo.
12
TIRONES DIAGONALES EXTERNOS
SOBRE PELOTA DE EJERCICIOS
(DE ARRIBA A ABAJO)
Coloque una de las asas de la banda elástica entre la puerta y
su marco, a unas 2 pulgadas (5 cm) de la parte superior de la
puerta; luego cierre la puerta para que la banda quede
sujetada contra el marco. Siéntese sobre la pelota, con la
cabeza erguida y los ojos mirando hacia adelante. Deje las
orejas alineadas con los hombros. Mantenga los hombros
hacia atrás como si estuviera tratando de aproximarlos entre sí,
y aparte los pies de modo que estén alineados con las caderas.
Siéntese con un costado mirando a la puerta. Agarre la otra asa
con la mano más alejada de la puerta. Dejando recto el brazo,
tire de la banda elástica diagonalmente por encima del cuerpo
en dirección del piso. Mantenga la palma orientada hacia
usted. Vuelva lentamente a la posición de partida. Repita este
ejercicio de 10 a 15 veces, luego cambie de lado y hágalo con
el otro brazo. Haga 3 sesiones al día.
13
TIRONES DIAGONALES INTERNOS
SOBRE PELOTA DE EJERCICIOS
(DE ARRIBA A ABAJO)
Coloque una de las asas de la banda elástica entre la
puerta y su marco, a unas 2 pulgadas (5 cm) de la parte
superior de la puerta; luego cierre la puerta para que la
banda quede sujetada contra el marco. Siéntese sobre la
pelota, con la cabeza erguida y los ojos mirando hacia
adelante. Deje las orejas alineadas con los hombros.
Mantenga los hombros hacia atrás como si estuviera
tratando de aproximarlos entre sí, y aparte los pies de modo
que estén alineados con las caderas. Siéntese con un
costado mirando a la puerta. Agarre la otra asa con la mano
más cercana a la puerta. Dejando recto el brazo, tire de la
banda elástica diagonalmente hacia abajo por encima del
cuerpo. El pulgar estará hacia arriba al principio del ejercicio
y, conforme usted tira de la banda hacia abajo
diagonalmente sobre el cuerpo, terminará orientado hacia
abajo. Vuelva lentamente a la posición de partida. Repita
este ejercicio de 10 a 15 veces, luego cambie de lado y
hágalo con el otro brazo. Haga 3 sesiones al día.
14
TIRONES DIAGONALES INTERNOS
SOBRE PELOTA DE EJERCICIOS
(DE ABAJO A ARRIBA)
Coloque el asa de la banda elástica entre la puerta y su marco,
a unas 2 pulgadas (5 cm) del piso; luego cierre la puerta para
que el asa quede sujetada contra el marco. Siéntese sobre la
pelota, con la cabeza erguida y los ojos mirando hacia
adelante. Deje las orejas alineadas con los hombros. Mantenga
los hombros hacia atrás como si estuviera tratando de
aproximarlos entre sí, y aparte los pies de modo que estén
alineados con las caderas. Siéntese con un costado mirando a
la puerta. Agarre la banda elástica con la mano más alejada de
la puerta. Mientras mantiene recto el brazo, tire de la banda
elástica diagonalmente hacia arriba por encima del cuerpo.
Mantenga el pulgar orientado hacia arriba durante el ejercicio.
Vuelva lentamente a la posición de partida. Repita este
ejercicio de 10 a 15 veces, luego cambie de lado y hágalo con
el otro brazo. Haga 3 sesiones al día.
15
TIRONES DIAGONALES EXTERNOS
SOBRE PELOTA DE EJERCICIOS
(DE ABAJO A ARRIBA)
Coloque el asa de la banda elástica entre la puerta y su marco,
a unas 2 pulgadas (5 cm) del piso; luego cierre la puerta para
que el asa quede sujetada contra el marco. Siéntese sobre la
pelota, con la cabeza erguida y los ojos mirando hacia
adelante. Deje las orejas alineadas con los hombros. Mantenga
los hombros hacia atrás como si estuviera tratando de
aproximarlos entre sí, y aparte los pies de modo que estén
alineados con las caderas. Siéntese con un costado mirando a
la puerta. Agarre la banda elástica con la mano más cercana a
la puerta. Dejando recto el brazo, tire de la banda elástica
diagonalmente hacia arriba por encima del cuerpo. Mantenga
el pulgar orientado hacia arriba durante el ejercicio. Vuelva
lentamente a la posición de partida. Repita este ejercicio de 10
a 15 veces, luego cambie de lado y hágalo con el otro brazo.
Haga 3 sesiones al día.
16
Por favor refiérase al libro del ejercicio de
Backnobber®II para los ejercicios y la
instrucción específicos.
Instrucciones para inflar la pelota de ejercicios
Paso 1: Conecte el tubo de llenado blanco corto al extremo de la bomba de aire.
Paso 2: Introduzca la punta del tubo de llenado blanco directamente en la pelota
de ejercicios.
Paso 3: Con la bomba de aire, infle la pelota de ejercicios hasta conseguir la dureza
deseada. Nota: Las pelotas de ejercicio pueden dejarse ligeramente desinfladas para
que estén más blandas, o sobreinflarse si se prefieren más duras.
Paso 4: Cuando termine de inflar, quite rápidamente la bomba de aire de la pelota de
ejercicios e introduzca el tapón blanco largo, empujándolo hasta que quede al ras de la
superficie de la pelota.
Figura 4a: Tapón blanco largo
Figura 4b: Pelota de ejercicios completamente
inflada, con el tapón al ras de la superficie.
Método de inflado opcional
Si lo desea, puede inflar la pelota de ejercicios usando otra bomba de aire, como por
ejemplo un inflador de neumáticos de bicicleta o una bomba con compresor.
NOTAS
NOTAS
Home Exercise Kit
Cervical
User Manual
18011 Mitchell South, Irvine, CA 92614
Call 800.266.6969 Fax 800.821.8012
www.vqorthocare.com
[email protected]
VQO15032602