1
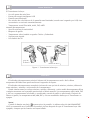
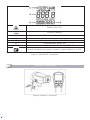
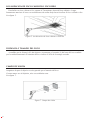
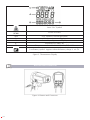
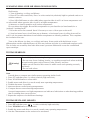
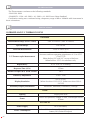
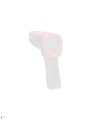
MANUAL DE INSTRUCCIONES
OPERATING INSTRUCTIONS
TERMÓMETRO DIGITAL POR
INFRARROJOS /
INFRARED DIGITAL THERMOMETER
COD. 51262
ESPAÑOL................................ 2
ENGLISH............................... 20
GARANTIA / GUARANTEE.... 39
ESPAÑOL
TABLA DE CONTENIDO
Introducción.....................................................................................................................................3
Información de seguridad.................................................................................................................4
Características...................................................................................................................................5
Pantalla.............................................................................................................................................5
Botones y conectores........................................................................................................................6
Cómo trabaja el Termómetro............................................................................................................7
Funcionamiento del Termómetro......................................................................................................7
Localización de foco caliente o foco frío...........................................................................................8
Distancia y tamaño del foco..............................................................................................................8
Campo de visión...............................................................................................................................8
Emisividad........................................................................................................................................9
Configuración de usuario..................................................................................................................9
Configuración de emisividad............................................................................................................9
Bloqueo del gatillo.........................................................................................................................11
Selección ºC/ºF...............................................................................................................................11
Configuración HAL.........................................................................................................................12
Configuración LAL..........................................................................................................................12
Datos..............................................................................................................................................12
Medición Termopar tipo K..............................................................................................................12
Retención.......................................................................................................................................13
Mediciones típicas..........................................................................................................................13
Prueba de contactores (arrancadores)..............................................................................................13
Prueba de relés cerrados.................................................................................................................13
Prueba de fusibles y conexiones.....................................................................................................14
Prueba de conexiones eléctricas.....................................................................................................14
Exploración de paredes por pérdidas de aire o deficiencias del aislamiento....................................14
Prueba de cojinetes........................................................................................................................15
Prueba de correas y poleas.............................................................................................................15
Comprobación calor radiante..........................................................................................................16
Medición de temperatura de descarga de rejilla, caja o difusor.......................................................16
Comprobación de obstrucción de aire-aire en los evaporadores o condensadores...........................16
2
Mantenimiento...............................................................................................................................17
Cambio de la batería.......................................................................................................................17
Limpieza de la lente.......................................................................................................................17
Limpieza de la carcasa....................................................................................................................17
Solución de problemas...................................................................................................................17
Certificado CE.................................................................................................................................17
Especificaciones..............................................................................................................................18
Infrarrojos.......................................................................................................................................18
Láser...............................................................................................................................................18
Eléctrico.........................................................................................................................................18
Físico..............................................................................................................................................18
Ambiente........................................................................................................................................18
LISTADO DE TABLAS
Símbolos...........................................................................................................................................4
Botones y Conectores.......................................................................................................................7
Emisividad de la superficie................................................................................................................9
Solución de problemas...................................................................................................................17
LISTADO DE FIGURAS
Símbolos y marcas de seguridad.......................................................................................................4
Termómetro infrarrojos.....................................................................................................................5
Pantalla del Termómetro...................................................................................................................6
Botones y Conectores.......................................................................................................................6
Localización del foco caliente...........................................................................................................8
Distancia y tamaño del foco..............................................................................................................8
Campo de visión...............................................................................................................................8
INTRODUCCION
El termómetro por infrarrojos modelo COD. 51262 (de ahora en adelante, el “Termómetro”)
puede determinar la temperatura de una superficie, midiendo la cantidad de energía infrarroja
irradiada por la superficie del objetivo. Dispone de diferentes distancias para enfocar (D:S) el
objeto y diferentes rangos de temperatura, para más detalles ver contenido.
Los termómetros por infrarrojos no necesitan contacto para tomar medidas de temperatura.
Cuentan con un diseño de bajo consumo para que puedan ser utilizados por un periodo de tiempo
más largo, solventando así la problemática del frecuente cambio de baterías y los problemas de
baja batería durante la medición.
El diseño inteligente puede tomar medidas de manera más fácil y rápida. El termómetro por
infrarrojos, de forma inteligente, puede seleccionar la batería o USB como fuente de energía.
3
INFORMACION DE SEGURIDAD
Advertencia!
Una advertencia identifica condiciones y acciones que representen un peligro
para el usuario. Para evitar descargas eléctricas o daños personales, siga las
siguientes instrucciones:
No apunte con el láser directamente a los ojos o indirectamente a
superficies reflectantes.
- Antes del uso del Termómetro, inspeccione la carcasa. No use el
Termómetro si ésta parece dañada. Busque roturas o pérdidas de plástico.
- Reemplace la batería tan pronto como el indicador de batería
aparezca.
- No utilice el Termómetro si opera de manera anormal. La protección puede
estar dañada.
En caso de duda, el Termómetro debe ser reparado.
- No utilice el Termómetro alrededor de gas explosivo, vapor, o polvo.
Para evitar quemaduras, recuerde que los objetos altamente reflectantes
pueden dar lugar a mediciones inferiores a su temperatura real.
- No lo use de una manera no especificada por este manual o la protección
suministrada por el equipo podrá verse afectada.
Precaución.
Para evitar daños al termómetro o al equipo bajo prueba protéjalos de lo
siguiente:
- EMF (campos electromagnéticos) de soldaduras por arco, calentadores de
inducción, etc.
- Electricidad estática.
- Cambios bruscos de temperatura (causados por largos o abruptos cambios
de temperatura en el ambiente-espere 30 minutos completos hasta que se
estabilice el Termómetro antes de usarlo).
- No deje el Termómetro en o cerca de objetos de alta temperatura.
Tabla 1 y figura 1. Muestra varios símbolos y marcas de seguridad que están en el Termómetro y
en este manual.
Tabla 1. Símbolos
Símbolo
Explicación del símbolo
Riesgo de peligro. Información importante. Lea el manual.
Advertencia. Láser.
Conforme con los estándares de la Unión Europea
Batería
Figura 1. Símbolos y marcas de seguridad
4
CARACTERISTICAS
El Termómetro incluye:
- Un sólo punto de mira láser
- Fuente de energía inteligente USB
- Pantalla retroiluminada
- Dos niveles de color blanco de la pantalla retroiluminada (cuando esté cargando por USB, ésta
característica se activará automáticamente)
- Temperatura actual Plus MIN, MAX, DIF, MED
Muestra de temperatura
- Sencillo selector de emisividad.
- Bloqueo de gatillo
- Temperatura seleccionable en grados Celsius y Fahrenheit
- Soporte para trípode
- Una batería de 9V
Pantalla
Láser
Gatillo
Tapa de
la batería
Batería 9V 6F22
Figura 2. Termómetro Infrarrojos
PANTALLA
El indicador de temperatura principal informa de la temperatura actual o de la última
temperatura IR leída hasta que transcurran 8 segundos de espera.
El indicador de temperatura secundario informa de una opción de máximo, mínimo, diferencia
entre máximo y mínimo o valor medio de la temperatura.
Puede alternar entre los valores máximo, mínimo, diferencia y valor medio de temperatura IR en
cualquier momento en la pantalla presionando el botón amarillo. Las temperaturas MAX, MIN, DIF
y AV son constantemente calculadas y actualizadas cuando el gatillo es presionado. Después de
liberar el gatillo, las temperaturas MX,MIN,DIF y AV son mantenidas hasta que el Termómetro se
apague.
Notas:
Cuando la batería este baja,
aparecerá en la pantalla. La última selección (MAX/MIN/DIF/
AVG) es mantenida en el indicador secundario incluso después de que el Termómetro haya sido
apagado, siempre que las baterías no hayan fallado.
5
Símbolo Láser “On”
HOLD
SCAN
ºCºF
A
B
C
D
Explorar o Retener
ºC/ºF Símbolo (Celsius/Fahrenheit)
Indicador de temperatura principal
Indicador de temperatura secundario
Emisividad baja, media, alta
Valores de temperatura para MAX, MIN, DIF, MED
Símbolo de batería baja aparece cuando la carga de batería es <4.5V.
Figura 3. Pantalla del Termómetro.
BOTONES Y CONECTORES
Figura 4. Botones y conectores
6
Tabla2. Botones y conectores
Botón /
Conector
Botón
AMARILLO
SET
Descripción
Presione botón AMARILLO para alternar entre MAX, MIN, DIF, MED, HAL,
LAL, DATA nad ºT-ºC.
Presione botón AMARILLO para encender nuevamente el Termómetro y
mostrar el resultado de la ultima medición
Presione para entrar en modo configuración.
Para detalles consulte apartado configuración de usuario.
Presione
para encender la retroiluminación de la pantalla, nivel
uno de retroiluminación, nivel dos de retroiluminación y apagado de la
retroiluminación, el icono
aparecerá y desaparecerá.
Presione
DATA
TC-K jack
POWER jack
USB
para encender y apagar el láser. después de que el láser se
encienda,
será mostrado.
Botón de transferencia de datos
. Detalles en apartado configuración de
usuario.
Cuando el Termómetro entre en modo configuración, pulse
para
seleccionar una opción. Detalles en apartado configuración de usuario.
Cuando el Termómetro entre en modo configuración, pulse
para
seleccionar una opción. Detalles en apartado configuración de usuario
Inserte el termopar tipo K en esta entrada para tomar medidas de temperatura
con contacto.
Inserte el adaptador de corriente en esta entrada.
Después de conectar el cable USB, automáticamente el Termómetro
selecciona alimentación por USB y la pantalla retroiluminada se encenderán.
Con el software instalado, puede llevar a cabo la transeferencia y tratado de
datos.
COMO TRABAJA EL TERMOMETRO
El termómetro infrarrojos toma la medida de temperatura de la superficie de un objeto opaco.
La óptica del termómetro detecta la energía infrarroja, que es conectada y enfocada a un detector.
Entonces la electrónica del Termómetro traduce la información en un lector de temperatura
mostrándolo en la pantalla. El único fin del láser es de apuntar al objeto a medir.
FUNCIONAMIENTO DEL TERMOMETRO
El Termómetro se enciende cuando presiona el gatillo.
El termómetro se apaga cuando no se detecta actividad durante 8 segundos.
Para medir temperatura, apunte con el Termómetro al objeto, presione y mantenga el gatillo.
Libere el gatillo para mantener la lectura de temperatura.
Asegúrese de considerar la relación tamaño distancia al foco y campo de visión. El láser sólo es
usado para apuntar.
7
LOCALIZACION DE FOCO CALIENTE O FOCO FRIO
Para hallar un foco caliente o frío, apunte el Termómetro fuera del área objetivo. Luego,
lentamente atraviese el área con movimientos de arriba abajo hasta localizar el foco caliente o frío.
Vea figura 5.
Figura 5. Localización de foco caliente o foco frío
DISTANCIA Y TAMAÑO DEL FOCO
A medida que la distancia (D) del objetivo incremente, el tamaño (S) del área del foco medido
por la unidad aumentará. El tamaño del foco indica el 90% de la energía cercada.
CAMPO DE VISION
Asegúrese de que el objetivo es más grande que el tamaño del foco.
Cuanto menor sea el objetivo, más cerca debería estar.
Vea figura 7.
No
Si
Figura 7. Campo de visión
8
EMISIVIDAD
La emisividad describe las características de emisión de energía de los materiales. La mayor
parte de las superficies de los materiales y pinturas u óxidos tienen una emisividad en torno a 0.95.
Si es posible, para compensar las lecturas erróneas que pueden derivarse de la medición de
superficies de metales brillantes, cubra la superficie a medir con cinta adhesiva o pintura mate
negra (<150ºC/302ºF) y utilizar el ajuste de emisividad alto. Deje tiempo para que la cinta o la
pintura alcance la misma temperatura que la superficie debajo. Mida la temperatura de la superficie
de la cinta o pintura.
Si no puede usar cinta o pintura, puede mejorar la precisión de sus mediciones con el selector
de emisividad. A pesar del selector de emisividad, puede existir dificultad de conseguir una
precisión completa de la medición del objetivo con una superficie metálica o brillante.
CONFIGURACION DE USUARIO
Presione botón SET para pasar a través de configuración de emisividad, bloqueo de gatillo, o
selección ºC/ºF.
Presione botón AMARILLO para seleccionar y salir.
CONFIGURACION DE EMISIVIDAD
Esta característica es para cambiar el valor de emisividad. Para ajustar este valor, siga el siguiente
procedimiento:.
1. Presione SET para seleccionar emisividad. El icono E parpadeará.
2.Presione
para aumentar el valor de 0.01 o presione y mantenga
para acceder a
configuración rápida. El máximo valor es 1.00.
3.Presione
para reducir el valor o presione y mantenga
para acceder a configuración
rápida. El valor mínimo es 0.10.
El Termómetro le permite ajustar la unidad de emisividad para el tipo de superficie antes de
medir.
Remitir a tabla 2. Pero solamente es un caso de referencia. Puede basarse en su propio caso y
materiales para tener diferentes configuraciones.
Tabla 3. Emisividad de la superficie
Superficie
Valor de cambio
METALES
Aluminio
Oxidado
Aleación A3003
Oxidado
Rugoso
0.2-0.4
0.3
0.1-0.3
Latón
Bruñido
Oxidado
0.3
0.5
9
Cobre
Oxidado
Bloques de terminales eléctricos
0.4-0.8
0.6
Haynes
Aleación
0.3-0.8
Inconel
Oxidado
Chorro de arena
Electropulido
0.7-0.95
0.3-0.6
0.15
Hierro fundido
Oxidado
Sin oxidar
Fundido
0.6-0.95
0.2
0.2-0.3
Hierro forjado
Mate
0.9
Conductor
Áspero
Oxidado
0.4
0.2-0.6
Molibdeno
Oxidado
0.2-0.6
Niquel
Oxidado
0.2-0.5
Platino
Negro
0.9
Acero
Laminado en frío
0.7-0.9
Hierro
Oxidado
Enmohecido
0.5-0.9
0.5-0.7
NO-METALES
Amianto
0.95
Asfalto
0.95
Basalto
0.7
Carbón
Sin oxidar
Grafito
0.8-0.9
0.7-0.8
Carborundo
0.9
Cerámica
0.95
10
Arcilla
0.95
Tela
0.95
Ground Sheet
Polished Sheet
0.4-0.6
0.1
Zinc
Oxidado
0.1
Vídrio
Plata
0.85
Grava
0.95
Yeso
0.8-0.95
Hielo
0.98
Piedra caliza
0.98
Papel (cualquier color)
0.95
Plástico
Opaco
0.95
Tierra
0.9-0.98
Agua
0.93
Madera (natural)
0.9-0.95
BLOQUEO DEL GATILLO
Para bloquear o desbloquear el gatillo, proceda de la siguiente manera:
1. Presione SET para seleccionar bloqueo de gatillo, el icono
parpadeará.
2. Presione
o
para seleccionar apagado o encendido.
Cuando el gatillo esté bloqueado, el Termómetro quedará encendido para continuar midiendo,
no es necesario pulsar el gatillo.
Cuando el gatillo esté desbloqueado, es necesario que pulse el gatillo para medir. Cuando libere
el gatillo, el Termómetro mantendrá el resultado de la medida automáticamente.
SELECCIONAR ºC/ºF
Esta característica permite la selección entre ºC o ºF.
1. Presione SET para elegir modo selección ºC/ºF.
2. Presione
o
para seleccionar ºC o ºF.
11
CONFIGURACION HAL
Esta característica sirve para configurar el límite máximo de temperatura. El Termómetro sonará
si el valor medido es superior al máximo configurado.
1.Presione botón AMARILLO para sellecionar modo HAL.
2.Presione
para incrementar el valor o presione y mantenga
para incrementarlo
rápidamente hasta el máximo valor de temperatura deseado. El Termómetro para y suena.
3.Presione
para decrementar el valor o presione y mantenga
para decrementarlo
rápidamente hasta el mínimo valor de temperatura deseado o hasta el mínimo valor LAL. El
Termómetro para y suena.
4.Presione SET para confirmar esta configuración mostrando en la pantalla HIGH.
5. Esta característica no es válida cuando se lleven a cabo medidas con el modo termopar tipo K.
6. El valor HAL no puede ser configurado por debajo del valor LAL.
CONFIGURACION LAL
Esta característica es para configurar el límite mínimo de temperatura. El Termómetro sonará si
el valor medido es superior al máximo configurado.
1.Presione botón AMARILLO para sellecionar modo LAL.
2.Presione
para incrementar el valor o presione y mantenga
para incrementarlo
rápidamente hasta el máximo valor de temperatura deseado o hasta el máximo valor HAL. El
Termómetro para y suena.
3.Presione
para decrementar el valor o presione y mantenga
para decrementarlo
rápidamente hasta el mínimo valor de temperatura deseado.El Termómetro para y suena.
4.Presione SET para confirmar esta configuración siendo mostrada en la pantalla LOW,
5. Esta característica no es válida cuando se lleven a cabo medidas con el modo termopar tipo K.
6. El valor LAL no puede ser configurado por encima del valor HAL.
DATOS
Esta característica sirve para almacenar los datos recogidos en modo medición.
1. El máximo número de datos a ser almacenados es 99.
2. Cuando la memoria esté vacía se mostrará ‘--- . ---’
3. Bajo modo no medición, presione y mantenga DATA y
durante 8 segundos para eliminar los
datos de la memoria, el termómetro sonará.
4. Bajo modo medición, presione botón AMARILLO para cambiar a modo DATA.
5. Presione
o
para seleccionar la localización de los datos almacenados.
6. Presione DATA para almacenar el valor.
MEDICION TERMOPAR TIPO K
Esta característica sirve para medir la temperatura con termopar tipo K.
1. Presione botón AMARILLO para acceder a modo ºT-ºC. La pantalla mostrará OL antes de que el
termopar se desconecte.
2. Conecte el termopar tipo k, presione el gatillo y comience la medición. La pantalla mostrará la
lectura.
3. Libere el gatillo. La lectura será mantenida y la pantalla mostrará ºT-ºC. La temperatura medida
es mostrada en la parte inferior derecha.
12
RETENCION
La pantalla se mantendrá activada 8 segundos después de liberar el gatillo. HOLD aparece en
la mitad superior de la pantalla. Cuando el gatillo se pulse de nuevo, el Termómetro comenzará a
medir con la última función seleccionada.
MEDICIONES TIPICAS
Esta sección describe una variedad de mediciones realizadas a menudo por los técnicos.
Recordatorio:
- El usuario puede seleccionar apagar o encender la retroiluminación y apagar o encender el
láser donde sean tomadas las lecturas con el Termómetro. Pero si se está utilizando el USB como
medio de alimentación, los dos niveles de retroiluminación se encenderán automáticamente.
- Emisividad relativamente alta significa normalmente ajuste de emisividad de alrededor de
0.95.
- Emisividad relativamente baja significa normalmente ajuste de emisividad de alrededor de
0.30.
- Cuando el usuario no pueda identificar la emisividad del objeto a medir, el usuario puede
cubrir la superfice a medir (temperatura>150ºC) con una cinta eléctrica negra (emisividad de
alrededor de 0.95). De tiempo a la cinta para que alcance la misma temperatura que la del objeto
a medir. Mida y registre la temperatura de la cinta.
- Apunte con el Termómetro hacia el objeto a medir, ajuste la emisividad para que sea la
misma que la temperatura de la cinta. En este momento, el ajuste de la emisividad del termómetro
está cerca de la emisividad del objeto a ser medido, la medición puede comenzar.
PRUEBA DE CONTACTORES (ARRANCADORES)
1.Presione SET para seleccionar emisividad. Presione
/
para seleccionar emisividad
relativamente baja para contactos brillantes, o 0.7 de nivel medio para contactos oscuros.
2.Presione AMARILLO para seleccionar MAX.
3.Mida la línea y carga lateral de un polo sin liberar el gatillo.
4.Una diferencia de temperatura entre la línea y la carga lateral de un polo indica un incremento
de la resistencia de un punto y el contacto puede estar fallando.
PRUEBA DE RELES CERRADOS
1.Presione SET y luego
/
para ajustar la emisividad a relativamente baja para conectores
sin aislamiento o relativamente alta para relés recubiertos de plástico o para relés cerrados de
baquelita o conectores aislados.
2.Presione botón AMARILLO para seleccionar MAX.
3.Inicie la búsqueda
4.Mida la carcasa del relé en busca de focos calientes.
5.Mida las conexiones eléctricas en los terminales del relé en busca de focos calientes.
13
PRUEBA DE FUSIBLES Y CONEXIONES
1.Presione SET y luego presione para configurar emisividad a relativamente alta para el cuerpo del
fusible cubierto de papel o conectores aislados.
2.Presione botón AMARILLO para seleccionar MAX.
3.Busque a lo largo de la cubierta del papel del fusible.
4.Sin liberar el gatillo, busque cada fusible.
Temperaturas desiguales entre fusibles pueden indicar desequilibrio de intensidad o amperaje.
5.Presione SET y luego
/
para ajustar la emisividad a relativamente baja, para fusibles de
metal y tapas y conexiones aisladas.
6.Presione MODE para seleccionar MAX.
7.Busque el extremo de cada tapa en cada fusible.
Nota:
Temperaturas desiguales o una temperatura alta indica una conexión floja o corroída a través
de la abrazadera del fusible.
PRUEBA DE CONEXIONES ELECTRICAS
1. Presione SET y luego
/
para ajustar la emisividad a relativamente baja para conectores
sin aislamiento o conexiones buss o relativamente alta para conexiones aisladas.
Nota:
Usualmente los conductores son más pequeños que el tamaño del foco del Termómetro. Si el
tamaño del foco es mayor que el conector, la lectura de temperatura es la media de la del foco.
2. Busque el conductor, moviendo hacia la dirección del conector eléctrico (conexión rápida,
tuerca para cable, conexión buss, o agarradera).
EXPLORACION DE PAREDES POR PERDIDAS DE AIRE
O DEFICIENCIAS DEL AISLAMIENTO
1. Apague la calefacción, enfriadores o aireadores
2.Presione SET para seleccionar emisividad. Presione
/
para seleccionar emisividad
relativamente alta para superficies pintadas o superficies de ventanas.
3. Presione botón AMARILLO para seleccionar MIN cuando el lado opuesto de la pared
está a menor temperatura y/o seleccione MAX cuando el lado opuesto de la pared esté a mayor
temperatura.
4. Mida la temperatura de la superficie interior de la pared.
No libere el gatillo. Registre la temperatura como su base (o punto de referencia) para paredes
“perfectamente” aisladas.
5. Póngase en frente de la pared a escanear. Escaneela.
6. Analice con líneas horizontales desde la parte superior hasta la inferior, o en líneas
horizontales del techo de pared a pared. Busque las mayores desviaciones de temperatura como
referencia para identificar los problemas. Esto completa el análisis del aislamiento.
Encienda el aireador (no calor, no enfriador) y compruebe de nuevo. Si los resultados del
test con el aireador activado son diferentes que con el aireador desactivado, esto puede indicar
14
fugas de aire en las paredes acondicionadas. Las pérdidas de aire son causadas por fugas en los
conductos que crea una presión diferencial a través del espacio acondicionado.
PRUEBA DE COJINETES
Advertencia!
Para evitar daños probando cojinetes:
-No lleve ropas amplias, joyas, o cualquier otra cosa alrededor del cuello
cuando trabaje sobre elementos de movimiento tales como motores,
aireadores, correas y ventiladores.
-Asegúrese de que la desconexión eléctrica está al alcance, libre y operando
correctamente.
-No trabaje sólo.
Nota:
Funciona mejor comparar dos motores similares que operan con cargas similares.
1.Presione SET y luego
/
para seleccionar emisividad relativamente alta.
2.Presione botón AMARILLO para seleccionar MAX.
3.Active el motor y permita que alcance la temperatura de funcionamiento estable.
4.Desactive el motor si es posible.
5.Mida las temperaturas de los dos cojinetes de los motores y compárelas.
6.Temperaturas desiguales o una alta temperatura puede indicar una falla de lubricación u otro
problema del cojinete que sea producido por un exceso de fricción.
7.Repita la secuencia para los cojinetes de los aireadores.
PRUEBA DE CORREAS Y POLEAS
1.Presione SET y luego
/
para seleccionar emisividad relativamente alta.
2.Presione botón AMARILLO para seleccionar MAX.
3.Active el motor y permita que alcance la temperatura en funcionamiento estable.
4.Apunte con el Termómetro a la superficie a medir.
5.Comienza el registro de temperatura.
6.Mueva lentamente el Termómetro hasta la correa hacia la segunda polea.
- Si la correa esta deslizando, la temperatura de la polea será más elevada debido a la fricción.
- Si la correa está deslizando, la temperatura de la correa entre poleas permanecerá elevada.
- Si la correa no está deslizando, la temperatura de la correa entre poleas se reducirá.
- Si la superficie interior de la polea no mantiene la forma de “V”, esto indica deslizamiento
de la correa y por lo tanto continuará operando a alta temperatura hasta que la polea no sea
reemplazada.
- Las poleas deben estar correctamente alineadas (incluido inclinación y orientación) para que
la correa y poleas operen a las temperaturas adecuadas. Una regla o cuerda tensa, puede ser
utilizada para comprobar alineaciones.
- La polea del motor debe operar a una temperatura constante con la polea del aireador.
Si la polea del motor esta a una temperatura más alta en su eje que en la circunferencia exterior,
probablemente la correa no esté deslizando correctamente.
Si la circunferencia exterior de la polea está a una temperatura más elevada que el eje del motor,
entonces la correa está probablemente deslizando y las poleas pueden estar mal alineadas.
15
COMPROBACION CALOR RADIANTE
El calor radiante de las tubos en el suelo normalmente correrá paralelamente hacia el exterior de
las paredes. Partiendo de la unión suelo-pared, explore paralelamente a la pared mientras se aleja
de ella.
En paralelo al exterior de la pared debería encontrar filas paralelas isotérmicas indicando la
ubicación del calor de los tubos bajo la superficie. Perpendicular a l exterior de la pared, debería
encontrar incrementos y descensos de temperaturas a iguales distancias. Altas temperaturas indica
que está explorando un tubo caliente bajo la superficie del suelo, temperaturas bajas indican un
espacio entre tubos calientes.
1.Presione SET y luego
/
para seleccionar emisividad relativamente alta.
2. Presione botón AMARILLO para seleccionar MAX.
3. Para localizar calor radiante de los tubos en el suelo, temporalmente eleve la temperatura
del circuito para crear focos más calientes e identificar los tubos.
4. Antes de liberar el gatillo, presione MODE para alternar entre el MIN,MAX,DIF de las
temperaturas del suelo y registrar la temperatura para futuras comparaciones y tendencias bajo
condiciones similares.
MEDICION DE TEMPERATURA DE DESCARGA DE REJILLA, CAJA O DIFUSOR
1.Presione SET y luego
/
tpara seleccionar emisividad relativamente alta.
2.Apunte con el Termómetro a la descarga de la rejilla de aire, caja o difusor.
3.Mida la temperatura de descarga.
4.Libere el gatillo para congelar la lectura de temperatura durante 8 segundos y registre esta
temperatura.
5.La temperatura de la rejilla, caja o difusor debería ser equivalente a la temperatura de descarga
en el controlador del aire.
COMPROBACION DE OBSTRUCCION AIRE-AIRE EN LOS EVAPORADORES
O CONDENSADORES
1.Retire los paneles para mejorar el acceso a las curvas de retorno de las bobinas y horquillas.
2.Presione SET y luego
/
para seleccionar emisividad relativamente alta para tubos de cobre.
3.Inicie el sistema de refrigeración
4.Apunte con el Termómetro a las curvas de la bobina/horquillas.
5.Comience el registro de temperatura.
6.Tome la temperatura de cada curva de la bobina/horquilla.
- Todas las curvas/horquillas de retorno del evaporador deberían estar por encima o ligeramente
por encima de la temperatura de saturación del evaporador del cuadro presión/temperatura.
- Todas las curvas/horquillas de retorno del evaporador deberían ser menores o ligeramente
menores que la temperatura de saturación del evaporador.
- Si un grupo de curvas/horquillas de retorno no se ajusta a las temperaturas esperadas, eso indica
un bloqueo o restricción del distribuidor o tubo distribuidor.
16
MANTENIMIENTO
CAMBIO DE LA BATERIA
Para instalar o cargar la batería de 9V, abra el compartimento de la batería como se muestra en
la Figura 2.
LIMPIEZA DE LAS LENTES
- Elimine las partículas adheridas con un compresor de aire.
- Limpie cuidadosamente la superficie con algodón húmedo.
- El algodón puede ser humedecido con agua.
LIMPIEZA DE LA CARCASA
Use agua y jabón en una esponja suave o un paño suave.
Para evitar daños no empape el Termómetro en agua.
¡Precaución!
Para evitar dañar el Termómetro, no lo sumerja en agua.
SOLUCION DE PROBLEMAS
Tabla 4. Solución de problemas
Síntoma
Problema
OL (en pantalla)
La temperatura está sobre rango
-OL (en pantalla)
La temperatura está bajo rango
Pantalla en blanco
El láser no funciona
Suena de manera
constante
Acción
Seleccione el objeto con las
especificaciones adecuadas
Seleccione el objeto con las
especificaciones adecuadas
Batería baja
Sustituya la batería
Fallo en batería
1. Fallo o batería baja
2. Temperatura del ambiente por
encima de 40ºC (104ºF)
1. Está configurada la opción HIGH/
LOW? y
2. El valor de la medida está por
encima del límite.
Compruebe o sustituya la batería
1. Sustituya la batería
2. Utilicelo en un área de menor
temperatura
3. Reinicie la configuración o
4. Cancele el límite
CERTIFICADO CE
El Termómetro cumple con los siguientes estándares:
- EN61326-1 EMC
- EN60825-1 Seguridad
Las pruebas de certificación se realizarán con un rango de frecuencia de 80 a 100 MHz con el
instrumento en tres orientaciones.
17
ESPECIFICACIONES
INFRARROJOS Y TERMOPAR ºT-ºC
INFRARROJOS
Rango de medida (COD. 51262)
-50ºC a 1050ºC (-58ºF a 1992ºF)
Rango espectral
8 a 14 um
Medida Infrarrojos
1.8% a 1.8ºC (4ºF)
Medida Termopar ºT-ºC
1% a 1ºC (2ºF)
(Asumiento que la temperatura del ambiente está
comprendida entre 23-25ºC (73 a 77ºF)
Por debajo de 0ºC: añadir 1ºC en lo alto de la base.
Por debajo -35ºC: sólo para referencia.
Repetibilidad
0.5ºC o 0.5% de lectura
Tiempo de respuesta (95%)
250ms
Distancia al foco (D:S) (COD. 51262)
50:1
Ajuste de emisividad
0.10~1.00
Resolución de pantalla
0.1ºC (0.1ºF)
(Siendo menor que 10ºC: 0.2ºC. Siendo mayor que
999.9: 1ºC/1ºF)
Información de pantalla secundaria
Máximo, Mínimo, Diferencia, Media
LASER
Observación
Único punto láser
Energía
Clase 2 (II) operación; Salida <1mV, longitud de onda
630 a 670mm
ELECTRICO
Suministro de energía
Batería 6F22 9V
Consumo de energía
Al menos 30 horas de batería (Alcalinas), al menos 10
horas de batería (uso general)
FISICO
Peso
270g
Tamaño
168.5mm (H) x 137.8mm (L) x 53mm (W)
AMBIENTE
Rango de Temperatura de Operación
18
0ºC a 50ºC (32ºF a 120ºF)
Humedad relativa
0 a 75% sin condensación
Temperatura de almacenaje
-20ºC a 65ºC (-4ºF a 150ºF)
ACCESSORIOS
Termopar tipo K, caja de herramientas, software CD, cable USB, batería y manual.
NOTAS
IMPORTANTE!
El fabricante no se responsabiliza de los daños o mal funcionamiento del aparato, en caso de
que no se use correctamente o se haya utilizado para trabajos para los que no esté diseñado.
De acuerdo con la Directiva de Residuos de Aparatos Eléctricos y Electrónicos (RAEE),
estos deben ser recogidos y dispuestos por separado. Si usted tiene que tirar, por favor, no use
la basura habitual. Por favor, póngase en contacto con su distribuidor para el reciclaje de forma
gratuita.
GARANTIA
Esta garantía no cubre aquellas piezas que por su uso normal tienen un desgaste.
Nota: para obtener la validez de la garantía, es absolutamente imprescindible que complete y
remita al fabricante el documento de “CERTIFICADO DE GARANTIA”, dentro de los siete dias a
partir de la fecha de compra.
19
ENGLISH
TABLE OF CONTENTS
Introduction....................................................................................................................................21
Safety Information...........................................................................................................................22
Features..........................................................................................................................................23
Display...........................................................................................................................................23
Buttons and Connector...................................................................................................................24
How the Thermometer works.........................................................................................................25
Operating the Thermometer............................................................................................................25
Locating a Hot or Cold Spot............................................................................................................26
Distance and Spot Size...................................................................................................................26
Field of View..................................................................................................................................27
Emissivity........................................................................................................................................27
User Setup......................................................................................................................................27
Emissivity Setup..............................................................................................................................27
Trigger Lock Setup..........................................................................................................................30
Switching........................................................................................................................................30
HAL Setup......................................................................................................................................30
LAL Setup.......................................................................................................................................30
DATA.............................................................................................................................................31
TC-K Thermocouple Measurement..................................................................................................31
HOLD............................................................................................................................................31
Typical Measurements....................................................................................................................31
Testing Contactors (Starters)............................................................................................................32
Testing Enclosed Relays..................................................................................................................32
Testing Fuses and Buss Connections...............................................................................................32
Testing Electrical Connections........................................................................................................32
Scanning Walls for Air Leaks or Insulation Deficiencies..................................................................33
Testing Bearings..............................................................................................................................33
Testing Belts and Sheaves...............................................................................................................33
Checking Hydronic Radiant Heat Applications...............................................................................34
Measuring Grille, Register, or Diffuser Discharge Temperature.......................................................34
20
Checking for Blockage in Air-To-Air Evaporators or Condensers......................................................34
Maintenance...................................................................................................................................35
Changing the Battery......................................................................................................................35
Cleaning the Lens...........................................................................................................................35
Cleaning the Housing.....................................................................................................................35
Troubleshooting..............................................................................................................................35
CE Certification...............................................................................................................................36
Specifications..................................................................................................................................36
Infrared and T-C Thermocouple......................................................................................................36
Laser...............................................................................................................................................36
Electrical.........................................................................................................................................36
Physical..........................................................................................................................................37
Environmental................................................................................................................................37
LIST OF TABLES
Symbols..........................................................................................................................................22
Buttons and Connector...................................................................................................................24
Surface Emissivity...........................................................................................................................28
Troubleshooting..............................................................................................................................35
LIST OF FIGURES
Symbols and Safety Markings..........................................................................................................22
Infrared Thermometer.....................................................................................................................23
Thermometer Display.....................................................................................................................24
Buttons and Connector...................................................................................................................24
Locating Hot or Cold Spot..............................................................................................................26
Distance and Spot Size...................................................................................................................26
Field of View..................................................................................................................................27
INTRODUCTION
The Model COD. 51262 Infrared Thermometer (hereafter, the ‘Thermometer’) can determine the surface
temperature by measuring the amount of infrared energy radiated by the targetís surface. They have
different distance to spot (D:S) figure and different temperature range, details see the contents.
The Thermometers are non-contact infrared thermometer with low consumption design so that they can
be used for a longer time, which can solve the frequently changing battery and low battery issues during
measurement.
Intelligent design can make measurement easier and quicker. The Thermometer can intelligently select
battery or USB power source.
21
SAFETY INFORMATION
Warning!
A warning identifies conditions and actions that pose hazards to the user. To
avoid electrical shock or personal injury, follow these guidelines:
Do not point laser directly at eye or indirectly off reflective surfaces.
- Before using the Thermometer inspect the case. Do not use the Thermometer
if it appears damaged. Look for cracks or missing plastic.
- Replace the battery as soon as the battery indicator
appears.
- Do not use the Thermometer if it operates abnormally. Protection may be
impaired.
When in doubt, have the Thermometer serviced.
- Do not operate the Thermometer around explosive gas, vapor, or dust.
- To avoid a burn hazard, remember that highly reflective objects will often
result in lower than actual temperature measurements.
- Do not use in a manner not specified by this manual or the protection
supplied by the equipment may be impaired.
Caution
To avoid damaging the thermometer or the equipment under test protect them
from the following:
- EMF (electro-magnetic fields) from arc welders, induction heaters, etc.
- Static electricity.
- Thermal shock (caused by large or abrupt ambient temperature changes – all
30 minutes from the Thermometer to stabilize before use).
- Do not leave the Thermometer on or near objects of high temperature.
Table 1 and Figure 1 show various symbols and safety markings that are on the Thermometer
and in this manual.
Table 1. Symbols
Symbol
Explanation
Risk of danger. Important information.
See Manual.
Warning. Laser
Conforms to Standards of European Union
Battery
Figure 1. Symbols and Safety Markings
22
FEATURES
The Thermometer includes:
- Single-spot Laser Sighting
- Intelligent USB power source
- Two level white colour Backlit Display (when using USB power up, this feature will be on
automatically).
- Current Temperature Plus MIN, MAX, DIF, AVG Temperature Displays/
- Easy Emissivity Selector
- Trigger Locked
- Degree Celsius and Fahrenheit Temperature Selectable
- Tripod mount
- One 9V Battery
Figure 2. Infrared Thermometer
DISPLAY
The primary temperature display reports the current or last IR temperature read until the
8-second hold time elapses.
The secondary temperature display reports a choice of maximum, minimum, difference between
maximum and minimum temperature or average value.
You can toggle through the maximum, minimum, difference and average IR temperatures
anytime the display is on by pressing the yellow button. The MAX, MIN, DIF and AV temperatures
are constantly calculated and updated when the trigger is pressed. After the trigger is released, the
MAX, MIN, DIF and AV temperatures are held until the Thermometer is auto power off.
Notes:
When the battery is low,
appears on the display. The last selection (MAX/MIN/DIF/AVG) is
maintained on the secondary display even after the Thermometer has been turned off, providing the
batteries have not failed.
23
Laser “On” Symbol
HOLD
SCAN
ºCºF
A
B
C
D
SCAN or HOLD
ºC/ºF Symbol (Celsius/Fahrenheit)
Primary temperature Display
Secondary temperature Display
Emissivity LO, MED, HI
Temperature values for the MAX, MIN, DIF, AVG
Low Battery symbol. Appears when the battery charge is <4.5V.
Figure 3. Thermometer Display
BUTTONS AND CONNECTOR
Figure 4. Buttons and Connector
24
Table 2. Buttons and Connector
Button /
Connector
YELLOW Button
SET
Description
Press YELLOW button to toggle between MAX, MIN, DIF, AVG, HAL, LAL,
DATA nad T-C options.
Press YELLOW to turn the Thermometer on again and displays the last
measurement result.
Press to enter set up mode.
Details refer to the below User Setup topics.
Press
to step through turning the display backlight on, level one display
backlight, level two display backlight and turning off the display backlight.
icon will be on and off also.
Press
DATA
TC-K jack
POWER jack
USB port
to turn the laser on and off. After laser is on,
will be shown.
Data transfer button to be used with
. Details refer to User Setup topics.
When the Thermometer enters the setup up mode, press
to select an
option, details refer to the below User Setup topics.
When the Thermometer enters the user setup mode, press
to select an
option, details refer to the below User Setup topics.
Insert the K type thermocouple into this jack to carry out contact temperature
measurement.
Insert the power adaptor into this jack.
After connecting the USB cable, the Thermometer automatically selects USB
power supply and two levels white colour Backlit Display will be on.
With the software installed, it could carry out data transferring and
management.
HOW THE THERMOMETER WORKS
Infrared thermometers measure the surface temperature of an opaque object. The Thermometer’s
optics sense infrared energy, which is collected and focused onto a detector. The Thermometer’s
electronics then translate the information into a displayed temperature reading which appears on
the display. The laser is used for aiming purposes only.
OPERATING THE THERMOMETER
The Thermometer turns on when you press the trigger.
The Thermometer turns off when no activity is detected for 8 seconds.
To measure temperature, aim the Thermometer at the target, pull and hold the trigger. Release
the trigger to hold a temperature reading.
Be sure to consider distance-to-spot size ratio and filed of view. The laser is used for aiming only.
25
LOCATING A HOT OR COLD SPOT
To find a hot or cold spot, aim the Thermometer outside the target area. Then, slowly scan across
the area with an up and down motion until you located the hot or cold spot. See Figure 5.
Figure 5. Locating Hot or Cold Spot
DISTANCE AND SPOT SIZE
As the distance (D) from the target being measured increases, the spot size (S) of the area
measured by the unit becomes larger. The spot size indicates 90% encircled energy. The maximum
D:S is obtained when the Thermometer is 600mm (60 in) form the target resulting in a spot size of
20mm (2 in). See Figure 6.
Figure 6. Distance and Spot Size
26
FIELD OF VIEW
Make sure that the target is larger than the spot size.
The smaller the target, the closer you should be to it.
See Figure 7.
Figure 7. Field of View
EMISSIVITY
Emissivity describes the energy-emitting characteristics of materials. Most organic materials and
painted or oxidized surfaces have an emissivity of about 0.95.
If possible, to compensate for inaccurate readings that may result from measuring shiny metal
surfaces, cover the surface to be measured with masking tape or flat black paint (<150 ºC/ 302 ºF)
and use the high emissivity setting. Allow time for the tape or paint to reach the same temperatures
as the surface beneath it. Measure the temperature of the tape or painted surface.
If you cannot use paint or use tape, then you could improve the accuracy of your measurements
with the emissivity selector. Even with emissivity selector, it can be difficult to get a completely
accurate infrared measurement of a target with a shiny or metallic surface.
USER SETUP
Press SET button to step through Emissivity Setup Trigger Lock Switching ºC/ºF Normal
Measurement.
Press YELLOW button to save and exit Setup.
EMISSIVITY SETUP
This feature is to change the value of emissivity. To adjust values for emissivity, follow the below
procedure:
1.Press SET to select emissivity set up, icon E=0 on the display is blinking.
2.Press
to increase the value by 0.01 or press and hold
to access quick setting. The
maximum value is 1.00.
3.Press
to decrease the value by 0.01 or press and hold
to access quick setting. The
minimum value is 0.10.
27
The Thermometer allows you to adjust the unitís emissivity for the type of surface before measured.
Refer to Table 2. But it is only a typical case. You could base on your own case and materials to
have different setting.
Table 3. Surface Emissivity
Measure Surface
Swich Setting
METALS
Aluminum
Oxidized
Alloy A3003
Oxidized
Roughened
0.2-0.4
0.3
0.1-0.3
Brass
Burnished
Oxidized
0.3
0.5
Copper
Oxidized
Electrical Terminal Blocks
0.4-0.8
0.6
Haynes
Alloy
0.3-0.8
Inconel
Oxidized
Sandblasted
Electoropolished
0.7-0.95
0.3-0.6
0.15
Iron Cast
Oxidized
Unoxidized
Molten
0.6-0.95
0.2
0.2-0.3
Iron Wrought
Dull
0.9
Lead
Rough
Oxidized
0.4
0.2-0.6
Molydbenum
Oxidized
0.2-0.6
Nickel
Oxidized
0.2-0.5
Platinum
Black
0.9
Steel
Cold-Rolled
0.7-0.9
Iron
Oxidized
Rusted
28
0.5-0.9
0.5-0.7
NON-METALS
Asbestos
0.95
Asphalt
0.95
Basalt
0.7
Carbon
Unoxidized
Graphite
0.8-0.9
0.7-0.8
Carborundum
0.9
Ceramic
0.95
Clay
0.95
Concrete
0.95
Cloth
0.95
Ground Sheet
Polished Sheet
0.4-0.6
0.1
Zinc
Oxidized
0.1
Glass
Plate
0.85
Gravel
0.95
Gypsum
0.8-0.95
Ice
0.98
Limestone
0.98
Paper (any colour)
0.95
Plastic
Opaque
0.95
Soil
0.9-0.98
Water
0.93
Wood, (natural)
0.9-0.95
29
TRIGGER LOCK SETUP
This feature is to set trigger lock or unlock.
To lock or unlock the trigger, follow the below procedures:
1. Press SET to select trigger lock setting, the
is blinking.
2. Press
or
to select ON or OFF.
When the trigger is locked, the Thermometer is on for continues measurement, there is no need
to pull the trigger.
When the trigger is unlocked, user needs to pull the trigger for measurement. When you release
the trigger, the Thermometer will keep hold the measurement result automatically.
SWITCHING ºC/ºF
This feature is to select ºC or ºF.
1. Press SET to choose ºC/ºF selection mode.
2. Press
or
to select ºC or ºF.
HAL SETUP
This feature is to set up the high limit. When carrying out measuring, the Thermometer beeps
continuous if the temperature is over this limit.
1.Press YELLOW button to toggle to HAL mode.
2.Press
to increase the value by 0.1 or press and hold
to access quick setting until the
maximum value is reached. The thermometer stops and beeps.
3.Press
to increase the value by 0.1 or press and hold
to access quick setting until the
minimum value is reached or ot lower than LAL value. The thermometer stops and beeps.
4.Press SET to confirm this setting, the LCD displays HIGH.
5. This feature is not valid when carrying out measurement with TC-K type thermocouple.
6. HAL value cannot set below the LAL value.
LAL SETUP
This feature is to set up the low limit. When carrying out measuring, the Thermometer beeps
continuous if the temperature is below this limit.
1. Press YELLOW button to toggle to LAL mode.
2. Press
to increase the value by 0.1 or press and hold
to access quick setting until the
maximum value is reached or higher than HAL value. The thermometer stops and beeps.
3. Press
to decrease the value by 0.1 or press and hold
to access quick setting until the
minimum value is reached. The thermometer stops and beeps.
4. Press SET to confirm this setting, the LCD displays.
5. This feature is not valid when carrying out measurement with TC-K type thermocouple LOW.
6. HAL value cannot set higher than the LAL value.
30
DATA
This feature is to store the data measuring under infrared mode.
1. The maximum number of data to be stored is 99.
2. When the storage is empty, it displays ‘--- . ---’
3. Under non-measurement mode, press and hold DATA and
for 8 seconds to clear the stored
data, the Thermometer beeps.
4. Under measurement mode, press YELLOW button to toggle to DATA mode.
5. Press
or
to select the location of storing the data.
6. Press DATA to store the value.
TC-K THERMOCOUPLE MEASUREMENT
This feature is to measure temperature with K type thermocouple.
1. Press YELLOW button to toggle to T-C mode. The LCD display shows OL before the
thermocouple is connected.
2. Connect the K type thermocouple, press the trigger to start measuring. The LCD display shows
the reading.
3. Release the trigger, the reading is kept, LCD shows T-C. The temperature reading is shown on
the bottom of right hand side.
HOLD
The display will remain activated 8 seconds after the trigger is released. HOLD appears in
the upper middle of the display. When the trigger is pulled again, the Thermometer will begin
measuring in the last function selected.
TYPICAL MEASUREMENTS
This section describes a variety of measurements often performed by technicians.
Reminder:
- User could select to turn on or off the backlight and laser whenever you are making readings
with the Thermometer. But if you are using USB to power up the Thermometer, the two levels
white colour backlight will be on automatically.
- Relatively high emissivity normally means emissivity setting of about 0.95.
- Relatively low emissivity normally means emissivity setting of about 0.30.
- When user cannot identify the emissivity of the object to be measured, user could cover the
surface to be measured (temperature >150 ) with black electric tape (emissivity of about 0.95).
Allow time for the tape to reach the same temperature as the object to be measured. Measure
and record the temperature of the tape.
Target the Thermometer to the object to be measured, adjust the emissivity setting to make it as
the same temperature as the tape. At this time, the Thermometer emissivity setting is close to the
emissivity of the object to be measured, measurement could be started.
31
TESTING CONTACTORS (STARTERS)
1. Press SET to select emissivity. Press
/ to select relatively low emissivity for bright contacts,
or 0.7 mid level for darkened contacts.
2. Press YELLOW button to select MAX.
3. Measure line and load side of one pole without releasing trigger
4. A temperature difference between the line and load sides of a pole indicate increased resistance
of one point and a contactor may be failing.
TESTING ENCLOSED RELAYS
1. Press SET and then press
/ to set emissivity to relatively low for uninsulated connectors or
relatively high for plastic encased relays or for bakelite enclosed relays or insulated connectors.
2. Press YELLOW button to select MAX.
3. Start to scan.
4. Measure the relay casing, looking for hot spots.
5. Measure electrical connections on relay terminals looking for hot spots.
TESTING FUSES AND BUSS CONNECTIONS
1. Press SET and then press
/ to set emissivity to relatively high for paper covered fuse body or
insulated connections.
2. Press YELLOW button to select MAX.
3. Scan the paper covered length of fuse.
4. Without releasing the trigger, scan each fuse. Unequal temperatures between fuses may indicate
voltage or amperage imbalance.
5. Press SET and then press
/ to set emissivity to relatively low, for metal fuses and caps and
insulated buss connections.
6. Press YELLOW button to select MAX.
7. Scan each end cap on each fuse.
Note
Unequal temperatures or a high temperature indicates loose or corroded connection through the
fuse buss spring clip.
TESTING ELECTRICAL CONNECTIONS
1. Press SET and then press
/ to set emissivity to relatively low for uninsulated connectors
or buss connections or relatively high for insulated connections.
Note
Conductors are typically smaller than the Thermometerís spot size. If the spot size is bigger than
the connector, the temperature reading is the average within the spot.
2. Scan the conductor, moving toward direction of electrical connector (quick connect, wire nut,
buss connection, or lug).
32
SCANNING WALLS FOR AIR LEAKS OR INSULATION
Deficiencies
1. Turn off heating, cooling, and blower.
2. Press SET to select emissivity. Press / to select emissivity relatively high for painted surfaces or
window surfaces.
3. Press YELLOW button to select MIN when opposite side of wall is at lower temperature and
or select MAX when opposite side of wall is at higher temperature.
4. Measure an interior partition wall surface temperature.
Do not release the trigger. Record this temperature as your baseline (or benchmark) for a
‘perfectly’ insulated wall.
5. Face the wall to be scanned. Stand 1.2m away to scan a 10cm spot on the wall.
6. Scan horizontal rows of wall from top to bottom, or horizontal rows of ceiling from wall to
wall. Look for greatest deviations from baseline temperature to identify problems. This completes
the insulation test scan .
Turn on the blower (no heat, no cooling) and retest. If test results with the blower on are
different than results with the blower off, this may indicate air leaks in conditioned envelope walls.
The air leaks are caused by duct leaks that create a pressure differential across the conditioned
space envelope.
TESTING BEARINGS
Warning!
To avoid injury when testing bearings:
- Do not wear loose clothing, jewelry, or anything around neck when working
around moving parts such as motors, belts, blower, and fans.
- Make sure an electrical disconnect is within reach and operating correctly
and freely.
- Do not work alone.
Note
It works best to compare two similar motors operating similar loads.
1. Press SET and then press / to select relatively high emissivity.
2. Press YELLOW button to select MAX.
3. Enable motor and allow it to reach steady state operating temperatures.
4. Disable the motor if possible.
5. Measure the two motor bearing temperatures
6. Compare the two motor bearing temperatures.
Unequal temperatures or a high temperature can indicate a lubrication or other bearing problem
that is resulting from excess friction.
7. Repeat the sequence for the blower bearings.
TESTING BELTS AND SHEAVES
1. Press SET and then press
/ to select relatively high emissivity.
2. Press YELLOW button to select MAX.
3. Enable the motor and allow it to reach a steady state operating temperatures.
4. Aim the Thermometer at the surface to be measured.
33
5. Start recording temperature
6. Slowly move the Thermometer up the belt toward second sheave.
- If belt is slipping, sheave temperature will be high from friction.
- If belt is slipping, belt temperature will remain high between sheaves.
- If belt is not slipping, belt temperature will reduce between sheaves.
- If inner surfaces of sheaves are not a true ‘V’ shape, this indicates belt slippage and will continue
to operate at elevated temperatures until sheave is replaced.
- Sheaves must be properly aligned (include ‘pitch & yaw’) for belt and sheaves to operate at
appropriate temperatures. A straight edge or taut string, can be used to check alignments.
- Motor sheave should operate at a temperature consistent with blower sheaves.
- If motor sheave is at a higher temperature at motor shaft than at outer circumference, belt is
probably not slipping.
- If outer circumference of sheave is at higher temperature than sheave at motor shaft, then belt is
probably slipping and sheaves may be misaligned.
CHECKING HYDRONIC RADIANT HEAT APPLICATIONS
Radiant heat tubes in the floor will normally run parallel to the outside walls. Starting at the
floor wall juncture, scan parallel to the wall while moving into the room away from the wall.
Parallel to the outside wall you should find parallel isothermal rows indicating the location of
heat tubes below the surface. Perpendicular to the outside wall, you should find rising and falling
temperatures at equal distances. High temperatures indicate you are scanning a heat tube beneath
the floor surface, low falling temperatures indicate a space between the heat tubes.
1. Press SET and then press
/ to select relatively high emissivity.
2. Press YELLOW button to select MAX.
3. To locate radiant heat tubes in floor, temporarily elevate the loop temperature to create hotter
spots for identifying tubing runs.
4. Before releasing trigger, press YELLOW button to toggle between MIN, MAX, DIF floor
temperatures and record the temperature for future comparison and trending under similar
conditions.
MEASURING GRILLE, REGISTER, OR DIFFUSER DISCHARGE TEMPERATURE
1. Press SET and then press
/ to select relatively high emissivity.
2. Aim the Thermometer at the discharge air grille, register, or diffuser.
3. Measure discharge temperature.
4. Release trigger to freeze the temperature reading for 8 seconds and record this temperature.
5. Grille, register, or diffuser temperature should be equivalent to discharge temperature at the
air handler.
CHECKING FOR BLOCKAGE IN AIR-TO-AIR EVAPORATORS OR CONDENSERS
1. Remove panels to gain access to coil return bends or hairpins.
2. Press SET and then press / to select relatively high emissivity for copper tube.
3. Start the refrigeration system.
4. Aim the Thermometer at coil turn bends/hairpins.
5. Start recording temperature.
6. Take temperature of each return bend/hairpin.
34
- All evaporator return bends/hairpins should be at or slightly above evaporator saturation
temperature from the pressure/temperature chart.
- All condenser return bend/hairpins should be at or slightly less than condenser saturation
temperature.
- If a group of return bends/hairpins do not conform to expected temperatures, that indicates a
blocked or restricted distributor or distributor tube.
MAINTENANCE
CHANGING THE BATTERY
To install or change the 9V battery, open the battery compartment the battery as shown in Figure 2.
CLEANING THE LENS
Blow off loose particles using clean compressed air.
Carefully wipe the surface with a moist cotton swab.
The swab may be moistened with water.
CLEANING THE HOUSING
Use soap and water on a damp sponge or soft cloth.
To avoid damage to the Thermometer, do not soak the unit into water.
Caution!
To avoid damaging the Thermometer, do NOT submerge it in water.
TROUBLESHOOTING
Table 4. Troubleshooting
Symptom
OL (on display)
-OL (on display)
Blank Display
Laser does not work
Beeper beeps
continuously
Problem
Target temperature is over range
Target temperature is under range
Action
Select target with specifications
Select target with specifications
Low Battery
Replace Battery
Possible dead battery
1. Low or dead battery
2. Ambient temperature above 40ºC
(104ºF)
1. Has the High/Low feature been set?
And
2. Measurement value has over the
limit
Check and / or replace battery
1. Replace battery
2. Use in area with lower ambient
temperature.
3. Reset the setting or
4. Cancel the limit setting
35
CE CERTIFICATION
The Thermometer conforms to the following standards:
- EN61326: 2006
- EN60825-1: 1994+A2: 2001+A1: 2001+A1: 2002 Laser Safety Standard
Certification testing was conducted using a frequency range of 80 to 100MHz with instrument in
three orientations.
SPECIFICATIONS
INFRARED AND T-C THERMOCOUPLE
INFRARED
Measurement Range (COD. 51262)
-50ºC to 1050ºC (-58ºF to 1992ºF)
Spectral Range
8 to 14 um
Infra-red Measurement
1.8% or 1.8ºC (4ºF)
T-C Thermocouple Measurement
1% or 1ºC (2ºF)
(Assumes ambient operating temperature of 23 to 25ºC
(73 to 77ºF)
When below 0ºC: add 1ºC on top of the base.
When bellow -35ºC: for reference only.
Repeatability
0.5ºC or 0.5% of reading
Response Time (95%)
250ms
Distance to Spot (D:S) (COD. 51262)
50:1
Emissivity Adjustment
0.10~1.00
Display Resulation
0.1ºC (0.1ºF)
(When less than 10ºC:0.2ºC. When moe than 999.9:
1ºC/1ºF)
Secondary Display Information
Maximum, Minimum, Differential, Average
LASER
Sighting
Single point laser
Power
Class 2 (II) operation; Output <1mV, wavelength 630 to
670nm
ELECTRICAL
36
Power Supply
6F22 9V Battery
Power Consumption
At least 30 hours battery life (Alkarine), At least 10 hours
battery life (General Purpose)
PHYSICAL
Weight
270g
Size
168.5mm (H) x 137.8mm (L) x 53mm (W)
ENVIRONMENTAL
Operating Temperature Range
0ºC to 50ºC (32ºF to 120ºF)
Relative Humidity
0 to 75% non condensing
Storage Temperature
-20ºC to 65ºC (-4ºF to 150ºF)
ACCESSORIES
K type thermocouple, tool box, CD software, USB cable, battery and manual
NOTES
IMPORTANT!
The maker will not take responsibility for damage or malfunction as a result of the device being
incorrectly used or, applied for a purpose for whith it was not intended.
According to Waste Electrical and Electronic Equipment directive (WEEE), these ones must
be collected and arranged separately. If you have to throw them out, please, do not use the usual
rubbish. Please, contact your distributor for free recycling.
GUARANTEE
The maker guarantees to the device owner 12 months against any manufacture defect.
This guarantee do not cover the parts wich are consumables.
Note: to apply the guarantee its necesary to send the “GUARANTEE CERTIFICATE” duly filled
within one week after purchased the machine to the maker.
37
38
CERTIFICADO DE GARANTIA
GUARANTEE CERTIFICATE
CERTIFICAT DE GARANTIE
ARTICULO / ITEM / ARTICLE:.....................................................................................................................
Nº DE SERIE / SERIE Nº / Nº SERIE:............................................................................................................
DISTRIBUIDOR / DISTRIBUTOR / DISTRIBUTEUR:....................................................................................
PAIS / COUNTRY / PAYS:..............................................................................TEL.:....................................
FECHA DE VENTA / SALE DATE / DATE VENTE:.........................................................................................
NOMBRE DEL COMPRADOR / BUYER NAME / NOM DE L’ACHETEUR:...................................................
TEL. COMPRADOR / BUYER TEL. / TEL. DE L’ACHETEUR:.........................................................................
EGA MASTER GARANTIZA AL COMPRADOR DE ESTA MAQUINA LA GARANTIA TOTAL (DURANTE 12 MESES), DE LAS PIEZAS CON DEFECTOS DE FABRICACION. ESTA
GARANTIA NO CUBRE AQUELLAS PIEZAS QUE POR SU USO NORMAL TIENEN UN DESGASTE. PARA OBTENER LA VALIDEZ DE LA GARANTIA , ES ABSOLUTAMENTE
IMPRESCINDIBLE QUE COMPLETE Y REMITA ESTE DOCUMENTO A EGA MASTER , DENTRO DE LOS SIETE DIAS A PARTIR DE LA FECHA DE COMPRA.
EGA MASTER GUARANTEES TO THE BUYER OF THIS MACHINE THE TOTAL WARRANTY (DURING 12 MONTHS), OF THE PIECES WITH MANUFACTURING FAULTS.
THIS GUARANTEE DOES NOT COVER THOSE PIECES WORN OUT DUE TO A NORMAL USE. IN ORDER TO OBTAIN THE VALIDITY OF THIS WARRANTY , IT IS
ABSOLUTELY NECESSARY TO FULFILL THIS DOCUMENT AND RESEND IT TO EGA MASTER WITHIN 7 DAYS FROM SALE DATE.
EGA MASTER GARANTIE A L’ACHETEUR DE CETTE MACHINE LA GARANTIE TOTALE (PENDANT 12 MOIS) DES PIECES AVEC DEFAUTS DE FABRICATION. CETTE GARANTIE
NE COUVRE PAS LES PIECES QUE PAR UN USAGE NORMAL, SOIENT DETERIOREES. POUR OBTENIR LA VALIDITE DE LA GARANTIE, IL EST ABSOLUMENT IMPERATIF
COMPLETER ET ENVOYER CE DOCUMENT EGA MASTER, DANS UN DELAI DE 7 JOURS A PARTIR DE LA DATE D’ACHAT.
SELLO / STAMP / CACHET
EJEMPLAR PARA EGA MASTER / COPY FOR EGA MASTER / EXEMPLAIRE POUR EGA MASTER
CERTIFICADO DE GARANTIA
GUARANTEE CERTIFICATE
CERTIFICAT DE GARANTIE
ARTICULO / ITEM / ARTICLE:.....................................................................................................................
Nº DE SERIE / SERIE Nº / Nº SERIE:............................................................................................................
DISTRIBUIDOR / DISTRIBUTOR / DISTRIBUTEUR:....................................................................................
PAIS / COUNTRY / PAYS:..............................................................................TEL.:....................................
FECHA DE VENTA / SALE DATE / DATE VENTE:.........................................................................................
NOMBRE DEL COMPRADOR / BUYER NAME / NOM DE L’ACHETEUR:...................................................
TEL. COMPRADOR / BUYER TEL. / TEL. DE L’ACHETEUR:.........................................................................
EGA MASTER GARANTIZA AL COMPRADOR DE ESTA MAQUINA LA GARANTIA TOTAL (DURANTE 12 MESES), DE LAS PIEZAS CON DEFECTOS DE FABRICACION. ESTA
GARANTIA NO CUBRE AQUELLAS PIEZAS QUE POR SU USO NORMAL TIENEN UN DESGASTE. PARA OBTENER LA VALIDEZ DE LA GARANTIA , ES ABSOLUTAMENTE
IMPRESCINDIBLE QUE COMPLETE Y REMITA ESTE DOCUMENTO A EGA MASTER , DENTRO DE LOS SIETE DIAS A PARTIR DE LA FECHA DE COMPRA.
EGA MASTER GUARANTEES TO THE BUYER OF THIS MACHINE THE TOTAL WARRANTY (DURING 12 MONTHS), OF THE PIECES WITH MANUFACTURING FAULTS.
THIS GUARANTEE DOES NOT COVER THOSE PIECES WORN OUT DUE TO A NORMAL USE. IN ORDER TO OBTAIN THE VALIDITY OF THIS WARRANTY , IT IS
ABSOLUTELY NECESSARY TO FULFILL THIS DOCUMENT AND RESEND IT TO EGA MASTER WITHIN 7 DAYS FROM SALE DATE.
EGA MASTER GARANTIE A L’ACHETEUR DE CETTE MACHINE LA GARANTIE TOTALE (PENDANT 12 MOIS) DES PIECES AVEC DEFAUTS DE FABRICATION. CETTE GARANTIE
NE COUVRE PAS LES PIECES QUE PAR UN USAGE NORMAL, SOIENT DETERIOREES. POUR OBTENIR LA VALIDITE DE LA GARANTIE, IL EST ABSOLUMENT IMPERATIF
COMPLETER ET ENVOYER CE DOCUMENT EGA MASTER, DANS UN DELAI DE 7 JOURS A PARTIR DE LA DATE D’ACHAT.
SELLO / STAMP / CACHET
EJEMPLAR PARA EL CLIENTE / COPY FOR THE CUSTOMER / EXEMPLAIRE POUR LE CLIENT
C/ ZORROLLETA 11, POL. IND. JUNDIZ
01015 VITORIA, SPAIN P.O.B. APTDO. 5005
TEL. 34 - 945 290 001
FAX. 34 - 945 290 141
[email protected]
www.egamaster.com