1
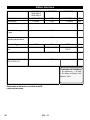
WD 1 ѝ᮷ ........................5 English................10 Español...............16 ΔϳΒήόϠ ...............29 ...............30 ไทย w rc ae k w. w om r.c he in -w nd -a er st gi /re 59657760 (07/15) 2 3 34 ⴞᖅ а㡜ᨀ⽪˖ ᆹޘ䈤᰾ 䇮༷䈤᰾ 䈤᰾ ޫ؍о㔤ᣔ ᭵䳌ᧂ䲔 ӗ૱㿴Ṭ ৲ᮠ 䍘䟿؍䇱 ZH ZH ZH ZH ZH ZH ZH Ӣ⡡Ⲵᇒᡧ˖ ൘ᛘࡍ⅑֯⭘ᵜӗ૱ࡽˈ䈧Ԅ㓶 䰵䈫ᵜ䈤᰾Җˈᒦ䈧࿕ழ؍ᆈԕ ׯᰕਾḕ䰵DŽ а㡜ᨀ⽪˖ ਸѾ㿴ᇊⲴ֯⭘ ṩᦞᵜ䈤᰾ҖѝᡰⲴ᧿䘠઼ᆹޘᨀ ⽪ˈᵜ੨ቈಘ⭘ཊ࣏㜭੨ቈಘDŽ 䈕䇮༷ᔰਁ⭘Ҿ⿱ᇦ⭘䙄ˈᒦ䶎䇮䇑┑䏣 ᐕ୶ъ֯⭘㾱≲DŽ – 䱢→ᵪಘਇࡠ䴘⏻DŽн㾱ᆈ᭮൘ᇔཆ४ ฏDŽ – нᗇ֯⭘ᵜ䇮༷ᣭ੨⚠✜઼⻣唁DŽ ᵜཊ࣏㜭੨ቈಘਚ֯⭘˖ – 䝽䗷└ಘ㺻DŽ – 䝽༷Ԧǃ䱴Ԧᡆ䘹㻵䝽ԦDŽ ሩҾ⭡Ҿᢗ㹼ᵚ㿴ᇊⲴ֯⭘ᡆ䭉䈟Ⲵ 䙐ᡀⲴਟ㜭Ⲵᦏཡˈࡦ䙐୶ሶнᣵԫօ 䍓ԫDŽ ᡁԜ൘ഭⲴ㓿䬰୶ᐢ㓿ޜᐳҶഭᓄ Ⲵ䍘䟿؍䇱ᶑⅮDŽ൘䍘䟿؍䇱ᵏˈྲ᷌ ᛘⲴӗ૱ਁ⭏Ҷԫօ᭵䳌ˈᡁԜ䜭ሶѪᛘ ᨀݽ䍩㔤ˈ؞նᱟ䘉⿽᭵䳌ᓄᖃᱟ⭡Ҿ ᵪ䓛ᶀᯉᡆࡦ䙐кⲴ㕪䲧䙐ᡀⲴDŽ䈧ᛘੁ 㓿䬰୶ᡆ㘵оᛘ䐍ᴰ䘁Ⲵ㓿䗷ᦸᵳⲴᇒ ᡧᴽ࣑༴㚄㌫ˈᨀࠪ؞؍䈧≲ˈᒦᨀ ᓄⲴӗ૱䍝Ҡ䇱᰾᮷ԦDŽ ᇒᡧᴽ࣑ ྲᴹ⯁䰞ᡆӗ⭏᭵䳌ˈᡁԜ.$5&+(5ޜਨ Ⲵ࠶ޜਨሶҀҾ㔗㔝ᑞࣙᛘDŽ 䇒䍝༷Ԧ઼䘹㻵䝽Ԧ ൘䈤᰾ҖⲴ㔃ቮ䜘࠶ᛘਟԕࡠ㋮䘹Ⲵᴰ 仁㑱䴰㾱Ⲵ༷ԦDŽ ੁ䍥ᯩ㓿䬰୶ᡆੁ䍥༴.$5&+(5ޜਨ࠶ޜ ਨ䍝Ҡ༷Ԧ઼䱴ԦDŽ – – ⧟ຳ؍ᣔ व㻵ᶀᯉਟԕഎ᭦࡙⭘DŽ䈧н㾱ᢺव 㻵ᶀᯉоᲞ䙊ඳ൮᭮൘а䎧༴⨶ˈ㘼 ᓄ࿕ழᆹᧂഎ᭦DŽ ᰗⲴ䇮༷ѝਜ਼ᴹᇍ䍥Ⲵਟ࡙⭘Ⲵᶀ ᯉˈᓄ࣐ԕഎ᭦࡙⭘DŽ䈧䙊䗷䘲ᖃⲴ ᭦䳶㌫㔏༴⨶ᛘⲴᰗ䇮༷DŽ ⨶䗷└ಘ઼䗷└ಘ㺻 䗷└ಘ઼䗷└ಘ㺻⭡⧟؍ᶀᯉࡦᡀDŽ ྲ᷌㻛ᣭ੨䘋৫Ⲵ⢙䍘ᒦ䶎⭏⍫ඳ൮ᡰ⾱ →Ⲵ⢙䍘ˈࡉਟѪ↓ᑨⲴ⭏⍫ඳ൮䘋㹼 ⨶DŽ 䜘ᶀᯉᨀ⽪5($&+ ᴰᯠⲴ䜘ᶀᯉؑ䈧ᛘ൘ྲл䬮᧕ѝḕ ˖ ZZZNDHUFKHUFRP5($&+ – – – – – – ZH – 5 ᆹޘ䈤᰾ ᵜ䇮༷нᗇ䇙䛓Ӌ䓛փ㜭࣋ ᴹ䲀ǃᝏᇈ㜭࣋ᕡᡆ⨶䀓㜭 ࣋ᐞᡆ㘵㕪ѿ㓿傼઼ ᡆ㕪 ѿ⸕䇶ⲴӪઈ֯⭘ˈ䲔䶎Ԇ ԜᴹуӪⴁⶓᡆ᧕ਇуӪᤷ ሬྲօ䇮༷ᒦҶ䀓ަਟ 㜭ӗ⭏Ⲵড䲙DŽ 䎵䗷Ⲵᆙᆀ൘ᴹⴁᣔӪ ⴁⶓᡆ㧧ᗇ֯⭘䇮༷Ⲵᤷሬ ᒦҶ䀓ަਟ㜭ӗ⭏Ⲵড䲙Ⲵ ࡽᨀлਟԕ֯⭘䈕䇮༷DŽ ݯㄕнᗇ⧙㘽ᵜ䇮༷DŽ ➗ⴻྭݯㄕˈԕ⺞؍ԆԜн ⭘䇮༷⧙㘽 DŽ ݯㄕᵚਇⴻ㇑нᗇ䘋㹼⌱ ઼⭘ᡧޫ؍DŽ 䇙ݯㄕ䘌व㻵㮴㟌ˈࡉ Պᴹヂড䲙ʽ ൘⇿⅑֯⭘ਾ઼൘⇿⅑⌱ ޣࡽޫ؍䰝䇮༷DŽ ᆈ൘⚛⚮ড䲙DŽнᣭ੨↓൘ ⟳✗ᡆቊᴹ։✜Ⲵ⢙૱DŽ 5 ⾱→൘ᆈ൘⠶⛨ড䲙Ⲵオ䰤 䘀㹼ᵜ䇮༷DŽ 몇 ⭥≄᧕ਓ ᵜ䇮༷ਚ㜭䘎᧕Ӕ⍱⭥ⓀDŽ⭥ ᗵ享┑䏣䇮༷䬝⡼кⲴᮠᦞ㾱 ≲DŽ ᆈ൘⭥ࠫড䲙 䈧य⭘⒯᧕䀖ᨂཤ઼ᨂᓗDŽ н㾱䙊䗷ࣘ⭥㓯ሶ⭥ⓀᨂཤӾ ᨂᓗкᤄлDŽ ⇿⅑֯⭘ࡽỰḕ⭥㓯वᤜ⭥Ⓚᨂ ཤᱟਇᦏDŽᦏൿⲴ䘎᧕ሬ㓯ᓄ ・ণ䇙ᐢᦸᵳⲴᇒᡧᴽ࣑Ӫઈ ⭥≄уъӪઈ䘋㹼ᴤᦒDŽ ѪҶ䚯⭏ਁݽ䀖⭥һ᭵ˈᡁԜᔪ 䇞֯⭘ࡽ䶒ᑖ┿⭥؍ᣔᔰⲴޣᨂ ᓗ ˄ᴰབྷ仍ᇊ䀖ਁ⭥⍱ᕪᓖѪ P$˅DŽ 䆖 ḀӋ⢙䍘൘㻛੨ޕオ≄ᨵࣘᰦˈ ਟ㜭Պ⭏ᡀ⠶⛨ᙗ≄փᡆਸ ⢙ʽ нᗇ֯⭘ᵜ䇮༷ᢛԕл⢙䍘˖ – ᱃⟳᱃⠶Ⲵ≄փǃ⏢փ઼㊹ ቈ ˄৽ᓄᙗ㊹ቈ˅ – о儈⻡ᙗᡆ儈䞨ᙗ⍇⏔ࡲ ॆਸⲴ⍫ᙗ䠁仇㋂ ˄∄ྲ 䬍ǃ䭠ǃ䬼ㅹ˅ – ᵚ㓿〰䟺Ⲵᕪ⻡઼ᕪ䞨 – ᴹᵪⓦࡲ ˄∄ྲ⊭⋩ǃ⎲ᯉ 〰䟺ࡲǃᷴ䞞ǃ≁⭘⟳ᯉ⋩ ㅹ˅DŽ ਖཆˈк䘠⢙䍘ҏՊ䙐ᡀ䇮༷ᶀ ᯉ㞀㲰DŽ – 䈤᰾ҖѝⲴㅖਧ മ⡷৲㿱ᣈਐᔿᨂ亥ʽ 䈕䇮༷ਁ䍗ᰦᨀє⿽㿴ṬDŽ – ֯⭘䗷└㺻DŽ – ֯⭘䗷└ㆂDŽ ൘ᢃᔰӗ૱व㻵Ⲵ਼ᰦˈ䈧⺞䇔䇮༷䱴Ԧ ⋑ᴹ㕪ཡˈ㇡⢙૱⋑ᴹᦏൿDŽྲ᷌ᛘਁ ⧠䘀䗃䙄ѝ䙐ᡀᦏൿˈ䈧㚄㌫㓿䬰୶DŽ ᣭ੨䖟㇑᧕ཤ മ ѪҶ੨ቈᰦ੨ቈ䖟㇑Ⲵ䘎᧕DŽ ੨ቈ䖟㇑֯⭘ᷴ മ ሶ੨ቈ䖟㇑䖜ࣘࡠ੨ቈ䖟㇑᧕ཤк ˄ᨂ ᔿ䘎᧕˅DŽ ⊑⢙Ầሱ㖙 മ ੁཆণਟᢃᔰˈੁ᤹ণਟޣкDŽ 䇮༷ᔰ˄ ޣᔰ ˅ޣ മ ս㖞,˖੨ᡆ੩DŽ ս㖞˖䇮༷ᐢޣ䰝DŽ ᵪཤ䝽Ԧᓗ 䈕䝽Ԧᓗਟ؍㇑ᵪཤⲴ੨DŽ ᷴ മ 䀓䬱ਾˈ〫ࣘ੨ቈಘᡆਆлᵪཤDŽ ਟ䖜㝊䖞 ড䲙 ণᕅਁေ㛱Ⲵড䲙ˈ㠤֯䓛փ ѕ䟽Քᇣᡆ↫ӑDŽ 6 몇 䆖 ▌㯿Ⲵড䲙ᛵߥˈਟ㜭㠤֯䓛փ ѕ䟽Քᇣᡆ↫ӑDŽ 몇 ⌘ ▌㯿Ⲵড䲙ᛵߥˈਟ㜭㠤֯䓛փ 䖫ᗞՔᇣᡆᦏՔDŽ 䇮༷䈤᰾ മ Ӕ䍗ᰦ䖜ੁ䖞ᆹ㖞൘Ầˈ䈳䈅ࡽ䘋㹼 ᆹ㻵DŽ ZH – 6 ᣭ੨㇑[ 䈤᰾ മ ሶᣭ੨㇑ᨂ൘а䎧ᒦо੨ቈ䖟㇑䘎᧕DŽ ൠ䶒੨ മ ⒯ᔿ઼ᒢᔿᣭ੨ᰦ֯⭘ൠ䶒੨DŽ 몇 ⌘ ⒯ᔿᣭ੨ᰦˈ㓸֯⭘㖞Ⲵ⌑ ⋛ࡲ䗷└ಘ䘋㹼ᐕDŽ ᒢᔿᣭ੨ᰦˈ㓸֯⭘㖞Ⲵ䗷 └㺻ᡆ䗷└ㆂ䘋㹼ᐕDŽ ੩≄᧕ཤ 䇮༷ࣘࡽ മ ੨ቈ䖟㇑ᨂޕ੩≄᧕ཤˈӾ㘼◰⍫੩≄ ࣏㜭DŽ ⭥㓯ᤲ䫙 മ ֯⭘䇮༷ࡽˈ䈧᤹മ⽪ሶ䜘Ԧ㓴㻵ྭDŽ 䈳䈅 മ 䘎᧕䱴Ԧ മ ᨂк⭥ⓀDŽ മ ࣘ䇮༷DŽ മ ৲㿱ㅜ 37 ᆈ᭮⭥Ⓚ䘎᧕ሬ㓯DŽ ⭥Ⓚ㓯 ᒢᔿᣭ੨ 㕍䳉੨ 몇 ⌘ ֯⭘ࡽỰḕ䗷└ಘᱟਇᦏˈྲ ᴹᗵ㾱䘋㹼ᴤᦒDŽ ⭘Ҿ䗩䀂ǃ㕍䳉ǃ࣐✝ಘ઼䳮ԕ᧕䀖ࡠⲴ ४ฏDŽ ⌑⋛ࡲ䗷└ಘ മ ⒯ᔿᣭ੨ᰦˈሶ⌑⋛ࡲ䗷└ಘӾ䗷└㈃ кᤄࠪDŽ ᨀ⽪˖⌘⌑⋛ࡲ䗷└ಘᱟപᇊᇊսDŽ ྇ㆂᔿ䗷└ಘ ˄㿶䝽㖞ᛵߥ˅ മ ᣭ੨㋇བྷⲴ⊑⢙ᰦˈ֯⭘䗷└ㆂDŽ 䗷└㺻 ˄㿶䝽㖞ᛵߥ˅ മ ᣭ੨㋇བྷⲴ⊑⢙ᰦˈ֯⭘䗷└㺻DŽ ᨀ⽪˖ᆹ㻵䗷└㺻ᰦˈ䈧⌘䗷└㺻н㾱 ᵚ㓿䗷└ቡ੨ޕオ≄DŽ മ ᧘㦀˖ᣭ੨ቈෳ享֯⭘䗷└㺻DŽ 䗷└㺻ᨀ⽪ – – – 䗷└ಘ㺻Ⲵ┑ݵᓖਆߣҾᡰᣭ੨Ⲵ⊑ ⢙DŽ ྲ⊑⢙㌫ቈෳǃ⸲ᆀㅹˈࡉᗵ享㓿ᑨᴤ ᦒ䗷└ಘ㺻DŽ ࣐Ⲵ䗷└㺻ਟ㜭㻛㛰ˈѪ↔享৺ᰦ ᴤᦒ䗷└㺻ʽ 몇 ⌘ ӵ֯⭘亴࠶ಘᣭ੨ߧ⚠✜DŽ สᵜⅮ䇒অ㕆ਧ˖ˈՈ䍘Ⅾ˖ 䗷└ಘ㺻 മ മ ᨀ⽪˖䘋㹼⒯ᔿᣭ੨ᰦнᗇ֯⭘䗷└㺻ʽ ᧘㦀˖ᣭ੨ቈෳ享֯⭘䗷└㺻DŽ ਟ֯⭘䗷└㺻〽ᗞൠ༴⨶л੨⚠Ⲵޕ ቈDŽ ZH – 7 7 ޫ؍о㔤ᣔ ⒯ᔿᣭ੨ 몇 䆖 ড䲙 аᰖᖒᡀ⌑⋛ᡆਁ⭏⏢փ⋴┿ˈ ࡉ・ণޣ䰝੨ቈಘᡆᤄл⭥Ⓚᨂ ཤʽ н֯⭘䗷└ಘ㺻ʽ ൘ሩ䇮༷䘋㹼㔤؞о㔤ᣔѻࡽˈ ᗵ享ޣ䰝䇮༷ᒦᤄл⭥ⓀᨂཤDŽ ਚ㜭⭡㓿䗷ᦸᵳⲴᇒᡧᴽ࣑ѝᗳ 㔤؞DŽ 몇 䆖 н֯⭘৫⊑ࡲǃ⧫⪳⌱ࡲᡆޘ 㜭⌱ࡲʽӾнሶ䇮༷⎨⌑൘≤ ѝDŽ ᨀ⽪˖аᰖ⊑⢙Ầᐢ┑ˈ⎞⨳ণޣ䰝ᣭ੨ ਓᒦф䇮༷儈䙏䘀䖜DŽ↔ᰦˈ䈧・ণޣ䰝 䇮༷ᒦオ䍞⚠ẦDŽ ⒯ᔿᣭ੨ᰦˈሶ⌑⋛ࡲ䗷└ಘӾ䗷└㈃ кᤄࠪDŽ ᨀ⽪˖⌘⌑⋛ࡲ䗷└ಘᱟപᇊᇊսDŽ ੩≄࣏㜭 ⌱䳮ԕཏࡠⲴս㖞ᡆнਟ㜭ᣭ੨ࡠⲴൠ ᯩˈֻྲ⸣㣡උ䟼ⲴṁਦDŽ മ ੨ቈ䖟㇑ᨂޕ੩≄᧕ཤˈӾ㘼◰⍫੩≄ ࣏㜭DŽ ѝᯝ䘀㹼 ֯⭘୶ᓇਟҠࡠⲴກᯉ⌱ࡲ㔤ᣔ䇮༷ ઼ກᯉ䱴ԦDŽ 䴰㾱ᰦ⭘≤ߢ⍇Ầ઼䱴Ԧᒦ൘㔗㔝֯⭘ ࡽሶަᒢ⠕DŽ മ ৲㿱ㅜ 37 㿶䴰㾱ӵሶ⌑⋛ࡲ䗷└ಘ㖞Ҿ㠚ᶕ≤л ⍇ˈн㾱ᬖᒢᡆࡧ⍇DŽ൘ᆹ㻵ࡽᆼޘ ᒢ⠕DŽ ᭵䳌ᧂ䲔 ޣ䰝䇮༷DŽ 㔃ᶏ䘀㹼 ޣ䰝䇮༷ᒦᤄл⭥ⓀᨂཤDŽ オẦ മ ৲㿱ㅜ 37 ਆлᵪཤᒦሶẦオDŽ ੨ቈಘ؍㇑ മ ৲㿱ㅜ 37 ሶ⭥Ⓚ䘎᧕ሬ㓯઼䝽Ԧᮤ喀᭮൘䇮༷ кDŽ䇮༷؍㇑൘ᒢ⠕ⲴᇔDŽ 8 ੨ቈ࣏⦷߿ᕡ аᰖ੨ቈಘ࣏⦷߿ᕡˈࡉ䈧Ựḕлࡇ亩 㾱⛩DŽ മ 䱴Ԧǃ੨ቈ䖟㇑ᡆᣭ੨㇑ຎˈ䈧⭘ᵘ ỽ䲔ຎ⢙DŽ മ 䗷└㺻ᐢ┑ˈ㻵ޕᯠⲴ䗷└㺻DŽ മ ৲㿱ㅜ 37 ⭘㠚ᶕ≤⍇⌑⋛ࡲ䗷└ಘˈᆹ᭮ࡽሶ ަᒢ⠕DŽ 䗷└㺻ਈ㜿ˈሶ䗷└㺻ᒢ߰DŽ 䗷└ㆂਈ㜿ˈሶ䗷└ㆂᒢ߰DŽ ᴤᦒൿⲴ྇ㆂᔿ䗷└ಘDŽ ZH – 8 ӗ૱㿴Ṭ ৲ᮠ ⭥Ⓚ⭥ 仁⦷ ⊑⢙Ầփ〟 a a a 50/60 9 䎛ީ O ᷴⲴ੨≤ᙗ O ൠ䶒੨Ⲵ੨≤ᙗ O ࣏⦷3 仍ᇊ ⭥Ⓚ㓯 +99)[ 599[ 䟽䟿 ˄нਜ਼䱴Ԧ˅ ༠⭥ᒣ ˄(1˅ 75 6-7:$:*& e& ⬖ ॳݻ 77 $ 㓗࠶ 䍍 㿴Ṭ㤕ᴹਈᴤˈᚅнਖ㹼䙊⸕DŽ ZH – 9 9 Contents General notes. . . . . . . . . . . . . . Safety instructions . . . . . . . . . . Description of the Appliance. . . Operation . . . . . . . . . . . . . . . . . Maintenance and care . . . . . . . Troubleshooting . . . . . . . . . . . . Technical specifications . . . . . . EN EN EN EN EN EN EN . . .5 . . .6 . . .7 . . .8 . . .9 . . .9 . .10 Dear Customer, Please read and comply with these original instructions prior to the initial operation of your appliance and store them for later use or subsequent owners. General notes Proper use In accordance with the descriptions and the safety information in these operating instructions the appliance is intended for use as a multi-purpose vacuum cleaner. This appliance has been designed for use in private households and is not intended for commercial use. – Protect the unit from rain. Do not store outside. – This device may not be used to suck in ash and soot. Use the multi-purpose vacuum cleaner only with: – Original filter bag. – Original spare parts, accessories and special accessories. The manufacturer is not responsible for any damages that may occur on account of improper use or wrong operations. Environmental protection The packaging material can be recycled. Please do not place the packaging into the ordinary refuse for disposal, but arrange for the proper recycling. Old appliances contain valuable materials that can be recycled. Please arrange for the proper recycling of old 10 appliances. Please dispose your old appliances using appropriate collection systems. Disposing the filters and filter bags Filters and filter bags are made from environment-friendly materials. They can therefore be disposed off through the normal household garbage provided you have not sucked in substances that are not permitted to be thrown into household garbage. Notes about the ingredients (REACH) You will find current information about the ingredients at: www.kaercher.com/REACH Warranty The terms of the guarantee applicable in each country have been published by our respective national distributors. We will repair possible faults on your unit free of charge within the warranty period, insofar as the faults are caused by material defects or defective workmanship. Guarantee claims should be addressed to your dealer or the nearest authorized customer service centre, and supported by documentary evidence of purchase. Customer Service Our KÄRCHER branch will be pleased to help you further in the case of questions or faults. Ordering spare parts and special attachments At the end of the operating instructions you will find a selected list of spare parts that are often required. You can procure the spare parts and the attachments from your dealer or your KÄRCHER branch office. EN – 5 – – – – – – – – Safety instructions This appliance is not intended for use by persons with limited physical, sensory or mental capacities or lacking experience and/or skills, unless such persons are accompanied and supervised by a person in charge of their safety or they have received precise instructions on the use of this appliance and have understood the resulting risks. Children may only use this appliance if they are over the age of 8 and supervised by a person in charge of their safety, or if they have received instructions on the use of this appliance and have understood the resulting risks. Children must not play with this appliance. Supervise children to prevent them from playing with the appliance. Cleaning and user maintenance must not be performed by children without supervision. Keep packaging film away from children - risk of suffocation! Switch the appliance off after every use and prior to every cleaning/maintenance procedure. Risk of fire. Do not vacuum up any burning or glowing objects. The appliance may not be used in areas where a risk of explosion is present. 몇 Electrical connection The appliance may only be connected to alternating current. The voltage must correspond with the type plate on the appliance. Risk of electric shock Never touch the mains plug and the socket with wet hands. Do not pull the plug from the socket by pulling on the connecting cable. Check the power cord with mains plug for damage before every use. If the power cord is damaged, please arrange immediately for the exchange by an authorized customer service or a skilled electrician. To avoid accidents due to electrical faults we recommend the use of sockets with a line-side current-limiting circuit breaker (max. 30 mA nominal tripping current). Warning Certain materials may produce explosive vapours or mixtures when agitated by the suction air! Never vacuum up the following materials: – Explosive or combustible gases, liquids and dust particles (reactive dust particles) – Reactive metal dust particles (such as aluminium, magnesium, zinc) in combination – EN – 6 11 with highly alkaline or acidic detergents – Undiluted, strong acids and alkalies – Organic solvents (such as petrol, paint thinners, acetone, heating oil). In addition, these substances may cause the appliance materials to corrode. Symbols in the operating instructions Danger Immediate danger that can cause severe injury or even death. 몇 Warning Possible hazardous situation that could lead to severe injury or even death. 몇 Caution Possible hazardous situation that could lead to mild injury to persons or damage to property. Description of the Appliance Illustrations on fold-out page! Two models of this appliance are offered. – With filter bag. – With cartridge filter. When unpacking the product, make sure that no accessories are missing and that none of the package contents have been damaged. If you detect any transport damages please contact your dealer. Suction hose with handle Illustration Insert the suction hose into the suction hose connection (bayonet lock). Container closure Illustration Pull out to open, push in to lock. ON/OFF switch for appliance Illustration Position I: Suction or blowing Position 0: Appliance is switched off Accessory compartment, appliance head This accessory compartment allows the storage of suction nozzles on the appliance. Carrying handle Illustration To carry the appliance or to remove the appliance head after unlocking. Swivel casters Illustration The steering rollers are located in the compartment when the appliance is delivered. These must be attached prior to starting up the appliance. Suction pipes (3x) Illustration Put the suction pipes together and connect with suction hose. Floor nozzle Illustration Floor nozzle with insert for wet and dry vacuum cleaning Suction hose connection Blowing connection Illustration To connect the suction hose during vacuuming. 12 Illustration Connect the suction hose to the blower connection, this will activate the blower function. EN – 7 Cable hook Illustration See page 37. To store the mains cable. Supply Cord Crevice nozzle For edges, joints, heaters and hard to reach locations. Operation 몇 Caution Always work with the inserted foam filter during wet vacuum cleaning. Always work with the inserted filter bag or cartridge filter during dry vacuum cleaning. Before Startup Foam filter Illustration Pull a foam filter over the filter basket for wet vacuum cleaning. Note: Ensure firm seating of the foam filter. Cartridge filter (depending on model) Illustration Use cartridge filter for vacuuming up coarse soiling. Filter bag (depending on model) Illustration Use filter bag for vacuuming up coarse soiling. Note: When installing the filter bag, ensure that no unfiltered air can be sucked through the filter basket. Filter bag Illustration Illustration Note: Do not use a filter bag for wet vacuuming! Recommendation: To vacuum fine dust, use the filter bag. Vacuumed up dust can be more easily disposed of with the filter bag. Illustration Mount loose parts delivered with appliance prior to start-up. Start up Illustration Connect accessories. Illustration Plug in the main plug. Illustration Turn on the machine. Dry vacuum cleaning 몇 Caution Check the filter for damage prior to installation and replace as necessary. Illustration Recommendation: To vacuum fine dust, use the filter bag. Information filter bag – – – The filling level of the filter bag depends on the dirt that is sucked in. The filter bag needs to be replaced more frequently while sucking in fine dust, sand, etc. Clogged filter bags can burst - therefore make sure to replace the filter bag in a timely manner! 몇 Caution Vacuum cold ashes only when using a pre-filter. Order no. basic design: 2.863-139.0, premium design: 2.863-161.0. EN – 8 13 Wet vacuum cleaning 몇 Warning Immediately switch the appliance off or pull the power plug if foam forms or liquids escape! Do not use a filter bag! Note: If the container is full, a float closes the suction opening, and the appliance works at a higher speed. Switch off the appliance immediately, and empty the container. Pull a foam filter over the filter basket for wet vacuum cleaning. Note: Ensure firm seating of the foam filter. Blowing function Cleaning hard to reach locations or, where vacuuming is not possible, like leaves from a gravel bed. Illustration Connect the suction hose to the blower connection, this will activate the blower function. Interrupting operation Maintenance and care Danger Turn off the appliance and remove the mains plug prior to any care and maintenance work. Repair works may only be performed by the authorised customer service. 몇 Warning Do not use abrasives, glass or universal cleaners! Never immerse the appliance in water. Clean the appliance and accessory parts made of plastic with a commercial plastic cleaner. If required, rinse the container and accessories with water properly and dry them before reuse. Illustration See page 37. Only clean the foam filter under running water; do not wipe or brush. Let it dry completely prior to installation. Troubleshooting Turn off the appliance. Finish operation Decreasing cleaning power Turn off the appliance and disconnect the mains plug. Empty the container Illustration See page 37. Remove the appliance head and empty the reservoir. Storing the appliance Illustration See page 37. Stow away the mains cable and accessory at the machine. Store the appliance in a dry room. 14 If the cleaning power of the appliance deteriorates please check the following: Illustration Accessories, suction hose or suction pipes are clogged, please remove the obstruction using a stick. Illustration Filter bag is full, install new filter bag. Illustration See page 37. Clean the foam filter under running water; let it dry before reinserting it. Filter bag is soiled, tap filter bag. Cartridge filter is soiled, tap cartridge filter. Replace damaged cartridge filter. EN – 9 Technical specifications 1.098-300.0 1.098-304.0 1.098-306.0 1.098-303.0 1.098-305.0 120-127 Mains voltage 220 - 240 220 Frequency 1~50/60 1~50 1~50/60 V Container capacity 15 Hz l Water intake with handle 9,0 l Water intake with floor nozzle 6,0 l Output Pnom 1000 900 1200 Power cord H 05VV-F2x0,75 53RVV 2x0,75 SJTW-16AWG-2C 105°C Weight (without accessories) 3,8 Sound pressure level (EN 60704-2-1) 75 W kg 77 dB(A) Subject to technical modifications! EN – 10 15 Índice de contenidos Indicaciones generales . . . . . . Indicaciones de seguridad . . . . Descripción del aparato . . . . . . Manejo . . . . . . . . . . . . . . . . . . . Cuidados y mantenimiento. . . . Ayuda en caso de avería . . . . . Datos técnicos . . . . . . . . . . . . . ES ES ES ES ES ES ES . . .5 . . .6 . . .7 . . .8 . . .9 . .10 . . 11 Estimado cliente: Antes del primer uso de su aparato, lea este manual original, actúe de acuerdo a sus indicaciones y guárdelo para un uso posterior o para otro propietario posterior. Indicaciones generales Eliminación de filtro y bolsa filtrante El filtro y la bolsa filtrante están fabricados con materiales biodegradables. Si no aspira sustancias que no estén permitidas en la basura convencional, los puede eliminar con ella. Indicaciones sobre ingredientes (REACH) Encontrará información actual sobre los ingredientes en: www.kaercher.com/REACH Garantía Uso previsto El aparato está previsto para el uso como aspirador en seco conforme a las descripciones e instrucciones de seguridad de este manual de instrucciones. Este aparato ha sido diseñado para el uso particular y no para los esfuerzos del uso industrial. – Proteger el aparato de la lluvia. No depositarlo a la intemperie. – No se deben aspirar cenizas ni hollín con este aparato. Utilizar el aspirador de usos múltiples solo con: – bolsas filtrantes originales. – Accesorios y piezas de repuesto o accesorios opcionales originales. El fabricante no asume responsabilidad alguna por los daños que pudieran derivarse de un uso inadecuado o incorrecto. Protección del medio ambiente Los materiales de embalaje son reciclables. Por favor, no tire el embalaje a la basura doméstica; en vez de ello, entréguelo en los puntos oficiales de recogida para su reciclaje o recuperación. 16 Los aparatos viejos contienen materiales valiosos reciclables que deberían ser entregados para su aprovechamiento posterior. Por este motivo, entregue los aparatos usados en los puntos de recogida previstos para su reciclaje. En todos los países rigen las condiciones de garantía establecidas por nuestra sociedad distribuidora. Las averías del aparato serán subsanadas gratuitamente dentro del período de garantía, siempre que las causas de las mismas se deban a defectos de material o de fabricación. En un caso de garantía, le rogamos que se dirija con el comprobante de compra al distribuidor donde adquirió el aparato o al Servicio al cliente autorizado más próximo a su domicilio. Servicio de atención al cliente En caso de dudas o alteraciones, la sucursal de KÄRCHER estará encantada de ayudarle. Pedido de piezas de repuesto y accesorios especiales Podrá encontrar una selección de las piezas de repuesto usadas con más frecuencia al final de las instrucciones de uso. En su distribuidor o en la sucursal de KÄRCHER podrá adquirir piezas de repuesto y accesorios. ES – 5 – – – – – – – – – Indicaciones de seguridad Este aparato no es apto para ser manejado por personas con incapacidades físicas, sensoriales o intelectuales o falta de experiencia y/o conocimientos, a no ser que sean supervisados por una persona encargada o hayan recibido instrucciones de esta sobre como usar el aparato y qué peligros conlleva. Los niños solo podrán utilizar el aparato si tienen más de 8 años y siempre que haya una persona supervisando su seguridad o les hayan instruido sobre como manejar el aparato y los peligros que conlleva. Los niños no pueden jugar con el aparato. Supervisar a los niños para asegurarse de que no jueguen con el aparato. Los niños no pueden realizar la limpieza ni el mantenimiento sin supervisión. Mantener alejado el plástico del embalaje de los niños, se pueden ahogar. Apagar el aparato después de cada uso y antes de cada limpieza/mantenimiento. Peligro de incendio. No aspire objetos incandescentes, con o sin llama. Está prohibido usar el aparato en zonas en las que exista riesgo de explosiones. 몇 Conexión eléctrica Conecte el aparato únicamente a corriente alterna. La tensión tiene que corresponder a la indicada en la placa de características del aparato. Peligro de descarga eléctrica No toque nunca el enchufe de red o la toma de corriente con las manos mojadas. No saque el enchufe de la toma de corriente tirando del cable. Antes de cada puesta en servicio, compruebe si el cable de conexión y el enchufe de red presentan daños. Si el cable de conexión estuviera deteriorado, debe solicitar sin demora a un electricista especializado del servicio de atención al cliente autorizado que lo sustituya. Para evitar accidentes de origen eléctrico, recomendamos utilizar tomas de corriente con un interruptor protector de corriente de defecto preconectado (intensidad de corriente de liberación nominal: máx. 30 mA). Advertencia Determinadas sustancias pueden mezclarse con el aire aspirado debido a las turbulencias dando lugar a mezclas o vapores explosivos. No aspirar nunca las siguientes sustancias: – Gases, líquidos y polvos explosivos o inflamables, (polvos reactivos) ES – 6 17 Polvos de metal reactivos (p. ej. aluminio, magnesio, zinc) en combinación con detergentes muy alcalinos y ácidos – Ácidos y lejías fuertes sin diluir – Disolventes orgánicos (p.ej. gasolina, diluyentes cromáticos, acetona, fuel). Además, esas sustancias pueden afectar negativamente a los materiales empleados en el aparato. – Símbolos del manual de instrucciones Racor de empalme de la manguera de aspiración Imagen Para conectar la manguera de absorción al aspirar. Manguera de aspiración con asa Imagen Insertar la manguera de aspiración en su orificio de conexión (cierre de bayoneta). Cierre del recipiente Imagen Tirar hacia fuera para afrir, presionar hacia dentro para bloquear. Interruptor del aparato (ON / OFF) Peligro Para un peligro inminente que acarrea lesiones de gravedad o la muerte. 몇 Advertencia Para una situación que puede ser peligrosa, que puede acarrear lesiones de gravedad o la muerte. 몇 Precaución Para una situación que puede ser peligrosa, que puede acarrear lesiones leves o daños materiales. Descripción del aparato Ilustraciones, véase la contraportada. El aparato está disponible en 2 acabados diferentes. – Con saco filtrante. – Con filtro de cartucho. Cuando desempaque el contenido del paquete, compruebe si faltan accesorios o si el aparato presenta daños. Informe a su 18 distribuidor en caso de detectar daños ocasionados durante el transporte. Imagen Posición I: Aspirar o soplar. Posición 0: El aparato está apagado. Alojamiento de accesorios en el cabezal del aparato El alojamiento de accesorios permite guardar las boquillas de aspiración en el cabezal del aparato. Asa de transporte Imagen Para transportar el aparato o para extraer el cabezal de aparato tras el desbloqueo. Ruedas giratorias Imagen Las ruedas de dirección se suministran dentro del recipiente, montar antes de la puesta en marcha. Tuberías de aspiración (3) Imagen Insertar tubos de aspiración y conectar con la manguera de aspiración. ES – 7 Boquilla barredora de suelos Bolsa del filtro Imagen Boquilla de suelos con módulo para aspiración de sólidos y fluidos Conexión para soplado Imagen Insertar la manguera de aspiración en la toma de aire para que se active la función de soplado. Gancho porta cables Imagen Véase la página 37. Para almacenar el cable de alimentación. Cable de conexión a la red Boquilla para juntas Para bordes, juntas, radiadores y zonas de difícil acceso. Filtro de celulosa Imagen Poner el filtro de espuma encima de la cesta filtrante para aspirar en húmedo. Indicación:Cerciorarse del asiento firme del filtro de espuma. Filtro de cartuchos (según equipamiento) Imagen Utilizar un filtro de cartucho para aspirar partículas de suciedad gruesa. saco de filtrado (según equipamiento) Imagen Utilizar un saco de filtro para aspirar partículas de suciedad gruesa. Indicación: A la hora de montar el saco del filtro, procurar que no se aspire ningún aire no filtrado por la cesta del filtro. Imagen Imagen Indicación: Para aspirar líquidos no se debe colocar una bolsa filtrante. Recomendación: Colocar la bolsa filtrante para aspirar polvo fino. El polvo aspirado se puede eliminar más fácil con la bolsa filtrante. Manejo 몇 Precaución Al aspirar en húmedo se debe trabajar siempre con el filtro de espuma colocado. Al aspirar en seco se tienen que trabajar siempre con el saco del filtro o el filtro de cartucho colocado. Antes de la puesta en marcha Imagen Antes de la puesta en marcha montar las piezas sueltas suministradas con el aparato. Puesta en marcha Imagen Conecte el accesorio. Imagen Enchufe la clavija de red. Imagen Conectar el aparato. Aspiración en seco 몇 Precaución Antes de usar el filtro, comprobar si está dañado y cambiar si es necesario. Imagen Recomendación: Colocar la bolsa filtrante para aspirar polvo fino. ES – 8 19 Indicaciones sobre la bolsa filtrante – – – Cuanto más suciedad de aspira más se llena la bolsa filtrante. En caso de aspirar polvo fino, arena etc... se debe cambiar la bolsa filtrante con más frecuencia. Las bolsas filtrantes pueden explotar, por eso es necesario cambiarla a tiempo. 몇 Precaución Aspirar cenizas frías solo con el separador previo. Nº referencia modelo Basic: 2.863-139.0, modelo Premium: 2.863-161.0. Aspiración de líquidos 몇 Advertencia ¡En caso de que se forme espuma o salga líquido, desconecte el aparato inmediatamente o desenchufar! ¡No utilizar una bolsa filtrante! Nota: Si el recipiente está lleno, un flotador cierra el orificio de aspiración y el aparato gira a un mayor número de revoluciones. Desconecte el aparato de inmediato y vacíe el recipiente. Poner el filtro de espuma encima de la cesta filtrante para aspirar en húmedo. Indicación:Cerciorarse del asiento firme del filtro de espuma. Función de soplado Limpieza de zonas de difícil acceso o donde la aspiración no sea posible, p.ej. hojas del lecho de gravilla. Imagen Insertar la manguera de aspiración en la toma de aire para que se active la función de soplado. Interrupción del funcionamiento Desconexión del aparato 20 Finalización del funcionamiento Apague el aparato y desenchufe la clavija de red. Vacíe el depósito Imagen Véase la página 37. Quite el cabezal de aparato y vacíe el depósito. Almacenamiento del aparato Imagen Véase la página 37. Guardar la conexión a la red y los accesorios en el aparato. Guarde el aparato en un lugar seco. Cuidados y mantenimiento Peligro Apague el aparato y desenchufe la clavija de red antes de efectuar los trabajos de cuidado y mantenimiento. Los trabajos de reparación y trabajos en componentes eléctricos sólo los puede realizar el Servicio técnico autorizado. 몇 Advertencia No utilice detergentes abrasivos, ni detergentes para cristales o multiuso. No sumerja jamás el aparato en agua. Limpie el aparato y los accesorios de plástico con un limpiador de materiales sintéticos de los habituales en el mercado. En caso necesario, aclarar el depósito y los accesorios con agua y secar antes de volverlos a utilizar. Imagen Véase la página 37. Si es necesario, limpiar el filtro de celulosa bajo agua corriente, no frotar ni cepillar. Antes del montaje dejar secar totalmente. ES – 9 Ayuda en caso de avería Potencia de aspiración reducida Si la potencia de absorción del aparato disminuye, comprobar los siguientes puntos. Imagen Los accesorios, la manguera de aspiración o los tubos de aspiración están obstruidos; elimine la obstrucción con ayuda de una vara. Imagen La bolsa filtrante está llena, sustituirla por otra. Imagen Véase la página 37. Limpiar el filtro de espuma con agua corriente, secar bien antes de volver a colocarlo. Si el saco del filtro está sucio, sacudirlo para que caiga la suciedad. Si el filtro de cartucho está sucio, sacudirlo para que caiga la suciedad. Cambiar el filtro de cartucho dañado. ES – 10 21 Datos técnicos Tensión de red Frecuencia Capacidad del depósito 1.098-300.0 1.098-304.0 1.098-306.0 220 - 240 1~50/60 1.098-303.0 220 1~50 15 1.098-305.0 120-127 V 1~50/605560HHz l Absorción de agua con el asa 9,0 l Absorción de agua con boquilla para suelos 6,0 l Potencia Pnom Cable de conexión a la red Peso sin accesorios 1000 H 05VV-F2x0,75 900 53RVV 2x0,75 1200 SJTW-16AWG-2C 105°C 3,8 Nivel de presión acústica (EN 60704-2-1) 75 W kg 77 dB(A) CONSUMO DE ENERGIA 1. En Operación: 1,15 kWh 2. En Modo de Espera: N/A Modelo: WD 1 Reservado el derecho a realizar modificaciones técnicas. 22 ES – 11 البيانات الفنية 1.098-300.0 1.098-303.0 1.098-305.0 1.098-304.0 1.098-306.0 الجهد الكهربائي 243 - 223 223 التردد 1~50/60 1~50 121-123 1~50/60 فولت هرتز سعة الخزان 11 لتر سحب المياه بالمقبض اليدوي 8,3 لتر سحب المياه بفوهة األرضية. 3,3 لتر القدرة االسمية سلك كهربائي 1333 833 1233 H 05VV-F2x0,75 53RVV 2x0,75 SJTW-16AWG-2C W 105°C الوزن (بدون الملحقات) 0,9 مستوى ضغط الصوت ()EN 60704-2-1 15 جميع حقوق إدخال تعديالت فنية محفوظة! 23 AR gk 77 ديسيبل (أ) العناية والصيانة خطر يجب غلق الجهاز وسحب القابس الكهربائي في كل مرة قبل القيام بأعمال العناية والصيانة. غير مسموح بإجراء اإلصالحات واستخدام المكونات الكهربائية بالجهاز إال لمركز خدمة العمالء المعتمد. تحذير ال تستخدم أية أداة كاشطة أو زجاج أو منظف متعدد االستخدام .ال تغمر الجهاز في الماء أبدًا.ال تغمر الجهاز في الماء مطلقًا. قم بتنظيف الجهاز وأجزاء الملحقات البالستيكية باستخدام منظف البالستيك المتداول. يمكن غسل خزان االتساخات والملحقات بالماء عند الضرورة ،إال أنه ينبغي تجفيفها قبل إعادة االستخدام. صورة انظر صفحة .2 37 قم بتنظيف فلتر الخرطوشة عند الحاجة تحت الماء المنساب ،واحرص على عدم حكه أو تنظيفه بالفرشاة .ويجب تركه حتى يجف تمامًا قبل التركيب. المساعدة عند حدوث أعطال أنبوبة الشفط المتدلية ال تخفض أنبوبة الشفط الخاصة بالجهاز ،وتأكد من فضلك من النقاط التالية. صورة أال تكون الملحقات ،أو خرطوم أو ماسورة الشفط مسدودة ،قم بإزالة االنسداد باستخدام عصا رفيعة. صورة كيس الفلتر ممتلئ ،استخدم كيس فلتر جديدًا. صورة .37 انظر صفحة 2 قم بتنظيف فلتر الرغوة تحت الماء المتدفق ،واتركه يجف تمامًا قبل التركيب. كيس الفلتر متسخ ،فقم بالطرق عليه. فلتر الخرطوشة متسخ ،فقم بالطرق عليه. قم بتغيير فالتر الخرطوشة التالفة. AR 24 مالحظات حول كيس الفلتر ترتبط درجة ملء كيس الفلتر بالقاذورات التي تم شفطها. بالنسبة للغبار الناعم والرمل وما إلى ذلك، يجب تغيير كيس الفلتر بصورة متكررة. فقد تنفجر أكياس الفلتر الممتلئة للغاية، وبالتالي ،يجب تغيير كيس الفلتر في الوقت المناسب احترس استخدم الفلتر األولي فقط من أجل شفط الرماد البارد. رقم الطلب التنفيذ االعتيادي،2.930108.3 : تنفيذ بريميوم.2.930131.3 : التنظيف بالماء تحذير في حالة تكوين رغاوي أو خروج سوائل يجب فصل الجهاز فورًا أو نزع القابس من المقبس. ال تستخدم كيس الفلتر! ملحوظة :في حالة امتالء الخزان ،تقوم عوامة بإغالق فتحة الشفط وتزيد سرعة الجهاز .قم بإيقاف الجهاز على الفور وتفريغ الخزان. للشفط الرطب قم بسحب فلتر الرغوة فوق سلة الفلتر. إرشاد :افحص فلتر الرغوة من حيث ثباته. 25 وظيفة النفخ تنظيف األماكن التي يصعب الوصول إليها أو األماكن التي ال يمكن الشفط بها ،مثل شفط أوراق الشجر أو النباتات الخضراء من أرضية من الحصى. صورة أدخل خرطوم الشفط في وصلة النفخ التي تعمل على تنشيط وظيفة النفخ. إيقاف التشغيل قم بإيقاف الجهاز. إنهاء التشغيل أوقف الجهاز واسحب قابس الشبكة. تفريغ الخزان صورة 37 انظر صفحة .2 انزع رأس الجهاز وقم بتفريغ الخزان. تخزين الجهاز صورة انظر صفحة .2 37 قم بتخزين وصلة اإلمداد بالكهرباء والملحقات بالجهاز .يحفظ الجهاز في أماكن جافة. AR خطافات األسالك صورة يمكن التخلص من التراب المشفوط بشكل أسهل بواسطة كيس الفلتر. انظر صفحة .2 37 االستخدام لتخزين وصلة اإلمداد بالطاقة. احترس كابل الشبكة الكهربائية فوهة الشقوق للعقد والشقوق وأجهزة التسخين واألماكن التي يصعب الوصول إليها. عند الشفط الرطب ،احرص دائما على تركيب فلتر الرغوة أثناء العمل. عند الشفط الجاف ،احرص دائما على تركيب كيس الفلتر أو فلتر الخرطوشة أثناء العمل. مرشح الرغوة صورة للشفط الرطب قم بسحب فلتر الرغوة فوق سلة الفلتر. إرشاد :افحص فلتر الرغوة من حيث ثباته. فلتر الخرطوشة قبل بدء التشغيل صورة قبل بدء التشغيل يتم تثبيت األجزاء المفكوكة المرفقة مع الجهاز. (تبعا للتجهيز) صورة استخدم فلتر الخرطوشة في شفط األوساخ الكبيرة. كيس فلتر (تبعا للتجهيز) صورة استخدم كيس الفلتر في شفط األوساخ الكبيرة. إرشاد :عند تركيب كيس الفلتر ينبغي مراعاة عدم إمكانية شفط أي هواء غير مفلتر من خالل سلة الفلتر. كيس الفلتر صورة صورة مالحظة :للشفط الرطب ،ال يسمح باستخدام كيس فلتر! إرشادات :لشفط الغبار الناعم ،استخدم كيس فلتر. التشغيل صورة قم بتوصيل الملحقات. صورة قم بتوصيل قابس الكهرباء. صورة قم بتشغيل الجهاز. التنظيف الجاف احترس تحقق قبل االستخدام من أي أضرار في الفلتر وقم بإستبداله عند الضرورة. صورة إرشادات :لشفط الغبار الناعم ،يجب استخدام كيس فلتر. AR 26 سدادة الخزان الرموز الواردة في دليل التشغيل خطر للمخاطر التي تهدد الحياة بصورة مباشرة وتؤدي إلى إصابات جسدية بالغة أو تتسبب في الوفاة. تحذير لمواقف قد تحفها المخاطر وقد تؤدي إلى إصابات جسدية بالغة أو تتسبب في الوفاة. احترس لمواقف قد تحفها المخاطر وقد تؤدي إلى إصابات بسيطة أو تتسبب في أضرار مادية. وصف الجهاز الصور ،انظر الصفحة المطوية! يأتي الجهاز في موديللين مختلفين. مزود بكيس فلتر. مزود بفلتر الخرطوشة. عند فض محتويات العبوة قم بالتأكد من عدم نقص أي ملحقات أو وجود أضرار .يرجى إخطار الموزع عند تعرض الجهاز ألضرار بسبب النقل. توصيلة خرطوم الشفط صورة لتوصيل خرطوم الشفط عند القيام بعملية الشفط. خرطوم شفط بمقبض يدوي صورة قم بتركيب خرطوم الشفط داخل وصلة خرطوم الشفط (وصلة ذات مسمارين). 27 صورة للفتح ،اسحبها نحو الخارج ،وللغلق اضغط عليها للداخل. مفتاح الجهاز (تشغيل/إيقاف) صورة الوضع : 1الشفط أو النفخ الوضع صفر :الجهاز متوقف عن العمل فتحة الملحقات -رأس الجهاز تسمح فتحة الملحقات هذه بتخزين فوهات الشفط برأس الجهاز. مقبض الحمل صورة لحمل الجهاز أو لسحب رأس الجهاز بعد فكه. بكرات التوجيه صورة عند التسليم يتم تخزين بكرات التوجيه في الخزان .قم بتركيبها قبل التشغيل أنابيب الشفط ( 0أضعاف) صورة قم بتركيب مواسير الشفط وتوصيلها بخرطوم الشفط. فوهة األرضية صورة فوهة أرضية مع عنصر للشفط الرطب والشفط الجاف وصلة للنفخ صورة أدخل خرطوم الشفط في وصلة النفخ التي تعمل على تنشيط وظيفة النفخ. AR طلب قطع غيار وملحقات إضافية ستجد في نهاية دليل التشغيل نماذج لقطع الغيار األكثر استخداما. يمكنك الحصول على قطع الغيار والملحقات من الموزع أو من فرع مؤسسة .REKCRÄK إرشادات السالمة هذا الجهاز غير مخصص لالستخدام من قبل األشخاص محدودي القدرات البدنية أو الحسية أو العقلية أو من ال تتوافر لديهم الخبرة و/أو المعرفة إال إذا تم اإلشراف عليهم من قبل شخص مختص بأمنهم وسالمتهم أو بعد حصولهم على تعليمات من هذا الشخص بشأن كيفية استخدام هذا الجهاز واألخطار الناشئة عن ذلك. غير مسموح لألطفال باستخدام الجهاز ،إال إذا كانوا فوق سن الثامنة ،أو تحت إشراف شخص يختص بأمنهم وسالمتهم ،أو بعد أن يحصلوا من هذا الشخص على تعليمات بشأن كيفية استخدام الجهاز واألخطار الناشئة عن ذلك. ال يسمح لألطفال بالعبث بالجهاز. ينبغي مراقبة األطفال لضمان عدم تالعبهم بالجهاز. ال يجوز أن يقوم األطفال بعملية التنظيف والصيانة إال إذا تم اإلشراف عليهم. تحفظ لفافة ورق القصدير الخاصة بالتغليف بعيدًا عن متناول األطفال ،حيث يكمن خطر االختناق ! يتعين إيقاف تشغيل الجهاز بعد كل استخدام وقبل القيام بكل عملية تنظيف أو صيانة. يكمن هنا خطر الحريق .ال يجب شفط أية أشياء مشتعلة أو متوهجة. يحظر تمامًا تشغيل الجهاز في أماكن معرضة لخطر االنفجار. الوصلة الكهربائية قم بتوصيل الجهاز بتيار كهربائي متردد .يجب أن يتوافق الجهد الكهربائي مع الجهد المذكور على الملصق الموجود على الجهاز. خطر حدوث صدمة كهربائية ال تقم باإلمساك بالقابس والمقبس إذا كانت يداك مبللتين. ال تسحب القابس من خالل نزع الوصلة من المقبس. يجب فحص الوصلة مع القابس الكهربائي قبل كل تشغيل للجهاز للتأكد من عدم وجود أية تلفيات .يجب استبدال الوصالت التالفة على الفور من أي فني كهربائي معتمد أو أي مركز خدمة عمالء معتمد من أجل تالفي وقوع أية أخطار. تجنبا لوقوع حوادث كهربائية ننصح باستخدام مقابس ذات مفاتيح قطع الدائرة الكهربائية لتيار الخلل مضادة للتيار (الحد األقصى 03 مللي أمبير لشدة تيار التحرير االسمي). تحذير بعض المواد يمكن أن تُكون أبخرة أو خليط قابل لالنفجار عند اتحادها مع الهواء الممتص! ال تقم بشفط األشياء التالية مطلقًا: الغازات القابلة لالنفجار أو االحتراق ،السوائل واألتربة (األتربة التفاعلية) غبار المعادن القابل للتفاعل (مثل األلومونيوم، والماغنسيوم ،والزنك) عند اتحادها مع وسائل التنظيف القلوية والحمضية القوية. األحماض والعناصر القوية والمركزة المواد العضوية المذيبة (مثل البنزين ،ومزيل األلوان ،واآلسيتون ،والزيت الساخن). باإلضافة إلى ذلك يمكن أن تؤدي هذه المواد إلى تآكل الخامات المستخدمة في صنع الجهاز. AR 28 عزيزي العميل يرجى قراءة دليل التشغيل األصلي هذا قبل أول استخدام لجهازكم، ثم التعامل مع الجهاز وفقًا للتعليمات الواردة بهذا الدليل .كما يرجى االحتفاظ بدليل التشغيل ألي استخدامات أخرى فيما بعد أو في حالة تسليم الجهاز لمستخدمين آخرين. إرشادات عامة االستخدام المطابق للتعليمات الجهاز مطابق للشروح الواردة في دليل التشغيل هذا وإلرشادات السالمة الخاصة باستخدامه كمكنسة متعددة االستخدامات. تم تطوير هذا الجهاز من أجل االستخدام الشخصي كما أنه غير مصمم لتلبية متطلبات االستخدام التجاري. يجب حماية الجهاز من األمطار .ال يجوز تخزينه في األماكن الخارجية المفتوحة. ال يمكن شفط الرماد والسخام بهذا الجهاز. ال تستخدم المكنسة متعددة األغراض إال مع المكونات التالية: كيس الفلتر األصلي. قطع الغيار األصلية أو الملحقات األصلية أو الملحقات اإلضافية األصلية. لن تتحمل الشركة المنتجة مسئولية أية أضرار محتملة قد تحدث نتيجة لالستخدام غير المطابق للمواصفات أو التشغيل الخاطئ. حماية البيئة مواد التغليف قابلة للتدوير وإعادة االستخدام .يرجى عدم التخلص من العبوة في سلة القمامة المنزلية ولكن عليك بتقديمها للجهات المختصة بإعادة تدوير القمامة. تحتوي األجهزة القديمة على مواد قيمة قابلة إلعادة التدوير واالستخدام والتي يجب االستفادة منها .لذا ،قم بالتخلص من األجهزة القديمة بما يتوافق مع نظم التجميع المناسبة. التخلص من الفلتر وكيس الفلتر يتم تصنيع الفلتر وكيس الفلتر من مواد صديقة للبيئة. طالما أنها ال تحتوي على أية مواد قابلة لالمتصاص والتي يحظر إلقائها في سلة القمامة المنزلية ،يمكنك التخلص منها في سلة القمامة المنزلية العادية. الضمان في كل دولة تسري شروط الضمان التي تضعها شركة التسويق المختصة التابعة لنا. نحن نتولى عالج األعطال التي قد تطرأ على جهازك بدون مقابل خالل فترة الضمان طالما أن السبب في هذه األعطال ناجم عن وجود عيب في المواد أو في الصنع .في حالة استحقاق الضمان ،توجه من فضلك بقسيمة الشراء إلى أقرب موزع أو مركز خدمة عمالء معتمد. خدمة العمالء يسر فرع مؤسسة REKCRÄKأن يقدم لك كافة أشكال المساعدة في حالة وجود استفسارات أو أعطال. 29 AR ...5 ........ ....... ...6 . . .. . . . . . ...7 ................ ........ ......... .......... ...8 . . .10 . . .10 . .. 10 (REACH) www.kaercher.de/REACH : KÄRCHER KÄRCHER 30 Å¥ -5 11 - 8 - - 30 mA) - ! ! . Å¥ -6 11 31 : ! 2 - B1 B1 ) A1 B3 I: . 0: A1 32 Å¥ -7 11 ( A1 ) D1 3 ( B1 ) D1 : B1 A2 D2 ! : E1 : F2 37 . A1 B C1 B : B3 Å¥ -8 11 33 E1 A2 : - ! F1 37 : 2.863-139.0, : 2.863-161.0. F2 37 ! ! : : 34 Å¥ -9 11 B1 A2 G1 ! 37 G1 37 . 1.098-300.0 1.098-304.0 1.098-306.0 220 - 240 1.098-303.0 1.098-305.0 220 120-127 1~50/60 1~50 1~50/60 15 9,0 6,0 Pnom 1000 900 1200 H 05VVF2x0,75 53RVV 2x0,75 SJTW-16AWG2C 105°C 3,8 75 77 (A) (EN 60704-2-1) ! Å¥ -10 11 35 3 36 37 http://www.kaercher.com/dealersearch Alfred Kärcher GmbH & Co. KG Alfred-Kärcher-Str. 28 - 40 71364 Winnenden (Germany) Tel.: +49 7195 14-0 Fax: +49 7195 14-2212