Transcript
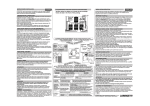
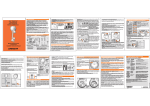
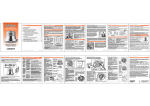
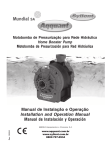
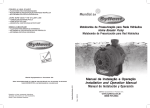
1 - Presentación/ Presentation
Grifo Eléctrico
Electric TAP
Pico Móvil
Movable Spout
!Usted compró el nuevo Grifo eléctrico Lorenzetti, desarrollado para ofrecerle eficacia con el
menor consumo eléctrico. Práctico y económico.
Accionamiento automático con la apertura del registro, consumiendo energía solamente
en esta condición.
!You have just acquired the new Electric Tap Lorenzetti, developed to offer you all comfort
and suitability, with less consumption of electrical energy. Three temperatures
!Practical and economic. Automatic operation when the register is open, consuming
energy only in this case. Designed to match with any kitchen decoration.
2 - Atención / Atention
!Lea antetamente las instrucciones de instalación antes de instalar el producto.
!La instalación de este producto debe ser efectuada por personas capacitadas
!Este producto fue desarrollado para ser utilizado con agua previamente tratada por la
distribuidora pública.
!No conecte dispositivos o accesórios no indicados en este manual en la salida del aparato.
!Conserve este manual para futuras consultas
!Read all installation instructions
carefully before installing the product. The
installation of this product must be done by qualified people
!Keep this manual for further reference
!Do not connect any devices or accessories that have not been indicated in this manual.
!This product was developed to be used with treated water by the public water supplier
3 - Características Técnicas/ Technical Characteristics
Grado de protección: IP24/Protection degree: IP 24
Especificación / Specifications
Grifo Eléctrico/ Electric TAP
Modelo/ Model
Tensión / Tension (V~)
127
220
Desconectado/ OFF
0
0
Potencia Selector de
(Watios)
Power
(Watts)
Manual de instrucciones de instalación
Installation and instruction manual
Temperatura
Temperature
Selector
Tibia/ Warm
Caliente/Hot
Disyuntor o Fusible ( Amperios)
Circuit Breaker (Ampers)
2
Sección de lo cables/ Wires (mm )***
AWG
Presión de trabajo
Working Pressure
6
8
Conexión Eléctrica / Electric Connection
4
10
20 kPa (2 mca )
400 kPa (40 mca )
Mínima/ Minimum
Máxima/ Maximum
Conexión Hidraulica/ Hydraulic Connection
**3222
5500
30
**2997
4500
40
Entrada de agua - Rosca 1/2” BSP
Water inlet - Thread 1/2” BSP
Cables Blancos - Fase/ Fase - White Wire - Phase/Phase
Fase/Neutro - Phase / Neutral
Cable verde amrillo - Puesta a tierra
Green / Yellow Wire - Grounding Wire
Resistividad del agua/ Water Resistivity: A 22º no debe ser
inferior a 1300 Ohmx cm At 22º/72ºF
must not be lower than 1300Ohmxcm
** Para distancia superior a 30 metros, usar conductores de mayor sección
For distances greater than 30 meters, larger wires must be used.
* Potencia económica / Economic Power.
4 - Preparación para instalación/ Preparing to install
! Certifíquese de que la tensión(voltaje) de su
01
grifo/canilla corresponda a la tensión (voltaje) de la
linea de instalación (127V~ o 220V~) (fig.: 01).
!Verifique o providencie una linea directa exclusiva
del cuadro de distribución(fig.:02), usando
conductores (cables) y protección (disyuntor o
fusible),considerando los valores de tensión, potencia
y la distancia del grifo hasta el cuadro de distribución,
conforme tabla de Características Técnicas.
! Make sure the voltage of yout tap is adequate to the
voltage of the line which comes from the main
swirchboard (127V~or 220V~) (Pict.01)
! Verify and provide an exclusive direct line from the
switchboard (Pict 2), using conductors (wires) and
appropriate circuit breaker or fuse, considering the
tension, power rating and distance from the tap,
according to the table of Technical Characteristics
!Use disyuntor bipolar p/ 220V~ (fase-fase)y
disyuntor unipolar en el conductor fase p/ 127V~
Barra de tierra
y 220V~ (fase-neutro).Desconecte el disyuntor o
Barra Neutro
Land Bar 02
fusible del cualdro de distribución de energía
Neutral Bar
Grifo
eléctrica del circuito en el cual será instalado el
Tap
grifo, antes de iniciar la instalación.
! Use two pole circuit breaker for 220V~(phasephase) and a single pole circuit breaker in the
phase conductor for 127V~and 220V~(phaseneutral). Disconnect the fuse and/or circuit
breaker at the main electric switchboard where
the tap will be installed, before starting the
installation.
220V~ 5500W
30A
4mm2
IMPORTANTE: Este Grifo puede ser usado en circuitos con dispositivo Diferencial Residual (DR)
de alta (IDn: 0,030 A) o baja sensibilidad (IDn: 0,30 A), para una resistividad mínima del agua de
1300 W cm.
IMPORTANT: This tap can be used by circuits with Differential Residual Dispositive (DR) of high
(IDn: 0,30 A)or low sensitivity(IDn: 0,30 A), for a minimum resistivity of water of 1300 W cm
!The water column until the point of the product installation must have at least 2mca. and at the
most 40mca (Meter of water column)(Pict 3)Verify if the water exit of 1/2”, is leveled with the tile.
If it is more than 3mm inwards, use a galvanized iron, brass or plastic prolonger. This prolonguer
is not supplied (Pict. 4).
!If the pipe does not match with the 1/2” thread, use an adaptor (Pict 4).
!This adaptor does not come with the equipment.
En el caso de que la cañeria no coincida con la rosca 1/2” BSP, use un buje de reducción.
Este buje no acompaña el grifo.
If the pipe does not match with the thread of 1/2”, use an adaptor. This adaptor is not
supplied.
Abra el registro de agua y deje salir agua para retirar las suciedades de la cañeria. Este
grifo permite la instalación directa en la salida del agua. (Fig.:04).
!Open the water valve and let the water flow through the pipe, to remove any dirt.
!This tap can be installed directly on the water outlet.
04
Pared/Wall
Tanque
de agua
Water Think
Producto
Product
Salida de agua
Water outlet
mca
Torneira Versátil
Presión
minima
Minimum
Pressure
03
Presión
máxima
Maximum
Pressure
Reductor
de Presión
Pressure reducer
! Use cinta veda rosca en el niple de entrada de agua del grifo (fig.05).
!Para columna de agua entre 8 mca. y 40 mca. o salida de agua proveniente de la calle
(distribuidora), es necesario colocar el reductor que acompaña el producto en la entrada del
agua.
!Use sealing tape on the niple of the tap’s water inlet.
!For water column between 8mca and 40mca, or water exit from the street (public supplier), it
is necesary to connect the reducer, that comes together with the product,
Cable de Tierra
Grounding Wire
2,0 mca 40,0 mca
(mca = metro de columna de agua
wmc = water meter column)
Pila
Font
Piso/ Wall
10 kPa = 1 mca =1 metro linear/linera meter
Revestimiento
Covering
220V~ 5500W
30A
4mm2
Pico/ Spout
Versá
til
07
Registro/ Register
08
Registro
Register
05
220V~ 5500W2
4mm
30A
5 - Instalación Hidraulica/ Hydraulic installation
La columna de agua hasta el punto
de instalación del producto debe ser
como mínimo 2 mca. y máximo de
40 mca. (Metros de columna de
agua) (Fig.: 03).
!Verifique si la salida de agua de
1/2”(pulgada), está nivelada con el
azulejo. Caso esté a más de 3mm
(milímetros) para dentro, use un
prolongador de hierro galvanizado,
latón o plástico. Este prolongador
no acompaña el grifo
Cinta Veda
Rosca
Sealing
6.1 - Puesta a tierra / Grounding Wire
06
!Para instalar el grifo en la pared es necesario retirar el
Tuerca pico del producto. Retire la tuerca del pico, girándolo en
del Pico
Spout el sentido antihorario, retire el pico y verá que el cable
Thread de tierra del producto estará expuesto (esto es normal)
(fig.:06). Instale el grifo girándolo suavemente sin usar
herramientas (fig.:07).
!No usar el registro de accionamiento como palanca
para instalar el grifo (fig.:08).
!To have the tap installed on the wall is necessary to remove the spout of the product,
turning in the anticlockwise direction, remove the spout and notice that the grounding wire
will be exposed (this is normal)(Pic06).
!Install the tap by turning it softly with no tools (Pic 07)
!Do not use the activating register as a lever to have the tap installed (Pic.08).
Correcto/ Right
Equivocado/ Wrong
! Recoloque el pico en el producto, colocando el cable de tierra del producto en el
interior.(fig.:06). Recoloque la tuerca del pico, sin usar herramientas en el sentido horario.
(Fig.:06).
! Haga correr agua por el grifo antes de conectar el mismo a la red eléctrica, para llenar la
cámara de calentamiento y para que no se queme la resistencia. Verifique si hay algun
escape de agua y cierre el registro de accionamiento.
! Este procedimiento deberá ser realizado cuando se instale el producto, o en eventuales
cambios de la resistencia y siempre que el producto es retirado de la pared por algun motivo.
!Replace the spout placing the grounding wire inside the producto (Pic.06)Place the screw
with no need of tools in the clockwise direction.
!Before connecting the unit to the wires, let the water flow through the product in order to
have the chamber filled and avoid burning the heating element.While the water flows through
the unit, check out for any leakage points and then close the water valve. Make sure that this
operation is repeated every time the tap unit is removed from the wall or when heating
element is changed
La temperatura de salida del agua, también puede ser regulada a través del registro del
Importante para su seguridad:
Para que no haya riesgos de choques eléctricos, conecte el cable de tierra del
producto a un sistema de puesta a tierra eficaz. No utilice el cable neutro como
puesta a tierra. El sistema de puesta a tierra le garantiza seguridad durante la
utilización de aparatos electrodomésticos.
Para que se llegue a una máxima eficiencia, el sistema de puesta a tierra debe ser
efectuado por profesional capacitado. Un buen sistema de puesta a tierra es
obtenido con la colocación de jabalinas metálicas en el suelo, obteniéndose una
impedancia máxima de 10ohms (10W)
Important for your safety:
In order to avoid the risk of electric shocks, make sure to connect the grounding
wire from the product to a grounding system. Do not use the Neutral Wire as the
grounding one. The grounding system guarantees your safety while home
appliances are used. To a maximum efficiency the grounding system should be
done by a qualified professional.
A good grounding system is obtained with the installation of copper ground rods in
the floor with a maximum impedance of 10 ohms (10W)
Registro abierto 10
Open Main Register
6 - Intalación Eléctrica / Electric Intallation
! En el caso de una nueva construcción, providencie
09
una caja de derivación a una distancia próxima de
13cm, arriba o al lado de la salida de agua. (fig. 09).
!Certifíquese que la llave general o el disyuntor del
circuito que alimentará el grifo este desconectado.
!For nue constructions, make sure to provide a
13 cm
derivate box 13cm above the water outlet. Be sure
that the main switch and the cricuit breakers of the
tap are turned off.
!Conecte los cables de conexión del grifo a los cables de la red eléctrica, usando un
conector adecuado a la tensión y corriente eléctrica del grifo (fig.:09).
!Este conector no acompaña el producto.
Atención : No use ningún tipo de toma o triple para la instalación de este aparato.
!Be sure that the main switch and the circuit breakers of the tap are turned off.
!Connect the unit to the wires and make sure the connectors used match the right voltage
and power rating of the electrical circuit of the tap (Pic. 14).
!This connector does not come with the product.
Attention: Do not use plugs or socket for the product installation.
7.1 - Control de la Temperatura/ Temperature control
Manopla Selectora / Gauntlet Selector
Caliente - Hot
Desconecta / OFF
Tibia / Warm
V
e
rs
á
ti
l
Manopla Selectora de 11
Temperaturas
Temperature selector
9 - Eventuales problemas y respectivas soluciones
Frequent questions and answers
!The water temperature can also be controlled by the water valve
IMPORTANTE/ IMPORTANT
! Para su seguridad y mayor vida útil de los componentes del producto, accione la
manopla selectora de temperaturas con el registro del grifo cerrado.
! En días más calientes, es posible economizar energía, para esto posicione la manopla
selectora de temperaturas en la posición “Tibio” y ajuste la temperatura a través del
registro del grifo.
!Este aparato puede calentar el agua a una temperatura superior a la adecuada para usar el
grifo. Por lo tanto, antes y durante el uso del grifo, será necesario la máxima atención de
forma a regular adecuadamente la temperatura del agua. Niños , personas de mucha edad,
enfermos personas física o mentalmente incapacitadas, deben ser supervisionadas cuando
de la utilización del aparato.
! For your own safety and to provide a longer life to the componentes of the unit, only use the
7 - Utilización / Usage
! Conecte el disyuntor o llave fusible del cuadro de distribución de energía en el
cual está instalado el grifo.
!Para el producto funcionar, tendrá que abrir el registro del agua y el mismo
entrará en funcionamiento automáticamente.(Fig 10)
!Turn on the circuit breaker or fuse of the main switchboard where the tap unit is
connected to.
!Open the water valve. The tap turns automatically on.
Registro cerrado
Closed Register
grifo, aumentado o disminuyendo el flujo del agua.
switch key if the water valve (register )is closed.
!For warm days, use the unit in the economic position and fitting the temperature of the tap
register.
!This equipment can heat the water at a temperature above the one adequate for use. Therefore
before and during its use, special care should be taken so that temperature can be adequately
adjusted.Children, the elderly, sick, disabled or mentally ill people, must be supervised if they
need to use the equipment.
8 - Limpieza y mantenimiento / Cleaning and maintenance
! Antes de iniciar la limpieza del producto, desconecte el disyuntor o fusible del cuadro de
distribución de energía eléctrica del circuito en el cual la ducha está instalada.
! Use sólamente paño húmedo para la limpieza, pues el uso de productos abrasivos pueden
dañar el producto.
!Suciedades y residuos contenidos en el agua pueden perjudicar el funcionamiento de este
producto, (item 8.1). Si el agua suministrada en este aparato presentar tales características,
providencie la instalación de dispositivos/ filtros capaces de evitar que este tipo de suciedad
llegue hasta el producto.
!Certifíquese de que estes dispositivos sean adecuados y no comprometan la presión mínima
de funcionamiento del producto.
! En caso de dudas, contacte el distribuidor Lorenzetti en su país.
!Before cleaning the product, disconnect the circuit breaker or fuse key in the main switchbox
from the circuit which the shower head is installed.
!Use a damp cloth only for cleaning, chemical products may damage the product.
!Dirt and residues in the water may damage the operation of this product (Item 8).
!If the water provided presents such characteristics arrange for filters/devices installation to
avoid dirt form entering the product.
!Make sure these devices are adequate and do not damage the minimum working pressure of
this equipment.
!In case of queries, contact a Lorenzetti distributor in your country.
Observe el cuadro abajo antes de solicitar ayuda técnica.
Please read the table below, before requesting technical support.
Problema
Problem
The tap does
not turn ON
automatically
El gripo no
conecta
automáticame
nte
Causa probable
Probable reason
Solucion/ Solutions
Disyuntor desconectado
Circuit breaker is turned
OFF
Accione el disyuntor
Turn the cricuit breaker key ON
La manopla de control de
temperaturas esta
desconectado
Temperature control key
is OFF
Posicionar la manopla de temperaturas en la
que más le agradar.
Press the selector key in the temperature that
pleases you most.
No sale agua
por el producto
The water
does not flow
from the tap
El registro está
cerrado o existe aire
en la cañeria
The bathroom
register is closed or
there is air in the
pipes
El producto
calienta poco
con la
temperatura en
la posicion
caliente.
The product
doesNot head
Enough event
though the
selecting button
is on the hot
position
Cableado
Inadecuado
Inadequate wires
Tensión
eléctrica baja
Low Tension
Abra el registro principal y/o as canillas que
pertenecen al mismo circuito hidráulico, hasta retirar
todo el aire.
Open the register and/or the taps and let the water
flow
Consulte un profesional para verificar si el cableado
esta de acuerdo con las especificaciones del manual.
Contact a professional to check if wires are adequate
Consulte un profesional para verificar si la tensión
eléctrica esta abajo de los valores nominales de
suministro (127V~ ou 220V~). En este caso, comunique
a la proveedora de su región.
Contact a qualified technician, to verify your electrical
system. If the nominal voltage of your system is under
the values spacified by your electrical supplier (127V~or
220V~) contact the utility responsible for your electrical
supply
IMPORTANTE: Ocurriendo quema de la resistencia cámbielas por
resistencias originales Lorenzetti.
En caso de defectos en los conductos del cordón de alimentación del
aparato, no los substituya, retire el aparato del
punto de utilización y envíelo
a un técnico especializado.
IMPORTANT: Replace the heating element for originals Lorenzetti.
In case there are defects in the feeding wires do not replace them, remove
Av. Presidente Wilson, 1230 - CEP 03107-901
São Paulo - BRASIL
www.lorenzetti.com.br
CÓD. 370792 - Fev /06