1
Dexaplan GmbH
Paul-Böhringer-Str. 3 ·
D-74229 Oedheim (Germany)
Estado de la información - Aggiornamento delle informazioni Information last updated - Stand der Informationen: 08/2007
Ident.-No.: 08-2007-BA-611-ES/IT/GB/MT/DE/AT
DISPOSITIVO DE LLAMADA
PARA URGENCIAS Y ALARMA
APPARECCHIO DI SELEZIONE
ALLARME E D’EMERGENZA
L 15
BA 611
DISPOSITIVO DE LLAMADA
PARA URGENCIAS Y ALARMA
Instrucciones de utilización
y de seguridad
APPARECCHIO DI SELEZIONE
ALLARME E D’EMERGENZA
Indicazioni per l‘uso
e per la sicurezza
ALARM AND EMERGENCY
TELEPHONE DIALLER
Operation and Safety Notes
ALARM- UND
NOTFALL-WÄHLGERÄT
Bedienungs- und
Sicherheitshinweise
Contenido
Introducción
Utilización correcta ..........................................................
Contenido del suministro..................................................
Equipamiento ..................................................................
Datos técnicos .................................................................
Página
Página
Página
Página
4
4
4
5
Indicaciones de seguridad ........................................ Página 5
Puesta en funcionamiento
Planificación de la colocación...........................................
Conexión telefónica..........................................................
Suministro de corriente ....................................................
Realización de ajustes......................................................
Colocar la unidad de alarma.............................................
Manejo.............................................................................
Cambiar las pilas..............................................................
Conexiones opcionales.....................................................
Página
Página
Página
Página
Página
Página
Página
Página
6
6
6
7
9
10
11
11
Solucionar errores ........................................................ Página 12
Mantenimiento y limpieza
Mantenimiento del sistema de alarma.............................. Página 13
Limpieza .......................................................................... Página 13
Eliminación ...................................................................... Página 13
Información
Garantía ........................................................................... Página 13
Asistencia ........................................................................ Página 13
Declaración de conformidad............................................. Página 13
ES
2
A
Q
B
W
C
{
D
E
A
I
}
E
R
U
q
w
e
r
t
y
u
O
P
Ta
Y
S
F
G
[
J
]
T
o
a
s
d
G
100°
H
22 mm
H
K
ca.40°
:
L
i
F
D
p
6m
I
K
180°
max. 90°
6m
L
m
7m
M
N
2
f
ca. 4 mm
3
Introducción
Introducción
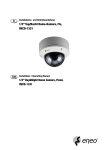
Lea completa y detenidamente este manual de instrucciones y despliegue para ello la página 3, que contiene
las ilustraciones. El manual de instrucciones pertenece a
este producto y contiene indicaciones importantes sobre
la puesta en marcha y el manejo. Observe siempre todas las indicaciones de seguridad. Si tiene dudas o no
está seguro respecto al manejo del aparato, infórmese
en la dirección de Internet www.dexaplan.com o póngase en contacto con el punto de asistencia (véase el capítulo «Asistencia»). Conserve estas instrucciones en lugar
seguro y, en caso necesario, entréguelas a terceros.
Utilización correcta
El dispositivo de llamada para urgencias y alarma ha
sido concebido exclusivamente para el uso doméstico
en interiores. El suministro eléctrico de la unidad de
alarma se produce a través del bloque de alimentación suministrado de 9 V CC conectado a una corriente de 230 V
~ CA, 50 Hz. Una pila de bloque de 9 voltios (no incluida),
mantiene la función en caso de interrumpirse el suministro eléctrico. Para la función de marcado se necesita
una conexión telefónica analógica.
El dispositivo de llamada para urgencias y alarma se activa o desactiva en la unidad de alarma o en el mando a
distancia. La temporización de entrada (ajustable) y de
salida permiten la activación o desactivación en el área
vigilada. El sensor de movimiento integrado en la unidad
de alarma reacciona al movimiento de personas en el
área vigilada. De activarse la alarma la unidad marca los
números de teléfono que usted haya programado. Además en caso de alarma la sirena integrada en la unidad
puede producir un toque de alarma. En caso de urgencia
se puede también desencadenar la alarma inmediatamente pulsando un botón de pánico.
Como alternativa a la función de alarma, la unidad de
alarma puede producir un sonido de gong al detectar
movimiento.
4
ES
El fabricante no se hace responsable de los daños ocasionados por un uso o manejo incorrecto.
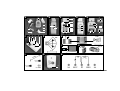
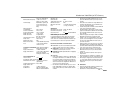
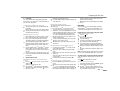
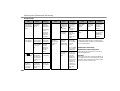
Contenido del suministro
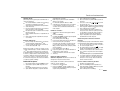
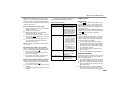
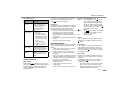
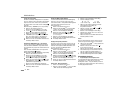
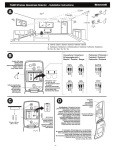
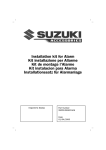
Véase la fig. A
Q 1 Unidad de alarma BA 611
W 2 pegatinas de enmascaramiento
E 2 tornillos para la unidad de alarma
R 2 tacos para la unidad de alarma
T 1 Mando a distancia BA 611 R
Ta 1 pila CN23 A, de 12 V, alcalina
Y 1 en su caso, adaptador de cable de teléfono
(específico para el país)
U 1 cable de conexión telefónica (aprox. 2 m, con
conector RJ-11)
I 1 bloque de alimentación con aprox. 1,8 m de cable
1 Manual de instrucciones
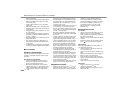
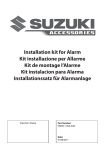
Equipamiento
Unidad de alarma BA 611
Véase la fig. B
O conexión de línea telefónica «LINE»
P conexión telefónica «PHONE»
Véase la fig. C
{ sensor de movimiento
} LED de tensión (power LED)
q LED de detección/pila débil
w pantalla LCD
e teclas numéricas, de 0 a 9
r tecla «PROG»
t tecla «PAUSE»
y tecla «OK»
u tecla «PANIC»
i tecla
o tecla
Véase la fig. D
p sirena
[ toma de conexión del bloque de alimentación (9V)
] interruptor de conexión / desconexión del gong
Véase la fig. E
A tapa del compartimento de conexión
S tornillo para la tapa del compartimento de conexión
D orificios para colgar con tornillos
F bornes de conexión
G ranura
H compartimento de la pila
J tornillo de la tapa del compartimento de la pila
K tapa del compartimento de la pila
L conexión de la pila
Mando a distancia BA 611 R
Véase la fig. F
: tecla «PANIC»
a LED de control
s tecla « » para activar
d tecla « » para desactivar
Véase la fig. M
f tapa del compartimento de la pila
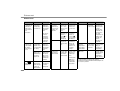
Fehler beheben / Wartung und Reinigung / Entsorgung / Informationen
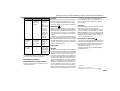
Fehler
Ursache
Behebung
Ihre Einstellungen werden
nicht gespeichert.
Die Einstellungen
wurden nicht
bestätigt.
Bestätigen Sie
die Einstellungen durch Drücken der Taste
OK y.
Bei sonstigen
Fehlern
Führen Sie ein
Reset durch
(s. Kapitel
„Einstellungen
vornehmen“
Absatz „Reset“).
Für weitere Fragen und Probleme stehen Im Internet unter
www.dexaplan.com Informationen zur Problembehandlung
zur Verfügung.
Wartung und Reinigung
Wartung der Alarmanlage
Überprüfen Sie regelmäßig die technische Sicherheit
und Funktion des Gerätes.
Reinigung
Ziehen Sie das Netzgerät aus der Steckdose, bevor Sie
das Gerät reinigen. Reinigen Sie die Geräte nur mit
einem trockenen oder nebelfeuchten Tuch. Tauchen Sie
die Geräte nicht ins Wasser ein. Verwenden Sie zum Reinigen
keine Lösungsmittel.
und Elektronik-Altgeräte und Umsetzung in nationales
Recht müssen verbrauchte Elektrogeräte getrennt
gesammelt und einer umweltgerechten Wiederverwertung zugeführt werden. Entnehmen Sie die Batterien, bevor
Sie die Geräte entsorgen. Sie als Endverbraucher sind gesetzlich (Batterieverordnung) zur Rückgabe aller gebrauchten
Batterien verpflichtet. Batterien dürfen nicht über den
Hausmüll entsorgt werden.
Informationen
Garantie
Montag-Freitag, 9:00 - 17:00 Uhr mit unserer Servicestelle in Verbindung. Dort erhalten Sie alle notwendigen
Informationen zu Servicefragen wie Rücksendung etc.
Konformitätserklärung
Hiermit erklärt die Firma Dexaplan GmbH, dass sich das
Alarm- und Notfall- Wählgerät in Übereinstimmung mit
den grundlegenden Anforderungen und den anderen relevanten Vorschriften der Richtlinie 1999 / 5 / EG befindet.
Die Konformität wurde nachgewiesen.
Die vollständige Konformitätserklärung ist nachlesbar
unter: www.dexaplan.com
Sie erhalten auf dieses Produkt 3 Jahre Garantie ab
Kaufdatum. Bitte bewahren Sie den Kassenbon als Kaufnachweis auf. Setzen Sie sich bitte im Garantiefall mit
der Servicestelle Ihres Landes in Verbindung. Nur so
kann eine kostenlose Einsendung Ihrer Ware gewährleistet
werden. Die Garantieleistung gilt ferner nur für Materialoder Fabrikationsfehler. Sie gilt nicht für Verschleißteile
oder für Beschädigungen an zerbrechlichen Teilen, z. B.
Schalter oder Batterien. Das Produkt ist lediglich für den
privaten und nicht für den gewerblichen Gebrauch bestimmt.
Es besteht kein Anspruch auf Schadensersatz im Falle
eines Einbruches. Ein Alarmgerät ist kein Ersatz für Versicherungsschutz und ersetzt nicht Ihre Sorgfaltspflicht.
Bei missbräuchlicher und/oder unsachgemäßer Behandlung,
Gewaltanwendung und bei Eingriffen, die nicht von der
Servicestelle vorgenommen wurden, erlischt die Garantie.
Ihre gesetzlichen Rechte werden durch diese Garantie
nicht eingeschränkt.
Service
Entsorgung
Entsorgen Sie das Verpackungsmaterial sowie ausgediente Batterien und Geräte bei einer Entsorgungseinrichtung Ihrer Stadt oder Gemeinde.
Gemäß Europäischer Richtlinie 2002/96/EG über Elektro-
Im Internet unter www.dexaplan.com stehen Informationen
zur Problembehandlung.
Setzen Sie sich bitte bei Rückfragen per E-Mail
([email protected]) oder telefonisch
(
0 71 36 / 91 08 88) (
0512 - 362 362)
Dexaplan GmbH
Paul-Böhringer-Str. 3 · D-74229 Oedheim
Stand der Informationen 08/2007 · Ident.-No.: 08-2007-BA-611-DE /AT
DE/AT
49
Introducción / Indicaciones de seguridad
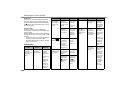
Datos técnicos
Unidad de alarma BA 611
CC
Tensión de funcionamiento: 9V
Absorción de corriente:
130 mA (alarma), < 5 mA
(en espera)
Suministro de corriente:
a través del bloque de alimentación suministrado, o
bien mediante una pila de
corriente de emergencia
(6LR61 de bloque, 9 voltios, no incluida)
Radiorreceptor:
433,92 MHz
Sirena:
100 dB(A) + / - 5dB(A) a
0,3 m (funcionando con
bloque de alimentación)
Duración de la sirena (máx.): aprox. 30 s / aprox. 30 s
pausa / aprox. 30 s alarma
Función de gong:
desactivable; avisa de cada
movimiento detectado mediante un sonido de gong
Números de teléfono
programables:
máx. 5 números
Marcación automática:
hasta 5 veces
Código programable:
de 3 a 6 dígitos
Temporización de salida:
aprox. 55 s
Suministro de entrada:
programable:
0 / 5 / 10 / 15 / 20 s
Temperatura de
funcionamiento:
de 0°C a +39°C
Ámbito de aplicación:
interiores
Material de la carcasa:
ABS
Dimensiones de la carcasa: aprox. 86 x 150 x 46 mm
(an. x al. x pr.)
Peso:
aprox. 197 g (sin pila, sin
accesorios)
Sensor de movimiento (fijado a la unidad de alarma)
Sensor:
pasivo por infrarrojos (PIR)
Ángulo de detección:
aprox. 100° horizontal
Alcance de detección:
aprox. 6 m a 20° C (movimiento transversal, altura
de montaje de 0,5 a 2 m
aprox.)
Mando a distancia BA 611 R
CC
Tensión de funcionamiento: 12V
Absorción de corriente:
máx. 25 mA
Suministro de corriente:
1 pila de 12 V, alcalina
(tipo CN 23 A)
Frecuencia de transmisión: 433,92 MHz
Alcance de transmisión:
aprox. 20 m (en el exterior)
Codificación:
una vez, guardada ya de
fábrica en la unidad de
alarma
Indicación de funcionamiento: LED
Temperatura de
funcionamiento:
de 0° C a + 40° C
Material de la carcasa:
ABS
Dimensiones de la carcasa: aprox. 45 x 67 x 16 mm
(an. x al. x pr.)
Peso:
aprox. 34 g (con pila)
Explicación de los símbolos y términos utilizados:
¡ Peligro! Si se incumplen estas indicaciones se
pone en peligro la vida y la salud.
¡Atención! Si se incumplen estas indicaciones se
pone en peligro objetos materiales.
¡Consejo! Si se cumple esta indicación se obtendrán
los mejores resultados.
Bloque de alimentación
Suministro de corriente:
Consumo de energía:
Salida de corriente:
230V ~ CA, 50 Hz
4,5 VA
CC, máx. 500 mA
9V
Indicaciones de seguridad
Las siguientes indicaciones sirven para su seguridad y
satisfacción a la hora de utilizar el aparato. Tenga en
cuenta que el incumplimiento de estas indicaciones de
seguridad puede causar riesgos considerables.
¡Peligro!
Utilice la unidad de alarma exclusivamente con corriente
continua de 9 V. Antes de conectar la fuente de alimentación de 12 V CC a la red, asegúrese de que la
corriente esté asegurada de acuerdo a las normativas. No conecte ninguna tensión externa a los bornes de conexión. De lo contrario existen riesgos
mortales o de lesiones.
contrario pueden correr riesgos mortales por asfixia.
contrario existen riesgos mortales o de lesiones.
al lado del oído. De lo contrario pueden producirse
lo contrario existen riesgos mortales y de lesiones.
Evite que los aparatos entren en contacto con humedad.
De lo contrario existen riesgos mortales y de lesiones.
lo contrario existen riesgos mortales o de lesiones.
ES
5
Indicaciones de seguridad / Puesta en funcionamiento
riesgo de lesiones por ácido abrasivo.
ves a la salud.
lo contrario se corre peligro mortal por riesgo de
¡Atención!
una pila alcalina de 12 V (tipo CN 23 A o L1028)
Cuando coloque la batería fíjese en la polaridad correcta.
Las baterías recargables no son adecuadas por
descargarse automáticamente.
tadas.
eléctricos fuertes.
mecánicos grandes.
compruebe si el suministro está completo e intacto.
técnico autorizado y formado.
el transporte). En caso de duda pregunte a su servicio
de atención al cliente.
y alarma durante un periodo de tiempo largo, retire
las pilas.
6
ES
Puesta en funcionamiento
Planificación de la colocación
Compruebe el funcionamiento del dispositivo de llamada
para urgencias y alarma desde el lugar en que lo desee
colocar.
Preste atención a los siguientes puntos:
Coloque la unidad de alarma cerca de una toma de
corriente y una conexión telefónica analógica. Tenga
en cuenta la longitud del cable.
No coloque la unidad de alarma cerca de objetos
metálicos, como por ejemplo armarios metálicos, u
otros objetos que podrían influir en la recepción por
radio.
La vigilancia se produce mediante un sensor de
movimiento montado arriba, en la unidad de alarma.
Para su colocación escoja una zona del edificio por
la que sea más probable que cruce un intruso, como
por ejemplo un pasillo o unas escaleras.
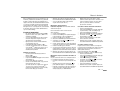
El sensor de movimiento reacciona ante fuentes de
calor cambiantes, por ejemplo movimientos de personas dentro de su área de detección (hasta aprox.
6 m a un máx. de 100° a una altura ideal de montaje
de aprox. 0,5 a 2 m, véase la fig. G).
No tape el sensor de movimiento de la unidad de
alarma. De lo contrario se ve perjudicada la capacidad
de funcionamiento del sensor.
Puesto que el sensor de movimiento reacciona a los
cambios de temperatura, no debe haber fuentes de
calor en el área de detección, por ejemplo calefacciones, aires acondicionados, ventanas, fogones,
corrientes fuertes de aire.
Las mascotas pueden también disparar la alarma.
En caso necesario manténgalas lejos del área vigilada
si el dispositivo de llamada para urgencias y alarma
está activado u oriente el sensor de movimiento de
forma correspondiente.
La velocidad de detección depende también de la
temperatura ambiente. En los entornos fríos la detección es más rápida.
Los movimientos transversales respecto al sensor
de movimiento se detectan más rápido que los movimientos en dirección al mismo. Por lo tanto, colóquelo de modo que sea más probable que el intruso
pase transversalmente (véase la fig. G, dirección de
la flecha).
Coloque la unidad de alarma de tal manera que un
posible intruso no la note inmediatamente.
Conexión telefónica
Conecte el cable de conexión telefónica U suministrado a la conexión de línea telefónica «LINE» O y a
la conexión telefónica analógica de su casa. Para
ello utilice, en caso necesario, el adaptador Y suministrado (específico para el país).
Según sea necesario, puede conectar un teléfono u
otro terminal mediante un cable con conector RJ-11
a la toma «PHONE» P si las dos patillas centrales
del conector RJ-11 están ocupadas.
Nota: Existen distribuciones de patillas específicas
para cada aparato.
Suministro de corriente
Mando a distancia:
Deslice la tapa del compartimento de la pila f presionando ligeramente hacia abajo (véase la fig. M).
Coloque correctamente los polos de la pila Ta
(véase la inscripción del compartimento de la pila).
Vuelva a deslizar la tapa del compartimento de la
pila en la carcasa.
Compruebe el funcionamiento del mando a distancia
d. El LED de control a se
pulsando la tecla
ilumina.
Puesta en funcionamiento
Unidad de alarma:
pila de bloque de 9 V (opcional, para el suministro de corriente de emergencia)
Con un destornillador de estrella retire el tornillo J
de la tapa del compartimento de la pila K.
Saque la tapa del compartimento de la pila tirando
de ella hacia abajo.
Conecte una pila de bloque de 9 V a la conexión de
la pila L. Tenga en cuenta la polaridad.
Coloque ahora la pila conectada dentro del compartimento de la pila H.
Vuelva a deslizar la tapa sobre el compartimento de
la pila.
Vuelva a fijar la tapa del compartimento de la pila
con el tornillo.
Bloque de alimentación:
Conecte el bloque de alimentación I a la toma de
conexión del bloque de alimentación [ (9V).
Conecte el bloque de alimentación a una toma de
corriente adecuada (230V ~ CA).
Después de conectado con éxito a la corriente (con pila
o bloque de alimentación) se enciende el LED de tensión
rojo } de la unidad de alarma y aparece la indicación
de pantalla LCD w. Si se separa el aparato del suministro eléctrico y después vuelve a recibir suministro, todos
los ajustes se mantienen en la memoria del aparato excepto la fecha y la hora. Si el aparato funciona sin pila
de corriente de emergencia, ello se indica encendiéndose cada tres segundos el LED q.
Realización de ajustes
Para cambiar al modo de ajuste [PROG] debe estar
desactivado el aparato. («ARM» no aparece en la
pantalla).
Si no realiza ninguna introducción en el modo de
ajuste durante 10 segundos, el aparato abandona
automáticamente este modo.
Cada vez que se pulsa una tecla de la unidad de
alarma se oye un pitido.
con la tecla OK y, el aparato reacciona con un
«sonido de error» y abandona automáticamente el
modo de ajuste.
Cambiar la contraseña:
«000»).
Pulse la tecla PROG r.
La palabra «PASSWORD» de la parte superior izquierda
de la pantalla LCD w parpadea.
Para confirmar pulse la tecla OK y.
Con las teclas numéricas de 0 a 9 e introduzca la
(Si introduce más de 6 dígitos el aparato responde
con un «sonido de error». Pulse entonces la tecla
OK y y vuelva a empezar desde el principio pasados
unos 10 segundos.)
Para confirmar pulse la tecla OK y.
Espere 10 segundos a que el aparato abandone automáticamente el modo de ajuste.
«Reinicio»).
3.
4.
5.
6.
7.
8.
9.
Para confirmar pulse la tecla OK y.
Ahora se muestra en la pantalla LCD la posición de
memoria 1.
oy
i la posición
Seleccione con las teclas
de memoria del 1 al 5.
Introduzca el número telefónico con las teclas numéricas
de 0 a 9 e (máx. 14 dígitos por posición de memoria).
Para confirmar pulse la tecla OK y.
Si desea introducir más números telefónicos en
otras posiciones de memoria, repita los pasos del 3
al 7 repetidas veces hasta que todos los números
telefónicos deseados hayan sido introducidos.
Espere 10 segundos a que el aparato abandone
automáticamente el modo de ajuste.
Guardar los números telefónicos:
Advertencia importante: No almacene los números de
emergencia en las posiciones de memoria.
Guardar una pausa de marcado en el número
telefónico:
Para poder llamar por ejemplo en una instalación de teléfono
una central telefónica puede guardar una pausa de marcado.
En ese caso proceda como se describe en lo puntos
del 1 al 5 del capítulo anterior.
En el punto 6 pulse la tecla de pausa t en el lugar
deseado. En la pantalla LCD w aparece «P».
Continúe con la introducción de los números telefónicos conforme a los puntos del 7 al 9 del capítulo
anterior.
En la pantalla LCD aparece por ejemplo: 0P0123456789
Si se activa la alarma y la unidad de alarma marca
este número telefónico, se efectúa una pausa de
marcado en «P» de 3,6 seg. antes de terminar de
marcar el número telefónico.
Puede guardar como máximo 5 números telefónicos
(cada uno con máx. 14 dígitos).
2. Pulse la tecla PROG r durante repetidas veces
hasta que parpadee la palabra «Memory» en la parte
superior de la pantalla LCD w.
Borrar los números telefónicos guardados:
Pulse la tecla PROG r durante repetidas veces
hasta que parpadee la palabra «Memory» en la parte
superior de la pantalla LCD w.
Para confirmar pulse la tecla OK y.
ES
7
Puesta en funcionamiento
Ahora se muestra en la pantalla LCD la posición de
memoria 1.
oy
i la posición
Seleccione con las teclas
de memoria (del 1 al 5).
Pulse dos veces la tecla OK y para borrar el número
telefónico seleccionado.
Espere 10 segundos a que el aparato abandone automáticamente el modo de ajuste.
Conectar / desconectar la sirena
El dispositivo de llamada para urgencias y alarma dispone
de una sirena incorporada. La sirena se puede desconectar;
si se activa la alarma no se escucha la sirena (alarma silenciosa).
Si la sirena está desconectada aparece en la pantalla LCD .
Ajuste de fábrica: «Sound ON» (la sirena está conectada):
Pulse la tecla PROG r durante repetidas veces
en la pantalla
hasta que parpadee el símbolo
LCD w.
Para confirmar pulse la tecla OK y.
Seleccione con las teclas o y i «Sound ON»
(sirena conectada) o «Sound OFF» (sirena desconectada,
alarma silenciosa).
Para confirmar pulse la tecla OK y.
Espere 10 segundos a que el aparato abandone
automáticamente el modo de ajuste.
Conectar / desconectar la función de marcado
automático:
La función de marcado automático se puede desconectar.
Si la función de marcado automático está conectada, en
caso de alarma se marcan todos los números telefónicos
guardados.
Si la función de marcado automático no está conectada,
en la pantalla LCD aparece . Ajuste de fábrica: «CALL ON»
(la función de marcado está conectada):
8
ES
Pulse la tecla PROG r durante repetidas veces
en la pantalla
hasta que parpadee el símbolo
LCD w.
Para confirmar pulse la tecla OK y.
oy
i «CALL ON»
Seleccione con las teclas
(función de marcado conectada) o «CALL OFF» (función
de marcado desconectada).
Para confirmar pulse la tecla OK y.
Espere 10 segundos a que el aparato abandone
automáticamente el modo.
Seleccionar la cantidad de marcaciones:
Puede ajustar la cantidad de marcaciones automáticas
entre 1 y 5 veces. Cada número telefónico se marca las
veces programadas, independientemente de que la llamada sea o no aceptada.
Ajuste de fábrica: 3 veces
Pulse la tecla PROG r durante repetidas veces
hasta que parpadee la palabra «CYCLE» en la pantalla LCD w.
Para confirmar pulse la tecla OK y.
oy
i la cantidad
Seleccione con las teclas
de marcaciones automáticas (1 / 2 / 3 / 4 / 5).
Para confirmar pulse la tecla OK y.
Espere 10 segundos a que el aparato abandone
automáticamente el modo de ajuste.
Ajustar la temporización de entrada:
Aquí puede ajustar el periodo de tiempo que le queda,
después de la detección de movimiento estando en estado activado, para desconectar la alarma activada antes de que suene la sirena o el dispositivo de llamada
efectúe la llamada.
Ajuste de fábrica: 20 segundos.
Pulse la tecla PROG r durante repetidas veces
hasta que parpadee la palabra «ENTRY» en la pantalla LCD w.
Para confirmar pulse la tecla OK y.
oy
i el tiempo
Seleccione con las teclas
de temporización de entrada (0 / 5 / 10 / 15 / 20).
Para confirmar pulse la tecla OK y.
Espere 10 segundos a que el aparato abandone
automáticamente el modo de ajuste.
Ajustar la fecha y la hora en la pantalla:
2. Pulse la tecla PROG r durante repetidas veces
hasta que parpadee la palabra «TIME» en la parte
superior de la pantalla LCD w.
3. Para confirmar pulse la tecla OK y.
4. En la pantalla LCD aparece:
05 – 01 – 01
12 - 00
5. Seleccione el número deseado pulsando repetidamente la tecla OK y.
El número deseado parpadea.
oy
i el ajuste que
6. Realice con las teclas
desee.
7. Para confirmar pulse la tecla OK y.
8. Repita los puntos 6 y 7 durante repetidas veces
hasta que haya ajustado todos los valores.
9. Espere 10 segundos a que el aparato abandone
automáticamente el modo.
Reinicio:
efectúe un reinicio de la siguiente manera:
Mantenga la tecla «PROG» r pulsada hasta que
escuche un pitido.
Pulse inmediatamente la tecla de pausa t hasta
que escuche un pitido.
Puesta en funcionamiento
Retire ahora la pila y el bloque de alimentación.
Vuelva a colocar la pila y / o a conectar el bloque de
alimentación después de dos minutos.
Ahora todos los ajustes de fábrica están nuevamente
fábrica («000»).
Colocar la unidad de alarma
1. Limitación del área de detección:
En el estado de envío el sensor de movimiento tiene un
área de detección de aprox. 100° y aprox. 6 m (estando
montado a una altura de 0,5 a 2m) (vea fig. G). Puede
modificar la dirección del área de detección ajustando el
sensor de movimiento.
Para limitar el área de detección utilice una o dos pegatinas de enmascaramiento suministradas W (cortadas o
enteras).
Véase la fig. H
Ángulo de detección horizontal limitado (aprox. 40°)
p. ej. como detector de paso.
Véase la fig. I
Apagar el sensor de movimiento pegando toda la
pegatina de enmascaramiento, p. ej. si desea una
detección sólo mediante un detector conectado en
el exterior (véase párrafo «conexiones opcionales»).
2. Colocación:
Puede colocar la unidad de alarma en vertical u horizontal.
Si la base es resbaladiza y el aparato se podría deslizar,
colóquelo en todo caso en horizontal.
Colocación en horizontal (véase fig. K):
Gire cuidadosamente el sensor de movimiento {
en el sentido de las agujas del reloj 180° en la posición horizontal.
Coloque la unidad de alarma Q en la posición
deseada.
Incline cuidadosamente el sensor de movimiento en
vertical (máx. 90°) hasta que alcance la inclinación
deseada.
Montaje en la pared:
Busque un lugar apropiado de montaje en la pared.
Antes de montar fijamente la unidad de alarma Q
efectúe los pasos descritos en el párrafo 3 «Controlar
funciones» en el lugar previsto de montaje.
Si el dispositivo de llamada para urgencias y alarma
funciona correctamente, perfore en este lugar dos
orificios a una distancia horizontal de 27 mm
(véase fig. L).
Ajuste en ellos los tornillos E y tacos suministrados R. La cabeza de los tornillos debe estar a una
distancia de 4 mm (véase fig. L) de la pared.
Deslice ahora los orificios para colgar D en los tornillos hasta que la unidad de alarma cuelgue fijamente de la pared.
3. Controlar las funciones:
Controlar la función del mando a distancia
Pulse la tecla
del mando a distancia para activar
la unidad de alarma Q.
La activación se confirma con tres pitidos.
En la pantalla LCD w de la unidad de alarma se lee
«ARM».
d
Desactive la unidad de sirena pulsando la tecla
del mando a distancia.
La desactivación se confirma con un pitido.
En la pantalla LCD w de la unidad de alarma desaparece la palabra «ARM».
Controlar la alarma de emergencia:
El sistema dispone de una función de alarma de emergencia.
Pulse la tecla de pánico : del mando a distancia T.
La sirena suena durante 30 segundos (si la sirena
está encendida, véase capítulo «Conectar / desco-
nectar la sirena») y se marcan los números telefónicos
programados (si la función de marcado automático
está encendida, véase capítulo «Conectar / desconectar la función de marcado automático»).
Después de una pausa de 30 segundos, la sirena
vuelve a sonar por segunda vez durante 30 segundos.
Para detener la alarma y la marcación pulse la tecla
d del mando a distancia.
La unidad de alarma emite un pitido y la alarma
está ahora activada.
Controlar la función del sensor de movimiento:
Encienda el interruptor de conexión / desconexión
del gong ] (posición «I»). El sonido de gong suena
una vez.
Después de 50 segundos se escucha el sonido de
gong.
Muévase ahora en el área de detección del sensor
de movimiento {.
Si el sensor de movimiento reconoce el movimiento,
el sonido de gong suena dos veces.
Apague el interruptor de conexión / desconexión del
gong ] (posición «0»).
Controlar la función de marcado automático:
Mantenga la tecla «PROG» r pulsada hasta que
escuche un pitido.
Presione seguidamente un número de posición de
la memoria (Teclas de cifras e de «1» a «5»). El
dispositivo de llamada marca automáticamente el
número telefónico correspondiente y este número
telefónico aparece en la pantalla LCD w (siempre y
cuando la posición de memoria tenga un número
telefónico grabado).
Espere hasta que el aparato abandone automáticamente la marcación.
ES
9
Puesta en funcionamiento
Manejo
la tecla OK y, el aparato reacciona con un «sonido de
error» y regresa automáticamente al modo normal.
Activar el dispositivo de llamada para urgencias y
alarma:
Activación con el mando a distancia
Pulse la tecla
.
en la unidad de alarma
Pulse la tecla OK y.
La unidad de alarma emite un pitido y en la parte
inferior de la pantalla LCD w aparece «ARM».
Ahora dispone de aprox. 55 segundos (temporización
de salida) para abandonar el área vigilada sin que
se active la alarma.
Después de esta temporización de salida suena un
pitido.
El dispositivo de llamada para urgencias y alarma
está ahora activado.
Nota: Si el dispositivo está activado, la función de gong
no está activa, incluso cuando el interruptor de conexión /
desconexión ] está en la posición «I».
La alarma suena, activada por una detección de
movimiento
En el estado activado el sensor de movimiento { reconoce
un movimiento.
q alumbra brevemente una sola vez.
El
Después de la temporización de salida ajustada:
Si se activa la alarma, en la pantalla LCD w aparece
en la parte inferior «TRIGGER» parpadeando.
La sirena p suena durante 30 segundos (si la sirena
está activada). Después de una pausa de 30 segundos,
la sirena vuelve a sonar por segunda vez durante
30 segundos.
10
ES
Correspondientemente al ajuste de la función de
marcado automático (ajuste de fábrica: función de
marcado encendida) y al número programado de
marcaciones, el dispositivo de llamada para urgencias
y alarma marca todos los números telefónicos
guardados en los siguientes periodos de tiempo:
1. número telefónico (30 seg.) - 3 seg. de tiempo de
espera
2. número telefónico (30 seg.) - 3 seg. de tiempo de
espera
3. número telefónico (30 seg.) - 3 seg. de tiempo de
espera
4. número telefónico (30 seg.) - 3 seg. de tiempo de
espera
5. número telefónico (30 seg.) - 3 seg. de tiempo de
espera
1. número telefónico (30 seg.) - 3 seg. de tiempo de
espera…
etc.
Si el destinatario toma la llamada, oye un sonido de alarma
durante tanto tiempo (incluso si la sirena está activada)
hasta que la comunicación telefónica sea interrumpida por
la unidad de alarma después de máx. 35 segundos.
Si la conexión telefónica del dispositivo de llamada y
el número marcado disponen de un reconocimiento de
número de teléfono, en sus pantallas LCD aparece el número
telefónico del dispositivo de llamada. Incluso cuando uno
o varios destinatarios toman la llamada se marcarán todos
los números telefónicos (también los que ya tomaron la
llamada) en la cantidad de veces programada. El ciclo de
marcación se puede interrumpir desactivando el aparato.
Si no se desactiva el dispositivo de llamada para urgencias
y alarma durante o después de una alarma, el mismo
permanece activado. Después de finalizar el paso de la
sirena (aprox. 90 seg.) y el ciclo de marcación se puede
volver a activar la alarma.
Desactivar el dispositivo de llamada para urgencias
y alarma
Desactivación con el mando a distancia
d.
Pulse la tecla
Introduzca la contraseña actual
Pulse la tecla OK y.
Dado el caso se apaga el sonido de alarma.
La palabra parpadeante, si fuese el caso, «TRIGGER»
desaparece.
La unidad de alarma emite un pitido.
La palabra «ARM» desaparece de la pantalla LCD w.
El dispositivo de llamada para urgencias y alarma
está ahora desactivado.
Nota: Mientras la unidad de alarma marca un número
telefónico, es decir, genera la comunicación telefónica,
el dispositivo de llamada para urgencias y alarma no se
puede desactivar mediante el teclado. Con el mando a
distancia se puede desactivar el aparato en todo momento.
Conectar / desconectar la alarma de pánico:
Pulse la tecla «PANIC» u de la unidad de alarma o
la tecla «PANIC» : del mando a distancia.
Si se activa la alarma, en la pantalla LCD w aparece
en la parte inferior «TRIGGER» parpadeando.
La sirena p suena durante 30 segundos (si la sirena
está encendida, véase capítulo «Conectar / desconectar la sirena») y se marcan los números telefónicos
programados (si la función de marcado automático
está encendida, véase capítulo «Conectar/desconectar
la función de marcado automático»).
Después de una pausa de 30 segundos, la sirena
vuelve a sonar por segunda vez durante 30 segundos.
Para detener la alarma y la llamada introduzca en la
d.
OK y o pulse en el mando a distancia la tecla
La palabra parpadeante «TRIGGER» desaparece.
La unidad de alarma emite un pitido y la alarma
está ahora activada.
Puesta en funcionamiento
Nota: Mientras la unidad de alarma marca un número
telefónico, es decir, genera la comunicación telefónica,
la alarma de pánico no se puede desactivar mediante el
teclado. Con el mando a distancia se puede desactivar el
aparato en todo momento.
Conectar / desconectar la función de gong:
Coloque el interruptor de conexión / desconexión del
gong ] en la posición «I».
El sonido de gong suena una vez.
Después de 50 segundos se escucha un pitido.
Ahora la función de gong está activa.
Si el sensor de movimiento { reconoce un moviq alumbra una vez y el sonido
miento, el LED
de gong suena 2 veces.
Para volver a desconectar la función de gong coloque el interruptor de conexión/desconexión del
gong ] en la posición «0».
Nota: Si el dispositivo está activado, la función de gong
no está activa.
Vista general de los 5 últimos casos de alarma:
Ahora no es encuentra en el modo de entrada ni el dispositivo de llamada para urgencias y alarma está activado.
i.
Pulse nuevamente la tecla
Sucesivamente se muestran los momentos de los
últimos 5 casos de alarma.
Si espera aprox. 10 segundos, el modo de aviso se
apaga nuevamente de manera automática.
Vista general de los números telefónicos guardados:
Ahora no es encuentra en el modo de entrada ni el dispositivo de llamada para urgencias y alarma está activado.
o.
Pulse nuevamente la tecla
Sucesivamente se muestra los números telefónicos
guardados.
Las posiciones de memoria no ocupadas se indican
mediante «- - - - - - - - - - - - - -»
Si espera aprox. 10 segundos, el modo de aviso se
apaga nuevamente de manera automática.
Vista general de los sonidos
Sonido
Tres pitidos
Alarma de sirena
Un sonido de gong
Dos sonidos de gong
Significado
La temporización de salida
está activa, la activación
del dispositivo de llamada
para urgencias y alarma no
se activa hasta después de
la temporización de salida
de aprox. 55 segundos.
La sirena suena
1. activada mediante el
sensor de movimiento,
después de la temporización de salida programada en los periodos: 30 seg. enc.; 30
seg. pausa; 30 seg.
enc.
2. activada mediante la
tecla «PANIC» u o :
como alarma de pánico.
El interruptor de gong
está en la posición «I», la
función de gong aún no
está activa.
El movimiento fue
reconocido, la función de
gong está activa.
Cambiar las pilas
Unidad de alarma
q se alumbra una vez cada tres segunSi el LED
dos (a partir de aprox. 7,7V +- 0,5V), cambie la pila de
bloque de 9V. Sustituya la pila según lo descrito en el
capítulo «Suministro eléctrico» en la «Unidad de alarma,
pila de bloque de 9V».
Si el dispositivo está activado, la unidad de alarma recibe
suministro de la pila por aprox. 24 horas después de que
q haya comenzado a alumbrarse.
el LED
Mando a distancia
Si al pulsar las teclas del mando a distancia, el LED de
control a se produce una luz tenue o el alcance radio
disminuye, entonces se deberá cambiar la pila (pila de
12V, alcalina (tipo CN 23 A o L1028)).
Deslice la tapa del compartimento de la pila f
presionando ligeramente hacia abajo (véase la fig. M).
Sustituya la pila por una nueva. Coloque correctamente los polos de la pila nueva (véase la inscripción
del compartimento de la pila).
Vuelva a deslizar la tapa del compartimento de la
pila en la carcasa.
Controle el funcionamiento del mando a distancia.
Conexiones opcionales
Para que pueda conectar los aparatos externos opcionales
debe poner al descubierto los bornes de conexión necesarios en la unidad de alarma:
Con un destornillador de estrella retire el tornillo S
de la tapa del compartimento de la pila (véase fig. E).
Deslice el destornillador en la ranura G y mueva la
tapa del compartimento de conexión primero hacia
abajo y luego retírela.
Ahora puede realizar las conexiones deseadas en
los bornes de conexión F (véase «Descripción de
las conexiones»). Utilice el cable con una sección de
ES
11
Puesta en funcionamiento / Solucionar errores
conductor de 0,2 a 0,3mm, p. ej. el cable de teléfono.
Introduzca todos los cables conectados en la ranura
G de la unidad de alarma.
Vuelva a colocar la tapa del compartimento de
conexión A.
Apriete fuertemente el tornillo S de la tapa del
compartimento de conexión.
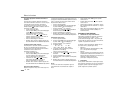
Descripción de las conexiones (v. fig. N)
INPUT :
en una interrupción de la conexión con se
activa un sonido de gong (si la función de
gong está encendida) o una alarma (si está
en el estado activado), pero únicamente
después de la temporización de salida; si
después de la temporización de salida este
borne no está unido a , no se activa la
alarma.
:
0V (masa)
SIREN *: 12 V(pikto) (máx. 150 mA) cuando se activa
la alarma (independientemente de que la sirena interna esté conectada o desconectada).
NA:
sin función.
Sirena *:
Una sirena externa (no incluida en el suministro) con 9 o
12V CC, máx. 150 mA se puede conectar con los bornes
y «SIREN».
Reedkontakt:
También puede conectar un contacto de láminas flexibles
(contacto magnético como detector de intrusión (NC), no
incluido en el suministro) como un detector de apertura
de ventanas y puertas con los bornes INPUT y . Se pueden conectar hasta 6 contactos de láminas flexibles en
fila.
12
ES
Otros contactos:
Los contactos sin potencial de otros detectores o instalaciones se pueden conectar para activar la alarma la
marcación.
Los contactos NC se pueden conectar con los bornes
INPUT y (si existe más de un contacto: conectar en fila).
* Si falla el suministro eléctrico por medio del bloque
de alimentación, el borne SIREN no tiene potencial.
El borne INPUT está activo durante el funcionamiento mediante la pila de corriente de emergencia.
Solucionar errores
Error
Causa
Solución
El sensor de movimiento avisa
de un movimiento sin causa
aparente.
Mascotas, movimientos de
aire, luz directa,
etc.
Cambie el sensor de movimiento de sitio.
El alcance del
sensor de movimiento es
Error
Causa
Solución
El LED
parpadea regularmente.
No hay conectada ninguna
pila de corriente
de emergencia
o la que hay
está débil.
Conecte una
pila de corriente
de emergencia
nueva.
El destinatario
no recibe ninguna llamada
en caso de
alarma.
No se ha introducido ningún
número de teléfono o el número introducido
es incorrecto.
Vuelva a introducir el número
de teléfono.
La función de
marcado está
desconectada
(en la pantalla
LCD aparece
).
Conecte la función de marcado (en la pantalla LCD deja de
aparecer ).
La línea telefónica es defectuosa.
Compruebe el
funcionamiento
de la línea telefónica con un teléfono analógico.
No ha dado ninguna orden
después de la
introducción de
Para activar /
desactivar pulse
la tecla OK y.
Use una pegatina de enmascaramiento para
excluir una zona
determinada de
la detección.
La temperatura
ambiente es
demasiado alta
(20° C es lo
ideal).
Cambie el sensor de movimiento de sitio.
El aparato está
montado muy
bajo o muy alto.
Cambie la altura de montaje o
la inclinación
del sensor de
movimiento.
El aparato no
reacciona a la
Pulse la tecla
PROG r para
acceder al
modo de ajuste.
Solucionar errores / Mantenimiento y limpieza / Eliminación / Información
Error
Causa
introducida es
incorrecta.
Su configuración no se
guarda.
Las configuraciones no fueron confirmadas.
Solución
Introduzca la
rrecta.
Si olvidó la con
a colocar el
aparato en el
ajuste de fábrica según como
se describe en
el capítulo
«Cambiar la
Confirme las
configuraciones
pulsando la tecla OK y.
Limpieza
Retire el bloque de alimentación del tomacorriente antes
de limpiar el aparato. Limpie los aparatos sólo con un
los aparatos en agua. No utilice disolventes para limpiar.
Asistencia
Eliminación
Elimine el material de embalaje y las pilas y aparatos
usados en un centro de reciclaje de su ciudad o municipio.
Según la Directiva europea 2002 / 96 / CE sobre residuos
de aparatos eléctricos y electrónicos y en cumplimiento
con el derecho nacional, los aparatos eléctricos usados
se tienen
re las pilas antes de tirar los aparatos. Como consumidor
final está usted obligado por ley a devolver todas las pilas
y baterías usadas (reglamento sobre la recogida y eliminación de pilas usadas). Las pilas usadas no deben desecharse en la basura doméstica.
Información
En caso de
otros errores
Efectúe un reinicio (vea capítulo
«Realización de
ajustes», párrafo
„Reinicio“).
En la página www.dexaplan.com de internet, encontrará
informaciones sobre la solución de problemas.
Mantenimiento y limpieza
Mantenimiento del sistema de alarma
Compruebe regularmente la seguridad técnica y el funcionamiento del aparato.
en caso de uso de la fuerza y en caso de manipulaciones no realizadas por uno de nuestros puntos de asistencia, se anula la garantía. Esta garantía no limita sus
derechos legales.
Garantía
la fecha de compra. Guarde el tique de caja como prueba
de compra. En caso de necesitar hacer uso de la garantía
póngase en contacto con el punto de asistencia de su
país. Sólo así se puede garantizar el envío gratuito de su
mercancía. La prestación de garantía tiene además validez
sólo para errores de fabricación o de material. No se
aplica a las piezas de desgaste o a los deterioros de piezas
frágiles, p. ej. interruptores o baterías. Este producto ha
para el uso industrial. En caso de rotura, no se tiene derecho a reclamación por compensación. Un aparato de
alarma no sustituye a un seguro ni a un comportamiento
cuidadoso. En caso de manejo inapropiado y/o incorrecto,
En la página www.dexaplan.com de Internet, encontrará
informaciones sobre la solución de problemas.
Si desea realizar alguna consulta, póngase en contacto
por correo electrónico ([email protected]) o teléfono
902 010207), de lunes a viernes de 8:30 a 17:00
(
con nuestro punto de asistencia. Allí le informarán detalladamente sobre cuestiones relacionadas con nuestros
servicios, como devoluciones, etc.
Declaración de conformidad
Por la presente, la empresa Dexaplan GmbH, declara que
el dispositivo de llamada para urgencias y alarma cumple las exigencias esenciales y otras prescripciones importantes de la Directiva europea 1999 / 5 / CEE. Se ha
comprobado la conformidad.
Se puede leer la declaración de conformidad completa
en: www.dexaplan.com
Dexaplan GmbH
Paul-Böhringer-Str. 3 · D-74229 Oedheim
Estado de la información 08/2007 · N.º de ident.: 08-2007-BA-611-ES
ES
13
14
Contenuto
Introduzione
Uso corretto .....................................................................
Fornitura ..........................................................................
Equipaggiamento .............................................................
Dati tecnici.......................................................................
Pagina
Pagina
Pagina
Pagina
16
16
16
16
Indicazioni per la sicurezza ...................................... Pagina 17
Messa in funzione
Pianificare il posizionamento............................................
Collegamento al telefono..................................................
Alimentazione di corrente.................................................
Eseguire le impostazioni...................................................
Posizionare l’unità d’allarme.............................................
Uso ..................................................................................
Sostituire la batteria.........................................................
Collegamenti opzionali .....................................................
Pagina
Pagina
Pagina
Pagina
Pagina
Pagina
Pagina
Pagina
18
18
18
19
20
21
23
23
Eliminare errori .............................................................. Pagina 24
Manutenzione e Pulizia
Manutenzione dell’impianto d’allarme .............................. Pagina 25
Pulizia .............................................................................. Pagina 25
Smaltimento .................................................................... Pagina 25
Informazioni
Garanzia........................................................................... Pagina 25
Service............................................................................. Pagina 25
Dichiarazione di conformità.............................................. Pagina 25
IT/MT
15
Introduzione
Introduzione
Fornitura
] Interruttore ON/OFF Gong
Per favore leggete completamente questo manuale e
aprite anche la pagina 3 con le illustrazioni. Questo manuale
appartiene al prodotto e contiene importanti annotazioni
per la messa in funzione ed il maneggiamento. Osservate
sempre le indicazioni per la sicurezza. Se avete delle
domande oppure se siete insicuri sull’uso degli apparecchi, informatevi in Internet all’indirizzo www.dexaplan.
com oppure mettetevi in contatto con il servizio assistenza (vedi capitolo “Service”). Conservate bene questo
manuale e consegnatelo eventualmente a terzi.
Vedi Fig. A
Q 1x Unità d’allarme BA 611
W 2x Adesivo di mascheramento
E 2x Viti per l’unità d’allarme
R 2x Tasselli per l’unità d’allarme
T 1x Telecomando BA 611 R
Ta 1x Batteria CN23 A, 12V alcalica
Y 1x Evtl. Adattatore ad cavo del telefono (specifico
per ogni paese)
U 1x Cavo di collegamento al telefono (circa 2 m, con
spina RJ-11)
I 1x Alimentatore con circa 1,8 m di cavo
1x Manuale d´uso
A
S
D
F
G
H
J
K
L
Uso corretto
L’apparecchio di selezione allarme e caso d’emergenza
è destinato e concepito per il solo uso in stanze interne
in case private. L’alimentazione di corrente dell’unità
d’allarme avviene attraverso l’alimentatore 9 V DC fornito,
il quale viene collegato alla corrente di rete da 230 V ~ AC,
50 Hz. Una batteria da 9 Volt (non inclusa nella fornitura)
mantiene il funzionamento, se l’alimentazione di corrente viene interrotta. Per la funzione di selezione serve un
collegamento telefonico analogo.
L’apparecchio di selezione d’allarme e caso d’emergenza viene acceso e/o spento sull’unità d’allarme. Ritardi
d’entrata (regolabile) e d’uscita premettono l’accensione
e/o lo spegnimento nella zona controllata.
Il segnalatore di movimento integrato nell’unità d’allarme reagisce a movimenti di persone nella zona controllata. L’allarme seleziona i numeri di telefono programmati nell’unità d’allarme. Durante l’allarme la sirena
integrata nell’unità d’allarme può emettere un suono.
Inoltre è possibile emettere un allarme, premendo il tasto di panico in caso d’emergenza.
In alternativa alla funzione d’allarme l’unità d’allarme
può emettere un suono tipo Gong in caso di riconoscimento di un movimento.
Il produttore non risponde per danni causati dal uso non
corretto oppure dal errato maneggiamento.
16
IT/MT
Equipaggiamento
Unità d’allarme BA 611
Vedi Fig. B
O Collegamento al telefono “LINE”
P Collegamento al telefono “PHONE”
Vedi Fig. E
Coperchio vano di collegamento
Vite per coperchio vano di collegamento
Fori per le viti per il fissaggio a muro
Morsetti di collegamento
Incavo
Vano batterie
Vite per coperchio vano batterie
Coperchio vano batterie
Collegamento batteria
Telecomando BA 611 R
Vedi Fig. F
: Tasto „PANIC“
a LED di controllo
s Tasto „ ” per l’accensione
d Tasto „ ” per lo spegnimento
Vedi Fig. M
f Coperchio vano batterie
Vedi Fig. C
{ Segnalatore di movimento:
} Power-LED
q LED per batteria/rilevamento debole
w LC-Display
e Tasti numerici da 0 fino a 9
r Tasto „PROG“
t Tasto “PAUSE”
y Tasto „OK“
u Tasto „PANIC“
i
-Tasto
o
-Tasto
Vedi Fig. D
p Sirena
[ Presa di collegamento a rete (9V)
Dati tecnici
Unità d’allarme BA 611
DC
Tensione di rete:
9V
Assorbimento della corrente: 130 mA (Allarme), < 5 mA
(Standby)
Alimentazione di corrente:
Attraverso l’alimentatore
e/o la batteria per corrente
d’emergenza (9 Volt Block
6LR61, non inclusa nella
fornitura)
Ricevitore:
433,92 MHz
Sirena:
100 dB(A) +/- 5 dB(A) a
0,3m (in caso di funziona
Introduzione / Indicazioni
per la/ Bedienung
sicurezza
Sicherheit
mento con l’alimentatore)
Durata della sirena (max.): ca. 30 sec./ca. 30 sec.
Pausa / ca. 30 sec. Alarm
Funzione Gong:
Disattivabile, segnala ogni
riconoscimento di movimenti con un suono tipo
Gong
Numeri di telefono
programmabili:
max. 5 numeri
Selezione automatica:
Fino a 5 volte
Codice programmabile:
3 fino a 6 numeri
Ritardo all‘uscita:
ca. 55 secondi
Ritardo all‘entrata:
Programmabile:
0 / 5 / 10 / 15 / 20 Sec.
Temperatura d‘esercizio:
0 °C fino a +39 °C
Campo d’uso:
Stanze interne
Materiale del carter:
ABS
Dimensioni del carter:
ca. 86x150x46 mm (LxAxP)
Peso:
ca. 197 g (senza batteria,
senza accessori)
Segnalatore di movimenti (fissato all’unità d’allarme)
Sensore:
Passivo Infrarosso (PIR)
Angolo di rilevamento:
ca. 100° orizzontale
Raggio di rilevamento:
ca. 6 m a 20° C (Movimento
trasversale, altezza di
montaggio ca. 0,5 fino a 2m)
Telecomando BA 611 R
DC
Tensione di rete:
12V
Assorbimento della corrente:max. 25 mA
Alimentazione di corrente: 1x batteria 12 V, alcalica
(Tipo CN 23 A)
Frequenza di trasmissione: 433,92 MHz
Raggio d’azione del
trasmettitore:
ca. 20 m (all’aperto)
Codificazione:
Una volta, registrato già in
fabbrica nell’unità d’allarme
Indicazione del
funzionamento:
Temperatura d‘esercizio:
Materiale del carter:
Dimensioni del carter:
Peso:
LED
0 °C fino a + 40 °C
ABS
ca. 45 x 67 x 16 mm (L xA x P)
ca. 34 g (con batteria)
Alimentatore
Alimentazione di corrente: 230V ~ AC, 50 Hz
Assorbimento di potenza: 4,5 VA
Uscita di corrente:
9V
DC, max. 500 mA
Indicazioni per la sicurezza
Le seguenti indicazioni servono alla vostra sicurezza e
soddisfazione durante l´uso dell’apparecchio. Tenete
conto che la non osservazione di queste indicazioni per
la sicurezza possono causare seri pericoli di incidenti.
Descrizione dei simboli e dei termini usati:
P ericolo! In caso di non osservanza di questa indi
A ttenzione! In caso di non osservanza di questa
Consiglio! Osservando questa indicazione si raggiunge
ottimi risultati.
Pericolo!
di collegare l’alimentatore a 12 V DC alla corrente di
rete assicurarsi della presenza di un interruttore di
sicurezza a norma. Non collegate nessuna tensione
estranea ai morsetti di collegamento. Altrimenti esi
menti esiste il pericolo per la vita causato da soffo
vicinanze immediate delle orecchie. Altrimenti esi
oppure telecomunicazione durante i lavori di foratura
possano essere danneggiati e che non presentino
un pericolo di caduta. Altrimenti esiste il pericolo
Altrimenti esiste il pericolo per la vita causato da
goiare di batterie può causare seri danni alla salute.
Altrimenti esiste il pericolo per la vita causato da
Attenzione!
alcalica (tipo CN 23 A oppure L1028)
IT/MT
17
Indicazioni per la sicurezza / Messa in funzione
Batterie ricaricabili non sono adatte a causa dello
scaricamento proprio.
l’apparecchio.
in funzione, se la fornitura è stata danneggiata e se
danni di trasporto). Chiedete eventualmente all’assistenza clienti.
è fuori uso per un tempo prolungato, Togliete le batterie.
Messa in funzione
Pianificare il posizionamento
Controllate il funzionamento dell’apparecchio di selezione allarme e d’emergenza nel punto nel quale si vuole
posizionarlo.
Fate attenzione ai seguenti punti:
Piazzate l’unità d’allarme nelle vicinanze di una
presa e di un collegamento telefonico analogico.
Tenete conto della lunghezza del cavo.
Non piazzate l’unità d’allarme nelle vicinanze di
oggetti metallici come p.es. armadi metallici oppure
oggetti, i quali potrebbero influire sulla ricezione.
Il controllo avviene attraverso un segnalatore di
18
IT/MT
movimenti, il quale è situato nella parte superiore
dell’unità d’allarme. Per il posizionamento scegliete
una zona dell’edificio che sarà attraversata molto
probabilmente da un eventuale intruso, come p.es.
il corridoio oppure le scale.
Il segnalatore di movimenti reagisce ai fonti di calore
che si modificano; p.es. movimenti di persone
all’interno di una zona di rilevamento (fino a ca. 6m
su max. 100° in caso di un’altezza di montaggio di
circa 0,4 – 2,0 m; vedi Fig. G).
Non coprite il segnalatore di movimenti sull’unità
del sensore.
Siccome il segnalatore di movimenti reagisce aille
modifiche di calore, non si devono trovare fonti di
calore all’interno della zona di rilevamento come p.es.
caloriferi, climatizzatori, finestre, forni, forti spifferi.
Anche gli animali domestici possono provocare un
allarme. Teneteli eventualmente lontani dalla zona
di rilevamento, quando l’apparecchio di selezione
allarme e d’emergenza è acceso oppure orientate il
segnalatore di movimento di conseguenza.
La velocità di rilevamento dipende anche dalla
temperatura ambiente. In un ambiente più freddo il
rilevamento avviene più velocemente.
Movimenti trasversali al segnalatore di movimento
vengono riconosciuti più velocemente che quelli
che vanno direttamente nella sua direzione. Posizionatelo perciò in modo che l’intruso si trovi possibilmente trasversalmente (vedi Fig. G, direzione della
freccia), quando deve passare.
Piazzate l’unità d’allarme in modo che un possibile
intruso non la possa notare immediatamente.
Collegamento al telefono
Collegate il cavo del telefono fornito U con il collegamento del telefono “LINE” O e con il suo collegamento in casa del telefono. Usate eventualmente
l’adattatore Y fornito (dipendente dal paese).
In caso di necessità potete collegare un telefono
oppure un altro apparecchio terminale con un cavo
RJ-11 alla presa “PHONE” P, quando i due pin
centrali della presa RJ-11 sono già occupati.
Nota: Ci sono diversi occupazioni pin specifici
dell’apparecchio.
Alimentazione di corrente
Telecomando:
Spingete il coperchio del vano batterie f con una
leggera pressione verso il basso (vedi Fig. M).
Inserite la batteria T a rispettando la polarità (vedi
marcatura nel vano batterie)
Spingete il coperchio del vano batterie nuovamente
sul carter.
Controllate la funzione del telecomando, premendo
d. Il Led di controllo a si illumina.
il tasto
Unità d’allarme:
Batteria Block da 9V (Optional, per l’alimentazione in
caso di mancanza di corrente).
Togliete la vite J del coperchio vano batterie K
con un cacciavite a stella.
Togliete il coperchio vano batterie, tirandolo verso il
basso.
Collegate una batteria Block da 9V al collegamento
batteria L. Tenete conto della polarità.
Inserite la batteria collegata nel vano batterie H.
Spingete il coperchio del vano batterie nuovamente
sul vano batterie.
Serrate la vite del coperchio vano batterie.
Alimentatore:
Collegate l’alimentatore I con la presa di
collegamento alimentatore [ (9V).
Collegate l’alimentatore ad una presa di corrente
adatta (230V -AC).
Messa in funzione
Dopo il collegamento alla corrente (con batteria e / o alimentatore), si illumina il Power-LED rosso } dell’unità
d’allarme e appare l’indicazione sul LC-Display w. Se
l’apparecchio è stato staccato dall’alimentazione di corrente
e poi di nuovo ricollegato, rimangono memorizzati tutte
le impostazioni a parte la data e l’orario nella memoria
dell‘apparecchio. Se si usa l’apparecchio senza la batteria
d’emergenza, questo viene indicato dall’illuminazione
ogni 3 secondi del LED q.
Eseguire le impostazioni
Per cambiare nel mdo delle impostazioni [PROG],
l’apparecchio deve essere spento. (“ARM” non è
visualizzato sul display).
Se non eseguite immissioni entro 10 secondi nel
modo delle impostazioni, l‘apparecchio lascia
automaticamente questa modalità.
Ogni pressione di un tasto sull’unità d’allarme è
accompagnato da un suono.
La password impostata in fabbrica è “000”.
Se inserite una password errata e la confermate
con il tasto OK y, l’apparecchio reagisce con un
“Suono d’errore” e lascia immediatamente la
modalità delle impostazioni.
Modificare la password:
Inserite la password attuale (Impostazione in
fabbrica: „000“).
Premete il tasto PROG r.
La parola “PASSWORD” lampeggia in alto a sinistra
sul LC-Display w.
Premete il tasto OK y per confermare.
Inserite con i tasti numerici 0 fino a 9 e la vostra
nuova passwrd (3 fino a 6 cifre).
(Se inserite più di 6 cifre, l’apparecchio emette un
“Suono d’errore”. Premete poi il tasto OK y e
ricominciate nuovamente dopo circa 10 secondi).
Premete il tasto OK y per confermare.
Attendete 10 secondi, fino a quando l’apparecchio
lascia automaticamente la modalità delle impostazioni.
Se vi siete dimenticati della vostra password,
eseguite un Reset (vedi “Reset”).
Memorizzare i numeri telefonici:
Indicazione importante: Non memorizzate numeri di
chiamata d’emergenza.
Potete memorizzare al max. 5 numeri telefonici
(max. 14 numeri).
1. Inserite la password attuale.
2. Premete il tasto PROG r fino a quando lampeggia
la parola “Memory” in alto sul LC-Display w.
3. Premete il tasto OK y per confermare.
4. Adesso viene visualizzato il posto di memorizzazione 1.
oe
i il posto di
5. Selezionate con i tasti
memorizzazione 1 fino a 5.
6. Inserite i numeri telefonici con i tasti numerici 0 fino
a 9 e (max. 14 numeri per posto di memorizzazione).
7. Premete il tasto OK y per confermare.
8. Se volete inserire altri numeri telefonici in altri posti
di memorizzazione, ripetete i passi 3 fino a 7 fino a
quando avete inserito tutti i numeri telefonici desiderati.
9. Attendete 10 secondi, fino a quando l’apparecchio
lascia automaticamente la modalità delle impostazioni.
Memorizzare una pausa di selezione nel numero di
telefono:
Per poter selezionare una linea con un impianto telefonico, è possibile memorizzare una pausa di selezione.
Procedete come indicato nei precedenti punti 1 fino
a 5.
Arrivati al punto 6, premete il tasto Pause t al
punto desiderato. Appare “P” sul LC-Display w.
Continuate con l’immissione del numero di telefono
come nel precedente capitolo al punto 7 fino a 9.
Sul display appare p.es.: 0P0123456789
Quando viene provocato un allarme e l’unità
d’allarme seleziona questo numero di telefono, essa
esegue una pausa di selezione di 3,6 secondi al
punto “P”, prima di continuare a selezionare
questo numero di telefono.
Cancellare un numero di telefono memorizzato:
Inserite la password attuale.
Premete il tasto PROG r fino a quando lampeggia
la parola “Memory” in alto sul LC-Display w.
Premete il tasto OK y per confermare.
Adesso viene visualizzato il posto di memorizzazione 1.
oe
i il posto di
Selezionate con i tasti
memorizzazione (1 fino a 5).
Premete 2 volte il tasto OK y, per cancellare i
numero di telefono selezionato.
Attendete 10 secondi, fino a quando l’apparecchio
lascia automaticamente la modalità delle impostazioni.
Accendere / spegnere la sirena
L’apparecchio si selezione d`’allarme e d’emergenza
possiede una sirena integrata. Potete spegnere la sirena;
quando viene provocato un allarme, la sirena non è
udibile (allarme silenzioso).
A sirena spenta, appare sul LC-Display .
Impostazione in fabbrica: „Sound on“ (Sirena accesa):
Inserite la password attuale.
Premete il tasto PROG r fino a quando lampeggia
il segno in alto sul LC-Display w.
Premete il tasto OK y per confermare.
oe
i “Sound on”
Selezionate con i tasti
(sirena accesa) oppure “Sound off”
(sirena spenta - allarme silenzioso).
Premete il tasto OK y per confermare.
Attendete 10 secondi, fino a quando l’apparecchio
lascia automaticamente la modalità delle impostazioni.
IT/MT
19
Messa in funzione
Accendere / Spegnere la funzione automatica di
selezione:
Potete spegnere la funzione automatica di selezione.
Se la funzione automatica di selezione è accesa, vengono
selezionati tutti i numeri di telefono memorizzati.
Se la funzione automatica di selezione è spenta, sul
LC-Display appare
Impostazione in fabbrica: „CALL on“
(Funzione di selezione accesa)
Inserite la password attuale.
Premete il tasto PROG r fino a quando lampeggia
il segno
in alto sul LC-Display w.
Premete il tasto OK y per confermare.
oe
i “CALL on”
Selezionate con i tasti
(Funzione di selezione accesa) oppure “CALL off”
(Funzione di selezione spenta).
Premete il tasto OK y per confermare.
Attendete 10 secondi, fino a quando l’apparecchio
lascia automaticamente la modalità delle impostazioni.
Scegliere il numero delle selezioni:
Potete impostare le procedure di selezione automatica
da 1 fino a 5 volte. Ogni numero di telefono viene
selezionato tante volte, indipendentemente dal fatto se
la telefonata è stata accettata o meno.
Impostazione in fabbrica: 3x
Inserite la password attuale.
Premete il tasto PROG r fino a quando lampeggia
la parola “CYCLE” in alto sul LC-Display w.
Premete il tasto OK y per confermare.
oe
i il numero
Selezionate con i tasti
delle selezioni automatiche (1 / 2 / 3 / 4 / 5).
Premete il tasto OK y per confermare.
Attendete 10 secondi, fino a quando l’apparecchio
lascia automaticamente la modalità delle impostazioni.
Impostare il ritardo all’entrata:
Qui potete impostare il tempo che vi rimane dopo il rico20
IT/MT
noscimento del movimento in caso di apparecchio acceso,
per spegnere l’emissione dell’allarme, prima che la sirena
parte e / o l’apparecchio di selezione chiama i numeri.
Impostazione in fabbrica: 20 sec.
Inserite la password attuale.
Premete il tasto PROG r fino a quando lampeggia
la parola “ENTRY” in alto sul LC-Display w.
Premete il tasto OK y per confermare.
oe
i la durata del
Selezionate con i tasti
ritardi d’entrata (0 / 5 / 10 / 15 / 20 sec.).
Premete il tasto OK y per confermare.
Attendete 10 secondi, fino a quando l’apparecchio
lascia automaticamente la modalità delle impostazioni.
Impostazione data / orario:
1. Inserite la password attuale.
2. Premete il tasto PROG r fino a quando lampeggia
la parola “TIME” in alto sul LC-Display w.
3. Premete il tasto OK y per confermare.
4. Sul display appare:
05 - 01 - 01
12 - 00
= Anno - Mese - Giorno Ora - Minuto
5. Selezionate il numero desiderato, premendo
ripetutamente il tasto OK y.
Il numero selezionato lampeggia.
oe
i l’impostazione
6. Selezionate con i tasti
desiderata.
7. Premete il tasto OK y per confermare.
8. Ripetete il punto 6 e 7 fino a quando avete impostato
tutti i valori.
9. Attendete 10 secondi, fino a quando l’apparecchio
lascia automaticamente la modalità delle impostazioni.
Reset:
Se volete cancellare tutte le impostazioni oppure se
avete dimenticato la vostra Password, eseguite un
Reset:
Tenete premuto il tasto PROG r, fino a quando
sentite un suono.
Premete subito il tasto Pause t, fino a quando
sentite un suono.
Togliete adesso la batteria e l’alimentatore. Inserite
dopo 2 minuti nuovamente la batteria e / o collegate
l‘alimentatore.
Adesso tutte le impostazioni di fabbrica come anche
la Password inserita in fabbrica (“000”) sono
nuovamente attive.
Posizionare l’unità d’allarme
1. Limitazione del campo di rilevamento:
Alla fornitura il segnalatore di movimento possiede un
campo di rilevamento di circa 100° e ca. 6 m
(ad un’altezza di montaggio di 0,5 – 2 m) (vedi Fig. G).
Potete modificare la direzione del campo di rilevamento,
regolando il segnalatore di movimento.
Per limitare il campo di rilevamento, utilizzate uno dei
due adesivi forniti W (tagliati oppure interi).
Vedi Fig. H
Angolo di rilevamento orizzontale limitato (ca. 40°)
p.es. come segnalatore di passaggio.
Vedi Fig. I
Spegnere la funzione del segnalatore di movimento
incollando tutto l’adhesivo di mascheramento, p.es.
quando si desidera il rilevamento solo attraverso un
segnalatore collegato esternamente
(vedi capitolo “Collegamenti opzionali“)
2. Piazzamento:
Potete piazzare l’unità d’allarme in piedi oppure appoggiata. Scegliete comunque in ogni caso il posizionamento
appoggiato, quando la superficie d’appoggio è liscia e
quando l’apparecchio potrebbe spostarsi.
Messa in funzione
Piazzamento appoggiato (vedi Fig. K):
Girate il segnalatore di movimento { attentamente
nel senso orario di 180° in orizzontale.
Appoggiate l’unità d’allarme Q sul punto desiderato.
Inclinate il segnalatore di movimento attentamente
in verticale (max. 90°), Fino a quando ha l’inclinazione
desiderata.
Montaggio al muro:
Cercate il punto adatto sul muro.
Prima di montare l’unità d‘allarme Q in modo fisso,
eseguite i passi descritti nel capitolo 3 “Controllo
delle funzioni” sul punto di montaggio desiderato.
Se l’apparecchio di selezione d’allarme e d’emergenza funziona correttamente, eseguite due fori a
quel punto con una distanza orizzontale di 27 mm
(vedi Fig. L).
Qui avvitate le due viti E e tasselli R forniti. Le teste
delle viti devono fuoriuscire ancora di ca. 4 mm
(vedi Fig. L) dal muro.
Spingete adesso i fori per le viti D per appendere
l‘apparecchio sulle viti, fino a quando l‘unità
d‘allarme è fissata al muro.
3. Controllare le funzioni:
Controllare il funzionamento del telecomando
Premete il tasto
sul telecomando, per
accendere l’unità d’allarme Q.
L’accensione viene confermata da tre suoni.
Sul LC-Display w dell’unità d’allarme appare
“ARM”.
Spegnete l’unità della sirena, premendo il tasto
d sul telecomando.
Lo spegnimento viene confermata da un suono.
Sul LC-Display w dell’unità d’allarme si spegne la
parola “ARM”.
Controllare l’allarme d’emergenza:
Il sistema possiede una funzione d’allarme d’emergenza.
Premete il tasto di panico : sul telecomando T.
La sirena suona per 30 secondi (quando la sirena è
accesa – vedi capitolo “accendere / spegnere la
sirena”) e vengono selezionati i numeri telefonici
programmati (quando la funzione automatica di
selezione è accesa – vedi capitolo “Accendere /
spegnere la selezione automatica”).
Dopo 30 secondi di pausa la sirena suona una
seconda volta per 30 secondi.
Per fermare l’allarme e la chiamata, premete il
d sul telecomando.
tasto
L’unità d’allarme emette un suono e l’allarme è spento.
Controllare il funzionamento del segnalatore di
movimento:
Accendete l’interruttore ON / OFF ] (Posizione “I”).
Il Gong suona una volta.
Dopo circa 50 secondi di ritardo suona il Gong una
volta.
Movimentate adesso il campo di rilevamento del
segnalatore di movimento {.
Se il segnalatore di movimento riconosce il
movimento, il Gong suona 2 volte.
Spegnete l’interruttore ON / OFF ] (Posizione “0”).
Controllare il funzionamento automatico di selezione:
Tenete premuto il tasto PROG r, fino a quando
sentite un suono.
Premete immediatamente un posto di memorizzazione
(Tasto numerico e “1” fino a “5”). L’apparecchio di
selezione seleziona automaticamente il rispettivo
numero telefonico, il quale viene visualizzato in
modo lampeggiante sul LC-Display w (condizione
che il posto di memorizzazione è occupato con un
numero telefonico).
Attendete, fino a quando l’apparecchio lascia
automaticamente la procedura di selezione.
Uso
Se inserite una password errata e la confermate con il
tasto OK y, l’apparecchio reagisce con un “Suono
d’errore” e ritorna immediatamente alla modalità normale.
Accendere l’apparecchio di selezione allarme e
d’emergenza:
Accensione con telecomando:
Premete il tasto
.
Sull’unità d’allarme
Inserite la password attuale.
Premete il tasto OK y.
L’unità d’allarme emette tre suoni e in basso sul
LC-Display w appare “ARM”.
Adesso avete circa 55 secondi (ritardo d’uscita) di
tempo, per lasciare il campo controllato, senza
provocare un allarme.
Dopo questo ritardo d’uscita viene emesso un suono.
Adesso l’apparecchio d’allarme è acceso.
Nota: Nella condizione accesa la funzione di Gong non è
attiva, anche se l’interruttore ON / OFF Gong ] è in
posizione “I”.
L’allarem suona – provocato da un riconoscimento
di un movimento.
A condizione accesa, il segnalatore di movimento {
riconosce un movimento.
q si illumina brevemente una volta.
Il LED
Dopo il ritardo di entrata impostato:
Viene emesso il allarme, sul LC-Display w appare
in basso lampeggiante “TRIGGER”.
La sirena p suona per 30 secondi (quando la sirena
è accesa). Dopo 30 secondi di pausa la sirena suona
una seconda volta per 30 secondi.
IT/MT
21
Messa in funzione
A seconda la impostazione della selezione automatica (Impostazione in fabbrica: Funzione di selezione
accesa) come del numero impostato delle procedure
di selezione, l’apparecchio di selezione allarme e
d’emergenza seleziona tutti i numeri telefonici
memorizzati in frequenza:
1. Numero di telefono (30 sec.) – 3 sec. attesa 2. Numero di telefono (30 sec.) – 3 sec. attesa 3. Numero di telefono (30 sec.) – 3 sec. attesa 4. Numero di telefono (30 sec.) – 3 sec. attesa 5. Numero di telefono (30 sec.) – 3 sec. attesa 1. Numero di telefono (30 sec.) – 3 sec. attesa…
Ecc.
Quando la persona chiamata accetta la telefonata, sente
il suono di allarme (anche quando la sirena è spenta),
fino a quando il collegamento telefonico viene automaticamente staccato dall’unità d’allarme dopo max. 35 sec.
Se il collegamento telefonico dell’apparecchio chiamante
come il telefono chiamato possiede un riconoscimento
del numero, appare sul LC-Display il numero di telefono
dell’apparecchio chiamante. Anche se uno o più persone
chiamate accettano le chiamate, tutti i numeri telefonici
(anche quelli già risposte) vengono chiamate tante volte,
quanto programmato. Il ciclo di chiamata può essere
interrotto solamente, spegnendo l’apparecchio.
Se l’apparecchio di selezione d’allarme e d’emergenza
non viene spento dopo un allarme, esso rimane acceso.
Alla fine del ciclo di sirena (circa 90 secondi) e / o alla
fine del ciclo di chiamate, l’allarme può essere provocato
nuovamente.
Spegnere l’apparecchio di selezione allarme e
d’emergenza:
Spegnimento con telecomando:
d.
Premete il tasto
22
IT/MT
Sull’unità d’allarme
Inserite la password attuale.
Premete il tasto OK y.
Eventualmente si spegne il suono d’allarme.
La parola “TRIGGER”, eventualmente lampeggiante,
si spegne.
L’unità d’allarme emette un suono.
La parola “ARM” sul LC-Display w si spegne.
Adesso l’apparecchio d’allarme è spento.
Nota: Mente l’unità d’allarme seleziona un numero telefonico, cioè quando crea il collegamento telefonico, l’apparecchio di selezione allarme e d’emergenza non può
essere spento attraverso la tastiera. L’apparecchio può
essere spento in ogni momento con il telecomando.
Accendere / spegnere l’allarme d’emergenza:
Premete il tasto PANIC u sull’unità d’allarme oppure il tasto “PANIC” : del telecomando.
Viene emesso il allarme, sul LC-Display w appare
in basso lampeggiante “TRIGGER”.
La sirena p suona per 30 secondi (quando la sirena
è accesa – vedi capitolo “accendere / spegnere la
sirena”) e vengono selezionati i numeri telefonici
programmati (quando la funzione automatica di
selezione è accesa – vedi capitolo “Accendere /
spegnere la selezione automatica”).
Dopo 30 secondi di pausa la sirena suona una
seconda volta per 30 secondi.
Per fermare l’allarme e la chiamata, inserite
sull’unità d’allarme la Password attuale e premete il
d sul
tasto OK y oppure premete il tasto
telecomando.
La parola “TRIGGER” lampeggiante si spegne.
L’unità d’allarme emette un suono e l’allarme è
spento.
Nota: Mente l’unità d’allarme seleziona un numero telefonico, cioè quando crea il collegamento telefonico, l’allarme d’emergenza non può essere spento attraverso la
tastiera. L’apparecchio può essere spento in ogni
momento con il telecomando.
Accendere / spegnere la funzione Gong:
Accendete l’interruttore ON / OFF ] in posizione “I”.
Il Gong suona una volta.
Dopo circa 50 secondi di ritardo si sente un suono.
Adesso la funzione di Gong è attiva.
Se il segnalatore di movimento { rileva un
q si illumina una
movimento, il LED
volta e il Gong suona 2 volte.
Per spegnere la funzione Gong, portate l’interruttore
ON / OFF ] in posizione “0”.
Nota: Quando l’apparecchio è acceso, la funzione Gong
non è attiva.
Panoramica sui ultimi 5 allarmi:
Non vi trovate né nella modalità di inserimento, né
l’apparecchio di segnalazione allarme e d’emergenza
è acceso.
i.
Premete ripetutamente il tasto
Vengono visualizzati gli orari degli ultimi 5 allarmi.
Attendete circa 10 secondi e la modalità di visualizzazione si spegne automaticamente.
Panoramica degli numeri telefonici memorizzati:
Non vi trovate né nella modalità di inserimento, né
l’apparecchio di segnalazione allarme e d’emergenza
è acceso.
o.
Premete ripetutamente il tasto
Vengono visualizzati a sequenza i numeri telefonici
memorizzati.
I posti di memorizzazione vuoti vengono visualizzati
con “-----------“.
Attendete circa 10 secondi e la modalità di
visualizzazione si spegne automaticamente.
Messa in funzione
Panoramica dei suoni
Suono
Significato
Tre suoni
Il ritardo d’uscita è attivo,
l’accensione dell’apparecchio
di selezione allarme e
d’emergenza è attiva solo
dopo 55 secondi.
Allarme sirena
La sirena suona
1. A causa del riconoscimento di un movimento –
dopo il ritardo d’entrata in
frequenza: 30 sec. acceso
– 30 sec. pausa – 30 sec.
acceso.
2. Provocato dal tasto
“PANIC” u e / o : come
allarme d’emergenza.
Singolo Gong
Linterruttore Gong è stato portato in posizione “I”, la funzione
Gontg non è ancora attiva.
Due Gong
È stato riconosciuto un movimentom la funzione Gong è
attiva.
Sostituire la batteria
Unità d’allarme:
q si illumina ogni 3 secondi una
Quando il LED
volta (da circa 7,7V +- 0,5V), dovete sostituire la batteria
Bock da 9V. Sostituite la batteria come descritto nel
capitolo “Alimentazione” al punto “Unità d’allarme –
batteria Block da 9V”.
In condizione accesa l’unità d’allarme viene alimentata
ancora per circa 24 ore dalla batteria, dopo che il
q ha iniziato a lampeggiare.
LED
Telecomando
Se il LED di controllo a si illumina debolmente durante
l’attivazione dei tasti del telecomando e / o se la distanza
del segnale diminuisce, si deve sostituire la batteria
(Batteria da 12V, alcalica (tipo CN 23 A o L1028)).
Spingete il coperchio del vano batterie f con una
leggera pressione verso il basso (vedi Fig. M).
Sostituite la batteria con una nuova. Inserite la
batteria rispettando la polarità (vedi marcatura nel
vano batterie)
Spingete il coperchio del vano batterie nuovamente
sul carter.
Controllate la funzione del telecomando.
Descrizione dei collegamenti (vedi Fig. N)
INPUT :
In caso di interruzione verso si provoca
un suono Gong (a funzione Gong accesa)
oppure un allarme (in condizione allarme
acceso), ma solamente a partire dalla fine
del ritardo d’uscita; se al termine del ritardo
d’uscita il morsetto non è collegato con ,
nessun allarme viene provocato.
:
0V (Massa)
(max. 150 mA) in caso di allarme
SIREN *:
12V
(indipendentemente dal fatto se la sirena
interna è accesa o spenta).
NA:
Nessuna funzione.
Sirene *:
Potete collegare una sirena esterna (non inclusa nella
fornitura) con 9 o 12V DC, max. 150 mA con i morsetti
e SIREN.
Collegamenti opzionali
Per poter collegare apparecchi opzionali esterni, dovete
liberare i morsetti di collegamenti rispettivi sull’unità
d’allarme:
Togliete la vite S del coperchio vano collegamenti
con un cacciavite a stella (vedi Fig. E).
Inserite il cacciavite nel foro G e sollevate poi il
coperchio del vano collegamenti prima in alto per
poi toglierlo.
Adesso potete eseguire i collegamenti necessari sui
morsetti di collegamento F (vedi “Descrizione dei
collegamenti”). Usate cavi con un diametro dei fili di
0,2 – 0,3 mm, p.es. cavo telefonico.
Portate tutti i cavi attraverso il foro G fuori
dall’unità d’allarme.
Inserite nuovamente il coperchio del vano
collegamenti A.
Serrate la vite S del coperchio vano collegamenti.
Conatto Reed:
Potete collegare un contatto Reed (Contatto magnetico
come segnalatore di apertura (NC), non incluso nella
fornitura) come segnalatore di apertura porta o finestra
con i morsetti INPUT e . Possono essere collegati fino
a 6 contatti Reed in serie.
Altri contatti:
Contatti senza potenziale di altri segnalatori oppure impianti possono essere collegati per provocare l’allarme /
la selezione.
Contatti d’apertura (NC) possono essere collegati con i
morsetti (INPUT) e (in caso di più di un contatto:
collegare in serie).
* In caso di mancanza di corrente attraverso l’alimentatore non esiste nessun potenziale al morsetto
SIREN. Il morsetto INPUT è attivo anche attraverso
la batteria d’alimentazione d’emergenza.
IT/MT
23
Eliminare errori
Eliminare errori
Errore
Causa
Eliminazione
Errore
Causa
Eliminazione
Il segnalatore di
movimento segnala un movimento senza ragione
riconoscibile
Animali, movimenti dell’aria,
luce diretta, ecc.
Modificate il
posizionamento del segnalatore di movimento.
La persona
chiamata non
riceve la chiamata in caso
d’allarme
Il numero telefonico è stato
immesso errato
oppure per
niente
Immettete nuovamente il numero di telefono.
La funzione di
selezione è
spenta ( si
vede sul
LCD-Display)
Accendete la
funzione di
selezione (
non si vede sul
LCD-Display)
Collegamento
telefonico difettoso.
Controllate la
funzione del
collegamento
telefonico con
un telefono
analogico.
Non avete dato
un ordine dopo
l’inserimento
della Password
Premete il tasto
OK y per accendere /spegnere.
Usate un adesivo di mascheramento,
per escludere
un determinato campo dal
rilevamento.
Il raggio d’azione del segnalatore di movimento è troppo
piccolo.
Il LED
lampeggia periodicamente
24
IT/MT
La temperatura
ambiente è troppo elevata (20°C
sono ottimi)
Modificate il
posizionamento del segnalatore di movimento.
L’apparecchio è
posizionato troppo in basso o
troppo in alto.
Modificate l’altezza di montaggio e/o l’inclinazione del
segnalatore di
movimento
Non è stata collegata una batteria d’emergenza oppure la
batteria è debole.
Inserite una
nuova batteria
di corrente
d’emergenza.
L’apparecchio
non reagisce
alla Password
Premete il tasto
PROG r per
entrare nella
modalità delle
impostazioni.
Errore
Le Vostre
impostazioni
non vengono
memorizzate.
Altri errori
Causa
Eliminazione
La Password
inserita è errata
Inserite la password corretta.
Se avete
dimenticato la
Password, settate l’apparecchio sulle
impostazioni di
fabbrica come
descritto nel
capitolo
“Modificare la
Password”.
Le impostazioni
non sono state
confermate.
Premete il tasto
OK y per
confermare le
impostazioni.
Eseguite un Reset (vedi capitolo
“Eseguire le
impostazioni”
Punto “Reset”).
Per altre domande e problemi potete trovare le
informazioni in Internet all’indirizzo www.dexaplan.com,
per risolvere i problemi.
Manutenzione e Pulizia / Smaltimento
Sicherheit/ Informazioni
/ Bedienung
Manutenzione e Pulizia
Manutenzione dell’impianto d’allarme
Controllate periodicamente la sicurezza tecnica e la
funzione dell‘apparecchio.
Pulizia
Togliete la spina prima di pulire l’apparecchio. Pulite
l’apparecchio solamente con un panno asciutto o leggermente umido. Non immergete gli apparecchi nell’acqua.
Non usate detergenti per la pulizia.
parti delicati, p.es. interruttori oppure batterie. Il prodotto
è destinato solamente all’uso privato e non a quello
commerciale. Non esiste il diritto di pagamento del danno
in caso di infrazione. L‘apparecchio d‘allarme non è una
sostituzione di un‘assicurazione e non sostituisce l‘obbligo
di cura. In caso di uso non corretto ed errato, l’uso delle
forze brute e interventi, che non sono stati eseguiti da
una sede d’assistenza autorizzata, la garanzia decade.
I vostri diritti di legge non vengono limitati da questa
garanzia.
Service
Smaltimento
Smaltite il materiale d’imballaggio e le batterie usurate
ed apparecchi presso un punto dedicato di smaltimento
della vostra città.
Secondo la normativa europee 2002 / 96 / EG su apparecchi elettrici ed elettronici vecchi e la traduzione nel
diritto nazionale, i apparecchi elettrici devono essere
raccolti separatamente e riciclati in modo da rispettare
l´ambiente. Togliete le batterie prima di smaltire l‘apparecchio. Come utilizzatore finale siete obbligati alla
restituzione delle batterie usurate (normative batterie).
Le batterie non devono essere gettate nella spazzatura
della casa.
Informazioni
Garanzia
Per questo prodotto ricevete una garanzia di 3 anni a
partire dalla data d´acquisto. Per favore conservate la
ricevuta come prova dell’acquisto. In caso di garanzia
mettetevi in contatto telefonico con l‘assistenza clienti
del vostro paese. Solo in questo modo è possibile garantire l’invio gratuito della vostra merce. La garanzia copre
solo difetti del materiali e difetti di fabbrica. Questo non
vale per parti soggetti ad usura oppure per danni alle
In Internet sul sito www.dexaplan.com troverete le
informazioni per la procedura in caso di problemi.
In caso di domande rivolgetevi per E-mail
([email protected]) oppure telefonicamente
04 73 - 23 54 74) Lunedì - Venerdì,
(
ore 7:45 - 14:30 al nostro servizio d’assistenza. Qui
riceverete tutte le informazioni necessarie per domande
sull´assistenza come restituzione, ecc.
Dichiarazione di conformità
Con la presente la ditta Dexaplan GmbH dichiara, che
l’apparecchio di segnalazione allarme e d’emergenza è
stato costruito in conformità alle richieste e le altre
normative rilevanti della normativa 1999 / 5 / EG.
La conformitá è stata comprovata.
La dichiarazione di conformità completa può essere
trovata: www.dexaplan.com
Dexaplan GmbH
Paul-Böhringer-Str. 3 · D-74229 Oedheim
Aggiornamento delle informazioni 08 / 2007
Ident.-No.: 08-2007-BA-611-IT/MT
IT/MT
25
26
Content
Introduction
Proper use........................................................................
Included items .................................................................
Features and equipment ..................................................
Technical information.......................................................
Page
Page
Page
Page
28
28
28
29
Safety advice .................................................................. Page 29
Preparing for first use
Plan where you are going to locate the device..................
Telephone connection ......................................................
Power supply ...................................................................
Making the settings .........................................................
Positioning the alarm unit.................................................
Operation .........................................................................
Changing batteries ...........................................................
Optional connections........................................................
Page
Page
Page
Page
Page
Page
Page
Page
30
30
30
31
32
33
35
35
Rectifying faults ............................................................ Page 36
Maintenance and cleaning
Maintenance of the alarm system .................................... Page 36
Cleaning........................................................................... Page 36
Disposal ............................................................................ Page 37
Information
Guarantee ........................................................................ Page 37
Service............................................................................. Page 37
Declaration of conformity................................................. Page 37
GB/MT
27
Introduction
Introduction
Included items
Please read carefully and completely through these operating instructions and fold out page 3, the page with the
illustrations. These operating instructions form part of the
product and contain important information about bringing
the product into use and its handling. Always observe all
the safety advice. If you have any questions or are unsure
of how to handle the device please consult our Internet
page at www.dexaplan.com or contact our service centre
(see the section about “Service”). Keep these instructions
and if necessary pass them on to a third party.
See Fig. A
Q 1x Alarm unit BA 611
W 2x Masking stickers
E 2x Screws for alarm unit
R 2x Dowels for alarm unit
T 1x Remote control BA 611 R
Ta 1x Battery CN23 A, 12V alkaline
Y 1x Telephone cable adapter (only included in
some countries)
U 1x Telephone connection cable (approx. 2 m,
with RJ11 plug)
I 1x Mains adapter with approx. 1.8 m cable
1x Operating instructions
Proper use
This alarm and emergency telephone dialler is intended
exclusively for use in internal rooms in private houses.
The power for the alarm unit is provided by the supplied
9V DC mains adapter connected to the 230V ~ AC, 50 Hz
mains supply. A 9 volt block backup battery (not included)
ensures the functions are retained if the mains supply is
interrupted. For the dialling function to work connection
to an analogue telephone line is required.
This alarm and emergency telephone dialler can be armed
and disarmed using the keypad or the remote control.
A programmable entry delay and an exit delay allow you
to arm or disarm the unit from within the monitored area.
The motion detector integrated into the alarm unit reacts
to the motion of people in the monitored area. On alarm
the alarm unit dials the telephone numbers you have
preprogrammed into it. In addition the siren integrated
into the alarm unit can give off an audible alarm sound.
The alarm can also be triggered immediately by a panic
button.
Alternatively the unit can be set to give a gong chime on
detection of motion.
The manufacturer shall not be liable for damage caused
by improper use or incorrect operation.
28
GB/MT
See Fig. D
p Siren
[ Mains adapter connection socket (9V)
] Gong On / Off switch
See Fig. E
Connection compartment cover
Screw for connection compartment cover
Screw holes for mounting
Connection terminals
Recess slot
Battery compartment
Screw for battery compartment cover
Battery compartment cover
Battery connector
A
S
D
F
G
H
J
K
L
Features and equipment
Alarm unit BA 611
See Fig. B
O Telephone line connection “LINE”
P Telephone connection “PHONE”
See Fig. C
{ Motion detector (PIR)
} Power LED
q LED for low battery / detection
w LC display
e Number keys 0 to 9
r “PROG” key
t “PAUSE” key
y “OK” key
u “PANIC” key
i
key
o
key
Remote control BA 611 R
See Fig. F
: “PANIC” key
a Check LED
s “ ” key for arming device
d “ ” key for disarming device
See Fig. M
f Battery compartment cover
Introduction / Safety advice
Technical information
Alarm unit BA 611
Operating voltage:
Current input:
Power supply:
Radio receiver:
Siren:
Siren duration (max.):
Gong function:
DC
9V
130mA (alarm), < 5mA (standby)
From the supplied mains
adapter or the backup battery
(9 volt block 6LR61,
not included)
433.92 MHz
100 dB(A) +/- 5 dB(A) at 0.3 m
(mains operation)
Approx. 30sec./approx. 30sec.
pause / approx. 30 sec. alarm
Can be deactivated; signals
each detected motion with a
gong sound
Programmable
telephone numbers:
Automatic dialling:
Programmable code:
Exit delay:
Entry delay:
Max. 5 numbers
Up to 5 times
3 to 6 digits
Approx. 55 sec.
Programmable: 0/5/10/15/
20sec.
Operating temperature: 0 °C to + 39 °C
Area of use:
Interior rooms
Housing material:
ABS
Housing dimensions:
Approx. 86 x 150 x 46 mm
(W x H x D)
Weight:
Approx. 197 g (without battery,
without accessories)
Motion detector (attached to the alarm unit)
Sensor:
Passive infrared (PIR)
Detection angle:
Approx. 100 ° horizontal
Detection range:
Approx. 6 m at 20 °C (transverse motion, mounting height
approx. 0.5 to 2 m)
Remote control BA 611 R
Operating voltage:
12V
DC
Current input:
max. 25 mA
Power supply:
1x battery 12V, alkaline
(type CN 23 A)
Transmission frequency: 433.92 MHz
Transmission range:
Approx. 20 m (in open space)
Coding:
Factory set unique code
Function indicator:
LED
Operating temperature: 0 °C to + 40 °C
Housing material:
ABS
Housing dimensions:
Approx. 45 x 67 x 16 mm
(W x H x D)
Weight:
Approx. 34 g (with battery)
Mains adapter
Power supply:
Power consumption:
Output:
230V ~ AC, 50 Hz
4.5VA
DC, max. 500 mA
9V
Safety advice
The following advice is intended for your safety and satisfaction during operation of the device. Please note that
non-observation of this safety advice can lead to considerable danger.
Explanation of the symbols and terms used:
Danger! Non-observance of this instruction or
advice could endanger life and health.
Attention! Non-observance of this instruction or
advice will endanger property.
Tip! Observance of this instruction or advice will
achieve best performance.
Danger!
connecting the 12 V DC adapter to the mains that the
electricity supply to the device is protected by the appropriate fuse or trip in accordance with the applicable regulations. Do not connect any other power supply to the connection terminals. Otherwise there is a
someone is in its direct vicinity Otherwise there is a
water or telecoms when you are drilling or mounting
cables in such a position that they cannot be damaged or become a trip hazard. Otherwise there is a
batteries can result in serious damage to health.
GB/MT
29
Safety advice / Preparing for first use
Attention!
for the remote control. Do not use any other battery
type.
batteries are not suitable because they discharge
themselves.
the device.
discharged batteries.
check the supplied items for damage and complete
not connect it. If in doubt ask your customer service
centre.
telephone dialler is likely to remain out of operation
for a prolonged period.
Preparing for first use
Plan where you are going to locate the device
Check that the alarm and emergency telephone dialler
works properly at the proposed site.
30
GB/MT
Observe the following points:
Place the alarm unit near a mains outlet socket and
an analogue telephone connection point. Take note
of the cable length required.
Do not position the alarm unit near any metal objects,
such as metal cabinets or other objects that may
interfere with radio reception.
Monitoring is by means of a motion detector (PIR)
attached to the top of the alarm unit. The position
you select for the device should be in an area of the
building that is likely to be crossed by an intruder, for
example a corridor or stairs.
The motion detector reacts to changing heat sources;
e.g. movement of people within its detection range
(up to approx. 6 m over a max. angle of 100 °, from
an ideal mounting height of approx. 0.5 – 2 m, see
Fig. G).
Otherwise this will detrimentally affect the proper
functioning of the detector.
As the motion detector reacts to changes in heat,
there should be no sources of heat in detection range,
e.g. heaters, air conditioning units, windows, ovens
or strong draughts.
Pets may also trigger the alarm. Keep pets away from
the monitored areas when the alarm and emergency
telephone dialler is armed or direct the motion detector in an appropriate direction.
The speed of detection also depends on the ambient
temperature. Detection is faster in a cooler environment.
Motion moving transverse to the motion detector
will be detected faster than motion moving directly
towards it. Position the device in such a way that an
intruder would be most likely to move transversely
to it (see Fig. G, direction of arrows).
Position the alarm unit in such a way that a potential
intruder would not immediately notice it.
Telephone connection
Connect the supplied telephone connection cable U
between the telephone line connection “LINE” O
and your analogue domestic telephone connection
point. For some countries an adapter is included.
If necessary you can connect a telephone or another
terminal device with an RJ-11 plug cable to the
“PHONE” socket P if the two middle pins of the
RJ-11 plug are wired.
Note: The pin assignments differ from device to device.
Power supply
Remote control:
Push the battery compartment cover f downwards
using light pressure (see Fig. M).
Insert the battery Ta, observing the correct polarity
(see marking in the battery compartment).
Push the battery compartment cover back on to the
housing again.
Check that the remote control unit works properly by
key d. The check LED a illuminates.
pressing the
Alarm unit:
9 V block battery (optional, for backup power supply)
Remove the screw J from the battery compartment cover K with a crossheaded screw driver.
Remove the battery compartment cover by pushing
it downwards.
Connect a 9V block battery to the battery connector L.
Pay attention to the correct polarity.
Now place the connected battery inside the battery
compartment H.
Push the battery compartment cover back on to the
battery compartment again.
Tighten the screw to fasten the battery compartment cover back into place.
Preparing for first use
Mains adapter:
Connect the mains adapter I to the mains adapter
connection socket [ (9V).
Connect the mains adapter to a suitable mains outlet
socket (230V ~AC).
After successful connection to a power source (battery
and/or mains adapter), the red power LED } of the
alarm unit illuminates and the LC display w illuminates.
If the device is disconnected from the power supply and
then reconnected the device retains all the settings except the date and time in its memory. If a backup battery
is not fitted or the battery is exhausted then this is indicated by the LED q lighting up every three seconds.
Making the settings
The device must be disarmed to change to the settings mode [PROG]. (“ARM” is not visible on the
display).
If you do not enter any settings within 10 seconds
in the settings mode then the device automatically
quits this mode.
Every time you press a key the alarm unit issues a
pip sound.
The default password set at the factory is “000”.
If you enter an incorrect password and confirm it
with the OK key y, the device responds with an error
sound and automatically quits the settings mode.
Changing the password:
Enter the current password (factory setting: “000”).
Press the PROG key r.
The word “PASSWORD” flashes in the left top of the
LC display w.
Press the OK key y to confirm.
Enter your new password (3 to 6 digits) with the
number keys 0 to 9 e. (If you enter more than
6 numbers, the device responds with an error sound.
Then press the OK key y and after 10 seconds
start from the beginning of this process again.)
Press the OK key y to confirm.
Wait 10 seconds until the device automatically quits
the settings mode.
If you forget your password you can carry out a reset
(see “Reset”).
Storing telephone numbers:
Important information: Do not store any emergency
services numbers in the memory.
You can store up to 5 telephone numbers (each a max.
14 digits long).
1. Enter the current password.
2. Press the PROG key r a sufficient number of times
until the word “MEMORY” flashes at the top of the
LC display w.
3. Press the OK key y to confirm.
4. Now the LC displays memory location 1.
key o and the
key i select a
5. Using the
memory location from 1 to 5.
6. Enter the telephone number using the number keys
0 to 9 e (max. 14 digits per memory location).
7. Press the OK key y to confirm.
8. If you then wish to enter further telephone numbers
in other memory locations then repeat steps 3 to 7
until you have entered all the telephone numbers
you need.
9. Wait 10 seconds until the device automatically quits
the settings mode.
To include a dialling pause in the telephone number:
If you have an internal telephone exchange you may
need to include one or more dialling pauses in the dialling
sequence.
To do this go back to the previous section items 1 to 5
In item 6 at the desired position press the PAUSE
key t. A “P” appears on the LC display w.
Continue entering the telephone number as in the
previous section items 7 to 9.
The LC display now shows e.g.: 0P0123456789
If an alarm is triggered and the alarm unit dials this telephone number, it makes a 3.6 second pause in dialling at the “P” before it dials the rest of the number.
Erasing a stored telephone number:
Enter the current password.
Press the PROG key r a sufficient number of times
until the word “MEMORY” flashes at the top of the
LC display w.
Press the OK key y to confirm.
Now the LC displays memory location 1.
Using the
key o and the
key i select a
memory location from 1 to 5.
Press the OK key y twice to delete the selected
telephone number.
Wait 10 seconds until the device automatically quits
the settings mode.
Switching the siren on / off
The alarm and emergency telephone dialler has an integral siren. You can switch off the siren. In this state if an
alarm is triggered the siren will not sound (silent alarm).
If the siren is switched off this is indicated on the
LC display .
Factory setting: “SOUND ON” (siren switched on):
Enter the current password.
Press the PROG key r a sufficient number of times
until the symbol flashes at the top of the LC display w.
Press the OK key y to confirm.
Use the
key o and
key i to select “SOUND
ON” (Siren switched on) or “SOUND OFF” (Siren
switched off – silent alarm).
GB/MT
31
Preparing for first use
Press the OK key y to confirm.
Wait 10 seconds until the device automatically quits
the settings mode.
Switching automatic dialling on / off:
You can switch off the automatic dialling function.
The device calls all the stored telephone numbers if the
automatic dialling function is switched on when an
alarm is triggered.
if the automatic dialling funcThe LC display shows
tion is not switched on. Factory setting: “CALL ON” (dialling function switched on)
Enter the current password.
Press the PROG key r a sufficient number of times
symbol flashes at the top of the LC disuntil the
play w.
Press the OK key y to confirm.
Use the
key o and
key i to select “CALL
ON” (dialling function switched on) or “CALL OFF”
(dialling function switched off).
Press the OK key y to confirm.
Wait 10 seconds until the device automatically quits
the settings mode.
Selecting the number of dialling processes:
You can select the number of times the automatic dialling function dials the numbers as between once and 5
times. Every stored telephone number will be called this
number of times, whether or not the call is answered.
Factory setting: 3 times
Enter the current password.
Press the PROG key r a sufficient number of times
until the word “CYCLE” flashes at the top of the LC
display w.
Press the OK key y to confirm.
Using the
key o and the
key i select the
number of automatic dialling processes (1/2/3/4/5).
Press the OK key y to confirm.
32
GB/MT
Wait 10 seconds until the device automatically quits
the settings mode.
Setting the entry delay:
Here you can set the time you have, from the time any
motion is detected by the device in the armed state, to
cancel the alarm before the siren starts or the telephone
numbers are automatically dialled.
Factory setting: 20 seconds.
Enter the current password.
Press the PROG key r a sufficient number of times
until the word “ENTRY” flashes at the top of the LC
display w.
Press the OK key y to confirm.
Using the
key o and the
key i select the
length of the entry delay (0 / 5 / 10 / 15 / 20 seconds).
Press the OK key y to confirm.
Wait 10 seconds until the device automatically quits
the settings mode.
Setting the date / time display:
1. Enter the current password.
2. Press the PROG key r a sufficient number of times
until the word “TIME” flashes at the top of the LC
display w.
3. Press the OK key y to confirm.
4. The LCD display now shows:
05 – 01 – 01
12 - 00
= Year – Month – Day Hours - Minutes
5. Select the appropriate field by pressing the OK key y
the required number of times.
The selected field flashes.
6. Using the
key o and the
key i select the
desired setting.
7. Press the OK key y to confirm.
8. Repeat items 6 and 7 until all the values have been
entered.
9.
Wait 10 seconds until the device automatically the
settings mode.
Reset:
If you wish to delete all the settings or you have forgotten
your password, you can initiate a reset as follows:
Keep the PROG key r pressed until you hear a pip
sound.
Now immediately press the Pause key t until you
hear a pip sound.
Now remove the battery and disconnect the mains
adapter. After 2 minutes insert the battery again
and/or reconnect the mains adapter.
Now all the factory settings and the factory-installed
password (“000”) are restored.
Positioning the alarm unit
1. Limiting the detection range/angle:
In the as-supplied condition the motion detector has a
detection angle of approx. 100 ° and detection range of
approx. 6 m (at a mounting height of 0.5 - 2m) (see Fig. G).
You can modify the detection range and angle by adjusting
the motion detector.
To limit the detection angle use one of the two supplied
masking stickers W (complete or cut to size).
See Fig. H
Limited horizontal detection angle (approx. 40 °) e.g.
as a crossing detector.
See Fig. I
You can disable the motion detector by applying the
whole masking sticker, e.g. if detection is to be performed by an externally connected detector (see the
section on “Optional connections”).
Preparing for first use
2. Positioning:
You can position the alarm unit upright or lying down.
If the surface is very smooth it is recommended that you
place the device lying down.
Placing the device lying down (see Fig. K):
Turn the motion detector { carefully through 180 °
horizontally.
Place the alarm unit Q down in the desired location.
Carefully turn the motion detector vertically into the
desired direction (max. 90 °).
Mounting the device on a wall:
Find a suitable place to mount the device on a wall.
Before you fix the alarm unit Q permanently into
place, carry out the steps described in section 3
“Checking the functions” at the planned mounting site.
If the alarm and emergency telephone dialler is
functioning properly, drill two suitable holes 27 mm
apart and horizontal (see Fig. L) at the planned location.
Use the supplied screws E and dowels R to fix the
device in place. The screw heads must be left projecting approx. 4 mm (see Fig. L) from the surface of
the wall.
Push the screw holes for mounting the device D on
to the screws until the alarm unit is firmly suspended
from the wall.
3. Checking the functions:
Checking that the remote control is functioning
properly
Press the
key on the remote control to arm the
alarm unit Q.
Arming is confirmed by three pips.
The LC display w of the alarm unit shows “ARM”.
Disarm the siren unit by pressing the
key d on
the remote control.
Disarming is confirmed by one pip.
The word “ARM” disappears from the LC display w
of the alarm unit.
Checking the emergency alarm:
The device has an emergency alarm function
(Panic function).
Press the panic key : on the remote control T.
The siren sounds for 30 seconds (if the siren is
switched on – see section “Switching the siren on/off”)
and the programmed telephone numbers are called
(if the automatic dialling function is switched on –
see section “Switching automatic dialling on / off).
After 30 seconds pause the siren sounds for a second time for 30 seconds.
To stop the alarm and the dialling process press the
key d on the remote control.
The alarm unit sounds a pip and the alarm is now
switched off.
Checking the function of the motion detector:
Set the gong on / off switch ] on (setting “I”). The
gong sound sounds once.
After approx. 50 seconds delay the gong sounds
again.
Now move into the range of detection of the motion
detector {.
If the motion detector detects your motion the gong
sound sounds 2 x.
Set the gong on / off switch ] off (setting “0”).
Checking the automatic dialling function:
Keep the PROG key r pressed until you hear a pip
sound.
Now press a memory location number (number keys
e “1” to“5”). The dialling unit now automatically
dials the associated assigned telephone number and
the telephone number flashes on the LC display w
(assuming that the memory location has been assigned a telephone number).
Wait until the device automatically quits the dialling
process.
Operation
If you entered an incorrect password and confirmed it
with the OK key y, the device responds with an “error
sound” and automatically returns to the normal mode.
Arming the alarm and emergency telephone dialler:
Arming with the remote control
Press the
key
on the alarm unit
Enter the current password.
Press the OK key y.
The alarm unit sounds three pips and “ARM” appears at the bottom of the LC display w.
You now have approx. 55 seconds (exit delay) to
leave the monitored area without triggering the alarm.
After this exit delay has expired the device sounds a
pip.
The alarm and emergency telephone dialler is now
armed.
Note: In the armed state the gong function is not activated, even if the gong On / Off switch ] is in setting “I”.
The alarm sounds - triggered by the detected motion
In the armed state the motion detector { detects some
motion.
The
LED q illuminates once briefly.
After the set entry delay expires:
If the alarm is triggered, the word “TRIGGER” appears
at the bottom of the LC display w.
The siren p sounds for 30 seconds (if the siren is
switched on). After 30 seconds pause the siren sounds
for a second time for 30 seconds.
GB/MT
33
Preparing for first use
As determined by the automatic dialling function
(factory setting: dialling function switched on) and
the set number of dialling processes the alarm and
emergency telephone dialler dials all the stored telephone numbers in a cycle:
1st telephone number (30 sec.) - 3 sec. wait 2nd telephone number (30 sec.) - 3 sec. wait 3rd telephone number (30 sec.) - 3 sec. wait 4th telephone number (30 sec.) - 3 sec. wait 5th telephone number (30 sec.) - 3 sec. wait 1st telephone number (30 sec.) - 3 sec. wait ....
etc.
If the person called accepts the call, he will hear an alarm
sound (even if the siren is switched off ) until the telephone
connection is automatically stopped after max. 35 seconds
by the alarm unit.
If the telephone connection of the dialling device and the
called telephone device have the features to enable the
caller display function to work then the telephone number
of the dialling device is displayed on the LC display of the
called telephone device. Even if one or more of the called
people accept the calls, all the telephone numbers (even
those who have already answered) are called for the set
number of dialling processes. The dialling cycle can only
be interrupted by disarming the device.
If the alarm and emergency telephone dialler is not disarmed during or after an alarm then it remains armed.
The alarm can be triggered again after the end of the siren sounding process (approx. 90 seconds) or at the end
of the dialling cycle.
Disarming the alarm and emergency telephone
dialler:
Disarming with the remote control
Press the
key d
on the alarm unit
34
GB/MT
Enter the current password.
Press the OK key y.
If appropriate, the alarm sound stops.
If appropriate, the flashing word “TRIGGER” disappears.
The alarm unit sounds a pip.
The word “ARM” disappears from the LC display w.
The alarm and emergency telephone dialler is now
disarmed.
Note: Whilst the alarm unit is dialling a telephone
number, i.e. it is establishing a telephone connection, the
alarm and emergency telephone dialler cannot be disarmed using the keys on the device. The remote control
can be used to disarm the device at any time.
Switching the panic alarm On / Off:
Press the PANIC key u on the alarm unit or the
“PANIC” key : on the remote control.
If the alarm is triggered, the word “TRIGGER” appears
at the bottom of the LC display w.
The siren p sounds for 30 seconds (if the siren is
switched on – see section “Switching the siren on/off”)
and the programmed telephone numbers are called
(if the automatic dialling function is switched on –
see section “Switching automatic dialling on / off).
After 30 seconds the siren sounds for a second
time for 30 seconds.
To stop the alarm and dialling process, enter your
current password and press the OK key y or press
key d on the remote control.
the
The flashing word “TRIGGER” disappears.
The alarm unit sounds a pip and the alarm is now
switched off.
Note: Whilst the alarm unit is dialling a telephone number,
i.e. it is establishing a telephone connection, the panic
alarm cannot be disarmed using the keys on the device.
The remote control can be used to disarm the device at
any time.
Switching the gong function on/off:
Set the gong On / Off switch ] on (setting “I”).
The gong sound sounds once.
After approx. 50 seconds delay a pip sounds. The
gong function is now activated.
If the motion detector { detects some motion, the
LED q illuminates once more and the gong
sound sounds 2 x.
To switch the gong function off again, set the gong
On / Off switch ] off (setting “0”).
Note: In the armed state the gong function is not activated.
Summary of the last 5 alarm events:
This function is not available when in the setting mode
nor when the alarm and emergency telephone dialler is
armed.
Press the
key i repeatedly.
The times of the last 5 alarm events are displayed
one after the other.
Wait approx. 10 seconds and the display mode automatically switches off again.
Summary of the stored telephone numbers:
This function is not available when in the setting mode
nor when the alarm and emergency telephone dialler is
armed.
Press the
key o repeatedly.
The stored telephone numbers are displayed one
after the other.
Unassigned memory locations are shown as
“- - - - - - - - - - - - - -”.
Wait approx. 10 seconds and the display mode automatically switches off again.
Preparing for first use
Summary of the sounds
Sound
Meaning
Three pips
The exit delay is activated, the
arming of the alarm and emergency telephone dialler will be
activated after approx 55 seconds.
Siren alarm
The siren sounds
1. Triggered by motion detection
– after the set entry delay in
the cycle:
30 sec. on – 30 sec.
pause – 30 sec. on.
2. Triggered by pressing the
“PANIC” key u or : as a
panic alarm.
Single gong
sound
Two gong sounds
Gong switch was set to setting
“I”, the gong function is still not
activated.
Motion was detected,
the gong function is activated.
Changing batteries
Alarm unit
If the
LED q illuminates once every three seconds
(from approx 7.7V + - 0.5V), then you should renew the
9V block battery. Replace the battery as described in
section “Power supply” under “Alarm unit - 9V block
battery”. In the armed state the alarm unit is supplied
with power for approx. 24 hours after the
LED q
starts to illuminate.
Remote control handset
If the check LED a is weak when the keys on the remote
control are operated and/or the range of the remote control
is reduced then the battery needs to be replaced (battery
12V, alkaline (type CN 23 A or L1028)).
Push the battery compartment cover f downwards
using light pressure (see Fig. M).
Replace the battery with a new one. Insert the new
battery, observing the correct polarity (see marking
in the battery compartment).
Push the battery compartment cover back on to the
housing again.
Check that the remote control is working properly.
Optional connections
In order to be able to connect optional external devices
you must first expose the necessary terminal connections in the alarm unit:
Remove the screw S from the connection compartment cover with a crossheaded screw driver (see
Fig. E).
Push the screwdriver into the recess slot G and
first lift up then take off the connection compartment
cover.
Then you can make the desired connections at the
connection terminals F (see “Description of the
connections”). Use cable with a wire cross section
of 0.2 – 0.3 mm, e.g. telephone cable.
Guide all the connected cables out of the alarm unit
through the recess slot G.
Put the connection compartment cover A back in
place.
Tighten the screw S on the connection compartment cover again.
function is switched on) or an alarm is triggered (in the armed state), however only after
the end of the exit delay; if at the end of the
exit delay this terminal is not connected to
no alarm will be triggered.
:
0V (neutral)
(max. 150 mA) when the alarm is
SIREN *: 12V
triggered (irrespective of whether the internal
siren is switched on or off).
NA:
No function.
Siren *:
You can connect an external siren (not included) operating at 9 or 12V DC, max. 150 mA to the and SIREN
terminals.
Reed contact:
You can connect a reed contact (magnetic contact as
opening detector (NC), not included) as a door or window
opening detector to the INPUT and terminals. Up to 6
reed contacts can be connected in series.
Other contacts:
The potential-free contacts of other detectors or systems
can be connected to trigger the alarm / dialling function.
Opener contacts (NC) can be connected to the INPUT
and terminals (with more than one contact: connected
in series).
*
If the power supply from the mains adapter fails then
there is no voltage at the SIREN terminal. The INPUT
terminal remains active during operation from the
backup battery.
Description of the connections (see Fig. N)
INPUT: If an external connection between INPUT and
is broken a gong sound sounds (if the gong
GB/MT
35
Rectifying faults / Maintenance and cleaning
Rectifying faults
Fault
Motion detector
detects motion
without apparent
reason.
Cause
Pets, air movements, direct
light, etc.
Remedy
Fault
Change the
position of the
motion detector.
Use a masking
sticker to
restrict a particular part of
the detection
angle / range.
The range of the
motion detector
is not adequate.
Ambient temperature is too high
(20°C is optimal).
Change the
position of the
motion detector.
Device is mounted
too low or too
high.
Change the
mounting
height or the
inclination of
the motion
detector.
LED
There is no
The
flashes regularly. backup battery
connected or the
connected backup battery is too
weak.
Connect a new
backup battery.
The called
number does
not receive a
call on alarm.
Enter the telephone number
again.
36
GB/MT
The telephone
number was incorrectly or not
entered.
The device
does not react
to the password.
Cause
Remedy
Dialling function
is switched off
( appears on
the LC display.
Set the dialling
function on.
( does not
appear on the
LC display.
The telephone
line is faulty.
Check the
telephone line
with an
analogue telephone.
You have not
yet given a
command after
password entry.
Press the OK
key y to arm/
disarm the
device.
Should you have further questions or problems please
consult www.dexaplan.com where you can find information on problem handling.
Press the PROG
key r to enter
settings mode.
Maintenance and cleaning
The password
entered is
wrong.
Enter the correct password.
If you have
forgotten the
password, set
the device back
to the factory
settings as described in the
section “Changing the password”.
Fault
Your settings
were not
stored.
Cause
The settings
were not confirmed.
There are other
faults
Remedy
Press the OK
key y to
confirm the
settings.
Carry out a reset (see section
“Making the
settings” item
“Reset”).
Maintenance of the alarm system
You should regularly check the device to see that it is
safe and working properly.
Cleaning
Before you clean the device, pull the mains adapter out
of the mains socket. Use a dry or slightly moist cloth for
cleaning the device. Never immerse the device in water.
Do not use solvents to clean the device.
Disposal / Information
Disposal
Dispose of packaging materials, used batteries and worn
out devices at a local authority approved disposal facility.
In accordance with European Directive 2002/96/EC (covering waste electrical and electronic equipment) and its
transposition into national legislation, worn out electrical
devices must be collected separately and recycled. Take
out the batteries before you dispose of electrical devices.
As the end user you have a duty to recycle or properly
dispose of your used batteries. Batteries must not be
disposed of with the household refuse.
Information
Guarantee
This product carries a 3-year guarantee from the date of
purchase. Please retain the sales voucher as proof of
purchase. In the event of a claim under the guarantee
please contact the service centre for your country to ensure that your goods can be returned at no cost. Furthermore, the guarantee is restricted to defects in material
and manufacture only. It does not cover batteries, wear
and tear or damage to fragile parts. The product is intended for private and domestic use exclusively. It is not
intended for commercial use. No liability is accepted for
damages in the event of a break-in. An alarm is no substitute for security protection and does replace your obligation to be careful. The guarantee is void in the event of
misuse or improper handling, the use of force or attempted
repairs unless carried out by the service centre. This
guarantee does not affect your statutory rights.
Service
Information on what to do in the event of a problem can
be found on the Internet at www.dexaplan.com.
In the event of questions please contact our service centre
by e-mail ([email protected]) or telephone
0870 / 241 3029) Monday-Friday, 8:30 - 17:00
(
hours. There you will obtain all the necessary information
about service procedures such as returning devices etc.
Declaration of conformity
Dexaplan GmbH hereby declares that the alarm and
emergency telephone dialler complies with the basic
requirements and the other relevant regulations of
Directive 1999 / 5 / EC. Conformity has been demonstrated.
The complete declaration of conformity can be read at:
www.dexaplan.com
Dexaplan GmbH
Paul-Böhringer-Str. 3 · D-74229 Oedheim
Information last updated 08/2007 · Ident.-No.: 08-2007-BA-611-GB / MT
GB/MT
37
38
Inhalt
Einleitung
Bestimmungsgemäße Verwendung ......................... Seite
Lieferumfang .......................................................... Seite
Ausstattung ............................................................ Seite
Technische Daten .................................................... Seite
40
40
40
41
Sicherheitshinweise ............................................. Seite 41
Inbetriebnahme
Platzierung planen................................................... Seite
Telefonanschluss..................................................... Seite
Stromversorgung .................................................... Seite
Einstellungen vornehmen......................................... Seite
Alarmeinheit platzieren............................................ Seite
Bedienung ............................................................... Seite
Batterien wechseln.................................................. Seite
Optionale Anschlüsse .............................................. Seite
42
42
42
43
44
45
47
47
Fehler beheben ....................................................... Seite 48
Wartung und Reinigung
Wartung der Alarmanlage........................................ Seite 49
Reinigung ................................................................ Seite 49
Entsorgung .............................................................. Seite 49
Informationen
Garantie .................................................................. Seite 49
Service .................................................................... Seite 49
Konformitätserklärung............................................. Seite 49
DE/AT
39
Einleitung
Einleitung
Bitte lesen Sie diese Bedienungsanleitung vollständig
und sorgfältig durch und klappen Sie dabei die Seite 3
mit den Abbildungen aus. Die Bedienungsanleitung
gehört zu diesem Produkt und enthält wichtige Hinweise
zur Inbetriebnahme und Handhabung.
Beachten Sie immer alle Sicherheitshinweise. Sollten
Sie Fragen haben oder unsicher in Bezug auf die Handhabung der Geräte sein, informieren Sie sich im Internet
unter www.dexaplan.com oder setzen Sie sich bitte mit
der Servicestelle (s. Kapitel „Service“) in Verbindung. Bewahren Sie diese Anleitung bitte sorgfältig auf und geben Sie sie ggf. an Dritte weiter.
Bestimmungsgemäße Verwendung
Das Alarm- und Notfall- Wählgerät ist ausschließlich für
den Betrieb in Innenräumen in privaten Haushalten konzipiert. Die Stromversorgung der Alarmeinheit erfolgt über
das mitgelieferte Netzgerät 9V DC angeschlossen am
Netzstrom 230V ~ AC, 50Hz. Eine 9 Volt Blockbatterie (nicht
im Lieferumfang enthalten), erhält die Funktion aufrecht,
wenn die Stromversorgung unterbrochen wird. Für die
Wählfunktion ist ein analoger Telefonanschluss notwendig.
Das Alarm- und Notfall- Wählgerät wird an der Alarmeinheit oder an der Fernbedienung scharf- bzw.
unscharfgeschaltet. Eingangs- (einstellbar) und Ausgangsverzögerung ermöglichen die Scharf- bzw.
Unscharfschaltung im überwachten Bereich.
Der in die Alarmeinheit integrierte Bewegungsmelder reagiert auf Bewegungen von Personen im überwachten Bereich. Bei Alarm wählt die Alarmeinheit die von Ihnen einprogrammierten Telefonnummern an. Zusätzlich kann
bei Alarm die in die Alarmeinheit integrierte
Sirene einen Alarmton abgeben. Alarm kann im Notfall
auch sofort durch eine Paniktaste ausgelöst werden.
Alternativ zur Alarmfunktion kann die Alarmeinheit einen
40
DE/AT
Gongton bei Bewegungserkennung auslösen.
Der Hersteller haftet nicht für Schäden, die durch nicht
bestimmungsgemäßen Gebrauch oder falsche Bedienung verursacht werden.
Lieferumfang
Siehe Abb. A
Q 1x Alarmeinheit BA 611
W 2x Maskierungsaufkleber
E 2x Schrauben für Alarmeinheit
R 2x Dübel für Alarmeinheit
T 1x Fernbedienung BA 611 R
Ta 1x Batterie CN23 A, 12V alkalisch
Y 1x ggf. Telefonkabel-Adapter (länderspezifisch)
U 1x Telefonanschlusskabel (ca. 2 m,
mit RJ-11- Stecker)
I 1x Netzgerät mit ca. 1,8 m Kabel
1x Bedienungsanleitung
Ausstattung
Alarmeinheit BA 611
Siehe Abb. B
O Telefonleitungsanschluss „LINE“
P Telefonanschluss „PHONE“
Siehe Abb. C
{ Bewegungsmelder
} Power-LED
q LED für schwache Batterie / Erfassung
w LC-Display
e Ziffern-Tasten 0 bis 9
r Taste „PROG“
t Taste „PAUSE“
y Taste „OK“
u Taste „PANIC“
i Taste
o Taste
Siehe Abb. D
p Sirene
[ Netzgerätanschlussbuchse (9V
] Gong Ein- /Aus-Schalter
Siehe Abb. E
Anschlussfachdeckel
Schraube für Anschlussfachdeckel
Schraubenlöcher zum Aufhängen
Anschlussklemmen
Aussparung
Batteriefach
Schraube für Batteriefachdeckel
Batteriefachdeckel
Batterieanschluss
A
S
D
F
G
H
J
K
L
Fernbedienung BA 611 R
Siehe Abb. F
: Taste „PANIC“
a Kontroll-LED
s Taste „ “ zum Scharfschalten
d Taste „ “ zum Unscharfschalten
Siehe Abb. M
f Batteriefachdeckel
)
Einleitung / Sicherheitshinweise
Technische Daten
Alarmeinheit BA 611
Betriebsspannung:
Stromaufnahme:
Stromversorgung:
Funk-Empfänger:
Sirene:
Sirenendauer (max.):
Gongfunktion:
Programmierbare
Telefonnummern:
Automatisches Wählen:
Programmierbarer Code:
Ausgangsverzögerung:
Eingangsverzögerung:
Betriebstemperatur:
Anwendungsbereich:
Gehäusematerial:
Gehäusemaße:
Gewicht:
DC
9V
130 mA (Alarm),
< 5 mA (Standby)
über mitgeliefertes Netzgerät,
bzw. über eine Notstrombatterie
(9 Volt Block 6LR61, nicht im
Lieferumfang enthalten)
433,92 MHz
100dB(A) +/- 5dB(A) bei 0,3m
(bei Netzgerätbetrieb)
ca. 30Sek./ca. 30Sek.
Ruhe/ca. 30 Sek. Alarm
deaktivierbar; meldet jede Bewegungserkennung mit einem
Gongton
max. 5 Nummern
bis zu 5 Mal
3 bis 6 Ziffern
ca. 55 Sek.
programmierbar:
0 / 5 / 10 / 15 / 20 Sek.
0 °C bis +39 °C
Innenräume
ABS
ca. 86 x 150 x 46 mm (B x H xT)
ca. 197 g (ohne Batterie, ohne
Zubehör)
Bewegungsmelder (an der Alarmeinheit befestigt)
Sensor:
Passiv Infrarot (PIR)
Erfassungswinkel:
ca. 100 ° horizontal
Erfassungsreichweite: ca. 6 m bei 20 °C
(Querbewegung, Montagehöhe
ca. 0,5 bis 2 m)
Fernbedienung BA 611 R
DC
Betriebsspannung:
12V
Stromaufnahme:
max. 25 mA
Stromversorgung:
1x Batterie 12V,
alkalisch (Typ CN 23A)
Sendefrequenz:
433,92 MHz
Sendereichweite:
ca. 20 m (im Freien)
Codierung:
Einmalig, bereits im Werk in
die Alarmeinheit eingespeichert
Funktionsanzeige:
LED
Betriebstemperatur:
0 °C bis + 40 °C
Gehäusematerial:
ABS
Gehäusemaße:
ca. 45 x 67 x 16 mm (B x H xT)
Gewicht:
ca. 34 g (mit Batterie)
Netzgerät
Stromversorgung:
Leistungsaufnahme:
Stromausgang:
Gefahr!
anschluss des Netzteils 12V DC, dass der Netzstrom
vorschriftsmäßig abgesichert ist. Schließen Sie keine
Fremdspannung an den Anschlussklemmen an. An
230V ~ AC, 50 Hz
4,5VA
DC, max. 500mA
9V
Sicherheitshinweise
Die folgenden Hinweise dienen Ihrer Sicherheit und
Zufriedenheit beim Betrieb des Gerätes. Beachten Sie,
dass die Nichtbeachtung dieser Sicherheitshinweise zu
erheblichen Unfallgefahren führen kann.
Erklärung der verwendeten Zeichen und Begriffe:
Gefahr! Bei Nichtbeachtung dieses Hinweises werden
Leben und Gesundheit gefährdet.
Achtung! Bei Nichtbeachtung dieses Hinweises
werden Sachwerte gefährdet.
Tipp! Bei Beachtung dieses Hinweises werden optimale
Ergebnisse erzielt.
Wasser oder Telekommunikation bei Bohrarbeiten
diese so, dass sie nicht beschädigt werden kann
und keine Stolpergefahr darstellt. Andernfalls drohen
Andernfalls droht Verletzungsgefahr durch ätzende
DE/AT
41
Sicherheitshinweise / Inbetriebnahme
Das Verschlucken von Batterien kann zu ernsthaften
Gesundheitsschäden führen.
oder lang andauernder Temperatureinwirkung über
42
Achtung!
1 x 12V Batterie, alkalisch (Typ CN 23A oder L1028).
Polung.
guter Qualität. Aufladbare Akkus sind auf Grund der
Selbstentladung ungeeignet.
aus dem Gerät.
falls gebrauchte.
betriebnahme die Lieferung auf Beschädigungen und
Schließen Sie kein beschädigtes Gerät (z.B. Transportschaden) an. Fragen Sie im Zweifelsfall Ihren Kundendienst.
nicht in Betrieb, dann entfernen Sie die Batterien.
DE/AT
Inbetriebnahme
Platzierung planen
aus die Funktion des Alarm- und Notfall- Wählgerätes.
Achten Sie auf folgende Punkte:
Platzieren Sie die Alarmeinheit in der Nähe einer
Netzsteckdose und eines analogen Telefonanschlusses.
Berücksichtigen Sie hierbei die Kabellänge.
Platzieren Sie die Alarmeinheit nicht in der Nähe
von Metallgegenständen, wie z.B. Metallschränken
oder Gegenständen, die den Funkempfang beeinflussen können.
melder, der oben an der Alarmeinheit angebracht
ist. Wählen Sie zur Platzierung einen Bereich des
Gebäudes aus, der mit großer Wahrscheinlichkeit
von einem Eindringling durchquert werden wird,
wie z.B. Flur oder Treppe.
D
er Bewegungsmelder reagiert auf sich ändernde
Wärmequellen; z.B. Bewegungen von Menschen innerhalb seines Erfassungsbereiches (bis zu ca. 6m
über max. 100° bei einer idealen Montagehöhe von
ca. 0,5 – 2 m, s. Abb. G).
D
ecken Sie den Bewegungsmelder an der Alarm
fähigkeit des Sensors beeinträchtigt.
Da der Bewegungsmelder auf die Wärmeveränderung reagiert, dürfen sich keine Wärmequellen im
Erfassungsbereich befinden, z.B. Heizungen, Klimaanlagen, Fensterflächen, Herd, starker Durchzug.
H
austiere können auch Alarm auslösen. Halten Sie
diese ggf. vom überwachten Bereich fern, wenn das
Alarm- und Notfall- Wählgerät scharfgeschaltet ist oder
richten Sie den Bewegungsmelder entsprechend aus.
D
ie Erfassungsgeschwindigkeit ist auch von der
Umgebungstemperatur abhängig. In einer kälteren
Umgebung ist die Erfassung schneller.
Bewegungen quer zum Bewegungsmelder werden
schneller erfasst als Bewegungen direkt auf ihn zu.
Platzieren Sie ihn deshalb so, dass ein Einbrecher
möglichst quer zu ihm (s. Abb. G, Pfeilrichtung) passieren würde.
P latzieren Sie die Alarmeinheit so, dass sie einem
möglichen Einbrecher nicht sofort auffällt.
Telefonanschluss
V erbinden Sie das mitgelieferte Telefonanschlusskabel U mit dem Telefonleitungsanschluss „LINE“ O
und mit Ihrem analogen Haustelefonanschluss. Benutzen Sie hierzu ggf. den beiliegenden Adapter Y
(länderspezifisch).
S ie können bei Bedarf ein Telefon- oder ein anderes
Endgerät mit einem RJ-11-Steckerkabel mit der
Buchse „PHONE“ P verbinden, wenn die zwei mittleren
Pins des RJ-11-Steckers belegt sind.
Hinweis: Es gibt Gerätespezifische unterschiedliche
Pin- Belegungen.
Stromversorgung
Fernbedienung:
Schieben Sie den Batteriefachdeckel f mit leichtem
Druck nach unten (s. Abb. M).
Setzen Sie die Batterie Ta polrichtig ein
(s. Beschriftung im Batteriefach).
Schieben Sie den Batteriefachdeckel wieder auf das
Gehäuse.
Prüfen Sie die Funktion der Fernbedienung indem Sie
d drucken. Der Kontroll-LED a leuchtet
auf Taste
auf.
Alarmeinheit:
9 V Blockbatterie (optional, zur Notstromversorgung)
Entfernen Sie mit einem Kreuzschlitz-Schraubendreher die Schraube J des Batteriefachdeckels K.
Inbetriebnahme
E ntfernen Sie den Batteriefachdeckel, indem Sie ihn
nach unten ziehen.
S chließen Sie eine 9V Blockbatterie an den Batterieanschluss L an. Achten Sie dabei auf die Polarität.
L egen Sie nun die angeschlossene Batterie in das
Batteriefach H.
S chieben Sie den Batteriefachdeckel wieder auf das
Batteriefach.
D
rehen Sie mit der Schraube den Batteriefachdeckel
wieder fest.
Netzgerät:
V erbinden Sie das Netzgerät I mit der Netzgerätanschlussbuchse [ (9V
).
V erbinden Sie das Netzgerät mit einer geeigneten
Netzstromdose (230V ~ AC).
Nach erfolgreichem Stromanschluss (durch Batterie und /
oder Netzgerät) leuchtet die rote Power LED } der Alarmeinheit auf und die LC - Display w erscheint. Wenn das
Gerät von der Stromversorgung getrennt und dann wieder mit Strom versorgt wird, bleiben dennoch alle Einstellungen außer Datum und Uhrzeit im Speicher des Gerätes erhalten. Wird das Gerät ohne Notstrombatterie
betrieben, wird dies durch ein Aufleuchten der LED q
alle drei Sekunden angezeigt.
Einstellungen vornehmen
Um in den Einstellungs-Modus [PROG] zu wechseln,
muss das Gerät unscharf sein. („ARM“ ist nicht auf
dem Display zu sehen).
W
enn Sie innerhalb von 10 Sek. keine Eingabe im
Einstellungs-Modus machen, verlässt das Gerät
automatisch diesen Modus.
J eder Tastendruck auf der Alarmeinheit wird von
einem Piepston begleitet.
D
as im Werk eingestellte Passwort lautet „000“.
W
enn Sie ein falsches Passwort eingeben und mit
der Taste OK y bestätigen, reagiert das Gerät mit
einem „Fehlerton“ und verlässt automatisch den
Einstellungs-Modus.
Passwort ändern:
G
eben Sie das aktuelle Passwort ein (Werkseinstellung: „000“).
Drücken Sie die Taste PROG r.
Das Wort „PASSWORD“ links oben auf dem LC-Display w blinkt.
Drücken Sie zur Bestätigung die Taste OK y.
G
eben Sie mit den Zifferntasten 0 bis 9 e; Ihr neues
Passwort (3 bis 6 Zeichen) ein.
(Wenn Sie mehr als 6 Zeichen eingeben, antwortet
das Gerät mit einem „Fehlerton“. Drücken Sie dann
die Taste OK y und beginnen Sie nach ca. 10 Sek.
wieder von vorne.)
Drücken Sie zur Bestätigung die Taste OK y.
W
arten Sie 10 Sek., bis das Gerät automatisch den
Einstellungs-Modus verlässt .
Wenn Sie Ihr Passwort vergessen haben, führen Sie
ein Reset durch.
Telefonnummern einspeichern:
Wichtiger Hinweis: Speichern Sie keine Notrufnummern
auf den Speicherplätzen ab.
Sie können max. 5 Telefonnummern (je max. 14 Zeichen)
einspeichern.
1. Geben Sie das aktuelle Passwort ein.
2. Drücken Sie die Taste PROG r so oft, bis das Wort
„Memory“ oben auf dem LC-Display w blinkt.
3. Drücken Sie zur Bestätigung die Taste OK y.
4. Nun wird auf dem LC-Display der Speicherplatz 1 angezeigt.
o und
i den
5. Wählen Sie mit den Tasten
Speicherplatz 1 bis 5 aus.
6. Geben Sie die Telefonnummer mit den Zifferntasten 0
7.
8.
9.
bis 9 e ein (max. 14 Ziffern pro Speicherplatz).
Drücken Sie zur Bestätigung die Taste OK y.
Wenn Sie weitere Telefonnummern an weiteren
Speicherplätzen eingeben wollen, dann wiederholen
Sie die Schritte 3. bis 7. so oft, bis sie alle gewünschten Telefonnummern eingegeben haben.
Warten Sie 10 Sek., bis das Gerät automatisch den
Einstellungs-Modus verlässt.
Eine Wählpause in die Telefonnummer einspeichern:
Um z.B. bei einer Telefonanlage ein Amt anwählen zu
können, kann eine Wählpause eingespeichert werden.
G
ehen Sie dabei vor wie im vorigen Kapitel Punkt 1.
bis 5.
D
rücken Sie bei Punkt 6. an der gewünschten Stelle
die Pausen-Taste t. Es erscheint „P“ auf dem
LC-Display w.
Fahren Sie weiter fort mit der Telefonnummer-Eingabe wie im vorigen Kapitel Punkt 7. bis 9.
Auf dem LC-Display erscheint z.B.: 0P0123456789
W
ird ein Alarm ausgelöst und die Alarmeinheit wählt
diese Telefonnummer, macht sie bei „P“ eine Wählpause von 3,6 Sek., bevor sie die Telefonnummer zu
Ende wählt.
Eingespeicherte Telefonnummer löschen:
Geben Sie das aktuelle Passwort ein.
D
rücken Sie die Taste PROG r so oft, bis das Wort
„Memory“ oben auf dem LC-Display w blinkt.
D
rücken Sie zur Bestätigung die Taste OK y.
N
un wird auf dem LC-Display der Speicherplatz 1
angezeigt.
o und
i den
W
ählen Sie mit den Tasten
Speicherplatz aus (1 bis 5).
Drücken Sie 2 x die Taste OK y, um die gewählte
Telefonnummer zu löschen.
Warten Sie 10 Sek., bis das Gerät automatisch den
den Einstellungs-Modus verlässt.
DE/AT
43
Inbetriebnahme
Sirene ein-/ausschalten
Das Alarm- und Notfall- Wählgerät hat eine eingebaute
Sirene. Sie können die Sirene ausschalten; wird ein Alarm
ausgelöst, ist die Sirene nicht zu hören (stiller Alarm).
Bei ausgeschalteter Sirene wird auf dem LC-Display
angezeigt.
Werkseinstellung: „SOUND ON“ (Sirene eingeschaltet):
Geben Sie das aktuelle Passwort ein
D
rücken Sie die Taste PROG r so oft, bis das
oben auf dem LC-Display w blinkt.
Zeichen
Drücken Sie zur Bestätigung die Taste OK y.
o und
i
W
ählen Sie mit den Tasten
„SOUND ON“ (Sirene eingeschaltet) oder „SOUND
OFF“ (Sirene ausgeschaltet – stiller Alarm) aus.
D
rücken Sie zur Bestätigung die Taste OK y.
W
arten Sie 10 Sek., bis das Gerät automatisch den
Einstellungs-Modus verlässt.
Automatische Wählfunktion ein- / ausschalten:
Sie können die automatische Wählfunktion ausschalten.
Ist die automatische Wählfunktion eingeschaltet, werden
bei einem Alarm alle gespeicherten Telefonnummern angewählt.
Ist die automatische Wählfunktion nicht eingeschaltet,
wird auf dem LC-Display
angezeigt.
Werkseinstellung: „CALL ON“ (Wählfunktion eingeschaltet)
Geben Sie das aktuelle Passwort ein.
D
rücken Sie die Taste PROG r so oft, bis das
Zeichen
oben auf dem LC-Display w blinkt.
Drücken Sie zur Bestätigung die Taste OK y.
o und
i „CALL
W
ählen Sie mit den Tasten
ON“ (Wählfunktion eingeschaltet) oder „CALL OFF“
(Wählfunktion ausgeschaltet) aus.
Drücken Sie zur Bestätigung die Taste OK y.
W
arten Sie 10 Sek., bis das Gerät automatisch den
Einstellungs-Modus verlässt.
44
DE/AT
Anzahl der Wählvorgänge wählen:
Sie können die Anzahl der automatischen Wählvorgänge
zwischen 1 x bis 5 x einstellen. Jede gespeicherte
Telefonnummer wird so oft angewählt, unabhängig davon
ob der Anruf angenommen wird oder nicht.
Werkseinstellung: 3 x
G
eben Sie das aktuelle Passwort ein.
D
rücken Sie die Taste PROG r so oft, bis das Wort
„CYCLE“ oben auf dem LC-Display w blinkt.
Drücken Sie zur Bestätigung die Taste OK y.
o und
i die
W
ählen Sie mit den Tasten
Anzahl der automatischen Wahlvorgänge
(1 / 2 / 3 / 4 / 5) aus.
Drücken Sie zur Bestätigung die Taste OK y.
W
arten Sie 10 Sek., bis das Gerät automatisch den
Einstellungs-Modus verlässt.
Eingangsverzögerung einstellen:
Hier können Sie die Zeit einstellen, die Ihnen nach der
Bewegungserkennung im scharfgeschalteten Zustand
bleibt, um einen ausgelösten Alarm abzuschalten, bevor
die Sirene ertönt bzw. das Wählgerät wählt.
Werkseinstellung: 20 Sek.
Geben Sie das aktuelle Passwort ein.
D
rücken Sie die Taste PROG r so oft, bis das Wort
„ENTRY“ oben auf dem LC-Display w blinkt.
D
rücken Sie zur Bestätigung die Taste OK y.
Wählen Sie mit den Tasten o und i die Länge
der Eingangsverzögerung (0 / 5 / 10 / 15 / 20 Sek.) aus.
Drücken Sie zur Bestätigung die Taste OK y.
W
arten Sie 10 Sek., bis das Gerät automatisch den
Einstellungs-Modus verlässt.
Datum / Zeit - Anzeige einstellen:
1. Geben Sie das aktuelle Passwort ein.
2. Drücken Sie die Taste PROG r so oft, bis das Wort
„TIME“ oben auf dem LC-Display w blinkt.
3.
4.
5.
6.
7.
8.
9.
Drücken Sie zur Bestätigung die Taste OK y.
Auf dem LC-Display erscheint:
05 – 01 – 01
12 - 00
= Jahr – Monat – Tag
Stunde - Minute
Wählen Sie die gewünschte Zahl durch wiederholtes Drücken der Taste OK y aus.
Die gewählte Zahl blinkt.
o und
i die
Nehmen Sie mit den Tasten
gewünschte Einstellung vor.
Drucken Sie zur Bestätigung die Taste OK y.
Wiederholen Sie Punkt 6. und 7. so oft, bis Sie alle
Werte eingestellt haben.
Warten Sie 10 Sek., bis das Gerät automatisch den
Einstellungs-Modus verlässt.
Reset:
Wenn Sie alle Einstellungen löschen möchten oder Ihr
Passwort vergessen haben, führen Sie ein Reset durch:
H
alten Sie die Taste PROG r so lange gedrückt, bis
ein Piepston zu hören ist.
D
rücken Sie nun sofort die Pausen-Taste t,
bis ein Piepston zu hören ist.
E ntfernen Sie nun die Batterie und das Netzgerät.
Nach 2 Minuten legen Sie die Batterie wieder ein
und / oder schließen das Netzgerät wieder an.
N
un sind alle Werkseinstellungen wieder aktiv sowie
auch das im Werk eingestellte Passwort („000“).
Alarmeinheit platzieren
1. Begrenzung des Erfassungsbereiches:
Im Lieferzustand hat der Bewegungsmelder einen Erfassungsbereich von ca. 100 ° und ca. 6 m (bei einer
Montagehöhe von 0,5 - 2 m) (siehe Abb. G). Sie können
die Richtung des Erfassungsbereiches durch Justierung
des Bewegungsmelders ändern.
Inbetriebnahme
Um den Erfassungsbereich zu begrenzen, verwenden Sie
einen der zwei mitgelieferten Maskierungsaufkleber W
(abgeschnitten oder ganz).
Siehe Abb. H
Begrenzter horizontaler Erfassungswinkel (ca. 40°)
z.B. als Durchgangsmelder.
Siehe Abb. I
Funktion des Bewegungsmelders ausschalten
durch Bekleben mit dem ganzen Maskierungsaufkleber, z.B. wenn Erfassung nur durch einen extern
angeschlossenen Melder erwünscht (siehe Absatz
„Optionale Anschlüsse“).
2. Platzierung:
Sie können die Alarmeinheit stehend oder liegend platzieren.
Wählen Sie für das Gerät in jedem Fall die liegende Platzierung, wenn der Untergrund glatt ist und das Gerät verrutschen könnte.
Liegende Platzierung (s. Abb. K):
Drehen Sie den Bewegungsmelder { vorsichtig im
Uhrzeigersinn um 180 ° in der Waagerechten.
Legen Sie die Alarmeinheit Q an die gewünschte Stelle.
Kippen Sie den Bewegungsmelder vorsichtig so in
der Senkrechten (max. 90 °), bis er die gewünschte
Neigung hat.
Wandmontage:
Suchen Sie eine geeignete Montagestelle an einer
Wand.
Bevor Sie die Alarmeinheit Q fest montieren, führen
Sie die Schritte, wie in Abschnitt 3. „Funktionen
kontrollieren“ beschrieben, am vorgesehenen Montageort aus.
W
enn das Alarm- und Notfall- Wählgerät ordnungsgemäß funktioniert, bohren Sie an dieser Stelle in
einem waagerechten Abstand von 27 mm (s. Abb. L)
zwei geeignete Löcher.
Befestigen Sie darin die mitgelieferten Schrauben E
und Dübel R. Die Schraubenköpfe müssen noch
ca. 4 mm (s. Abb. L) aus der Wand heraus stehen.
Schieben Sie nun die Schraubenlöcher D zum Aufhängen so auf die Schrauben, bis die Alarmeinheit
fest an der Wand hängt.
3. Funktionen kontrollieren:
Funktion der Fernbedienung kontrollieren
Drücken Sie die Taste
auf der Fernbedienung
um die Alarmeinheit Q scharf zu schalten.
D
as Scharfschalten wird durch drei Pieptöne bestätigt.
Auf dem LC-Display w der Alarmeinheit ist „ARM“
zu lesen.
Schalten Sie die Sireneneinheit unscharf, indem Sie die
d auf der Fernbedienung drücken.
Taste
Das Unscharfschalten wird durch einen Piepton
bestätigt.
Auf dem LC-Display w der Alarmeinheit erlischt das
Wort „ARM“.
Notfallalarm kontrollieren:
Das System hat eine Notfallalarmfunktion.
Drücken Sie die Panik -Taste : auf der Fernbedienung T.
D
ie Sirene ertönt 30 Sek. lang (wenn die Sirene eingeschaltet ist – siehe Kapitel „Sirene ein-/ausschalten“)
und die programmierten Telefonnummern werden angerufen (wenn die automatische Wählfunktion eingeschaltet ist – siehe Kapitel „Automatische Wählfunktion
ein- / ausschalten).
N
ach 30 Sek. Ruhe ertönt die Sirene ein zweites
Mal für 30 Sek.
U
m den Alarm und den Anruf zu stoppen, drücken
d.
Sie auf der Fernbedienung die Taste
D
ie Alarmeinheit gibt einen Piepton von sich und
der Alarm ist nun ausgeschaltet.
Funktion des Bewegungsmelders kontrollieren:
S tellen Sie den Gong Ein- /Aus-Schalter ] ein
(Stellung „I“). Der Gongton ertönt ein Mal.
N
ach ca. 50 Sek. Verzögerung ertönt ein Gongton.
B
ewegen Sie sich nun im Erfassungsbereich des
Bewegungsmelders {.
E rkennt der Bewegungsmelder die Bewegung,
ertönt der Gongton 2 x.
Schalten Sie den Gong Ein- /Aus-Schalter ] aus
(Stellung „0“).
Funktion der automatischen Wählfunktion
kontrollieren:
H
alten Sie die Taste PROG r so lange gedrückt, bis
ein Piepston zu hören ist.
D
rücken Sie nun sofort eine Speicherplatznummer
(Zifferntaste e „1“ bis „5“). Das Wählgerät wählt
nun automatisch die entsprechend zugehörige Telefonnummer, wobei die Telefonnummer blinkend auf
dem LC-Display w zu sehen ist (vorausgesetzt, der
Speicherplatz ist mit einer Telefonnummer belegt).
W
arten Sie, bis das Gerät automatisch den Wählvorgang verlässt.
Bedienung
Wenn Sie ein falsches Passwort eingeben und mit der
Taste OK y bestätigt haben, reagiert das Gerät mit
einem „Fehlerton“ und kehrt automatisch zurück zum
normalen Modus.
Alarm- und Notfall- Wählgerät scharfschalten:
Scharfschaltung mit der Fernbedienung
Drücken Sie die Taste
.
an der Alarmeinheit
Geben Sie das aktuelle Passwort ein.
Drücken Sie die Taste OK y.
DE/AT
45
Inbetriebnahme
Die Alarmeinheit gibt drei Pieptöne von sich und unten
auf dem LC-Display w erscheint „ARM“.
Sie haben jetzt ca. 55 Sek. (Ausgangsverzögerung)
Zeit, den überwachten Bereich zu verlassen, ohne
Alarm auszulösen.
Nach dieser Ausgangsverzögerung ertönt ein Piepton.
Das Alarm- und Notfall- Wählgerät ist nun scharf.
Hinweis: Im scharfgeschalteten Zustand ist die Gongfunktion nicht aktiv, auch wenn der Gong Ein- /AusSchalter ] auf Stellung „I“ steht.
geschaltet ist), bis die Telefonverbindung automatisch von
der Alarmeinheit nach max. 35 Sek. unterbrochen wird.
Hat der Telefonanschluss des Wählgeräts sowie das
angerufene Telefon eine Rufnummer-Erkennung, so wird
an dessen LC-Display die Telefonnummer des Wählgerätes
angezeigt. Auch wenn ein oder mehrere Angerufene die
Anrufe annehmen, werden alle Telefonnummern (auch
die, welche schon angenommen haben) mit der eingestellten
Anzahl der Wählvorgänge angerufen. Der Wählzyklus kann nur
durch Unscharfschalten des Gerätes unterbrochen werden.
Alarm ertönt - ausgelöst durch
Bewegungserkennung
Im scharfgeschalteten Zustand erkennt der Bewegungsmelder { eine Bewegung.
q leuchtet ein Mal kurz auf.
Die LED
Wird das Alarm- und Notfall- Wählgerät während oder
nach einem Alarm nicht unscharf geschaltet, bleibt es
scharfgeschaltet. Nach Ende des Sirenendurchlaufs
(ca. 90 Sek.) bzw. am Ende des Wählzyklus kann erneut
Alarm ausgelöst werden.
Nach der eingestellten Eingangsverzögerung:
W
ird der Alarm ausgelöst, erscheint auf dem
LC-Display w unten blinkend „TRIGGER“.
D
ie Sirene p ertönt 30 Sek. lang (wenn die Sirene
eingeschaltet ist). Nach 30 Sek. Ruhe ertönt die Sirene
ein zweites Mal für 30 Sek.
Entsprechend der Einstellungen der automatischen
Wählfunktion (Werkseinstellung: Wählfunktion eingeschaltet) sowie der eingestellten Anzahl der Wählvorgänge wählt das Alarm- und Notfall-Wählgerät alle
gespeicherten Telefonnummern im Takt:
1. Telefonnummer (30 Sek.) - 3 Sek. Wartezeit 2. Telefonnummer (30 Sek.) - 3 Sek. Wartezeit 3. Telefonnummer (30 Sek.) - 3 Sek. Wartezeit 4. Telefonnummer (30 Sek.) - 3 Sek. Wartezeit 5. Telefonnummer (30 Sek.) - 3 Sek. Wartezeit 1. Telefonnummer (30 Sek.) - 3 Sek. Wartezeit....
usw.
Alarm- und Notfall- Wählgerät unscharfschalten:
Unscharfschaltung mit der Fernbedienung
d.
Drücken Sie die Taste
an der Alarmeinheit
Geben Sie das aktuelle Passwort ein
Drücken Sie die Taste OK y.
Ggf. erlischt der Alarmton.
Das ggf. blinkende Wort „TRIGGER“ erlischt.
D
ie Alarmeinheit gibt einen Piepton von sich.
D
as Wort „ARM“ auf dem LC-Display w erlischt.
Das Alarm- und Notfall- Wählgerät ist nun unscharf.
Hinweis: Während die Alarmeinheit eine Telefonnummer
wählt, also die Telefonverbindung aufbaut, kann das
Alarm- und Notfall- Wählgerät nicht an der Tastatur unscharf
geschaltet werden. Mit der Fernbedienung kann das Gerät
jederzeit unscharf geschaltet werden
Wenn der Angerufene den Anruf entgegennimmt, vernimmt
er so lange einen Alarmton (auch wenn die Sirene aus46
DE/AT
Panikalarm ein-/ausschalten:
D
rücken Sie die Taste „PANIC“ u auf der Alarmeinheit
oder auf die Taste „PANIC“ : der Fernbedienung.
W
ird der Alarm ausgelöst, erscheint auf dem
LC-Display w unten blinkend „TRIGGER“.
D
ie Sirene p ertönt 30 Sek. lang (wenn die Sirene
eingeschaltet ist – siehe Kapitel „Sirene ein-/ausschalten“) und die programmierten Telefonnummern
werden angerufen (wenn die automatische Wählfunktion eingeschaltet ist – siehe Kapitel „Automatische Wählfunktion ein- / ausschalten).
N
ach 30 Sek. Ruhe ertönt die Sirene ein zweites
Mal für 30 Sek.
U
m den Alarm und den Anruf zu stoppen, geben Sie
an der Alarmeinheit das aktuelle Passwort ein und
drücken die Taste OK y oder drücken Sie auf der
d.
Fernbedienung die Taste
Das blinkende Wort „TRIGGER“ erlischt.
D
ie Alarmeinheit gibt einen Piepton von sich und
der Alarm ist nun ausgeschaltet.
Hinweis: Während die Alarmeinheit eine Telefonnummer
wählt, also die Telefonverbindung aufbaut, kann der Panikalarm nicht an der Tastatur unscharf geschaltet werden. Mit der Fernbedienung kann das Gerät jederzeit unscharf geschaltet werden
Gongfunktion ein-/ausschalten:
Stellen Sie den Gong Ein- /Aus-Schalter ] auf Stellung „I“.
Der Gongton ertönt ein Mal.
Nach ca. 50 Sek. Verzögerung ertönt ein Piepton.
Jetzt ist die Gongfunktion aktiv.
Erkennt der Bewegungsmelder { eine Bewegung,
q ein Mal auf und der
leuchtet die LED
Gongton ertönt 2 x.
Um die Gongfunktion wieder auszuschalten, stellen Sie
den Gong Ein-/Aus-Schalter ] auf Stellung „0“.
Hinweis: Im scharfgeschalteten Zustand ist die Gongfunktion nicht aktiv.
Inbetriebnahme
Übersicht der letzten 5 Alarmereignisse:
Sie befinden sich weder in einem Eingabe-Modus noch
ist das Alarm- und Notfall- Wählgerät scharfgeschaltet.
i.
Drücken Sie wiederholt die Taste
Nacheinander werden die Zeitpunkte der letzten
5 Alarmereignisse angezeigt.
Warten Sie ca. 10 Sek., und der Anzeige-Modus
schaltet sich automatisch wieder aus.
Übersicht der eingespeicherten Telefonnummern:
Sie befinden sich weder in einem Eingabe-Modus noch ist
das Alarm- und Notfall- Wählgerät scharfgeschaltet.
o.
Drücken Sie wiederholt die Taste
Nacheinander werden die eingespeicherten Telefonnummern angezeigt.
Nicht belegte Speicherplätze werden durch
“- - - - - - - - - - - - - -“ angezeigt
Warten Sie ca. 10 Sek., und der Anzeige-Modus
schaltet sich automatisch wieder aus.
Übersicht der Töne
Ton
Drei Pieptöne
Sirenenalarm
Bedeutung
Die Ausgangsverzögerung ist
aktiv, die Scharfschaltung des
Alarm- und Notfall- Wählgeräts
ist erst nach ca. 55 Sek. Ausgangsverzögerung aktiv.
Die Sirene ertönt
1. ausgelöst durch
Bewegungserkennung –
nach der eingestellten Eingangsverzögerung im Takt:
30 Sek. an – 30 Sek. Pause –
30 Sek. an.
Ton
Bedeutung
2. ausgelöst durch
Drücken der Taste „PANIC“ u
bzw. : als Panikalarm.
Einfacher
Gongton
Gongschalter wurde auf Stellung
„I“ gestellt, Gongfunktion ist noch
nicht aktiv.
Zwei Gongtöne
Bewegung wurde
erkannt, Gongfunktion ist aktiv.
Batterien wechseln
Alarmeinheit
q alle drei Sek. ein Mal aufleuchtet
Wenn die LED
(ab ca. 7,7V +- 0,5V), dann erneuern Sie die 9V BlockBatterie. Ersetzen Sie die Batterie, wie in Kapitel „Stromversorgung“ unter „Alarmeinheit - 9V Blockbatterie“
beschrieben steht.
Im scharfgeschalteten Zustand wird die Alarmeinheit
noch ca. 24 Stunden mit Strom durch die Batterie versorgt,
q begonnen hat aufzuleuchten.
nachdem die LED
Fernbedienung
Leuchtet die Kontroll-LED a bei Bedienung der Tasten auf
der Fernbedienung schwach und / oder wird die Funkreichweite geringer, so ist ein Batteriewechsel erforderlich
(Batterie 12V, alkalisch (Typ CN 23 A oder L1028)).
S chieben Sie den Batteriefachdeckel f mit leichtem
Druck nach unten (s. Abb. M).
E rsetzen Sie die Batterie durch eine neue. Setzen
Sie die neue Batterie polrichtig ein (s. Beschriftung
im Batteriefach).
S chieben Sie den Batteriefachdeckel wieder auf das
Gehäuse.
Prüfen Sie die Funktion der Fernbedienung.
Optionale Anschlüsse
Damit Sie optionale externe Geräte anschließen können,
müssen Sie die dafür notwendigen Anschlussklemmen an
der Alarmeinheit freilegen:
Entfernen Sie mit einem Kreuzschlitz-Schraubendreher
die Schraube S des Anschlussfachdeckels (s. Abb. E).
S chieben Sie den Schraubendreher in die Aussparung G und heben Sie dann den Anschlussfachdeckel erst hoch und dann ab.
Jetzt können Sie die gewünschten Anschlüsse an
den Anschlussklemmen F (siehe „Beschreibung
der Anschlüsse“) vornehmen. Verwenden Sie Kabel
mit einem Adernquerschnitt von
0,2 – 0,3 mm, z.B. Telefonkabel.
Führen Sie alle angeschlossenen Kabel durch die
Aussparung G aus der Alarmeinheit.
Setzen Sie den Anschlussfachdeckel A wieder auf.
Drehen Sie die Schraube S des Anschlussfachdeckels wieder fest ein.
Beschreibung der Anschlüsse (s. Abb. N)
INPUT :
bei Unterbrechung der Verbindung zu wird
ein Gongton (bei eingeschalteter Gongfunktion)
oder ein Alarm (im scharfgeschaltetem Zustand)
ausgelöst, jedoch erst ab dem Ende der Ausgangsverzögerung; Ist am Ende der Ausgangsverzögerung diese Klemme nicht mit
verbunden, wird kein Alarm ausgelöst.
:
0V (Masse)
(max. 150 mA) bei AlarmausSIREN *: 12V
lösung (unabhängig davon, ob die interne Sirene ein- oder ausgeschaltet ist).
NA:
keine Funktion.
Sirene *:
Sie können eine externe Sirene (nicht im Lieferumfang
enthalten) mit 9 oder 12V DC, max. 150 mA mit den
Klemmen und SIREN verbinden.
DE/AT
47
Inbetriebnahme / Fehler beheben
Reedkontakt:
nungsmelder (NC), nicht im Lieferumfang enthalten) als
Tür- oder Fensteröffnungsmelder mit den Klemmen INPUT
und verbinden. Bis zu 6 Reedkontakte können in Reihe
angeschlossen werden.
Andere Kontakte:
Potentialfreie Kontakte von anderen Meldern oder
Anlagen können zur Auslösung von Alarm /Wählen angeschlossen werden.
verbunden werden (bei mehr als einem Kontakt: in Reihe
verbinden).
* Bei Ausfall der Stromversorgung über das Netzgerät
steht kein Potential bei der Klemme SIREN.
Die Klemme INPUT ist bei Betrieb über die Notstrombatterie weiterhin aktiv.
Fehler beheben
Fehler
Bewegungsmelder meldet
Bewegung ohne
erkennbaren
Grund.
Ursache
Behebung
Haustiere, LuftÄndern Sie die
bewegungen,
Platzierung
direktes Licht, etc. des Bewegungsmelders.
Verwenden Sie
einen
Maskierungsaufkleber, um
einen bestimmten Bereich von der
Erfassung auszuschließen.
48
DE/AT
Fehler
Ursache
Behebung
Die Reichweite
des Bewegungsmelders ist zu
gering.
Umgebungstemperatur ist zu
hoch (20 °C sind
optimal).
Ändern Sie die
Platzierung
des
Bewegungsmelders.
Gerät ist zu
niedrig oder zu
hoch montiert.
Ändern Sie die
Montagehöhe
bzw. die Neigung des Bewegungsmelders.
Die LED
Es ist keine Notblinkt regelmäßig. strombatterie
angeschlossen
oder die angeschlossene
Notstrombatterie
wird schwach.
Schließen Sie
eine neue
Notstrombatterie an.
Die Telefonnummer wurde nicht
oder falsch eingegeben.
Geben Sie die
Telefonnummer neu ein.
Wählfunktion ist
ausgeschaltet
( ist auf dem
LC-Display zu
sehen).
Stellen Sie die
Wählfunktion
ein ( ist
nicht auf dem
LC-Display zu
sehen).
Der Angerufene
erhält bei Alarm
keinen Anruf.
Fehler
Das Gerät
reagiert nicht
auf das Passwort.
Ursache
Behebung
Telefonleitung ist
fehlerhaft.
Prüfen Sie die
Funktion der
Telefonleitung
mit einem analogen Telefon.
Sie haben
nach der Passworteingabe
noch keinen Befehl gegeben.
Drücken Sie
zum Scharf-/
Unscharfschalten die Taste
OK y.
Drücken Sie
die Taste PROG
r, um in den
EinstellungsModus zu gelangen.
Das eingegebene Passwort
ist falsch.
Geben Sie das
richtige Passwort ein.
Wenn Sie das
Passwort vergessen haben,
setzen Sie das
Gerät auf die
Werkseinstellung zurück,
wie in Kapitel
„Passwort
ändern“
beschrieben.