1
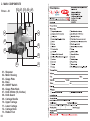
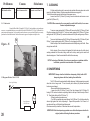
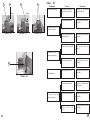
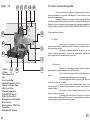
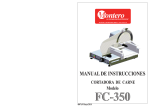
INSTRUCTION MANUAL /
MANUAL DE INSTRUCCIONES
CAUTION!
HAZARDOUS MOVING PARTS
Disconnect Power Before
Cleaning or Servicing
Meat Slicer / Cortadora de Carne
WAREHOUSE
71 Bloomfield Ave
Newark, NJ 07104
Phone: 973 482 5070
Fax: 973 482 0725
Cell: 973 985 8239
Fax: 305 866 2704
TOLL FREE
800 445 6601
www.skyfood.us
[email protected]
OFFICE
12550 Biscayne Blvd.
Suite 800-3
North Miami, FL 33181
Phone: 305 868 1603
Fax: 305 866 2704
UG 0059
SUMMARY / INDICE
1. ENGLISH
01
2. ESPAÑOL
08
SUMMARY
1. Main Precautions
01
2. Main Components
02
3. Technical Data
03
4. Installation
03
5. Pre Operation
03
6. Operation
03
7. Sharpening
05
8. Cleaning
05
9. General Advices
07
10. Electric Diagram
07
11. Lubrication
07
NOTICE TO OWNERS AND OPERATORS
The FC-350 meat slicer is designed to slice food products safely and
efficiently. Unless the operator is properly trained and supervised, however, there is
the possibility of a serious injury. It is the responsability of the owner to assure that
this machine is used properly and safely, strictly following the instructions contained
in this Manual and any requirements of local law.
1. MAIN PRECAUTIONS
When incorrectly used the Meat Slicer model FC-350 can be a potentially dangerous
machine. Maintenance, cleaning or any other service has to be done by trained
people.
ALWAYS turn off, unplug from power source BEFORE cleaning or servicing.
NEVER use tools not belonging to the machine to help operation.
NEVER touch knife edge, it could cause serious irreparable damages. Keep hands away
from exposed knife.
DO NOT catch slices with your hands, let slices drop down on receiving tray.
DO NOT wear loose clothes mainly no loose sleeves during operation.
NEVER connect power source with wet hands nor wet clothes.
NEVER spray water or other liquid substances directly at motor, power switch or any other
electrical components.
ALWAYS install equipment in working area with adequate light and space away from
children and visitors.
NEVER operate without all warning labels attached and owner/operator manual available to
operator.
NEVER leave unattended while operating.
ALWAYS ground machine properly.
BEFORE turning machine ON check if all its removable parts are properly fitted into their
right positions, and isolate machine from power supply before assembling parts.
NEVER operate without knife guard.
KEEP hands off the knife during operation.
01
2. MAIN COMPONENTS
Picture - 01
03
01
07
02
08
09
10
05
11
04
12
06
01 - Shapener
02 - Motor Housing
03 - Gauge Plate
04 - Base
05 - ON/OFF Switch
06 - Gauge Plate Knob
07 - Knife 350mm (13,8 inches)
08 - Knife Guard
09 - Carriage Handle
10 - Upper Carriage
11 - Lower Carriage
12 - Carriage Knob
13 - Rubber Feet
02
13
All returned goods are subject to a 20% handling/restocking fee. All returns must be returned in their original
packaging and within thirty (30) days from the shipping date.
SKYFOOD reserves the right to change the design and specifications of its equipment or any related
documentation at any time. The end user is not entitled to upgrades nor refunds resulting from these
changes.
Updates
These Terms and Conditions were last updated on February 02nd, 2010.
3. TECHNICAL DATA
Table - 01
Technical Data
Units
FC-350
Voltage
[V]
[Hz]
[Hp]
[kW/h]
[mm]
[mm]
[mm]
[kg]
[mm]
[mm]
[rpm]
110/220 (*)
50 / 60 (*)
Frequency
Horse Power
Consumption
Height
Width
SKYFOOD'S LIMITED WARRANTY
All new products FLEETWOOD BY SKYMSEN, sold by SKYFOOD EQUIPMENT, LLC. (“SKYFOOD”), for
use only in the continental Unites States (collectively, “Products” or singularly, “Product”), are warranted to
be free from defects in materials and workmanship for a period of one (1) year from the date of purchase by
the original purchaser/user (“End User”). No warranty is given or implied to a subsequent transferee or any
other third party. This warranty is expressly conditional upon SKYFOOD being notified of any defects in
materials or workmanship within five (5) days of its occurrence, within the warranted time period. If a notice
of a claim under this warranty is timely made by the End User, SKYFOOD or a designated service company
(“Service Company”), will repair the Product or replace the part which is defective, subject to the additional
conditions hereinafter described.
This warranty shall not apply if damage occurs from improper installation, wrong voltage, nor to the extent
that Products or parts have been used other than in conformance with operating and maintenance
instructions, subjected to misuse or abuse or damaged by accident, acts of God, abnormal use or stress or
any other matter unrelated to SKYFOOD, and beyond its reasonable control. In addition, this warranty does
not cover normal wear and tear of certain items, such as, but not limited to, blades, stones, chopper cutting
knives, plates, slicing knives, cutting disc, gaskets, oil changes, sealing tape, heat seal wires, worm gears,
and other parts expendable by nature and that need to be replaced frequently. THIS WARRANTY
EXCLUDES ALL ORAL, STATUTORY, EXPRESS OR IMPLIED WARRANTIES WHICH MAY BE
APPLICABLE TO SKYFOOD, INCLUDING, BUT NOT LIMITED TO, ANY IMPLIED WARRANTY OF
MERCHANTABILITY AND FITNESS FOR PARTICULAR PURPOSE. Under no circumstances shall
SKYFOOD be liable for loss of use, revenue or profit or for incidental or consequential damages. The sole
and exclusive remedy for breach of any warranty is limited to the remedies provided in the
paragraph above.
Products weighing less than seventy (70) lbs. must be taken or shipped, shipping charges prepaid, either to
SKYFOOD's facility or a SKYFOOD's designated service company (“Service Company”). SKYFOOD offers
a limited on-site warranty only for Products whose weight exceeds seventy (70) lbs., provided they
are installed in a location that is within a thirty (30) mile radius of a Service Company. In this case,
warranty services will be provided during regular business hours.
This warranty shall not take effect unless and until a properly completed and executed WARRANTY
REGISTRATION form has been received by SKYFOOD EQUIPMENT, LLC, within thirty (30) days from the
date of purchase. The WARRANTY REGISTRATION is available either in the Instruction Manual of every
Product or at SKYFOOD's website www.skyfood.us. The End User must fulfill the WARRANTY
REGISTRATION form and send it to SKYFOOD according to the instructions posted on the referred
website. Failure to do so will void the warranty.
Lenght
Net Weight /Shipping Weight
Maximum Thickness
Knife Diameter
Knife Rotation
SEE NAMEPLATE
0,38
525
750
760
45/49
40
350
580
(*) All machines are wired
for the voltage and
frequency as ordered.
4. INSTALLATION
The meat slicer FC-350 must be installed on a level, non-skid work surface with a maximum
recommended height of 85 cm.
Check the voltage of the machine. The unit voltage must be the same as the power source
voltage.
Use qualified electrician to install according to building codes.
Contact your local distributor if you have any questions or problems with the installation or
operation of this machine.
This equipment is provided with a two or three pin electric cable. All pins must be connected
before the machine is turned on.
5. PRE OPERATION
Check if machine is firm, no movement shall be allowed on the working surface.
Remove and wash all food-contact parts with hot water and neutral soap. To remove the
parts follow the same instructions as CLEANING.
Gauge plate is adjusted by means of knob. The only electrically-operated component of this
machine is the knife. The machine is designed for continuos duty. The carriage is moved
back and forth manually.
IMPORTANT: Make sure all removable parts are fitted properly before operation.
6. OPERATION
CAUTION: Do not use your hands to push products towards the knife, but
carefully follow the procedure described hereafter.
Pull the carriage rearward to the loading position. Place boneless meat onto upper carriage
No.10 (Picture-01) and press it against gauge plate No.03 (Picture-01) with the carriage
handle No. 09 (Picture-01). Use gauge plate knob No.06 (Picture-01) to obtain desired
thickness.
03
Start machine by pressing red push-button switch No.05 (Picture-01) located on the
left side of the machine. Holding firmly the carriage handle No.09 (Picture-01) move the
upper carriage forward and backwards. Repeat this movement as many times as
necessary.
02
SKYFOOD EQUIPMENT LLC - SERVICE
Parts and services are available from the address indicated herein. Parts can be combined with finished goods
order or by itself.
SKYFOOD EQUIPMENT LLC – Warehouse
71 BLOOMFIELD AVE - NEWARK, NJ 07104 - USA - Phone: 973 482 5070 - Fax: 973 482 0725 - TOLL FREE
800 445 6601
01
TERMS AND CONDITIONS OF SALE
Terms of Sale
03
Picture - 02
Picture - 03
Details AA
Details AA
01
02
Purchase of any products sold by SKYFOOD shall be subject to and expressly limited by the terms and conditions
contained herein. No changes to, waiver of, or addition to any of these terms and conditions shall be effective
unless agreed to in writing and signed by SKYFOOD. Buyer acknowledges and agrees that these terms and
conditions supersede the terms and conditions of any purchase order or other documentation used by Buyer and,
except for delivery and billing addresses, and quantities prices and items ordered, any conflicting or additional
terms are void and have no effect, but that Buyer may place orders by use of purchase orders and other
documentation for its convenience purposes only. Notwithstanding the foregoing, SKYFOOD reserves the right at
any time to amend these terms and conditions, and Buyer shall be deemed to accept such amended terms and
conditions by ordering products herein offered after the date of such amendment. Additional special terms and
conditions of SKYFOOD may be applicable with respect to certain products.
Orders Acceptance
All orders from Buyers, whether solicited and written by either a SKYFOOD EQUIPMENT, LLC (“SKYFOOD”)
Sales Representative, distributor or dealer, are deemed offerings to purchase until accepted by SKYFOOD.
SKYFOOD reserves the right to accept orders in full or in part. Acceptance may be either by written confirmation or
shipment of the order, in full or in part.
Picture - 04
Picture - 05
03
04
Shipping
TERMS – All prices are FCA (Free Carrier) shipping point. Unless express instructions in writing are received from
the Buyer, SKYFOOD has complete freedom in choosing the means, route and procedure to be followed in the
handling, transportation and delivery of the goods. SKYFOOD will advance the shipping costs on behalf of the
Buyer and charge it accordingly. SKYFOOD shall under no circumstances be liable for any loss, damage,
expense or delay to the goods for any reason whatsoever when said goods are in the custody, possession or
control of third parties selected by SKYFOOD to forward, enter, clear, transport, or render other services with
respect to such goods. Please, inspect your unit upon arrival at the destination and report any transit damage to
SKYFOOD and to the shipping company, in order to initiate a claim with the latter. Claims must be reported to the
transportation company within fifteen (15) days as of the date of the invoice.
Free Shipping
Orders of $4,000.00 or more, with a minimum of 2 pieces (mixed or match), shipped to the same address in the
continental United States will have free shipping.
Picture - 06
Picture - 07
Interest
Past due balances are subject to a interest charge of 1.5% per month or the highest rate permitted by law,
whichever is lower, until paid.
01
02
Picture - 08
04
Tax Information
Any tax, duty, custom or other fee of any nature imposed upon the products, their sale, transportation, delivery, use
or consumption shall be paid by Buyer in addition to the price quoted or invoiced. If SKYFOOD is required to prepay
any such tax or fee, Buyer will reimburse SKYFOOD. Buyer must provide SKYFOOD with a resale/exemption
certificate in order to avoid the withholding of applicable taxes.
Picture - 09
Return Policy
All returns are subject to the prior authorization of SKYFOOD, in its discretion. Buyer must contact Buyer Support
at (305) 868-1603, or by fax at (305) 866-2704, or via e-mail at [email protected] in order to request a
Return Authorization number (“RA”) providing, along with the identification of the goods, a specific reason for
return. Buyer Support will either authorize or deny the request for return. Only NEW and UNUSED items are
acceptable for return. Unauthorized returns will be destroyed and no credit issued. All authorized returned goods
must be shipped freight prepaid to SKYFOOD.
Problemas
Causas
Mesa movible con
dificultad de deslizar .
Falta lubricación en la
Guía de la mesa movible
Soluciones
Lubricar la guía de
acuerdo con el ítem 5.1.2
7. CLEANING
All food-contact parts must be removed and washed with warm water and neutral
soap, to do that do as follows: (All pictures mentioned below are on page 04)
Turn off slicer and disconnect electrical cord from power source.
Loosen knob No.01 (Picture-02) turning it counter-clockwise and remove cover
guard No.02 (Picture-03).
CAUTION: When removing the cover guard be careful with the knife, it can cause
serious irreparable damages.
5.1.2 Lubricación
Cuando la Mesa Móvil Completa N°11 (Fig.01) esté trabando o esté pesada para
moverse, se recomienda lubricar con vaselina la Guia de la Mesa Móvil N°01 (Fig.15) ubicado en la
parte interna de la maquina. Con la ayuda de una brocha suave, pasar vaselina (liquida o en crema),
para hacer la referida lubricación. Nunca utilizar aceite, engrase o cualquier otro tipo de óleo.
01
Figura - 15
To remove upper carriage No.02 (Picture-05) loosen knob No.01 (Picture -04) and
lift up the carriage as per Picture-05. To remove lower carriage No.04 (Picture-07) loosen
carriage knob No.03 (Picture-06) counter-clockwise and lift up the carriage as per Picture07.
To remove knife sharpener No.02 (Picture-09) loosen knob No.01 (Picture-08) and
lift it up. To remove plate scraper No.01 (Picture-13 on next page) just lift it up.
Wash the body of the slicer with warm water and mild soap using a soft cloth. Rinse
using a clean soft cloth.
Knife cleaning: Press a damp cloth against the knife and wipe the knife slowly
working outwards from the center, being careful not to let any water go into center hole
where bearings are. Clean the rear side of the knife in the same way.
NOTE: Contact your Distributor if you have any questions or problems with the
installation, operation or maintenance of this machine.
8. SHARPENING
IMPORTANT: Always clean the knife before sharpening. A dirty knife will fill
sharpening stones with food, making them ineffective.
5.2 Diagrama Eléctrico Mod. FC-350
Llave Liga/Desliga
Llave Selectora
110/220 Volts
20
The FC-350 model is equipped with a knife sharpener. Knife sharpening is required
when the cut is no longer neat. To use it correctly do as follows: (All pictures mentioned
below are on next page)
- Disconnect machine from power source.
- Loosen knob No.03 (Picture-11) and lift up the sharpener No.02 (Picture-10)
turning it 180º counter clockwise and placing it back on the top of the knife as per Picture10. Then, tighten the knob No.03 (Picture-11).
- Connect machine to power source.
- Turn ON the machine and press buttoms No.04 (Picture-12) of which pushes the
stones right against the knife, sharpening it. Repeat this operation 3 to 5 times for 3
seconds each time, until the knife is well sharpened.
if the stones are dirty, clean them. If the stones become dull, replace them.
IMPORTANT: After the sharpening operation move the knife sharpener back to its
original position following the above procedure.
05
01
02
03
04
Tabla - 02
Problemas
Olor a quemado o humo
Before
After
Causas
Soluciones
Problema con el motor o
otros circuitos eléctricos.
Llame el asistente
técnico autorizado
Correas con mala tensión
Llame el asistente técnico
autorizado
Falla del condensador de
partida del motor
Llame el asistente técnico
autorizado
Disco sin corte , o aplastado
Afile el disco, ítem 3.8
(Pag.07)
Correas con mala tensión
Llame el asistente técnico
autorizado
Rodamientos con fallas
Llame el asistente técnico
autorizado
Falta de energía eléctrica
Verifique si el enchufe está
en su soquete
Correas con mala tensión
Llame el asistente técnico
autorizado
Algún contacto malo en la llave
eléctrica o en otras
partes
eléctricas .
Llame el asistente técnico
autorizado
La maquina liga pero el a
disco demora a girar
Picture - 10
Picture - 11
Picture - 12
Dificultad de corte y/o
producto desmigajado
01
Ruidos anormales
Picture - 13
El Disco de corte para
durante la operación
06
19
4.5
Después de Terminar el Trabajo
4.5.1
Cuidados
Siempre limpie la maquina para tanto , deslíguela físicamente del
soquete .
Nunca limpie la maquina antes de su PARADA COMPLETA.
Recoloque todos los componentes de la maquina en sus lugares ,
antes de ligarla otra vez.
Al verificar la tensión delas correas, NO coloque los dedos entre las
correas y las poleas.
4.6
Manutención
4.6.1
Peligros
9. GENERAL ADVICES
ALWAYS turn machine off before cleaning and maintenance.
PROVIDE enough space around machine to avoid breakings.
ALWAYS keep the floor dry. Wet floors may cause slippings.
ALWAYS turn machine off in case of power supply lack.
NEVER let dust or water to get into electrical and mechanical components of
the machine.
DO NOT modify original features of the machine.
DO NOT take out nor tear off any safety or identification label.
10. DIAGRAM ELECTRIC
ON/OFF Switch
Con la maquina ligada cualquier operación de manutención es
peligrosa . DESLÍGUELA FÍSICAMENTE DE LA RED ELÉCTRICA , DURANTE TODA
LA OPERACIÓN DE MANUTENCIÓN .
4.6.2
Avisos
La manutención eléctrica o mecánica debe ser hecha por una
persona calificada para hacer el trabajo .
La persona encargada por la manutención debe certificarse que la
maquina trabaje bajo condiciones TOTALES DE SEGURIDAD .
5. Análisis y Solución de Problemas
5.1
Problemas , Causas y Soluciones
11. Lubrification
In case of the Complete Movable Table Nº 09 (Pic.01) is jammed or hard to be moved, it is
recommended the lubrification of the Movable Table Guide Nº 01 (Pic.10) located on the inside part
of the machine.
We suggest to use a tube or brush with silicon (liquid or paste) in order to facilitate the
lubrification. Please avoid the usage of any kind of oil.
Before the lubrification, it is important to remove any kind of residue that may exist on the
Movable Table Guide.
01
La Cortadora de Carne , fue diseñada para que necesite un mínimo de
manutención . Sin embargo pueden ocurrir algunas irregularidades en su funcionamiento , debido al
desgaste natural causado por su uso .
Caso haya algún problema con su maquina , verifique la Tabla 02 abajo ,
donde están indicadas algunas soluciones recomendadas .
Picture - 14
18
07
4.2.3
SUMÁRIO
1. Introducción
1.1Seguridad
1.2Componentes Principales
1.3Características Técnicas
09
09
09
11
2. Instalación y Pré-operación
2.1 Instalación
2.2 Pré-Operación
11
11
11
3. Operación
3.1 Accionamiento
3.2 Procedimiento para el Uso
3.3 Limpieza
3.4 Removiendo la Protección del Disco
3.5
Removiendo la Mesa Movible Superior y Inferior
3.6 Removiendo el Afilador
3.7 Retirando el Rascador de la Chapa
3.8 Como Afilar el Disco
12
12
12
12
12
13
13
14
14
4.
4.1
4.2
4.3
4.4
4.5
4.6
15
15
16
17
17
18
18
Cuidados
El cable de alimentación de energía eléctrica de la maquina , debe
tener una sección suficiente para soportar la potencia eléctrica consumida .
Cables eléctricos que estuvieran en el suelo cerca de la maquina ,
deben ser protegidos para evitar corto circuitos .
4.3Inspección de Rutina
4.3.1
Al averiguar la tensión de las correas , NO coloque los dedos entre las
correas y las poleas .
4.3.2
5. Análisis y Solución de Problemas
5.1 Problemas, Causas y Soluciones
5.2 Diagrama Eléctrico Mod. FC-350
08
18
18
19
Cuidados
Verifique los motores y las partes deslizantes o girantes de la
maquina , con relación a ruidos anormales .
Verifique la tensión de las correas , y sustituya el conjunto , caso
alguna correa o polea tenga desgaste . Al verificar la tensión de las correas , NO coloque los
dedos entre la s correas y poleas.
Verifique las protecciones y los dispositivos de seguridad para que
siempre funcionen adecuadamente .
4.4
Nociones Generales de Seguridad
Practicas Básicas de Operación
Cuidados y Observaciones Antes de Ligar la Maquina
Inspección de Rutina
Operación
Después de Terminar el Trabajo
Manutención
Aviso
Operación
4.4.1
Avisos
Não trabalhe com cabelos compridos, que possam tocar qualquer
parte da máquina, pois os mesmos poderão causar sérios acidentes. Amarre-os para cima e
para trás, ou cubra-os com um lenço.
Somente usuários treinados e qualificados podem operar a máquina.
Nunca toque com as mãos ou de qualquer outra maneira, partes
girantes da máquina.
JAMAIS opere a máquina, sem algum(ns) de seu(s) acessório(s) de
segurança.
17
1. Introducción
4.1.3 Avisos
En el caso de falta de energía eléctrica , desligue inmediatamente la
1.1 Seguridad
llave liga/desliga.
Use solamente óleos lubrificantes o grasas recomendadas o
equivalentes .
Evite choques mecánicos , ellos pueden causar fallas o malo
funcionamiento .
Evite que agua , suciedad o polvo entren en los componentes
mecánicos y eléctricos de la maquina .
NO ALTERE las características originales de la maquina .
NO SUCIE , RASGUE O RETIRE CUALQUIER ETIQUETA DE
SEGURIDAD O DE IDENTIFICACIÓN . Caso alguna esté ilegible o perdida, solicite otra al
Asistente Técnico mas cercano .
LEA ATENTAMENTE Y CON CUIDADO LAS ETIQUETAS DE
SEGURIDAD Y DE IDENTIFICACIÓN CONTENIDAS EN LA MAQUINA , ASÍ COMO
LAS INSTRUCCIONES Y LAS TABLAS TÉCNICAS CONTENIDAS EN ESTE MANUAL .
Cuando usada incorrectamente , la Cortadora de Carne Mod. CF-350 es una
maquina potencialmente PELIGROSA . La manutención , la limpieza o otra cualquier actividad de
servicio , solamente deben ser hechas por personas debidamente entrenadas , y con la maquina
desconectada de la red eléctrica .
Las instrucciones abajo deberán ser seguidas para evitar accidentes :
1.1.1
Desconecte la maquina de la red eléctrica cuando sea deseado retirar
cualquier parte removible , para hacer la limpieza , la manutención o otro cualquier servicio.
1.1.2
auxiliar en su operación .
Nunca usar instrumentos fuera a los que acompañan la maquina para
1.1.3
Antes de ligar la maquina , verifique si las partes removibles están fijas en
1.1.4
Nunca use chorros de agua directamente sobre la maquina .
sus posiciones .
4.2 Cuidados y Observaciones Antes de Ligar la Maquina .
IMPORTANTE:
Lea con atención y cuidado las INSTRUCCIONES contenidas en este Manual, antes
de ligar la maquina . Certifiquese que entendió correctamente todas las informaciones . En
caso de duda , consulte su superior o el Revendedor .
4.2.1 Peligro
Cables o hilos eléctricos con aislamiento dañado , pueden provocar
choques eléctricos . Antes de usarlos verifique sus condiciones .
1.1.5
durante la operación .
Nunca use ropas con mangas anchas , principalmente en los puños ,
1.1.6
Nunca trabaje sin el Protector del Disco No. 08 (Fig. 01 ) y tampoco lo
retire con la maquina conectada a la red eléctrica .
1.1.7
Mantenga las manos lejos de las partes movibles.
1.1.8
Nunca ligue la maquina con las manos , los zapatos o ropas mojadas .
1.1.9
Cuando se haga la instalación de la maquina no sea olvidado de hacer la
conexión de tierra .Una buena conexión a la tierra es importante para la seguridad suya y del equipo .
4.2.2 Avisos
Esté seguro que las INSTRUCCIONES contenidas en este Manual,
estén completamente entendidas . Cada función o procedimiento de operación y de
manutención debe estar perfectamente claro .
El accionamiento de un comando manual ( botón, llave eléctrica,
palanca, etc. ) debe ser hecho siempre después que se tenga la certitud de que es el comando
correcto .
1.2 Componentes Principales
Todos los componentes que incorporan la maquina son construidos con materiales
cuidadosamente seleccionados para su función , dentro de los padrones de prueba y de la experiencia
de SIEMSEN. Por ejemplo : Aluminio Anodizado y Acero Inoxidable Pulido .
16
09
Figura - 01
4. Nociones Generales de Seguridad
03 01 07 08 09
Las Nociones Generales de Seguridad fueran preparadas para orientar y
instruir adecuadamente a los operadores de las maquinas , así como aquellos que serán
responsables por su manutención .
La maquina solamente debe ser entregue al operador en buenas condiciones
de uso , al que el operador debe ser orientado cuanto al uso y a la seguridad de la maquina por el
Revendedor . El operador solamente debe usar la maquina con el conocimiento completo de los
cuidados que deben ser tomados , después de LER ATENTAMENTE TODO ESTE MANUAL .
02
10
4.1 Practicas Básicas de Operación
4.1.1 Peligros
05
11
04
Algunas partes del accionamiento eléctrico presentan pontos o
terminales con altos voltajes . Cuando tocados pueden ocasionar graves choques eléctricos , o
hasta la muerte de una persona .
Nunca toque un comando manual ( botón , llave eléctrica , etc. ) con
las manos , zapatos o ropas mojadas . No obedecer esta recomendación , también podrá
provocar choques eléctricos , o hasta la muerte de una persona .
12
4.1.2 Advertencias
14
06
1.Afilador
2.Gabinete
3.Mesa Guía de Corte
4.Base
5.Llave Liga/Desliga
6.Manipula Reguladora de Corte
7.Disco de Corte con 350 mm
8.Protector del Disco
9.Manipula Empujadora
10.Mesa Movible Superior
11.Mesa Movible Inferior
12.Manipula de la Mesa Movible
13.Pies de Goma
14.Llave Selectora 110/220 Volts
15.Prendedor
16.Manipula del Prendedor
10
13
El local de la llave liga/desliga debe ser bien conocido , para que sea
posible accionarla a cualquier momento sin la necesidad de procurarla .
Antes de cualquier manutención desconecte la maquina de la red
eléctrica .
Proporcione espacio suficiente para evitar caídas peligrosas .
Agua o aceite podrán hacer resbaloso y peligroso el piso . Para evitar
accidentes el piso debe estar seco y limpio .
Antes de accionar cualquier comando manual ( botones , llaves
eléctricas , palancas , etc. ) verifique siempre si el comando es el correcto , o en caso de dudas ,
consulte este Manual .
Nunca toque ni accione un comando manual ( botones , llaves
eléctricas , palancas etc. ) por acaso .
Si un trabajo debe ser hecho por dos o más personas , señales de
coordinación deben ser dados antes de cada operación . La operación siguiente no debe ser
comenzada sin que la respectiva señal sea dada y respondida .
15
1.3 Características Técnicas
3.7 Retirando el Rascador de la Chapa
Tabla - 01
Para retirar el Rascador No.01 (Fig.14) tirelo para arriba . Para colocarlo de
vuelta encájelo y empujelo para abajo .
Características
Voltaje (**)
Frecuencia (* )
Potencia
Consumo
Altura
Ancho
Profundidad
Peso Neto/Bruto
Largura máxima de corte
Diámetro del Disco
Figura - 14
01
Unidad
[V]
[Hz]
[CV]
[kW/h]
[mm]
[mm]
[mm]
[kg]
[mm]
[mm]
FC-350
110/220 (**)
50 ou 60 (*)
0,5
0,38
525
750
760
45/49
40
350
(*) La Frecuencia será única de acuerdo con el motor que equipa la maquina .
(**) Use la Llave selectora de Voltaje No. 14 ( Fig. 01 ) para cambiar el voltaje
de acuerdo con el de la red eléctrica .
3.8Como Afilar el Disco
La Cortadora de Carne Mod. FC-350 es equipada con su propio Afilador , de
operación fácil y eficaz . Para usarlo correctamente siga las instrucciones abajo:
* Desligue la maquina de la corriente eléctrica , con la llave Liga-Desliga .
* Afloje la Manipula No.03 (Fig.12) y retire el Afilador No.02 (Fig.11) y girelo
por 180 grados para encajarlo otra vez . Después apriete la Manipula No.03 (Fig.12) .
* Ligue la maquina , y con el disco en movimiento , haga presión
sobre la
Manipula No.04 (Fig.13) , hasta que la piedra de amolar entre en contacto con el Disco y lo afile .
Mantenga la presión por 2 a 3 segundos . Repita la operación de 3 a 5 veces . Caso el disco no esté
afilado repita toda la operación .
01
02
03
04
2 Instalación y Pré-operación
2.1 Instalación
La Cortadora de Carne , posee pies de goma antideslizantes , y debe ser instalada sobre una superficie
estable de aproximadamente 850 mm de altura ( Fig.02) .
Verifique el voltaje de la red eléctrica donde se conectará el enchufe , si es 110 o 220 V. En seguida
ajuste el voltaje de la maquina para que sea el mismo del de la red . Para eso, en la parte inferior de la
maquina está una Llave Selectora de Voltaje , pongala en el voltaje deseado , la llave esta en la parte
inferior de la maquina No. 14 (Fig.01).
El cable de alimentación posee dos clavijas redondas y un hilo de atierramiento - Hilo tierra . Es
obligatorio que los tres puntos estén debidamente conectados antes de poner en operación el equipo .
Figura - 02
Depois
850mm
Antes
Figura - 11
Figura - 12
Figura - 13
2.2 Pré-operación
IMPORTANTE
Após feita a afiação do Disco, retorne o Afiador a posição inicial.
14
Verifique si la Cortadora está firme en su posición . Antes del uso se debe lavar con
agua y jabón todas las partes removibles .
11
3 Operación
IMPORTANTE
Al se retirar el Protector del Disco No.02 (Fig.04) , tenga cuidado con el Disco de Corte
No.02 (Fig.03) , pues es afilado y puede cortar .
3.1 Accionamiento
Se apriete el botón verde Liga/Desliga No. 05 que se encuentra en la lateral
izquierda de la Base No.04 (Fig.01)
3.2 Procedimiento para el uso
Levante la Manipula Empujadora No.09 (Fig.01) hasta su posición final. Coloque
la carne (sin hueso) sobre la Mesa Movible Superior No.10 (Fig.01), en seguida baje la Manipula
Empujadora sobre ella . Utilice la Manipula Reguladora de Corte No.06 (Fig.01) para determinar el
espesor deseado de la tajada de carne . La Manipula Reguladora de Corte No.06 (Fig.01) tiene
graduación milimétrica ( mm ) .
3.5 Removiendo la Mesa Movible Superior y Inferior
Para retirar la Mesa Movible Superior No.02 (Fig.06) afloje la Manipula del
Prendedor No.01 (Fig.05) parcialmente y saque el conjunto entero levantándolo . Para retirar la Mesa
Movible Inferior No.04 (Fig.08) afloje la Manipula de la Mesa Movible No.03 (Fig.07) y saquela
verticalmente para arriba .
Detalle AA
Detalle AA
01
02
Ligue la maquina, agarre firmemente la Manipula Empujadora No.09
y mueva la Mesa Movible Superior No.10 (Fig.01) para adelante y
para atrás .
A cada movimiento para atrás de la Mesa Movible Superior No.10 ,
empuje la carne contra la Mesa Guía de Corte No.03 (Fig.01) y repita
la operación .
Figura - 05
IMPORTANTE
Certifiquese antes de usar la maquina , que la Mesa Movible Superior No.10 , y el
Protector del Disco No.08(Fig.01) estén bien fijos .
Figura - 06
03
04
3.3 Limpieza
IMPORTANTE
Nunca proceda a la limpieza con la maquina ligada a la red eléctrica , para hacer la
limpieza retire el enchufe de su soquete .
Todas las partes movibles deben ser removidas y limpias . Abajo describimos el
procedimiento para la remoción de estas partes .
3.4 Removiendo el Protector del Disco
Suelte la Manipula No.01 (Fig.03), girándola en el sentido anti-horario y retire el
Protector del Disco No.02 como en (Fig.04)
Figura - 07
3.6 Removiendo el Afilador
Afloje la Manipula No.01 (Fig. 09) . Retire el Afilador No. 02 (Fig.10) , tirandolo
para arriba
01
Figura - 04
Figura - 03
Figura - 08
02
02
01
03
Figura - 09
12
Figura - 10
13