1
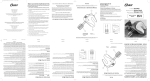
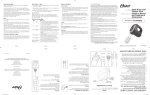
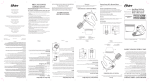
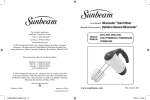
Instruction
Manual MANUAL
INSTRUCTION
Automatic Digital
Blood Pressure Monitor
04-525-001
Please read this instruction manual
completely before operating this unit.
English • Spanish
Limited One-Year Warranty
The warrantor guarantees that its Digital Blood Pressure Monitor will be free from
manufacturing defects under normal use for a period of one year from the date of purchase
subject to the following terms and conditions.
This warranty covers only normal use, and does not apply to use in any clinical or
commercial applications. This warranty does not cover batteries or other power sources that may
be provided with or used with the Digital Blood Pressure Monitor. This warranty is voided if the
Digital Blood Pressure Monitor product is misused or abused in any manner.
If the Digital Blood Pressure Monitor fails to operate during the time the original
purchaser owns it, return it postage prepaid along with $5.00 for return shipping and insurance to:
Repair Department, 1931 Norman Drive South, Waukegan, IL 60085. When returning a product,
please also include a letter with your name, address, phone number and brief description of
the specific problem. Please carefully package the product to avoid any damage that may
occur while in the transit. Packaging insurance with returned receipt is recommended.The
warrantor will repair or replace the defective unit at the option of the warrantor. Repair or replacement of the defective unit, at the warrantor’s option, is the sole remedy under this warranty.
ANY IMPLIED WARRANTIES WHICH THE PURCHASER MAY HAVE ARE LIMITED IN DURATION TO THE TIME THAT THE ORIGINAL CONSUMER PURCHASER OWNS THE PRODUCT.
Some states do not allow limitations or how long an implied warranty lasts, so the above limitation
may not apply to you.
This warranty constitutes the warrantor’s only responsibility and obligation to repair and/or replace
materials or components, or refund the purchase price. The warrantor will not be responsible
for any indirect, incidental, special, consequential, or punitive damages or other loss, including, but not limited to, damage to or loss of other property or equipment and personal injuries,
whether to purchaser or others. The warrantor shall in no event be liable to the purchaser for any
amount in excess of the cost of repair and/or replacement of the unit, or the purchase price of the
unit. Some states do not allow the exclusive or limitation of incidental or consequential damages,
so the above limitation or exclusion may not apply to you.
This warranty gives you specific legal rights, and you may also have other rights which vary from
state to state.
Toll-Free Customer Care Help Line: 1-800-622-4714
Monday - Friday 8:00 am - 4:30 pm CST
Index
Introduction . . . . . . . . . . . . . . . . . . . . . . . . . . . . . . . . . . . 3
Product Identification & Caution . . . . . . . . . . . . . . . . . . . 4
Why Monitor Your Blood Pressure at Home? . . . . . . . . . 5
General Blood Pressure Information . . . . . . . . . . . . . . 5-7
Important Information Before Use . . . . . . . . . . . . . . . . . 7
Battery Installation/Replacement . . . . . . . . . . . . . . . . . . 8
Applying Your Blood Pressure Cuff . . . . . . . . . . . . . . . . 9
Taking Your Blood Pressure Reading . . . . . . . . . . . . . . 10
Description of Display Symbols . . . . . . . . . . . . . . . . . . 11
Troubleshooting . . . . . . . . . . . . . . . . . . . . . . . . . . . . . . 11
Care and Maintenance . . . . . . . . . . . . . . . . . . . . . . . . . 12
Product Specifications . . . . . . . . . . . . . . . . . . . . . . . . . 12
Sample Blood Pressure Log . . . . . . . . . . . . . . . . . . 13-14
Introduction
To achieve the maximum benefit from your blood pressure monitor, we recommend that you
first consult with your physician or trained healthcare professional.
Thank you for purchasing a HealthSmart Automatic Digital Blood Pressure Monitor. With
proper care and use, your monitor will provide you with many years of reliable readings.
The method of measurement that your Automatic Monitor uses is called the oscillometric
method. The monitor detects your blood’s movement through the artery in your arm and
converts the movements into a digital reading. The oscillometric method does not require a
stethoscope, making the monitor easy to use.
Blood pressure readings determined with this device are equivalent to measurements
obtained by a trained observer using the cuff/stethoscope auscultation method, within the
limits prescribed by the American National Standard for Electronic or Automated
Sphygmomanometers.
HealthSmart RX
1931 Norman Drive South • Waukegan, IL 60085
847-680-6811 • FAX 847-680-9646
–3–
Why Monitor Your Blood Pressure at Home
Product Identification and Caution
Many people experience “White Coat Syndrome”, which is a temporary elevation of blood
pressure during a visit at their physician’s office. Although only temporary, it can cause blood
pressure to rise and give a false indication of a person’s true blood pressure.
Arm Cuff
AC Adaptor Port
Digital Display
IC
TOL
SYS
S
DIA
IC
TOL
SE/
P UL
min
NOTE: Variations in your individual readings should only be interpreted by your physician or
trained healthcare professional.
General Blood Pressure Information
Start
FF
ON/O
On / Off
Button
Tubing Connector
Whether or not you experience “White Coat Syndrome”, home blood pressure monitoring
provides:
1) The opportunity to supplement your physician’s office measurements.
2) An accurate indication of any change.
3) A record to assist your physician in evaluating your health and making important
decisions.
4) Consistent, daily measurements of your blood pressure.
Start Button
Battery Compartment
What is Blood Pressure?
Blood pressure is the pressure that is exerted by blood flowing against the walls of the blood
vessels throughout your body.
Your heart, which is the center of the circulatory system, provides the force for the blood to flow
or circulate. When your heart contracts or beats, the blood is forced through the blood vessels
increasing the pressure. This is the highest pressure in the cycle or what is referred to as
SYSTOLIC blood pressure. In between beats, your heart relaxes and your blood pressure
decreases. This is referred to as DIASTOLIC blood pressure.
This complete series of events, which occurs in a single heartbeat, is known as the CARDIAC
CYCLE.
Your MABIS Automatic Blood Pressure Monitor will automatically read your blood pressure and
display both systolic and diastolic readings on the screen. Your systolic will be positioned as the
upper number and the diastolic reading will be the lower number.
(systolic)
CAUTION:
You can stop the inflation or deflation process anytime by pressing the On/Off button.
/
120 80
(diastolic)
–4–
–5–
Blood pressure is measured in millimeters (mm) of mercury (Hg) and is generally recorded
with the systolic pressure (120) listed first and the diastolic pressure (80) listed second. The
numbers are typically separated by a slash mark (/) as shown.
Both pressure readings, the SYSTOLIC and DIASTOLIC, are necessary for a physician to
evaluate the status of a patient’s blood pressure.
Variations in Blood Pressure
Blood pressure is influenced by many factors and can change from moment to moment.
Normally, blood pressure is lowest during sleeping periods and rises during the day. The
graph below represents variations in blood pressure shown over a day with measurements
taken every 5 minutes.
Please contact your physician for specific information regarding your own blood pressure.
The dotted line represents the sleep
period. The rise in blood pressure at
1 p.m. (A in the graph) corresponds
to a stressful occurrence and at
7 p.m. (B in the graph) a period of
exercise.
What Influences Blood Pressure?
Many factors such as genetics, age, sex, altitude, physical activity, anxiety, muscular
development, certain medications or even the time of day can influence blood pressure.
Influences such as sleep or relaxation decrease blood pressure, while anxiety or exercise
increase blood pressure.
WHO Blood Pressure Classifications
Standards for assessment of high or low blood pressure have been established by the
World Health Organization (WHO) as shown on the following chart:
CATEGORY
Optimal
Normal
High - Normal
Mild Hypertension
Moderate Hypertension
Severe Hypertension
SYSTOLIC (mmHg)
DIASTOLIC (mmHg)
<120
120-129
130-139
140-159
160-179
≥180
<80
80-84
85-89
90-99
100-109
≥110
≥140
<90
Isolated Systolic Hypertension
This chart is only a general guideline. Contact your physician or trained healthcare
professional to determine your NORMAL blood pressure.
Important Information Before Use
1.
Blood pressure readings should be interpreted by a physician or trained healthcare
professional, who is familiar with your medical history.
2.
Perform your measurement in a quiet place. You should be seated and relaxed.
3.
Avoid smoking, eating, taking medication, alcohol consumption or physical activity 30
minutes prior to taking a reading. If you are exhibiting signs of stress, avoid taking your
measurement until the feeling subsides.
4.
Rest 15 minutes prior to taking a reading.
5.
Remove any constrictive clothing or jewelry that may interfere with the cuff placement.
6.
Keep the monitor stable during measurements. Remain still; do not talk during
measurements.
7.
Record your daily readings on the chart provided.
8.
Take your readings at the same time, each day (or as recommended by your physician).
9.
Wait a minimum of 15 minutes between readings. The wait time may vary depending on
individual physiological characteristics.
10. This device is intended for adult use.
11. The inflation or deflation process can be stopped by pressing the On/Off button.
–6–
–7–
Battery Installation/Replacement
1)
Slide battery cover off, Fig.1.
2)
Insert or replace 4 “AA” batteries into the compartment, matching the indicated
polarity symbols, Fig. 1.
3)
Replace the battery cover.
Before applying your blood pressure cuff, be sure you have selected the appropriate cuff:
Small Adult Cuff fits arm circumference 8-5/8” - 11-3/4” (22-30 cm)
Adult Cuff fits arm circumference 11-3/4” - 16-1/2” (30-42 cm)
Large Adult Cuff fits arm circumference 16-1/2” - 18-7/8” (42-48 cm)
NOTE: If for any reason you are unable to or should not use your left arm, please modify
the following instructions and apply the cuff to your right arm.
Your physician can tell you which arm is best for you to use.
NOTE: Replace the batteries when the Low Battery
symbol appears on the display or when the display
remains blank when the On/Off button is pressed.
4)
Applying Your Blood Pressure Cuff
1. Remove any constrictive clothing or jewelry that may
interfere with the cuff placement.
It is recommended to remove the batteries if the
unit will not be used for an extended period of
time.
2. Be seated with your feet flat on the floor.
Fig. 1
AC Power Adapter (optional)
An AC adapter is available separately for battery-free operation. The AC adapter plugs
into the side of the unit as shown, Fig. 2. Please remember to practice electrical safety
precautions while using the adapter. To order an AC adapter, please see the enclosed
order form.
AC Adapter
Output: 6V DC 600mA
AC Adapter Port
3. Position the cuff on a solid surface with the tubing facing
UP and AWAY from you, Fig. 1. The metal bar on the cuff
should be to the left of the tubing.
4. Widen or open the cuff by pulling or rolling the
bottom of the cuff towards the right, Fig. 2.
This should open the cuff, creating a cylinder.
Do not extend the cuff beyond the metal bar.
5. Insert your arm into the cuff (cylinder).
Position the ( ) mark over the main artery
(on the inside of your arm), Fig. 3.
Fig. 2
6. The bottom edge of the cuff should be
positioned approximately one inch ABOVE
the elbow joint, Fig. 4.
7. Reaching underneath your left arm with your
right hand, pull the end of the cuff towards
your body to tighten the cuff, Fig. 5. Wrap and
secure the cuff making sure that the ( ) mark
remains as shown, Fig. 3.
Fig. 2
–8–
Applying Your Blood
Pressure Cuff
Fig. 1
8. The cuff should fit comfortably, yet snugly around your arm.
You should be able to insert two fingers between your arm
and the cuff.
Fig. 3
1”
Fig. 4
Fig. 5
NOTE: The cuff size is suitable for use when the vertical “Index” mark is within the
horizontal “OK” range. A different sized cuff is needed if the “Index” mark is outside of the
“OK” range.
–9–
Taking Your Blood Pressure Reading
Description of Display Symbols
Proceed only after reading the previous sections of this manual.
1. Position the monitor on a flat, stable surface with the digital display panel in view. Insert the cuff tubing connector into the left
side of the monitor, Fig. 1.
2. Rest your elbow on a solid surface with your palm facing
upward. Elevate your arm so that the cuff is at the same level as
your heart, Fig. 2. Relax your left hand.
3.
Appears when batteries should be replaced.
Shows the pulse rate per minute.
Fig. 1
Occurs when an error was made during measurement.
Appears when the unit is ready or a measurement error has occurred. Restart
the measurement if an error occurs.
Press the On/Off button to turn the unit on
4. This unit will run a self-test, Fig. 3.
Appears when the cuff is unstable or it has too much air left in it. Once the arrow
stops flashing, the unit is ready to take a measurement.
5. When the display appears as shown, Fig. 4, the monitor
is ready.
SYSTOLIC
DIASTOL
IC
PULSE/m
in
6. Press the Start button and the monitor will automatically
begin to inflate.
Troubleshooting
7. The display will show the increasing pressure in the cuff.
Fig. 3
8. The cuff will automatically inflate to approximately 187
mmHg.
9. Once the cuff inflates to approximately 187 mmHg, the
measurement will begin.
If any abnormality occurs during use, please check and correct the following:
Condition
Correction
Display is blank when power is on.
Check and correct the polarity of the installed
batteries. Reinstall or replace batteries.
Measurement incomplete or abnormally low
or high values displayed.
Review and follow “Applying Your and “Taking
Your Blood Pressure Reading” sections.
Replace the batteries.
Fig. 4
10. The unit will begin to automatically delfate and the numbers
appearing on the display will decrease.
11. When all the air is deflated, the measurement is complete.
The unit will display your blood pressure (systolic and
diastolic) measurements and pulse rate, Fig. 5.
Appears when the measurement is being taken.
Fig. 2
More pressure is needed in the cuff. Retake
your measurement.
Fig. 5
EE and RETEST symbol displays.
12. Record you readings on a chart.
Pressure quickly fell. Check to make sure the cuff
is correctly connected and that no air is leaking.
13. To conserve the batteries, press the On/Off button to turn the power off. Otherwise, the
unit will automatically shut off after approximately 3 minutes.
14. Disconnect the tubing from the monitor prior to storing.
NOTE: This monitor inflates the cuff to approximately 187 mmHg. If the system detects that
the cuff needs additional pressure, it will automatically reinflate to approximately 225
mmHg, 263 mmHg, then finally if needed 300 mmHg.
– 10 –
Do not talk or move during the measurement.
Review “Applying Your Blood Pressure Cuff”
section.
Measurements are different from
those typically measured by
physician or every measurement
reading is different.
Remember, blood pressure readings
are influenced by physical and mental
conditions and/or even the time of day.
Daily measurements should be
interpreted by your physician.
– 11 –
Care and Maintenance
1.
2.
3.
4.
5.
6.
7.
Sample Blood Pressure Log
Disconnect the cuff tubing from the monitor and remove batteries prior to storing.
Only use a soft, dry cloth to clean your blood pressure monitor.
Avoid using any types of liquids on the monitor or cuff.
Do not store the unit where it will be exposed to direct sunlight, dust or humidity.
Avoid extreme temperatures.
Never disassemble the monitor or cuff.
Dropping or subjecting your blood pressure monitor to strong shocks should be avoided.
Product Specifications
Name and model number
Display system
Measuring method
Power source
Measuring range
Accuracy
Inflation
Deflation
Automatic shut-off
Operation environment
Storage environment
Monitor dimensions
Weight
Arm circumference range
Accessories
Options (sold separately)
Automatic Digital Blood Pressure Arm Monitor,
04-525-001
Digital display/LCD
Oscillometric
4 “AA” batteries
Pressure: 0-300 mmHg
Pulse: 30-180 beats/minute
Pressure: ±3 mmHg
Pulse: ±5% of reading
Pump Driven
Automatic Pressure Release Valve
Approximately 3 minutes after last button operation
Temperature 41oF – 104oF (5oC – 40oC)
Humidity < 85%
Temperature -4oF – 149oF (-20oC – 65oC)
Humidity < 90%
5-5/8” x 4” x 2-1/2”
13.4 oz. (without batteries)
Adult size cuff fits arm circumference: 11-3/4” - 16-1/2” (30-42 cm),
Cuff, detailed guidebook, quick start guide, blood pressure log,
four “AA” batteries, storage case
Large adult size cuff fits arm circumference:
16-1/4” -18-7/8” (42-48 cm), Small adult size cuff fits arm
circumference: 8-5/8” -11-3/4” (22-30 cm), AC Adapter
Specifications are subject to change without notice.
#91-032-525 08/08
©2008 HealthSmart RX
– 12 –
– 13 –
Sample Blood Pressure Log
Manual
de Instrucciones
MANUAL
DE INSTRUCCIONES
Monitor de Presión
Arterial Automático Digital
04-525-001
Sírvase leer toda esta guía
antes de operar la unidad.
Inglés • Español
Garantía Limitada
– 14 –
Garantia Un Año Vitalicia
El garante garantiza que su Digital para Presión Arterial estará libre de defectos de
fábrica en condiciones normales de uso durante un año a partir de la fecha de compre.
Esta garantía cubre solamente el uso normal y no cubre el uso en aplicaciones clínicas o comerciales. Esta garantía no cubre baterías u otras fuentes de potencia que se
suministren o usen con el Digital para Presión Arterial. Esta garantía carece de validez si el Digital
para Presión Arterial es sometido a malos tratos o abusos de cualquier manera.
Si el Digital para Presión Arterial dejara de funcionar durante el tiempo en que esté en posesión
del comprador original, el mismo deberá enviarlo, con timbre pre-pago a: Repair Department, 1931
Norman Drive South, Waukegan, IL 60085. Al devolver un producto, también incluya por favor una carta
con su nombre,direccion,numero de teléfono y una breve descripción del problema especifico. Empaquete
por favor cuidadosamente el producto para evitar cualquier daño que pueda ocurrir mientras en transito.
El garante reparará o reemplazará la unidad defectuosa, a criterio del garante. La reparación o
reemplazo de la unidad defectuosa, a criterio del garante, es el único recurso que ofrece esta
garantía.
CUALQUIER GARANTÍA IMPLÍCITA QUE EL COMPRADOR PUEDA TENER SE LIMITA EN
DURACIÓN AL TIEMPO EN QUE EL COMPRADOR ORIGINAL TENGA EL
PRODUCTO EN SU PODER. Algunos estados no permiten limitaciones sobre el tiempo de
duración de una garantía implícita, de manera que la limitación citada puede no
aplicarse en su caso.
Esta garantía constituye la única responsabilidad y obligación del garante de reparar y/o cambiar
materiales o componentes, o reintegrar el precio de compra. El garante no será responsable por
los daños indirectos, incidentales, especiales, consecuentes o punitivos u otras pérdidas,
incluyendo sin limitación, daños o pérdidas de otros bienes o equipos y lesiones personales, ya
sea al comprador o a otros. El garante no será deninguna manera responsable frente al comprador
por cualquier monto que supere el costo de reparación y/o cambio de la unidad, o el precio de
compra de la misma. Algunos estados no permiten la exclusión o limitación de los daños incidentales o consecuentes, de manera que la limitación o exclusión citadas pueden no aplicarse en su
caso.
Esta garantía le otorga derechos legales específicos. Es probable que además goce de otros derechos, los cuales varían según el estado.
Línea Telefónica Gratuita para la Atención al Cliente: 1-800-622-4714
El lunes - el viernes 8:00 es - 4:30 p.m. CST
Índice
Introducción . . . . . . . . . . . . . . . . . . . . . . . . . . . . . . . . . . . . . . . . . . . . . 17
Identificación del producto y precaución . . . . . . . . . . . . . . . . . . . . . . 18
¿Por qué controlar la presión arterial en el hogar? . . . . . . . . . . . . 19
Información general acerca de la presión arterial . . . . . . . . . . 19-20
Variaciones de la presión arterial . . . . . . . . . . . . . . . . . . . . . . . . . . 21
Información importante previo al uso . . . . . . . . . . . . . . . . . . . . . . 21
Colocación/cambio de baterías . . . . . . . . . . . . . . . . . . . . . . . . . . . 22
Cómo colocar el brazalete de presión arterial . . . . . . . . . . . . . . . 23
Cómo tomar la lectura de la presión arterial . . . . . . . . . . . . . . . . . 24
Descripción de los símbolos del visor . . . . . . . . . . . . . . . . . . . . . . 25
Análisis de fallas . . . . . . . . . . . . . . . . . . . . . . . . . . . . . . . . . . . . . . . 25
Cuidado y mantenimiento . . . . . . . . . . . . . . . . . . . . . . . . . . . . . . . 26
Especificaciones del producto . . . . . . . . . . . . . . . . . . . . . . . . . . . . 26
Ejemplo de registro de la presión arterial . . . . . . . . . . . . . . . . . 27-28
Introducción
Introducción
Para obtener el máximo beneficio del monitor de presión arterial, se recomienda consultar
primero con el médico o profesional capacitado del área de salud.
Gracias por comprar un Monitor Digital Automático de Presión Arterial HeatlhSmart. Con el
debido cuidado y uso, obtendrá lecturas confiables durante muchos años.
El método de medición que emplea el Monitor Automático se denomina oscilométrico. El
monitor detecta el movimiento de la sangre por la arteria del brazo y lo convierte en lectura
digital. El método oscilométrico no requiere del uso de un estetoscopio; por lo que el
monitor resulta fácil de usar.
Las lecturas de presión arterial determinadas con este dispositivo equivalen a las obtenidas
por un observador capacitado que emplee el método de auscultación con brazalete/
estetoscopio, dentro de los límites prescritos por la American National Standard for
Electronic or Automated Sphygmomanometers (Norma Nacional Estadounidense de
Esfigmomanómetros Electrónicos o Automatizados).
HealthSmart RX
1931 Norman Drive South • Waukegan, IL 60085
847-680-6811 • FAX 847-680-9646
– 17 –
¿Por qué Controlar la Presión Arterial en el Hogar?
Identificación del Producto
y Precaución
I
Mucha gente experimenta el “síndrome del delantal blanco”, que es un aumento
momentáneo de la presión arterial durante la visita al consultorio médico. Si bien es algo
transitorio, puede hacer que la presión arterial suba y brinde una indicación falsa de la
verdadera presión arterial de una persona.
Puerto para
adaptador AC
Brazalete para
el brazo
Experimente o no el “síndrome del delantal blanco”, el control de la presión arterial en el
hogar le brinda:
1) La oportunidad de complementar las mediciones realizadas en el consultorio del
médico.
2) Una indicación exacta de cualquier cambio.
3) Un registro que le ayudará a su médico a evaluar su salud y a tomar decisiones
importantes.
4) Mediciones de su presión arterial diarias y consistentes.
Visor digital
IC
TOL
SYS
S
DIA
IC
TOL
SE/
PUL
min
NOTA: Las variaciones en las lecturas individuales sólo debe interpretarlas su médico o un
profesional capacitado del área de salud.
Start
Información General Acerca de la Presión Arterial
FF
ON/O
Botón de
inicio
Conector del tubo
Botón
encendido/
apagado
Compartimiento de las
baterías
PRECAUCIÓN:
Puede detener el proceso de inflado o desinflado en cualquier momento presionando el
botón de ENCENDIDO/APAGADO.
¿Qué es la presión arterial?
La presión arterial es la que ejerce la sangre al fluir por las paredes de los vasos
sanguíneos del organismo.
El corazón, centro del sistema circulatorio, ofrece la fuerza para que la sangre fluya o
circule. Cuando se contrae o late, la sangre se impulsa a través de los vasos sanguíneos y
aumenta la presión. Esta es la presión más alta en el ciclo o la denominada PRESIÓN
ARTERIAL SISTÓLICA. Entre cada latido, el corazón se relaja y la presión arterial
disminuye; lo cual se conoce con el nombre de PRESIÓN ARTERIAL DIASTÓLICA.
Esta serie completa de eventos que tiene lugar en un solo latido del corazón se denomina
CICLO CARDÍACO.
El Monitor Automático HealthSmart RX leerá automáticamente su presión arterial y
mostrará las lecturas sistólica y diastólica en la pantalla. La presión sistólica estará indicada
por el número superior y la diastólica, por el inferior.
(sistólica)
/
120 80
(diastólica)
– 18 –
– 19 –
Ambas lecturas, la SISTÓLICA y la DIASTÓLICA, son necesarias para que un médico
pueda evaluar el estado de la presión arterial de un paciente.
Póngase en contacto con su médico para recibir información específica acerca de su
presión arterial.
?
?Qué influye en la presión arterial?
Variaciones de la Preción Arterial
Muchos factores influyen en la
presión arterial y puede variar de un
momento a otro. Normalmente, la
presión arterial es más baja durante
el sueño y se eleva durante el día. El
gráfico a continuación representa las
variaciones de la presión arterial
durante el día con mediciones
tomadas cada 5 minutos.
Presión arterial (mmHg)
La presión arterial se mide en milímetros (mm) de mercurio (Hg) y, por lo general, al
registrarla, se indica primero la presión sistólica (120) y la diastólica (80) después.
Típicamente, los números están separados por una barra ( / ) según se indica más arriba.
P.M.
Heure
A.M.
Muchos factores relacionados con la genética, edad, sexo, altitud, actividad física,
ansiedad, desarrollo muscular, ciertos medicamentos e incluso el momento del día pueden
influir en la presión arterial. Factores como el dormir y la relajación disminuyen la presión
arterial, mientras que la ansiedad o el ejercicio físico la aumentan.
La línea de puntos representa el período de sueño. El aumento de la presión arterial a la
1 p.m. (A en el gráfico) corresponde a un hecho estresante y a las 7 p.m. (B en el gráfico) a
un período de ejercicios físicos.
WHO (ORGANIZACIÓN MUNDIAL DE LA SALUD)
CLASIFICACIONES DE LA PRESIÓN ARTERIAL
Información Importante Previo al Uso
La Organización Mundial de la Salud estableció normas para la evaluación de la presión
arterial alta y baja, según se muestra en el siguiente cuadro:
1. Las mediciones de la presión arterial sólo debe interpretarlas un médico o profesional
capacitado del área de salud familiarizado con su historia clínica.
2. Tome las mediciones en un lugar tranquilo. Debe estar sentado y relajado.
CATEGORIA
Optima
Normal
Alto - Normal
Hipertensión leve
Hipertensión moderada
Hipertensión grave
SISTÓLICA (mmHg) DIASTÓLICA (mmHg)
<120
120-129
130-139
140-159
160-179
≥180
<80
80-84
85-89
90-99
100-109
≥110
≥140
<90
Hipertensión Sistólica Aislada
3. Evite fumar, comer, tomar medicamentos, el consumo de alcohol o la actividad física 30
minutos antes de la lectura. Si evidencia signos de estrés, evite tomarse la presión
mientras esa sensación no haya desaparecido.
4. Descanse 15 minutos antes de tomar una lectura.
5. Retire toda indumentaria o accesorio apretado que pudiera interferir con la colocación
del brazalete.
6. Mantenga el monitor estable durante la medición. Permanezca quieto; no hable durante
la medición.
7. En el cuadro que se suministra anote las lecturas diarias.
8. Tome las lecturas todos los días a la misma hora (o según lo recomendado por el
médico).
9. Espere, como mínimo, 15 minutos entre lecturas. El tiempo de espera puede variar
dependiendo de las características fisiológicas individuales.
Este cuadro es sólo una guía general. Consulte a su médico o profesional capacitado en el
campo de la salud para determinar su presión arterial NORMAL.
10. Este dispositivo ha sido diseñado para uso en adultos.
11. Se puede detener el proceso de inflado y desinflado con sólo pulsar el botón de
ENCENDIDO/APAGADO.
– 20 –
– 21 –
Colocación/Cambio de Baterías
Cómo Colocar el Brazalete de Presión Arterial
1) Retire la tapa de las baterías, Fig. 1.
Antes de colocarse el brazalete para la presión arterial, verifique que tenga el brazalete
apropiado:
Brazalete para adulto pequeño corresponde a circunferencia de brazo: 8-5/8” - 11-3/4”
(22-30 cm)
Brazalete para adulto corresponde a circunferencia de brazo: 11-3/4” - 16-1/2” (30-42 cm)
Brazalete para adulto grande corresponde a circunferencia de brazo: 16-1/2” - 18-7/8”
(42-48 cm)
2) Coloque o cambie 4 baterías “AA” en el compartimiento, haciendo coincidir los símbolos de polaridad,
Fig 1.
3) Coloque la tapa de las baterías.
NOTA: Si por algún motivo no puede o no debe usar su brazo izquierdo, modifique las
siguientes instrucciones y coloque el brazalete en su brazo derecho. Su médico puede
decirle qué brazo debe usar.
NOTA: Cambie las baterías cuando aparezca el
símbolo de Poca Batería en el visor o cuando el visor
permanezca en blanco al presionar el Botón encendido/
apagado.
Fig. 1
1. Quite cualquier ropa o joyas ajustadas que puedan
interferir con la colocación del brazalete.
4) Se recomienda quitar las baterías si no se usará la unidad durante un período
prolongado.
2. Siéntese con los pies apoyados sobre el piso.
Adaptador de CA (Opcional)
Viene con un adaptador para corriente alterna para funcionamiento sin baterías. El
adaptador de corriente alterna se conecta a la parte lateral de la unidad como se muestra
en la Fig. 2. Tome las medidas de seguridad adecuadas con respecto a la electricidad
cuando use el adaptador. Para pedir un adaptador AC, consulte el formulario de pedido
adjunto.
4. Agrande o abra el brazalete extendiendo o
enrollando la parte inferior del brazalete hacia
la derecha, Fig. 2. Esto debería abrir el brazalete, creando un cilindro. No extienda el brazalete más allá de la barra de metal.
Adaptador de CA
Salida: 6V DC 600mA
Puerto para adaptador AC
3. Apoye el brazalete sobre una superficie sólida con el
tubo mirando hacia ARRIBA y LEJOS suyo, Fig. 1. La
barra de metal del brazalete deberá estar a la
izquierda del tubo.
Fig. 2
5. Inserte el brazo en el brazalete (cilindro). Coloque el signo ( )
sobre la arteria principal (en la parte interna del brazo), Fig. 3.
– 22 –
Artère principale
6. El borde inferior del brazalete debería colocarse aproximadamente
1”
una pulgada por ARRIBA del codo, Fig. 4.
7. Con la mano derecha yendo por debajo, tome el brazo
izquierdo y estire el extremo del brazalete hacia usted
para ajustar el brazalete, Fig. 5. Enrolle de manera
segura el brazalete, verificando que el signo
( ) permanezca como se muestra en la Fig. 3.
Fig. 2
Fig. 1
Fig. 3
Fig. 4
8. El brazalete debe calzar cómodamente pero ajustado
alrededor del brazo y no debe incomodar. Tiene que poder
insertar dos dedos entre el brazo y el brazalete.
NOTA: El tamaño del brazalete es el adecuado cuando el
signo “Índice” vertical esté dentro del rango horizontal “OK”. Se
necesita un tamaño diferente de brazalete si el signo “Índice”
queda fuera del rango “OK”.
– 23 –
Fig. 5
Cómo Tomar la Lectura de la Presión Arterial
Proceda luego de haber leído las secciones anteriores de este manual.
Aparece cuando se deben cambiar las baterías.
1. Coloque el monitor sobre una superficie plana y estable
con el panel del visor digital a la vista. Inserte el conector del
tubo del brazalete en el lado izquierdo del monitor, Fig. 1.
Muestra las pulsaciones por minuto.
Fig. 1
2. Apoye el codo (izquierdo) sobre un superficie sólida con la
palma mirando hacia arriba. Eleve el brazo de manera que el
brazalete quede al mismo nivel del corazón, Fig. 2. Relaje la
mano (izquierda).
Ocurre cuando se comete un error durante la medición.
Aparece cuando la unidad está lista o ha ocurrido un error de medida. Comience
nuevamente la medición si se produce un error.
3. Presione el botón de encendido/apagado para encender la
unidad.
Aparece cuando la unidad está lista para la medición, el brazalete no está estable
o le ha quedado mucho aire dentro. Una vez que la flecha deje de titilar, la unidad
está lista para tomar una medición.
4. La unidad hará una auto-evaluación, Fig. 3.
SYSTOLIC
DIASTOL
IC
PULSE/m
in
5. Cuando aparezca el visor como se muestra, Fig. 4, el monitor
está listo.
Descripción de los Símbolos del Visor
Aparece cuando se está tomando la medida
Fig. 2
6. Presione el botón de inicio y el monitor comenzará a inflarse automáticamente.
7. El visor mostrará la presión creciente en el brazalete.
8. El brazalete se inflará automáticamente a aproximadamente
187 mmHg.
Fig. 3
9. Una vez que el brazalete se infle a aproximadamente
187 mmHg, comenzará la medición.
10. La unidad comenzará a desinflarse automáticamente y los
números que aparecen en el visor disminuirán.
Fig. 4
11. Una vez que se ha desinflado todo el aire, la medición está
completa. La unidad mostrará su presión arterial (sistólica y
diastólica) y el pulso, Fig. 5.
12. Anote las lecturas en un cuadro.
Fig. 5
13. Para conservar las baterías, presione el botón de ENCENDIDO/
APAGADO (On/Off) para apagar la unidad, de lo contrario la unidad se apagará
automáticamente al cabo de alrededor de 3 minutos.
Análisis de Fallas
Si ocurriera una anomalía durante el uso, verifique y corrija lo siguiente:
CONDICIÓN
CORRECCIÓN
El visor está en blanco cuando el
botón de encendido está prendido
Revise y corrija la polaridad de
las baterías. Vuelva a colocar o
cambie las baterías.
Medición incompleta o aparecen
valores anormalmente altos o bajos.
Revise y siga las secciones “Cómo
Colocar el Brazalete de Presión Arterial” y
“Cómo Tomar una Lectura de Presión
Arterial”. Cambie las baterías
Se requiere más presión en el brazalete. Vuelva a
tomar la medición.
Aparece el símbolo EE
La presión bajó rápidamente. Verifique que el
brazalete esté correctamente conectado y que no
haya pérdida de aire.
15. Desconecte el tubo del monitor antes de guardar la unidad.
NOTA: Este monitor infla el brazalete a aproximadamente 187 mmHg. Si el sistema detecta
que el brazalete necesita presión adicional, se volverá a inflar automáticamente a
aproximadamente 225 mmHg, 263 mmHg, y por último si se necesita a 300 mmHg.
– 24 –
?Se movió o conversó durante la medición
Refiérase a la sección “Cómo Aplicar
el Brazalete de Presión Arterial”.
Las mediciones son diferentes de
las mediciones usuales que realiza
el médico o cada lectura de
medición es diferente.
Recuerde que las condiciones mentales y
físicas y/o el momento del día influyen
en las lecturas de la presión arterial. Su
médico es quien debe interpretar las
mediciones diarias.
– 25 –
Ejemplo de Registro de Presión
Cuidado y Mantenimiento
1.
2.
3.
4.
5.
6.
7.
Desconecte el tubo del brazalete del monitor y quite las baterías antes de guardar la
unidad.
Use solamente un paño seco y suave para limpiar el monitor de presión arterial.
Evite usar cualquier tipo de líquido en el monitor o brazalete.
No guarde la unidad donde esté expuesta a la luz directa del sol, polvo o humedad.
Evite las temperaturas extremas.
Nunca desarme el monitor o brazalete.
Evite que se caiga o golpee el monitor de presión arterial.
Especificaciones del Producto
Nombre y número de modelo
Tipo de visor
Método de Medición:
Fuente de energía:
Alcance de la medición
Precisión
Inflado
Desinflado
Apagado automático
Ambiente de funcionamiento
Ambiente de almacenamiento
Tamaño del monitor
Peso
Rango de circunferencia del brazo
Accesorios
Opciones (se venden por separado)
Monitor de Presión Arterial Automático Digital.
04-525-001
Visor digital/LCD
Oscilométrico
4 baterías tipo “AA”
Presión: 0-300 mmHg
Pulso: 30-180 pulsaciones/minuto
Presión: ± 3 mmHg
Pulso: ± 5% de la lectura
Impulsado por bomba
Válvula de descarga de presión automática
Alrededor tres minutos después de presionar
el último botón
Temperatura 41oF – 104oF (5oC – 40oC)
Humedad <85%
Temperatura -4oF – 149oF (-20oC – 65oC)
Humedad <90%
5-5/8” x 4” x 2-1/2”
13,4 oz. (sin baterías)
El tamaño adulto es adecuado para la
circunferencia del brazo: 11-3/4” – 16-1/2” (30-42 cm),
Brazalete, guía detallada, guía para comenzar rápido,
registro de presión arterial,cuatro baterías “AA”,
Caso Del Almacenaje
Brazalete para adulto tamaño grande corresponde a
circunferencia de brazo: 16-1/4” -18-7/8” (42-48 cm),
Brazalete para adulto tamaño pequeño corresponde a
circunferencia de brazo: 8-5/8” -11-3/4” (22-30 cm),
Adaptador de CA
Las especificaciones están sujetas a cambios sin previo aviso.
#91-032-525 08/08
©2008 HealthSmart RX
– 26 –
– 27 –
Ejemplo de Registro de Presión
– 28 –