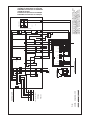
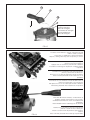
1
AUTOMATIC MULTIPORT VALVE
VANNE MULTIVOIES AUTOMATIQUE
VÁLVULA SELECTORA AUTOMÁTICA
VALVOLA SELETTRICE AUTOMATICA
AUTOMATISCHES MEHRWEGE VENTIL
VÁLVULA SELECTORA AUTOMÁTICA
INSTALLATION AND MAINTENANCE MANUAL
MANUEL D'INSTALLATION ET D'ENTRETIEN
MANUAL DE INSTALACIÓN Y MANTENIMIENTO
MANUALE DI INSTALLAZIONE MANUTENZIONE
INSTALLATIONS-UND BEDIENUNGSANLEITUNGEN
MANUAL DE INSTALAÇAO Y MANUTENÇAO
'HFODUDFLyQGHFRQIRUPLGDG&(
(&'HFODUDWLRQRI&RQIRUPLW\
6\VWHP95$&
(OIDEULFDQWHWKHPDQXIDFWXUHU95$&6$
&/OHYDQWQ~P3RO,QG/OHYDQW
3DUHWVGHO9DOOqV
%DUFHORQD6SDLQ
&HUWLILFDTXHQXHVWURGHFODUDTXHQXHVWURFHUWLI\WKDWRXUGHFODUHVWKDW
7LSRW\SH$FWXDGRUHOHFWUyQLFR6\VWHP95$&GH9FRUULHQWHFRQWLQXDSDUDYiOYXODV
VHOHFWRUDVDXWRPiWLFDV
96\VWHP95$&DFWXDWRUIRUDXWRPDWLFPXOWLSRUWYDOYHV
0RGHOR0RGHO$FWXDGRU\SDUDYiOYXODVVHOHFWRUDVGHò\
$FWXDWRUDQGIRUòDQGPXOWLSRUWYDOYHV
FXPSOHFRQORVUHTXLVLWRVHVWDEOHFLGRVSRUOD81,Ï1(8523($HQ&203$7,%,/,'$'
(/(&7520$*1e7,&$GHDFXHUGRDODVVLJXLHQWHVQRUPDV
LVDFFRUGLQJWRUHTXLUHPHQWVVWDEOLVKHGE\WKH(8523($181,21LQWKH(/(&75,&$/
0$*1(7,&&203$7,%,/,7<(0&',5(&7,9(&(DFFRUGLQJWRIROORZLQJVWDQGDUGV
(1&203$7,%,/,'$'(/(&7520$*1Ê7,&$&(01RUPDVJHQpULFDV
(PLVLRQHVHQHQWRUQRVUHVLGHQFLDOHVFRPHUFLDOHV\GHLQGXVWULDOLJHUD
(1(/(&7520$*1(7,&&203$7,%,/,7<(0&*HQHULFVWDQGDUGV(PLVVLRQ
VWDQGDUGIRUUHVLGHQWLDOFRPPHUFLDODQGOLJKWLQGXVWULDOHQYLURQPHQWV
(1&203$7,%,/,'$'(/(&7520$*1Ê7,&$&(01RUPDVJHQpULFDV
,QPXQLGDGHQHQWRUQRVUHVLGHQFLDOHVFRPHUFLDOHV\GHLQGXVWULDOLJHUD
(1(/(&7520$*1(7,&&203$7,%,/,7<(0&*HQHULFVWDQGDUGV,PPXQLW\IRU
UHVLGHQWLDOFRPPHUFLDODQGOLJKWLQGXVWULDOHQYLURQPHQWV
<SRUHOFXPSOLPLHQWRGHHVWDVGLUHFWLYDVQXHVWURDFWXDGRU6\VWHP95$&SXHGHLQFRUSRUDUOD
PDUFD&(
%\DFFRPSOLVKLQJWKHVHGLUHFWLYHVRXU6\VWHP95$&DFWXDWRUFDQLQFRUSRUDWHWKH&(PDUN
<VHUYHQGLGRVHQOD81,21(8523($FXPSOLHQGRFRQORVUHTXLVLWRVOHJDOHV
$QGWKH\FDQEHVROGWKURXJKRXW(8523($181,21SURYLGLQJDOOOHJDOUHTXLUHPHQWV
0U5DPRQ6DOLFKV'LUHFWRU0DQDJHU
3DUHWVGHO9DOOqV(QHUR
ESPAÑOL
"Importante: El manual de instrucciones que usted tiene en sus manos, contiene
información fundamental acerca de las medidas de seguridad a adoptar a la hora de la
instalación y puesta en servicio. Por ello, es imprescindible que tanto el instalador como el
usuario lean las instrucciones antes de pasar al montaje y puesta en marcha."
Para conseguir un óptimo rendimiento de la válvula automática es conveniente observar las
instrucciones que se indican a continuación.
Prescripciones generales de seguridad:
Esta simbología
indica la posibilidad de peligro como consecuencia de no
respetar las prescripciones correspondientes.
PELIGRO. Riesgo de electrocución. La no advertencia de esta prescripción comporta un riesgo
de electrocución.
PELIGRO. La no advertencia de esta prescripción comporta un riesgo de daño a las personas
o cosas.
ATENCION. La no advertecia de esta prescripción comporta un riesgo de daños a la válvula
automática o a la instalación.
NORMAS GENERALES DE SEGURIDAD
GENERALIDADES.
La válvula citada en este manual está especialmente diseñada para obtener la circulación del
agua en la piscina en sus diferentes fases de trabajo.
Está concebida para trabajar con aguas limpias y con temperaturas que no exceda de 35ºC.
La instalación debe ser efectuada de acuerdo con las indicaciones particulares para cada
implantación.
Se deben respetar las normas vigentes para la prevención de accidentes.
Cualquier modificación que se pretenda efectuar en el modulo electrónico de la válvula o
mando a distancia requiere la previa autorización del fabricante. Los repuestos originales y los
accesorios autorizados por el fabricante sirven para garantizar una mayor seguridad. El
fabricante de la válvula automática queda eximido de toda responsabilidad de los daños
ocasionados por repuestos o accesorios no autorizados.
Durante el funcionamiento, las partes eléctricas y electrónicas de la válvula se encuentran
bajo tensión.
El trabajo sobre la válvula automática o sobre los equipos a ella ligados, solo podrán efectuarse
después de haber desconectado los dispositivos de arranque.
El usuario debe cerciorarse de que los trabajos de montaje y mantenimiento los llevan a cabo
personas cualificadas y autorizadas, y que éstas hayan leído previamente de forma detenida
las instrucciones de instalación y servicio.
La seguridad en el funcionamiento de la válvula automática sólo se garantiza bajo el
cumplimiento y respecto de lo expuesto en las instrucciones de instalación y servicio.
Los valores límite de voltaje no deben sobrepasarse en ningún caso.
En caso de funcionamiento defectuoso o avería, diríjase a la representación del fabricante
más próximo o al servicio de asistencia técnica del fabricante.
31
ESPAÑOL
ADVERTENCIAS EN LOS TRABAJOS DE INSTALACIÓN Y MONTAJE.
Durante la conexión de los cables eléctricos al módulo de la válvula cuidar la disposición de la
polaridad y verificar que no queden trozos de cable en el interior después del cierre.
Realizar las conexiones siguiendo el esquema eléctrico adjunto al módulo de la válvula.
Asegurarse de que las conexiones de los cables eléctricos a la placa electrónica de la válvula
queden bien engastados.
Comprobar que la junta de la caja del módulo queda bien posicionada para evitar la entrada de
agua. Igualmente, comprobar que se han colocado correctamente los prensaestopas.
Hay que prestar particular atención a que en ningún caso entre agua en el módulo electrónico.
En caso de que la utilización prevista no sea la citada, pueden ser necesarias adecuaciones y
normativas técnicas suplementarias.
ADVERTENCIAS EN LA PUESTA EN MARCHA.
Antes de la puesta en marcha de la válvula automática verificar la calibración de los dispositivos
de protección eléctricos del armario de maniobra de manera que estén correctamente
posicionados y fijados.
NOTA: Se recomienda no utilizar las instalaciones de baño mientras el equipo de filtración esté
en funcionamiento.
ADVERTENCIAS EN LOS TRABAJOS DE MONTAJE Y MANTENIMIENTO.
Para el montaje y la instalación de la válvula automática se tienen que tener en cuenta las
reglamentaciones de instalación nacionales.
Hay que prestar particular atención a que de ninguna manera entre agua en el circuito
electrónico de la válvula automática.
Evitar en todo momento el contacto, incluso accidental, con las partes móviles de la válvula
automática durante el funcionamiento de la misma y/o antes de su parada total.
Antes de proceder con cualquier intervención de mantenimiento eléctrico o electrónico,
asegurarse de que los dispositivos de puesta en marcha estén bloqueados.
Es aconsejable seguir los siguientes pasos antes de efectuar cualquier intervención sobre la
válvula automática:
1.- Quitar la tensión eléctrica de la válvula.
2.- Bloquear los dispositivos de puesta en marcha.
3.- Verificar que no haya voltaje presente en los circuitos, incluso en los auxiliares y
los servicios suplementarios.
La lista expuesta debe ser considerada indicativa y no vinculante a los efectos de seguridad,
pudiendo existir normas de seguridad específicas en normativas particulares.
IMPORTANTE.- Debido a la complejidad de los casos tratados, las instrucciones de instalación,
uso y mantenimiento contenidas en este manual no pretenden examinar todos los casos
posibles e imaginables de servicio y mantenimiento. Si fueran necesarias instrucciones
suplementarias o si surgen problemas particulares, no dudar en contactar con el distribuidor
o directamente con el fabricante de la válvula.
El montaje de nuestras válvulas automáticas sólo está permitido en piscinas o estanques que
cumplan con la norma HD 384.7.702. En supuestos dudosos rogamos consulten a su
especialista.
Compruebe el contenido del embalaje.
32
ESPAÑOL
INDICE
1.
1.1
1.2
1.3
1.4
1.5
1.6
Instalación de la válvula
Verificación del tipo de válvula
Garantías
Esquema de flujo de las diferentes posiciones de trabajo de la válvula
Modulo de control
Mando a distancia
Electro válvula
2.
2.1
2.2
Conexiones eléctricas de la válvula al cuadro de maniobra
Instalación eléctrica
Conexionado de la válvula (esquema)
3.
3.1
3.2
3.3
3.4
3.5
Ajuste del programa en el mando a distancia
Cómo operar con el programador
Programa predeterminado por el fabricante
Modificación del programa predeterminado por el fabricante
Programa manual
Mantenimiento del mando a distancia
4.
4.1
Como proceder en caso de mal funcionamiento de la válvula
Posibles averías
5.
5.1
5.2
5.3
5.4
5.5
Instrucciones para el desmontaje del módulo instalado en la válvula
Procedimiento para el desmontaje de la válvula
Como proceder para desmontar el módulo de la válvula
Instrucciones para el montaje del módulo a la válvula
Conversión del sistema de forma temporal en manual
Como pasar de válvula manual a automática
33
ESPAÑOL
1. INSTALACIÓN DE LA VÁLVULA
1.1 VERIFICACIÓN DEL TIPO DE VÁLVULA.
Válvula selectora 1 1/2" Modelo - 24 VDC - Modelo 2" 24 VDC
El modelo y el código están indicados en una etiqueta junto con las características de trabajo
de la válvula. La etiqueta está ubicada en la parte posterior de la tapa del módulo electrónico
instalado sobre la válvula.
En fábrica se comprueba el funcionamiento hidráulico y eléctrico de la válvula.
Se recomienda que antes de efectuar el montaje, se realice una inspección visual por si
hubiera recibido algún golpe que pudiera haberla dañado.
Cualquier reclamación justificada se procederá a la sustitución de la válvula.
1.2 GARANTIAS.
El equipo sale testado de fábrica, por ello aseguramos su funcionamiento. La garantía será
efectiva siempre que la instalación sea la correcta. Por ello será necesario que el equipo sea
instalado por una persona con la cualificación requerida para este tipo de trabajos.
1.3 ESQUEMA DE FLUJO DE LAS DIFERENTES POSICIONES DE TRABAJO.
La válvula se montará en el filtro siguiendo las instrucciones descritas en un folleto adjunto.
No debe montarse la válvula en posición invertida.
La válvula debe montarse en el lado izquierdo del filtro para facilitar la comunicación con el
mando a distancia.
Montaje en carga: la columna de agua máxima que puede soportar la válvula es de 6 m (19,68 ft).
Las conexiones hidráulicas para el funcionamiento se efectuarán siguiendo el marcaje que
indica la válvula.
PUMP indica conexión procedente de la bomba.
TOP indica la entrada superior a filtro.
BOTTOM indica el retorno inferior de filtro a válvula.
RETURN indica el retorno de válvula a piscina.
WASTE indica la conexión a desagüe.
Introducción al funcionamiento de un proceso de Filtración:
La bomba aspira el agua de la piscina por medio del Skimmer, Limpiafondos o Sumidero; la
hace llegar a la válvula selectora (boca PUMP) y ésta la deriva al filtro boca (TOP); atraviesa
el lecho filtrante y la recoge de nuevo la válvula por medio de la boca BOTTOM; la distribuye a
la piscina por medio de la boca RETURN.
La válvula lleva incorporado un Presostato el cual está tarado de fábrica a una presión de
trabajo 1.5kg/cm² (21,3 psi). Si és necesario hacer una nueva regulación, esta debe ajustarse
a la presión de la bomba que se monte, rango de ajuste de 0.3 a 2 kg/cm² (4,2-28,4 psi) según
necesidades, puede montarse con un ajuste entre 1 y 6 kg/cm² (14,22-85,3 psi).
Cuando la presión sobrepase el límite preestablecido la válvula cambia automáticamente a
posición de Lavado.
34
ESPAÑOL
Proceso de Lavado:
La válvula automática invierte el ciclo de filtración e inicia el lavado de la arena. Para ello se
posiciona de forma que el agua procedente de la boca PUMP pasa por el interior de la válvula
y sale a filtro por la boca BOTTOM; la arena se remueve y el agua junto con la suciedad retenida
pasa por la válvula boca TOP y comunica con el WASTE. Este proceso se ejecuta en función del
tiempo preestablecido.
Proceso de Enjuague:
La válvula se posiciona para comprimir el lecho filtrante y no mandar agua con arena a la
piscina. Para ello el agua procedente de la boca PUMP entra al filtro por la posición TOP,
comprime la arena y el agua entra a la válvula por la boca BOTTOM. Ésta la distribuye hacia la
boca WASTE. Este proceso se ejecuta en función del tiempo preestablecido. Transcurrido
éste, la válvula entra de nuevo en filtración.
CARACTERÍSTICAS DE LA VÁLVULA.
Tamaños 1 1/2" y 2" montaje lateral y top
Cuerpo de la válvula fabricado en ABS
Distribuidor interno fabricado en PPO
Conexionado por medio de roscas hembra, BSP o NPT, boca BOTTOM para encolar.
Presión de trabajo 3.5 bars.
Presión de prueba 5.2 bars.
1.4 MODULO DE CONTROL.
Es la parte de la válvula que consiste en un motor reductor y una placa electrónica con finales
de carrera para las diferentes posiciones de servicio de la válvula.
Un circuito electrónico donde se reciben las órdenes para que se ejecute el programa
predeterminado.
Unos elementos mecánicos que son los que ejecutan el movimiento de la válvula.
Todo el conjunto está integrado en una caja transparente cerrada por cuatro tornillos.
El módulo lleva incorporado un lector emisor receptor de señal para recibir y dar órdenes a la
válvula.
Las conexiones eléctricas de entrada y salida se protegen por medio de prensaestopas para el
perfecto aislamiento de agentes externos que pudieran dañar el conjunto.
La alimentación es de 24 VDC.
35
ESPAÑOL
1.5 MANDO A DISTANCIA.
El mando a distancia sirve para programar las funciones que se desea que trabaje la válvula.
Las órdenes las transmite por medio de infrarrojos, por este motivo, cuando se dé una orden el
mando debe estar enfocado hacia el módulo de la válvula, concretamente enfrente del plano
inclinado del módulo. Como referencia usar el piloto rojo que se ve a través de la tapa del
módulo.
Cada función programada debe mandarse de forma individual. Transcurrirán unos segundos
hasta recibir la confirmación de la transmisión. Durante este tiempo el mando debe estar
enfocado a la válvula. No operar con distancias superiores a 3 m. La programación del idioma
se podrá realizar sin la necesidad de dar la orden de transmisión al módulo de la válvula.
El mando permite:
Seleccionar el idioma a utilizar.
Operar en automático con las siguientes funciones:
Dos programas de filtración, lavado, enjuague, encendido de luces piscina programado y
manual.
Operar en manual con las siguientes funciones:
Filtración fondo, filtración skimmers, lavado, enjuague, recirculación, vaciado y cierre.
Funciona con dos pilas alcalinas LR-6 de 1.5v, por ello cuando el equipo no se utilice (invierno)
es aconsejable quitarlas para evitar posibles daños. Se recomienda guardar el mando en casa
en un lugar seco.
Durante el período invernal se aconseja tener la piscina en funcionamiento con un mínimo de
tiempo de filtración y así evitar el apelmazamiento de la arena.
1.6 ELECTRO VALVULA
La electro válvula debe ser de 1 ½” o 2” funcionamiento a 24VAC normalmente cerrada,
presión mínima de trabajo 0 kg/cm2 (0 psi).
2. CONEXIONES ELÉCTRICAS DE LA VÁLVULA AL CUADRO DE MANIOBRA.
2.1 INSTALACIÓN ELÈCTRICA.
La válvula automática se instala en el filtro y debe conexionarse al armario de maniobra
general del sistema.
Componentes adicionales a instalar en el cuadro de maniobra para el funcionamiento de la
válvula:
TRANSFORMADOR RECTIFICADOR CON SALIDA A 24VCD. Se utiliza para alimentar al módulo
electrónico de la válvula.
BATERIAS AUXILIARES RECARGABLES. Se conectan de forma automática y son utilizadas en
casos de emergencia como falta de fluido eléctrico. La válvula se posiciona en "filtración" y se
para. El mantenimiento de carga es automático desde el módulo de control. EN SU
INSTALACIÓN, ES MUY IMPOTANTE NO CAMBIAR LA POLARIDAD YA QUE PODRÍA DAÑAR EL
FUSIBLE PROTECTOR DE LA PLACA ELECTRÓNICA COLOCADO EN EL ARMARIO DE
MANIOBRA.
Información de conexionado del resto de componentes de normal instalación en los armarios
de maniobra:
CONTACTOR DE ARRANQUE BOMBA. El módulo electrónico cierra el circuito que se encarga
de dar tensión a la bobina del contactor para el arranque de la bomba. Tensión de la bobina
24VDC o 24VCA NO CONECTAR TENSIONES SUPERIORES A LAS INDICADAS.
TRANSFORMADOR PARA LUCES PISCINA. Del módulo electrónico sale una señal eléctrica
programada que sirve para cerrar el circuito que activa la bobina del contactor (24VDC o
24VAC) de puesta en marcha de los focos.
OTROS COMPONENTES. Serán los propios para la protección de una instalación compuesta
de motor bomba.
Opcional relé auxiliar para la conexión de una válvula de tres vías con actuador eléctrico con
alimentación de bobina a 24VCD.
2.2 CONEXIONADO DE LA VÁLVULA .- Ver anexo (1)
36
ESPAÑOL
3.AJUSTE DEL PROGRAMA EN EL MANDO A DISTANCIA
3.1 COMO OPERAR CON EL PROGRAMADOR.
El programador dispone de una pantalla donde pueden leerse las ordenes introducidas.
El menú está formado por 8 pantallas las cuales están reflejadas como sigue:
FILTRANDO PROGRAMA 1
PROGRAMA FILTRACIÓN 2
on: 6:45
on: 20:45
off: 9:30
Idioma seleccionado
1
ESPAÑOL
Dia:
21-4-2003
Hora:
15:30
ILUMINACIÓN PISCINA
on: 21:45
off: 22:30
TIEMPO DE LAVADO DEL FILTRO
20 seg.
PROGAMA FILTRACIÓN 1
on: 6:45
off: 24:30
TIEMPO DE ENJUAGUE
off: 9:30
30 seg.
Durante el funcionamiento del motor del módulo, el mando indica "ESPERE MOVIENDO
VÁLVULA", cuando para y se pone en marcha la bomba, aparece en pantalla la función que en
este momento esté realizando.
ESPERE
MOVIENDO VÁLVULA
ATENCIÓN: Autoparado de bomba cuando la válvula está efectuando un cambio de posición.
El teclado:
ON.- Es el interruptor principal por medio del cual se pone en marcha. Se desconecta de forma
automática transcurridos 2 minutos. IMPORTANTE: si se para el sistema durante el invierno la
válvula debe estar en posición CERRADO MOTOR : OFF (Función manual)
AUTO.- El equipo entra en funcionamiento y ejecuta las ordenes programadas de filtración,
lavado, enjuague y luces piscina. La pantalla indicará NO HAY COMUNICACIÓN. Debe
mantenerse unos 6 segundos enfocado hacia el módulo para que se programe. A continuación
se irán visualizando todos los datos programados.
Teclas de menú.Avanzar menú.- ésta tecla avanzará las pantallas del menú
Retroceder menú.- ésta tecla hará retroceder las pantallas del menú
OK
+
+
_-
MANUAL
Tecla para entrar en el menú y validar las ordenes introducidas
Se utiliza para incrementar la variable que en este momento se tenga seleccionada,
también se utiliza para confirmar la pregunta de pantalla (s/n)
Se utiliza para disminuir la variable que en este momento se tenga seleccionada,
también se utiliza para negar la pregunta de pantalla (s/n)
Para acceder del AUTOMÁTICO a MANUAL, se debe pulsar MANUAL y aparece la
pantalla que en aquel momento esté operando. Por ejemplo si la bomba está
filtrando aparecerá en pantalla
FILTRACION
MOTOR : ON
37
ESPAÑOL
MANUAL
MANUAL.- Se accederá al control del programador para poder seleccionar
manualmente las seis posiciones: cerrado, filtración, lavado, enjuague, recirculación
y vaciado.
PUMP
PUMP ON/OFF.- Se utiliza para poner en marcha o parar la bomba en posición manual.
ON/OFF
VALVE
TURN.- Efectuará un giro en la válvula y se situará en la siguiente posición. En la
pantalla se podrá leer en que posición se encuentra la válvula.
TRANSMISIÓN.- Envío de ordenes a la válvula.
AUTO
AUTOMATICO
MENÚ DE PANTALLA.
Avanzar menú.- pantalla que permite seleccionar el idioma. Afectará a todos los
mensajes que aparezcan en pantalla.
Idioma Seleccionado:
Español
Avanzar menú se entra en la pantalla que permite modificar el día y hora del equipo.
Esta actualización sólo se deberá realizar una sola vez ya que el equipo dispone de un
reloj interno que, por medio de una pequeña batería, lo mantendrá siempre en hora.
Cuando la batería se agote se podrá ver en el modulo de la válvula 8 destellos
seguidos que nos indicarán batería agotada. A continuación debe ponerse en contacto con su instalador para su sustitución (ver anexo 5).
Debe reprogramarse de nuevo todo el proceso de filtración programado por el cliente.
Se mantiene el programa de fábrica.
Día: 20-10-2002
Hora: 15:30
Avanzar menú aparecerá la pantalla de información del primer programa (recuerde que el equipo dispone de 2 programas). En esta pantalla se informa del número
de programa que está visualizando y en segunda línea la programación de la hora
de inicio y la hora de acabado.
PROGRAMA FILTRACIÓN 1
on: 6:45
off: 9:30
38
ESPAÑOL
Avanzar menú aparece la pantalla con el programa 2.
Programa filtración 2:
on: 22:10 off: 24:50
Avanzar menú aparece la pantalla que informa del horario de puesta en marcha y
paro de las luces que iluminan la piscina.
Iluminación piscina:
on: 16:45 off: 17:50
Avanzar menú aparece en la pantalla el tiempo de programación para la limpieza
del filtro cuando el equipo detecte que hace falta aplicar esta acción. Las unidades de tiempo se expresan en segundos y el rango de tiempo programable es de 0
a 240.
Tiempo de lavado del filtro:
60 seg.
Avanzar menú aparece la opción enjuague. Ésta pantalla informa del tiempo
programado para el enjuague que el equipo aplicará automáticamente después de
haber hecho el lavado del filtro Las unidades de tiempo se expresan en segundos y
el rango de tiempo programable es de 0 a 240.
Tiempo de enjuague:
30 seg.
LIGHT
Pulsador para encender y apagar los focos de piscina. Esta función sólo se puede
utilizar con el sistema de programación de luces piscina automático puesto a “0”.
ON/OFF
3.2 PROGRAMA PREDETERMINADO POR EL FABRICANTE.
FILTRACIÓN.- Inicio y final en programas 1 y 2. La duración de todo un proceso de filtración
será limitado por el presostato hasta que el filtro alcance la presión ajustada por el instalador.
Ésta depende de la bomba utilizada. El rango de regulación está entre 1 y 1.6kg/cm², en este
momento la válvula se situará en posición de lavado.
Programa de filtración1
Programa de filtración2
on: 05:00
on: 22:00
off: 08:00
off: 02:00
LAVADO.- Al entrar la válvula en posición de lavado, realiza esta operación y transcurrido el
tiempo previsto, entra a la siguiente posición, enjuague.
Tiempo de lavado del filtro
60seg
ENJUAGUE.- Esta es la última fase a partir de la cual la válvula entra en posición de filtración.
Tiempo de enjuague
20seg
39
ESPAÑOL
3.3 MODIFICACIÓN DEL PROGRAMA PREDETERMINADO POR EL FABRICANTE.
MÉTODO.- Para poder modificar cualquier variable se deberá pulsar la tecla «ON» para poner
en marcha el equipo, siempre enfocando el mando hacia la válvula hasta que se tenga
comunicación. A partir de este momento puede programarse sin la necesidad de estar en
comunicación con la válvula.
Seleccionar las flechas del menú
(adelante )
( atrás) hasta acceder a la pantalla del
idioma.
Idioma seleccionado
ESPAÑOL
OK
A continuación presionar «OK» para poder acceder a la modificación del idioma,
aparecerá la pantalla
Quieres modificar el
idioma ?
s/n
Con el signo «+» confirme la función. Si quiere renunciar presione «-».
+
_
Pulse
+ - OK
ESPAÑOL
se procederá a seleccionar el idioma. Una vez seleccionado presione
Con la flecha
acceder a la pantalla
«OK» para validar. A continuación con las flechas
"FILTRACIÓN1" (se podrá modificar el inicio y final del programa de filtración) y se
procederá como sigue:
1º presione «OK» y aparecerá la pantalla.
Quiere modificar
programa 1?
s/n
el
Con el signo «+» confirme la función. A continuación aparece la pantalla.
Pulse: "
On: 00:00
+ - OK"
off:00:00
Aparecerá el primer dígito en intermitencia.
Con las flechas
debe colocarse encima de los dígitos que se desean modificar.
Con el signo «+» incrementará el dígito numérico.
Con el signo «-» disminuye.
Si programa On: 00:00 y Off: 00:00 la válvula no se pondrá en marcha.
Finalmente pulsen AUTO para confirmar la orden, SIEMPRE ENFOCANDO EL MANDO
PROGRAMADOR HACIA EL MODULO DE LA VÁLVULA Y A UNA DISTANCIA NO
SUPERIOR A 3m (9,8ft), YA QUE EN CASO CONTRARIO EN EL DISPLAY APARECERÁ
EL MENSAJE.
NO HAY COMUNICACIÓN
40
ESPAÑOL
Una vez se tenga la confirmación de la comunicación proceda a la siguiente función presionando
la flecha
que dará acceso a el resto de funciones.
LAVADO y ENJUAGUE. Proceder de la misma manera.
3.4 PROGRAMA MANUAL.
Poner en funcionamiento el programador presionando la tecla ON manteniendo el mando
enfocado hacia la válvula y aparecerá en pantalla la función que en aquel momento esté
realizando.
Presione la tecla «MANUAL»
Si aparece en pantalla por ejemplo:
FILTRACIÓN
MOTOR: ON
Si pulsa la tecla PUMP aparecerá en la pantalla:
FILTRACIÓN
MOTOR :OFF
De esta forma procederá a programar para PARAR la bomba.
A continuación pulse la tecla = enfoque el programador hacia el modulo de la válvula hasta
confirmar que la señal ha sido recibida.
No es necesario parar la bomba para hacer el cambio de posición: el programa se encarga de
hacer está función de forma automática.
El siguiente paso es seleccionar la función que se desee acceder.
Accionando la tecla VALVE la válvula girará pasando por FILTRACIÓN, FILTRACIÓN SKIMMER,
VACIADO, CERRADO, LAVADO RECIRCULACIÓN, ENJUAGUE.
Presione AUTO para volver al programa AUTOMATICO con el mando enfocado hacia la válvula
(aparecerá en pantalla TRANSMISION REALIZADA). A continuación aparecerá en la pantalla
la función que en aquel momento está realizando.
ESPERE MOVIENDO
VALVULA
ATENCIÓN.- Cuando el motor del módulo está en funcionamiento, no hay transmisión. Deben
esperar a que termine el movimiento de la válvula y se ponga en marcha la bomba de filtración
para poder ejecutar cualquier orden de programación.
3.5 MANTENIMIENTO DEL MANDO A DISTANCIA.
El mando a distancia es un aparato electrónico y como tal debe ser tratado con el máximo
cuidado, evitando caídas y que se moje.
No requiere otro mantenimiento que el de sacar las pilas durante la hibernación de la piscina,
y guardarlo en un lugar exento de polvo y humedad.
41
ESPAÑOL
4. COMO PROCEDER EN CASO DE MAL FUNCIONAMIENTO DE LA VÁLVULA.
4.1 POSIBLES AVERIAS
Comprobar que la programación efectuada en el mando a distancia esté en la fecha y hora
correctas.
La válvula está protegida y dispone de un sistema para detectar posibles averías.
En la parte superior del módulo montado en la válvula y a través de la transparencia de su tapa
protectora puede verse un LED rojo, el cual se pondrá en distintas intermitencias en caso de
avería.
Dos destellos.
Cuatro destellos.
Seis destellos.
Ocho destellos.
Si la válvula se para por cualquiera de las circunstancia descritas, debe ponerse en contacto
con el servicio técnico de su distribuidor. Indicar el modelo de válvula y tipo de destello.
El mando a distancia no funciona.- comprobar si las pilas están bien montadas
Comprobar que las pilas no estén agotadas.
El mando a distancia no admite el ser programado.- mala comunicación entre el mando y el
módulo de la válvula. Pruebe de aproximar la transmisión, si no responde, póngase en contacto
con el servicio técnico.
La válvula no responde a la programación.- cambiar la batería instalada en el módulo. Para
efectuar este cambio debe quitarse la tapa protectora del módulo que da acceso a la placa
electrónica donde está instalada la batería. La programación hecha por el cliente se pierde.
Esta batería es de larga duración (aprox. 3 años) (ver figura 8).
INFORMACIÓN PARA EL SERVICIO TÉCNICO
Posibles averías:
La válvula no se pone en marcha y el LED está apagado.- comprobar las conexiones de entrada
y salida de la fuente de alimentación 24VDC.
Comprobar que haya tensión en la red.
Comprobar la conexión de entrada a la válvula. El cambio de polaridad provoca que la válvula
no funcione. Se aconseja montar las conexiones con la polaridad correcta.
El LED está encendido y la bomba no funciona.- comprobar la conexión de la bomba y de la
válvula al contactor de la bomba.
LED.
2
destellos: no ha encontrado el micro de parada, posible rotura del micro.
4
destellos: exceso de consumo del motor campana frenada, causa: podría ser motivada
por un mal funcionamiento del filtro que deja pasar arena.
6
destellos: ha fallado el micro de elevación de la campana.
8
destellos: batería del módulo agotada, proceder al cambio.
No entra en fase de lavado: la presión que marca el manómetro es inferior a la ajustada por el
instalador en el presostato.
Causas: desajuste de la presión limitada por el presostato. Ajustar utilizando el manómetro.
Como referencia esta operación se realizará aflojando o apretando el tornillo (1) figura 1.
Para saber la presión máxima de bomba debe cerrarse el retorno a piscina.
Si haciendo está operación la válvula no entra en lavado, se aconseja ponerse en contacto con
el fabricante.
La válvula automática dispone de un sistema de seguridad alimentado por baterías. Este
sistema debe controlarse cuando se instale la válvula.
Desconecte la entrada de corriente de la red y la válvula de forma automática conecta las
baterías. La válvula se posicionará en FILTRACION y se parará.
42
ESPAÑOL
5. INSTRUCCIONES PARA EL DESMONTAJE DE LA VALVULA.
5.1 Procedimiento para el desmontaje de la válvula.- La válvula automática está compuesta
de dos elementos: la parte hidráulica que consta de una válvula convencional y el módulo
automático que es el que ejecuta las órdenes recibidas por el mando a distancia (ver anexo 2).
Para desmontar la válvula del filtro se procede como en una válvula manual.
5.2 Como proceder para desmontar el módulo del automatismo.- ANTES DE MANIPULAR LA
VÁLVULA DESCONECTAR DE LA FUENTE DE ALIMENTACIÓN.
Proceder al desmontaje.- En primer lugar sacar los cuatro tornillos que sujetan la tapa 1 (Fig. 2).
Desconectar todos los cables de entrada al módulo (Fig. 7) ATENCION primero debe
desconectarse toda fuente de alimentación de la red. ATENCIÓN proteger los extremos de los
cables de conexión batería ya que esta tiene corriente.
Volver a colocar la tapa 1 (Fig. 2).
Desmontar los tres tornillos (11) que sujetan el módulo a la válvula (Fig. 3).
Extraer el módulo hacia arriba con cuidado.
Colocarlo en una caja con protecciones para evitar que se dañe y mandarlo al fabricante.
A partir de este punto se puede operar de dos formas:
1ª La substitución del módulo por otro igual.
2ª Convertir de forma temporal el sistema en válvula manual.
5.3 Instrucciones para el montaje del módulo a la válvula.- El fabricante entregará al servicio
técnico o instalador el conjunto módulo automatismo para su instalación. Proceder con el
siguiente orden:
1º Montar el conjunto en la válvula. Para ello se deberá posicionar el módulo de forma que la
marca 2 (Fig. 3) coincida con la marca de la tapa de la válvula. Bajar el módulo con el
máximo cuidado hasta que quede encajado con el tornillo 3 (Fig. 4). En caso de no encajar
se puede girar el tornillo hasta que se acople con el pasador del motor 4 (Fig. 4). Se
requiere atención de no bajarlo bruscamente, pues podrían dañarse los micros del módulo.
2º Montar los tres tornillos 11 (Fig. 3).
3º Quitar la tapa 1 (Fig. 2) desmontando los 4 tornillos (13) para poder acceder a la regleta
de conexiones.
4º Conexionado.- (ASEGÚRARSE DE QUE NO HAY TENSIÓN EN LA RED) los cables deben
conexionarse de acuerdo con los esquemas adjuntos (ANEXO 1). IMPORTANTE utilizar los
prensaestopas que vienen montados en el módulo.
5º Montar la tapa 1 (Fig. 2) y fijar con los tornillos (13).
6º Conectar la entrada de tensión en el armario de maniobra y verificar el funcionamiento de
la válvula presionando AUTO, deberá iniciar el ciclo programado.
5.4- Conversión del sistema de forma temporal en manual.- Proceder a desmontar el módulo
según lo indicado en el apartado 5.2.
Desenroscar el tornillo 3 (Fig. 4), sacarlo, tirar hacia arriba de la pieza trinquete (5). A
continuación (ver Fig. 5) extraer el pasador (6) sale en dirección de la flecha, quitar la pieza
(7), quedando la válvula en posición de montaje de la maneta.
Para su montaje, colocar la maneta* 14 (Fig. 6) siempre orientada de forma que coincida el
triángulo marcado en el eje de la campana con el posicionador (9) de la maneta. Una vez
montada entrar el pasador* 10.
Armario de conexiones: - El pulsador MAN – AUTO debe estar en posición MAN.
* Piezas entregadas como recambio.
43
ESPAÑOL
5.5- Como pasar de válvula manual a automática.- Quitar el pasador 10 (Fig. 6). Sacar la
maneta (14), proceder a montar la pieza 7 (Fig. 5). Para ello debe orientarse de forma que
coincida la ranura (8) con el triángulo (Fig. 6). Una vez encajada colocar el pasador (6) (Fig.
5) que debe estar centrado en su longitud. A continuación montar la pieza (5) (Fig. 4). Esta
debe quedar posicionada (solo tiene un sentido de montaje). Montar el tornillo (3), roscar
hasta el final. No es necesario apretar ya que será conveniente aflojarlo para su orientación
con el pasador (4) del conjunto motor. A partir de este punto puede montarse el conjunto
módulo tal como se indica en el proceso de montaje del módulo a la válvula.
Armario de conexiones:- El pulsador MAN – AUTO debe estar en posición AUTO
44
87
28718 - 6A-10A ; 1,5CV-2CV
LINE
2
N
A1
1
5
2
3
6
4
4
6
2
AUT
1
A2
A1
4
MAN
COM
Electronic board connections
Press. Switch
PUMP
B
A2
KM1
2
GV
R3
11
FU 0.5A
21 22
22
7
8
21
24
19 20
9
10
KM2
A1
A2
4
3
LIGHTS
11 12
2
1
8 7 10 9 14 13
13 14
A2
R2
A1
12
14
-
15 16
11
19 20
Transformer rectifier 220V-24V
FU 0,5A
R 2W-4,7
21
22
Battery 24 VDC
Control box with rechargeable battery and 3 way valve
Armario con baterias y válvula de 3 vias
Coffret pour batteries et vanne 3 voies
Armadio di batterie e valvola a 3 vie
Batterieschrank und Dreiwegeventil
Armário de baterias e válvula de 3 vias
23 1
Act.
Diteico
220v
17 18
24
24V
220V
ELECTRICAL WIRING DIAGRAMS
SCHÉMAS ÉLECTRIQUES DE CÂBLAGE
ESQUEMAS ELÉCTRICOS DE CONEXIÓN
SCHEMI ELETTRICI
ELEKTRISCHE ANSCHLUSSSCHEMATA
ESQUEMAS ELÉCTRICOS DE LIGAÇÃO
28631 - 4A-6,3A ; ¾CV-1CV
Code :
Monofasico
1-Phase
LINE 220/50Hz
DIF
Press. Switch
5
Battery
3
24 VDC
1
E. VALVE
1
Motor-Pump
N
Lights
Control unit
3 Way valve
ANEXO 1 -
28714 - 6A-10A ; 1,5CV-2CV
1
A2
A1
2
R1
12
14
3
SOLENOIDE
11
4
A1
5
2
1
6
4
3
4
3
6
5
AUT
2
GV
1
A2
A1
4
MAN
COM
Electronic board connections
Press. Switch
PUMP
B
A2
KM1
2
1
R3
11
FU 0.5A
14
22
8
24
2 1 19 20
7
21
10
4
3
LIGHTS
11 12
2
1
8 7 10 9 13 14
9
A2
KM2
A1
R2
A1
13 14
A2
15 16
14
23 1
Act.
Diteico
220v
17 18
19 20
24
Transformer rectifier 220V-24V
Control box with solenoid valve and 3 way valve
Armario con electroválvula y válvula de 3 vias
Coffret pour électrovanne et vanne 3 voies
Armadio con elettrovalvola e valvola a 3 vie
Schrank mit Elektroventil und Dreiwegeventil
Armário com electroválvula e válvula de 3 vias
12
11
24V
220V
ELECTRICAL WIRING DIAGRAMS
SCHÉMAS ÉLECTRIQUES DE CÂBLAGE
ESQUEMAS ELÉCTRICOS DE CONEXIÓN
SCHEMI ELETTRICI
ELEKTRISCHE ANSCHLUSSSCHEMATA
ESQUEMAS ELÉCTRICOS DE LIGAÇÃO
28625 - 4A-6,3A ; ¾CV-1CV
Code :
Monofasico
1-Phase
LINE 220/50Hz
LINE
1
Press. Switch
2
Battery
N
24 VDC
N
E. VALVE
DIF
Motor-Pump
Control unit
Lights
88
3 Way valve
ANEXO 1 -
28720 - 2,5A-4A ;1,5CV-2CV
LINE
1
N
3
5
2
1
6
4
3
Motor Bomba
B
A2
KM1
A1
2
1
4
3
6
5
(a)
6
5
AUT
2
GV
1
A2
A1
4
MAN
COM
R3
11
FU 0.5A
21 22
Electronic board connections
Press. Switch
2
3
22
7
24
19 20
8
21
10
4
3
LIGHTS
11 12
2
1
8 7 10 9 14 13
9
A2
KM2
A1
13 14
A2
R2
A1
12
14
15 16
11
-
19 20
Transformer rectifier 220V-24V
FU 0,5A
R 2W-4,7
21
Battery 24 VDC
22
Control box with solenoid valve and 3 way valve
Armario con electroválvula y válvula de 3 vias
Coffret pour électrovanne et vanne 3 voies
Armadio con elettrovalvola e valvola a 3 vie
Schrank mit Elektroventil und Dreiwegeventil
Armário com electroválvula e válvula de 3 vias
23 1
Act.
Diteico
220v
17 18
24
24V
220V
ELECTRICAL WIRING DIAGRAMS
SCHÉMAS ÉLECTRIQUES DE CÂBLAGE
ESQUEMAS ELÉCTRICOS DE CONEXIÓN
SCHEMI ELETTRICI
ELEKTRISCHE ANSCHLUSSSCHEMATA
ESQUEMAS ELÉCTRICOS DE LIGAÇÃO
28635 - 1,6A-2,5A ; 1CV
Code :
Trifasico
3-Phase
LINE 230/400V 50Hz
3
2
1
N
DIF
2
Press. Switch
2
Battery
1
E. VALVE
N
24 VDC
N
Motor-Pump
Control unit
Lights
89
3 Way Valve
ANEXO 1 -
90
Code :
28716 - 2,5A-4A : 1,5CV-2CV
1
A2
A1
2
R1
LINE
12
14
3
1
N
SOLENOIDE
11
2
N
4
3
A1
5
2
1
6
4
3
4
Motor Bomba
B
A2
KM1
2
6
5
(a)
6
AUT
2
GV
1
A2
A1
4
MAN
COM
Electronic board connections
Press. Switch
2
5
R3
11
FU 0.5A
14
22
8
24
2 1 19 20
7
21
9
A2
10
KM2
A1
4
3
LIGHTS
11 12
2
1
8 7 10 9 14 13
-
13 14
A2
R2
A1
14
15 16
11
23 1
Act.
Diteico
220v
17 18
19 20
24
Transformer rectifier 220V-24V
Control box with solenoid valve and 3 way valve
Armario con electroválvula y válvula de 3 vias
Coffret pour électrovanne et vanne 3 voies
Armadio con elettrovalvola e valvola a 3 vie
Schrank mit Elektroventil und Dreiwegeventil
Armário com electroválvula e válvula de 3 vias
12
24V
220V
ELECTRICAL WIRING DIAGRAMS
SCHÉMAS ÉLECTRIQUES DE CÂBLAGE
ESQUEMAS ELÉCTRICOS DE CONEXIÓN
SCHEMI ELETTRICI
ELEKTRISCHE ANSCHLUSSSCHEMATA
ESQUEMAS ELÉCTRICOS DE LIGAÇÃO
28629 - 1,6A - 2,5A ; 1CV
Trifasico
3-Phase
LINE 230/400V 50Hz
3
2
1
N
DIF
3
Press. Switch
1
Battery
3
E. VALVE
2
24 VDC
1
Motor-Pump
N
Lights
Control unit
3 Way valve
ANEXO 1 -
Code : 30945
LINE 220/50Hz
Press. Switch
LINE
2
N
Cancel timer
FU0.5A
5
2
6
4
21 22
1 2 19 20
Electronic board connections
PUMP
B
A2
KM1
A1
4
LIGHTS
11 12
2
3
8 7 10 9 14 13
A2
KM2
A1
1
3
6
GV
1
4
5
Anular temporizador
Cancel timer
2
3
E. VALVE
Anular temporizador
Press. Switch
DIF
1
Battery
1
24 VDC
N
ARMARIO EXISTENTE
Motor-Pump
Control unit
EXISTING CONTROL BOX
2
AUT
1
R3
5
A2
A1
4
MAN
COM
6
12
7
8
11
14
9
10
13 14
A2
R2
A1
12
14
15 16
11
23 1
Act.
Diteico
220v
17 18
ARMARIO CON BATERIAS 24V DC
CONTROL BOX WITH RECHARGEABLE BATTERIES 24V DC
-
Transformer rectifier 220V-24V DC
21
A
22
Battery 24 VDC
N
L
T
(*)
(*)Complementary control box for existing intallations
Armario complementario para armarios existentes
Coffret auxiliaire (dans le cas de coffrets déjà existants)
Armadio complementare per armadi già esistenti
Erweiterungsschrank für vorhandene Schränke
Armário complementar para armários existentes
FU 0,5A
R2W-4,7
19 20
24
24V
220V
ELECTRICAL WIRING DIAGRAMS
SCHÉMAS ÉLECTRIQUES DE CÂBLAGE
ESQUEMAS ELÉCTRICOS DE CONEXIÓN
SCHEMI ELETTRICI
ELEKTRISCHE ANSCHLUSSSCHEMATA
ESQUEMAS ELÉCTRICOS DE LIGAÇÃO
Lights
91
3 Way valve
ANEXO 1 -
Code : 30944
LINE 220/50Hz
LINE
Press. Switch
DIF
1
2
N
5
2
6
4
1 2 19 20
Electronic board connections
PUMP
B
A2
KM1
A2
KM2
A1
4
3
LIGHTS
11 12
2
1
A1
1
FU0.5A
Anular temporizador
3
GV
Anular temporizador
6
5
Cancel timer
4
3
24 VDC
Cancel timer
2
1
Battery
N
ARMARIO EXISTENTE
E. VALVE
EXISTING CONTROL BOX
8 7 10 9 14 13
Motor-Pump
Control unit
Press. Switch
5
6
1
A2
A1
2
R1
CONTROL BOX WITH SOLENOID VALVE
12
3
1
SOLENOIDE
11
AUT
2
4
A2
A1
4
MAN
COM
R3
12
7
14
8
11
9
ARMARIO CON SOLENOIDE PARA ELECTROVALVULA
-
10 13 14
A2
R2
A1
15 16
14
23 1
Act.
Diteico
220v
17 18
19 20
24
Transformer rectifier 220V-24V DC
N L
(*)
T
(*)Complementary control box for existing intallations
Armario complementario para armarios existentes
Coffret auxiliaire (dans le cas de coffrets déjà existants)
Armadio complementare per armadi già esistenti
Erweiterungsschrank für vorhandene Schränke
Armário complementar para armários existentes
12
11
24V
220V
ELECTRICAL WIRING DIAGRAMS
SCHÉMAS ÉLECTRIQUES DE CÂBLAGE
ESQUEMAS ELÉCTRICOS DE CONEXIÓN
SCHEMI ELETTRICI
ELEKTRISCHE ANSCHLUSSSCHEMATA
ESQUEMAS ELÉCTRICOS DE LIGAÇÃO
Lights
92
3 Way valve
ANEXO 1 -
93
94
-
- Turn on the pool lights (Manual)
- Mise sous tension de l'éclairage de la piscine
(Manuel)
- Conecta las luces de la piscina (Manual)
- Accensione delle luci della piscina (manuale)
- Schaltet die Schwimmbeckenbeleuchtung ein (manuell)
- Liga as luzes da piscina (Manual)
Main switch
Interrupteur principal
Interruptor principal
Interruttore principale
Hauptschalter
Interruptor principal
- Increase the setting and
confirm answer to prompt.
- Incrémentation de la variable et
réponse affirmative aux
questions affichées à l'écran
- Incrementa variable y confirma
pregunta de pantalla.
- Incrementa la variabile e
conferma la domanda che
appare sul display
- Erhöht die Variable und bejaht
die Bildschirmfrage.
- Aumenta a variável e confirma a
pergunta do ecrã.
-
Accept the command
Validation des commandes
Validacion de ordenes
Conferma degli ordini
Befehlsbestätigung
Validação de ordens
-
Access the automatic menu.
Accès au menu automatique.
Accede a menu automatico.
Accesso al menu automatico.
Zugriff auf Menü „Auto“
Tem acesso a menu
automático.
-
- Decrease setting and cancel
answer to prompt.
- Décrémentation de la variable
et réponse négative aux
questions affichées à l'écran.
- Disminuye variable y niega
pregunta de pantalla.
- Diminuisce la variabile e
annulla la domanda che appare
sul display
- Verringert die Variable und
verneint die Bildschirmfrage
- Diminui a variável e nega a
pergunta do ecrã.
- Back to previous menu
- Défilement arrière du
menu
- Retrocede menu.
- Fa scorrere in dietro il
menu
- Zurück im Menü
- Retrocede o menu
-
Go to manual menu
Accès au menu manuel
Accede a menu manual
Accesso al menu manuale
Zugriff auf Menü „Manuell“
Tem acesso a menu manual
- Start or stop the pump. (Manual).
- Mise en marche ou arrêt de la pompe.
(Manuel)
- Pone en marcha o para la bomba. (Manual).
- Avvio o arresto della pompa (manuale).
- Schaltet die Pumpe ein oder aus (manuell).
- Põe em funcionamento ou pára a bomba.
Forward to next menu.
Défilement avant du menu.
Avanza menu.
Fa scorrere in avanti il menu.
Weiter im Menü
Avança menu.
-
-
Send orders to the valve. (Manual)
Envoi des commandes à la vanne. (Manuel)
Transmite las ordenes a la valvula. (Manual).
Trasmette gli ordini alla valvola (manuale)
Überträgt die Befehle an das Ventil (manuell).
Transmite as ordens à válvula. (Manual)
Select the valve position. (Manual)
Sélecteur de position de la vanne. (Manuel)
Seleccionador de posicion de la valvula. (Manual)
Seleziona le posizioni della valvola (manuale)
Wahlschalter für Ventilstellung (manuell)
Seleccionador de posição da válvula. (Manual)
Automatic module
Module automatique
Módulo automático
Modulo automatico
Automatikmodul
Módulo automatico
1
13
Screw
Vis
Tornillo
Viti
Schraube
Parafuso
Multiport valve
Vanne multivoies
Válvula selectora
Valvola selettrice
Mehrwege ventil
Valvula selectora
1
FIG. 1
FIG. 2
11
2
3
5
4
FIG. 3
FIG. 4
6
7
8
FIG. 5
14
9
10
Triangle mark
Repère triangulaire
Marca del triangulo
Riferimento del triangolo
Dreiecksmarkierung
Marca do triângulo
FIG. 6
Lift about 2 millimetres to release some pressure and
make it easier to remove.
Press with a screwdriver to remove the battery.
Replace, making absolutely sure the polarity is correct.
Soulever de 2 millimètres environ pour soulager la
pression et faciliter la dépose.
Appuyer avec un tourne-vis pour extraire la batterie.
Procéder au remontage en respectant scrupuleusement
la polarité.
FIG. 7
Levantar unos 2 milímetros para que tenga menos
presión y así facilitar la extracción.
Presionar con un destornillador para extraer la batería.
Volver a montar prestando mucha atención con la
polaridad.
Sollevare di circa 2 millimetri in modo da diminuirne la
pressione e agevolarne così l'estrazione.
Fare pressione con un cacciavite per estrarre la batteria.
Rimontare, prestando molta attenzione alla polarità.
Etwa zwei Millimeter anheben, um den Druck zu
mindern und das Herausziehen zu erleichtern.
Zur Batterieentnahme mit einem Schraubenzieher
eindrücken.
Beim Wiedereinsetzen unbedingt auf die Polarität
FIG. 8
Levantar uns 2 milímetros para que tenha menos
pressão e assim facilitar a extracção.
Premir com uma chave de parafusos para extrair a
bateria.
Voltar a montar prestando muita atenção à polaridade.
TECHNICAL CHARACTERISTICS
CARACTERISTIQUES TECHNIQUES
CARACTERÍSTICAS TÉCNICAS
DATI TECNICI
TECHNISCHE ANGABEN
CARACTERISTICAS TECNICAS
1½”
2”
(mm)
A
B
C
D
E
F
G
H
I
J
K
L
M
N
O
330
180
200
132
64
63
101
172
43
30
95
1”½”
90
6
50
365
211
200
132
76
63
127
235
43
31,5
115,5
2”
105,5
5
63
www.astralpool.com
Cod. 400
- WE RESERVE THE RIGHT TO CHANGE ALL OR PART OF THE FEATURES OF THE ARTICLES OR CONTENTS OF
THIS DOCUMENT , WITHOUT PRIOR NOTICE.
- NOUS NOUS RÉSERVONS LE DROIT DE MODIFIER TOTALEMENT OU EN PARTE LES CARACTERISTIQUES DE
NOS ARTICLES OU LE CONTENU DE CE DOCUMENT SANS PRÉ-AVIS.
- NOS RESERVAMOS EL DERECHO DE CAMBIAR TOTAL O PARCIALMENTE LAS CARACTERÍSTICAS DE
NUESTROS ARTÍCULOS O CONTENIDO DE ESTE DOCUMENTO SIN PREVIO AVISO.
- CI RISERVIAMO IL DIRITTO DI CAMBIARE TOTALMENTE O PARZIALMENTE LE CARATTERISTICHE TECNICHE
DEI NOSTRI PRODOTTI ED IL CONTENUTO DI QUESTO DOCUMENTO SENZA NESSUM PREAVVISO.
- WIR BEHALTEN UNS DAS RECHT VOR, DIE MERKMALE UNSERER PRODUKTE UND DEN INHALT DIESER
BESCHREIBUNG OHNE VORHERIGE ANKÜNDIGUNG GANZ ODER TEILWEISE ZU ÄNDERN.
- RESERVAMO-NOS NO DIREITO DE ALTERAR, TOTAL OU PARCIALMENTE AS CARACTERISTICAS DOS NOSSOS
ARTIGOS OU O CONTEÚDO DESTE DOCUMENTO SEM AVISO PRÉVIO.
COPYRIGHT ASTRALPOOL- EDICIÓN FEBRERO 2004 -
Dimensiones
Dimensions
AUTOMATIC MULTIPORT VALVE
VANNE MULTIVOIES AUTOMATIQUE
VÁLVULA SELECTORA AUTOMÁTICA
VALVOLA SELETTRICE AUTOMATICA
AUTOMATISCHES MEHRWEGE VENTIL
VÁLVULA SELECTORA AUTOMÁTICA
INSTALLATION AND MAINTENANCE MANUAL
MANUEL D'INSTALLATION ET D'ENTRETIEN
MANUAL DE INSTALACIÓN Y MANTENIMIENTO
MANUALE DI INSTALLAZIONE MANUTENZIONE
INSTALLATIONS-UND BEDIENUNGSANLEITUNGEN
MANUAL DE INSTALAÇAO Y MANUTENÇAO
'HFODUDFLyQGHFRQIRUPLGDG&(
(&'HFODUDWLRQRI&RQIRUPLW\
6\VWHP95$&
(OIDEULFDQWHWKHPDQXIDFWXUHU95$&6$
&/OHYDQWQ~P3RO,QG/OHYDQW
3DUHWVGHO9DOOqV
%DUFHORQD6SDLQ
&HUWLILFDTXHQXHVWURGHFODUDTXHQXHVWURFHUWLI\WKDWRXUGHFODUHVWKDW
7LSRW\SH$FWXDGRUHOHFWUyQLFR6\VWHP95$&GH9FRUULHQWHFRQWLQXDSDUDYiOYXODV
VHOHFWRUDVDXWRPiWLFDV
96\VWHP95$&DFWXDWRUIRUDXWRPDWLFPXOWLSRUWYDOYHV
0RGHOR0RGHO$FWXDGRU\SDUDYiOYXODVVHOHFWRUDVGHò\
$FWXDWRUDQGIRUòDQGPXOWLSRUWYDOYHV
FXPSOHFRQORVUHTXLVLWRVHVWDEOHFLGRVSRUOD81,Ï1(8523($HQ&203$7,%,/,'$'
(/(&7520$*1e7,&$GHDFXHUGRDODVVLJXLHQWHVQRUPDV
LVDFFRUGLQJWRUHTXLUHPHQWVVWDEOLVKHGE\WKH(8523($181,21LQWKH(/(&75,&$/
0$*1(7,&&203$7,%,/,7<(0&',5(&7,9(&(DFFRUGLQJWRIROORZLQJVWDQGDUGV
(1&203$7,%,/,'$'(/(&7520$*1Ê7,&$&(01RUPDVJHQpULFDV
(PLVLRQHVHQHQWRUQRVUHVLGHQFLDOHVFRPHUFLDOHV\GHLQGXVWULDOLJHUD
(1(/(&7520$*1(7,&&203$7,%,/,7<(0&*HQHULFVWDQGDUGV(PLVVLRQ
VWDQGDUGIRUUHVLGHQWLDOFRPPHUFLDODQGOLJKWLQGXVWULDOHQYLURQPHQWV
(1&203$7,%,/,'$'(/(&7520$*1Ê7,&$&(01RUPDVJHQpULFDV
,QPXQLGDGHQHQWRUQRVUHVLGHQFLDOHVFRPHUFLDOHV\GHLQGXVWULDOLJHUD
(1(/(&7520$*1(7,&&203$7,%,/,7<(0&*HQHULFVWDQGDUGV,PPXQLW\IRU
UHVLGHQWLDOFRPPHUFLDODQGOLJKWLQGXVWULDOHQYLURQPHQWV
<SRUHOFXPSOLPLHQWRGHHVWDVGLUHFWLYDVQXHVWURDFWXDGRU6\VWHP95$&SXHGHLQFRUSRUDUOD
PDUFD&(
%\DFFRPSOLVKLQJWKHVHGLUHFWLYHVRXU6\VWHP95$&DFWXDWRUFDQLQFRUSRUDWHWKH&(PDUN
<VHUYHQGLGRVHQOD81,21(8523($FXPSOLHQGRFRQORVUHTXLVLWRVOHJDOHV
$QGWKH\FDQEHVROGWKURXJKRXW(8523($181,21SURYLGLQJDOOOHJDOUHTXLUHPHQWV
0U5DPRQ6DOLFKV'LUHFWRU0DQDJHU
3DUHWVGHO9DOOqV(QHUR
ENGLISH
"Important: This instruction manual contains basic information with respect to safety
measures which should be adopted during installation and putting into service. For this
reason, it is essential that both the installer and user carefully read these instructions
before carrying out any installation or putting into service operations."
In order to obtain optimum performance from the automatic valve, it is recommended that the
instructions given below are strictly followed.
General safety prescriptions:
These symbols
indicate the possibility of danger as the consequence of not
respecting the corresponding prescriptions.
DANGER. Risk of electrocution. The lack of warning of this prescription involves a risk of
electrocution.
DANGER. The lack of warning of this prescription involves a risk of personal injury or material
damages.
WARNING. The lack of warning of this prescription involves a risk of damage to the automatic
valve or the installation.
GENERAL SAFETY REGULATIONS
GENERAL.
The valve described in this manual has been specially designed to provide correct water
circulation in the swimming pool during the various operational phases.
It has been designed to work with clean water at temperatures not exceeding 35ºC.
The installation must be carried out in accordance with the specific instructions for each
particular implementation.
Current in-force regulations for the prevention of accidents must be observed.
Any modification to the valve’s electronic module or remote control unit requires the prior
authorisation from the manufacturer. Original spare parts and accessories authorised by the
manufacturer will guarantee greater safety. The manufacturer of this automatic valve is exempt
from all responsibility for any damage caused by non-authorised spare parts or accessories.
During operation, the valve’s electric and electronic parts have electric power connected to
them.
Any work to the automatic valve and any equipment connected to it, must only be carried out
when the start-up devices have been disconnected.
The user must ensure that installation and maintenance work is carried out by adequately
qualified and authorised personnel, and these have previously carefully read the installation
and service instructions.
Automatic valve operational safety is only guaranteed by full compliance and respect of the
installation and service instructions.
The maximum voltage values must never be exceeded under any circumstances.
In the case of incorrect operation or a fault, please contact the closest manufacturer’s
representative or technical assistance service.
3
ENGLISH
ADVICE DURING INSTALLATION AND ASSEMBLY OPERATIONS.
During the connection operations of the electrical wiring to the valve modules, great attention
must be given to polarity, and it must be verified that pieces of wiring are not left inside after
closing.
The connections should be made by following the electrical diagram included with the valve
module.
It should be verified that the electrical wiring connections to the valves electronic card are
firmly made.
The seal on the module’s box should be checked for correct positioning to prevent the entry of
water, it should also be checked that the compression gland is also correctly located
Particular attention should be paid, so that, under no circumstances, is it possible for water to
enter the electronic module. In the case where the intended use is not that for which the valve
was designed, adaptation and supplementary technical regulations may be necessary.
ADVICE FOR WHEN PUTTING INTO SERVICE.
Before putting the automatic valve into service, it is necessary to verify the calibration of the
electrical protection devices in the operations cabinet and that they are correctly positioned
and fixed in place.
NOTE: It is recommended that the bathing facilities are not used while the filtration equipment
is in operation.
ADVICE DURING INSTALLATION AND MAINTENANCE WORK.
National installation regulations must be taken into account when assembling and installing
the automatic valve.
Extra care must be taken so that it is not possible, under any circumstances, for water to enter
the automatic valve electronic circuit.
All contact, including accidental, must be avoided at all times with the moving parts in the
automatic valve during operation and/or before complete shutdown.
Before carrying out any maintenance or any other electrical or electronic work, it must be
ensured that switch-on devices are locked.
It is recommended that the following steps be taken before performing any maintenance on
the automatic valve.
1.- Remove electrical power to the valve.
2.- Lock the switch-on devices.
3.- Verify that there is no electrical power being applied to the circuits, including auxiliary
and supplementary services.
This list must be considered indicative and not binding with respect to safety, there may be
other specific safety standards in particular regulations.
IMPORTANT: due to the complexity of the situations covered, the instructions for installation,
use and maintenance contained in this manual, do not make any attempt to cover all possible
service and maintenance cases. If additional instructions are necessary or specific problems
arise, please do not hesitate in contacting the distributor or the valve manufacturer directly.
Our automatic valves may only be installed in swimming or other pools which fully comply with
the HD 384.7.702 standard. When any doubt exists a specialist should be consulted.
Please check the packing contents.
4
ENGLISH
CONTENTS
1.
1.1
1.2
1.3
1.4
1.5
1.6
Valve installation
Verification of valve type
Guarantees
Flow diagram for the various valve operating positions
Control. module
Remote control
Solenoid valve
2.
2.1
2.2
Electrical connections between the valve and the control board
Electrical installation
Valve connections (diagram)
3.
3.1
3.2
3.3
3.4
3.5
Remote control programming
How to operate the programmer
Manufacturer’s default program
Modification of manufacturer’s default program
Manual program
Remote control maintenance
4.
4.1
What to do in the case of incorrect valve operation
Possible faults
5.
5.1
5.2
5.3
5.4
5.5
Instructions for removing the module installed on the valve
Valve disassembly procedure
How to disassemble the valve module
Instructions for installing the module on the valve
Temporary conversion of the system to manual operation
How to change the valve from manual to automatic operation
5
ENGLISH
1. VALVE INSTALLATION
1.1 VERIFICATION OF VALVE TYPE
Multiport valve, 1½” Model
24 Vdc Model 2”
24 Vdc
Both the model and code are indicated on a label, together with the valve operating
specifications and the label itself is located on the rear section of the electronic module cover
which is installed on the valve.
Valve hydraulic and electrical operation are verified before it leaves the factory.
It is recommended that before carrying out the installation, a visual inspection be performed
in case any knocks were received which could have damaged the valve.
The valve will be replaced in any justified complaint.
1.2 GUARANTEES.
The valves leave the factory in a fully tested condition, which enables us to guarantee operation.
The guarantee will be effective provided that the installation has been correctly carried out
and this requires that the actual installation operation be performed by a person with the
necessary qualifications for this type of work.
1.3 FLOW DIAGRAM FOR THE VARIOUS VALVE OPERATING POSITIONS.
The valve should be installed in the filter following the instructions provided in the included
leaflet.
The valve must not be installed in the inverted position.
The valve should be installed on the left side of the filter in order to facilitate communication
with the remote control.
Installation under load, the maximum water column that can be supported by the pump is six
metres (19.68 ft).
The hydraulic connections for correct operation are made by following the markings on the
valve itself.
PUMP indicates the connection coming from the pump.
TOP indicates the upper input to the filter.
BOTTOM indicates the lower return from the filter to the valve.
RETURN indicates the return from the valve to the swimming pool.
WASTE indicates the connection to the drains.
Introduction to the filtration process operation:
The pump sucks water from the swimming pool via the skimmer, bottom cleaner or drain, it is
taken to the multiport valve (PUMP connection) and from here to the filter (TOP). It passes
through the filter bed and returns to the valve once again via the BOTTOM connection and is
taken back to the swimming pool by means of the RETURN connection.
The valve includes a pressure switch which is factory set to an operating pressure of 1.5kg/cm2
(21.3 psi). If this requires further adjustment, it should be set to the pressure of the installed
pump, adjustment range: 0.3 to 2 kg/cm2 (4.2-28.4 psi). According to requirements, it can be
installed with an adjustment of between 1 and 6 kg/cm2 (14.22-85.3 psi).
If the pressure exceeds the pre-established limit, the valve will automatically changeover to
the Backwash position.
6
ENGLISH
Wash process:
The valve automatically reverses the filtration cycle and commences the sand wash process,
this requires that the valve is set so that the water coming from the PUMP connection passes
through the valve and is taken to the filter by the BOTTOM connection, the sand is stirred and
the water, together with any accumulated dirt exits the valve TOP connection which
communicates with the WASTE connection and is taken to the drains. This process is carried
out in accordance with the pre-established timing.
Back-wash process:
The valve is positioned to compress the filter bed and not to send water containing sand to the
swimming pool, this is achieved by water coming from the PUMP connection entering the filter
by the TOP connection, it then compresses the sand and the water enters the valve via the
BOTTOM connection which then sends it to the WASTE connection. This process is carried out
in function of the pre-established time and once it has elapsed, the valve commences the
filtration process again.
VALVE CHARACTERISTICS
Sizes 1½” and 2”, side and top mounting
Valve body manufactured in ABS
Internal distributor manufactured in PPO
Connection via threaded female, BSP or NPT, BOTTOM connection for gluing
Operating pressure 3.5 bars
Test pressure 5.2 bars
1.4 CONTROL MODULE.
This is the part of the valve which consists of a geared motor and an electronic card with limit
switches for the various valve operational positions.
An electronic circuit which receives commands so that the pre-established program is executed.
Mechanical components which carry out the various valve movements.
The entire assembly is mounted inside a transparent casing which is closed by four screws.
The module includes a signal receptor/transmitter unit for receiving and giving commands to
the valve.
The electrical input and output connections are protected by compression glands which provide perfect protection against external agents which could damage the assembly.
The power supply is 24 Vdc.
7
ENGLISH
1.5 REMOTE CONTROL
The remote control is used to programme the valve’s operating functions. The commands are
transmitted by infrared and this means that, when a command is given, the control must be
directed towards the valve module, specifically, in front of the module’s inclined plane, using
the red pilot light which can be seen through the module’s cover as a reference.
Each programmed function must be transmitted separately and after a few seconds transmission
confirmation will be received. During this time, the control must be directed towards the valve
and will not operate at distances exceeding three metres. Language programming can be
accomplished without having to issue the transmission command to the valve module.
The control permits:
Selection of the language to be used.
Automatic operation with the following functions:
Two filtration programs, wash, back-wash, programmed and manual lighting of the swimming
pool lights.
Manual operation with the following functions:
Bottom filtration, skimmer filtration, wash, back-wash, re-circulation, empty and close.
It requires two LR-6 1.5v alkaline batteries, and it is recommended that when the equipment
is not in use (during winter) that the batteries be removed to prevent any possible damage and
the control stored in the house in a dry place.
During winter, it is also recommended that the swimming pool operates with minimum filtration
time in order to prevent sand compaction.
1.6 SOLENOID VALVE
The solenoid valve must be 1½” or 2", 24 Vac operation and normally closed, and must have a
minimum working pressure of 0 kg/cm2 (0 psi).
2. ELECTRICAL CONNECTIONS BETWEEN THE VALVE AND THE CONTROL BOARD.
2.1 ELECTRICAL INSTALLATION.
The automatic valve is installed on the filter and has to be connected to the system’s general
control cabinet.
Additional components which are to be installed on the control board for valve operation:
TRANSFORMER RECTIFIER WITH 24 Vdc OUTPUT, which is used to power the valve’s electronic module.
RECHARGEABLE BACKUP BATTERIES, are connected automatically for use during emergencies, such as mains power failure, the valve moves to the filtration position and then shuts
down. Charge maintenance is automatically carried out from the control module. DURING
INSTALLATION, IT IS VERY IMPORTANT NOT TO REVERSE THE POLARITY, WHICH COULD
LEAD TO THE FUSE BLOWING ON THE ELECTRONIC CARD IN THE CONTROL CABINETS.
Connection information for the other components which are normally installed in the control
cabinets:
PUMP START-UP CONTACTOR, the electronic module closes the circuit which provides power
to the pump start-up contactor. Coil voltage is either 24 Vdc or 24 Vac. HIGHER VOLTAGES
MUST NOT BE USED.
SWIMMING POOL LIGHTS TRANSFORMER, on the electronic module provides a programmed
signal which is used to close the circuit that energise the contactor coil (24 Vdc or 24 Vac)
which switches on the lights.
OTHER COMPONENTS, these are used for the protection of an installation which includes a
pump motor.
There is also an optional auxiliary relay for operation of a 3-way valve with a 24 Vdc electrical
actuator.
2.2 VALVE CONNECTIONS. See appendix (1)
8
ENGLISH
3. REMOTE CONTROL PROGRAMMING
3.1 HOW TO OPERATE THE PROGRAMMER.
The programmer is fitted with a screen on which the entered commands may be read.
The menu consists of eight different screens which are shown below:
BACK-WASH TIME
FILTRATION PROGRAM 1
on: 6:45
on: 20:45
off: 9:30
off: 24:30
LENGUAGE SELECTED
POOL LIGHTING
ENGLISH
on: 21:45
Day:
21-4-2003
Time:
15:30
FILTER BACKWASH TIME
20 sec.
RINSE TIME
FILTRATION PROGRAM 1
on: 6:45
off: 22:30
30 sec.
off: 9:30
During operation of the module’s motor, the control will display «WAIT! VALVE MOVING»,
when it stops and the pump comes on, the screen will display the function that is currently
being performed.
WAIT !
VALVE MOVING
WARNING: The pump stops automatically when the position is being changed.
The keyboard:
ON: this is the main switch used for switching on, it will be automatically switched off after two
minutes. IMPORTANT: if the system is switched off during winter, the valve must be in the
CLOSED MOTOR: OFF position (manual function).
AUTO: the equipment is operating and carries out the programmed commands for filtration,
wash, back-wash and swimming pool lights. The screen will indicate NO COMMUNICATION and
should be held pointed at the module for some six seconds, so that it is programmed, after
which all the programmed information will be displayed .
Menu keys:
Menu forward: this key will move forward through the menu screens.
Menu back: this key will move backward through the menu screens
OK
+
+
-_
-
MANUAL
key used to enter in the menu and confirm the entered commands.
used to increase the currently selected variable, also used for a positive reply
to the screen question (y/n).
used to decrease the currently selected variable, also used for a negative reply to
the screen question (y/n).
To go from AUTOMATIC to MANUAL, MANUAL should be pressed and the currently
operational screen will be displayed, for example, if the pump is filtering, the following
will be displayed on-screen:
FILTRATION
MOTOR : ON
9
ENGLISH
MANUAL
PUMP
MANUAL.- Programmer control is accessed so that the six positions may be manually
selected: closed, filtration, wash, back-wash, re-circulation and empty.
PUMP ON/OFF.- used to start or stop the pump in manual position.
ON/OFF
VALVE
TURN.- causes the valve to rotate and move to the following position, the screen will
display the current valve position.
TRANSMISSION
= - transmission of commands to the valve.
AUTO
AUTOMATIC
SCREW MENU
Menu forward: the screen allows the language to be selected; this will
affect all screen messages.
Language selected:
ENGLISH
Menu forward displays the screen which permits the equipment day and
time to be modified. This operation is only required once because the equipment is fitted with a battery-operated internal clock which will maintain the
time.
When the battery requires replacing, the valve module will flash eight times
and the installer should be contacted for replacement. (See Appendix 5)
The customer’s full filtration process must be reprogrammed.
The factory program is maintained.
Day: 20.10.2002
Time: 15.30
When Menu forward is pressed, the screen will display the information for
the first program (the equipment has two programs). This screen will indicate the number for the program being displayed and the second line shows
the programmed ON and OFF times.
FILTRATION PROGRAMM 1
on: 6:45
off: 9:50
10
ENGLISH
Menu forward, displays the screen for program 2:
FILTRATION PROGRAMM 2
on: 22:10
off: 24:50
Menu forward: displays the screen showing the ON and OFF times for the
swimming pool lights.
SWIMMING POOLS LIGHTS
on: 16:45
off: 17:50
Menu forward displays the programmed time for filter backwash when the
equipment detects that this operation is necessary. This time is expressed
in seconds and can be programmed from 0 to 240 seconds.
FILTER WASH TIME
60 secons
Menu forward displays the rinse option. This screen displays the programmed time
for the rinse which will be automatically applied after the filter backwash. This
time is expressed in seconds and can be programmed from 0 to 240 seconds.
RINSE TIME
30 secons
LIGHT
ON/OFF
Menu forward displays the rinse option. This screen displays the programmed time
for the rinse which will be automatically applied after the filter backwash. This
time is expressed in seconds and can be programmed from 0 to 240 seconds.
Push-button for switching the swimming pool lights on and off, this function can only be used
when the automatic swimming pool light system set to “0”.
3.2 MANUFACTURER’S DEFAULT PROGRAM.
FILTRATION: Programs 1 and 2 start and stop times. The filtration process duration is limited
by the pressurestat to when the filter reaches the pressure set by the installer, this depends on
the pump used, the adjustment range is from 1 to 1.6 kg/cm2, the valve will move to the wash
position.
FILTRATION PROGRAM
FILTRATION PROGRAM 2
on: 05:00
off: 08:00
on: 22:00
off: 02:00
WASH: The wash process is carried out in this valve position, and after the programmed time
has elapsed, it moves to the following position of back-wash .
Filter wash time
60seg
BACK-WASH: this is the final operational position before the valve returns to the filtration
position.
Back-wash time
20seg
11
ENGLISH
3.3 MODIFICATION OF MANUFACTURER’S DEFAULT PROGRAM
METHOD: in order to modify a variable, the “ON” key must be pressed to switch the equipment
on, by pointing the control at the valve until communication is obtained, from this point in time
programming may be carried out without being in communication with the valve.
Use the menu keys
(forward)
( back) until the language screen is displayed.
Selected language:
ENGLISH
Then press “OK” in order to access the language modification screen:
Do you wish to change
the language?
y/n
The “+” confirms the function. Press “-” if not required.
Press
+ - OK
ENGLISH
Use the
to select the language and once selected press “OK” to confirm, then
to access the “FILTRATION 1” screen (the filtration program start and
use the
stop times can be modified) the steps are as follows:
First, press “OK” and the following screen will be displayed:
Do you wish to modify
program 1?
y/n
Use the “+” to confirm the function which will display the following screen:
Press: "
On: 00:00
+ - OK"
off:00:00
The first digit will flash.
The arrow keys
should be placed over the digits to be modified.
The “+” will increase the digit.
The “-” will increase the digit.
If On:00:00 and Of: 00:00 are programmed, then the valve will not operate.
Finally press AUTO to confirm the command (ALWAYS POINTING THE PROGRAMMING CONTROL AT THE VALVE MODULE AND AT A DISTANCE OF NO MORE THAN
3 m (9.8 ft), OTHERWISE THE FOLLOWING MESSAGE IS DISPLAYED.
THERE IS NO COMMUNICATION
12
ENGLISH
Once communication confirmation is received, the following function can be selected by
pressing the
arrow, which will then provide access to the other functions:
WASH and BACK-WASH: proceed in a similar way.
3.4 MANUAL PROGRAM
Switch on the programmer by pressing the “ON” key with the control pointing at the valve and
the current function will be displayed on-screen.
Press the “MANUAL” key
If, for example, the following screen is displayed:
FILTRATION
MOTOR: ON
If the PUMP key is pressed, the following screen is displayed:
FILTRATION
MOTOR: OFF
In this way the PUMP can be programmed OFF.
Then press the "=" key with the control pointing at the valve module until it is confirmed that
the signal is received.
It is not necessary to stop the pump in order to change position, the program will perform this
automatically.
The next step is to select the function to be accessed.
By using the VALVE key, the valve will rotate, passing through the FILTRATION, SKIMMER
FILTRATION, EMPTY, CLOSED, BACKWASH, RE-CIRCULATION and RINSE positions.
Press AUTO to return to the AUTOMATIC program with the control pointing at the valve
(TRANSMISSION COMPLETED will be displayed). The current function will then be displayed.
WAIT!
VALVE MOVING
WARNING: when the module motor is operating, there is no transmission and valve movement
must be allowed to finish and the filter pump to start up in order to execute any programming
command.
3.5 REMOTE CONTROL MAINTENANCE.
The remote control is a piece of electronic equipment and as such, should be handled with
great care, it should not be dropped or allowed to get wet.
It does not require any maintenance other than removing the batteries while the swimming
pool is not being used during the cold months. It should be stored in a dry, dust-free place.
13
ENGLISH
4. WHAT TO DO IN THE CASE OF INCORRECT VALVE OPERATION
4.1 POSSIBLE FAULTS
Check that the settings programmed from the remote control have the correct date and time.
The valve is protected and is fitted with a system which detects possible faults.
Through the transparent cover on the module which is mounted on top of the valve can be seen
a red LED which flashes at different rates in a fault situation.
Two flashes
Four flashes
Six flashes
Eight flashes
If valve operation stops for any of the described circumstances, the distributors’ technical
service should be contacted. The valve model and type of flashing should be given.
Remote control does not work: check that the batteries are correctly inserted.
Check that the batteries are good condition.
The remote control will not accept programming: poor communications between the remote
control and the valve module, try moving the control closer to the valve, if it still does not work,
the technical service should be contacted.
The valve does not respond to programming operations: change the battery inside the module.
This is accomplished by removing the module’s cover, which will provide access to the electronic
card on which the battery is installed. The customer’s programming is lost. These batteries are
long-lasting (approximately 3 years) (see Fig.8).
INFORMATION FOR THE TECHNICAL SERVICE
Possible faults:
The valve does not operate and the LED is off: check the input and output connections for the
24 Vdc power supply.
Check the mains supply voltage.
Check the valve input connection, inverted polarity will cause valve failure, the valve must be
connected with the correct polarity.
The LED is lit and the pump does not work: check the connection to the pump and from the
valve to the pump contactor.
LED.
2
flashes: stop microswitch not found, the microswitch may be broken.
4
flashes: excessive motor consumption due to bell braking, possibly caused by incorrect
filter operation which is allowing sand to pass through the system.
6
flashes: failure of the bell elevation microswitch.
8
flashes: the module battery requires changing.
Will not enter the wash phase: the manometer pressure is less than that set on the pressurestat
by the installer.
Causes: incorrect pressurestat adjustment, it should be adjusted by using the manometer as a
reference and adjusting the screew (1) (Fig.1). In order to establish the maximum pressure the
swimming pool return should be closed.
If it is not possible to get the valve to enter the wash process, the manufacturer should be
contacted.
The automatic valve is fitted with a battery-powered safety system, which should be checked
when the valve is installed.
Switch off the mains supply and the valve automatically connects these batteries, the valve will
position itself to FILTRATION and then shutdown.
14
ENGLISH
5. VALVE DISASSEMBLY PROCEDURE
5.1 Valve disassembly procedure: The automatic valve consists of two sections, the hydraulic
part which includes a conventional valve and an automatic module which carries out the
commands received from a remote control (see Appendix 2).
The filter valve is disassembled in the same manner as a manual valve.
5.2 How to disassemble the valve module: BEFORE ANY OPERATION IS CARRIED OUT ON THE
VALVE, IT MUST DISCONNECTED FROM THE POWER SUPPLY.
Disassembly: First remove the four screws which hold the cover (1) in place. (Fig. 2).
Disconnect all input wires to the module (Fig. 7). WARNING: All mains power supply connections
must be removed first. WARNING: The ends of the battery connections must be insulated since
they are carrying power.
Refit the cover 1 (Fig. 2)
Remove the three screws (11) which hold the module in place on the valve (Fig. 3).
Carefully remove the module in an upwards direction.
Protect inside suitable packaging to prevent any damage and send it to the manufacturer.
From this point there are two possibilities:
1. Replacement of the module.
2. Temporarily convert the system to manual valve operation.
5.3 Instructions for installing the module on the valve. The manufacturer will ship the valvemodule assembly to the technical service or installer ready for installation. It should be
installed as follows:
1. Install the valve assembly by positioning the module so that marking 2 (Fig. 3) coincides
with the mark on the valve cover, carefully lower the module until it is correctly in place with
respect to the screw (3, Fig. 4). In a situation where it does not fit, the screw may be rotated
until it couples with the motor pin (4) (Fig.4). Care must be taken not to lower it too
brusquely since this could damage the module’s microswitches.
2 Install the three screws (11) (Fig. 3 ).
3 Remove the cover 1 (Fig. 2) by removing the four screws (13) in order to access the
connection strip.
4 Connection (MAKE SURE THERE IS NO MAINS VOLTAGE). Connect the cables as indicated
in the attached diagrams (APPENDIX 1). IMPORTANT! Use the gland seals that come
installed in the module.
5 Replace the cover 1 (Fig. 2) and replace it with the screws (13).
6 Connect the power input to the control board and check valve operation by pressing AUTO,
the programmed cycle should commence.
5.4 Temporary conversion of the system to manual operation. The module should be dismounted
as described in Section 5.2 .
Remove screw (3) Appendix 3 (Fig. 4), and pull the pawl (5) upwards, then (see Fig. 5)
remove the pin (6) in the direction of the arrow sale, remove part (7), leaving the valve in
position for installing the handle.
To install the handle, position the handle* (14) (Fig. 6) such that the triangle on the bell
shaft always coincides with the handle positioner (9). Once it is installed, the pin* (10)
can be inserted .
* Supplied as spare parts.
15
5.5 How to change the valve from manual to automatic operation. Remove the pin (10) (Fig.
6), remove the handle (14) and install the part (7) (Fig. 5). This is accomplished by orienting
the mark (A) such that it coincides with the triangle (Fig. 6). Once fitted in place, the pin (6)
(Fig. 5) should be inserted, which should be centred along its length. Then install the part
(5) (Fig. 4) which should be well-positioned (it only has one mounting direction). Insert the
screw (3) and screw in. It should not be fully tightened since it has to be loosened in order
to orient it with the pin (4) on the motor assembly. At this point, it is now possible to install
the module assembly as described in the valve module installation process. Connection
cabinet: The MAN-AUTO pushbutton should be in the AUTO position.
16
87
28718 - 6A-10A ; 1,5CV-2CV
LINE
2
N
A1
1
5
2
3
6
4
4
6
2
AUT
1
A2
A1
4
MAN
COM
Electronic board connections
Press. Switch
PUMP
B
A2
KM1
2
GV
R3
11
FU 0.5A
21 22
22
7
8
21
24
19 20
9
10
KM2
A1
A2
4
3
LIGHTS
11 12
2
1
8 7 10 9 14 13
13 14
A2
R2
A1
12
14
-
15 16
11
19 20
Transformer rectifier 220V-24V
FU 0,5A
R 2W-4,7
21
22
Battery 24 VDC
Control box with rechargeable battery and 3 way valve
Armario con baterias y válvula de 3 vias
Coffret pour batteries et vanne 3 voies
Armadio di batterie e valvola a 3 vie
Batterieschrank und Dreiwegeventil
Armário de baterias e válvula de 3 vias
23 1
Act.
Diteico
220v
17 18
24
24V
220V
ELECTRICAL WIRING DIAGRAMS
SCHÉMAS ÉLECTRIQUES DE CÂBLAGE
ESQUEMAS ELÉCTRICOS DE CONEXIÓN
SCHEMI ELETTRICI
ELEKTRISCHE ANSCHLUSSSCHEMATA
ESQUEMAS ELÉCTRICOS DE LIGAÇÃO
28631 - 4A-6,3A ; ¾CV-1CV
Code :
Monofasico
1-Phase
LINE 220/50Hz
DIF
Press. Switch
5
Battery
3
24 VDC
1
E. VALVE
1
Motor-Pump
N
Lights
Control unit
3 Way valve
ANEXO 1 -
28714 - 6A-10A ; 1,5CV-2CV
1
A2
A1
2
R1
12
14
3
SOLENOIDE
11
4
A1
5
2
1
6
4
3
4
3
6
5
AUT
2
GV
1
A2
A1
4
MAN
COM
Electronic board connections
Press. Switch
PUMP
B
A2
KM1
2
1
R3
11
FU 0.5A
14
22
8
24
2 1 19 20
7
21
10
4
3
LIGHTS
11 12
2
1
8 7 10 9 13 14
9
A2
KM2
A1
R2
A1
13 14
A2
15 16
14
23 1
Act.
Diteico
220v
17 18
19 20
24
Transformer rectifier 220V-24V
Control box with solenoid valve and 3 way valve
Armario con electroválvula y válvula de 3 vias
Coffret pour électrovanne et vanne 3 voies
Armadio con elettrovalvola e valvola a 3 vie
Schrank mit Elektroventil und Dreiwegeventil
Armário com electroválvula e válvula de 3 vias
12
11
24V
220V
ELECTRICAL WIRING DIAGRAMS
SCHÉMAS ÉLECTRIQUES DE CÂBLAGE
ESQUEMAS ELÉCTRICOS DE CONEXIÓN
SCHEMI ELETTRICI
ELEKTRISCHE ANSCHLUSSSCHEMATA
ESQUEMAS ELÉCTRICOS DE LIGAÇÃO
28625 - 4A-6,3A ; ¾CV-1CV
Code :
Monofasico
1-Phase
LINE 220/50Hz
LINE
1
Press. Switch
2
Battery
N
24 VDC
N
E. VALVE
DIF
Motor-Pump
Control unit
Lights
88
3 Way valve
ANEXO 1 -
28720 - 2,5A-4A ;1,5CV-2CV
LINE
1
N
3
5
2
1
6
4
3
Motor Bomba
B
A2
KM1
A1
2
1
4
3
6
5
(a)
6
5
AUT
2
GV
1
A2
A1
4
MAN
COM
R3
11
FU 0.5A
21 22
Electronic board connections
Press. Switch
2
3
22
7
24
19 20
8
21
10
4
3
LIGHTS
11 12
2
1
8 7 10 9 14 13
9
A2
KM2
A1
13 14
A2
R2
A1
12
14
15 16
11
-
19 20
Transformer rectifier 220V-24V
FU 0,5A
R 2W-4,7
21
Battery 24 VDC
22
Control box with solenoid valve and 3 way valve
Armario con electroválvula y válvula de 3 vias
Coffret pour électrovanne et vanne 3 voies
Armadio con elettrovalvola e valvola a 3 vie
Schrank mit Elektroventil und Dreiwegeventil
Armário com electroválvula e válvula de 3 vias
23 1
Act.
Diteico
220v
17 18
24
24V
220V
ELECTRICAL WIRING DIAGRAMS
SCHÉMAS ÉLECTRIQUES DE CÂBLAGE
ESQUEMAS ELÉCTRICOS DE CONEXIÓN
SCHEMI ELETTRICI
ELEKTRISCHE ANSCHLUSSSCHEMATA
ESQUEMAS ELÉCTRICOS DE LIGAÇÃO
28635 - 1,6A-2,5A ; 1CV
Code :
Trifasico
3-Phase
LINE 230/400V 50Hz
3
2
1
N
DIF
2
Press. Switch
2
Battery
1
E. VALVE
N
24 VDC
N
Motor-Pump
Control unit
Lights
89
3 Way Valve
ANEXO 1 -
90
Code :
28716 - 2,5A-4A : 1,5CV-2CV
1
A2
A1
2
R1
LINE
12
14
3
1
N
SOLENOIDE
11
2
N
4
3
A1
5
2
1
6
4
3
4
Motor Bomba
B
A2
KM1
2
6
5
(a)
6
AUT
2
GV
1
A2
A1
4
MAN
COM
Electronic board connections
Press. Switch
2
5
R3
11
FU 0.5A
14
22
8
24
2 1 19 20
7
21
9
A2
10
KM2
A1
4
3
LIGHTS
11 12
2
1
8 7 10 9 14 13
-
13 14
A2
R2
A1
14
15 16
11
23 1
Act.
Diteico
220v
17 18
19 20
24
Transformer rectifier 220V-24V
Control box with solenoid valve and 3 way valve
Armario con electroválvula y válvula de 3 vias
Coffret pour électrovanne et vanne 3 voies
Armadio con elettrovalvola e valvola a 3 vie
Schrank mit Elektroventil und Dreiwegeventil
Armário com electroválvula e válvula de 3 vias
12
24V
220V
ELECTRICAL WIRING DIAGRAMS
SCHÉMAS ÉLECTRIQUES DE CÂBLAGE
ESQUEMAS ELÉCTRICOS DE CONEXIÓN
SCHEMI ELETTRICI
ELEKTRISCHE ANSCHLUSSSCHEMATA
ESQUEMAS ELÉCTRICOS DE LIGAÇÃO
28629 - 1,6A - 2,5A ; 1CV
Trifasico
3-Phase
LINE 230/400V 50Hz
3
2
1
N
DIF
3
Press. Switch
1
Battery
3
E. VALVE
2
24 VDC
1
Motor-Pump
N
Lights
Control unit
3 Way valve
ANEXO 1 -
Code : 30945
LINE 220/50Hz
Press. Switch
LINE
2
N
Cancel timer
FU0.5A
5
2
6
4
21 22
1 2 19 20
Electronic board connections
PUMP
B
A2
KM1
A1
4
LIGHTS
11 12
2
3
8 7 10 9 14 13
A2
KM2
A1
1
3
6
GV
1
4
5
Anular temporizador
Cancel timer
2
3
E. VALVE
Anular temporizador
Press. Switch
DIF
1
Battery
1
24 VDC
N
ARMARIO EXISTENTE
Motor-Pump
Control unit
EXISTING CONTROL BOX
2
AUT
1
R3
5
A2
A1
4
MAN
COM
6
12
7
8
11
14
9
10
13 14
A2
R2
A1
12
14
15 16
11
23 1
Act.
Diteico
220v
17 18
ARMARIO CON BATERIAS 24V DC
CONTROL BOX WITH RECHARGEABLE BATTERIES 24V DC
-
Transformer rectifier 220V-24V DC
21
A
22
Battery 24 VDC
N
L
T
(*)
(*)Complementary control box for existing intallations
Armario complementario para armarios existentes
Coffret auxiliaire (dans le cas de coffrets déjà existants)
Armadio complementare per armadi già esistenti
Erweiterungsschrank für vorhandene Schränke
Armário complementar para armários existentes
FU 0,5A
R2W-4,7
19 20
24
24V
220V
ELECTRICAL WIRING DIAGRAMS
SCHÉMAS ÉLECTRIQUES DE CÂBLAGE
ESQUEMAS ELÉCTRICOS DE CONEXIÓN
SCHEMI ELETTRICI
ELEKTRISCHE ANSCHLUSSSCHEMATA
ESQUEMAS ELÉCTRICOS DE LIGAÇÃO
Lights
91
3 Way valve
ANEXO 1 -
Code : 30944
LINE 220/50Hz
LINE
Press. Switch
DIF
1
2
N
5
2
6
4
1 2 19 20
Electronic board connections
PUMP
B
A2
KM1
A2
KM2
A1
4
3
LIGHTS
11 12
2
1
A1
1
FU0.5A
Anular temporizador
3
GV
Anular temporizador
6
5
Cancel timer
4
3
24 VDC
Cancel timer
2
1
Battery
N
ARMARIO EXISTENTE
E. VALVE
EXISTING CONTROL BOX
8 7 10 9 14 13
Motor-Pump
Control unit
Press. Switch
5
6
1
A2
A1
2
R1
CONTROL BOX WITH SOLENOID VALVE
12
3
1
SOLENOIDE
11
AUT
2
4
A2
A1
4
MAN
COM
R3
12
7
14
8
11
9
ARMARIO CON SOLENOIDE PARA ELECTROVALVULA
-
10 13 14
A2
R2
A1
15 16
14
23 1
Act.
Diteico
220v
17 18
19 20
24
Transformer rectifier 220V-24V DC
N L
(*)
T
(*)Complementary control box for existing intallations
Armario complementario para armarios existentes
Coffret auxiliaire (dans le cas de coffrets déjà existants)
Armadio complementare per armadi già esistenti
Erweiterungsschrank für vorhandene Schränke
Armário complementar para armários existentes
12
11
24V
220V
ELECTRICAL WIRING DIAGRAMS
SCHÉMAS ÉLECTRIQUES DE CÂBLAGE
ESQUEMAS ELÉCTRICOS DE CONEXIÓN
SCHEMI ELETTRICI
ELEKTRISCHE ANSCHLUSSSCHEMATA
ESQUEMAS ELÉCTRICOS DE LIGAÇÃO
Lights
92
3 Way valve
ANEXO 1 -
93
94
-
- Turn on the pool lights (Manual)
- Mise sous tension de l'éclairage de la piscine
(Manuel)
- Conecta las luces de la piscina (Manual)
- Accensione delle luci della piscina (manuale)
- Schaltet die Schwimmbeckenbeleuchtung ein (manuell)
- Liga as luzes da piscina (Manual)
Main switch
Interrupteur principal
Interruptor principal
Interruttore principale
Hauptschalter
Interruptor principal
- Increase the setting and
confirm answer to prompt.
- Incrémentation de la variable et
réponse affirmative aux
questions affichées à l'écran
- Incrementa variable y confirma
pregunta de pantalla.
- Incrementa la variabile e
conferma la domanda che
appare sul display
- Erhöht die Variable und bejaht
die Bildschirmfrage.
- Aumenta a variável e confirma a
pergunta do ecrã.
-
Accept the command
Validation des commandes
Validacion de ordenes
Conferma degli ordini
Befehlsbestätigung
Validação de ordens
-
Access the automatic menu.
Accès au menu automatique.
Accede a menu automatico.
Accesso al menu automatico.
Zugriff auf Menü „Auto“
Tem acesso a menu
automático.
-
- Decrease setting and cancel
answer to prompt.
- Décrémentation de la variable
et réponse négative aux
questions affichées à l'écran.
- Disminuye variable y niega
pregunta de pantalla.
- Diminuisce la variabile e
annulla la domanda che appare
sul display
- Verringert die Variable und
verneint die Bildschirmfrage
- Diminui a variável e nega a
pergunta do ecrã.
- Back to previous menu
- Défilement arrière du
menu
- Retrocede menu.
- Fa scorrere in dietro il
menu
- Zurück im Menü
- Retrocede o menu
-
Go to manual menu
Accès au menu manuel
Accede a menu manual
Accesso al menu manuale
Zugriff auf Menü „Manuell“
Tem acesso a menu manual
- Start or stop the pump. (Manual).
- Mise en marche ou arrêt de la pompe.
(Manuel)
- Pone en marcha o para la bomba. (Manual).
- Avvio o arresto della pompa (manuale).
- Schaltet die Pumpe ein oder aus (manuell).
- Põe em funcionamento ou pára a bomba.
Forward to next menu.
Défilement avant du menu.
Avanza menu.
Fa scorrere in avanti il menu.
Weiter im Menü
Avança menu.
-
-
Send orders to the valve. (Manual)
Envoi des commandes à la vanne. (Manuel)
Transmite las ordenes a la valvula. (Manual).
Trasmette gli ordini alla valvola (manuale)
Überträgt die Befehle an das Ventil (manuell).
Transmite as ordens à válvula. (Manual)
Select the valve position. (Manual)
Sélecteur de position de la vanne. (Manuel)
Seleccionador de posicion de la valvula. (Manual)
Seleziona le posizioni della valvola (manuale)
Wahlschalter für Ventilstellung (manuell)
Seleccionador de posição da válvula. (Manual)
Automatic module
Module automatique
Módulo automático
Modulo automatico
Automatikmodul
Módulo automatico
1
13
Screw
Vis
Tornillo
Viti
Schraube
Parafuso
Multiport valve
Vanne multivoies
Válvula selectora
Valvola selettrice
Mehrwege ventil
Valvula selectora
1
FIG. 1
FIG. 2
11
2
3
5
4
FIG. 3
FIG. 4
6
7
8
FIG. 5
14
9
10
Triangle mark
Repère triangulaire
Marca del triangulo
Riferimento del triangolo
Dreiecksmarkierung
Marca do triângulo
FIG. 6
Lift about 2 millimetres to release some pressure and
make it easier to remove.
Press with a screwdriver to remove the battery.
Replace, making absolutely sure the polarity is correct.
Soulever de 2 millimètres environ pour soulager la
pression et faciliter la dépose.
Appuyer avec un tourne-vis pour extraire la batterie.
Procéder au remontage en respectant scrupuleusement
la polarité.
FIG. 7
Levantar unos 2 milímetros para que tenga menos
presión y así facilitar la extracción.
Presionar con un destornillador para extraer la batería.
Volver a montar prestando mucha atención con la
polaridad.
Sollevare di circa 2 millimetri in modo da diminuirne la
pressione e agevolarne così l'estrazione.
Fare pressione con un cacciavite per estrarre la batteria.
Rimontare, prestando molta attenzione alla polarità.
Etwa zwei Millimeter anheben, um den Druck zu
mindern und das Herausziehen zu erleichtern.
Zur Batterieentnahme mit einem Schraubenzieher
eindrücken.
Beim Wiedereinsetzen unbedingt auf die Polarität
FIG. 8
Levantar uns 2 milímetros para que tenha menos
pressão e assim facilitar a extracção.
Premir com uma chave de parafusos para extrair a
bateria.
Voltar a montar prestando muita atenção à polaridade.
TECHNICAL CHARACTERISTICS
CARACTERISTIQUES TECHNIQUES
CARACTERÍSTICAS TÉCNICAS
DATI TECNICI
TECHNISCHE ANGABEN
CARACTERISTICAS TECNICAS
1½”
2”
(mm)
A
B
C
D
E
F
G
H
I
J
K
L
M
N
O
330
180
200
132
64
63
101
172
43
30
95
1”½”
90
6
50
365
211
200
132
76
63
127
235
43
2”
105,5
5
63
31,5 115,5
www.astralpool.com
Cod. 400
- WE RESERVE THE RIGHT TO CHANGE ALL OR PART OF THE FEATURES OF THE ARTICLES OR CONTENTS OF
THIS DOCUMENT , WITHOUT PRIOR NOTICE.
- NOUS NOUS RÉSERVONS LE DROIT DE MODIFIER TOTALEMENT OU EN PARTE LES CARACTERISTIQUES DE
NOS ARTICLES OU LE CONTENU DE CE DOCUMENT SANS PRÉ-AVIS.
- NOS RESERVAMOS EL DERECHO DE CAMBIAR TOTAL O PARCIALMENTE LAS CARACTERÍSTICAS DE
NUESTROS ARTÍCULOS O CONTENIDO DE ESTE DOCUMENTO SIN PREVIO AVISO.
- CI RISERVIAMO IL DIRITTO DI CAMBIARE TOTALMENTE O PARZIALMENTE LE CARATTERISTICHE TECNICHE
DEI NOSTRI PRODOTTI ED IL CONTENUTO DI QUESTO DOCUMENTO SENZA NESSUM PREAVVISO.
- WIR BEHALTEN UNS DAS RECHT VOR, DIE MERKMALE UNSERER PRODUKTE UND DEN INHALT DIESER
BESCHREIBUNG OHNE VORHERIGE ANKÜNDIGUNG GANZ ODER TEILWEISE ZU ÄNDERN.
- RESERVAMO-NOS NO DIREITO DE ALTERAR, TOTAL OU PARCIALMENTE AS CARACTERISTICAS DOS NOSSOS
ARTIGOS OU O CONTEÚDO DESTE DOCUMENTO SEM AVISO PRÉVIO.
COPYRIGHT ASTRALPOOL- EDICIÓN FEBRERO 2004 -
Dimensiones
Dimensions