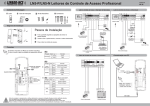
1
Termostato electrónico
CEPRA 4110 con interruptor marcha-paro
Manual de instrucciones
Familia de termostatos electrónicos
Esquema de conexión
Ajuste y funcionamiento
Alimentación con baterías.
1. Para conectar o desconectar el
funcionamiento del termostato
Cepra 4110, utilizar el interruptor
de marcha-paro colocándolo en la
posición I ó O respectivamente.
2. Presione la tecla ▼ o ▲. En
la pantalla aparecerá una
temperatura de consigna
parpadeando y el símbolo
de “ajuste de temperatura de
consigna”.
3. Pulse de nuevo la tecla de ▼ o
▲ para ajustar. Dicho ajuste se
realizará de grado en grado.
4. Cuando finalice el ajuste de
la temperatura de consigna
deseada, por favor espere 15
segundos hasta que la pantalla
deje de parpadear. Entonces el
termostato empezará a trabajar
y en la pantalla aparecerá la
temperatura actual de la estancia.
Nota: Este termostato electrónico
tiene un tiempo mínimo de
conmutación entre dos maniobras
de conexión consecutivas de 3
minutos.
Alimentación con baterías.
1. Ajustar el modo de
funcionamiento en el selector de
calor-paro-frío.
2. Presione la tecla ▼ o ▲. En
la pantalla aparecerá una
temperatura de consigna
parpadeando y el símbolo
de “ajuste de temperatura de
consigna”.
3. Pulse de nuevo la tecla de ▼ o
▲ para ajustar. Dicho ajuste se
realizará de grado en grado.
4. Cuando finalice el ajuste de
la temperatura de consigna
deseada, por favor espere 15
segundos hasta que la pantalla
deje de parpadear. Entonces el
termostato empezará a trabajar
y en la pantalla aparecerá la
temperatura actual de la estancia.
Nota: Este termostato electrónico
tiene un tiempo mínimo de
conmutación entre dos maniobras
de conexión consecutivas de 3
minutos.
Fig. 1
2. ¡PRECAUCIÓN!
Debe recordar que
tiene que apagar el
interruptor general
de alimentación
eléctrica antes de
instalar el termostato.
3. Para abrir la tapa
frontal presione
la pestaña con un
destornillador (ver
figura 2) y tire de la
tapa (ver figura 3).
Fig. 2
3
5
FRÍO
1
CALOR
BATERIA ALCALINA
LR03/"AAA" TIPO 1.5V
6. Realice la conexión entre
el termostato y el elemento
controlado, teniendo en cuenta
el esquema del termostato (ver
figura 5) y el esquema del equipo
controlador.
BATERIA ALCALINA
LR03/"AAA" TIPO 1.5V
4. Quitar la tapa
cubrebornas
presionando con un
1. Buscar en la estancia una
destornillador sobre
ubicación donde la temperatura
Fig. 4
las pestañas de la
sea constante y que no esté
parte posterior.
afectada por corrientes de aire, ni
esté bajo la influencia directa de
5. Fijar en la pared a través de
un foco de calor o de frío (ver el
los agujeros de la base del
ejemplo de la figura1).
termostato. No olvide pasar los
cables por el agujero destinado a
tal efecto (ver figura 4).
Fase(Línea)
Neutro
Fig. 5
NOTA:
(1) C. Común.
(3) N.C. Refrigeración.
(5) N.A. Calefacción.
Símbolos y teclas
7. Coloque la tapa cubrebornas y
vuelva a montar la tapa sobre
la base asegurandose que las
pestañas de la base cierren sobre
la tapa.
8. Conectar el interruptor general de
alimentación eléctrica.
Fig. 3
Se reserva el derecho a realizar cualquier modificación sin previo aviso.
BATERIA ALCALINA
LR03/"AAA" TIPO 1.5V
Ajuste y funcionamiento
BATERIA ALCALINA
LR03/"AAA" TIPO 1.5V
Esquema de conexión
4100
Instalación
Termostato electrónico
CEPRA 4120 con selector calor-paro-frío
1
3
CARGA
Fase (Línea)
Neutro
Fig. 5
NOTA:
(1) C. Común.
(3) Fase.
Símbolos y teclas
Datos técnicos
Datos técnicos
1. Visualización de temperatura
ambiente y de consigna.
2. Indicador de ajuste de la
temperatura de consigna.
3. Tecla para elevar la temperatura
de consigna.
4. Interruptor de marcha paro.
5. Tecla para reducir la temperatura
de consigna.
• Ajuste de temperatura: 5ºC a 35ºC
en intervalos de 1ºC
• Alimentación: 2 baterías alcalinas
LR03/AAA
• Diferencial: ±0,5 K
• Contacto: conmutado
• Intensidad permanente:
6(3) A / 250V CA
• Grado de protección: IP 21
• Clase: II
• Temperatura ambiente:
0ºC a +35ºC
• Temperatura de almacenaje:
-5ºC a +40ºC
1. Visualización de temperatura
ambiente y de consigna.
2. Indicador de ajuste de la
temperatura de consigna.
3. Tecla para elevar la temperatura
de consigna.
4. Selector calor-paro-frío.
5. Tecla para reducir la temperatura
de consigna.
• Ajuste de temperatura: 5ºC a 35ºC
en intervalos de 1ºC
• Alimentación: 2 baterías alcalinas
LR03/AAA
• Diferencial: ±0,5 K
• Contacto: simple
• Intensidad permanente:
6 (3) A / 250V CA
• Grado de protección: IP 21
• Clase: II
• Temperatura ambiente:
0ºC a +35ºC
• Temperatura de almacenaje:
-5ºC a +40ºC
Digital thermostat
CEPRA 4110 with ON/OFF switch
Operating manual
Setting & Operating
Wiring diagram
Fig. 1
2. WARNING! You
must remember
to turn off your
main power switch
before installing the
thermostat.
3. Disconnect the front
cover by pressing a
hook on the top of
the front cover with
a screw driver. (see
Fig. 3
figure 2). Remove
the front cover with your hand
holding both sides of the cover
(see figure 3).
3
5
COOL
HEAT
Phase(Line)
Neutral
Fig. 4
5. Install the wires into the terminal
block with a screw driver to
tighten the screw on top of
terminal block (see figure 5).
Before you install the wires, you
must check your system wiring
diagram. If your system is other
than this type please check with
your local dealer or consult with a
profession electrician.
6. Put the front cover back on the
base and make sure the hooks on
the base are locked with the front
cover.
Fig. 2
1
7. You can turn on the main power
switch for operation.
Fig. 5
NOTE:
(1) C. Common.
(3) N.C. Cooling.
(5) N.A. Heating.
Key function
Technical data
• Range temperature: 5 … 35ºC,
steps 1ºC
• Supply: 2 batteries Alcaline
LR03/AAA
• Histeresis: ±0,5 K
• Contact: 1-change over
1. Current temperature
• Switching current:
display&temperature setting
6 (3) A / 250V CA
display.
• Degree of protection: IP 21
2. Temperature set symbol.
3. Temperature - up. Adjustment key. • Class: II
• Operating temperature:
4. On/Off switch.
0ºC…+35ºC
5. Temperature - down. Adjustment
• Store temperature: -5ºC…+40ºC
key.
ALKALINE BATTERY
LR03/"AAA" SIZE 1.5V
1. Look for a location which has
a constant temperature in the
house and it is not near the door
entry or air conditioning outlet.
(see example on figure 1).
4. Mount the base with
the wire through the
holes of the base
and tighten the base
with screws on the
wall (see figure 4).
1. To turn on/off the thermostat
Cepra 4110, set the on/off switch
in the position I or O.
2. Press either ▼ or ▲ and LCD
display will show a flashing
temperature and “Temperature
Set” symbol.
3. Press again either ▼ or ▲ to set
a desired temperature. Every
press on ▲ will increase 1ºC and
every press on ▼ will decrease
1ºC.
4. When you complete setting your
desire temperature, please wait
for 15 seconds until the LCD
display stops flashing. Then,
the thermostat starts to operate
and the LCD display on the front
panel of this unit shows room
temperature.
Note: there is a minimun
switching time of 3 min. between
two consecutive connections.
Setting & Operating
Wiring diagram
ALKALINE BATTERY
LR03/"AAA" SIZE 1.5V
Installation
ALKALINE BATTERY
LR03/"AAA" SIZE 1.5V
4100
ALKALINE BATTERY
LR03/"AAA" SIZE 1.5V
Digital thermostat family
Digital thermostat
CEPRA 4120 with heating-off-cooling selector
1
3
LOAD
Phase (Line)
Neutral
Fig. 5
NOTE:
(1) C. Common.
(3) Phase (Line).
Key function
1. Set mode operation with heatingoff-cooling selector.
2. Press either ▼ or ▲ and LCD
display will show a flashing
temperature and “Temperature
Set” symbol.
3. Press again either ▼ or ▲ to set
a desired temperature. Every
press on ▲ will increase 1ºC and
every press on ▼ will decrease
1ºC.
4. When you complete setting your
desire temperature, please wait
for 15 seconds until the LCD
display stops flashing. Then,
the thermostat starts to operate
and the LCD display on the front
panel of this unit shows room
temperature.
Note: there is a minimun
switching time of 3 min. between
two consecutive connections.
Technical data
• Range temperature: 5 … 35ºC,
steps 1ºC
• Supply: 2 batteries Alcaline
LR03/AAA
• Histeresis: ±0,5 K
• Contact: break contact
• Switching current:
1. Current temperature
6 (3) A / 250V CA
display&temperature setting
• Degree of protection: IP 21
display.
• Class: II
2. Temperature set symbol.
3. Temperature - up. Adjustment key. • Operating temperature:
0ºC…+35ºC
4. Heating-off-cooling selector.
5. Temperature - down. Adjustment • Store temperature: -5ºC…+40ºC
key.