1
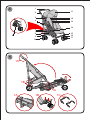
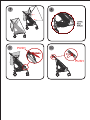
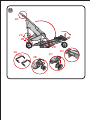
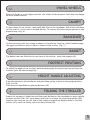
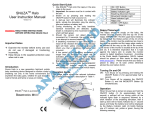
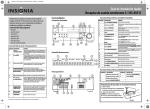
MANUAL DE INSTRUCCIONES
INSTRUCTION LEAFLET
A
1
11
2
3
12
4
13
14
5
7
8
9
6
15
16
17
10
1C
1B
1A
1A
1B
1Cclick
9
PUSH
10
PUSH
11
2A
2C
2B
2D
2D
2A
PUSH
2B
2C
!
Lea detenidamente el manual antes de utilizar este
artículo. Conserve estas instrucciones para futuras
consultas.
Please read this instruction leaflet fully prior to use
and keep it for future reference.
INDICE
INDEX
Español
1 -3
English
4-6
Garantia/Warranty
7-8
E INSTRUCCIONES
DESPIECE
A
1-
PULSADOR BLOQUEO
MANILLAR
PULSADOR REGULACION
MANILLAR
COMPAS CAPOTA
PINZA DE BLOQUEO
PLEGADO
PEDAL DE PLEGADO
PIEZA BLOQUEO SILLA
PIEZA REGULACON DE
REPALDO
CESTA
2345678-
1
91011121314151617-
DISPOSITIVO DE FRENO
RUEDAS TRASERAS
CAPOTA
RESPALDO
ARNES DE SEGURIDAD
BOTON DE REGULACION
REPOSAPIES SUPERIOR
REPOSAPIES INFERIOR
CONJUNTO DE GIRATORIO
RUEDA DELANTERA
MONTAJE DEL CHASIS
Suelte la pinza 4 para desbloquear el plegado (Fig. 1A). Tire del manillar hacia
arriba al tiempo que presiona con el pie el pedal de plegado (Fig. 1B)que bloquea
la silla una vez desplegada. Posicione el manillar hasta que escuche el "click" de
bloqueo (Fig. 1C).
2
ARNÉS DE SEGURIDAD
Para soltar el arnés, presione los pulsadores de la hebilla. Cada vez que siente al niño en
la silla ajuste y después cierre el arnés de seguridad.
3
REGULACIÓN DEL RESPALDO
Presione hacia arriba las palancas de reclinado hasta colocar el respaldo en la posición
deseada. Para elevar el respaldo empújelo hacia arriba.
Atención: Para evitar caídas, mantenga el respaldo en la posición mas vertical cuando
tenga que subir escaleras o cuestas pronunciadas.
4
FRENO
Presione la palanca central que une los 2 frenos traseros hacia abajo y actuará sobre las
4 ruedas traseras. Presione la misma palanca hacia arriba para desbloquear el freno.
1
5
RUEDAS GIRATORIAS
Las ruedas delanteras pueden colocarse en posición fija o giratoria. Seleccione la posición
accionando hacia arriba o hacia abajo la palanca trasera del conjunto giratorio.
CAPOTA
6
Fije la capota al chasis con las pinzas laterales y abra los compases para tensarla. Fije la
capota al chasis abrazando las cintas de velcro al tubo. Para extraerla, suelte las cintas y
tire de las pestañas encajadas en el chasis hacia arriba.
BURBUJA
7
Coloque la burbuja sobre la capota como muestra el dibujo. Abroche la burbuja por detrás
del respaldo y de las tijeras delanteras utilizando los ganchos de los elásticos.
CESTA
8
La cesta portaobjetos va abrochada en la parte baja del chasis.
9
REGULACION REPOSAPIES
Pulse los botones de los laterales del reposapiés y posiciónelos en la medida deseada.
10
MANILLAR REGULABLE
Presione los pulsadores situados en ambos lados del manillar y bloquee la altura seleccionada.
11
PLEGADO
Pulse el botón central del manillar y desbloquee el conjunto de manillar (Fig. 2A). Eleve
la escuadra inferior de cierre situada en la parte trasera del chasis (Fig. 2B). Accione el
pedal situado en la parte lateral de la tijera trasera, después empuje hacia delante hasta
plegar la silla (Fig.2C). Accione el gancho de fijación, para mantener el chasis plegado.
(Fig. 2D).
2
RECOMENDACIONES
DE USO
recomienda el uso de la silla NANO, a partir de los 4 meses.
recomienda no utilizar productos de segunda mano, ya que la omisión del
prospecto de instrucciones, así como el desgaste de los componentes pueden resultar
peligrosos. Solicite nuestro catálogo
para conocer las nuevas Colecciones de paseo
y complementos. Es necesario un cuidado esmerado, para mantener su producto
en las mejores condiciones de uso y seguridad.
IMPORTANTE
1.- Atención: Este vehículo está diseñado para transportar a un solo bebé
de hasta 15 Kg.
2.- Atención: La seguridad de su hijo es su responsabilidad. Nunca deje solo al niño.
3.- Es importante que toda persona que maneje este vehículo, comprenda las
instrucciones correctamente. Si encuentra alguna dificultad en el montaje, repita las
operaciones sin forzar los mecanismos.
4.- Atención: Mantenga al niño alejado de las partes móviles cuando realice los ajustes
descritos anteriormente.
5.- Atención: Nunca sobrecargue el vehículo. El límite de carga no debe superar los 5 Kg.
Cualquier bolsa que cuelgue del manillar afectará a su estabilidad.
6.- Atención: Nunca estacione el vehículo sin utilizar el dispositivo de freno. Evite
estacionamientos en pendientes.
7.- Atención: No utilice accesorios que no estén aprobados por el fabricante, ni realice
reparaciones por su cuenta para no dañar el vehículo.
INSTRUCCIONES
DE LAVADO
No usar lejía
No planchar
No limpiar en seco
No secar en secadora
3
GB INSTRUCTIONS
PRODUCT KEY
A
12345678910-
1
HANDLE BLOCK MECHANISM
HEIGHT ADJUSTING BUTTON
CANOPY ROD
SAFETY LOCK
PRIMARY LOCK
LOCK LEVER
SEAT RECLINING MECHANISM
BASKET
BREAK
REAR WHEELS
11121314151617-
CANOPY
SEAT BACK
SAFETY HARNESS
UPPER FOOTREST ADJUSTING
BUTTON
LOWER FOOTREST
SWIVEL DEVICE
FRONT WHEEL
OPENING THE STROLLER
Before opening the pushchair the safety lock (4) needs to be unbuckled (1-A). Pull the
handles upwards while stepping on the footboard until it locks in place (1-B). Please make
sure that the handle bar is safely locked with an audible "click" (1-C)
2
SAFETY HARNESS
Press both side bukles in order to unfasten the harness. Children should be harnessed in
at all times. Sit the baby in the stroller and then insert the buckles again, adjusting the
length of the strap. (Fig. 2)
3
RECLINING THE BACKREST
To recline seat back, lift both handgrips to release seat locks and slide the seat back to
desired position. Lower handgrips to engage locks on both locks and sides.
To raise, push seat back to original upright or desired intermediate position (3).
Atention: Liftup the backrest while climb stairs or steep slope to prevent from falling risk.
4
BRAKE
To apply direct brake in all-four wheels, press central bar down. To release the brake, lift
it up. (Fig. 4)
4
5
SWIVEL WHEELS
When the flange is in the higher position, the wheel will be blocked. Push down the flange
to allow wheel rotation.
6
CANOPY
Fit the canopy to the stroller, using both side clips on the handlebar. Pull plastic rod down
to fully open it. Secure velcro around the bar. To remove the hood simply operate in the
opposite way. (Fig. 6)
7
RAINCOVER
Fit the raincover onto the canopy as shown in the picture. Pass the elastic band through
the upper and bottom tubs in order to fasten to the stroller. (Fig. 7)
8
BASKET
The basket must be fitted to the rear bars of the stroller, using the poppers (8)
9
FOOTREST POSITIONS
To adjust the angle of the footrest, push simultaneously the lateral buttons and turn the
footrest up to the desired angle(9)
10
HEIGHT HANDLE ADJUSTING
Push side buttons on the handle bar and push them up the to place in the upright position
until it clicks.
Fold down the handlebar by pushing buttons (10)
11
FOLDING THE STROLLER
Ensure the canopy is folded back and then push buttons on the handlebar to place handle
in lower position (2A). Lift the primary lock lever to release the stretching system (2B).
Step the lock lever on the left side of the chassis and push the handle down to fold the
stroller (2C), until the safety clip is securely locked (2D).
5
ADVICE FOR USE
recommends to use NANO stroller from 4 months on.
recommends not to use second-hand babycare articles. No provided instruction
leaflet as well as worn parts can be very dangerous. Please apply for
catalogue
in order to see the new Collection of prams, pushchairs and accessories. Care and
maintenance are essential to keep your
looking new and being safe for years.
IMPORTANT
1.- Warning: This product has been designed and tested to carry only one 0 to 15 Kg. baby.
2.- Warning: Your child’s safety is your responsibility. Children must never be left
unattended in this vehicle. Children should be harnessed in this vehicle at all times.
3.- It is important that any person intending to use this vehicle fully understands these
instructions. If you find any difficulty in fitting, repeat instructions carefully, without
forcing mechanism.
4.- Children should always be kept clear of moving parts while making adjustments to
the vehicle.
5.- Never overload the vehicle. The weight limit for the shopping tray is 5 Kg. Any load
attached to the handle will adversely affect the stability of the vehicle.
6.- Warning: Never leave the vehicle without first engaging the parking device. Avoid
uphill or downhill parking. Avoid using the vehicle on steps, stair or escalators, as it may
be dangerous and affect the safety of the vehicle.
7.- Do not use replacement parts other than those approved or supplied by the
manufacturer; it may be unsafe.
WASHING INSTRUCTIONS
Do not bleach
Do not iron
Do not dry clean
Do not tumble dry
6