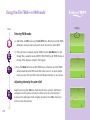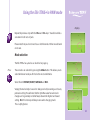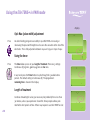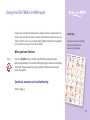
1
TM
Instructions for use
The Elle TENS+™is a 3-in-1 state-of-the art, efficient method of drug-free pain relief.
This powerful digital TENS unit is smooth, sophisticated and simple to use. It has been
cleverly crafted by Babycare TENS specifically for home use for mums-to-be, for the
management of pain for labour and beyond. The Elle TENS+ contains a powerful TENS unit
to combat labour pain with a built in contraction timer, a TENS unit for general pain relief
and a Pelvic Floor Stimulator (PFS) for treating post-natal incontinence.
The instructions in this manual are designed to
cover most operational issues. If you have any
questions concerning setting up, using or
maintaining this device which are not covered by
these instructions or any other concerns please
do not hesitate to contact Babycare TENS at
[email protected].
TENS is recognised as a safe and highly effective
method of pain relief and is regularly
recommended by medical professionals.
TENS is drug-free, with no known side effects.
It can also be used in conjunction with any
additional medication if required.
2
Explanation of symbols on unit
Equipment providing a particular degree of
protection against electric shock particularly
regarding allowable leakage currents having an
F type (floating) applied part.
Warning Please read these instructions before use.
Denotes a product which must be disposed
of safely.
What is TENS?
Section
TENS (Transcutaneous Electrical Nerve Stimulation) works
by passing mild electrical impulses through the skin, via
electrode pads, into the nerve fibres which lie below.
1
Using your Elle TENS+
in BIRTH mode:
Section
Using your Elle TENS+
in PAIN mode:
See page 4
The TENS impulses help your body produce its own pain
killing chemicals, such as endorphins. The level of pain
relief obtained varies from person to person.
What can the Elle TENS+
be used for?
2
See page 16
1. The Elle TENS+ provides pain relief during labour.
However some people may find that other analgesics
are also needed during the later stages of labour.
2. The Elle TENS+ can be used for many chronic and acute
pain conditions such as back pain, shoulder pain,
arthritis, sciatica, sports injuries, migraine, period pain
and post-operative pain.
3. The Elle TENS+ can also be used for treating
incontinence. (NOT to be used during the 12 weeks
following childbirth).
Section
3
Using your Elle TENS+
in PELVIC mode:
See page 24
3
1
Section
For more information
Please also refer to your
‘Women’s guide to drug free
pain relief’.
BIRTH mode
Waiting for that big day to finally arrive is exciting, but it is perfectly
natural to feel a little apprehensive. You will be thinking about how to
make giving birth as easy as possible - preparation is essential.
Babycare TENS has become the most popular choice for mums-to-be as it is
specifically designed to combat pain during childbirth. This is a safe, effective
drug-free method of pain relief, which still allows you to use other analgesics,
such as pethidine or gas-and-air if you wish.
Contents for BIRTH mode
4
Controls on your Elle TENS+
Display symbols and their meanings
Setting up your Elle TENS+ for birth
Suggested electrode placement diagram
Entering BIRTH mode
Adjusting intensity for pain relief during labour
Burst (use between contractions)
Boost (use during contractions)
Using the contraction timer
Recalling your contraction history
The Mode Button
The Opti-Max Key
Questions, answers and troubleshooting
5
6
7
9
10
10
11
11
12
12
13
14
15
Controls on your Elle TENS+
in BIRTH mode
Leadwire Jack Plug Sockets
im
Boost/T
er
The Elle TENS+ is very simple to use.
However, it is essential to read these
instructions to obtain the most out of
the unit.
Please ensure that all of the
contraindications and precautions
have been read thoroughly.
See pages 34 and 35.
Opti-Max Key
Adjusts depth of the pulses:
Refer to p14 for more details.
Channel 1 Intensity
Adjustment Keys
Mode Button
Selects modes.
Space to attach neck cord
Boost/Timer Button
Used for an extra surge of
power during contractions
and also activates
Contraction Timer.
ELLETENS+
BIRTH
PAIN
PELV
On/Off Button
+
Opti
Max
+
+
CH1
CH2
Mode
CH1
Channel 2 Intensity
Adjustment Keys
CH2
N.B. Automatic Power Off
When the intensity levels are zero,
and the Elle TENS+ has not been in
use for 5 minutes, it will shut off
automatically.
5
Display symbols and their meanings in BIRTH mode
Mode 1 and 2
There are two mode ranges
available each with a Burst and
Boost function (see page 13).
/Timer
Boost
BURST
This function is used at the
onset of labour and in between
contractions. There are two
Burst modes available indicated
by a 1 or 2. You can switch
between them by pressing the
Mode Button (see page 11).
BOOST
The Boost Button at the top right
of the unit activates the BOOST
mode. This function is used
during contractions. There are
two Boost modes available
indicated by a 1 or 2. You can
switch between them by
pressing the Mode Button.
Between Contraction Timer
Starts by pressing the Boost
Button, this automatically
measures the time interval
between your contractions.
ELLETENS+
BIRTH
PAIN
PELV
+
Opti
Max
+
+
CH1
CH2
Mode
6
Low Battery Indicator
This sign will start flashing if the
batteries run low. If this is the
case, change both batteries.
Please refer to page 7 for
instructions.
Power Bar
This shows the output from 0 to 15
for both channel 1 and 2. Each
segment represents
approximately 7% of the total
output.
Contraction Timer
Starts by pressing the Boost
Button, this automatically records
the duration of your contractions.
Opti-Max
Indicates the Opti-Max output.
Refer to p14 for more details.
Pad contact warning
(safety cut-out)
This symbol will appear if any of
your pads are not attached
securely to the skin.
Setting up your Elle TENS+ for BIRTH
Press
AA R6 1.5v
AA R6 1.5v
+
+
AA R6 1.5v
b) Release the battery
compartment cover and
insert 2 x AA batteries
ensuring the positive (+)
and negative (-) terminals
are correctly positioned as
marked in the battery
compartment.
Replace the cover.
Rotate
+
a) Press and rotate the belt
clip at the back of the Elle
TENS+ in either direction
to reveal the battery
compartment.
AA R6 1.5v
• 1 x Elle TENS+ Unit
• 1 x Pack of 4 Self Adhesive Electrodes
(40mm x 100mm)
• 2 x Leadwires and 1 Spare
• 2 x AA Batteries and 2 Spare
• 1 x Carrying Pouch
• 1 x Easy-Release Neck Cord
• 1 x Instruction Manual
• 1 x Quick Start Guide
• 1 x Women’s Guide*
• 1 x Electrode Placement Chart*
• 1 x Lubricant Gel Sachet
1 x vaginal probe
(NOT to be used until at least 12 weeks
after childbirth. See contraindications
and precautions on pages 34 and 35.
For use only in the PELVIC mode see p24).
The Assembly Stage
+
Check the following contents:
Cover
Release
*(only if you have purchased this unit)
7
Setting up your Elle TENS+ for BIRTH
c) Take two of the pink
leadwires and insert
each of the black jack
plugs into the sockets
at the top of the Elle
TENS+ unit.
Jack Plug
Jack Plug
d) Now insert the pins
(at the other end of the
leadwires) into the
sockets attached to the
sticky electrodes.
Do not remove the
electrodes from the
backing at this stage.
If you wish, attach the
easy-release neck cord
which enables you to hang
the Elle TENS+ from your
neck.
+
8
AA R6 1
AA R6 1.5v
N.B. Each leadwire has a red
and black pin. It makes no
difference which electrode
they are attached to.
Pins
Sockets
Sticky Electrodes
Suggested electrode placement diagram
The sticky electrode pads need to be placed in the correct position for
maximum pain relief. It is preferable to obtain assistance from either your
birthing partner or medical adviser when positioning the pads.
Please read the following instructions carefully:
1. Clean the skin thoroughly and allow skin to dry before applying the pads.
CH1
CH1
2. Carefully peel the pads from the plastic backing using your forefinger and
thumb. Do not pull on the lead wires. Retain plastic backing and pouch for
storage after use.
3. Position the top two pads (connected to the left socket CH1) approximately
4cm either side of the spine and 4-5cm above the imaginary navel line as
seen in the diagram.
Bra line
Naval line
CH2
CH2
Panty line
4. Position the bottom two pads (connected to the right socket CH2)
approximately 4cm either side of the spine and 4-5cm below
the imaginary navel line as seen in the diagram.
Reference: Cluett E. (1994) SRN RM ADM PGCEA. Analgesia in Labour: A review of the TENS method. Professional Care of Mother and Child. Mar;4 (2): 50-2.
9
Using the Elle TENS+ in BIRTH mode
Press
Display
Entering BIRTH mode
a). You are now ready to use your Elle TENS+. Ensure that the Boost Button
located at the top right of the unit is not pressed in. Switch the unit ON by
pressing the On/Off Button. You will see ‘BIRTH’ flashing in the top left
corner of the display.
Mode
+
Opti
Max
b). Press Mode to confirm ‘BIRTH’ mode, otherwise your Elle TENS+ will
automatically enter the BIRTH mode after a few seconds.
c). If the unit does not already display ‘BIRTH’ (i.e. PAIN or PELVIC is flashing),
use the Opti-Max Key to cycle through the modes, until ‘BIRTH’ is flashing.
N.B. Your Elle TENS+ always starts up in the mode used previously.
To select another mode you must first turn off the unit and follow the
instructions as above.
+
CH1
10
Adjusting intensity for pain relief during labour
Begin by pressing the CH1+ key. Each time this key is pressed, ‘half-moons’
will appear on the screen increasing in number and size as the intensity is
BIRTH
Using the Elle TENS+ in BIRTH mode
Display
increased. You will begin to feel a pulsating sensation. The unit is in
BURST mode. Press CH1- should you wish to reduce the intensity.
+
CH2
Repeat the previous step with the CH2+ and CH2- keys. You will now feel a
sensation in both sets of pads.
Burst 1 (use between contractions*)
This is the first mode that you will use. It feels like a pulsing, tingling
sensation i.e. the pulses are off and on periodically. This mode will help to
promote those all-important natural pain-killing chemicals known as
‘endorphins’ and ‘encephalins’.
imer
Boost/T
Boost 1 (use during contractions*)
When experiencing a contraction, simply press the Boost Button once and
release. This is the big button located at the top right of the unit. Your Elle
TENS+ will then switch automatically into the BOOST mode for that extra
surge of power required to combat pain during contractions. This will feel
like a continuous sensation. You do not need to hold the button in.
*See page 13 for additional BURST and BOOST information.
11
Using the Elle TENS+ in BIRTH mode
Display
imer
Boost/T
Once the contraction has passed, release the Boost Button by lightly pressing
it. The Elle TENS+ will return to the original BURST 1 mode. Continue this cycle
during the early stages of labour.
Using the contraction timer
The first time you press the Boost Button, the Elle TENS+ will automatically
trigger the Contraction Timer (CT). This can be seen in the bottom right of the
display. This measures the duration of your contractions in seconds. Once the
contraction has passed and the Boost Button is released, the unit will trigger
the Between Contraction Timer (BCT) which measures the time between
contractions.
Press
CH1
CH2
+
Opti
Max
12
Recalling your contraction history
To recall a list of your last 5 ‘Contraction Times’ (CT) and ‘Between Contraction
Times’ (BCT) press the CH1- and CH2- buttons simultaneously. The last
recorded set of BCT and CT times are shown as -1. Use the Opti-Max - Key to go
back to previous sets (eg, -2, -3, -4, -5) or forward again by pressing the OptiMax + Key. Recalling the contraction history will not interrupt the functionality
of the unit. N.B. To avoid losing contraction history, do NOT switch unit off.
Using the Elle TENS+ in BIRTH mode
Display
CH1
CH2
To return back to the original BIRTH mode screen, press the CH1- and CH2buttons together again.
The Mode Button
There are two mode ranges available on the Elle TENS+, each with a Burst and
Boost function.
Mode 1 (BURST 1 and BOOST 1), which has been described above, is primarily
used for the earlier stages of labour.
Mode 2 (BURST 2 and BOOST 2) usually used when your labour advances and
your contractions become more frequent.
Press
Mode
Press the Mode Button to switch between mode ranges. You will see from the
User Display, that the number in the centre of the display will change from 1 to
2 and vice-versa.
N.B. Both modes are interchangeable and can be used according to your
preference, not necessarily for the stage of labour you are in.
13
Using the Elle TENS+ in BIRTH mode
Display
The Opti-Max Key
This provides extra versatility to your Elle TENS+. Increasing or decreasing
the Opti-Max Key will allow you to either heighten or lessen the level of pulse
power transmitted to the electrode pads.
Press
+
Opti
Max
Pressing the Opti-Max Key either + or - will increase or decrease Opti-Max
sensation. This is extremely useful for the final stages of labour when you need
an extra surge of power. There are 5 Opti-Max levels in the BIRTH mode: 50,
100, 150, 200 and 250애s (microseconds). The unit will always start up at OptiMax 150애s, which is exactly half way between the highest and lowest setting.
N.B. 1. The Opti-Max Key can be used according to your preference and not
necessarily for the stage of labour you are in. 2. When operating the Opti-Max
Key the CT information will temporarily be replaced but will return automatically.
When you have finished
14
Press the On/Off Button to turn the unit off before removing the wires. Remove
the jack plugs from sockets holding the plugs between the forefinger and thumb.
Remove electrodes returning them to the plastic backing and pouch as supplied.
Useful Tips
Continue stimulation for as
long as necessary, unless
you experience discomfort.
If you stimulate for a number
of hours ensure the pads do
not become dry. If this
occurs, switch off the unit,
disconnect the electrodes,
and apply a small drop of
water to them.
Questions, answers and troubleshooting
Q When shall I start using my Elle TENS+?
A Use as early as you can after the onset of labour to allow time
for your body’s pain-killing chemicals to rise.
Q What conditions can TENS be used to treat?
A
Q Can I try the Elle TENS+ before going into labour?
A Yes, using one leadwire, place 2 pads on your forearm to feel
the different pulse sensations following the instructions on
page 9.
Q Can I combine the Elle TENS+ with other medication?
A Yes, you can still use analgesics such as gas and air (entinox)
or pethidine.
Q Can the Elle TENS+ be used in hospital?
A Yes. However, a midwife may ask you to switch it off
temporarily.
Q Can I use the Elle TENS+ if I am considering a water birth?
A Yes, but not in the water itself.
If you are unsure about using TENS please consult your
medical adviser or contact Babycare TENS at
[email protected].
Troubleshooting Questions
Q Why does the pulse sensation not appear to be as strong
after you have used the Elle TENS+ for a while?
A
Yes, TENS is used widely for pain relief and is recommended by
medical professionals.
Q Can I use it with other medications?
A
Yes. TENS is drug-free so you can use it with any
other medication including paracetamol.
Increase the intensity, you may have become acclimatised to a
lower setting.
Q Why does the pulse sensation feel strong but ineffective?
A
Q Is TENS safe?
A
TENS can be used to treat numerous pain conditions such as
back pain, neck pain, period pain and arthritic pain etc.
You may need to reposition the electrode pads (don’t forget to
switch the Elle TENS+ off before doing so).
Q What should I do if I can not feel any or little sensation even
on a high intensity setting?
A
Check that the leadwires are properly connected and the pads
are fixed to the skin. Also check batteries.
15
2
Section
Pad Placement
For help with placement of
pads please refer to
diagrams found in your
‘Electrode Placement Chart’.
PAIN mode
TENS (Transcutaneous Electrical Nerve Stimulation) works by passing
mild electrical impulses through the skin, into the nerve fibres which
lie below, via electrode pads. TENS impulses help your body produce
its own pain-killing chemicals, such as‘endorphins’.
TENS can be used for many chronic and acute pain conditions such as back pain,
shoulder pain, arthritis, sciatica, sports injuries, migraine, period pain and postoperative pain.
Contents for PAIN mode
16
Controls on your Elle TENS+ in PAIN mode
Display symbols and their meanings
About the modes
Entering PAIN mode
Adjusting intensity for pain relief
Mode selection
Opti-Max (pulse width) adjustment
Using the timer
When you have finished
Questions, answers and troubleshooting
17
18
19
20
20
21
22
22
23
24
Controls on your Elle TENS+
in PAIN mode
Leadwire Jack Plug Sockets
im
Boost/T
er
The Elle TENS+ is very simple to use.
However, it is advisable to read these
instructions to obtain the most out of
the unit.
Please ensure that all of the
contraindications and
precautions have been read
thoroughly. See pages 34 and 35.
Opti-Max Key
Adjusts depth of the pulses
Refer to p22 for more details.
Channel 1 Intensity
Adjustment Keys
Mode Button
Selects one of four different modes:
Refer to p19 for more details.
Space to attach neck cord
Timer Button
ELLETENS+
BIRTH
PAIN
PELV
On/Off Button
+
Opti
Max
+
+
CH1
CH2
Mode
CH1
Channel 2 Intensity
Adjustment Keys
CH2
N.B. Automatic Power Off
When the intensity levels are zero,
and the Elle TENS+ has not been in
use for 5 minutes, it will shut off
automatically.
17
Display symbols and their meanings in PAIN mode
Timer
Shows your selected length of treatment.
/Timer
Boost
Mode Indicator
indicates mode currently in use.
For more information on the
modes available see opposite
page.
Pad contact warning
(safety cut-out)
This symbol will appear if any of
your pads are not attached
securely to the skin.
ELLETENS+
BIRTH
PAIN
PELV
+
Opti
Max
+
+
CH1
CH2
Mode
18
Low Battery Indicator
This sign will start flashing if the
batteries run low. If this is the
case, change both batteries.
Please refer to page 7 for
instructions.
Power Bar
This shows the output from
0 to 15 for both channels.
Each segment represents
approximately
7% of the total output.
Opti-Max
Indicates the Opti-Max output
in numerals.
Setting up your Elle TENS+ in PAIN mode
First set up unit as described on page 7. Please contact Body Clock Health Care should you require a new set of
electrode pads for using your Elle TENS+ in the PAIN mode. www.bodyclock.co.uk Tel +44 (0)20 8532 9595.
About the modes
The Elle TENS+ has 4 TENS modes. Each has been designed to provide a different sensation. You can use any of the TENS
modes to treat your pain.
CONSTANT
Pulses are continuous and feel like a tingly sensation. This mode is generally used for acute pain conditions.
BURST
Pulses are off and on in a regular cycle and will feel like a heartbeat sensation. This mode is generally used
for chronic pain conditions.
MASSAGE
The pulses decrease and then increase in regular cycles creating a massaging sensation.
MIXED (Dense Disperse or Han Stimulation*)
3 seconds of Constant and 3 seconds of Burst as described above.
* Professor Han suggests that switching between lowand high-frequency stimulation for three seconds each i.e. 2/100 stimulation
produces a simultaneous activation of the of the enkephalin and dynorphin systems which creates a more potent analgesic
effect to combat pain. Published in the January issue of 2003 of ‘Trends in Neuroscience’ (26:17-22).
19
Using the Elle TENS+ in PAIN mode
Display
Press
Entering PAIN mode
a). Switch the unit ON by pressing the On/Off Button. Note that your Elle TENS+
will always start up in perviously used mode. You need to select ‘PAIN’.
+
Opti
Max
Mode
b). If the unit does not already display ‘PAIN’ press the Opti-Max Key to cycle
through the 3 available modes, (BIRTH, PAIN, PELVIC) until ‘PAIN’ flashes at
the top of the display as shown in the diagram.
c). Press the Mode Button to confirm ‘PAIN’ mode, otherwise your Elle TENS+
will automatically enter PAIN mode after a few seconds. To select another
mode you must first turn off the unit and follow instructions as in a) above.
Adjusting intensity for pain relief
+
CH1
20
Begin by pressing the CH1+ key. Each time this key is pressed, ‘half-moons’
will appear on the screen increasing in number and size as the intensity is
increased. You will begin to feel a tingling sensation. Press CH1- should you
wish to reduce the intensity.
Using the Elle TENS+ in PAIN mode
Display
+
CH2
Repeat the previous step with the CH2+ and CH2- keys. You will now feel a
sensation in both sets of pads.
Please note that you do not need to use both channels. Either one will work
on its own.
Mode selection
The Elle TENS+ has 4 modes as described on page 19.
Press
These modes are selected by pressing the Mode Button. This allows you to
select whichever mode you find to be the most comfortable.
Mode
Select from: CONSTANT, BURST, MASSAGE and MIX .
Varying the modes helps to avoid or delay your body becoming used to any
particular setting. You will note that the Opti-Max value for each mode
changes and is generally set at half way between the highest and lowest
setting. N.B. The intensity will drop to zero when changing mode.
This is safety feature.
21
Using the Elle TENS+ in PAIN mode
Display
Opti-Max (pulse width) adjustment
Press
+
Opti
Max
An added facility giving extra versatility to your Elle TENS+. Increasing or
decreasing the pulse width heightens or lessens the sensation at the site of the
electrodes. This is fully adjustable between 20µs and 250µs in steps of 10µs.
Using the timer
imer
Boost/T
Press
The timer allows you to set your length of treatment. There are 5 settings:
Continuous (C), 15 mins, 30 mins, 45 mins and 60 mins.
In any mode press the Timer Button to cycle through the 5 available time
periods. The default setting is Continuous (C). The programme’s
remaining time is shown in the display.
Length of treatment
Continue stimulating for as long as necessary but preferably for no less than
30 minutes, unless you experience discomfort. Some people achieve pain
relief after short periods of time. Others may require to use their TENS for a lot
22
Using the Elle TENS+ in PAIN mode
longer. If you continue to stimulate for a number of hours, temporarily turn
off your unit and check to make sure your self-adhesive electrodes have not
dried out. If this is the case, dampen them slightly. If electrodes are allowed
to dry out this can cause minor skin irritation.
Useful Tips
Remember to refer to Electrode
Placement Chart for pad
placement information.
When you have finished
Press
Press the On/Off Button to turn the unit off before removing the wires.
Remove the jack plugs from sockets holding the plugs between the forefinger
and thumb. Remove electrodes returning them to the plastic backing and
pouch as supplied.
Questions, answers and troubleshooting
Refer to page 15.
23
3
Section
PELVIC mode
NOT to be used until at least 12 weeks after childbirth.
Check the appropriate time with your medical advisor.
The PELVIC mode is an ultra simple, yet powerful digital Pelvic Floor
Stimulator (PFS). It is designed for use by women of all ages to help
strengthen pelvic floor muscles and to treat incontinence.
Like all other muscles in your body, the more you stimulate them, the stronger they
become. Women with strong pelvic floor muscles enjoy greater control over their
bladder, increased vaginal tone and greater sensation during intercourse.
One in three women suffers from some form of incontinence during her life.
It can occur at any time, most commonly after childbirth.
The severity of incontinence can vary.
Contents for PELVIC mode
Controls on your Elle TENS+ in PELVIC mode
Display symbols and their meanings
About the 4 programmes
Setting up in PELVIC mode
Entering PELVIC mode
Adjusting your intensity level
After use
Questions, answers and troubleshooting
24
25
26
27
28
29
30
30
31
Controls on your Elle TENS+
in PELVIC mode
Leadwire Jack Plug Socket
(Use in channel 1 only)
im
Boost/T
er
The Elle TENS+ is very simple to use.
However, it is advisable to read these
instructions to obtain the most out of
the unit.
Please ensure that all of the
contraindications and
precautions have been read
thoroughly. See pages 34 and 35.
ELLETENS+
BIRTH
PAIN
PELV
On/Off Button
+
Opti
Opti-Max Key
Preset for use in the PELVIC mode.
Max
+
+
CH1
Channel 1 Intensity
Adjustment Keys
Mode Button
Selects modes.
Space to attach neck cord
Timer Button
CH2
Mode
CH1
CH2
N.B. Automatic Power Off
When the intensity levels are zero,
and the Elle TENS+ has not been in
use for 5 minutes, it will shut off
automatically.
25
Display symbols and their meanings in PELVIC mode
Timer
Shows your length of treatment which
is preset in the PELVIC mode.
/Timer
Boost
Mode Indicator
indicates mode currently in use.
For more information on the
modes available see opposite
page.
Probe contact warning
(safety cut-out)
This symbol will appear if the
probe is not inserted correctly or
insufficient gel has been used.
ELLETENS+
BIRTH
PAIN
PELV
+
+
+
CH2
Mode
26
Power Bar
This shows the output from 0 to 15
for channel 1. Each segment
represents approximately 7% of
the total output.
Opti-Max
Preset for use in the PELVIC mode.
Opti
Max
CH1
Low Battery Indicator
This sign will start flashing when
the batteries are running low.
If this is the case, change both
batteries. Please refer to page 5
for instructions.
Setting up your Elle TENS+ in PELVIC mode
About the 4 programmes
Your Elle TENS+ has four preset programmes:
PROG 1 - For Urge Incontinence
Occurs with a strong, sudden and uncontrollable urge to urinate.
PROG 2 - For Stress Incontinence
Occurs when sneezing, coughing, laughing, lifting or during exercise and causes a small amount of urine to leak.
PROG 3 - For Mixed Incontinence
A combination of urge and stress incontinence.
PROG 4 - After Care
This is an optional mode and can be used directly after treatment:Provided you are not experiencing any muscle fatigue or as a maintenance mode.
After you have been using the unit on a regular basis and have experienced an improvement in your condition.
27
Setting up your Elle TENS+ for PELVIC mode
Setting up in PELVIC mode
1. Remove the Vaginal Probe from its
packaging. Wash hands in soap and
warm running water. Liberally wash
the probe using the same method but
do not soak. Rinse all soap and residue
from hands and probe. Dry your hands
and the probe with a clean cloth/paper
towel and allow to air dry.
2. Take one of the leadwires and insert
the black jack plug into the channel 1
(only) socket at the top of
3. Now insert the pins (at the other
end of the leadwire) into the
sockets attached to the Vaginal
Probe.
Pins
Sockets
4. Apply a thin coating of
lubricating gel to the probe.
Jack Plug
Channel 1
only
28
the Elle TENS+ unit
(the socket to the right when
viewed from the back).
5. Insert the probe until the flange
at the base of the probe is sited
between the labia as shown in the
diagram. There is no need for
precise orientation.
Using the Elle TENS+ in PELVIC mode
Press
Display
Entering PELVIC mode
a). Switch the unit ON by pressing the On/Off Button. Note that your Elle
TENS+ will always start up in last previously used mode.
You need to select ‘PELVIC’.
+
Opti
Max
b). If the unit does not already display ‘PELVIC’ press the Opti-Max Key to cycle
through the 3 available modes, (BIRTH, PAIN, PELVIC) until ‘PELVIC’ flashes
at the top of the display as shown in the diagram.
Mode
c). Press the Mode Button to confirm ‘PELVIC’ mode, otherwise your Elle TENS+
will automatically enter PELVIC mode after a few seconds. To select another
mode you must first turn off the unit and follow instructions from a) above.
Mode
Select the Programme most appropriate for your type of incontinence by
pressing the Mode Button (refer to page 27 for Programme descriptions).
Programme
PROG 1
PROG 2
PROG 3
PROG 4
Duration
30 mins
30 mins
45 mins
45 mins
How often?
Once or twice a day
Once a day or every other day depending on severity
Complete the programme once a day
At your discretion
29
Using the Elle TENS+ in PELVIC mode
Display
Do not exceed treatment times unless advised by a medical professional.
Adjusting your intensity level
+
CH1
CH1
Begin by pressing the CH1+ key. Each time you press this key, you will see the
intensity level increase on the LCD.
Carefully continue to press CH1+ key until you comfortably feel your muscles
contracting. If the sensation feels too strong, simply press the CH1- key to
minimise the intensity.
The programme’s remaining time is shown in the display.
Important
After use
Your Elle TENS+ will automatically switch off once the programme is
complete. After use, always remember to ensure that the Elle TENS+ is
switched off. Remove the Elle TENS+ probe from your body and disconnect
the leads. Clean the probe with warm running water but do not soak. Rinse
all soap and residue from probe. Dry with a clean cloth/paper towel and
allow to air dry.
30
• The Vaginal Probe is single
patient use only. Additional
probes and gel can only be
purchased from Body Clock.
• Probes may be re-used by the
same patient only.
• Wash probe as instructed
before each use.
• Do NOT use the probe if the
pack is open or damaged.
Questions and answers in PELVIC mode
Q How long will it take to see results?
Q What does it feel like?
A The amount of time varies from woman to woman.
It is also dependent on the type of incontinence from
which you are suffering.
A All three PFS programmes feel slightly different.
In general, the feeling is that of a pleasant, tingly,
squeezing sensation that contracts and relaxes
the pelvic floor muscles.
STRESS Incontinence improvement comes slowly with the building
of muscle fibre and nerve sensitivity. This can take
up to 2 months.
URGE Incontinence improvements are made by reducing the false signals
sent by the bladder to the brain. Results can be seen in
as little as 14 days
Q Is it suitable for use by all women?
A Yes, all women can use it provided none of the
contraindications apply.
Q Can I use it in PELVIC mode whilst I’m pregnant?
A No, not until at least 12 weeks after childbirth.
Check the appropriate time with your medical advisor
Q Are there any side effects?
MIXED Incontinence improvements are made by building the muscle fibre
and nerve sensitivity as well as reducing the false
signals being sent to the brain. This can take slightly
longer, but you should be able to notice
a difference within 21 days.
A No, it is totally drug free. There are no known side
effects.
31
Specifications
General
BIRTH mode
Equipment type
Dual Channel Digital TENS
Classification
This unit is fully compliant with EEC Directive 93/42/EEC,
classified as internally powered equipment type BF.
It is intended for continuous operation.
Programme
Display
Burst
Burst 1
Pulse Frequency (16Hz) Pulse Width (150애s)
1 burst per second, 8 pulses per burst*
Burst
Burst 2
Pulse Frequency (32Hz) Pulse Width (150애s)
2 bursts per second, 8 pulses per burst*
Boost
Boost 1
Pulse Frequency (80Hz) Pulse Width (150애s)
continuous*
Boost 2
Boost 2
Pulse Frequency (100Hz) Pulse Width (150애s)
continuous*
* Default pulse width after mode changed (pulse width not changed when switched between
Output Frequency / Duration
BURST and BOOST mode) 5 selectable pulse widths in all modes: 50, 100, 150, 200, 250
32
Unit Size
115mm x 55mm x 30mm
Unit Weight
75 grams
Output Jacks
CE Touch-proof jacks
Display
Digital LCD - 8 seven segment digits and around
95 segments
Automatic Power Off
Will switch off after 5 minutes if not used
Battery Low Detect
2.2v ± 0.2v
Battery
2 x 1.5v AA Battery (Type LR6)
Operating Environment
Temperature 0-40˚C
Air humidity 30-75%
Air pressure 700 hPa-1060 hPa
Storage and Transport
Environment
Temperature 0-40˚C
Air humidity 30-90%
Air pressure 700 hPa-1060 hPa
Output Channel
Dual Channel
Output Waveform
Symmetrical bi-phasic rectangular
Output Voltage
0 - 55v zero to peak adjustable in 15 steps at 500q load
Output Intensity
0 - 110mA adjustable in 15 steps at 500q load Intensity
level will drop back to zero after programme changes
* Pulse width adjustment does not change when switching between Burst and Boost modes.
Default pulse width is 150애s. There are 5 adjustable pulse widths selectable in all modes: 50, 100,
150, 200 and 250애s.
PAIN mode
PELVIC mode
Programme
Display
Pulse Frequency 100Hz
Pulse Width 20-250애s
Urge
PROG 1
5Hz / 3 mins 10Hz / 5 mins 15Hz / 5 mins
20Hz / 5--Hz / 5 mins
10Hz / 5 mins 5Hz / 2 mins
Total time = 30 mins*
BURST
32Hz-2 bursts per second, 14 pulses per burst
Pulse Frequency 2Hz (each Hz = 14 pulses per burst)
Pulse Width 20-250애s
Stress
PROG 2
10Hz / 5 mins 35Hz / 5 mins 50Hz / 10 mins
35Hz / 5 mins 10Hz / 5 mins
Total time = 30 mins*
Massage
MASSAGE
Pulse Frequency 100Hz fixed frequency
modulating on pulse width
Pulse Width 20-250애s
Mixed
PROG 3
10Hz / 5 mins 20Hz / 5 mins 30Hz / 5 mins
40Hz / 5 mins 50Hz / 5 mins 40Hz / 5 mins
30Hz / 5 mins 20Hz / 5 mins 10Hz / 5 mins
Total time = 45 mins*
Mixed
MIX
3 seconds in mode 1, 3 seconds in mode 2, repeat
Pulse Frequency 2Hz (each Hz = 16 pulses per burst)
and 100Hz (repeated)
Pulse Width 20-250애s
PROG 4
Frequency Modulation
Frequency increases from 2 Hz to 10 Hz in 4 secs.
and then back to 2Hz in another 4 secs.
Total cycle = 8 secs
Total time = 45 mins*
Programme
Display
Contstant
CONSTANT
Burst
Timer
min
Output Frequency / Duration
(C) Continuous, 15 Minutes, 30 Minutes
45 Minutes and 60 Minutes
Output Channel
Dual Channel
Output Waveform
Asymmetrical bi-phasic rectangular
Output Voltage
0-60V adjustable in 15 steps (500Ω load, peak to 0)
Output Intensity
0 - 120mA adjustable in 15 steps (500Ω load). Intensity
level will drop back to 0 after mode changes
After Care
Output Frequency / Duration
Pulse Duration
Pulse width fixed at 200애s for all progammes
Output Channel
Single Channel
Output Waveform
Bi-phasic rectangular
Output Voltage
0-40V adjustable in 14 steps across a 500 ohm load
Output Intensity
0-80mA adjustable in 14 steps across a 500 ohm load
* Timer countdown displayed on screen.
33
Contraindications
1. Do NOT use TENS before 37 weeks of pregnancy unless under medical supervision.
2. Electrodes should only be positioned as recommended for childbirth (see page 7),
unless otherwise stated by your midwife or medical adviser.
3. Do NOT place electrodes on the abdomen (before birth), the front or side of the
neck, or areas on the head, which could cause current to flow transcerebrally.
4. Do NOT use TENS if you have a demand-type cardiac pacemaker.
5. If you suffer from or any undiagnosed pain, have any metal plates or any doubts
whatsoever consult your medical adviser.
6. Never use TENS to mask undiagnosed pain as this could require urgent treatment.
7. The unit MUST NOT be used for Pelvic Floor Stimulation in any mode or with the
Vaginal Probe during pregnancy.
8. You can only use the unit for Pelvic Floor Stimulation from at least 12 weeks after
childbirth. Check the appropriate time with your medical advisor.
9. Do NOT use the Elle TENS+ for Pelvic Floor Stimulation with the Vaginal Probe if
you are suffering from any urinary or vaginal infection, or at the same time as
using a barrier contraceptive device such as a diaphragm or cervical cap, or during
your menstrual period.
General Precautions & Adverse Reactions
1. Do NOT use this unit without first reading these instructions.
2. Do NOT immerse the Elle TENS+ in any liquid.
3. Do NOT place it close to any source of excessive heat or operate it in the presence
of flammable gas.
4. Do NOT drop this unit onto a hard surface.
5. Do NOT attempt to dismantle the Elle TENS+.
6. Only use specified batteries, electrodes and probe.
7. If damaged, do not use. Return to supplier.
8. Remove the batteries when not in use.
9. Do NOT use while driving or operating potentially dangerous machinery.
10.Do NOT use in close proximity (e.g. 1m) to shortwave or microwave therapy
equipment to avoid instability in the stimulator output.
11. Do NOT use adjacent to or stacked with other equipment.
12.Keep out of the reach of children.
34
13.DO NOT place electrodes or vaginal probe across or through the head, directly or
near the eyes, covering the mouth, on the front or sides of the neck (especially
the carotid sinus), on the chest and upper back so as to cross over the heart,
directly over your heart or an area of broken, inflamed, infected or numb skin.
14.Electrodes should only be applied to skin with normal sensation unless under
medical supervision as skin irritation may occur following long term application.
15.This is an internally powered medical electrical equipment. Do not use battery or
power sources other than those specified in these instructions
16.No modification of this equipment is allowed.
Warnings
1. Electronic monitoring equipment (such as ECG monitors and ECG alarms) may not
operate properly when TENS is in use. Portable and mobile RF communications
equipment can affect medical electrical equipment. Operation of the equipment or
system below this amplitude or value may cause inaccurate results.
2. Mild temporary skin irritation can occur following long term application.
Simultaneous connection by the user to a high frequency surgical medical
electrical equipment may result in burns at the site of the electrodes and
equipment. Users should seek advice from their medical advisors when use of this
equipment is required.
3. Keep out of the reach of children and babies at all times. Children and babies may
be at risk of strangulation by entaglement in leadwires or choking by swallowing
small parts or accessories. Ensure that from the device and all accessories are
stored away safely out of the reach of children and babies at all times.
4. It is unsafe to use accessories, detachable parts and materials not described in
these instructions for use. Please see www.bodyclock.co.uk for suitable
accessories or contact us if you require any spare parts on +44 (0)20 853 9595.
5. Do not interconnect this device with any other equipment not described in these
instructions for use.
6. Do not modify this equipment in any way.
7. The device shall not be serviced or maintained while in use with a patient.
8. The Elle TENS+ is not user repairable and must be returned to the manufacturer if
it requires repair.
If you have any concerns please do not hesitate to contact Babycare TENS at
[email protected].
Checking system performance and troubleshooting
Device failures
1. Check if the unit is turned on and if so, turn it off before taking any further steps.
2. Then replace the batteries and turn the device on. If it does not function at all,
return the device for repair.
3. If your unit does not appear to be operating properly or there are changes in the
performance of your equipment, first replace the batteries following the
instructions for doing so in this manual. Replacing the battery can eliminate most
operational problems. If the device still does not appear to function properly or
the changes to the performance still continue, turn off the unit and double check
that your skin is prepared as instructed above. Finally, replace your electrodes
with new ones. If your device still does not appear to function properly or the
performance is still changed return the device for repair to the manufacturer.
4. Where there are any unexpected operational issues or events when using this
device, turn off the unit and contact the manufacturer for advice and assistance.
1. Please do not attempt to repair damaged devices yourself.
2. In case of further inquiries, always state the model of your device (as this device
should only be repaired by the manufacturer’s qualified technical personnel).
3. This unit is guaranteed for a period of 2 years (the service life of this unit) against
manufacturer’s defects excluding consumables. Consumables include leadwires,
batteries, a vaginal probe and self-adhesive electrodes. The expected service life
will depend on how often the device is used but the average service life is
expected to be 3 months for leadwires, 20 hours for batteries, 3 months for the
vaginal probe and 10-20 applications for self-adhesive electrodes depending on
skin type.
4. Note: the guarantee is null and void if any attempt is made to open or modify the
unit by unauthorized personnel.
5. In the event of a fault please contact the supplier (address found on the invoice or
delivery note) or Body Clock, 108 George Lane, South Woodford, E18 1AD.
Tel: +44 20 8532 9595 Fax: +44 20 8532 9551 email: [email protected]
Maintenance and Care (Guidelines for optimum performance):
1. Remove the batteries if this device is not likely to be used for some time.
2. Change the batteries regularly when regularly using this device.
3. The unit must be switched off when changing the batteries. Check if the unit is
turned on and if so, turn it off before taking any further steps.
4. The unit should be wiped clean periodically using a very slightly dampened cloth.
A mild soap may be used but DO NOT apply solvents.
5. Follow instructions supplied with your electrodes and take note of their intended
number of uses and replace them when needed.
6. Do not attempt to open or dismantle this device at any time to undertake any
other repairs or maintenance.
7. Please see troubleshooting section found on page 15 for further information.
Battery Replacement
Please refer to page 7.
Materials The Elle TENS+ casing is made from ABS plastic and the material used
for the vaginal probe is ABS plastic and stainless steel metal. Electrodes consist of
fibre, conductive carbon mesh and conductive hydro gel.
Applied Parts
The self adhesive electrdoes and the vaginal probe.
Recycling
Recycling of batteries, electrical and electronic equipment (WEEE)
When you decide to dispose of used batteries of if you ever choose to dispose of
your device, please do so safely using official recycling facilities. To find your nearest
recycling sites for waste electrical and electronic products, contact your local council,
or visit www.recycle-more.co.uk and type your postcode into the recycling bank
locator.
Latex Warning
The Elle TENS+ and applied parts are NOT made with latex. Please check carefully
before choosing to use any other third party accessories other than those provided
by the manufacturer.
Natural rubber latex or its synthetic derivative is used in numerous medical products.
Repeated exposure can result in sensitivity to natural rubber latex proteins, with
symptoms ranging from skin redness, rash, hives or itching to difficulty breathing and
wheezing. Rarely, shock and even death can occur. Learn to recognize the symptoms
of a natural rubber latex allergy, seek medical advice and take all steps
recommended by your medical advisors.
Guarantee: The Elle TENS+ is guaranteed for 2 years against
manufacturer’s defects excluding consumables.
35
www.babycaretens.com
Body Clock Health Care Ltd
108 George Lane, South Woodford, London E18 1AD
January 2014 (1)
Tel (+44) (0)20 8532 9595
Fax (+44) (0)20 8532 9551
www.bodyclock.co.uk
e-mail [email protected]
ISO 9001:2008 ISO 13485:2003
EC DIRECTIVE 93/42/EEC Annex V
0120
This manual is recyclable