1
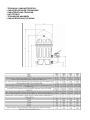
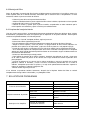
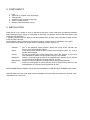
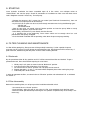
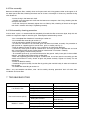
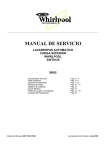
MANUAL DE INSTRUCCIONES Y FUNCIONAMIENTO
MANUAL DE INSTRUCCIONES Y FUNCIONAMIENTO
MANUAL DE INSTRUCCIONES Y FUNCIONAMIENTO
MANUAL DE INSTRUCCIONES Y FUNCIONAMIENTO
MANUAL DE INSTRUCCIONES Y FUNCIONAMIENTO
MANUAL DE INSTRUCCIONES Y FUNCIONAMIENTO
DIATOMACEOUS EARTH FILTER
FILTRE Â DIATOMEÉS
FILTROS DE DIATOMEAS
FILTRO A DIATOMEE
KIESELGURFILTER
FILTROS DE DIATOMIES
• TECHNICAL CHARACTERISTICS
• CARACTERISTIQUES TECHNIQUES
• CARATERISTICAS TECNICAS
• DATI TECNICI
• TECHNISCHE ANGABEN
• CARACTERISTICAS TECNICAS
ESPAÑOL
El presente manual está especialmente pensado para el instalador del filtro así como para las personas
encargadas de su mantenimiento. Siguiendo los consejos que aquí se indican, fruto de la larga
experiencia de la empresa ASTRAL en sistemas de filtración, conseguirá una inigualable calidad y
máxima cristalinidad del agua en su piscina.
1.INTRODUCCIÓN
Las diatomeas son algas unicelulares presentes tanto en agua dulce como en agua salada y que tienen
la capacidad de retener el silicio disuelto en el agua. Después de morir, sus esqueletos se fosilizan
formando una roca blanca, ligera y muy porosa llamada diatomita. A partir de esta roca, secándola y
triturándola, se obtiene el polvo de diatomita utilizado en la filtración de agua. Gracias a la gran porosidad
y reducido tamaño de las diatomitas, del orden de 0.036 mm, se consiguen filtrar partículas de hasta 2
micras (0.0002 mm).
2. PRINCIPIO DE FUNCIONAMIENTO
En el interior del filtro se encuentran 8 placas filtrantes inyectadas en plástico y recubiertas de una fina
tela de polipropileno, denominada “septum”. Después de introducir las diatomeas directamente en el
skimmer (diluidas en agua en forma de pasta), entran en el filtro por la parte inferior y se distribuyen
uniformemente sobre estas placas, formando una fina película que será la encargada de retener la
suciedad del agua (Fig. 1).
El agua limpia es recogida por un colector situado en la parte superior del filtro y enviada a la piscina. A
pesar de que la pérdida de carga inicial en estos filtros es muy baja, su gran capacidad de filtración hace
que se ensucien muy rápidamente, en funcionamiento continuo, en menos de 24 horas seria necesario
realizar un lavado. Sin embargo, en este tipo de filtros se produce un fenómeno de “regeneración
automática” de la capa filtrante que permite alargar considerablemente el período de filtración.
2.1. La regeneración automática
Las diatomeas se mantienen adosadas a la tela gracias a la fuerza del agua. Por este motivo, cada vez
que se para la bomba de filtración, se desprenden de la tela y caen al fondo del filtro. Gracias al especial
diseño de las placas, que sacuden la tela al cesar la presión, se consigue en máximo desprendimiento
de las diatomeas. De esta manera conseguimos en el fondo del filtro una pasta formada por diatomeas y
por la suciedad retenida.
Al poner en marcha de nuevo la bomba, toda esta pasta se mezcla debido a la turbulencia del agua y
sube hacia las placas para formar una nueva capa lista para reanudar la filtración (Fig. 2).
Aunque el principio de funcionamiento parece sencillo, existen tres detalles fundamentales a los que
ASTRAL ha dedicado especial atención para conseguir el máximo rendimiento del sistema:
• Máximo desprendimiento de las diatomeas de las placas.
Gracias a la especial forma de las placas (en forma de “costillas”), se consigue una gran superficie de
filtración, una distribución uniforme de las diatomeas en toda su superficie y un desprendimiento máximo
al parar la bomba (Fig. 3).
• Aprovechamiento total de las diatomeas.
Uno de los principales problemas de estos filtros es que la pasta de diatomeas se acumula poco a poco
en zonas de difícil acceso, llegando a alcanzar grosores considerables y disminuyendo paulatinamente la
diatomea útil para filtrar. Gracias al especial diseño de la rejilla inferior, con forma cónica y una superficie
reducida, se consigue evitar al máximo la acumulación y pérdida de diatomeas (Fig. 4).
• Regeneración uniforme.
El especial diseño de la parte inferior de la reja provoca una gran turbulencia en la zona inferior del filtro
que facilita la homogeneización de la pasta y una distribución rápida y uniforme por toda la superficie de
las placas. Con esto se consigue una prolongación del ciclo y una mejor filtración (Fig. 4).
3. COMPONENTES
1.
2.
3.
4.
5.
6.
Filtro
Válvula selectora de 6 vías completa, con enlaces a filtro, especial para diatomeas.
Juntas tóricas para conexión de la válvula.
Sistema de purga de aire y manómetro.
Manual de instrucciones del filtro.
Manual de instalación de la válvula.
4. INSTALACIÓN
Colocar el filtro en una superficie plana la más cerca posible de la bomba, por debajo del nivel del agua y
al reparo de las heladas. Prever un desagüe para el vaciado del filtro y espacio suficiente para realizar el
desmontaje y mantenimiento del filtro (ver “Características técnicas”).
Si es posible, conectar el filtro a tuberías de ø 2” y montar válvulas antes y después del filtro para facilitar
el mantenimiento del filtro y de la válvula.
Montar la válvula selectora siguiendo su manual de instalación y conectar las tuberías de la instalación
según se indica en las diferentes salidas de la válvula.
ATENCIÓN: No conectar el agua de la red directamente al grupo de filtrado.
La válvula selectora de 6 vías permite realizar las siguientes operaciones: ver (Fig. 5).
Filtración:
Es la posición normal de funcionamiento. El agua proveniente de la bomba entra
en el filtro y retorna a la piscina después de ser filtrada.
Vaciado:
El agua es enviada por la bomba directamente al desagüe, sin pasar por el filtro.
Se utiliza para vaciar parcialmente la piscina.
Cerrado:
En esta posición todas las entradas y salidas de la válvula están cerradas. Se
utiliza para abrir el filtro. Nunca poner en marcha el filtro con la válvula en esta
posición.
Lavado:
El agua circula a través del filtro en sentido inverso al de filtración y se envía al
desagüe. Se utiliza para limpiar el filtro, eliminando las diatomeas y la suciedad.
Recirculación: El agua circula por la instalación sin pasar por el filtro.
Enjuague:
El agua atraviesa el filtro en sentido normal y se envía al desagüe. Esta posición
se utiliza después del lavado para evitar el retorno a la piscina de agua turbia.
NUNCA MANIOBRAR LA VÁLVULA SELECTORA O DESMONTAR EL FILTRO SIN PARAR LA
BOMBA.
ATENCIÓN: Verificar que la instalación de desagüe del filtro cumple con las normativas sanitarias
locales. Si es necesario, instalar un filtro separador de diatomeas.
5. PUESTA EN MARCHA
Una vez montada la instalación hidráulica, situar la válvula en la posición “Recirculación” y poner en
marcha la bomba. Verificar todas las conexiones de la instalación para comprobar que no hay pérdidas.
Reapretar los racords si fuera necesario. Parar la bomba.
• Preparar la cantidad de diatomeas necesaria para su modelo de filtro
(ver “Características
técnicas”), mezclando con agua hasta formar una pasta liquida.
• Se puede utilizar cualquier tipo de diatomea para piscinas aunque recomendamos utilizar los
siguientes tipos:
- CELITE 545
- CELATOM FW-60
• Abrir la purga superior de aire del filtro, situar la válvula en la posición “Filtración” y poner en
marcha la bomba. Cuando empiece a salir agua por la purga de aire, cerrarla.
• Inmediatamente, introducir las diatomeas disueltas en agua directamente en el skimmer.
• En los primeros instantes es posible que el agua que retorna a la piscina no tenga la suficiente
claridad pro este fenómeno desaparecerá rápidamente.
• Una vez en marcha toda la instalación, anotar la presión indicada por el manómetro.
PRESIÓN INICIAL
Kg/cm2
o
PSI
6. LIMPIEZA Y MANTENIMIENTO
A medida que el filtro se va ensuciando, la presión va aumentando progresivamente. Si, después de un
periodo de reposo, esta presión supera en 0.7 kg/cm2 (10 PSI) a la presión inicial anotada, se deberá
proceder al lavado del filtro. Si la piscina es nueva, se efectuará el lavado transcurridas 48 horas desde
la instalación del filtro.
6.1 Lavado
Mediante este procedimiento se eliminarán del filtro tanto las partículas de suciedad como las diatomeas,
enviándolas al desagüe. Para un perfecto lavado, se debe dejar reposar el filtro durante unas horas
antes.
a- Con la bomba parada, abrir la válvula de la línea de desagüe y situar la válvula selectora en la
posición de “Lavado”.
b- Poner la bomba en marcha hasta que el agua salga clara. Parar la bomba
c- Situar la válvula en la posición de “Enjuague” y poner la bomba en marcha durante 30
segundos.
d- Repetir las operaciones “A” y “C” hasta que el agua salga completamente limpia al iniciar el
lavado.
e- Verificar el nivel de agua de la piscina.
Para poner en marcha de nuevo el filtro, colocar la válvula en la posición de “Filtración” y volver a
introducir las diatomeas según lo indicado en el apartado 5.
6.2 Desmontaje del filtro
Antes de proceder a realizar cualquier operación en el filtro, parar la bomba y desconectar el interruptor
eléctrico de la instalación.
• Situar la válvula selectora en la posición “Cerrado”.
• Abrir el tapón de vaciado del filtro y de la purga de aire para vaciar totalmente de agua el filtro.
• Aflojar el tornillo del suncho hasta que quede completamente libre la parte superior del filtro.
6.3 Montaje del filtro
Antes de proceder al montaje del filtro, limpiar cuidadosamente el asiento de la junta tórica, tanto en la
mitad superior como en la inferior del filtro, verificando que no existan fisuras o desperfectos. Si fuera
necesario; lubricar la junta con aceite de silicona.
• Colocar la junta tórica en la parte inferior del filtro.
• Colocar cuidadosamente la parte superior del filtro sobre la inferior, ejerciendo una leve presión
y verificando que la junta no se ha movido.
• Colocar el suncho y apretar poco a poco el tornillo, comprobando en todo momento que la
mitad superior este centrada y que el suncho ajusta correctamente.
6.4 Limpieza del conjunto interior
Una vez al año, como mínimo, se recomienda desmontar totalmente el filtro para eliminar algas, aceites
bronceadores y depósitos de calcio o magnesio que se depositan en las placas filtrantes. Esta limpieza
se efectuará preferentemente a final de temporada.
• Realizar un “Lavado” completo del filtro, según el punto 6.1.
• Desmontar el filtro siguiendo el punto 6.2.
• Estirar fuertemente hacia arriba del colector para extraer el conjunto de placas filtrantes.
• Aflojar la tuerca superior y sacar las placas u la purga interior de aire. Prestar atención a la
posición de las placas en la reja inferior, ya que una de las 8 placas es más pequeña (Fig.6).
• Limpiar la purga de aire y cada placa con la ayuda de un cepillo suave y detergente industrial.
• Si es necesario, dejarlas en remojo durante unas horas. Introducir cada placa en un recipiente
aparte con algún líquido limpiador especial existente en el mercado. Seguir cuidadosamente las
instrucciones del fabricante.
• Aclarar con abundante agua a baja presión.
• Para facilitar el montaje de las placas (septum), introducir el espárrago en la reja y situar esta
en el suelo. Colocar las placas en las ranuras de la reja, teniendo en cuenta la posición de la
placa pequeña.
• Insertar el colector en las ranuras de las placas teniendo en cuenta la posición de la placa
pequeña. Colocar la arandela y roscar la tuerca suavemente presionando con la mano el
colector. Comprobar que todas las placas y la reja están perfectamente colocadas. Apretar la
tuerca sin excederse y colocar la purga de aire.
• Montar el filtro según el punto 6.3.
Si en invierno se producen heladas frecuentes, después de la limpieza interior del filtro se vaciará
completamente de agua toda la instalación y se protegerá el filtro.
7. SOLUCIÓN DE PROBLEMAS
PROBLEMA
Poco caudal de filtración
Rápido incremento de presión
Burbujas en las boquillas
CAUSA
SOLUCIÓN
Filtro sucio
Realizar "Lavado"
Prefiltro de la bomba sucio
Limpiar prefiltro
Tuberías obturadas
Verificar válvulas y boquillas
Filtro sucio
Realizar "Lavado"
Algas en la piscina
Tratamiento químico piscina
Cantidad de diatomeas
incorrecta
Lavar y volver a cargar la cantidad
exacta
Nivel de agua de la piscina baja
Llenar la piscina
Válvulas de aspiración
parcialmente cerradas
Abrir válvulas
Prefiltro de la bomba sucio
Limpiar
ENGLISH
This manual has been specially written to guide the installer of filter as well as any person responsible for
its maintenance. Following the recommendations hereby started, which are a result from a long work
experience about filtration systems at ASTRAL company, you will get the best quality and the highest
crystallinity of your pool water.
1. INTRODUCTION
Diatoms are unicellular algaes existing in both fresh and sea water, they are capable lf retaining the silica
dissolved into water. After they die, their skeletons fossilize becoming a white, light and porous rock
which is used to water filtration. Due to the D.E. porosity and tiny size, around 0.0036 mm, it is even
possible to filter particles down to microns.
2. PRINCIPLES OF OPERATION
At the inside of the filter there are 8 filtering grids injection molded of plastic and covered by a thin, flexible
woven polypropylene cloth, called “septum”. After introducing the D.E. directly into the skimmer (dissolved
into water), they enter the filter from the bottom and gradually distribute all over the grids making up a thin
layer called “filter cake” where dirt from water will be retained, (See Fig. 1).
Clean water is taken up by a top mounted grid manifold, then water returns to pool. Even though the initial
head loss on these filters is very low, their great power of filtration make them dirty very easily, when
operating continuously, it is necessary to backwash it in less than 24 hours.
Nevertheless, in this kind of filters a regeneration process occurs that lengthens the time between filter
cleaning.
2.1 The automatic regeneration
The D.E. keep attached to the septum due to the water pressure. That is the reason why, any time the
filtration pump is turned off, they are released from the septum and fall down to the bottom of the filter. It
is due to the special design of the grids, which shake off the septum when the pressure stops, that the
highest D.E. detachment is achieved. That is hoe we get, at the bottom of the filter, a paste formed by
diatomaceous earth and retained dirt.
When starting the pump, the whole pasta is mixed due in the water turbulence, then it goes up to the
grids and makes up a new filter cake which will ready to restart filtration (See Fig. 2).
Although the principles of operation seem to be simple, there are three fundamental details to which
ASTRAL has paid special attention in order to achieve the highest efficiency from this system:
• Highest D.E. detachment from grids
Thanks to the special grid shape (curved vertical grids) you achieve as follows: a large filtration area, a
D.E. uniform distribution all over their area and highest D.E. detachment when turning the pump off (See
Fig. 2).
• D.E. Total profit
One of the main problems from using these filters is that the D.E. paste is little by little accumulated in
difficult accessible areas and the number of useful filtering D.E. detachment when turning the pump off
(See Fig. 3).
• Uniform regeneration
The special design of the support grid’s bottom causes a great turbulence at the lower area in the filter
that makes the paste easy to homogenize as well as it causes a quick and uniform distribution all over the
grids area. From all that, a longer cycle an better filtration are achieved (See Fig. 4).
3. COMPONENTS
1.
2.
3.
4.
5.
6.
Filter
Special D.E. multiport valve, with fittings.
Valve gaskets.
Air relief system and pressure gauge.
Filter instruction manual.
Multiport valve installation manual.
4. INSTALLATION
Place filter on a flat surface as close as possible to the pump, under water level, and provide protection
when freezing weather. Supply an outlet pipe to drain filter. Let enough space to filter disassembly (see
“Technical characteristics”).
If possible, connect filter to 2” pipes and install isolation valves on both sides of the filter to allow for easy
valves and filter servicing.
Install multiport valve by following its instructions manual. Connect pipes as indicated in valve ports.
The multiport valve allows you to operate the 6 following functions (see Fig. 5)
Filtration:
Waste:
Closed:
Backwash:
Recirculation:
Rinse:
This is the operation normal position. Water from pump enters the filter and
returns to the pool after been filtered.
Pump drives water directly to drain, without going thought the filter. It is used to
partially drain the pool.
All inlet and outlet ports will be closed when setting this position. It is used for
filter maintenance. Never start pump while valve is in this position.
Water is running through the filter on the opposite filter’s direction and is drained.
It is used to clean the filter by removing the D.E. and dirt.
Water is running through the installation without going through the filter.
Water runs through filter in normal direction and it is drained. This position is used
after Backwash to avoid dirty water going back to pool.
NEVER OPERATE MULTIPORT VALVE OR DISASSEMBLE FILTER WITHOUT TURNING OFF PUMP.
NOTICE: Make sure that waste water disposal complies with local codes and ordinances. Provide a D.E.
separation tank, if necessary.
5. STARTING
Once hydraulic installation has been assembled open all in line valves, turn multiport valves to
“Recirculation” and start the pump. Check all connections of installation to make sure that there are no
leaks. Retighten raccords if necessary. Turn off pump.
• Prepare the necessary D.E. amount for your model (see Technical Characteristics), then mix
with water until a liquid paste will be made up.
• Any kind of D.E. for pools can be used, even though we recommend using the following types:
- CELITE 545
- CELATOM FW-60
• Open air vent valve, set control valve to Filtration position and start the pump. When a steady
stream of water appears, close the vent valve.
• Immediately, introduce D.E. paste directly into the skimmer.
• It is possible that at the beginning, return water would not be enough clear but such
phenomenon will quickly disappear.
• Once the whole installation will be operating, write down the pressure gauge reading.
6. FILTER CLEANING AND MAINTENANCE
As filter will be getting dirty, filter pressure will be gradually increasing. If, after a period of repose,
pressure rises 0.7 kg/cm2 (10 PSI) above the annotated pressure, filter backwash will be necessary. If
pool were new, backwashing will take place 48 hours after installing the filter.
6.1 Backwash
By this procedure either all dirty particles and D.E. will be removed from filter and drained. To get a
perfect backwash, filter should be left reposing for a few hours.
abcde-
While pump is off, open set control valve to “Backwash” position.
Start pump until water will be clear. Turn off pump.
Set control valve to “Rinse” position and start pump for 30 seconds.
Repeat operations “a” and “c” until water will be completely clear when starting the pump.
Check the pool’s level of water.
In order to reoperate the filter, set control valve to “Filtration” position and reintroduce D.E. as indicated
on section 5.
6.2 Filter disassembly
Before disassembling filter, turn off pump and the installation electrical switch.
• Set control valve to “Closed” position.
• Open the filter’s drain plug and air vent valve (nº3 Fig. 8) to completely drain the filter water.
• Remove handle operated clamp loosening the nuts (Notice: complete clamp disassembly is not
necessary).
6.3 Filter assembly
Before assembling the filter, carefully clean and inspect tank and O-ring groove, either at the upper as all
the lower part of the filter, checking that there are no fissures or damages. If necessary, lubricate O-ring
with silicone oil.
• Put the O-ring in the lower tank shell.
• Carefully push the upper tank shell over the lower one to compress the O-ring, checking that the
O-ring has not moved.
• Insert the clamp and alternately tighten the nuts little by little, checking all time that the upper
tank shell is centred and clamp is tightening correctly.
6.4 Grid assembly cleaning procedure
At least once a year, it is recommended to completely dismantle the filter to remove algae, body oils and
calcium or magnesium deposits from the grids. Cleaning best before ending season.
• Run a complete filter “Backwash” according to section 6.1.
• Disassemble filter according to section 6.2.
• Pull top mounted manifold to remove grid assembly.
• Unscrew the manifold nut and remove grids and internal air bleed assembly. Pay attention to
grids position at supporting grid as one of the 8 grids in smaller (see Fig. 6).
• Clean air bleed assembly and grids using a soft brush and industrial detergent.
• If necessary, leave grids to soak for several hours. Put every grid into a separate tank and soak
with a commercial filter cleaner. Follow cleaner manufacturer’s instructions carefully.
• Rinse using plenty of water at low pressure.
• To assemble grids easily, put manifold inverted on the ground. Softly insert grids in the manifold
grooves, considering the position of the smaller plate.
• Place the supporting grid over the 8grids. Introduce the tie rod turn over the assembly, put the
washer and thread nut softly. Check all grids are placed correctly. Tighten nut slowly. Do not
overtighten.
• Put the air bleed assembly.
• Introduce the grid assembly into the filter by pushing the manifold softly in order to introduce it
into the pipe.
• Assemble filter according to section 6.3.
When very cold weather conditions, after “Grid assembly cleaning procedure” drain all water from
installation and cover filter.
7. TROUBLESHOOTING
PROBLEM
PROBABLE CAUSE
Dirty filter
Low filtration flow
Pressure increases quicky
Operate "BACKWASH"
Dirty pump filter
Clean prefilter
Clogged pipes
Check valves and inlets/outlets
Dirty filter
Operate "BACKWASH"
Algaes into pool
Chemical treatment
Wrong D.E. amount
Bubbles in outlets
SOLUTION
Backwash and precoat with
exact quantity
Low level of pool water
Fill up pool
Inlet valves partially closed
Open valves
Dirty pump filter
Clean prefilter