1
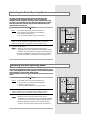
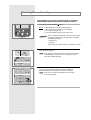
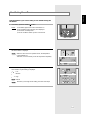
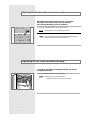
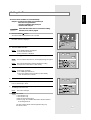
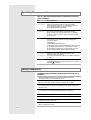
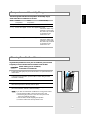
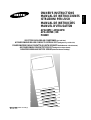
ENGLISH
OWNER’S INSTRUCTIONS
MANUAL DE INSTRUCCIONES
ISTRUZIONI PER L’USO
MANUAL DE INSTRUÇÕES
MANUEL D’UTILISATION
APH240PE / APH240PD
APH-2807ER / DR
PH28ZV
ITALIANO
SPLIT-TYPE PACKAGED AIR CONDITIONER (Cool and Heat)
ACONDICIONADOR DE AIRE COMPACTO SISTEMA SPLIT (Refrigeración y Calefacción)
CONDIZIONATORE D’ARIA COMPATTO AD UNITÀ SEPARATE (Raffreddamento e Riscaldamento)
AR CONDICIONADO COMPACTO TIPO SPLIT (Refrigeração e Aquecimento)
CLIMATISEUR EMBALLÉ DE TYPE SÉPARÉ (Refroidissement et Chauffage)
E S I P F DB68-30756B(2)
Contents
◆ PREPARING YOUR AIR CONDITIONER
■
■
■
■
■
■
■
■
Getting Started ...............................................................................................
Remote Control - Buttons and Display ...........................................................
Inserting the Remote Control Batteries ..........................................................
Keeping the Remote Control ..........................................................................
Indoor Unit ......................................................................................................
Outdoor Unit ...................................................................................................
Control panel ..................................................................................................
Setting the Time .............................................................................................
3
4
5
5
6
7
7
8
◆ OPERATING YOUR AIR CONDITIONER
■
■
■
■
■
■
■
■
■
■
■
■
Operating Preparation ....................................................................................
Using the Control Panel on the Indoor Unit ....................................................
Using the Remote Control ..............................................................................
Selecting the Auto Operating Mode ...............................................................
Starting to Heat ..............................................................................................
Starting to Cool ...............................................................................................
Selecting the Turbo Operating Mode ..............................................................
Selecting the Mild Operating Mode ................................................................
Removing Excess Humidity ............................................................................
Ventilating Your Room .....................................................................................
Adjusting the Air Flow Direction Horizontally .................................................
Adjusting the Air Flow Direction Vertically ......................................................
9
9
9
10
11
12
13
13
14
15
16
16
◆ PROGRAMMING YOUR AIR CONDITIONER
■
■
■
■
Setting the Timer ............................................................................................
Setting the Quick Timer ..................................................................................
Cancelling the Timer .......................................................................................
Cancelling the Quick Timer ............................................................................
17
18
19
19
◆ RECOMMENDATIONS FOR USE
■
■
■
■
■
E-2
Operating Recommendations .........................................................................
Safety Precautions ..........................................................................................
Temperature and Humidity Ranges ................................................................
Cleaning Your Air Conditioner .........................................................................
Before Calling the After-Sales Service ...........................................................
20
20
21
21
22
ENGLISH
Getting Started
You have just purchased a packaged air conditioner and it has been installed by
your installation specialist.
Users of this product are cautioned not to attempt repair of this product at their
own discretion. Instead, they are requested to directly contact a designated
service center or the outlet at which the product was purchased.
Your Owner’s Instructions contain much valuable information on using your
air conditioner. Please take the time to read them as they will help you take full
advantage of the unit’s features.
The booklet is organized as follows:
◆ The following figures are shown on page 4, page 6 and page 7.
- Remote control(buttons and display)
- Indoor unit
- Outdoor unit
They will help you find the buttons and switches
and understand the symbols displayed.
◆ In the main part of the document, you will find a series of step-by-step
procedures for each function available.
The illustrations in the step-by-step procedures use three different symbols:
PRESS
PUSH
HOLD DOWN
E-3
Remote Control - Buttons and Display
Setting display
- Indicator : TURBO, MILD,
Q.TIMER,
Transmission
Battery discharge.
C
Operating mode/Temperature display :
- Mode indicators : AUTO, COOL, DRY,
FAN, HEAT
Setting display :
- Fan speed
- Air flow direction
Time/Timer display
- Current time
- Timer settings
ON/OFF Button
TURBO setting
Q.Timer adjustment
Mild setting(Automatic stop)
Operating mode selection
Fan speed adjustment
Air flow adjustment
Timer adjustment
Time adjustment
Timer setting/cancellation
Temperature adjustment
E-4
ENGLISH
Inserting the Remote Control Batteries
You must insert or replace the remote control batteries when:
◆ You purchase the air conditioner
◆ The remote control does not work correctly
IMPORTANT Use two LR03(AAA) 1.5V batteries. Do not use old batteries, or different kinds of batteries together. Batteries
may not be usable after 12 months though they have
not been used.
1
Push the battery cover on the rear of the remote control with your
thumb in the direction of the arrow.
2
Insert the two batteries, taking care to respect the polarities:
◆ + on the battery with + on the remote control
◆ - on the battery with - on the remote control
3
Close the cover by sliding it back until it clicks into place.
NOTE
When the following indication is displayed, replace the batteries
with a new set of it.
Keeping the Remote Control
Keep the remote control in remote control case of the indoor unit
when it is not being used.
1
Open the control panel by pushing a part of it.
2
Put the remote control into the case.
Close the control panel by pushing a part of it in the direction
of the arrow until it clicks into place.
Remote
control
case
E-5
Indoor Unit
Air Flow(Direction) adjusting Blade
Air Outlet
Auto Shutter
Each time you can press the ON/OFF(
it open or close automatically.
)button,
Remote Control Case
Control Panel
Remote Control Sensor
Air Inlet Grille
To disassemble the air inlet grille.
•Hold the upper part of the air inlet grille,
and then pull it lightly forward.
E-6
ENGLISH
Outdoor Unit
Electric Parts Box
Air Outlet
Connection Valve
Control Panel
Open the control panel by pushing a part of it.
Temperature adjustment
Operating Light
Temperature display
Fan Light
ON/OFF Button
Operating Light
Mild setting(Automatic stop)
Turbo setting
Fan Speed adjustment
Operating Mode Selection
E-7
Setting the Time
Your air conditioner contains a clock used to start or stop the unit
automatically at a given time.
You must set the time when you:
◆ Purchase the air conditioner
◆ Replace the batteries
NOTE
1
Be sure to change the time in an area where summertime
is applied.
Insert the batteries.
Result:
The TIME indicator flashes.
NOTE
To set the time during the operation.
Open the lid on the rear side of the remote control, and press the
(time set) button using a tool with a sharp end point.
Result:
2
The TIME indicator flashes.
Press the TIME ▲ or ▼ buttons, and set the current time.
NOTE
◆ Each time the (▲) button is pressed, the time increases
by one minute.
When the (▲) button is continually pressed,
the time increases by ten minutes.
◆ Each time the (▼) button is pressed, the time decreases
by one minute.
When the (▼) button is continually pressed,
the time decreases by ten minutes.
Result:
3
After setting the time, press the
Result:
C
E-8
AM or PM are displayed to indicate whether the setting
corresponds to a time before or after midday.
(time set) button one more time.
The Time indicator stops flashing and the clock is started.
ENGLISH
Operating Preparation
Look around the indoor and outdoor units.
Confirm if any obstacles that may prevent the air flow are present near
the air conditioner.
1
Turn the power switch on.
Result:
The POWER light on the indoor unit switches on.
IMPORTANT
2
To operate the unit, the power switch is fitted to
the wall must be set to ON
Remove a protective cover of the outdoor unit.
Using the Control Panel on the Indoor Unit
You can operate with indoor unit when you do not wish to
or cannot operate the air conditioner with the remote control.
You can :
Adapt the auto operating, cooling, heating, turbo operating,
mild operating, drying and fan settings to your
specific requirements ;
Exemple:
Remote control broken or lost.
Open the control panel by pushing a part of it.
NOTE
You cannot operate the timer function with indoor unit.
Using the Remote Control
All air conditioner features can be controlled from your seat,
by using the remote control.
C
You can :
Adapt the auto operating, cooling, heating turbo operating,
mild operating, drying and fan settings to your specific
requirements ;
See pages 10 to 18 for further details.
E-9
Selecting the Auto Operating Mode
You can start the air conditioner in AUTO mode .
1
If necessary, press the ON/OFF(
Result:
) button.
◆ The OPER. light on indoor unit switches on.
◆ The operation mode previously set is displayed.
◆ The indoor unit beeps twice.
◆ The air conditioner starts up in the current.
IMPORTANT The air conditioner is fitted with a protection feature
which prevents the unit from being damaged when
it is started immediately after being:
◆ Switched on
◆ Stopped
After a rest period of three minutes, it will start up normally.
2
If the AUTO indicator is not displayed at the top of the remote control,
press MODE under the remote control flap one or more times until it
appears.
Result:
NOTE
◆ The indoor unit beeps each time you press MODE.
◆ The air conditioner starts up in AUTO mode.
In AUTO mode, the optimum fan speed is selected automatically
and cannot be changed.
◆ You can, however, change modes at any time when the
air conditioner is operating.
◆ How to control the standard temperature.
When the unit is in automatic operation mode, the standard
temperature is automatically set.
However, the standard temperature can be adjusted
up to ±2°C by pressing the TEMP.SET ▲ or ▼ buttons
depending upon the user.
C
•
•
•
•
•
E-10
Upward control by +2°C from the standard temperature (
Upward control by +1°C from the standard temperature (
Standard temperature
(
Downward control by -1°C from the standard temperature (
Downward control by -2°C from the standard temperature (
)
)
)
)
)
ENGLISH
Starting to Heat
You must select the HEAT mode if you wish to adjust the:
◆ Heating temperature
◆ Fan speed when Heating
1
If necessary, press the ON/OFF(
Result:
) button.
◆ The OPER. light on the indoor unit switches on.
◆ The operation mode previously set is displayed.
◆ The indoor unit beeps twice.
◆ The air conditioner starts up in the current mode.
IMPORTANT The air conditioner is fitted with a protection feature which
prevents the unit from being damaged when it is started
immediately after being:
◆ Switched on
◆ Stopped
After a rest period of three minutes, it will start up normally.
2
Press MODE under the remote control flap one or more times until the
HEAT indicator is displayed.
3
Select the temperature by pressing the TEMP.SET ▲ or ▼ buttons one
or more times until the required temperature is displayed.
Possible temperatures are between 16°C and 30°C inclusive.
C
NOTE Each time you change the temperature by one degree,
the indoor unit beeps.
The air conditioner will only start cooling if the room temperature
is higher than the selected temperature.
The fan will, however, operate. During heating, the operating
light is red.
During defrosting, LED may indicate temperature lower
than real one.
4
Select the fan speed by pressing the FAN SPEED button one or more
times until the required setting is displayed:
Low
Medium
High
Auto
NOTE Each time you change the fan setting, the indoor unit beeps.
For the first 3 to 5 minutes the fan operates very slowly
until the air has been sufficiently warmed.
Once the correct temperature has been reached,
it will be automatically switched to the selected speed.
5
Control the air flow direction when necessary.
Refer to page 16.
E-11
Starting to Cool
You must select the COOL mode if you wish to adjust the:
◆ Cooling temperature
◆ Fan speed when cooling
1
If necessary, press the ON/OFF(
Result:
) button.
◆ The OPER. light on the indoor unit switches on.
◆ The operation mode previously set is displayed.
◆ The indoor unit beeps twice.
◆ The air conditioner starts up in the current mode.
IMPORTANT The air conditioner is fitted with a protection feature which
prevents the unit from being damaged when it is started
immediately after being:
◆ Switched on
◆ Stopped
After a rest period of three minutes, it will start up normally.
C
2
Press MODE under the remote control flap one or more times until the
COOL indicator is displayed.
3
Select the temperature by pressing the TEMP.SET ▲ or ▼ buttons one
or more times until the required temperature is displayed.
Possible temperatures are between 18°C and 30°C inclusive.
NOTE
4
Each time you change the temperature by one degree,
the indoor unit beeps.
The air conditioner will only start cooling if the room temperature
is higher than the selected temperature.
The fan will, however, operate. During cooling, the operating
light is green.
Select the fan speed by pressing the FAN SPEED button one or more
times until the required setting is displayed:
Low
Medium
High
NATURAL
AUTO
NOTE
5
E-12
Natural
Auto
Each time you change the fan setting, the indoor unit beeps.
Control the air flow direction when necessary.
Refer to page 16.
ENGLISH
Selecting the Turbo Operating Mode
The turbo cooling(heating) operation function provides heavy duty
cooling(heating) for 30 minutes regardless of the set temperature.
Therefore, you can instantly get cool(warm) in this operation mode when
you feel it is very hot(cold) in the room after returning home from outside.
After 30 minutes turbo operation, the unit returns automatically to the
operation mode previously set.
1
If necessary, press the ON/OFF(
Result:
) button.
◆ The OPER. light on the indoor unit switches on.
◆ The operation mode previously set is displayed.
◆ The indoor unit beeps twice.
◆ The air conditioner starts up in the current mode.
2
Check to see whether the operation mode is positioned at “AUTO”,
“COOL” or “HEAT”; the turbo cooling(heating) operation cannot be
selected when the unit is in the “DRY” or “FAN” operation mode.
3
Press the TURBO button.
C
NOTE ◆ When the unit is in the turbo operation mode, the set
temperature and air flow quantity are automatically controlled.
Therefore, it is not necessary to make any separate selection.
◆ Press the TURBO button again to cancel the turbo operation.
(Then the unit returns to the operation mode previously set.)
Selecting the Mild Operating Mode
The mild cooling(heating) operation function provides automatic control
of the set temperature and air flow quantity to ensure pleasant operation
during, sleeping or when used by elderly people.
The mild operation function stops automatically after operating for three
hours.
1
If necessary, press the ON/OFF(
Result:
) button.
◆ The OPER. light on the indoor unit switches on.
◆ The operation mode previcusly set is displayed.
◆ The indoor unit beeps twice.
◆ The air conditioner starts up in the current mode.
2
Check to see whether the operation mode is positioned at “AUTO”,
“COOL” or “HEAT” ; the mild cooling(heating) operation cannot be
selected when the unit is in the “DRY” or “FAN” operation mode.
3
Press the MILD button.
C
NOTE ◆ When the unit is in the mild operation mode, the set
temperature and air flow quantity are automatically controlled.
Therefore, it is not necessary to make any separate selection.
◆ Press the MILD button again to cancel the mild operation.
(Then the unit returns to the operation mode previously set.)
E-13
Removing Excess Humidity
If the atmosphere in your room is very humid or damp, you can remove
excess humidity without lowering the room temperature excessively.
1
If necessary, press the ON/OFF(
Result:
) button.
◆ The OPER. light on the indoor unit switches on.
◆ The operation mode previously set is displayed.
◆ The indoor unit beeps twice.
◆ The air conditioner starts up in the current mode.
IMPORTANT The air conditioner is fitted with a protection feature which
prevents the unit from being damaged when it is started
immediately after being:
◆ Switched on
◆ Stopped
After a rest period of three minutes, it will start up normally.
2
Press MODE under the remote control flap one or more times until the
DRY indicator is displayed.
NOTE
C
3
Select the temperature by pressing the TEMP.SET ▲ or ▼ buttons
one or more times until the required temperature is displayed.
Possible temperatures are between 18°C and 30°C inclusive.
NOTE
E-14
When the unit is in the dry operation mode, the air flow quantity
is automatically set. Therefore, it is not necessary to select
the air flow quantity separately.
Each time you change the temperature by one degree,
the indoor unit beeps.
ENGLISH
Ventilating Your Room
If the atmosphere in your room is stale, you can ventilate it using the
Fan feature.
1
If necessary, press the ON/OFF(
Result:
2
◆ The OPER. light on the indoor unit switches on.
◆ The operation mode previously set is displayed.
◆ The indoor unit beeps twice.
◆ The air conditioner starts up in the current mode.
Press MODE under the remote control flap one or more times until
the FAN indicator is displayed.
NOTE
3
) button.
When the unit is in the fan operation mode, the temperature
is automatically set.
Therefore, it is not necessary to set the temperature separately.
C
Select the fan speed by pressing the FAN SPEED button one or more
times until the required setting is displayed:
Low
Medium
High
Natural
NOTE
Each time you change the fan setting, the indoor unit beeps.
E-15
Adjusting the Air Flow Direction Horizontally
Depending on the position of the indoor unit, you can adjust
the position of the air flow blades on the top of the unit,
thus increasing the efficiency of the air conditioner.
1
Press the L/R SWING button on the remote control.
Result:
2
The blades are moved between right and left.
To stop the blades, press the L/R SWING button.
NOTE
To set to the required position, press the L/R SWING button
when the blades are in the required position,
Adjusting the Air Flow Direction Vertically
Just as the air flow blades can be adjusted vertically, they can also
be adjusted by the hands.
1
Set the horizontal blades in the disired direction.
NOTE
◆ Effective control of air flow direction.
• Adjust the blades to face upward for cooling.
E-16
ENGLISH
Setting the Timer
You can turn the air conditioner on or off automatically.
Example: You wish to start cooling your room before you
return from work; you decide to:
◆ Set the air conditioner going at 5:30 p.m.
◆ Switch it off at 11:30 p.m.
IMPORTANT Check that the current time is correct before setting
the timer; if not, refer to page 8.
1
Press the ON/OFF( ) button.
You cannot make any reservation in the “off” state.
2
Press MODE under the remote control flap one or more times until
the COOL indicator is displayed.
3
Press the TIMER ON button.
Result:
4
5
◆ The TIMER indicator is displayed.
◆ The ON indicator flashes.
◆ The preset time is displayed.
Press the TIME ▲ or ▼ buttons to set the “on time”(“off time”).
NOTE
You can hold the button down to scroll rapidly through the figures.
Result:
AM or PM are displayed to indicate whether the setting
corresponds to a time before or after midday.
When you are satisfied with the start time, press SET-TIMER.
Result:
◆ The indoor unit beeps.
◆ The TIMER light switches on.
◆ The unit is switched off and will start up automatically
when the start time is reached.
6
Press the TIMER OFF button.
7
Indicate the time at which you wish to stop the air conditioner;
to do so, follow steps 4 above.
8
When you are satisfied with the stop time, press SET-TIMER to transmit
the settings to the indoor unit.
Result:
The indoor unit beeps.
NOTE You can set:
◆ The start time only
◆ The stop time only
◆ Both the start and stop times
◆ Refer to page 19 for detailed information about the method
of cancelling the timer.
The timer function allows reserved operation using only
the remote control.
E-17
Setting the Quick Timer
The quick timer function allows reserved operation using only one button.
Therefore, it is very convenient especially for children and elderly people to
make reserved operation using this function. When the reserved operation is
too complex presenting difficulty in use. You can set reservation in the range
of thirty minutes - one hour - two hours - three hours - five hours. When the
set period has elapsed, the operation stops automatically.
1
If necessary, press the ON/OFF(
2
Press the Q. TIMER button.
) button and select the operating mode.
NOTE Each time the button is pressed, the following are displayed sequentially:
Result:
◆ The Q.TIMER indicator is displayed.
◆ When the timer operation function starts,
the remaining time is displayed on the remote control.
NOTE The quick timer function allows reserved operation using only
the remote control.
E-18
ENGLISH
Cancelling the Timer
If you no longer wish to use the timer that you have set,
you can cancel it at any time.
1
To cancel the start time, press TIMER ON.
Result:
2
Press the TIMER-CANCEL.
Result:
3
◆ The indoor unit beeps.
◆ The TIMER light switches off if no stop time is currently set.
◆ The unit operates normally.
To cancel the stop time, press TIMER OFF.
Result:
4
The ON indicator flash.
The OFF indicator flash.
Press the TIMER-CANCEL
Result:
◆ The indoor unit beeps.
◆ The TIMER light switches off.
◆ The unit operates normally.
Cancelling the Quick Timer
If you no longer wish to use the Quick timer function,
you can cancel it at any time.
Press the Q.TIMER button.
Set the button so that (- : - -) is displayed. After the elapse of five seconds,
the current time is displayed, and the quick timer is cancelled.
Result:
◆ The indoor unit beeps.
◆ The Q.TIMER indicator is no longer displayed.
◆ The unit operates normally.
E-19
Operating Recommendations
Here are a few recommendations that you should follow when using
your air conditioner.
Topic
Recommendation
Heating
performances
The heat pump inside the air conditioner absorbs heat from
outside air and brings it indoors. If the temperature
of the outside air drops, the air conditioner will heat less.
If you find that the room is not warm enough,
use an additional heating appliance.
Warm air
circulation
The air conditioner circulates warm air to heat your room;
as a result, some time will be required after starting
the air conditioner to warm the entire room. If necessary,
set the air conditioner going a short time before you wish
to use the room.
Frost
When outside temperatures are low and humidity is high,
frost may form in the outdoor unit when heating with
your air conditioner.
If this happens:
◆ The heating fans are stopped.
◆ The Defrost mode is triggered automatically for about 9 minutes.
◆ The DEICE light on the indoor unit switches on (red).
No intervention is required by you; after about 9 minutes,
the air conditioner starts operation again normally.
High indoor
and outdoor
temperatures
If both indoor and outdoor temperatures are high and you
select the HEAT mode, the outdoor unit’s fan and
compressor may stop at times.
This is normal; simply wait until the air conditioner switches
on again.
Power failure
If a power failure occurs while the air conditioner is operation,
it is switched off. When the power returns, you must press
ON/OFF( ) to restart it.
Safety Precautions
The following safety precautions should be taken when using your air
conditioner.
1 Make sure that the indoor unit is correctly ventilated at all times;
do not place clothing or other materials over it.
2 Never spill liquids of any kind into the indoor unit. Should this happen,
turn the power switch off and contact your installation specialist.
3 Do not insert anything between the air outlet blades as the inner fan may
be damaged and you may be hurt. Particularly, keep children away from
the indoor unit.
4 Always ensure that the power cable is in good condition. Make sure that
it is not walked on or damaged by items placed on or against it.
5 Do not overload wall sockets or extension cables.
6 Do not place any obstacles in front of the outdoor unit.
7 If the remote control will not be used for a long time, remove the batteries
and keep in remote control case.
8 When you intend to reoperate AIR CONDITIONER, it will be operated
after 3 minutes from its stop.
E-20
Temperature and Humidity Ranges
Mode
Outdoor
Temperature
Indoor
Temperature
Heating
0°C to 24°C approx.
27°C or less
Cooling
21°C to 43°C approx. 21°C to 32°C approx.80% or less
If the unit is used for long
periods at a high humidity
level, water may condense
on and drip from the
surface of the unit.
Drying
21°C to 43°C approx. 21°C to 32°C approx.-
ENGLISH
The following table indicates the temperature and humidity ranges,
within which the air conditioner can be used.
Indoor Humidity
-
If the unit is used for long
periods at a high humidity
level, water may condense
on and drip from the
surface of the unit.
Cleaning Your Air Conditioner
To get the best possible use out of your air conditioner, you must clean
it regularly to remove the dust that accumulates on the air filter.
IMPORTANT Before cleaning your air conditioner,
ensure that it is switched off.
1
Pull the inlet grille lightly and pull out the air filter in an upward direction to
release them.
2
Remove all dust on air filter with a vacuum cleaner or brush. In case
of serious dust accumulation, put the air filter in warm detergent water
and shake it vertically.
3
Dry the air filter.
4
When you have finished, insert the bottom part of the filters into
their slot and push down until they click into place.
5
Clean the front panel with the damp cloth and mild detergent
(do not use benzene, solvents or other chemicals).
NOTE If you have not used the air conditioner for a long period of time:
◆ Check that the air filter is clean and remove any dust
◆ Set the fan going for three to four hours to dry the inside
of the air conditioner thoroughly
◆ Turn the switch off after stopping the operation
◆ Cover the outdoor unit with a protective cover.
E-21
Before Calling the After-Sales Service
Before calling for service, make a few simple checks as follows.
Problem
The air conditioner
does not operate
at all
Explanation/Solution
◆ Check that the power switch is turned ON.
◆ Check that the OPER. light on the indoor
unit is on; if necessary, press ON/OFF( ).
◆ Check whether the TIMER light on the indoor
unit is on. If so:
- Wait until the start time is reached
and the air conditioner starts up automatically.
- Cancel the timer; see page 19.
The air conditioner
does not operate
with the
remote control
◆ Check that there are no obstacles between you
and the indoor unit.
◆ Check the remote control batteries.
◆ Check that you are close enough to the indoor unit
(7 meters or less).
◆ Reset the remote control by pressing ACL under
the battery compartment cover with
a sharp end point.
The air conditioner
does not cool or heat
◆ Check that the correct operating mode has been
selected AUTO,COOL or HEAT.
◆ The room temperature may be too low or too high.
◆ Dust may be blocking the air filter guard;
refer to page 21 for cleaning instructions.
◆ Check that there is no obstacle in front of
the outdoor unit.
When heating, the
required room temperature is never reached
and the air conditioner
stops frequently
◆ Check that the required temperature has been
set correctly.
◆ Increase the fan speed.
◆ If the air flow is directed downwards, use the
remote control to turn it upwards.
The fan speed does
◆ Check that the Operating Mode is set to
not change when you
HEAT,COOL or FAN; in the AUTO mode, the fan
press the FAN SPEED
speed changes automatically and in DRY mode,
it is set to AUTO.
button
E-22
The air flow direction
does not change
when you press
L/R SWING
◆ Check that the air conditioner has been switched
on.
The timer is not
triggered correctly
◆ Check that you have set the clock to the right time;
see page 8.
◆ Check that the timer has been programmed
correctly; see page 17.
Smells are permeated
in the room during air
conditioning
◆ Ventilate the room.
The temperature display
on the indoor unit is
different from one
on the remote control.
◆ The indoor unit and the remote control can be
different each other, because the room
temperature always is not equal.
If the indicators are
displayed as below;
◆ Turn the power switch off.
◆ Contact your installation specialist.
ENGLISH
MEMO
E-23
THIS AIR CONDITIONER IS MANUFACTURED BY:
ESTE ACONDICIONADOR DE AIRE ES FABRICADO POR:
QUESTO CONDIZIONATORE D’ARIA E’PRODOTTO DA:
ESTE APARELHO DE AR CONDICIONADO É FABRICADO POR:
CE CLIMATISEUR EST FABRIQUE PAR:
ELECTRONICS
Printed in Korea