1
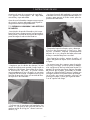
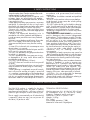
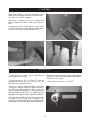
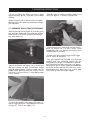
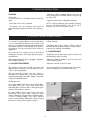
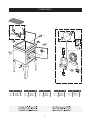
lpm
manual de instrucciones
instruction manual
Índice
1
Atención
pág.4
2
Introducción
pág.4
3
Instrucciones de seguridad
pág.4
4
Especificaciones técnicas
pág.5
5
Embalaje
pág.6
6
Suministro de aire
pág.6
7
Instrucciones de servicio
pág.7
8
Cambio de disolvente y mantenimiento
pág.8
9
Lista de repuestos
pág.9
10
Condiciones de garantía
pág.10
11
Declaración de conformidad
pág.10
- 3 -
1. ATENCIÓN
Antes de poner en marcha el equipo, deberá leer,
tener en cuenta y cumplir en su totalidad todas las
indicaciones descritas en este Manual.
Deberá conservarlo en un lugar seguro y accesible
a todos los usuarios del equipo.
El equipo sólo debe ser puesto en funcionamiento
y utilizado por personas instruidas en su manejo,
y exclusivamente para ser utilizado en los fines
previstos.
Asimismo, deberá tener en cuenta las Normas de
Prevención de accidentes, los Reglamentos y
Directivas para los Centros de trabajo y las Leyes
y restricciones vigentes.
SAGOLA S.A., los logotipos de SAGOLA y otros
productos SAGOLA, mencionados en este manual,
son marcas registradas o marcas de la empresa
SAGOLA S.A.
2. INTRODUCCIÓN
El equipo que tiene en su poder pertenece a la
familia de equipos que se emplean para la
limpieza de pistolas aerográficas, sus accesorios
y complementos.
Fabricado con acero Inoxidable y construido
en conformidad con las disposiciones
recogidas en la directiva 89/392/CEE y
sucesivas modificaciones. Está por tanto
provista de la marca
De serie está compuesto por:
- Maquina Lavadora, con mangueras y conexiones para
proyectar disolvente y aire comprimido necesarios.
- Manual de Instrucciones
- Envase
Elementos opcionales y complementarios del equipo:
- Mangueras de aire SAGOLA.
- Purificadores y/o Reguladores de aire SAGOLA.
- Conectores y acoplamientos de aire comprimido
SAGOLA.
3. INSTRUCCIONES DE SEGURIDAD
- Garantice la Salud y la Seguridad. Al utilizar los
equipos, que se cumplan las normativas generales y
de la administración local de talleres.
- Mantenga la zona de trabajo limpia y exenta de
desechos potencialmente peligrosos (Diluyentes, trapos,
etc... ).Durante el trabajo y en la zona de trabajo, no
debe existir ninguna fuente de ignición (fuego abierto,
cigarrillos encendidos, etc.), ya que durante el mismo
se pueden generar gases fácilmente inflamables.
Asimismo deberá utilizar la protección laboral
homologada de acuerdo con las Normativas
establecidas al respecto.
- El equipo no debe ser NUNCA utilizado para el lavado
o desengrase de objetos destinados a estar en contacto
con alimentos.
- La lavadora en sí misma no propicia ningún riesgo
mecánico de perforaciones, impactos o pinzamientos,
salvo los derivables de instalaciones indebidas o
manipulaciones incorrectas.
- La manipulación del equipo, requiere una atención
adecuada, para evitar que se produzcan en el mismo
deterioros generadores de situaciones de peligro para
el usuario o las personas que se hallen próximas, como
consecuencia de escapes, roturas, etc.
- La lavadora está preparada para su uso a temperatura
ambiente. La temperatura máxima de servicio es de
50oC.
- Si durante la utilización de la lavadora el nivel sonoro
ambiental sobrepasa 90 dB. Es recomendable el uso
de protectores acústicos homologados.
- EL lugar de instalación debe estar equipado con
extintores adecuados (el agua no debe ser utilizada) y
salidas de emergencia. El lugar debe estar dotado de
ventilación suficiente y acorde con las normativas y
disposiciones vigentes al respecto. Asimismo debe
disponer de todos los medios previstos en la legislación
referentes a la salud y a la prevención de riesgos
laborables de los operarios.
- Desconecte el suministro de aire del equipo antes de
cambiar los accesorios, productos o al realizar cualquier
mantenimiento.
- Mantenga la lavadora en buen estado (use un
limpiador adecuado).
- Reemplace o repare las partes dañadas solamente
con piezas originales. Las piezas no autorizadas pueden
ser peligrosas y anulan la garantía.
- Instale la lavadora en un área de trabajo adecuada.
Asegúrese de que la misma se encuentra en una
superficie firme y nivelada. Mantenga el área limpia,
ordenada y libre de productos no relacionados.
Asegúrese de que el área esté bien ventilada y que
cuente con una iluminación adecuada.
- Asegúrese de que se mantiene la presión de aire
correcta y que no la sobrepase. Presión recomendada
es de 2,8 - 4.2 kg/cm2.
- Mantenga la manguera fuera de las zonas de calor,
aceite y de bordes afilados. Revise la manguera de
aire antes de cada uso, y asegúrese de que todas las
conexiones son seguras.
UTILICE MANGUERAS ANTIESTÁTICAS SAGOLA
PARA ELIMINAR LAS POSIBLES DESCARGAS
ELÉCTRICAS QUE PUDIERAN CREAR RIESGOS DE
INCENDIO O EXPLOSIÓN.
- En esta lavadora se recomienda utilizar solamente
disolventes.
- Sugerimos que el usuario pueda utilizar disolventes de
base xileno, base orgánico o base agua, pero primero
tiene que ver MSDS (véase 1.30) y pedir las normas
de seguridad y no desobedecer la normativa vigente.
- Mantenga la lavadora limpia. Limpie el filtro de
aspiración del interior de la lavadora regularmente para
un mejor rendimiento.
- 4 -
3. INSTRUCCIONES DE SEGURIDAD
- No fume y evite las fuentes de ignición cerca de
- No haga funcionar la lavadora sin la rejilla dentro
la unidad, tales como calentadores, lámparas,
del depósito. Esto puede hacer que el disolvente
materiales inflamables o combustibles, etc..., ya
se derrame al abrir la tapa.
que hay riesgo de explosión.
- No abra la tapa cuando concluya la limpieza.
- Use gafas de seguridad, mascarilla y guantes.
Apague la máquina de la válvula de aire (15) y
Si el disolvente entra en la piel o en los ojos lávese
espere unos 30 segundos y deje que las gotitas
abundantemente con agua limpia y tome cualquier
de disolvente se condensen para evitar la
otra acción que requiera las instrucciones del
inhalación de vapor de disolvente.
disolvente.
- La inhalación de una gran cantidad de disolvente
- Evite vestir con ropa mal ajustada. No use
puede causar daño físico, y también puede hacer
corbatas, relojes, anillos y otras joyas sueltas, el
daño a mujeres durante el embarazo.
pelo largo, y lleve ropa de protección adecuada. - ES ABSOLUTAMENTE DESACONSEJABLE la
- Utilice siempre equipos respiratorios homologados
utilización de disolventes y/o detergentes que
conforme a las Normativas y Reglamentos vigentes
contengan
hidrocarburos
halogenados
para protegerse de las posibles emanaciones
(Tricloretano, Cloruro de metilo, etc.), pueden
producidas durante el trabajo.
originar reacciones químicas en el equipo, así
- Mantengase siempre en equilibrio. Asegúrese
como en sus componentes cincados (el tricloroetano
de que el suelo no es resbaladizo y use calzado
mezclado con pequeñas cantidades de agua
antideslizante.
produce ácido clorhídrico). Debido a ello, tales
- Mantenga a personas no esenciales lejos de la
componentes pueden oxidarse y en caso extremos,
zona de trabajo.
la reacción química originada puede efectuarse
- En caso de incendio en el depósito, no trate de
de forma explosiva. Utilice productos que no
mover el equipo cuando esté en funcionamiento.
contengan los componentes mencionados. En
ningún caso se deben utilizar ácidos, sosa ( álcalis,
- No use el depósito con la tapa abierta y no lo
o decapantes, etc.) para la limpieza del equipo.
use para la pulverización de pruebas para la
- Hacer caso omiso de la toma tierra puede causar
pistola.
un incendio.
- No utilice el depósito para cualquier propósito
- Antes de abrir la tapa del depósito para insertar
que no sea para el que está diseñado.
la pistola, hacer tierra el cuerpo metálico de la
- No utilice la lavadora si falta alguna pieza o
está averiada, ya que podría ocasionar fallos y/o
pistola tocándola con el metal de la lavadora para
posibles lesiones personales.
descargar la electricidad estática.
- No llene demasiado el depósito de la lavadora
(menos de 19 litros).
En general, toda manipulación del equipo debe
- No dirija el aire de la manguera a sí mismo o a
realizarse teniendo la precaución de no
otras presonas.
deteriorarlo. Los racores de unión deben estar
- No utilice la lavadora cuando esté cansado o
bien apretados y en buen estado de uso. Las
bajo la influencia del alcohol, drogas o algún
normas de seguridad deben estar comprendidas
medicamento.
y aplicadas. El incumplimiento de las indicaciones
- Limpieza. Cuando la limpieza finalice, asegúrese
del presente manual puede ocasionar incidentes
de que todos los controles estén en la posición de
que pueden repercutir en la integridad física del
apagado y que el suministro de aire esté apagado. usuario, otras personas o animales.
- Es responsabilidad del operador asegurarse de
que no hay ninguna descarga incontrolada de
SAGOLA, S.A. no se responsabiliza de estos
fluidos usados con este equipo y que los arreglos
daños producidos por el mal uso del equipo.
apropiados se han hecho para la correcta
eliminación de los residuos, de conformidad con
Respete y cumpla las indicaciones relativas a la
las regulaciones de las normativas vigentes.
preservación del medio ambiente.
- El operador debe ser un técnico capacitado y
cualificado.
4. ESPECIFICACIONES TÉCNICAS
La lavadora LP1010 es adecuada para talleres
de carrocería de tamaño medio. El tanque
proporciona suficiente disolvente para limpiar dos
pistolas y depósitos en cada ciclo de lavado. El
suministro de aire se cortará automáticamente
cuando se abra la tapa. Si no se detiene, puede
simplemente cerrar la válvula de aire (15).
ESPECIFICACIONES TÉCNICAS:
Presión de trabajo: 2,8 - 4,2 kg/cm2 (40 - 60 psi)
Consumo de aire: 0,06 - 0,11 m3/min (2 - 4cfm)
Capacidad: 2 depósitos y 2 pistolas
Dimensiones: 0,47m. x 0,65m. x 1m.
Peso: 33,5 kg.
Nivel de ruido en funcionamiento: 75dB
Material del depósito interno: Polietileno
- 5 -
5. EMBALAJE
Nota: Los números de componentes en paréntesis
son los de las piezas adjuntas en la lámina de
despiece.
Monte las patas al depósito con los tornillos, las
arandelas y las tuercas, y ajustando siempre la
válvula de drenaje (14) a la base del tanque.
Para prevenir una posible acumulación de
electricidad estática, conecte el cable de tierra
del bastidor a la tierra. Antes de utilizar el equipo,
el usuario tiene que comprobar la conexión del
cable de tierra.
6. SUMINISTRO DE AIRE
- Asegúrese que la válvula de aire (15) está
cerrada antes de conectar el suministro de aire.
- Una presión de aire de 2,8 - 4,2 kg/cm2, y un
volumen de aire disponible de 0,06 - 0,11 m3/min.
será necesario para el funcionamiento de la
lavadora.
- Mantenga la manguera alejada del calor, aceite
y bordes con partes afiladas. Revise las mangueras
para su uso y asegúrese de que todas las
conexiones son seguras.
- La conexión de entrada de aire es 1/4".
- Garantice que el suministro de aire esté limpio
y no supere 4,2 kg/cm2. Si la presión de aire es
demasiado alta y/o el aire no es limpio se acortará
la vida útil del producto, debido a un desgaste
excesivo y puede ser peligroso, provocando
posibles daños y lesiones personales. El aire
suministrado debe estar equipado con regulador,
filtro/separador y engrasador.
- La presión de la línea debe incrementarse para
compensar la caída de presión en las mangueras
de aire inusualmente largas (más de 8 metros). El
diámetro interno de manguera debe ser l0 mm. y
los accesorios deben tener la misma dimensión
interna.
- 6 -
7. INSTRUCCIONES DE USO
Asegúrese de seguir las instrucciones de seguridad.
Use guantes homologados de seguridad,
mascarilla y ropa adecuada.
Antes de usar la lavadora siempre toque un punto
de conexión a tierra adecuado para disipar la
carga electrostática que pueda tener.
- Accione el mando del regulador y permita que
la bomba funcione con lentitud durante aprox. 2
minutos para purgar el fluido usado para las
pruebas del fabricante.
7.1. PREPARAR LA LAVADORA Y LOS ARTÍCULOS
DE LIMPIEZA
- Antes de abrir la tapa de la lavadora y de insertar
la pistola, hacer contacto entre el cuerpo metálico
de la pistola y el metal de la máquina de limpieza
para descargar la electricidad estática.
-
- Compruebe la pistola a limpiar, vacie y almacene
el exceso de pintura para su futuro uso. Para
mejores resultados límpiela inmediatamente
después de su uso, después de haber eliminado
la mayor cantidad de pintura residual.
- Para limpiar las pistolas, apriete el gatillo y el
seguro del gatillo de ajuste como se muestra en
la figura.
- Asegúrese que la válvula de drenaje (14) del
tanque de drenaje esté cerrada y luego verter en
el depósito el disolvente. Para ayudar en un futuro
la eliminación del lodo, se puede añadir
aproximadamente 2 litros de agua, ya sea antes
o después del disolvente. Asegúrese que el nivel
final sea al menos de 25 mm. por encima del filtro
de aspiración de la bomba.
- Se proporcionan dos soportes para la pistola,
uno corto y otro largo. Utilice el soporte se adapte
a la configuración de la pistola para limpiar. En
general, las pistolas que tienen mejores entradas
de pintura (por ejemplo, gravedad) se pueden
colocar en cualquiera de los apoyos siempre que
no hagan contacto con la parte inferior de la tapa.
Las pistolas que tienen entradas inferiores de
pintura (por ejemplo, succión) por lo general deben
ir en el soporte más largo.
- Confirme que el manómetro del regulador (04)
marca “0” y la presión de suministro de aire se
regula a no más de 4,2 kg/cm2. Abra el suministro
de aire (15).
- 7 -
7. INSTRUCCIONES DE USO
- La limpieza estará completada después de 60
segundos.
LIMPIEZA
Tapa de la lavadora
- Asegúrese que se cierra y que la válvula de aire
de la bomba esté completamente abierta.
- Seleccione el tiempo de ciclo a través del
temporizador.
La bomba iniciará el ciclo y expulsará un spray
atomizado a través de las boquillas en el tanque
de limpieza.
- Abra la tapa y retire el equipo a limpiar.
NOTA: Si durante la limpieza, se abre la tapa, el
proceso de limpieza se detendrá automáticamente.
Cierre la tapa para continuar. NO almacene
pistolas en el depósito.
8. CAMBIO DE DISOLVENTE Y MANTENIMIENTO
Es responsabilidad del operador asegurarse que
no hay ninguna descarga incontrolada de fluidos
usados con este equipo y que las reparaciones
apropiadas se han hecho para la correcta
eliminación de los residuos, de conformidad con
las normativas vigentes.
Cambio de disolvente:
Desconecte el suministro de aire de la unidad
antes de cambiar los accesorios, productos o
realizar cualquier mantenimiento.
8.2. MANTENIMIENTO
Use guantes homologados de seguridad, gafas,
respirador y ropa adecuada.
8.1. CAMBIO DE DISOLVENTE
El número de pistolas que el disolvente puede
limpiar dependerá de la cantidad de pintura
residual que se deja el equipo de pulverización.
Sin embargo, recomendamos que se cambie
semanalmente el disolvente para proporcionar un
rendimiento óptimo de limpieza.
Vacie completamente de disolvente sucio. Limpie
el interior del depósito y el filtro antes de rellenar
con disolvente limpio. Limpie cualquier derrame
inmediatamente.
- Compruebe regularmente que la apertura de la
tapa de la lavadora detenga automáticamente la
pulverización.
- Compruebe regularmente y añada aceite de
engrase por la válvula de aire (15) mensualmente.
- Mantenga el exterior de la unidad limpia.
- Utilice un destornillador para abrir la tapa circular
de la bomba e inyecte lubricante en él.
Se extrae, como se detalla a continuación:
Eliminación de lodos:
a) sin añadir agua : Retire 2 litros de lodos de
disolvente por la válvula de drenaje (14). Cierre
la válvula y añada disolvente para limpiar el
tanque para que el nivel llegue por lo menos a
25 mm. por encima del filtro.
b) añadiendo agua: Añada el agua hasta que se
convierta descolorida. Cambie el “disolvente sucio”
del receptáculo, vuelva a abrir la válvula de
desagüe y retire 2 litros de lodos de disolvente.
Cierre la válvula, reemplace el agua en el tanque
y luego añada disolvente limpio para que el nivel
llegue por lo menos a 25 mm. por encima del
filtro.
- 8 -
9. LISTA DE REPUESTOS
03
02
16
17
09
01
12
18
06
11
15
13
05
04
19
14
08
10
05
Nº
01
02
03
04
Cod.
49000632
49000633
49000634
40000185
U.
1
1
1
1
Nº
05
06
07
08
Cod.
U.
49000635
49000636
49000637
49000638
1
1
1
1
Nº
09
10
11
12
Cod.
49000639
49000640
49000641
49000642
- 9 -
U.
1
1
1
1
Nº
13
14
15
16
Cod.
49000643
49000644
49000645
49000647
07
U.
1
1
1
1
Nº
17
18
19
Cod.
49000648
49000649
49000615
U.
1
1
1
10. CONDICIONES DE GARANTÍA
Este aparato ha sido fabricado con rigurosa
precisión. Habiendo sido sometido a numerosos
controles antes de su salida de fábrica.
La GARANTÍA concedida es de 2 años, a partir
de la fecha de compra, que será indicada por e
establecimiento vendedor en el lugar habilitado
para el respecto, junto con su sello.
Esta GARANTÍA cubre cualquier defecto de
fabricación, que será subsanado sin cargo para
e comprador. Sin embargo quedan expresamente
excluidas todas aquellas averías resultantes de un
mal uso de aparato, tales como conexiones
incorrectas, rotura por caída o similares, desgaste
normal y en general cualquier deficiencia no
imputable a la fabricación del aparato.
Así mismo se perderá la GARANTÍA cuando se
constate que el aparato ha sido manipulado por
personas ajenas a nuestro Servicio de Asistencia
Técnica.
Esta GARANTÍA no respalda los compromisos
adquiridos con cualquier persona ajena al Servicio
Técnico.
Servicio de Asistencia Técnica
(Tel. 34 945 214 150 - Fax 34 945 214 147)
En caso de avería durante el periodo de
GARANTÍA, adjunte al aparato el justificante del
certificado de garantía y entréguelo en el Servicio
de Asistencia que más le interese o bien póngase
en contacto con fábrica.
Queda excluida cualquier exigencia de más
trascendencia contra el proveedor, en particular
la indemnización por daños y prejuicios. Esto se
aplica igualmente a los daños que se originasen
durante el asesoramiento, la adquisición de
práctica y la demostración.
Las prestaciones por garantía no tienen por
consecuencia una prolongación del periodo de
la misma.
No se atenderá en garantía ningún equipo del
cual no conste en los archivos de SAGOLA el
resguardo adjunto, del certificado de garantía
debidamente cumplimentado.
Reservadas la modificaciones Técnicas.
11. DECLARACIÓN DE CONFORMIDAD
Según la directiva 2006/42/CE, Anexo II, Apartado A
Fabricante:
SAGOLA S.A.
Dirección:
Calle Urartea, 6 · 01010 VITORIA-GASTEIZ (Álava) ·
ESPAÑA
Declaramos que el producto:
Marca:
SAGOLA
Modelo:
LPM1010
Es conforme con las disposiciones de la Directiva de la
sobre máquinas (Directiva 2006/42/CEE), en
cumplimiento con EN 60204-1:2006 y en cumplimiento con la Directiva de baja Tensión 2006/95/EC.
Es conforme a los requisitos de las siguientes Directivas europeas
98/37/CEE del 22 de Enero 1998 (SEGURIDAD DE MAQUINARIA)
94/9/CEE (ATEX) del 23 Marzo 1994
así como a sus modificaciones y actualizaciones, y a las disposiciones según el ordenamiento legislativo
nacional del país de destino
Es conforme a los requisitos de las siguientes Directivas Europeas, y de haber utilizado para su construcción las
siguientes normas técnicas:
Se encuentran disponibles, la documentación técnica completa y las instrucciones de servicio del producto en la
versión original, así como en los idiomas comunitarios de los usuarios.
En Vitoria-Gasteiz, a 01/03/2014
Director General
- 10 -
Index
1
Attention
page.12
2
Introduction
page.12
3
Safety instructions
page.12
4
Technical specifications
page.13
5
Assembly
page.14
6
Air supply
page.14
7
Operation instructions
page.15
8
Solvent change & maintenance
page.16
9
Spare parts
page.17
10
Guarantee conditions
page.18
11
Declaration of conformity
page.18
- 11 -
1. ATTENTION
Before activating the unit, you must read, take note
of, and entirely follow all the indications described
in this Manual.
You must keep the unit in a safe place and one
accessible for all unit users.
The unit must be started and handled exclusively
by personnel instructed in its use.
Likewise, Accident Prevention Standards,
Regulations, Work Centre Directives and current
legislation and restrictions must be taken into
consideration.
SAGOLA S.A., the SAGOLA logotypes and other
SAGOLA products mentioned in this manual are
registered trademarks or brand names of the
company SAGOLA S.A.
2. INTRODUCTION
The unit in your possession belongs to the family
of units used for cleaning aerographic spray guns,
its accessories, and complements, with water
and/or water based detergent, as well as
compressed air.
Manufactured with stainless steel and constructed
in conformity with provisions found in the directive
89/392/EEC and subsequent modifications
It consists of the following standard features:
- Washing machine, with hoses, connections,
and spray guns to project the necessary cleaning
liquid.
- Instruction Manual
- Packaging
Optional and complementary unit parts:
- SAGOLA air hoses
- SAGOLA air Purifiers and/or Regulators
- SAGOLA compressed air connectors and
couplings
3. SAFETY INSTRUCTIONS
- Ensure Health & Safety. Local authority and
general workshop practice regulations are adhered
to when using equipment.
- Keep the work area clean and free from
potentially dangerous waste (thinners, rags, etc...).
During the work and in the work area, no ignition
source should exist (open fire, lit cigarettes, etc.),
as easily inflammable gases can be generated
during the same. Likewise, work protection
approved in accordance with the established
Regulations in this respect should be used.
- The unit should NEVER be used to clean or degrease
objects intended to be in contact with food.
- The washing machine in itself does not propitiate
any mechanical risk of perforations, impacts or
pinching, except those arising from improper
installations and handling.
- Pay adequate attention when handling the unit
in order to prevent any damage that might lead
to dangerous situations for the user or personnel
standing near the unit, as a consequence of leaks,
breakages, etc.
- The washing machine has been designed for use
at room temperature. The maximum service
temperature is 50oC.
- If during use of the washing machine, the
environmental audible level rises over 90 dB, the
use of approved acoustic protectors is
recommended.
- Installation site must be equipped with suitable
fire extinguishers (water must not be used) and
escape routes. The room should be supplied with
sufficient ventilation and be in accordance with
the current legislation and regulations in this
respect. In the same way, all established legislative
methods concerning the health of and prevention
of work risk to operators should be made available.
- Disconnect the air supply from the tank before
changing accessories, servicing or doing any
maintenance.
- Maintain the washer in good condition (use an
authorized service agent).
- Replace or repair damaged parts using genuine
parts only. Non-authorized parts may be
dangerous and will invalidate the warranty.
- Locate the tank in an adequate working area.
Ensure the tank stands on a firm level surface.
Keep area clean and tidy and free from unrelated
materials. Ensure the area is well ventilated and
has adequate lighting.
- Ensure correct air pressure. Recommended pressure
is 2.8 - 4.2 kg/cm2.
- Keep air hose away from heat, oil and sharp
edges. Check air hose for wear before each use,
and ensure that all connections are secure.
USE SAGOLA ANTISTATIC HOSES TO ELIMINATE
POSSIBLE ELECTRICAL DISCHARGES, WHICH
COULD CAUSE FIRE OR EXPLOSION RISKS.
- This washer is recommended to use only with
solvents.
- 12 -
3. SAFETY INSTRUCTIONS
- Keep the washer clean. Clean the aspiration filter inside
washer regularly for best performance.
- NEVER smoke and keep sources of ignition, such
as heaters, lamps, etc. away from the unit, together
with flammable or combustible materials, as there
is an explosion risk.
- Wear approved safety eye protection, respirator
and gloves. If solvent gets on skin or in eyes wash
thoroughly with clean water and take safety other
action as required by the solvent instructions.
- Remove ties, watches, rings and other loose
jewelry, contain long hair, and wear appropriate
protective clothing.
- Always use approved breathing units in
accordance with current Standards and Regulations
in order to protect yourself from emissions produced
the work.
- Maintain correct balance and footing. Ensure the
floor is not slippery and wear non-slip shoes.
- Keep non-essential persons away from the working
area.
- In case of fire in the tank, do not attempt to move
the unit when it is running.
- DO NOT use the tank with the lid open and DO
NOT use it for spray gun testing.
- DO NOT use the tank for any purpose other than
for which it is designed.
- DO NOT operate the tank if any parts are missing
or damaged as this may cause failure and/or
possible personal injury.
- DO NOT over-fill the tank (19 liters).
- DO NOT direct air from the air hose at yourself
or others.
- DO NOT operate the tank when you are tired or
under the influence of alcohol, drugs or intoxicating
medication.
- When cleaning is completed, ensure all controls
are in off position and the air supply is turned off.
- It is operator’s responsibility to ensure that there
is no uncontrolled discharge of any fluids used
with this unit and that appropriate arrangements
have been made for correct-disposal of waste in
accordance with government/local authority
regulations.
- The operator should be a trained and qualified
technician.
- DO NOT run the machine without screen platform
inside the tank. It may cause the solvent spilling
when opening the lid.
- DO NOT open the lid just finished the cleaning
cycle. Turn the machine off by the ball valve (15),
and wait about 30 seconds, let the solvent droplet
condense to avoid inhalation of solvent vapor.
- Breathing a large amount of solvent may cause
physical damage.
- IT IS ABSOLUTELY UNADVISABLE to use thinners
and/or detergents that contain halogenated
hydrocarbons (Trichloroethane, methyl Chloride,
etc.), which can cause chemical reactions in the
unit, as well as in its zinc coated components
(trichloroethane mixed with small quantities of
water produces hydrochloric acid). Due to this,
such components may rust and, in extreme cases,
the chemical reaction caused may be explosive.
- Do not use acids, soda (alkalis or pickling
substances, etc.) for cleaning under any
circumstances.
- Disregarding of earth connection may cause fire.
- Before opening the lid of tank to insert the spray
gun, earth the metal body of the spray gun to bear
metal contact on the cleaning machine to discharge
any static electricity.
- In general, precautions must be taken whenever
the unit is handled, in order to prevent any
deterioration to it. Connectors must be securely
tightened and in good condition. Safety standards
should be understood and applied. Any
non-compliance with the indications set out in this
manual may lead to incidents affecting the physical
integrity of the user, other personnel or animals.
- SAGOLA, S.A. not responsible for damage
caused by such misuse of equipment.
- Respect and comply with indications relating to
the conservation of the environment.
4. TECHNICAL SPECIFICATIONS
The LPM1010 washer is suitable for the busy
medium sized body shop. The tank is robustly
manufactured and delivers sufficient solvent to
clean two guns and pots in each washing cycle.
The air supply is automatically cut off when the lid
is opened. If it does not stop, you can just turn off
the valve (15) at the air inlet.
TECHNICAL SPECIFICATIONS:
Working pressure: 2,8 - 4,2 kg/cm2 (40 - 60 psi)
Air consumption: 0,06 - 0,11 m3/min (2 - 4cfm)
Capacity: 2 deposits and 2 spray guns
Dimensions: 0,47m. x 0,65m. x 1m.
Weight: 33,5 kg.
Life: 3 años
Noise under operation: 75dB
Material of inner tank: Polyethylene
- 13 -
5. ASSEMBLY
Note: Item numbers in brackets are those in the
attached Parts Diagram instructions should be read
in conjunction with this diagram.
Attach legs to cabinet with screws, washers and
nuts provided and fit drain valve (14) to base of
tank.
To prevent possible static build up, run an earth
wire from the frame to earth. Before operating the
machine, user has to check the earth wire.
6. AIR SUPPLY
- Ensure that the air valve (15) is closed before
connecting the air supply.
- An air pressure of 2.8 - 4.2 kg/cm2, and an
available air volume of 0.06 - 0.11 m3/min. will
be required to operate the unit.
- Keep hose away from heat, oil and sharp edges.
Check hoses for wear and make certain that all
connections are secure.
- The air inlet connection is 1/4” NPT.
- Ensure air supply is clean and does not exceed
4.2 kg/cm2. Too high air pressure and/or unclean
air will shorten the product life due to excessive
wear and may be dangerous, causing possible
damage and personal injury. Air supply must be
equipped with regulator, filter/separator and oiler.
- Line pressure should be increased to compensate
unusually long air hoses (over 8 meters). The
minimum hose internal diameter should be l0mm
and fittings must have the same internal dimension.
- 14 -
7. OPERATION INSTRUCTIONS
- Ensure you follow the safety instructions. Wear
approved safety gloves, respirator, and suitable
clothing.
- Partially open air valve and allow pump to run
slowly for approx. 2 minutes to purge fluid.
- Before using the washer always touches a suitable
earthing point to dissipate any electrostatic charge
you may have.
7.1. PREPARING TANK & ITEMS FOR CLEANING
- Before opening the lid of tank to insert the spray
gun, earth the metal body of the spray gun to bear
metal contact on the cleaning machine to discharge
any static electricity.
-
- Check the spray gun, empty and store any excess
paint for future use. For best results clean
immediately after use, having removed as much
residual paint as possible.
- To clean spray guns squeeze trigger and fit trigger
lock as shown in the figure.
- Ensure tank drain ball valve (14) is closed and
then pour solvent into tank. To aid future sludge
removal approximately 2 litres of water may be
added, either before or after the solvent. Ensure
final level is at least 25mm (1 inch) above pump
suction strainer.
- Two gun supports are provided, one short and
another long. Use whichever support suits the
configuration of the gun to be cleaned. In general,
guns which have top entry paint inlets (e.g. gravity
feed) can be put on either support provided they
do not foul on the underside of the lid. Guns which
have bottom entry paint inlets (e.g. suction feed)
will usually go onto the longer support.
- Confirm the regulator manometer (04) mark “0”
and air supply pressure is regulated not over than
4.2 kg/cm2. Turn on air supply (15).
- 15 -
7. OPERATION INSTRUCTIONS
CLEANING
Lid washer
- Ensure washer lid is closed and the air valve fully
open.
- Select the time on the cycletimer.
- The pump will now operate and expel an
atomized spray through the nozzles in the cleaning
tank.
- Cleaning will be complete after 60 seconds, at
which time pump should be turned off by closing
air valve (20).
- Open lid and remove cleaned equipment.
NOTE: If, during cleaning, lid is opened, cleaning
process will automatically stop. Close lid to
continue, DO NOT store guns in tank.
8. SOLVENT CHANGE & MAINTENANCE
It is operator's responsibility to ensure that there
is no uncontrolled discharge of any fluids used
with this unit and that appropriate arrangements
have been made for correct disposal of waste in
accordance with government/local authority
regulations.
Disconnect the air supply from the unit before
changing accessories, servicing or performing any
maintenance.
Solvent change:
Completely drain dirty solvent. Clean inside of
tank and strainer before refilling with clean solvent
wipe up any spillage immediately.
8 2. MAINTENANCE
- Regularly check that opening the washer lid
automatically stops the spray.
Wear approved safety gloves, goggles, respirator
and suitable clothing.
- Regularly check and add air tool oil to air valve
(15) on monthly basis.
8 1.SOLVENT REPLACEMENT
- Keep the outside of the unit clean.
The number of guns the solvent can clean will
depend upon the amount of residual paint, which
is left in spray equipment.
- Use a screwdriver in tool bag to open the circular
cap of the pump and inject lubricant into it.
We recommend however that the solvent is
changed on a regular basis to provide optimum
cleaning performance that pain sludge is removed
weekly, as detailed below:
Sludge removal:
a) no water added: Drain 2 liters of solvent/sludge
from drain valve (14). Close valve. Close valve
and add clean solvent to tank to bring level up to
at least 25mm above strainer.
b) water added: Drain water until it becomes
discolored, close drain valve. Change to ‘dirty
solvent’ receptacle, re-open drain valve and drain
2 litres of solvent/sludge. Close valve, replace
water in tank and then add clean solvent to bring
level up to at least 25mm above strainer.
- 16 -
9. SPARE PARTS
03
02
16
17
09
01
12
18
06
11
15
13
05
04
19
14
08
10
05
Nº
01
02
03
04
Cod.
49000632
49000633
49000634
40000185
U.
1
1
1
1
Nº
05
06
07
08
Cod.
U.
49000635
49000636
49000637
49000638
1
1
1
1
Nº
09
10
11
12
Cod.
49000639
49000640
49000641
49000642
- 17 -
U.
1
1
1
1
Nº
13
14
15
16
Cod.
49000643
49000644
49000645
49000647
07
U.
1
1
1
1
Nº
17
18
19
Cod.
49000648
49000649
49000615
U.
1
1
1
11. GUARANTEE CONDITIONS
This guarantee has been manufactured with strict
precision an d has been subjected to a large
number of controls before it left the factory.
The GUARANTEE is for 2 years, counted as of the
date of purchase, which will be indicated by the
establishment where the apparatus is purchased
in the place provided for this purpose, together
with its stamp.
The GUARANTEE covers all nanufacturind defects
which will be repaired free of charge. Nevertheless,
all those malfunctions which are the result of the
incorrect use of the apparatus, such as incorrect
connections, breakage due to the apparatus being
dropped or similar, normal wear and tear and in
general, any deficiency not attributable to
manufacture.
Likewise, the GUARANTEE will became invalid
should be abserved that the apparatus has been
handled by persons other than our Technical
Service personnel.
This GUARANTEE does not support any
commitment made by any person other than our
Technical Service personnel.
Technical Service Personnel
(Tel. 34 945 214 150 - Fax 34 945 214 147)
In the case of any malfunction during the peiod of
GUARANTEE, enclose the guarantee certificate
with the apparatus and deliver it to the nearest
Technical Service or get in contact with the factory.
Any other claims against the supplier beyond those
expressed above are excluded, especially
regarding indemnification for damages. This is
equallu applicable to damages arising during
consultation, trainingand demostration.
The provision of services during the Guarantee
period will not cause this period to be extended
as a consequence.
No gurantee claims shall be acepted for
equipament for which SAGOLA has noduly
completed guarantee certificate coupon in its files.
Technical modifications may be made without
notice.
12. DECLARATION OF CONFORMITY
According to the directive 89/392/EEC, Annex II, Section A, dated 14th of June 1989
Manufacturer:
SAGOLA S.A.
Address:
Calle Urartea, 6 · 01010 VITORIA-GASTEIZ (Álava) · SPAIN
We declare that the product:
Brand:
SAGOLA
Model:
LPM1010
Is in conformity with the provisions of the
Directive on machines (Directive 89/392/EEC) including
modifications of the same (91/368/EEC and 93/68/EEC) and the corresponding incorporation into National
Law.
Is in conformity with the requirements of the following European Directives
98/37/EEC of 22nd of January 1998 (MACHINE SAFETY)
94/9/EEC (ATEX) of 23rd March 1994
II 3 G
as well as its modifications and updates, and provisions according to the national legislative code of the
destination country.
Is in conformity with the requirements of the following European Directives, and has used the following
technical standards for its construction:
Complete technical documentation and product service instructions are available in the original version, as
well as in the community languages of the users.
In Vitoria-Gasteiz, on 01/10/2013
General Director
- 18 -
CONDICIONES DE GARANTÍA
GUARANTEE C0NDITIONS
CONDITIONS DE GARANTIE
GARANTIEBENDINGUNGEN
CONDIÇÕES DA GARANTIA
CONDIZIONI DI GARANZIA
Adquirido por: / Purchased by: / Acquis par: / Erworben durch: / Adquirido por: / Acquistato da:
Domicilio: / Address: / Adresse: / Wohnsitz: / Endereço: / Indirizzo:
Población: / Town: /
Ville:
Ortschaft:/ Povoaçao: / Località:
Provincia: / Province: / Région:
Provinz: / Provincia: / Provincia:
C.P. P.C. C.P.
PLZ CP CAP
País
Land
Tel:
Fax
Country
País
Pays
Paese
E-mail:
Vendido por: / Sold by: / Vendu par: / Verkauft durch: / Vendido por: / Venduto da:
Tel:
Fax
Modelo: / Model: / Modèle:
Modell: / Modelo: / Modello:
Nº de equipo: /Equipment no.: / No. de l’appareil:
Geräte-Nr: /
Nº de equipa: / N. attrezzatura:
Sello: / Stamp: / Cachet: / Stempel: / Selo: / Timbro:
Fecha de compra: / Date of purchase: / Date d’achat: / Kaufdatum: / Data de Compra: / Data di aacquisto:
CONDICIONES DE GARANTÍA
GUARANTEE C0NDITIONS
CONDITIONS DE GARANTIE
GARANTIEBENDINGUNGEN
CONDIÇÕES DA GARANTIA
CONDIZIONI DI GARANZIA
Adquirido por: / Purchased by: / Acquis par: / Erworben durch: / Adquirido por: / Acquistato da:
Domicilio: / Address: / Adresse: / Wohnsitz: / Endereço: / Indirizzo:
Población: / Town: /
Ville:
Ortschaft:/ Povoaçao: / Località:
Provincia: / Province: / Région:
Provinz: / Provincia: / Provincia:
C.P. P.C. C.P.
PLZ CP CAP
País
Land
Tel:
Fax
Country
País
Pays
Paese
E-mail:
Vendido por: / Sold by: / Vendu par: / Verkauft durch: / Vendido por: / Venduto da:
Tel:
Modelo: / Model: / Modèle:
Modell: / Modelo: / Modello:
Fax
Nº de equipo: /Equipment no.: / No. de l’appareil:
Geräte-Nr: /
Nº de equipa: / N. attrezzatura:
Sello: / Stamp: / Cachet: / Stempel: / Selo: / Timbro:
Fecha de compra: / Date of purchase: / Date d’achat: / Kaufdatum: / Data de Compra: / Data di aacquisto:
ed. 10 (2010)
DE ASIS
TENCIA T
A D E RE
ÉCNICA
PA RA C IÓ
N PR O FE
SI O N A L
T E C H N IC
AL
R
PR O FF ES
E
P
A
IR
IO N A L
S E R V IC E
RE PA IR
G U A RA N
TE E
SERVICE D
’ASSISTA
GARANTIE
DE RÉPARA NCE TECHNIQ
U
TION PRO
FESSIONN E
ELLE
T E C H N IS
PR O FE SS
CHER
IO N N EL LE
SERVIÇO
DE ASSIS
RE PA RATU
D IE N S T
RG A RA N
TI E
TÊNCIA TÉ
A D E RE
CNIC
PA RA Ç A O
PR O FI SS IO A
NAL
SERVIZIO
DI ASS
GARANZI
A DI RIPA ISTENZA TECN
RAZIONE
ICA
PROFESSIO
NALE
G A RA N TÍ
SAGOLA S.A.
Urartea, 6 · 01010 Vitoria-Gasteiz · ESPAÑA
Tel.: +34 945 214 150 · Fax: +34 945 214 147
e-mail: [email protected] · web: www.sagola.com
543 001 28
SERVICIO
G A RA N TÍ