1
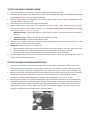
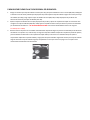
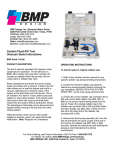
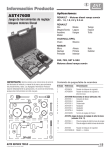
ATD‐3305 10P RADIATOR PRESSURE TESTER ADAPTER UPDATE* KIT *For use with the ATD‐3300 set SAFETY WARNING AND PRECAUTIONS General Safety Warnings: WARNING: The instructions and warnings contained in this manual should be read and understood before using or operating this tool. Do not allow anyone to use or operate this tool until they have read this manual and have developed a thorough understanding of how this tool works. Failure to observe any of the following instructions could result in severe personal injury to tool user and bystanders, or cause damage to the tool and property. Keep this manual for future reference. Note: The warnings and cautions discussed in this instruction manual cannot cover all possible conditions and situations that may occur. It must be understood by the operator that common sense and caution are factors which cannot be built into this product, but must be supplied by the operator. WARNING: Use safety equipment. User and bystanders should use safety goggles or safety glasses with side shields which comply with current national standards, or when needed, a face shield. Use an ANSI approved dust mask or respirator when working around metal, wood, and chemical dusts and mists. This applies to all persons in the work area. Also use non‐skid safety shoes, hardhat, gloves, dust collection systems, and hearing protection when appropriate. WARNING: Keep bystanders and children out of the work area while operating this tool. WARNING: Always keep your work area clean, uncluttered, and well lit. Cluttered or dark areas invite accidents and injuries. DO NOT work on floor surfaces that are slippery. WARNING: Do not operate this tool if you are tired or under the influence of alcohol, drugs, or medications that could affect your ability to use the tool properly. WARNING: Dress properly. Do not wear loose clothing or jewelery as they can be caught in moving parts. Wear restrictive hair covering to contain long hair.
WARNING: Do not reach over or across running machines. Keep proper footing and balance at all times. Non‐skid footwear is recommended when working. OPERATING INSTRUCTIONS: •
Before performing the test on your cooling system, test the pump (Supplied separately with the ATD‐3300 or ATD3301 sets) first by pumping few times to ensure the pump is working correctly. When testing, DO NOT pump over 20 PSI. •
During your inspection and during the test of your cooling system, when pumping the pump handle, always make sure that the force is applied straight into the pump rather than at an angle, or else it may the pump to leak. (See Figure 1) TO TEST FOR LEAKS IN COOLING SYSTEM:
1.
2.
3.
4.
5.
Refer to the vehicle’s service manual for any specific radiator pressure testing instructions. Loosen the vehicle’s radiator cap slowly to relieve any excess pressure before removing the cap completely. NEVER OPEN THE SYSTEM WHILE HOT, as this may cause personal injury. Select the proper adapter and configuration of the stationary seat accessories. Securely attach the adapter to the filler neck of the radiator or expansion tank. Attach the quick connector of the hand pump onto the adapter. Rapidly pump the hand pump handle using straight force as shown in figure 1 while watching the pressure gauge. Pressurize the radiator up to the optimal pressure only ‐ DO NOT OVER PRESSURIZE THE RADIATOR. Ideal readings should range between 15‐20PSI (1.03‐1.37 BAR) . •
6.
7.
•
Needle drops slowly – Indicates the presence of the small leaks or seepage. •
Needle drops quickly – Indicates serious leakage is present. Once the test is complete, release the air pressure by depressing the pressure release valve on the hand pump. Then disconnect the quick coupler and adapter assembly. Maintenances – After testing process in Radiator Test: •
8.
Needle holds steady – If gauge hand holds at the same pressure number for 2 minutes, there are no serious leaks in the system. Keep the adaptor connected to the pump as you had set up while performing the actual test. Operate the pump several times to dissipate moisture and/or coolant that may have remained in the adaptor and pump. •
Oil the hand pump in order to lubricate the piston and prevent corrosion and internal damage. Store the radiator pressure tester kit in its carrying case and keep the kit in a clean, dry, safe location out of reach of children and other unauthorized persons. TO TEST FOR LEAKS IN ORIGINAL RADIATOR CAP: 1. Choose the correct radiator cap connector (5A or 5B) and correct steel radiator cap (#02, #03, or #04) for the correct vehicle being tested from the test kit. Fasten the original radiator cap to the radiator cap connector (5A or 5B) and then fasten the steel radiator cap (#02, #03, or #04) from the test kit to the other end of the radiator cap connector(5A or 5B). 2. Remove the hand pump assembly (#1) from the test kit and fasten the quick coupler at the end of the hose to the radiator cap (#02, #03, or #04) securely. Operate the hand pump until reaching the pressure recommended by the vehicle manufacturer. ‐ DO NOT OVER PRESSURIZE. Ideal readings should range between 15‐20PSI (1.03‐1.37BAR). 3. Check the pressure reading on the gauge immediately after reaching the vehicle manufacturer’s recommended pressure. If the pressure drops, there is a leak in the radiator cap. After pressure testing is completed, press the release button on the quick coupler until the reading on the gauge reads 0. Remove quick coupler from radiator cap and then remove the original radiator cap from the original radiator cap connector. Discard original radiator cap and replace with new cap if leaking or if it does not meet vehicle manufacturer’s recommendations. ITEM #
ORDERING PART#
PART DESCRIPTION
5A
PRT3301-5A
RADIATOR CAP TEST CONNECTOR FOR #2 & #3-BLACK
5B
PRT3301-5B
RADIATOR CAP TEST CONNECTOR FOR #2 & #4-BLUE
14
PRT3301-14
#14 ALUMINUM ADAPTER
15
PRT3301-15
FORD: (MONDEO), (FOCUS), (C-MAX03)
#15 ALUMINUM ADAPTER
MAZDA: (M3: 2004-);
FORD: (FOCUS: 2011-2012)
16
PRT3301-16
#16 ALUMINUM ADAPTER
MERCEDES: (A-CLASS : W168)
17
PRT3301-17
18
PRT3301-18
#17 ALUMINUM ADAPTER
BMW: (E60, E63,E64, E65)
#18 ALUMINUM ADAPTER
VW SHARAN 1.8T 2.8
19
PRT3301-19
#19 ALUMINUM ADAPTER
TOYOTA: (RAV4), (PREVIA), (CELICA: 2000-), (MR2 SPYDER: 2000-)
20
PRT3301-20
#20 ALUMINUM ADAPTER
ALFA
CITROEN
FIAT
MINI: (COOPER S: 2002-)
PEUGEOT: (206: 1999-), (307: 2004-), (406: 1999-), (407: 2004-), (807: 2004-)
RENAULT: ( ALL : 1985-1987); (AVANTIME: 2002-), (ESPACE: 2002-)
SAAB : (900: 1978-1993), (9000: 1986-1998)
STERLING: (ALL: 1987-1991)
JEEP
VOLVO : (PASSENGER VEHICLES W/ THREADED NECK)
#21 ALUMINUM ADAPTER
CADILLAC:
(SEVILLE:
1998-2003);
(FLEETWOOD:
1994-1996);
(ESCALADE:
1999&NEWER);
(CTS:
2003)
CHEVROLET: (TAHOE: 1999-2009); (SILVERADO2500: 1999-2009); (SUBURBAN: 2000-2009); (SILVERADO1500:
1999-2009); (METRO: 1999); (PRIZM: 1999); (MALIBU: 1997-1999); (CORVETTE: 1999); (IMPALA SS:
1994-1996);
(CORSICA: 1992-1996); (COBALT: 2005-2009); (CAVALIER: 1995-1999); (CAPRICE:
1995-1996); (CAMARO: 1999); ( BERETTA: 1992-1996); (TRACKER:1999); (TRAILBLAZER: 2001-2002);
FORD: (FIVE HUNDRED: 2005); (F-150: 2004-2005); (EXCURSION: 2002–2004) (EXPLORER: 2002-2005); (TAURUS:
21
PRT3301-21
1996-2006)
FREIGHTLINER: (DIESEL TRUCK: 2004)
GM: (ALL MODELS WITH PLASTIC THREADED NECK: 1992-2009)
GMC: (ENVOY: 2002); (SIERRA 1500: 1999-2003); (SIERRA2500: 1999-2003); (YUKON: 1999);
JAGUAR: (S TYPE: 2000-2003)
LAND ROVER: (FREELANDER: 2005) ;( LR3: 2005-2007)
OLDSMOBILE: (ACHIEVA: 1992-1998); (ALERO: 1999); (AURORA: 1995-1999); (CUTLASS: 1997-1998); (INTRIGUE:
1999-2000)
PONTIAC: (GRAND AM: 1992-1999); (SUNFIRE: 1995-1999); (G6: 2005)
SAAB: (9,3: 2003-2004)
SATURN: (ALL MODELS:1990-1999); (VUE: 2003) ;(ION: 2005)
32
PRT3305-32
BLOW MOLDED CASE
N/S
PRT3301-14G
GASKET FOR #14 ADAPTER
N/S
PRT3301-15G
GASKET FOR #15 ADAPTER
N/S
PRT3301-16G
GASKET FOR #16 ADAPTER
N/S
PRT3301-17G
GASKET FOR #17 ADAPTER
N/S
PRT3301-18G
GASKET FOR #18 ADAPTER
N/S
PRT3301-19G
GASKET FOR #19 ADAPTER
N/S
PRT3301-20G
GASKET FOR #20 ADAPTER
N/S
PRT3301-21G
GASKET FOR #21 ADAPTER
ATD-3305
PAQUETE DE ACTUALIZACION PARA ADAPTOR
DE PRUEBA DE PRESION DEL SISTIMA DE
ENFRIAMIENTO DE 10 PIEZAS
(PARA SU USO CON EL CONJUNTO ATD‐3300) PRECAUCIONES Y ADVERTENCIAS DE SEGURIDAD Advertencias de Seguridad General: ADVERTENCIA: Debe leer las instrucciones y advertencias contenidas en este manual antes de usar u operar esta herramienta. No permita que nadie utilice u opere esta herramienta hasta que haya leído este manual y ha obtenido un conocimiento completo sobre cómo funciona. No seguir las instrucciones a continuación puede resultar en lesiones personales severas del usuario de la herramienta y las personas cercanas, o causar daño a la herramienta y a la propiedad. Guarde este manual para consultas futuras. Nota: Las advertencias y precauciones discutidas en este manual de instrucciones no pueden cubrir todas las posibles condiciones y situaciones que puedan llegar a ocurrir. El operador debe entender que el sentido común y la precaución son factores que no se pueden integrar a este producto, sino que son proporcionadas por el operador. ADVERTENCIA: Utilice equipo de seguridad. Los usuarios y las personas cercanas deben usar goggles o gafas de seguridad con protectores laterales que cumplan con los estándares nacionales actuales, o cuando sea necesario, un protector facial. Utilice un respirador o una máscara aprobada por la ANSI cuando trabaje cerca de vapores y polvos químicos, de madera o de metal. Esto aplica para todas las personas en el área de trabajo. También utilice zapatos de seguridad antiderrapantes, casco, guantes, sistemas de recolección de polvo y protecciones auditivas cuando sea adecuado. ADVERTENCIA: Mantener a las personas cercanas y a niños fuera del área de trabajo mientras opera esta herramienta. ADVERTENCIA: Mantener siempre el área de trabajo limpia, despejada y bien iluminada. Las áreas atiborradas u oscuras invitan a los accidentes y las lesiones. NO trabaje sobre superficies de suelo que sean resbalosas. ADVERTENCIA: No operar esta herramienta si está cansado o bajo la influencia de alcohol, drogas o medicamentos que puedan afectar su capacidad de usar la herramienta adecuadamente. ADVERTENCIA: Vestir adecuadamente. No utilizar ropa floja o joyería ya que pueden quedar atrapados en las partes móviles. Usar una cubierta que restrinja el cabello largo. ADVERTENCIA: No tratar de alcanzar algo por arriba o a través de máquinas en funcionamiento. Mantener el equilibrio y una pisada adecuados en todo momento. Se recomienda usar calzado antiderrapante mientras trabaja. INSTRUCCIONES DE OPERACIÓN: •
•
Antes de llevar a cabo una prueba en el sistema de enfriamiento, probar la bomba primero bombeando algunas veces para asegurar que esté funcionando correctamente. Cuando haga la prueba NO bombee a más de 20 PSI. Durante su inspección y durante la prueba de su sistema de enfriamiento, al bombear la manija de la bomba, asegurarse que siempre la fuerza sea aplicada directo a la bomba y no en ángulo, sino puede hacer que la bomba fugue. (Ver Figura 1.) PARA BUSCAR FUGAS EN EL SISTEMA DE ENFRIAMIENTO: 1.
2.
3.
4.
5.
6.
7.
8.
9.
Consultar el manual de servicio del vehículo para las instrucciones de prueba de presión del radiador específicas. Aflojar la tapa del radiador del vehículo lentamente para liberar cualquier presión excedente antes de quitar la tapa completamente. NUNCA ABRIR EL SISTEMA CUANDO ESTÉ CALIENTE, ya que puede causar lesiones. Seleccionar el adaptador y configuración adecuados entre los accesorios del asiento estacionario. Fijar hasta apretar el adaptador al cuello del filtro del radiador o el tanque de expansión. Sujetar el conector rápido de la bomba de mano en el adaptador. Bombear rápidamente la manija de la bomba de mano usando fuerza directa como se muestra en la figura 1 mientras se observa el medidor de presión. Aplique presión al radiador hasta el nivel de presión óptima solamente – NO EXCEDER LA PRESIÓN DEL RADIADOR. Las lecturas ideales estarán en el rango de 15‐20PSI (1.03‐1.37 BAR) . • La aguja se mantiene estable – Si el medidor se mantiene con la misma presión por 2 minutos, entonces no hay fugas serias en el sistema. • La aguja cae lentamente – Indica la presencia de pequeñas fugas o filtraciones. • La aguja cae rápidamente – Indica que hay una fuga seria. Una vez completada la prueba, liberar la presión del aire al soltar la válvula de alivio de presión en la bomba de mano. Desconectar luego el acoplamiento rápido y el conjunto del adaptador. Mantenimientos – Después del proceso de prueba del radiador: • Mantener el adaptador conectado a la bomba como lo había preparado al llevar a cabo la prueba real. Operar la bomba varias veces para disipar la humedad y/o refrigerante que puedan quedar en el adaptador y la bomba. • Aceitar la bomba de mano para lubricar el pistón y prevenir la corrosión y el daño interno. Guardar el paquete del probador de presión del radiador en su estuche y guardar el paquete en un lugar limpio, seco y seguro fuera del alcance de los niños u otras personas no autorizadas. Bomba del sistema de enfriamiento: PRECAUCIÓN: LA PRESIÓN MÁXIMA NO PUEDE EXCEDER 20 PSI (1.37BAR), DE LO CONTRARIO DAÑARÁ AL RADIADOR. PARA BUSCAR FUGAS EN LA TAPA ORIGINAL DEL RADIADOR: 1. Escoger la conexión para tapa de radiador correcta (5A o 5B) y la tapa de radiador de acero correcta (#02, #03, o #04) para el vehículo correcto siendo probado para el paquete de prueba. Sujetar la tapa de radiador original al conector para tapa de radiador (5A o 5B) y luego sujetar la tapa de radiador de acero (#02, #03, o #04) del paquete de prueba al otro extremo del conector para tapa de radiador (5A o 5B). 2. Quitar el conjunto de bomba de mano (#1) del paquete de prueba y apretar el acoplamiento rápido en el extremo de la manguera a la tapa de radiador (#02, #03, o #04). Operar la bomba de mano hasta que alcance la presión recomendada por el fabricante del vehículo. – NO APLICAR PRESIÓN DE MÁS. Las lecturas ideales deberán estar en el rango de 15‐20PSI (1.03‐1.37BAR). 3. Revisar la lectura de presión en el medidor inmediatamente después de llegar a la presión recomendada por el fabricante del vehículo. Si la presión cae, entonces hay una fuga en la tapa del radiador. Después de completar la prueba de presión, presione el botón de liberación en el acoplamiento rápido hasta que la lectura en el medidor indique 0. Quitar el acoplamiento rápido de la tapa del radiador y luego quitar la tapa de radiador original del conector para tapa de radiador original. Desechar la tapa de radiador original y reemplazarla con una tapa nueva si hay fuga o si no cumple con las recomendaciones del fabricante del vehículo. ÍTEM
# PIEZA PEDIDO
DESCRIPCIÓN DE PIEZA
5A
PRT3301-5A
CONECTOR PARA PRUEBA DE TAPA DE RADIADOR PARA #2 Y #3-NEGRO
5B
PRT3301-5B
CONECTOR PARA PRUEBA DE TAPA DE RADIADOR PARA #2 Y #4-AZUL
14
PRT3301-14
ADAPTADOR DE ALUMINIO #14
15
PRT3301-15
FORD: (MONDEO), (FOCUS), (C-MAX03)
ADAPTADOR DE ALUMINIO #15
MAZDA: (M3: 2004-)
FORD: (FOCUS: 2011-2012)
16
PRT3301-16
ADAPTADOR DE ALUMINIO #16
MERCEDES: (A-CLASS : W168)
17
PRT3301-17
18
PRT3301-18
ADAPTADOR DE ALUMINIO #17
BMW: (E60, E63,E64, E65)
ADAPTADOR DE ALUMINIO #18
VW SHARAN 1.8T 2.8
19
PRT3301-19
ADAPTADOR DE ALUMINIO #19
TOYOTA: (RAV4), (PREVIA), (CELICA: 2000-), (MR2 SPYDER: 2000-)
20
PRT3301-20
ADAPTADOR DE ALUMINIO #20
ALFA
CITROEN
FIAT
MINI: (COOPER S: 2002-)
PEUGEOT: (206: 1999-), (307: 2004-), (406: 1999-), (407: 2004-), (807: 2004-)
RENAULT: ( TODOS : 1985-1987); (AVANTIME: 2002-), (ESPACE: 2002-)
SAAB : (900: 1978-1993), (9000: 1986-1998)
STERLING: (TODOS: 1987-1991)
JEEP
VOLVO : (VEHÍCULOS DE PASAJEROS C/CUELLO ROSCADO)
ADAPTADOR DE ALUMINIO #21
CADILLAC:
(SEVILLE:
1998-2003);
(FLEETWOOD:
1994-1996);
(ESCALADE:
1999&NEWER);
(CTS:
2003)
CHEVROLET: (TAHOE: 1999-2009); (SILVERADO2500: 1999-2009); (SUBURBAN: 2000-2009); (SILVERADO1500:
(1999-2009); (METRO: 1999); (PRIZM: 1999); (MALIBU: 1997-1999); (CORVETTE: 1999); (IMPALA SS: 1994-1996);
(CORSICA: 1992-1996); (COBALT: 2005-2009); (CAVALIER: 1995-1999); (CAPRICE: 1995-1996); (CAMARO: 1999);
( BERETTA: 1992-1996); (TRACKER:1999); (TRAILBLAZER: 2001-2002)
FORD: (FIVE HUNDRED: 2005); (F-150: 2004-2005); (EXCURSION: 2002–2004) (EXPLORER: 2002-2005); (TAURUS:
21
PRT3301-21
1996-2006)
FREIGHTLINER: (CAMIÓN DIESEL: 2004)
GM: (TODOS LOS MODELOS CON CUELLO ROSCADO DE PLÁSTICO: 1992-2009)
GMC: (ENVOY: 2002); (SIERRA 1500: 1999-2003); (SIERRA 2500: 1999-2003); (YUKON: 1999)
JAGUAR: (S TYPE: 2000-2003)
LAND ROVER: (FREELANDER: 2005);( LR3: 2005-2007)
OLDSMOBILE: (ACHIEVA: 1992-1998); (ALERO: 1999); (AURORA: 1995-1999); (CUTLASS: 1997-1998); (INTRIGUE:
1999-2000)
PONTIAC: (GRAND AM: 1992-1999); (SUNFIRE: 1995-1999); (G6: 2005)
32
PRT3305-32
ESTUCHE MOLDEADO
N/S
PRT3301-14G
EMPAQUE PARA ADAPTADOR #14
N/S
PRT3301-15G
EMPAQUE PARA ADAPTADOR #15
N/S
PRT3301-16G
EMPAQUE PARA ADAPTADOR #16
N/S
PRT3301-17G
EMPAQUE PARA ADAPTADOR #17
N/S
PRT3301-18G
EMPAQUE PARA ADAPTADOR #18
N/S
PRT3301-19G
EMPAQUE PARA ADAPTADOR #19
N/S
PRT3301-20G
EMPAQUE PARA ADAPTADOR #20
N/S
PRT3301-21G
EMPAQUE PARA ADAPTADOR #21