1
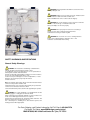
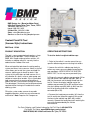
BMP Design, Inc. (Bavarian Motor Parts)
3208 Park Center Drive Tyler, Texas, 75701
Toll Free: (800) 648-7278
Local: (903) 581-1855
24-Hour Fax: (903) 581-8206
Sales: [email protected]
Service: [email protected]
Coolant Flush/Fill Tool
(Vacuum Style) Instructions
BMP Part# 115186
PRODUCT DESCRIPTION
OPERATING INSTRUCTIONS
The tool is vacuum operated and requires a shop
compressor for operation. The kit will work on
BMW, Mini Cooper and most other vehicles. Kit
includes an adapter which fits securely into the
coolant tank or radiator filler neck.
To test for leaks in original radiator cap:
When activated the tool draws the entire cooling
system and hoses into a vacuum. A built in shut off
valve allows you to seal the system and hold it in
vacuum, allowing you to check for leaks. If the
system at this point does not hold vacuum, this is
an indication of a leak in a hose, water pump seal,
radiator or some other location. If the system does
hold vacuum then that vacuum will draw fresh
coolant into the system without starting the vehicle.
The advantage is that leaks can be discovered and
repaired without having to fill and drain the entire
cooling system.
Filling the system under vacuum also avoids
trapped air pockets, which can cause thermostat
malfunction. Note: Requires Air Compressor
1. Refer to the vehicle’s service manual for any
specific radiator cap pressure testing instructions.
2. Loosen the vehicle’s radiator cap slowly to
relieve any excess pressure before removing the
cap completely. NEVER OPEN THE SYSTEM
WHILE HOT, as this may cause personal injury.
3. Choose the correct radiator cap connector (5A or
5B) and correct steel radiator cap (#02, #03, or
#04) for the correct vehicle being tested from the
test kit. Fasten the original radiator cap to the
radiator cap connector (5A or 5B) and then fasten
the steel radiator cap (#02, #03, or #04) from the
test kit to the other end of the radiator cap
connector(5A or 5B).
4. Remove the hand pump assembly (#1) from the
test kit and fasten the quick coupler at the end of
the hose to the radiator cap (#02, #03, or #04)
securely. Operate the hand pump until reaching the
pressure recommended by the vehicle
manufacturer.
For Parts Ordering, and Product Information Call Toll Free: 1-800-648-7278
For Repair Tip Videos: www.BMPdesign.com/technical
BMP DESIGN, INC. 3208 Park Center Dr. Tyler, TX 75701
DO NOT OVER PRESSURIZE THE
RADIATOR CAP. Ideal readings should range
between 15-20PSI (1.03-1.37BAR).
5. Connect air supply to the purge and refill
tool( #22) and press operating button until the
pressure reaches 20-25 Hg (50-60cmHg). Turn
valve (#27) to the closed position and press
ON/OFF SWITCH (#28) off.
5. Check the pressure reading on the gauge
immediately after reaching the vehicle
manufacturer’s recommended pressure.
If the pressure drops, there is a leak in the
radiator cap. After pressure testing is
completed, press the release button on
the quick coupler until the reading on the gauge
reads 0. Remove quick coupler from radiator
cap and then remove the
Refill Cooling System:
original radiator cap from the original radiator
cap connector. Discard original radiator cap and
replace with new cap if
1. Connect the coolant hose (#24A) to the
coolant hose quick coupler (#29) and submerge
in coolant.
leaking or if it does not meet vehicle
manufacturer’s recommendations.
2. Assure that valve (#27) is in the closed
position and that there is coolant in the coolant
hose.
PURGING AND REFILLING COOLING
SYSTEM
Purge Cooling System:
3. Turn valve (#26) to the open position to allow
the coolant to refill the cooling system.
4. The refill is complete when the pressure
gauge reads 0.
NOTE: PLEASE CHECK THE COOLANT LEVEL AND ADD
COOLANT AS NECCESSARY TO THE PROPER LEVEL.
1. Drain coolant from radiator.
2. Remove the purge and refill tool( #22from the
test kit and hang the tool in a convenient location
under the
hood with the hook provided.
3. Choose the correct radiator cap for the vehicle
being tested, or the universal rubber radiator
adapter (#23) from the test kit and install the one of
your choice on the cooling system opening. Fasten
the quick coupler at the end of the hose on the
purge and refill tool to the radiator cap securely.
4. Turn valve (#27) to the open position and valve
(#26) to the closed position.
For Parts Ordering, and Product Information Call Toll Free: 1-800-648-7278
For Repair Tip Videos: www.BMPdesign.com/technical
BMP DESIGN, INC. 3208 Park Center Dr. Tyler, TX 75701
WARNING: Keep bystanders and children out of the work area
while operating this tool.
WARNING: Always keep your work area clean, uncluttered, and
well lit. Cluttered or dark areas invite accidents and
injuries. DO NOT work on floor surfaces that are slippery.
WARNING: Do not operate this tool if you are tired or under the
influence of alcohol, drugs, or medications that could
affect your ability to use the tool properly.
WARNING: Dress properly. Do not wear loose clothing or
jewelery as they can be caught in moving parts. Wear
restrictive hair covering to contain long hair.
WARNING: Do not reach over or across running machines.
Keep proper footing and balance at all times. Non‐skid
footwear is recommended when working.
SAFETY WARNINGS AND PRECATIONS
General Safety Warnings:
WARNING: The instructions and warnings contained in this
manual should be read and understood before using
or operating this tool. Do not allow anyone to use or operate this tool
until they have read this manual and have
developed a thorough understanding of how this tool works. Failure to
observe any of the following instructions could
result in severe personal injury to tool user and bystanders, or cause
damage to the tool and property. Keep this manual
for future reference.
Note: The warnings and cautions discussed in this instruction manual
cannot cover all possible conditions and
situations that may occur. It must be understood by the operator that
common sense and caution are factors which
cannot be built into this product, but must be supplied by the operator.
WARNING: Use safety equipment. User and bystanders should
use safety goggles or safety glasses with side shields
which comply with current national standards, or when needed, a face
shield. Use an ANSI approved dust mask or respirator
when working around metal, wood, and chemical dusts and mists. This
applies to all persons in the work area. Also use
non‐skid safety shoes, hardhat, gloves, dust collection systems, and
hearing protection when appropriate.
For Parts Ordering, and Product Information Call Toll Free: 1-800-648-7278
For Repair Tip Videos: www.BMPdesign.com/technical
BMP DESIGN, INC. 3208 Park Center Dr. Tyler, TX 75701