1
SOLOGIC B921
USER GUIDE / HANDLEIDING / MANUEL D’UTILISATEUR
BEDIENUNGSANLEITUNG / MANUAL DE USUARIO
BRUKSANVISNING / MANUALE D’USO
MANUAL DO UTILIZADOR / UŽIVATELSKÁ PÍRUKA
/ INSTRUKCJA OBSUGI
V 1.0 - 05/11
UK The features described in this manual are published with reservation to modifications.
NL De in deze handleiding beschreven mogelijkheden worden gepubliceerd onder voorbehoud van
wijzigingen.
FR Les possibilités décrites dans ce manuel sont publiées sous réserve de modifications.
DE Die in dieser Bedienungsanleitung umschriebenen Möglichkeiten, werden vorbehaltlich
Änderungen publiziert.
ES Las características descritas en este manual pueden ser objeto de futuras modificaciones.
SE Funktionerna i denna bruksanvisning publiceras med reservation för ändringar.
IT Le caratteristiche descritte nel presente manuale vengono pubblicate con riserva di modifica.
PT As características descritas neste manual são publicadas sob reserva de modificação.
CZ Možnost úpravy funkcí popsaných v této píruce vyhrazena.
GR , .
PL Waciwoci opisane w niniejszej instrukcji obsugi s! publikowane z zatrze"eniem prawa
wprowadzenia zmian.
UK
NL
FR
DE
ES
SE
IT
PT
CZ
GR
PL
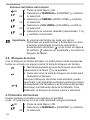
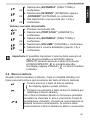
To be connected to the public analogue telephone network.
Geschikt voor aansluiting op het openbare analoog geschakelde telefoonnetwerk.
Il est destiné à être raccordé au réseau de télécommunication public.
Kompatibel für den analogen Telefonanschluss.
Conexión a la red telefónica analógica
For anslutning til det analoga nätverket.
Destinato ad essere collegato alla rete telefonica analogica pubblica.
Para efectuar a ligação com a rede pública analógica.
Pipojit k veejné analogové telefonní síti.
#$ % $ & & &
.
Do pod!czenia do publicznej analogowej sieci telefonicznej.
This product is in compliance with the essential requirements and other relevant provisions of the
R&TTE directive 89/336/EEC. The Declaration of conformity can be found on :
http://www.topcom.be/cedeclarations.asp
UK The CE symbol indicates that the unit complies with the essential requirements of the R&TTE
directive.
NL Het toestel voldoet aan de basiseisen van de R&TTE-richtlijn. Dit wordt bevestigd door de CEmarkering.
FR La conformité de l’appareil avec les exigences fondamentales de la directive européenne R&TTE
relative aux terminaux, est confirmée par le label CE.
DE Die Übereinstimmung des Gerätes mit den grundlegenden Anforderungen der R&TTE-Directive
ist durch das CE-Kennzeichen bestätigt.
ES El sello CE corrobora la conformidad del equipo con los requerimientos básicos de la directiva
R&TTE.
SE CE-märket bekräftar att apparaten uppfyller de grundläggande kraven i R&TTE direktivet.
IT Il simbolo CE indica che l’unità è conforme ai requisiti fondamentali della direttiva R&TTE.
PT O símbolo CE indica que esta unidade cumpre com os requisitos essenciais da directiva R&TTE.
CZ Symbol CE znamená, že jednotka spl(uje základní požadavky sm)rnice R&TTE.
GR * + CE / +&$ R&TTE.
PL Symbol CE oznacza, "e urz!dzenie spenia istotne wymogi dyrektywy R&TTE.
UK This product works with rechargeable batteries only. If you put non-rechargeable
batteries in the handset and place it on the base, the handset will be damaged and this in
NOT covered under the warranty conditions.
NL Dit product werkt alleen op herlaadbare batterijen. Als u niet herlaadbare batterijen in de
handset stopt en deze op de basis plaatst, zal de handset beschadigd raken. Deze beschadiging wordt
NIET gedekt door de garantie.
FR Ce produit fonctionnement uniquement avec des piles rechargeables. Si vous mettez des piles non
rechargeables dans le combiné et si vous le placez sur la base, le combiné sera endommagé et ceci
ne sera PAS couvert par la garantie.
DE Dieses Gerät darf nur mit Akkus betrieben werden. Wenn Sie das Mobilteil mit nicht
wiederaufladbaren Batterien bestücken und es auf die Basisstation stellen, wird das Mobilteil
beschädigt und fällt nicht unter die Garantie.
ES Este producto solo funciona con pilas recargables. Si pone pilas no recargables en el terminal y lo
pone en la base, el terminal se dañará, lo que NO está incluido en la garantía.
SE Den här produkten fungerar endast med uppladdningsbara batterier. Om du sätter i ickeuppladdningsbara batterier i handenheten och placerar den på basenheten, kommer handenheten att
skadas. Sådana skador täcks INTE av garantin.
IT Questo prodotto funziona solo con batterie ricaricabili. Se si inseriscono batterie non ricaricabili nel
ricevitore portatile e lo si ripone sulla sua base, il portatile subirà dei danni e questi NON saranno
coperti dalla garanzia.
PT Este produto trabalha apenas com baterias recarregáveis. Se colocar baterias não recarregáveis
no portátil e o colocar sobre a base, este ficará danificado. Estes danos não são cobertos pelas
condições da garantia.
CZ Tento výrobek je uren pro použití pouze s dobíjecími bateriemi. Pokud vložíte do telefonu
nedobíjecí baterie a položíte telefon do základny, dojde k poškození telefonu a na tuto škodu se záruka
NEVZTAHUJE.
GR * 0 1 . 2 1 &
& & % +, &
& % ++ 324 & .
PL Urz!dzenie to dziaa tylko z akumulatorkami nadaj!cymi si5 do adowania. W przypadku wo"enia
do suchawki zwykych, nienadaj!cych si5 do adowania baterii, a nast5pnie poo"enia jej na bazie,
suchawka ulegnie uszkodzeniu i NIE bedzie to obj5te przez gwarancj5.
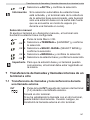
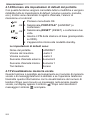
Figure 1
B
A
C
Figure 2
A
B921
+
Figure 3
B
14
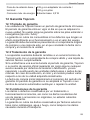
Figure 4
13
1
12
11
10
2
R
OK
ESC/
INT
3
4
9
17
5
16
15
8
6
7
+
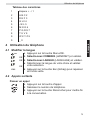
General information
This user guide contains all the information you need to install, set up
and operate your device. It also contains information and important
notes for your safety and help in the event of problems.
Always keep the user guide near the device.
Keep this user guide in a safe place and pass it on to another user if
necessary.
1.1 The product: Sologic B921
This product has been manufactured in accordance with the uniform
digital standard for cordless telephones (DECT). DECT technology
features a high level of security against interception as well as highquality digital transmission. This telephone is intended for various
applications, for example on a network of base stations and cordless
handsets that make up a complete PBX: up to 4 cordless handsets
can be operated on one base station and one cordless handset can be
operated on up to 4 base stations. Internal calls can be made between
the base station and handset or between two handsets.
If available on your line, caller ID and SMS services from your
telephone service provider are possible on this telephone. If you use
these services, the caller's telephone number is shown in the
telephone display.
Important To use "Caller ID", this feature must first be enabled
for your telephone line. Contact your telephone line
provider for information about activating this feature.
If this feature is not enabled, the numbers from
which incoming calls originate will NOT be shown in
the telephone display.
1.2 Copyright
This document is protected by copyright.
All rights, including those of total or partial photomechanical
reproduction, duplication and distribution by means of particular
processes (such as data processing, data carriers and data networks),
and substantive and technical changes, are reserved.
3
English
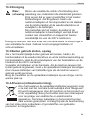
1 General information
General information
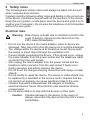
1.3 Signal words and symbols
Symbol Signal word Meaning
Warning
Warning of risk of potential serious injury or
death if you fail to comply with this
information.
Caution
Warning of risk of potential minor injury if you
fail to comply with this information.
none
Caution
Risk of material or environmental damage.
Important This provides important information about the
function.
Info, tip
General information or particular tips.
1.4 Intended use
This product is intended for making telephone calls via a fixed line
within a telephone network. The pre-requisite for proper use of the
phone is professional installation taking account of the information in
this user guide.
Any other use is deemed improper and is not permitted.
Any modifications or conversions by the user that are not described in
this user guide, are deemed improper and are not permitted. We
accept no liability for any damage that may arise from these.
1.5 Contents of box
Check that the contents of the box are complete and undamaged.
Contact your dealer immediately if parts are missing or defective.
Keep the packaging in case you need to return the telephone or send
it for repair.
1 Base station
1 Mains adapter for base station
1 Telephone cable for base station
1 Cordless handset incl. 2 rechargeable batteries (AAA, 1.2 V /
500 mAh, NiMH) and a battery compartment cover
1 User guide
Warning Risk of suffocation for children! Keep packaging
films out of the reach of children.
Important Dispose of packaging material in an environmentally
responsible way!
4
Safety notes
The following basic safety notes must always be taken into account
when using electrical devices.
Carefully read the following safety notes and details on the correct use
of the device. Familiarise yourself with all the functions of the device.
Keep this user guide in a safe place near the device and pass it on to
another user if necessary. Do not pass the telephone on to third parties
without the user guide.
Electrical risks:
Warning Risk of injury or death due to electrical current! In the
event of danger, disconnect the device from the
230V mains immediately.
• Do not use the device if the mains adapter, cable or device are
damaged. Take care not to drop the device as it could be damaged.
• The voltage within the device is at hazardous levels. Never open
the casing or insert object through the ventilation slot.
• Prevent liquids penetrating the device. If this should occur, unplug
the mains adapter from the power socket and the telephone cable
connector from the wall socket.
• Also unplug the mains adapter from the power socket and the
telephone cable connector from the wall socket if faults occur
during operation and before cleaning the device.
• Do not touch the charger and plug connectors with sharp or metal
objects.
• Do not modify or repair the device. The device or cable should only
be repaired by a specialist in the service centre. Repairs that are
not carried out properly can cause significant risks to the user.
• Children frequently underestimate the dangers of handling
electrical devices. Never allow children near electrical devices
unsupervised.
• Do not allow children to play with the devices or their parts.
Caution Possible damage to the device. In the event of
danger, disconnect the device from the 230 V mains
immediately.
5
English
2 Safety notes
Safety notes
• Do not use the device in humid areas (e.g. bathroom) or very dusty
areas.
• Devices connected to the mains may be damaged during
thunderstorms. Therefore always unplug the device in a
thunderstorm.
• The mains adapter must be completely removed from the socket to
disconnect the device fully from the power supply. Always pull the
plug and never the cable.
• Check cables regularly for damage, protect them against hot
surfaces and other hazards, unwind them fully, lay them so that
nobody can trip over them and do not constrict them.
Fire risks:
Warning Risk of injury or death due to fire!
Do not expose the device to excessive heat and
disconnect it from the 230 V mains supply
immediately in the event of danger.
The heat generated inside the device may cause a fault or a fire in the
device. Therefore do not expose this device to extreme temperatures:
– Avoid direct sunlight and heat
– Do not cover the ventilation slot on the device
Risk of explosion:
Warning Risk of injury due to explosion!
Exercise particular caution in respect of children!
• Never throw disposable or rechargeable batteries into fire.
• Do not operate the device in an environment with a risk of
explosions!
Risk of poisoning:
Warning Risk of injury due to poisoning!
Exercise particular caution in respect of children!
• Keep disposable and rechargeable batteries out of the reach of
children.
6
Safety notes
Warning Risk of injury due to suffocation!
Exercise particular caution in respect of children!
• Keep packaging films out of the reach of children.
• Consider possible risks to children (risk of strangulation) if you use
extension cables.
Faults:
Warning Possible risk of injury due to faults in the device!
Exercise particular caution in respect of medical
equipment.
• The function of medical electrical devices may be affected by
electromagnetic radiation from your device. Therefore make sure
that the device is installed and operated sufficiently far away from
medical electrical devices. The same applies to implanted medical devices such as
pacemakers.
• The cordless handset may cause an unpleasant buzz in hearing
aids so keep it sufficiently far away from hearing aids.
Possible damage:
Caution
Possible damage to the device! Read the
information in this user guide.
• Only use the supplied main adapters. Do not use any third-party
adapters as the rechargeable batteries could be damaged.
• The socket for connecting the mains adapter must be near the
device and easily accessible.
• Only use the supplied rechargeable batteries. When they need to
be replaced, use rechargeable batteries of the same type. Make
sure the batteries are inserted the right way round (information can
be found in the battery compartment on the device). Never use
ordinary disposable batteries!
Important In the event of a power failure, it is only possible to
make calls using the base station.
7
English
Risk of suffocation:
First steps
2.1 Notes on low-radiation operation
This cordless telephone (compliant with the DECT standard) facilitates
low-radiation operation (ECO mode).
During a call, the handset reduces the radio output depending on the
distance from the base station. When no call is being conducted, the
handset reduces the radio output to a minimum. This does not mean
that normal DECT radiation is harmful to health. Rather, low-radiation
operation avoids any unnecessary radiation exposure.
The base does not reduce radio output! Set up the base station in a
location where you do not spend much time, for example in the
hallway. Avoid setting it up in your or your children's bedrooms or the
lounge.
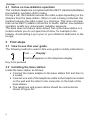
3 First steps
3.1 How to use this user guide
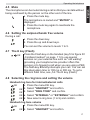
The following method is used in this user guide to clarify instructions:
Text ....... „Display“.
Text that appears on the telephone display
Key to be pressed
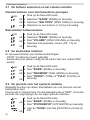
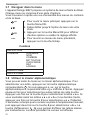
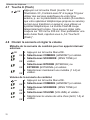
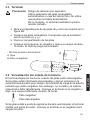
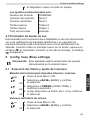
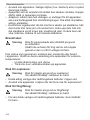
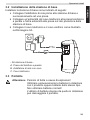
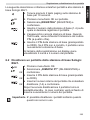
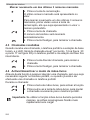
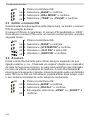
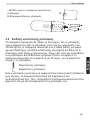
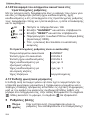
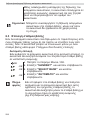
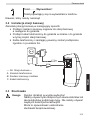
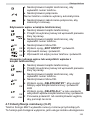
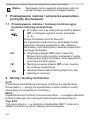
3.2 Installing the base station
Install the base station as follows:
1 Connect the mains adapter to the base station first and then to
a socket.
2 Connect one end of the telephone cable to the telephone socket
on the wall and the other to the connector on the back of the
base station.
3 The telephone and power cables should be connected as
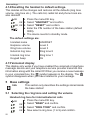
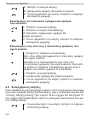
shown in figure 3A.
8
English
First steps
B
A
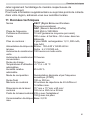
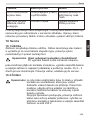
C
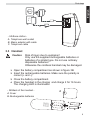
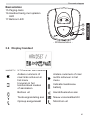
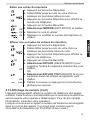
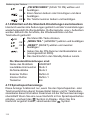
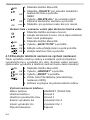
- 3A Base station A. Telephone wall socket
B. Mains adapter with cable
C. Telephone cable
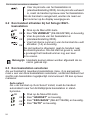
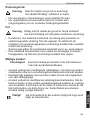
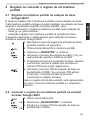
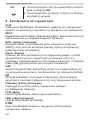
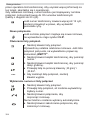
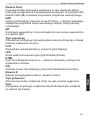
3.3 Handset
Caution
1
2
3
4
Risk of injury due to explosion!
Only use the supplied rechargeable batteries or
batteries of a similar type. Do not use ordinary
disposable batteries!
Otherwise the cordless handset may be damaged.
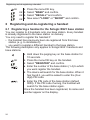
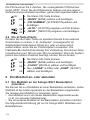
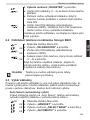
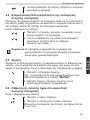
Open the battery compartment as shown in figure 3B.
Insert the rechargeable batteries. Make sure the polarity is
correct (+ and -).
Close the battery compartment.
Place the handset in the charger and charge it for 16 hours.
The charging LED is illuminated
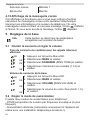
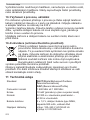
B921
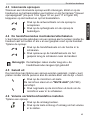
- 3B Back of the handset A.Cover
B.Rechargeable batteries
A
+
B
+
9
First steps
3.4 Battery status display
The handset will stop working when the batteries are flat. If the
batteries are completely flat and you place the handset on the base
station for just a short time, the battery charge indicator will show that
they are full. However they are not and the battery performance will
deteriorate rapidly. You must leave the handset on the charger for
16 hours to charge batteries fully.
Charged batteries
Flat batteries
The handset will emit a warning tone when the batteries are nearly flat
during a call. Place the handset on the handset charger to recharge the
10
First steps
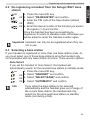
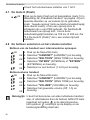
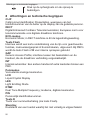
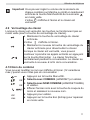
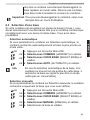
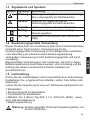
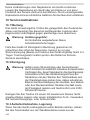
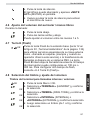
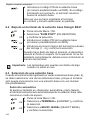
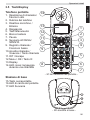
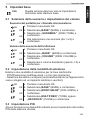
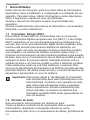
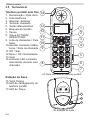
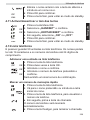
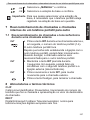
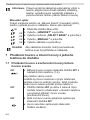
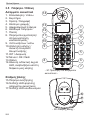
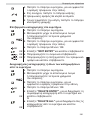
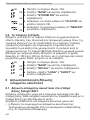
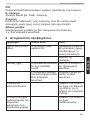
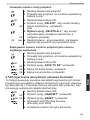
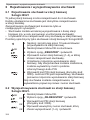
3.5 Keys/Display
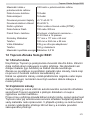
Cordless handset
1. Redial / up
2. Phone book
3. Mute / delete
4. Hang up
5. Alphanumeric keys
6. Key lock
7. Pause
8. Ringer on/off
9. Calls list / down
10.Answer call / hands free /
call button
11. INT / escape
12.Menu / OK / flash
13.Display
14.Red LED, flashes during a call
English
batteries.
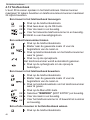
14
13
1
12
11
10
2
R
OK
ESC/
INT
3
4
9
5
8
6
7
- 3C Front of the handset -
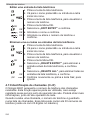
11
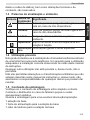
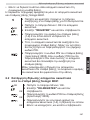
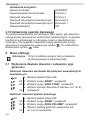
First steps
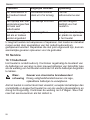
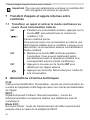
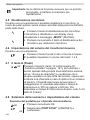
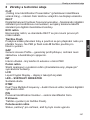
Base station
15.Paging key
16.Handset charging LED
17.Ringer LED
17
16
15
3.6 Handset display
- 3D Base station -
HANDSE x = handset number
TX
Other numbers or scroll
left through the menu
Find or create phone
book entries
Ringer off
Other numbers or scroll
right through the menu
Battery status display
Key lock on
New voicemail message
Call created
Microphone muted
12
Hands free mode on
New numbers in the
calls list
Internal call
The antenna indicates the
strength of the reception
signal. The antenna flashes
when the handset is out of
range.
3.7 Navigating through the menu
The Sologic B921 has an easy-to-use menu system. Every menu
consists of a series of options.
A summary of the menus on the handset and base station can be
found below.
1 Press the menu/OK key to open the main menu.
OK
2 Scroll to the required menu option.
3 Press the menu/OK key to open more options or to
OK
confirm the displayed setting.
4 Press the escape key to go back to the previous
ESC
menu level
Menu
PHONE BOOK
HANDSET
Sub-menu options
RING TONE
HANDSET NAME
KEYPAD BEEP
SELECT BASE
RESET
LANGUAGE
REGISTER HANDSET
DE-REGISTER HANDSET
3.8 Using the alphanumeric keys
You can use the alphanumeric keys to enter text. Press the
appropriate alphanumeric key to select a letter 5 . For example , if you
press the 5 numeric key, the letter 'j' appears in the display first. Press
the key several times to select the other letters.
Press the 2 key once to select the letter "a". If you want to enter the
letters "a" and "b" in succession, first press the 2 key once to select
the letter "a". Wait 2 seconds until the cursor has moved to the next
13
English
First steps
First steps
position. Now press the 2 key twice to select "b". You can use the
delete key
3 to delete letters that have been entered incorrectly.
The letter before the cursor is deleted.
14
Operating the telephone
1
2
3
4
5
6
7
8
9
0
English
Table of characters
Space + - / 1
ABC2
DEF3
GHI4
JKL5
MNO6
PQRS7
TUV8
WXYZ9
_0
4 Operating the telephone
4.1 Changing the language
OK
1
OK 2
OK 3
OK 4
5
ESC
Press the menu/OK key.
Select "HANDSET" and confirm.
Select "LANGUAGE" and confirm.
Select the desired language and confirm.
Press the escape key to return to standby mode.
4.2 Outgoing calls
Making a call
1
4 5 6
G
H
I
J
K
L
M
N
O
2
3
Press the call button.
Enter the telephone number.
Press the hang up key to end the call.
Call preparation
1 Enter the telephone number.
4 5 6
You can correct a wrong number using the mute key. If you do not press any key for 10 seconds, the
number disappears and the handset reverts to
standby mode.
2 Press the call button.
G
H
I
J
K
L
M
N
O
15
Operating the telephone
The telephone number is automatically dialled.
3 Press the hang up key to end the call.
Redialling the last telephone number called
1 Press the call button.
2 Press the redial button.
The last telephone number is automatically dialled.
3 Press the hang up key to end the call.
Redialling one of the last 3 telephone numbers called
Press the redial key.
The last number called appears in the display.
If you want to redial one of the last 3 numbers, keep
pressing the redial key until the number you want
appears in the display.
2 Press the call button.
The telephone number is automatically dialled.
3 Press the hang up key to end the call.
1
4.3 Incoming calls
When an incoming call is received, the handset and the base station
ring and the visual call signal LED (see point 14 in figure 3C and
point 17 in figure 3D) flashes on the handset and base station.
1
2
Press the answer call key to answer the call.
Press the hang up key to end the call.
4.4 Activating/deactivating hands free mode
You can use this function to answer a call without having to hold the
handset or if the a call is already being conducted on the handset.
During the call:
1 Press the hands free key to activate the function.
2 Press the hands free key again to switch the call
back to the handset.
Important The batteries discharge more quickly if you use
hands free mode for a long time!
16
Operating the telephone
The microphone can be muted during a call so that you can talk without
being overheard by the person on the other end of the line.
1 Press the mute key.
The microphone is muted and "MUTED" is
displayed.
2 Press the mute key again to reactivate the
microphone.
4.6 Setting the earpiece/hands free volume
During a call:
Press the down key.
2 Press the up and down keys.
You can set the volume to levels 1 to 5.
1
4.7 The R key (Flash)
OK
Press the Flash key on the handset (key12 in figure 3C
„Cordless handset“ on page 11) to use special
services on your external line such as "call waiting"
(providing your telephone line provider offers this
service) or to forward a call when you are using a PBX.
The flash key R briefly interrupts your call. You can set
this interruption time to 100 ms or 300 ms. To set a
different flash time, see „5.4 The R key (Flash)“
4.8 Selecting the ring tone and setting the volume
Handset ring tone for internal/external calls
1 Press the menu/OK key.
OK
OK 2 Select "HANDSET" and confirm.
OK 3 Select "RING TONE" and confirm.
OK 4 Select "INTERNAL" or "EXTERNAL" and confirm.
OK 5 Now select a ring tone (1 to 9) and confirm.
Handset ring tone volume
1 Press the menu/OK key.
OK
OK 2 Select "HANDSET" and confirm.
17
English
4.5 Mute
Operating the telephone
OK 3 Select "RING TONE" and confirm.
OK 4 Select "VOLUME" and confirm.
OK 5 Select the required volume (Off, 1-5) and confirm.
Important You can switch the ring tone volume of any
individual handset on or off by simply holding the
ring tone on/off key
in standby mode.
The symbol
appears in the display and the key
lock is activated.
4.9 Key lock
When the key lock is on, pressing any key in standby mode has no
effect (with the exception of the key lock key).
1 Press and hold the key lock key.
The symbol appears in the display.
2 Press the key lock key again to deactivate key lock.
When key lock is activated, you can still answer
incoming calls by pressing the answer call key . The
keypad functions as usual during the call. Key lock is
activated again after the call.
4.10 Handset name
You can change the name that appears in the display (max.
12 characters) if no call is being conducted.
1 Press the menu/OK key.
OK
OK 2 Select "HANDSET" and confirm.
OK 3 Select "HANDSET NAME" and confirm.
4 5 6 4 Delete the previous name using the mute key and
enter a new one.
5 Press to confirm.
OK
6 Press the escape key to return to standby mode.
ESC
G
H
I
18
J
K
L
M
N
O
Operating the telephone
1
OK
OK 2
OK 3
4
OK
5
ESC
6
Press the menu/OK key.
Select "HANDSET" and confirm.
Select "KEYPAD BEEP" and confirm.
Now select "ON“ or "OFF“.
Press to confirm.
Press the escape key to return to standby mode.
4.12 Phone book
You can store 50 entries in the phone book. Names may be up to
16 characters long and telephone numbers up to 24 digits long.
Adding a phone book entry
1 Press the phone book key.
OK 2 Press the OK key twice.
OK
4 5 6 OK 3 Enter the name and confirm.
4 5 6 OK 4 Enter the desired telephone number and confirm.
A confirmation tone is now sounded.
G
H
I
J
K
L
M
N
O
G
H
I
J
K
L
M
N
O
Dialling an abbreviated number
1 Press the phone book key.
2 Scroll to the required name or enter the initial letters
of the name.
4 5 6
3 Press the phone book key to display the telephone
number.
4 Now press the call key.
The telephone number is automatically dialled.
5 Press the hang up key to end the call.
G
H
I
J
K
L
M
N
O
Editing a phone book entry
1 Press the phone book key.
2 Scroll to the required name or enter the initial letters
of the name.
4 5 6
3 Press the phone book key to display the telephone
number.
4 Press the menu/OK key.
OK
G
H
I
J
K
L
M
N
O
19
English
4.11 Activate / deactivate keypad beep
Operating the telephone
OK 5 Select "EDIT ENTRY" and confirm.
4 5 6
OK 6 Enter the name and confirm.
4 5 6
OK 7 Enter or edit the telephone number and confirm.
G
H
I
G
H
I
J
K
L
J
K
L
M
N
O
M
N
O
Deleting one entry or all entries in the phone book
1 Press the phone book key.
2 Scroll to the required name or enter the initial letters
of the name.
4 5 6
3 Press the phone book key to display the telephone
number.
4 Press the menu/OK key.
OK
5 Select "DELETE ENTRY" to delete the current
phone book entry and confirm.
OK
OR
6 Select "DELETE ALL" to delete all phone book
entries and confirm.
OK
ESC 7 Confirm again or press the escape key to skip.
OK
G
H
I
J
K
L
M
N
O
4.13 Caller ID (CLIP)
The Sologic B921 displays the telephone number of incoming calls.
This function can only be used if you are registered for this service with
your telephone line provider. Contact your provider for more
information.
When you receive a call, the telephone number is stored in a calls list.
This list can hold up to 30 numbers (each of up to 23 digits).
If the telephone number consists of more than
12 digits, you can scroll to the right in the display to
see the other digits.
New calls
When there is a new call received in the calls list, the
CLIP symbol flashes in the display.
Opening the calls list
1 Press the calls list key.
The last call received is displayed. If the calls list is
empty, the word "EMPTY" appears in the display.
20
2
3
4
5
ESC
Press the phone book key to skip the number.
Press the phone book key to skip the date and time.
Press the up and down keys to scroll through the list.
Press the escape key to exit the calls list.
Calling a number in the call list
1 Press the calls list key.
2 Scroll through the calls list until the telephone
number you want is displayed.
3 Press the call key to start the call.
The telephone number is automatically dialled.
4 Press the hang up key to end the call.
Deleting a number from the call list
1 Press the calls list key.
2 Scroll through the calls list until the telephone
number you want is displayed.
3 Press the menu/OK key.
OK
4 Select "DELETE" to delete the current telephone
number and confirm.
OK
OR
5 Select "DELETE ALL" to delete all phone book
entries and confirm.
OK
ESC 6 Press to confirm or press the escape key to return.
OK
Storing a number in the call list as an abbreviated dial
number
1 Press the calls list key.
2 Scroll through the calls list until the telephone
number you want is displayed.
3 Press the menu/OK key.
OK
OK 4 Select "SAVE TO PB" and confirm.
4 5 6 OK 5 Edit or add a name and then confirm.
4 5 6 OK 6 Edit the telephone number and confirm.
G
H
I
J
K
L
M
N
O
G
H
I
J
K
L
M
N
O
21
English
Operating the telephone
Base settings
4.14 Resetting the handset to default settings.
This deletes all the changes and restores all the defaults (ring tone
volume, ring tone etc.). The calls list, redial list and phone book are
also deleted!
1 Press the menu/OK key.
OK
OK 2 Select "HANDSET" and confirm.
OK OK 3 Select "RESET" and confirm.
4 Enter the PIN number of the base station (default
4 5 6
0000).
5 The device reverts to standby mode.
G
H
I
J
K
L
M
N
O
The default settings are:
Handset name
HANDSET
Earpiece volume
Level 3
Ring tone volume
Level 3
External ring tone
Ring tone 8
Internal ring tone
Ring tone 1
Keypad beep
On
4.15 Voicemail display
This display only works if you have enabled the voicemail or telephone
message service and your telephone service provider transmits this
information along with the caller ID! When you receive a new message
in your voicemail box, the
symbol appears in the display. The
symbol disappears when you have listened to your message.
5 Base settings
Info
This section only describes the settings stored inside
the base station!
5.1 Selecting the ring tone and setting the volume
Handset ring tone for internal/external calls
1 Press the menu/OK key.
OK
OK 2 Select "BASE" and confirm.
OK 3 Select "RING TONE" and confirm.
OK 4 Now select a ring tone (1 to 9) and confirm.
22
Base ring tone volume
1 Press the menu/OK key.
OK
OK 2 Select "BASE" and confirm.
OK 3 Select "RING VOLUME" and confirm.
OK 4 Select the required volume (Off, 1-5) and confirm.
5.2 Setting the dialling mode
There are two dialling modes for telephone connections:
- DTMF / tone dialling (most common)
- Pulse dialling mode (only necessary if this devices is operated on an
older PBX!)
OK
1
OK 2
OK 3
OK 4
Press the menu/OK key.
Select "BASE" and confirm.
Select "DIAL MODE" and confirm.
Select "TONE" or "PULSE" and confirm.
5.3 Setting the system PIN
Some functions are only available if you know the PIN code for the
base station.
The PIN code is 4 characters long. The default PIN code is "0000".
Proceed as follows to change the PIN code and set your own PIN:
1 Press the menu/OK key.
OK
OK 2 Select "BASE" and confirm.
OK 3 Select "SYSTEM PIN" and confirm.
4 5 6 OK 4 Enter the "OLD PIN" and press OK.
4 5 6 OK 5 Enter the "NEW PIN" and confirm.
G
H
I
J
K
L
M
N
O
G
H
I
J
K
L
M
N
O
5.4 The R key (Flash)
Press the Flash key to use special services on your external line such
as "call waiting" (providing your telephone line provider offers this
service) or to forward a call when you are using a PBX. The flash key
R briefly interrupts your call. You can set this interruption time to
100 ms or 300 ms. However, if your system requires a longer flash
time, you can change this.
23
English
Base settings
Registering and de-registering a handset
OK
1
OK 2
OK 3
OK 4
Press the menu/OK key.
Select "BASE" and confirm.
Select "RECALL" and confirm.
Now select "LONG" or "SHORT" and confirm.
6 Registering and de-registering a handset
6.1 Registering a handset to the Sologic B921 base station
You can register to 4 handsets onto one base station. Every handset
is already registered to the base station on delivery.
You only need to register the handset if:
• the handset has previously been de-registered from this base
station (e. g. to reinitialise it)
• you want to register a different handset to the base station.
The following description only applies to Sologic B921 handsets and
base stations.
Hold down the paging key on the base station for
10 seconds.
2 Press the menu/OK key on the handset.
3 Select "REGISTER" and confirm.
4 Enter the number of the base station (1-4) to which
you want register the handset.
5 The device will search for the base station. When it
has found it, you will be asked to enter the (fourdigit) PIN code.
6 Enter the PIN code of the base station (default
0000). If the PIN code if wrong, the handset will
search for the base station again.
Once the handset has been registered, its name and
number appear on the display.
1
OK
4 5 6
G
H
I
J
K
L
M
N
O
4 5 6
G
H
I
24
J
K
L
M
N
O
6.2 De-registering a handset from the Sologic B921 base
station
OK
4 5 6
G
H
I
J
K
L
M
N
O
4 5 6
G
H
I
J
K
L
M
N
O
Press the menu/OK key.
OK 2 Select "DE-REGISTER" and confirm.
3 Enter the PIN code of the base station (default
0000).
OK
OK 4 Enter the internal number of the handset you want to
de-register (1-4) and confirm.
Once the handset has been successfully deregistered, it reverts to standby mode. Otherwise you
will be asked to enter the handset number again.
1
Important Handsets can only be de-registered when they are
not in use.
6.3 Selecting a base station
If your handset is registered to more than one base station (max. 4),
you must select one of these base stations since the handset only
communicates with one base station at a time. There are two options:
Auto Select
If you set the handset to 'Auto Select', the handset will
automatically search for the nearest base station in standby mode.
1 Press the menu/OK key.
OK
OK 2 Select "HANDSET" and confirm.
OK 3 Select "SELECT BASE" and confirm.
OK 4 Select "AUTOMATIC" and confirm.
Info
If you allow the base station to be selected
automatically and the handset goes out of range of
the current base station, the handset will only
search for the strongest base station in standby
mode (not during a call).
25
English
Registering and de-registering a handset
Call forwarding and internal calls from one handset to another
Manual Select
If you set the handset to 'Manual Select', the handset will only
search for the base station you have set.
1 Press the menu/OK key.
OK
OK 2 Select "HANDSET" and confirm.
OK 3 Select "SELECT BASE" and confirm.
OK 4 Select "MANUAL" and confirm.
OK 5 Select the base station and confirm.
Important For the base and the handset to be able to
communicate, the handset must be registered to
that base.
7 Call forwarding and internal calls from one handset
to another
7.1 Call forwarding and conference calls during an
external call
INT
4 5 6
G
H
I
J
K
L
INT
INT
26
During an external call, press the INT key and then
the number of the handset (1-4).
The other handset will ring.
If the call was set up with the other handset, you can
talk internally. When you hang up, the external call
will be forwarded to the other handset.
2 Hold down the INT key for 3 seconds. You can now
talk to the second handset and the external call at
the same time (conference call).
3 Press the INT key again to switch back to the
external call.
4 Press the hang up key to end the call.
1
M
N
O
Abbreviations and technical terms
CLIP
Calling Line Identification Presentation, display of the caller's
telephone number on the called party's display.
DECT
Digital Enhanced Cordless Telecommunication; European
telecommunications standard for digital cordless telephones.
ECO mode
Economic Mode; in DECT telephony this is low-radiation operation.
Flash key
Effects a brief line interruption that is used to activated features such
as toggling or call forwarding. On PBXs, the flash or R key is used for
internal recall.
GAP
Generic Access Profile; interface between the base station and
handset that facilitates the cordless connection.
INT
Internal subscriber. Other handset or extensions within a PBX
Pulse mode
Obsolete analogue dialling mode ("clattering" dialling noises).
LCD
Liquid Crystal Display
LED
Light Emitting Diode
DTMF
Dual Tone Multiple Frequency; modern, digital dialling mode.
PIN
Personal Identification Number.
R key
Recall key (see Flash key).
Stand by
"Idle" status of a device without being completely switched off.
Twin
Designation for a device unit with two identical devices e.g. two
handsets.
27
English
8 Abbreviations and technical terms
Troubleshooting
9 Troubleshooting
Problem
No display
Possible cause
Solution
The batteries are not Check that both
charged
batteries have been
inserted correctly
Charge the batteries
No sound
The telephone cable Check the cable
is not connected
connection.
correctly.
The line is engaged Wait until the other
by a different handset handset hangs up
The caller is too quiet.
Adjust the volume
during the call using
the volume key
The handset ring tone
Adjust the ring tone
is too quiet.
volume
A number cannot be The dialling mode is See „5.2 Setting the
dialled.
incorrectly set.
dialling mode“ to set
the correct dialling
mode
The
symbol is
Handset is out of
Move the handset
flashing
range
within range of the
base station.
The base station has Check the mains
no power
adapter and cable.
The handset is not
Register the handset to
registered to the base the base
station
The base station or
The ring tone volume Adjust the ring tone
handset does not ring is off or too low
volume
A call cannot be
The flash time is too Set the device to a long
forwarded to an
short
flash time
extension.
28
Servicing
Possible cause
The telephone does
Operating error
not respond when keys
are pressed
Solution
Remove the batteries
and reinsert them.
Do not modify or repair the device. The device or cable should only be
repaired by a specialist in the service centre. Repairs that are not
carried out properly can cause significant risks to the user.
10 Servicing
10.1 Maintenance
The device is maintenance-free. Occasionally check the condition of
the batteries and replace them with new batteries of the same type if
performance is impaired or if they are beginning to leak.
Warning Danger of chemical burns!
Wear protective gloves to remove flat rechargeable
batteries.
if the device comes into contact with liquid, remove the batteries
immediately and disconnect the device from the power supply (base
station) and dry it out carefully. Check its operation after 2-3 days.
Send it into the service centre if it is defective.
10.2 Cleaning
Warning Risk of electric shock or short circuit from contact with
components that conduct electricity.
Prevent liquids penetrating the device. If this should
occur, unplug the mains adapter from the power
socket and the telephone cable connector from the
wall socket and remove the batteries.
Do the same if the device, cable or mains adapter are
damaged: avoid direct contact with liquids and
disconnect the device from the 230 V mains
immediately.
Clean the telephone with a damp cloth that has been dipped in
lukewarm water or an anti-static cloth. Never use cleaning agents or
abrasives.
29
English
Problem
Technical data
10.3 Decommissioning, storage
To decommission the device temporarily, disconnect the telephone
cable from the wall socket and from the telephone jack on the base
station. Unplug the base station and handset mains adapters from the
230 V sockets.
Remove the batteries from the handsets. If the telephone is
decommissioned for a long time, replace the rechargeable batteries
with new ones of the same type when the phone is recommissioned.
Store the devices and rechargeable batteries in a dry place that is not
too warm.
10.4 Disposal (environmental protection)
The device and rechargeable batteries must not be
disposed of in normal household refuse at the end of their
service life. This is indicated by this symbol on the product
and/or on the packaging. Take the device to a collection
point for recycling electrical and electronic devices. Some
of the materials in the product can be recycled there. You
can help the environment by recycling some parts or raw
materials from used products.
Also dispose of packaging materials in an environmentally friendly
way. Contact your local authority for more information on collection
points in your area.
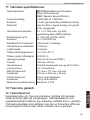
11 Technical data
Standard
Frequency range
Emissions
Range
Handset batteries:
Base station power supply
Handset standby time:
30
DECT (Digital Enhanced Cordless
Telecommunications)
GAP ( Generic Access Profile )
1,880 MHz to 1,900 MHz
10 mW (average output per channel)
Up to 300 m in open terrain - up to 50
m in buildings
2 x 1.2 V, 500mAh AAA type
rechargeable NiMh batteries
Input: 100~240 V AC / 50-60 Hz
Output: 6 V DC/ 500 mA
100 hours in standby mode
Topcom Warranty
10 hours
16 hours
+5 °C to + 45 °C
25 to 85 %
Pulse and tone dialling (DTMF)
100 or 300 ms
50 phone book entries of up to
24 digits and 16 letters
Dimensions Base station / 117 mm x 117 mm x 60 mm /
Handset
182 mm x 284 mm x 58 mm
Weight Base station / 239 g with mains adapter / Handset
152 g with batteries
Maximum power
Base station : 2.0 W
consumption
English
Handset talk time
Charging time:
Permitted operating
temperatures
Permitted relative humidity
Dialling mode
Flash time
Handset number memory
12 Topcom Warranty
12.1 Warranty period
The Topcom units have a 24-month warranty period. The warranty
period starts on the day the new unit is purchased. There is no
warranty on standard or rechargeable batteries (AA/AAA type).
Consumables or defects causing a negligible effect on operation or
value of the equipment are not covered.
The warranty has to be proven by presentation of the original or copy
of the purchase receipt, on which the date of purchase and the unitmodel are indicated.
12.2 Warranty handling
A faulty unit needs to be returned to a Topcom service centre including
a valid purchase note and a filled in service return card.
If the unit develops a fault during the warranty period, Topcom or its
officially appointed service center will repair any defects caused by
material or manufacturing faults free of charge, by either repairing or
exchanging the faulty units or parts of the faulty units. In case of
replacement, colour and model can be different from the original
purchased unit.
31
Topcom Warranty
The initial purchase date shall determine the start of the warranty
period. The warranty period is not extended if the unit is exchanged or
repaired by Topcom or its appointed service centre.
12.3 Warranty exclusions
Damage or defects caused by incorrect treatment or operation and
damage resulting from use of non-original parts or accessories are not
covered by the warranty.
The warranty does not cover damage caused by outside factors, such
as lightning, water and fire, nor any damage caused during
transportation.
No warranty can be claimed if the serial number on the units has been
changed, removed or rendered illegible.
Any warranty claims will be invalid if the unit has been repaired, altered
or modified by the buyer.
This appliance may only be used with rechargeable batteries. If you
want to replace the originally included batteries, please check whether
the batteries you use are suitable and rechargeable. Alkaline batteries
may under NO circumstances be used in the handsets.
If you use Alkaline batteries and place the handset on the basis, the
batteries will heat up and may explode. Any damage which may be
caused cannot be recovered from the manufacturer and the damage
thus caused to the appliance is not covered by the warranty conditions.
Any repairs will be charged to you.
32
Algemene informatie
Deze gebruikershandleiding bevat alle informatie die u nodig hebt voor
de installatie, het instellen en de bediening van uw toestel. Daarnaast
bevat de handleiding informatie en belangrijke opmerkingen voor uw
veiligheid en hulp bij problemen.
Bewaar deze gebruikershandleiding altijd bij het toestel.
Bewaar deze gebruikershandleiding zorgvuldig en geef de handleiding
indien nodig aan de volgende gebruiker.
1.1 Het product: Sologic B921
Dit product is geproduceerd in overeenstemming met de uniforme
digitale standaards voor draadloze telefoons (DECT). DECTtechnologie wordt gekenmerkt door een zeer goede beveiliging tegen
afluisteren en een kwalitatief zeer goede digitale overdracht. Deze
telefoon is bedoeld voor verschillende toepassingen, bijvoorbeeld voor
gebruik in een netwerk met een PBX met basisstations en draadloze
handsets: er kunnen maximaal 4 draadloze handsets via één
basisstation worden bediend en één draadloze handset kan op
maximaal 4 basisstations worden bediend. Er kunnen interne
oproepen tussen het basisstation en een handset of tussen twee
handsets worden gemaakt.
Als de functies nummerweergave en sms van uw
telefoonmaatschappij beschikbaar zijn op uw lijn, kunt u ze op deze
telefoon gebruiken. Als u deze diensten gebruikt, wordt het
telefoonnummer van de beller op de telefoondisplay weergegeven.
Belangrijk U kunt nummerweergave alleen gebruiken als de
functie voor uw telefoonlijn is ingeschakeld. Neem
contact op met uw telefoonmaatschappij voor
informatie over het activeren van deze functie. Als deze functie niet is ingeschakeld, worden de
nummers bij inkomende oproepen NIET op de
telefoondisplay weergegeven.
1.2 Copyright
Dit document is auteursrechtelijk beschermd.
Alle rechten, inclusief het recht op volledige of gedeeltelijke
fotomechanische reproductie, kopiëren en verspreiding via bepaalde
processen (zoals gegevensverwerking, gegevensdragers en
gegevensnetwerken), en wezenlijke en technische wijzigingen zijn
voorbehouden.
33
Nederlands
1 Algemene informatie
Algemene informatie
1.3 Signaalwoorden en -symbolen
Symbool Signaalwoord Betekenis
WaarWaarschuwing voor het risico van
mogelijk ernstig of zelfs dodelijk letsel als
schuwing
u zich niet aan deze informatie houdt.
Voorzichtig
Waarschuwing voor het risico van
mogelijk licht letsel als u zich niet aan
deze informatie houdt.
geen
Voorzichtig
Risico van schade aan materiaal of de
omgeving.
Belangrijk
Dit geeft belangrijke informatie over de
functie.
Info, tip
Algemene informatie of specifieke tips.
1.4 Gebruiksbestemming
Dit product is bedoeld voor het bellen via een vaste lijn binnen een
telefoonnetwerk. Een essentiële voorwaarde voor het juiste gebruik
van de telefoon is installatie door een professional, waarbij rekening
wordt gehouden met de informatie in deze gebruikershandleiding.
Elk andere gebruik wordt als verkeerd beschouwd en is niet toegestaan.
Elke aanpassing of omzetting door de gebruiker die niet in deze
gebruikershandleiding wordt beschreven, wordt als verkeerd
beschouwd en is niet toegestaan. We aanvaarden geen
aansprakelijkheid voor eventuele schade die hieruit kan ontstaan.
1.5 Inhoud van de doos
Controleer of de inhoud van de doos compleet en onbeschadigd is.
Neem meteen contact op met uw dealer als er onderdelen ontbreken
of defect zijn.
Bewaar de verpakking voor het geval u de telefoon moet terugsturen
of voor reparatie moet opsturen.
1 basisstation
1 netstroomadapter voor basisstation
1 telefoonkabel voor basisstation
1 draadloze handset incl. 2 oplaadbare batterijen (AAA, 1,2 V / 500 mAh, NiMH) en een deksel voor het batterijvak
1 gebruikershandleiding
34
Veiligheidsvoorschriften
2 Veiligheidsvoorschriften
De volgende basisvoorschriften moeten altijd in acht genomen worden
tijdens het gebruik van elektrische apparaten.
Lees de volgende veiligheidsvoorschriften en informatie over het juiste
gebruik van het toestel aandachtig door. Stel u op de hoogte van alle
functies van het toestel. Bewaar deze gebruikershandleiding op een
veilige plek bij het toestel en overhandig de handleiding indien nodig
aan een andere gebruiker. Geef de telefoon niet zonder de
gebruikershandleiding aan anderen.
Elektrische risico's:
WaarKans op letsel of de dood door elektrische stroom!
schuwing Koppel het toestel in gevaarlijke situaties meteen
los van de 230 V-voeding.
• Gebruik dit toestel niet als de netadapter, de kabel of het toestel
beschadigd is. Laat het toestel niet vallen omdat het hierdoor
beschadigd kan raken.
• De voltage in het toestel is hoog en gevaarlijk. Open de behuizing
nooit en stop geen voorwerpen in de ventilatieopening.
• Zorg ervoor dat er geen vloeistoffen in het toestel binnendringen.
Als dit gebeurt, haalt u de netstroomadapter uit de aansluiting en
de stekker van de telefoonkabel uit het stopcontact.
• Haal ook de netstroomadapter uit het stopcontact en de stekker
van de telefoonkabel uit de wandcontactdoos als er zich storingen
voordoen tijdens het gebruik van de telefoon en voordat u het
toestel schoonmaakt.
• Raak de contactpunten van de lader en de stekker niet aan met
scherpe of metalen voorwerpen.
• U mag het toestel niet aanpassen of repareren. Het toestel en de
kabel mogen enkel door specialisten van het onderhoudscentrum
gerepareerd worden. Reparaties die niet juist uitgevoerd zijn,
kunnen aanzienlijke gevaren opleveren voor de gebruiker.
35
Nederlands
WaarVerstikkingsgevaar voor kinderen! Houd
schuwing verpakkingsmaterialen buiten het bereik van kinderen.
Belangrijk Gooi het verpakkingsmateriaal op een
milieuvriendelijke manier weg!
Veiligheidsvoorschriften
• Kinderen onderschatten vaak de gevaren van het bedienen van
elektrische toestellen. Laat kinderen niet zonder toezicht in de
buurt van elektrische toestellen.
• Laat kinderen niet met de toestellen of onderdelen ervan spelen.
Voorzichtig Mogelijke schade aan het toestel. Koppel het toestel in gevaarlijke situaties meteen los van de 230 V-voeding.
• Gebruik het toestel niet in vochtige (zoals de badkamer) of erg
stoffige ruimten.
• Toestellen die aangesloten zijn op het elektriciteitsnet, kunnen door
onweer beschadigd raken. Haal daarom altijd de stekker uit het
stopcontact als het onweert.
• Om het toestel volledig van het elektriciteitsnet te ontkoppelen,
moet de stekker uit het stopcontact gehaald worden. Trek hierbij
altijd aan de stekker zelf en nooit aan de kabel.
• Controleer kabels regelmatig op schade, bescherm ze tegen hete
oppervlakken en andere gevaren, wikkel ze volledig af, leg ze
zodanig dat er niemand over kan struikelen en snoer ze niet in.
Brandgevaar:
WaarKans op letsel of de dood door brand!
schuwing Stel het toestel niet bloot aan te hoge temperaturen
en koppel het toestel bij gevaar onmiddellijk los
van de 230 V-netstroom.
De warmte die zich in het toestel opbouwt, kan leiden tot een defect of
brand in het toestel. Stel dit toestel daarom niet bloot aan extreem
hoge temperaturen:
– Vermijd direct zonlicht en hitte.
– Dek de ventilatieopening op het toestel niet af.
Explosiegevaar:
WaarRisico van letsel door explosie!
schuwing Wees vooral zeer voorzichtig met kinderen!
• Gooi de oplaadbare of wegwerpbatterijen nooit in open vuur.
• Gebruik het toestel niet in een omgeving waar de kans op
ontploffing bestaat!
36
Veiligheidsvoorschriften
Vergiftigingsgevaar:
WaarRisico van letsel door vergiftiging!
schuwing Wees vooral zeer voorzichtig met kinderen!
• Houd oplaadbare en wegwerpbatterijen uit de buurt van kinderen.
WaarRisico van letsel door verstikking!
schuwing Wees vooral zeer voorzichtig met kinderen!
• Houd verpakkingsmaterialen buiten het bereik van kinderen.
• Let op mogelijke risico's voor kinderen (risico van verstikking) als u
verlengkabels gebruikt.
Fouten:
WaarMogelijk risico van letsel door fouten in het toestel!
schuwing Wees vooral zeer voorzichtig met medische
apparatuur!
• De werking van medische elektrische apparaten kan worden
beïnvloed door de elektromagnetische straling van uw toestel. Zorg
daarom dat het toestel wordt geïnstalleerd en bediend op
voldoende afstand van medische elektrische apparaten. Hetzelfde geldt voor geïmplanteerde medische apparaten, zoals
pacemakers.
• De draadloze handset kan een vervelend gezoem in
hoorapparaten veroorzaken, dus houd de handset ver genoeg uit
de buurt van hoorapparaten.
Mogelijke schade:
Voorzichtig Mogelijke schade aan het toestel! Lees de
informatie in deze gebruikershandleiding
• Gebruik alleen de meegeleverde netstroomadapter. Gebruik geen
adapters van derden, anders kunnen de oplaadbare batterijen
beschadigd raken.
• Het stopcontact voor de netadapter moet zich in de buurt van het
toestel bevinden en gemakkelijk toegankelijk zijn.
• Gebruik alleen de meegeleverde oplaadbare batterijen. Als de
batterijen moeten worden vervangen, gebruik dan oplaadbare
batterijen van hetzelfde type. Zorg ervoor dat de batterijen op de
37
Nederlands
Gevaar voor verstikking:
De eerste stappen
juiste manier worden geplaatst (zie de informatie op het batterijvak
op het toestel). Gebruik nooit gewone wegwerpbatterijen!
Belangrijk Bij een stroomstoring kunt u alleen met het
basisstation bellen.
2.1 Opmerkingen bij lagestralingswerking
Deze draadloze telefoon (conform de DECT-norm) vergemakkelijkt de
lagestralingswerking (ECO-modus).
Tijdens een gesprek verlaagt de handset het stralingsvermogen al
naargelang de afstand vanaf het basisstation. Als er geen oproep
wordt gemaakt, verlaagt de handset het stralingsvermogen tot het
minimum. Dit betekent niet dat de normale DECT-straling schadelijk is
voor de gezondheid. De lagestralingswerking vermijdt juist onnodige
blootstelling aan straling.
Voor het basisstation wordt het stralingsvermogen niet verlaagd!
Plaats het basisstation op een plaats waar u niet veel tijd doorbrengt,
bijvoorbeeld in de gang. Plaats het basisstation niet in uw slaapkamer,
in de slaapkamer van uw kinderen of in de woonkamer.
3 De eerste stappen
3.1 Deze gebruikershandleiding gebruiken
De volgende methode wordt gebruikt in deze handleiding om de
instructies te verduidelijken:
Tekst ....... „Display".
Tekst die op de display van de telefoon verschijnt
Toets die ingedrukt moet worden
3.2 Het basisstation installeren
Installeer het basisstation als volgt:
1 Sluit de netadapter eerst aan op het basisstation en vervolgens
op een stopcontact.
2 Steek één uiteinde van de telefoonkabel in de wandcontactdoos
van de telefoonaansluiting en het andere uiteinde in de
aansluiting aan de achterkant van het basisstation.
3 De telefoon- en stroomkabels moeten worden aangesloten
zoals aangegeven in figuur 3A.
38
De eerste stappen
B
Nederlands
A
C
- 3A Basisstation A. Wandcontactdoos
telefoonaansluiting
B. Netadapter met kabel
C. Telefoonkabel
3.3 Handset
Voorzichtig Risico van letsel door explosie!
Gebruik alleen de meegeleverde oplaadbare
batterijen of batterijen van hetzelfde type. Gebruik
geen gewone wegwerpbatterijen! Anders kan de
draadloze handset beschadigd raken.
1
2
3
4
Open het batterijvak zoals aangegeven in figuur 3B.
Plaats de oplaadbare batterijen. Zorg ervoor dat de polariteit
juist is (+ en -).
Sluit het batterijvak.
Plaats de handset in de lader en laat hem 16 uur laden. Het
laadlampje zal branden.
B921
- 3B Achterkant van de handset A.Deksel
B.Oplaadbare batterijen
A
+
B
+
39
De eerste stappen
3.4 Indicatie laadniveau batterij
De handset houdt op met werken als de batterijen leeg zijn. Wanneer
de batterijen volledig leeg zijn en u de handset gedurende korte tijd op
het basisstation hebt geplaatst, zal het batterijsymbool aangeven dat
de batterijen volledig opgeladen zijn. Dit is echter niet het geval en de
werking van de batterijen zal snel achteruitgaan. Laat de handset
16 uur in de lader staan, zodat de batterijen volledig worden
opgeladen.
Opgeladen batterijen
Lege batterijen
De handset geeft u een waarschuwingssignaal als de batterijen tijdens
een gesprek bijna leeg zijn. Plaats de handset op de handsetlader om
de batterijen op te laden.
3.5 Toetsen/Display
14
Draadloze handset
1. Nummerherhaling /
omhoog
2. Telefoonboek
3. Geluid uit / wissen
4. Ophangen
5. Alfanumerieke toetsen
6. Toetsvergrendeling
7. Pauze
8. Beltoon AAN/UIT
9. Oproeplijst / omlaag
10.Antwoorden / handsfree /
oproepen
11. INT / Escape
12.Menu / OK / Flash
13.Display
14.Rode led, knippert tijdens een oproep
13
1
12
11
10
2
R
OK
ESC/
INT
3
4
9
5
8
6
7
- 3C Voorkant van de handset -
40
De eerste stappen
Basisstation
17
16
15
- 3D Basisstation -
3.6 Display handset
HANDSET X
x = nummer van handset
Andere nummers of
naar links schuiven in
het menu
Invoeren in het
telefoonboek zoeken of aanmaken
Andere nummers of naar
rechts schuiven in het
menu
Beltoon uit
Handsfreemodus aan
Toetsvergrendeling aan
Nieuw voicemailbericht
Oproep aangemaakt
Microfoon uit
Indicatie laadniveau
batterij
41
Nederlands
15.Paging-toets
16.Handset bezig met opladen
LED
17.Beltoon LED
De eerste stappen
Nieuwe nummers in de oproeplijst
Interne oproep
De antenne geeft de
sterkte van de ontvangst
aan. De antenne knippert
wanneer de handset buiten
bereik is.
3.7 Door het menu bladeren
De Sologic B921 heeft een eenvoudig menusysteem. Elk menu
bestaat uit een aantal opties.
Hieronder wordt een kort overzicht van de menu's op de handset en
het basisstation gegeven.
1 Druk op de Menu/OK-toets om het hoofdmenu te
OK
openen.
2 Blader naar de gewenste menuoptie.
3 Druk op de Menu/OK-toets om meer opties te tonen
OK
of de getoonde instelling te bevestigen.
4 Druk op de Escape-toets om terug te gaan naar het
ESC
vorige menuniveau.
Handset
TELEFOONBOEK
HANDSET
BELTOON
HANDSET
NAAM
TOETSTOON
KIES BASIS
RESET
TAAL
AANMELDEN
(REGISTER)
HANDSET AFM.
3.8 De alfanumerieke toetsen gebruiken
U kunt de alfanumerieke toetsen gebruiken om tekst in te voeren. Druk
op de relevante alfanumerieke toets om een letter te selecteren 5 .
Voorbeeld: wanneer u op de numerieke toets 5 drukt, verschijnt eerst
de letter "j" op de display. Druk herhaaldelijk op de toets om de andere
letters te selecteren.
42
De telefoon bedienen
Nederlands
Druk één keer op toets 2 om de letter "a" te selecteren. Om
achtereenvolgens de letters "a" en "b" in te voeren, drukt u toets 2
eerst één keer in om de letter "a" te selecteren. Wacht vervolgens
2 seconden totdat de cursor naar de volgende positie is gegaan. Druk
nu twee keer op toets 2 om "b" te selecteren. U kunt de wistoets
3
gebruiken om foutief ingevoerde letters te wissen. Hierbij wordt de
letter links van de cursor gewist.
Tabel met tekens
1
2
3
4
5
6
7
8
9
0
Spatie + - / 1
ABC2
DEF3
GHI4
JKL5
MNO6
PQRS7
TUV8
WXYZ9
_0
4 De telefoon bedienen
4.1 De taal wijzigen
OK
1
OK 2
OK 3
OK 4
5
ESC
Druk op de Menu/OK-toets.
Selecteer "HANDSET" (HANDSET) en bevestig.
Selecteer "TAAL" (LANGUAGE) en bevestig.
Selecteer de gewenste taal en bevestig.
Druk op de Escape-toets om terug te keren naar de
stand-bymodus.
4.2 Uitgaande oproepen
Een oproep maken
1 Druk op de oproeptoets.
2 Voer het telefoonnummer in.
4 5 6
G
H
I
J
K
L
M
N
O
43
De telefoon bedienen
3
Druk op de ophangtoets om de oproep te
beëindigen.
Voorbereiding voor oproepen
1 Voer het telefoonnummer in.
4 5 6
U kunt een foutief nummer corrigeren door de
microfoon uit-toets te gebruiken. Het nummer zal verdwijnen wanneer u gedurende
10 seconden niet op een toets hebt gedrukt. De
handset keert dan terug naar de stand-bymodus.
2 Druk op de oproeptoets.
Het telefoonnummer wordt automatisch gekozen.
3 Druk op de ophangtoets om de oproep te
beëindigen.
G
H
I
J
K
L
M
N
O
Het laatst gekozen telefoonnummer opnieuw kiezen
1 Druk op de oproeptoets.
2 Druk op de nummerherhalingstoets.
Het laatste telefoonnummer wordt automatisch
gekozen.
3 Druk op de ophangtoets om de oproep te
beëindigen.
Een van de 3 laatstgekozen telefoonnummers opnieuw
kiezen
1 Druk op de nummerherhalingstoets.
Het laatst gekozen nummer verschijnt op de display.
Als u een van de laatste 3 nummers wilt herhalen,
houd dan de nummerherhalingstoets ingedrukt tot
het nummer dat u zoekt op de display verschijnt.
2 Druk op de oproeptoets.
Het telefoonnummer wordt automatisch gekozen.
3 Druk op de ophangtoets om de oproep te
beëindigen.
44
De telefoon bedienen
4.3 Inkomende oproepen
Wanneer een inkomende oproep wordt ontvangen, klinkt er op de
handset en op het basisstation een beltoon en zal het lampje "Visueel
oproepsignaal" (zie punt 14 in figuur 3C en punt 17 in figuur 3D)
knipperen op de handset en op het basisstation.
2
Druk op de antwoordtoets om de oproep te
accepteren.
Druk op de ophangtoets om de oproep te
beëindigen.
Nederlands
1
4.4 De handsfreemodus inschakelen/uitschakelen
U kunt deze functie gebruiken om een oproep aan te nemen zonder de
handset vast te houden of als u al een gesprek voert op de handset.
Tijdens de oproep:
1 Druk op de handsfreetoets om de functie in te
schakelen.
2 Druk opnieuw op de handsfreetoets om het
gesprek terug te schakelen naar de handset.
Belangrijk De batterijen raken sneller leeg als u de
handsfreemodus langere tijd gebruikt!
4.5 Geluid uit
De microfoon kan tijdens een oproep worden gedempt, zodat u kunt
praten zonder dat de persoon aan de andere kant van de lijn u hoort.
1 Druk op de microfoon uit-toets.
De microfoon staat uit en "MUTE AAN" (MUTED)
verschijnt.
2 Druk nogmaals op de microfoon uit-toets om de
microfoon weer in te schakelen.
4.6 Volume oortelefoon/handsfree instellen
Tijdens een oproep:
1 Druk op de omlaag-toetsen.
2 Druk op de toets omhoog of omlaag om het volume
in te stellen.
45
De telefoon bedienen
U kunt het volumeniveau instellen van 1 tot 5.
4.7 De toets R (Flash)
OK
Druk op de toets Flash op het basisstation (toets 12 in
afbeelding 3E „Draadloze handset“ op pagina 40) om
speciale diensten op uw externe lijn te gebruiken,
zoals 'tweede oproep' (mits uw telefoonmaatschappij
deze dienst levert), of om een oproep door te
schakelen als u een PBX gebruikt. De flashtoets R
onderbreekt uw oproep kort. U kunt deze
onderbrekingstijd instellen op 100 ms of 300 ms. Zie
"5.4 De toets R (Flash)" als u een andere tijd wilt
instellen.
4.8 De beltoon selecteren en het volume instellen
Beltoon van de handset voor interne/externe oproepen
1 Druk op de Menu/OK-toets.
OK
OK 2 Selecteer "HANDSET" (HANDSET) en bevestig.
OK 3 Selecteer "BELTOON" (RING TONE) en bevestig.
4 Selecteer "INTERN" (INTERNAL) of "EXTERN"
(EXTERNAL) en bevestig.
OK
OK 5 Selecteer nu een beltoon (1 tot 9) en bevestig.
Beltoonvolume handset
1 Druk op de Menu/OK-toets.
OK
OK 2 Selecteer "HANDSET" (HANDSET) en bevestig.
OK 3 Selecteer "BELTOON" (RING TONE) en bevestig.
OK 4 Selecteer "VOLUME" (VOLUME) en bevestig.
5 Selecteer het gewenste volume (Off, 1-5) en
bevestig.
OK
Belangrijk U kunt het belvolume van elke individuele handset
aan- of uitschakelen door de beltoon AAN/UIT-toets
ingedrukt te houden
in de stand-bymodus.
Het symbool
verschijnt op de display en de
toetsvergrendeling staat aan.
46
De telefoon bedienen
Als de toetsvergrendeling is ingeschakeld, zal er niets gebeuren bij het
indrukken van een willekeurige toets in de stand-bymodus (behalve bij
het indrukken van de toetsvergrendelingstoets).
1 Houd de toetsvergrendelingstoets ingedrukt.
Het symbool verschijnt op de display.
2 Druk de toetsvergrendelingstoets opnieuw in om de
toetsvergrendeling uit te schakelen.
Als de toetsvergrendeling is ingeschakeld, kunt u
inkomende oproepen nog steeds beantwoorden door op
de antwoordtoets te drukken. Het toetsenbord functioneert
normaal tijdens het gesprek. De toetsvergrendeling wordt
na het gesprek weer ingeschakeld.
4.10 Naam van de handset
U kunt de naam die op de display wordt aangegeven veranderen (max. 12 tekens), mits er geen gesprek wordt gevoerd.
1 Druk op de Menu/OK-toets.
OK
OK 2 Selecteer "HANDSET" (HANDSET) en bevestig.
3 Selecteer "HANDSET NAAM" (HANDSET NAME)
en bevestig.
OK
4 5 6 4 Verwijder de vorige naam met de toets voor
microfoon uit en voer een nieuwe naam in.
5 Druk op de toets om te bevestigen.
OK
6 Druk op de Escape-toets om terug te keren naar de
ESC
stand-bymodus.
G
H
I
J
K
L
M
N
O
4.11 Toetstoon in-/uitschakelen
1
OK
OK 2
3
OK
4
OK
5
ESC
6
Druk op de Menu/OK-toets.
Selecteer "HANDSET" (HANDSET) en bevestig.
Kies "TOETSTOON" (KEYPAD BEEP) en
bevestig.
Kies nu "AAN" (ON) of "UIT" (OFF).
Druk op de toets om te bevestigen.
Druk op de Escape-toets om terug te keren naar de
stand-bymodus.
47
Nederlands
4.9 Toetsvergrendeling
De telefoon bedienen
4.12 Telefoonboek
U kunt 50 invoeren opslaan in het telefoonboek. Namen kunnen
maximaal 16 tekens bevatten en telefoonnummers kunnen maximaal
24 cijfers bevatten.
Een invoer in het telefoonboek toevoegen
1 Druk op de telefoonboektoets.
OK 2 Druk twee keer op de OK-toets.
OK
4 5 6 OK 3 Voer de naam in en bevestig.
4 5 6 OK 4 Voer het relevante telefoonnummer in en bevestig.
Er klinkt nu een bevestigingstoon.
G
H
I
J
K
L
M
N
O
G
H
I
J
K
L
M
N
O
Een verkort kiesnummer kiezen
1 Druk op de telefoonboektoets.
2 Blader naar de gewenste naam of voer de
beginletters van de naam in.
4 5 6
3 Druk op telefoonboektoets om het telefoonnummer
weer te geven.
4 Druk nu op de oproeptoets.
Het telefoonnummer wordt automatisch gekozen.
5 Druk op de ophangtoets om de oproep te
beëindigen.
G
H
I
J
K
L
M
N
O
Een invoer in het telefoonboek bewerken
1 Druk op de telefoonboektoets.
2 Blader naar de gewenste naam of voer de
beginletters van de naam in.
4 5 6
3 Druk op telefoonboektoets om het telefoonnummer
weer te geven.
4 Druk op de Menu/OK-toets.
OK
OK 5 Selecteer "BEWERK" (EDIT ENTRY) en bevestig.
4 5 6 OK 6 Voer de naam in en bevestig.
4 5 6 OK 7 Voer het telefoonnummer in of bewerk het nummer
en bevestig.
G
H
I
G
H
I
J
K
L
M
N
O
G
H
I
J
K
L
M
N
O
J
K
L
M
N
O
Eén of alle invoeren in het telefoonboek wissen
1 Druk op de telefoonboektoets.
48
2
4 5 6
G
H
I
J
K
L
M
N
O
3
4
OK
5
OK
6
OK
ESC 7
Blader naar de gewenste naam of voer de
beginletters van de naam in.
Druk op telefoonboektoets om het telefoonnummer
weer te geven.
Druk op de Menu/OK-toets.
Kies "WIS" (DELETE ENTRY) om de huidige
invoer in het telefoonboek te wissen en bevestig.
OF
Kies "WIS ALLES" (DELETE ALL) om alle invoeren
in het telefoonboek te wissen en bevestig.
Bevestig opnieuw of druk op Esc om dit over te slaan.
4.13 Nummerweergave (CLIP)
De Sologic B921 geeft het telefoonnummer van inkomende oproepen
weer. Deze functie kan alleen worden gebruikt als u zich voor deze
dienst hebt aangemeld bij uw telefoonmaatschappij. Neem contact op
met uw telefoonmaatschappij voor meer informatie.
Als u een oproep ontvangt, wordt het telefoonnummer opgeslagen in
de oproeplijst. Deze lijst kan maximaal 30 telefoonnummers bevatten
(elk met maximaal 23 cijfers).
Als het telefoonnummer uit meer dan 12 cijfers
bestaat, kunt u in de display naar rechts schuiven
om de andere cijfers te zien.
Nieuwe oproepen
Als er een nieuwe oproep in de oproeplijst is
ontvangen, knippert het CLIP-symbool op de
display.
De oproeplijst openen
1 Druk op de oproeplijsttoets.
De laatst ontvangen oproep wordt weergegeven.
Wanneer de oproeplijst leeg is, verschijnt het woord
"LEEG" (EMPTY) op de display.
2 Druk op de telefoonboektoets om het nummer over te slaan.
49
Nederlands
De telefoon bedienen
De telefoon bedienen
3
4
ESC
5
Druk op de telefoonboektoets om de datum en de tijd over te slaan.
Gebruik de omhoog- en omlaag-toetsen om door de lijst te bladeren.
Druk op de Escape-toets om de oproeplijst te verlaten.
Een nummer uit de oproeplijst bellen
1 Druk op de oproeplijsttoets.
2 Blader door de oproeplijst totdat het gewenste
telefoonnummer verschijnt.
3 Druk op de oproeptoets om de oproep te starten.
Het telefoonnummer wordt automatisch gekozen.
4 Druk op de ophangtoets om de oproep te
beëindigen.
Een nummer uit de oproeplijst wissen
1 Druk op de oproeplijsttoets.
2 Blader door de oproeplijst totdat het gewenste
telefoonnummer verschijnt.
3 Druk op de Menu/OK-toets.
OK
4 Selecteer "WIS" (DELETE) om het getoonde
telefoonboeknummer te wissen en bevestig.
OK
OF
5 Selecteer "WIS ALLES" (DELETE ALL) om alle
invoeren in het telefoonboek te wissen en bevestig.
OK
ESC 6 Druk op om te bevestigen of druk op de OK
Escape-toets om terug te keren.
Een naam in de oproeplijst als een verkort kiesnummer
opslaan
1 Druk op de oproeplijsttoets.
2 Blader door de oproeplijst totdat het gewenste
telefoonnummer verschijnt.
3 Druk op de Menu/OK-toets.
OK
OK 4 Kies "SLA NR OP" (SAVE TO PB) en bevestig.
50
Instellingen basisstation
4 5 6
OK 5 Bewerk of voeg een naam toe en bevestig daarna.
4 5 6
OK 6 Bewerk het telefoonnummer en bevestig.
G
H
I
G
H
I
J
K
L
J
K
L
M
N
O
M
N
O
Alle wijzigingen worden dan ongedaan gemaakt en alle
standaardwaarden worden hersteld (volume beltoon, beltoon enz.).
De oproeplijst, de nummerherhalingslijst en het telefoonboek worden
ook verwijderd!
OK
1
OK 2
OK OK 3
4 5 6
G
H
I
J
K
L
M
N
O
4
5
Druk op de Menu/OK-toets.
Kies "HANDSET" en bevestig.
Kies "RESET" en bevestig.
Voer de pincode van het basisstation in
(standaardinstelling 0000).
Het toestel keert terug naar de stand-bymodus.
De standaardinstellingen zijn:
Naam van de handset
HANDSET
Volume oortelefoon
Niveau 3
Beltoonvolume
Niveau 3
Externe beltoon
Beltoon 8
Interne beltoon
Beltoon 1
Toetstoon
Aan
4.15 Display voicemail
Deze display werkt alleen als de voicemail of berichtenservice is
ingeschakeld en uw telefoonmaatschappij deze informatie samen met de
nummerweergave verstuurt! Als u een nieuw bericht in uw voicemailbox
ontvangt, wordt het symbool
op de display weergegeven. Het
symbool
verdwijnt als u het bericht hebt beluisterd.
5 Instellingen basisstation
Info
Dit gedeelte beschrijft alleen de instellingen
opgeslagen in het basisstation!
51
Nederlands
4.14 De handset weer op de standaardinstellingen zetten.
Instellingen basisstation
5.1 De beltoon selecteren en het volume instellen
Handset beltoon voor interne/externe oproepen
1
OK
OK 2
OK 3
OK 4
Druk op de Menu/OK-toets..
Selecteer "BASIS" (BASE) en bevestig.
Selecteer "BELTOON" (RING TONE) en bevestig.
Selecteer nu een beltoon (1 tot 9) en bevestig.
Basisstation beltoonvolume
1
OK
OK 2
OK 3
4
OK
Druk op de Menu/OK-toets..
Selecteer "BASIS" (BASE) en bevestig.
Kies "VOLUME" (RING VOLUME) en bevestig.
Selecteer het gewenste volume (Off, 1-5) en
bevestig.
5.2 De kiesmodus instellen
Er zijn twee belmodi voor telefoonverbindingen:
- DTMF / toonkiezen (meest gebruikt)
- Kiesmodus puls (alleen nodig als dit toestel met een oudere PBX
werkt!)
1
OK
OK 2
OK 3
4
OK
Druk op de Menu/OK-toets..
Kies "BASIS" (BASE) en bevestig.
Kies "KIESMODE" (DIAL MODE) en bevestig.
Kies "TONEN" (TONE) of "PULS" (PULSE) en
bevestig.
5.3 De pincode voor het systeem instellen
Bepaalde functies zijn alleen beschikbaar als u de pincode van het
basisstation kent.
De pincode is 4 tekens lang. De standaardpincode is "0000". U kunt de
pincode als volgt wijzigen en uw eigen pincode instellen:
1 Druk op de Menu/OK-toets..
OK
OK 2 Kies "BASIS" (BASE) en bevestig.
3 Kies "SYSTEEM PIN" (SYSTEM PIN) en bevestig.
4 Voer de "OUDE-" pincode (OLD PIN) in en druk op
4 5 6
OK.
OK
G
H
I
52
J
K
L
M
N
O
Een handset aanmelden en afmelden
5
4 5 6
G
H
I
J
K
L
M
N
O
OK
Voer de "NIEUWE-" pincode (NEW PIN) in en
bevestig.
Druk op de toets Flash om speciale diensten op uw externe lijn te
gebruiken, zoals 'tweede oproep' (mits uw telefoonmaatschappij deze
dienst levert), of om een oproep door te schakelen als u een PBX
gebruikt. De flashtoets R onderbreekt uw oproep kort. U kunt deze
onderbrekingstijd instellen op 100 ms of 300 ms. Maar als uw systeem
een langere flashtijd nodig heeft, kunt u dit aanpassen.
1 Druk op de Menu/OK-toets..
OK
OK 2 Kies "BASIS" (BASE) en bevestig.
OK 3 Kies "RECALL" (RECALL) en bevestig.
4 Kies nu "LANG" (LONG) of "KORT" (SHORT) en
bevestig.
OK
6 Een handset aanmelden en afmelden
6.1 Een handset aanmelden op het Sologic B921
basisstation
U kunt 4 handsets bij één basisstation aanmelden. Elke handset is bij
levering al bij het basisstation aangemeld.
U hoeft alleen de handset aan te melden als:
• de handset eerder is afgemeld bij het basisstation (bijvoorbeeld om
het basisstation opnieuw op te starten);
• u een andere handset bij het basisstation wilt aanmelden.
De volgende beschrijving is alleen van toepassing op Sologic B921
handsets en basisstations.
1
OK
2
3
4 5 6
G
H
I
J
K
L
M
N
O
4
5
Houd de paging-toets op het basisstation
10 seconden ingedrukt.
Druk op de toets Menu/OK op de handset.
Kies "AANMELDEN" (REGISTER) en bevestig.
Voer het nummer van het basisstation (1-4) in
waarbij u de handset wilt aanmelden.
Het toestel zal het basisstation gaan zoeken.
Wanneer het basisstation is gevonden, vraagt de
handset naar de (viercijferige) pincode.
53
Nederlands
5.4 De toets R (Flash)
Een handset aanmelden en afmelden
4 5 6
G
H
I
J
K
L
M
N
O
Voer de pincode van het basisstation in
(standaardinstelling 0000). Als de pincode verkeerd
is, zoekt de handset opnieuw naar het basisstation.
Als de handset is aangemeld, worden de naam en
het nummer op de display weergegeven.
6
6.2 Een handset afmelden bij het Sologic B921basisstation
OK
4 5 6
G
H
I
J
K
L
M
N
O
4 5 6
G
H
I
J
K
L
M
N
O
Druk op de Menu/OK-toets.
OK 2 Kies "HS VERWIJD" (DE-REGISTER) en bevestig.
3 Voer de pincode van het basisstation in
(standaardinstelling 0000).
OK
4 Voer het interne nummer in van de handset die u wilt
afmelden (1-4) en bevestig.
OK
Als de handset is afgemeld, gaat de handset naar de stand-bymodus. Als dat niet het geval is, wordt u gevraagd het handsetnummer nog een keer in te voeren.
1
Belangrijk Handsets kunnen alleen worden afgemeld als ze
niet in gebruik zijn.
6.3 Een basisstation selecteren
Als uw handset bij meerdere basisstations (max. 4) is aangemeld,
moet u een van deze basisstations selecteren, omdat de handset met
slechts één basisstation tegelijkertijd communiceert. Dit kan op twee
manieren:
Auto select
Als u de handset op 'Auto Select' instelt, zoekt de handset
automatisch naar het dichtstbijzijnde basisstation in standbymodus.
1 Druk op de Menu/OK-toets.
OK
OK 2 Kies "HANDSET" en bevestig.
OK 3 Kies "KIES BASIS" (SELECT BASE) en bevestig.
OK 4 Kies "AUTO" en bevestig.
54
Een oproep doorschakelen en interne oproepen tussen twee handsets
Als het basisstation automatisch moet worden
geselecteerd en de handset buiten bereik van het
huidige basisstation komt, dan zoekt de handset
alleen naar het sterkste basisstation in de standbymodus (niet tijdens een gesprek).
Manual Select (handmatig selecteren)
Als u de handset op 'Manual Select' (handmatige selectie) instelt,
dan zoekt de handset alleen naar het basisstation dat u hebt
ingesteld.
1 Druk op de Menu/OK-toets.
OK
OK 2 Kies "HANDSET" en bevestig.
OK 3 Kies "KIES BASIS" (SELECT BASE) en bevestig.
OK 4 Kies "MANUEEL" (MANUAL) en bevestig.
OK 5 Kies het basisstation en bevestig.
Belangrijk De handset moet bij een basisstation zijn
aangemeld, anders kunnen ze niet met elkaar communiceren.
7 Een oproep doorschakelen en interne oproepen
tussen twee handsets
7.1 Oproepdoorschakeling en conferentiegesprekken
tijdens een externe oproep
4 5 6
G
H
I
INT
INT
Druk tijdens een externe oproep op de INT-toets en
vervolgens op het nummer van de handset (1-4).
Op de andere handset klinkt een beltoon.
Als de oproep met de andere handset tot stand is
gebracht, kunt u intern met elkaar praten. Als u
ophangt, zal de externe oproep worden
doorgeschakeld naar de andere handset.
2 Houd de INT-toets 3 seconden ingedrukt. Nu kunt
u gelijktijdig praten met de tweede handset en de
externe oproep (conferentiegesprek).
3 Druk opnieuw op de INT-toets om terug te keren
naar het externe gesprek.
1
INT
J
K
L
M
N
O
55
Nederlands
Info
Afkortingen en technische begrippen
4
Druk op de ophangtoets om de oproep te
beëindigen.
8 Afkortingen en technische begrippen
CLIP
Calling Line Identification Presentation, weergave van het
telefoonnummer van de beller op de display van de gebelde persoon.
DECT
Digital Enhanced Cordless Telecommunication; Europese norm voor
telecommunicatie voor digitale draadloze telefoons.
ECO-modus
Economic Mode; in DECT-telefonie is dit de lagestralingswerking.
Toets Flash
Hiermee wordt een korte onderbreking van de lijn voor geactiveerde
functies, zoals wisselgesprek of doorschakelen, uitgevoerd. Bij PBX's
wordt de toets Flash of R voor interne oproepen gebruikt.
GAP
Generic Access Profile; interface tussen het basisstation en de
handset, die de draadloze verbinding vergemakkelijkt.
INT
Internal subscriber. Een andere handset of extra toestellen binnen een
PBX.
Pulsmodus
Verouderde analoge kiesmodus.
LCD
Liquid Crystal Display
LED
Light Emitting Diode
DTMF
Dual Tone Multiple Frequency; moderne, digitale kiesmodus.
PIN
Persoonlijk identificatienummer.
Toets R
Toets voor nummerherhaling (zie toets Flash).
Stand-by
Ruststand van een toestel waarbij het niet volledig is uitgeschakeld.
56
Probleemoplossing
Twin
Aanduiding voor een toesteleenheid met twee identieke apparaten,
bijvoorbeeld twee handsets.
Probleem
Mogelijke oorzaak
Oplossing
Geen weergave
De batterijen zijn niet
opgeladen
Controleer of de twee
batterijen op de juiste
manier zijn geplaatst
Batterijen opladen
Geen geluid
De telefoonkabel is niet Controleer de
goed aangesloten.
aansluiting van de kabel
De lijn wordt gebruikt Wacht totdat de
door een andere
andere handset het
handset
gesprek heeft
beëindigd
Pas het volume aan
De beller praat te zacht
tijdens het gesprek
door de volumetoets
te gebruiken
De beltoon van de
Pas het
handset is te zacht
beltoonvolume aan
Er kan geen nummer De kiesmodus is
Zie "5.2 De kiesmodus
worden gekozen
verkeerd ingesteld
instellen" om de juiste
kiesmodus in te stellen
Het -symbool
knippert
Handset is buiten
bereik
Het basisstation heeft
geen stroom
De handset is niet
aangemeld bij het
basisstation
Plaats de handset
binnen het bereik van
het basisstation
Controleer de
netstroomadapter en
de kabel
Meld de handset aan
bij het basisstation
57
Nederlands
9 Probleemoplossing
Service
Probleem
Mogelijke oorzaak
Oplossing
Het basisstation of
de handset rinkelt
niet
Een oproep kan niet
wordendoorgeschak
eld naar een
andertoestel
De telefoon reageert
niet als er toetsen
worden ingedrukt
Het beltoonvolume
staat uit of is te laag
Pas het
beltoonvolume aan
De flashtijd is te kort
Stel een langere
flashtijd voor het
toestel in
Bedieningsfout
Verwijder de batterijen
en plaats ze opnieuw
in het toestel
U mag het toestel niet aanpassen of repareren. Het toestel en de kabel
mogen enkel door specialisten van het onderhoudscentrum
gerepareerd worden. Reparaties die niet juist uitgevoerd zijn, kunnen
aanzienlijke gevaren opleveren voor de gebruiker.
10 Service
10.1 Onderhoud
Het toestel is onderhoudsvrij. Controleer regelmatig de toestand van
de batterijen en vervang ze door nieuwe batterijen van hetzelfde type
als de werking van het toestel vermindert of als de batterijen beginnen
te lekken.
WaarGevaar van chemische brandwonden!
schuwing Draag veiligheidshandschoenen om lege,
oplaadbare batterijen te verwijderen.
Als het toestel in contact komt met vloeistof, verwijder de batterijen dan
onmiddellijk en koppel het toestel los van de voeding (basisstation) en
droog het zorgvuldig. Controleer de werking na 2-3 dagen. Stuur het
naar het servicecentrum als het defect is.
58
Service
WaarRisico van elektrische schok of kortsluiting door
schuwing aanraking van onderdelen die elektriciteit geleiden.
Zorg ervoor dat er geen vloeistoffen in het toestel
binnendringen. Als dit gebeurt, haalt u de
netstroomadapter uit het stopcontact en de stekker
van de telefoonkabel uit de wandcontactdoos en
verwijdert u de batterijen.
Doe hetzelfde als het toestel, de kabel of de
netstroomadapter is beschadigd: vermijd direct
contact met vloeistoffen en koppel het toestel
onmiddellijk los van de 230 V-netstroom.
Reinig de telefoon met een doek die met lauw water is bevochtigd of
een antistatische doek. Gebruik nooit reinigingsmiddelen of
schuurmiddelen.
10.3 Buiten gebruik stellen, opslag
Als u het toestel tijdelijk buiten gebruik wilt nemen, haalt u de
telefoonkabel uit de wandcontactdoos en uit de telefoonaansluiting op
het basisstation. Haal de stroomadapters van het basisstation en de
handset uit de 230 V-contacten.
Verwijder de batterijen uit de handsets. Als de telefoon langere tijd
buiten gebruik is geweest, moet u de oplaadbare batterijen vervangen
door nieuwe batterijen van hetzelfde type als de telefoon weer in
gebruik wordt genomen.
Berg de toestellen en de oplaadbare batterijen op een droge, niet te
warme plek op.
10.4 Afvoeren (milieubescherming)
Als u het toestel en de oplaadbare batterijen weggooit, mag
u ze niet met het normale huishoudelijke afval meegeven.
Dit wordt aangegeven door dit symbool op het product en/
of de verpakking. Breng het toestel naar een inzamelpunt
voor recyclage van elektrische en elektronische
apparatuur. Sommige materialen in het product kunnen
daar worden gerecycled. U draagt bij aan de bescherming
van het milieu door onderdelen of grondstoffen van gebruikte
producten te hergebruiken.
59
Nederlands
10.2 Reiniging
Technische gegevens
Gooi ook verpakkingsmaterialen op een milieuvriendelijke manier
weg.
Wend u tot uw plaatselijke overheid voor meer informatie over de
inzamelpunten in uw buurt.
11 Technische gegevens
Standaard
Frequentiebereik
Emissies
Bereik
Batterijen van handset:
Netspanning basisstation
Stand-bytijd handset:
Gesprekstijd van handset
Laadtijd:
Toegestane temperaturen
tijdens gebruik
Toegestane relatieve
vochtigheid
Kiesmodus
Flashtijd
Nummergeheugen van de
handset
Afmetingen basisstation/
Handset
Gewicht basisstation/
Handset
Maximaal stroomverbruik
60
DECT(Digital Enhanced Cordless
Telecommunications)
GAP (Generic Access Profile)
1880 MHz tot 1900 MHz
10 mW (gemiddeld vermogen per kanaal)
Tot 300 m op open terrein - tot 50 m in
gebouwen
2 x oplaadbare NiMh-batterijen van het type
AAA, 1,2 V, 500 mAh
Ingang: 100~240 V AC / 50-60 Hz
Vermogen: 6 V DC / 500 mA
100 uur in stand-bymodus
10 uur
16 uur
+5 °C tot + 45 °C
25 tot 85 %
Pulskiezen en toonkiezen (DTMF)
100 of 300 ms
50 telefoonboekinvoeren van maximaal
24 cijfers en 16 letters
117 mm x 117 mm x 60 mm /
182 mm x 284 mm x 58 mm
239 g met netstroomadapter /
152 g met batterijen
Basisstation: 2,0 W
Garantie
12 Garantie
Op de Topcom-toestellen wordt een garantie van 24 maanden
verleend. De garantieperiode gaat in op de dag waarop het nieuwe
toestel wordt gekocht. Er is geen garantie op standaard- of oplaadbare
batterijen (type AA/AAA).
Kleine onderdelen of defecten die een verwaarloosbaar effect hebben
op de werking of waarde van het toestel worden niet gedekt door de
garantie.
De garantie moet worden aangetoond door overlegging van het
originele aankoopbewijs of een kopie waarop de aankoopdatum en het
toesteltype staan vermeld.
12.2 Afwikkeling van garantieclaims
Een defect toestel moet, samen met een geldig aankoopbewijs en een
ingevulde serviceretourkaart, worden teruggestuurd naar een
Topcom-servicedienst.
Als het toestel tijdens de garantieperiode een defect vertoont, zal
Topcom of een door Topcom geautoriseerde servicedienst eventuele
defecten die te wijten zijn aan materiaal- of productiefouten gratis
repareren door het defecte toestel of onderdelen ervan te repareren of
te vervangen. Wanneer het toestel wordt vervangen, kunnen de kleur
en het model afwijken van het oorspronkelijk gekochte toestel.
De oorspronkelijke aankoopdatum is bepalend voor het begin van de
garantieperiode. De garantieperiode wordt niet verlengd als het toestel
wordt vervangen of gerepareerd door Topcom of een door Topcom
geautoriseerde servicedienst.
12.3 Garantiebeperkingen
Schade of defecten die te wijten zijn aan onjuist gebruik of bediening
en schade die te wijten is aan het gebruik van niet-originele
onderdelen of accessoires worden niet gedekt door de garantie.
De garantie dekt geen schade die te wijten is aan externe factoren,
zoals bliksem, water en brand, noch enige transportschade.
61
Nederlands
12.1 Garantieperiode
Garantie
Er kan geen aanspraak worden gemaakt op de garantie als het
serienummer op het toestel gewijzigd, verwijderd of onleesbaar
gemaakt is.
Garantieclaims zijn ongeldig wanneer het toestel door de koper werd
gerepareerd, gewijzigd of aangepast.
Dit apparaat mag alleen worden gebruikt met oplaadbare batterijen.
Als u de oorspronkelijk bijgeleverde batterijen wilt vervangen, let dan
goed op of de batterijen die u gaat gebruiken geschikt zijn en
oplaadbaar zijn. Gebruik in GEEN geval alkalinebatterijen in de
handsets.
Als u alkalinebatterijen gebruikt en de handset op het basisstation
plaatst, worden deze batterijen opgewarmd en kunnen ze exploderen.
Mogelijke schade die zo wordt veroorzaakt kan niet worden geclaimd
bij de fabrikant. De hierdoor veroorzaakte schade aan het apparaat
valt niet onder de garantievoorwaarden. Eventuele reparaties worden
in dat geval aan u in rekening gebracht.
, let dan goed op of de nieuwe batterijen geschikt en oplaadbaar zijn.
Gebruik in GEEN geval alkalinebatterijen in de handsets.
Als u alkalinebatterijen gebruikt en de handset in de lader plaatst,
worden deze batterijen opgewarmd en kunnen ze exploderen.
Mogelijke schade die hierdoor ontstaat, wordt niet gecompenseerd
door de fabrikant en een toestel dat op die manier beschadigd is
geraakt, wordt niet door de garantie gedekt. Alle reparaties worden in
dat geval aan u in rekening gebracht.
62
Généralités
1 Généralités
Ce mode d'emploi contient toutes les informations importantes sur
l'installation, la configuration et l'utilisation de votre appareil. En outre,
vous y trouverez des renseignements sur les consignes importantes
en matière de sécurité ainsi qu'une aide au dépannage.
Conservez toujours le mode d'emploi à proximité de l'appareil.
Conservez précieusement ce mode d'emploi et transmettez-le le cas
échéant aux autres utilisateurs.
Ce produit a été fabriqué conformément à la norme harmonisée
relative aux téléphones numériques sans fil (DECT). La technologie
DECT se caractérise par une sécurité élevée contre l'écoute ainsi
qu'une transmission numérique de haute qualité. Ce téléphone est
prévu pour différents domaines d'application, par exemple pour un
réseau de bases et de combinés formant un système téléphonique
complet : vous pouvez ainsi utiliser jusqu'à 4 combinés sur une même
base et un combiné sur 4 bases au maximum. Vous pouvez avoir des
conversations internes entre une base et un combiné ou bien entre 2
combinés.
Si votre ligne le permet, ce téléphone est compatible avec l'affichage
des numéros et les services SMS de votre opérateur. Si vous utilisez
ces services, le numéro de téléphone de l'appelant s'affiche sur l'écran
du téléphone.
Important Pour utiliser la fonction « Affichage du numéro de
l'appelant », celle-ci doit être activée sur votre ligne
téléphonique. Pour de plus amples informations sur
l'activation de cette fonction, contactez votre
opérateur. Si cette fonction n'est pas activée, les
numéros des appels entrants n'apparaîtront PAS sur
l'écran de votre téléphone.
1.2 Notes de droits d'auteur
Ce document est protégé par les droits d'auteur.
Tous droits, y compris la transmission photomécanique, la
reproduction et la diffusion par des procédés particuliers (par exemple
traitement de données, supports de données et réseaux de données),
même partielles, ainsi que les modifications techniques et de contenu,
réservés.
63
Français
1.1 Produit : Sologic B921
Généralités
1.3 Indications et symboles
Symbole Indication
Avertissement
Attention
Signification
Risque de blessure grave ou mortelle en cas
de non-respect de la consigne.
aucun
Risque de dégâts matériels ou
environnementaux.
Conseil important pour le bon fonctionnement
de l'appareil.
Informations générales ou conseils
spécifiques.
Attention
Important
Info,
conseil
Risque de blessure bénigne en cas de nonrespect de la consigne.
1.4 Utilisation conforme à l'usage prévu
Ce produit sert à téléphoner à partir d'une ligne téléphonique
raccordée à un réseau téléphonique. Pour garantir l'utilisation de cet
appareil à l'usage prévu, il doit être installé conformément aux
instructions fournies dans ce mode d'emploi.
Toute autre utilisation est considérée comme non conforme à la
destination et donc interdite.
Il est interdit de procéder à des modifications ou des transformations
arbitraires non décrites dans le présent mode d'emploi. Nous
déclinons toute responsabilité en cas de dommages résultant de tels
agissements.
1.5 Pièces fournies
Vérifiez que toutes les pièces nécessaires ont été livrées et sont en
bon état. Si vous constatez l'absence ou la défectuosité de certains
éléments, veuillez contacter immédiatement votre revendeur.
Conservez l'emballage pour le cas où vous devriez renvoyer ou faire
réparer votre appareil.
1 base
1 adaptateur secteur pour la base
1 câble téléphonique pour la base
1 combiné, 2 piles rechargeables (type AAA, 1,2 V/500 mAh, NiMH)
incluses et un couvercle pour le compartiment à piles
1 mode d'emploi
64
Consignes de sécurité
AvertRisque d'étouffement pour les enfants ! Conservez
issement les feuilles d'emballage hors de portée des enfants.
Important Jetez l'emballage de manière respectueuse de
l'environnement.
Veillez à toujours respecter les consignes de sécurité suivantes lors de
l'utilisation d'appareils électriques.
Veuillez lire attentivement les recommandations et indications
suivantes relatives à l'utilisation correcte de l'appareil. Familiarisezvous avec toutes les fonctions du produit. Veillez à conserver le mode
d'emploi à proximité de l'appareil et faites-le lire aux autres utilisateurs
si nécessaire. Ne donnez votre téléphone à des tiers qu'accompagné
de son mode d'emploi.
Sécurité électrique :
AvertDanger de blessure ou de mort lié au courant
issement électrique ! En cas de danger, débranchez
immédiatement l'appareil de l'alimentation 230 V.
• N'utilisez pas l'appareil si la prise d'alimentation, le câble ou
l'appareil lui-même sont endommagés. Évitez de laisser tomber
l'appareil car cela pourrait l'endommager.
• Des tensions dangereuses sont présentes dans l'appareil.
N'ouvrez jamais l'appareil et n'introduisez jamais d'objets dans les
fentes de ventilation.
• Ne laissez pas pénétrer de liquide dans l'appareil. Si cela se
produit, retirez immédiatement l'adaptateur de la prise et
débranchez la fiche du câble téléphonique de la prise murale.
• De même, débranchez l'alimentation et la fiche du téléphone si un
problème apparaît lors de l'utilisation de l'appareil et avant de le
nettoyer.
• Ne touchez pas les contacts de charge ou de la fiche avec des
objets pointus ou métalliques.
• Ne procédez à aucune modification ou réparation de votre appareil
vous-même. Pour toute réparation de l'appareil ou du câble,
adressez-vous à un professionnel du service après-vente. Des
réparations inappropriées peuvent entraîner des dangers
considérables pour l'utilisateur.
65
Français
2 Consignes de sécurité
Consignes de sécurité
• Les enfants sous-estiment souvent les dangers associés aux
appareils électriques. Ne laissez jamais des enfants sans
surveillance à proximité d'un appareil électrique.
• Ne laissez pas les enfants jouer avec l'appareil ou ses pièces.
Attention Possibilité de dégâts sur l'appareil. En cas de
danger, débranchez immédiatement l'appareil de
l'alimentation 230 V.
• N'utilisez pas l'appareil dans une pièce humide (p. ex. salle de
bains) ou très poussiéreuse.
• En cas d'orage, les appareils branchés sur le secteur peuvent être
endommagés. Par conséquent, débranchez toujours l'adaptateur
de la prise lors d'un orage.
• Pour déconnecter complètement l'appareil de l'alimentation,
débranchez l'adaptateur de la prise murale. Pour ce faire, tirez
toujours sur la fiche et jamais sur le câble.
• Vérifiez régulièrement que le câble n'est pas endommagé,
protégez-le des surfaces chaudes ou d'autres sources de danger,
déroulez-le complètement sans le bloquer ni le coincer.
Risque d'incendie :
AvertDanger de blessure ou de mort en cas d'incendie !
issement N'exposez pas l'appareil à une chaleur excessive.
En cas de danger, débranchez immédiatement
l'appareil de l'alimentation 230 V.
La chaleur accumulée à l'intérieur de l'appareil peut entraîner une
défaillance de l'appareil ou y mettre le feu. Par conséquent, n'exposez
pas l'appareil à des températures extrêmes :
– évitez l'exposition directe au soleil ou à la chaleur d'un
radiateur,
– n'obstruez pas les fentes de ventilation de l'appareil.
Risque d'explosion :
AvertDanger de blessure en cas d'explosion !
issement Surveillez particulièrement les enfants !
• Ne jetez pas les batteries ou les piles au feu.
• N'utilisez pas l'appareil dans un environnement où il existe un
risque d'explosion.
66
Consignes de sécurité
Risque d'empoisonnement :
AvertDanger de blessure par empoisonnement !
issement Surveillez particulièrement les enfants !
• Conservez les batteries ou les piles hors de portée des enfants.
Risque d'étouffement :
AvertDanger de blessure par étouffement !
issement Surveillez particulièrement les enfants !
• Conservez les feuilles d'emballage hors de portée des enfants.
• Disposez les câbles de manière à ce qu'ils ne présentent aucun
danger (risque d'étranglement) pour les enfants.
Français
Dysfonctionnements :
AvertDanger éventuel de blessure en cas de
issement dysfonctionnement de l'appareil !
Faites particulièrement attention aux appareils
médicaux.
• Le rayonnement électromagnétique de votre téléphone peut
perturber le bon fonctionnement des appareils médicaux
électriques. Veillez donc à installer et utiliser votre appareil à une
distance suffisante de ce type d'appareil. Cette précaution s'applique aussi aux appareils médicaux
implantés dans le corps, tels que les pacemakers.
• Le combiné peut générer un bourdonnement désagréable dans les
appareils auditifs. Veillez donc à l'éloigner suffisamment de ceux-ci.
Dégâts possibles :
Attention Risque d'endommager l'appareil ! Veuillez respecter
les instructions données dans ce mode d'emploi.
• Utilisez uniquement les adaptateurs secteur fournis. N'utilisez pas
d'autres adaptateurs secteur, sous peine d'endommager les piles
rechargeables.
• La prise d'alimentation électrique doit se trouver à proximité de
l'appareil concerné et être facilement accessible.
• Utilisez uniquement les piles rechargeables fournies. Si vous
devez les remplacer, n'utilisez que des piles du même type. Veillez
à placer les piles rechargeables en respectant les polarités (elles
67
Premiers pas
sont indiquées à l'intérieur du compartiment à piles du combiné).
N'utilisez jamais des piles normales !
Important En cas de coupure de courant, vous ne pouvez
téléphoner qu'avec la base.
2.1 Remarques sur le mode de faible rayonnement
Ce téléphone sans fil (conforme à la norme DECT) propose un mode
de faible rayonnement (mode ECO).
En conversation, le combiné réduit la puissance d'émission en fonction
de la distance avec la base. Lorsque vous n'êtes pas en conversation,
le combiné réduit la puissance d'émission à une valeur minimale. Cela
ne signifie pas que les ondes DECT normales sont dangereuses pour
la santé, mais plutôt que le mode de faible rayonnement évite une
surcharge d'ondes inutile.
La base ne réduit pas sa puissance d'émission ! Placez la base à un
endroit peu fréquenté, par exemple dans l'entrée. Évitez les chambres,
notamment celles des enfants, et le séjour.
3 Premiers pas
3.1 Comment utiliser ce mode d'emploi
Le présent mode d'emploi utilise la méthode suivante pour expliquer
les instructions :
Texte ....... «Ecran ».
Texte apparaissant à l'écran du téléphone
Touche à enfoncer
3.2 Installer la base
Installez la base comme suit :
1 Commencez par brancher l'adaptateur secteur à la base, puis à
la prise murale.
2 Branchez une extrémité du câble téléphonique à la prise
téléphonique murale et l'autre extrémité à la prise située à
l'arrière de la base.
3 Raccordez le câble du téléphone et de l'alimentation comme
indiqué sur l'illustration 3A.
68
Premiers pas
B
A
C
Français
- 3A Base A. Prise téléphonique murale
B. Adaptateur secteur avec son câble
C. Câble téléphonique
3.3 Combiné
Attention Danger de blessure en cas d'explosion !
Insérez uniquement les piles rechargeables
fournies ou des piles du même type. Pas de piles
jetables ! Vous risquez d'endommager le combiné.
1
2
3
4
Ouvrez le compartiment à piles comme indiqué sur l'illustration
3B.
Insérez les piles. Respectez la polarité (+ et -).
Refermez le compartiment à piles.
Laissez le combiné se charger sur la station pendant
16 heures. Le témoin de charge s'allume sur la station.
B921
- 3B Arrière du combiné A.Couvercle
B.Piles rechargeables
A
+
B
+
69
Premiers pas
3.4 Témoin de charge des piles
Le combiné ne fonctionne plus lorsque les piles sont déchargées. Si
vous laissez le combiné pendant un court moment seulement sur la
station de charge alors que les piles sont complètement déchargées,
le témoin de charge des piles vous indique qu'elles sont pleines. Mais
ce n'est pas le cas et leurs performances vont rapidement diminuer.
Vous devez laisser le combiné 16 heures sur la station de charge pour
recharger complètement les piles.
Piles chargées
Piles déchargées
Si les piles sont presque vides pendant un appel, le combiné émet une
tonalité d'alarme. Placez le combiné sur la station de charge pour
recharger les piles.
3.5 Touches/écran
14
Combiné sans fil
1. Recomposition d'un
numéro/vers le haut
2. Répertoire
3. Couper le son/effacer
4. Raccrocher
5. Touches alphanumériques
6. Verrouillage du clavier
7. Pause
8. Marche/arrêt de la
sonnerie
9. Journal des appels/vers le
bas
10.Décrocher/mains libres/
appeler
11. INT/Echap
12.Menu/OK/Flash
13.Écran
14.Témoin rouge ; clignote
pendant un appel
13
1
12
11
10
2
R
OK
ESC/
INT
4
9
5
8
6
7
- 3C Avant du combiné -
70
3
Premiers pas
Base
15.Touche Recherche
16.Voyant de chargement du
combiné
17.Voyant Sonnerie
17
16
15
Français
- 3D Base -
3.6 Écran du combiné
COMBINÉ X
x = numéro du combiné
Autres numéros ou faire
défiler le menu vers la
gauche
Rechercher ou créer des
entrées de répertoire
Autres numéros ou faire
défiler le menu vers la
droite
Témoin de charge des
piles
Sonnerie désactivée
Mode Mains libres activé
Verrouillage clavier
activé
Nouveau message
Liaison téléphonique
Micro coupé
Nouveaux numéros
dans le journal des
appels
L'antenne indique
l'intensité du signal de
réception. L'antenne
clignote lorsque le combiné
est hors de portée.
Appel interne
71
Premiers pas
3.7 Naviguer dans le menu
L'appareil Sologic B921 propose un système de menus facile à utiliser.
Chaque menu se compose d'une série d'options.
Vous trouverez ci-après une vue d'ensemble des menus du combiné
et de la base.
1 Pour ouvrir le menu principal, appuyez sur la
OK
touche Menu/OK.
2 Faites défiler jusqu'à l'option de menu de votre
choix.
3 Appuyez sur la touche Menu/OK pour afficher
OK
d'autres options ou valider le réglage affiché.
4 Pour revenir au niveau de menu précédent,
ESC
appuyez sur la touche Echap.
Combiné
REPERTOIRE
COMBINE
SONNERIE
NOM
COMBINE
BIP TOUCHE
CHOIX BASE
RAZ
LANGUE
ENREG COMB
SUPPR COMB
3.8 Utiliser le clavier alphanumérique
Vous pouvez saisir du texte sur le clavier alphanumérique. Pour
sélectionner une lettre, appuyez sur la touche alphanumérique
correspondante 5 . Si vous appuyez p. ex. sur la touche
alphanumérique 5, la première lettre « j » s'affiche à l'écran. Appuyez
plusieurs fois pour sélectionner les autres lettres de cette touche.
Appuyez une fois sur la touche 2 pour sélectionner la lettre « a ». Si
vous souhaitez saisir les lettres « a » et « b » l'une derrière l'autre,
appuyez une fois sur la touche 2 pour sélectionner « a ». Patientez
2 secondes, le temps que le curseur se place à l'emplacement suivant,
puis appuyez deux fois sur la touche 2 pour sélectionner « b ». La
touche d'effacement
3 vous permet d'effacer les lettres saisies
par inadvertance. La lettre précédant le curseur est effacée.
72
Utilisation du téléphone
Tableau des caractères
Espace + - / 1
ABC2
DEF3
GHI4
JKL5
MNO6
PQRS7
TUV8
WXYZ9
_0
4 Utilisation du téléphone
4.1 Modifier la langue
1
OK
OK 2
OK 3
4
OK
5
ESC
Appuyez sur la touche Menu/OK.
Sélectionnez COMBINE (HANDSET) et validez.
Sélectionnez LANGUE (LANGUAGE) et validez.
Sélectionnez la langue de votre choix et validez
votre sélection.
Appuyez sur la touche Esc (Echap) pour repasser
en mode veille.
4.2 Appels sortants
Passer un appel
1 Appuyez sur la touche d'appel.
2 Saisissez le numéro de téléphone.
4 5 6
3 Appuyez sur la touche Raccrocher pour mettre fin
à la conversation.
G
H
I
J
K
L
M
N
O
73
Français
1
2
3
4
5
6
7
8
9
0
Utilisation du téléphone
Prénumérotation
1 Saisissez le numéro de téléphone.
4 5 6
Vous pouvez corriger une erreur de saisie avec la
touche de coupure du micro. Si vous n'appuyez sur aucune touche pendant
10 secondes, le numéro disparaît et le combiné
repasse en mode veille.
2 Appuyez sur la touche d'appel.
Le numéro de téléphone se compose
automatiquement.
3 Appuyez sur la touche Raccrocher pour mettre fin
à la conversation.
G
H
I
J
K
L
M
N
O
Recomposer le dernier numéro
Appuyez sur la touche d'appel.
2 Appuyez sur la touche de recomposition.
Le dernier numéro de téléphone se compose
automatiquement.
3 Appuyez sur la touche Raccrocher pour mettre fin
à la conversation.
1
Recomposer l'un des 3 derniers numéros saisis
1 Appuyez sur la touche de recomposition.
Le dernier numéro composé s'affiche à l'écran.
Si vous souhaitez recomposer l'un des 3 derniers
numéros saisis, appuyez plusieurs fois sur la touche
de recomposition jusqu'à ce que le numéro de votre
choix s'affiche.
2 Appuyez sur la touche d'appel.
Le numéro de téléphone se compose
automatiquement.
3 Appuyez sur la touche Raccrocher pour mettre fin
à la conversation.
74
Utilisation du téléphone
4.3 Appels entrants
Lors d'un appel entrant, le combiné et la base sonnent, tandis que le
témoin de signal d'appel visuel (cf. numéro 14 sur l'illustration 3C et
numéro 17 sur l'illustration 3D) du combiné et de la base clignote.
1
2
Appuyez sur la touche Décrocher pour parler.
Appuyez sur la touche Raccrocher pour mettre fin
à la conversation.
Cette fonction vous permet de prendre un appel sans tenir le combiné
ou peut être activée alors que vous parlez déjà dans le combiné.
Pendant la conversation :
1 Appuyez sur la touche Mains libres pour activer la
fonction.
2 Appuyez à nouveau sur la touche Mains libres pour
rebasculer la conversation sur le combiné.
Important Les piles se déchargent plus vite lorsque vous
utilisez longtemps la fonction mains libres !
4.5 Coupure du micro
Vous pouvez couper le micro au cours d'une conversation afin de
pouvoir parler sans être entendu par la personne à l'autre bout de la
ligne.
1 Appuyez sur la touche de mise en sourdine.
Le micro est coupé et MUET ENCL (MUTED)
s'affiche.
2 Appuyez à nouveau sur la touche de coupure du
micro pour réactiver le micro.
4.6 Régler le volume de l'écouteur/haut-parleur
Pendant une conversation :
1 Appuyez sur la touche de défilement vers le haut
ou vers le bas.
Vous pouvez régler le volume sur une échelle de 1 à
5.
75
Français
4.4 Activer/désactiver le mode Mains libres
Utilisation du téléphone
4.7 Touche R (Flash)
OK
Appuyez sur la touche Flash (touche 12 sur
l'illustration 3C „Combiné sans fil“ à la page 70) pour
utiliser des services spécifiques de votre ligne
externe, p. ex. la présentation du numéro (à condition
que votre opérateur téléphonique propose ce service)
ou bien pour transférer un appel si vous utilisez un
système téléphonique. La touche Flash R coupe
temporairement la ligne. Vous pouvez régler cette
coupure sur 100 ms ou 300 ms. Pour paramétrer une
autre durée flash, reportez-vous à „5.4 Touche R
(Flash)“.
4.8 Choisir la sonnerie et régler le volume
Mélodie de la sonnerie du combiné pour les appels internes/
externes
1 Appuyez sur la touche Menu/OK.
OK
OK 2 Sélectionnez COMBINE (HANDSET) et validez.
3 Sélectionnez SONNERIE (RING TONE) et
validez.
OK
4 Sélectionnez INTERNE (INTERNAL) ou
EXTERNE (EXTERNAL) et validez.
OK
5 Sélectionnez maintenant une mélodie (1 à 9) et
validez.
OK
Volume de la sonnerie du combiné
1 Appuyez sur la touche Menu/OK.
OK
OK 2 Sélectionnez COMBINE (HANDSET) et validez.
3 Sélectionnez SONNERIE (RING TONE) et
validez.
OK
OK 4 Sélectionnez VOLUME (VOLUME) et validez..
5 Sélectionnez le volume de votre choix (Arrêt, 1-5) et
validez.
OK
76
Utilisation du téléphone
Important Vous pouvez régler le volume de la sonnerie de
chaque combiné sur Marche ou Arrêt en maintenant
enfoncée la touche Marche/Arrêt de la sonnerie
en mode veille.
L'icône
s'affiche à l'écran et le clavier est
verrouillé.
Lorsque le clavier est verrouillé, les touches ne fonctionnent pas en
mode veille (sauf la touche de verrouillage du clavier).
1 Maintenez la touche de verrouillage du clavier
enfoncée.
L'icône
s'affiche à l'écran.
2 Maintenez à nouveau la touche de verrouillage du
clavier enfoncée pour déverrouiller le clavier.
Lorsque le clavier est verrouillé, vous pouvez
continuer à prendre les appels entrants en appuyant
sur la touche Décrocher . Le clavier fonctionne
normalement pendant la conversation. Le clavier se
verrouille à nouveau à la fin de la conversation.
4.10 Nom du combiné
Vous pouvez modifier le nom qui s'affiche à l'écran (12 caractères
max.) quand vous n'êtes pas en conversation :
1 Appuyez sur la touche Menu/OK.
OK
OK 2 Sélectionnez COMBINE (HANDSET) et validez.
3 Sélectionnez NOM COMBINE (HANDSET NAME)
et validez.
OK
4 5 6 4 Effacez l'ancien nom avec la touche de coupure du
micro et saisissez le nouveau nom.
5 Appuyez pour valider.
OK
6 Appuyez sur la touche Esc (Echap) pour repasser
ESC
en mode veille.
G
H
I
J
K
L
M
N
O
77
Français
4.9 Verrouillage du clavier
Utilisation du téléphone
4.11 Activer/désactiver le bip touche
1
OK
OK 2
3
OK
4
OK
5
ESC
6
Appuyez sur la touche Menu/OK.
Sélectionnez COMBINE (HANDSET) et validez.
Sélectionnez BIP TOUCHE (KEYPAD BEEP) et
validez.
Sélectionnez MARCHE (ON) ou ARRET (OFF).
Appuyez pour valider.
Appuyez sur la touche Esc (Echap) pour repasser
en mode veille.
4.12 Répertoire
Vous pouvez enregistrer 50 entrées dans le répertoire. Les noms ne
doivent pas contenir plus de 16 caractères et les numéros plus de
24 chiffres.
Ajouter une entrée dans le répertoire
1 Appuyez sur la touche Répertoire.
OK 2 Appuyez deux fois sur la touche OK.
OK
4 5 6 OK 3 Saisissez le nom et validez.
4 Saisissez le numéro de téléphone de votre choix et
4 5 6
validez.
OK
Un bip de confirmation retentit.
G
H
I
J
K
L
M
N
O
G
H
I
J
K
L
M
N
O
Composer un numéro abrégé
1 Appuyez sur la touche Répertoire.
2 Faites défiler jusqu'au nom de votre choix ou
saisissez les premières lettres du nom.
4 5 6
3 Appuyez sur la touche Répertoire pour afficher le
numéro de téléphone.
4 Appuyez maintenant sur la touche d'appel.
Le numéro de téléphone se compose
automatiquement.
5 Appuyez sur la touche Raccrocher pour mettre fin à
la conversation.
G
H
I
78
J
K
L
M
N
O
Utilisation du téléphone
Éditer une entrée du répertoire
1 Appuyez sur la touche Répertoire.
2 Faites défiler jusqu'au nom de votre choix ou
saisissez les premières lettres du nom.
4 5 6
3 Appuyez sur la touche Répertoire pour afficher le
numéro de téléphone.
4 Appuyez sur la touche Menu/OK.
OK
OK 5 Sélectionnez MODIFIE (EDIT ENTRY) et validez.
4 5 6 OK 6 Saisissez le nom et validez.
4 5 6 OK 7 Saisissez ou modifiez le numéro de téléphone et
validez.
G
H
I
J
K
L
M
N
O
G
H
I
J
K
L
M
N
O
J
K
L
M
N
O
Effacer une ou toutes les entrées du répertoire
1 Appuyez sur la touche Répertoire.
2 Faites défiler jusqu'au nom de votre choix ou
saisissez les premières lettres du nom.
4 5 6
3 Appuyez sur la touche Répertoire pour afficher le
numéro de téléphone.
4 Appuyez sur la touche Menu/OK.
OK
5 Sélectionnez EFFACE (DELETE ENTRY) pour
supprimer l'entrée du répertoire sélectionnée, puis
validez.
OK
OU
6 Sélectionnez EFFACE TOUT (DELETE ALL) pour
supprimer toutes les entrées du répertoire, puis
validez.
OK
ESC 7 Validez à nouveau ou appuyez sur la touche Esc
OK
(Echap) pour annuler.
G
H
I
J
K
L
M
N
O
4.13 Affichage du numéro (CLIP)
L'appareil Sologic B921 affiche le numéro de téléphone des appels
entrants. Cette fonction n'est disponible que si vous avez souscrit à ce
service auprès votre opérateur téléphonique. Pour de plus amples
informations, consultez votre opérateur.
Lorsque vous recevez un appel, le numéro de téléphone est enregistré
dans un journal des appels. Ce journal peut contenir jusqu'à
30 numéros de téléphone (de 23 chiffres chacun max.).
79
Français
G
H
I
Utilisation du téléphone
Si le numéro de téléphone contient plus de
12 chiffres, faites défiler l'écran vers la droite pour
afficher les autres chiffres.
Nouveaux appels
Si le journal des appels contient un nouvel appel,
l'icône CLIP clignote à l'écran.
Afficher le journal des appels
1 Appuyez sur la touche du journal des appels.
Le dernier appel reçu s'affiche. Si le journal des
appels est vide, VIDE (EMPTY) s'affiche à l'écran.
2 Appuyez sur la touche Répertoire pour afficher le
numéro.
3 Appuyez sur la touche Répertoire pour afficher la
date et l'heure.
4 Appuyez sur la touche de défilement vers le haut ou
vers le bas pour faire défiler la liste.
5 Appuyez sur la touche Esc (Echap) pour quitter le
ESC
journal des appels.
Appeler un numéro enregistré dans le journal des appels
Appuyez sur la touche du journal des appels.
2 Faites défiler le journal des appels jusqu'à ce que
le numéro de votre choix s'affiche.
3 Appuyez sur la touche d'appel pour parler.
Le numéro de téléphone se compose
automatiquement.
4 Appuyez sur la touche Raccrocher pour mettre fin
à la conversation.
1
Effacer un numéro enregistré dans le journal des appels
1 Appuyez sur la touche du journal des appels.
2 Faites défiler le journal des appels jusqu'à ce que
le numéro de votre choix s'affiche.
3 Appuyez sur la touche Menu/OK.
OK
80
Utilisation du téléphone
OK
5
OK
ESC 6
OK
Sélectionnez EFFACE (DELETE) pour supprimer
le numéro de téléphone sélectionné, puis validez.
OU
Sélectionnez EFFACE TOUT (DELETE ALL) pour
supprimer toutes les entrées, puis validez.
Appuyez pour valider ou appuyez sur la touche Esc
(Echap) pour annuler.
Enregistrer un numéro du journal des appels en tant que
numéro abrégé
1 Appuyez sur la touche du journal des appels.
2 Faites défiler le journal des appels jusqu'à ce que
le numéro de votre choix s'affiche.
3 Appuyez sur la touche Menu/OK.
OK
4 Sélectionnez MEMO NUMERO (SAVE TO PB) et
validez.
OK
4 5 6 OK 5 Ajoutez ou modifiez le nom, puis validez.
4 5 6 OK 6 Modifiez le numéro de téléphone et validez.
G
H
I
J
K
L
M
N
O
G
H
I
J
K
L
M
N
O
4.14 Réinitialiser les paramètres par défaut sur lecombiné
Toutes les modifications sont effacées et tous les réglages par défaut
rétablis (volume de la sonnerie, mélodie de la sonnerie, etc.). De plus,
le journal des appels, la liste de recomposition et le répertoire sont
effacés !
1 Appuyez sur la touche Menu/OK.
OK
OK 2 Sélectionnez COMBINE (HANDSET) et validez.
OK OK 3 Sélectionnez RAZ (RESET) et validez.
4 Saisissez le PIN système de la base (0000 par
4 5 6
défaut).
5 L'appareil repasse en mode veille.
G
H
I
J
K
L
M
N
O
Les paramètres par défaut sont :
Nom du combiné
COMBINE
Volume de l'écouteur
Niveau 3
Volume de la sonnerie
Niveau 3
Sonnerie externe
Mélodie 8
81
Français
4
Réglages de la base
Sonnerie interne
Bip touche
Mélodie 1
Marche
4.15 Affichage de la messagerie vocale
Cet affichage ne fonctionne que si vous avez activé la fonction
répondeur ou messagerie et que votre opérateur téléphonique
transmet ces informations et le numéro de téléphone ! Si votre
messagerie vocale contient un nouveau message, l'icône
s'affiche
à l'écran. Si vous avez écouté le message, l'icône
disparaît.
5 Réglages de la base
Info
Cette section ne décrit que les paramètres
enregistrés sur la station de base !
5.1 Choisir la sonnerie et régler le volume
Type de sonnerie du combiné pour les appels internes/
externes
1 Appuyez sur la touche Menu/OK.
OK
OK 2 Sélectionnez BASE et validez.
OK 3 Sélectionnez SONNERIE (RING TONE) et validez.
4 Sélectionnez maintenant une mélodie (1 à 9) et
validez.
OK
Volume de sonnerie de la base
1 Appuyez sur la touche Menu/OK.
OK
OK 2 Sélectionnez BASE et validez.
3 Sélectionnez VOLUME (RING VOLUME) et
validez.
OK
4 Sélectionnez le volume de votre choix (Arrêt, 1-5)
et validez.
OK
5.2 Régler le mode de numérotation
Il existe deux modes de numérotation pour téléphoner :
- DTMF/composition du numéro par fréquence acoustique (le plus
fréquent)
- Numérotation décimale (nécessaire uniquement si l'appareil est
utilisé avec une installation téléphonique ancienne !)
82
Réglages de la base
1
OK
OK 2
3
OK
4
OK
Appuyez sur la touche Menu/OK.
Sélectionnez BASE et validez.
Sélectionnez MODE COMPOS (DIAL MODE) et
validez.
Sélectionnez TONALITES (TONE) ou
IMPULSIONS (PULSE) et validez.
Certaines fonctions ne sont disponibles que si vous connaissez le PIN
système de la base.
Le PIN système comporte 4 caractères. Le PIN système par défaut est
« 0000 ». Pour modifier le PIN système et en paramétrer un personnel,
procédez comme suit :
1 Appuyez sur la touche Menu/OK.
OK
OK 2 Sélectionnez BASE et validez.
3 Sélectionnez PIN SYSTEME (SYSTEM PIN) et
validez.
OK
4 Saisissez le PIN système ACTUEL- (OLD PIN) et
4 5 6
appuyez sur OK.
OK
5 Saisissez le PIN système NOUVEAU- (NEW PIN)
4 5 6
et validez.
OK
G
H
I
J
K
L
M
N
O
G
H
I
J
K
L
M
N
O
5.4 Touche R (Flash)
Appuyez sur la touche Flash pour utiliser des services spécifiques de
votre ligne externe, p. ex. la présentation du numéro (à condition que
votre opérateur téléphonique propose ce service) ou bien pour
transférer un appel si vous utilisez un système téléphonique. La
touche Flash R coupe temporairement la ligne. Vous pouvez régler
cette coupure sur 100 ms ou 300 ms. Vous pouvez également la
modifier si votre installation nécessite une autre durée flash.
1 Appuyez sur la touche Menu/OK.
OK
OK 2 Sélectionnez BASE et validez.
OK 3 Sélectionnez RAPPEL (RECALL) et validez.
4 Sélectionnez LONG (LONG) ou COURT (SHORT)
et validez.
OK
83
Français
5.3 Paramétrer le PIN système
Enregistrer ou désenregistrer un combiné
6 Enregistrer ou désenregistrer un combiné
6.1 Enregistrer un combiné sur la base Sologic B921
Vous pouvez enregistrer jusqu'à 4 combinés sur une même base.
Chaque combiné est déjà inscrit sur la base à la livraison.
Vous devez enregistrer le combiné uniquement si :
• le combiné a été au préalable désenregistré de cette base (p. ex. lors d'une réinitialisation).
• Vous souhaitez enregistrer un autre combiné sur la base.
Les instructions suivantes s'appliquent uniquement aux combinés et
aux bases Sologic B921.
1 Maintenez la touche Paging de la base enfoncée
pendant 10 secondes.
2 Appuyez sur la touche Menu/OK du combiné.
OK
3 Sélectionnez ENREG COMB (REGISTER) et
validez.
4 Indiquez le numéro de la base (1-4) sur laquelle
4 5 6
vous souhaitez enregistrer le combiné.
5 L'appareil recherche la base. Lorsqu'il l'a trouvée,
vous êtes invité à saisir le PIN système (à quatre
chiffres).
6 Saisissez le PIN système de la base (0000 par
4 5 6
défaut). Si le PIN système est incorrect, le combiné
recherche à nouveau la base.
Une fois le combiné enregistré, le nom du combiné et
son numéro s'affichent à l'écran.
G
H
I
J
K
L
M
N
O
G
H
I
J
K
L
M
N
O
6.2 Désenregistrer un combiné de la base Sologic B921
1
OK
2
OK
3
4 5 6
G
H
I
J
K
L
M
N
O
OK
4
4 5 6
G
H
I
J
K
L
M
N
O
OK
84
Appuyez sur la touche Menu/OK.
Sélectionnez SUPPR CB (DE-REGISTER) et
validez.
Saisissez le PIN système de la base (0000 par
défaut).
Indiquez le numéro interne du combiné que vous
souhaitez désenregistrer (1-4), puis validez.
Enregistrer ou désenregistrer un combiné
Une fois le combiné correctement désenregistré, la
base repasse en mode veille. Dans le cas contraire,
vous êtes invité à ressaisir le numéro du combiné.
Important Pour pouvoir désenregistrer le combiné, celui-ci ne
doit pas être en cours d'utilisation.
6.3 Sélection d'une base
Sélection automatique
Si vous paramétrez le combiné sur Sélection automatique, le
combiné recherche automatiquement la base la plus proche en
mode veille.
1 Appuyez sur la touche Menu/OK.
OK
OK 2 Sélectionnez COMBINE (HANDSET) et validez.
OK 3 Sélectionnez CHOIX BASE (SELECT BASE) et
validez.
OK 4 Sélectionnez AUTO (AUTOMATIC) et validez.
Info
En cas de sélection automatique de la base, si le
combiné se trouve hors de portée de cette base, il
recherche la base au signal le plus fort en mode
veille (pas en conversation).
Sélection manuelle
Si vous paramétrez le combiné sur Sélection manuelle, le combiné
recherche uniquement la base que vous avez définie.
1 Appuyez sur la touche Menu/OK.
OK
OK 2 Sélectionnez COMBINE (HANDSET) et validez.
OK 3 Sélectionnez CHOIX BASE (SELECT BASE) et
validez.
OK 4 Sélectionnez MANUEL (MANUAL) et validez.
OK 5 Sélectionnez la base et validez.
85
Français
Si votre combiné est enregistré sur plusieurs bases (4 max.), vous
devez sélectionner l'une des bases afin que le combiné communique
constamment avec une seule et même base. Vous avez deux
possibilités :
Transfert d'appels et appels internes entre combinés
Important Pour pouvoir sélectionner une base, le combiné doit
être enregistré sur la base en question.
7 Transfert d'appels et appels internes entre
combinés
7.1 Transférer un appel et activer le mode conférence au
cours d'une conversation externe
4 5 6
G
H
I
INT
INT
Pendant une conversation externe, appuyez sur la
touche INT, puis sélectionnez le numéro du
combiné (1-4).
L'autre combiné sonne.
Vous pouvez avoir une conversation en interne une
fois la liaison établie avec le combiné. Lorsque vous
raccrochez, la conversation externe est transférée à
l'autre combiné.
2 Maintenez la touche INT enfoncée pendant
3 secondes. Vous pouvez maintenant parler
simultanément avec le deuxième combiné et le
correspondant externe (mode conférence).
3 Appuyez à nouveau sur la touche INT pour
rebasculer sur l'appel externe.
4 Appuyez sur la touche Raccrocher pour mettre fin
à la conversation.
1
INT
J
K
L
M
N
O
8 Abréviations et termes techniques
CLIP
Calling Line Identification Presentation, service de communication du
numéro de l'appelant et affichage de celui-ci sur l'écran du destinataire
de l'appel.
DECT
Digital Enhanced Cordless Telecommunication ; norme de
télécommunication européenne relative aux téléphones sans fil
numériques.
Mode ECO
Economic Mode ; mode de fonctionnement de faible rayonnement
proposé dans le cadre de la téléphonie DECT.
86
Touche Flash
Provoque une brève coupure de la ligne permettant d'activer des
fonctions comme le double appel ou la transmission d'appel. Sur des
installations téléphoniques équipées d'une touche Flash ou R, cette
touche est utilisée pour la mise en attente interne.
GAP
Generic Access Profile ; interface entre la base et le combiné qui
permet d'établir une connexion sans fil.
INT
Correspondant interne. Autre combiné ou poste secondaire dans une
installation téléphonique.
ND
Numérotation décimale ; procédure de numérotation obsolète,
analogique (« clics » de numérotation).
LCD
Liquid Crystal Display ; écran à cristaux liquides.
LED
Light Emitting Diode ; diode électroluminescente.
NMF
Numérotation multifréquence ; procédure de numérotation moderne,
numérique.
PIN
Personal Identification Number.
Touche R
Touche de mise en attente (voir la touche Flash).
Veille
« État au repos » d'un appareil, sans qu'il ne soit complètement éteint.
Twin
« Jumeau » : désignation d'une unité composée de deux appareils
identiques, p. ex. deux combinés.
87
Français
Abréviations et termes techniques
Dépannage
9 Dépannage
Problème
Cause possible
Solution
Pas d'affichage.
Les piles ne sont pas
chargées.
Vérifiez que les deux
piles rechargeables
sont correctement
insérées.
Chargez les piles.
Absence de tonalité. Le câble téléphonique Vérifiez le
n'est pas correctement raccordement du
raccordé.
câble téléphonique.
Attendez que l'autre
La ligne est occupée
par un autre combiné. combiné raccroche.
La voix du
Réglez le volume au
correspondant est à
cours de la
peine perceptible.
conversation grâce à
la touche du volume.
La sonnerie du
Réglez le volume de la
combiné est à peine
sonnerie.
perceptible.
Impossible de
Le mode de
Voir „5.2 Régler le
composer un
composition est
mode de
numéro.
incorrect.
numérotation“ pour
sélectionner le mode
de composition qui
convient.
L'icône
clignote.
Combiné hors de
portée.
La base n'est pas
alimentée en courant.
Remettez le téléphone
dans la zone de
portée de la base.
Vérifiez l'adaptateur
secteur et le câble
d'alimentation.
Le combiné n'est pas Enregistrez le
enregistré sur la base. combiné sur la base.
88
Procédures d'entretien
Problème
Cause possible
La base ou le
combiné ne sonne
pas.
Le volume de la
Réglez le volume de la
sonnerie est désactivé sonnerie.
ou trop faible.
Impossible de
transférer un
appelsur l'autre
ligne.
Le téléphone ne
réagit pas lorsque
vous appuyez sur
les touches.
La durée flash est trop Réglez une durée
courte.
flash plus longue.
Retirez puis remettez
les piles.
Ne procédez à aucune modification ou réparation de votre appareil
vous-même. Pour toute réparation de l'appareil ou du câble, adressezvous à un professionnel du service après-vente. Des réparations
inappropriées peuvent entraîner des dangers considérables pour
l'utilisateur.
10 Procédures d'entretien
10.1 Entretien
Ce téléphone ne nécessite aucune maintenance. Vérifiez de temps en
temps l'état des piles rechargeables et remplacez-les par des piles
neuves de même type en cas de baisse de puissance ou de début de
fuite.
AvertDanger de brûlure par l'acide !
issement Lorsque vous retirez des piles qui ont coulé, veillez
à toujours porter des gants de protection.
Si l'appareil est entré en contact avec du liquide, retirez
immédiatement les piles ou débranchez l'appareil de l'alimentation
(base) et séchez-le soigneusement. Laissez sécher l'appareil pendant
2-3 jours, puis vérifiez s'il fonctionne correctement. En cas de
dysfonctionnement, envoyez-le au service après-vente.
89
Français
Erreur d'utilisation.
Solution
Procédures d'entretien
10.2 Nettoyage
AvertDanger de décharge électrique ou de court-circuit en
issement cas de contact avec des pièces conductrices
d'électricité.
Ne laissez pas pénétrer de liquide dans l'appareil. Si
cela se produit, retirez immédiatement la fiche
d'alimentation de la prise et débranchez la fiche du
câble téléphonique de la prise murale ou retirez les
piles rechargeables de l'appareil.
Si l'appareil, le câble ou l'adaptateur sont
endommagés : évitez tout contact direct avec du
liquide et débranchez immédiatement l'appareil de
l'alimentation 230 V.
Nettoyez votre téléphone à l'aide d'un torchon légèrement humidifié
d'eau tiède ou un torchon antistatique. N'utilisez jamais de détergent
ni de produit abrasif.
10.3 Mise hors service, rangement
Si vous souhaitez mettre votre téléphone provisoirement hors service,
débranchez le câble téléphonique de la prise murale ainsi que la fiche
de raccordement de la base. Débranchez l'adaptateur secteur de la
base ainsi que les combinés des prises murales 230 V.
Retirez les piles des combinés. Si le téléphone est laissé hors service
pendant une période relativement longue, remplacez les piles
rechargeables par des piles neuves de même type lorsque vous le
remettez en service.
Rangez les appareils et les piles rechargeables dans un endroit sec et
tempéré.
10.4 Mise au rebut (protection de l'environnement)
Ne jetez pas l'appareil ni les piles rechargeables en fin de
vie dans la poubelle des déchets ménagers. Le symbole
illustré ici et apposé sur le produit et/ou son emballage
vous l'indique. Déposez l'appareil dans un point de collecte
assurant le tri des appareils électriques et électroniques.
Certains matériaux du produit pourront y être recyclés.
Contribuez à la protection de l'environnement en recyclant
certaines pièces ou matières premières des produits usagés.
90
Données techniques
Jetez également l'emballage de manière respectueuse de
l'environnement.
Pour toute information supplémentaire au sujet des points de collecte
dans votre région, adressez-vous aux autorités locales.
11 Données techniques
DECT (Digital Enhanced Cordless
Telecommunications)
GAP ( Generic Access Profile)
Plage de fréquence
1880 MHz à 1900 MHz
Puissance d'émission
10 mW (puissance moyenne par canal)
Portée
300 m max. à l'air libre - 50 m max. dans les
bâtiments
Piles du combiné :
2 piles NiMH rechargeables 1,2 V, 500 mAh,
type AAA
Alimentation électrique de Entrée : 100~240 V CA/50-60 Hz
la base
Sortie : 6 V CC/500 mA
Autonomie du combiné en 100 heures en mode veille
veille
Autonomie du combiné en 10 heures
conversation
Durée de charge :
16 heures
Températures d'utilisation +5 °C à + 45 °C
admissibles
Humidité relative
25 à 85 %
admissible
Mode de composition
Numérotation décimale et par fréquence
acoustique (DTMF)
Durée flash
100 ou 300 ms
Mémoire du combiné
50 entrées de répertoire de 24 chiffres et
16 lettres max.
Dimensions de la base/ 117 mm x 117 mm x 60 mm/
combiné
182 mm x 284 mm x 58 mm
Poids de la base/combiné 239 g avec l'adaptateur/
152 g avec les piles
Consommation électrique Base: 2,0 W
max.
Français
Norme
91
Garantie Topcom
12 Garantie Topcom
12.1 Période de garantie
Les appareils Topcom bénéficient d'une période de garantie de 24
mois. La période de garantie prend effet le jour de l'achat du nouvel
appareil. Il n'y a aucune garantie sur les piles standard ou
rechargeables (de type AA/AAA).
Les accessoires et les défauts qui ont un effet nuisible sur le
fonctionnement ou la valeur de l'appareil ne sont pas couverts.
La garantie s'applique uniquement sur présentation du reçu d'achat
original ou une copie de celui-ci sur lequel figurent la date de l'achat et
le modèle de l'appareil.
12.2 Mise en œuvre de la garantie
Tout appareil défectueux doit être retourné à un centre de service
après-vente Topcom, accompagné d'un ticket d'achat valable.
En cas de panne pendant la période de garantie, Topcom ou son
centre de service après-vente officiel réparera gratuitement les
dysfonctionnements dus à un vice de matière ou de fabrication, en
réparant ou en remplaçant les appareils ou les pièces défectueux. En
cas de remplacement, la couleur et le modèle peuvent être différents
de ceux de l'appareil acheté initialement.
La date d'achat initiale détermine le début de la période de garantie.
La période de garantie n'est pas prolongée si l'appareil est remplacé
ou réparé par Topcom ou son centre de service après-vente officiel.
12.3 Exclusions de garantie
Les dommages et les pannes causés par un mauvais traitement ou
une utilisation incorrecte et les dommages qui résultent de l'utilisation
de pièces et d'accessoires non originaux ne sont pas couverts par la
garantie.
La garantie ne couvre pas les dommages causés par des éléments
extérieurs tels que la foudre, l'eau et le feu, ni les dommages
provoqués par le transport.
Aucune garantie ne pourra être invoquée si le numéro de série indiqué
sur les appareils a été modifié, supprimé ou rendu illisible.
Aucune garantie ne peut non plus être invoquée si l'appareil a été
réparé ou modifié par l'acheteur.
92
Garantie Topcom
Français
Cet appareil doit être utilisé avec des piles rechargeables uniquement.
Si vous voulez remplacer les piles fournies avec l'appareil, veuillez
vérifier que les piles que vous utilisez sont adaptées et rechargeables.
N'utilisez PAS de piles alcalines dans les combinés.
Si vous utilisez des piles alcalines et que vous placez le combiné sur
la base, les piles vont chauffer et risquent d'exploser. Le fabricant ne
sera pas tenu responsable des dommages provoqués et ceux causés
sur l'appareil ne seront pas pris en charge par la garantie. Toutes les
réparations seront à vos frais.
93
Allgemeines
1 Allgemeines
In dieser Bedienungsanleitung finden Sie alle wichtigen Informationen
zur Installation, Einstellung und Bedienung Ihres Gerätes. Außerdem
erhalten Sie Informationen sowie wichtige Hinweise zu Ihrer Sicherheit
sowie Hilfe bei Problemen.
Bewahren Sie Bedienungsanleitung stets in der Nähe der Geräte auf.
Bewahren Sie diese Bedienungsanleitung sorgfältig auf, und geben
Sie sie, wenn nötig, an andere Benutzer weiter.
1.1 Das Produkt: Sologic B921
Dieses Produkt wurde in Übereinstimmung mit dem einheitlichen,
digitalen Standard für schnurlose Telefone (DECT) hergestellt. Die
DECT-Technologie ist durch hohe Abhörsicherheit sowie qualitativ
hochwertige, digitale Übertragung gekennzeichnet. Dieses Telefon ist
für verschiedene Anwendungsbereiche vorgesehen, beispielsweise
für ein Netzwerk von Basisstationen und Mobilteilen, die ein
komplettes Telefonsystem bilden: So ist ein Betrieb von bis zu
4 Mobilteilen an einer Basisstation sowie der Betrieb eines Mobilteils
an bis zu 4 Basisstationen möglich. Jeweils zwischen Basisstation und
Mobilteil oder zwischen 2 Mobilteilen sind Interngespräche möglich.
Falls an Ihrem Anschluss vorhanden, sind Rufnummernanzeige und
SMS-Dienste des Netzanbieter für dieses Telefon möglich. Wenn Sie
diese Dienste nutzen, wird die Rufnummer des Anrufers am Display
des Telefons angezeigt.
Wichtig
Zur Verwendung der “Rufnummernanzeige” muss
das Leistungs-merkmal für Ihren Telefonanschluss
freigeschaltet sein. Für nähere Informationen zur
Aktivierung dieses Leistungsmerkmals kontaktieren
Sie Ihren Netzanbieter. Wenn dieses Leistungsmerkmal nicht freigeschaltet ist, werden
die Rufnummern eingehender Anrufe NICHT am
Display Ihres Telefons angezeigt.
1.2 Urheberrecht
Dieses Dokument ist urheberrechtlich geschützt.
Alle Rechte, einschließlich die der gesamten oder teilweisen
photomechanischen Wiedergabe, Vervielfältigung und Verbreitung
mittels bestimmter Verfahren (wie Datenverarbeitung, Datenträger
und Datennetzwerke) sowie inhaltlicher und technischer Änderungen,
bleiben vorbehalten.
94
Allgemeines
1.3 Signalworte und Symbole
Symbol Signalwort Bedeutung
Warnung Warnung vor möglicher schwerer Verletzungsbzw. Lebensgefahr bei Nichtbeachten.
ohne
Vorsicht
Warnung vor möglicher leichter
Verletzungsgefahr bei Nicht-beachten.
Vorsicht
Wichtig
Gefahr von Sach- oder Umweltschaden.
Hier wird ein für die Funktion wichtiger
Hinweis gegeben.
Allgemeine Informationen oder besondere
Tipps.
Info, Tipp
Dieses Produkt dient zum Telefonieren über einen Festnetzanschluss
innerhalb eines Telefonnetzes. Voraussetzung für die
bestimmungsgemäße Verwendung ist die sachgerechte Installation
unter Beachtung der Hinweise dieser Bedienungsanleitung.
Jede andere Verwendung ist nicht bestimmungsgemäß und somit
unzulässig.
Eigenmächtige Veränderungen oder Umbauten, die nicht in dieser
Bedienungsanleitung beschrieben werden, sind unzulässig und die
Haftung aus daraus resultierende Schäden schließen wir
grundsätzlich aus.
1.5 Lieferumfang
Prüfen Sie die Vollständigkeit und Unversehrtheit des Lieferumfangs.
Kontaktieren Sie umgehend Ihren Händler, sollten Teile fehlen oder
defekt sein.
Heben Sie die Verpackung für eine evtl. Rücksendung/Reparatur auf.
1 Basisstation
1 Steckernetzgerät für Basisstation
1 Telefonkabel für Basisstation
1 Mobilteil, inkl. 2 Akkus (Typ AAA, 1,2 V / 500 mAh, NiMH), sowie
einer Akkufachabdeckung
1 Bedienungsanleitung
Warnung Erstickungsgefahr für Kinder! Verpackungsfolien von
Kindern fernhalten.
95
Deutsch
1.4 Bestimmungsgemäße Verwendung
Sicherheitshinweise
Wichtig
Verpackungsmaterial umweltgerecht entsorgen!
2 Sicherheitshinweise
Folgende grundlegende Sicherheitshinweise müssen beim Einsatz
von elektrischen Geräten in jedem Fall berücksichtigt werden.
Lesen Sie die folgenden Sicherheitshinweise und Angaben zum
korrekten Gebrauch des Gerätes sorgfältig durch. Machen Sie sich mit
allen Funktionen des Gerätes vertraut. Bewahren Sie diese
Bedienungsanleitung sorgfältig in der Nähe des Gerätes auf und
geben Sie sie, wenn nötig, an andere Benutzer weiter. Geben Sie das
Telefon nur mit Bedienungsanleitung an Dritte weiter.
Elektrische Gefahren:
Warnung Verletzungs- bzw. Lebensgefahr durch elektrischen
Strom! Im Gefahrfall Gerät sofort vom 230VStromnetz trennen.
• Das Gerät nicht in Betrieb nehmen, wenn das Steckernetzgerät,
das Kabel oder das Gerät beschädigt ist. Achten Sie darauf, dass
das Gerät nicht herunterfällt, da es dabei beschädigt werden
könnte.
• Im Inneren des Gerätes gibt es gefährliche Spannungen. Niemals
das Gehäuse öffnen oder Gegenstände durch die Lüftungsschlitze
einführen.
• Verhindern Sie, dass Flüssigkeit in das Gerät gelangt. Andernfalls
sofort das Steckernetzgerät aus der Steckdose und den Stecker
des Telefonkabels aus der Wandsteckdose ziehen.
• Ziehen Sie ebenfalls das Steckernetzgerät aus der Steckdose und
den Stecker des Telefonkabels aus der Wandsteckdose, wenn
während des Betriebs Störungen auftreten und bevor Sie das
Gerät reinigen.
• Berühren Sie die Lade- und Steckerkontakte nicht mit spitzen oder
metallischen Gegenständen.
• Keine Veränderungen oder Reparaturen am Gerät vornehmen.
Lassen Sie Reparaturen am Gerät oder am Kabel nur von einer
Fachkraft des Service-Zentrums durchführen. Durch
unsachgemäße Reparaturen können erhebliche Gefahren für den
Benutzer entstehen.
96
Sicherheitshinweise
• Kinder unterschätzen häufig die Gefahren beim Umgang mit
Elektrogeräten. Lassen Sie Kinder nie unbeaufsichtigt in die Nähe
von Elektrogeräten.
• Lassen Sie Kinder nich mit den Geräten oder seinen Teilen spielen.
Vorsicht Mögliche Beschädigungen des Gerätes. Im Gefahrfall Gerät sofort vom 230V-Stromnetz trennen.
• Das Gerät darf nicht in Feuchträumen (z. B. Badezimmer) oder
Räumen mit starkem Staubanfall verwendet werden.
• Bei einem Gewitter können am Stromnetz angeschlossene Geräte
Schaden nehmen. Ziehen Sie bei Gewitter deshalb immer das
Steckernetzgerät aus der Steckdose.
• Um das Gerät vollständig von der Stromversorgung zu trennen,
muss das Steckernetz-gerät aus der Steckdose gezogen werden.
Dabei immer am Steckernetzgerät und niemals am Kabel ziehen.
• Kabel regelmäßig auf eventuelle Schäden prüfen, vor heißen
Oberflächen oder anderen Gefahrenquellen schützen, vollständig
abwickeln, stolper- und klemmfrei verlegen.
Warnung Verletzungs- bzw. Lebensgefahr durch Brand!
Gerät nicht übermäßiger Wärme aussetzen und bei
Gefahr sofort vom 230V-Stromnetz trennen.
Im Inneren des Gerätes aufstauende Hitze kann zum Defekt bzw. zum
Brand des Gerätes führen. Dieses Gerät daher keiner extremen
Temperatur aussetzen:
– Direkte Sonneneinstrahlung und Heizungswärme vermeiden
– Lüftungsschlitze des Gerätes nicht verdecken
Explosionsgefahr:
Warnung Verletzungsgefahr durch Explosion!
Achten Sie besonders auf Kinder!
• Werfen Sie Batterien bzw. Akkus niemals ins Feuer.
• Gerät nicht in explosionsgefährdeter Umgebung in Betrieb
nehmen!
97
Deutsch
Brandgefahren:
Sicherheitshinweise
Vergiftungsgefahr:
Warnung Verletzungsgefahr durch Vergiftung!
Achten Sie besonders auf Kinder!
• Bewahren Sie Batterien bzw. Akkus für Kinder unzugänglich auf.
Erstickungsgefahr:
Warnung Verletzungsgefahr durch Ersticken!
Achten Sie besonders auf Kinder!
• Verpackungsfolien von Kindern fernhalten.
• Bei Kabelverlegung mögliche Gefahren für Kinder bedenken
(Gefahr des Strangulierens).
Störungen:
Warnung Mögliche Verletzungsgefahr durch Gerätestörungen!
Achten Sie besonders auf medizinische Geräte.
• Medizinische elektrische Geräte können durch elektromagnetische
Strahlung Ihres Gerätes in ihrer Funktion beeinflusst werden. Das
Gerät daher in ausreichendem Abstand zu medizinischen
elektrischen Geräten installieren und betreiben. Das gilt auch für implantierte medizinische Geräte, z. B.
Herzschrittmacher.
• Das Mobilteil kann in Hörgeräten einen unangenehmen Brummton
verursachen, daher ausreichenden Abstand zu Hörgeräten
einhalten.
Mögliche Beschädigungen:
Vorsicht Mögliche Beschädigung des Gerätes! Beachten Sie
die Hinweise dieser Bedienungsanleitung.
• Verwenden Sie nur die mitgelieferten Steckernetzgeräte. Keine
fremden Steckernetz-geräte verwenden, da die Akkus beschädigt
werden könnten.
• Die Steckdose zum Anschluss des Steckernetzgerätes muss nahe
am jeweiligen Gerät angebracht und leicht zugänglich sein.
• Verwenden Sie nur die mitgelieferten Akkus. Bei Ersatz nur Akkus
des gleichen Typs verwenden. Akkus richtig gepolt einlegen
(Hinweise hierzu finden Sie im Akkufach des jeweiligen Mobilteils).
Verwenden Sie niemals normale Batterien!
98
Erste Schritte
Wichtig
Bei Stromausfall ist das Telefonieren mit diesem
Gerät nur möglich mit der Basisstation.
2.1 Hinweise zur strahlungsarmen Betriebsweise
Dieses schnurlose Telefon (nach DECT-Standard) ermöglicht einen
strahlungsarmen Betrieb (ECO mode).
Während eines Gesprächs verringert das Mobilteil die Funkleistung
entfernungsabhängig zur Basis. Wenn kein Gespräch geführt wird,
reduziert das Mobilteil die Funkleistung auf ein Minimum. Das
bedeutet jedoch nicht, dass die normale DECT-Funkstrahlung
gesundheits-schädlich ist, sondern dass die strahlungsarme
Funktionsweise unnötige Strahlungs-belastung vermeidet.
Die Basis reduziert die Funkleistung nicht! Stellen Sie die Basisstation
dort auf, wo Sie sich nicht ständig aufhalten, zum Beispiel im Flur.
Meiden Sie Kinder-, Schlaf- und Wohnzimmer.
3 Erste Schritte
In dieser Bedienungsanleitung wird folgende Methode angewendet,
um die Anweisungen zu verdeutlichen:
Text ....... „Display“.
Text, der auf dem Telefon-Display erscheint
Zu drückende Taste
3.2 Basisstation installieren
Basisstation wie folgt installieren:
1 Netzadapter erst an die Basisstation und dann an eine
Steckdose anschließen.
2 Das eine Ende des Telefonkabels an den
Telefonwandanschluss und das andere Ende an den Anschluss
auf der Rückseite der Basisstation anschließen.
3 Das Telefon- und das Stromkabel wie in Abbildung 3A gezeigt
anschließen.
99
Deutsch
3.1 Zum Gebrauch dieser Bedienungsanleitung
Erste Schritte
B
A
C
- 3A Basisstation A. Telefonwandanschluss
B. Netzadapter mit Kabel
C. Telefonkabel
3.3 Mobilteil
Vorsicht Verletzungsgefahr durch Explosion!
Nur mitgelieferte oder gleichartige Akkus einlegen.
Keine Batterien!
Andernfalls kann das Mobilteil beschädigt werden.
1
2
3
4
Öffnen Sie das Akkufach wie in Abbildung 3B dargestellt.
Legen Sie die Akkus ein. Achten Sie dabei auf richtige Polarität
(+ und -).
Schließen Sie das Akkufach.
Laden Sie das Mobilteil 16 Stunden im Ladegerät auf. Die
Lade-LED am Ladegerät leuchtet auf.
A
B921
- 3B Rückseite des Mobilteils A.Abdeckung
B.Akkus
+
B
100
+
Erste Schritte
3.4 Akkuzustandsanzeige
Das Mobilteil funktioniert nicht mehr, wenn die Akkus leer sind. Wenn
die Akkus vollständig entladen sind und Sie das Mobilteil nur für kurze
Zeit ins Ladegerät stellen, zeigt die Akkuzustandsanzeige an, dass die
Akkus voll sind. Dies ist jedoch nicht der Fall, und die Akkuleistung
wird rasch nachlassen. Sie müssen das Mobilteil 16 Stunden lang im
Ladegerät lassen, um die Akkus vollständig aufzuladen.
Aufgeladene Akkus
Leere Akkus
Wenn die Akkus während eines Anrufs fast leer sind, erzeugt das
Mobilteil einen Warnton. Stellen Sie das Mobilteil auf das MobilteilLadegerät, um die Akkus wieder aufzuladen.
3.5 Tasten/Display
14
13
1
12
11
10
2
R
OK
ESC/
INT
3
4
9
5
8
6
7
- 3C Vorderseite des Mobilteils 101
Deutsch
Schnurloses Mobilteil
1. Wahlwiederholung / Nach oben
2. Telefonbuch
3. Stummschalten / Löschen
4. Auflegen
5. Alphanumerische Tasten
6. Tastatursperre
7. Pause
8. Rufton EIN/AUS
9. Anrufliste / Nach unten
10.Gespräch annehmen /
Freisprechen / Anruftaste
11. INT / Escape
12.Menü / OK / Flash
13.Display
14.Rote LED-Anzeige; blinkt
während eines Anrufs
Erste Schritte
Basisstation
15.Paging-Taste
16.Mobilteil-Ladeanzeige (LED)
17.LED-Anzeige für Anruf
17
16
15
3.6 Mobilteil-Display
MOBILTEIL X
x = Mobilteil-Nummer
Weitere Nummern oder
Menü nach links
durchblättern
Telefonbucheinträge
finden oder erstellen
Rufton ausgeschaltet
Tastatursperre
eingeschaltet
Telefonverbindung
besteht
Neue Nummern in der
Anrufliste
Interner Anruf
102
- 3D Basisstation -
Weitere Nummern oder
Menü nach rechts
durchblättern
Akkuzustandsanzeige
Freisprechmodus
eingeschaltet
Neue Voicemail-Nachricht
Mikrofon stummgeschaltet
Die Antenne gibt die Stärke
des Empfangssignals an.
Die Antenne blinkt, wenn
sich das Mobilteil außer
Reichweite befindet.
Erste Schritte
3.7 Durch das Menü navigieren
Das Sologic B921 verfügt über ein leicht zu bedienendes Menüsystem.
Jedes Menü besteht aus einer Reihe von Optionen.
Nachstehend finden Sie eine Übersicht über die Menüs des Mobilteils
und der Basis.
OK
1
2
OK
ESC
3
4
Zum Öffnen des Hauptmenüs die Menü/OK-Taste
drücken.
Blättern Sie zur gewünschten Menüoption.
Drücken Sie die Menü/OK-Taste zum Aufrufen
weiterer Optionen oder zum Bestätigen der
angezeigten Einstellung.
Um zur vorherigen Stufe des Menüs
zurückzugehen, drücken Sie die Escape-Taste.
Mobilteil
Deutsch
TELEFONBUCH
MOBILTEIL
RUFTON
MOBILT NAME
TASTENTON
BASIS AUSW
RESET
SPRACHE
MT ANMELDEN
MT ABMELDEN
3.8 Die alphanumerischen Tasten verwenden
Mit den alphanumerischen Tasten können Sie Text eingeben. Zum
Auswählen eines Buchstabens drücken Sie die entsprechende
alphanumerische Taste 5 . Wenn Sie z. B. die alphanumerische
Taste 5 drücken, wird der erste Buchstabe „j“ im Display angezeigt.
Durch mehrmaliges Drücken wählen Sie die anderen Buchstaben
dieser Taste aus.
Drücken Sie einmal die Taste 2, um den Buchstaben „a“
auszuwählen. Wenn Sie die Buchstaben „a“ und „b“ nacheinander
auswählen möchten, drücken Sie die Taste 2 einmal, um „a“
auszuwählen. Warten Sie 2 Sekunden, bis der Cursor an die nächste
Position gerückt ist, und drücken Sie die Taste 2 nun zweimal, um „b“
auszuwählen. Mit der Löschtaste
3 können Sie versehentlich
103
Bedienung des Telefons
eingegebene Buchstaben löschen. Es wird der Buchstabe vor dem
Cursor gelöscht.
Tabelle der Zeichen
1
2
3
4
5
6
7
8
9
0
Leerzeichen+ - / 1
ABC2
DEF3
GHI4
JKL5
MNO6
PQRS7
TUV8
WXYZ9
_0
4 Bedienung des Telefons
4.1 Sprache ändern
1
OK
2
OK
3
OK
4
OK
5
ESC
Die Menü/OK-Taste drücken.
„MOBILTEIL“ (HANDSET) wählen und
bestätigen.
„SPRACHE“ (LANGUAGE) wählen und
bestätigen.
Wählen Sie die gewünschte Sprache aus, und
bestätigen Sie die Auswahl.
Drücken Sie die Esc-Taste, um in den StandbyModus zurückzukehren.
4.2 Abgehende Anrufe
Einen Anruf tätigen
1 Drücken Sie die Anruftaste.
2 Die Telefonnummer eingeben.
4 5 6
3 Drücken Sie die Auflegen-Taste, um das Gespräch
zu beenden.
G
H
I
104
J
K
L
M
N
O
Bedienung des Telefons
Wahlvorbereitung
1 Die Telefonnummer eingeben.
4 5 6
Sie können eine falsche Nummer mit der
Stummschalttaste korrigieren. Wenn Sie 10 Sekunden lang keine Taste drücken,
verschwindet die Nummer, und das Mobilteil kehrt in
den Standby-Modus zurück.
2 Drücken Sie die Anruftaste.
Die Telefonnummer wird automatisch gewählt.
3 Drücken Sie die Auflegen-Taste, um das Gespräch
zu beenden.
G
H
I
J
K
L
M
N
O
Die letzte Telefonnummer erneut wählen
Drücken Sie die Anruftaste.
2 Drücken Sie die Wahlwiederholungstaste.
Die letzte Telefonnummer wird automatisch gewählt.
3 Drücken Sie die Auflegen-Taste, um das Gespräch
zu beenden.
Eine der letzten 3 gewählten Nummern erneut wählen
1 Die Wahlwiederholungstaste drücken.
Die zuletzt gewählte Nummer erscheint im Display.
Wenn Sie eine der letzten 3 gewählten Nummern
erneut wählen möchten, die Wahlwiederholungstaste mehrmals drücken, bis die gewünschte
Nummer im Display erscheint.
2 Drücken Sie die Anruftaste.
Die Telefonnummer wird automatisch gewählt.
3 Drücken Sie die Auflegen-Taste, um das Gespräch
zu beenden.
4.3 Ankommende Anrufe
Bei einem ankommenden Anruf klingelt das Mobilteil und Basisstation,
und die LED „Visuelles Anrufsignal“ (siehe Punkt 14 in Abbildung 3C
und Punkt 17 in Abbildung 3D) an der Mobilteil und der Basisstation
blinken.
105
Deutsch
1
Bedienung des Telefons
1
2
Drücken Sie die Gespräch-annehmen-Taste, um
das Gespräch zu beginnen.
Drücken Sie die Auflegen-Taste, um das Gespräch
zu beenden.
4.4 Freisprechmodus ein-/ausschalten
Mit dieser Funktion kann man einen Anruf annehmen, ohne das
Mobilteil festhalten zu müssen, oder wenn bereits ein Gespräch auf
dem Mobilteil geführt wird.
Während des Gesprächs:
1 Die Freisprechtaste drücken, um die Funktion zu
aktivieren.
2 Erneut die Freisprechtaste drücken, um das
Gespräch wieder zum Mobilteil zu schalten.
Wichtig
Wenn Sie die Freisprechfunktion längere Zeit
nutzen, entladen sich die Akkus schneller!
4.5 Stummschaltung
Das Mikrofon kann während eines Gesprächs stummgeschaltet
werden, sodass Sie sprechen können, ohne von der Person am
anderen Ende der Leitung gehört zu werden.
Stummschalttaste drücken.
Das Mikrofon ist stummgeschaltet und „MIKROFON
AUS“ (MUTED) wird angezeigt.
2 Die Stummschalttaste noch einmal drücken, um
das Mikrofon wieder zu aktivieren.
1
4.6 Einstellen der Hörmuschel-/Freisprechlautstärke
Während eines Gesprächs:
1 Die Nach-oben- bzw. die Nach-unten-Taste
drücken.
Sie können die Lautstärke auf die Stufen 1 bis 5
einstellen.
106
Bedienung des Telefons
4.7 Die R-Taste (Flash)
OK
Drücken Sie die Flash-Taste (Taste 12 in
Abbildung 3C „Schnurloses Mobilteil“ auf Seite 101),
um spezielle Dienste Ihres externen Anschlusses zu
nutzen, z. B. „Anklopfen“ (vorausgesetzt, Ihr
Netzbetreiber bietet diesen Dienst an), oder um einen
Anruf weiterzuleiten, wenn Sie ein Telefonsystem
verwenden. Die Flashtaste R unterbricht kurzzeitig
Ihre Verbindung. Sie können diese Unterbrechung auf
100 ms oder 300 ms einstellen. Zum Einstellen einer
anderen Flashzeit siehe „5.4 Die R-Taste (Flash)“.
Ruftonmelodie des Mobilteils für interne/externe Anrufe
1 Die Menü/OK-Taste drücken.
OK
OK 2 „MOBILTEIL“ (HANDSET) wählen und bestätigen.
OK 3 „RUFTON“ (RING TONE) wählen und bestätigen.
4 „INTERN“ (INTERNAL) oder „EXTERN“
(EXTERNAL) wählen und bestätigen.
OK
5 Nun eine Ruftonmelodie (1 bis 9) auswählen und
bestätigen.
OK
Ruftonlautstärke des Mobilteils
1 Die Menü/OK-Taste drücken.
OK
OK 2 „MOBILTEIL“ (HANDSET) wählen und bestätigen.
OK 3 „RUFTON“ (RING TONE) wählen und bestätigen.
4 „LAUTSTARKE“ (VOLUME) wählen und
bestätigen.
OK
5 Die gewünschte Lautstärke (Aus, 1-5) wählen und
bestätigen.
OK
Wichtig
Sie können die Ruftonlautstärke jedes einzelnen
Mobilteils EIN oder AUS stellen, indem Sie einfach
die Taste Rufton EIN/AUS
im Standby-Modus
gedrückt halten.
Das Symbol
erscheint im Display, und die
Tastatursperre ist aktiviert.
107
Deutsch
4.8 Rufton auswählen und Lautstärke einstellen
Bedienung des Telefons
4.9 Tastatursperre
Wenn die Tastatursperre aktiviert ist, haben die Tasten im StandbyModus keine Funktion (mit Ausnahme der Tastatursperrtaste).
1 Halten Sie die Tastatursperrtaste gedrückt.
Das Symbol erscheint im Display.
2 Die Tastatursperrtaste erneut gedrückt halten, um
die Tastatursperre zu deaktivieren.
Wenn die Tastatursperre aktiviert ist, können Sie
trotzdem ankommende Anrufe annehmen, in dem
Sie die Gespräch-annehmen-Taste drücken. Die
Tastatur funktioniert während des Gesprächs wie
gewohnt. Die Tastatursperre wird nach dem
Gespräch erneut aktiviert.
4.10 Mobilteil-Name
Sie können den Namen, der auf dem Display angezeigt wird, ändern
(max. 12 Zeichen), wenn kein Gespräch geführt wird:
1 Die Menü/OK-Taste drücken.
OK
OK 2 „MOBILTEIL“ (HANDSET) wählen und bestätigen.
3 „MOBILT NAME“ (HANDSET NAME) wählen und
bestätigen.
OK
4 5 6 4 Den vorherigen Namen mit der Stummschalttaste
löschen und einen neuen Namen eingeben.
5 Zur Bestätigung drücken.
OK
6 Drücken Sie die Esc-Taste, um in den StandbyESC
Modus zurückzukehren.
G
H
I
J
K
L
M
N
O
4.11 Tastenton ein-/ausschalten
1
OK
OK 2
3
OK
4
108
OK
5
ESC
6
Die Menü/OK-Taste drücken.
„MOBILTEIL“ (HANDSET) wählen und bestätigen.
„TASTENTON“ (KEYPAD BEEP) wählen und
bestätigen.
Wählen Sie nun „EIN“ (ON) oder „AUS“ (OFF).
Zur Bestätigung drücken.
Drücken Sie die Esc-Taste, um in den StandbyModus zurückzukehren.
Bedienung des Telefons
4.12 Telefonbuch
Sie können 50 Einträge im Telefonbuch speichern. Namen können bis
zu 16 Zeichen und Telefonnummern bis zu 24 Ziffern lang sein.
Einen Telefonbucheintrag hinzufügen
1 Die Telefonbuch-Taste drücken.
OK 2 Drücken Sie zweimal die OK-Taste.
OK
4 5 6 OK 3 Den Namen eingeben und bestätigen.
4 Die gewünschte Telefonnummer eingeben und
4 5 6
bestätigen.
OK
Nun ertönt ein Bestätigungston.
J
K
L
M
N
O
G
H
I
J
K
L
M
N
O
Eine Kurzwahlnummer wählen
1 Die Telefonbuch-Taste drücken.
2 Zum gewünschten Namen blättern oder die
Anfangsbuchstaben des Namens eingeben.
4 5 6
3 Die Telefonbuchtaste drücken, um die
Telefonnummer anzuzeigen.
4 Drücken Sie nun die Anruftaste.
Die Telefonnummer wird automatisch gewählt.
5 Drücken Sie die Auflegen-Taste, um das Gespräch
zu beenden.
G
H
I
J
K
L
M
N
O
Einen Telefonbucheintrag bearbeiten
1 Die Telefonbuch-Taste drücken.
2 Zum gewünschten Namen blättern oder die
Anfangsbuchstaben des Namens eingeben.
4 5 6
3 Die Telefonbuchtaste drücken, um die
Telefonnummer anzuzeigen.
4 Die Menü/OK-Taste drücken.
OK
OK 5 „BEARB“ (EDIT ENTRY) wählen und bestätigen.
4 5 6 OK 6 Den Namen eingeben und bestätigen.
4 5 6 OK 7 Die Telefonnummer eingeben oder ändern und
bestätigen.
G
H
I
G
H
I
J
K
L
M
N
O
G
H
I
J
K
L
M
N
O
J
K
L
M
N
O
109
Deutsch
G
H
I
Bedienung des Telefons
Einen oder alle Einträge im Telefonbuch löschen
1 Die Telefonbuch-Taste drücken.
2 Zum gewünschten Namen blättern oder die
Anfangsbuchstaben des Namens eingeben.
4 5 6
3 Die Telefonbuchtaste drücken, um die
Telefonnummer anzuzeigen.
4 Die Menü/OK-Taste drücken.
OK
5 „LOESCHEN“ (DELETE ENTRY) wählen, um den
aktuellen Telefonbucheintrag zu löschen, und
bestätigen.
OK
ODER
6 „ALLE LOESCH“ (DELETE ALL) wählen, um alle
Telefonbucheinträge zu löschen, und bestätigen.
OK
ESC 7 Nochmals bestätigen oder zum Überspringen EscOK
Taste drücken.
G
H
I
J
K
L
M
N
O
4.13 Anruferkennung (CLIP)
Das Sologic B921 zeigt die Telefonnummer ankommender Anrufe an.
Diese Funktion kann nur benutzt werden, wenn Sie sich für diesen
Dienst bei Ihrem Netzanbieter angemeldet haben. Weitere
Informationen erhalten Sie von Ihrem Netzanbieter.
Wenn Sie einen Anruf erhalten, wird die Telefonnummer in einer
Anrufliste gespeichert. Diese Liste kann bis zu 30 Telefonnummern
(jede mit maximal 23 Ziffern) enthalten.
Wenn die Telefonnummer aus mehr als 12 Ziffern
besteht, können Sie im Display nach rechts gehen,
um die restlichen Ziffern zu sehen.
Neue Anrufe
Wenn ein neuer Anruf in der Anrufliste ist, blinkt das
CLIP-Symbol im Display.
Anrufliste aufrufen
1 Die Taste für die Anrufliste drücken.
Der zuletzt empfangene Anruf wird angezeigt. Ist die
Anrufliste leer, meldet das Display „LEER“ (EMPTY).
2 Auf die Telefonbuchtaste drücken, um die Nummer
zu überspringen.
110
Bedienung des Telefons
3
4
ESC
5
Auf die Telefonbuchtaste drücken, um Datum und
Uhrzeit zu überspringen.
Die Nach-oben- bzw. die Nach-unten-Taste
drücken, um die Liste zu durchblättern.
Drücken Sie die Esc-Taste, um die Anrufliste zu
verlassen.
Eine Nummer aus der Anrufliste löschen
1 Die Taste für die Anrufliste drücken.
2 Durchsuchen Sie die Anrufliste, bis die
gewünschte Telefonnummer angezeigt wird.
3 Die Menü/OK-Taste drücken.
OK
4 „LOESCHEN“ (DELETE) wählen, um die aktuelle
Telefonnummer zu löschen, und bestätigen.
OK
ODER
5 „ALLE LOESCH“ (DELETE ALL) wählen, um alle
Telefonbucheinträge zu löschen, und bestätigen.
OK
ESC 6 Zur Bestätigung drücken oder die Esc-Taste
OK
drücken, um zurückzukehren.
Eine Nummer aus der Anrufliste als Kurzwahlnummer
speichern
1 Die Taste für die Anrufliste drücken.
2 Durchsuchen Sie die Anrufliste, bis die
gewünschte Telefonnummer angezeigt wird.
3 Die Menü/OK-Taste drücken.
OK
111
Deutsch
Eine Nummer aus der Anrufliste anrufen
1 Die Taste für die Anrufliste drücken.
2 Durchsuchen Sie die Anrufliste, bis die
gewünschte Telefonnummer angezeigt wird.
3 Drücken Sie die Anruftaste, um das Gespräch zu
beginnen.
Die Telefonnummer wird automatisch gewählt.
4 Drücken Sie die Auflegen-Taste, um das Gespräch
zu beenden.
Bedienung des Telefons
4
OK
5
4 5 6
G
H
I
J
K
L
M
N
O
OK
4 5 6
G
H
I
J
K
L
M
N
O
OK 6
„PB SPEICHERN“ (SAVE TO PB) wählen und
bestätigen.
Einen Namen ändern oder hinzufügen und dann
bestätigen.
Die Telefonnummer ändern und bestätigen.
4.14 Mobilteil auf die Standard-Einstellungen zurücksetzen
Hierdurch werden alle Änderungen gelöscht und alle Voreinstellungen
wiederhergestellt (Ruftonlautstärke, Ruftonmelodie, usw.). Außerdem
werden dadurch die Anrufliste, die Wiederwahlliste und das
Telefonbuch gelöscht!
1 Die Menü/OK-Taste drücken.
OK
OK 2 „MOBILTEIL“ (HANDSET) wählen und bestätigen.
OK 3 „RESET“ (RESET) wählen und zweimal
bestätigen.
OK
4 Geben Sie die PIN-Nummer der Basisstation ein
4 5 6
(voreingestellt ist 0000).
5 Das Gerät kehrt in den Standby-Modus zurück.
G
H
I
J
K
L
M
N
O
Die Standard-Einstellungen sind:
Name des Mobilteils
HANDSET
Lautstärke Hörmuschel Stufe 3
Ruftonlautstärke
Stufe 3
Externer Rufton
Rufton 8
Interner Rufton
Rufton 1
Tastenton
Ein
4.15 Sprachspeicheranzeige
Diese Anzeige funktioniert nur, wenn Sie den Sprachspeicher- oder
Telefonnachrichten-dienst freigeschaltet haben und Ihr Telefondiensteanbieter diese Information zusammen mit der Rufnummernanzeige
übermittelt! Wenn Sie eine neue Nachricht in Ihre Sprachspeicherbox
erhalten, erscheint das
Symbol im Display. Wenn Sie Ihre
Nachricht angehört haben, verschwindet das
Symbol.
112
Einstellungen der Basisstation
5 Einstellungen der Basisstation
Info
Dieser Abschitt beschreibt nur die in der
Basisstation gespeicherten Einstellungen.
5.1 Rufton auswählen und Lautstärke einstellen
Ruftonlautstärke der Basisstation
1 Die Menü-/OK-Taste drücken.
OK
OK 2 „BASIS“ (BASE) wählen und bestätigen.
3 „LAUTSTARKE“ (RING VOLUME) wählen und
bestätigen.
OK
4 Die gewünschte Lautstärke (Aus, 1-5) wählen und
bestätigen.
OK
5.2 Wahlverfahren einstellen
Für Telefonanschlüsse gibt es zwei Wahlverfahren:
- DTMF/Tonwahlverfahren (am häufigsten)
- Impulswahlverfahren (Nur notwendig wenn dieses Gerät an einer
älteren Telefonanlage betrieben wird!)
1 Die Menü-/OK-Taste drücken.
OK
OK 2 „BASIS“ (BASE) wählen und bestätigen.
3 „ANRUF TYP“ (DIAL MODE) wählen und
bestätigen.
OK
4 „TON“ (TONE) oder „IMPULS“ (PULSE) wählen
und bestätigen.
OK
5.3 PIN-Nummer einstellen
Bestimmte Funktionen sind nur verfügbar, wenn Sie die PIN-Nummer
der Basisstation kennen.
113
Deutsch
Rufton des Mobilteils für interne/externe Anrufe
1 Die Menü-/OK-Taste drücken.
OK
OK 2 „BASIS“ (BASE) wählen und bestätigen.
OK 3 „RUFTON“ (RING TONE) wählen und bestätigen.
4 Nun eine Ruftonmelodie (1 bis 9) wählen und
bestätigen.
OK
Ein Mobilteil an- oder abmelden
Die PIN-Nummer hat 4 Zeichen. Die voreingestellte PIN-Nummer
lautet „0000“. Wenn Sie die PIN-Nummer ändern und eine eigene
Geheimnummer einstellen möchten, gehen Sie folgendermaßen vor:
1 Die Menü-/OK-Taste drücken.
OK
OK 2 „BASIS“ (BASE) wählen und bestätigen.
3 „PIN NUMMER“ (SYSTEM PIN) wählen und
bestätigen.
OK
4 5 6 OK 4 „ALTE-“ (OLD PIN) eingeben und OK drücken.
4 5 6 OK 5 „NEUE-“ (NEW PIN) eingeben und bestätigen.
G
H
I
J
K
L
M
N
O
G
H
I
J
K
L
M
N
O
5.4 Die R-Taste (Flash)
Drücken Sie die Flash-Taste um spezielle Dienste Ihres externen
Anschlusses zu nutzen, z. B. „Anklopfen“ (vorausgesetzt, Ihr
Netzbetreiber bietet diesen Dienst an), oder um einen Anruf
weiterzuleiten, wenn Sie ein Telefonsystem verwenden. Die
Flashtaste R unterbricht kurzzeitig Ihre Verbindung. Sie können diese
Unterbrechung auf 100 ms oder 300 ms einstellen. Wenn Ihr System
jedoch eine andere Flashzeit benötigt, können Sie sie ändern.
1 Die Menü-/OK-Taste drücken.
OK
OK 2 „BASIS“ (BASE) wählen und bestätigen.
OK 3 „FLASH“ (RECALL) wählen und bestätigen.
4 Nun „LANGE“ (LONG) oder „KURZ“ (SHORT)
wählen und bestätigen.
OK
6 Ein Mobilteil an- oder abmelden
6.1 Ein Mobilteil an der Sologic B921 Basisstation
anmelden
Sie können bis zu 4 Mobilteile an einer Basisstation anmelden. Jedes
Mobilteil ist bei Lieferung bereits an der Basisstation angemeldet.
Sie müssen das Mobilteil nur anmelden, wenn:
• das Mobilteil zuvor von dieser Basisstation abgemeldet wurde (z. B. zur erneuten Initialisierung).
• Sie ein anderes Mobilteil an der Basisstation anmelden möchten.
Die folgende Beschreibung gilt nur für Sologic B921 Mobilteile und
Basisstationen.
114
Ein Mobilteil an- oder abmelden
Halten Sie die Paging-Taste an der Basisstation für
10 Sekunden gedrückt.
2 Drücken Sie die Menü/OK-Taste am Mobilteil.
3 „MT ANMELDEN“ (REGISTER) wählen und
bestätigen.
4 Geben Sie die Nummer der Basisstation (1-4) ein,
bei der Sie das Mobilteil anmelden möchten.
5 Das Gerät sucht die Basisstation. Wenn es sie
gefunden hat, werden Sie aufgefordert, die
(vierstellige) PIN-Nummer einzugeben.
6 Geben Sie die PIN-Nummer der Basisstation ein
(voreingestellt ist 0000). Ist die PIN-Nummer falsch,
sucht das Mobilteil erneut nach der Basisstation.
Nachdem das Mobilteil angemeldet wurde,
erscheinen der Name des Mobilteils und seine
Nummer auf dem Display.
1
OK
4 5 6
G
H
I
J
K
L
M
N
O
4 5 6
G
H
I
J
K
L
M
N
O
OK
4 5 6
G
H
I
J
K
L
M
N
O
4 5 6
G
H
I
J
K
L
M
N
O
Die Menü/OK-Taste drücken.
2 „MT ABMELDEN“ (DE-REGISTER) wählen und
bestätigen.
OK
3 Geben Sie die PIN-Nummer der Basisstation ein
(voreingestellt ist 0000).
OK
4 Geben Sie die interne Nummer des Mobilteils ein,
das Sie abmelden möchten(1-5), und bestätigen Sie.
OK
Nachdem das Mobilteil erfolgreich abgemeldet
wurde, kehrt es in den Standby-Zustand zurück.
Andernfalls werden Sie aufgefordert, die MobilteilNummer erneut einzugeben.
Wichtig
1
Mobilteile können nur abgemeldet werden, wenn sie
nicht im Gebrauch sind.
115
Deutsch
6.2 Ein Mobilteil von der Sologic B921 Basisstation
abmelden.
Ein Mobilteil an- oder abmelden
6.3 Auswahl einer Basisstation
Wenn Ihr Mobilteil an mehreren Basisstationen (max. 4) angemeldet
ist, müssen Sie eine von diesen Basisstationen auswählen, da das
Mobilteil zu einem Zeitpunkt immer nur mit einer Basisstation
kommuniziert. Es gibt zwei Möglichkeiten:
Automatische Auswahl
Wenn Sie das Mobilteil auf automatische Auswahl einstellen, sucht
sich das Mobilteil automatisch die nächste Basisstation im
Standby-Modus.
1 Die Menü/OK-Taste drücken.
OK
OK 2 „MOBILTEIL“ (HANDSET) wählen und bestätigen.
OK 3 „BASIS AUSW“ (SELECT BASE) wählen und
bestätigen.
OK 4 „AUTOMATISCH“ (AUTOMATIC) wählen und
bestätigen.
Info
Wenn Sie die Basisstation automatisch auswählen
lassen und das Mobilteil außer Reichweite der
derzeitigen Basisstation gelangt, sucht das Mobilteil
nur nach der stärksten Basisstation im StandbyModus (nicht während eines Gesprächs).
Manuelle Auswahl
Wenn Sie das Mobilteil auf manuelle Auswahl einstellen, sucht das
Mobilteil nur nach der von Ihnen eingestellten Basisstation.
1 Die Menü/OK-Taste drücken.
OK
OK 2 „MOBILTEIL“ (HANDSET) wählen und bestätigen.
OK 3 „BASIS AUSW“ (SELECT BASE) wählen und
bestätigen.
OK 4 „MANUELL“ (MANUAL) wählen und bestätigen.
OK 5 Wählen Sie die Basisstation und bestätigen.
Wichtig
116
Damit Sie eine Basisstation auswählen können,
muss das Mobilteil an der betreffenden Basisstation
angemeldet sein.
Anrufweiterleitung und interne Anrufe von einem Mobilteil zum anderen
7 Anrufweiterleitung und interne Anrufe von einem
Mobilteil zum anderen
7.1 Anrufweiterleitung und Konferenzschaltung während
eines externen Gesprächs
INT
INT
J
K
L
M
N
O
8 Abkürzungen und Fachbegriffe
CLIP
Calling Line Identification Presentation, Übertragung der Rufnummer
des Anrufers und Anzeige am Display des Angerufenen.
DECTsDigital Enhanced Cordless Telecommunication;
Europäischer Telekommunikationsstandard für digitale,
„schnurlose“ Telefone.
ECO Mode
Economic Mode; im Bereich der DECT-Telefonie strahlungsarme
Betriebsweise.
Flash-Taste
Bewirkt eine kurze Leitungsunterbrechung, womit Leistungsmerkmale
wie Makeln oder Weiterleitungen aktiviert werden. Im Falle von
Telefonanlagen wird die Flash- oder R-Taste für interne Rückfragen
verwendet.
117
Deutsch
4 5 6
G
H
I
Drücken Sie während eines externen Gesprächs
die INT-Taste und anschließend die Nummer des
Mobilteils (1-4).
Das andere Mobilteil klingelt
Wenn die Verbindung mit dem anderen Mobilteil
hergestellt wurde, können Sie intern sprechen.
Wenn Sie auflegen, wird das externe Gespräch an
das andere Mobilteil weitergeleitet.
2 Halten Sie die INT-Taste 3 Sekunden lang
gedrückt. Jetzt können Sie mit dem zweiten
Mobilteil und der externen Verbindung gleichzeitig
sprechen (Konferenzschaltung).
3 Drücken Sie die INT-Taste erneut, um zum
externen Anruf zurückzuschalten.
4 Drücken Sie die Auflegen-Taste, um das Gespräch
zu beenden.
1
INT
Problembeseitigung
GAP
Generic Access Profile; Schnittstelle zwischen Basisstation und
Mobilteil, die die drahtlose Verbindung ermöglicht.
INT
Interner Teilnehmer. Weiteres Mobilteil oder Nebenstelle innerhalb
einer Telefonanlage.
IWV
Impulswahlverfahren; veraltetes, analoges Wahlverfahren
(„klackernde“ Wählgeräusche).
LCD
Liquid Crystal Display; Flüssigkristallanzeige.
LED
Light Emitting Diode; Leuchtdiode.
MFV
Mehrfrequenzwahlverfahren; modernes, digitales Wahlverfahren.
PIN
Personal Identification Number.
R-Taste
Rückfrage-Taste (siehe Flash-Taste).
Standby
„Ruhezustand“ eines Gerätes, ohne völlig ausgeschaltet zu sein.
Twin
„Zwilling“; Bezeichnung für eine Geräteeinheit mit zwei identischen
Geräten, z. B. zwei Mobilteilen.
9 Problembeseitigung
Problem
Mögliche Ursache
Lösung
Kein Display.
Akkus sind nicht
geladen.
Kein Ton.
Das Telefonkabel ist
nicht korrekt
angeschlossen.
Prüfen, ob beide
Akkus korrekt
eingelegt wurden.
Akkus laden.
Telefonkabelanschluss überprüfen.
118
Problembeseitigung
Mögliche Ursache
Lösung
Die Leitung ist von
einem anderen
Mobilteil besetzt.
Warten, bis das
andere Mobilteil
aufgelegt wird.
Der Anrufer ist zu
leise.
Der Rufton des
Mobilteils ist zu
leise.
Eine Nummer kann
nicht gewählt
werden.
Das -Symbol
blinkt.
Regeln Sie die
Lautstärke während
des Gesprächs mit der
Lautstärketaste.
Ruftonlautstärke
einstellen.
Das Wahlverfahren ist Siehe „5.2
falsch eingestellt.
Wahlverfahren
einstellen“, um das
richtige Wahlverfahren
einzustellen.
Mobilteil außer
Mobilteil in die
Reichweite.
Reichweite der
Basisstation bringen.
Die Basisstation hat
Netzadapter und keinen Strom.
kabel prüfen.
Das Mobilteil ist nicht
an der Basisstation
angemeldet.
Basisstation oder
Die Ruftonlautstärke ist
Mobilteil klingeln
ausgeschaltet oder zu
nicht.
leise.
Ein Anruf kann nicht Die Flashzeit ist zu
an einen Nebenkurz.
anschluss weitergeleitet werden.
Das Telefon reagiert Bedienungsfehler.
nicht, wenn Tasten
gedrückt werden.
Das Mobilteil an der
Basisstation
anmelden.
Ruftonlautstärke
einstellen.
Das Gerät auf lange
Flashzeit einstellen.
Akkus herausnehmen
und wieder einsetzen.
119
Deutsch
Problem
Servicemaßnahmen
Keine Veränderungen oder Reparaturen am Gerät vornehmen.
Lassen Sie Reparaturen am Gerät oder am Kabel nur von einer
Fachkraft des Service-Zentrums durchführen. Durch unsachgemäße
Reparaturen können erhebliche Gefahren für den Benutzer entstehen.
10 Servicemaßnahmen
10.1 Wartung
Das Gerät ist wartungsfrei. Prüfen Sie gelegentlich den Zustand der
Akkus und tauschen Sie diese bei nachlassender Leistung oder
beginnender Undichtigkeit gegen gleichartige neue Akkus aus.
Warnung Verätzungsgefahr!
Zur Entnahme ausgelaufener Akkus
Schutzhandschuhe tragen.
Falls das Gerät mit Flüssigkeit in Berührung gekommen ist,
entnehmen Sie sofort die Akkus bzw. trennen es von der
Stromversorgung (Basis) und trocknen das Gerät sorgfältig. Nach 2-3
Tagen Trocknungszeit Funktion prüfen. Bei Defekt an ServiceZentrum einschicken.
10.2 Reinigung
Warnung Gefahr eines Stromschlags oder Kurzschlusses
durch Kontakt mit elektrisch leitenden Komponenten.
Verhindern Sie, dass Flüssigkeit in das Gerät gelangt.
Andernfalls sofort das Steckernetzgerät aus der
Steckdose und den Stecker des Telefonkabels aus
der Wandsteckdose ziehen bzw. Akkus entnehmen.
Ebenso bei Beschädigung des Gerätes, des Kabels
oder des Steckernetzteils: Direkten Kontakt sowie
mit Flüssigkeit meiden und Gerät sofort vom 230VStromnetz trennen.
Reinigen Sie das Telefon mit einem mit lauwarmem Wasser leicht
angefeuchteten Lappen oder einem antistatischen Tuch. Verwenden
Sie niemals Reinigungs- oder Scheuermittel.
10.3 Außerbetriebnahme, Lagerung
Wenn Sie das Gerät vorübergehend außer Betrieb nehmen, ziehen
Sie das Telefonkabel aus der Wandsteckdose sowie aus der
120
Technische Daten
Telefonbuchse der Basisstation. Ziehen Sie die Steckernetzgeräte der
Basisstation sowie der Mobilteile aus den 230 V-Steckdosen.
Entnehmen Sie die Akkus der Mobilteile. Bei längerer
Außerbetriebnahme ersetzen Sie die Akkus bei
Wiederinbetriebnahme durch gleichartige neue Akkus.
Lagern Sie die Geräte und die Akkus an einem nicht zu warmen,
trockenen Ort.
10.4 Entsorgung (Umweltschutz)
11 Technische Daten
Standard
Frequenzbereich
Emissionsleistung
Reichweite
Akkus des Mobilteils:
Stromversorgung der
Basisstation
Mobilteil-Standby-Zeit
Mobilteil-Sprechzeit
Ladezeit:
DECT (Digital Enhanced Cordless
Telecommunications)
GAP ( Generic Access Profile )
1.880 MHz bis 1.900 MHz
10 mW (durchschnittliche Leistung pro Kanal)
Bis zu 300 m im Freien - bis zu 50 m in
Gebäuden
2 x 1,2 V, 500 mAh AAA-Typ,
wiederaufladbarer NiMH-Akku
Eingang: 100~240 V AC/50-60 Hz
Ausgang: 6 V DC/500 mA
100 Stunden im Standby-Modus
10 Stunden
16 Stunden
121
Deutsch
Am Ende der Lebensdauer des Gerätes darf dieses sowie
auch die Akkus nicht im normalen Hausmüll entsorgt
werden. Das nebenstehende Symbol am Produkt und/
oder auf der Verpackung zeigt dies an. Bringen Sie das
Gerät zu einer Sammelstelle zur Aufbereitung elektrischer
und elektronischer Geräte. Einige der Materialien des
Produkts können dort wiederverwendet werden. Mit der
Wiederverwertung einiger Teile oder Rohmaterialien aus gebrauchten
Produkten leisten Sie einen wichtigen Beitrag zum Umweltschutz.
Entsorgen Sie auch die Verpackungsmaterialien umweltgerecht.
Wenden Sie sich an Ihre örtlichen Behörden, wenn Sie weitere
Informationen über Sammelstellen in Ihrer Umgebung benötigen.
Topcom-Garantie
Zulässige
+5 °C bis + 45 °C
Betriebstemperaturen
Zulässige relative
25 bis 85 %
Luftfeuchtigkeit
Wählmodus
Impuls- und Tonwahlverfahren (DTMF)
Flashzeit
100 oder 300 ms
Nummernspeicher des
50 Telefonbucheinträge mit bis zu 24 Ziffern
Mobilteils
und 16 Buchstaben
Abmessungen Basisstation/ 117 mm x 117 mm x 60 mm/
Mobilteil
182 mm x 284 mm x 58 mm
Gewicht Basisstation/
239 g mit Netzadapter /
Mobilteil
152 g mit Akkus
Maximaler Stromverbrauch Basis: 2,0 W
12 Topcom-Garantie
12.1 Garantiezeit
Topcom-Geräte haben eine 24-monatige Garantiezeit. Die
Garantiezeit beginnt an dem Tag, an dem das neue Gerät erworben
wurde. Die Garantie gilt nicht für normale Batterien oder
wiederaufladbare Akkus (Typen AA/AAA).
Verschleißteile oder Mängel, die den Wert oder die
Gebrauchstauglichkeit des Geräts nur unerheblich beeinflussen, sind
von der Garantie ausgeschlossen.
Der Garantieanspruch muss durch den Originalkaufbeleg oder eine
Kopie des Kaufbelegs, auf dem das Kaufdatum und das Gerätemodell
ersichtlich sind, nachgewiesen werden.
12.2 Abwicklung des Garantiefalls
Senden Sie das fehlerhafte Gerät mit dem gültigen Kaufbeleg an ein
Topcom Service-Zentrum.
Tritt ein Gerätefehler innerhalb der Garantiezeit auf, übernimmt
Topcom oder ein autorisiertes Service-Zentrum unentgeltlich die
Reparatur jedes durch einen Material- oder Herstellungsfehler
aufgetretenen Defekts mittels Reparatur oder Austausch des
fehlerhaften Geräts oder von Teilen des fehlerhaften Geräts. Bei
einem Austausch können Farbe und Modell vom eigentlich
erworbenen Gerät abweichen.
122
Topcom-Garantie
Das ursprüngliche Kaufdatum bestimmt den Beginn der Garantiezeit.
Die Garantiezeit verlängert sich nicht, wenn das Gerät von Topcom
oder einem seiner autorisierten Service-Zentren ausgetauscht oder
repariert wird.
12.3 Garantieausschlüsse
Dieses Gerät darf nur mit Akkus betrieben werden. Falls Sie die
ursprünglich im Lieferumfang enthaltenen Akkus ersetzen möchten,
prüfen Sie bitte, ob sich die neuen Akkus eignen und wiederaufladbar
sind. Sie dürfen in den Mobilteilen unter keinen Umständen
Alkalibatterien verwenden.
Wenn Sie Alkalibatterien verwenden und das Mobilteil in die
Basisstation setzen, erwärmen sich die Batterien und explodieren
möglicherweise. Ein durch die Verwendung falscher Batterien
bedingter Defekt wird durch den Hersteller nicht entschädigt und das
auf diese Weise beschädigte Gerät fällt nicht unter die Garantie. Alle
Reparaturen werden Ihnen in Rechnung gestellt.
123
Deutsch
Schäden oder Mängel, die durch unsachgemäße Handhabung oder
unsachgemäßen Betrieb verursacht werden, sowie Defekte, die durch
die Verwendung von Nicht-Originalteilen oder -zubehör entstehen,
werden nicht von der Garantie abgedeckt.
Die Garantie deckt keine Schäden ab, die durch äußere Einflüsse
entstanden sind, wie z. B. Blitzeinschlag, Wasser, Brände oder
jegliche Transportschäden.
Wenn die Seriennummer des Geräts verändert, entfernt oder
unleserlich gemacht wurde, kann keine Garantie in Anspruch
genommen werden.
Alle Garantieansprüche erlöschen, wenn das Gerät vom Käufer
repariert, verändert oder umgebaut wurde.
Información general
1 Información general
Este manual de usuario contiene toda la información necesaria para
instalar, configurar y utilizar su dispositivo. Además, también incluye
información e indicaciones importantes acerca de su seguridad, así
como ayuda para la resolución de problemas.
Guarde siempre este manual de usuario cerca del equipo.
Guarde este manual de usuario en un lugar seguro y facilítelo a otros
usuarios si es necesario.
1.1 Producto: Sologic B921
Este producto ha sido fabricado según el estándar de
telecomunicación digital inalámbrica (DECT). La tecnología DECT se
caracteriza por ofrecer una protección de alta seguridad frente a
intercepciones y una transmisión digital de alta calidad. Este teléfono
se ha diseñado para diferentes aplicaciones, por ejemplo, en una red
de estaciones base y terminales inalámbricos que constituyan un
sistema de centralita (PBX) completo. De modo que se pueden utilizar
hasta 4 terminales inalámbricos con una estación base, así como un
terminal inalámbrico con hasta 4 estaciones base. También es posible
realizar llamadas internas entre la estación base y el terminal o entre
dos de los terminales.
Siempre que su conexión disponga de ellas, con este teléfono se
pueden utilizar las funciones de identificación de llamada y servicio de
SMS de su operador de telefonía. Si es usuario de estos servicios, el
número de teléfono de la llamada entrante se muestra en la pantalla
del teléfono.
Importante Para poder utilizar la «identificación de llamada», su línea de teléfono debe tener habilitada dicha
función. Para obtener más información acerca de la
activación de esta función, póngase en contacto con
su operador de telefonía. Si esta función no está
habilitada, los números de las llamadas entrantes
NO se visualizarán en la pantalla del teléfono.
1.2 Derechos de autor
Esta documentación está protegida por derechos de autor.
Se reservan todos los derechos, incluidos los derechos de
reproducción fotomecánica total o parcial, duplicación y distribución
por medio de procesos específicos (como el procesamiento de datos,
los soportes de datos y las redes de datos), así como las
124
Información general
modificaciones técnicas y sustanciales.
1.3 Símbolos y palabras de señalización
Palabra de
Significado
señalización
Advertencia Advertencia de posible peligro de
lesiones graves o de muerte en caso de
inobservancia de esta información.
Precaución Advertencia de posible peligro de
lesiones leves en caso de inobservancia de esta información.
Ninguno Precaución Peligro de daños materiales
o medioambientales.
Importante
Aquí se dan indicaciones importantes
para la función.
Información, Información general o consejos
específicos.
consejo
Símbolo
Este producto está previsto para la realización de llamadas telefónicas
a través de una línea fija dentro de una red telefónica. Es condición
necesaria para un uso conforme a lo previsto una instalación
profesional que observe las indicaciones de este manual de usuario.
Cualquier otro tipo de uso no es conforme a lo previsto, y por lo tanto,
está prohibido.
Quedan prohibidos las modificaciones o cambios realizados no
descritos en este manual de usuario. No se aceptará ninguna
responsabilidad por los daños que puedan derivarse de un
uso inadecuado.
1.5 Contenido de la caja
Compruebe que el contenido de la caja está completo y no presenta
desperfectos. Si faltaran piezas o detectara algún defecto, póngase en
contacto de inmediato con su distribuidor.
Conserve el embalaje para eventuales devoluciones / reparaciones.
1 estación base
1 adaptador de corriente para la estación base
1 cable de teléfono para la estación base
125
Español
1.4 Uso previsto
Instrucciones de seguridad
1 terminal inalámbrico con 2 pilas recargables (AAA, 1,2 V / 500 mAh,
NiMH) y una tapa del compartimiento de las pilas
1 manual de usuario
Advertencia Peligro de asfixia para los niños. Mantenga los plásticos de embalaje fuera del alcance de los niños.
Importante Deseche el material de embalaje de forma
respetuosa con el medio ambiente.
2 Instrucciones de seguridad
Es importante tener en cuenta las instrucciones de seguridad que se
especifican a continuación al utilizar dispositivos eléctricos.
Lea con atención la información y las instrucciones de seguridad que
se presentan a continuación acerca de cómo usar el dispositivo
correctamente. Familiarícese con todas las funciones del dispositivo.
Guarde este manual de usuario en un lugar seguro cerca del
dispositivo y facilítelo a otros usuarios si es necesario. Cuando
entregue el teléfono a terceros, proporcióneles también el manual de
usuario.
Peligros eléctricos:
•
•
•
•
•
•
Advertencia Peligro de lesiones o muerte por corriente
eléctrica. En caso de peligro, desenchufe
inmediatamente el dispositivo de la red de 230 V.
No utilice el dispositivo si el adaptador de corriente, el cable o el
propio dispositivo presentan daños. Tenga cuidado de que el
dispositivo no caiga al suelo, ya que podría sufrir daños.
El voltaje del dispositivo se encuentra en unos niveles peligrosos.
No abra nunca la carcasa ni introduzca objetos a través de la
ranura de ventilación.
Evite la entrada de líquidos en el dispositivo. En el caso de que
suceda esto, desenchufe de inmediato el adaptador de corriente
de la toma de red y el cable de teléfono de la roseta.
Desenchufe igualmente el adaptador de corriente de la toma de
red y la clavija del cable de teléfono de la roseta si durante el uso
se produce alguna avería y antes de limpiar el dispositivo.
No toque los conectores del cargador ni del enchufe con objetos
afilados o metálicos.
No realice modificaciones ni reparaciones en el dispositivo.
126
Instrucciones de seguridad
La reparación del dispositivo o del cable debe dejarse en manos
de un especialista del centro de servicio. Las reparaciones que no
se realizan correctamente pueden entrañar riesgos importantes
para el usuario.
• Los niños a menudo no son conscientes de los riesgos derivados
de la manipulación de dispositivos eléctricos. No debe dejar nunca
a un niño sin vigilancia cerca de dispositivos eléctricos.
• No permita que los niños jueguen con los dispositivos o
sus piezas.
Precaución Es posible ocasionar desperfectos en el
dispositivo. En caso de peligro, desenchufe
inmediatamente el dispositivo de la red de 230 V.
• No utilice el dispositivo en espacios con humedad (por ejemplo,
el baño) o mucho polvo.
• Los dispositivos conectados a la red durante una tormenta pueden
sufrir daños. Por ello, debe desenchufar siempre el dispositivo en
estas situaciones.
• Para desconectar totalmente el dispositivo de la red debe
desenchufar el adaptador de corriente de la toma. Debe hacerlo
siempre cogiendo el enchufe y nunca tirando del cable.
• Compruebe regularmente si el cable está dañado, protéjalo de
superficies calientes u otras fuentes de peligro, y tiéndalo
completamente desenrollado, de forma que nadie pueda tropezar
con el mismo, y sin que esté aplastado.
Peligro de incendio:
Español
Advertencia Peligro de lesiones o muerte por fuego.
No someta el dispositivo a calor excesivo y,
en caso de peligro, desenchúfelo
inmediatamente de la red de 230 V.
El calor que se genera en el interior del dispositivo puede provocar un
fallo o un incendio en el equipo. Por ello, es importante no exponerlo
a temperaturas extremas:
– Evite la exposición a la luz directa del sol y al calor.
– No cubra la ranura de ventilación del dispositivo.
127
Instrucciones de seguridad
Peligro de explosión:
Advertencia Peligro de lesiones por explosión.
Preste especial atención a los niños.
• No tire nunca las pilas al fuego, ya sean desechables
o recargables.
• No use el dispositivo en lugares donde haya riesgo
de explosiones.
Peligro de intoxicación:
Advertencia Peligro de lesiones por intoxicación.
Preste especial atención a los niños.
• Mantenga las pilas fuera del alcance de los niños, ya sean
desechables o recargables.
Peligro de asfixia:
Advertencia Peligro de lesiones por asfixia.
Preste especial atención a los niños.
• Mantenga los plásticos de embalaje fuera del alcance de los niños.
• Tenga en cuenta los posibles peligros para los niños al usar cables
de prolongación (estrangulamiento).
Averías:
Advertencia Posible peligro de lesiones por averías
del dispositivo.
Preste especial atención a los equipos médicos.
• La radiación electromagnética de su dispositivo puede afectar al
funcionamiento de equipos médicos eléctricos. Por tanto, se debe
instalar y utilizar el dispositivo a una distancia suficiente respecto a
cualquier equipo médico eléctrico. Esto también se aplica a dispositivos médicos implantados, como
por ejemplo, los marcapasos.
• El terminal inalámbrico puede provocar un zumbido desagradable
en los audífonos, por lo que debe mantenerse a una distancia lo
suficientemente amplia de dichos dispositivos.
128
Instrucciones de seguridad
Posibles desperfectos:
Precaución Es posible ocasionar desperfectos en el
dispositivo. Observe las indicaciones de
este manual de usuario.
• Utilice únicamente los adaptadores de corriente facilitados. No use
adaptadores de terceros, puesto que podrían provocar daños en
las pilas recargables.
• La toma para conectar el adaptador de corriente debe estar
situada cerca del dispositivo y ser de fácil acceso.
• Utilice solamente las pilas recargables suministradas. Cuando sea
necesario sustituirlas, utilice únicamente pilas recargables del
mismo tipo. Asegúrese de colocarlas según aparece indicado (esta
información se especifica en el compartimento de pilas del
dispositivo). No utilice nunca pilas normales desechables.
Importante En caso de falta de alimentación, sólo se pueden
realizar llamadas utilizando la estación base.
Este teléfono inalámbrico (conforme al estándar DECT) funciona con
un nivel de radiación bajo (modo ECO).
Durante una llamada, el terminal reduce la potencia de la radiación
dependiendo de la distancia a la estación base. Cuando no se está
realizando ninguna llamada, el terminal reduce la potencia de la
radiación al mínimo. Esto no significa que la radiación DECT normal
sea perjudicial para la salud, sino que el modo de funcionamiento de
baja radiación evita la emisión de radiaciones innecesarias.
La base no reduce la potencia de la radiación. Coloque la estación
base en lugares donde no haya personas permanentemente, por
ejemplo, en un pasillo. Evite las habitaciones de los niños, los
dormitorios y las salas de estar.
129
Español
2.1 Indicaciones para el funcionamiento de baja radiación
Primeros pasos
3 Primeros pasos
3.1 Cómo utilizar este manual de usuario
En este manual de usuario, se utiliza el método que se indica a
continuación para presentar las instrucciones de una forma clara:
Texto... «Pantalla» (Display).
Texto que aparece en la pantalla del teléfono
Tecla que debe pulsarse
3.2 Instalación de la estación base
Para instalar la estación base, siga estos pasos:
1 Conecte el adaptador de red primero a la estación base y
después a una toma de corriente.
2 Conecte un extremo del cable de teléfono a la toma de teléfono
de la pared y el otro extremo al conector que encontrará en la
parte posterior de la estación base.
3 El teléfono y los cables de alimentación deben conectarse como
se indica en la figura 3A.
B
A
C
- 3A Estación base A. Roseta de teléfono
B. Adaptador de corriente
con cable
C. Cable de teléfono
130
Primeros pasos
3.3 Terminal
Precaución Peligro de lesiones por explosión.
Utilice solamente las pilas recargables
suministradas o unas del mismo tipo. No utilice
nunca pilas normales desechables.
De lo contrario, el terminal inalámbrico podría
resultar dañado.
1
2
3
4
Abra el compartimento de las pilas tal y como se muestra en la
figura 3B.
Coloque las pilas recargables. Compruebe que la polaridad
sea la correcta (+) y (-).
Cierre el compartimento de las pilas.
Coloque el terminal en el cargador y deje que cargue durante
16 horas. El LED de carga se iluminará.
A
B921
- 3B Vista posterior del terminal A.Tapa
B.Pilas recargables
+
B
+
El terminal dejará de funcionar cuando las pilas estén descargadas.
Si las pilas están totalmente descargadas y deja el terminal en la
estación base durante poco tiempo, el indicador de carga de la batería
indicará que están cargadas. Sin embargo, no lo están y la batería
empezará a fallar rápidamente. Coloque el terminal en el cargador y
deje que cargue totalmente durante 16 horas.
Pilas cargadas
Pilas descargadas
Si las pilas están a punto de agotarse durante una llamada, el terminal
emitirá una señal de aviso. Coloque el terminal en el cargador para
cargar las pilas.
131
Español
3.4 Visualización del estado de la batería
Primeros pasos
3.5 Teclas / Pantalla
Terminal inalámbrico
14
1.
2.
3.
4.
5.
6.
7.
8.
13
Rellamada / Arriba
Agenda
Silencio / Borrar
Colgar
Teclas alfanuméricas
Bloqueo de teclas
Pausa
Activación / Desactivación
de timbre
9. Lista de llamadas / Abajo
10.Tecla de aceptación de
llamadas / Manos libres /
Llamar
11. INT / ESC
12.Menú / OK / Flash
13.Pantalla
14.LED rojo (parpadea
durante una llamada)
1
12
11
10
2
R
OK
ESC/
INT
3
4
9
5
8
6
7
- 3C Vista frontal del terminal -
Estación base
15.Tecla de búsqueda
16.LED de carga del terminal
17.LED de timbre
17
16
15
- 3D Estación base 132
Primeros pasos
3.6 Pantalla del terminal
TERMINAL X
x = número de terminal
Otros números o
desplazarse hacia la
izquierda por el menú
Buscar o crear entradas
en la agenda
Otros números o desplazarse
hacia la derecha por el menú
Visualización del estado de la
batería
Sin sonido
Modo manos libres activado
Bloqueo de teclas
activado
Nuevo mensaje de voz
Llamada creada
Micrófono silenciado
Números nuevos en la
lista de llamadas
La antena indica la intensidad
de la señal de recepción y
parpadea si el terminal está
fuera de cobertura.
Llamada interna
El sistema del menú del Sologic B921 es muy fácil de manejar.
Cada menú consiste en una serie de opciones.
Encontrará a continuación un resumen de los menús del terminal y la estación base.
1 Pulse la tecla de Menú / OK para abrir el
OK
menú principal.
2 Desplácese hasta la opción del menú deseada.
3 Pulse la tecla Menú / OK para ver más opciones
OK
o para confirmar el ajuste mostrado.
4 Pulse la tecla ESC para regresar al nivel de
ESC
menú anterior.
133
Español
3.7 Navegación por el menú
Primeros pasos
Terminal
AGENDA
TERMINAL
TIMBRENOMB
RE TERM
TONO TECLA
SELEC. BASE
RESETEAR
IDIOMA
REGISTRAR
TERMINAL
DAR DE BAJA
TERMINAL
3.8 Uso de las teclas alfanuméricas
Puede utilizar las teclas alfanuméricas para introducir texto. Pulse la
tecla alfanumérica correspondiente para seleccionar una letra 5 . Por
ejemplo , si pulsa la tecla numérica 5, aparecerá en la pantalla el
primer carácter, «j». Pulse la tecla varias veces para seleccionar las
otras letras.
Pulse la tecla 2 una vez para elegir la letra «a». Si desea introducir las
letras «a» y «b» sucesivamente, pulse primero la tecla 2 una vez para
seleccionar la letra «a». Espere 2 segundos hasta que el cursor se
haya desplazado hasta la posición siguiente. Ahora pulse la tecla 2
dos veces para seleccionar «b». Las letras que se hayan introducido
erróneamente se pueden borrar con la tecla de borrado
3 .
Se eliminará la letra situada delante del cursor.
Tabla de caracteres
1
2
3
4
5
6
7
8
9
0
134
Espacio + - / 1
ABC2
DEF3
GHI4
JKL5
MNO6
PQRS7
TUV8
WXYZ9
_0
Uso del teléfono
4 Uso del teléfono
4.1 Cambio del idioma
1
OK
2
OK
3
OK
4
OK
5
ESC
Pulse la tecla Menú / OK.
Seleccione «TERMINAL» (HANDSET) y confirme
la selección.
Seleccione «IDIOMA» (LANGUAGE) y confirme
la selección.
Seleccione el idioma deseado y confirme
la selección.
Pulse la tecla ESC para regresar al modo
de espera.
4.2 Llamadas salientes
Realizar una llamada
1 Pulse el botón de llamada.
2 Introduzca el número de teléfono.
4 5 6
3 Pulse la tecla de colgar para finalizar la llamada.
J
K
L
M
N
O
Preparar la marcación
1 Introduzca el número de teléfono.
4 5 6
Puede corregir un número incorrecto con la tecla
de silencio. Si no pulsa ninguna tecla durante 10 segundos,
el número desaparece y el terminal vuelve al
modo en espera.
2 Pulse el botón de llamada.
El número de teléfono se marca automáticamente.
3 Pulse la tecla de colgar para finalizar la llamada.
G
H
I
J
K
L
M
N
O
Volver a llamar al último número de teléfono marcado
1 Pulse el botón de llamada.
2 Pulse el botón de rellamada.
Se vuelve a llamar automáticamente al último
número de teléfono marcado.
3 Pulse la tecla de colgar para finalizar la llamada.
135
Español
G
H
I
Uso del teléfono
Volver a llamar a uno de los 3 últimos números marcados
Pulse la tecla de rellamada.
Aparecerá en la pantalla el último número marcado.
Si desea volver a llamar a uno de los 3 últimos
números marcados, siga pulsando la tecla de
rellamada hasta que aparezca el número que desea
en la pantalla.
2 Pulse el botón de llamada.
El número de teléfono se marca automáticamente.
3 Pulse la tecla de colgar para finalizar la llamada.
1
4.3 Llamadas entrantes
Cuando se recibe una llamada entrante, el terminal y la estación base
suenan y el LED de «señal visual de llamada» (consulte el punto 14 de la figura 3C y el punto 17 de la figura 3D) parpadea en el
terminal y en la estación base.
1
2
Pulse la tecla de aceptación de llamadas para
responder a la llamada.
Pulse la tecla de colgar para finalizar la llamada.
4.4 Activación / desactivación del modo de manos libres
Puede utilizar esta función para responder a una llamada sin tener que
sujetar el terminal o si ya atiende una llamada por el terminal.
Durante la llamada:
1 Pulse la tecla de manos libres para activar
la función.
2 Vuelva a pulsar la tecla de manos libres para
atender la llamada con el terminal.
Importante Al utilizar la función de manos libres durante
mucho tiempo, las pilas se descargan
más rápidamente.
4.5 Silenciamiento
En el transcurso de una llamada, puede silenciar el micrófono para
que pueda hablar sin que le oiga la persona que está al otro lado
del teléfono.
136
Uso del teléfono
Pulse la tecla de silencio.
El micrófono queda silenciado y aparece «MUTE
ACT» (MUTED) en pantalla.
2 Vuelva a pulsar la tecla de silencio para activar el micrófono de nuevo.
1
4.6 Ajuste del volumen del auricular / manos libres
Durante la llamada:
1 Pulse la tecla abajo.
2 Pulse las teclas arriba y abajo.
Puede ajustar el volumen entre los niveles 1 a 5.
4.7 Tecla R (Flash)
OK
Pulse la tecla Flash de la estación base (tecla 12 en
la figura 3C „Terminal inalámbrico“ de la página 132)
para utilizar servicios especiales de su línea externa
como «llamada en espera» (siempre y cuando su
operador ofrezca este servicio) o la transferencia de
llamadas si dispone de un sistema PBX. La tecla
Flash R interrumpe la llamada brevemente. El tiempo
de interrupción puede configurarse en 100 ms o
300 ms. Para configurar otro tiempo de flash,
consulte «5.4 Tecla R (Flash)».
Timbre del terminal para llamadas internas / externas
1 Pulse la tecla Menú / OK.
OK
2 Seleccione «TERMINAL» (HANDSET) y confirme
la selección.
OK
3 Seleccione «TIMBRE» (RING TONE) y confirme la
selección.
OK
4 Seleccione «INTERNA» (INTERNAL) o
«EXTERNA» (EXTERNAL) y confirme la selección.
OK
5 Luego seleccione un timbre (de 1 a 9) y confirme
la selección.
OK
137
Español
4.8 Selección del timbre y ajuste del volumen
Uso del teléfono
Volumen del timbre del terminal
1 Pulse la tecla Menú / OK.
OK
2 Seleccione «TERMINAL» (HANDSET) y confirme
la selección.
OK
3 Seleccione «TIMBRE» (RING TONE) y confirme
la selección.
OK
4 Seleccione «VOLUMEN» (VOLUME) y confirme
la selección.
OK
5 Seleccione el volumen deseado (desactivado, 1-5)
y confirme la selección.
OK
Importante El volumen del timbre de cada uno de los
terminales se puede activar y desactivar con sólo
mantener presionada la tecla de activación y
desactivación de timbre
en el modo en espera.
El símbolo
aparece en la pantalla y se activa el
bloqueo de teclas.
4.9 Bloqueo de teclas
Con el bloqueo de teclas activado, no podrá hacer nada si pulsa las
teclas en el modo en espera (salvo la tecla de bloqueo de teclas).
1 Mantenga pulsada la tecla de bloqueo de teclas.
Aparecerá el símbolo en la pantalla.
2 Pulse de nuevo la tecla de bloqueo de teclas para
desactivar el bloqueo.
Aunque el bloqueo de teclas esté activado, puede
responder a las llamadas entrantes pulsando la tecla
de aceptación de llamadas. Las funciones del teclado
funcionan normalmente durante la llamada. Tras
finalizarla, el bloqueo de teclas vuelve a activarse.
4.10 Nombre del terminal
Puede cambiar el nombre que aparece en pantalla
(máx. 12 caracteres) si no se está realizando ninguna llamada.
1 Pulse la tecla Menú / OK.
OK
2 Seleccione «TERMINAL» (HANDSET) y confirme
la selección.
OK
138
Uso del teléfono
3
OK
4 5 6
G
H
I
J
K
L
M
N
O
4
OK
5
ESC
6
Seleccione «HANDSET NAME» y confirme la
selección.
Borre el nombre anterior con la tecla de silencio e
introduzca uno nuevo.
Pulse la opción para confirmar.
Pulse la tecla ESC para regresar al modo de
espera.
4.11 Activación / desactivación del tono de las teclas
1
OK
2
OK
3
OK
4
OK
5
ESC
6
Pulse la tecla Menú / OK.
Seleccione «TERMINAL» (HANDSET) y confirme
la selección.
Seleccione «TONO TECLA» (KEYPAD BEEP) y
confirme la selección.
Ahora seleccione «ACTIVADO» (ON) o
«DESACTIVADO» (OFF) y confirme la selección.
Pulse la opción para confirmar.
Pulse la tecla ESC para regresar al modo de
espera.
4.12 Agenda
Puede almacenar 50 entradas en la agenda. Los nombres pueden
tener un máximo de 16 caracteres, y los números pueden contener
hasta 24 dígitos.
G
H
I
J
K
L
M
N
O
G
H
I
J
K
L
M
N
O
Español
Añadir una entrada en la agenda
1 Pulse la tecla Agenda.
OK 2 Pulse la tecla OK dos veces.
OK
4 5 6 OK 3 Escriba el nombre y confírmelo.
4 Teclee el número de teléfono deseado
4 5 6
y confírmelo.
OK
Se oirá un tono de confirmación.
Marcar un número de marcación abreviada
1 Pulse la tecla Agenda.
2 Desplácese hasta el nombre deseado o introduzca
sus primeras letras.
4 5 6
G
H
I
J
K
L
M
N
O
139
Uso del teléfono
Pulse la tecla Agenda para ver el número
de teléfono.
4 Pulse ahora la tecla de llamada.
El número de teléfono se marca automáticamente.
5 Pulse la tecla de colgar para finalizar la llamada.
3
Editar una entrada de la agenda
1 Pulse la tecla Agenda.
2 Desplácese hasta el nombre deseado o introduzca
sus primeras letras.
4 5 6
3 Pulse la tecla Agenda para ver el número
de teléfono.
4 Pulse la tecla Menú / OK.
OK
5 Seleccione «EDITAR» (EDIT ENTRY) y confirme
la selección.
OK
4 5 6 OK 6 Escriba el nombre y confírmelo.
4 5 6 OK 7 Teclee o modifique el número de teléfono
y confírmelo.
G
H
I
G
H
I
J
K
L
M
N
O
G
H
I
J
K
L
M
N
O
J
K
L
M
N
O
Eliminar una o todas las entradas de la agenda
1 Pulse la tecla Agenda.
2 Desplácese hasta el nombre deseado o
introduzca sus primeras letras.
4 5 6
3 Pulse la tecla Agenda para ver el número
de teléfono.
4 Pulse la tecla Menú / OK.
OK
5 Seleccione «BORRAR» (DELETE ENTRY) para
borrar la entrada de agenda actual y confirme
la selección.
OK
O
6 Seleccione «BORRAR TODO» (DELETE ALL) para
borrar todas las entradas de la agenda y confirme
la selección.
OK
ESC 7 Confirme de nuevo o pulse la tecla ESC para saltar.
OK
G
H
I
140
J
K
L
M
N
O
Uso del teléfono
4.13 Identificación de llamada (CLIP)
El Sologic B921 muestra en pantalla los números de teléfono desde
los que se realizan las llamadas entrantes. Esta función solo está
disponible si tiene contratado este servicio con su operador de
telefonía. Si desea más información, póngase en contacto con
su operador.
Cuando recibe una llamada, el número de teléfono se guarda en la
lista de llamadas. Esta lista puede almacenar un máximo de
30 números (de hasta 23 dígitos cada uno).
Si el número de teléfono consta de más de
12 dígitos, puede desplazarse a la derecha de la
pantalla para ver el resto de dígitos.
Llamadas nuevas
Abrir la lista de llamadas
1 Pulse la tecla de lista de llamadas.
Aparecerá en pantalla la última llamada recibida. Si
la lista de llamadas está vacía, aparecerá «VACIO»
(EMPTY) en la pantalla.
2 Pulse la tecla Agenda para saltarse el número
de teléfono.
3 Pulse la tecla Agenda para saltarse la fecha y
la hora.
4 Pulse la tecla arriba y abajo para desplazarse por
la lista.
5 Pulse la tecla ESC para salir de la lista de llamadas.
ESC
Llamar a un número de la lista de llamadas
1 Pulse la tecla de lista de llamadas.
2 Desplácese por la lista de llamadas hasta que
aparezca el número de teléfono deseado.
3 Pulse la tecla de llamada para iniciar la llamada.
El número de teléfono se marca automáticamente.
4 Pulse la tecla de colgar para finalizar la llamada.
141
Español
Cuando hay una llamada nueva en la lista de
llamadas, parpadea el símbolo CLIP en la pantalla.
Uso del teléfono
Eliminar un número de la lista de llamadas
1
2
3
OK
4
OK
5
OK
ESC 6
OK
Pulse la tecla de lista de llamadas.
Desplácese por la lista de llamadas hasta que
aparezca el número de teléfono deseado.
Pulse la tecla Menú / OK.
Seleccione «BORRAR» (DELETE) para borrar el
número de teléfono actual y confirme la selección.
O
Seleccione «BORRAR TODO» (DELETE ALL)
para borrar todas las entradas de la agenda y
confirme la selección.
Pulse para confirmar o pulse la tecla ESC
para regresar.
Almacenar un número de la lista de llamadas como número
de marcación abreviada
1 Pulse la tecla de lista de llamadas.
2 Desplácese por la lista de llamadas hasta que
aparezca el número de teléfono deseado.
3 Pulse la tecla Menú / OK.
OK
4 Seleccione «A AGENDA» (SAVE TO PB) y
confirme la selección.
OK
4 5 6 OK 5 Edite o añada un nombre y pulse para confirmar.
4 5 6 OK 6 Teclee el número de teléfono y confírmelo.
G
H
I
J
K
L
M
N
O
G
H
I
J
K
L
M
N
O
4.14 Restablecimiento de los ajustes predeterminados
del terminal
Se borran todos los cambios y se restablecen los ajustes
predeterminados (volumen del timbre, timbre, etc.). También se
borran la lista de llamadas, la lista de rellamadas y la agenda.
1 Pulse la tecla Menú / OK.
OK
OK 2 Seleccione «TERMINAL» (HANDSET) y confirme
la selección.
OK OK 3 Seleccione "RESET" y confirme la selección.
4 Introduzca el número PIN de la estación base
4 5 6
(el número predeterminado es 0000).
G
H
I
142
J
K
L
M
N
O
Config. base (Base settings)
5
El dispositivo vuelve al modo en espera.
Los ajustes predeterminados son:
Nombre del terminal
TERMINAL
Volumen del auricular
Nivel 3
Volumen del timbre
Nivel 3
Timbre externo
Timbre 8
Timbre interno
Timbre 1
Tono de las teclas
Activado
4.15 Indicador de buzón de voz
Este indicador solo funciona si tiene habilitado un servicio de buzón de
voz o de notificación de llamadas telefónicas y su operador de
telefonía transmite esta información junto con la identificación de
llamada. Cuando recibe un mensaje nuevo en su buzón, aparece el
símbolo
en la pantalla. Cuando se ha oído el mensaje, el símbolo
desaparece.
5 Config. base (Base settings)
Información Este apartado explica únicamente los ajustes
almacenados en la estación base.
Melodía del terminal para llamadas internas / externas
1 Pulse la tecla Menú / OK.
OK
1 Seleccione «BASE» (BASE) y confirme
la selección.
OK
2 Seleccione «TIMBRE» (RING TONE) y
confirme la selección.
OK
3 Luego seleccione un timbre (de 1 a 9) y confirme
la selección.
OK
Volumen del timbre de la base
1 Pulse la tecla Menú / OK.
OK
2 Seleccione «BASE» (BASE) y confirme
la selección.
OK
143
Español
5.1 Selección del timbre y ajuste del volumen
Config. base (Base settings)
3
OK
4
OK
Seleccione «VOLUMEN» (RING VOLUME) y
confirme la selección.
Seleccione el volumen deseado (desactivado, 1-5)
y confirme la selección.
5.2 Ajuste del modo de marcación
Hay dos modos de marcación para las conexiones telefónicas:
- DTMF / Marcación por tonos (la más empleada)
- Marcación por pulsos (sólo necesaria si el dispositivo se utiliza en
una instalación antigua)
1
OK
2
OK
3
OK
4
OK
Pulse la tecla Menú / OK.
Seleccione «BASE» (BASE) y confirme
la selección.
Seleccione «MARCACION» (DIAL MODE) y
confirme la selección.
Seleccione «TONOS» (TONE) o «PULSOS»
(PULSE) y confirme la selección.
5.3 Configuración del PIN del sistema
Algunas funciones solo están disponibles si conoce el código PIN de
la estación base.
El código PIN tiene 4 caracteres y de forma predeterminada es 0000.
Para cambiar el código PIN e introducir uno nuevo, proceda
como sigue:
1 Pulse la tecla Menú / OK.
OK
2 Seleccione «BASE» (BASE) y confirme
la selección.
OK
3 Seleccione «PIN SISTEMA» (SYSTEM PIN) y
confirme la selección.
OK
4 Pulse «ANTIG» (OLD PIN) para introducir el
4 5 6
código PIN antiguo y pulse OK.
OK
5 Pulse «NUEVO» (NEW PIN) para introducir el
4 5 6
nuevo código PIN y confirme la selección.
OK
G
H
I
J
K
L
M
N
O
G
H
I
J
K
L
M
N
O
5.4 Tecla R (Flash)
Pulse la tecla Flash para utilizar servicios especiales de su línea
externa como «llamada en espera» (siempre y cuando su operador
144
Registro y baja de un terminal
ofrezca este servicio) o la transferencia de llamadas si dispone de un
sistema PBX. La tecla Flash R interrumpe la llamada brevemente. El
tiempo de interrupción puede configurarse en 100 ms o 300 ms. Sin
embargo, si su sistema requiere otro tiempo de flash, puede modificar
esta configuración.
1
OK
2
OK
3
OK
4
OK
Pulse la tecla Menú / OK.
Seleccione «BASE» (BASE) y confirme la
selección.
Seleccione «TECLA R» (RECALL) y confirme la
selección.
Ahora seleccione «LARGO» (LONG) o «CORTO»
(SHORT) y confirme la selección.
6 Registro y baja de un terminal
6.1 Registro de un terminal a la estación base
Sologic B921
1
OK
2
3
4 5 6
G
H
I
J
K
L
M
N
O
4
5
Mantenga pulsada la tecla de búsqueda de la
estación base durante 10 segundos.
Pulse la tecla Menú / OK del terminal.
Seleccione «REGISTRAR» (REGISTER) y
confirme la selección.
Introduzca el número de la estación base (1-4) al
que desea registrar el terminal.
El dispositivo buscará la estación base. Cuando la
haya encontrado, se le pedirá que introduzca el
código PIN (cuatro dígitos).
145
Español
Pueden registrarse hasta 4 terminales a una estación base. Todos los terminales ya están registrados a la estación base cuando
se entregan.
Solo es preciso realizar el registro si:
• el terminal se había dado de baja anteriormente de esta estación
base (por ej. para reinicializarlo)
• desea registrar otro terminal a la estación base.
La descripción que se presenta a continuación corresponde
únicamente a los terminales y las estaciones base Sologic B921.
Registro y baja de un terminal
4 5 6
G
H
I
J
K
L
M
N
O
Introduzca el código PIN de la estación base
(el número predeterminado es 0000). Si el código
introducido es incorrecto, el terminal volverá a
buscar la estación base.
Una vez que se haya registrado el terminal,
su nombre y número aparecerán en pantalla.
6
6.2 Baja de un terminal de la estación base Sologic B921
OK
4 5 6
G
H
I
J
K
L
M
N
O
4 5 6
G
H
I
J
K
L
M
N
O
Pulse la tecla Menú / OK.
2 Seleccione "ELIM PORT" (DE-REGISTER)
y confirme la selección.
OK
3 Introduzca el código PIN de la estación base
(el número predeterminado es 0000).
OK
4 Introduzca el número interno del terminal que desea
dar de baja (1 - 4) y confirme la selección.
OK
Cuando haya dado de baja el terminal, el dispositivo
volverá al modo en espera. Si la operación no se ha
realizado correctamente, deberá volver a introducir el
número del terminal.
1
Importante Los terminales solo pueden ser dados de baja
cuando no están en uso.
6.3 Selección de una estación base
Cuando el terminal está registrado en varias estaciones base (máx. 4),
se debe seleccionar una de las estaciones base, porque el terminal
solo puede comunicarse con una estación base a la vez. Existen
dos posibilidades:
Selección automática
Si ajusta el terminal en «Selección automática» (Auto Select),
el terminal seleccionará automáticamente la estación base más
cercana en modo de espera.
1 Pulse la tecla Menú / OK.
OK
OK 2 Seleccione «TERMINAL» (HANDSET) y confirme
la selección.
OK 3 Seleccione «SELEC. BASE» (SELECT BASE)
y confirme la selección.
146
Transferencia de llamadas y llamadas internas de un terminal a otro
OK 4 Seleccione «AUTO» y confirme la selección.
Información Si la selección automática de estación base
está activada, y el terminal sale de la cobertura
de la estación base seleccionada, este buscará
solo una estación base con la señal más fuerte
que se encuentre en modo de espera (no
durante una llamada en curso).
Selección manual
Si ajusta el terminal en «Selección manual», el terminal solo
buscará la estación base configurada.
1 Pulse la tecla Menú / OK.
OK
OK 2 Seleccione «TERMINAL» (HANDSET) y confirme
la selección.
OK 3 Seleccione «SELEC. BASE» (SELECT BASE) y
confirme la selección.
OK 4 Seleccione «MANUAL» y confirme la selección.
OK 5 Seleccione la estación base y confirme la selección.
Importante Para que la estación base y el terminal puedan
comunicarse, el terminal debe estar registrado en
la misma.
7.1 Transferencia de llamadas y teleconferencia durante
una llamada externa
INT
Pulse la tecla INT seguida del número del terminal
(1-4) durante una llamada externa.
Sonará el otro terminal.
Si se ha establecido la llamada con el otro terminal,
puede hablar internamente. Cuando cuelgue, se
transferirá la llamada externa al otro terminal.
1
4 5 6
G
H
I
J
K
L
M
N
O
147
Español
7 Transferencia de llamadas y llamadas internas de un
terminal a otro
Abreviaturas y términos técnicos
INT
2
INT
3
4
Mantenga pulsada la tecla INT durante
3 segundos. De esta forma, podrá hablar con el
segundo terminal y con la llamada externa al
mismo tiempo (teleconferencia).
Pulse de nuevo la tecla INT para volver a la
llamada externa.
Pulse la tecla de colgar para finalizar la llamada.
8 Abreviaturas y términos técnicos
CLIP
Calling Line Identification Presentation; transmisión del número de
teléfono entrante y visualización en la pantalla del receptor.
DECT
Digital Enhanced Cordless Telecommunication; estándar europeo
para las comunicaciones inalámbricas digitales.
Modo ECO
Economic Mode; en el ámbito de la telefonía DECT es un
funcionamiento de baja radiación.
Tecla Flash
Provoca una breve interrupción de la línea para que puedan activarse
funciones de conmutación o transferencia de llamadas, entre otras. En
caso de instalaciones telefónicas PBX, la tecla Flash o R se utiliza
para peticiones internas.
GAP
Generic Access Profile; interfaz entre la estación base y el terminal
que hace posible la conexión inalámbrica.
INT
Teléfono interno. Otro terminal o extensión dentro de un sistema con
centralita (PBX).
Modo de pulsos
Obsoleto procedimiento de marcación analógico (ruidos de «clac, clac» al marcar).
LCD
Liquid Crystal Display; pantalla de cristal líquido.
LED
Light Emitting Diode; diodo luminoso.
148
Solución de problemas
DTMF
Dual Tone Multiple Frequency; marcación multifrecuencia, moderno
procedimiento de marcación digital.
PIN
Personal Identification Number; número de identificación personal.
Tecla R
Tecla de rellamada (véase tecla Flash).
En espera
«Estado de reposo» de un dispositivo sin que esté completamente
apagado.
Twin
«Gemelo»; denominación de una unidad con dos dispositivos
idénticos, por ejemplo dos terminales.
9 Solución de problemas
Posible causa
Pantalla vacía.
Las pilas no están
cargadas.
No hay tono.
No se oye la
persona que llama.
Solución
Compruebe que las
dos pilas estén bien
colocadas.
Cargue las pilas.
El cable de teléfono no Compruebe la
está bien conectado.
conexión del cable.
La línea está ocupada Espere hasta que el
por otro terminal.
otro terminal cuelgue.
Ajuste el volumen en
el transcurso de la
llamada pulsando la
tecla de volumen.
No se oye el timbre
del terminal.
No se puede marcar El modo de marcación
un número.
no se ha ajustado
correctamente.
Ajuste el volumen
del timbre.
Consulte «5.2 Ajuste
del modo de
marcación» para
configurar el modo de
marcación correcto.
149
Español
Problema
Servicio
Problema
Posible causa
Parpadea el símbolo El terminal está fuera
.
de cobertura.
La estación base no
recibe alimentación.
La estación base o
el terminal no
suenan.
No se puede
transferir una
llamada a una
extensión.
El teléfono no
responde al pulsar
las teclas.
Solución
Mueva el terminal
dentro del alcance de
la estación base.
Compruebe el
adaptador de corriente
y el cable.
El terminal no está
registrado en la
estación base.
El volumen del timbre
está desactivado o
muy bajo.
El tiempo de flash es
demasiado corto.
Registre el terminal en
la base.
Error de
funcionamiento.
Extraiga las pilas y
vuelva a insertarlas.
Ajuste el volumen
del timbre.
Aumente el tiempo de
flash del dispositivo.
No realice modificaciones ni reparaciones en el dispositivo. La
reparación del dispositivo o del cable debe dejarse en manos de un
especialista del centro de servicio. Las reparaciones que no se
realizan correctamente pueden entrañar riesgos importantes para
el usuario.
10 Servicio
10.1 Mantenimiento
Este dispositivo no requiere mantenimiento. Compruebe
ocasionalmente el estado de las pilas y cámbielas por otras pilas del
mismo tipo cuando su rendimiento disminuya o cuando comiencen a
presentar fugas.
Advertencia Peligro de quemaduras químicas
Póngase guantes protectores al extraer las
pilas recargables gastadas.
150
Servicio
En caso de que el dispositivo haya entrado en contacto con líquido,
extraiga las pilas de inmediato, desenchúfelo de la alimentación
(estación base) y séquelo detenidamente. Compruebe su
funcionamiento después de dejarlo secar entre 2 y 3 días. En caso de defectos, envíelo al servicio técnico.
10.2 Limpieza
Advertencia Peligro de descarga eléctrica o cortocircuito por
contacto con componentes con conductividad
eléctrica.
Evite la entrada de líquidos en el dispositivo. En el
caso de que suceda esto, desenchufe de inmediato
el adaptador de corriente de la toma de red y el
cable de teléfono de la roseta, y retire las pilas.
Haga lo mismo si el dispositivo, el cable o el
adaptador de corriente presentan daños: evite el
contacto directo con líquidos y desenchufe de
inmediato el dispositivo de la red eléctrica de 230 V.
Limpie el teléfono con un paño ligeramente humedecido con agua tibia
o con una gamuza antiestática. No use nunca agentes limpiadores
ni abrasivos.
Si pone el dispositivo fuera de servicio de forma temporal, desenchufe
el cable de teléfono de la roseta y de la toma en la estación base.
Desenchufe el adaptador de corriente de la estación base y el terminal
de la toma de 230 V.
Extraiga las pilas de los terminales. En caso de una puesta fuera de
servicio prolongada, cambie las pilas recargables por otras nuevas del
mismo tipo al volver a poner el dispositivo en servicio.
Guarde los dispositivos y las pilas recargables en un lugar seco y no
demasiado cálido.
10.4 Eliminación (protección medioambiental)
El dispositivo y las pilas recargables no deben desecharse
junto con la basura doméstica normal al final de su vida útil.
El símbolo que figura en el producto o en el embalaje así
lo indica. El dispositivo debe desecharse en un punto de
recogida para reciclar dispositivos eléctricos y
151
Español
10.3 Puesta fuera de servicio y almacenamiento
Datos técnicos
electrónicos. Esto permitirá el reciclaje de algunos de los materiales
del producto. El reciclaje de piezas o de materias primas de los
productos usados ayuda a proteger el medio ambiente.
Deseche el material de embalaje de forma respetuosa con el medio
ambiente. Si necesita más información sobre los puntos de recogida
de su zona, póngase en contacto con las autoridades municipales.
11 Datos técnicos
Estándar
Telecomunicaciones inalámbricas mejoradas
digitalmente (DECT, por sus siglas en inglés)
Perfil de acceso genérico (GAP, por sus
siglas en inglés)
Intervalo de frecuencia
1.880 MHz a 1.900 MHz
Emisiones
10 mW (potencia media por canal)
Alcance
Hasta 300 m en espacios abiertos - hasta
50 m en edificios
Pilas del terminal:
2 x 1,2 V de 500 mAh del tipo AAA NiMh
recargables
Alimentación estación base Entrada: 100~240 V CA / 50-60 Hz
Salida: 6 V CC / 500 mA
Tiempo en espera del
100 horas en modo en espera
terminal:
Tiempo de conversación
10 horas
del terminal
Tiempo de carga:
16 horas
Temperaturas de
funcionamiento autorizadas De +5 °C a 45 °C
Humedad relativa
Del 25 al 85 %
autorizada
Modo de marcación
Marcación por pulsos y marcación por tonos
(DTMF)
Tiempo flash
100 o 300 ms
Memoria numérica del
50 entradas de agenda de hasta 24 dígitos y
terminal
16 letras
Dimensiones de la estación 117 mm x 117 mm x 60 mm /
base / terminal
182 mm x 284 mm x 58 mm
152
Garantía Topcom
Peso de la estación base /
terminal
Consumo máx. de energía
239 g con adaptador de corriente /
152 g con pilas
Estación base: 2,0 W
12 Garantía Topcom
12.1 Período de garantía
Las unidades de Topcom tienen un período de garantía de 24 meses.
El período de garantía entra en vigor el día en que se adquiere la
nueva unidad. No existe ninguna garantía sobre las pilas estándar o
recargables (tipo AA / AAA).
La garantía no cubre los consumibles ni los defectos que tengan un
efecto insignificante en el funcionamiento o en el valor del equipo.
La garantía debe demostrarse presentando el comprobante original
de compra o una copia de este, en el que constarán la fecha de la
compra y el modelo de la unidad.
Los aparatos averiados deberán remitirse a un servicio técnico de
Topcom junto con un comprobante de compra válido y una tarjeta de
servicio técnico cumplimentada.
Si la unidad tiene una avería durante el período de garantía, Topcom
o su centro de servicio oficial repararán sin cargo alguno cualquier
avería causada por defectos de material o fabricación, ya sea
reparando o sustituyendo las unidades defectuosas o partes de las
mismas. En caso de sustitución, el color y el modelo pueden variar
respecto a los de la unidad adquirida inicialmente.
La fecha de compra inicial determinará el comienzo del período de
garantía. El período de garantía no se ampliará si Topcom o sus
centros de servicio autorizados sustituyen o reparan la unidad.
12.3 Limitaciones de la garantía
Los daños o defectos ocasionados por un tratamiento o
funcionamiento incorrectos, así como los daños resultantes del
uso de piezas o accesorios no originales, no estarán cubiertos
por esta garantía.
La garantía no cubre los daños ocasionados por factores externos
tales como relámpagos, agua o fuego, como tampoco los daños
causados durante el transporte.
153
Español
12.2 Tratamiento de la garantía
Garantía Topcom
La garantía no será válida si el número de serie de las unidades se
cambia, se elimina o resulta ilegible.
Cualquier reclamación de la garantía se invalidará si la unidad ha sido
reparada, alterada o modificada por el comprador.
Esta aplicación solo debe utilizarse con pilas recargables. Si desea
sustituir las pilas incluidas originalmente, compruebe que las pilas que
utilice sean adecuadas y recargables. Bajo NINGUNA circunstancia
debe utilizar pilas alcalinas en los terminales.
Si utiliza pilas alcalinas y pone el terminal en la base, las pilas se
calentarán y podrían explotar. Los daños que ello pueda causar no
podrán recuperarse del fabricante, y los daños ocasionados en el
aparato no están cubiertos por la garantía. Usted deberá hacerse
cargo del coste de cualquier reparación.
154
Allmän information
1 Allmän information
Den här användarhandboken innehåller all information du behöver för
att installera, ställa in och använda din enhet. Den innehåller också
viktiga säkerhetsinstruktioner och hjälp för dig vid eventuella problem.
Förvara alltid handboken i närheten av enheten.
Förvara denna användarhandbok på ett säkert ställe och se till att
nästa ägare får tillgång till den vid behov.
1.1 Produkten: Sologic B921
Denna produkt har tillverkats i enlighet med den vedertagna
digitalstandarden för sladdlösa telefoner (DECT). DECT-teknik håller
hög säkerhetsnivå mot störningar och har en hög kvalitet på digitala
överföringar. Den här telefonen är avsedd för olika applikationer, t.ex.
för ett nätverk av basenheter och sladdlösa handenheter som
tillsammans utgör ett komplett PBX: upp till 4 sladdlösa handenheter
kan användas med en basenhet och en sladdlös handenhet kan
användas med upp till 4 basenheter. Internsamtal kan ringas mellan en
basenhet och en handenhet eller mellan två handenheter.
Om tjänsterna är tillgängliga hos din operatör, är det möjligt att
använda nummerpresentation och SMS-tjänster från din
telefonoperatör på den här telefonen. Om du använder dessa tjänster
visas numret till personen som ringer på telefondisplayen.
Viktigt!
Om du vill använda nummerpresentation måste
tjänsten aktiveras för ditt abonnemang. Kontakta din
telefonoperatör för att få mer information om hur du
aktiverar den här tjänsten. Om tjänsten inte är
aktiverad, visas INTE numret som det inkommande
samtalet kommer från på telefondisplayen.
Denna dokumentation är upphovsrättsligt skyddad.
Alla rättigheter förbehållna, inklusive fullständig kopiering eller
kopiering av vissa delar, duplikation och distribution genom särskilda
processer (såsom databehandling, dataöverföring och datanätverk)
samt omfattande och tekniska förändringar.
155
Svenska
1.2 Copyright
Allmän information
1.3 Signalord och symboler
Symbol Signalord
Varning
inga
Betydelse
Varning som visar på risker för allvarliga
personskador eller dödsfall om du inte följer
denna information.
Försiktighet Varning som visar på risker för mindre
personskador om du inte följer denna
information.
Försiktighet Risk för material- eller miljöskada.
Viktigt!
Här hittar du viktig information om funktionen.
Info, tips
Allmän information eller specifika tips.
1.4 Avsedd användning
Denna produkt är avsedd för telefonsamtal via en fast telefonlinje inom
ett telefonnät. Förutsättningen för korrekt användning av telefonen är
professionell installation med beaktande av informationen i denna
användarhandbok.
All annan användning anses vara inkorrekt och är inte tillåten.
Eventuella förändringar utförda av användaren som inte beskrivs
i denna användarhandbok, anses vara inkorrekta och är inte tillåtna.
Vi ansvarar ej för eventuella skador som härrör från sådana ändringar.
1.5 Innehållet i lådan
Kontrollera att innehållet i lådan är komplett och oskadat. Kontakta
genast återförsäljaren om delar saknas eller är skadade.
Spara förpackningen ifall du behöver returnera telefonen eller skicka
in den för reparation.
1 basenhet
1 nätadapter för basenheten
1 telefonsladd för basenheten
1 sladdlös handenhet inkl. 2 uppladdningsbara batterier (AAA, 1,2 V/500 mAh, NiMH) och en batterilucka
1 bruksanvisning
Varning
156
Kvävningsrisk för barn! Förvara plasten
i förpackningen utom räckhåll för barn.
Säkerhetsföreskrifter
Viktigt!
Kassera förpackningsmaterialet på ett
miljövänligt sätt.
2 Säkerhetsföreskrifter
Följande grundläggande säkerhetsanvisningar måste alltid följas när
elektrisk utrustning används.
Läs noga följande säkerhetsanvisningar och detaljer om korrekt användning av apparaten. Bekanta dig med enhetens alla funktioner. Förvara denna användarhandbok på ett säkert ställe nära enheten och kom
ihåg att överlämna den till eventuell nästa ägare av systemet. Överlämna inte telefonen till tredje part utan att bifoga användarhandboken.
Risker med elektricitet:
Risk för personskada eller dödsfall på grund av
elektrisk ström! Vid fara, koppla genast bort
enheten från 230 V-uttaget.
• Använd inte apparaten om adaptern, sladden eller enheten är
skadad. Undvik att tappa apparaten eftersom den då kan skadas.
• Spänningen i apparaten ligger på farligt höga nivåer. Öppna aldrig
höljet och för inte in några föremål i ventilationshålen.
• Se till att vätska inte tränger in i apparaten. Om detta skulle inträffa
ska du koppla ur adaptern ur eluttaget och dra ut kontakten till
telefonsladden ur telefonjacket.
• Koppla även ur adaptern ur eluttaget och kontakten till
telefonsladden ur telefonjacket om fel uppstår vid användning
samt före rengöring av apparaten.
• Rör inte vid laddaren eller kontakterna med vassa föremål
eller metallföremål.
• Försök inte att modifiera eller reparera enheten. Enheten eller
sladden bör endast repareras av en specialist på ett auktoriserat
servicecenter. Reparationer som inte utförs korrekt kan vara
mycket farliga för användaren.
• Barn underskattar ofta de faror som är förbundna med hantering av
elektriska apparater. Låt aldrig barn hantera elektriska enheter på
egen hand.
• Tillåt heller inte att barn leker med enheterna eller tillhörande delar.
Försiktighet Eventuell skada på enheten. Vid fara, koppla
genast bort enheten från 230 V-uttaget.
157
Svenska
Varning
Säkerhetsföreskrifter
• Använd inte apparaten i fuktiga miljöer (t.ex. badrum) eller i mycket
dammiga miljöer.
• Apparater som är anslutna till elnätet kan skadas vid åska. Koppla
därför alltid ur apparaten vid åska.
• Adaptern måste vara helt utdragen ur eluttaget för att apparaten
ska vara bortkopplad från strömförsörjningen. Dra alltid i kontakten,
aldrig i elsladden.
• Kontrollera regelbundet att det inte finns skador på sladdarna, håll
dem borta från heta ytor och andra faror, linda upp dem helt och
dra sladdarna så att ingen kan snubbla på dem. Undvik även att
vika, klämma, sträcka ut och belasta sladdarna.
Brandrisker:
Varning
Risk för personskada eller dödsfall på grund
av eldsvåda!
Utsätt inte enheten för hög värme och koppla
genast ur den ur 230 V-uttaget vid fara.
Den värme som genereras i enheten kan orsaka fel eller brand
i apparaten. Utsätt av denna anledning inte apparaten för extrema
temperaturer:
– Undvik direkt solljus och värme
– Täck inte över ventilationshålen på apparaten
Risk för explosion:
Varning
Risk för skador på grund av explosion!
Var särskilt försiktig i närheten av barn!
• Kasta aldrig vanliga eller laddningsbara batterier i öppen eld.
• Använd inte apparaten i miljöer där det finns risk för explosioner!
Risk för förgiftning:
Varning
Risk för skador på grund av förgiftning!
Var särskilt försiktig i närheten av barn!
• Förvara både vanliga och laddningsbara batterier utom räckhåll
för barn.
158
Säkerhetsföreskrifter
Kvävningsrisk:
Varning
Risk för skador på grund av kvävning!
Var särskilt försiktig i närheten av barn!
• Förvara plasten i förpackningen utom räckhåll för barn.
• Var uppmärksam på eventuella risker för mindre barn
(strypningsfara) om du använder förlängningssladdar.
Fel:
Varning
Möjlig risk för skada på grund av fel på enheten!
Var extra försiktig när det gäller medicinsk utrustning.
• Funktionen hos elektrisk medicinsk utrustning kan påverkas av
elektromagnetisk strålning från din apparat. Se därför till att
installera och använda apparaten på behörigt avstånd från elektrisk
medicinsk utrustning. Samma sak gäller för medicinska implantat som t.ex. pacemakers.
• Den sladdösa handenheten kan orsaka ett obehagligt surrande i
hörapparater, så håll den på behörigt avstånd från dessa.
Möjliga skador:
Försiktighet
Eventuell skada på enheten! Läs informationen
i den här användarhandboken.
Viktigt!
Vid strömavbrott är det endast möjligt att ringa med
hjälp av basenheten.
159
Svenska
• Använd endast den medföljande nätadaptern. Använd inga andra
nätadaptrar eftersom de laddningsbara batterierna då kan skadas.
• Eluttaget där adaptern ska anslutas måste finnas nära apparaten
och vara lättillgängligt
• Använd endast de medföljande laddningsbara batterierna. När de
behöver bytas ut ska endast uppladdningsbara batterier av samma
sort användas. Kontrollera att du sätter in batterierna vända åt rätt
håll (information om detta finner du i batterifacket på enheten).
Använd aldrig vanliga batterier!
De första stegen
2.1 Information om funktionen för reducerad strålning
Den här sladdlösa telefonen (som uppfyller DECT-standarden) har en
lågeffektsfunktion för reducerad strålning (ECO-läge).
Vid samtal minskas handenhetens radiofrekventa strålning, beroende
på avståndet till basenheten. När inget samtal pågår, reduceras den
radiofrekventa strålningen från handenheten till ett minimum.
Detta innebär inte att normal DECT-strålning är skadlig för hälsan.
Det är snarare så att det lågstrålande läget förhindrar att strålning
avges i onödan.
Basenheten minskar inte den radiofrekventa strålningen! Placera
basenheten på en plats där du inte tillbringar mycket tid, t.ex. i hallen.
Undvik att placera den i ditt eget eller barnens sovrum, eller
i vardagsrummet.
3 De första stegen
3.1 Så här används bruksanvisningen
I den här bruksanvisningen används följande metod för att förtydliga
instruktionerna:
Text ....... „Display”.
Text som visas på telefonens display.
Knapp som ska tryckas ned.
3.2 Installera basenheten
Installera basenheten enligt följande anvisningar:
1 Anslut först nätadaptern till basenheten och sedan till ett eluttag.
2 Anslut ena änden av telefonsladden till väggtelefonjacket och
den andra änden till uttaget på basenhetens baksida.
3 Telefonen och strömkablarna ska anslutas på det sätt som visas
på bild 3A.
160
De första stegen
B
A
C
- 3A Basenhet A. Telefonjack
B. Nätadapter med sladd
C. Telefonsladd
3.3 Handenhet
Försiktighet Risk för skador på grund av explosion!
Använd endast de medföljande
uppladdningsbara batterierna eller batterier av
samma typ. Använd inte vanliga batterier!
Annars kan den sladdlösa handenheten skadas.
2
3
4
Öppna batterifacket såsom visas på bild 3B.
Sätt i de laddningsbara batterierna. Kontrollera att du sätter i
batterierna åt rätt håll (+ och -).
Stäng batterifacket.
Placera handenheten i laddaren och ladda den i 16 timmar.
Laddningslampan tänds
B921
- 3B Handenhetens baksida A.Lucka
B.Laddningsbara batterier
A
Svenska
1
+
B
+
161
De första stegen
3.4 Batteristatusindikator
Handenheten slutar fungera när batterierna är urladdade.
Om batterierna är helt urladdade och du placerar handenheten
i basenheten under endast en kort tid, visar batteristatusindikatorn
att batterierna är fulladdade. Det är de dock inte och batteriprestandan
kommer snabbt att försämras. Du måste låta handenheten stå
laddaren i 16 timmar för att batterierna ska bli fulladdade.
Laddade batterier
Urladdade batterier
Handenheten sänder under samtal ut en varningston när batterierna
nästan är urladdade. Placera handenheten på laddningsenheten för
att ladda batterierna.
3.5 Knappar/Display
Sladdlös handenhet
1. Återuppringning/Upp
2. Telefonbok
3. Stäng ljud/Radera
4. Lägg på
5. Knappsats (alfanumerisk)
6. Knapplås
7. Paus
8. Ringsignal TILL/FRÅN
9. Samtalslista/Ned
10.Svara/Handsfree /Ring
11. Internt samtal/Escape
12.Meny/OK /Flash
13.Display
14.Röd lampa, blinkar under pågående samtal
14
13
1
12
11
10
2
R
OK
ESC/
INT
3
4
9
5
8
6
7
- 3C Handenhetens framsida -
162
De första stegen
Basenhet
15.Sök
16.Laddningslampa för
handenhet
17.Lysdiod, samtal
17
16
15
- 3D Basenhet -
3.6 Handenhetens display
x = handenhetens nummer
Andra nummer eller bläddra
åt vänster genom menyn
Hitta eller skapa nya poster
i telefonboken
Andra nummer eller bläddra
åt höger genom menyn
Ringsignal av
Handsfreeläge på
Knapplås på
Nytt röstmeddelande
Samtal skapat
Mikrofon avstängd
Nya nummer i samtalslistan
Antennen anger
mottagningssignalens styrka.
Antennen blinkar när
handenheten är utanför
räckvidden.
Internt samtal
Batteristatusindikator
163
Svenska
HANDENHET
(HANDSET) X
De första stegen
3.7 Navigera i menyn
Sologic B921 har ett menysystem som är lätt att använda. I varje meny
finns en lista med alternativ.
En sammanfattning av handenhetens och basenhetens menyer
finns nedan.
OK
1
2
OK
ESC
3
4
Tryck på knappen Meny/OK för att öppna huvudmenyn.
Bläddra till önskat menyalternativ.
Tryck på Meny/OK för att visa fler alternativ eller för att
bekräfta den visade inställningen.
Tryck på Escape-knappen för att återgå till föregående
menyalternativ
Handenhet
TELEFONBOK
HANDENHET
RINGSIGNAL
HANDENHETENS
NAMN
KNAPPLJUD
VÄLJ BAS
ÅTERSTÄLLNING
SPRÅK
REGISTRERA
HANDENHET
AVREGISTRERA
HANDENHET
3.8 Använda de alfanumeriska knapparna
Du kan använda de alfanumeriska knapparna för att skriva in text.
Tryck på en alfanumerisk knapp för att välja en bokstav 5 . Om du till
exempel trycker på knappen 5, visas först bokstaven "j" på displayen.
Tryck på knappen upprepade gånger för att välja någon av de andra
bokstäverna.
Tryck på knappen 2 en gång för att välja bokstaven "a". Om du vill
skriva in bokstäverna "a" och "b" i följd, tryck först en gång på
knappen 2 för att välja bokstaven "a". Vänta 2 sekunder tills markören
har flyttats till nästa position. Tryck sedan på knappen 2 två gånger för
att välja bokstaven "b". Du kan använda raderingsknappen
3 för
att radera bokstäver som slagits in av misstag. Bokstaven till vänster
om markören raderas.
164
Använda telefonen
Teckentabell
1
2
3
4
5
6
7
8
9
0
Mellanslag+ - / 1
ABC2
DEF3
GHI4
JKL5
MNO6
PQRS7
TUV8
WXYZ9
_0
4 Använda telefonen
4.1 Byta språk
OK
1
OK 2
OK 3
OK 4
5
ESC
Tryck på knappen Meny/OK.
Välj "HANDENHET" (HANDSET) och bekräfta.
Välj "SPRÅK" (LANGUAGE) och bekräfta.
Välj önskat språk och bekräfta.
Tryck på Escape-knappen för att återgå
till vänteläge.
4.2 Utgående samtal
Ringa ett samtal
1 Tryck på Ring-knappen.
2 Ange telefonnumret.
4 5 6
3 Tryck på knappen "lägg på" för att avsluta samtalet.
G
H
I
J
K
L
M
N
O
G
H
I
J
K
L
Svenska
Samtalsförberedelse
1 Ange telefonnumret.
4 5 6
Skriver du fel kan du rätta till numret genom att
trycka på tyst-knappen (mute). Om du inte trycker på någon knapp inom
10 sekunder, försvinner numret och handenheten
återgår automatiskt till vänteläge.
M
N
O
165
Använda telefonen
Tryck på Ring-knappen.
Telefonnumret rings upp automatiskt.
3 Tryck på knappen "lägg på" för att avsluta samtalet.
2
Ring upp det senast uppringda telefonnumret
Tryck på Ring-knappen.
2 Tryck på återuppringningsknappen.
Det senast uppringda telefonnumret rings upp
automatiskt.
3 Tryck på knappen "lägg på" för att avsluta samtalet.
1
Återuppringning av ett av de 3 senast slagna telefonnumren
Tryck på återuppringningsknappen.
Det senast slagna numret visas på displayen.
Om du vill ringa upp ett av de 3 senast slagna numren
trycker du på återuppringningsknappen flera gånger
tills önskat nummer visas på displayen.
2 Tryck på Ring-knappen.
Telefonnumret rings upp automatiskt.
3 Tryck på knappen "lägg på" för att avsluta samtalet.
1
4.3 Inkommande samtal
När ett inkommande samtal tas emot ringer både handenheten och
basenheten, och lampan "SYNLIGT SAMTAL" (Visual call signal) (se
punkt 14 i fig. 3C och punkt 17 i fig. 3D) blinkar på handenheten och
basenheten.
1
2
Tryck på Svara-knappen för att besvara samtalet.
Tryck på knappen "lägg på" för att avsluta samtalet.
4.4 Aktivera/inaktivera handsfreeläget
Du kan använda denna funktion för att svara på ett samtal utan att
behöva hålla i handenheten eller om ett samtal redan pågår via
handenheten.
Under samtalet:
1 Tryck på handsfreeknappen för att aktivera
funktionen.
166
Använda telefonen
Tryck på handsfreeknappen igen för att koppla
tillbaka samtalet till handenheten.
2
Viktigt!
Batterierna laddas ur snabbare om du använder
handsfreeläget under lång tid.
4.5 Stäng ljud (Mute)
Du kan stänga av mikrofonen under ett pågående samtal så att du kan
prata utan att personen i andra änden av telefonlinjen hör.
1 Tryck på Stäng ljud-knappen.
Mikrofonen är inställd på tyst läge och "MUTED"
visas.
2 Tryck på Stäng ljud-knappen igen för att aktivera
mikrofonen.
4.6 Ställa in volymen för hörlur/högtalare
Under ett samtal:
Tryck på nedknappen.
2 Tryck på upp- och nedknapparna.
Du kan ställa in volymen från nivå 1 till 5.
1
4.7 R-knappen (paus)
Tryck på pausknappen på basenheten (knapp 12 i
fig. 3C „Sladdlös handenhet“ på sidan 162) för att
använda vissa tjänster på den externa linjen som
exempelvis "samtal väntar" (om telefonoperatören
erbjuder denna tjänst) eller för att överföra samtal om
du använder en telefonväxel (PBX). Pausknappen
R avbryter kort ditt samtal. Du kan ställa in paustiden
på 100 ms eller 300 ms. För att ställa in en annan
paustid, se „5.4 R-knappen (paus)“.
4.8 Välja ringsignal och ställa in volym
Handenhetens ringsignal för interna/externa samtal
1 Tryck på knappen Meny/OK.
OK
OK 2 Välj "HANDENHET" (HANDSET) och bekräfta.
167
Svenska
OK
Använda telefonen
OK 3 Välj "RINGSIGNAL" (RING TONE) och bekräfta.
4
OK
OK 5
Välj "INTERN" (INTERNAL) eller "EXTERN"
(EXTERNAL) och bekräfta.
Välj en ringsignal (1 till 9) och bekräfta.
Handenhetens ringvolym
1 Tryck på knappen Meny/OK.
OK
OK 2 Välj "HANDENHET" (HANDSET) och bekräfta.
OK 3 Välj "RINGSIGNAL" (RING TONE) och bekräfta.
OK 4 Välj "VOLUM" (VOLUME) och bekräfta.
OK 5 Välj önskad volym (Av, 1–5) och bekräfta.
Viktigt!
Du kan sätta på eller stänga av ringsignalen för varje
enskild handenhet genom att hålla ned ringsignalens
på/av-knapp
i vänteläget.
Symbolen
visas på displayen och knapplåset
aktiveras.
4.9 Knapplås
När knappsatsen är låst händer ingenting om du trycker på någon
knapp i vänteläget (förutom om du håller knappen för knapplås
nedtryckt).
1 Håll ned knapplåsknappen.
Symbolen visas på displayen.
2 Tryck på knapplåsknappen igen för att inaktivera
knapplåset.
När knapplåset är aktiverat kan du fortfarande svara
på ett inkommande samtal genom att trycka på
Svara-knappen. Knappsatsen fungerar som vanligt
under samtalet. Knapplåset aktiveras igen efter
samtalet.
4.10 Handenhetens namn
Du kan ändra namnet som visas på displayen (högst 12 tecken)
när inget samtal pågår.
1 Tryck på knappen Meny/OK.
OK
OK 2 Välj "HANDENHET" (HANDSET) och bekräfta.
168
Använda telefonen
3
OK
4 5 6
G
H
I
J
K
L
M
N
O
4
OK
5
ESC
6
Välj "HANDENHETNAM" (HANDSET NAME)
och bekräfta.
Ta bort det befintliga namnet med hjälp av Ljud av-knappen och skriv in det nya namnet.
Tryck för att bekräfta.
Tryck på Escape-knappen för att återgå till
vänteläget.
4.11 Aktivera/avaktivera knappljud
1
OK
OK 2
3
OK
4
OK
5
ESC
6
Tryck på knappen Meny/OK.
Välj "HANDENHET" (HANDSET) och bekräfta.
Välj "KNAPPLJUD" (KEYPAD BEEP) och
bekräfta.
Välj sedan "PÅ" (ON) eller "AV" (OFF).
Tryck för att bekräfta.
Tryck på Escape-knappen för att återgå till
vänteläge.
4.12 Telefonbok
Du kan lagra 50 poster i telefonboken. Namn kan vara upp till
16 tecken långa och telefonnummer upp till 24 siffror långa.
G
H
I
J
K
L
M
N
O
G
H
I
J
K
L
M
N
O
Ringa ett snabbnummer
1 Tryck på telefonboksknappen.
2 Bläddra fram till önskat namn eller skriv in de första
bokstäverna i namnet.
4 5 6
3 Tryck på telefonboksknappen för att visa
telefonnumret.
4 Tryck sedan på Ring-knappen.
G
H
I
J
K
L
M
N
O
169
Svenska
Lägga till en telefonbokspost
1 Tryck på telefonboksknappen.
OK 2 Tryck på knappen OK två gånger.
OK
4 5 6 OK 3 Ange namnet och bekräfta.
4 5 6 OK 4 Skriv in det önskade telefonnumret och bekräfta.
En bekräftelseton hörs nu.
Använda telefonen
Telefonnumret rings upp automatiskt.
5 Tryck på knappen "lägg på" för att avsluta samtalet.
Redigera en telefonbokspost
1 Tryck på telefonboksknappen.
2 Bläddra fram till önskat namn eller skriv in de första
bokstäverna i namnet.
4 5 6
3 Tryck på telefonboksknappen för att visa
telefonnumret.
4 Tryck på knappen Meny/OK.
OK
OK 5 Välj "REDIGERA" (EDIT ENTRY) och bekräfta.
4 5 6 OK 6 Ange namnet och bekräfta.
4 5 6 OK 7 Ange eller redigera telefonnumret och bekräfta.
G
H
I
G
H
I
J
K
L
M
N
O
G
H
I
J
K
L
M
N
O
J
K
L
M
N
O
Radera en post eller alla poster i telefonboken
1 Tryck på telefonboksknappen.
2 Bläddra fram till önskat namn eller skriv in de första
bokstäverna i namnet.
4 5 6
3 Tryck på telefonboksknappen för att visa
telefonnumret.
4 Tryck på knappen Meny/OK.
OK
5 Välj "RADERA" (DELETE ENTRY) för att radera
den aktuella telefonboksposten och bekräfta.
OK
ELLER
6 Välj "RADERA ALLA" (DELETE ALL) för att radera
alla telefonboksposter och bekräfta.
OK
ESC 7 Bekräfta igen eller tryck på Escape-knappen för att
OK
hoppa över.
G
H
I
J
K
L
M
N
O
4.13 Nummerpresentation (CLIP)
Sologic B921 visar telefonnumren för de inkommande samtalen.
Denna funktion kan endast användas om du har registrerats för
tjänsten hos din telefonileverantör. Kontakta din telefonileverantör
för mer information.
När du tar emot ett samtal sparas telefonnumret i en samtalslista.
Listan kan innehålla upp till 30 nummer (vart och ett med högst
23 siffror).
170
Använda telefonen
Om telefonnumret är längre än 12 siffror kan du
bläddra åt höger på displayen för att visa resten
av siffrorna.
Nya samtal
När det finns ett nytt obesvarat samtal i samtalslistan
kommer symbolen CLIP att blinka på displayen.
Öppna samtalslistan
Tryck på samtalslisteknappen.
Det senast mottagna samtalet visas. Om samtalslistan
är tom, visas ordet "TOM" (EMPTY) på displayen.
2 Tryck på telefonboksknappen för att hoppa över
numret.
3 Tryck på telefonboksknappen för att hoppa över
datum och tid.
4 Tryck på upp- och nedknapparna för att bläddra
genom listan.
5 Tryck på Escape-knappen för att lämna
samtalslistan.
1
ESC
Ringa ett nummer i samtalslistan
1 Tryck på samtalslisteknappen.
2 Bläddra genom samtalslistan tills det önskade
telefonnumret visas.
3 Tryck på Svara-knappen för påbörja samtalet.
Telefonnumret rings upp automatiskt.
4 Tryck på knappen "lägg på" för att avsluta samtalet.
Svenska
Radera ett nummer från samtalslistan
1 Tryck på samtalslisteknappen.
2 Bläddra genom samtalslistan tills det önskade
telefonnumret visas.
3 Tryck på knappen Meny/OK.
OK
171
Använda telefonen
4
OK
5
OK
ESC 6
OK
Välj "RADERA" (DELETE) för att radera det
aktuella numret.
ELLER
Välj "RADERA ALLA" (DELETE ALL) för att
radera alla telefonboksposter och bekräfta.
Tryck för att bekräfta eller Escape-knappen för att
gå tillbaka.
Spara ett nummer från samtalslistan som snabbnummer
1 Tryck på samtalslisteknappen.
2 Bläddra genom samtalslistan tills det önskade
telefonnumret visas.
3 Tryck på knappen Meny/OK.
OK
OK 4 Välj "SPAR TILL TB" (SAVE TO PB) och bekräfta.
4 5 6 OK 5 Redigera eller lägg till ett namn och bekräfta sedan.
4 5 6 OK 6 Redigera telefonnumret och bekräfta.
G
H
I
J
K
L
M
N
O
G
H
I
J
K
L
M
N
O
4.14 Återställa handenheten till standardinställningarna.
Detta raderar alla ändringar och återställer alla standardinställningar
(ringvolym, ringsignal osv). Samtalslistan, återuppringningslistan och
telefonboken raderas också.
1 Tryck på knappen Meny/OK.
OK
OK 2 Välj "HANDENHET" (HANDSET) och bekräfta.
OK OK 3 Välj "ATERSTALL" (RESET) och bekräfta.
4 Ange basenhetens PIN-kod (0000 som standard).
4 5 6
5 Enheten återgår till vänteläge.
G
H
I
J
K
L
M
N
O
Standardinställningarna är:
Handenhetens namn
HANDENHET
Lurvolym
Nivå 3
Ringvolym
Nivå 3
Extern ringsignal
Ringsignal 8
Intern ringsignal
Ringsignal 1
Knappljud
På
172
Basenhetsinställningar
4.15 Telefonsvararvisning
Den här indikeringen fungerar enbart om du har aktiverat
röstmeddelande- eller telefonsvarartjänsten och om din
telefonoperatör sänder denna information tillsammans med
nummerpresentationen. När du får ett nytt meddelande i inkorgen
för röstmeddelanden visas symbolen
på displayen. Symbolen
försvinner när du har lyssnat på meddelandet.
5 Basenhetsinställningar
Info
Det här avsnittet beskriver endast de inställningar
som finns lagrade i basenheten.
5.1 Välja ringsignal och ställa in volym
Ringsignal för interna/externa samtal i handenheten.
1 Tryck på knappen Meny/OK.
OK
OK 2 Välj "BAS" (BASE) och bekräfta.
OK 3 Välj "RINGSIGNAL" (RING TONE) och bekräfta.
OK 4 Välj en ringsignal (1 till 9) och bekräfta.
Basenhetens ringvolym
1 Tryck på knappen Meny/OK.
OK
OK 2 Välj "BAS" (BASE) och bekräfta.
OK 3 Välj "VOLUM" (RING VOLUME) och bekräfta.
OK 4 Välj önskad volym (Av, 1–5) och bekräfta.
5.2 Ställa in uppringningsläget
1
OK
OK 2
OK 3
4
OK
Tryck på knappen Meny/OK.
Välj "BAS" (BASE) och bekräfta.
Välj "RINGLAGE"(DIAL MODE) och bekräfta.
Välj "TON" (TONE) eller "PULS" (PULSE) och
bekräfta.
173
Svenska
Det finns två sorters uppringningssätt för telefonanslutningar:
- DTMF/Tonuppringning (vanligast)
- Ringläget pulsval (behövs endast om enheten används i ett
äldre växelsystem)
Registrera och avregistrera en handenhet
5.3 Ställa in system-PIN
Du kan endast nå vissa funktioner om du känner till basenhetens PIN-kod.
PIN-koden består av 4 tecken. Standardinställningen för PIN-koden är
"0000". Så här ändrar du PIN-koden och ställer in en egen PIN-kod:
OK
1
OK 2
OK 3
4 5 6
OK 4
4 5 6
OK 5
G
H
I
G
H
I
J
K
L
J
K
L
M
N
O
M
N
O
Tryck på knappen Meny/OK.
Välj "BAS" (BASE) och bekräfta.
Välj "SYSTEM PIN" och bekräfta.
Tryck på "GAM PIN-" (OLD PIN-) och tryck på OK.
Ange "NY PIN-" (NEW PIN-) och bekräfta.
5.4 R-knappen (paus)
Tryck på pausknappen för att använda vissa tjänster på den externa
linjen som exempelvis "samtal väntar" (om telefonoperatören erbjuder
denna tjänst) eller för att överföra samtal om du använder en
telefonväxel (PBX). Pausknappen R avbryter kort ditt samtal. Du kan
ställa in paustiden på 100 ms eller 300 ms. Du kan dock ändra detta
om du önskar en längre paustid.
1 Tryck på knappen Meny/OK.
OK
OK 2 Välj "BAS" (BASE) och bekräfta.
OK 3 Välj "ÅTERUPPRING" (RECALL) och bekräfta.
4 Välj sedan "LÅNG" (LONG) eller "KORT"
(SHORT) och bekräfta.
OK
6 Registrera och avregistrera en handenhet
6.1 Registrera handenheten på basenheten Sologic B921
Du kan registrera upp till 4 handenheter på en basenhet. Alla
handenheter är redan registrerade på basenheten vid leverans.
Du behöver endast registrera handenheten om:
• handenheten tidigare har avregistrerats från basenheten (t.ex. för att nollställa den)
• du vill registrera en annan handenhet på basenheten.
Följande beskrivning gäller endast för Sologic B921-systemets
handenheter och basenheter.
1
174
Tryck ned sökarknappen på basenheten i
10 sekunder.
Registrera och avregistrera en handenhet
Tryck på knappen Meny/OK på handenheten.
3 Välj "REGISTER" och bekräfta.
4 Ange numret på den basenhet (1–4) som du vill
registrera handenheten på.
5 Enheten börjar nu att söka efter basenheten.
När den har hittat den ombeds du att skriva in PIN-koden (fyra siffror).
6 Ange basenhetens PIN-kod (0000 som standard).
Om PIN-koden är felaktig kommer handenheten att
börja söka efter basenheten på nytt.
När handenheten väl har registrerats visas dess
namn och nummer på displayen.
2
OK
4 5 6
G
H
I
J
K
L
M
N
O
4 5 6
G
H
I
J
K
L
M
N
O
6.2 Avregistrera en handenhet från basenheten Sologic B921
OK
4 5 6
G
H
I
J
K
L
M
N
O
4 5 6
G
H
I
J
K
L
M
N
O
Tryck på knappen Meny/OK.
OK 2 Välj "TA BORT HE" (DE-REGISTER) och bekräfta.
OK 3 Ange basenhetens PIN-kod (0000 som standard).
4 Ange det interna numret till den handenhet som du
vill avregistrera (1–4) och bekräfta.
OK
När handenheten har avregistrerats återgår den till
vänteläge. I annat fall kommer du att bli ombedd att
ange handenhetens nummer igen.
Viktigt!
1
Handenheten kan endast avregistreras när den
inte används.
Om din handenhet är registrerad på mer än en basenhet (högst 4)
måste du välja en av dessa basenheter eftersom handenheten bara
kan kommunicera med en basenhet åt gången. Det finns två alternativ:
Automatiskt val
Om du ställer in handenheten på "Auto" kommer handenheten
automatiskt att söka efter den närmaste basenheten i vänteläge.
1 Tryck på knappen Meny/OK.
OK
OK 2 Välj "HANDENHET" (HANDSET) och bekräfta.
175
Svenska
6.3 Välja en basenhet
Vidarekoppla och ringa interna samtal från en handenhet till en annan
OK 3 Välj "VÄLJ BASENH" (SELECT BASE)
OK 4
Info
och bekräfta.
Välj "AUTO" och bekräfta.
När du har aktiverat automatiskt basenhetsval
och handenheten är utom räckvidd för nuvarande
basenhet, kommer handenheten bara att leta
efter den starkaste basenheten i vänteläge
(inte under samtal).
Manuellt val:
Om du ställer in handenheten på "Manuell" kommer handenheten
bara att söka efter den basenhet som du har valt.
1 Tryck på knappen Meny/OK.
OK
OK 2 Välj "HANDENHET" (HANDSET) och bekräfta.
OK 3 Välj "VÄLJ BASENH" (SELECT BASE) och
bekräfta.
OK 4 Välj "MANUELL" (MANUAL) och bekräfta.
OK 5 Välj basenhet och bekräfta.
Viktigt!
För att det ska vara möjligt för basenheten och
handenheten att kommunicera måste handenheten
vara registrerad på basenheten.
7 Vidarekoppla och ringa interna samtal från en
handenhet till en annan
7.1 Vidarekoppling och konferenssamtal under ett
externt samtal
INT
4 5 6
G
H
I
176
Under ett externt samtal trycker du på INT-knappen
och sedan handenhetens nummer (1–4).
Den andra handenheten börjar nu att ringa.
Om samtalet har kopplats till handenheten, kan ni
prata internt. När du lägger på kommer det externa
samtalet att vidarekopplas till den andra
handenheten.
1
J
K
L
M
N
O
Förkortningar och tekniska termer
INT
2
INT
3
4
Håll knappen INT nedtryckt i 3 sekunder. Nu kan
du tala med den andra handenheten och den
externa linjen samtidigt (konferenssamtal).
Tryck på INT-knappen igen för att återgå till det
externa samtalet.
Tryck på knappen "lägg på" för att avsluta samtalet.
CLIP
Med nummerpresentation (Calling Line Identification Presentation –
CLIP) visas det uppringande numret på telefondisplayen.
DECT
DECT-telefoni; Europeisk telekommunikationsstandard för digitala
sladdlösa telefoner.
DTMF
DTMF; modernt, digitalt ringläge.
ECO-läge
ECO-läget för DECT-telefoni är ett lågstrålningsläge.
GAP
GAP är gränssnittet mellan basenheten och handenheten som gör det
möjligt med trådlös kommunikation.
INT
Intern mottagare. Annan handenhet eller förlängningar inom ett
telefonväxelsystem (PBX).
LCD
Display med flytande kristaller (Liquid Chrystal Display).
LED
Lampa, lysdiod.
Pausknapp
Med knappen görs ett kort avbrott på linjen som används för att
aktivera sådana funktioner som koppling eller vidarekoppling.
I telefonväxelsystem (PBX) används pausknappen eller R för
intern återuppringning.
PIN-kod
Personligt identifikationsnummer.
Pulsläge
Omodernt, analogt ringläge (störande ringljud).
177
Svenska
8 Förkortningar och tekniska termer
Felsökning
R-knappen
Återuppringningsknappen (se pausknappen).
Twin (tvilling)
Avser en enhet med två identiska enheter, t.ex. två handenheter.
Viloläge
"Vilostatus" för en enhet utan att den är helt avstängd.
9 Felsökning
Problem
Möjlig orsak
Lösning
Inget syns på
displayen
Batterierna är inte
laddade
Kontrollera att båda
batterierna är korrekt
insatta
Inget ljud
Volymen är för låg
Handenhetens
ringvolym är för låg
Ladda batterierna
Telefonsladden är inte Kontrollera
korrekt ansluten
sladdanslutningen
Linjen används av en Vänta tills den
annan handenhet
andra handenheten
lägger på
Justera volymen
under samtalet genom
att trycka på
volymknappen
Ställ in ringvolymen
Det går inte att ringa Uppringningsläget är
upp ett nummer
felaktigt inställt
Symbolen
178
blinkar Handenheten är utom
räckvidd
Se „5.2 Ställa in
uppringningsläget“
för att ställa in rätt
uppringningsläge
Flytta handenheten
inom räckvidd för
basenheten
Det finns ingen ström i Kontrollera
basenheten
nätadaptern och
sladden
Skötsel
Problem
Möjlig orsak
Lösning
Handenheten är inte
registrerad på
basenheten
Ringvolymen är
avstängd eller för låg
Registrera
handenheten på
basenheten
Ställ in ringvolymen
Basenheten eller
handenheten
ringer inte
Ett samtal kan inte Paustiden är för kort
vidarekopplas till ett
annat nummer
Det händer inget när Driftsfel
man trycker på
knapparna på
telefonen
Ställ in enheten på
lång paustid
Ta ut batterierna och
sätt tillbaka dem igen
Försök inte att modifiera eller reparera enheten. Enheten eller sladden
bör endast repareras av en specialist på ett auktoriserat servicecenter.
Reparationer som inte utförs korrekt kan vara mycket farliga för
användaren.
10 Skötsel
10.1 Underhåll
Apparaten är underhållsfri. Kontrollera batterierna med jämna
mellanrum och byt ut dem mot nya batterier av samma typ om deras
funktion försämras eller om de visar tecken på att börja läcka.
Risk för kemiska brännskador!
Använd skyddshandskar om du behöver ta ut
uppladdningsbara batterier som har börjat läcka.
Om enheten kommer i kontakt med vätska ska du omedelbart ta ut
batterierna och koppla bort enheten från strömförsörjningen
(basenheten) och torka den försiktigt. Kontrollera om den fungerar
efter 2–3 dagar. Skicka den till servicecentret om den är trasig.
179
Svenska
Varning
Skötsel
10.2 Rengöring
Varning
Risk för elektriska stötar eller kortslutning på grund av
kontakt med strömförande delar.
Se till att vätska inte tränger in i apparaten. Om detta
skulle inträffa ska du koppla ur adaptern ur eluttaget
och kontakten till telefonsladden ur telefonjacket och
ta ut batterierna.
Gör samma sak om enheten, sladden eller
nätadaptern är skadad: undvik direktkontakt med vätska och koppla genast ur enheten ur 230 V-uttaget.
Rengör telefonen med en fuktig trasa som har doppats i ljummet vatten
eller med en antistatisk dammtrasa. Använd aldrig rengöringsmedel
eller slipande lösningsmedel.
10.3 Ta ur bruk, förvaring
För att tillfälligt ta enheten ur bruk kopplar du ur telefonsladden ur
telefonjacket i väggen och ur telefonjacket på basenheten. Dra ut
nätadaptrarna till basenheten och handenheten från 230 V-uttagen.
Ta ut batterierna ur handenheten. Om telefonen tas ur bruk under lång
tid ska du byta ut de uppladdningsbara batterierna mot nya batterier av
samma typ när telefonen tas i bruk igen.
Förvara enheterna och de laddningsbara batterierna på en torr plats
som inte är för varm.
10.4 Kassering (miljöskydd)
Enheten och de laddningsbara batterierna får inte
kasseras på tillsammans med hushållsavfallet. Detta visas
genom denna symbol på produkten och/eller på
förpackningen. Ta med apparaten till en
återvinningscentral som tar emot elektriska och
elektroniska apparater. En del av materialet i produkten
kan återvinnas där. Du kan bidra till att skydda miljön
genom att återvinna vissa delar eller råmaterial från använda
produkter.
Kassera även förpackningsmaterialet på ett miljövänligt sätt. Kontakta
kommunen om du behöver mer information om närbelägna
återvinningsstationer.
180
Tekniska specifikationer
11 Tekniska specifikationer
Telefonstandard
DECT(Digital Enhanced Cordless
Telecommunications)
GAP ( Generic Access Profile )
Frekvensomfång
1 880 MHz till 1 900 MHz
Emission
10 mW (genomsnittlig uteffekt per kanal)
Räckvidd
Upp till 300 m i öppen terräng och upp till
50 m i byggnader
Handenhetens batterier:
2 x 1,2 V, 600 mAh, typ AAA,
uppladdningsbara NiMh-batterier
Strömförsörjning för
In: 100~240 VAC/50–60 Hz
basenhet
Ut: 6 VDC/500 mA
Standbytid för handenhet: 100 timmar i vänteläge
Handenhetens samtalstid
10 timmar
Laddningstid:
16 timmar
Tillåtna driftstemperaturer +5 °C till +45 °C
Tillåten relativ luftfuktighet 25 till 85 %
Uppringningsläge
Pulsval och tonval (DTMF)
Paustid
100 eller 300 ms
Handenhetens
50 telefonboksposter på upp till 24 siffror nummerminne
och 16 bokstäver
Mått för basenhet/
117 mm x 117 mm x 60 mm/
handenhet
182 mm x 284 mm x 58 mm
Vikt för basenhet/ 239 g med nätadapter/
handenhet
152 g med batterier
Maximal energiförbrukning Basenhet: 2,0 W
12 Topcoms garanti
Garantiperioden på Topcoms produkter omfattar 24 månader.
Garantin börjar gälla på inköpsdagen. Standardbatterier och
uppladdningsbara batterier (typ AA/AAA) omfattas inte av garantin.
Förbrukningsartiklar eller defekter som har en försumbar effekt på
utrustningens funktion eller värde omfattas inte av garantin.
181
Svenska
12.1 Garantiperiod
Topcoms garanti
Garantianspråket måste styrkas genom uppvisande av inköpskvitto i
original eller kopia, där inköpsdatumet och enhet/modell anges.
12.2 Handläggning av garantianspråk
En felaktig apparat måste returneras till något av Topcoms
servicecenter tillsammans med ett giltigt inköpskvitto och ifyllt
servicekort.
Om ett fel uppstår på enheten under garantiperioden åtgärdar Topcom
eller dess officiellt förordnade servicecenter alla defekter orsakade av
material- eller tillverkningsfel utan kostnad. Detta sker antingen genom
reparation eller utbyte av den felaktiga enheten eller av delar av den
felaktiga enheten. Vid utbyte kan den nya produktens färg och modell
skilja sig från den ursprungligen inköpta produktens.
Garantiperioden inleds på det ursprungliga inköpsdatumet, och
perioden förlängs inte om enheten byts ut eller repareras av Topcom
eller något av dess förordnade servicecenter.
12.3 Undantag från garantin
Skador eller defekter som har orsakats av felaktig behandling eller
användning, och skador som har uppkommit till följd av användning
av delar eller tillbehör som inte är original, omfattas inte av garantin.
Vidare omfattar inte garantin skador som orsakas av yttre faktorer,
såsom blixtnedslag, vatten och brand och inte heller skador som
uppkommer under transport.
Inga garantianspråk kan göras om serienumret på enheterna har
ändrats, tagits bort eller gjorts oläsligt.
Alla garantikrav ogiltigförklaras om enheten har reparerats, ändrats
eller modifierats av köparen.
Den här produkten får endast användas med uppladdningsbara
batterier. Om du vill byta ut batterierna som medföljde produkten,
kontrollera då att de batterier som du använder är lämpliga och
uppladdningsbara. Alkaliska batterier får under INGA omständigheter
användas i handenheterna.
Om du använder alkaliska batterier och placerar handenheten på
basenheten, kommer batterierna att hettas upp och de kan explodera.
Eventuella skador som uppstår kommer inte att ersättas av
tillverkaren, och de skador som uppstår på produkten omfattas inte
av garantin. Du får själv betala eventuella reparationer.
182
Informazioni generali
Il presente manuale illustra tutte le informazioni necessarie per
l'installazione, l'impostazione e l'utilizzo dell'apparecchio acquistato e
contiene informazioni e riferimenti relativi alla sicurezza, nonché
supporto per la risoluzione di problemi.
Conservare le istruzioni d'uso sempre in prossimità dell'apparecchio.
Conservare con cura queste istruzioni d'uso e prendersi cura di
fornirle, se necessario, ad altri utenti dell'apparecchio.
1.1 Il prodotto: Sologic B921
Questo articolo è prodotto conformemente allo standard digitale per la
telefonia wireless (DECT). La tecnologia DECT è caratterizzata da
un'elevata sicurezza contro le intercettazioni e da una trasmissione
digitale della comunicazione di elevata qualità. Questo telefono può
essere utilizzato in diversi ambiti di applicazione, quali ad esempio una
rete di stazioni di base e telefoni portatili che formano un sistema
telefonico completo. Ad una stazione di base possono essere collegati
al massimo 4 portatili ed ogni portatile può funzionare con un
massimo di 4 stazioni di base. Sono possibili conversazioni interne tra
la stazione di base e un portatile oppure tra due portatili.
Il telefono dispone della funzione di visualizzazione del numero e dei
servizi di SMS dell'operatore di rete, se questi sono abilitati per la
propria linea telefonica. In caso di utilizzo di tali servizi il numero
chiamante verrà visualizzato sul display del telefono.
Importante Per utilizzare la funzione "mostra ID chiamante",
questo servizio deve essere attivato sulla propria
linea telefonica. Per ulteriori dettagli circa
l'attivazione del servizio, contattare il proprio
operatore di rete. Se questo servizio non è già
attivato, i numeri dei chiamanti NON vengono
visualizzati sul display del telefono.
1.2 Diritti d'autore
Questo documento è tutelato dai diritti d'autore.
Tutti i diritti riservati, incluso il diritto di riproduzione fotomeccanica
totale o parziale, riproduzione e divulgazione attraverso determinati
procedimenti (come elaborazione dati, supporti dati e reti telematiche)
nonché il diritto di apportare modifiche tecniche o ai contenuti.
183
Italiano
1 Informazioni generali
Informazioni generali
1.3 Parole di segnalazione e simboli
Simbolo Parola di Significato
segnalazio
Avviso
Avviso di possibile ferita grave ovvero pericolo
di morte in caso di inosservanza.
Attenzione Avviso di pericolo di possibile ferita lieve in
caso di inosservanza.
senza
Attenzione Pericolo di danni alle cose o all'ambiente.
Importante Qui viene fornita un'indicazione importante per
la funzione.
Info,
Informazioni generali o raccomandazioni
raccoman- particolari.
dazione
1.4 Uso convenzionale
Questo prodotto serve a effettuare telefonate mediante una linea
telefonica fissa all'interno di una rete telefonica. Il presupposto per
l'uso convenzionale dell'apparecchio è costituito dalla sua corretta
installazione previa osservanza di tutte le indicazioni contenute in
queste istruzioni d'uso.
Qualsiasi altro utilizzo non è conforme alle disposizioni e pertanto non
è consentito.
Non è consentito apportare modifiche o cambiamenti non descritti nel
presente manuale. Si declina qualsiasi responsabilità per danni
risultanti da tali attività.
1.5 Equipaggiamento di fornitura
Verificare la completezza e l'incolumità dell'equipaggiamento di
fornitura. Contattare subito il proprio fornitore qualora alcune parti
dovessero mancare o essere danneggiate.
Conservare il pacco per eventuali spedizioni di ritorno/riparazioni.
1 stazione di base
1 alimentatore di rete a spina per la stazione di base
1 cavo telefonico per la stazione di base
1 telefono portatile, incl. 2 batterie (tipo AAA, 1,2 V / 500 mAh, NiMH)
e coperchio vano batterie
1 istruzioni d'uso
184
Avviso
Pericolo di soffocamento per bambini! Tenere le
pellicole del pacco fuori dalla portata dei bambini.
Importante Provvedere al corretto smaltimento del materiale
del pacco!
2 Disposizioni di sicurezza
Quando si mettono in funzione degli apparecchi elettrici, le seguenti
disposizioni di sicurezza fondamentali devono essere assolutamente
rispettate in ogni caso.
Leggere attentamente le seguenti disposizioni di sicurezza e
informazioni per il corretto uso dell'apparecchio. Avere cura di
familiarizzare con tutte le funzioni dell'apparecchio. Conservare con
cura queste istruzioni d'uso in prossimità dell'apparecchio e prendersi
cura di fornirle, se necessario, ad altri utenti dell'apparecchio. Fornire
il telefono a terzi solo se corredato dalle istruzioni d'uso.
Pericoli causati dall'elettricità:
Avviso
Pericolo di ferita ovvero di morte a causa della
corrente elettrica! In caso di pericolo staccare
immediatamente l'apparecchio dalla corrente a
230V.
• Non mettere in funzione l'apparecchio nel caso in cui l'alimentatore
di rete a spina, il cavo o l'apparecchio risultino danneggiati. Fare
molta attenzione a non far cadere l'apparecchio, poiché potrebbe
esserne danneggiato.
• All'interno dell'apparecchio vi sono delle tensioni elettriche
pericolose. Non aprire mai la cassa dell'apparecchio e non inserire
corpi al suo interno attraverso le fessure di ventilazione.
• Tenere sempre lontano l'apparecchio dai liquidi. In caso contrario,
togliere subito l'alimentatore di rete a spina dalla presa di corrente
e la spina del cavo telefonico dalla presa a muro.
• Togliere l'alimentatore di rete a spina dalla presa di corrente e la
spina del cavo telefonico dalla presa a muro anche quando
insorgono dei disturbi mentre l'apparecchio è in funzione e prima di
pulire l'apparecchio.
• Evitare che i contatti dell'alimentatore di rete a spina entrino in
contatto con parti acuminate o oggetti metallici.
185
Italiano
Disposizioni di sicurezza
Disposizioni di sicurezza
• Non apportare modifiche o riparazioni all'apparecchio. Lasciar
effettuare le riparazioni dell'apparecchio o del cavo solo a
personale esperto del centro servizi. Le riparazioni inappropriate
possono causare dei seri pericoli per l'utente.
• I bambini spesso sottovalutano i pericoli che incorrono nell'uso di
apparecchiature elettriche. e pertanto non devono mai essere
lasciati da soli e inosservati in prossimità di apparecchi elettrici.
• Non lasciare giocare i bambini con l'apparecchio o con i
componenti dello stesso.
Attenzione Possibili danneggiamenti dell'apparecchio. In caso
di pericolo staccare immediatamente l'apparecchio
dalla corrente a 230 V.
• Non utilizzare l'apparecchio in locali umidi (ad es. bagno) oppure in
locali molto polverosi.
• In caso di temporale, gli apparecchi connessi alla rete elettrica
possono essere danneggiati a causa dei fulmini. Pertanto, in caso di
temporali staccare sempre l'alimentatore di rete a spina dalla presa.
• Per staccare completamente l'apparecchio dall'alimentazione
elettrica, l'alimentatore di rete a spina deve essere estratto
completamente dalla presa di corrente. Afferrare sempre
direttamente l'alimentatore di rete e non tirare mai il cavo.
• Esaminare regolarmente il cavo per verificare l'eventuale presenza
di danni, proteggerlo dalle superfici calde e da altre fonti di
pericolo, srotolarlo completamente e posizionarlo in modo che lo
stesso non venga schiacciato e non vi si possa inciampare.
Pericoli di incendio:
Avviso
Pericolo di ferita ovvero di morte a causa di
incendio!
Non esporre l'apparecchio a temperature
eccessivamente calde e in caso di pericolo
staccarlo subito dalla corrente a 230 V.
Il calore accumulatosi all'interno dell'apparecchio può causare il non
funzionamento oppure l'incendio dell'apparecchio stesso. Pertanto,
non esporre mai questo apparecchio a temperature estreme:
– Impedire che venga esposto direttamente ai raggi solari o ai
riscaldamenti.
– Non coprire le fessure di ventilazione dell'apparecchio.
186
Disposizioni di sicurezza
Avviso
Pericolo di ferita a causa di esplosioni!
Prestare particolare attenzione ai bambini!
• Non gettare mai nel fuoco le batterie e gli accumulatori.
• Non applicare mai l'apparecchio in ambienti a rischio di esplosione!
Pericolo di avvelenamento:
Avviso
Pericolo di avvelenamento!
Prestare particolare attenzione ai bambini!
• Tenere le batterie e gli accumulatori fuori dalla portata dei bambini.
Pericolo di soffocamento:
Avviso
Pericolo di soffocamento!
Prestare particolare attenzione ai bambini!
• Tenere le pellicole del pacco fuori dalla portata dei bambini.
• In sede di istallazione dei cavi, tener debito conto dei possibili
pericoli per i bambini (pericolo di strangolamento).
Guasti:
Avviso
Possibile pericolo di ferita a causa di guasti
dell'apparecchio! Prestare particolare attenzione agli
apparecchi medici.
• Il funzionamento degli apparecchi elettrici di natura medica può
essere influenzato negativamente dalle onde elettromagnetiche di
questo apparecchio. Pertanto, l'apparecchio deve essere istallato e
messo in funzione a debita distanza da apparecchi elettrici di
natura medica. Ciò vale anche per gli apparecchi medici impiantati, ad es. i
pacemaker.
• Il telefono portatile può causare un fastidioso ronzio se utilizzato in
vicinanza di apparecchi acustici e deve essere pertanto tenuto a
debita distanza da tali apparecchi.
Possibili danneggiamenti:
Attenzione Possibile danneggiamento dell'apparecchio!
Seguire le indicazioni contenute in queste istruzioni
d'uso.
187
Italiano
Pericolo di esplosione:
Operazioni iniziali
• Utilizzare esclusivamente gli alimentatori di rete a spina forniti in
dotazione con l'apparecchio. Non utilizzare mai alimentatori di rete
a spina diversi da quelli in dotazione, in quanto questi potrebbero
danneggiare le batterie.
• La presa a cui collegare l'alimentatore di rete a spina deve trovarsi
nei pressi dell'apparecchio ed essere facilmente accessibile.
• Utilizzare esclusivamente le batterie fornite in dotazione con
l'apparecchio. In caso di sostituzione, utilizzare esclusivamente lo
stesso tipo di batterie. Inserire le batterie con i poli orientati nelle
direzioni giuste (le indicazioni sono riportate all'interno del vano
batterie dell'apparecchio). Non utilizzare mai batterie normali!
Importante In mancanza di corrente l'apparecchio può
comunicare soltanto con la stazione di base.
2.1 Informazioni sulla modalità a bassa emissione di onde
elettromagnetiche
Questo telefono portatile (conformemente allo standard DECT)
permette di impostare una modalità a bassa emissione di onde
elettromagnetiche (ECO mode).
Durante una conversazione il telefono portatile riduce l'intensità del
segnale radio a seconda della distanza dalla base. In assenza di
conversazione il telefono riduce il segnale radio al minimo. Ciò non
significa che il normale segnale radio DECT sia dannoso per la salute,
bensì che la modalità ECO impedisce un'inutile emissione di onde
elettromagnetiche.
La base non riduce il segnale radio! Collocare la stazione di base in un
luogo in cui non ci si trattiene a lungo, ad esempio nel corridoio. Evitare
di collocare la stazione di base nella camera da letto, nella stanza dei
bambini o in soggiorno.
3 Operazioni iniziali
3.1 Utilizzo delle presenti istruzioni d'uso
Nelle presenti istruzioni d'uso le indicazioni vengono spiegate come
illustrato di seguito:
Testo ....... „Display“.
Testo che appare sul display
Tasto da premere
188
Operazioni iniziali
Installare la stazione di base come indicato di seguito:
1 Collegare l'adattatore di rete prima alla stazione di base e
successivamente ad una presa.
2 Collegare un'estremità del cavo telefonico alla presa telefonica
a parete e l'altra estremità alla presa sul lato posteriore della
stazione di base.
3 Collegare il cavo telefonico e il cavo elettrico come illustrato
nell'immagine 3A.
B
A
C
- 3A stazione di base A. Presa del telefono a parete
B. Adattatore di rete con cavo
C. Cavo telefonico
3.3 Portatile
Attenzione Pericolo di ferita a causa di esplosioni!
Utilizzare esclusivamente le batterie in dotazione
con il prodotto oppure batterie dello stesso tipo.
Non utilizzare batterie normali!
L'utilizzo di batterie diverse da quelle in dotazione
può danneggiare il portatile.
189
Italiano
3.2 Installazione della stazione di base
Operazioni iniziali
1
2
3
4
Aprire il vano batterie come illustrato nell'immagine 3B.
Inserire le batterie. Prestare attenzione alla corretta polarità (+ e -).
Chiudere il vano batterie.
Lasciare il portatile in stazione di ricarica per 16 ore. Il LED di
ricarica sulla stazione di ricarica si accende.
B921
- 3B lato posteriore del telefono
portatile A.Coperchio
B.Batterie
A
+
B
+
3.4 Visualizzazione livello di batteria
Quando la batteria è scarica il portatile non funziona. Se la batteria è
del tutto scarica e il telefono viene lasciato nella stazione di ricarica
soltanto per poche ore, il livello di batteria indicherà batteria
completamente carica. In realtà la batteria non è completamente
carica e si scaricherà rapidamente. Per ricaricare completamente la
batteria è necessario lasciare il portatile in ricarica per 16 ore.
Batteria carica
Batteria scarica
Se la batteria del telefono si scarica durante una telefonata, il portatile
emette un segnale acustico. Posizionare il portatile nella stazione di
ricarica per ricaricare la batteria.
190
Operazioni iniziali
Telefono portatile
1. Ripetizione di chiamata / freccia in alto
2. Rubrica del telefono
3. Disattiva microfono /
Elimina
4. Riaggancia
5. Tasti alfanumerici
6. Blocco tastiera
7. Pausa
8. Suoneria ACCESA/
SPENTA
9. Registro chiamate /
Freccia in basso
10.Accetta chiamata /
Vivavoce / Tasto chiamata
11. INT / Escape
12.Menu / OK / Tasto R
13.Display
14.LED rosso; lampeggia
durante una chiamata
Italiano
3.5 Tasti/display
14
13
1
12
11
10
2
R
OK
ESC/
INT
3
4
9
5
8
6
7
- 3C lato anteriore del portatile -
Stazione di base
15.Tasto cercaportatile
16.LED di carica del portatile
17.LED Suoneria
17
16
15
- 3D stazione di base 191
Operazioni iniziali
3.6 Display del portatile
PORTATILE X
x = numero del portatile
Scorri a sinistra per
visualizzare gli altri
numeri o il menu
Cerca o crea voci della
rubrica telefonica
Scorri a destra per
visualizzare gli altri numeri
o il menu
Visualizzazione livello di
batteria
Suoneria disattivata
Vivavoce attivo
Blocco tastiera attivo
Nuovo messaggio vocale
Connesso
Microfono disattivato
Nuovi numeri nel
registro chiamate
L'antenna mostra la
potenza del segnale di
ricezione. L'antenna
lampeggia quando il
portatile si trova fuori dalla
portata.
Chiamata interna
3.7 Navigazione menu
Il telefono Sologic B921 dispone di una struttura menu di semplice
utilizzo. Ogni menu è composto da una serie di opzioni. Di seguito è
illustrata una panoramica dei menu del portatile e della base.
1 Per aprire il menu principale premere menu/tasto
OK
OK.
2 Scorrere fino all'opzione menu desiderata.
3 Premere menu/tasto OK per richiamare altre
OK
opzioni oppure per confermare le impostazioni
visualizzate.
4 Per tornare al livello precedente del menu premere
ESC
il tasto Escape .
192
Operazioni iniziali
RUBRICA DEL
TELEFONO
PORTATILE
Italiano
Portatile
SUONERIA
NOME
PORTATILE
TONI
TASTIERA
SELEZ. BASE
RESET
LINGUA
REGISTRA PT.
RIMUOVI PT.
3.8 Utilizzo della tastiera alfanumerica
Attraverso i tasti alfanumerici è possibile digitare un testo. Per
selezionare una lettera premere il tasto alfanumerico corrispondente
5 . Ad es. premendo il tasto alfanumerico 5, sul display appare la
prima lettera „j“. Premendo ripetutamente selezionare le altre lettere
di questo tasto. Premere una volta il tasto 2 per selezionare la lettera
„a“. Per inserire consecutivamente le lettere „a“ e „b“, premere prima
una sola volta il tasto 2 per selezionare „a“. Attendere 2 secondi fino
a che il cursore si sia spostato nella posizione successiva e ora
premere due volte il tasto 2 per selezionare „b“. E' possibile eliminare
le lettere inserite erroneamente con il tasto di cancellazione
3 . Il
carattere che precede il cursore viene cancellato.
Tabella caratteri
1
2
3
4
5
6
7
8
9
0
Spazio + - / 1
ABC2
DEF3
GHI4
JKL5
MNO6
PQRS7
TUV8
WXYZ9
_0
193
Utilizzo del telefono
4 Utilizzo del telefono
4.1 Modifica della lingua
1
OK
2
OK
3
OK
4
OK
5
ESC
Premere menu/tasto OK.
Selezionare„PORTATILE“ (HANDSET) e
confermare.
Selezionare „LINGUA“ (LANGUAGE) e
confermare.
Selezionare la lingua desiderata e confermare la
selezione.
Premere il tasto Esc per tornare alla modalità
standby.
4.2 Chiamate in uscita
Effettuare una telefonata
1 Premere il tasto di chiamata.
2 Inserire il numero di telefono.
4 5 6
3 Premere il tasto di fine chiamata per terminare la
conversazione.
G
H
I
J
K
L
M
N
O
Preselezione
4 5 6
G
H
I
J
K
L
M
N
O
Inserire il numero di telefono.
E' possibile correggere un numero errato con il tasto
di disattivazione microfono. Se per 10 secondi non viene premuto alcun tasto, il
numero scompare e il portatile torna
automaticamente alla modalità standby.
2 Premere il tasto di chiamata.
Il numero telefonico viene selezionato
automaticamente.
3 Premere il tasto di fine chiamata per terminare la
conversazione.
1
Selezionare l'ultimo numero chiamato
1 Premere il tasto di chiamata.
2 Premere il tasto di ripetizione di selezione.
194
L'ultimo numero chiamato viene selezionato
automaticamente.
3 Premere il tasto di fine chiamata per terminare la
conversazione.
Selezionare uno degli ultimi 3 numeri chiamati
1 Premere il tasto di ripetizione di chiamata.
L'ultimo numero selezionato viene visualizzato sul
display.
Per selezionare uno degli ultimi 3 numeri chiamati,
premere più volte il tasto di ripetizione di chiamata
fino a che il numero desiderato non viene
visualizzato sul display.
2 Premere il tasto di chiamata.
Il numero telefonico viene selezionato
automaticamente.
3 Premere il tasto di fine chiamata per terminare la
conversazione.
4.3 Chiamate in arrivo
Durante una chiamata in arrivo il portatile e la stazione di base
suonano, inoltre sul portatile e sulla stazione di base lampeggia il LED
„Segnale visivo di chiamata“ (vedi punto 14 nell'immagine 3C e
punto 17 nell'immagine 3D) .
1
2
Premere il tasto di accettazione di chiamata per
iniziare la conversazione.
Premere il tasto di fine chiamata per terminare la
conversazione.
4.4 Attivazione/disattivazione della modalità vivavoce
Questa funzione permette di accettare una chiamata senza dover
tenere in mano il portatile oppure se è già in corso una conversazione
sul portatile.
Durante la conversazione:
1 Premere il tasto vivavoce per attivare la funzione.
2 Premere nuovamente il tasto vivavoce per
riattivare la conversazione sul portatile.
195
Italiano
Utilizzo del telefono
Utilizzo del telefono
Importante Se si utilizza la funzione vivavoce per un periodo
prolungato, le batterie si scaricano più
rapidamente!
4.5 Disattivazione microfono
Durante una conversazione è possibile disattivare il microfono, in
modo da poter parlare senza essere ascoltati dalla persona dall'altra
parte della linea.
1 Premere il tasto di disattivazione del microfono.
Il microfono è disattivato e sul display viene
visualizzato il messaggio „MUTE“ (MUTED).
2 Premere nuovamente il tasto di disattivazione del
microfono per riattivare il microfono.
4.6 Impostazione del volume del ricevitore/vivavoce
Durante una conversazione:
1 Premere il tasto freccia in alto o freccia in basso.
E' possibile impostare il volume dal livello 1 a 5.
4.7 Il tasto R (Flash)
OK
Premere il tasto R (tasto 12 nell'immagine 3C
„Telefono portatile“ a pagina 191), per utilizzare i
servizi speciali della propria linea telefonica esterna,
ad es. "Avviso di chiamata" (a condizione che il
proprio operatore di rete offra tali servizi), oppure per
inoltrare una chiamata in caso di utilizzo di un sistema
di telefoni. Il tasto R interrompe brevemente il
collegamento. E' possibile impostare il tempo di
interruzione a 100 ms oppure a 300 ms. Per
impostare un tempo di interruzione diverso, vedi „5.4 Il
tasto R (Flash)“.
4.8 Selezione della suoneria e impostazione del volume
Suoneria del portatile per chiamate interne/esterne
1 Premere menu/tasto OK.
OK
2 Selezionare„PORTATILE“ (HANDSET) e
confermare.
OK
196
Utilizzo del telefono
OK
4
OK
5
OK
Selezionare„SUONERIA“ (RING TONE) e
confermare.
Selezionare„INTERNO“ (INTERNAL) oppure
„ESTERNO“ (EXTERNAL) e confermare.
Ora selezionare una suoneria (da 1 a 9) e
confermare.
Italiano
3
Volume suoneria del portatile
1 Premere menu/tasto OK.
OK
2 Selezionare„PORTATILE“ (HANDSET) e
confermare.
OK
3 Selezionare„SUONERIA“ (RING TONE) e
confermare.
OK
OK 4 Selezionare„VOLUME“ (VOLUME) e confermare.
5 Selezionare il volume desiderato (spento,1-5) e
confermare.
OK
Importante E' possibile impostare il volume della suoneria di
ogni singolo portatile su ACCESO oppure
SPENTO, tenendo premuto il tasto di suoneria
ACCESO/SPENTO
in modalità standby.
Sul display appare il simbolo
e il blocco tastiera
è attivato.
4.9 Blocco tastiera
Quando il blocco tastiera è attivato, i tasti in modalità standby non
hanno alcuna funzione (ad eccezione del tasto di blocco tastiera).
1 Tenere premuto il tasto di blocco tastiera.
Sul display appare questo simbolo.
2 Premere nuovamente il tasto di blocco tastiera per
disattivare il blocco tastiera.
Con il blocco tastiera attivato è comunque possibile
accettare le chiamate in arrivo, premendo il tasto di
accettazione chiamata . Durante la conversazione la
tastiera funziona normalmente. Al termine della
conversazione il blocco tastiera si attiva nuovamente.
197
Utilizzo del telefono
4.10 Nome del portatile
E' possibile modificare il nome visualizzato sul display (max.
12 caratteri), quando non è in corso alcuna conversazione:
1 Premere menu/tasto OK.
OK
2 Selezionare„PORTATILE“ (HANDSET) e
confermare.
OK
3 Selezionare„NOME“ (HANDSET NAME) e
confermare.
OK
4 5 6 4 Cancellare il nome precedente con il tasto di
disattivazione microfono e inserire un nuovo nome.
5 Per confermare permere.
OK
6 Premere il tasto Esc per tornare alla modalità
ESC
standby.
G
H
I
J
K
L
M
N
O
4.11 Attivazione/disatttivazione della modalità vivavoce
1
OK
2
OK
3
OK
4
OK
5
ESC
6
Premere menu/tasto OK.
Selezionare„PORTATILE“ (HANDSET) e
confermare.
Selezionare„TONI TASTI“ (KEYPAD BEEP) e
confermare.
Ora selezionare „ACCESO“ (ON) oppure
„SPENTO“ (OFF).
Per confermare permere.
Premere il tasto Esc per tornare alla modalità
standby.
4.12 Rubrica del telefono
E' possibile memorizzare fino a 50 voci nella rubrica del telefono. I
nomi possono avere una lunghezza di 16 caratteri e i numeri possono
essere lunghi fino a 24 cifre.
Aggiungere una voce nella rubrica telefonica
1 Premere il tasto rubrica del telefono.
OK 2 Premere due volte il tasto OK .
OK
4 5 6 OK 3 Inserire il nome e confermare.
G
H
I
198
J
K
L
M
N
O
Utilizzo del telefono
Inserire il numero di telefono desiderato e
confermare.
OK
Ora l'apparecchio emette un tono di conferma.
G
H
I
J
K
L
M
N
O
Selezionare un numero di selezione rapida
1 Premere il tasto rubrica del telefono.
2 Scorrere fino al nome desiderato oppure inserire la
prima lettera del nome.
4 5 6
3 Premere il tasto rubrica per visualizzare il numero di
telefono.
4 Ora premere il tasto di chiamata.
Il numero telefonico viene selezionato
automaticamente.
5 Premere il tasto di fine chiamata per terminare la
conversazione.
G
H
I
J
K
L
M
N
O
Modificare una voce della rubrica telefonica
1 Premere il tasto rubrica del telefono.
2 Scorrere fino al nome desiderato oppure inserire la
prima lettera del nome.
4 5 6
3 Premere il tasto rubrica per visualizzare il numero di
telefono.
4 Premere menu/tasto OK.
OK
5 Selezionare „MODIFICA“ (EDIT ENTRY) e
confermare.
OK
4 5 6 OK 6 Inserire il nome e confermare.
4 5 6 OK 7 Inserire o modificare il numero di telefono e
confermare.
G
H
I
G
H
I
J
K
L
M
N
O
G
H
I
J
K
L
M
N
O
J
K
L
M
N
O
Cancellare una o tutte le voci della rubrica del telefono
1 Premere il tasto rubrica del telefono.
2 Scorrere fino al nome desiderato oppure inserire la
prima lettera del nome.
4 5 6
3 Premere il tasto rubrica per visualizzare il numero di
telefono.
4 Premere menu/tasto OK.
OK
G
H
I
J
K
L
M
N
O
199
Italiano
4
4 5 6
Utilizzo del telefono
5
OK
6
OK
OK
ESC 7
Selezionare„CANCELLA“ (DELETE ENTRY) per
cancellare l'attuale voce della rubrica e confermare.
OPPURE
Selezionare„CANC TUTTI“ (DELETE ALL) per
cancellare tutte le voci della rubrica e confermare.
Confermare nuovamente oppure premere il tasto
Esc per ignorare la funzione.
4.13 Riconoscimento chiamate (CLIP)
Il telefono Sologic B921 permette di visualizzare i numeri delle
chiamate in arrivo. Per poter utilizzare questa funzione è necessario
richiedere l'abilitazione del servizio presso il proprio operatore di rete.
Per ulteriore informazioni rivolgersi al proprio operatore di rete.
Al momento della ricezione di una chiamata, il numero di telefono
viene memorizzato nel registro chiamate. Il registro può contenere fino
a 30 numeri telefonici (di un massimo di 23 cifre l'uno).
Se il numero di telefono è più lungo di 12 cifre, è
possibile scorrere verso il lato destro del display per
visualizzare anche le ultime cifre.
Nuove chiamate
Quando il registro chiamate contiene una nuova
chiamata, sul display lampeggia il simbolo CLIP.
Richiamare il registro chiamate
1 Premere il tasto del registro chiamate.
L'ultima chiamata ricevuta viene visualizzata. Se il
registro chiamate è vuoto, sul display appare il
messaggio „VUOTO“ (EMPTY).
2 Premere il tasto rubrica per ignorare il numero.
3 Premere il tasto rubrica per ignorare la data e l'ora.
4 Premere il tasto freccia in alto o freccia in basso per
scorrere l'elenco.
5 Premere il tasto Esc per uscire dal registro
ESC
chiamate.
200
Utilizzo del telefono
Premere il tasto del registro chiamate.
2 Cercare all'interno del registro chiamate il numero
telefonico desiderato.
3 Premere il tasto di chiamata per iniziare la
conversazione.
Il numero telefonico viene selezionato
automaticamente.
4 Premere il tasto di fine chiamata per terminare la
conversazione.
1
Cancellare un numero dal registro chiamate
1
2
3
OK
4
OK
5
OK
ESC 6
OK
Premere il tasto del registro chiamate.
Cercare all'interno del registro chiamate il numero
telefonico desiderato.
Premere menu/tasto OK.
Selezionare „CANCELLA“ (DELETE) per
cancellare il numero attuale e confermare.
OPPURE
Selezionare„CANC TUTTI“ (DELETE ALL) per
cancellare tutte le voci della rubrica e confermare.
Per confermare premere oppure premere il tasto
Esc per tornare indietro.
Memorizzare un numero del registro chiamate come numero
di selezione rapida
1 Premere il tasto del registro chiamate.
2 Cercare all'interno del registro chiamate il numero
telefonico desiderato.
3 Premere menu/tasto OK.
OK
4 Selezionare„SALVA A AG“ (SAVE TO PB) e
confermare.
OK
4 5 6 OK 5 Modificare o aggiungere un nome e confermare.
4 5 6 OK 6 Modificare il numero di telefono e confermare.
G
H
I
J
K
L
M
N
O
G
H
I
J
K
L
M
N
O
201
Italiano
Chiamare un numero del registro chiamate
Utilizzo del telefono
4.14 Ritornare alle impostazioni di default del portatile
Con questa funzione vengono cancellate tutte le modifiche e vengono
ristabilite tutte le impostazioni di default (volume suoneria, melodia,
ecc.) Inoltre viene cancellato il registro chiamate, l'elenco di
riselezione e la rubrica!
1 Premere menu/tasto OK.
OK
OK 2 Selezionale„PORTATILE“ (HANDSET) e
confermare.
OK 3 Selezionare„RESET“ (RESET) e confermare due
volte.
OK
4 Inserire il PIN della stazione di base (preimpostato
4 5 6
su 0000).
5 L'apparecchio ritorna alla modalità standby.
G
H
I
J
K
L
M
N
O
Le impostazioni di default sono:
Nome del portatile
HANDSET
Volume del ricevitore
Livello 3
Volume suoneria
Livello 3
Suoneria chiamata esterna Suoneria 8
Suoneria chiamata interna Suoneria 1
Toni tastiera
Acceso
4.15 Visualizzazione memoria vocale
Questa funzione è possibile esclusivamente se il servizio di memoria
vocale o di messaggi telefonici è abilitato e se l'operatore telefonico
trasmette questa informazione con la visualizzazione del numero di
telefono! Dopo aver ricevuto un messaggio nella propria casella
vocale, sul display appare il simbolo
. Dopo aver ascoltato il
messaggio il simbolo
scompare.
202
Impostaz base
Info
Italiano
5 Impostaz base
Questa sezione descrive solo le impostazioni
archiviate nella stazione base.
5.1 Selezione della suoneria e impostazione del volume
Suoneria del portatile per chiamate interne/esterne
1 Premere menu/tasto OK.
OK
OK 2 Selezionare„BASE“ (BASE) e confermare.
3 Selezionare „SUONERIA“ (RING TONE) e
confermare.
OK
4 Ora selezionare una suoneria (da 1 a 9) e
confermare.
OK
Volume della suoneria dell'unità base
1 Premere menu/tasto OK.
OK
OK 2 Selezionare „BASE“ (BASE) e confermare.
3 Selezionare „VOLUME“ (RING VOLUME) e
confermare.
OK
4 Selezionare il volume desiderato (spento,1-5) e
confermare.
OK
5.2 Impostazione della modalità di selezione
Esistono due modalità di selezione per le linee telefoniche:
- DTMF/selezione multifrequenza o a toni (più ricorrente)
- Selezione decadica o a impulsi (necessaria soltanto se l'apparecchio
viene collegato ad un impianto telefonico vecchio!)
1 Premere menu/tasto OK.
OK
OK 2 Selezionare„BASE“ (BASE) e confermare.
3 Selezionare„MODO SELEZ“ (DIAL MODE) e
confermare.
OK
4 Selezionare„MULTIFREQ“ (TONE) oppure
„DECADICA“ (PULSE) e confermare.
OK
5.3 Impostazione PIN
Alcune funzioni sono disponibili soltanto previo inserimento del codice
PIN della stazione di base.
203
Registrazione o disattivazione di un portatile
Il codice PIN è composto da 4 caratteri. Il codice PIN preimpostato è
"0000". Per modificare il PIN ed inserire un codice segreto personale,
procedere come descritto di seguito:
1 Premere menu/tasto OK.
OK
OK 2 Selezionare„BASE“ (BASE) e confermare.
OK 3 Selezionare„PIN“ (SYSTEM PIN) e confermare.
4 Selezionare„VECCHIO-“ (OLD PIN) e premere
4 5 6
OK.
OK
4 5 6 OK 5 Selezionare„NUOVO-“ (NEW PIN) e confermare.
G
H
I
J
K
L
M
N
O
G
H
I
J
K
L
M
N
O
5.4 Il tasto R (Flash)
Premere il tasto R per utilizzare i servizi speciali della propria linea
telefonica esterna, ad es. "Avviso di chiamata" (a condizione che il
proprio operatore di rete offra tali servizi), oppure per inoltrare una
chiamata in caso di utilizzo di un sistema di telefoni. Il tasto R
interrompe brevemente il collegamento. E' possibile impostare il
tempo di interruzione a 100 ms oppure a 300 ms. Se richiesto dal
proprio sistema, è possibile impostare anche un tempo di interruzione
diverso.
1 Premere menu/tasto OK.
OK
OK 2 Selezionare„BASE“ (BASE) e confermare.
OK 3 Selezionare„TASTO R“ (RECALL) e confermare.
4 Ora selezionare„LUNGO“ (LONG) oppure
„CORTO“ (SHORT) e confermare.
OK
6 Registrazione o disattivazione di un portatile
6.1 Registrare un portatile sulla stazione di base Sologic B921
Su ogni stazione di base è possibile registrare fino a 4 portatili. Al
momento dell'acquisto ogni portatile è già registrato sulla stazione di
base.
E' necessario registrare un portatile soltanto quando:
• il portatile è stato precedentemente disattivato dalla stazione di
base. (ad es. per una nuova inizializzazione).
• Si desidera registrare un altro portatile sulla stazione di base.
204
La seguente descrizione si riferisce ai telefoni portatili e alle stazioni di
base Sologic B921.
1 Tenere premuto il tasto paging sulla stazione di
base per 10 secondi.
2 Premere menu/tasto OK sul portatile.
OK
3 Selezionare„REGISTRA“ (REGISTER) e
confermare.
4 Inserire il numero della stazione di base (1-4) sulla
4 5 6
quale si desidera registrare il portatile.
5 L'apparecchio cerca la stazione di base. Quando
l'ha trovata, viene richiesta l'immissione del codice
PIN (a quattro cifre).
6 Inserire il PIN della stazione di base (preimpostato
4 5 6
su 0000). Se il PIN non è corretto, il portatile cerca
nuovamente la stazione di base.
Al termine della registrazione sul display viene
visualizzato il nome e il numero del portatile.
G
H
I
J
K
L
M
N
O
G
H
I
J
K
L
M
N
O
6.2 Disattivare un portatile dalla stazione di base Sologic
B921.
OK
4 5 6
G
H
I
J
K
L
M
N
O
4 5 6
G
H
I
J
K
L
M
N
O
Premere menu/tasto OK.
2 Selezionare „RIMUOVI PT“ (DE-REGISTER) e
confermare.
OK
3 Inserire il PIN della stazione di base (preimpostato
su 0000).
OK
4 Inserire il numero interno del portatile che si desidera
disattivare (1-4) e confermare.
OK
Dopo l'avvenuta disattivazione il portatile torna in
modalità standby. In caso contrario verrà richiesto di
inserire nuovamente il numero del portatile.
1
Importante E' possibile disattivare i portatili soltanto quando
questi non sono in uso.
205
Italiano
Registrazione o disattivazione di un portatile
Registrazione o disattivazione di un portatile
6.3 Selezione di una stazione di base
Se il telefono portatile è registrato presso più stazioni di base (max. 4),
è necessario selezionare una stazione di base poiché il telefono
comunica sempre e solo con una stazione di base alla volta. Esistono
due possibilità:
Selezione automatica
Impostando il portatile su ‘Selezione automatica’, il telefono cerca
automaticamente la prima stazione di base in modalità standby.
1 Premere menu/tasto OK.
OK
OK 2 Selezionare „PORTATILE“ (HANDSET) e
confermare.
OK 3 Selezionare „SELEZ BASE“ (SELECT BASE) e
confermare.
OK 4 Selezionare „AUTOMATICO“ (AUTOMATIC) e
confermare.
Info
Se si seleziona la ricerca automatica della stazione
di base e il portatile si trova al di fuori della portata, il
telefono cerca la stazione di base in modalità
standby con il segnale più forte (non durante una
conversazione).
Selezione manuale
Impostando il portatile su ‘Selezione manuale’, il telefono cerca
soltanto la stazione di base impostata manualmente.
1 Premere menu/tasto OK.
OK
OK 2 Selezionare „PORTATILE“ (HANDSET) e
confermare.
OK 3 Selezionare „SELEZ BASE“ (SELECT BASE) e
confermare.
OK 4 Selezionare„MANUALE“ (MANUAL) e
confermare.
OK 5 Selezionare la stazione di base e confermare.
Importante Per poter selezionare una stazione di base il
portatile deve essere registrato sulla relativa
stazione di base.
206
7 Inoltro chiamata e chiamate interne da un portatile
all'altro
7.1 Inoltro chiamata e conferenza telefonica durante una
conversazione esterna
4 5 6
G
H
I
INT
INT
Durante una conversazione esterna premere il
tasto INT e successivamente il numero del portatile
(1-4).
L'altro portatile suona
Una volta stabilita la comunicazione con l'altro
portatile, si può iniziare la conversazione interna.
Riagganciando il telefono, la conversazione esterna
viene trasferita sull'altro portatile.
2 Tenere premuto il tasto INT per 3 secondi. Ora è
possibile parlare contemporaneamente con il
secondo portatile e con l'interlocutore esterno
(conferenza telefonica).
3 Premere nuovamente il tasto INT per ritornare alla
chiamata esterna.
4 Premere il tasto di fine chiamata per terminare la
conversazione.
1
INT
J
K
L
M
N
O
8 Abbreviazioni e definizioni tecniche
CLIP
Calling Line Identification Presentation, trasmissione del numero
telefonico del chiamante e indicazione sul display del destinatario della
chiamata.
DECT
Digital Enhanced Cordless Telecommunication; Standard europeo di
telecomunicazioni per telefoni digitali "senza fili".
ECO mode
Economic Mode; Modalità a ridotta emissione di onde
elettromagnetiche nell'ambito della telefonia DECT.
Tasto R
Crea una breve interruzione della linea, durante la quale vengono
attivati dei servizi come la chiamata in attesa o il trasferimento di
chiamata. In caso di impianti telefonici, il tasto R viene utilizzato per le
richiamate interne.
207
Italiano
Inoltro chiamata e chiamate interne da un portatile all'altro
Risoluzione problemi
GAP
Generic Access Profile; Interfaccia tra la stazione di base e il portatile
che permette il collegamento senza fili.
INT
Utente interno. Ulteriore portatile o postazione all'interno di un
impianto telefonico.
IWV
Selezione a impulsi; vecchia selezione analogica (selezione rumorosa
"scrosciante").
LCD
Liquid Crystal Display, display a cristalli liquidi.
LED
Light-Emitting Diode, diodo luminescente.
MFV
Selezione multifrequenza, selezione digitale moderna.
PIN
Personal Identification Number.
Tasto R
Tasto richiamata ( vedi tasto R).
Standby
"Stato di riposo" di un apparecchio senza essere completamente
spento.
Twin
"Gemelli"; Definizione di un'unità composta da due apparecchi identici,
ad es. due telefoni portatili.
9 Risoluzione problemi
Problema
Possibili cause
Soluzione
Display spento.
Le batterie sono
scariche.
Controllare se
entrambe le batterie
sono inserite
correttamente.
Caricare le batterie.
Controllare il
collegamento del cavo
telefonico.
Il telefono non suona. Il cavo telefonico non
è collegato
correttamente.
208
Risoluzione problemi
Possibili cause
La voce
dell'interlocutore è
troppo bassa.
La linea è occupata da Attendere che l'altro
un altro portatile.
portatile venga
riagganciato.
Regolare il volume
durante la
conversazione con il
tasto del volume.
Impostare il volume
della suoneria.
La suoneria del
portatile è troppo
bassa.
Non è possibile
selezionare un
numero.
Soluzione
La modalità di
selezione non è
impostata
correttamente.
Vedi „5.2
Impostazione della
modalità di selezione“
per impostare
correttamente la
modalità di selezione.
Il simbolo
Il portatile è al di fuori Portare il telefono
lampeggia.
dalla portata.
all'interno della portata
della stazione di base.
La stazione di base
Controllare
non ha corrente.
l'adattatore e il cavo di
rete.
Il portatile non è
Registrare il portatile
registrato sulla
sulla stazione di base.
stazione di base.
La stazione di base o La suoneria è
Impostare il volume
il portatile non suona. disattivata o è troppo della suoneria.
bassa.
Impossibile inoltrare Il tasto R è troppo
Impostare un tasto R
una chiamata a un
breve.
lungo
telefono in
sull'apparecchio.
derivazione.
Il telefono non
Errore operatore.
Estrarre e poi
reagisce quando
reinserire le batterie.
vengono premuti i
tasti.
209
Italiano
Problema
Misure di assistenza tecnica
Non apportare modifiche o riparazioni all'apparecchio. Lasciar
effettuare le riparazioni dell'apparecchio o del cavo solo a personale
esperto del centro servizi. Le riparazioni inappropriate possono
causare dei seri pericoli per l'utente.
10 Misure di assistenza tecnica
10.1 Manutenzione
L'apparecchio non richiede manutenzione. Verificare regolarmente lo
stato delle batterie e sostituirle in caso di funzionamento ridotto oppure
in caso di principio di permeabilità con delle batterie nuove dello stesso
tipo.
Avviso
Pericolo di corrosione!
Utilizzare dei guanti protettivi per rimuovere le
batterie esaurite.
Se l'apparecchio è venuto a contatto con dei liquidi, estrarne subito le
batterie ovvero togliere l'apparecchio dall'alimentazione elettrica
(base) ed asciugarlo con cura. Dopo un periodo di asciugamento di 23 giorni, verificare il funzionamento dell'apparecchio. In caso di guasti
inviarlo al centro servizi.
10.2 Pulizia
Avviso
Pericolo di scossa elettrica o corto circuito in seguito
al contatto con componenti elettriche conduttrici.
Tenere sempre lontano l'apparecchio dai liquidi. In
caso contrario, togliere subito l'alimentatore di rete a
spina dalla presa di corrente e la spina del cavo
telefonico dalla presa a muro ovvero togliere le
batterie.
Fare altrettanto in caso di danneggiamento
dell'apparecchio, del cavo o dell'alimentatore di rete
a spina: evitare il contatto diretto con liquidi e togliere
subito l'apparecchio dalla corrente 230 V.
Pulire il telefono con uno straccio leggermente inumidito con acqua
tiepida o con un panno antistatico. Non utilizzare mai detergenti o
abrasivi.
210
Dati tecnici
Se si mette provvisoriamente fuori servizio l'apparecchio, togliere il
cavo telefonico dalla presa a muro e dalla presa dal telefono della
stazione di base. Togliere gli alimentatori di rete a spina della stazione
di base e dei portatili dalle prese a 230 V.
Estrarre le batterie dei portatili. In caso di periodi di inoperatività
maggiori, sostituire le batterie in sede di rimessa in servizio con delle
nuove batterie dello stesso tipo.
Conservare gli apparecchi e le batterie in un luogo asciutto e non
troppo caldo.
10.4 Smaltimento (tutela ambientale)
Al termine della durata di vita del prodotto, non gettare lo
stesso e le batterie insieme ai normali rifiuti domestici. Tale
divieto è rappresentato dal simbolo a lato sul prodotto e/o
sulla confezione.
Portare l'apparecchio in un centro di raccolta per lo
smaltimento di apparecchi elettrici ed elettronici. Qui alcuni
materiali di cui è composto il prodotto possono essere
riciclati. Con il riciclaggio di alcuni componenti o materie prime dei
prodotti usati è possibile dare un grande contributo alla tutela
ambientale.
Smaltire anche i materiali di imballaggio nel rispetto dell'ambiente.
Rivolgersi alle autorità competenti della propria zona per ulteriori
informazioni circa gli impianti di raccolta nelle vicinanze della propria
zona di residenza.
11 Dati tecnici
Standard
Frequenza
Potenza di trasmissione
Portata
Batterie del portatile:
Alimentazione della
stazione di base
DECT (Digital Enhanced Cordless
Telecommunications)
GAP ( Generic Access Profile )
1.880 MHz fino a 1.900 MHz
10 mW (potenza media per canale)
Fino a 300 m all'aperto - fino a 50 m all'interno
di edifici
2 x 1,2 V, 500 mAh tipo AAA, batterie NiMH
ricaricabili
Ingresso: 100~240 V AC/50-60 Hz - Uscita: 6 V DC/500 mA
211
Italiano
10.3 Messa fuori servizio e conservazione
Garanzia Topcom
Autonomia portatile in
standby
Autonomia portatile in uso
Tempo di ricarica:
Temperature di
funzionamento consentite
Umidità relativa dell'aria
consentita
Modalità di selezione
TASTO R
Memoria numeri del
portatile
Dimensioni stazione di
base/portatile
Peso stazione di base/
portatile
Consumo massimo di
corrente
100 ore in modalità standby
10 ore
16 ore
+5 °C fino a + 45 °C
25 fino a 85 %
Selezione a impulsi e selezione a toni (DTMF)
100 oppure 300 ms
50 voci della rubbrica con una lunghezza
massima di 24 cifre e 16 lettere
117 mm x 117 mm x 60 mm/
182 mm x 284 mm x 58 mm
239 g con adattatore di rete /
152 g con batterie
Base: 2,0 W
12 Garanzia Topcom
12.1 Periodo di garanzia
Le unità Topcom sono coperte da una garanzia di 24 mesi. Il periodo
di garanzia decorre dal giorno d'acquisto della nuova unità. Non esiste
alcuna garanzia su batterie standard o ricaricabili (tipo AA/AAA).
Le parti soggette a usura o i difetti che causano effetti trascurabili sul
funzionamento o sul valore dell'apparecchio non sono coperti da
garanzia.
La garanzia potrà ritenersi valida solo dietro presentazione della
ricevuta originale di acquisto o di una copia di essa, a condizione che
vi siano indicati la data di acquisto e il tipo di unità.
12.2 Utilizzo della garanzia
Un apparecchio difettoso dovrà essere restituito a un centro di
assistenza autorizzato insieme a un valido documento di acquisto.
Durante il periodo di validità della garanzia, Topcom o un centro di
assistenza ufficiale autorizzato provvederà alla riparazione gratuita di
ogni difetto imputabile ai materiali o a errori di produzione, riparando o
sostituendo le unità difettose o i pezzi difettosi delle unità. In caso di
212
sostituzione, il colore e il modello potrebbero differire dall'unità
originariamente acquistata.
La data d'acquisto iniziale determina l'inizio del periodo di garanzia. Il
periodo di garanzia non sarà esteso se l'unità viene sostituita o riparata
da Topcom o dai suoi centri di assistenza autorizzati.
12.3 Decadenza della garanzia
Si intendono esclusi dalla garanzia tutti i danni o i guasti dovuti a una
cattiva manutenzione o a un errato utilizzo dell'apparecchio, nonché i
danni dovuti all'uso di ricambi o di accessori non originali.
La presente garanzia non copre i danni causati da fattori esterni come
fulmini, acqua e incendi, né i danni dovuti al trasporto.
La garanzia non è applicabile in caso di modifica, eliminazione o
illeggibilità del numero di serie delle unità.
Qualsiasi rivendicazione in garanzia sarà considerata priva di
fondamento in caso di intervento da parte dell'acquirente.
Questo dispositivo è da usarsi solo con batterie ricaricabili. Se si
desidera sostituire le batterie originali, verificare che le batterie che si
vogliono usare siano ricaricabili e del tipo adatto. NON è permesso
inserire batterie alcaline nel ricevitore.
Se si inserissero batterie alcaline e si riponesse il ricevitore sulla base,
le batterie si scalderebbero e potrebbero esplodere. Qualsiasi danno
provocato non potrà essere riparato dal fabbricante. Inoltre, il danno
provocato al dispositivo non è coperto dalle condizioni di garanzia.
Qualsiasi riparazione sarà a carico del cliente.
213
Italiano
Garanzia Topcom
Generalidades
1 Generalidades
Neste manual de instruções, pode encontrar todas as informações
importantes sobre a instalação, a configuração e a utilização do seu
aparelho. Para além disso, obtém informações e notas importantes
sobre a segurança e ajuda em caso de problemas.
Guarde o manual de instruções sempre na proximidade dos
aparelhos.
Guarde cuidadosamente este manual de instruções e, se necessário,
transmita-o a outros utilizadores.
1.1 O produto: Sologic B921
Este produto foi fabricado em conformidade com a norma para
telecomunicações digitais europeias sem fios (DECT). A tecnologia
DECT caracteriza-se por uma elevada segurança relativamente a
escutas, bem como uma transmissão digital de alta qualidade. Este
telefone está previsto para diversos âmbitos de aplicação, por
exemplo, para uma rede de estações de base e telefones portáteis,
que compõem um sistema de telefone completo: deste modo, é
possível um funcionamento de até 4 telefones portáteis numa estação
de base, bem como o funcionamento de um telefone portátil em até 4
estações de base. É possível realizar chamadas internas entre a
estação de base e um telefone portátil ou entre 2 telefones portáteis.
Caso exista essa opção na sua linha telefónica, é possível obter
serviços de identificação de chamadas e de SMS do operador de rede
para esse telefone. Se utilizar esses serviços, o número de telefone do
chamador é apresentado no visor do telefone.
Importante Para poder utilizar a “Identificação de chamadas”,
esta característica deve estar activada para a sua
linha telefónica. Contacte o seu operador de rede
para obter mais informações sobre a activação
desta característica. Se esta característica não
estiver activada, os números de telefone das
chamadas recebidas NÃO serão apresentados no
visor do telefone.
1.2 Direitos de autor
Este documento está protegido por direitos de autor.
Todos os direitos, incluindo os de reprodução total ou parcial
fotomecânica, duplicação e divulgação através de certos
procedimentos (tais como o processamento de dados, portadores de
214
Generalidades
dados e redes de dados), bem como alterações técnicas e de
conteúdo, são reservados.
Símbolo Palavra de Significado
sinalização
Aviso
Aviso de possível perigo de lesão grave ou de
vida em caso de não observância.
Cuidado
Aviso de possível perigo de lesão ligeira em
caso de não observância.
nenhum Cuidado
Perigo de danos materiais ou para o
ambiente.
Importante Aqui é fornecida uma nota importante em
relação à função.
Informação, Informações gerais e dicas especiais.
dica
1.4 Utilização prevista
Este produto destina-se à realização de chamadas telefónicas através
de uma linha fixa numa rede telefónica. Um requisito para a utilização
adequada é a instalação correcta observando as notas deste manual
de instruções.
Qualquer outra utilização não está prevista e, desse modo, não é
permitida.
Não são permitidas alterações ou transformações arbitrárias que não
estejam descritas neste manual de instruções e, desse modo, não
assumimos a responsabilidade de quaisquer danos que possam daí
resultar.
1.5 Conteúdo da embalagem
Verifique se o conteúdo da embalagem está completo e intacto.
Contacte o distribuidor no caso de faltarem peças ou estas
apresentarem defeitos.
Guarde a embalagem para uma eventual devolução/reparação.
1 estação de base
1 fonte de alimentação para a estação de base
1 cabo de telefone para a estação de base
215
Português
1.3 Palavras de sinalização e símbolos
Avisos de segurança
1 telefone portátil, incl. 2 pilhas recarregáveis (tipo AAA, 1,2 V /
500 mAh, NiMH), bem como uma tampa do compartimento das pilhas
1 manual de instruções
Aviso
Perigo de asfixia para crianças! Mantenha as
películas de embalagem fora do alcance das
crianças.
Importante Elimine o material de embalagem respeitando o
meio ambiente!
2 Avisos de segurança
Os seguintes avisos básicos de segurança devem ser sempre
considerados ao utilizar aparelhos eléctricos.
Leia atentamente os seguintes avisos de segurança e as indicações
acerca da utilização correcta do aparelho. Familiarize-se com todas as
funções do aparelho. Guarde este Manual de instruções na
proximidade do aparelho e, se necessário, transmita-o a outros
utilizadores. Transmita o telefone a terceiros apenas juntamente com
o manual de instruções.
Perigos eléctricos:
Aviso
Perigo de lesão ou de vida por corrente eléctrica!
Em caso de perigo, desligue imediatamente o aparelho da rede eléctrica de 230V.
• Não utilize o aparelho se a fonte de alimentação, o cabo ou o
aparelho estiverem danificados. Certifique-se de que o aparelho
não cai, caso contrário, poderá ficar danificado.
• No interior do aparelho existem tensões perigosas. Nunca abra a
caixa do equipamento nem insira objectos através dos orifícios de
ventilação.
• Não permita a infiltração de líquidos no interior do aparelho. Caso
tal aconteça, retire imediatamente a fonte de alimentação da
tomada e a ficha do cabo de telefone da tomada de parede.
• Retire também a fonte de alimentação da tomada e a ficha do cabo
de telefone da tomada de parede se ocorrerem avarias durante a
utilização e antes de iniciar a limpeza do aparelho.
• Não toque nos contactos de carga e da ficha com objectos afiados
ou metálicos.
216
• Não efectue pessoalmente modificações ou reparações no
aparelho. As reparações do aparelho ou do cabo apenas devem
ser efectuadas por um especialista do centro de assistência. As
reparações inadequadas podem causar perigos consideráveis
para o utilizador.
• As crianças frequentemente subestimam os perigos envolvidos na
utilização de aparelhos eléctricos. Nunca deixe as crianças sem
supervisão na proximidade de aparelhos eléctricos.
• Não deixe que as crianças brinquem com os aparelhos ou as suas
peças.
Cuidado Possíveis danos no aparelho. Em caso de perigo,
desligue imediatamente o aparelho da rede eléctrica
de 230V.
• O aparelho não deve ser utilizado em locais húmidos (por
exemplo, casas de banho) nem em salas com muito pó.
• Durante uma trovoada, os aparelhos ligados à rede eléctrica
poderão ser danificados. Por esse motivo, desligue sempre a fonte
de alimentação da tomada em caso de trovoada.
• Para desligar o aparelho completamente da alimentação de
corrente, retire a ficha da fonte de alimentação da tomada. Para
isso, puxe sempre pela ficha da fonte de alimentação e nunca pelo
cabo.
• Verifique o cabo regularmente quanto a danos, mantenha-o
afastado de superfícies quentes ou de outras fontes de perigo,
desenrole-o completamente e coloque-o de modo a que não seja
possível tropeçar sobre o mesmo e que não fique entalado.
Perigos de incêndio:
Aviso
Perigo de lesão ou de vida devido a incêndio!
Não exponha o aparelho a calor excessivo e, em
caso de perigo, desligue-o imediatamente da rede
eléctrica de 230V.
O calor acumulado no interior do aparelho pode causar uma avaria ou
um incêndio do mesmo. Por isso, este aparelho não deve ser exposto
a temperaturas extremas:
– Evitar a radiação solar directa e o calor gerado por
aquecimentos
– Não cobrir os orifícios de ventilação do aparelho
217
Português
Avisos de segurança
Avisos de segurança
Perigo de explosão:
Aviso
Perigo de lesão devido a explosão!
Preste especial atenção às crianças!
• Nunca coloque as pilhas ou pilhas recarregáveis no fogo.
• Não utilize o aparelho em ambientes que apresentem risco de
explosão!
Perigo de intoxicação:
Aviso
Perigo de lesão devido a intoxicação!
Preste especial atenção às crianças!
• Mantenha as pilhas ou pilhas recarregáveis fora do alcance das
crianças.
Perigo de asfixia:
Aviso
Perigo de lesão devido asfixia!
Preste especial atenção às crianças!
• Mantenha as películas de embalagem fora do alcance das
crianças.
• Ao instalar os cabos, tenha em consideração possíveis perigos
para crianças (perigo de estrangulamento).
Avarias:
Aviso
Possível perigo de lesão devido a avarias de
aparelhos!
Preste especial atenção a dispositivos médicos.
• O funcionamento dos dispositivos médicos eléctricos pode ser
afectado pela radiação electromagnética do seu aparelho. Por
esse motivo, o aparelho deve ser instalado e operado a uma
distância suficiente de dispositivos médicos eléctricos. Isto também se aplica a dispositivos médicos implantados, por
exemplo pacemakers.
• O telefone portátil pode causar um zumbido desagradável em
aparelhos auditivos. Por isso, é necessário manter uma distância
suficiente dos aparelhos auditivos.
218
Primeiros passos
Possíveis danos:
• Utilize apenas as fontes de alimentação fornecidas. Não utilize
fontes de alimentação diferentes, caso contrário, as pilhas
recarregáveis poderão ficar danificadas.
• A tomada para ligar a fonte de alimentação deve estar próxima do
respectivo aparelho e ser de fácil acesso.
• Utilize apenas as pilhas recarregáveis fornecidas. Em caso de
substituição, utilize apenas pilhas recarregáveis do mesmo tipo.
Insira as pilhas recarregáveis na polaridade correcta (no
compartimento das pilhas do telefone portátil encontram-se
indicações a este respeito). Nunca utilize pilhas normais!
Importante Em caso de falha de corrente, apenas é possível
telefonar com este aparelho utilizando a estação
de base.
2.1 Notas sobre o modo de funcionamento de baixa
radiação
Este telefone sem fios (segundo a norma DECT) permite um
funcionamento de baixa radiação (modo ECO).
Durante uma chamada, o telefone portátil reduz a potência de
transmissão de acordo com a distância para a base. Caso não esteja
a ser efectuada uma chamada, o telefone portátil reduz a potência de
transmissão a um mínimo. No entanto, isto não significa que a
radiação de radiofrequência DECT normal seja prejudicial para a
saúde, mas que o modo de funcionamento de baixa radiação evita
uma exposição desnecessária a radiações.
A base não reduz a potência de transmissão! Instale a estação de
base num local onde não se encontre constantemente, por exemplo
no corredor. Evite quartos de crianças, quartos de dormir e salas de
estar.
3 Primeiros passos
3.1 Acerca da utilização deste manual de instruções
Neste manual de instruções, é utilizado o seguinte método para
explicar as instruções:
219
Português
Cuidado Possível dano no aparelho! Observe as notas deste
manual de instruções.
Primeiros passos
Texto ....... „Visor“.
Texto apresentado no visor do telefone
Tecla a premir
3.2 Instalar a estação de base
Instale a estação de base da seguinte forma:
1 Ligue o adaptador de rede primeiro à estação de base e depois
a uma tomada.
2 Ligue uma extremidade do cabo de telefone à tomada de
telefone na parede e a outra à entrada na parte de trás da
estação de base.
3 Ligue o cabo de telefone e o cabo de corrente conforme
mostrado na figura 3A.
B
A
C
- 3A Estação de base A. Tomada de telefone na parede
B. Adaptador de rede com cabo
C. Cabo de telefone
3.3 Telefone portátil
Cuidado Perigo de lesão devido a explosão!
Inserir apenas pilhas recarregáveis fornecidas ou
do mesmo tipo. Não utilizar pilhas normais!
Caso contrário, o telefone portátil poderá ficar
danificado.
220
1
2
3
4
Abra o compartimento das pilhas conforme mostrado na figura
3B.
Insira as pilhas recarregáveis. Observe, se a polaridade está
correcta (+ e -).
Feche o compartimento das pilhas.
Carregue o telefone portátil durante 16 horas na estação de
carregamento. O LED de carregamento na estação de
carregamento acende.
B921
- 3B Parte de trás do telefone portátil A.Tampa
B.Pilhas recarregáveis
A
+
B
+
3.4 Indicador do estado das pilhas recarregáveis
O telefone portátil não funciona quando as pilhas recarregáveis estão
vazias. Quando as pilhas recarregáveis estão totalmente
descarregadas e colocar o telefone portátil apenas por um curto
espaço de tempo na estação de carregamento, o indicador do estado
das pilhas recarregáveis indica que as pilhas estão cheias. No
entanto, este não é o caso, e a potência das pilhas irá diminuir
rapidamente. Deixe o telefone portátil durante 16 horas na estação de
carregamento, para carregar as pilhas totalmente.
Pilhas carregadas
Pilhas vazias
Quando as pilhas recarregáveis estão quase vazias durante uma
chamada, o telefone portátil emite um sinal sonoro de aviso. Coloque
o telefone portátil na estação de carregamento, para recarregar as
pilhas.
221
Português
Primeiros passos
Primeiros passos
3.5 Teclas/visor
Telefone portátil sem fios
1.
2.
3.
4.
5.
6.
7.
8.
Remarcação / Para cima
Lista telefónica
Silenciar / Eliminar
Terminar chamada
Teclas alfanuméricas
Bloqueio de teclado
Pausa
Toque ACTIVAR/
DESACTIVAR
9. Lista de chamadas / Para
baixo
10.Atender chamada / Mãoslivres / Tecla de chamada
11. INT / Sair
12.Menu / OK / Rechamada
13.Visor
14.Indicador LED vermelho;
intermitente durante uma
chamada
14
13
1
12
11
10
2
R
OK
ESC/
INT
3
4
9
5
8
6
7
- 3C Parte da frente do telefone portátil -
Estação de base
15.Tecla Paging
16.LED de carregamento do
telefone portátil
17.LED de Toque
17
16
15
- 3D Estação de base 222
Primeiros passos
HANDSET X
x = número do telefone
portátil
Outros números ou
avançar no menu para
a esquerda
Encontrar ou criar
entradas na lista telefónica
Toque desactivado
Bloqueio de teclado
activado
Ligação telefónica
estabelecida
Novos números na
lista de chamadas
Chamada interna
Outros números ou avançar
no menu para a direita
Indicador do estado das
pilhas recarregáveis
Modo de mãos-livres
activado
Nova mensagem de correio
de voz
Microfone silenciado
A antena indica a força do
sinal de recepção. A antena fica intermitente
quando o telefone portátil se
encontra fora de alcance.
3.7 Navegar no menu
O Sologic B921 dispõe de um sistema de menu simples de utilizar.
Cada menu é composto por uma série de opções. A seguir, encontrase uma síntese dos menus do telefone portátil e da base.
1 Prima a tecla Menu/OK para abrir o menu principal.
OK
2 Vá para a opção de menu pretendida.
3 Prima a tecla Menu/OK para chamar outras opções
OK
ou para confirmar a definição apresentada.
4 Para voltar ao nível anterior do menu, prima a tecla
ESC
Sair.
223
Português
3.6 Visor do telefone portátil
Primeiros passos
Telefone portátil
PHONEBOOK
HANDSET
RING TONE
HANDSET
NAME
KEYPAD BEEP
SELECT BASE
RESET
LANGUAGE
REGISTER
DE-REGISTER
3.8 Utilizar as teclas alfanuméricas
É possível introduzir texto através das teclas alfanuméricas. Para
seleccionar uma letra, prima a tecla alfanumérica correspondente 5 .
Se premir p. ex. a tecla alfanumérica 5, será apresentada no visor a
primeira letra „j“. Para seleccionar as outras letras, prima a tecla
várias vezes.
Prima uma vez a tecla 2, para seleccionar a letra „a“. Caso pretenda
seleccionar as letras „a“ e „b“ sucessivamente, prima uma vez a tecla
2, para seleccionar „a“. Espere 2 segundos, até que o cursor avance
para a posição seguinte e, em seguida, prima a tecla 2 duas vezes,
para seleccionar „b“. Com a tecla de eliminação
3 , pode eliminar
letras introduzidas inadvertidamente. Será eliminada a letra antes do
cursor.
Tabela dos caracteres
1
2
3
4
5
6
7
8
9
0
224
Espaço em branco + - / 1
ABC2
DEF3
GHI4
JKL5
MNO6
PQRS7
TUV8
WXYZ9
_0
Utilização do telefone
4 Utilização do telefone
1
OK
OK 2
OK 3
4
OK
5
ESC
Prima a tecla Menu/OK.
Seleccione „HANDSET“ e confirme.
Seleccione „LANGUAGE“ e confirme.
Seleccione o idioma pretendido e confirme a
selecção.
Prima a tecla Sair, para voltar ao modo de standby.
4.2 Chamadas de saída
Efectuar uma chamada
1 Prima a tecla de chamada.
2 Introduza o número de telefone.
4 5 6
3 Prima a tecla Desligar, para terminar a chamada.
G
H
I
J
K
L
M
N
O
Preparação de marcação
1 Introduza o número de telefone.
4 5 6
É possível corrigir um número incorrecto com a tecla
de silêncio. Se não premir qualquer tecla durante 10 segundos,
o número desaparece e o telefone portátil volta ao
modo de standby.
2 Prima a tecla de chamada.
O número de telefone será marcado
automaticamente.
3 Prima a tecla Desligar, para terminar a chamada.
G
H
I
J
K
L
M
N
O
Marcar novamente o último número de telefone
1 Prima a tecla de chamada.
2 Prima a tecla de remarcação.
O último número de telefone será marcado
automaticamente.
3 Prima a tecla Desligar, para terminar a chamada.
225
Português
4.1 Alterar o idioma
Utilização do telefone
Marcar novamente um dos últimos 3 números marcados
Prima a tecla de remarcação.
O último número marcado será apresentado no
visor.
Para marcar novamente um dos últimos 3 números
marcados, prima várias vezes a tecla de
remarcação, até que seja apresentado no visor o
número pretendido.
2 Prima a tecla de chamada.
O número de telefone será marcado
automaticamente.
3 Prima a tecla Desligar, para terminar a chamada.
1
4.3 Chamadas recebidas
Quando recebe uma chamada, o telefone portátil e a estação de base
tocam, e o LED „Sinal de chamada visual“ (ver ponto 14 na figura 3C
e ponto 17 na figura 3D) no telefone portátil e na estação de base fica
intermitente.
1
2
Prima a tecla Atender chamada, para iniciar a
chamada.
Prima a tecla Desligar, para terminar a chamada.
4.4 Activar/desactivar o modo de mãos-livres
Através desta função é possível atender uma chamada, sem que seja
necessário segurar no telefone portátil, ou quando já está a ser
efectuada uma chamada no telefone portátil.
Durante a chamada:
1 Prima a tecla de mãos-livres, para activar a função.
2 Prima outra vez a tecla de mãos-livres, para mudar
a chamada novamente para o telefone portátil.
Importante Se utilizar a função mãos-livres durante períodos
maiores, as pilhas recarregáveis ficarão mais
rapidamente sem carga!
226
Utilização do telefone
O microfone pode ser silenciado durante uma chamada, para que
possa falar, sem que a pessoa do outro lado da linha o ouça.
1 Prima a tecla de silêncio.
O microfone está silenciado e é apresentado
„MUTED“ no visor.
2 Prima novamente a tecla de silêncio, para reactivar
o microfone.
4.6 Definir o volume do auscultador/da função de
mãoslivres
Durante uma chamada:
1 Prima a tecla Para cima ou Para baixo.
Pode definir o volume nos níveis 1 a 5.
4.7 A tecla R
OK
Prima a tecla Rechamada (tecla 12 na figura 3C
„Telefone portátil sem fios“ da página 222), para
utilizar serviços especiais da sua ligação externa,
p. ex. „Chamada em espera“ (desde que o operador
de rede forneça esse serviço), ou para reencaminhar
uma chamada, no caso de utilizar um sistema de
telefone. A tecla Rechamada R interrompe
brevemente a ligação. Essa interrupção pode ser
definida para 100 ms ou 300 ms. Para definir outro
tempo de rechamada, ver „5.4 A tecla R“.
4.8 Seleccionar toque e definir volume
Melodia de toque do telefone portátil para chamadas
internas/externas
1 Prima a tecla Menu/OK.
OK
OK 2 Seleccione „HANDSET“ e confirme.
OK 3 Seleccione „RING TONE“ e confirme.
4 Seleccione „INTERNAL“ ou „EXTERNAL“ e
confirme.
OK
5 Seleccione uma melodia de toque (1 a 9) e
confirme.
OK
227
Português
4.5 Silêncio
Utilização do telefone
Volume do toque do telefone portátil
1 Prima a tecla Menu/OK.
OK
OK 2 Seleccione „HANDSET“ e confirme.
OK 3 Seleccione „RING TONE“ e confirme.
OK 4 Seleccione „VOLUME“ e confirme.
5 Seleccione o volume pretendido (desactivado, 1-5)
e confirme.
OK
Importante É possível ACTIVAR ou DESACTIVAR o volume
do toque de cada telefone portátil individual,
mantendo premida a tecla Toque ACTIVAR/
DESACTIVAR
no modo de standby.
O símbolo
é apresentado no visor e o bloqueio
de teclado está activado.
4.9 Bloqueio de teclado
Se o bloqueio de teclado estiver activado, as teclas em modo de
standby não têm função (com excepção da tela de bloqueio de
teclado).
1 Mantenha a tela de bloqueio de teclado premida.
O símbolo será apresentado no visor.
2 Mantenha novamente a tela de bloqueio de teclado
premida, para desactivar o bloqueio de teclado.
Se o bloqueio de teclado estiver activado, pode,
apesar disso, atender chamadas recebidas,
premindo a tecla Atender chamada . Durante uma
chamada, o teclado funciona como de costume.
Após a chamada, o bloqueio de teclado é novamente
activado.
4.10 Nome do telefone portátil
É possível alterar o nome apresentado no visor (máx. 12 caracteres),
quando não está a ser efectuada uma chamada:
1 Prima a tecla Menu/OK.
OK
OK 2 Seleccione „HANDSET“ e confirme.
OK 3 Seleccione „HANDSET NAME“ e confirme.
228
Utilização do telefone
4 5 6
G
H
I
J
K
L
M
N
O
4
OK
5
ESC
6
Elimine o nome anterior com a tecla de silêncio e
introduza um nome novo.
Prima OK para confirmar.
Prima a tecla Sair, para voltar ao modo de standby.
1
OK
OK 2
OK 3
4
OK
5
ESC
6
Prima a tecla Menu/OK.
Seleccione „HANDSET“ e confirme.
Seleccione „KEYPAD BEEP“ e confirme.
Em seguida, seleccione „ON“ ou „OFF“.
Prima OK para confirmar.
Prima a tecla Sair, para voltar ao modo de standby.
4.12 Lista telefónica
É possível guardar 50 entradas na lista telefónica. Os nomes podem
ter até 16 caracteres e os números de telefone até 24 dígitos de
comprimento.
Adicionar uma entrada na lista telefónica
1 Prima a tecla da lista telefónica.
OK 2 Prima duas vezes a tecla OK .
OK
4 5 6 OK 3 Introduza o nome e confirme.
4 Introduza o número de telefone pretendido e
4 5 6
confirme.
OK
Será emitido um sinal sonoro de confirmação.
G
H
I
J
K
L
M
N
O
G
H
I
J
K
L
M
N
O
Marcar um número de marcação rápida
1 Prima a tecla da lista telefónica.
2 Vá para o nome pretendido ou introduza a letra
inicial do nome.
4 5 6
3 Prima a tecla da lista telefónica, para visualizar o
número de telefone.
4 Em seguida, prima a tecla de chamada.
O número de telefone será marcado
automaticamente.
5 Prima a tecla Desligar, para terminar a chamada.
G
H
I
J
K
L
M
N
O
229
Português
4.11 Activar/desactivar o tom das teclas
Utilização do telefone
Editar uma entrada da lista telefónica
1 Prima a tecla da lista telefónica.
2 Vá para o nome pretendido ou introduza a letra
inicial do nome.
4 5 6
3 Prima a tecla da lista telefónica, para visualizar o
número de telefone.
4 Prima a tecla Menu/OK.
OK
OK 5 Seleccione „EDIT ENTRY“ e confirme.
4 5 6 OK 6 Introduza o nome e confirme.
4 5 6 OK 7 Introduza ou altere o número de telefone e
confirme.
G
H
I
G
H
I
J
K
L
M
N
O
G
H
I
J
K
L
M
N
O
J
K
L
M
N
O
Eliminar uma ou todas as entradas da lista telefónica
1 Prima a tecla da lista telefónica.
2 Vá para o nome pretendido ou introduza a letra
inicial do nome.
4 5 6
3 Prima a tecla da lista telefónica, para visualizar o
número de telefone.
4 Prima a tecla Menu/OK.
OK
5 Seleccione „DELETE ENTRY“, para eliminar a
entrada actual da lista telefónica, e confirme.
OK
OU
6 Seleccione „DELETE ALL“, para eliminar todas as
entradas da lista telefónica, e confirme.
OK
ESC 7 Confirme novamente ou prima a tecla Sair, para
OK
ignorar.
G
H
I
J
K
L
M
N
O
4.13 Identificação de chamadas (CLIP)
O Sologic B921 apresenta o número de telefone das chamadas
recebidas. Esta função apenas pode ser utilizada, caso esteja
registado nesse serviço junto do operador de rede. Poderá obter mais
informações, junto do seu operador de rede.
Quando recebe uma chamada, o número de telefone é guardado
numa lista de chamadas. Essa lista pode conter até 30 números de
telefone (cada um com 23 dígitos no máximo).
230
Utilização do telefone
Novas chamadas
Se existir uma nova chamada na lista de chamadas,
o símbolo CLIP fica intermitente no visor.
Chamar a lista de chamadas
Prima a tecla para a lista de chamadas.
Será apresentada a última chamada recebida. Se a
lista de chamadas estiver vazia, será apresentado
„EMPTY“ no visor.
2 Prima a tecla da lista telefónica, para ignorar o
número.
3 Prima a tecla da lista telefónica, para ignorar a data
e a hora.
4 Prima a tecla Para cima ou Para baixo, para passar
pela lista.
5 Prima a tecla Sair, para sair da lista de chamadas.
1
ESC
Marcar um número da lista de chamadas
1 Prima a tecla para a lista de chamadas.
2 Passe pela lista de chamadas, até que seja
apresentado o número de telefone pretendido.
3 Prima a tecla de chamada, para iniciar a chamada.
O número de telefone será marcado
automaticamente.
4 Prima a tecla Desligar, para terminar a chamada.
Eliminar um número da lista de chamadas
1 Prima a tecla para a lista de chamadas.
2 Passe pela lista de chamadas, até que seja
apresentado o número de telefone pretendido.
3 Prima a tecla Menu/OK.
OK
231
Português
Se o número de telefone tiver mais de 12 dígitos,
poderá avançar no visor para a direita, para
visualizar os dígitos restantes.
Utilização do telefone
4
OK
5
OK
ESC 6
OK
Seleccione „DELETE“, para eliminar o número de
telefone actual, e confirme.
OU
Seleccione „DELETE ALL“, para eliminar todas as
entradas da lista telefónica, e confirme.
Prima OK para confirmar ou a tecla Sair para voltar
para trás.
Guardar um número da lista de chamadas como número de
marcação rápida
1 Prima a tecla para a lista de chamadas.
2 Passe pela lista de chamadas, até que seja
apresentado o número de telefone pretendido.
3 Prima a tecla Menu/OK.
OK
OK 4 Seleccione „SAVE TO PB“ e confirme.
5 Altere ou adicione um nome e, em seguida,
4 5 6
confirme.
OK
4 5 6 OK 6 Altere o número de telefone e confirme.
G
H
I
J
K
L
M
N
O
G
H
I
J
K
L
M
N
O
4.14 Reiniciar o telefone portátil para as definições padrão
Deste modo, serão eliminadas todas as alterações e repostas todas
as predefinições (volume do toque, melodia de toque, etc.). Para além
disso, serão eliminadas a lista de chamadas, a lista de remarcação e
a lista telefónica!
1 Prima a tecla Menu/OK.
OK
OK 2 Seleccione „HANDSET“ e confirme.
OK OK 3 Seleccione „RESET“ e confirme duas vezes.
4 Introduza o número PIN da estação de base (a
4 5 6
predefinição é 0000).
5 O aparelho volta ao modo de standby.
G
H
I
J
K
L
M
N
O
As definições padrão são:
Nome do telefone
HANDSET
portátil
Volume do auscultador Nível 3
Volume do toque
Nível 3
Toque externo
Toque 8
232
Configurações da base
Toque interno
Tom das teclas
Toque 1
Activado
Esta indicação funciona apenas se o serviço de mensagens de voz ou
de mensagens telefónicas estiver activado e o seu operador de
telefone transmitir esta informação juntamente com a identificação de
chamadas! Se receber uma nova mensagem na caixa de mensagens
de voz, é apresentado o símbolo
no visor. O símbolo
desaparece depois de ouvir a mensagem.
5 Configurações da base
Info
Esta secção descreve apenas as definições
guardadas no interior da base!
5.1 Seleccionar o toque e definir o volume
Toque do telefone portátil para chamadas internas/externas
1 Prima a tecla Menu/OK.
OK
OK 2 Seleccione „BASE“ e confirme.
OK 3 Seleccione „RING TONE“ e confirme.
4 Seleccione uma melodia de toque (1 a 9) e
confirme.
OK
Volume do tom de toque da base
1 Prima a tecla Menu/OK.
OK
OK 2 Seleccione „BASE“ e confirme.
OK 3 Seleccione „RING VOLUME“ e confirme.
4 Seleccione o volume pretendido (desactivado, 1-5)
e confirme.
OK
5.2 Definir modo de marcação
Existem dois modos de marcação para linhas telefónicas:
- DTMF/modo de marcação por tons (mais frequente)
- Modo de marcação por impulsos (apenas necessário se o aparelho
for utilizado numa central telefónica mais antiga!)
233
Português
4.15 Indicador de mensagem de voz
Configurações da base
1
OK
OK 2
OK 3
OK 4
Prima a tecla Menu/OK.
Seleccione „BASE“ e confirme.
Seleccione „DIAL MODE“ e confirme.
Seleccione „TONE“ ou „PULSE“ e confirme.
5.3 Definir o número PIN
Determinadas funções apenas estão disponíveis, se souber o número
PIN da estação de base.
O número PIN tem 4 caracteres. O número PIN predefinido é „0000“.
Para alterar o número PIN e criar um número secreto próprio, proceda
seguinte forma:
1 Prima a tecla Menu/OK.
OK
OK 2 Seleccione „BASE“ e confirme.
OK 3 Seleccione „SYSTEM PIN“ e confirme.
4 5 6 OK 4 Introduza o „OLD PIN“ e prima OK.
4 5 6 OK 5 Introduza o „NEW PIN“ e confirme.
G
H
I
J
K
L
M
N
O
G
H
I
J
K
L
M
N
O
5.4 A tecla R
Prima a tecla Rechamada para utilizar serviços especiais da sua
ligação externa, p. ex. „Chamada em espera“ (desde que o operador
de rede forneça esse serviço), ou para reencaminhar uma chamada,
no caso de utilizar um sistema de telefone. A tecla Rechamada R
interrompe brevemente a ligação. Essa interrupção pode ser definida
para 100 ms ou 300 ms. No entanto, poderá alterar esse tempo, caso
o seu sistema necessite de outro tempo de rechamada.
1 Prima a tecla Menu/OK.
OK
OK 2 Seleccione „BASE“ e confirme.
OK 3 Seleccione „RECALL“ e confirme.
4 Em seguida, seleccione „LONG“ ou „SHORT“ e
confirme.
OK
234
Registar ou cancelar o registo de um telefone portátil
6 Registar ou cancelar o registo de um telefone
portátil
É possível registar até 4 telefones portáteis numa estação de base.
Cada telefone portátil entregue já está registado na estação de base.
Apenas é necessário registar o telefone portátil, caso:
• tenha cancelado o registo do telefone portátil nesta estação de
base (p. ex. para reiniciar).
• pretenda registar outro telefone portátil na estação de base.
A seguinte descrição é válida apenas para estações de base e
telefones portáteis Sologic B921.
1 Mantenha a tecla de paging da estação de base
premida durante 10 segundos.
2 Prima a tecla Menu/OK no telefone portátil.
OK
3 Seleccione „REGISTER“ e confirme.
4 Introduza o número da estação de base (1-4), na
4 5 6
qual pretende registar o telefone portátil.
5 O aparelho irá procurar a estação de base. Quando
a encontrar, ser-lhe-á pedido que introduza o
número PIN (com quatro algarismos).
6 Introduza o número PIN da estação de base (a
4 5 6
predefinição é 0000). Se o número PIN estiver
incorrecto, o telefone portátil irá procurar
novamente a estação de base.
Após o registo do telefone portátil, será apresentado
no visor o nome do telefone portátil e o respectivo
número.
G
H
I
J
K
L
M
N
O
G
H
I
J
K
L
M
N
O
6.2 Cancelar o registo de um telefone portátil na estação
de base Sologic B921
1
OK
OK 2
3
4 5 6
G
H
I
J
K
L
M
N
O
OK
Prima a tecla Menu/OK.
Seleccione „DE-REGISTER“ e confirme.
Introduza o número PIN da estação de base (a
predefinição é 0000).
235
Português
6.1 Registar um telefone portátil na estação de base
Sologic B921
Registar ou cancelar o registo de um telefone portátil
4 5 6
G
H
I
J
K
L
M
N
O
Introduza o número interno do telefone portátil, do
qual pretende cancelar o registo (1-4), e confirme.
OK
Depois que o registo do telefone portátil tenha sido
cancelado com êxito, o telefone volta ao modo de
standby. Caso contrário, ser-lhe-á pedido que
introduza novamente o número do telefone portátil.
4
Importante Apenas é possível cancelar o registo de telefones
portáteis que não estejam a ser utilizados.
6.3 Selecção de uma estação de base
Caso o seu telefone portátil esteja registado em várias estações de
base (máx. 4), deverá seleccionar uma dessas estações de base, uma
vez que o telefone portátil só comunica com uma estação de base em
cada momento. Existem duas possibilidades:
Selecção automática
Caso defina o telefone portátil para selecção automática, o
telefone portátil procura automaticamente a estação de base mais
próxima em modo de standby.
1 Prima a tecla Menu/OK.
OK
OK 2 Seleccione „HANDSET“ e confirme.
OK 3 Seleccione „SELECT BASE“ e confirme.
OK 4 Seleccione „AUTOMATIC“ e confirme.
Informação Se a estação de base for seleccionada
automaticamente e o telefone portátil ficar fora de
alcance da estação de base actual, o telefone
portátil procura apenas a estação de base com o
sinal mais forte em modo de standby (não
durante uma chamada).
Selecção manual
Caso defina o telefone portátil para selecção manual, o telefone
portátil procura apenas a estação de base definida.
1 Prima a tecla Menu/OK.
OK
OK 2 Seleccione „HANDSET“ e confirme.
OK 3 Seleccione „SELECT BASE“ e confirme.
236
Reencaminhamento de chamadas e chamadas internas de um telefone portátil para outro
OK 4 Seleccione „MANUAL“ e confirme.
OK 5 Seleccione a estação de base e confirme.
Português
Importante Para que possa seleccionar uma estação de
base, é necessário que o telefone portátil esteja
registado na estação de base em questão.
7 Reencaminhamento de chamadas e chamadas
internas de um telefone portátil para outro
7.1 Reencaminhamento de chamadas e teleconferência
durante uma chamada externa
4 5 6
G
H
I
INT
INT
Prima a tecla INT durante uma chamada externa e,
em seguida, o número do telefone portátil (1-4).
O outro telefone portátil toca
Depois que tenha sido estabelecida a ligação com o
outro telefone portátil, poderá falar internamente.
Quando desligar, a chamada externa será
reencaminhada para o outro telefone portátil.
2 Mantenha a tecla INT premida durante
3 segundos. Em seguida, poderá falar em
simultâneo com o segundo telefone portátil e a
ligação externa (teleconferência).
3 Prima novamente a tecla INT, para mudar
novamente para a chamada externa.
4 Prima a tecla Desligar, para terminar a chamada.
1
INT
J
K
L
M
N
O
8 Abreviaturas e termos técnicos
CLIP
Calling Line Identification Presentation, transmissão do número de
telefone que faz a chamada e apresentação no visor do destinatário
da chamada.
DECT
Digital Enhanced Cordless Telecommunication; norma para
telecomunicações digitais europeias sem fios.
237
Abreviaturas e termos técnicos
Modo ECO
Modo económico; modo de funcionamento de baixa radiação na área
da telefonia DECT.
Tecla Rechamada
Provoca uma curta interrupção da ligação, activando características
como chamadas em espera ou reencaminhamentos. No caso de
centrais telefónicas, a tecla Rechamada ou R é utilizada para
consultas internas.
GAP
Generic Access Profile; interface entre a estação de base e o telefone
portátil, que permite a ligação sem fios.
INT
Participante interno. Outro telefone portátil ou outra extensão numa
central telefónica.
IWV
Modo de marcação por impulsos; modo de marcação analógico
obsoleto (ruídos de marcação de „chocalho“).
LCD
Liquid Crystal Display; ecrã de cristal líquido.
LED
Light Emitting Diode; díodo emissor de luz.
MFV
Modo de marcação multifrequência; modo de marcação digital
moderno.
PIN
Personal Identification Number.
Tecla R
Tecla de consulta (ver tecla Rechamada).
Standby
„Estado de repouso“ de um aparelho, sem estar completamente
desligado.
Twin
„Gémeo“; denominação utilizada para uma unidade com dois
aparelhos idênticos, p.ex. dois telefones portáteis.
238
Resolução de problemas
9 Resolução de problemas
Problema
Causa possível
Solução
As pilhas recarregáveis Verifique, se ambas as
não estão carregadas. pilhas recarregáveis
estão inseridas
correctamente.
Carregue as pilhas
recarregáveis.
Sem som.
O cabo de telefone não Verifique a ligação do
está ligado de forma
cabo de telefone.
correcta.
A linha está ocupada Espere até que o
por outro telefone
outro telefone portátil
portátil.
seja desligado.
A chamada recebida
Regule o volume
está demasiado
durante a chamada
baixa.
com a tecla de
volume.
O toque do telefone
Defina o volume do
portátil está
toque.
demasiado baixo.
Não é possível
O modo de marcação Consulte „5.2 Definir
marcar um número. está definido de forma modo de marcação“,
incorrecta.
para definir o modo de
marcação correcto.
O símbolo
está
intermitente.
Telefone portátil fora de Desloque o telefone
alcance.
portátil para que fique
dentro do alcance da
estação de base.
A estação de base não Verifique o cabo e o
tem corrente eléctrica. adaptador de rede.
O telefone portátil não Registe o telefone
está registado na
portátil na estação de
estação de base.
base.
239
Português
Sem visor.
Medidas de assistência
Problema
Causa possível
Solução
A estação de base
ou o telefone portátil
não toca.
Não é possível
reencaminhar uma
chamada para uma
extensão.
O telefone não
reage quando as
teclas são premidas.
O volume do toque
está desactivado ou
demasiado baixo.
O tempo de rechamada
é demasiado curto.
Defina o volume do
toque.
Erro de utilização.
Defina o aparelho
para um tempo de
rechamada mais
longo.
Retire as pilhas
recarregáveis e volte a
inseri-las.
Não efectue pessoalmente modificações ou reparações no aparelho.
As reparações do aparelho ou do cabo apenas devem ser efectuadas
por um especialista do centro de assistência. As reparações
inadequadas podem causar perigos consideráveis para o utilizador.
10 Medidas de assistência
10.1 Manutenção
O aparelho não necessita de manutenção. Verifique ocasionalmente
o estado das pilhas recarregáveis e substitua as mesmas por pilhas
recarregáveis do mesmo tipo se o desempenho diminuir ou em caso
de fuga de líquido.
Aviso
Perigo de corrosão!
Utilize luvas de protecção para retirar pilhas com
fugas.
Se o aparelho entrar em contacto com líquidos, retire imediatamente
as pilhas recarregáveis ou desligue o aparelho da alimentação de
corrente (base) e seque-o cuidadosamente. Após 2-3 dias de tempo
de secagem, verifique o funcionamento do aparelho. Em caso de
avaria, remeta-o ao centro de assistência.
240
Medidas de assistência
Aviso
Perigo de choque eléctrico ou curto-circuito devido a
contacto com componentes que sejam condutores
eléctricos.
Não permita a infiltração de líquidos no interior do
aparelho. Caso aconteça, retire imediatamente a
fonte de alimentação da tomada e a ficha do cabo de
telefone da tomada de parede ou retire as pilhas
recarregáveis.
Faça o mesmo em caso de dano no aparelho, no
cabo ou na fonte de alimentação: evite o contacto
directo com líquidos e desligue imediatamente o
aparelho da rede eléctrica de 230V.
Limpe o telefone com um pano ligeiramente humedecido com água
morna ou com um pano antiestático. Nunca utilize produtos de
limpeza nem abrasivos.
10.3 Retirada de serviço, armazenagem
Se retirar o aparelho temporariamente de serviço, retire o cabo de
telefone da tomada de parede e da entrada do cabo do telefone da
estação de base. Desligue as fontes de alimentação da estação de
base e dos telefones portáteis das tomadas de 230 V.
Retire as pilhas recarregáveis dos telefones portáteis. No caso de uma
retirada de serviço mais longa, substitua as pilhas recarregáveis por
pilhas recarregáveis novas do mesmo tipo quando voltar a utilizar o
aparelho.
Armazene os aparelhos e as pilhas recarregáveis num local seco, que
não seja demasiado quente.
10.4 Eliminação (protecção do ambiente)
No fim da vida útil do aparelho, este, bem como as pilhas
recarregáveis, não devem ser eliminados juntamente com
os resíduos domésticos normais. O símbolo ao lado, que
se encontra no produto e/ou na embalagem, indica esse
facto. Deve levar o aparelho a um ponto de recolha para
reciclagem de aparelhos eléctricos e electrónicos. Alguns
materiais do produto poderão ser reutilizados. Através da
reciclagem de algumas peças ou matérias-primas de produtos
241
Português
10.2 Limpeza
Dados técnicos
usados, contribui de forma importante para a protecção do meio
ambiente.
Elimine também os materiais de embalagem respeitando o meio
ambiente.
Contacte as autoridades locais se necessitar de mais informações
sobre os pontos de recolha existentes na sua área.
11 Dados técnicos
Padrão
DECT (Digital Enhanced Cordless
Telecommunications)
GAP ( Generic Access Profile )
Gama de frequências
1.880 MHz a 1.900 MHz
Potência de emissão
10 mW (potência média por canal)
Alcance
Até 300 m em zonas livres - até 50 m em
edifícios
Pilhas recarregáveis do
2 x 1,2 V, 500 mAh tipo AAA, pilha
telefone portátil:
recarregável NiMH
Alimentação de corrente da Entrada: 100~240 V CA/50-60 Hz
estação de base
saída: 6 V CC/500 mA
Tempo de standby do
100 horas em modo de standby
telefone portátil
Tempo de conversação do 10 horas
telefone portátil
Tempo de carregamento:
16 horas
Temperaturas de
+5 °C a + 45 °C
funcionamento permitidas
Humidade relativa do ar
25 a 85 %
permitida
Modo de marcação
Marcação por impulsos e por tons (DTMF)
Tempo de rechamada
100 ou 300 ms
Memória de números do
50 entradas da lista telefónica com até
telefone portátil
24 algarismos e 16 letras
Dimensões estação de base/117 mm x 117 mm x 60 mm/
telefone portátil
182 mm x 284 mm x 58 mm
Peso estação de base/
239 g com adaptador de rede /
telefone portátil
152 g com pilhas
Consumo máximo de
Base: 2,0 W
corrente
242
Topcom garantia
12 Topcom garantia
As unidades Topcom têm um período de garantia de 24 meses. O
período de garantia entra em efeito a partir da data de compra da
unidade. Não há nenhuma garantia em baterias padrão ou
recarregáveis (tipo de AA/AAA).
Consumíveis e defeitos que causem um efeito negligenciável sobre o
funcionamento ou o valor do equipamento não se encontram cobertos
por esta garantia.
A prova de garantia terá de ser dada com a apresentação da
respectiva confirmação de compra, ou uma cópia da mesma, no qual
aparecem indicados a data de compra bem como o modelo da
unidade.
12.2 Modo de funcionamento da garantia
Uma unidade defeituosa necessita de ser devolvida aos serviços
centrais da Topcom juntamente com uma nota de compra válida ao
cliente devidamente preenchido.
Caso a unidade desenvolva um defeito durante o período de garantia,
a Topcom ou um centro de serviços oficialmente por ela designado
reparará qualquer defeito derivado de material ou falhas de fabrico,
reparando ou substituindo as unidades ou as peças defeituosas, sem
qualquer custo adicional. No caso de substituição, a cor e o modelo
poderão ser diferentes dos da unidade adquirida originalmente.
A data inicial de compra determinará o início do período de garantia.
O período de garantia não será prolongado no caso da unidade ser
trocada ou reparada por Topcom ou qualquer dos seus centros de
reparação.
12.3 Exclusões de garantia
Danos ou defeitos causados pelo tratamento ou operação incorrectos
e danos resultantes da utilização de peças ou acessórios não originais
não são abrangidos pela garantia.
A garantia não cobre danos causados por factores externos, como
relâmpagos, água e fogo, nem quaisquer danos causados durante o
transporte.
Não se poderá reclamar os direitos de garantia se o número de série
que se encontra na unidade tiver sido alterado, retirado ou tornado
ilegível.
243
Português
12.1 Período de garantia
Topcom garantia
Qualquer reclamação de garantia não será válida se a unidade tiver
sido reparada, alterada ou modificada pelo comprador.
Este dispositivo apenas deve ser utilizado com pilhas recarregáveis.
Se pretende substituir as pilhas incluídas originalmente, verifique se
as pilhas novas são adequadas e recarregáveis. NÃO devem utilizarse pilhas alcalinas nos terminais portáteis, em quaisquer
circunstâncias.
Se utilizar pilhas alcalinas nos terminais portáteis, estas irão aquecer
quando colocar o portátil na base e poderão explodir. Qualquer dano
causado não poderá ser recuperado pelo fabricante, e como tal não
se encontra coberto pelas condições da garantia. Quaisquer
despesas de reparação ser-lhe-ão facturadas.
244
Obecné informace
1 Obecné informace
Tato uživatelská píruka obsahuje všechny informace, které
potebujete pro instalaci, nastavení a provoz vašeho zaízení.
Také obsahuje informace a dležité poznámky pro vaší
bezpenost a pomáhá v pípad) problém.
Vždy m)jte uživatelskou píruku poblíž zaízení.
Uložte tuto uživatelskou píruku na bezpené místo a podle
poteby ji pedejte dalšímu uživateli.
Tento výrobek byl vyroben v souladu s jednotným digitálním
standardem pro bezdrátové telefony (DECT). DECT technologie
obsahuje vysokou úrove( bezpenosti proti odposlechu a také
vysokou kvalitu digitálního penosu. Tento telefon je urený pro rzná
použití, napíklad na síti základen a bezdrátových telefon, které tvoí
kompletní PBX: na základn) lze provozovat až 4 bezdrátových
telefon a jeden bezdrátový telefon mže být provozován až na
4 základnách. Interní hovory mohou být provád)né mezi základnou
a telefonem nebo mezi dv)ma hovory.
Pokud jste k dispozici na vaší lince, ID volajícího a SMS služby
od vašeho poskytovatele telefonních služeb jsou na tomto telefonu
k dispozici. Pokud používáte tyto služby, telefonní íslo volajícího
je na telefonním displeji zobrazeno.
Dležité
Pro použití „ID volajícího“ je teba tuto funkci
nejdíve na telefonní lince umožnit. Kontaktujte
vašeho poskytovatele telefonních služeb ohledn)
informace na téma aktivace této funkce. Pokud tato
funkce není povolena, ísla, odkud píchozí
telefony pocházejí, NEBUDOU zobrazena na
telefonním displeji.
1.2 Chránno autorským právem
Tento dokument je chrán)n autorským právem.
Všechna práva jsou vyhrazena, vetn) práv fotomechanické
reprodukce, kopírování i distribuce zvláštními prostedky (napíklad zpracování dat, ukládání na médiích i na sítích), stejn) jako technické zm)ny a zm)ny obsahu.
245
esky
1.1 Výrobek: Sologic B921
Obecné informace
1.3 Signální slova a symboly
Symbol
žádné
Signální
Význam
slovo
Upozornní Upozorn)ní na riziko možného vážného
poran)ní i smrti, pokud nebudete jednat
v souladu s touto informací.
Opatrn
Upozorn)ní na riziko možného mírného
poran)ní, pokud nebudete jednat v souladu
s touto informací.
Opatrn
Riziko poškození materiálu i prostedí.
Dležité
Toto poskytuje dležité informace ohledn)
funkce.
Informace, Obecné informace nebo zvláštní tipy.
tip
1.4 Zamýšlené použití
Tento výrobek je uren pro provád)ní telefonních hovor
prostednictvím pevné linky v rámci telefonní sít). Pedpokladem pro
správné použití telefonu je profesionální instalace pi zohledn)ní
informace v této uživatelské píruce.
Jakékoliv jiné použití je považováno za nesprávné a není povoleno.
Jakékoliv úpravy i konverze ze strany uživatele, které nejsou popsány
v této uživatelské píruce, jsou považovány za nesprávné a nejsou
povolené. Nemáme žádnou odpov)dnost za jakékoliv poškození,
které z toho mže vyplynout.
1.5 Obsah balení
Zkontrolujte, že obsah balení je kompletní a nepoškozený. V pípad) chyb)jících i poškozených ástí okamžit) kontaktujte
vašeho prodejce.
Uschovejte originální balení pro pípad, kdy byste potebovali telefon
vrátit i jej poslat k oprav).
1 základna
1 síový adaptér pro základnu
1 telefonní kabel pro základnu
1 bezdrátový pístroj vetn) 2 dobíjecích baterií (AAA, 1,2 V/500 mAh, NiMH) a krytem oddílu na baterie
1 uživatelská píruka
246
Poznámky k bezpenosti
Upozornní
Dležité
Riziko udušení d)tí! Uchovávejte obalové fólie
mimo dosah d)tí.
Obalový materiál likvidujte zodpov)dným
zpsobem pro životní prostedí!
2 Poznámky k bezpenosti
Elektrická rizika:
Upozornní Riziko poran)ní nebo smrti zpsobené elektrickým
proudem! V pípad) nebezpeí odpojte okamžit)
pístroj z nap)tí 230 V.
• Nepoužívejte toto zaízení, pokud je poškozený síový adaptér,
kabel nebo samotný pístroj. Dbejte na to, aby pístroj neupadl,
jelikož by mohl být poškozený.
• Elektrické nap)tí v pístroji je nebezpené. Nikdy neotevírejte kryt,
ani nestrkejte pedm)ty do ventilaních otvor.
• Zabra(te vniknutí tekutin do pístroje. Pokud toto nastane,
odpojte síový adaptér ze zástrky a konektor telefonního
kabelu ze zásuvky.
• Také odpojte síový adaptér ze zástrky a konektor telefonního
kabelu ze zásuvky, pokud b)hem a ped išt)ní pístroje dojde
k chyb).
• Nedotýkejte se nabíjeky a konektor zástrky ostrými nebo
kovovými pedm)ty.
• Pístroj neupravujte nebo neopravujte. Pístroj nebo kabel
mohou být opravovány jen odborníkem v servisním stedisku.
Opravy, které nebudou provedeny ádn), mohou uživatele
vystavit vážným rizikm.
• D)ti asto podce(ují nebezpeí pi zacházení s elektrickými
pístroji. Nikdy nenechávejte d)ti blízko elektrických pístroj
bez dozoru.
247
esky
Pi používání elektrických zaízení musí být vždy brán zetel na
následující základní bezpenostní sd)lení.
Pet)te si peliv) následující bezpenostní upozorn)ní a podrobnosti
o správném používání pístroje. Seznamte se se všemi funkcemi
zaízení. Uložte tuto uživatelskou píruku na bezpené místo a podle
poteby ji pedejte dalšímu uživateli. Nepostupujte telefon tetím
stranám bez uživatelské píruky.
Poznámky k bezpenosti
• Nedovolujte d)tem, aby si se zaízením nebo jeho souástmi hrály.
Opatrn
Možnost poškození pístroje. V pípad) nebezpeí
odpojte okamžit) pístroj z nap)tí 230 V.
• Nepoužívejte pístroj na vlhkých místech (nap. v koupeln)) nebo
ve velmi prašných prostorách.
• Pístroje pipojené k síti mohou být poškozeny pi bouce.
B)hem bouky proto vždy vypojte pístroj ze zásuvky.
• Aby byl pístroj zcela odpojen od napájení, musí být síový adaptér
vypojen ze zásuvky. Pi odpojování tahejte vždy za zástrku,
nikoliv za kabel.
• Pravideln) provád)jte kontrolu kabel, zda nejsou poškozené,
chra(te je ped horkými povrchy a dalšími riziky, zcela je odvíjejte,
položte je tak, aby je nikdo nemohl perušit a stlait je.
Nebezpeí požáru:
Upozornní Riziko poran)ní nebo smrti zpsobené požárem!
Nevystavujte pístroj pílišnému teplu a odpojte
jej z napájení 230 V okamžit), pokud se
vyskytne nebezpeí.
Teplo, které vzniká v pístroji, mže být píinou poruchy nebo požáru
v pístroji. Proto nevystavujte pístroj extrémním teplotám:
– Vyhn)te se pímému psobení slunce a horka.
– Nezakrývejte v)trací otvor na pístroji.
Riziko exploze:
Upozornní Riziko poran)ní zpsobené explozí!
Dbejte zvýšené opatrnosti s ohledem na d)ti!
• Nikdy nevhazuje b)žné nebo dobíjecí baterie do ohn).
• Pístroj nepoužívejte v prostedí, kde je riziko exploze!
Riziko otravy:
Upozornní Riziko poran)ní zpsobené otravou!
Dbejte zvýšené opatrnosti s ohledem na d)ti!
• Udržujte b)žné a dobíjecí baterie mimo dosah d)tí.
248
Poznámky k bezpenosti
Riziko udušení:
Upozornní Riziko poran)ní zpsobené udušením!
Dbejte zvýšené opatrnosti s ohledem na d)ti!
• Uchovávejte obalové fólie mimo dosah d)tí.
• Zvažte možná rizika pro d)ti (riziko uškrcení), pokud používáte
prodlužovací kabely.
Vady:
• Funkce lékaských elektrických zaízení mže být poškozena
elektromagnetickou radiací z vašeho zaízení. Z tohoto dvodu se
ujist)te, že zaízení je instalováno a funguje v dostatené
vzdálenosti od lékaských elektrických zaízení. To stejné platí pro lékaské implantáty, jako jsou kardiostimulátory.
• Bezdrátový telefon mže zpsobit nepíjemný zvuk pi použití
naslouchátek, proto jej uchovávejte v dostatené vzdálenosti
od naslouchátek.
Možné poškození:
Opatrn
Možnost poškození pístroje! Pet)te si informace
v této uživatelské píruce.
• Používejte pouze síový adaptér, který se dodává s pístrojem.
Nepoužívejte adaptéry cizích výrobc, protože dobíjecí baterie
se mohou poškodit.
• Zásuvka, do které bude pipojen síový adaptér, musí být poblíž
pístroje a musí být snadno pístupná.
• Používejte pouze dodané dobíjecí baterie. Pokud potebujete
baterie vym)nit, použijte pouze dobíjecí baterie stejného typu.
Ujist)te se, že baterie jsou vložené správnou polaritou (informaci
lze nalézt v oddílu pro baterie na pístroji). Nikdy nepoužívejte
b)žné spotební baterie!
Dležité
V pípad) výpadku elektiny budete moci k volání
používat pouze základnu.
249
esky
Upozornní Možné riziko poran)ní z dvodu vadného zaízení!
Dbejte zvýšené opatrnosti s ohledem na
lékaské vybavení.
První kroky
2.1 Poznámky ohledn provozu pi nízké radiaci
Tento bezdrátový telefon (kompatibilní se standardem DECT)
umož(uje provoz v režimu sníženého vyzaování (ECO mode).
B)hem hovoru telefon zredukuje rádiový výstup v závislosti na
vzdálenosti od základny. Pokud se neprovádí žádný hovor, telefon
zredukuje radiový výstup na minimum. To neznamená, že normální
vyzaování podle standardu DECT škodí zdraví. Nicmén) provoz pi
nízké radiaci zamezí jakémukoliv zbytenému vystavení
radiovému záení.
Základna neredukuje radiový výstup! Sestavte základnu na místo, kde
netrávíte píliš mnoho asu, napíklad do haly. Vyhn)te se umíst)ní do
vaší i d)tské ložnice i do odpoinkové místnosti.
3 První kroky
3.1 Jak používat tuto Uživatelskou píruku
Pro objasn)ní pokyn je v této uživatelské píruce používána
následující metoda:
Text ....... „Display“.
Text objevující se na displeji telefonu
Tlaítko, které musí být stisknuto
3.2 Instalace základny
Instalujte základnu podle následujících pokyn:
1 Pipojte síový adaptér k základn) a potom do síové zásuvky.
2 Pipojte jeden konec telefonního kabelu do telefonní zásuvky
ve zdi a druhý ke konektoru na zadní stran) základny.
3 Telefonní a síový kabel se musí pipojit, jak ukazuje
obrázek 3A.
250
První kroky
B
A
C
esky
– 3A základna –
A. Telefonní zásuvka ve zdi
B. Síový adaptér s kabelem
C. Telefonní kabel
3.3 Telefon
Opatrn
1
2
3
4
Riziko poran)ní zpsobené explozí!
Použijte pouze dodané dobíjecí baterie nebo
baterie podobného typu. Nepoužívejte b)žné
spotební baterie!
Jinak mžete bezdrátový telefon poškodit.
Otevete schránku baterií, tak jak ukazuje obrázek 3B.
Vložte dobíjecí baterie. Ujist)te se, že polarita je správná (+ a -).
Zavete prostor pro baterie.
Vložte telefon do nabíjeky a nabíjejte 16 hodin. LED kontrolka
nabíjení svítí.
B921
– 3B Zadní strana telefonu–
A.Kryt
B.Dobíjecí baterie
A
+
B
+
251
První kroky
3.4 Zobrazení stavu baterií
Telefon pestane fungovat, když se baterie vybijí. Když jsou baterie
zcela vybité a položíte telefon na krátkou dobu na základnu, indikátor
dobíjení baterií ukáže, že jsou nabité. Nicmén) baterie nejsou zcela
nabité a jejich životnost se rychle zkrátí. Musíte nechat telefon v
nabíjece po dobu 16 hodin pro úplné dobití baterií.
Nabité baterie
Vybité baterie
Telefon vydá b)hem hovoru varování, pokud jsou baterie tém) vybité.
Vložte telefon do jeho nabíjeky, aby se baterie dobily.
3.5 Tlaítka/Displej
Bezdrátový telefon
1. Opakovaná volba/nahoru
2. Telefonní seznam
3. Ztlumit/Smazat
4. Zav)sit
5. Alfanumerická tlaítka
6. Zámek klávesnice
7. Pauza
8. Zap./vyp. zvon)ní
9. Seznam hovoru/dol
10.Pijmout hovor/hlasitý
odposlech/tlaítko volání
11. INT/odejít
12.Menu/OK/pepojení
13.Displej
14.ervená LED kontrolka
bliká b)hem hovoru
14
13
1
12
11
10
2
R
OK
ESC/
INT
3
4
9
5
8
6
7
– 3C Pední ást telefonu –
252
První kroky
Základna
15.Èíselník
16.LED kontrolka nabíjení
sluchátka
17.LED kontrolka vyzvánìní
17
16
15
esky
– 3D Základna –
3.6 Displej telefonu
HANDSET X
x = íslo telefonu
Další ísla nebo pohyb
v menu doleva
Nalezení nebo vytvoení
záznamu v seznamu
Další ísla nebo pohyb
v menu doprava
Vypnuté vyzván)ní
Zapnutý režim hlasitého
odposlechu
Zapnutý zámek
klávesnice
Nová zpráva na záznamníku
Sestavený hovor
Ztlumený mikrofon
Nová ísla v seznamu
hovor
Anténa ukazuje sílu
pijímaného signálu. Anténa
bliká, když je telefon mimo
dosah.
Interní hovor
Zobrazení stavu baterií
253
První kroky
3.7 Navigace v menu
Sologic B921 má jednoduchý systém menu. Každé menu obsahuje
n)kolik možností.
Seznam menu telefonu a základny najdete níže.
1
OK
2
3
OK
4
ESC
Ke vstupu do hlavního menu stiskn)te tlaítko
Menu/OK.
V menu pejd)te na požadovanou možnost.
Stisknutím tlaítka Menu/OK zobrazíte další
možnosti nebo potvrdíte zobrazené nastavení.
Stiskn)te tlaítko Escape pro návrat do
pedchozí nabídky.
Telefon
TELEFONNÍ
SEZNAM
TELEFON
VYZVÁNCÍ TÓN
NÁZEV TELEFONU
PÍPNUTÍ KLÁVESNICE
VYBRAT
ZÁKLADNU
RESETOVAT
JAZYK
REGISTROVAT
TELEFON
ODREGISTROVAT TELEFON
3.8 Použití alfanumerické klávesnice
Alfanumerická tlaítka mžete použít k zadání textu. Stiskn)te
píslušné alfanumerické tlaítko pro výb)r písmena 5 . Napíklad ,
pokud stisknete numerické tlaítko 5, objeví se na displeji nejprve
písmeno „j“. K výb)ru ostatních písmen stiskn)te tlaítko vícekrát.
Chcete-li zadat písmeno „a“, stiskn)te jednou tlaítko „2“. Chcete-li
zadat písmena „a“ a „b“ za sebou, nejdíve jednou stiskn)te tlaítko
2 pro výb)r písmena „a“. Pokejte 2 sekundy na pesunutí kurzoru do
další polohy. Nyní stiskn)te dvakrát tlaítko 2 pro zadání „b“.
K vymazání nesprávn) zadaných písmen mžete použít tlaítko
mazání
3 . Písmeno ped kurzorem se smaže.
254
Obsluha telefonu
Tabulka písmen
1
2
3
4
5
6
7
8
9
0
Mezera+ -/1
ABC2
DEF3
GHI4
JKL5
MNO6
PQRS7
TUV8
WXYZ9
_0
esky
4 Obsluha telefonu
4.1 Zmna jazyka
OK
1
OK 2
OK 3
OK 4
5
ESC
Stiskn)te tlaítko Menu/OK.
Vyberte „HANDSET“ a potvrte.
Vyberte „LANGUAGE“ a potvrte.
Vyberte požadovaný jazyk a potvrte.
Stisknutím tlaítka Esc pejd)te zp)t do
pohotovostního režimu.
4.2 Odchozí hovory
Volání
1
4 5 6
G
H
I
J
K
L
M
N
O
2
3
Stiskn)te tlaítko volání.
Zadejte telefonní íslo.
Hovor ukonete op)tovným stisknutím
tlaítka zav)šení.
Píprava volání
1 Zadejte telefonní íslo.
4 5 6
Nesprávné íslo mžete opravit pomocí
tlaítka ztlumení. Jestliže po dobu 10 sekund nestisknete žádné
tlaítko, íslo zmizí a telefon se vrátí do
pohotovostního režimu.
G
H
I
J
K
L
M
N
O
255
Obsluha telefonu
Stiskn)te tlaítko volání.
Telefonní íslo se vytoí automaticky.
3 Hovor ukonete op)tovným stisknutím
tlaítka zav)šení.
2
Opakované vytoení posledního volaného ísla
1 Stiskn)te tlaítko volání.
2 Stiskn)te tlaítko opakování vytáení.
Poslední telefonní íslo se vytoí automaticky.
3 Hovor ukonete op)tovným stisknutím
tlaítka zav)šení.
Opakované vytoení posledních 3 volaných telefonních ísel
1 Stiskn)te tlaítko opakování vytáení.
Poslední volané íslo se objeví na displeji.
Jestliže chcete znovu vytoit jedno ze 3 naposledy
volaných ísel, stiskn)te tlaítko opakovaného
vytáení tolikrát, až se objeví íslo, které potebujete.
2 Stiskn)te tlaítko volání.
Telefonní íslo se vytoí automaticky.
3 Hovor ukonete op)tovným stisknutím
tlaítka zav)šení.
4.3 Píchozí hovory
Pi píchozím hovoru vyzvání telefon a základna a LED „vizuálního
signálu volání“(viz bod 14 v obrázku 3C a bod 17 v obrázku 3D) na
telefonu a základn) blikají.
1
2
Hovor pijm)te stisknutím pijímacího
tlaítka hovoru.
Hovor ukonete op)tovným stisknutím
tlaítka zav)šení.
4.4 Aktivace/deaktivace režimu hlasitého odposlechu
Tuto funkci mžete použít pro pijetí hovoru bez nutnosti držení
telefonu nebo jestliže už máte hovor v telefonu.
B)hem hovoru:
256
Obsluha telefonu
1
2
Dležité
Funkci aktivujte stisknutím tlaítka
hlasitého odposlechu.
Stiskn)te znovu tlaítko hlasitého odposlechu
a pepojte hovor zp)t do telefonu.
Pi delším používání hlasitého odposlechu se
baterie rychleji vybijí!
B)hem hovoru mžete ztlumit mikrofon, takže mžete hovoit, aniž by
vás osoba na druhém konci linky slyšela.
1 Stiskn)te tlaítko ztlumení.
Mikrofon se ztlumí a zobrazí se nápis „MUTED“.
2 Mikrofon mžete znovu aktivovat op)tovným
stisknutím tlaítka ztlumení.
4.6 Nastavení hlasitosti telefonu/handsfree
B)hem hovoru:
Stiskn)te tlaítko Dol.
2 Stiskn)te tlaítko Dol.
Mžete nastavit hlasitost v úrovních 1 až 5.
1
4.7 Tlaítko R (Flash)
OK
Stiskn)te tlaítko Flash na základn) (tlaítko 12 na
obrázku 3C„Bezdrátový telefon“na stran) 252) pro
použití speciálních služeb na vaší externí lince, jako
je "ekající hovor“ (za pedpokladu, že váš
poskytovatel telefonních služeb tuto službu nabízí)
nebo pedání hovoru pi použití PBX. Tlaítko flash
R krátce peruší váš hovor. Mžete nastavit tento as
perušení na 100 ms nebo 300 ms. Pro nastavení
jiného asu flashe, viz „5.4 Tlaítko R (Flash)“.
4.8 Nastavení vyzváncího tónu a nastavení hlasitosti
Vyzváncí tón telefonu pro interní/externí hovory
1 Stiskn)te tlaítko Menu/OK.
OK
257
esky
4.5 Ztlumení
Obsluha telefonu
OK 2 Vyberte „HANDSET“ a potvrte.
OK 3 Vyberte „RING TONE“ a potvrte.
4
OK
OK 5
Vyberte „INTERNAL“ nebo „EXTERNAL“
a potvrte.
Vyberte melodii vyzván)ní (1 až 19) a potvrte.
Hlasitost vyzváncího tónu telefonu.
1 Stiskn)te tlaítko Menu/OK.
OK
OK 2 Vyberte „HANDSET“ a potvrte.
OK 3 Vyberte „RING TONE“ a potvrte.
OK 4 Vyberte „VOLUME“ a potvrte.
5 Vyberte požadovanou hlasitost (vypnuto, 1 – 5)
a potvrte.
OK
Dležité
Mžete zapnout nebo vypnout (ON nebo OFF)
hlasitost vyzván)cího tónu jednotlivého telefonu
jednoduchým pidržením tlaítka vyzván)cího tónu
ON/OFF
v pohotovostním režimu.
Na displeji se objeví symbol a zámek tlaítek
je aktivován.
4.9 Zámek klávesnice
Když je zámek klávesnice aktivní, stisknutí jakéhokoliv tlaítka v
pohotovostním režimu nebude mít žádný efekt (s výjimkou tlaítka
zámku klávesnice).
1 Stiskn)te a pidržte tlaítko zámku klávesnice.
Na displeji se zobrazí symbol
.
2 Zámek klávesnice zrušte op)tovným pidržením
tlaítka zámku klávesnice.
Když je zámek tlaítek aktivní, mžete pesto pijímat
píchozí hovory, a to stisknutím tlaítka hovoru .
B)hem hovoru je možné normáln) využívat funkce
klávesnice. Zámek tlaítek se op)t aktivuje po
ukonení hovoru.
258
Obsluha telefonu
4.10 Název telefonu
Mžete zm)nit jméno, které se objeví na displeji (max. 12 písmen),
pokud zrovna neprobíhá žádný hovor.
1 Stiskn)te tlaítko Menu/OK.
OK
OK 2 Vyberte „HANDSET“ a potvrte.
OK 3 Vyberte „HANDSET NAME“ a potvrte.
4 5 6 4 Smažte pedchozí jméno pi použití klávesy
ztlumení a pro zadání nového.
5 Stisknutím tlaítka potvrte.
OK
6 Stisknutím tlaítka Esc pejd)te zp)t do
ESC
pohotovostního režimu.
G
H
I
J
K
L
M
N
O
1
OK
OK 2
OK 3
4
OK
5
ESC
6
esky
4.11 Aktivace/deaktivace pípnutí klávesnice
Stiskn)te tlaítko Menu/OK.
Vyberte „HANDSET“ a potvrte.
Vyberte „KEYPAD BEEP“ a potvrte.
Nyní vyberte „ON“ nebo „OFF“ .
Stisknutím tlaítka potvrte.
Stisknutím tlaítka Esc pejd)te zp)t do
pohotovostního režimu.
4.12 Telefonní seznam
Do telefonního seznamu mžete uložit 50 záznam. Jména mohou
obsahovat až 16 znak a telefonní ísla až 24 íslic.
Pidání záznamu do telefonního seznamu
1 Stiskn)te tlaítko telefonního seznamu.
OK 2 Stiskn)te dvakrát tlaítko OK.
OK
4 5 6 OK 3 Zadejte jméno a potvrte.
4 5 6 OK 4 Zadejte požadované telefonní íslo a potvrte.
Nyní zazní potvrzující tón.
G
H
I
J
K
L
M
N
O
G
H
I
J
K
L
M
N
O
Vytáení ísla zrychleného volání
1 Stiskn)te tlaítko telefonního seznamu.
2 Vyberte požadované jméno, nebo zadejte
poátení písmena jména.
4 5 6
G
H
I
J
K
L
M
N
O
259
Obsluha telefonu
K zobrazení telefonního ísla stiskn)te tlaítko
telefonního seznamu.
4 Nyní stiskn)te tlaítko hovoru.
Telefonní íslo se vytoí automaticky.
5 Hovor ukonete op)tovným stisknutím
tlaítka zav)šení.
3
Editování záznamu telefonního seznamu
1 Stiskn)te tlaítko telefonního seznamu.
2 Vyberte požadované jméno, nebo zadejte
poátení písmena jména.
4 5 6
3 K zobrazení telefonního ísla stiskn)te tlaítko
telefonního seznamu.
4 Stiskn)te tlaítko Menu/OK.
OK
OK 5 Vyberte „EDIT ENTRY“ a potvrte.
4 5 6 OK 6 Zadejte jméno a potvrte.
4 5 6 OK 7 Zadejte nebo editujte telefonní íslo a potvrte.
G
H
I
G
H
I
J
K
L
M
N
O
G
H
I
J
K
L
M
N
O
J
K
L
M
N
O
Smazání jednoho nebo všech záznam v
telefonním seznamu.
1 Stiskn)te tlaítko telefonního seznamu.
2 Vyberte požadované jméno, nebo zadejte
poátení písmena jména.
4 5 6
3 K zobrazení telefonního ísla stiskn)te tlaítko
telefonního seznamu.
4 Stiskn)te tlaítko Menu/OK.
OK
5 Stiskn)te „DELETE ENTRY“ pro smazání
aktuálního telefonního ísla a potvrte.
OK
NEBO
6 Vyberte „DELETE ALL“ pro smazání všech
záznam telefonního seznamu a potvrte.
OK
ESC 7 Znovu potvrte nebo stiskn)te tlaítko Esc
OK
pro opušt)ní.
G
H
I
J
K
L
M
N
O
4.13 ID volajícího ( CLIP)
Sologic B921 zobrazuje telefonní ísla píchozích hovor. Tato funkce
mže být použita jen v pípad), že ji máte registrovanou u svého
260
Obsluha telefonu
poskytovatele telefonních služeb. Další informace získáte u svého
telefonního operátora.
Když pijmete hovor, telefonní íslo se uloží do seznamu hovor. Tento
seznam má kapacitu 30 ísel (každé z nich mže mít až 23 íslic).
Jestliže se telefonní íslo skládá z více než 12 íslic,
mžete pejet (rolovat) na pravou stranu displeje,
aby se zobrazily i ostatní íslice.
Nové hovory
Jestliže je do seznamu pijato nové íslo, bliká na
displeji symbol CLIP.
Otevení seznamu hovor
Stiskn)te tlaítko seznamu hovor.
Zobrazí se poslední pijatý hovor. Jestliže je seznam
prázdný, na displeji se objeví slovo„EMPTY“.
2 Chcete-li íslo peskoit, stiskn)te tlaítko
telefonního seznamu.
3 Datum a as peskoíte stisknutím tlaítka
telefonního seznamu.
4 K procházení seznamu stiskn)te tlaítka nahoru
a dol.
5 Seznam hovor opustíte stisknutím tlaítka Esc.
ESC
Volání ísla ze seznamu hovor
1 Stiskn)te tlaítko seznamu hovor.
2 Listujte seznamem hovor, až se objeví
telefonní íslo, které potebujete.
3 Hovor zahájíte stisknutím tlaítka hovoru.
Telefonní íslo se vytoí automaticky.
4 Hovor ukonete op)tovným stisknutím
tlaítka zav)šení.
Vymazání ísla ze seznamu volajících
1 Stiskn)te tlaítko seznamu hovor.
2 Listujte seznamem hovor, až se objeví telefonní
íslo, které potebujete.
261
esky
1
Obsluha telefonu
3
OK
4
OK
5
OK
ESC 6
OK
Stiskn)te tlaítko Menu/OK.
Stiskn)te „DELETE“ pro smazání aktuálního
telefonního ísla a potvrte.
NEBO
Vyberte „DELETE ALL“ pro smazání všech
záznam telefonního seznamu a potvrte.
Stiskn)te pro potvrzení nebo Esc pro návrat.
Uložení ísla v seznamu volání jako zkrácená íselná volba
1 Stiskn)te tlaítko seznamu hovor.
2 Listujte seznamem hovor, až se objeví telefonní
íslo, které potebujete.
3 Stiskn)te tlaítko Menu/OK.
OK
OK 4 Vyberte „SAVE TO PB“ a potvrte.
4 5 6 OK 5 Editujte nebo pidejte jméno a poté potvrte.
4 5 6 OK 6 Zadejte telefonní íslo a potvrte.
G
H
I
J
K
L
M
N
O
G
H
I
J
K
L
M
N
O
4.14 Resetujte telefonní seznam na výchozí nastavení.
Takto vymažete všechny zm)ny a nastavíte výchozí (hlasitost
vyzván)cího tónu, vyzván)cí tón, atd.). Seznam volání, seznam
op)tovného vyzván)ní a telefonní seznam budou také smazány!
1 Stiskn)te tlaítko Menu/OK.
OK
OK 2 Vyberte „HANDSET“ a potvrte.
OK OK 3 Vyberte „RESET“ a potvrte.
4 Vložte íslo PIN základny (standardn) je 4 5 6
nastaveno 0000).
5 Zaízení se pepne do pohotovostního režimu.
G
H
I
J
K
L
M
N
O
Výchozí nastavení telefonu:
Název telefonu
HANDSET (TELEFON)
Hlasitost telefonu
Úrove( 3
Hlasitost vyzván)cího tónu Úrove( 3
Externí vyzván)cí tón
Vyzván)cí tón 8
Interní vyzván)cí tón
Vyzván)cí tón 1
Pípnutí klávesnice
Zapnuto
262
Nastavení základny
4.15 Displej hlasové schránky
Tento displej funguje pouze tehdy, pokud máte na telefonu schránku
nebo zprávy a váš poskytovatel tel.služeb pedává tyto informace
spolen) s ID volajícího! Jakmile obdržíte novou zprávu do schrány,
na displeji se objeví symbol
. Symbol
zmizí, jakmile si zprávu
poslechnete.
5 Nastavení základny
Informace V této sekci je popsáno pouze nastavení uložené v
základnì!
5.1 Nastavení vyzvánìcího tónu a nastavení hlasitosti
esky
Hlasitost zvonìní sluchátka pro interní/externí hovory
1 Stiskn)te tlaítko Menu/OK.
OK
OK 2 Vyberte „BASE“ a potvrte.
OK 3 Vyberte „RING TONE“ a potvrte..
OK 4 Vyberte melodii vyzván)ní (1 až 9) a potvrte.
Hlasitost vyzvánìcího tónu základny
1 Stiskn)te tlaítko Menu/OK.
OK
OK 2 Vyberte „BASE“ a potvrte.
OK 3 Vyberte „RING VOLUME?“ a potvrte.
4 Vyberte požadovanou hlasitost (vypnuto, 1 – 5)
a potvrte.
OK
5.2 Nastavení režimu vytáení
Existují dva režimy vyzván)ní pro telefonní spojení:
– DTMF/tónové vytáení (nejb)žn)jší)
– Pulzní režim vytáení (pouze nezbytný v pípad), kdy toto zaízení
funguje na starším PBX!)
OK
1
OK 2
OK 3
OK 4
Stiskn)te tlaítko Menu/OK.
Vyberte „BASE“ a potvrte.
Vyberte možnost „DIAL MODE“ a potvrte ji.
Vyberte „TONE“ nebo „PULSE“ a potvrte.
263
Pihlášení a odhlášení telefonu
5.3 Nastavení systémového kódu PIN
N)které funkce jsou k dispozici pouze tehdy, pokud znáte PIN kód
základny.
Kód PIN je 4 písmena dlouhý. Výchozí PIN kód je "0000". Postupujte
následovn) pro zm)nu PIN kódu a pro nastavení vašeho vlastního
PIN:
OK
1
OK 2
OK 3
4 5 6
OK 4
4 5 6
OK 5
G
H
I
G
H
I
J
K
L
J
K
L
M
N
O
M
N
O
Stiskn)te tlaítko Menu/OK.
Vyberte „BASE“ a potvrte.
Vyberte „SYSTEM PIN“ a potvrte.
Zadejte „OLD PIN“ a stiskn)te OK.
Zadejte „NEW PIN“ a potvrte.
5.4 Tlaítko R (Flash)
Stiskn)te tlaítko Flash pro použití speciálních služeb na vaší externí
lince, jako je "ekající hovor“ (za pedpokladu, že váš poskytovatel
telefonních služeb tuto službu nabízí) nebo pedání hovoru pi použití
PBX. Tlaítko flash R krátce peruší váš hovor. Mžete toto perušení
nastavit na 100 ms nebo na 300 ms. Nicmén), pokud váš systém
požaduje delší as flashe, mžete to zm)nit.
1 Stiskn)te tlaítko Menu/OK.
OK
OK 2 Vyberte „BASE“ a potvrte.
OK 3 Vyberte „RECALL“ a potvrte.
OK 4 Nyní vyberte „LONG“ nebo „SHORT“ a potvrte.
6 Pihlášení a odhlášení telefonu
6.1 Pihlášení telefonu na základnu Sologic B921
K jedné základn) mže být pihlášeno až 4 sluchátek. Každý telefon je
pihlášen k základn) pi dodání.
Telefon musíte pihlásit pouze v následujících pípadech:
• telefon byl ze základny odhlášen (nap. pro op)tovné nastavení)
• budete chtít pihlásit k základn) jiný telefon.
Následující popis se vztahuje pouze na telefony základny Sologic B921.
1
OK
264
2
Pidržte tlaítko vyhledávání na základn) po dobu
10 sekund.
Stiskn)te tlaítko Menu/OK.
Pihlášení a odhlášení telefonu
Vyberte možnost „REGISTER“ a potvrte.
4 Vložte íslo základny (1 – 4), ke které chcete telefon
pihlásit.
5 Zaízení zane vyhledávat základnu. Když ji
nalezne, budete požádáni o vložení tymístného
ísla PIN:
6 Vložte íslo PIN základny (standardn) je nastaveno 0000). Jestliže je íslo PIN nesprávné,
telefon zane znovu vyhledávat základnu.
Jakmile je telefon pihlášen, na displeji se objeví jeho
íslo a jméno.
3
4 5 6
G
H
I
J
K
L
M
N
O
4 5 6
G
H
I
J
K
L
M
N
O
OK
4 5 6
G
H
I
J
K
L
M
N
O
4 5 6
G
H
I
J
K
L
M
N
O
Stiskn)te tlaítko Menu/OK.
OK 2 Vyberte „DE-REGISTER“ a potvrte.
3 Vložte íslo PIN základny (standardn) je nastaveno 0000).
OK
4 Zadejte interní íslo telefonu, který chcete odhlásit (1 – 4) a potvrte.
OK
Když byl telefon úsp)šn) odebrán, pejde do
pohotovostního režimu. Jinak budete požádáni
o op)tovné zadání ísla telefonu.
Dležité
1
Telefony je možné odhlásit pouze tehdy,
pokud nejsou používány.
6.3 Výbr základny
Pokud je váš telefon pihlášen k více než jedné základn) (max. 4),
musíte vybrat jednu z t)chto základen, jelikož telefon komunikuje
pouze s jednou základnou. Existují dv) možnosti výb)ru:
Auto Select (automatický výbr)
Pokud nastavíte telefon na „Auto Select“, telefon automaticky
vyhledá nejbližší základnu v pohotovostním režimu.
1 Stiskn)te tlaítko Menu/OK.
OK
OK 2 Vyberte „HANDSET“ a potvrte.
OK 3 Vyberte možnost „SELECT BASE“ a potvrte ji.
OK 4 Vyberte „AUTOMATIC“ a potvrte.
265
esky
6.2 Odhlášení telefonu na základnu Sologic B921.
Pedávání hovoru a interní hovory z jednoho telefonu do druhého
Informace Pokud umožníte základn) automatický výb)r a
telefon pejde mimo dosah aktuální základny,
telefon vyhledá pouze nejsiln)jší základnu v
pohotovostním režimu (nikoliv b)hem hovoru).
Manuální výbr
Pokud nastavíte telefon na „Manual Select“ (manuální výb)r),
telefon vyhledá pouze tu základnu, kterou jste nastavili.
1 Stiskn)te tlaítko Menu/OK.
OK
OK 2 Vyberte „HANDSET“ a potvrte.
OK 3 Vyberte možnost „SELECT BASE“ a potvrte ji.
OK 4 Vyberte „MANUAL“ a potvrte.
OK 5 Vyberte základnu a potvrte ji.
Dležité
Aby základna a telefon mohly komunikovat,
telefon musí být pihlášen k základn).
7 Pedávání hovoru a interní hovory z jednoho
telefonu do druhého
7.1 Pedávání hovoru a konferenní hovory bhem
hovoru zvenku
4 5 6
G
H
I
INT
INT
266
B)hem hovoru zvenku stiskn)te tlaítko INT a
následn) íslo telefonu (1-4).
Jiný telefon zane zvonit.
Jestliže byl hovor sestaven s jiným telefonem,
mžete volat ve vnitním okruhu. Když zav)síte,
bude hovor zvenku pedán jinému telefonu.
2 Pidržte tlaítko INT po dobu 3 sekund. Nyní
mžete mluvit s úastníkem u druhého telefonu
a souasn) pijímat i hovor zvenku
(konferenní hovor).
3 Zp)t na hovor zvenku pepnete op)tovným
stisknutím tlaítka INT.
4 Hovor ukonete op)tovným stisknutím
tlaítka zav)šení.
1
INT
J
K
L
M
N
O
Zkratky a technické údaje
CLIP
„Calling Line Identification Presentation“ (pedstavení identifikace
volané linky) – zobrazí íslo telefonu volajícího na displeji volaného.
DECT
Digital Enhanced Cordless Telecommunication – Mezinárodní digitální
standard pro bezdrátovou komunikaci; evropský telekomunikaní
standard pro digitální bezdrátové telefony.
ECO režim
Ekonomický režim; ve standardu DECT se jím rozumí provoz pi
nízké radiaci.
Tlaítko Flash
Poskytne krátké perušení linky a používá se pro pepínání nebo pro
pedání hovoru. Na PBX je flash nebo R tlaítko použito pro
interní vyvolání.
GAP
Generic Access Profile – generický profil pístupu; rozhraní mezi
základnou a bezdrátovým spojením.
INT
Interní uživatel. Jiný telefon i extenze v rámci PBX
Pulzní režim
Starší analogový vyzván)cí režim (charakterizovaný „klapavým“
vyzván)cím zvukem).
LCD
Liquid Crystal Display – displej z tekutých krystal
LED – SVTELNÝ INDIKÁTOR
Sv)telná dioda
DTMF
Dual Tone Multiple Frequency – duální tónová volba; moderní digitální
vyzván)cí režim.
PIN
Personal Identification Number – osobní identifikaní íslo.
R klávesa
Tlaítko vyvolání (viz tlaítko Flash).
Pohotovostní režim
Status „neinný“ pro zaízení, aniž by bylo zcela vypnuto.
267
esky
8 Zkratky a technické údaje
Odstra(ování problém
Dvoje
Oznaení zaízení, které má dv) identická zaízení, nap. dva telefony.
9 Odstraování problém
Problém
Možná píina
ešení
Na displeji se nic
nezobrazuje.
Baterie nejsou dobité.
Žádný zvuk.
Telefonní kabel není
správn) pipojen.
Linka je aktivována
jiným telefonem.
Zkontrolujte, jestli byly
ob) dobíjecí baterie
správn) vloženy.
Dobíjení baterií
Zkontrolujte pipojení
manžety.
Pokejte, až dojde k
zav)šení druhého
telefonu.
Hlasitost upravte
b)hem hovoru
tlaítkem hlasitosti.
Nastavte hlasitost
vyzván)cího tónu.
Volající je píliš
potichu.
Vyzván)cí tón
telefonu je píliš
tichý.
Nelze vytoit íslo.
Viz „5.2 Nastavení
režimu vytáení“
nastavení správného
režimu vytáení.
Symbol
bliká.
Telefon je mimo dosah. Pesu(te telefon do
rozsahu základny.
Základna je bez
Zkontrolujte síový
napájení.
adaptér a kabel.
Telefon není v základn) Registrujte telefon v
pihlášen.
základn).
Základna nebo
Hlasitost vyzván)cího Nastavte hlasitost
telefon nevyzván)jí. tónu je vypnutá nebo vyzván)cího tónu.
píliš slabá.
268
Režim vytáení není
správn) nastaven.
Servis
Problém
Možná píina
Hovor nelze pedat
na jinou linku.
Doba pepojení (Flash) Nastavte pístroj na
je píliš krátká.
delší asový úsek
Flash.
Provozní chyba.
Vyjm)te baterie a
vložte je znovu.
Když jsou tlaítka
stisknuta, telefon
nereaguje.
ešení
Pístroj neupravujte nebo neopravujte. Pístroj nebo kabel mohou být
opravovány jen odborníkem v servisním stedisku. Opravy, které
nebudou provedeny ádn), mohou uživatele vystavit vážným rizikm.
10.1 Údržba
Zaízení nevyžaduje žádnou údržbu. Obas zkontroluje stav baterií
a vym)(te je za nové baterie stejného typu, pokud je výkon
nedostatený i pokud zaínají téct.
Upozornní Hrozí nebezpeí poleptání chemikáliemi!
Pi vyjímání baterií noste ochranné rukavice.
pokud zaízení pijde do kontaktu s tekutinou, vyjm)te okamžit) baterie
a odpojte zaízení z napájení (základna) a peliv) je osušte. Po 2 – 3
dnech provoz zkontrolujte. Pokud je vadné, odešlete jej do servisu.
10.2 ištní
Upozornní Je zde riziko elektrického šoku i zkratu v pípad)
kontaktu se souástkami, které jsou vodivé.
Zabra(te vniknutí tekutin do pístroje. Pokud toto
nastane, odpojte síový adaptér ze zástrky a
konektor telefonního kabelu ze zásuvky a poté
baterie vyjm)te.
Stejným zpsobem postupujte, pokud je zaízení,
kabel nebo síový adaptér poškozen: vyhn)te se
pímému kontaktu s tekutinami a odpojte okamžit)
zaízení ze sít) 230 V.
269
esky
10 Servis
Technické údaje
Vyist)te telefon navlheným hadíkem, namoeným ve vlažné vod),
nebo antistatickým hadíkem. Nikdy nepoužívejte isticí prostedky
nebo abrazivní prostedky.
10.3 Vyazení z provozu, ukládání
Pro doasné vyazené pístroje z provozu je teba odpojit telefonní
kabel z nást)nné zásuvky a z portu na základn). Odpojte základnu
a adaptér telefonu ze zásuvky na 230 V.
Vyjm)te z telefonu baterie. Pokud je telefon vyazen z provozu na delší
dobu, vym)(te dobíjecí baterie za nové stejného typu, jakmile je
telefon znovu uveden do provozu.
Ukládejte zaízení a dobíjecí baterie na suchém míst), které není
píliš horké.
10.4 Likvidace (ochrana životního prostedí)
Pístroj a dobíjecí baterie nesmí být na konci svého
provozního života likvidovány v rámci b)žného domácího
odpadu. To je uvedeno tímto symbolem na výrobku a/nebo
na obalu. Odvezte zaízení do sb)rného stediska, které
pijímá elektrické a elektronické pístroje pro recyklaci.
N)které souásti zaízení zde mohou být recyklována.
Recyklováním n)kterých ástí nebo surovin z použitých
výrobk pomžete životnímu prostedí.
Obalový materiál likvidujte zodpov)dným zpsobem pro životní
prostedí. Pro další informace ohledn) sb)rných stedisek ve vaší
oblasti kontaktujte místní úady.
11 Technické údaje
Standard
Frekvenní rozsah
Emise
Rozsah
Baterie telefonu:
Napájení základny
270
DECT(Digital Enhanced Cordless
Telecommunications)
GAP (Generic Access Profile)
1 880 MHz až 1 900 MHz
10 mW (prm)rný výkon na jeden kanál)
Až 300 m v oteveném prostranství – až 50 m v budovách
2 x 1,2 V, dobíjecí baterie typu NiMH,
kapacita 500 mAh, velikost AAA
Vstup: 100~240 V AC/50-60 Hz
Výstup: 6 V DC/500 mA
Topcom Záruka Sologic B921
Maximální doba v
pohotovostním režimu:
Doba hovoru telefonu
Doba dobíjení:
Dovolené provozní teploty
Dovolená relativní vlhkost
Režim vytáení
Doba funkce Flash
Pam)ísel v telefonu
100 hodin v pohotovostním režimu
esky
10 hodin
16 hodin
+5 °C až 45 °C
25 až 85 %
Pulzní volba a tónová volba (DTMF)
100 nebo 300 ms
50 vstup v telefonním seznamu – až 24 ísel a 16 písmen
Rozm)ry Základna/
117 mm x 117 mm x 60 mm/
Telefon
182 mm x 284 mm x 58 mm
Váha Základna/
239 g se síovým adaptérem/
Telefon
152 g s bateriemi
Maximální spoteba energie Základna: 2,0 W
12 Topcom Záruka Sologic B921
12.1 Záruní doba
Na pístroje Topcom je poskytována dvouletá záruní doba. Záruní
doba zaíná dnem zakoupení nového pístroje. Na standardní ani
dobíjecí baterie (typ AA/AAA) se žádná záruka nevztahuje.
Záruka se nevztahuje na spotební materiál nebo závady, které mají
na provoz i hodnotu zaízení zanedbatelný vliv.
Nárok na uplatn)ní záruky vzniká pedložením originálu nebo kopie
dokladu o koupi, na kterém musí být uvedeno datum nákupu a
model pístroje.
12.2 Uplatnní záruky
Vadný pístroj je nutné vrátit do autorizovaného servisního stediska
spolenosti Topcom spolen) s platným dokladem o koupi a
vypln)nou servisní kartikou.
Projeví-li se u pístroje závada b)hem záruní doby, opraví spolenost
Topcom nebo její autorizované servisní stedisko bezplatn) jakékoli
vady materiálu nebo zpracování. V pípad) vým)ny se mohou barva
a model vym)n)ného pístroje lišit od barvy a modelu pvodn)
zakoupeného pístroje.
271
Topcom Záruka Sologic B921
Zaátek záruní doby je uren poátením datem nákupu. V pípad),
že spolenost Topcom nebo n)které z jejích servisních stedisek
pístroj vym)ní nebo opraví, záruní doba se neprodlužuje.
12.3 Výjimky ze záruky
Záruka se nevztahuje na poškození nebo vady zpsobené
nesprávným zacházením s pístrojem nebo jeho nesprávným
používáním ani na škody vzniklé z dvodu použití neoriginálních
souástí nebo píslušenství.
Záruka se nevztahuje na žádné škody zpsobené vn)jšími vlivy, nap.
bleskem, vodou i požárem, ani na škody vzniklé b)hem pepravy.
Záruku nelze uplatnit, pokud bylo sériové íslo na pístroji zm)n)no,
odstran)no nebo je neitelné.
Pokud byl pístroj opravován, zm)n)n i upraven uživatelem,
pozbývá záruka platnosti
Zaízení je ureno pouze pro použití s dobíjecími bateriemi. Pokud
chcete vym)nit pvodní baterie, zkontrolujte, zda máte vhodné a
dobíjecí baterie. V telefonech se NIKDY nesmí používat
alkalické baterie.
Kdybyste použili alkalické baterie a položili telefon do základny, baterie
by se zahály a mohly by vybouchnout. Za jakékoli pípadné poškození
nelze vyžadovat náhradu od výrobce a poškození zaízení tudíž není
kryto záruními podmínkami. Veškeré opravy vám budou útovány.
272
&$ 1 * $ 1 &, % & &
. #$ & &$
/ , &%/ & +% + &
.
& &
.
$ & /
, 1 &
.
* 0 $ &&
&/ +$ &/ (Digital Enhanced
Cordless Telecommunications, DECT). DECT
$ &$, &%/ &
& . &
1
$, $ &
&
%/ + & &
&/ 1
$ PBX: &% % + $ $ &
4 &
& & &% &
& % $ & 4 % +. &$ & % + &
&
& &
&/.
&
+ / &
& SMS % , ' $
% . 2 $,
% /
1 % &
.
>*+<% /
&, % $ / & . & , & % . 2 %, % & 324 %
1 % &
.
1.2 #&*+< +=*+<+
* $ % & &.
273
1.1 #$%: Sologic B921
&$ &/, +$ & & & & ,
& $ &&$ &/ (
$, $ & &
$) &
&/ & &/ .
1.3 >&@*+< [ + \*]+
>\*]
&$
>&@*+<^
`+
[
# # &
&
+/ &/ ++/
& %
, $.
#
_^
# &
&
&/ ++/,
$.
#
_^
&/ +&/ 1/.
>*+<%
$ &$ & .
#+, &$ &&$
+
$.
&*]&^
1.4 @^ _^
&
1 &/
& $ % & & &
.
#% /
$
& , % + .
% % & $.
*
$ % %$ &
$. $ &
% & % .
1.5 #_%* &
&+
+
+% &
& $ 1. 2 & $ &,
%
% $ .
274
/
&
, % $ &
&
.
1 % +
1 *& % +
1 *& &/ % +
1 &
&, . 2 1 /
($%
AAA, 1,2 V / 500 mAh, NiMH) & $ &
/
1 2 #
/!
+ &
& .
>*+<% & &
&
+!
&&/ &
/, $ + ' & / .
&& & / & $ & % &
.
2&% &
.
%$ & &
&
/ & , 1.
++1 &
, .
{& +% < <% \*+:
#
& &/ ++/ &
& %
&& !
&
, + $ &
1 230 V.
• &
, ,
&/ &
$
1. #$ $ &
& , $
% 1.
• & &
&
. $ + &
& & .
275
2 >*=
+
++
/ • $ & &
. 2 + & $, + & 1 & & &/ 1 /
.
• 2, + & 1 & & &/ 1 /
, ++/ & & &%
&
.
• 1 & &$& + & &.
• & &
&
.
&
&/ $ &
1 & &$ $+. *
&
$ %
& &%$
& &
.
• * &
1 &&/ &
/. #$ $ +& & &&$ &
$,
.
• 1
&
$ $ .
#
_^ 2 1 &
. &
, + $ &
1
230 V.
• &
/
(.. ) $ &.
• &
$ $ 1 & &
& 1 / &
/.
/, +1 &
1 &.
• % &
&
,
$ + 1. # + & $ &/.
• 2$ && &/ 1, $ &
$ & &
, $ & / &
& & & /.
276
/ {& &+:
#
& &/ ++/ &
& %
&!
&%$ &
+& %
&, &
, + $
1 230 V.
% & &
&$ ++ & &
.
/, &%$
&
+& $ %&:
– & &+ & &
$
%
– & &
{& [:
& &/ ++/
$&!
3 , !
• #$ (1 ) .
• 1 &
+
&
$&!
{& <+
:
#
& &/ ++/
!
3 , !
•
(1 ) & .
{& %
+
&[+:
#
& &/ ++/
!
3 , !
•
+ &
& .
• 2 &/ $&, + &
(&
).
277
#
/ |]:
#
#% &
& &/
++/ ++ &
!
3 , & !
• &/ &&/ &
/ && &+ &
.
/, ++% & &
&
& &$ &&$ &
$. * & $ &$ &
$, .. && +.
• * &
& &$ $ &
++ &
& +&, ' & $ &
$.
#@+^ }*:
#
_^ 2 1 &
! 3+
$ .
• .
& &&
/,
% &$
1 1 .
• 1 % %% $ +& & &
, .
• 1 .
2 &, 1 . +% % % &
( &$ &
/ &
). #$ &$
!
>*+<% & , % & % +.
278
#/ +
2.1 >*=
_< * < <&+ _+*^
*^ +<]+
$ (
+ DECT)
& &+ ( ECO).
& &, &
& / & &+, % +. 2 &, &
& / & &+ .
&& &+ &$ &
$ DECT 1 .
%, &+ $ $&% &+.
+ / & &
&+! *% % + $ , .. . % & .
3 #=<+ ]^*+<+
3.1 ~% _^
+&<\ <& \ _^
& /, 1 $%:
....... “@%”.
1 % /
#& $ 3.2 +<
<+
<& <+@*\ ]
2& % + :
1 #/ $ & % + & + 1.
2
$ $ + & &
1
/
& +& $ % +.
3 * &/ /
& % $ %
&1 3A.
279
#/ +
B
A
C
- 3A A. B. C. ! 3.3
\*+< +&
<%
#
_^
& &/ ++/
$&!
1 . &$ !
3&, $ &% 1 &
&.
1
2
3
4
280
$ &
/, 3B.
*% 1 .
+% & (+ & -) .
*% &
/
%$ .
*% &
& & 16 /. && LED % $
#/ +
B921
- 3B " # A.!
B.$%
%
A
+
B
+
* &
& % , $
&. 2 & &
% &
& % + &
& , $ & % $. , & / % % . #$ &
& 16 /, .
$ 2& 2 &
& & &
&, &
& % $
& . *, % &
& .
281
3.4 `[ +<
<+
*+<++
#/ +
3.5 #^<+ / @%
\*+< +&
<%
14
1.
2.
3.
4.
5.
6.
7.
8.
13
2& / 2
/ %& &
&
#
#& 2/
&
9. & / &
10. & /
& /
&
11. INT / &
12. / OK / flash
13.%
14.&& && LED, ++ & & &
1
12
11
10
2
R
OK
ESC/
INT
3
4
9
5
8
6
7
- 3C # -
><+@*% ]
15.#& 1
16. LED &
&
17. LED &
17
16
15
- 3D 282
#/ +
3.6 @% +
\*+<& +&
<\
x = % &
&
% & $ 2 &
&
&
$
% &
$ &
&
& $
4$ & # &
&/
4$ % &
* & & $ +
. * & &
++, &
& & +$.
2& &
3.7 #^
*
+ < *\
* Sologic B921 %$ $ . % / /.
#& &
% & &
& & % +.
1 & , OK
& /OK.
2 + %$.
3 $ OK
++/ % 1 %, & /OK.
283
HANDSET X
#/ +
4
ESC
# & & $
.
\*+< +&
<%
PHONE BOOK
HANDSET
RING TONE
HANDSET
NAME
KEYPAD BEEP
SELECT BASE
RESET
LANGUAGE
REGISTER
HANDSET
DE-REGISTER
HANDSET
3.8 ^
< ++@*<= ^<
%& &, &. # & %& & $ $ 5 . , %& & 5, % % / "j'. $ & &
,
& $ 1.
# & 2 $ "a".
2 %$ & "a" & "b", /
& 2 $ "a".
$, $ 2 $ $
&% %$. , & 2 $ $ "b". & 3 & & %. &% &
,
+& $.
#++ _++<^
1
2
3
284
3+ - / 1
ABC2
DEF3
/
#++ _++<^
4
5
6
7
8
9
0
GHI4
JKL5
MNO6
PQRS7
TUV8
WXYZ9
_0
4 *% <& <=&
1
OK
OK 2
3
OK
4
OK
5
ESC
# & / OK.
2$ "HANDSET" & & ++/.
2$ "LANGUAGE" &
& ++/.
2$ / %$ &
& ++/.
$ & ,
& &.
4.2 [_%* ^
#+*+<
^
1 # &
&.
2 #& & %.
4 5 6
3 &, &
& .
G
H
I
J
K
L
M
N
O
#<*+
+ + +*+<
^
1 #& & %.
4 5 6
%/ $ % %,
& . 2 &$ & 10 , % + % & &
& $
& .
G
H
I
J
K
L
M
N
O
285
4.1 +^ < =
+
/
# &
&.
& % % &% .
3 &, &
& .
2
+
<& <&<+& <\ +@*\
& +
+<
# &
&.
2 # &
&.
& % %
&% .
3 &, &
& .
1
+
% +% <& 3 <&<+& +@*\ &
_+< +
1 # & &.
*, % % %
&$.
2 %$ &$ $ 3 % &$, & & $ % %$ %.
2 # &
&.
& % % &% .
3 &, &
& .
4.3 _%* ^
+ &, &
&
& % + &
1
, / && LED
"& $ &" (+. 14 3C & 17
3D) ++ &
& &
% +.
1
286
&, &
&.
/
2
&, &
& .
4.4 /+
< <&+
+_<^ &*+
& 1 & &
& & $ &
&.
& &:
1 # & .
2 ++ & &
&, &
& .
4.5 >+
& & & &, / & & & .
1 # & .
*, & % % & % % $ "MUTED".
2 # & &.
4.6 \@*
< <+
^_& < +&
<%/
+<^ &*+
& &:
1 # & &.
2 # & & &.
% $ 1 $ 5.
287
>*+<% &1 , & & !
/
4.7 ~ ^< R (Flash)
OK
& Flash %
+ (& 12 & 3E „
&
&“ 282) &$ & &
.. " &" ( % % $ &&$ ) % & &
& &$. * & R
(Flash) & & & $
&. % & 100 ms 300 ms. & &, $ „5.4 * & R (Flash)“.
4.8 ^ ^_& &&
*+< + \@*
<
<+
&&
*+<
_ &&
*+< < +
\*+< +&
<% +
</[< ^
1 # & / OK.
OK
OK 2 2$ "HANDSET" & & ++/.
OK 3 2$ "RING TONE" & & ++/.
4 2$ "INTERNAL" "EXTERNAL" & &
++/.
OK
5 $, $ $ &
(1 $ 9) & & ++/.
OK
`<+
^_& &&
*+< < +
\*+< +&
<%
1 # & / OK.
OK
OK 2 2$ "HANDSET" & & ++/.
OK 3 2$ "RING TONE" & & ++/.
OK 4 2$ "VOLUME" & & ++/.
5 2$ %
$ (#242¡/, 1-5)
& & ++/.
OK
288
/
>*+<% & $ &
&% &
&, / & &/ $ & / &
&
& & .
% % &
& & % &/.
&/ & $,
&
& ( & &/ &) $
&$ $.
1 # & & $ &
&/ &.
*, % % +
.
2 & &,
& &/ &.
&/ & $, & & & . & &, & &&. $ &, &/ &
.
4.10 *+ +
\*+<& +&
<\
1 %
($ 12 &), & &&$ &
&.
1 # & / OK.
OK
OK 2 2$ "HANDSET" & & ++/.
3 2$ "HANDSET NAME" & &
++/.
OK
289
4.9 {*+ ^<
/
4 5 6
G
H
I
J
K
L
M
N
O
4
OK
5
ESC
6
3 , +%
&
, & &
& $.
# ++.
$ & ,
& &.
4.11 /+
^_& ^<
1
OK
OK 2
3
OK
4
OK
5
ESC
6
# & / OK.
2$ "HANDSET" & & ++/.
2$ "KEYPAD BEEP" &
& ++/.
$, $ "ON" "OFF".
# ++.
$ & ,
& &.
4.12 &<^
, %& $ & 50 &.
* $
& $ & 16 & & & % $ & 24 .
#
@^ +<+_=
< &<^
1 # & .
OK 2 # & OK $.
OK
3 #& &
4 5 6
& ++/.
OK
4 #& %
&
4 5 6
% & & ++/.
OK
*, % &
$ ++.
G
H
I
J
K
L
M
N
O
G
H
I
J
K
L
M
N
O
{^
+@*\ <+_+ ^
1 # & .
2 &% $ & / .
4 5 6
G
H
I
290
J
K
L
M
N
O
/
# & , % /
%.
4 $, & &.
& % % &% .
5 &, &
& .
3
[+
+ +<+_=
< &<^
1 # & .
2 &% $ & / .
4 5 6
3 # & , % /
%.
4 # & / OK.
OK
OK 5 2$ "EDIT ENTRY" & & ++/.
4 5 6 OK 6 #& & ++/.
4 5 6 OK 7 #& &
% & & ++/.
G
H
I
J
K
L
M
N
O
G
H
I
J
K
L
M
N
O
J
K
L
M
N
O
++^ *+ +<+_=
^ % < +<+_^
+% < &<^
1 # & .
2 &% $ & / .
4 5 6
3 # & , % /
%.
4 # & / OK.
OK
5 2$ "DELETE ENTRY", &&$ &/ &
& ++/.
OK
¢
6 2$ "DELETE ALL" & & &
++/.
OK
G
H
I
J
K
L
M
N
O
291
G
H
I
/
OK
ESC 7
2++/ &
& +.
4.13 +=
^
(CLIP)
* Sologic B921 1 & % &. % ' % $ . , & % .
+ &, % /
%&
&.
$ & 30 % ( &%$ 23 ).
2 $ & % $ & 12 , &% % .
^
$ & &, + CLIP ++
%.
*+ < <+ ^
1 # & &.
*, % % &. 2 & &, % % $ "EMPTY" (EMPTY).
2 # & , %.
3 # & , & /.
4 &% $ , & /&.
5 + &, ESC
& &.
{^
+@*\ +% < <+ ^
1 # & &.
292
/
&% $ & $ %
& % %.
3 & &, & &.
& % % &% .
4 &, &
& .
++^ +@*\ +% < <+ ^
1 # & &.
2 &% $ & $ %
& % %.
3 # & / OK.
OK
4 2$ "DELETE", $ & % & &
++/.
OK
¢
5 [< "DELETE ALL" & & &
++/.
OK
ESC 6 # ++ &
OK
& .
@^&
+@*\ +% < <+ ^
+@*\
<+_+ ^
1 # & &.
2 &% $ & $ %
& % %.
3 # & / OK.
OK
OK 4 2$ "SAVE TO PB" & & ++/.
5 2 & $ &
4 5 6
& ++/.
OK
6 2 & % &
4 5 6
& ++/.
OK
G
H
I
J
K
L
M
N
O
G
H
I
J
K
L
M
N
O
293
2
¡
% +
4.14 ++ <& +
\*+<& +&
<\ <
* &@*
.
$ , $ $
& ($ &
, &
&..) $ $ %
. 3 & &, &
& !
1 # & / OK.
OK
OK 2 2$ "HANDSET" & & ++/.
OK OK 3 2$ "RESET" & & ++/.
4 #& && PIN % +
4 5 6
(: 0000).
5 *, &
% $% &
.
G
H
I
J
K
L
M
N
O
* &@*
+ +%&@:
&
&
HANDSET
&
&
2 3
&
2 3
¢ &
¢ . 8
&$ &
¢ &
¢ . 1
&$ &
¢ &
2$
4.15 `[ <\ *\*+<
$ ' $ &/ &/ & % $ &$ 1 % & ! + $
, % % +
. & , +
% .
5 &@*
]
#
294
, % %& % +!
¡
% +
5.1 ^ *+ &&
*+< + \@*
<
<+
<& ^_&
+ &&
*+< +
\*+<& +&
<\ +
</[< ^
1
OK
OK 2
OK 3
4
OK
# & / OK.
2$ "BASE" & & ++/.
2$ "RING TONE" & & ++/.
$, $ $ &
(1 $ 9) & & ++/.
+ &&
*+< ]
OK 2
3
OK
4
OK
# & / OK.
2$ "BASE" & & ++/.
2$ "RING VOLUME" & &
++/.
2$ %
$ (/, 1-5)
& & ++/.
5.2 {+@
*% <& &
<^*+< ^
£
& &$ $:
- DTMF/*& & ( & )
- #& & (1 &
& &$
!)
1
OK
OK 2
OK 3
4
OK
# & / OK.
2$ "BASE" & & ++/.
2$ "DIAL MODE" & & ++/.
2$ "TONE" "PULSE" & &
++/.
5.3 \@*
<& \ PIN <& &
<^*+<
%$ 1 && PIN % +.
&& PIN $ & 4 &. $ &&
PIN "0000". && PIN & & , & :
295
1
OK
3/& &
&
1
OK
OK 2
3
OK
4
4 5 6
G
H
I
J
K
L
M
N
O
OK
5
4 5 6
G
H
I
J
K
L
M
N
O
OK
# & / OK.
2$ "BASE" & & ++/.
2$ "SYSTEM PIN" & &
++/.
2 && "OLD PIN" &
& OK.
2 & && "NEW PIN"
& & ++/.
5.4 ~ ^< R (Flash)
& Flash &$ & & ..
" &" ( % %
$ &&$ ) % & &
& &$. * & R (Flash) & & &
$
&. % & 100 ms 300 ms. ¤, Flash, .
1 # & / OK.
OK
OK 2 2$ "BASE" & & ++/.
OK 3 2$ "RECALL" & & ++/.
4 , $ "LONG" "SHORT" &
& ++/.
OK
6 ^
/+<
^
+
\*+<& +&
<\
6.1 ^
+
\*+<& +&
<\ < <+@*%
]
Sologic B921
/ $ & 4 &
& % +. % &
& 1 % + $ % .
1 / $ &
& :
• &&$
&
& $ &% &&$ % +
(.. )
296
3/& &
&
• %$ / & &
& &&$ +.
& 1 &
&
& % + Sologic B921.
# & & $ &
1 % + 10 .
2 # & / OK &
&.
3 2$ "REGISTER" & & ++/.
4 #& % % + (1-4) %$ / &
&.
5 *, &
& % 1 &&$ % +. ,
% 1 & (4)
&& PIN.
6 #& && PIN % +
(: 0000). 2 && PIN %
& , &
& % + 1 % +.
&% &
& % +, & %
&
& % %.
OK
4 5 6
G
H
I
J
K
L
M
N
O
4 5 6
G
H
I
J
K
L
M
N
O
6.2 {+<
^
+
\*+<& +&
<\ +% < <+@*% ]
Sologic B921
1
OK
2
OK
3
4 5 6
G
H
I
J
K
L
M
N
O
OK
4
4 5 6
G
H
I
J
K
L
M
N
O
OK
# & / OK.
2$ "DE-REGISTER" & &
++/.
#& && PIN % +
(: 0000).
#& & % &
& (1-4), %$ &, & & ++/.
297
1
3/& &
&
&% & &
&, &
& $ & . 3&, % 1%
& % &
&.
>*+<% & &
&/ % +, ' &
& +& &
.
6.3 ^ <+@*\ ]
2 $ &
& $ $ % + ($ 4), % $ $ $ , &
& & $
% + &% . £
$ $:
&<%*+< ^
2 % &
& , &
& % 1 $ % +
& .
1 # & / OK.
OK
OK 2 2$ "HANDSET" & & ++/.
OK 3 2$ "SELECT BASE" & &
++/.
OK 4 2$ "AUTOMATIC" & &
++/.
#
298
2 $ % + $
& &
& + &
+$ $ % +, &
& % 1 % + & ( & &).
#/% & & &$ & &
&/
+&<%*+< ^
2 % &
& , &
& % 1 + $ .
OK
1
OK 2
OK 3
OK 4
OK 5
# & / OK.
2$ "HANDSET" & & ++/.
2$ "SELECT BASE" & &
++/.
2$ "MANUAL" & & ++/.
2$ %
% + &
& ++/.
>*+<% &
& & $ % +, &
&
% $ $ % &&$
% +.
7.1 #=@
^
+ ^
<
<
+ *+ [<^ ^
4 5 6
G
H
I
INT
& & &, & INT & & & % &
& (1-4).
*, &
& % &
1.
&% &
&, &. &+ &
&, & % % &
&.
2 # & & $ & INT
3 . $, % &
& & & &
(&).
1
INT
J
K
L
M
N
O
299
7 #=@
^
+ < ^
*<+[\
+
\*+< +&
<=
& & INT
3
4
$ & &, & INT.
&, &
& .
8 >&<*\
+ <_ %
CLIP
Calling Line Identification Presentation: &
% & % /
&
.
DECT
Digital Enhanced Cordless Telecommunication: 2
0& &/ & $.
ECO, <% <&+
Economic Mode: $ &
/
(DECT), &
& &+.
Flash, ^<
#& & & , / ..
/% &. & &$, &
Flash ( R) & &.
GAP
Generic Access Profile: % + &
&
&, & .
INT
INTernal subscriber: & . &
& & $ & &$
.
#+*% <% <&+
#$ & &/ %/ ( & ).
LCD, @%
Liquid Crystal Display: % / &
LED, <^ &_+
Light Emitting Diode: DTMF
Dual Tone Multiple Frequency: &
&/ %/.
300
/ +
PIN
Personal Identification Number: && + &
R, ^<
& Recall (+. Flash, &).
+*^
"" &
, & &
, $ %.
&* *+
& &
$, .. &
&.
9 <*<=
]*<
#@+% +<
$ %.
&.
\
++% & $
%% &.
.
$ .
* & &/ 2$ $ %
&
.
&
.
& #$ $ &$ & &
&.
&
&.
&/ ¡
% $
& .
&
&, +% &
$.
$ ¡
% $
&
&
.
&
& +& .
301
#%]*+
/ +
#%]*+
#@+% +<
3 &$ %.
& $
% $.
* +
++ %.
% +
&
& &
1.
3 & /% & &.
* $ & &.
\
$ „5.2
% &“
&.
* &
& & & +$. &
& +$ % +.
% + 2$ & & .
&/ .
* &
& 3/ &
&
$ % % +
% +.
$ ¡
% $
&
+& &
.
&
$ %.
Flash ¡
% +& &.
Flash &
.
.
$ & &
% .
& &
&
.
&
&/ $ &
1 & &$ $+. *
&
$ % &
&%$
& &
.
302
$+
10 >]
10.1 >&<^
&
1 . 2$ && & / & & $ &
% .
#
{& _*= +&*<!
$ 1 $
, & .
2 $ & &
, + $ & $ &
& (%
+) & / &&. 2$ $
2-3 /. 2 1 ,
/ &$ $+.
#
& +
&
&/, & $.
$ & &
. 2 + & $,
+ & 1 & & &/ 1 /
&
$ .
, &
, &/ & 1: '
% &
&
$ $ &
1
230 V.
%1 $ $ &$ $ & . #$ &%& 0 1
.
10.3 +^ _^
+ \+[
&
, $ & &/ 1 /
& &
% +. & %
303
10.2 {+@+
*%
*& + & &
& 1
230 V.
$ &
&. 2 &
&
& ,
& 1 $ $ &
.
&
$ & 1 /, & +& $ %&.
10.4 % (]+<^ <+
+)
&
& 1 $ , $ & 1
, 1 & && .
/ + , 0 /& &
. #/
&
$ &&/
& &&/ &
/ &&. &
& &&
0 % $
&
&% &. && & $ / &&
0, +%
+.
2, & &
& +. & 0 && ,
%
% & &&.
11 ~_ <_+
#
2 2&$
2+$
&
&:
*&
% +
304
DECT(Digital Enhanced Cordless
Telecommunications)
GAP (Generic Access Profile)
1.880 $ 1.900 MHz
10 mW ( $ &)
$ 300 . & $ 50 .
& &
3 (2) 1 NiMh 1,2 V, & 500 mAh,
AAA
2: 100~240 V AC / 50-60 Hz
: 6 V DC/ 500 mA
2 Topcom Sologic B921
12 \
< Topcom + < Sologic B921
12.1 # \
&
$ Topcom & & 24 /.
& $ &
. 3 $ 1 %$
(
AA/AAA).
& / / $
.
$ & & %&
, % & $ .
12.2 +
<+ +
+ < \
& &
$ $ $ &$
$+ Topcom 1 $&
& $
& $+.
2 & & & , &$ $+ Topcom % &
++ & & &&
& ,
+ &
&/ 305
100 / &
&:
10 /
&
&
:
16 /
2$ %& 5 $ 45 °C
2 & 25 $ 85 %
&
#& & & (DTMF) &
flash
100 300 ms
%/ 50 & , &
$
&
&
24 & 16 3 % +/ 117 mm x 117 mm x 60 mm /
&
&
182 mm x 284 mm x 58 mm
% +/ 239 g 1 & /
&
&
152 g 1 $ &
% +: 2,0 W
2 Topcom Sologic B921
/ &/ . &, / & $ $
& &
&.
$ &%1 & . &% &
Topcom $
&$ $+.
12.3 [+
\
& ++ / $ , &%/ & ++ & & .
& 1$ & ,
.. &
, & &, 1$ & &
.
3 &$ / , &
% $ %, $ % .
/ % $&
,
$ &
, % %
.
&
&& 1
. 2 %
& &$
+ , $ %
& & 1. &
&
$ ¥ % &&$ .
2 &&$ & % &
&
+, % %% & $ &.
++ & 1 &&
& / $
++ &
& . *
$
&
% +
.
306
Informacje ogólne
1 Informacje ogólne
Niniejsza instrukcja obsugi zawiera wszystkie informacje
potrzebne do zainstalowania, skonfigurowania i obsugi urz!dzenia.
Zawiera ona tak"e informacje i wa"ne uwagi zapewniaj!ce
bezpiecze¦stwo i stanowi!ce pomoc w przypadku problemów.
Instrukcj5 obsugi nale"y zawsze przechowywa§
w pobli"u urz!dzenia.
Niniejsz! instrukcj5 nale"y przechowywa§ w bezpiecznym miejscu
i przekaza§ nast5pnemu wacicielowi wraz z urz!dzeniem.
1.1 Produkt: Sologic B921
Wane Aby mo"na byo korzysta§ z funkcji identyfikacji
rozmówcy, nale"y j! najpierw w!czy§ dla linii
telefonicznej. Aby uzyska§ informacje dotycz!ce
aktywowania tej funkcji, nale"y skontaktowa§ si5 z
operatorem linii telefonicznej. Jeli ta funkcja nie jest
w!czona, numery rozmówców NIE b5d! widoczne na
wywietlaczu telefonu.
1.2 Prawa autorskie
Niniejszy dokument jest chroniony prawami autorskimi.
Wszystkie prawa, !cznie z prawem do powielania fotomechanicznego
caoci lub cz5ci, duplikacji i dystrybucji za pomoc! konkretnych
procesów (takich jak przetwarzanie danych, noniki danych i sieci
danych) oraz zmiany treci i zmiany techniczne, s! zastrze"one.
307
Polski
Ten produkt zosta wyprodukowany zgodnie z ujednoliconym
standardem cyfrowym telefonów bezprzewodowych (DECT).
Technologia DECT zapewnia wysoki poziom zabezpiecze¦ przed
przechwyceniem rozmowy, a tak"e wysokiej jakoci transmisj5
cyfrow!. Ten telefon ma wiele zastosowa¦, na przykad w sieci stacji
bazowych i suchawek bezprzewodowych tworz!cych system PBX:
jedna stacja bazowa mo"e obsugiwa§ do 4 suchawek
bezprzewodowych, a jedna suchawka bezprzewodowa mo"e by§
obsugiwana przez maksymalnie 4 stacje bazowe. Po!czenia
wewn5trzne mo"na nawi!zywa§ mi5dzy stacj! bazow! a
suchawk! oraz mi5dzy dwiema suchawkami.
Ten telefon obsuguje funkcje identyfikacji rozmówcy oraz usugi SMS
dostarczane przez operatora telefonicznego, jeli s! one dost5pne
w przypadku danej linii. Jeli te usugi s! u"ywane, numer telefonu
rozmówcy jest widoczny na wywietlaczu telefonu.
Informacje ogólne
1.3 Sowa i symbole sygnalizujce
Symbol
Brak
Sowo
Znaczenie
sygnalizujce
Ostrzeenie Niezastosowanie si5 do informacji
zawartych w tym ostrze"eniu mo"e
doprowadzi§ do mierci lub powa"nych
obra"e¦ ciaa.
Uwaga
Niezastosowanie si5 do informacji
zawartych w tym ostrze"eniu mo"e
doprowadzi§ do niewielkich obra"e¦ ciaa.
Uwaga
Ryzyko wyst!pienia szkód materialnych
lub ekologicznych.
Wane
Wa"ne informacje dotycz!ce funkcji.
Informacje,
Informacje ogólne lub konkretne
wskazówka wskazówki.
1.4 Przeznaczenie
Ten produkt su"y do wykonywania po!cze¦ z telefonu stacjonarnego
w sieci telefonicznej. Wymaganiem wst5pnym prawidowego
korzystania z telefonu jest jego profesjonalne zainstalowanie z
uwzgl5dnieniem informacji zawartych w niniejszej instrukcji obsugi.
Wszelkie inne u"ycie uwa"a si5 za niewaciwe i niedozwolone.
Wszelkie nieopisane w niniejszej instrukcji obsugi modyfikacje lub
przeróbki s! uznane za niewaciwe i niedozwolone. Producent nie
ponosi odpowiedzialnoci za "adne uszkodzenia wynike z
takich dziaa¦.
1.5 Zawarto opakowania
Nale"y sprawdzi§, czy zawarto§ opakowania jest kompletna i
nieuszkodzona. Jeli brakuje cz5ci lub s! one uszkodzone,
nale"y natychmiast skontaktowa§ si5 ze sprzedawc!.
Nale"y zachowa§ opakowanie w razie koniecznoci zwrotu telefonu
lub wysania go do naprawy.
1 stacja bazowa
1 zasilacz sieciowy stacji bazowej
1 kabel telefoniczny do pod!czenia stacji bazowej
308
Uwagi dotycz!ce bezpiecze¦stwa
1 suchawka bezprzewodowa z 2 akumulatorkami NiMH typu AAA o napi5ciu 1,2 V i pojemnoci 500 mAh oraz pokryw! komory
akumulatorków
1 instrukcja obsugi
Ostrzeenie Ryzyko uduszenia dziecka! Folie z opakowania
nale"y przechowywa§ poza zasi5giem dzieci.
Wane
Opakowanie nale"y zutylizowa§ w sposób
nieuci!"liwy dla rodowiska.
2 Uwagi dotyczce bezpieczestwa
U"ywaj!c urz!dzenia elektrycznego, nale"y zawsze przestrzega§
nast5puj!cych podstawowych zalece¦ dotycz!cych bezpiecze¦stwa.
Nale"y dokadnie zapozna§ si5 z poni"szymi uwagami dotycz!cymi
bezpiecze¦stwa oraz szczegóami prawidowego korzystania
z urz!dzenia. Konieczne jest te" zapoznanie si5 ze wszystkimi
funkcjami urz!dzenia. Niniejsz! instrukcj5 nale"y przechowywa§
w bezpiecznym miejscu w pobli"u urz!dzenia i przekaza§
nast5pnemu wacicielowi wraz z urz!dzeniem. Nie nale"y
przekazywa§ telefonu innym osobom bez instrukcji obsugi.
Zagroenie poraeniem elektrycznym:
• Nie u"ywaj urz!dzenia, jeli zasilacz sieciowy, przewód zasilaj!cy
lub samo urz!dzenie jest uszkodzone. Uwa"aj, aby nie upuci§
urz!dzenia, poniewa" mo"e to doprowadzi§ do jego uszkodzenia.
• Napi5cie w urz!dzeniu ma niebezpieczne wartoci. Nigdy nie
nale"y otwiera§ obudowy ani wsuwa§ jakichkolwiek przedmiotów
przez szczeliny wentylacyjne.
• Nale"y uwa"a§, aby do urz!dzenia nie dostay si5 pyny. Jeli tak
si5 stanie, nale"y od!czy§ zasilacz od gniazda sieciowego i
od!czy§ kabel telefoniczny od gniazda.
• Zasilacz sieciowy i kabel telefoniczny nale"y od!czy§ od gniazda
równie" wtedy, gdy wyst!pi awaria zasilacza, a tak"e przed
czyszczeniem urz!dzenia.
• Nie nale"y dotyka§ styków adowarki ani wtyczki ostrymi lub
metalowymi obiektami.
309
Polski
Ostrzeenie Niebezpiecze¦stwo kalectwa lub mierci
zwi!zane z pr!dem elektrycznym! W przypadku
niebezpiecze¦stwa natychmiast od!cz
urz!dzenie od gniazda zasilania 230 V.
Uwagi dotycz!ce bezpiecze¦stwa
• Nie wolno modyfikowa§ ani naprawia§ urz!dzenia. Urz!dzenie lub
przewód mog! by§ naprawiane wy!cznie przez specjalist5 w
centrum serwisowym. Naprawy, które nie zostay przeprowadzone
prawidowo, mog! by§ przyczyn! znacznego niebezpiecze¦stwa
dla u"ytkownika.
• Dzieci cz5sto nie dostrzegaj! zagro"e¦ zwi!zanych z obsug!
urz!dze¦ elektrycznych. Nie wolno dopuszcza§ dzieci w pobli"e
urz!dze¦ elektrycznych bez nadzoru.
• Nie nale"y zezwala§ dzieciom na zabaw5 urz!dzeniem lub
jego elementami.
Uwaga
Prawdopodobie¦stwo uszkodzenia urz!dzenia.
W przypadku niebezpiecze¦stwa natychmiast
od!cz urz!dzenie od gniazda zasilania 230 V.
• Nie wolno u"ywa§ urz!dzenia w pomieszczeniach o du"ej
wilgotnoci (np. w azience) ani o du"ym zapyleniu.
• Podczas burzy urz!dzenia pod!czone do gniazda sieciowego
mog! ulec uszkodzeniu. Dlatego zawsze nale"y od!cza§
urz!dzenie podczas burzy.
• Aby cakowicie od!czy§ urz!dzenie od zasilania elektrycznego,
nale"y wyci!gn!§ zasilacz sieciowy z gniazda. Nale"y zawsze
ci!gn!§ za wtyczk5 — nigdy za kabel.
• Nale"y regularnie sprawdza§, czy kable nie zostay uszkodzone;
chroni§ je przed zetkni5ciem z gor!cymi powierzchniami i innymi
niebezpiecze¦stwami; rozwija§ w caoci; ukada§ tak, aby nikt nie
potkn! si5 o nie; nie wolno tak"e ich cile mocowa§.
Zagroenie poarem:
Ostrzeenie Ryzyko obra"e¦ lub mierci zwi!zane z ogniem!
Nie wystawiaj urz!dzenia na zbyt wysok!
temperatur5, a w przypadku niebezpiecze¦stwa
natychmiast od!cz urz!dzenie od gniazda
zasilania 230 V.
Ciepo wytwarzane w urz!dzeniu mo"e spowodowa§ jego awari5 lub
po"ar. Dlatego nie nale"y nara"a§ go na wysokie temperatury:
– Nale"y unika§ bezporedniego dziaania promieni
sonecznych i gor!ca.
– Nie nale"y przykrywa§ szczelin wentylacyjnych.
310
Uwagi dotycz!ce bezpiecze¦stwa
Zagroenie wybuchem:
Ostrzeenie Ryzyko obra"e¦ w wyniku wybuchu!
Nale"y zachowa§ szczególn! ostro"no§ w
przypadku obecnoci dzieci!
• Nigdy nie nale"y wrzuca§ baterii ani akumulatorków do ognia.
• Nie wolno u"ywa§ urz!dzenia w miejscu, gdzie istnieje
zagro"enie wybuchem!
Zagroenie zatruciem:
Ostrzeenie Ryzyko obra"e¦ w wyniku zatrucia!
Nale"y zachowa§ szczególn! ostro"no§ w
przypadku obecnoci dzieci!
• Baterie i akumulatorki nale"y przechowywa§ poza
zasi5giem dzieci.
Zagroenie uduszeniem:
Ostrzeenie Ryzyko obra"e¦ w wyniku uduszenia!
Nale"y zachowa§ szczególn! ostro"no§ w
przypadku obecnoci dzieci!
• Folie z opakowania nale"y przechowywa§ poza zasi5giem dzieci.
• W przypadku u"ycia przedu"aczy nale"y zwróci§ uwag5 na
niebezpiecze¦stwo uduszenia.
Awarie:
Polski
Ostrzeenie Mo"liwe ryzyko urazów z powodu awarii
urz!dzenia!
Nale"y zachowa§ szczególn! ostro"no§ w
przypadku obecnoci sprz5tu medycznego.
• Dziaanie medycznych urz!dze¦ elektrycznych mo"e by§
zakócane promieniowaniem elektromagnetycznym z urz!dzenia.
Dlatego nale"y upewni§ si5, "e jest ono zainstalowane i u"ywane
w wystarczaj!co du"ej odlegoci od medycznych
urz!dze¦ elektrycznych. To samo dotyczy urz!dze¦
wszczepianych, takich jak rozruszniki serca.
• Suchawka bezprzewodowa mo"e wywoywa§ nieprzyjemne
odgosy w aparatach suchowych, wi5c nale"y przechowywa§
j! w odpowiedniej odlegoci od tych urz!dze¦.
311
Pierwsze kroki
Niebezpieczestwo uszkodze:
Uwaga
Prawdopodobie¦stwo uszkodzenia urz!dzenia!
Nale"y zapozna§ si5 z odpowiednimi informacjami
w niniejszej instrukcji obsugi.
• Nale"y u"ywa§ tylko zasilacza dostarczonego wraz z urz!dzeniem.
Nie nale"y u"ywa§ zasilaczy innych firm, poniewa" mo"e to
spowodowa§ uszkodzenie akumulatorków.
• Gniazdo do pod!czenia zasilacza sieciowego musi znajdowa§
si5 blisko urz!dzenia i by§ atwo dost5pne.
• Nale"y u"ywa§ tylko do!czonych akumulatorków. W przypadku
koniecznoci ich wymiany nale"y u"y§ akumulatorków tego
samego typu. Nale"y upewni§ si5, "e akumulatorki zostay
prawidowo wo"one (odpowiednie informacje mo"na znale©§
w komorze akumulatorków urz!dzenia). Nigdy nie nale"y
u"ywa§ zwykych baterii jednorazowych!
Wane
W przypadku awarii zasilania mo"na wykonywa§
po!czenia wy!cznie za pomoc! stacji bazowej.
2.1 Uwagi dotyczce trybu niskiego promieniowania
Telefon bezprzewodowy (zgodny ze standardem DECT) generuje
podczas pracy niskie promieniowanie (tryb ECO).
W trakcie po!czenia nat5"enie fal radiowych emitowanych przez
suchawk5 zmniejsza si5 w zale"noci od odlegoci od stacji bazowej.
Jeli nie s! wykonywane "adne po!czenia, nat5"enie emitowanych
fal radiowych zmniejsza si5 do wartoci minimalnej. Nie oznacza to,
"e zwyke promieniowanie DECT jest szkodliwe dla zdrowia. Dziaanie
w trybie niskiego promieniowania pozwala po prostu unikn!§
niepotrzebnego wystawiania si5 na dziaanie promieniowania.
Stacja bazowa nie zmniejsza nat5"enia emitowanych fal radiowych.
Stacj5 bazow! nale"y umieci§ w miejscu, w którym u"ytkownik nie
przebywa cz5sto, na przykad w korytarzu. Nie nale"y umieszcza§
stacji we wasnej sypialni lub w sypialni dzieci ani w salonie.
3 Pierwsze kroki
3.1 Jak korzysta z niniejszej instrukcji
W tej instrukcji obsugi zastosowano nast5puj!c! metod5,
aby poprawi§ jej czytelno§:
312
Pierwsze kroki
Tekst....... „Wywietlacz”.
Tekst pojawiaj!cy si5 na wywietlaczu telefonu.
Klawisz, który nale"y nacisn!§
3.2 Instalacja stacji bazowej
Zainstaluj stacj5 bazow! w nast5puj!cy sposób:
1 Pod!cz zasilacz sieciowy najpierw do stacji bazowej,
a nast5pnie do gniazda.
2 Pod!cz kabel telefoniczny do gniazda w cianie i do gniazda
w tylnej cz5ci stacji bazowej.
3 Kable telefoniczny i zasilaj!cy powinny zosta§ pod!czone
zgodnie z rysunkiem 3A.
B
A
C
Polski
— 3A. Stacja bazowa —
A. Gniazdo telefoniczne
B. Zasilacz sieciowy z kablem
C. Kabel telefoniczny
3.3 Suchawka
Uwaga
Ryzyko obra"e¦ w wyniku wybuchu!
Nale"y u"ywa§ tylko do!czonych akumulatorków lub
akumulatorków podobnego typu. Nie nale"y u"ywa§
zwykych baterii jednorazowych!
Mo"e to spowodowa§ uszkodzenie
suchawki bezprzewodowej.
313
Pierwsze kroki
1
2
3
4
Otwórz komor5 akumulatorków, jak pokazano na rysunku 3B.
Wó" akumulatorki. Upewnij si5, "e zostaa zachowana
waciwa biegunowo§ (oznaczenia + i –).
Zamknij komor5 akumulatorków.
Umie§ suchawk5 w adowarce i aduj j! przez 16 godzin.
W tym czasie b5dzie si5 wieci§ dioda adowania.
B921
— 3B. Tylna cz&'( s)uchawki —
A.Pokrywa
B.Akumulatorki
A
+
B
+
3.4 Wywietlanie stanu akumulatorków
Gdy akumulatorki si5 rozaduj!, suchawka przestanie dziaa§.
Jeli akumulatorki rozaduj! si5 cakowicie i suchawka zostanie na
chwil5 umieszczona w stacji bazowej, wska©nik poziomu naadowania
akumulatorków b5dzie wskazywa§ pene naadowanie. Nie jest to
jednak prawdziwy stan akumulatorków i zostan! one szybko
rozadowane. Aby w peni naadowa§ akumulatorki, nale"y
umieci§ suchawk5 w stacji bazowej na 16 godzin.
Akumulatorki naadowane
Akumulatorki wyczerpane
Jeli podczas rozmowy akumulatorki b5d! bliskie wyadowania,
suchawka wyemituje d©wi5k ostrzegawczy. Nale"y umieci§
suchawk5 w adowarce, aby naadowa§ akumulatorki.
314
Pierwsze kroki
3.5 Klawisze/
wywietlacz
14
Suchawka
bezprzewodowa
1. Ponowne wybieranie
numeru/do góry
2. Ksi!"ka telefoniczna
3. Wyciszenie/usuni5cie
4. Zako¦czenie rozmowy
5. Klawisze alfanumeryczne
6. Blokada klawiszy
7. Pauza
8. W!czenie/wy!czenie
dzwonka
9. Lista po!cze¦/w dó
10.Odebranie po!czenia/
tryb gonomówi!cy/
przycisk rozmowy
11. INT/wyjcie
12.Menu/OK/Flash
13.Wywietlacz
14.Czerwona dioda, miga podczas po!czenia
13
1
12
11
10
2
R
OK
ESC/
INT
3
4
9
5
8
6
7
— 3C. Przednia cz&'( s)uchawki —
Polski
Stacja bazowa
15.Klawisz przywoywania
16.Dioda adowania suchawki
17.Dioda dzwonka
17
16
15
— 3D. Stacja bazowa —
315
Pierwsze kroki
3.6 Wywietlacz suchawki
HANDSET X
x = numer suchawki
Inne numery lub
przewini5cie menu w lewo
Znajdowanie lub tworzenie
wpisów ksi!"ki telefonicznej
Inne numery lub przewini5cie
menu w prawo
Wywietlanie stanu
akumulatorków
Wy!czanie dzwonka
W!czony tryb gonomówi!cy
W!czona blokada klawiszy
Nowa wiadomo§ poczty
gosowej
Nawi!zano po!czenie
Mikrofon wyciszony
Nowe numery na
licie po!cze¦
Ikona anteny wskazuje si5
sygnau. Gdy suchawka jest
poza zasi5giem, ikona
anteny miga.
Po!czenie wewn5trzne
3.7 Poruszanie si po menu
Telefon Sologic B921 ma atwy w u"yciu system menu. W ka"dym
menu dost5pna jest lista opcji.
Poni"ej przedstawiono podsumowanie opcji menu suchawki oraz
stacji bazowej.
1 Nacinij klawisz Menu/OK, aby otworzy§
OK
menu gówne.
2 Przejd© do wybranej opcji menu.
3 Nacinij klawisz Menu/OK, aby wywietli§ dalsze
OK
opcje lub potwierdzi§ wywietlone ustawienia.
4 Nacinij klawisz wyjcia, aby powróci§ do
ESC
poprzedniego poziomu menu.
316
Pierwsze kroki
Suchawka
PHONE BOOK
HANDSET
RING TONE
HANDSET NAME
KEYPAD BEEP
SELECT BASE
RESET
LANGUAGE
REGISTER HANDSET
DE-REGISTER HANDSET
3.8 Uywanie klawiszy alfanumerycznych
Klawisze alfanumeryczne umo"liwiaj! wprowadzanie tekstu.
Nacinij odpowiedni klawisz alfanumeryczny, aby wybra§ liter5 5 .
Na przykad , jeli naciniesz klawisz numeryczny 5, na wywietlaczu
pojawi si5 najpierw litera „j”. Nacinij klawisz kilkakrotnie, aby wybra§
inne litery.
Nacinij raz klawisz 2, aby wybra§ liter5 „a”. Jeli chcesz wprowadzi§
litery „a” i „b” bezporednio po sobie, najpierw nacinij raz klawisz 2,
aby wybra§ liter5 „a”. Odczekaj 2 sekundy, a" kursor przejdzie do
nast5pnej pozycji. Nast5pnie nacinij dwukrotnie klawisz 2, aby
wybra§ liter5 „b”. Mo"esz u"y§ klawisza usuwania
3 , aby usun!§
wprowadzone b5dnie litery. W ten sposób usuniesz liter5
przed kursorem.
1
2
3
4
5
6
7
8
9
0
Polski
Zestawienie znaków
Odst5p + - / 1
ABC2
DEF3
GHI4
JKL5
MNO6
PQRS7
TUV8
WXYZ9
_0
317
Obsuga telefonu
4 Obsuga telefonu
4.1 Zmiana jzyka
OK
1
OK 2
OK 3
OK 4
5
ESC
Nacinij klawisz Menu/OK.
Wybierz opcj5 „HANDSET” i potwierd©.
Wybierz opcj5 „LANGUAGE” i potwierd©.
Wybierz j5zyk i potwierd©.
Nacinij klawisz wyjcia, aby powróci§ do
trybu gotowoci.
4.2 Rozmowy wychodzce
Nawizywanie poczenia
1 Nacinij przycisk rozmowy.
2 Wprowad© numer telefonu.
4 5 6
3 Nacinij klawisz zako¦czenia po!czenia,
aby zako¦czy§ rozmow5.
G
H
I
J
K
L
M
N
O
Przygotowanie do nawizania poczenia
1 Wprowad© numer telefonu.
4 5 6
Mo"esz poprawi§ nieprawidowy numer za pomoc!
klawisza wyciszania. Jeli przez 10 sekund nie zostanie nacini5ty "aden
klawisz, numer zniknie i suchawka powróci do
trybu gotowoci.
2 Nacinij przycisk rozmowy.
Numer telefonu zostanie wybrany automatycznie.
3 Nacinij klawisz zako¦czenia po!czenia,
aby zako¦czy§ rozmow5.
G
H
I
J
K
L
M
N
O
Ponowne wybieranie ostatniego numeru
1 Nacinij przycisk rozmowy.
2 Nacinij przycisk ponownego wybierania.
Ostatni numer telefonu zostanie
wybrany automatycznie.
3 Nacinij klawisz zako¦czenia po!czenia,
aby zako¦czy§ rozmow5.
318
Obsuga telefonu
Ponowne wybieranie jednego z trzech ostatnich numerów
Nacinij klawisz ponownego wybierania.
Na wywietlaczu pojawi si5 ostatnio wybrany numer.
Aby wybra§ jeden z 3 ostatnio wybieranych
numerów, naciskaj klawisz ponownego wybierania
do momentu pojawienia si5 odpowiedniego numeru
na wywietlaczu.
2 Nacinij przycisk rozmowy.
Numer telefonu zostanie wybrany automatycznie.
3 Nacinij klawisz zako¦czenia po!czenia, aby
zako¦czy§ rozmow5.
1
4.3 Rozmowy przychodzce
W przypadku rozmowy przychodz!cej suchawka i stacja bazowa
dzwoni!. Migaj! tak"e ich diody wizualnego sygnau po!czenia (patrz punkt 14 na rysunku 3C i punkt 17 na rysunku 3D).
1
2
Nacinij klawisz odbierania po!czenia, aby
rozpocz!§ rozmow5.
Nacinij klawisz zako¦czenia po!czenia, aby
zako¦czy§ rozmow5.
Ta funkcja umo"liwia odebranie po!czenia bez koniecznoci
trzymania suchawki lub w trakcie wykonywania po!czenia przy
u"yciu suchawki.
W czasie rozmowy:
1 Nacinij klawisz trybu gonomówi!cego w celu
w!czenia tej funkcji.
2 Nacinij ponownie klawisz trybu gonomówi!cego,
aby prze!czy§ rozmow5 z powrotem na
suchawk5.
Wane
U"ywanie trybu gonomówi!cego przez dugi czas
powoduje szybsze rozadowanie akumulatorków.
319
Polski
4.4 Wczanie i wyczanie trybu gonomówicego
Obsuga telefonu
4.5 Wyciszenie
Mikrofon mo"na wyciszy§ podczas po!czenia, tak aby rozmówca
niczego nie sysza.
1 Nacinij klawisz wyciszenia.
Mikrofon zostanie wyciszony, a na wywietlaczu
pojawi si5 komunikat „MUTED”.
2 Jeszcze raz nacinij klawisz wyciszenia, aby
z powrotem w!czy§ mikrofon.
4.6 Ustawianie gonoci suchawki i
trybu gonomówicego
W czasie rozmowy:
1 Nacinij klawisz w dó.
2 Naciskaj klawisze w gór5 i w dó.
Poziom gonoci mo"na ustawia§ w zakresie od 1 do 5.
4.7 Klawisz R (Flash)
OK
Nacini5cie klawisza Flash na stacji bazowej (klawisz
12 na rysunku 3C „Suchawka bezprzewodowa“ na
stronie 315) umo"liwia korzystanie ze specjalnych
usug na linii zewn5trznej, takich jak po!czenia
oczekuj!ce (pod warunkiem, "e operator linii
telefonicznej udost5pnia tak! usug5) lub
przekazywanie po!cze¦ w przypadku korzystania
z systemu PBX. Nacini5cie klawisza R chwilowo
przerywa po!czenie. Dla czasu przerwania
po!czenia mo"na ustawi§ warto§ 100 ms lub
300 ms. Informacje dotycz!ce ustawiania innego
czasu przerwania mo"na znale©§ w rozdziale „5.4 Klawisz R (Flash)“.
4.8 Wybieranie dwiku dzwonka i ustawianie
jego gonoci
Gono dzwonka suchawki dla pocze wewntrznych/zewntrznych
1 Nacinij klawisz Menu/OK.
OK
320
Obsuga telefonu
OK 2 Wybierz opcj5 „HANDSET” i potwierd©.
OK 3 Wybierz opcj5 „RING TONE” i potwierd©.
4
OK
5
OK
Wybierz opcj5 „INTERNAL” lub „EXTERNAL”
i potwierd©.
Wybierz melodi5 dzwonka (z zakresu od 1 do 9)
i potwierd©.
Gono dzwonka suchawki
1 Nacinij klawisz Menu/OK.
OK
OK 2 Wybierz opcj5 „HANDSET” i potwierd©.
OK 3 Wybierz opcj5 „RING TONE” i potwierd©.
OK 4 Wybierz opcj5 „VOLUME” i potwierd©.
5 Wybierz "!dan! gono§ (wy!czone lub od 1 do 5)
i potwierd©.
OK
Wane
Aby w!czy§ lub wy!czy§ dzwonek dowolnej
suchawki, nale"y przytrzyma§ nacini5ty
klawisz w!czania i wy!czania dzwonka
w trybie gotowoci.
Na wywietlaczu pojawi si5 symbol
i uaktywni
si5 blokada klawiszy.
Przy w!czonej blokadzie klawiszy nacini5cie dowolnego klawisza
w trybie gotowoci nie b5dzie miao "adnego efektu (z wyj!tkiem
nacini5cia klawisza blokady).
1 Nacinij i przytrzymaj klawisz blokady klawiszy.
Na wywietlaczu pojawi si5 symbol.
2 Nacinij ponownie klawisz blokady klawiszy w
celu odblokowania klawiszy.
Gdy klawisze s! zablokowane, mo"esz odebra§
po!czenie przychodz!ce przez nacini5cie klawisza
odbierania po!czenia . Podczas rozmowy klawisze
dziaaj! normalnie. Blokada jest w!czana ponownie
po zako¦czeniu rozmowy.
321
Polski
4.9 Blokada klawiszy
Obsuga telefonu
4.10 Nazwa suchawki
Nazw5 widoczn! na wywietlaczu (maksymalnie 12 znaków) mo"na
zmieni§, gdy nie jest wykonywane "adne po!czenie.
1 Nacinij klawisz Menu/OK.
OK
OK 2 Wybierz opcj5 „HANDSET” i potwierd©.
OK 3 Wybierz opcj5 „HANDSET NAME” i potwierd©.
4 5 6 4 Usu¦ star! nazw5 przy u"yciu klawisza wyciszania
i wprowad© now! nazw5.
5 Nacinij klawisz w celu potwierdzenia.
OK
6 Nacinij klawisz wyjcia, aby powróci§ do
ESC
trybu gotowoci.
G
H
I
J
K
L
M
N
O
4.11 Wczanie i wyczanie dwiku klawiatury
1
OK
OK 2
OK 3
4
OK
5
ESC
6
Nacinij klawisz Menu/OK.
Wybierz opcj5 „HANDSET” i potwierd©.
Wybierz opcj5 „KEYPAD BEEP” i potwierd©.
Wybierz opcj5 „ON” lub „OFF”.
Nacinij klawisz w celu potwierdzenia.
Nacinij klawisz wyjcia, aby powróci§ do
trybu gotowoci.
4.12 Ksika telefoniczna
W pami5ci ksi!"ki telefonicznej mo"na zapisa§ 50 wpisów. Nazwy
mog! zawiera§ do 16 znaków, a numery telefoniczne do 24 cyfr.
Dodawanie wpisu do ksiki telefonicznej
1 Nacinij klawisz ksi!"ki telefonicznej.
OK 2 Nacinij dwukrotnie klawisz OK.
OK
4 5 6 OK 3 Wprowad© nazw5 i potwierd©.
4 5 6 OK 4 Wprowad© numer telefonu i potwierd©.
Usyszysz sygna potwierdzenia.
G
H
I
J
K
L
M
N
O
G
H
I
J
K
L
M
N
O
Szybkie wybieranie numeru
1 Nacinij klawisz ksi!"ki telefonicznej.
2 Przejd© do wybranej nazwy lub wprowad© pierwsze
litery tej nazwy.
4 5 6
G
H
I
322
J
K
L
M
N
O
Obsuga telefonu
Nacinij klawisz ksi!"ki telefonicznej, aby
wywietli§ numer telefonu.
4 Nacinij klawisz po!czenia.
Numer telefonu zostanie wybrany automatycznie.
5 Nacinij klawisz zako¦czenia po!czenia, aby
zako¦czy§ rozmow5.
3
Edytowanie wpisu w ksice telefonicznej
1 Nacinij klawisz ksi!"ki telefonicznej.
2 Przejd© do wybranej nazwy lub wprowad© pierwsze
litery tej nazwy.
4 5 6
3 Nacinij klawisz ksi!"ki telefonicznej, aby
wywietli§ numer telefonu.
4 Nacinij klawisz Menu/OK.
OK
OK 5 Wybierz opcj5 „EDIT ENTRY” i potwierd©.
4 5 6 OK 6 Wprowad© nazw5 i potwierd©.
4 5 6 OK 7 Wprowad© lub edytuj numer telefonu i potwierd©.
G
H
I
J
K
L
M
N
O
G
H
I
J
K
L
M
N
O
J
K
L
M
N
O
Usuwanie jednego wpisu lub wszystkich wpisów z
ksiki telefonicznej
1 Nacinij klawisz ksi!"ki telefonicznej.
2 Przejd© do wybranej nazwy lub wprowad© pierwsze
litery tej nazwy.
4 5 6
3 Nacinij klawisz ksi!"ki telefonicznej, aby
wywietli§ numer telefonu.
4 Nacinij klawisz Menu/OK.
OK
5 Wybierz opcj5 „DELETE ENTRY”, aby usun!§
bie"!cy wpis ksi!"ki telefonicznej, i potwierd©.
OK
LUB
6 Wybierz opcj5 „DELETE ALL” w celu usuni5cia
wszystkich wpisów ksi!"ki telefonicznej i potwierd©.
OK
ESC 7 Ponownie potwierd© lub nacinij klawisz wyjcia,
OK
aby pomin!§ ten krok.
G
H
I
J
K
L
M
N
O
4.13 Identyfikacja rozmówcy (CLIP)
Telefon Sologic B921 wywietla numery rozmów przychodz!cych.
Ta funkcja jest dost5pna wy!cznie, jeli usuga zostaa udost5pniona
323
Polski
G
H
I
Obsuga telefonu
przez operatora linii telefonicznej. Aby uzyska§ wi5cej informacji na
ten temat, skontaktuj si5 z operatorem.
Gdy odbierasz rozmow5, numer telefonu jest zapisywany na licie
po!cze¦. Lista przechowuje do 30 numerów telefonicznych
(ka"dy o dugoci do 23 cyfr).
Jeli numer telefoniczny zawiera wi5cej ni" 12 cyfr,
mo"esz przewin!§ w prawo, aby wywietli§
pozostae cyfry.
Nowe poczenia
Jeli na licie po!cze¦ znajduje si5 nowa rozmowa,
na wywietlaczu miga symbol CLIP.
Otwieranie listy pocze
Nacinij klawisz listy po!cze¦.
Wywietli si5 ostatnia odebrana rozmowa. Jeli lista
po!cze¦ jest pusta, na wywietlaczu pojawi si5
komunikat „EMPTY”.
2 Nacinij klawisz ksi!"ki telefonicznej, aby pomin!§
numer.
3 Nacinij klawisz ksi!"ki telefonicznej, aby pomin!§
dat5 i godzin5.
4 Przewijaj list5 za pomoc! klawiszy „W gór5” i
„W dó”.
5 Aby zamkn!§ list5 po!cze¦, nacinij
klawisz wyjcia.
1
ESC
Wybieranie numeru z listy pocze
1 Nacinij klawisz listy po!cze¦.
2 Przewijaj list5 po!cze¦, a" zostanie wywietlony
"!dany numer.
3 Nacinij klawisz po!czenia, aby
rozpocz!§ rozmow5.
Numer telefonu zostanie wybrany automatycznie.
4 Nacinij klawisz zako¦czenia po!czenia, aby
zako¦czy§ rozmow5.
324
Obsuga telefonu
Usuwanie numeru z listy pocze
1
2
3
OK
4
OK
5
OK
ESC 6
OK
Nacinij klawisz listy po!cze¦.
Przewijaj list5 po!cze¦, a" zostanie wywietlony
"!dany numer.
Nacinij klawisz Menu/OK.
Wybierz opcj5 „DELETE”, aby usun!§ bie"!cy
numer telefoniczny, i potwierd©.
LUB
Wybierz opcj „DELETE ALL”, aby usun!§
wszystkie wpisy w ksi!"ce telefonicznej, a
nast5pnie potwierd©.
Nacinij klawisz , aby potwierdzi§, lub klawisz
wyjcia, aby powróci§ do poprzednich opcji.
Zapisywanie numeru na licie pocze jako numeru
szybkiego wybierania
1 Nacinij klawisz listy po!cze¦.
2 Przewijaj list5 po!cze¦, a" zostanie wywietlony
"!dany numer.
3 Nacinij klawisz Menu/OK.
OK
OK 4 Wybierz opcj5 „SAVE TO PB” i potwierd©.
4 5 6 OK 5 Edytuj lub dodaj nazw5 i potwierd©.
4 5 6 OK 6 Edytuj numer telefonu i potwierd©.
G
H
I
J
K
L
M
N
O
G
H
I
J
K
L
M
N
O
Ta funkcja powoduje usuni5cie wszystkich wprowadzonych zmian i
przywrócenie wszystkich ustawie¦ domylnych (gono§ dzwonka,
typ dzwonka itp.). Powoduje równie" usuni5cie listy po!cze¦, listy
ponownego wybierania i ksi!"ki telefonicznej.
1 Nacinij klawisz Menu/OK.
OK
OK 2 Wybierz opcj5 „HANDSET” i potwierd©.
OK OK 3 Wybierz opcj5 „RESET” i potwierd©.
4 Wprowad© kod PIN stacji bazowej 4 5 6
(domylny kod: 0000).
5 Urz!dzenie powróci do trybu gotowoci.
G
H
I
J
K
L
M
N
O
325
Polski
4.14 Przywracanie domylnych ustawie suchawki
Base settings
Ustawienia domylne:
Nazwa suchawki
Regulacja gonoci suchawki
Gono§ dzwonka
Dzwonek dla po!cze¦ zewn5trznych
Dzwonek dla po!cze¦ wewn5trznych
D©wi5k klawiatury
HANDSET
Poziom 3
Poziom 3
Dzwonek 8
Dzwonek 1
ON
4.15 Ustawienia aparatu bazowego
Ta funkcja wywietlacza jest dost5pna tylko wtedy, gdy w!czono
usug5 poczty gosowej lub wiadomoci telefonicznych, a operator
telefoniczny przekazuje te informacje razem z identyfikatorem
rozmówcy. W przypadku odebrania nowej wiadomoci poczty
gosowej na wywietlaczu pojawi si5 symbol
. Po odsuchaniu
wiadomoci symbol
znika.
5 Base settings
Informacje
W tym rozdziale opisano tylko ustawienia
przechowywane w stacji bazowej!
5.1 Wybieranie dwiku dzwonka i ustawianie jego
gonoci
Gono dzwonka suchawki dla pocze wewntrznych/
zewntrznych
1 Nacinij klawisz Menu/OK.
OK
OK 2 Wybierz opcj5 „BASE” i potwierd©.
s
OK 3 Wybierz opcj5 „RING TONE” i potwierd©.
4 Wybierz melodi5 dzwonka (z zakresu od 1 do 9)
i potwierd©.
OK
Gono dzwonka aparatu bazowego
1 Nacinij klawisz Menu/OK.
OK
OK 2 Wybierz opcj5 „BASE” i potwierd©.
OK 3 Wybierz opcj5 „RING VOLUME” i potwierd©.
4 Wybierz "!dan! gono§ (wy!czone lub od 1 do 5) i potwierd©.
OK
326
Base settings
5.2 Ustawianie trybu wybierania numeru
Dost5pne s! dwa tryby wybierania numerów telefonów:
— DTMF/wybieranie tonowe (najcz5ciej stosowany)
— Tryb wybierania impulsowego (wymagany tylko w przypadku
korzystania z urz!dzenia w starszym systemie PBX)
OK
1
OK 2
OK 3
OK 4
Nacinij klawisz Menu/OK.
Wybierz opcj5 „BASE” i potwierd©.
Wybierz opcj5 „DIAL MODE” i potwierd©.
Wybierz opcj5 „TONE” lub „PULSE” i potwierd©.
5.3 Ustawianie kodu PIN dla systemu
Niektóre funkcje dost5pne s! tylko po wprowadzeniu kodu
PIN stacji bazowej.
Dugo§ kodu PIN wynosi 4 znaki. Domylny kod PIN to „0000”.
Aby zmieni§ kod PIN i ustawi§ wasny kod PIN, nale"y wykona§
nast5puj!ce czynnoci:
1 Nacinij klawisz Menu/OK.
OK
OK 2 Wybierz opcj5 „BASE” i potwierd©.
OK 3 Wybierz opcj5 „SYSTEM PIN” i potwierd©.
4 Wprowad© stary kod w polu „OLD PIN” i nacinij
4 5 6
klawisz OK.
OK
4 5 6 OK 5 Wprowad© kod w polu „NEW PIN” i potwierd©.
G
H
I
J
K
L
M
N
O
G
H
I
J
K
L
M
N
O
Nacini5cie klawisza Flash umo"liwia korzystanie ze specjalnych
usug na linii zewn5trznej, takich jak po!czenia oczekuj!ce (pod
warunkiem, "e operator linii telefonicznej udost5pnia tak! usug5) lub
przekazywanie po!cze¦ w przypadku korzystania z systemu PBX.
Nacini5cie klawisza R chwilowo przerywa po!czenie. Dla czasu
przerwania po!czenia mo"na ustawi§ warto§ 100 ms lub 300 ms.
Jeli jednak u"ywany system wymaga du"szego czasu, mo"na
zmieni§ to ustawienie.
1 Nacinij klawisz Menu/OK.
OK
OK 2 Wybierz opcj5 „BASE” i potwierd©.
OK 3 Wybierz opcj5 „RECALL” i potwierd©.
OK 4 Wybierz opcj5 „LONG” lub „SHORT” i potwierd©.
327
Polski
5.4 Klawisz R (Flash)
Rejestrowanie i wyrejestrowywanie suchawki
6 Rejestrowanie i wyrejestrowywanie suchawki
6.1 Rejestrowanie suchawki w stacji bazowej Sologic B921
W jednej stacji bazowej mo"na zarejestrowa§ do 4 suchawek.
Ka"da udost5pniona suchawka jest domylnie zarejestrowana
w stacji bazowej.
Zarejestrowanie suchawki jest konieczne tylko w
nast5puj!cych sytuacjach:
• Suchawka zostaa wczeniej wyrejestrowana z danej stacji
bazowej (np. w celu ponownego uruchomienia suchawki).
• U"ytkownik chce zarejestrowa§ inn! suchawk5 w stacji bazowej.
Poni"szy opis dotyczy tylko suchawek i stacji bazowych Sologic B921.
Nacinij i przytrzymaj przez 10 sekund klawisz
przywoywania na stacji bazowej.
2 Nacinij klawisz Menu/OK na suchawce.
3 Wybierz opcj5 „REGISTER” i potwierd©.
4 Wprowad© numer stacji bazowej (1–4), w której
chcesz zarejestrowa§ suchawk5.
5 Urz!dzenie rozpocznie wyszukiwanie stacji
bazowej. Gdy stacja bazowa zostanie znaleziona,
zostanie wywietlony monit o podanie
czterocyfrowego kodu PIN.
6 Wprowad© kod PIN stacji bazowej (domylny kod:
0000). Jeli kod PIN jest nieprawidowy, suchawka
ponownie rozpocznie wyszukiwanie stacji bazowej.
Gdy suchawka zostanie zarejestrowana, na
wywietlaczu pojawi si5 nazwa i numer suchawki.
1
OK
4 5 6
G
H
I
J
K
L
M
N
O
4 5 6
G
H
I
J
K
L
M
N
O
6.2 Wyrejestrowywanie suchawki ze stacji bazowej
Sologic B921.
1
OK
OK 2
3
4 5 6
G
H
I
J
K
L
M
N
O
OK
4
4 5 6
G
H
I
J
K
L
M
N
O
OK
328
Nacinij klawisz Menu/OK.
Wybierz opcj5 „DE-REGISTER” i potwierd©.
Wprowad© kod PIN stacji bazowej (domylny kod: 0000).
Wprowad© wewn5trzny numer suchawki, któr!
chcesz wyrejestrowa§ (1–4), i potwierd©.
Rejestrowanie i wyrejestrowywanie suchawki
Gdy suchawka zostanie pomylnie wyrejestrowana,
powróci do trybu gotowoci. W przeciwnym razie
zostanie wywietlony monit o ponowne
wprowadzenie numeru suchawki.
Wane
Suchawki mo"na wyrejestrowa§ tylko wtedy, gdy nie s! u"ywane.
6.3 Wybieranie stacji bazowej
Jeli suchawka jest zarejestrowana w wielu stacjach bazowych
(maksymalnie w 4), nale"y wybra§ jedn! ze stacji, poniewa"
suchawka mo"e by§ po!czona jednoczenie tylko z jedn! stacj!
bazow!. Dost5pne s! dwie mo"liwoci:
Informacje Jeli suchawka dziaaj!ca w trybie
automatycznego wybierania zostanie przeniesiona
poza zasi5g bie"!cej stacji bazowej, to b5dzie
wyszukiwana tylko najbli"sza stacja bazowa, która
jest w trybie gotowoci, a nie w trakcie po!czenia.
Wybieranie rczne
Suchawka dziaaj!ca w trybie r5cznego wybierania wyszukuje
tylko stacj5 bazow! wybran! przez u"ytkownika.
1 Nacinij klawisz Menu/OK.
OK
OK 2 Wybierz opcj5 „HANDSET” i potwierd©.
OK 3 Wybierz opcj5 „SELECT BASE” i potwierd©.
OK 4 Wybierz opcj5 „MANUAL” i potwierd©.
OK 5 Wybierz stacj5 bazow! i potwierd©.
329
Polski
Wybieranie automatyczne
Suchawka dziaaj!ca w trybie automatycznego wybierania
automatycznie wyszukuje najbli"sz! stacj5 bazow! w
trybie gotowoci.
1 Nacinij klawisz Menu/OK.
OK
OK 2 Wybierz opcj5 „HANDSET” i potwierd©.
OK 3 Wybierz opcj5 „SELECT BASE” i potwierd©.
OK 4 Wybierz opcj5 „AUTOMATIC” i potwierd©.
Przekazywanie rozmów i po!czenia wewn5trzne pomi5dzy suchawkami
Wane
Suchawka mo"e nawi!za§ po!czenie tylko ze
stacj! bazow!, w której jest zarejestrowana.
7 Przekazywanie rozmów i poczenia wewntrzne
pomidzy suchawkami
7.1 Przekazywanie rozmów i rozmowy konferencyjne
podczas rozmowy zewntrznej
4 5 6
G
H
I
INT
INT
W czasie rozmowy zewn5trznej nacinij klawisz
INT, a nast5pnie wybierz numer suchawki (1–4).
Druga suchawka zacznie dzwoni§.
Po nawi!zaniu po!czenia ze suchawk! mo"na
wykona§ rozmow5 wewn5trzn!. Gdy odo"ysz
suchawk5, linia zewn5trzna zostanie prze!czona
na drug! suchawk5.
2 Przytrzymaj klawisz INT przez 3 sekundy. Mo"esz teraz jednoczenie rozmawia§ z osob!
obsuguj!c! drug! suchawk5 i lini! zewn5trzn!
(rozmowa konferencyjna).
3 Nacinij ponownie klawisz INT w celu powrotu do rozmowy zewn5trznej.
4 Nacinij klawisz zako¦czenia po!czenia, aby
zako¦czy§ rozmow5.
1
INT
J
K
L
M
N
O
8 Skróty i terminy techniczne
CLIP
Prezentacja identyfikatora rozmówcy (Calling Line Identification
Presentation) — polega na wywietlaniu numeru telefonu osoby
dzwoni!cej na wywietlaczu rozmówcy.
DECT
Digital Enhanced Cordless Telecommunication — europejski standard
telekomunikacyjny dla cyfrowych telefonów bezprzewodowych.
Tryb ECO
Tryb ekonomiczny — w telefonii w standardzie DECT oznacza to
dziaanie telefonu w trybie niskiego promieniowania.
330
Klawisz Flash
Powoduje krótkie przerwanie po!czenia w celu w!czenia takich
funkcji jak prze!czanie lub przekazywanie po!cze¦. W systemie PBX
klawisz Flash (R) umo"liwia przywoanie po!czenia wewn5trznego.
GAP
Ogólny profil dost5pu (Generic Access Profile) — interfejs uatwiaj!cy
nawi!zanie po!czenia bezprzewodowego mi5dzy stacj! bazow!
i suchawk!.
INT
Rozmówca wewn5trzny. Inna suchawka lub inne numery wewn5trzne
w systemie PBX.
Tryb impulsowy
Przestarzay analogowy tryb wybierania numerów (brz5cz!cy d©wi5k
podczas wybierania numeru).
LCD
Wywietlacz ciekokrystaliczny (Liquid Crystal Display).
LED
Dioda elektroluminescencyjna (Light Emitting Diode).
DTMF
Dual Tone Multiple Frequency — obecnie stosowany cyfrowy tryb
wybierania numerów.
PIN
Osobisty numer identyfikacyjny (Personal Identification Number).
Klawisz R
Klawisz przywoywania (zobacz „Klawisz Flash”).
Tryb gotowoci
Stan bezczynnoci urz!dzenia, które nie jest zupenie wy!czone.
Twin
Przypisanie do jednego urz!dzenia dwóch identycznych urz!dze¦,
np. dwóch suchawek.
331
Polski
Skróty i terminy techniczne
Rozwi!zywanie problemów
9 Rozwizywanie problemów
Problem
Prawdopodobna
przyczyna
Wywietlacz
nie dziaa.
Akumulatorki nie
s! naadowane.
Brak d©wi5ku.
Kabel telefoniczny
nie jest poprawnie
pod!czony.
Linia jest zaj5ta przez
inn! suchawk5.
Gos rozmówcy
jest zbyt cichy.
D©wi5k dzwonka
jest zbyt cichy.
Nie mo"na wybra§
numeru.
Symbol
miga.
Ustawiono
nieprawidowy tryb
wybierania numerów.
Suchawka jest poza
zasi5giem.
Brak zasilania stacji
bazowej.
332
Rozwizanie
Sprawd©, czy
poprawnie wo"ono
oba akumulatorki.
Naaduj akumulatorki.
Sprawd© pod!czenie
kabla.
Poczekaj na
zako¦czenie rozmowy
z drugiej suchawki.
Dostosuj gono§
w trakcie po!czenia
przy u"yciu klawisza
gonoci.
Dostosuj gono§
dzwonka.
Informacje na temat
ustawiania
prawidowego trybu
wybierania numerów
mo"na znale©§ w
rozdziale „5.2
Ustawianie trybu
wybierania numeru“.
Przenie suchawk5
w obszarze obj5tym
zasi5giem stacji
bazowej.
Sprawd© zasilacz
sieciowy i kabel
zasilania.
Serwis
Problem
Prawdopodobna
przyczyna
Suchawka nie jest
zarejestrowana w stacji
bazowej.
Dzwonek jest zbyt
cichy lub zosta
wy!czony.
Czas przerwania jest
zbyt krótki.
Stacja bazowa
lub suchawka
nie dzwoni.
Nie mo"na
przekaza§
po!czenia na numer
wewn5trzny.
Telefon nie
B!d dziaania.
odpowiada na
naciskanie klawiszy.
Rozwizanie
Zarejestruj suchawk5
w stacji bazowej.
Dostosuj gono§
dzwonka.
Ustaw du"szy czas
przerwania na
urz!dzeniu.
Wyjmij i ponownie
wó" akumulatorki.
Nie wolno modyfikowa§ ani naprawia§ urz!dzenia. Urz!dzenie lub
przewód mog! by§ naprawiane wy!cznie przez specjalist5 w centrum
serwisowym. Naprawy, które nie zostay przeprowadzone prawidowo,
mog! by§ przyczyn! znacznego niebezpiecze¦stwa dla u"ytkownika.
10 Serwis
10.1 Konserwacja
Polski
Urz!dzenie nie wymaga konserwacji. Co pewien czas nale"y
sprawdza§ stan akumulatorków i w przypadku obni"enia ich
wydajnoci lub wycieku wymieni§ je na nowe akumulatorki tego
samego typu.
Ostrzeenie Niebezpieczestwo oparze chemicznych!
Zu"yte akumulatorki nale"y wyjmowa§ w
r5kawicach ochronnych.
Jeli urz!dzenie zetknie si5 z pynem, nale"y natychmiast wyj!§
akumulatorki oraz od!czy§ urz!dzenie od zasilania (stacji bazowej) i
ostro"nie je wysuszy§. Po 2–3 dniach nale"y sprawdzi§ jego dziaanie.
Jeli b5dzie wadliwe, nale"y je odesa§ do centrum serwisowego.
333
Serwis
10.2 Czyszczenie
Ostrzeenie Ryzyko pora"enia pr!dem elektrycznym lub
zwarciem w wyniku kontaktu z elementami
przewodz!cymi pr!d.
Nale"y uwa"a§, aby do urz!dzenia nie dostay si5
pyny. Jeli tak si5 stanie, nale"y od!czy§ zasilacz
od gniazda sieciowego i od!czy§ kabel
telefoniczny od gniazda oraz wyj!§ akumulatorki.
T5 sam! czynno§ nale"y wykona§ w przypadku
uszkodzenia urz!dzenia, kabla lub zasilacza
sieciowego. Nale"y unika§ bezporedniego
kontaktu z pynami oraz natychmiast od!czy§
urz!dzenie od gniazda zasilania 230 V.
Telefon nale"y czyci§ szmatk! lekko zwil"on! letni! wod! lub
szmatk! antystatyczn!. Nie nale"y stosowa§ rodków czyszcz!cych
ani ciernych.
10.3 Wycofywanie z uytku i przechowywanie
Aby tymczasowo wycofa§ urz!dzenie z u"ytku, nale"y od!czy§ kabel
telefoniczny od gniazda zasilania i gniazda telefonu w stacji bazowej.
Nale"y od!czy§ zasilacz sieciowy stacji bazowej i suchawki od
gniazda zasilania 230 V.
Akumulatorki nale"y wyjmowa§ ze suchawek. Jeli telefon by
wycofany z u"ytku przez dugi czas, przed ponownym rozpocz5ciem
jego u"ywania nale"y wymieni§ akumulatorki na nowe akumulatorki
tego samego typu.
Urz!dzenia i akumulatorki nale"y przechowywa§ w suchym i niezbyt
ciepym miejscu.
10.4 Utylizacja (ochrona rodowiska)
Po zako¦czeniu eksploatacji nie wolno wyrzuca§
urz!dzenia ani akumulatorków do mieci. Informuje o tym
niniejszy symbol znajduj!cy si5 na produkcie i/lub
opakowaniu. Urz!dzenie nale"y przekaza§ do punktu
utylizacji urz!dze¦ elektrycznych i elektronicznych.
Niektóre materiay zawarte w produkcie mog! tam zosta§
poddane recyklingowi. Recykling niektórych cz5ci i surowców ze
zu"ytych produktów pomaga chroni§ rodowisko.
334
Dane techniczne
Opakowanie równie" nale"y zutylizowa§ w sposób nieuci!"liwy
dla rodowiska. Aby uzyska§ informacje na temat punktów zbiórki
w okolicy, nale"y skontaktowa§ si5 z lokalnymi wadzami.
11 Dane techniczne
DECT (Digital Enhanced Cordless
Telecommunications)
GAP (Generic Access Profile — ogólny
profil dost5pu)
Zakres cz5stotliwoci
1 880 MHz do 1 900 MHz
Moc emisji radiowej
10 mW (rednio na kana)
Zasi5g
Do 300 m na otwartej przestrzeni; do 50 m w budynkach
Akumulatorki do
2 akumulatorki NiMH typu AAA o napi5ciu 1,2 V
suchawki
i pojemnoci 500 mAh
Zasilanie stacji bazowej
Wejcie: 100–240 V pr!du przemiennego / 50–60 Hz
Wyjcie: 6 V pr!du staego / 500 mA
Czas gotowoci suchawki 100 godzin w trybie gotowoci
Czas rozmowy ze
10 godzin
suchawki
Czas adowania
16 godzin
Dozwolona temperatura dziaania
Od + 5°C do + 45°C
Dozwolona wilgotno§
Od 25 do 85%
wzgl5dna
Tryby wybierania
Wybieranie impulsowe i tonowe (DTMF)
Czas Flash
100 lub 300 ms
Pami5§ suchawki dla
50 wpisów w ksi!"ce telefonicznej skadaj!cych
numerów telefonów
si5 z maksymalnie 24 cyfr i 16 liter
Wymiary stacja bazowa/ 117 mm x 117 mm x 60 mm /
suchawka
182 mm x 284 mm x 58 mm
Waga stacja bazowa/ 239 g z zasilaczem sieciowym /
suchawka
152 g z akumulatorkami
Maksymalny pobór mocy Stacja bazowa: 2,0 W
335
Polski
Standard
Gwarancja na urz!dzenie Topcom Sologic B921
12 Gwarancja na urzdzenie Topcom Sologic B921
12.1 Okres gwarancji
Urz!dzenia firmy Topcom s! obj5te 24-miesi5cznym okresem
gwarancji. Okres gwarancji rozpoczyna si5 w dniu zakupu nowego
urz!dzenia. Firma Topcom nie udziela "adnej gwarancji na baterie ani
akumulatorki (typu AA/AAA).
Cz5ci eksploatacyjne i wady niezauwa"alnie wpywaj!ce na dziaanie
lub warto§ sprz5tu nie s! obj5te gwarancj!.
Gwarancj5 nale"y powiadczy§, przedstawiaj!c dokument zakupu
(orygina lub kopi5), na którym widnieje data zakupu oraz
model urz!dzenia.
12.2 Obsuga gwarancyjna
Wadliwe urz!dzenie nale"y zwróci§ do centrum serwisowego firmy
Topcom wraz z wa"nym dokumentem zakupu oraz wypenion!
kart! serwisow!.
Jeli w urz!dzeniu wyst!pi usterka w trakcie trwania okresu gwarancji,
firma Topcom lub jej autoryzowany zakad serwisowy bezpatnie
usunie powsta! usterk5 spowodowan! wad! materiaow! lub
produkcyjn! przez napraw5 lub wymian5 urz!dzenia albo jego cz5ci.
W przypadku wymiany kolor i model urz!dzenia mog! ró"ni§ si5 od
urz!dzenia pierwotnie zakupionego.
Data pierwotnego zakupu okrela pocz!tek okresu gwarancyjnego.
Okres gwarancyjny nie ulega przedu"eniu, jeli urz!dzenie zostao
wymienione lub naprawione przez firm5 Topcom lub autoryzowane
centrum serwisowe.
12.3 Wyjtki od gwarancji
Uszkodzenia lub wady spowodowane nieprawidowym obchodzeniem
si5 z urz!dzeniem lub nieprawidowym korzystaniem z urz!dzenia
oraz uszkodzenia powstae w wyniku zastosowania nieoryginalnych
cz5ci lub akcesoriów nie s! obj5te gwarancj!.
Gwarancja nie obejmuje szkód wywoanych przez czynniki
zewn5trzne, takie jak pioruny, woda i ogie¦, ani uszkodze¦ powstaych
w czasie transportu.
Gwarancja nie ma zastosowania, jeli numer seryjny urz!dzenia
zosta zmieniony lub usuni5ty albo nie mo"e zosta§ odczytany.
336
Gwarancja na urz!dzenie Topcom Sologic B921
Wszelkie roszczenia gwarancyjne zostan! uznane za niewa"ne,
jeli urz!dzenie byo naprawiane, zmieniane lub modyfikowane
przez u"ytkownika.
Polski
Urz!dzenie to mo"e by§ u"ywane tylko z akumulatorkami. Jeli
u"ytkownik zamierza wymieni§ oryginalnie dostarczone akumulatorki,
powinien sprawdzi§, czy nowe akumulatorki s! odpowiednie i nadaj!
si5 do adowania. Pod "adnym pozorem baterie alkaliczne NIE mog!
by§ u"ywane w suchawkach.
W przypadku u"ycia baterii alkalicznych i umieszczenia suchawki
w stacji bazowej baterie ulegn! rozgrzaniu i mog! eksplodowa§.
Jakiekolwiek powstae w ten sposób szkody nie mog! by§ pokrywane
przez producenta i nie s! obj5te gwarancj!. U"ytkownik zostanie
obci!"ony kosztami takich napraw.
337
SOLOGIC B921
visit our websites
www.topcom.net
www.sologic.info
MD19200366