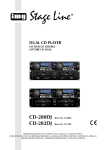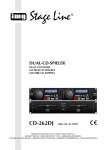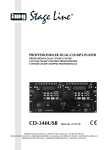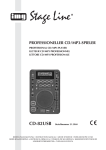
1
DUAL CD PLAYER
LECTEUR CD DOUBLE
LETTORE CD DUAL
CD-280DJ
Best.-Nr. 21.2040
BEDIENUNGSANLEITUNG • INSTRUCTION MANUAL • MODE D’EMPLOI
ISTRUZIONI PER L’USO • GEBRUIKSAANWIJZING • MANUAL DE INSTRUCCIONES • INSTRUKCJA OBSŁUGI
SIKKERHEDSOPLYSNINGER • SÄKERHETSFÖRESKRIFTER • TURVALLISUUDESTA
D
Bevor Sie einschalten ...
A
Wir wünschen Ihnen viel Spaß mit Ihrem neuen Gerät
von „img Stage Line“. Dabei soll Ihnen diese Bedienungsanleitung helfen, alle Funktionsmöglichkeiten kennen zu lernen. Die Beachtung der Anleitung vermeidet
außerdem Fehlbedienungen und schützt Sie und Ihr
Gerät vor eventuellen Schäden durch unsachgemäßen
Gebrauch.
We wish you much pleasure with your new unit by “img
Stage Line”. With these operating instructions you will be
able to get to know all functions of the unit. By following
these instructions false operations will be avoided, and
possible damage to yourself and your unit due to improper use will be prevented.
Den deutschen Text finden Sie auf den Seiten 4 – 13.
You will find the English text on the pages 4 – 13.
CH
GB
Before you switch on ...
F
Avant toute mise en service ...
B
Nous vous remercions d’avoir choisi un appareil “img
Stage Line” et vous souhaitons beaucoup de plaisir à
l’utiliser. Cette notice a pour objectif de vous aider à
mieux connaître les multiples facettes de l’appareil. En
outre, en respectant les conseils donnés, vous éviterez
toute mauvaise manipulation de sorte que vous-même et
votre appareil soient protégés de tout dommage.
Vi auguriamo buon divertimento con il Vostro nuovo
apparecchio “img Stage Line”. Le istruzioni per l’uso Vi
possono aiutare a conoscere tutte le possibili funzioni. E
rispettando quanto spiegato nelle istruzioni, evitate di
commettere degli errori, e così proteggete Voi stessi, ma
anche l’apparecchio, da eventuali rischi per uso improprio.
La version française se trouve pages 14 – 23.
Il testo italiano lo potete trovare alle pagine 14 – 23.
CH
NL
Voordat u inschakelt ...
B
Wij wensen u veel plezier met uw nieuw toestel van “img
Stage Line”. Met behulp van bijgaande gebruiksaanwijzing zal u alle functiemogelijkheden leren kennen.
Door deze instructies op te volgen zal een slechte werking vermeden worden, en zal een eventueel letsel aan
uzelf en schade aan uw toestel tengevolge van onzorgvuldig gebruik worden voorkomen.
I
E
S
Przed uruchomieniem ...
Antes de cualquier instalación ...
Tenemos de agradecerle el haber adquirido un aparato
“img Stage Line” y le deseamos un agradable uso. Este
manual quiere ayudarle a conocer las multiples facetas
de este aparato. La observación de las instrucciones
evita operaciones erróneas y protege Vd. y vuestro aparato contra todo daño posible por cualquier uso inadecuado.
La versión española se encuentra en las páginas 24 – 33.
U vindt de nederlandstalige tekst op de pagina’s 24 – 33.
PL
Prima di accendere ...
DK
Inden De tænder for apparatet ...
Życzymy zadowolenia z nowego produktu “img Stage
Line”. Dzięki tej instrukcji obsługi będą Państwo w
stanie poznać wszystkie funkcje tego urządzenia.
Stosując się do instrukcji unikną Państwo błędów i
ewentualnego uszkodzenia urządzenia na skutek nieprawidłowego użytkowania.
Vi ønsker Dem god fornøjelse med Deres nye “img
Stage Line” apparat. Læs oplysningerne for en sikker
brug af apparatet før ibrugtagning. Følg sikkerhedsoplysningerne for at undgå forkert betjening og for at
beskytte Dem og Deres apparat mod skade på grund af
forkert brug.
Tekst polski znajduje się na stronach 34 – 39.
Sikkerhedsoplysningerne finder De på side 40.
Förskrift
Vi önskar dig mycket nöje med din nya enhet från “img
Stage Line”. Läs gärna säkerhetsinstruktionerna innan
du använder enheten. Genom att följa säkerhetsinstruktionerna kan många problem undvikas, vilket annars kan
skada enheten.
FIN
Ennen virran kytkemistä …
Toivomme, että uusi “img Stage Line”-laitteesi tuo sinulle
paljon iloa ja hyötyä. Ole hyvä ja lue käyttöohjeet ennen
laitteen käyttöönottoa. Luettuasi käyttöohjeet voit käyttää laitetta turvallisesti ja vältyt laitteen väärinkäytöltä.
Käyttöohjeet löydät sivulta 40.
Du finner säkerhetsinstruktionerna på sidan 40.
w w w.imgstageline.com
2
1
2
➀
3
4
5
6
7
8
9
10 11
a
12
b
c
d e
f
g
h
13
➂
14
15
➁
16
17
18
22
19
20
i
24
➃
25
27
24
23
26
28
29
230 V~/50 Hz
DIGITAL
OUT
CONNECT TO
REMOTE CONTROL
L
LINE
OUT
➄
3
30
31
REMOTE
SELECT
LOCK
SW
R
32
k
21
23
START/
PAUSE
j
START/
PAUSE
DIGITAL
OUT
L
LINE
OUT
TACT
SW
R
30
31
32
22
l m
D
A
Bitte klappen Sie die Seite 3 heraus. Sie sehen
dann immer die beschriebenen Bedienelemente
und Anschlüsse.
1
CH
1.1 Steuereinheit (Abb. 1)
Inhalt
1
Übersicht der Bedienelemente und
Anschlüsse . . . . . . . . . . . . . . . . . . . . . . . . 4
1.1 Steuereinheit . . . . . . . . . . . . . . . . . . . . . . . . 4
1.1.1 Bedienfeld für Laufwerk 1 . . . . . . . . . . . . . 4
1.1.2 Display . . . . . . . . . . . . . . . . . . . . . . . . . . . 5
5.4
Anspielen eines Titels . . . . . . . . . . . . . . . . . 9
5.5
Funktion OUTRO . . . . . . . . . . . . . . . . . . . . 9
5.6
Schneller Vor- und Rücklauf . . . . . . . . . . . . 9
5.7
Genaues Anfahren einer Stelle . . . . . . . . . . 9
1.2
Laufwerkeinheit Frontseite . . . . . . . . . . . . . 6
1.3
Laufwerkeinheit Rückseite . . . . . . . . . . . . . 6
5.8 Geschwindigkeit und Tonhöhe verändern . . 9
5.8.1 Takt zwischen 2 Musikstücken angleichen
(„Pitch Bend“) . . . . . . . . . . . . . . . . . . . . . . 9
2
Hinweise für den sicheren Gebrauch . . . 6
5.9
3
Einsatzmöglichkeiten . . . . . . . . . . . . . . . . 6
Sprung zu einer zuvor bestimmten
Stelle (Cue-Punkt) . . . . . . . . . . . . . . . . . . 10
5.9.1 Taste BOP . . . . . . . . . . . . . . . . . . . . . . . 10
4
Gerät aufstellen und anschließen . . . . . . 6
5.10 Endlosschleife abspielen . . . . . . . . . . . . . . 10
5
Bedienung . . . . . . . . . . . . . . . . . . . . . . . . . 7
6
Eigene Titelfolge zusammenstellen . . . . 11
5.1
CD abspielen . . . . . . . . . . . . . . . . . . . . . . . . 7
6.1
Titelfolge programmieren . . . . . . . . . . . . . . 11
Anzeige der Titelnummer, Laufzeit, Taktschläge pro Minute und des Ruhemodus . . 7
5.2.1 Bargraph . . . . . . . . . . . . . . . . . . . . . . . . . . 7
5.2.2 Beatcounter . . . . . . . . . . . . . . . . . . . . . . . 8
5.2.3 Ruhemodus . . . . . . . . . . . . . . . . . . . . . . . 8
6.2
Programmierung überprüfen . . . . . . . . . . . 11
6.3
Programmierte Titelfolge abspielen . . . . . . 11
6.4
Programmierte Titelfolge löschen . . . . . . . 11
7
Faderstart über ein Mischpult . . . . . . . . 11
8
Pflege des Gerätes . . . . . . . . . . . . . . . . . 12
9
Technische Daten . . . . . . . . . . . . . . . . . . 12
10
Erklärung der Fachbegriffe . . . . . . . . . . 12
5.2
5.3 Betriebsart wählen . . . . . . . . . . . . . . . . . . . 8
5.3.1 Einzeltitelwiedergabe . . . . . . . . . . . . . . . . 8
5.3.2 Gesamttitelwiedergabe . . . . . . . . . . . . . . . 8
5.3.3 Relay-Betrieb – automatischer Start des
anderen Laufwerks . . . . . . . . . . . . . . . . . . 8
GB
Übersicht der Bedienelemente und
Anschlüsse
Please unfold page 3. Thus you will always be
able to see the operating elements and connections described.
1 Bedienfeld für Laufwerk 1 (Details siehe Abb. 2)
2 Bedienfeld für Laufwerk 2
3 Taste RELAY zum automatischen Starten des
anderen Laufwerks am Ende eines Titels oder
am Ende der CD (siehe Kapitel 5.3.3)
Die Funktion lässt sich nur aktivieren, wenn in
beiden Laufwerken eine CD eingelegt ist.
1.1.1 Bedienfeld für Laufwerk 1 (Abb. 2)
Die Bedienfelder für Laufwerk 1 und 2 sind identisch.
4 Taste
zum Öffnen und Schließen der CDSchublade (22)
(nicht möglich während der Wiedergabe)
5 Taste SEARCH (mit Kontroll-LED), um das Drehrad (16) auf die Funktion „schneller Vor-/Rücklauf“ umzuschalten
Hinweis: Wird das Drehrad im Wiedergabemodus 8 Sekunden nicht betätigt, erlischt die LED
und das Rad dient wieder für die Funktion „Pitch
Bend“ und im Pausenmodus zum exakten Anfahren einer bestimmten Stelle
6 Taste BOP zum Zurückspringen und sofortigen
Starten der Wiedergabe ab dem Anfang des
gerade laufenden Titels oder ab einem zuvor mit
der Taste CUE (17) gewählten Startpunkt
Durch mehrfaches kurzes Drücken dieser Taste
lassen sich Stottereffekte erzeugen.
7 Tasten TRACK zur Titelanwahl
Taste +10, um 10 Titel vorzuspringen
Taste
zum Anwählen des nächsten Titels
Taste
zum Sprung an den Anfang des gerade
laufenden Titels. Durch mehrfaches Drücken
der Taste
wird immer ein Titel weiter zurückgesprungen.
8 Taste CUE 1 für den Rücksprung zu einer zuvor
bestimmten Stelle (siehe Kap. 5.9)
1
Operating Elements and Connections
1.1 Control unit (fig. 1)
1 Control panel for player mechanism 1 (details
see fig. 2)
Contents
1
2 Control panel for player mechanism 2
Operating Elements and Connections . . .4
5.4
Short replay of a title beginning . . . . . . . . . . 9
1.1 Control unit . . . . . . . . . . . . . . . . . . . . . . . . . 4
1.1.1 Control panel for player mechanism 1 . . . 4
1.1.2 Display . . . . . . . . . . . . . . . . . . . . . . . . . . . 5
5.5
Function OUTRO . . . . . . . . . . . . . . . . . . . . 9
5.6
Fast forward and reverse . . . . . . . . . . . . . . 9
5.7
Precise selection of a spot . . . . . . . . . . . . . 9
3 Button RELAY for automatic start of the other
player mechanism at the end of a title or at the
end of the CD (see chapter 5.3.3)
The function can only be activated with a CD inserted in both player mechanisms.
5.8 Changing the speed and the pitch . . . . . . . 9
5.8.1 Matching the beat between 2 music pieces
(“Pitch Bend”) . . . . . . . . . . . . . . . . . . . . . . 9
1.1.1 Control panel for player mechanism 1 (fig. 2)
The control panels for player mechanisms 1 and 2
are identical.
1.2
Player mechanism unit, front panel . . . . . . . 6
1.3
Player mechanism unit, rear panel . . . . . . . 6
2
Safety Notes . . . . . . . . . . . . . . . . . . . . . . . 6
3
Applications . . . . . . . . . . . . . . . . . . . . . . . . 6
4
Setting up and Connecting the Unit . . . . 7
5
Operation . . . . . . . . . . . . . . . . . . . . . . . . . . 7
6
Compiling an Individual Title Sequence . 11
5.1
Replaying a CD . . . . . . . . . . . . . . . . . . . . . . 7
6.1
Programming a title sequence . . . . . . . . . . 11
Display of the title number, playing time,
beats per minute, and sleep mode . . . . . . . 7
5.2.1 Bar graph . . . . . . . . . . . . . . . . . . . . . . . . . 8
5.2.2 Beat counter . . . . . . . . . . . . . . . . . . . . . . . 8
5.2.3 Sleep mode . . . . . . . . . . . . . . . . . . . . . . . 8
6.2
Checking the programming . . . . . . . . . . . . 11
6.3
Replaying a programmed title sequence . . 11
6.4
Deleting a programmed title sequence . . . 11
7
Fader Start via a Mixer . . . . . . . . . . . . . . 11
8
Maintenance of the Unit . . . . . . . . . . . . . 12
9
Specifications . . . . . . . . . . . . . . . . . . . . . 12
10
Glossary . . . . . . . . . . . . . . . . . . . . . . . . . . 12
5.2
5.3 Selecting the operating mode . . . . . . . . . . . 8
5.3.1 Single title replay . . . . . . . . . . . . . . . . . . . 8
5.3.2 Total title replay . . . . . . . . . . . . . . . . . . . . . .
5.3.3 Relay mode – automatic start of the other
player mechanism . . . . . . . . . . . . . . . . . . 8
5.9
Return to a previously defined spot
(Cue point) . . . . . . . . . . . . . . . . . . . . . . . . 10
5.9.1 Button BOP . . . . . . . . . . . . . . . . . . . . . . .10
5.10 Replaying a continuous loop . . . . . . . . . . . 10
4 Button to open and close the CD tray (22)
(not possible during the replay)
5 Button SEARCH (with indicating LED) to switch
the rotary wheel (16) to the function “fast forward/reverse”
Note: If the rotary wheel is not actuated in the
replay mode for 8 seconds, the LED is extinguished and the wheel serves again for the
function “Pitch Bend” and in the pause mode for
exact positioning of a defined spot
6 Button BOP to return and immediately start the
replay from the beginning of the title currently
playing or from a starting point selected before
with the button CUE (17)
By repeated short actuation of this button, stutter
effects can be produced.
7 Buttons TRACK for title selection
button +10 to advance 10 titles
button
to select the next title
button
to return to the beginning of the title
currently playing. With each actuation of the button
, the unit always goes back one title.
8 Button CUE 1 to return to a previously defined
spot (see chapter 5.9)
4
9 Taste CONT./SINGLE zur Wahl des Betriebsmodus (siehe auch Kap. 5.3) und zum Ein-/Ausschalten der Funktion OUTRO
Grundeinstellung: Einzeltitelwiedergabe;
das Display signalisiert „AUTO
CUE SINGLE“ (d)
1. Tastendruck:
Wiedergabe aller Titel der CD;
das Display signalisiert „CONTINUE“ (c)
2. Tastendruck:
Zurückschalten auf die Grundeinstellung
Die Taste ca. 3 Sekunden gedrückt halten, bis im
Display „OUTRO“ (k) erscheint:
Einschalten der Funktion OUTRO zum Abspielen
der jeweils letzten 30 Sekunden der folgenden
Titel [Zum Ausschalten der Funktion entweder
die Taste erneut ca. 3 Sekunden gedrückt halten
oder die Taste TIME/STOP (10) kurz betätigen.]
10 Taste TIME/STOP:
wird die Taste länger als 3 Sekunden gedrückt
gehalten, stoppt das Laufwerk;
zur Umschaltung der Display-Zeitanzeige (j) die
Taste nur kurz antippen:
Grundeinstellung: Anzeige der Restzeit des laufenden Titels
1. Tastendruck:
Anzeige der bereits gespielten Zeit des laufenden Titels
2. Tastendruck:
Anzeige der Restzeit der gesamten CD
3. Tastendruck:
Zurückschalten auf die Grundeinstellung
11 Taste PROG. (mit Kontroll-LED) zum Programmieren einer beliebigen Titelfolge – siehe Kap. 6
12 Taste PITCH zur Wahl des Geschwindigkeitseinstellbereiches (max. ±8 % oder max. ±16 %
Abweichung von der Standardgeschwindigkeit),
der gewählte Bereich wird durch die entsprechende LED (13) neben der Taste angezeigt
13 LEDs zur Anzeige des mit der Taste PITCH (12)
gewählten Geschwindigkeitseinstellbereiches:
Blinken = der Regler PITCH CONTROL (14) ist
nicht aktiviert
9 Button CONT./SINGLE to select the operating
mode (also see chapter 5.3) and to activate/
deactivate the function OUTRO
Basic setting: single title replay;
the display indicates “AUTO
CUE SINGLE” (d)
1st actuation
of button:
replay of all titles of the CD;
the display indicates “CONTINUE” (c)
2nd actuation
of button:
return to the basic setting
Keep the button pressed for approx. 3 seconds
until “OUTRO” (k) is displayed:
Activation of the function OUTRO for replay of
the last 30 seconds each of the following titles
[To deactivate the function, either keep the button pressed again for approx. 3 seconds or
shortly actuate the button TIME/STOP (10).]
10 Button TIME/STOP:
If the button is kept pressed for more than 3 seconds, the player mechanism stops;
to switch over the time display (j), just press the
button shortly:
Basic setting: display of the remaining time of
the current title
1st actuation
of button:
display of the time already
played of the current title
2nd actuation
of button:
display of the remaining time of
the entire CD
3rd actuation
of button:
return to the basic setting
11 Button PROG. (with indicating LED) to programme any desired title sequence – see chap. 6
12 Button PITCH to select the speed adjusting
range (max. ±8 % or max. ±16 % deviation from
the standard speed), the selected range is displayed by the corresponding LED (13) next to the
button
14
15
16
17
18
19
20
21
konstantes Leuchten = der Regler wurde mit der
Taste ON/OFF (15) aktiviert
Schieberegler PITCH CONTROL zum Ändern
der Geschwindigkeit bzw. Tonhöhe (max. ±16 %);
die Einstellung des Reglers ist nur bei gedrückter
Taste ON/OFF (15) wirksam
Taste ON/OFF zum Aktivieren und Deaktivieren
des Reglers PITCH CONTROL (14)
Drehrad
1. Kontroll-LED der Taste SEARCH (5) aus:
für die Funktion „Pitch Bend“ und im Pausenmodus zum exakten Anfahren einer bestimmten Stelle
2. Taste SEARCH gedrückt, LED leuchtet:
für den schnellen Vor- und Rücklauf
Taste CUE zum Anspielen eines Titels und für
den Rücksprung zu einer zuvor bestimmten
Stelle (siehe Kap. 5.4 bzw. 5.9)
Taste PLAY/PAUSE
zum Umschalten zwischen Wiedergabe und Pause
Tasten zum Speichern und zur Wiedergabe
einer Endlosschleife:
Taste A zum Bestimmen des Startpunktes der
Schleife
Taste B/LOOP – EXIT zum Bestimmen des Endpunktes der Schleife und gleichzeitigem Starten der Schleife; zum Verlassen der Schleife
die Taste erneut drücken
Taste RELOOP zum erneuten Abspielen der
Schleife
Tasten PITCH BEND zur Anpassung des Taktes
eines Titels auf dem Laufwerk 1 an den eines
Titels auf dem Laufwerk 2
Solange eine der Tasten gedrückt gehalten wird,
erhöht bzw. reduziert sich die Standardgeschwindigkeit um 16 %.
Taste BPM/TAP für den manuellen Beatcounter
Um für einen Titel die Anzahl der Taktschläge
pro Minute zu ermitteln, die Taste einige Male
im Takt der Musik antippen: im Display wird
statt „PITCH“ (f) die Anzeige „BEAT“ (e) einge-
13 LEDs to indicate the speed adjusting range selected with the button PITCH (12)
flashing = the PITCH CONTROL (14) is not
activated
continuous lighting = the control has been activated with the button ON/OFF (15)
14 Sliding control PITCH CONTROL to modify the
speed or pitch (max. ±16 %); the adjustment of
the control is only effective with the button ON/
OFF (15) pressed
15 Button ON/OFF to activate and deactivate the
PITCH CONTROL (14)
16 Rotary wheel
1. Indicating LED of the button SEARCH (5)
extinguished:
for the function “Pitch Bend” and in the pause
mode for exact positioning of a desired spot
2. Button SEARCH pressed, LED lights up:
for the fast forward and reverse
17 Button CUE for short replay of a title beginning
and return to a previously defined spot (see
chapter 5.4 or 5.9)
18 Button PLAY/PAUSE
to switch between
replay and pause
19 Buttons to memorize and replay a continuous
loop:
button A to define the starting point of the loop
button B/LOOP – EXIT to define the end point of
the loop and to simultaneously start the loop;
to exit the loop, press the button once again
button RELOOP to replay the loop once again
20 Buttons PITCH BEND to synchronize the beat of
a title on player mechanism 1 to that of a title on
player mechanism 2
As long as one of the buttons is kept pressed, the
speed is by 16 % lower or higher than the standard speed.
21 Button BPM/TAP for the manual beat counter
To determine the number of beats per minute
for a title, shortly press the button several
times to the beat of the music: “BEAT” (e) is
blendet und das Anzeigefeld PITCH (h) gibt
statt der prozentualen Abweichung von der
Standardgeschwindigkeit die Anzahl der Taktschläge pro Minute des Titels an
Zum Zurückschalten auf Anzeige der Geschwindigkeitsabweichung die Taste ca. 3 Sekunden gedrückt halten, bis „BEAT“ erlischt
und wieder „PITCH“ angezeigt wird.
D
A
CH
1.1.2 Display (Abb. 3)
a Symbol für den Wiedergabemodus
b Symbol für den Pausenmodus
c Anzeige „CONTINUE“: signalisiert die Betriebsart „Gesamttitelwiedergabe“, siehe Position 9
Taste CONT./SINGLE
d Anzeige „AUTO CUE SINGLE“: signalisiert die
Betriebsart „Einzeltitelwiedergabe“
e Anzeige „BEAT“: signalisiert, dass rechts oben
im Display [Anzeigefeld (h)] die Taktschläge pro
Minute angezeigt werden, siehe Position 21
Taste BPM/TAP
f Anzeige „PITCH“: signalisiert, dass rechts oben
im Display [Anzeigefeld (h)] die prozentuale Abweichung von der Standardgeschwindigkeit [eingestellt mit dem Regler (14)] angezeigt wird
g Bargraph: gibt durch seine Länge die Restzeit
eines Titels bzw. der CD an [„REMAIN“ (m) eingeblendet] oder die bereits gespielte Zeit eines
Titels („REMAIN“ ausgeblendet)
h Anzeige der mit dem Regler PITCH CONTROL
(14) eingestellten prozentualen Abweichung von
der Standardgeschwindigkeit bzw. Anzeige der
Taktschläge pro Minute nach dem Umschalten
mit der Taste BPM/TAP (21)
i Titelnummer bzw. kurz nach dem Einlegen einer
CD die Anzahl der Titel auf der CD
j Zeitanzeige in Minuten (M), Sekunden (S) und
Frames (F); siehe Position 10 Taste TIME/ STOP
k Anzeige „OUTRO“: signalisiert die Funktion
OUTRO, siehe Position 9 Taste CONT./SINGLE
displayed instead of “PITCH” (f) and the display field PITCH (h) indicates the number of
beats per minute of the title instead of the percentage deviation from the standard speed
To switch back to display of the speed deviation, keep the button pressed for approx.
3 seconds until “BEAT” is extinguished and
“PITCH” is displayed again.
GB
1.1.2 Display (fig. 3)
a symbol for the replay mode
b symbol for the pause mode
c display “CONTINUE”: indicates the operating
mode “total title replay”, see item 9 button CONT./
SINGLE
d display “AUTO CUE SINGLE”: indicates the
operating mode “single title replay”
e display “BEAT”: indicates that on the top right of
the display [display field (h)] the beats per minute
are displayed, see item 21 button BPM/TAP
f display “PITCH”: indicates that on the top right of
the display [display field (h)] the percentage
deviation from the standard speed [set with the
control (14)] is displayed
g bar graph: its length indicates the remaining time
of a title or CD [“REMAIN” (m) displayed] or the
time already played of a title (“REMAIN” extinguished)
h display of the percentage deviation from the
standard speed adjusted with the PITCH CONTROL (14) or display of the beats per minute
after actuation with the button BPM/TAP (21)
i title number or, shortly after inserting a CD, the
number of titles on the CD
j time display in minutes (M), seconds (S), and
frames (F); see item 10 button TIME/STOP
k display “OUTRO”: indicates the function OUTRO,
see item 9 button CONT./SINGLE
l display “LOOP”: is displayed if a continuous loop
is replayed (chapter 5.10)
5
D
A
CH
l Anzeige „LOOP“: ist eingeblendet, wenn eine
Endlosschleife abgespielt wird (Kap. 5.10)
m Anzeige „REMAIN“: signalisiert, dass die Zeitanzeige (j) die Restzeit eines Titels oder der CD
angibt
1.2 Laufwerkeinheit Frontseite (Abb. 4)
22 CD-Schublade für das jeweilige Laufwerk
23 Beleuchtung für die CD-Schublade (22)
24 Taste
zum Öffnen und Schließen der jeweiilgen CD-Schublade (22)
(nicht möglich während der Wiedergabe)
25 Betriebsanzeige
26 Ein-/Ausschalter POWER
1.3 Laufwerkeinheit Rückseite (Abb. 5)
27 8-polige Mini-DIN-Buchse zur Verbindung von
Laufwerkeinheit und Steuereinheit:
die Buchse über das beiliegende Mini-DIN-Kabel
an die Buchse REMOTE CONTROL CONNECT
TO MAIN UNIT auf der Rückseite der Steuereinheit anschließen; dabei das Kabelende mit der
Entstördrossel (kleines Kästchen) in die Buchse
der Laufwerkeinheit stecken.
28 Umschalter REMOTE SELECT für die Art der
Fernsteuerung über die Buchsen START/PAUSE
(30), siehe Kap. 7
TACT SW:
Für die Steuerung über einen Taster
LOCK SW:
Für die Steuerung über einen Ein-/Ausschalter
29 Netzkabel zum Anschluss an eine Steckdose
(230 V~/50 Hz)
30 3,5-mm-Mono-Klinkenbuchse für die Fernsteuerung der Funktion „Start/Pause“ des jeweiligen
Laufwerks von einem Mischpult aus, siehe Kap. 7
31 digitaler Audioausgang (Cinch) des jeweiligen
Laufwerks
32 analoger Audioausgang mit Line-Pegel (Cinch,
Links/Rechts) des jeweiligen Laufwerks
GB
Hinweise für den sicheren Gebrauch
●
Dieses Gerät entspricht der Richtlinie für elektromagnetische Verträglichkeit 89/336/EWG und der
Niederspannungsrichtlinie 73/23/EWG.
●
2
Achtung! Das Gerät wird mit lebensgefährlicher
Netzspannung (230 V~) versorgt. Nehmen Sie deshalb niemals selbst Eingriffe am Gerät vor. Durch unsachgemäßes Vorgehen besteht die Gefahr
eines elektrischen Schlages. Außerdem
erlischt beim Öffnen des Gerätes jeglicher Garantieanspruch.
Beachten Sie auch unbedingt die folgenden Punkte:
● Vorsicht! Blicken Sie bei geöffneter CD-Schublade nicht in den CD-Schacht. Eventuell austretende Laserstrahlen können zu Augenschäden
führen.
● Verwenden Sie das Gerät nur im Innenbereich.
Schützen Sie es vor Tropf- und Spritzwasser, hoher Luftfeuchtigkeit und Hitze (zulässiger Einsatztemperaturbereich 0 – 40 °C).
● Stellen Sie keine mit Flüssigkeit gefüllten Gefäße,
z. B. Vasen oder Trinkgläser, auf das Gerät.
● Die in dem Gerät entstehende Wärme muss durch
Luftzirkulation abgegeben werden. Decken sie darum die Lüftungsschlitze des Gehäuses nicht ab.
● Stecken Sie nichts durch die Lüftungsschlitze! Dabei kann es zu einem elektrischen Schlag kommen.
● Nehmen Sie das Gerät nicht in Betrieb bzw. ziehen Sie sofort den Netzstecker, wenn:
1. sichtbare Schäden am Gerät oder an der Netzanschlussleitung vorhanden sind,
2. nach einem Sturz oder Ähnlichem der Verdacht
auf einen Defekt besteht,
3. Funktionsstörungen auftreten.
Geben Sie das Gerät in jedem Fall zur Reparatur
in eine Fachwerkstatt.
● Eine beschädigte Netzanschlussleitung darf nur
durch den Hersteller oder eine autorisierte Fachwerkstatt ersetzt werden.
m display “REMAIN”: indicates that the remaining
time of a title or CD is displayed by the time display (j)
2
1.2 Player mechanism unit, front panel (fig. 4)
Attention! The unit is supplied with hazardous
mains voltage (230 V~). Leave servicing to skilled personnel only. Inexpert
handling may cause an electric shock
hazard. Furthermore, any guarantee
claim will expire if the unit has been
opened.
22 CD tray for the respective player mechanism
23 Illumination for the CD tray (22)
24 Button
to open and close the respective CD
tray (22)
(not possible during the replay)
25 Power LED
26 POWER switch
This unit corresponds to the directive 89/336/EEC
for electromagnetic compatibility and to the low voltage directive 73/23/EEC.
28 Selector switch REMOTE SELECT for the type
of remote control via the jacks START/PAUSE
(30), see chapter 7
TACT SW:
for the control via a momentary push-button
LOCK SW:
for the control via an on/off switch
●
Caution! Do no look directly into the CD compartment with the CD tray opened. Laser beams can
be emitted which may cause eye damage.
●
The unit is suitable for indoor use only. Protect it
against dripping water and splash water, high air
humidity, and heat (admissible ambient temperature range 0 – 40 °C).
●
Do not place any vessels filled with liquid, e. g.
vases or drinking glasses, on the unit.
●
The heat being generated in the unit has to be
removed via air circulation. Therefore, the air
vents at the housing must not be covered.
●
Do not insert anything into the air vents! This
could result in an electric shock.
●
Do not set the unit into operation, and immediately
disconnect the mains plug from the mains socket
if
1. there is visible damage to the unit or to the
mains cable,
2. a defect might have occurred after a drop or
similar accident,
3. there are malfunctions.
The unit must in any case be repaired by skilled
personnel.
29 Mains cable for connection to a socket (230 V~/
50 Hz)
30 3.5 mm mono jack for the remote control of the
function “Start/Pause” of the respective player
mechanism from a mixer, see chapter 7
31 Digital audio output (phono) of the respective
player mechanism
32 Analog audio output with line level (phono, left/
right) of the respective player mechanism
6
Soll das Gerät endgültig aus dem Betrieb genommen werden, übergeben Sie
es zur umweltgerechten Entsorgung
einem örtlichen Recyclingbetrieb.
3
Einsatzmöglichkeiten
Der Dual-CD-Player CD-280DJ mit zwei Laufwerken ist speziell für den professionellen DJ-Bereich
konzipiert. Viele Funktionsmöglichkeiten sind genau
auf diesen Einsatzbereich abgestimmt, z. B. Beatcounter, nahtlose Wiedergabe einer Endlosschleife
(Seamless Loop), Einzeltitelwiedergabe oder manuelle Taktsynchronisation von zwei Titeln.
Auf dem CD-Player können Audio-CDs und
selbst gebrannte CDs (Audio CD-R) abgespielt werden. Bei wiederbeschreibbaren CDs (CD-RW) kann
es jedoch je nach CD-Typ, verwendetem CD-Brenner und Brennprogramm beim Abspielen zu Problemen kommen.
Der CD-Player ist mit einem Anti-Schock-Speicher ausgestattet, der Störungen beim Abtasten der
CD durch Stöße oder Vibration bis 10 Sekunden
ausgleichen kann.
4
Gerät aufstellen und anschließen
Die Steuer- und die Laufwerkeinheit sind für die
Montage in ein Rack für Geräte mit einer Breite von
482 mm (19") vorgesehen, können aber auch als
freistehende Tischgeräte verwendet werden. Die
Laufwerkeinheit muss auf jeden Fall waagerecht
betrieben werden, während die Steuereinheit beliebig, z. B. auch geneigt, eingebaut werden kann. Für
●
Never pull the mains cable to disconnect the mains
plug from the mains socket, always seize the plug.
●
No guarantee claims for the unit and no liability for
any resulting personal damage or material
damage will be accepted if the unit is used for
other purposes than originally intended, if it is not
correctly connected, operated, or not repaired in
an expert way.
If the unit is to be put out of operation
definitively, take it to a local recycling
plant for a disposal which is not harmful
to the environment.
It is essential to observe the following items:
1.3 Player mechanism unit, rear panel (fig. 5)
27 8-pole mini DIN jack to connect the player
mechanism unit and control unit:
connect the jack via the supplied mini DIN cable
to the jack REMOTE CONTROL CONNECT TO
MAIN UNIT on the rear side of the control unit;
plug the cable end with the anti-interference
choke (small box) into the jack of the player
mechanism unit
Safety Notes
Ziehen Sie den Netzstecker nie am Kabel aus der
Steckdose, fassen Sie immer am Stecker an.
Wird das Gerät zweckentfremdet, nicht richtig angeschlossen, falsch bedient oder nicht fachgerecht
repariert, kann keine Haftung für daraus resultierende Sach- oder Personenschäden und keine
Garantie für das Gerät übernommen werden.
●
A damaged mains cable must only be replaced by
the manufacturer or by authorized, skilled personnel.
●
3
Important for U. K. Customers!
The wires in this mains lead are coloured in
accordance with the following code:
blue = neutral
brown = live
As the colours of the wires in the mains lead of this
appliance may not correspond with the coloured
markings identifying the terminals in your plug,
proceed as follows:
1. The wire which is coloured blue must be connected to the terminal in the plug which is
marked with the letter N or coloured black.
2. The wire which is coloured brown must be connected to the terminal which is marked with the
letter L or coloured red.
Applications
The dual CD player CD-280DJ with two player
mechanisms has especially been designed for professional DJ applications. Many functional features
have precisely been matched to this range of application, e. g. beat counter, seamless loop, single title
replay, or manual beat synchronization of two titles.
The CD player allows replay of audio CDs and
CDs which you have written yourself (audio CD-R).
However, in case of rewritable CDs (CD-RW) problems may arise while replaying depending on the
CD type, CD burner used, and burning programme.
den Rackeinbau werden für die Steuer- und die
Laufwerkeinheit jeweils 2 HE benötigt (1 HE = 1 Höheneinheit = 44,45 mm).
Vor dem Anschluss bzw. vor dem Verändern von Anschlüssen den CD-Player und die anzuschließenden Geräte ausschalten.
1) Die Steuer- und die Laufwerkeinheit über das
beiliegende Mini-DIN-Anschlusskabel verbinden:
Das Kabelende mit der Entstördrossel (kleines Kästchen) in die Buchse CONNECT TO
REMOTE CONTROL (27) der Laufwerkeinheit
stecken und das andere Ende in die Buchse
REMOTE CONTROL CONNECT TO MAIN UNIT
auf der Rückseite der Steuereinheit.
2) Sind an Ihrem Mischpult oder Verstärker Digitaleingänge vorhanden, diese an die gelben CinchBuchsen DIGITAL OUT (31) anschließen.
Bei Geräten ohne Digitaleingang die StereoAusgänge LINE OUT (32) – linker Kanal L und
rechter Kanal R – über Cinch-Kabel mit den CDPlayer-Eingängen am Mischpult oder am Verstärker verbinden.
3) Die Laufwerke des CD-Players können über ein
Mischpult mit Faderstart-Funktion gestartet bzw.
auf Pause geschaltet werden. Zum Anschluss
der Steuerverbindung siehe Kap. 7.
4) Zuletzt den Netzstecker des Anschlusskabels
(29) in eine Steckdose (230 V~/50 Hz) stecken.
5
Bedienung
Im folgenden Text wird die Bedienung des Laufwerks 1 beschrieben. Die Bedienung des Laufwerks 2 ist vollkommen identisch.
5.1 CD abspielen
1) Den CD-Player mit dem Schalter POWER (26)
einschalten, die Betriebsanzeige (25) und die
LEDs (23) über den CD-Schubladen (22) leuchten. Befindet sich eine CD im Laufwerk, erscheinen nach dem Einlesevorgang im Display ver-
The CD player is provided with an anti-shock
memory which is able to compensate shocks and
vibrations up to 10 seconds while replaying the CD.
4
Setting up and Connecting the Unit
The control unit and the player mechanism unit are
designed for installation into a rack for units of
482 mm (19") width, however, they can also be used
as table top units. In any case, the player mechanism unit must be operated in a horizontal position
while the control unit can be installed as desired,
e. g. also in an inclined position. For the rack installation two rack spaces each (1 rack space =
44.45 mm) are required for the control unit and the
player mechanism unit.
Prior to making or changing any connections, switch
off the CD player and the units to be connected.
1) Connect the control unit and the player mechanism unit via the supplied mini DIN connection
cable:
Connect the cable end with the anti-interference choke (small box) to the jack CONNECT
TO REMOTE CONTROL (27) of the player
mechanism unit and the other end to the jack
REMOTE CONTROL CONNECT TO MAIN UNIT
on the rear side of the control unit.
2) In case of digital inputs existing on the mixer or
amplifier, connect them to the yellow phono jacks
DIGITAL OUT (31).
In case of units without digital input, connect
the stereo outputs LINE OUT (32) – left channel
L and right channel R – via cables with phono
connectors to the CD player inputs on the mixer
or amplifier.
3) The player mechanisms of the CD player can be
started or set to pause via a mixer with fader start
function. For making the control connection see
chapter 7.
4) Finally connect the mains plug of the connection
cable (29) to a mains socket (230 V~/50 Hz).
schiedene Informationen zur CD (Kap. 5.2). Ist
keine CD eingeschoben, wird
(keine CD)
angezeigt.
2) Mit der Taste
(4 oder 24) die CD-Schublade
öffnen. Eine CD mit der Beschriftung nach oben
einlegen und die CD-Schublade mit der Taste
schließen. Bei korrekt eingelegter CD gibt das
Display nach kurzer Zeit die Gesamttitelanzahl (i)
und die Gesamtspieldauer (j) der CD an und
anschließend die Spieldauer (j) des ersten Titels.
3) Zum Starten mit dem ersten Titel die Taste
(18) drücken. Solange die CD abgespielt wird,
zeigt das Display das Symbol
(a) und die
Taste
leuchtet permanent.
Soll mit einem anderen Titel gestartet werden,
diesen über die TRACK-Tasten (7) anwählen:
Mit jedem Betätigen der Taste +10 erfolgt ein
Sprung über 10 Titel vorwärts.
Durch Drücken der Taste
wird immer ein
Titel weitergeschaltet. Beim Drücken der Taste
wird an den Anfang des gerade laufenden
Titels gesprungen. Durch mehrfaches Drücken der Taste
wird immer ein Titel weiter
zurückgesprungen. Zum Überspringen mehrerer Titel kann die Taste
bzw.
auch
gedrückt gehalten werden.
Danach den Titel mit der Taste
starten.
4) Das Abspielen kann jederzeit mit der Taste
unterbrochen werden. Im Display erscheint das
Pausensymbol
(b) und die Tasten
und
CUE (17) blinken. Zum Weiterspielen der CD die
Taste
erneut drücken.
5) Nach dem Einschalten steht das Gerät immer
auf Einzeltitelwiedergabe: Das Display zeigt
„AUTO CUE SINGLE“ (d). Ist ein Titel zu Ende
gespielt, schaltet das Gerät am Anfang des nächsten Titels auf Pause. Soll jedoch ein Titel nach
dem anderen kontinuierlich gespielt werden, mit
der Taste CONT./SINGLE (9) auf Gesamttitelwiedergabe schalten (siehe auch Kapitel 5.3).
6) Soll das Abspielen einer CD vorzeitig beendet
werden, den CD-Player auf Pause schalten oder
5
Operation
The text below explains the operation of the player
mechanism 1. The operation of player mechanism 2
is identical.
5.1 Replaying a CD
1) Switch on the CD player with the POWER switch
(26), the power LED (25) and the LEDs (23)
above the CD trays (22) light up. If a CD is in the
player mechanism, various information on the
CD appear (chapter 5.2) after reading in. If no CD
has been inserted, the display indicates
.
2) Open the CD tray with the button (4 or 24). Insert a CD with the lettering facing upwards into
the tray and close the CD tray with the button .
If the CD is correctly inserted, after a short time
the display will show the total title number (i) and
the total playing time (j) of the CD and then the
playing time (j) of the first title.
3) To start with the first title, press the button
(18). As long as the CD is replayed, the symbol
(a) is displayed and the button
lights continuously.
To start with another title, select it via the
TRACK buttons (7):
Each time the button +10 is actuated, the unit
advances 10 titles.
By pressing the button
, the unit always
advances one title. By pressing the button
,
the unit goes to the beginning of the title currently playing. By pressing the button
repeatedly, the unit always goes back one title.
To skip several titles, the button
or
can
also be kept pressed.
Then start the title with the button
.
4) The replay can be interrupted at any time with the
button
. The pause symbol (b) is displayed,
and the buttons
and CUE (17) flash. To continue the CD, press the button
once again.
5) After switching on, the unit is always set to single
title replay: The display shows “AUTO CUE
SINGLE” (d). If a title is played to the end, the unit
das Laufwerk stoppen [Taste TIME/STOP (10)
länger als 3 Sekunden gedrückt halten]. Die CDSchublade kann nun mit der Taste
ausgefahren werden.
Hinweis: Während der Wiedergabe ist die CDSchublade gegen unbeabsichtigtes Öffnen verriegelt.
7) Vor dem Ausschalten des Gerätes immer mit
den Tasten die CD-Schubladen schließen, um
die Laser-Abtastsysteme vor Verschmutzung zu
schützen. Erst dann das Gerät mit dem Schalter
POWER (26) ausschalten.
D
A
CH
5.2 Anzeige der Titelnummer, Laufzeit, Taktschläge pro Minute und des Ruhemodus
In der Grundeinstellung nach dem Einschalten gibt
das Display (Abb. 3) während der Wiedergabe einer
CD und bei eingeschalteter Pause die Titelnummer
(i) und die Restzeit (j) des gerade laufenden Titels
an. Zur Kennzeichnung der Restzeit signalisiert das
Display „REMAIN“ (m). Die Zeit wird in Minuten (M)
und Sekunden (S) angezeigt, wobei die Sekunden
noch einmal in 75 sogenannte Frames (F) unterteilt
sind (1 Frame = 1/75 Sekunde).
Durch mehrfaches kurzes Betätigen der Taste
TIME/STOP (10) können folgende Zeitinformationen angezeigt werden (wird die Taste länger gedrückt, schaltet das Laufwerk auf Stopp):
1. Tastendruck
die bereits gespielte Zeit des momentanen
Titels (die Anzeige „REMAIN“ erlischt)
2. Tastendruck
die Restzeit der gesamten CD („REMAIN“ wird
wieder angezeigt)
3. Tastendruck
Grundeinstellung (Anzeige der Restzeit des laufenden Titels)
5.2.1 Bargraph
Der Bargraph (g) stellt die Titel- bzw. CD-Restzeit
oder die bereits gespielte Zeit eines Titels durch
seine Länge graphisch dar, je nachdem welche Zeit-
is set to pause at the beginning of the next title.
However, for continuous replay of one title after
the other, set the unit to total title replay with the
button CONT./SINGLE (9) [also see chapter 5.3].
6) To stop the CD replay at any time, set the CD
player to pause or stop the player mechanism
[keep the button TIME/STOP (10) pressed for
more than 3 seconds]. Now the CD tray can be
opened with the button .
Note: While replaying, the CD tray is locked
against unintentional opening.
7) Prior to switching off the unit, always close the
CD trays with the buttons
to protect the laser
systems against impurities before switching off
the unit with the POWER switch (26).
GB
5.2 Display of the title number, playing time,
beats per minute, and sleep mode
In the basic setting after switching on, while replaying a CD and with activated pause, the display
(fig. 3) shows the title number (i) and the remaining
time (j) of the title currently playing. To indicate the
remaining time, the display shows “REMAIN” (m).
The time is indicated in minutes (M) and seconds
(S), the seconds are again subdivided into 75 socalled frames (F) [1 frame = 1/75 second].
By repeated short actuation of the button TIME/
STOP (10) it is possible to display the following time
information (if the button is pressed for a longer
time, the player mechanism will stop):
1st actuation of button:
the time already played of the current title
(“REMAIN” is extinguished)
2nd actuation of button:
the remaining time of the entire CD (“REMAIN”
is displayed again)
3rd actuation of button:
basic setting (display of the remaining time of
the title currently playing)
7
D
A
CH
information im Display mit der Taste TIME/STOP
(10) gewählt wurde. Die letzten 30 Sekunden eines
Titels signalisiert der Bargraph durch Blinken in seiner vollen Länge, wobei die letzten 15 Sekunden
durch ein schnelleres Blinken angezeigt werden.
5.2.2 Beatcounter
Mit dem manuellen Beatcounter lässt sich die Anzahl der Taktschläge pro Minute (BPM = beats per
minute) des laufenden Titels feststellen:
1) Die Taste BPM/TAP (21) im Takt der Musik einige
Male antippen. Das Display wechselt von der Anzeige der Geschwindigkeitsabweichung (h) auf
die Anzahl der Taktschläge pro Minute und statt
„PITCH“ (f) wird „BEAT“ (e) eingeblendet.
2) Um bei dem nächsten Musikstück die Taktschläge pro Minute zu messen, die Taste BPM/TAP
wieder im Takt einige Male antippen. Das Display
zeigt den neuen Wert an.
3) Zum Zurückschalten auf die Anzeige der Geschwindigkeitsabweichung die Taste BPM/TAP
ca. 3 Sekunden gedrückt halten, bis statt „BEAT“
wieder „PITCH“ im Display eingeblendet wird.
5.2.3 Ruhemodus
Stehen beide Laufwerke länger als 30 Minuten auf
Pause, schaltet das Gerät automatisch in den Ruhemodus. Die beiden Laser-Abtastsysteme sind dann
abgeschaltet und werden somit geschont. Das Display zeigt „
“ (Schlaf) und alle beleuchteten
Tasten sowie alle LEDs an der Steuereinheit erlöschen. Durch Betätigen irgendeiner Taste wird in
den normalen Betriebsmodus zurückgeschaltet. Die
Laufwerke stehen danach exakt an der Stelle der
CD, an der sie vor dem Einschalten des Ruhemodus
standen.
Hinweis: Steht ein Laufwerk auf Stopp oder ist bei
einem Laufwerk keine CD eingelegt, schaltet das Gerät nicht in den Ruhemodus.
GB
5.2.1 Bar graph
According to the time indication selected on the display with the button TIME/STOP (10), the bar graph
(g) shows graphically by its length the remaining
time of a title or CD or the time of a title already
played. The last 30 seconds of a title are indicated
by the bar graph flashing in its full length, the last
15 seconds by even faster flashing.
5.2.2 Beat counter
With the manual beat counter the number of beats
per minute (BPM = beats per minute) of the title currently playing can be determined:
1) Shortly press the button BPM/TAP (21) several
times to the beat of the music. The display changes from the indication of the speed deviation (h)
to the number of beats per minute and “BEAT” (e)
instead of “PITCH” (f) is shown.
2) To determine the number of beats per minute of
the next piece of music, shortly press again button BPM/TAP several times to the beat. The display shows the new value.
3) To switch back to the display of the speed deviation, keep the button BPM/TAP pressed for
approx. 3 seconds until “PITCH” is again displayed instead of “BEAT”.
5.2.3 Sleep mode
If both player mechanisms are set to pause for a
period exceeding 30 minutes, the unit will automatically go to the sleep mode. In this case, both laser
systems are switched off for the purpose of conservation. “
” is displayed and all illuminated buttons and all LEDs on the control unit are extinguished. By actuating any button the unit returns to
the normal operating mode. Then the player mechanisms are precisely at the same spot of the CD
where they were before the unit was set to the sleep
mode.
Note: If a player mechanism is set to stop or if there
is no CD inserted in one of the player mechanisms, the unit will not go to the sleep mode.
8
5.3 Betriebsart wählen
5.3.1 Einzeltitelwiedergabe
Nach dem Einschalten des CD-Players ist immer die
Einzeltitelwiedergabe aktiviert, die speziell für DJAnwendungen vorgesehen ist:
1. Das Display zeigt „AUTO CUE SINGLE“ (d).
2. Nach dem Einlesen einer CD oder nach dem Anwählen eines Titels steht der CD-Player exakt an
der Stelle, an der die Musik beginnt (nicht bei
Zeitindex 0:00:00).
Diese Stelle wird automatisch als Startpunkt
gespeichert. Das Display signalisiert dabei kurz
„
“. Nach dem Starten des Titels kann mit
der Taste BOP (6) oder der Taste CUE (17) auf
diesen Startpunkt zurückgesprungen werden.
3. Nach dem Spielen eines Titels schaltet das Gerät
exakt an der Stelle auf Pause, an der die Musik
des nächsten Titels beginnt. Diese Stelle ist dann
als neuer Startpunkt gespeichert.
5.3.2 Gesamttitelwiedergabe
Soll ein Titel nach dem anderen kontinuierlich abgespielt werden, mit der Taste CONT./SINGLE (9) auf
Gesamttitelwiedergabe schalten. Das Display springt
von „AUTO CUE SINGLE“ (d) auf „CONTINUE“ (c)
um. Zum Zurückschalten auf Einzeltitelwiedergabe
die Taste CONT./SINGLE erneut betätigen.
5.3.3 Relay-Betrieb – automatischer Start des
anderen Laufwerks
Am Ende eines Titels oder am Ende einer CD kann
automatisch das andere Laufwerk gestartet werden.
Start des anderen Laufwerks am Ende eines Titels
1) Zuerst in beide Laufwerke eine CD einlegen.
Dann erst die Taste RELAY (3) betätigen. Die
LED über der Taste blinkt.
2) Beide Laufwerke mit der Taste CONT./SINGLE
(9) auf Einzeltitelwiedergabe schalten: „AUTO
CUE SINGLE“ (d) muss in beiden Displays angezeigt sein.
3) Die Wiedergabe auf einem Laufwerk mit der Tas-
5.3 Selecting the operating mode
5.3.1 Single title replay
After switching on the CD player, the single title
replay especially provided for DJ applications is
always activated:
1. The display shows “AUTO CUE SINGLE” (d).
2. After reading in a CD or after selecting a title, the
CD player is precisely at the spot where the
music starts (not at time index 0:00:00).
The unit automatically memorizes this spot as
a starting point. The display shortly indicates
“
”. After starting the title, it is possible to
return to this starting point with the button BOP
(6) or the button CUE (17).
3. After playing a title, the unit is set to pause precisely at the spot where the music of the next title
starts. This spot is then memorized as a new
starting point.
5.3.2 Total title replay
For continuous replay of one title after the other,
switch to total title replay with the button CONT./
SINGLE (9). The display switches from “AUTO CUE
SINGLE” (d) to “CONTINUE” (c). To return to single
title replay, actuate the button CONT./SINGLE once
again.
5.3.3 Relay mode – automatic start of the other
player mechanism
At the end of a title or at the end of a CD, the other
player mechanism can be started automatically.
Start of the other player mechanism at the end of
a title
1) Insert a CD into both player mechanisms first
before actuating the button RELAY (3). The LED
above the button flashes.
2) Set both player mechanisms to single title replay
with the button CONT./SINGLE (9): Both displays must indicate “AUTO CUE SINGLE” (d).
te
(18) starten. Das andere Laufwerk muss
auf Pause geschaltet sein (Anzeige ). Sobald
der Titel zu Ende gespielt ist, schaltet das Laufwerk auf Pause und das andere Laufwerk startet.
Dieser Vorgang wird bis zum Ausschalten des
Relay-Betriebs endlos wiederholt. (Zum Ausschalten die Taste RELAY erneut drücken.)
4) An jeder Stelle der CD kann mit der Taste
zusätzlich die Wiedergabe von einem zum anderen Laufwerk umgeschaltet werden.
5) Wird bei dem auf Pause stehenden Laufwerk eine
andere CD eingelegt, anschließend wieder den
Relay-Betrieb mit der Taste RELAY aktivieren.
Hinweise:
a Wird in dieser Betriebsart die Taste CUE (17) des
wiedergebenden Laufwerks betätigt, wechselt die
Wiedergabe zum anderen Laufwerk.
b Wird an dem auf Pause stehenden Laufwerk die
Taste CUE gedrückt gehalten, erfolgt die Wiedergabe von diesem Laufwerk so lange, bis die
Taste wieder gelöst wird.
Start des anderen Laufwerks am Ende einer CD
1) Zuerst in beide Laufwerke eine CD einlegen.
Dann erst die Taste RELAY (3) betätigen. Die
LED über der Taste blinkt.
2) Beide Laufwerke mit der Taste CONT./SINGLE (9)
auf Gesamttitelwiedergabe schalten: „CONTINUE“
(c) muss in beiden Displays angezeigt sein.
3) Ein Laufwerk auf Stopp schalten: Die Taste TIME/
STOP (10) so lange gedrückt halten, bis im Display das Pausensymbol (b) erlischt.
4) Die Wiedergabe auf dem anderen Laufwerk mit
der Taste
(18) starten. Am Ende der CD startet
das andere Laufwerk. Der Vorgang wiederholt sich
bis zum Ausschalten des Relay-Betriebs. (Zum
Ausschalten die Taste RELAY erneut drücken.)
5) Wird bei dem auf Stopp stehenden Laufwerk eine
andere CD eingelegt, anschließend wieder den
Relay-Betrieb mit der Taste RELAY aktivieren
und das Laufwerk mit der Taste TIME/STOP auf
Stopp schalten.
3) Start the replay on one player mechanism with
the button
(18). The other player mechanism
must be set to pause (display ). As soon as the
title has been played to the end, the player
mechanism is set to pause and the other player
mechanism starts. This procedure is continuously repeated until the relay mode is deactivated. (To switch off the mode, actuate the button
RELAY once again.)
4) On any spot of the CD, the replay can additionally
be switched from one player mechanism to the
other with the button
.
5) If another CD is inserted in the player mechanism
set to pause, activate the relay mode with the
button RELAY once again.
Notes:
a If the button CUE (17) of the replaying player
mechanism is actuated in this operating mode,
the replay changes to the other player mechanism.
b If the button CUE is kept pressed at the player
mechanism set to pause, the replay from this
player mechanism continues until the button is
released.
Start of the other player mechanism at the end of
a CD
1) Insert a CD into both player mechanisms first
before actuating the button RELAY (3). The LED
above the button starts flashing.
2) Set both player mechanisms to total title replay
with the button CONT./SINGLE (9): “CONTINUE” (c) must be indicated in both displays.
3) Set one player mechanism to stop: Keep the button TIME/STOP (10) pressed until the pause
symbol (b) is extinguished on the display.
4) Start the replay on the other player mechanism
with the button
(18). At the end of the CD, the
other player mechanism will start. This procedure
is repeated until the relay mode is deactivated.
(To switch off the mode, actuate the button
RELAY once again.)
5.4 Anspielen eines Titels
1) Nach dem Einlegen einer CD mit den TRACKTasten (7) auf den gewünschten Titel springen.
2) Erscheint im Display die Laufzeit (j) des Titels,
die Taste CUE (17) gedrückt halten. Der Titel wird
so lange angespielt, wie die Taste gedrückt wird.
3) Nach dem Loslassen der Taste CUE springt das
Gerät auf den Titelanfang zurück und schaltet auf
Pause. Zum Starten des Titels die Taste
(18)
drücken. Auf den Titelanfang kann weiterhin mit
der Taste CUE zurückgesprungen werden.
5.5 Funktion OUTRO
Die Funktion OUTRO dient zum Abspielen der jeweils letzten 30 Sekunden der folgenden Titel.
1) Zum Einschalten der Funktion die Taste CONT./
SINGLE (9) ca. 3 Sekunden gedrückt halten, bis
im Display „OUTRO“ (k) angezeigt wird.
2) Den gewünschten Titel mit den TRACK-Tasten (7)
wählen. Steht der CD-Spieler auf Pause, die Wiedergabe mit der Taste
(18) starten. Die letzten
30 Sekunden des Titels werden abgespielt.
3) Zum Ausschalten der Funktion OUTRO entweder
die Taste TIME/STOP (10) kurz betätigen oder
die Taste CONT./SINGLE erneut ca. 3 Sekunden
gedrückt halten, bis im Display „OUTRO“ erlischt.
5.6 Schneller Vor- und Rücklauf
1) Zum Aktivieren der Funktion „schneller Vor-/
Rücklauf“ die Taste SEARCH (5) drücken. Bei aktivierter Funktion leuchtet die LED bei der Taste.
2) Das Drehrad (16) drehen: Solange das Rad im
Uhrzeigersinn gedreht wird, wird auf der CD vorgefahren; solange es gegen den Uhrzeigersinn
gedreht wird, wird auf der CD zurückgefahren.
Die Vor- bzw. Rücklaufgeschwindigkeit hängt von
der Drehgeschwindigkeit des Rads ab.
Bei Gesamttitelwiedergabe (Kap. 5.3.2) fährt
der Vor- und Rücklauf auch über mehrere Titel
bis zum Anfang oder Ende der CD.
Wird bei der Einzeltitelwiedergabe (Kap. 5.3.1)
5) If another CD is inserted into the player mechanism set to stop, activate the relay mode once
again with the button RELAY and set the player
mechanism to stop with the button TIME/STOP.
5.4 Short replay of a title beginning
1) After inserting a CD, go to the desired title with
the TRACK buttons (7).
2) If the display shows the playing time (j) of the title,
keep the button CUE (17) pressed. The beginning of the title is played as long as the button is
pressed.
3) After releasing the button CUE, the unit returns to
the title beginning and is set to pause. Press the
button
(18) to start the title. It is still possible to
return to the title beginning with the button CUE.
5.5 Function OUTRO
The function OUTRO serves for replay of the last
30 seconds each of the following titles.
1) To activate the function, keep the button CONT./
SINGLE (9) pressed for approx. 3 seconds until
“OUTRO” (k) is shown on the display.
2) Select the desired title with the TRACK buttons
(7). If the CD player is in the pause mode, start
the replay with the button
(18). The last
30 seconds of the title are played.
3) To deactivate the function OUTRO, either shortly
press the button TIME/STOP (10) or keep the
button CONT./SINGLE pressed again for approx.
3 seconds until “OUTRO” is extinguished.
5.6 Fast forward and reverse
1) To activate the function “fast forward and reverse”,
press the button SEARCH (5). With activated
function, the LED next to the button lights up.
2) Turn the rotary wheel (16): As long as the wheel is
turned clockwise, the unit advances on the CD; as
long as it is turned counter-clockwise, the unit reverses on the CD. The forward or reverse speed
depends on the turning speed of the wheel.
mit dem Vorlauf der nächste Titel erreicht oder mit
dem Rücklauf der Titelanfang, schaltet das Gerät
auf Pause (siehe dazu die Hinweise a und b
unten). Der Vorlauf über mehrere Titel ist auch im
Pausenmodus möglich, der Rücklauf endet dagegen bei Erreichen des Titelanfangs.
3) Nach Beendigung eines schnellen Vor-/Rücklaufs ist diese Funktion noch für ca. 8 Sekunden
aktiv, danach erlischt die LED der Taste SEARCH
und das Drehrad dient wieder für die Funktion
„Pitch Bend“ (Kap. 5.8.1) bzw. im Pausenmodus
zum genauen Anfahren einer Stelle auf der CD
(Kapitel 5.7).
Hinweise: Befindet sich der CD-Player nach dem
schnellen Vor- oder Zurückfahren im Pausenmodus:
a wird – außer wenn über den Rücklauf der Titelanfang erreicht wurde – die momentane Stelle
ständig wiederholt, bis die Wiedergabe mit der
Taste
(18) gestartet oder die Taste CUE (17)
bzw. CUE 1 (8) zweimal kurz angetippt wird.
b wird die Funktion „schneller Vor-/Rücklauf“ nicht
automatisch nach ca. 8 Sekunden deaktiviert,
sondern muss manuell mit der Taste SEARCH
ausgeschaltet werden.
5.7 Genaues Anfahren einer Stelle
Im Pausenmodus kann mit dem Drehrad (16) eine
Stelle auf der CD exakt angefahren werden:
1) Ist die Funktion „schneller Vor-/Rücklauf“ aktiviert
[LED bei der Taste SEARCH (5) leuchtet], diese
durch Drücken der Taste SEARCH ausschalten.
2) Das Drehrad drehen. Auf der CD wird so lange
und so schnell vor- oder zurückgefahren, wie das
Rad gedreht wird. Dabei kann auf dem Display in
der Zeitanzeige (j) die genaue Position abgelesen und in Schritten von 1 Frame (F) angefahren
werden (1 Frame = 1/75 Sekunde).
3) Nach dem Drehen wird die momentane Stelle so
lange wiederholt, bis die Taste
(18) gedrückt
oder die Taste CUE (17) bzw. CUE 1 (8) zweimal
kurz angetippt wird.
With total title replay (chapter 5.3.2) the fast
forward and reverse also goes beyond several
titles to the beginning or end of the CD.
If with single title replay (chapter 5.3.1) the
next title is reached with the fast forward or the
title beginning with the reverse, the unit is set to
pause (for this see the notes a and b below). The
fast forward beyond several titles is also possible
in the pause mode, however, the reverse stops
when the title beginning is reached.
3) After ending the fast forward/reverse, this function
is still active for approx. 8 seconds, then the LED
of the button SEARCH is extinguished, and the
rotary wheel again serves for the function “Pitch
Bend” (chap. 5.8.1) or in the pause mode for precise selection of a spot on the CD (chap. 5.7).
Notes: If after the fast forward or reverse the CD
player is in the pause mode:
a the current spot is permanently repeated (unless
the reverse was used to go to the title beginning),
until the replay is started with the button
(18)
or the button CUE (17) or CUE 1 (8) is shortly
pressed twice.
b the function “fast forward/reverse” is not automatically deactivated after approx. 8 seconds but
it must manually be switched off with the button
SEARCH.
5.7 Precise selection of a spot
With the pause mode activated, it is possible to precisely select a spot on the CD with the rotary wheel
(16):
1) If the function “fast forward/reverse” is activated
[LED next to the button SEARCH (5) lights up],
switch it off by pressing the button SEARCH.
2) Turn the rotary wheel. The unit advances and reverses so long and so fast on the CD as the
wheel is turned. During this process it is possible
to read the precise position on the time display (j)
and to select it in steps of 1 frame (F) [1 frame =
1/75 second].
5.8 Geschwindigkeit und Tonhöhe verändern
Die Geschwindigkeit und damit gleichzeitig die Tonhöhe („pitch“) lassen sich mit dem Schieberegler
PITCH CONTROL (14) um max. ±16 % ändern:
1) Den Einstellbereich für die Geschwindigkeitsänderung mit der Taste PITCH (12) wählen. Die
LEDs (13) neben der Taste zeigen den gewählten Bereich an: ±8 % (Grundeinstellung nach
dem Einschalten) oder ±16 %. Die entsprechende LED blinkt. Das Blinken signalisiert, dass
der Regler PITCH CONTROL nicht aktiviert ist.
2) Die Taste ON/OFF (15) drücken. Damit ist der
Regler PITCH CONTROL aktiviert und die entsprechende LED (13) leuchtet konstant.
3) Die Geschwindigkeit mit dem Schieberegler
PITCH CONTROL (14) verändern. Das Display
zeigt die prozentuale Geschwindigkeitsänderung
im Feld PITCH (h) an.
Wurde mit der Taste BPM/TAP (21) der manuelle Beatcounter aktiviert [Anzeige „BEAT“ (e)
im Display], zeigt das Display im Anzeigefeld
PITCH (h) die Anzahl der Taktschläge pro Minute
an (siehe Kapitel 5.2.2 „Beatcounter“), die sich
bei Verstellen des Schiebereglers entsprechend
ändert.
4) Mit der Taste ON/OFF (15) kann jederzeit zwischen der mit dem Schieberegler eingestellten
Geschwindigkeit und der Standardgeschwindigkeit umgeschaltet werden.
D
A
CH
5.8.1 Takt zwischen 2 Musikstücken angleichen
(„Pitch Bend“)
Mit den Tasten PITCH BEND (20) kann der Takt
eines Titels auf dem Laufwerk 1 an den Takt eines
Titels auf dem Laufwerk 2 angepasst (synchronisiert) werden oder umgekehrt.
1) Zuerst mit dem Regler PITCH CONTROL (14)
die Geschwindigkeit des laufenden Musikstückes
an die Geschwindigkeit des zweiten Musikstückes angleichen.
2) Mit den Tasten PITCH BEND die Taktschläge beider Musikstücke genau übereinander legen: so-
3) After turning, the current spot is repeated so
many times until the button
(18) is pressed or
the button CUE (17) or CUE 1 (8) is shortly
pressed twice.
GB
5.8 Changing the speed and the pitch
The speed and at the same time the pitch can be
changed by max. ±16 % with the sliding control
PITCH CONTROL (14):
1) Select the adjusting range for the change of pitch
with the button PITCH (12). The LEDs (13) next to
the button show the selected range: ±8 % (basic
setting after switching on) or ±16 %. The corresponding LED flashes. The flashing indicates that
the PITCH CONTROL has not been activated.
2) Press the button ON/OFF (15). Thus, the PITCH
CONTROL is activated and the corresponding
LED (13) lights permanently.
3) Change the speed with the sliding control PITCH
CONTROL (14). The display shows the percentage deviation from the speed in the field PITCH
(h).
If the manual beat counter has been activated
with the button BPM/TAP (21) [“BEAT” (e) is displayed], the display indicates the number of
beats per minute in the field PITCH (h) [see chapter 5.2.2 “Beat counter”] which changes correspondingly when readjusting the sliding control.
4) It is possible at any time to switch with the button
ON/OFF (15) from the speed adjusted with the
sliding control to the standard speed and vice
versa.
5.8.1 Matching the beat between 2 music pieces
(“Pitch Bend”)
With the buttons PITCH BEND (20) it is possible to
match (synchronize) the beat of a title on player
mechanism 1 to the beat of a title on player mechanism 2 or vice versa.
1) First match the speed of the music piece currently playing to the speed of the second music
piece with the PITCH CONTROL (14).
9
D
A
CH
lange die Taste – bzw. + gedrückt gehalten wird,
läuft der Titel um 16 % langsamer bzw. schneller
als mit Standardgeschwindigkeit.
3) Durch Drehen des Drehrads (16) kann ebenfalls
eine Geschwindigkeitsänderung zur Taktanpassung erfolgen.
5.9 Sprung zu einer zuvor bestimmten Stelle
(Cue-Punkt)
Um schnell zu einer bestimmten Stelle springen zu
können, lassen sich mit der Taste CUE (17) und
CUE 1 (8) zwei unabhängige Startpunkte (Cue-Punkte) speichern.
Hinweise für den mit der Taste CUE gesetzten
Startpunkt:
a Bei Einzeltitelwiedergabe kann der Rücksprung
nur innerhalb eines Titels erfolgen. Beim Erreichen des nächsten Titels wird die markierte
Stelle durch den Startpunkt des nächsten Titels
ersetzt (siehe Kapitel 5.3.1).
b Sowohl bei Einzeltitel- als auch bei Gesamttitelwiedergabe wird beim Anwählen eines anderen
Titels mit den TRACK-Tasten (7) die markierte
Stelle immer durch den Anfang des gewählten
Titels ersetzt.
Um einen Cue-Punkt zu setzen und während der
Wiedergabe zu diesem zurückzukehren:
1) Während des Abspielens eines Titels mit der Taste
(18) auf Pause schalten, wenn die Stelle
erreicht ist, zu der später zurückgesprungen werden soll. Die Tasten
und CUE blinken.
2) Bei Bedarf kann mit dem Drehrad (16) die Stelle
exakter angefahren werden. Die momentane
Stelle ist fortlaufend zu hören.
3) Die Taste CUE bzw. CUE 1 antippen. Dadurch
wird intern die Stelle markiert. Die jeweilige Taste
blinkt schnell und leuchtet dann kontinuierlich.
Die Taste
blinkt weiter als Aufforderung die
Wiedergabe zu starten.
4) Das Abspielen mit der Taste
GB
wieder starten.
2) Synchronize the beats of both music pieces with
the buttons PITCH BEND: as long as the button –
or + is kept pressed, the title is played by 16 %
slower or faster than at standard speed.
3) By turning the rotary wheel (16), the speed can
also be changed for matching the beat.
5.9 Return to a previously defined spot
(Cue point)
To be able to go quickly to a defined spot, it is possible to memorize two independent starting points (Cue
points) with the buttons CUE (17) and CUE 1 (8).
Notes for the starting point defined with the button CUE:
a With single title replay, the return is only possible
within a title. When the next title is reached, the
marked spot is replaced by the starting point of
the next title (see chapter 5.3.1).
b With single title replay as well as total title replay,
when selecting another title with the buttons
TRACK (7), the marked spot is always replaced
by the beginning of the selected title.
To set a Cue point and to return to it while replaying:
1) While replaying a title, set the unit to pause with
the button
(18) if the spot is reached to which
the unit is to return later. The buttons
and
CUE flash.
2) If required, the spot can be selected more precisely with the rotary wheel (16). The current spot
is replayed continuously.
3) Shortly actuate the button CUE or CUE 1. Thus,
the spot is marked internally. The respective button flashes quickly and then lights permanently.
The button
continues to flash as a request to
start the replay.
4) Start the replay with the button
.
5) To go to the marked spot, press the respective
Cue button. The player mechanism is set to
pause at the marked spot. Start the replay with
the button
or keep the respective button Cue
pressed. After releasing the Cue button, the
10
5) Zum Springen auf die markierte Stelle die jeweilige Cue-Taste drücken. Das Laufwerk steht an
der markierten Stelle auf Pause. Mit der Taste
die Wiedergabe starten oder die jeweilige
Cue-Taste gedrückt halten. Nach dem Lösen der
Cue-Taste steht das Laufwerk wieder an der markierten Stelle auf Pause.
Bei Ausfahren der CD-Schublade [Taste
(4 oder
24)] oder bei Ausschalten des CD-Players [Taste
POWER (26)] werden die gesetzten Cue-Punkte
gelöscht.
5.9.1 Taste BOP
Während der Wiedergabe kann auch mit der Taste
BOP (6) auf den mit der Taste CUE (17) gesetzten
Startpunkt zurückgesprungen werden. Im Gegensatz zum Rücksprung mit der Taste CUE schaltet
das Gerät in diesem Fall nicht auf Pause, sondern
spielt sofort ab der markierten Stelle weiter. Durch
mehrfaches Drücken der Taste BOP lässt sich so
ein Stottereffekt erzeugen. Dieser ist dabei umso
effektiver, je geeigneter der Startpunkt ist (z. B. der
Anfang eines Wortes oder eines Instrumenteneinsatzes).
1.
PLAY
a
➅
player mechanism is set to pause again on the
marked spot.
When opening the CD tray [button
(4 or 24)] or
when switching off the CD player [button POWER
(26)], the Cue points set are deleted.
5.9.1 Button BOP
While replaying, it is also possible to go back with
the button BOP (6) to the starting point set with the
button CUE (17). Contrary to the return with the button CUE the unit is not set to pause in this case but
immediately continues to play from the marked spot.
By pressing the button BOP repeatedly, a stutter
effect can be produced. This is the more effective,
the more suitable the starting point (e. g. the beginning of a word or start of a musical instrument).
b
Endlosschleife abspielen
3) Um die Schleife zu verlassen und den Titel weiterzuspielen, die Taste B/LOOP – EXIT erneut
drücken. Die Anzeige „LOOP“ erlischt. Durch Anwählen eines anderen Titels oder durch Springen
auf einen gesetzten Cue-Punkt (Kap. 5.9) wird
die Schleife ebenfalls verlassen.
Die Schleife bleibt aber weiter gespeichert.
Um dies anzuzeigen, leuchten alle drei Tasten
kontinuierlich.
4) Mit der Taste RELOOP lässt sich die Schleife
jederzeit – aus dem Pausen-, Wiedergabe- und
dem Stoppmodus – erneut starten.
PLAY
Mit den Tasten A, B/LOOP – EXIT und RELOOP
(19) kann ein bestimmter Abschnitt auf der CD als
nahtlose Endlosschleife gespeichert und beliebig oft
wiederholt werden.
2) Ist beim Weiterlaufen der Wiedergabe das gewünschte Ende der Schleife erreicht (Punkt b),
die Taste B/LOOP – EXIT drücken. Der Abschnitt
zwischen den Punkten a und b wird fortlaufend
wiederholt. Alle drei Tasten blinken und das Display signalisiert „LOOP“ (l).
PLAY
LOOP
5.10 Endlosschleife abspielen
1) Mit der Taste
(18) auf Wiedergabe schalten.
Ist der Startpunkt der gewünschten Schleife
erreicht (Punkt a in Abb. 6), die Taste A antippen.
Die Taste blinkt kurz und leuchtet dann permanent. Die Taste RELOOP leuchtet permanent.
2.
A
c
LOOP
➆
Endlosschleife beenden und erneut starten
5) Zum Speichern einer anderen Endlosschleife
können der Start- und der Endpunkt mit den
Tasten A und B/LOOP – EXIT einfach neu festgelegt werden.
Bei Ausfahren der CD-Schublade [Taste
(4 oder
24)] oder bei Ausschalten des CD-Players [Taste
POWER (26)] wird die Endlosschleife gelöscht.
3) To exit the loop and to continue the title, press the
button B/LOOP – EXIT again. The display “LOOP”
is extinguished. It is also possible to exit the loop
by selecting another title or by going to a set Cue
point (chapter 5.9).
However, the loop is kept memorized. To indicate this, all three LEDs light continuously.
4) With the button RELOOP the loop can be restarted at any time from the pause mode, replay
mode, and stop mode.
PLAY
c
LOOP
5.10 Replaying a continuous loop
With the buttons A, B/LOOP – EXIT and RELOOP
(19), a certain section on the CD can be memorized
as a seamless continuous loop and be repeated as
many times as desired.
1) Switch to replay with the button
(18). If the
starting point of the desired loop is reached (point
a in fig. 6), shortly actuate the button A. The button shortly flashes and then lights permanently.
The button RELOOP lights permanently.
2) If the desired end of the loop is reached (point b)
while the replay is continued, press the button
B/LOOP – EXIT. The section between the points
a and b is continuously repeated. All three buttons flash and the display indicates “LOOP” (l).
1.
2.
A
PLAY
a
PLAY
b
LOOP
➅
Replaying a continuous loop
➆
Exit and restart of a continuous loop
5) To memorize another continuous loop, the starting point and the end point can easily be redefined with the buttons A and B/LOOP – EXIT.
When opening the CD tray [button
(4 or 24)] or
when switching off the CD player [POWER button
(26)], the continuous loop is deleted.
Hints
a At least 20 frames (= 0.27 seconds) must be between the starting point and the end point of a
continuous loop, otherwise the loop is neither
memorized nor started.
b The starting point and the end point of a continuous loop can precisely be defined to one
frame (1/75 second):
1) When the starting point is reached, first set the
unit to pause with the button
. Precisely
select the point with the rotary wheel (16).
Then press the button A.
2) Now either select the end point directly with
the rotary wheel or first start the replay with
the button
, when reaching the end point,
Tipps
a Zwischen dem Start- und dem Endpunkt einer
Endlosschleife müssen mindestens 20 Frames
liegen (= 0,27 Sekunden), sonst wird die Schleife
weder gespeichert noch gestartet.
b Der Start- und der Endpunkt einer Endlosschleife
lassen sich auch auf einen Frame (1/75 Sekunde)
genau festlegen:
1) Beim Erreichen des Startpunktes zuerst mit
der Taste
auf Pause schalten. Den Punkt
genau mit dem Drehrad (16) anfahren. Dann
die Taste A drücken.
2) Jetzt entweder den Endpunkt direkt mit dem
Drehrad anfahren oder zuerst die Wiedergabe
mit der Taste
starten, beim Erreichen des
Endpunktes wieder mit der Taste
auf
Pause schalten und den Endpunkt genau mit
dem Drehrad anfahren.
3) Nachdem der Endpunkt eingestellt ist, die
Taste B/LOOP – EXIT drücken. Die Endlosschleife startet.
4) Den Programmiervorgang für alle weiteren Titel
wiederholen. Ein Titel kann auch mehrfach, d. h.
unter mehreren Speicherplatznummern, programmiert werden. Nach 30 programmierten Titeln signalisiert das Display „
“ (voll). Mehr Titel lassen sich nicht programmieren.
6.2 Programmierung überprüfen
1) Mit der Taste PROG. (11) nacheinander alle
Speicherplätze aufrufen. Das Display zeigt jeweils die dazu gespeicherte Titelnummer an.
Wenn jedoch zuvor die Wiedergabe gestartet
wurde, muss zur Überprüfung der Programmierung zuerst auf Stopp geschaltet und dann die
Taste PROG. gedrückt werden.
2) Soll auf einem Speicherplatz ein anderer Titel gespeichert werden, durch Anwahl des gewünschten
Titels den momentanen Titel einfach überschreiben. Dann wieder die Taste PROG. drücken.
6.3 Programmierte Titelfolge abspielen
6
Eigene Titelfolge zusammenstellen
Mit dem CD-280DJ lässt sich eine eigene Titelfolge
mit bis zu 30 Titeln von einer CD zusammenstellen
und abspielen. Die ausgewählten Titel können in
beliebiger Reihenfolge programmiert werden.
6.1 Titelfolge programmieren
1) Zum Programmieren das Laufwerk auf Stopp
schalten: Die Taste TIME/STOP (10) ca. 3 Sekunden gedrückt halten, bis das Wiedergabesymbol
(a) bzw. das Pausensymbol (b) erlischt.
2) Die Taste PROG. (11) drücken. Das Display
schaltet auf die Anzeige „
“ um.
3) Mit den TRACK-Tasten (7) den gewünschten
ersten Titel anwählen und mit der Taste PROG.
bestätigen. Die LED bei der Taste leuchtet und
das Display schaltet auf den zweiten Speicherplatz „
“ um.
set the unit to pause again with the button
and precisely select the end point with the
rotary wheel.
3) After defining the end point, actuate the button
B/LOOP – EXIT. The continuous loop will
start.
6
Compiling an Individual Title Sequence
The CD-280DJ allows compilation and replay of an
individual title sequence of up to 30 titles of a CD.
The selected titles can be programmed in any desired order.
6.1 Programming a title sequence
1) For programming, set the player mechanism to
stop: Keep the button TIME/STOP (10) pressed
for approx. 3 seconds until the replay symbol
(a) or the pause symbol (b) is extinguished.
2) Press the button PROG. (11). The display changes to the indication “
”.
3) With the buttons TRACK (7) select the desired first
title and confirm with the button PROG. The LED
next to the button lights up and the display switches to the second memory location “
”.
4) Repeat the programming procedure for all further
titles. A title can also be programmed several
times, i. e. under several memory location numbers. After 30 programmed titles the display indicates “
”. It is not possible to programme any
more titles.
6.2 Checking the programming
1) Successively call all memory locations with the
button PROG. (11). The display shows in each
case the title number memorized for the location.
However, if the replay was started before, stop
the player mechanism first to check the programming, then press the button PROG.
(Bei Einzeltitelwiedergabe ist im Pausenmodus
wieder der erste programmierte Titel angewählt.)
Die Titelfolge lässt sich so oft erneut mit der Taste
abspielen, bis sie gelöscht wird.
Mit der Taste
(18) auf Pause oder mit der Taste
TIME/STOP (10) auf Stopp schalten und mit der
Taste
(4 oder 24) die CD-Schublade herausfahren. Die LED bei der Taste PROG. erlischt und die
Programmierung ist gelöscht. Durch Ausschalten
des CD-Players mit der Taste POWER (26) wird die
Programmierung ebenfalls gelöscht.
7
Faderstart über ein Mischpult
Der CD-Player lässt sich über ein Mischpult mit
Faderstart-Funktion fernbedienen. Mit dem Schalter
REMOTE SELECT (28) auf der Rückseite der Laufwerkeinheit den CD-Player auf die Art des Mischpult-Faderstartschalters einstellen:
Position LOCK SW für Ein- /Ausschalter
Für die meisten Mischpulte aus dem Sortiment
von „img Stage Line“ muss diese Schalterposition
gewählt werden. Mit dem Aufziehen des zugehörigen Mischpult-Faders wird ein Schalter im
Mischpult geschlossen, der den CD-Player startet. Beim Zuziehen des Faders öffnet der Schalter
und schaltet dadurch den CD-Player auf Pause.
2) For memorizing another title on a memory location, just overwrite the current number by selection of the desired title, then press the button
PROG. again.
7
1) To replay the programmed title sequence, press
the button
(18). If the programming was
checked before with the button PROG. (11), the
title will start which was indicated in the display
when the button PROG. was pressed the last
time.
2) For a continuous replay of the titles activate the
total title replay with the button CONT./SINGLE
(9): “CONTINUE” (c) appears in the display. (In
case of single title replay the unit is set to pause
after each title.)
3) While replaying, it is possible to shortly display
the memory location number of the title currently
playing with the button PROG.
4) The replay can be interrupted and restarted at
any time with the button
. To return to a title,
press the button
(7), and to skip titles, press
the button
.
5) At the end of the programmed title sequence, the
unit stops in case of total title replay. (In case of
single title replay the first programmed title is selected again in the pause mode.) The title sequence can be replayed with the button
so
many times until it is deleted.
CH
6.4 Programmierte Titelfolge löschen
1) Zum Abspielen der programmierten Titelfolge die
Taste
(18) drücken. Wurde zuvor die Programmierung mit der Taste PROG. (11) überprüft,
startet der Titel, der nach dem letzten Drücken
der Taste PROG. im Display angezeigt wurde.
2) Für eine fortlaufende Wiedergabe der Titel mit
der Taste CONT./SINGLE (9) auf Gesamttitelwiedergabe schalten: „CONTINUE“ (c) erscheint
im Display. (Bei Einzeltitelwiedergabe schaltet
das Gerät nach jedem Titel auf Pause.)
3) Während der Wiedergabe lässt sich mit der Taste
PROG. die Speicherplatznummer des gerade
laufenden Titels kurz anzeigen.
4) Die Wiedergabe kann jederzeit mit der Taste
unterbrochen und wieder gestartet werden. Zum
Zurückspringen auf einen Titel die Taste
(7)
drücken und zum Überspringen von Titeln die
Taste
.
5) Am Ende der programmierten Titelfolge schaltet
das Gerät bei Gesamttitelwiedergabe auf Stopp.
6.3 Replaying a programmed title sequence
D
A
Mischpult
Start
Pause
➇
Faderstart über Ein-/Ausschalter
Position TACT SW für Taster
Wird der Taster das erste Mal beim Aufziehen
des zugehörigen Faders am Mischpult betätigt,
startet der CD-Player. Wird der Taster zum zwei-
Fader Start via a Mixer
GB
The CD player can be remote-controlled via a mixer
with fader start function. Adjust the CD player to the
type of fader start switch of the mixer with the switch
REMOTE SELECT (28) on the rear side of the
player mechanism unit:
Position LOCK SW for on/off switch
This switch position must be selected for most
mixers from the product range of “img Stage Line”.
By advancing the corresponding fader on the
mixer, a switch starting the CD player is closed in
the mixer. When closing the fader, the switch
opens and thus switches the CD player to pause.
mixer
Start
Pause
➇
Fader start via on/off switch
Position TACT SW for momentary pushbutton
If the momentary pushbutton is pressed for the
first time when advancing the fader, the CD
player is started. If the momentary pushbutton is
pressed for the second time when closing the
fader, the CD player is set to pause.
mixer
1.x Start
2.x Pause
6.4 Deleting a programmed title sequence
Set the player mechanism to pause with the button
(18) or set it to stop with the button TIME/STOP
(10), and with the button
(4 or 24) open the CD
tray. The LED next to the button PROG. is extinguished and the programming is deleted. The programming is also deleted if the CD player is switched off with the POWER switch (26).
➈
Fader start via momentary pushbutton
To prevent malfunction, first switch off the CD player
and the mixer. Connect the corresponding fader
start jack on the mixer via a cable (see fig. 8 or 9) to
the respective jack START/PAUSE (30).
If the mixer is equipped with a prefader listening
function (monitoring function), it is possible to play
the beginning of a title and to monitor it via head-
11
ten Mal beim Zuziehen des Faders betätigt,
schaltet der CD-Player auf Pause.
Mischpult
D
A
CH
Lesefehlern und Tonaussetzern führen. Da sich
Zigarettenrauch nicht immer vermeiden lässt (z. B.
in der Discothek), muss das Gerät dann in einer
Fachwerkstatt gereinigt werden. Diese Reinigung ist
kostenpflichtig, auch während der Garantiezeit!
1. x Start
2. x Pause
9
➈
Faderstart über Taster
Damit es nicht zu einer Fehlfunktion kommen kann,
zuerst den CD-Player und das Mischpult ausschalten. Die entsprechende Faderstartbuchse am Mischpult über ein Verbindungskabel (siehe Abb. 8 oder 9)
an die jeweilige Buchse START/PAUSE (30) anschließen.
Ist das Mischpult mit einer Vorhörfunktion (Monitorfunktion) ausgestattet, kann trotz zugezogenem
Fader für den CD-Player ein Titel angespielt und
über einen Kopfhörer abgehört werden. Dazu den
CD-Player, wie im Kapitel 5.4 „Anspielen eines
Titels“ beschrieben, bedienen.
Hinweis: Die Steuerung über Mischpult-Fader ist bei
Relay-Betrieb (siehe Kap. 5.3.3) nicht sinnvoll, weil unabhängig von den zugehörigen
Fadern die Wiedergabe automatisch am
Ende eines Titels bzw. am Ende der CD
stoppt und das andere Laufwerk startet.
8
Pflege des Gerätes
Das Gerät vor Staub, Vibrationen, direktem Sonnenlicht, Tropf- und Spritzwasser, hoher Luftfeuchtigkeit
und Hitze schützen (zulässiger Einsatztemperaturbereich 0 – 40 °C). Für die Reinigung nur ein weiches, trockenes Tuch verwenden, auf keinen Fall
Wasser oder Chemikalien.
Hinweis zu Tonaussetzern und Lesefehlern
Zigarettenrauch dringt leicht durch alle Öffnungen
des Gerätes und setzt sich auch auf der Optik des
Laser-Abtastsystems ab. Dieser Belag kann zu
GB
phones despite a closed fader for the CD player. For
this purpose operate the CD player as described in
the chapter 5.4 “ Short replay of a title beginning”.
Note: Control via mixer fader is pointless during
relay operation (see chapter 5.3.3) as, regardless of the corresponding faders, the replay
will automatically stop at the end of a title or at
the end of the CD and the other player mechanism will start.
8
Maintenance of the Unit
Protect the unit from dust, vibrations, direct sunlight,
dripping water and splash water, high air humidity,
and heat (admissible ambient temperature range
0 – 40 °C). For cleaning only use a dry, soft cloth, by
no means water or chemicals.
Note concerning sound interruptions and reading errors
Cigarette smoke easily penetrates through all opening of the unit and also settles on the optics of the
laser system. This deposit may cause reading errors
and sound interruptions. As cigarette smoke cannot
always be prevented (e. g. in the discothèque), the
unit must be cleaned by skilled personnel. Please
note that there is a charge on cleaning in this case,
even during the warranty period!
Technische Daten
Frequenzbereich: . . . . . 20 – 20 000 Hz
Klirrfaktor: . . . . . . . . . . . < 0,1 %
Kanaltrennung: . . . . . . . > 80 dB
Dynamikumfang: . . . . . . > 90 dB
Störabstand: . . . . . . . . . > 80 dB
Gleichlaufschwankungen: nicht messbar, quarzgenau
Ausgänge
Line (analog): . . . . . . . 2 V
digital (koaxial): . . . . . 0,5 Vss S/PDIF
Stromversorgung: . . . . . 230 V~/50 Hz
Leistungsaufnahme: . . . 25 VA
Einsatztemperatur: . . . . 0 – 40 °C
Abmessungen (B x H x T)
Laufwerk: . . . . . . . . . . 482 x 89 x 260 mm, 2 HE
Steuereinheit: . . . . . . 482 x 89 x 80 mm, 2 HE
Gewicht: . . . . . . . . . . . . 6,9 kg
Anschlüsse
Audioausgang, analog: 2 x Cinch Links/Rechts
Audioausgang, digital: 2 x Cinch
Faderstart: . . . . . . . . . 2 x 3,5-mm-Klinke
Steuerverbindung: . . . über 8-poliges Mini-DINKabel (Länge 1,2 m)
10 Erklärung der Fachbegriffe
Kursiv gedruckte Wörter sind Stichwörter, die weitererklärt
werden.
Anti Shock Buffer Memory: Elektronischer Speicher, in dem
die Musik nach dem Lesen von der CD zwischengespeichert
wird, um bei Erschütterungen Unterbrechungen der Wiedergabe zu vermeiden.
Auto Cue: Beim Anwählen eines Titels steht der CD-Player
exakt an der Stelle, an der die Musik beginnt und nicht bei
dem Zeitindex 0:00:00. Dadurch startet nach dem Drücken
der Taste
die Musik sofort ohne Pause.
Bargraph: Im Display stellt ein Balken durch seine Länge die
Titel- bzw. CD-Restzeit oder die bereits gespielte Zeit eines
Titels graphisch dar.
Beatcounter engl. Taktzähler: Ermittelt die Anzahl der Taktschläge pro Minute (BPM) und damit, wie schnell ein Musikstück gespielt wird.
BOP (BOP = Stottereffekt): Die Taste BOP dient zum Zurückspringen und sofortigem Starten der Wiedergabe ab dem
Anfang des gerade laufenden Titels oder ab einem zuvor mit
der Taste CUE gewählten Startpunkt. Durch mehrfaches kurzes Drücken der Taste BOP entsteht ein Stottereffekt.
BPM: engl. beats per minute = Taktschläge pro Minute
Der integrierte manuelle Beatcounter ermittelt die Anzahl der
Taktschläge pro Minute eines Titels, wenn die Taste BPM /
TAP einige Male im Takt der Musik angetippt wird.
CE ( -Zeichen) franz. Communauté Européenne = Europäische Gemeinschaft: Bestimmte Produkte, die in der EU verkauft werden sollen, müssen das CE-Zeichen tragen. Damit
bestätigt der Hersteller bzw. der Vertreiber, dass das Produkt
alle entsprechenden Richtlinien der EU erfüllt (z. B. Niederspannungsrichtlinie, Richtlinie für Elektromagnetische Verträglichkeit etc.).
Laut Angaben des Herstellers.
Änderungen vorbehalten.
9
Specifications
Frequency range: . . . . .
THD: . . . . . . . . . . . . . . .
Channel separation: . . .
Dynamic range: . . . . . . .
S/N ratio: . . . . . . . . . . .
Wow and flutter: . . . . . .
Outputs
line (analog): . . . . . . .
digital (coaxial): . . . . .
Power supply: . . . . . . . .
Power consumption: . . .
Ambient temperature: . .
Dimensions (W x H x D)
player mechanism: . .
control unit: . . . . . . . .
Weight: . . . . . . . . . . . . .
Connections
audio output, analog: .
audio output, digital: .
fader start: . . . . . . . . .
control connection: . .
10 Glossary
20 – 20 000 Hz
< 0.1 %
> 80 dB
> 90 dB
> 80 dB
not measurable, quartz
precision
2V
0.5 Vpp S/PDIF
230 V~/50 Hz
25 VA
0 – 40 °C
482 x 89 x 260 mm, 2 RS
482 x 89 x 80 mm, 2 RS
6.9 kg
2 x phono left/right
2 x phono
2 x 3.5 mm jack
via 8-pole mini DIN cable
(length 1.2 m)
Words in italics are keywords which are further explained in
detail.
Anti-shock buffer memory: electronic memory where the
music is temporarily memorized after it has been read from
the CD to prevent interruptions of the replay in case of shocks
Auto Cue: When selecting a title, the CD player is exactly on
the spot where the music starts and not at the time index
0:00:00. For this reason, the music starts immediately without
pause after pressing the button
.
Bar graph: In the display there is a graphic display of a bar
which indicates the remaining time of a title or a CD or the
time already played of a title graphically by its length.
Beat counter: determines the number of beats per minute
(BPM) and thus the replay speed of a music piece.
BOP (= stutter effect): The button BOP serves for return and
immediate start of the replay from the beginning of the currently playing title or from a starting point previously defined
with the button CUE. Repeated short actuation of the button
BOP will produce a stutter effect.
BPM (= beats per minute): The integrated manual beat counter
determines the number of beats per minute of a title when the
button BPM/TAP is shortly pressed several times to the beat
of the music.
CE (
mark); French: Communauté Européenne = European
Community: certain products on sale in the EU must have the
CE mark. Thus, the manufacturer or the distributor confirms
that the product meets all corresponding EU requirements
(e. g. low voltage directive, directive for electromagnetic compatibility, etc.)
According to the manufacturer.
Subject to technical modification.
12
Continue ➔ Total title replay
D
Continue ➔ Gesamttitelwiedergabe
Cue-Punkt: Mit einer Cue-Taste frei wählbare Stelle auf der
CD, auf die direkt gesprungen werden kann. Wird mit der
Cue-Taste auf den Cue-Punkt zurückgesprungen, schaltet
der CD-Player in den Pausenmodus.
digital: Informationen in Ziffern dargestellt. Ein Analog-DigitalWandler setzt die von einem Mikrofon aufgenommen Schallwellen in eine schnell hintereinander folgende Serie von Einsen und Nullen (Binärzahlen, z. B. „1001“ = 9) um, die dann
auf einer CD gespeichert werden. Jede Binärzahl entspricht
einem momentanen Wert einer Schallschwingung. Ein ausgeklügeltes Fehlerkorrektursystem rechnet Aussetzer und
Störungen heraus, wodurch die hohe Wiedergabequalität entsteht. Ein Digital-Analog-Wandler setzt die Binärzahlen wieder in elektrische Schwingungen um, die dann verstärkt zu
einem Lautsprecher gelangen.
Einzeltitelwiedergabe: Spezielle Betriebsart für DJ-Anwendungen: Nach dem Spielen eines Titels schaltet das Gerät auf
Pause, im Gegensatz zur Gesamttitelwiedergabe.
Elektromagnetische Verträglichkeit (EMV): Die EMV-Richtlinie 89/336/EWG schreibt vor, wie groß die Störstrahlung
eines Gerätes maximal sein darf und mit welcher Störstrahlung es ohne Probleme belastet werden darf (Störfestigkeit).
Faderstart engl. to fade in = einblenden: Mit einem Schieberegler (Fader) an einem Mischpult, der mit einem Schalter
oder Taster gekoppelt ist, kann das CD-Laufwerk beim Aufziehen des Faders gestartet und beim Zuziehen des Faders
wieder auf Pause geschaltet werden.
Frame engl. Rahmen: Die Musik auf einer CD ist in Datenblöcken (Rahmen) gespeichert. In einem Block ist die Musikinformation für eine 1/75 Sekunde gespeichert. Eine Stelle auf
der CD kann dadurch in Schritten von 1/75 Sekunde präzise
angefahren werden.
Gesamttitelwiedergabe: Betriebsart zum kontinuierlichen Abspielen eines Titels nach dem anderen, im Gegensatz zur
Einzeltitelwiedergabe.
vom anderen Laufwerk zeitgleich laufen. Beim Überblenden
von einem zum anderen Titel wird dadurch der Tanzrhythmus
nicht gestört.
LED engl. light emitting diode: Elektronisches Bauteil, das elektrischen Strom direkt in Licht umwandelt (ohne Erzeugung
von Hitze wie bei einer Glühlampe); leuchtet je nach Material
in verschiedenen Farben oder auch in Weiß.
Rack engl. Gestell: Ein Rack dient zur Aufnahme von Geräten
mit einer genormten Breite von 482 mm (19"), um eine komplette Audioanlage zusammenzustellen, z. B. CD-Player,
Mischpult, Equalizer, Verstärker.
Line (-Ausgang, -Eingang, -Pegel) engl. Leitung: Um Signale
von einem Gerät zum anderen übertragen zu können, müssen diese einen festgelegten Spannungswert haben, sonst ist
keine optimale Übertragung möglich. Dieser Wert liegt zwischen 0,1 V und 2 V (Volt) und wird als Line-Pegel bezeichnet. Ein- und Ausgänge, die für diese Pegel vorgesehen sind,
tragen meistens die Beschriftung LINE.
Relay-Betrieb: Funktion, bei der die Titel oder die CDs automatisch wechselweise von den beiden Laufwerken abgespielt
werden.
Loop engl. Schleife: unendliche Wiederholung einer bestimmten
Musikpassage auf der CD, die durch das Setzen eines Startund eines Endpunktes festgelegt wird. Die gespeicherte Endlosschleife kann jederzeit verlassen und später wieder aufgerufen werden (Reloop).
Monitorfunktion ➔ Vorhörfunktion
Niederspannungsrichtlinie (73/23/EWG): Vorschrift für Geräte, die mit Spannungen von 50 V bis 1500 V arbeiten und
darum für den Benutzer entsprechend sicher aufgebaut sein
müssen.
OUTRO: Funktion, bei der nur die letzten 30 Sekunden eines
Titels abgespielt werden.
A
CH
Seamless Loop engl. nahtlose Schleife: Die Wiedergabe der
Endlosschleife (Loop) verläuft nahtlos, d. h. es ist keine Unterbrechung des Musiksignals zu hören, wenn der CD-Player vom
Endpunkt zurück zum Startpunkt der Schleife springt.
Single ➔ Einzeltitelwiedergabe
Taster: Schalter, dessen Kontakt nur so lange geschlossen ist,
wie der Schalterknopf gedrückt gehalten wird, Beispiel Klingelschalter.
Track: engl. Spur, Musikstück z. B. auf einer CD.
Vorhörfunktion (Pre Fader Listening): Möglichkeit, am Mischpult trotz zugezogenem Fader (Schieberegler) das Musiksignal, z. B. von einem CD-Player, über einen Kopfhörer abzuhören, um den nächsten Titel oder einen Startpunkt auszuwählen.
Pitch engl. Tonhöhe: Mit dem Regler PITCH CONTROL lässt sich
die Abspielgeschwindigkeit und damit die Tonhöhe verändern.
Pitch Bend: Funktion, mit der kurzzeitig die Abspielgeschwindigkeit erhöht oder verringert werden kann. Der Takt eines
Titels von einem Laufwerk kann so mit dem Takt eines Titels
Diese Bedienungsanleitung ist urheberrechtlich für MONACOR ® INTERNATIONAL GmbH & Co. KG
geschützt. Eine Reproduktion für eigene kommerzielle Zwecke – auch auszugsweise – ist untersagt.
GB
Cue point: spot on the CD which can be selected as desired
with a Cue button. The unit is able to go directly to this spot. If
the unit returns to the Cue point with the Cue button, the CD
player is set to the pause mode.
age value otherwise an optimum transmission is impossible.
This value is between 0.1 V and 2 V and is designated as line
level. Inputs and outputs provided for these levels are mostly
marked LINE.
Digital: information displayed in digits. An analog-digital converter converts the sound waves picked up by a microphone
into a sequence of ones and zeroes rapidly succeeding one
another (binary numbers: e. g. “1001” = 9) which are then
stored on a CD. Each binary number corresponds to a current
value of a sound vibration. A sophisticated error correction
system removes sound interruptions and disturbances which
results in a high reproduction quality. A digital-analog converter reconverts the binary numbers into electric oscillations
which are amplified and sent to a speaker.
Loop: continuous repeat of a certain music passage on the CD
defined by setting a starting point and an end point. The
memorized continuous loop can be left at any time and be
called later (reloop).
Electromagnetic Compatibility (EMC): the EMC directive
89/336/EEC stipulates the maximum interference of a unit
and the level of interference to which the unit may be subjected without any problems (interference resistance).
Fader start: with a sliding control (fader) on a mixer coupled to
a switch or momentary pushbutton, the CD player mechanism
can be started by advancing the fader and set to pause by
closing the fader.
Frame: the music on a CD is memorized in data blocks
(frames). The music information for a 1/75 second is memorized in one block. A spot on the CD can thus precisely be
located in steps of 1/75 second.
LED (light emitting diode): electronic component which directly
converts electric current into light (without generating heat like
an incandescent lamp); according to its material, it shows different colours or also white
Low voltage directive (73/23/EEC): directive for units operating at voltages from 50 V to 1500 V which must therefore
have a corresponding safe design for the user.
Rack: a rack serves for accommodating units of a standardized
width of 482 mm (19") to compile complete audio systems,
e. g. CD player, mixer, equalizer, amplifier.
Relay operation: function for automatic replay of the titles or
CDs alternately on both player mechanisms.
Seamless loop: the replay of the continuous loop is seamless,
i. e. no interruption of the music signal can be heard when the
CD player goes from the end point back to the starting point of
the loop.
Single ➔ single title replay
Momentary pushbutton: switch, the contact of which is only
closed as long as the switch knob is kept pressed, e. g. bell
button.
Single title replay: special operating mode for DJ applications:
After replay of a title the unit is set to pause, contrary to the
total title replay
Monitor function ➔ Prefader listening function
Total title replay: operating mode for replaying one title after
the other continuously, contrary to the single title replay
OUTRO: function for replaying only the last 30 seconds of a
title.
Track: music piece, e. g. on a CD
Pitch: the PITCH CONTROL allows modification of the replay
speed and thus the pitch.
Pitch Bend: function for temporary increase or decrease of the
replay speed. The beat of a title on one player mechanism
can thus be synchronized to the beat of a title on the other
player mechanism. Crossfading from one title to the other will
not affect the dance rhythm.
Prefader Listening: facility on the mixer to monitor the music
signal e. g. of a CD player via headphones in spite of a closed
fader (sliding control) to select the next title or a starting point.
Line (line output, line input, line level): for transmitting signals
from one unit to another, these signals must have a fixed volt-
All rights reserved by MONACOR ® INTERNATIONAL GmbH & Co. KG. No part of this instruction manual
may be reproduced in any form or by any means for any commercial use.
13
F
B
CH
Ouvrez le présent livret page 3 de manière à
visualiser les éléments et branchements.
1
1.1 Unité de commande (schéma 1)
Table des matières
Eléments et branchements . . . . . . . . . . 14
5.5
Fonction OUTRO . . . . . . . . . . . . . . . . . . . 19
1.1 Unité de commande . . . . . . . . . . . . . . . . . 14
1.1.1 Eléments du lecteur 1 . . . . . . . . . . . . . . . 14
1.1.2 Affichage . . . . . . . . . . . . . . . . . . . . . . . . . 15
5.6
Avance et retour rapides . . . . . . . . . . . . . . 19
5.7
Positionnement à un endroit donné . . . . . 19
1.2
Unité lecteur, face avant . . . . . . . . . . . . . . 16
5.8
Modification de la vitesse et de la hauteur
tonale . . . . . . . . . . . . . . . . . . . . . . . . . . . . 19
1.3
Unité lecteur, face arrière . . . . . . . . . . . . . 16
5.8.1
2
Conseils d’utilisation et de sécurité . . . 16
3
Possibilités d’utilisation . . . . . . . . . . . . . 16
4
Positionnement de l’appareil/montage
en rack . . . . . . . . . . . . . . . . . . . . . . . . . . . 16
1
5.9
5
Utilisation . . . . . . . . . . . . . . . . . . . . . . . . . 17
5.1
Lecture de CD . . . . . . . . . . . . . . . . . . . . . . 17
5.2
Affichage du numéro de titre, de la durée,
du nombre de beats par minute
et du mode repos . . . . . . . . . . . . . . . . . . . 17
5.2.1 Bargraphe . . . . . . . . . . . . . . . . . . . . . . . . 17
5.2.2 Compteur de beats . . . . . . . . . . . . . . . . . 18
5.2.3 Mode repos . . . . . . . . . . . . . . . . . . . . . . . 18
I
Eléments et branchements
5.9.1
Adaptation du rythme entre deux
morceaux de musique (“Pitch Bend”) . . . 19
Saut à un endroit préalablement déterminé
(point Cue) . . . . . . . . . . . . . . . . . . . . . . . . 20
Touche BOP . . . . . . . . . . . . . . . . . . . . . . 20
5.10 Lecture d’une boucle continue . . . . . . . . . 20
6
Création d’une séquence de titres . . . . 21
6.1
Programmation d’une séquence . . . . . . . . 21
6.2
Vérification d’une programmation . . . . . . . 21
6.3
Lecture d’une programmation . . . . . . . . . . 21
6.4
Effacement d’une programmation . . . . . . . 21
7
5.3 Sélection du mode de fonctionnement . . . 18
5.3.1 Lecture titre par titre . . . . . . . . . . . . . . . . 18
5.3.2 Lecture de tous les titres . . . . . . . . . . . . 18
5.3.3 Mode relais – Démarrage automatique
du second lecteur . . . . . . . . . . . . . . . . . . 18
Démarrage électrique via une table
de mixage . . . . . . . . . . . . . . . . . . . . . . . . . 21
8
Entretien de l’appareil . . . . . . . . . . . . . . . 22
9
Caractéristiques techniques . . . . . . . . . 22
5.4
10
Glossaire technique . . . . . . . . . . . . . . . . 22
Lecture des premières notes d’un titre . . . 19
Vi preghiamo di aprire completamente la pagina 3.
Così vedrete sempre gli elementi di comando e i
collegamenti descritti.
1 Eléments du lecteur 1 (voir détails schéma 2)
2 Eléments du lecteur 2
3 Touche RELAY pour un démarrage automatique
de l’autre lecteur à la fin d’un titre ou à la fin du
CD (voir chapitre 5.3.3).
La fonction ne peut être activée que si un CD est
inséré dans les deux lecteurs.
1.1.1 Eléments du lecteur 1 (voir schéma 2)
Les éléments pour les lecteurs 1 et 2 sont identiques.
4 Touche
pour ouvrir et fermer le tiroir CD (22)
(impossible pendant la lecture)
5 Touche SEARCH (avec LED de contrôle) pour
commuter la molette (16) sur la fonction
“Avance/Retour rapides”.
Conseil : si la molette n’est pas activée pendant
8 secondes en mode Lecture, la LED s’éteint et
la molette sert à nouveau pour la fonction “Pitch
Bend” ; en mode Pause, elle sert à aller avec
précision à un endroit déterminé.
6 Touche BOP pour un retour en arrière et un
démarrage immédiat de la lecture au début du
titre en cours ou à partir d’un point préalablement
sélectionné avec la touche CUE (17). Par plusieurs pressions brèves, vous pouvez produire
des effets “sampler (bégaiement)”.
7 Touches TRACK pour la sélection de titres :
touche +10 : pour sauter 10 titres
touche
pour sélectionner le titre suivant
touche
pour revenir au début du titre en
cours. Par plusieurs pressions sur la touche
, on recule toujours d’un titre.
8 Touche CUE 1 pour revenir à un endroit préalablement déterminé (voir chapitre 5.9)
1
Elementi di comando e collegamenti
1.1 Unità di comando (fig. 1)
Indice
1
Elementi di comando e collegamenti . . 14
5.5
Funzione OUTRO . . . . . . . . . . . . . . . . . . . 19
1.1 Unità di comando . . . . . . . . . . . . . . . . . . . 14
1.1.1 Quadro di comando del lettore 1 . . . . . . 14
1.1.2 Display . . . . . . . . . . . . . . . . . . . . . . . . . . 15
5.6
Avanzamento/ritorno veloce . . . . . . . . . . . 19
5.7
Posizionarsi con esattezza su
un determinato punto . . . . . . . . . . . . . . . . 19
1.2
Unità lettore pannello frontale
1.3
Unità lettore pannello posteriore . . . . . . . . 16
5.8 Variare la velocità e l’altezza del suono . . 19
5.8.1 Adattamento del ritmo fra due brani
(“pitch bend”) . . . . . . . . . . . . . . . . . . . . . 19
2
Avvertenze di sicurezza . . . . . . . . . . . . . 16
3
Possibilità d’impiego . . . . . . . . . . . . . . . 16
4
Collocamento e collegamenti . . . . . . . . 16
5
Funzionamento . . . . . . . . . . . . . . . . . . . . 17
5.1
Riprodurre un CD . . . . . . . . . . . . . . . . . . . 17
. . . . . . . . . 16
5.2
Visualizzazione del numero del titolo,
della durata, del numero di battute
al minuto, della modalità sleep . . . . . . . . . 17
5.2.1 Diagramma a barre . . . . . . . . . . . . . . . . .17
5.2.2 Beatcounter . . . . . . . . . . . . . . . . . . . . . . 18
5.2.3 Modalità sleep . . . . . . . . . . . . . . . . . . . . 18
14
5.9
Salto ad un punto fissato precedentemente
(“punto CUE”) . . . . . . . . . . . . . . . . . . . . . . 20
5.9.1 Tasto BOP . . . . . . . . . . . . . . . . . . . . . . . 20
5.10 Riproduzione di una sequenza senza fine
(“loop”) . . . . . . . . . . . . . . . . . . . . . . . . . . . . 20
6
Compilare una sequenza
individuale dei titol . . . . . . . . . . . . . . . . . 21
6.1
Programmare la sequenza dei titoli . . . . . . 21
6.2
Verificare la programmazione . . . . . . . . . . 21
6.3
Riproduzione dei titoli programmati . . . . . . 21
6.4
Cancellazione dei titoli programmati . . . . . 21
7
Avviamento tramite fader dal mixer . . . 21
5.3 Selezionare il modo di funzionamento . . . 18
5.3.1 Riproduzione di un singolo titolo . . . . . . . 18
5.3.2 Riproduzione di tutti i titoli . . . . . . . . . . . . 18
5.3.3 Funzionamento Relay –
avvio automatico dell’altro lettore . . . . . 18
8
Manutenzione . . . . . . . . . . . . . . . . . . . . . 22
9
Dati tecnici . . . . . . . . . . . . . . . . . . . . . . . . 22
5.4
10
Spiegazione dei termini tecnici . . . . . . . 22
Riproduzione dell’inizio di un titolo . . . . . . 19
1 Quadro di comando del lettore 1 (per i particolari
vedi fig. 2)
2 Quadro di comando del lettore 2
3 Tasto RELAY per l’avvio automatico dell’altro lettore alle fine di un titolo o del CD (vedi cap. 5.3.3).
La funzione può essere attivata solo se in entrambi i lettori è inserito un CD
1.1.1 Quadro di comando del lettore 1 (fig. 2)
I quadri di comando dei lettori 1 e 2 sono identici.
4 Tasto per aprire e chiudere il cassetto CD (22)
(non è possibile durante la riproduzione)
5 Tasto SEARCH (con LED di controllo), per attivare la funzione “Avanzamento/ritorno veloce”
della manopola (16)
N.B.: Se nella modalità di riproduzione, la manopola non viene azionata per 8 secondi, il LED si
spegne e la manopola serve nuovamente per la
funzione “Pitch Bend”, e nella modalità di pausa
per posizionarsi con esattezza su un punto preciso
6 Tasto BOP per ritornare all’inizio del titolo attuale
oppure a un punto determinato precedentemente con il tasto CUE (17) con successivo
avvio della riproduzione
Premendo il tasto più volte, si creano degli effetti
di “balbuziente”.
7 Tasti TRACK per la scelta dei titoli
Tasto +10, per saltare in avanti di 10 titoli
Tasto
per scegliere il titolo successivo
Tasto
per saltare all’inizio del titolo attuale.
Premendo più volte il tasto
si ritorna indietro ogni volta di un altro titolo.
8 Tasto CUE 1 per ritornare a un punto determinato precedentemente (vedi cap. 5.9)
9 Touche CONT./SINGLE : sélection du mode de
fonctionnement (voir également chapitre 5.3) et
pour allumer/éteindre la fonction OUTRO.
réglage de base : lecture titre par titre : l’affichage indique “AUTO CUE
SINGLE” (d)
1. pression :
lecture de tous les titres du
CD : l’affichage indique “CONTINUE” (c)
2. pression :
retour au réglage de base
Maintenez la touche enfoncée pendant 3 secondes environ jusqu’à ce que “OUTRO” (k) s’affiche :
Activation de la fonction OUTRO pour lire respectivement les 30 dernières secondes des titres
suivants [Pour déconnecter la fonction, soit
maintenez à nouveau la touche enfoncée pendant 3 secondes soit activez brièvement la touche TIME/STOP (10)].
10 Touche TIME/STOP : si la touche est enfoncée
plus de 3 secondes, le lecteur s’arrête ; pour
commuter l’affichage de la durée (j), n’enfoncez
la touche que brièvement :
réglage de base : affichage de la durée restante
du titre en cours
1. pression :
affichage de la durée déjà lue
du titre en cours
2. pression :
affichage de la durée restante
de tout le CD
3. pression :
retour au réglage de base
11 Touche PROG. (avec LED de contrôle) pour programmer une série de titres au choix – voir chapitre 6.
12 Touche PITCH pour sélectionner la plage de
réglage de la vitesse (déviation max. ± 8 % ou
max. ±16 % de la vitesse standard), la plage de
réglage sélectionnée est indiquée par la LED
correspondante (13) à côté de la touche
13 LEDs d’affichage de la plage de réglage de la
vitesse sélectionnée avec la touche PITCH (12) :
clignote = le réglage PITCH CONTROL (14)
n’est pas activé
brille tout le temps = le réglage a été activé avec
la touche ON/OFF (15)
14 Potentiomètre PITCH CONTROL pour modifier
la vitesse ou la hauteur tonale (max. ±16 %) ; le
réglage du potentiomètre n’est efficace que si la
touche ON/OFF (15) est enfoncée.
15 Touche ON/OFF pour activer/désactiver le réglage PITCH CONTROL (14)
16 Molette
1. LED de contrôle de la touche SEARCH (5)
éteinte : pour la fonction “Pitch Bend” et en
mode Pause pour aller exactement à un
endroit déterminé
2. Touche SEARCH enfoncée, la LED brille :
pour l’avance et le retour rapides
17 Touche CUE pour lire les premières notes d’un
titre et pour le retour à un endroit préalablement
déterminé (voir chapitre 5.4/5.9)
18 Touche PLAY/PAUSE
pour commuter entre
Lecture et Pause
19 Touches pour mémoriser et lire une boucle continue :
touche A : pour déterminer le point de départ de
la boucle
touche B/LOOP – EXIT : pour déterminer le point
d’arrêt de la boucle continue et pour démarrer
simultanément la boucle ; pour quitter la
boucle, enfoncez la touche une nouvelle fois.
touche RELOOP pour une nouvelle lecture de la
boucle
20 Touches PITCH BEND pour synchroniser le
rythme d’un titre sur le lecteur 1 avec le rythme
d’un titre sur le lecteur 2. Tant qu’une des touches est activée, la vitesse est augmentée ou
diminuée de 16 %.
21 Touche BPM/TAP pour le compteur manuel de
beats
Pour obtenir, pour un titre, le nombre de beats
par minute, enfoncez plusieurs fois la touche
selon le rythme de la musique : sur l’affichage
“BEAT” (e) s’affiche à la place de “PITCH” (f)
9 Tasto CONT./SINGLE per selezionare la modalità di funzionamento (vedi anche cap. 5.3) e per
attivare/disattivare la funzione OUTRO
impostazione
base:
riproduzione di titoli singoli;
il display segnala “AUTO CUE
SINGLE” (d)
1. pressione
del tasto:
riproduzione di tutti i titoli del CD;
il display segnala “CONTINUE” (c)
2. pressione
del tasto:
ritorno all’impostazione base
Tener premuto il tasto per 3 secondi ca. finché
sul display si vede “OUTRO” (k):
si attiva la funzione OUTRO per riprodurre gli
ultimi 30 secondi dei titoli seguenti [per disattivare la funzione tenere ancora premuto il tasto
per 3 secondi ca. oppure azionare brevemente il
tasto TIME/STOP (10).]
10 Tasto TIME/STOP:
se si tiene premuto il tasto per oltre 3 secondi, il
lettore si ferma;
per cambiare l’indicazione del tempo sul display
(j) toccare il tasto solo brevemente:
impostazione
base:
indicazione del tempo restante
del titolo attuale
1. pressione
del tasto:
indicazione del tempo già trascorso del titolo attuale
2. pressione
del tasto:
indicazione del tempo restante
dell’intero CD
3. pressione
del tasto:
ritorno all’impostazione base
11 Tasto PROG. (con LED di controllo) per programmare una sequenza individuale dei titoli –
vedi cap. 6
12 Tasto PITCH per scegliere il campo di regolazione
della velocità (deviazione dalla velocità standard
max. ±8 % o max. ±16 %), il campo selezionato
viene indicato dal relativo LED (13) vicino al tasto
13 LED per indicare il campo di velocità selezionato
con il tasto PITCH (12):
lampeggiano = il regolatore PITCH CONTROL
(14) non è stato attivato
rimangono accesi = il regolatore è stato attivato
con il tasto ON/OFF (15)
14 Cursore PITCH CONTROL per modificare la
velocità e l’altezza del suono (max. ±16 %); l’impostazione del regolatore è attiva solo se il tasto
ON/OFF (15) è premuto
15 Tasto ON/OFF per attivare e disattivare il regolatore PITCH CONTROL (14)
16 Manopola
1. LED di controllo del tasto SEARCH (5) spento:
per la funzione “Pitch Bend” e nella modalità
di pausa per posizionarsi su un punto preciso
2. Tasto SEARCH premuto, il LED è acceso:
per l’avanzamento/ritorno veloce
17 Tasto CUE per riprodurre l’inizio di un titolo e per
il ritorno a un punto determinato precedentemente (vedi cap. 5.4 e 5.9)
18 Tasto PLAY/PAUSE
per cambiare fra riproduzione e pausa
19 Tasti per memorizzare e riprodurre una sequenza senza fine:
Tasto A per determinare il punto di partenza della
sequenza
Tasto B/LOOP – EXIT per determinare il punto
finale della sequenza e per avviare la sequenza; per uscire dalla sequenza senza fine
premere di nuovo il tasto
Tasto RELOOP per riprodurre nuovamente la
sequenza senza fine
20 Tasti PITCH BEND per adattare il ritmo di un titolo del lettore 1 a quello di un titolo del lettore 2.
Finché si tiene premuto uno dei tasti, la velocità
standard aumenta o si riduce del 16 %.
21 Tasto BPM/TAP per il beatcounter manuale
Per stabilire per un titolo l’esatto numero di
battute al minuto premere brevemente il tasto
per alcune volte nel ritmo della musica: sul
et la zone PITCH (h) indique le nombre de
beats par minute du titre au lieu de la déviation en pourcentage de la vitesse standard.
Pour revenir à l’affichage de la déviation de la
vitesse, maintenez la touche enfoncée pendant 3 secondes environ jusqu’à ce que
“BEAT” s’éteigne et que “PITCH” s’affiche à
nouveau.
F
B
CH
1.1.2 Affichage (schéma 3)
a symbole pour le mode Lecture
b symbole pour le mode Pause
c affichage “CONTINUE” : indique le mode de
fonctionnement “Lecture de tous les titres”, voir
position 9 touche CONT./SINGLE.
d affichage “AUTO CUE SINGLE” : indique le
mode de fonctionnement “Lecture titre par titre”
e affichage “BEAT” : indique, en haut à droite sur
l’affichage [zone (h)], le nombre de beats par
minute, voir position 21 touche BPM/TAP.
f affichage “PITCH” : indique en haut à droite sur
l’affichage [zone (h)], la déviation en pourcentage
de la vitesse standard, réglée avec le potentiomètre (14).
g bargraphe : indique par sa longueur, la durée
restante d’un titre ou du CD [“REMAIN” (m)
affiché] ou la durée déjà lue d’un titre (affichage
“REMAIN” éteint)
h affichage de la déviation, en pourcentage, de la
vitesse standard, réglée avec le potentiomètre
PITCH CONTROL (14) ou affichage du nombre
de beats par minute après commutation avec la
touche BPM/TAP (21).
i
numéro du titre/nombre de titres sur le CD quelques instants après avoir inséré le CD
j
affichage de la durée en minutes (M), secondes
(S) et frames (F) : voir position 10 touche TIME/
STOP
k affichage “OUTRO” : indique la fonction OUTRO,
voir position 9 touche CONT./SINGLE
display, invece di “PITCH” (f) si vede “BEAT”
(e), e il campo di visualizzazione PITCH (h), al
posto della deviazione percentuale dalla velocità standard, indica il numero delle battute al
minuto del titolo.
Per ritornare alla visualizzazione della deviazione della velocità tener premuto il tasto per
3 secondi circa, finché “BEAT” si spegne e si
vede di nuovo “PITCH”.
I
1.1.2 Display (fig. 3)
a simbolo per la riproduzione
b simbolo per la pausa
c indicazione “CONTINUE”: segnala la modalità di
“riproduzione di tutti i titoli”, vedi posizione 9,
tasto CONT./SINGLE
d indicazione “AUTO CUE SINGLE”: segnala la
modalità di “riproduzione di un singolo titolo”;
e indicazione “BEAT”: segnala che il display indica
in alto a destra [campo (h)] il numero di battute al
minuto, vedi pos. 21, tasto BPM/TAP
f indicazione “PITCH”: segnala che il display
indica in alto a destra [campo (h)] la deviazione
percentuale dalla velocità standard [impostata
con il regolatore (14])
g diagramma a barre: indica con la sua lunghezza
il tempo restante di un titolo o del CD [si vede
“REMAIN” (m) sul display] oppure il tempo già
trascorso del titolo (non si vede “REMAIN”)
h indicazione della deviazione percentuale dalla
velocità standard impostata con il regolatore
PITCH CONTROL (14) o il numero di battute/
minuto dopo commutazione con il tasto BPM/
TAP (21)
i numero del titolo e, subito dopo l’inserimento del
CD, il numero globale dei titoli sul CD
j indicazione del tempo in minuti (M), secondi (S)
e frames (F); vedi anche il punto 10 tasto TIME/
STOP
k indicazione “OUTRO”: segnala la funzione
OUTRO, vedi pos. 9, tasto CONT./SINGLE
15
F
B
CH
l
affichage “LOOP” : s’affiche lorsqu’une boucle
continue est lue (voir chapitre 5.10)
m affichage “REMAIN” : indique que la durée restante (j) d’un titre ou d’un CD est affichée
2
1.2 Unité lecteur, face avant (schéma 4)
Attention ! Cet appareil est alimenté par une tension dangereuse 230 V~. Ne touchez
jamais l’intérieur de l’appareil car, en
cas de mauvaise manipulation, vous
pourriez subir une décharge électrique. En outre, l’ouverture de l’appareil
rend tout droit à la garantie caduque.
22 Tiroir CD pour chaque lecteur
23 Eclairage du tiroir CD (22)
24 Touche
pour ouvrir et fermer le tiroir CD respectif (22) [impossible pendant la lecture]
25 Témoin de fonctionnement
26 Interrupteur POWER Marche/Arrêt
1.3 Unité lecteur, face arrière (schéma 5)
27 Prise mini DIN 8 pôles pour relier l’unité lecture
et l’unité commande :
reliez la prise via le cordon mini DIN livré à la
prise REMOTE CONTROL CONNECT TO MAIN
UNIT sur la face arrière de l’unité de commande ; placez l’extrémité du cordon avec la self
d’anti-parasitage (petite boîte) dans la prise de
l’unité de lecture.
28 Commutateur REMOTE SELECT pour le type de
commande à distance via les prises START/
PAUSE (30), voir chapitre 7
TACT SW
pour la commande via un bouton poussoir
momentané
LOCK SW
pour la commande via un interrupteur marche/arrêt
29 Cordon secteur à relier à une prise secteur
230 V~/50 Hz
30 Prise jack 3,5 mono femelle pour la commande à
distance de la fonction “Start/Pause” (marche/
pause) de chaque lecteur depuis une table de
mixage – voir chapitre 7
31 Sortie audio digitale (RCA) de chaque lecteur
32 Sortie audio analogique (RCA, gauche/droite)
avec niveau ligne de chaque lecteur
I
l indicazione “LOOP”; si vede nel caso di riproduzione di una sequenza senza fine (vedi cap. 5.10)
m indicazione “REMAIN”; segnala che l’indicazione
del tempo (j) è riferita al tempo restante di un
titolo o dell’intero CD
1.2 Unità lettore pannello frontale (fig. 4)
22 Cassetto CD per il relativo lettore
23 Illuminazione per il cassetto CD (22)
24 Tasto per aprire e chiudere il relativo cassetto
CD (22)
(non è possibile durante la riproduzione)
25 Spia di funzionamento
26 Interruttore on/off POWER
1.3 Unità lettore pannello posteriore (fig. 5)
27 Presa Mini-DIN a 8 poli per collegare le unità lettori e di comando:
collegare la presa con la presa REMOTE CONTROL CONNECT TO MAIN UNIT sul retro dell’unità di comando servendosi del cavo mini-DIN in
dotazione; inserire il terminale con il soppressore
di radiodisturbi (la piccola scatola) nella presa
dell’unità lettore.
28 Commutatore REMOTE SELECT per il tipo di
telecomando mediante le prese START/PAUSE
(30), vedi cap. 7
TACT SW:
per il comando tramite un pulsante
LOCK SW:
per il comando tramite un interruttore on/off
29 Cavo di rete per il collegamento a una presa di
rete (230 V~/50 Hz)
30 Presa jack 3,5 mm mono per il telecomando da
un mixer della funzione “Start/Pausa” del relativo lettore, vedi cap. 7
31 Uscita digitale (RCA) del relativo lettore
32 Uscita audio analogica con livello Line (RCA,
sinistra/destra) del relativo lettore
16
Conseils d’utilisation et de sécurité
Cet appareil répond à la norme européenne
89/336/CEE relative à la compatibilité électromagnétique et à la norme 73/23/CEE portant sur les
appareils à basse tension.
Respectez scrupuleusement les points suivants :
● Attention ! Ne regardez jamais dans le tiroir CD
s’il est ouvert. Des rayonnements laser pourraient
causer des dommages aux yeux.
● L’appareil n’est conçu que pour une utilisation en
intérieur. Protégez-le des éclaboussures, de tout
type de projections d’eau, de l’humidité élevée et
de la chaleur (température ambiante admissible
0 – 40 °C).
● En aucun cas, vous ne devez poser d’objet contenant du liquide ou un verre sur l’appareil.
● La chaleur dégagée par l’appareil doit être évacuée par une circulation d’air adéquate. En aucun
cas, les ouïes d’aération du boîtier ne doivent être
obturées.
● Ne faites rien tomber dans les ouïes de ventilation, vous pourriez vous électrocuter.
● Ne faites jamais fonctionner l’appareil et débranchez-le immédiatement lorsque :
1. des dommages sur l’appareil et sur le cordon
secteur apparaissent.
2. après une chute ou accident similaire..., l’appareil peut présenter un défaut.
3. des dysfonctionnements apparaissent.
Dans tous les cas, les dommages doivent être
réparés par un technicien spécialisé.
● Tout cordon secteur endommagé ne doit être remplacé que par le fabricant ou un technicien habilité.
2
Avvertenze di sicurezza
Questo apparecchio è conforme alle direttive EMC
89/336/CEE sulla compatibilità elettromagnetica e
73/23/CEE per apparecchi a bassa tensione.
●
●
Lorsque l’appareil est définitivement retiré du service, vous devez le déposer
dans une usine de recyclage de proximité pour contribuer à son élimination
non polluante.
3
Possibilités d’utilisation
Le lecteur CD double CD-280DJ avec deux unités
de lecture est spécialement conçu pour une utilisation DJ professionnelle. De nombreuses possibilités
de fonctionnement sont précisément définies dans
ce but, par exemple un compteur de beats, une lecture sans interruption d’une boucle continue (Seamless Loop), une lecture titre par titre ou la synchronisation manuelle du rythme de deux titres.
Sur le lecteur, il est possible de lire des CDs
audio, des CD-R audio (gravés) ; des problèmes
lors de la lecture peuvent survenir avec des CD-RW
(CDs réinscriptibles) selon le type de CD, le graveur
et le logiciel de gravure utilisés.
Le lecteur CD est doté d’une mémoire anti chocs
qui peut compenser les dysfonctionnements causés
par des chocs ou vibrations jusqu’à 10 secondes.
4
Positionnement de l’appareil/montage
en rack
Les unités de lecture et de commande sont prévues
pour une installation dans un rack d’une largeur de
19" (= 482 mm) mais elles peuvent être directement
posées sur une table. L’unité de lecture doit, dans
●
Staccare il cavo rete afferrando la spina, senza tirare il cavo.
●
Nel caso di uso improprio, di collegamento sbagliato, di impiego scorretto o di riparazione non a
regola d’arte non si assume nessuna responsabilità per eventuali danni consequenziali a persone
o a cose e non si assume nessuna garanzia per lo
strumento.
Attenzione! Questo apparecchio funziona con
pericolosa tensione di rete di 230 V~.
Non intervenire mai al suo interno; la
manipolazione scorretta può provocare delle scariche pericolose. Se
l’apparecchio viene aperto, cessa
ogni diritto di garanzia.
Si devono osservare assolutamente anche i
seguenti punti:
● Attenzione! Non guardare dentro il cassetto
aperto del CD. I raggi laser eventualmente uscenti
possono danneggiare gli occhi.
● Usare l’apparecchio solo all’interno di locali. Proteggerlo dall’acqua gocciolante e dagli spruzzi
d’acqua, da alta umidità dell’aria e dal calore (temperatura d’impiego ammessa fra 0 e 40 °C).
● Non posare contenitori pieni di liquidi, p. es.
bicchieri, sull’apparecchio.
● Dev’essere garantita la libera circolazione dell’aria per dissipare il calore che viene prodotto all’interno dell’apparecchio. Non coprire in nessun
modo le fessure d’aerazione.
● Non inserire oggetti nelle fessure d’aerazione.
Altrimenti si potrebbe provocare una scarica
elettrica.
● Non mettere in funzione l’apparecchio e staccare
subito la spina rete se:
1. l’apparecchio o il cavo rete presentano dei
danni visibili;
2. dopo una caduta o dopo eventi simili sussiste il
sospetto di un difetto;
3. l’apparecchio non funziona correttamente.
Per la riparazione rivolgersi sempre ad una officina competente.
● Il cavo rete, se danneggiato, può essere sostituito
solo dal costruttore o da un laboratorio autorizzato.
Ne débranchez jamais l’appareil en tirant sur le
cordon secteur, tenez-le toujours par la prise.
Nous déclinons toute responsabilité en cas de
dommages corporels ou matériels résultants si
l’appareil est utilisé dans un but autre que celui
pour lequel il a été conçu, s’il n’est pas correctement branché, utilisé ou s’il n’est pas réparé par
une personne habilitée ; de même, la garantie
deviendrait caduque.
Se si desidera eliminare l’apparecchio
definitivamente, consegnarlo per lo
smaltimento ad un’istituzione locale per
il riciclaggio.
3
Possibilità d’impiego
Il lettore CD doppio CD-280DJ con 2 lettori CD è
stato realizzato specialmente per uso DJ professionale. Infatti, molte funzioni sono previste appositamente per quell’impiego, p. es. il beatcounter, la
riproduzione ininterrotta senza fine (seamless loop),
la riproduzione di un singolo titolo oppure la sincronizzazione del ritmo fra due titoli.
Con il lettore CD si possono riprodurre CD audio
e CD masterizzati in proprio (CD-R audio). Con i CD
riscrivibile (CD-RW) ci possono essere dei problemi
nella riproduzione a seconda del tipo del CD e del
masterizzatore.
Il lettore CD è equipaggiato con una memoria
anti-shock che riesce a compensare colpi o vibrazioni durante la scansione del CD per una durata
fino a 10 secondi.
4
Collocamento e collegamenti
Le unità di comando e lettore sono previste per il
montaggio in un rack (482 mm/19"), ma si possono
collocare anche liberamente su un tavolo. L’unità
lettore deve comunque essere collocata su un piano
perfettamente orizzontale. L’unità di comando invece può essere montata a piacere, anche inclinata.
tous les cas, être placée à l’horizontale ; l’unité de
commande, peut, p. ex. être placée de manière inclinée. Pour un montage en rack, 2 unités sont nécessaires respectivement pour l’unité de commande et
pour l’unité de lecture (1 unité = 44,45 mm).
Avant d’effectuer ou de modifier les branchements,
assurez-vous que le lecteur CD et les autres
appareils reliés sont éteints.
1) Reliez l’unité de commande et l’unité de lecture
avec le cordon de liaison mini DIN livré :
mettez l’extrémité du câble avec la self d’antiantiparasitage (petite boîte) à la prise CONNECT
TO REMOTE CONTROL (27) de l’unité de lecture et l’autre extrémité à la prise REMOTE
CONTROL CONNECT TO MAIN UNIT sur la
face arrière de l’unité de commande.
2) Si la table de mixage ou l’amplificateur est dotée
d’entrées digitales, reliez-les aux prises jaunes
RCA DIGITAL OUT (31).
Sur les appareils dépourvus d’entrée digitale,
reliez les sorties stéréo LINE OUT (32) – canal
gauche L et canal droit R- via les cordons RCA,
aux entrées lecteur CD sur la table de mixage ou
l’amplificateur.
3) Les lecteurs peuvent être démarrés ou mis sur
Pause via une table de mixage avec fonction de
démarrage électrique. Voir chapitre 7 pour le
branchement de la commande.
4) Reliez enfin la prise du cordon secteur (29) à une
prise 230 V~/50 Hz.
5
2)
3)
4)
5)
Utilisation
Le texte suivant décrit l’utilisation du lecteur 1 ; l’utilisation du lecteur 2 est en tout point identique.
5.1 Lecture de CD
reconnaissance du CD. Si aucun disque n’est
inséré,
(aucun CD) s’affiche.
Avec la touche
(4 ou 24), ouvrez le tiroir CD.
Insérez un CD, inscription vers le haut et fermez
le tiroir avec la touche . Si le CD est correctement placé, l’affichage indique après un bref
instant, le nombre total de titres (i) et la durée
totale (j) du CD puis la durée (j) du premier titre.
Pour démarrer avec le premier titre, enfoncez la
touche
(18). Tant que le CD est lu, l’affichage
indique le symbole
(a) et la touche
brille
en permanence.
Si la lecture doit démarrer avec un autre titre,
sélectionnez-le directement avec les touches
TRACK (7) :
à chaque pression sur la touche +10, le lecteur
fait un saut de 10 titres vers l’avant.
par une pression sur la touche
, on avance
toujours d’un titre. Par une pression la touche
, vous revenez au début du titre en cours de
lecture. Par plusieurs pressions sur la touche
, vous reculez toujours d’un titre. Pour sauter plusieurs titres, maintenez la touche
ou
enfoncée.
Démarrez ensuite le titre avec la touche
.
A tout moment, la lecture peut être interrompue
avec la touche
; sur l’affichage, le symbole
Pause
(b) apparaît, les touches
et CUE
(17) clignotent. Pour poursuivre la lecture, enfoncez une nouvelle fois la touche
.
Une fois allumé, l’appareil est toujours sur le
mode Lecture titre par titre ; l’affichage indique
“AUTO CUE SINGLE” (d). Si un titre est lu jusqu’à la fin, l’appareil passe sur Pause au début
du titre suivant. Si cependant, un titre après l’autre doit être lu en continu, passez sur le mode
Lecture de tous les titres avec la touche CONT./
SINGLE (9) [voir chapitre 5.3].
Si la lecture du CD doit se terminer plus tôt, mettez le lecteur sur Pause ou arrêtez-le [maintenez
la touche TIME/STOP (10) enfoncée plus de
3 secondes]. Le tiroir CD peut maintenant être
ouvert avec la touche .
1) Avec l’interrupteur POWER (26), allumez le lecteur CD, le témoin de fonctionnement (25) et les
LEDs (23) au-dessus des tiroirs (22) brillent. Si
un CD est inséré dans le lecteur, diverses informations apparaissent (chapitre 5.2) après la
6)
Per il montaggio in un rack, ogni unità richiede
2 unità di altezza (1 unità di altezza = 44,45 mm).
Prima di eseguire il collegamento o eventuali modifiche, spegnere il lettore CD e gli apparecchi da collegare.
1) Collegare l’unità di comando e il lettore mediante
il cavo mini-DIN di collegamento in dotazione:
inserire il terminale con il soppressore di radiodisturbi (la piccola scatola) nella presa CONNECT TO REMOTE CONTROL (27) dell’unità
lettore e l’altro terminale nella presa REMOTE
CONTROL CONNECT TO MAIN UNIT sul retro
dell’unità di comando.
2) Se il vostro mixer o amplificatore è equipaggiato
con ingressi digitali, questi si possono collegare
con le prese RCA gialle DIGITAL OUT (31).
Nel caso di apparecchi senza ingressi digitali,
collegare le uscite stereo LINE OUT (32) – canale sinistro L e destro R – con gli ingressi per lettori CD del mixer/amplificatore servendosi di cavi
con connettori RCA.
3) Le unità lettore possono essere avviate o messe
in pausa tramite un mixer con avviamento tramite
fader. Per il collegamento vedi capitolo 7.
4) Alla fine inserire la spina del cavo rete (29) in una
presa (230 V~/50 Hz).
2) Con il tasto (4 o 24) aprire il cassetto per il CD.
Inserire un CD con la scritta rivolta in alto e chiudere il cassetto con il tasto . Se il CD è inserito
correttamente, dopo breve tempo, il display
indica il numero globale dei titoli (i) nonché la
durata complessiva del CD (j). Successivamente
viene indicata la durata del primo titolo (j).
3) Per avviare la riproduzione del primo titolo premere il tasto
(18). Durante la riproduzione del
CD, sul display è visibile il simbolo
(a) e il
tasto
rimane acceso.
Se si desidera iniziare con un altro titolo, selezionarlo direttamente con i tasti TRACK (7):
con ogni pressione del tasto +10 si saltano 10
titoli in avanti.
Premendo il tasto
si va avanti sempre di un
titolo. Premendo il tasto
si ritorna all’inizio
del titolo attuale. Premendo il tasto
più
volte, ogni volta si salta indietro di un titolo. Per
saltare diversi titoli, su può anche tenere premuto il tasto
o
.
Quindi avviare la riproduzione con il tasto
.
4) Con il tasto
, si può in qualsiasi momento
interrompere la riproduzione. Sul display si vede
il simbolo di pausa (b), e i tasti
e CUE (17)
lampeggiano. Per riprendere la riproduzione premere di nuovo il tasto
.
5.1 Riprodurre un CD
5) Dopo l’accensione, l’apparecchio è sempre in
funzione di riproduzione di un singolo titolo e il
display indica “AUTO CUE SINGLE” (d). Al termine del titolo, l’apparecchio si ferma in pausa
all’inizio del titolo successivo. Per riprodurre
automaticamente un titolo dopo l’altro, attivare la
riproduzione dell’intero CD mediante il tasto
CONT./SINGLE (9) [vedi anche cap. 5.3].
1) Accendere l’apparecchio con l’interruttore
POWER (26). Si accendono la spia di funzionamento (25) e i LED (23) sopra le cassette per i
CD (22). Se è inserito un CD, dopo breve tempo,
il display indica diverse informazioni sul CD
(capitulo 5.2). Se non è inserito nessun CD, il display segnala
(nessun CD).
6) Per terminare la riproduzione prima del tempo,
attivare la pausa o arrestare il lettore [tenere premuto il tasto TIME/STOP (10) per più di 3 secondi]. Con il tasto si può ora aprire il cassetto
CD.
N.B.: Durante la riproduzione, il cassetto CD è
protetto contro l’apertura involontaria.
5
Funzionamento
Il testo seguente descrive il funzionamento dell’unità
lettore 1. Il funzionamento del lettore 2 è perfettamente identico.
Remarque : pendant la lecture, le tiroir CD est
verrouillé contre toute ouverture intempestive.
7) Avant d’éteindre l’appareil, fermez toujours les
tiroirs CD avec les touches
pour protéger le
système laser des salissures. Eteignez ensuite
l’appareil avec l’interrupteur POWER (26).
F
B
CH
5.2 Affichage du numéro de titre, de la
durée, du nombre de beats par minute et
du mode repos
Dans le réglage de base, une fois l’appareil allumé,
l’affichage (schéma 3) indique pendant la lecture d’un
CD et en mode Pause, le numéro du titre (i) et la
durée restante (j) du titre en cours. Sur l’affichage,
“REMAIN” (m) signale la durée restante. Elle est
affichée en minutes (M), secondes (S), les secondes
étant divisées en 75 “Frames” (F) [1 frame = 1/75 sec.].
Par plusieurs brèves pressions sur la touche
TIME/STOP (10), les informations de temps suivantes sont affichées (si la touche est maintenue enfoncée plus longtemps, le lecteur passe sur Arrêt) :
1. pression :
la durée déjà lue du titre en cours (l’affichage
“REMAIN” s’éteint)
2. pression :
la durée restante de tout le CD (“REMAIN” s’affiche à nouveau)
3. pression :
réglage de base (affichage de la durée restante
du titre en cours)
5.2.1 Bargraphe
Le bargraphe (g) indique par sa longueur, la durée
restante d’un titre ou du CD ou la durée déjà lue d’un
titre, en fonction des informations de temps sélectionnées avec la touche TIME/STOP (10) sur l’affichage. Il clignote dans toute sa longueur pour signaler les 30 dernières secondes d’un titre, les
15 dernières secondes sont signalées par un clignotement plus rapide.
7) Prima di spegnere l’apparecchio, con i tasti
chiudere sempre i cassetti CD per proteggere i
sistemi di scansione laser dallo sporco. Solo allora spegnere l’apparecchio con l’interruttore
POWER (26).
I
5.2 Visualizzazione del numero del titolo,
della durata, del numero di battute al
minuto, della modalità sleep
Nell’impostazione base e durante la riproduzione di
un CD o con la pausa attivata, il display (fig. 3)
indica, dopo l’accensione, il numero (i) e il tempo
restante (j) del titolo attuale. Per segnalare il tempo
restante sul display si vede “REMAIN” (m). L’indicazione del tempo è in minuti (M) e secondi (S), questi
ultimi suddivisi ancora in 75 frames (F) [1 frame =
1/75 sec.].
Con la pressione ripetuta del tasto TIME/STOP
(10) è possibile visualizzare diverse informazioni
sulla durata (se il tasto viene premuto per un tempo
prolungato, il lettore va su stop):
1. pressione del tasto:
il tempo già passato del titolo corrente (l’indicazione “REMAIN” si spegne)
2. pressione del tasto
il tempo restante dell’intero CD (si vede di
nuovo l’indicazione “REMAIN”)
3. pressione del tasto
ritorno all’impostazione base (indicazione del
tempo restante del titolo corrente)
5.2.1 Diagramma a barre
Il diagramma a barre (g) offre, con la sua lunghezza,
una visualizzazione grafica del tempo residuo del
titolo o del CD oppure quello già trascorso di un
titolo, a seconda del tipo di informazione selezionata
sul display con il tasto TIME STOP (10). Gli ultimi
30 secondi di un titolo sono segnalati con il lampeggìo del diagramma a barre in tutta la sua lunghezza, con aumento della frequenza negli ultimi
15 secondi.
17
F
B
CH
5.2.2 Compteur de beats
Avec le compteur manuel de beats, on peut constater le nombre de beats par minute (BPM = beats per
minute) du titre en cours :
1) Enfoncez la touche BPM/TAP (21) plusieurs fois
selon le rythme de la musique. L’affichage passe
de l’indication de la déviation de vitesse (h) au
nombre de beats par minute et “BEAT” (e) s’affiche à la place de “PITCH” (f).
2) Pour mesurer le nombre de beats par minute sur
le prochain morceau de musique, enfoncez à
nouveau plusieurs fois la touche BPM/TAP en
rythme. L’affichage indique la nouvelle valeur.
3) Pour revenir à l’affichage de la déviation de la
vitesse, maintenez la touche BPM/TAP enfoncée
pendant 3 secondes environ jusqu’à ce que
“PITCH” s’affiche à la place de “BEAT”.
5.2.3 Mode repos
Si les deux lecteurs restent sur Pause plus de 30 minutes, l’appareil passe automatiquement en mode
repos. Les deux systèmes lasers sont ainsi déconnectés et donc préservés. L’affichage indique
“
” (sommeil) et toutes les touches éclairées
ainsi que les LEDs sur l’unité de commande s’éteignent. En activant une touche quelconque, vous
revenez au mode de fonctionnement normal. Ensuite, les lecteurs sont exactement à l’endroit sur le
CD où ils étaient avant l’activation du mode repos.
Remarque : Si un lecteur est sur Stop, ou si aucun
CD n’est inséré dans un lecteur, l’appareil ne passe pas en mode repos.
5.3 Sélection du mode de fonctionnement
5.3.1 Lecture titre par titre
Une fois le lecteur allumé, le mode lecture titre par
titre est toujours activé ; ce mode est spécialement
conçu pour une utilisation par un DJ.
1. L’affichage indique “AUTO CUE SINGLE”( d).
2. Après le placement d’un CD ou la sélection d’un
titre, le lecteur est exactement à l’endroit où la
musique commence (pas à l’index de temps
0:00:00).
Cet endroit est automatiquement mémorisé
comme point de démarrage ; l’affichage indique
brièvement “
”. Après le démarrage du titre,
il est possible de revenir avec la touche BOP (6)
ou la touche CUE (17) à ce point de démarrage.
3. Après la lecture d’un titre, l’appareil se met à nouveau sur Pause, exactement à l’endroit où la
musique du titre suivant commence. Cet endroit
est mémorisé alors comme nouveau point de
démarrage.
5.3.2 Lecture de tous les titres
Si un titre doit être lu à la suite du précédent, commutez avec la touche CONT./SINGLE (9) sur le
mode de lecture de tous les titres. L’affichage passe
de “AUTO CUE SINGLE” (d) sur “CONTINUE” (c).
Pour revenir au mode de lecture titre par titre, enfoncez une nouvelle fois la touche CONT./SINGLE.
5.3.3 Mode relais – Démarrage automatique du
second lecteur
A la fin d’un titre ou d’un CD, le second lecteur peut
être démarré automatiquement.
Démarrage de l’autre lecteur à la fin d’un titre
1) Insérez dans les deux lecteurs un CD, activez
ensuite la touche RELAY (3), la LED au-dessus
de la touche clignote.
2) Mettez les deux lecteurs sur le mode lecture titre
par titre avec la touche CONT./SINGLE (9) :
“AUTO CUE SINGLE” (d) doit s’afficher sur les
deux lecteurs.
I
5.2.2 Beatcounter
Con il beatcounter manuale si può stabilire il numero
delle battute al minuto (BPM = beats per minute) del
brano corrente:
1) Premere brevemente e più volte il tasto BPM/
TAP (21) nel ritmo della musica. Il display cambia
dall’indicazione della deviazione della velocità (h)
al numero di battute al minuto e al posto di
“PITCH” (f) si vede “BEAT” (e).
2) Per misurare il numero di battute al minuto del
brano successivo, premere il tasto BPM/TAP di
nuovo brevemente nel ritmo della musica. Il display indicherà il nuovo valore.
3) Per ritornare all’indicazione della deviazione
della velocità premere il tasto BPM/TAP per circa
3 secondi finché sul display al posto di “BEAT” si
vede di nuovo “PITCH”.
5.2.3 Modalità sleep
Se entrambi i lettori sono in pausa per oltre 30 minuti, l’apparecchio passa automaticamente nella
modalità sleep. I due sistemi di scansione laser
sono disattivati per non consumarsi inutilmente. Il
display indica “
” (sonno), e tutti i tasti illuminati
nonché tutti i LED dell’unità di comando si spengono. Azionando un qualsiasi tasto si ritorna alla
modalità normale di funzionamento e i lettori si trovano esattamente sul punto in cui si trovavano
prima.
N.B.: Se un lettore è su stop o se in un lettore non è
inserito nessun CD, la modalità Sleep non
viene attivata.
5.3 Selezionare il modo di funzionamento
5.3.1 Riproduzione di un singolo titolo
Dopo l’accensione del lettore è attivata sempre la
riproduzione di un singolo titolo, prevista specialmente per l’uso in discoteca.
1. Il display segna “AUTO CUE SINGLE” (d).
2. Dopo il rilevamento di un CD o dopo la selezione
di un titolo, il lettore si trova esattamente sul
punto dove inizia la musica (non sull’indice di
tempo 0:00:00).
Questo punto viene memorizzato automaticamente come punto di avvio. Il display segnala
brevemente “
”. Dopo l’avvio del titolo, con i
tasti BOP (6) o CUE (17) si può ritornare su tale
punto.
3. Dopo la riproduzione di un titolo, il lettore si mette
in pausa esattamente nel punto dove inizia la
musica del titolo successivo. Tale punto rimane
quindi memorizzato come nuovo punto di avvio.
5.3.2 Riproduzione di tutti i titoli
Se si desidera riprodurre un titolo dopo l’altro senza
interruzione, attivare la riproduzione di tutti i titoli con
il tasto CONT./SINGLE (9). Il display passa da
“AUTO CUE SINGLE” (d) a “CONTINUE” (c). Per
ritornare alla riproduzione di un singolo titolo premere di nuovo il tasto CONT./SINGLE.
5.3.3 Funzionamento Relay – avvio automatico
dell’altro lettore
Al termine di un titolo o del CD esiste la possibilità di
far partire automaticamente l’altro lettore.
Avvio dell’altro lettore al termine di un titolo
1) Inserire dapprima i CD nei due lettori. Quindi
azionare il tasto RELAY (3). Il LED sopra il tasto
lampeggia.
2) Premere il tasto CONT./SINGLE (9) dei due lettori per impostare in entrambi la riproduzione di
singoli titoli: i due display devono segnalare
“AUTO CUE SINGLE” (d).
18
3) Démarrez la lecture sur un lecteur avec la touche
(18). L’autre lecteur doit être sur Pause
(affichage ). Dès que le titre est entièrement lu,
le lecteur passe sur Pause et l’autre lecteur
démarre. Ce processus se répète en continu jusqu’à ce que le mode fonctionnement Relais soit
désactivé. (Enfoncez une nouvelle fois la touche
RELAY pour le désactiver).
4) A tout endroit du CD, il est possible de commuter
en plus, la lecture d’un lecteur sur l’autre avec la
touche
.
5) Si un autre CD est inséré dans le lecteur mis sur
Pause, activez à nouveau le mode Relais avec la
touche RELAY.
Remarques :
a Si dans ce mode de fonctionnement, la touche
CUE (17) du lecteur en cours de lecture est
activée, la lecture passe sur l’autre lecteur.
b Si la touche CUE est maintenue enfoncée sur le
lecteur mis sur Pause, la lecture s’effectue alors
de ce lecteur, tant que la touche est maintenue
enfoncée.
Démarrage de l’autre lecteur à la fin d’un CD
1) Insérez un CD dans chacun des lecteurs, activez
ensuite la touche RELAY (3), la LED au-dessus
de la touche clignote.
2) Mettez les deux lecteurs sur le mode lecture de
tous les titres avec la touche CONT./SINGLE
(9) : “CONTINUE” (c) doit s’afficher sur les deux
lecteurs.
3) Mettez un lecteur sur Stop : maintenez la touche
TIME/STOP (10) enfoncée jusqu’à ce que le
symbole Pause (b) sur l’affichage s’éteigne.
4) Démarrez la lecture sur l’autre lecteur avec la
touche
(18). A la fin du CD, l’autre lecteur
démarre. Le processus se répète jusqu’à ce que
le mode relais soit désactivé. (Pour éteindre,
enfoncez une nouvelle fois la touche RELAY).
5) Si un autre CD est inséré dans le lecteur mis sur
Stop, activez à nouveau le mode Relais avec la
touche RELAY et commutez le lecteur sur Stop
avec la touche TIME/STOP.
3) Avviare la riproduzione con uno dei lettori premendo il tasto
(18). L’altro lettore deve trovarsi in pausa (simbolo ). Non appena il titolo è
terminato, il lettore attivo va in pausa e l’altro lettore si avvia. Questa procedura si ripete senza
fine fino alla disattivazione del funzionamento
relay (per disattivare la funzione premere un’altra
volta il tasto RELAY).
4) Con il tasto
è possibile in qualsiasi momento
passare per la riproduzione da un lettore all’altro.
5) Se in un lettore in pausa si inserisce un altro CD
occorre riattivare il funzionamento relay premendo di nuovo il tasto RELAY.
N.B.:
a Se in questa modalità di funzionamento si preme
il tasto CUE (17) del lettore attivo, la riproduzione
passa all’altro lettore.
b Se si tiene premuto il tasto CUE del lettore in
pausa, la riproduzione avviene su quel lettore finché non si lasci libero il tasto.
Avvio dell’altro lettore al termine del CD
1) Inserire i CD nei due lettori. Quindi azionare il
tasto RELAY (3). Il LED sopra il tasto lampeggia.
2) Premere il tasto CONT./SINGLE (9) dei due lettori per impostare in entrambi la riproduzione di
tutti i titoli: i due display devono segnalare “CONTINUE” (c).
3) Mettere un lettore su stop: tener premuto il tasto
TIME/STOP (10) finché sul display si spegne il
simbolo di pausa (b)
4) Avviare la riproduzione sull’altro lettore premendo il tasto
(18). Al termine del CD, l’altro
lettore si avvia. Questa procedura si ripete senza
fine fino alla disattivazione del funzionamento
relay (per disattivare la funzione premere un’altra
volta il tasto RELAY).
5) Se in un lettore su stop si inserisce un altro CD
occorre riattivare il funzionamento relay premendo di nuovo il tasto RELAY; quindi mettere il
lettore nuovamente su stop azionando il tasto
TIME/STOP.
5.4 Lecture des premières notes d’un titre
1) Une fois le CD inséré, allez tout d’abord au titre
souhaité via les touches TRACK (7).
2) Si sur l’affichage, la durée (j) du titre s’affiche,
maintenez la touche CUE (17) enfoncée. Le titre
est lu tant que la touche est enfoncée.
3) Lorsque la touche est relâchée, l’appareil revient
au début du titre et passe sur Pause ; pour
démarrer le titre, enfoncez la touche
(18) ; il
est possible de revenir au début du titre avec la
touche CUE.
5.5 Fonction OUTRO
La fonction OUTRO permet de lire les 30 dernières
secondes respectives des titres suivants.
1) Pour activer la fonction, maintenez la touche
CONT./SINGLE (9) enfoncée pendant 3 secondes environ jusqu’à ce que “OUTRO” (k) soit visible sur l’affichage.
2) Sélectionnez le titre souhaité avec les touches
TRACK (7). Si le lecteur est sur Pause, démarrez
la lecture avec la touche
(18). Les 30 dernières secondes du titre sont lues.
3) Pour désactiver la fonction OUTRO, enfoncez
soit la touche TIME/STOP (10) brièvement soit
une nouvelle fois la touche CONT./SINGLE pendant 3 secondes environ jusqu’à ce que
“OUTRO” s’éteigne.
5.6 Avance et retour rapides
1) Pour activer la fonction “Avance et retour rapides”, enfoncez la touche SEARCH (5). Lorsque
la fonction est activée, la LED sur la touche brille.
2) Tournez la molette (16) : tant que la molette est
tournée dans le sens des aiguilles d’une montre,
on avance sur le CD ; tant qu’elle est tournée
dans le sens inverse des aiguilles, on recule sur
le CD. La vitesse d’avance et de retour dépend
de la vitesse de rotation de la molette.
5.4 Riproduzione dell’inizio di un titolo
1) Dopo aver inserito un CD, selezionare il titolo
desiderato con i tasti TRACK (7).
2) Se sul display si vede la durata (j) del titolo,
tenere premuto il tasto CUE (17). L’inizio del titolo
viene riprodotto per tutto il tempo in cui si tiene
premuto il tasto.
3) Se si libera il tasto CUE, l’apparecchio torna all’inizio del titolo e va in pausa. Per avviare il titolo,
premere il tasto
(18). Comunque, con il tasto
CUE si può tornare di nuovo all’inizio del titolo.
5.5 Funzione OUTRO
La funzione OUTRO serve per riprodurre gli ultimi
30 secondi dei titoli seguenti.
1) Per attivare la funzione, tener premuto il tasto
CONT./SINGLE (9) per ca. 3 secondi, finché il
display indica “OUTRO” (k).
2) Selezionare il titolo desiderato con i tasti TRACK
(7). Se il lettore è in pausa, avviare la riproduzione con il tasto
(18). Si riproducono gli
ultimi 30 secondi del titolo.
3) Per disattivare la funzione OUTRO azionare
brevemente il tasto TIME/STOP (10) oppure tener nuovamente premuto il tasto CONT./
SINGLE per ca. 3 secondi, finché sul display sparisce “OUTRO”.
Dans le cas d’une lecture de tous les titres
(chapitre 5.3.2), l’avance/retour s’effectue sur
plusieurs titres jusqu’au début ou la fin du CD.
Dans le cas d’une lecture titre par titre (chap.
5.3.1), si avec l’avance, le titre suivant est atteint
ou avec le retour le début du titre, l’appareil bascule sur Pause (voir les conseils a et b ci-dessous). L’avance sur plusieurs titres est également possible en mode Pause, le retour s’arrête
en revanche lorsque le début du titre est atteint.
3) A la fin d’une avance/retour rapides, cette fonction est encore active pendant 8 secondes environ puis la LED de la touche SEARCH s’éteint et
la molette sert à nouveau pour la fonction “Pitch
Bend” (chapitre 5.8.1) ou en mode Pause pour
aller à un endroit précis sur le CD (chapitre 5.7).
Conseils : si le lecteur CD se trouve en mode
Pause après l’avance/retour rapides :
a l’endroit est répété en continu jusqu’à ce que la
lecture soit démarrée avec la touche
(18) ou
que la touche CUE (17) ou CUE 1 (8) soit enfoncée brièvement deux fois – sauf si le début du
titre a été atteint via la fonction retour.
b la fonction “avance/retour rapides” n’est pas automatiquement désactivée après 8 secondes environ mais elle doit être manuellement déconnectée avec la touche SEARCH.
5.7 Positionnement à un endroit donné
En mode Pause, il est possible d’aller à un endroit
donné sur le CD avec précision à l’aide de la molette
(16) :
1) Si la fonction “Avance/retour rapides” est activée
[la LED sur la touche SEARCH (5) brille], désactivez-la en appuyant sur la touche SEARCH.
2) Tournez la molette. Le CD avance ou recule
aussi longtemps et aussi vite que la molette est
tournée. Sur l’affichage, dans la zone durée (j),
on peut lire la position exacte et procéder par
palier de 1 frame (1 frame = 1/75 seconde).
Se durante la Riproduzione di un singolo titolo
(cap. 5.3.1), con l’avanzamento si giunge al titolo
successivo, oppure con il ritorno all’inizio del
titolo, l’apparecchio va in pausa (vedi le Note a
e b qui di seguito). Nella modalità di pausa,
l’avanzamento è possibile anche sopra diversi
titoli, mentre il ritorno termina al raggiungimento
dell’inizio del titolo.
3) Al termine dell’avanzamento/ritorno veloce, la
funzione rimane attiva ancora per 8 secondi ca.,
quindi il LED del tasto SEARCH si spegne e la
manopola serve di nuovo per la funzione “Pitch
Bend” (capitolo 5.8.1) oppure, nella modalità di
pausa, a posizionarsi su un punto preciso del CD
(capitolo 5.7).
Note: Se dopo l’avanzamento/ritorno veloce il lettore CD si trova nella modalità di pausa:
a a meno che non sia stato raggiunto l’inizio del
titolo con il ritorno veloce – si ripete continuamente il brano attuale finché la riproduzione non
viene avviata con il tasto
(18) oppure non si
prema due volte brevemente il tasto CUE (17) o
CUE 1 (8);
b la funzione “Avanzamento/ritorno veloce” non
viene disattivata automaticamente dopo 8 secondi ca., ma deve essere disattivata manualmente con il tasto SEARCH.
5.6 Avanzamento/ritorno veloce
5.7 Posizionarsi con esattezza su un determinato punto
1) Per attivare la funzione “Avanzamento/ritorno
veloce “ premere il tasto SEARCH (5). Se la funzione è attivata, il LED vicino al tasto si accende.
Nella modalità di pausa, con la manopola (16) ci si
può posizionare esattamente su un punto determinato del CD:
2) Girare la manopola (16): Girandola in senso orario, sul CD si va avanti; girandola in senso antiorario, si va indietro sul CD. La velocità di movimento dipende dalla velocità con cui si gira la
manopola.
Durante la Riproduzione di tutti i titoli (capitolo 5.3.2) l’avanzamento/ritorno veloce passa
sopra diversi titoli fino all’inizio o alla fine del CD.
1) Se è attivata la funzione “Avanzamento/ritorno
veloce” [il LED vicino al tasto SEARCH (5) è
acceso], disattivarla premendo il tasto SEARCH.
2) Girare la manopola. Sul CD si va avanti o indietro
finché si gira la manopola. Sul display è possibile, nella visualizzazione dei tempi (j), l’esatta
posizione sulla quale è possibile posizionarsi in
passi di 1 frame (F) [1 frame = 1/75 secondo].
3) Après avoir tourné la molette, le segment est
ensuite répété jusqu’à ce que la touche
(18)
soit enfoncée ou que la touche CUE (17) ou
CUE 1 (8) soit enfoncée brièvement deux fois.
F
B
CH
5.8 Modification de la vitesse et de la hauteur tonale
La vitesse et donc simultanément la hauteur tonale
(“pitch”) peuvent être modifiées avec le potentiomètre PITCH CONTROL (14) de ± 16 % maximum.
1) Sélectionnez la plage de réglage de la vitesse
avec la touche PITCH (12). Les LEDs (13) à côté
de la touche indiquent la plage sélectionnée :
±8 % (réglage de base après l’allumage) ou
±16 %. La LED correspondante clignote. Le clignotement indique que le réglage PITCH CONTROL n’est pas activé.
2) Enfoncez la touche ON/OFF (15). Le réglage
PITCH CONTROL est ainsi activé, la LED correspondante (13) brille constamment.
3) Modifiez la vitesse avec le réglage PITCH CONTROL (14). L’affichage indique la déviation en
pourcentage de la vitesse standard dans la zone
PITCH (h).
Si le compteur manuel de beats a été activé
avec la touche BPM/TAP (21) [“BEAT” (e) est visible], l’affichage indique dans la zone PITCH (h)
le nombre de beats par minute (voir chap. 5.2.2
“Compteur de beats”), qui se modifie en fonction
lors du positionnement du potentiomètre.
4) Avec la touche ON/OFF (15), il est possible à
tout instant, de commuter entre la vitesse standard et la vitesse réglée avec le potentiomètre.
5.8.1 Adaptation du rythme entre deux morceaux de musique (“Pitch Bend”)
Avec les touches PITCH BEND (20), vous pouvez
synchroniser le rythme d’un titre lu avec le lecteur 1
avec le rythme d’un titre lu sur le lecteur 2 ou inversement.
3) Successivamente, il brano attuale viene ripetuto
finché non si preme il tasto
(18) oppure non
si prema due volte brevemente il tasto CUE (17)
o CUE 1 (8).
I
5.8 Variare la velocità e l’altezza del suono
La velocità e quindi anche l’altezza del suono
(“pitch”) possono essere modificate del ±16 % max.
mediante il cursore PITCH CONTROL (14):
1) Selezionare il campo di regolazione con il tasto
PITCH (12). I LED (13) vicino al tasto indicano il
campo selezionato: ±8 % (impostazione base dopo l’accensione) o ±16 %. Il relativo LED lampeggia. Il lampeggìo segnala che il regolatore PITCH
CONTROL non è stato attivato.
2) Premere il tasto ON/OFF (15). Così il regolatore
PITCH CONTROL è attivato e il relativo LED (13)
rimane acceso.
3) Modificare la velocità con il cursore PITCH CONTROL (14). Nel campo PITCH (h), il display
indica la deviazione percentuale dalla velocità
standard.
Se con il tasto BPM/TAP (21) è stato attivato il
beatcounter manuale [indicazione “BEAT” (e) sul
display], il display indica nel campo “PITCH” (h) il
numero delle battute al minuto (vedi capitolo
5.2.2 “Beatcounter”) che cambia con lo spostamento del cursore.
4) Con il tasto ON/OFF (15) si può passare in ogni
momento fra la velocità impostata con il cursore
e la velocità standard.
5.8.1 Adattamento del ritmo fra due brani
(“pitch bend”)
Con i tasti PITCH BEND (20) è possibile adattare
(sincronizzare) il ritmo di un titolo sul lettore 1 a
quello di un titolo sul lettore 2 e viceversa.
1) Per prima cosa, con il regolatore PITCH CONTROL (14) adattare la velocità del titolo corrente
a quella dell’altro titolo.
2) Con i tasti PITCH BEND far si che le battute dei
due brani coincidano. Tenendo premuto i tasti -
19
F
B
CH
1) Avec le potentiomètre PITCH CONTROL (14),
adaptez tout d’abord la vitesse du morceau en
cours à la vitesse du second morceau.
2) Avec les touches PITCH BEND, faites exactement coïncider les deux rythmes : tant que la touche + ou - est maintenue enfoncée, le titre est lu
16 % plus vite ou moins vite que la vitesse standard.
3) En tournant la molette (16), on peut également
modifier la vitesse pour adapter le rythme.
5.9 Saut à un endroit préalablement déterminé (point Cue)
Pour pouvoir sauter rapidement à un endroit voulu
sur un CD, il est possible de mémoriser deux points
de départ indépendants (points Cue) avec les touches CUE (17) et CUE 1 (18).
Conseils pour le point de départ déterminé avec
la touche CUE :
a Dans le cas d’une lecture titre par titre, le retour
ne peut se faire qu’au sein d’un titre. Lorsque le
titre suivant est atteint, l’endroit repéré est remplacé par le point de départ du titre suivant (voir
chapitre 5.3.1).
b Aussi bien pour une lecture titre par titre qu’une
lecture de tous les titres, l’endroit marqué est toujours remplacé par le début du titre sélectionné
lorsqu’un autre titre est choisi avec les touches
TRACK (7).
Pour placer un point Cue et y revenir pendant la lecture :
1) Pendant la lecture d’un titre, avec la touche
(18), mettez le lecteur sur Pause lorsque l’endroit
où le lecteur doit revenir ultérieurement, est
atteint. Les touches
et CUE clignotent.
I
points a et b est répété en continu. Les trois touches clignotent et l’affichage indique “LOOP” (l).
4) Démarrez à nouveau la lecture avec la touche
.
5) Pour revenir à l’endroit repéré, enfoncez la touche Cue correspondante. Le lecteur est sur
Pause à l’endroit marqué. Avec la touche
,
démarrez la lecture ou maintenez la touche Cue
correspondante enfoncée. Lorsque vous relâchez la touche Cue, le lecteur revient sur Pause
à l’endroit repéré.
Les points Cue saisis sont effacés lorsque le tiroir
CD est ouvert [touche (4 ou 24)] ou le lecteur CD
éteint [touche POWER (26)].
5.9.1 Touche BOP
Pendant la lecture, on peut également revenir avec
la touche BOP (6) au point de départ réglé avec la
touche CUE (17). A l’inverse du retour avec la touche CUE, l’appareil ne commute pas, dans ce cas,
sur Pause, mais continue la lecture à partir du point
marqué. Par plusieurs pressions sur la touche BOP,
un effet “sampler (bégaiement)” est produit. Il est
d’autant plus efficace que le point de départ est bien
adapté (p. ex. démarrage d’un instrument ou début
d’un mot).
1.
2.
A
PLAY
a
PLAY
b
LOOP
➅
Lecture d’une boucle continue
3) Pour quitter la boucle et poursuivre le titre normalement, enfoncez la touche B/LOOP – EXIT
une nouvelle fois. L’affichage “LOOP” s’éteint. En
sélectionnant un autre titre ou en allant à un point
Cue saisi (chapitre 5.9), la boucle est également
quittée.
La boucle reste mémorisée cependant. Pour
le signaler, les trois touches brillent en continu.
4) Avec la touche RELOOP, la boucle peut à tout
moment – à partir du mode Pause, lecture ou
Stop – être redémarrée.
5.10 Lecture d’une boucle continue
PLAY
Avec les touches A, B/LOOP – EXIT et RELOOP
(19), un segment donné sur le CD peut être mémorisé comme boucle sans interruption et répété aussi
souvent que souhaité.
c
LOOP
➆
Fin de la boucle continue et redémarrage
2) Si besoin, avec la molette (16), allez à l’endroit
exact ; l’endroit en cours est audible en continu.
1) Avec la touche
(18), commutez sur le mode
Lecture. Si le point de départ de la boucle voulue
est atteint (point a, schéma 6), enfoncez brièvement la touche A. La touche clignote brièvement
et brille ensuite en permanence. La touche
RELOOP brille en permanence.
5) Pour mémoriser une autre boucle continue, les
points de départ et de fin peuvent être fixés simplement à nouveau avec les touches A et
B/LOOP – EXIT.
3) Enfoncez brièvement la touche CUE ou CUE 1,
l’endroit est repéré en interne ; la touche correspondante clignote rapidement et brille ensuite en
2) Lorsque, une fois la lecture lancée, la fin voulue
de la boucle est atteinte (point b), enfoncez la
touche B/LOOP – EXIT. Le segment entre les
La boucle continue est effacée lorsque le tiroir CD
est activé [touche (4 ou 24)] ou lorsque le lecteur
est éteint [touche POWER (26)].
o +, la velocità diminuisce o aumenta del 16 % rispetto alla velocità standard.
3) Una modifica della velocità per adattare il ritmo è
possibile anche girando la manopola (16).
Lasciando il tasto Cue, il lettore torna sul punto
marcato e va in pausa.
Aprendo il cassetto del CD [Tasto (4 o 24)] oppure
spegnendo il lettore CD [Tasto POWER (26)] i punti
Cue fissati vengono cancellati.
5.9 Salto ad un punto fissato precedentemente
5.9.1 Tasto BOP
Durante la riproduzione, con il tasto BOP (6) si può
ritornare il punto di avvio fissato con il tasto CUE
(17). Contrariamente al ritorna per mezzo del tasto
CUE, l’apparecchio in questo caso non va in pausa
ma inizia subito la riproduzione a partire dal punto
marcato. Premendo più volte il tasto BOP, si genera
un effetto di “balbuziente” la cui efficienza dipende
ovviamente dal tipo del punto cue (p. es. attacco di
uno strumento o inizio di una parola).
3) Per uscire dal loop e per continuare la riproduzione del titolo, premere nuovamente il tasto
B/LOOP – EXIT. L’indicazione “LOOP” si spegne.
Anche scegliendo un altro titolo o saltando su un
altro punto Cue fissato (cap. 5.9) si esce dal loop.
Tuttavia, il loop rimane ancora memorizzato. Per
segnalare tale circostanza, tutti e tre i tasti
rimangono accesi.
4) Con il tasto RELOOP si può riavviare il loop in
ogni momento dalle modalità di pausa, di riproduzione e di stop.
(“punto CUE”)
Per poter saltare velocemente su un punto fissato
precedentemente sul CD, è possibile memorizzare,
per mezzo dei tasti CUE (17) e CUE 1 (8), due punti
indipendenti di avvio (punti cue).
Note per il punto di avvio determinato con il
tasto CUE:
a Nella modalità di riproduzione di un titolo singolo,
il ritorno è possibile solo all’interno di un titolo. Se
si raggiunge il titolo successivo, il punto marcato
viene sostituito con il punto di avvio del titolo successivo (vedi capitolo 5.3.1).
b Sia durante la riproduzione di un titolo singolo
che di tutti i titoli, selezionando un altro titolo con
i tasti TRACK (7), il punto marcato viene sempre
sostituito con l’inizio del titolo selezionato.
Per fissare un punto Cue e per ritornarvi durante al
riproduzione:
1) Durante la riproduzione di un titolo, attivare la
pausa con il tasto
(18) non appena è raggiunto il punto su cui tornare successivamente. I
tasti
e CUE lampeggiano.
2) Se necessario, con la manopola (16) posizionarsi
esattamente su questo punto. Il punto attuale
viene riprodotto continuamente.
3) Toccare brevemente il tasto CUE o CUE 1. Così,
tale punto è marcato internamente. Il relativo
tasto lampeggia velocemente e rimane poi
acceso. Il tasto
continua a lampeggiare come
invito ad avviare la riproduzione.
4) Avviare la riproduzione con il tasto
.
5) Per saltare sul punto marcato premere il relativo
tasto Cue. Il lettore CD si trova in pausa sul punto
marcato. Avviare la riproduzione con il tasto
oppure tenendo premuto il relativo tasto Cue.
20
continu ; la touche
continue à clignoter
demandant le démarrage de la lecture.
PLAY
LOOP
5.10 Riproduzione di una sequenza senza
fine (“loop”)
Con i tasti A , B/LOOP – EXIT e RELOOP (19) si può
memorizzare una determinata parte del CD come
sequenza senza fine per essere ripetuta senza
interruzioni.
1) Con il tasto
(18) avviare la riproduzione. Al
raggiungimento del punto di partenza del loop
(punto a in fig. 6), premere brevemente il tasto A.
Il tasto lampeggia brevemente e poi rimane
acceso. Il tasto RELOOP rimane acceso.
2) Se, durante la continuazione della riproduzione,
si raggiunge la fine del loop voluto, (punto b), premere il tasto B/LOOP – EXIT. Il brano fra i punti a
e b viene ripetuto senza fine. Tutti e tre i tasti lampeggiano e il display segnala “LOOP” (l).
1.
2.
A
PLAY
a
PLAY
b
LOOP
➅
Riproduzione di un loop senza fine
c
➆
Terminare la riproduzione senza fine ed attivarla
di nuovo
5) Per memorizzare un altro loop, si possono determinare nuovi punti di avvio e di fine servendosi
dei tasti A e B/LOOP – EXIT.
Aprendo il cassetto per il CD [tasto
(4 o 24)]
oppure spegnendo il lettore CD [tasto POWER (26)]
il loop viene cancellato.
Alcuni consigli:
a Fra l’inizio e la fine di un loop devono trovarsi non
meno di 20 frames (= 0,27 secondi); altrimenti il
loop non viene né memorizzato né avviato.
b È possibile fissare i punti di inizio e di fine di un
loop con l’esattezza di un frame (1/75 secondo):
1) Al raggiungimento del punto di partenza attivare dapprima la pausa con il tasto
.
Quindi fissare il punto con esattezza servendosi della manopola (16) e premere il tasto A.
2) Selezionare la fine direttamente con la manopola oppure avviare la riproduzione dapprima
con il tasto
. Al raggiungimento del punto
Trucs :
a Entre le point de démarrage et le point de fin
d’une boucle continue, il faut 20 frames au moins
(= 0,27 secondes) sinon la boucle n’est pas
mémorisée et ne démarre pas.
b Le point de démarrage ou le point de fin d’une
boucle continue peut également être défini avec
la précision de 1 frame (1/75 seconde) :
1) Lorsque le point de démarrage est atteint,
passez tout d’abord sur Pause avec la touche
. Allez avec précision à l’endroit avec la
molette (16) puis enfoncez la touche A.
2) Maintenant, soit allez directement au point de
fin avec la molette soit démarrez tout d’abord
la lecture avec la touche
; lorsque le point
de fin est atteint, mettez le lecteur sur Pause
avec la touche
puis utilisez la molette pour
affiner le point de fin.
3) Une fois le point de fin localisé avec précision,
enfoncez la touche B/LOOP – EXIT, la boucle
continue démarre.
6
Création d’une séquence de titres
Le lecteur CD-280DJ permet de composer une
séquence personnalisée de 30 titres au plus d’un
CD et de les lire. Les titres sélectionnés peuvent
être programmés dans l’ordre voulu.
6.1 Programmation d’une séquence
1) Pour la programmation, mettez l’appareil sur
Stop : enfoncez la touche TIME/STOP (10) pendant trois secondes environ jusqu’à ce que le
symbole lecture
(a) ou le symbole Pause
(b) s’éteigne.
2) Enfoncez la touche PROG (11). L’affichage commute sur “
”.
3) Avec les touches TRACK (7), sélectionnez le premier titre voulu et confirmez avec la touche
PROG. La LED à côté de la touche brille et l’affichage commute sur le deuxième emplacement
de mémorisation “
”.
finale attivare nuovamente la pausa con il
tasto
e quindi individuare con esattezza il
punto finale con la manopola.
3) Dopo aver individuato bene il punto della fine
del loop azionare il tasto B/LOOP – EXIT. La
riproduzione del loop ha inizio.
6
Compilare una sequenza individuale
dei titoli
Con il CD-280DJ si possono compilare fino a 30 titoli
del CD per riprodurli poi. I titoli selezionati possono
essere programmati in qualsiasi ordine.
6.1 Programmare la sequenza dei titoli
1) Per la programmazione mettere il lettore su stop:
tener premuto per 3 secondi ca. il tasto TIME/
STOP (10) finché nel display si spegne il simbolo
di riproduzione
(a) oppure quello di pausa
(b).
2) Premere il tasto PROG. (11). Sul display appare
la scritta “
”.
3) Con i tasti TRACK (7) chiamare il primo titolo da
riprodurre e confermarlo con il tasto PROG. Il
LED vicino al tasto si accende e il display passa
alla seconda memorizzazione con “
”.
4) Ripetere la programmazione per gli altri titoli. Un
titolo può essere memorizzato più volte, con differenti numeri. Quando sono programmati 30 titoli, il display segnala “
” (pieno). Allora non si
possono programmare altri titoli.
6.2 Verificare la programmazione
1) Con il tasto PROG. (11) si possono chiamare uno
dopo l’altro tutti i numeri memorizzati. Il display
indica i numeri dei titoli memorizzati.
Se la riproduzione è già stata avviata, per verificare la programmazione occorre prima mettere
il lettore su Stop e quindi premere il tasto PROG.
4) Répétez le processus pour tous les autres titres ;
un titre peut être programmé plusieurs fois sous
plusieurs numéros. Lorsque 30 titres sont programmés, l’affichage indique “
” (plein). Il
n’est plus possible de programmer d’autres titres.
6.2 Vérification d’une programmation
1) Avec la touche PROG. (11), appelez l’un après
l’autre tous les emplacements. L’affichage indique respectivement le numéro de titre mémorisé.
Si cependant la lecture a été précédemment
démarrée, il faut tout d’abord passer sur Stop
pour vérifier la programmation puis enfoncer la
touche PROG.
2) Si un autre titre doit être mémorisé à un emplacement, écrasez simplement le titre actuel en sélectionnant le titre voulu puis enfoncez à nouveau
la touche PROG.
6.3 Lecture d’une programmation
séquence programmée peut être appelée avec la
touche
aussi souvent que souhaité jusqu’à
ce qu’elle soit effacée.
CH
6.4 Effacement d’une programmation
Passez avec la touche
(18) sur Pause ou avec la
touche TIME/STOP (10) sur Stop et avec la touche
(4 ou 24), ouvrez le tiroir CD. La LED à côté de la
touche PROG. s’éteint, la programmation est effacée. L’effacement est également possible lorsque
l’appareil est éteint avec la touche POWER (26).
7
Démarrage électrique via une table
de mixage
Le lecteur CD peut être activé à distance depuis une
table de mixage équipée de la fonction démarrage
électrique. Avec l’interrupteur REMOTE SELECT (28)
sur la face arrière de l’unité lecteur, réglez le type d’interrupteur de démarrage électrique de la table.
1) Pour lire une séquence programmée de titres,
enfoncez la touche
(18). Si la programmation
a été préalablement vérifiée avec la touche
PROG. (11), le titre affiché après la dernière
pression sur la touche PROG. démarre.
2) Pour une lecture continue des titres, commutez
avec la touche CONT./SINGLE (9) sur lecture de
tous les titres : “CONTINUE” (c) s’affiche (en lecture titre par titre, l’appareil passe en mode
Pause après chaque titre).
3) Pendant la lecture, il est possible, avec la touche
PROG., d’afficher brièvement le numéro de l’emplacement de la mémoire du titre en cours.
4) La lecture peut être interrompue à tout instant
avec la touche
puis redémarrée. Pour reculer
à un titre, enfoncez la touche
(7) et pour sauter des titres, enfoncez la touche
.
5) Une fois la séquence programmée lue, l’appareil
passe en lecture de tous les titres, sur Stop. (En
lecture titre par titre, le premier titre programmé
est à nouveau sélectionné en mode Pause). La
Position LOCK SW pour interrupteur marche/arrêt
Cette position doit être sélectionnée pour la majorité des tables de mixage de la gamme “img Stage
Line”. Lorsque le fader correspondant de la table
est ouvert, un interrupteur sur la table se ferme et
démarre le lecteur. Lorsque le fader est fermé, l’interrupteur s’ouvre, le lecteur passe sur Pause.
2) Se con un determinato numero si desidera memorizzare un altro titolo basta sovrascrivere il
numero chiamando il titolo desiderato. Quindi
premere di nuovo il tasto PROG.
7
6.3 Riproduzione dei titoli programmati
1) Per riprodurre la sequenza programmata premere il tasto
(18). Se la programmazione è
stata verificata prima con il tasto PROG. (11) la
riproduzione inizia con il titolo visualizzato sul
display dopo l’ultima pressione del tasto PROG.
2) Per una riproduzione continua dei titoli attivare la
riproduzione di tutti i titoli per mezzo del tasto
CONT./SINGLE (9): sul display si vede “CONTINUE” (c). [Con la riproduzione di singoli titoli,
dopo ogni titolo, il lettore va in pausa].
3) Durante la riproduzione, con il tasto PROG. è
possibile visualizzare brevemente il numero di
memoria del titolo attuale.
4) La riproduzione può essere interrotta e riavviata
in ogni momento con il tasto
. Per tornare indietro su un titolo, premere il tasto
(7) e per
saltare dei titoli in avanti premere il tasto
.
5) Al termine della sequenza programmata, l’apparecchio va su Stop se è stata attivata la riproduzione di tutti i titoli. (Con riproduzione di singoli
titoli, nella modalità pausa è selezionato di nuovo
il primo titolo programmato.) La sequenza può
essere ripetuta sempre con il tasto
fino alla
sua cancellazione.
F
B
Table de mixage
Start
Pause
➇
Démarrage électrique via un interrupteur marche/
arrêt
Position TACT SW pour un bouton poussoir
momentané
Si le bouton poussoir momentané est activé pour
la première fois lorsque le fader correspondant
sur la table de mixage est poussé, le lecteur CD
Avviamento tramite fader dal mixer
I
Il lettore CD può essere telecomandato mediante un
mixer che dispone della funzione di avviamento con
fader. Con il selettore REMOTE SELECT (28) posto
sul retro dell’unità lettore si può impostare il tipo di
interruttore sul mixer per l’avviamento con fader:
Posizione LOCK SW per interruttore on/off
Per la maggior parte dei mixer del programma
“img Stage Line” si deve selezionare questa
impostazione. Aprendo il relativo fader del mixer
si chiude un interruttore nel mixer che attiva il lettore CD. Chiudendo il fader, l’interruttore si apre
mettendo il lettore CD in pausa.
mixer
Start
Pause
➇
Avviamento tramite fader con interruttore on/off
Posizione TACT SW per pulsante
Se il pulsante viene attivato una prima volta
aprendo il relativo fader del mixer, il lettore CD
viene avviato. Se, chiudendo il fader, il pulsante
viene azionato per la seconda volta, il lettore CD
va in pausa.
mixer
1.x Start
2.x Pause
6.4 Cancellazione dei titoli programmatli
Con il tasto
(18) attivare la pausa oppure con il
tasto TIME/STOP (10) andare in Stop e con il tasto
(4 o 24) aprire il cassetto del CD. Il LED vicino al
tasto PROG. si spegne e la programmazione è cancellata. Anche spegnendo il lettore CD con il tasto
POWER (26), la programmazione viene cancellata.
➈
Avviamento tramite fader con pulsante
Per escludere un funzionamento errato spegnere
prima il lettore CD e il mixer. Collegare la relativa
presa per l’avviamento tramite fader del mixer con la
presa START/PAUSE (30), servendosi di un cavo di
collegamento (vedi fig. 8 o 9).
Se il mixer dispone della funzione di preascolto
(monitor), è possibile la riproduzione dell’inizio di un
21
démarre. Si le bouton poussoir momentané est
activé pour la deuxième fois en tirant le fader, le
lecteur CD passe sur Pause.
Table de mixage
F
B
CH
1. x Start
2. x Pause
➈
Démarrage électrique via un bouton poussoir
momentané
Pour éviter tout dysfonctionnement, débranchez
tout d’abord le lecteur et la table de mixage. Reliez
la prise de démarrage électrique correspondante de
la table via un cordon (schéma 8 ou 9) à la prise
START/PAUSE (30) correspondante.
Si la table de mixage est dotée d’une fonction préécoute (fonction monitor), on peut lire le début d’un
titre et en faire une écoute via un casque même si le
fader pour le lecteur CD est fermé. Utilisez le lecteur
CD comme décrit dans le chapitre 5.4 “Lecture des
premières notes d’un titre”.
Conseil : la commande via les faders de la table de
mixage n’a pas d’intérêt en mode relais
(voir chapitre 5.3.3) car la lecture s’arrête
automatiquement à la fin d’un titre ou d’un
CD indépendamment des faders correspondants et l’autre lecteur démarre.
8
Entretien de l’appareil
Protégez l’appareil de la poussière, des vibrations,
de la lumière directe du soleil, des éclaboussures,
de tout type de projections d’eau, d’une humidité
élevée et de la chaleur (température de fonctionnement admissible 0 – 40 °C). Pour le nettoyer, utilisez
uniquement un chiffon sec et doux, en aucun cas,
de produits chimiques ou d’eau.
Remarques sur les coupures du son et les
erreurs de lecture
La fumée de cigarettes s’introduit facilement dans
les ouvertures du lecteur et se dépose sur l’optique
I
titolo e il preascolto di un titolo tramite cuffia nonostante il fader per il lettore CD sia chiuso. In questo
caso procedere con il lettore CD come descritto nel
capitolo 5.4 “Riproduzione dell’inizio di un titolo”.
N.B.: Con le modalità Relay non ha senso il comando attraverso il fader (vedi anche cap. 5.3.3),
dato che la riproduzione si arresta automaticamente alla fine di un titolo o del CD e passa
automaticamente all’altro lettore, il tutto indipendentemente dalla posizione dei relativi
fader.
8
Manutenzione
Proteggere l’apparecchio dalla polvere, da vibrazioni, dalla luce diretta del sole, dagli spruzzi d’acqua e
dall’acqua gocciolante, dall’alta umidità e dal calore
(temperatura d’impiego ammessa fra 0 e 40 °C). Per
la pulizia usare solo un panno asciutto; non impiegare in nessun caso prodotti chimici o acqua.
Note su possibili errori di lettura
Il fumo di sigarette penetra facilmente fra tutte le
aperture dell’apparecchio e si deposita sul sistema
ottico della scansione ai raggi laser. Ciò può provocare errori di lettura e buchi nella riproduzione.
Poiché non si può escludere sempre il fumo di sigarette (p. es. in una discoteca), l’apparecchio deve
eventualmente essere pulito in un laboratorio specializzato. Una tale pulizia è a pagamento, anche
durante il periodo di garanzia!
du système laser. Cela peut générer des erreurs de
lecture et des coupures de son. On ne peut pas toujours éviter la fumée de cigarettes (par exemple en
discothèque), confiez impérativement le nettoyage
du lecteur à un technicien spécialisé. Cette opération est à la charge de l’utilisateur, même lorsque
l’appareil est sous garantie.
9
Caractéristiques techniques
Bande passante : . . . . . . 20 – 20 000 Hz
Taux de distorsion : . . . . . < 0,1 %
Séparation des canaux : . > 80 dB
Dynamique : . . . . . . . . . . > 90 dB
Rapport signal sur bruit : . > 80 dB
Pleurage et scintillement : non mesurable,
précision quartz
Sorties
Ligne (analogique) : . . . 2 V
Digitale (coaxiale) : . . . 0,5 Vcc S/PDIF
Alimentation : . . . . . . . . . 230 V~/50 Hz
Consommation : . . . . . . . 25 VA
Température de
fonctionnement : . . . . . . . 0 – 40 °C
Dimensions (L x H x P)
Lecteur : . . . . . . . . . . . . 482 x 89 x 260 mm, 2 U
Unité de commande : . 482 x 89 x 80 mm, 2 U
Poids : . . . . . . . . . . . . . . . 6,9 kg
Branchements
Sortie audio analogique : 2 x RCA droit/gauche
Sortie audio numérique : 2 x RCA
Démarrage électrique : . 2 x jack 3,5
Connexion unité
de commande : . . . . . . par cordon mini DIN
8 pôles,
(longueur 1,2 m)
D’après les données du constructeur.
Tout droit de modification réservé
9
Dati tecnici
Banda passante: . . . . . .
Fattore di distorsione: . .
Separazione canali: . . .
Range dinamico: . . . . . .
Rapporto S/R: . . . . . . . .
Wow and flutter: . . . . . .
10 Glossaire technique
Les termes indiqués en italique sont expliqués ultérieurement.
Auto Cue : lors de la sélection d’un titre, le lecteur CD est exactement à l’endroit où la musique commence et pas à l’index
temps 0:00:00. Ainsi, lorsqu’on active la touche
, la musique démarre immédiatement, sans pause.
Bargraphe : un affichage graphique sous forme de barre indique, par sa longueur, la durée restante ou la durée déjà lue
d’un titre ou d’un CD.
BOP : effets “sampler (bégaiement)” : la touche BOP sert au
retour et démarrage immédiat de la lecture à partir du début
du titre en cours ou à partir d’un point de départ préalablement sélectionné avec la touche CUE ; par plusieurs pressions brèves sur la touche BOP, il est possible de créer des
effets “sampler (bégaiement)”
Bouton poussoir momentané : interrupteur dont le contact est
maintenu fermé tant que le bouton est maintenu enfoncé (par
exemple interrupteur de sonnette).
BPM : beats par minute : le compteur de beats manuel intégré
détermine le nombre de beats par minute d’un titre lorsque la
touche BPM/TAP est enfoncée plusieurs fois selon le rythme
de la musique.
CE : (
communauté européenne) : certains produits vendus
dans la communauté européenne doivent porter le symbole
CE. Le fabricant et le revendeur certifient ainsi que le produit
répond bien à l’ensemble des directives correspondantes de
l’union européenne (par exemple directive pour la compatibilité électromagnétique, directive basse tension ).
Compatibilité électromagnétique : la directive 89/336/CEE
définit la radiation d’interférences maximale admissible d’un
appareil et le degré de radiations d’interférences auquel l’appareil peut être soumis sans problème (résistance aux interférences).
Compteur de beats : détermine le nombre de beats par minute
(BPM) et ainsi la vitesse à laquelle le morceau de musique est
lu.
10 Spiegazione dei termini tecnici
20 – 20 000 Hz
< 0,1 %
> 80 dB
> 90 dB
> 80 dB
non misurabile,
precisione del quarzo
Uscite
Line (analogica): . . . . 2 V
digitale (coassiale): . . 0,5 Vpp S/PDIF
Alimentazione: . . . . . . . 230 V~/50 Hz
Potenza assorbita: . . . . 25 VA
Temperatura d’esercizio: 0 – 40 °C
Dimensioni (l x h x p)
Unità lettore: . . . . . . . 482 x 89 x 260 mm, 2 RS
Unità di comando: . . . 482 x 89 x 80 mm, 2 RS
Peso: . . . . . . . . . . . . . . . 6,9 kg
Collegamenti
Uscita audio, analogica: 2 x RCA sinistra/destra
Uscita audio, digitale: 2 x RCA
Avviamento con fader: 2 x jack 3,5 mm
Collegamento
di comando: . . . . . . . . tramite cavo mini-DIN a
8 poli (lunghezza 1,2 m)
Dati forniti dal costruttore.
Con riserva di modifiche tecniche.
I vocaboli in corsivo sono spiegati con i relativi lemmi.
Auto Cue Selezionando un titolo, il lettore CD si trova esattamente sul punto dove inizia la musica e non sull’indice di
tempo 0:00:00. Così la musica inizia subito quando si preme
il tasto
.
Avviamento tramite fader ingl. to fade = aprire in dissolvenza;
con un particolare cursore (fader) sul mixer, accoppiato con
un interruttore o pulsante, si può avviare ed mettere in pausa
il lettore aprendo e chiudendo il fader.
Beatcounter ingl. contatore delle battute; stabilisce il numero
delle battute al minuto (BPM) e quindi la velocità di un brano
musicale.
BOP (BOP = effetto di “balbuziente”): il tasto BOP serve per
ritornare e ripartire subito con la riproduzione dall’inizio del
titolo corrente o da un punto di partenza fissato prima con il
tasto CUE; premendo il tasto ripetutamente, si ottiene l’effetto
di “balbuziente”.
BPM ingl. beats per minute = battute al minuto; il beatcounter
manuale integrato individua il numero di battute al minuto di
un titolo, se il tasto BPM/TAP viene premuto brevemente
alcune volte nel ritmo della musica.
CE (simbolo
) franc. Communauté Européenne = Comunità
europea: determinati prodotti destinati alla vendita nell’UE
devono avere il simbolo CE con il quale il costruttore o distributore certifica che il prodotto è conforme alle relative norme
dell’UE (p. es. Direttiva per la compatibilità elettromagnetica o
Direttiva per apparecchi a bassa tensione ecc.).
Compatibilità elettromagnetica (ingl. EMC) La direttiva EMC
89/336/CEE stabilisce il valore massimo dei disturbi che un
apparecchio può emanare e a quali disturbi può essere esposto (immunità ai disturbi).
22
F
Continue ➔ lecture de tous les titres
Démarrage électrique : avec un potentiomètre spécifique
(fader) sur une table de mixage, couplé avec un interrupteur
ou un bouton poussoir momentané, le lecteur CD peut être
démarré lorsque le fader est poussé, ou mis sur pause lorsque le fader est fermé.
Digital : informations représentées en chiffres ; un convertisseur analogique/digital convertit les ondes sonores captées
par un micro en une succession rapide de uns et de zéros
(nombres binaires par exemple “1001” = 9) qui sont mémorisés sur le CD. Chaque nombre binaire correspond à une
valeur momentanée d’une vibration sonore. Par un système
perfectionné de corrections d’erreurs, on peut exclure par des
calculs les interruptions et interférences pour obtenir une
meilleure qualité de lecture. Un convertisseur digital/analogique convertit les nombres binaires à nouveau, en ondulations
électriques qui parviennent amplifiées à un haut-parleur.
Directive basse tension (73/23/CEE) : directive selon laquelle
des appareils qui fonctionnent avec des tensions de 50 V à
1500 V, doivent être construits de manière sûre pour assurer
la protection de l’utilisateur.
Frame : la musique est stockée sur un CD en blocs de données
(angl. frames) ; dans un bloc, l’information est stockée pour
1/75 seconde. On peut ainsi aller à un endroit précis sur le CD
par palier de 1/75 seconde.
Lecture de tous les titres : mode de fonctionnement pour lire
un titre l’un après l’autre, à l’inverse de la lecture titre par titre.
titre sur un autre lecteur. Lors d’une transition d’un titre vers
un autre, le rythme dansant n’est pas perturbé.
Lecture titre par titre : mode de fonctionnement particulier
pour des utilisations DJ ; après la lecture d’un titre, l’appareil
passe sur pause, à l’inverse de la lecture de tous les titres .
Point Cue : avec une touche Cue, endroit librement sélectionnable sur le CD où le lecteur peut sauter directement. Si on
revient au point Cue avec la touche Cue, le lecteur CD passe
en mode Pause.
LED : light emitting diode : composant électronique qui convertit directement un courant électrique en lumière (sans production de chaleur comme pour une lampe à incandescence) ;
brille selon le matériau dans diverses couleurs ou même en
blanc.
Line : ligne : (sortie, entrée, niveau Ligne) : pour pouvoir transmettre des signaux d’un appareil à un autre, les signaux doivent avoir une valeur de tension constatée sinon aucune
transmission optimale n’est possible. Cette valeur est entre
0,1 V et 2 V (Volt) et est définie comme niveau Ligne ; les entrées et sorties prévues pour ces niveaux portent généralement l’inscription LINE.
B
CH
Rack : baie : dans un rack pour appareils avec une largeur normalisée de 482 mm (19”), il est possible de placer par exemple, un lecteur CD, une table de mixage, un égaliseur, un
amplificateur pour monter des installations audio complètes.
Seamless Loop : boucle continue : la lecture de la boucle sans
fin (loop) s’effectue sans pause c’est-à-dire qu’aucune interruption du signal musical n’est audible lorsque le lecteur CD
revient du point de fin au point de démarrage de la boucle.
Single ➔ lecture titre par titre
Track : (voie), morceau de musique sur un CD par exemple
Loop : boucle : répétition sans fin d’un passage de musique
donné sur un CD, déterminé par le positionnement d’un point
de démarrage et de fin. La boucle continue mémorisée peut
être quittée à tout moment et être rappelée ultérieurement
(reloop).
Mémoire anti chocs : mémoire électronique dans laquelle la
musique est temporairement stockée avant la lecture d’un CD
pour éviter, en cas de secousses, toute interruption du son.
Fonction monitor ➔ fonction préécoute
Fonctionnement relais : fonction avec laquelle les titres ou les
CDs sont lus automatiquement en alternance entre les deux
lecteurs.
Fonction préécoute : pre fader listening : possibilité sur la
table de mixage malgré le fader fermé, d’écouter le signal par
exemple depuis un lecteur CD via un casque pour sélectionner le titre suivant ou un point de départ.
Outro : fonction pour laquelle seules les 30 dernières secondes
d’un titre sont lues.
Pitch : hauteur tonale : avec le réglage PITCH CONTROL, il est
possible de modifier la vitesse de lecture et donc la hauteur
tonale.
Pitch Bend : fonction avec laquelle la vitesse de lecture peut
être brièvement augmentée ou diminuée. Le rythme d’un titre
d’un lecteur peut ainsi être synchronisé avec le rythme d’un
Notice d’utilisation protégée par le copyright de MONACOR ® INTERNATIONAL GmbH & Co. KG. Toute
reproduction même partielle à des fins commerciales est interdite.
I
Continue ➔ Riproduzione di tutti i titoli
Diagramma a barre Sul display viene visualizzata una barra
che con la sua lunghezza indica il tempo restante del titolo o
del CD oppure il tempo già trascorso del titolo.
digitale Informazioni in cifre; le onde sonore captate da un
microfono vengono convertite da un convertitore analogico/
digitale in una serie di 1 e 0 (numeri binari, p. es. “1001” = 9)
e memorizzate sul CD. Ogni numero binario corrisponde al
valore momentaneo di un onda sonora. Un sofisticato sistema
di correzioni permette di compensare eventuali difetti sul CD
il che garantisce un’alta qualità di riproduzione. Un convertitore digitale/analogico riconverte i numeri binari in oscillazioni
elettriche che vengono poi amplificate e portate all’altoparlante.
Direttiva per apparecchi a bassa tensione (73/23/CEE)
Direttiva secondo cui gli apparecchi con tensione fra 50 V e
1500 V devono presentare determinate caratteristiche di sicurezza per l’utente.
Frame ingl. cornice; la musica sul CD è memorizzata in blocchi
di dati. In un blocco (cornice), l’informazione è memorizzata
per 1/75 di secondo. Pertanto è possibile trovare un punto sul
CD con l’esattezza di un 1/75 di secondo.
Funzionamento Relay Funzione dove i titoli o i CD vengono
riprodotti alternativamente dai due lettori.
Funzione monitor ➔ Preascolto
LED ingl. light emitting diode = componente elettronico che converte la corrente elettrica direttamente in luce (senza produrre
calore come la lampada ad incandescenza). A seconda del
materiale sono possibili diversi colori, compreso il bianco.
Line (uscita, ingresso, livello Line); per trasmettere i segnali da
un apparecchio all’altro è richiesto una tensione fissa; altrimenti non è possibile una trasmissione ottimale. Tale valore si
trova fra 0,1 V e 2 V ed è chiamato livello Line. Gli ingressi e
le uscite previste per tale livello sono generalmente contrassegnati con LINE.
Punto Cue: Un punto sul CD selezionabile liberamente con un
tasto Cue sul quale e possibile saltare direttamente. Se con il
tasto Cue si salta sul punto Cue, il lettore CD va in pausa.
Rack Una struttura per apparechi con larghezza normalizzata
(482 mm =19"); per montarvi impianti audio completi, p. es.
lettori CD, mixer, equalizzatori, amplificatori.
Loop inglese anello: riproduzione senza fine di una parte del
CD determinata fissando i punti di avvio e di fine. In qualsiasi
momento si può uscire dal loop memorizzato e lo si può chiamare in un secondo tempo (Reloop).
Riproduzione di tutti i titoli Modalità in cui un titolo viene riprodotto dopo l’altro contrariamente alla riproduzione di un singolo titolo.
Memoria anti-shock Memoria elettronica che memorizza la
musica temporaneamente dopo la lettura del CD per escludere interruzioni in seguito a vibrazioni.
Riproduzione di un singolo titolo Modalità per applicazioni in
discoteca: dopo la riproduzione di un titolo, il lettore va in
pausa; il contrario è la riproduzione di tutti i titoli.
Outro Funzione in cui si riproducono solo gli ultimi 30 secondi
di un titolo.
Seamless loop inglese loop senza cucitura: La riproduzione
del loop avviene senza alcuna interruzione; il segnale musicale non viene interrotto quando il lettore CD salta dalla fine
all’inizio del loop.
Pitch ingl. altezza del suono; con il regolatore PITCH CONTROL si può modificare la velocità di riproduzione e quindi
l’altezza del suono.
Pitch Bend Funzione con cui si può aumentare o ridurre brevemente la velocità di riproduzione, per sincronizzare il ritmo di
un brano in un lettore con quello di un altro brano nell’altro lettore. Durante le dissolvenze fra due titoli il ritmo non viene
alterato.
Single ➔ Riproduzione di un singolo titolo
Track ingl. traccia; pezzo musicale, per es. su un CD.
Preascolto (PFL = pre fader listening, ascolto prima del fader)
Possibilità di ascoltare il brano musicale, p. es. di un lettore
CD, attraverso una cuffia, anche se il fader sul mixer è chiuso;
serve per selezionare il titolo successivo o il punto di avvio.
Pulsante interruttore il contatto è chiuso solo finché si tiene premuto il pulsante; tipico dei campanelli.
La MONACOR ® INTERNATIONAL GmbH & Co. KG si riserva ogni diritto di elaborazione in qualsiasi forma
delle presenti istruzioni per l’uso. La riproduzione – anche parziale – per propri scopi commerciali è vietata.
23
NL
B
Vouw bladzijde 3 helemaal open, zodat u steeds
een overzicht hebt van de bedieningselementen
en de aansluitingen.
1
Overzicht van de bedieningselementen
en aansluitingen
1.1 Stuureenheid (figuur 1)
Inhoudsopgave
1
Overzicht van de bedieningselementen
en aansluitingen . . . . . . . . . . . . . . . . . . . 24
1.1 Stuureenheid . . . . . . . . . . . . . . . . . . . . . . . 24
1.1.1 Bedieningspaneel voor
afspeelmechanisme 1 . . . . . . . . . . . . . . .24
1.1.2 Display . . . . . . . . . . . . . . . . . . . . . . . . . . . 25
Een track kort voorbeluisteren . . . . . . . . . 29
5.5
Functie OUTRO . . . . . . . . . . . . . . . . . . . . 29
5.6
Versneld vooruit en achteruit zoeken . . . . 29
5.7
Een bepaalde plaats in een track precies
opzoeken . . . . . . . . . . . . . . . . . . . . . . . . . . 29
1.2
Afspeeleenheid frontpaneel . . . . . . . . . . . 26
1.3
Afspeeleenheid achterzijde . . . . . . . . . . . . 26
2
Veiligheidsvoorschriften . . . . . . . . . . . . 26
3
Toepassingen . . . . . . . . . . . . . . . . . . . . . 26
Naar een bepaalde plaats in een
track terugkeren (Cue-punt) . . . . . . . . . . . 30
5.9.1 Toets BOP . . . . . . . . . . . . . . . . . . . . . . . 30
4
Het apparaat opstellen en aansluiten . . 26
5.10 Naadloze loop afspelen . . . . . . . . . . . . . . . 30
5
Bediening . . . . . . . . . . . . . . . . . . . . . . . . . 27
5.1
De cd afspelen . . . . . . . . . . . . . . . . . . . . . 27
5.2
Het tracknummer, de speeltijd,
het aantal beats per minuut en
de rustmodus weergeven . . . . . . . . . . . . . 27
5.2.1 Bargrafiek . . . . . . . . . . . . . . . . . . . . . . . . 28
5.2.2 Beatteller . . . . . . . . . . . . . . . . . . . . . . . . 28
5.2.3 Rustmodus . . . . . . . . . . . . . . . . . . . . . . . 28
5.3 De bedrijfsmodus selecteren . . . . . . . . . . . 28
5.3.1 Afspelen van een individuele track . . . . . 28
5.3.2 Afspelen van de volledige cd . . . . . . . . . 28
5.3.3 Relaiswerking – het andere afspeelmechanisme automatisch starten . . . . . . 28
E
5.4
5.8 Afspeelsnelheid en toonhoogte wijzigen . . 29
5.8.1 Het ritme van twee muziekfragmenten
synchroniseren ( Pitch Bend”) . . . . . . . . 30
5.9
6
Eigen reeks tracks samenstellen . . . . . . 31
6.1
Een reeks tracks programmeren . . . . . . . . 31
6.2
Programmering controleren . . . . . . . . . . . 31
6.3
Geprogrammeerde reeks tracks afspelen . 31
6.4
Geprogrammeerde reeks tracks wissen . . 31
7
Faderstart via een mengpaneel . . . . . . . 31
8
Onderhoud van het apparaat . . . . . . . . . 32
9
Technische gegevens . . . . . . . . . . . . . . . 32
10
Verklaring van de vakbegrippen . . . . . . 32
Por favor visualice la página 3. Así podrá ver los
elementos operativos y las conexiones según se
describe.
1 Bedieningspaneel voor afspeelmechanisme 1
(details zie figuur 2)
2 Bedieningspaneel voor afspeelmechanisme 2
3 Toets RELAY om het andere afspeelmechanisme automatisch te starten aan het einde van een
track of aan het einde van de cd (zie hfdst. 5.3.3)
De functie kan enkel worden geactiveerd, wanneer in beide afspeelmechanisme een cd is
gelegd.
1.1.1 Bedieningspaneel voor afspeelmechanisme 1 (figuur 2)
De bedieningspanelen voor mechanisme 1 en 2 zijn
identiek.
4 Toets om de cd-lade (22) te openen en te sluiten (niet mogelijk tijdens het afspelen)
5 Toets SEARCH (met controle-LED) om de draaiknop (16) naar de functie “snel vooruit/achteruit
zoeken” om te schakelen
Aanwijzing: Als de draaiknop in de weergavemodus gedurende 8 seconden niet wordt ingedrukt,
gaat de LED uit en dient de knop opnieuw voor
de functie “Pitch Bend” en – in de pauzemodus –
om een bepaalde plaats in een track nauwkeurig
op te zoeken
6 Toets BOP om terug te keren en onmiddellijk de
weergave te starten vanaf het begin van de
geselecteerde track of vanaf een met de toets
CUE (17) vastgelegd beginpunt
Door enkele keren kort op deze toets te drukken,
kunt u stottereffecten genereren.
7 Toetsen TRACK om de track te selecteren
Toets +10 om 10 tracks vooruit te gaan
Toets
om de volgende track te selecteren
Toets
om naar het begin van de geselecteerde track te springen. Door verschillende
keren op de toets
te drukken, wordt telkens een track teruggesprongen.
1
Elementos operativos y conexiones
1.1 Unidad de control (fig. 1)
Contenidos
1
Elementos operativos y conexiones . . . 24
5.5
Función OUTRO . . . . . . . . . . . . . . . . . . . . 29
1.1 Unidad de control . . . . . . . . . . . . . . . . . . . 24
1.1.1 Panel de control para el mecanismo
lector 1 . . . . . . . . . . . . . . . . . . . . . . . . . . 24
1.1.2 Visualización . . . . . . . . . . . . . . . . . . . . . . 25
5.6
Avance y rebobinado . . . . . . . . . . . . . . . . . 29
5.7
Selección precisa de un punto . . . . . . . . . 29
1.2
Unidad del mecanismo lector, panel frontal 26
1.3
Unidad del mecanismo lector, panel trasero 26
2
Notas de seguridad . . . . . . . . . . . . . . . . . 26
3
Aplicaciones . . . . . . . . . . . . . . . . . . . . . . 26
4
Instalación y conexión de la unidad . . . 27
5
Funcionamiento . . . . . . . . . . . . . . . . . . . 27
5.1
Reproducción de un CD . . . . . . . . . . . . . . 27
Modificación de la velocidad
y la altura tonal . . . . . . . . . . . . . . . . . . . . . 29
5.8.1 Adaptación del ritmo entre dos canciones
(“Pitch Bend”) . . . . . . . . . . . . . . . . . . . . . 30
5.8
5.9
Vuelve a un punto definido anteriormente
(Cue point) . . . . . . . . . . . . . . . . . . . . . . . . 30
5.9.1 Botón BOP . . . . . . . . . . . . . . . . . . . . . . . 30
5.10 Reproducción de un bucle continuo . . . . . 30
5.2
Visualización del número del título,
tiempo de reproducción, beats por minuto,
y modo Sleep (descanso) . . . . . . . . . . . . . 27
5.2.1 Barra gráfica . . . . . . . . . . . . . . . . . . . . . . 28
5.2.2 Contador de beats . . . . . . . . . . . . . . . . . 28
5.2.3 Modo Sleep (descanso) . . . . . . . . . . . . . 28
5.3 Selección del modo operativo . . . . . . . . . . 28
5.3.1 Reproducción de un solo título . . . . . . . . 28
5.3.2 Reproducción de todos los títulos . . . . . 28
5.3.3 Modo Relay – Inicio automático
del segundo lector . . . . . . . . . . . . . . . . . 28
5.4
24
Corta reproducción del inicio
de un título . . . . . . . . . . . . . . . . . . . . . . . . 29
1 Panel de control para el mecanismo lector 1 (ver
detalles fig. 2)
2 Panel de control para el mecanismo lector 2
3 Botón RELAY para inicio automático de otro
mecanismo lector al final del título o al final del
CD (ver capítulo 5.3.3)
La función sólo puede activarse con un CD insertado en los dos mecanismos de reproducción.
6
Creación de una secuencia
de títulos individual . . . . . . . . . . . . . . . . 31
6.1
Programación de una secuencia
de títulos . . . . . . . . . . . . . . . . . . . . . . . . . . 31
6.2
Comprobación de la programación . . . . . . 31
6.3
Reproducción de una secuencia
de títulos programada . . . . . . . . . . . . . . . . 31
6.4
Borrar una secuencia
de títulos programada . . . . . . . . . . . . . . . . 31
7
Inicio de fader vía un mezclador . . . . . . 31
8
Mantenimiento de la unidad . . . . . . . . . . 32
9
Especificaciones . . . . . . . . . . . . . . . . . . . 32
10
Glosario . . . . . . . . . . . . . . . . . . . . . . . . . . 32
1.1.1 Panel de control para el mecanismo lector 1
(fig. 2)
Los paneles de control para los mecanismos de lectura 1 y 2 son idénticos.
4 Botón
para abrir y cerrar la bandeja del CD
(22) [no posible durante la reproducción]
5 Botón SEARCH (con LED indicativo) para establecer la rueda (16) en la función “avance/rebobinado”
Nota: si la rueda no actúa en el modo de reproducción durante más de 8 segundos, el LED se
apaga y la rueda sirve de nuevo para la función
“Pitch Bend” y en el modo pausa para el posicionamiento exacto de un determinado punto
6 Botón BOP para volver e inmediatamente iniciar
la reproducción desde el principio de un título que
ya está sonando o desde el punto de inicio seleccionado anteriormente con el botón CUE (17)
Repitiendo la pulsación en este botón, pueden
producirse efectos de tartamudeo
7 Botón TRACK para la selección del título
Botón +10 para avanzar 10 títulos
Botón
para seleccionar el siguiente título
Botón
para volver al principio del título que se
reproduce actualmente. Con cada pulsación
del botón
, la unidad siempre retrocede un
título.
8 Botón CUE 1 para volver a un punto definido
anteriormente (ver capítulo 5.9)
8 Toets CUE 1 om terug te keren naar een bepaalde plaats in een track (zie hoofdstuk 5.9)
9 Toets CONT./SINGLE voor het selecteren van
de bedrijfsmodus (zie ook hoofdstuk 5.3) en het
in-/uitschakelen van de functie OUTRO
Basisinstelling:
Afspelen van een individuele
track;
op het display verschijnt
“AUTO CUE SINGLE” (d)
1ste keer drukken
op de toets:
alle tracks van de cd worden
weergegeven;
op het display verschijnt de
melding “CONTINUE” (c)
2de keer drukken
op de toets:
terugschakelen naar de basisinstelling
Houd de toets ca. 3 seconden ingedrukt tot op
het display de melding “OUTRO” (k) verschijnt:
Schakel de functie OUTRO in om telkens de
laatste 30 seconden van de volgende track af te
spelen [Om de functie uit te schakelen, houdt u
de toets opnieuw ca. 3 seconden ingedrukt of
drukt u kort op de toets TIME/STOP (10).]
10 Toets TIME/STOP:
indien u de toets langer dan 3 seconden ingedrukt houdt, stopt het afspeelmechanisme;
om het display met tijdsweergave (j) om te schakelen, drukt u kort op de toets:
Basisinstelling:
weergave van de resterende
tijd van de geselecteerde track
1ste keer drukken
op de knop:
weergave van de verstreken
afspeeltijd van de geselecteerde track
2de keer drukken
op de knop:
weergave van de resterende
speeltijd van de volledige cd
3de keer drukken
op de knop:
terugschakelen naar de basisinstelling
11 Toets PROG. (met controle-LED) om een willekeurige reeks tracks te programmeren – zie hfdst. 6
12 Toets PITCH voor het selecteren van het snelheidsregelbereik (max. ±8 % of max. ±16 % afwijking ten opzichte van de standaardsnelheid),
het geselecteerde bereik wordt door de overeenkomstige LED (13) naast de toets aangeduid
13 LED’s voor het aanduiden van het snelheidsbereik dat met de toets PITCH (12) is geselecteerd:
Knipperen = de regelaar PITCH CONTROL (14)
is niet geactiveerd
Constant oplichten = de regelaar werd met de
toets ON/OFF (15) geactiveerd
14 Schuifregelaar PITCH CONTROL om de snelheid
resp. toonhoogte te veranderen (max. ±16 %); de
instelling van de regelaar functioneert alleen,
wanneer de toets ON/OFF (15) is ingedrukt
15 Toets ON/OFF om de regelaar PITCH CONTROL (14) te activeren en deactiveren
16 Draaiknop
1. Controle-LED van de toets SEARCH (5) uit:
voor de functie “Pitch Bend” en in de pauzemodus om een bepaalde plaats in een track
nauwkeurig op te zoeken
2. Toets SEARCH ingedrukt, LED licht op:
voor het snel vooruit/achteruit zoeken
17 Toets CUE om een track voor te beluisteren en
om terug te keren naar een bepaalde plaats (zie
hoofdstuk 5.4 resp. 5.9)
18 Toets PLAY/PAUSE
om tussen afspelen en
pauze om te schakelen
19 Toetsen voor het opslaan en afspelen van een
naadloze loop:
toets A om het beginpunt van de naadloze loop
vast te leggen
toets B/LOOP– EXIT om het eindpunt van de
naadloze loop vast te leggen en de loop tegelijk te starten; druk nogmaals op de toets om
deze modus te verlaten
Toets RELOOP om de naadloze loop opnieuw af
te spelen
20 Toetsen PITCH BEND voor het aanpassen van
het ritme van een track in afspeelmechanisme 1
aan dat van een track in afspeelmechanisme 2
9 Botón CONT./SINGLE para seleccionar el modo
operativo (ver también capítulo 5.3) y para
activar/desactivar la función OUTRO
Ajuste básico:
reproducción de un sólo
título; la pantalla muestra
“AUTO CUE SINGLE” (d)
1st pulsación
del botón:
reproducción de todos los
títulos del CD; la pantalla
muestra “CONTINUE” (c)
2nd pulsación
del botón:
vuelve al ajuste básico
Mantener el botón presionado durante unos
3 seg. aprox. hasta que aparezca en pantalla
“OUTRO” (k):
Activación de la función OUTRO para la reproducción de los últimos 30 segundos de cada
título siguiente [Para desactivar la función, o bien
se presiona el botón durante unos 3 seg, o se
presiona brevemente el botón TIME/STOP (10).]
10 Botón TIME/STOP
Si el botón se mantiene presionado durante más
de 3 segundo, el mecanismo lector se detiene;
para conmutar el tiempo de visualización (j), presionar brevemente el botón:
Ajuste básico:
visualización del tiempo que
queda por reproducir del título actual
1st actuación
del botón:
visualización del tiempo reproducido del título actual
2nd actuación
del botón:
visualización del tiempo restante del CD completo
3rd actuación
del botón:
volver al ajuste básico
11 Botón PROG. (con LED indicativo) para programar cualquier secuencia de títulos deseada –
ver capítulo 6
12 Botón PITCH para seleccionar el rango de ajuste
de velocidad (máx. ±8 % o máx. ±16 % desviación de la velocidad estándar), el rango seleccio-
nado se visualiza con el correspondiente LED
(13) que hay al lado del botón.
LEDs para indicar el rango de ajuste de velocidad seleccionado con el botón PITCH (12)
parpadeo = el PITCH CONTROL (14) no está
activado
luz continuada = el control ha sido activado con
el botón ON/OFF (15)
Control deslizante PITCH CONTROL para modificar la velocidad o el altura tonal (máx. ±16 %);
el ajuste de control sólo es efectivo con el botón
ON/OFF (15) presionado
Botón ON/OFF para activar y desactivar el
PITCH CONTROL (14)
Rueda
1. LED indicativo del botón SEARCH (5) apagado:
para la función “Pitch Bend” y en modo pausa
para el posicionamiento exacto de un punto
deseado
2. Botón SEARCH presionado, LED se ilumina:
para el avance y rebobinado
Botón CUE para una corta reproducción del inicio de un título y vuelta a un punto definido anteriormente (ver capítulo 5.4 o 5.9)
Botón PLAY/PAUSE
para escoger entre
reproducción y pausa
Botones para memorizar y reproducir una secuencia continua:
botón A para definir el punto de inicio de la secuencia
botón B/LOOP – EXIT para definir el final de la
secuencia y simultáneamente iniciarla; para
salir de la secuencia, pulsar el botón de nuevo
botón RELOOP para reproducir la secuencia de
nuevo
Botones PITCH BEND para sincronizar los beats
de un título en el mecanismo lector 1 con uno en
el mecanismo lector 2
Mientras uno de los botones se mantiene presionado, la velocidad es un 16 % más baja o más
alta que la velocidad estándar.
13
14
15
16
17
18
19
20
Zolang u een van de toetsen ingedrukt houdt,
neemt de standaardsnelheid met 16 % toe resp.
af.
21 Toets BPM/TAP voor de manuele beatteller
Om voor een track het aantal beats per minuut
te bepalen, tipt u de toets enkele keren aan op
het ritme van de muziek: op het display verschijnt in plaats van “PITCH” (f) de melding
“BEAT” (e) en het weergaveveld PITCH (h)
geeft in plaats van de procentuele afwijking
ten opzichte van de standaardsnelheid het
aantal beats per minuut van de track aan.
Om terug naar weergave van de snelheidsafwijking te schakelen, houdt u de toets ca.
3 seconden ingedrukt tot “BEAT” van het display verdwijnt en “PITCH” opnieuw verschijnt.
NL
B
1.1.2 Display (figuur 3)
a Symbool voor de weergavemodus
b Symbool voor de pauzemodus
c De melding “CONTINUE”: duidt de bedrijfsmodus “Afspelen van de volledige cd” aan, zie positie 9 toets CONT./SINGLE
d De melding “AUTO CUE SINGLE”: duidt de bedrijfsmodus “Afspelen van een individuele track”
aan
e De melding “BEAT”: duidt aan dat rechts boven
in het display [Weergaveveld (h)] de beats per
minuut worden weergegeven, zie positie 21 toets
BPM/TAP
f De melding “PITCH”: duidt aan dat rechts boven
op het display [Weergaveveld (h)] de procentuele afwijkingen ten opzichte van de standaardsnelheid [ingesteld met de regelaar (14)] wordt
weergegeven
g Bargrafiek: duidt door zijn lengte de resterende
speeltijd van een track resp. de cd aan [“REMAIN” (m) op het display] of de verstreken speeltijd van een track (“REMAIN” niet weergegeven)
h De weergave van de procentuele afwijking ten
opzichte van de standaardsnelheid, ingesteld
met regelaar PITCH CONTROL (14), resp. de
weergave van het aantal beats per minuut na
omschakelen met de toets BPM/TAP (21)
21 Botón BPM/TAP para contar manualmente los
beats
Para determinar el número de beats por minuto
para un título, presionar brevemente el botón
varias veces al ritmo de la música: “BEAT” (e) se
visualiza en pantalla en vez de “PITCH” (f) y la
visualización del campo PITCH (h) indica el
número de beats por minuto del título en vez del
porcentaje de desviación de la velocidad estándar.
Para volver a visualizar la desviación de velocidad, mantener el botón presionado durante unos
3 seg. aprox hasta que “BEAT” haya desaparecido y aparezca de nuevo “PITCH”.
E
1.1.2 Visualización (fig. 3)
a símbolo para el modo de reproducción
b símbolo para el modo pausa
c visualización “CONTINUE”: indica el modo operativo “reproducción de todos los títulos”, ver
artículo 9 botón CONT./SINGLE
d visualización “AUTO CUE SINGLE”: indica el
modo operativo “reproducción de un sólo título”
e visualización “BEAT”: indica que en la parte
superior derecha de la pantalla [campo de visualización (h)] los beats por minuto se visualizan,
ver artículo 21 botón BPM/TAP
f visualización “PITCH”: indica que en la parte superior derecha de la pantalla [campo de visualización (h)] se visualiza el porcentaje de desviación de la velocidad estándar [ajustes con el
control (14)]
g barra gráfica: su longitud indica el tiempo que
queda de un título o de un CD [“REMAIN” (m)
visualizado] o el tiempo ya reproducido de un
título (“REMAIN” desaparecido)
h visualización del porcentaje de desviación de la
velocidad estándar ajustada con el PITCH CONTROL (14) o visualización de los beats por minuto
después de la pulsación del botón BPM/TAP (21)
i número del título o, brevemente después de insertar un CD, el número de título del CD
j tiempo visualizado en minutos (M), segundos (S),
y marcos (F); ver artículo 10 botón TIME/STOP
25
NL
B
i Tracknummer resp. – kort na het inleggen van
een cd – het aantal tracks op de cd
j Tijdsaanduiding in minuten (M), seconden (S) en
frames (F); zie positie 10 toets TIME/STOP
k De melding “OUTRO”: duidt de functie OUTRO
aan, zie positie 9 toets CONT./SINGLE
l De melding “LOOP”: verschijnt op het display,
om weer te geven dat een bepaald fragment
continu wordt afgespeeld (zie hoofdstuk 5.10)
m De melding “REMAIN”: geeft aan dat de tijdsaanduiding (j) de resterende tijd van een track of
van de cd aanduidt
1.2 Afspeeleenheid frontpaneel (figuur 4)
22 Cd-lade voor het respectieve afspeelmechanisme
23 Verlichting voor de cd-lade (22)
24 Toets
voor het openen en sluiten van de respectieve cd-lade (22)
(niet mogelijk tijdens het afspelen)
25 POWER-LED
26 POWER-schakelaar
2
2. er een defect zou kunnen optreden nadat een
apparaat bijvoorbeeld gevallen is,
3. een apparaat slecht functioneert.
Het apparaat moet in elk geval worden hersteld
door een gekwalificeerd vakman.
●
Een beschadigd netsnoer mag enkel door de
fabrikant of door een gekwalificeerd persoon worden hersteld.
●
Trek de stekker nooit met het snoer uit het stopcontact, maar met de stekker zelf.
●
In geval van ongeoorloofd of verkeerd gebruik,
verkeerde aansluiting, foutieve bediening of van
herstelling door een niet-gekwalificeerd persoon
vervalt de garantie en de verantwoordelijkheid
voor hieruit resulterende materiële of lichamelijke
schade.
Veiligheidsvoorschriften
Dit apparaat is in overeenstemming met de EU-richtlijn 89/336/EWG voor elektromagnetische compatibiliteit en 73/23/EWG voor toestellen op laagspanning.
Opgelet! De netspanning (230 V~) van het apparaat
is levensgevaarlijk. Open het apparaat
niet, want door onzorgvuldige ingrepen
loopt u het risico van elektrische schokken. Bovendien vervalt elke garantie bij
het eigenhandig openen van het apparaat.
27 8-polige mini-DIN-jack voor het verbinden van
afspeeleenheid en besturingseenheid:
verbind de jack via de meegeleverde mini-DINkabel met de jack REMOTE CONTROL CONNECT TO MAIN UNIT aan de achterzijde van de
besturingseenheid; steek daarbij het kabeluiteinde met de ontstoringsspoel (klein kastje) in de
jack van de afspeeleenheid.
28 Keuzeschakelaar REMOTE SELECT voor de afstandsbedieningsmethode via de jacks START/
PAUSE (30), zie hoofdstuk 7
TACT SW:
voor de bediening via een drukknop
LOCK SW:
voor de bediening via een in-/uitschakelaar
29 Netsnoer voor aansluiting op een stopcontact
(230 V~/50 Hz)
Let eveneens op het volgende:
● Opgelet! Kijk bij geopende cd-lade niet in het binnenwerk van de cd-speler, want eventueel actieve
laserstralen kunnen oogletsels veroorzaken.
● Het apparaat is uitsluitend geschikt voor gebruik
binnenshuis. Vermijd druip- en spatwater, uitzonderlijk warme plaatsen en plaatsen met een hoge
vochtigheid (toegestaan omgevingstemperatuurbereik: 0 – 40 °C).
● Plaats geen bekers met vloeistof zoals vazen of
drinkglazen op het apparaat.
● De warmte die in het apparaat ontstaat, moet door
ventilatie worden afgevoerd. Dek daarom de ventilatieopeningen van de behuizing niet af.
● Zorg ervoor dat u niets in de ventilatieopeningen
steekt! Er bestaat immers gevaar voor elektrische
schokken.
● Schakel het toestel niet in resp. trek onmiddellijk
de stekker uit het stopcontact, wanneer:
1. het apparaat of het netsnoer zichtbaar beschadigd is,
k visualización “OUTRO”: indica la función OUTRO,
ver artículo 9 botón CONT./SINGLE
l visualización “LOOP”: se visualiza si se reproduce una secuencia continua (capítulo 5.10)
m visualización “REMAIN”: indica que el tiempo
que falta por reproducir de un título o CD se
visualiza en el tiempo de la pantalla (j)
tivo mecanismo lector desde un mezclador, ver
capítulo 7
31 Salida audio digital (phono) del respectivo mecanismo lector
32 Salida audio analógica con el nivel línea (phono,
izquierda/derecha) del respectivo mecanismo
lector
1.3 Afspeeleenheid achterzijde (figuur 5)
E
30 3,5 mm-monostekkerbus voor de afstandsbediening van de functie “Start/Pause” van het betreffende afspeelmechanisme vanaf een mengpaneel, zie hoofdstuk 7
31 digitale audio-uitgang (cinch) van het betreffende afspeelmechanisme
32 analoge audio-uitgang met lijnniveau (cinch, links/
rechts) van het betreffende afspeelmechanisme
Wanneer het apparaat definitief uit
bedrijf wordt genomen, bezorg het dan
voor milieuvriendelijke verwerking aan
een plaatselijk recyclagebedrijf.
3
●
●
1.2 Unidad del mecanismo lector, panel frontal
(fig. 4)
22 Bandeja del CD para el respectivo mecanismo
lector
23 Iluminación para la bandeja del CD (22)
24 Botón para abrir y cerrar la respectiva bandeja
de CD (22)
(no es posible durante la reproducción)
25 Power LED
26 Tecla POWER
1.3 Unidad del mecanismo lector, panel trasero (fig. 5)
27 Jack 8 polos mini DIN para conectar la unidad
del mecanismo lector y la unidad de control:
conectar el jack vía el cable mini DIN entregado
al jack REMOTE CONTROL CONNECT TO
MAIN UNIT en la parte trasera de la unidad de
control; enchufar el cable con el estrangulador
anti-interferencias (caja pequeña) al jack de la
unidad del mecanismo lector
28 Tecla selección REMOTE SELECT para el tipo
de control remoto vía los jacks START/PAUSE
(30), ver capítulo 7
TACT SW:
Para el control vía una pulsación momentánea del botón
LOCK SW:
Para el control vía una tecla on/off
29 Cable principal para la conexión a la toma de
corriente (230 V~/50 Hz)
30 Jack 3,5 mm mono para el control remoto de la
función “Start/Pause” (Inicio/Pausa) del respec-
26
2
Notas de seguridad
●
Este aparato es conforme con la normativa 89/336/
CEE relacionada con la compatibilidad electromagnética y con la normativa 73/23/CEE relacionada
con los aparatos de baja tensión.
¡Atención! Este aparato está alimentado par una
tensión peligrosa 230 V~. No manipule
nunca el interior del aparato y no modificarlo, podría en caso de manipulación inadecuada, sufrir una descarga
eléctrica mortal. La apertura del aparato, niega todo derecho de garantía.
Respete escrupulosamente los puntos siguientes:
● ¡Atención! No mire nunca el compartimento CD
cuando la bandeja está abierta. Rayos láser
podrían generar daños en la vista.
● El aparato está fabricado solo para una utilización
en interior. Protégelo de todo tipo de proyección
de agua, de salpicaduras, de la humedad elevada
y del calor (temperatura de funcionamiento autorizada: 0 – 40 °C).
● En ningún caso, debe depositar objetos que contiene líquidos o un vaso encima del aparato.
● El calor generado por la unidad debe eliminarse
mediante la circulación del aire. Así que los ventiladores no deben cubrirse nunca.
● Nunca insertar nada en los ventiladores! Esto
podría causarle un choc eléctrico.
● No lo haga nunca funcionar y no lo desconecte
inmediatamente cuando:
1. Daños aparecen en el aparato y en el cable de
red.
Toepassingen
De dubbele cd-speler CD-280DJ met twee afspeelmechanismen is speciaal voor professionele DJtoepassingen ontworpen. Diverse functiemogelijkheden zijn precies op dit toepassingsbereik afgestemd, b.v. beatteller, weergave van een naadloze loop (seamless loop), afspelen van een individuele track of manuele synchronisatie van het ritme
van twee tracks.
Op de cd-speler kunnen conventionele cd’s en
zelfgebrande cd’s (cd-r of cd recordable) worden
afgespeeld. Bij herbeschrijfbare cd’s (cd-rw) kan het
afspelen naargelang het cd-type en gebruikte cdbrander echter problematisch verlopen.
De cd-speler is uitgerust met een anti-schokgeheugen, dat storingen bij het aftasten van de cd door
schokken en trillingen tot 10 seconden kan compenseren.
2. Después de una caída o accidente similar..., el
aparato presenta un defecto.
3. hay un mal funcionamiento
En todos los casos, los daños deben repararse
sólo por un técnico cualificado y especializado.
Todo cable de red dañado debe cambiarse por un
técnico habilitado o por el fabricante.
No desconecte nunca el aparato tirando del cable
de red directamente, agarrar siempre el enchufe.
Rechazamos todo tipo de responsabilidad en
caso de daños materiales o corporales resultandos si el aparato se utiliza en otro fin para el cual
ha sido fabricado, si no está correctamente
conectado, utilizado o reparado por una persona
habilitada; por estos mismos motivos carecería de
todo tipo de garantía.
Cuando el aparato deja de utilizarse,
debe depositarlo en una fábrica de
reciclaje de proximidad para contribuir a
una eliminación no contaminante.
3
Aplicaciones
El lector de CD dual CD-280DJ con dos mecanismos lectores ha sido especialmente diseñado para
aplicaciones de DJ profesionales. Dispone de
numerosas posibilidades de funcionamiento precisamente definidas con el fin por ejemplo de una lectura canción por canción, un contador de beats o
sincronización manual de beats de dos títulos, reproducción sin ruptura de un bucle continuo (seamless loop).
El lector de CD permite la reproducción de CDs
de audio y CDs que han sido grabados por usted
mismo (audio CD-R). Aún así, en caso de CDs
regrabables CDs (CD-RW) puede haber problemas
durante la reproducción según el tipo de CD, el grabador utilizado y el software de grabación.
El lector de CD está provisto de una memoria
anti-choque que puede compensar los choques y
las vibraciones de hasta 10 seg. durante la reproducción del CD.
4
Het apparaat opstellen en aansluiten
5.1 De cd afspelen
Hieronder wordt de bediening van het afspeelmechanisme 1 beschreven. De bediening van het afspeelmechanisme 2 is volkomen identiek.
1) Schakel de cd-speler in met de schakelaar
POWER (26): de POWER-LED (25) en de LED’s
(23) boven de cd-lades (22) lichten op. Als er een
cd in het afspeelmechanisme is geladen, verschijnen na het inlezen op het display diverse gegevens over de cd (hfds. 5.2). Als er geen cd is geladen, verschijnt
(geen cd) op het display.
2) Druk op de toets
(4 of 24) om de cd-lade te
openen. Leg een cd in de lade met het label naar
boven en sluit de cd-lade met de toets . Bij correct geladen cd verschijnen na korte tijd het
totale aantal tracks (i) en de totale speelduur (j)
van de cd en vervolgens de speelduur (j) van de
eerste track op het display.
3) Druk op de toets
. (18) om met de eerste track
te beginnen. Zolang de cd wordt afgespeeld, ziet
u het symbool
(a) op het display en licht de
toets
continu op.
Indien u met een andere track wenst te starten,
selecteer deze dan via de toetsen TRACK (7):
Door op de toets +10 te drukken, springt u telkens 10 tracks vooruit.
Door verschillende keren op de toets
te
drukken, wordt telkens een track verdergegaan. Door op de toets
te drukken, springt
de cd-speler terug naar het begin van de
geselecteerde track. Door verschillende keren
op de toets
te drukken, wordt telkens een
track teruggesprongen. U kunt de toets
resp.
ook ingedrukt houden om deze functie over verschillende tracks te laten werken.
Start vervolgens de track met de toets
4) Het afspelen kan op elk moment met de toets
worden onderbroken. Op het display verschijnt
het pauzesymbool
(b) en de toetsen
en
CUE (17) knipperen. Druk opnieuw op de toets
om de cd verder af te spelen.
5) Bij inschakelen is het apparaat steeds ingesteld
op Afspelen van een individuele track: op het display verschijnt “AUTO CUE SINGLE” (d). Na het
afspelen van een track schakelt het apparaat aan
het begin van de volgende track in pauze. Wenst
4
5.1 Reproducción de un CD
De stuur- en de afspeeleenheid zijn ontworpen voor
montage in een rack voor apparatuur met een
breedte van 19" (482 mm). Ze kunnen echter ook als
vrijstaand tafelmodel worden gebruikt. De afspeeleenheid moet in ieder geval horizontaal worden
geplaatst, terwijl men de stuureenheid in een willekeurige positie kan inbouwen, zelfs gekanteld. Voor
de montage in een rack hebt u voor de besturingsen afspeeleenheid telkens 2 rack-eenheden nodig
(1 rack-eenheid = 44,45 mm).
De in- en uitgangen mogen enkel worden aangesloten en gewijzigd, wanneer de cd-speler en de aan te
sluiten apparatuur is uitgeschakeld.
1) Verbind de besturings- en afspeeleenheid door
middel van de bijgeleverde mini-DIN-kabel:
Plug het kabeleinde met de ontstoringsspoel
(klein kastje) in de jack CONNECT TO REMOTE
CONTROL (27) van de afspeeleenheid en het
andere einde in de jack REMOTE CONTROL
CONNECT TO MAIN UNIT achteraan de besturingseenheid.
2) Indien het mengpaneel of de versterker digitale
ingangen heeft, dienen deze op de gele cinchjacks DIGITAL OUT (31) te worden aangesloten.
Bij apparatuur zonder digitale ingang verbindt
u de stereo-uitgangen LINE OUT (32) – linker
kanaal L en rechter kanaal R – via een cinchkabel met de overeenkomstige cd-speleringangen op het mengpaneel of de versterker.
3) De afspeelmechanismen van de cd-speler kunnen via een mengpaneel met faderstart-functie
worden gestart resp. in pauze geschakeld. De
aansluiting van de stuurverbinding vindt u terug
in hoofdstuk 7.
4) Plug ten slotte de netstekker van het aansluitsnoer (29) in een stopcontact (230 V~/50 Hz).
5
Bediening
Instalación y conexión de la unidad
Las unidades de lectura y de mando están previstas
para una instalación en rack de anchura de 19" =
482 mm pero se pueden colocar directamente sobre
una mesa. La unidad de lectura debe, en todos los
casos, instalarse horizontalmente; la unidad de control puede colocarse de cualquier manera deseada;
p. ej. en posición inclinada. Para un montaje en
rack, 2 U (1 unidad de altura = 44,5 mm) respectivamente para las unidades de control y de lectura son
necesarias.
Antes de efectuar o modificar las conexiones, asegúrese que el lector CD y los otros aparatos estén
desconectados.
1) Conecte la unidad de control y la unidad de lectura con el cable de conexión mini DIN entregado: enchufar el cable con el estrangulador antiinterferencias (caja pequeña) con la toma
CONNECT TO REMOTE CONTROL (27) de la
unidad de lectura y otra extremidad con la toma
REMOTE CONTROL CONNECT TO MAIN UNIT
en la parte trasera de la unidad de control.
2) En caso que haya entradas digitales en el mezclador o amplificador, conectarlas a los jacks
phono amarillos DIGITAL OUT (31).
En caso de unidades sin entrada digital, conectar las salidas estéreo LINE OUT (32) – canal
izquierdo L y canal derecho R- vía cables con
conectores phono a las entradas del lector del
CD en el mezclador o amplificador.
3) Los lectores pueden arrancarse o ponerse en
pausa a través una mesa de mezcla que dispone
de una función de inicio de fader. Vea capitulo 7
para la conexión del cable de control.
4) Conecte por fin la toma del cable de red (29) con
una toma de 230 V~/50 Hz.
5
Funcionamiento
El texto siguiente describe la utilización del lector 1;
la utilización del lector 2 es idéntica.
1) Conectar el lector de CD con la tecla POWER
(26), el LED (25) de potencia y los LEDs (23)
encima de las bandejas de los CDs (22) se iluminan. Si hay un CD en el mecanismo lector,
aparece distinta información del CD después de
leerlo (capítulo 5.2). Si no se ha insertado ningún
CD, la pantalla muestra
(ningún CD).
2) Abrir la bandeja del CD con el botón
(4 o 24).
Insertar un CD con las letras hacia arriba en la
bandeja y cerrarla con el botón . Si el CD está
correctamente insertado, después de poco tiempo la pantalla mostrará el número total de títulos
(i) y el tiempo total de reproducción (j) del CD y
luego el tiempo de reproducción (j) del primer
título.
3) Para empezar con el primer título, presionar el
botón
(18). Mientras el CD se reproduce, el
símbolo
(a) se visualiza y el botón
se ilumina de manera continuada.
Para empezar con otro título, seleccionarlo
vía los botones TRACK (7):
Cada vez que se presiona el botón +10, la
unidad avanza 10 títulos.
Presionando el botón
, la unidad siempre
avanza un título. Presionando el botón
, la
unidad va hacia el principio del título que está
sonando actualmente. Presionando el botón
repetidamente, la unidad siempre retrocede un título. Para saltar varios títulos, el
botón
o
puede mantenerse también
presionado.
Luego iniciar el título con el botón
.
4) La reproducción puede interrumpirse en cualquier momento con el botón
. El símbolo de
pausa
(b) se visualiza, y los botones
y
CUE (17) parpadean. Para continuar el CD, presionar el botón
de nuevo.
5) Después de conectarlo, la unidad siempre se
ajusta a la reproducción de un sólo título: la pantalla muestra “AUTO CUE SINGLE” (d). Si un
título se reproduce hasta el final, la unidad se
establece en pausa al principio del siguiente
u echter alle tracks na elkaar continu af te spelen,
schakel dan met behulp van de toets CONT.
SINGLE (9) naar Afspelen van de volledige cd
(zie ook hoofdstuk 5.3).
6) Wenst u het afspelen van een cd voortijdig te
beëindigen, schakel de cd-speler dan in pauze of
stop het afspeelmechanisme [houd de toets
TIME/STOP (10) langer dan 3 seconden ingedrukt]. De cd-lade kan alleen met de toets worden geopend.
Tip: Zolang de cd wordt afgespeeld, is de cdlade beveiligd tegen onbedoeld openen.
7) Alvorens de cd-speler uit te schakelen, dient u
steeds met de toetsen
de cd-laden te sluiten.
Zo vermijdt u dat er vuil in de laser-aftastsystemen geraakt. Schakel het apparaat uit met de
schakelaar POWER (26).
NL
B
5.2 Het tracknummer, de speeltijd, het aantal beats per minuut en de rustmodus
weergeven
In de beginstand na inschakelen worden op het display (fig. 3) tijdens het afspelen van een cd en bij
ingeschakelde pauze het tracknummer (i) en de
resterende tijd (j) van de geselecteerde track weergegeven. Voor weergave van de resterende tijd verschijnt de melding “REMAIN” (m) op het display. De
tijd wordt in minuten (M) en seconden (S) weergegeven, waarbij de seconden nog eens in 75 frames
(F) verdeeld zijn (1 frame = 1/75 seconde).
Door verschillende keren kort op de toets TIME/
STOP (10) te drukken, kunt u onderstaande tijdsinformatie opvragen (indien u de toets langer ingedrukt houdt, schakelt het afspeelmechanisme in de
Stopstand):
1ste keer drukken op de toets
de verstreken afspeeltijd van de geselecteerde
track (de melding “REMAIN” verdwijnt van het
display)
2de keer drukken op de toets
de resterende speeltijd van de totale cd
(“REMAIN” wordt opnieuw weergegeven)
título. Aún así, para la reproducción continua de
un título después de otro, establecer la unidad en
reproducción de todos los títulos mediante el
botón CONT./SINGLE (9) [ver también cap. 5.3].
6) Para detener la reproducción del CD en cualquier momento, establecer el lector de CD en
modo pausa o detener el mecanismo lector
[mantener el botón TIME/STOP (10) presionado
durante más de 3 segundos]. Ahora la bandeja
del CD puede abrirse con el botón .
Nota: Mientras reproduce, la bandeja del CD
está bloqueada contra la apertura no intencionada.
7) Antes de desconectar la unidad, siempre cerrar las
bandejas de los CDs con los botones para proteger el sistema láser contra impurezas antes de
desconectar la unidad con la tecla POWER (26).
E
5.2 Visualización del número del título, tiempo
de reproducción, beats por minuto y modo
sleep (descanso)
En el reglaje de base, una vez el aparato conectado,
el visualizador (fig.3) indica durante la lectura de un
CD y en modo pausa, el número (i) y la duración
restante (j) de la canción en curso. En el visualizador, “REMAIN” (m) señala la duración restante. Se
visualiza en minutos (M), segundos (S), los segundos están divididos en “Marcos” (F) [1 marco =
1/75 segundo].
Por varias presiones de la tecla TIME/STOP (10),
las informaciones de tiempo siguientes se visualizan
(si el botón se presiona durante un largo período, el
mecansimo de lectura se detendrá):
1ª presión:
la duración ya reproducida de una canción en
curso (la visualización “REMAIN” se apaga).
2ª presión:
tiempo restante de todo el CD (“REMAIN” aparece de nuevo en pantalla)
3º presión:
ajuste básico (visualización del tiempo restante
del título que se está reproduciendo)
27
NL
B
3de keer drukken op de toets
Basisinstelling (weergave van de resterende tijd
van de geselecteerde track)
5.2.1 Bargrafiek
De bargrafiek (g) geeft de resterende speeltijd van
track resp. cd of de reeds gespeelde tijd van een
track door zijn lengte grafisch weer, in functie van de
tijdsinformatie die op de display met de toets TIME/
STOP (10) werd geselecteerd. De bargrafiek geeft
de laatste 30 seconden van een track aan door over
de volledige lengte te knipperen. Tijdens de laatste
15 seconden gaat de bargrafiek sneller knipperen.
5.2.2 Beatteller
Met de manuele beatteller kunt u het aantal beats
per minuut (BPM = beats per minute) van de geselecteerde track bepalen:
1) Druk enkele keren op de toets BPM/TAP (21)
volgens het ritme van de muziek. Het display wisselt van de weergave van de snelheidsafwijking
(h) naar het aantal beats per minuut en in plaats
van “PITCH” (f) wordt “BEAT” (e) weergegeven.
2) Om bij het volgende muziekstuk het aantal beats
per minuut te meten, drukt u opnieuw enkele
keren volgens het ritme op de toets BPM/TAP.
Op het display verschijnt de nieuwe waarde.
3) Om terug naar de weergave van de snelheidsafwijking te schakelen, houdt u de toets BPM/TAP
ca. 3 seconden ingedrukt tot op het display
opnieuw “PITCH” in plaats van “BEAT” verschijnt.
5.2.3 Rustmodus
Wanneer beide afspeelmechanismen langer dan
30 minuten in de pauzestand staan, schakelt het
apparaat automatisch in rustmodus. De beide laseraftastsystemen zijn dan uitgeschakeld en worden zo
gespaard. Op het display verschijnt de melding
“
” (slaap), en alle oplichtende toetsen evenals
alle LED’s op de besturingseenheid gaan uit. Door
op een willekeurige toets te drukken, schakelt het
apparaat terug naar de normale bedrijfsmodus. De
afspeelmechanismen staan daarna exact op de
E
5.2.1 Barra gráfica
Según la indicación temporal seleccionada en la pantalla con el botón TIME/STOP (10), la barra gráfica
(g) indica por su longitud, la duración restante o la
duración ya reproducida de una canción o de un CD.
Parpadea en toda su longitud para señalar los 30 últimos segundos de una canción, los 15 últimos segundos se señalan parpadeando más rápidamente.
5.2.2 Contador de beats
Con el contador manual de beats, puede determinar
la cantidad de beats por minuto (BMP) de la canción en curso de lectura:
1) Pulse la tecla BPM/TAP (21) varias veces en función del ritmo de la música: la visualización pasa
de la indicación de la desviación de velocidad (h)
a la cantidad de beats por minuto y se muestra
“BEAT” (e) en vez de “PITCH” (f)
2) Para medir la cantidad de beats por minuto de la
canción siguiente, pulse de nuevo la tecla BPM/
TAP varias veces en ritmo; la visualización indica
el nuevo valor.
3) Para volver a la visualización de la desviación de
velocidad, mantenga la tecla BPM/TAP pulsada
durante 3 segundos hasta que “PITCH” se visualice de nuevo en vez de “BEAT”.
5.2.3 Modo Sleep (descanso)
Si los dos mecanismos se establecen en modo
pausa durante un periodo que excede los 30 minutos, la unidad se pondrá automáticamente en modo
sleep. En este caso, los dos sistemas láser se desconectan para su conservación. “
” se visualiza y se apagan todos los botones iluminados y
todos los LEDs en la unidad de control. Presionando
cualquier tecla la unidad volverá al modo operativo
normal. Luego los mecanismos lectores se colocan
exactamente en el mismo punto del CD que estaban
antes que la unidad se pusiese en modo sleep.
Nota: Si un mecanismo lector se detiene o si no hay
ningún CD insertado en uno de los mecanismos lectores, la unidad no se pondrá en modo
sleep.
28
plaats van de cd waar ze stonden alvorens de rustmodus is ingeschakeld.
Tip: Indien een afspeelmechanisme in de stopstand
staat, of in een van de afspeelmechanismen is
geen cd geladen, dan schakelt het apparaat niet
naar de rustmodus.
5.3 De bedrijfsmodus selecteren
5.3.1 Afspelen van een individuele track
Bij het inschakelen van de cd-speler is steeds de
modus Afspelen van een individuele track geactiveerd. Deze instelling is speciaal bedoeld voor DJtoepassingen:
1. Op het display verschijnt “AUTO CUE SINGLE”
(d).
2. Nadat de cd is ingelezen of de track is geselecteerd, staat de cd-speler precies op de plaats
waar de muziek begint (niet bij tijdsindex 0:00:00).
Deze plaats wordt automatisch als beginpunt
opgeslagen. Op het display verschijnt hierbij even
de melding “
”. Nadat het afspelen van de
track is begonnen, kunt u met de toets BOP (6) of
de toets CUE (17) naar dit beginpunt terugkeren.
3. Na het afspelen van een track schakelt het apparaat in pauze precies op de plaats, waar de muziek van de volgende track begint. Deze plaats
wordt dan als het nieuwe beginpunt opgeslagen.
5.3.2 Afspelen van de volledige cd
Wenst u tracks continu na elkaar af te spelen, schakel dan met de toets CONT. SINGLE (9) naar Afspelen van de volledige cd. Het display wisselt van
“AUTO CUE SINGLE” (d) naar “CONTINUE” (c).
Druk opnieuw op de toets CONT. SINGLE om terug
te schakelen naar Afspelen van een individuele track.
5.3.3 Relaiswerking – het andere afspeelmechanisme automatisch starten
Aan het einde van een track of het einde van een cd
kan automatisch het andere afspeelmechanisme
worden gestart.
5.3 Selección del modo operativo
5.3.1 Reproducción de un solo título
Después de conectar el lector de CD, siempre se
activa la reproducción de un solo título diseñado
especialmente para aplicaciones DJ:
1. La pantalla muestra “AUTO CUE SINGLE” (d).
2. Después de leer un CD o después de seleccionar un título, el lector de CD está en el punto preciso donde empieza la música (no en el índice
del tiempo 0:00:00).
La unidad memoriza automáticamente este
punto como punto de inicio. La pantalla muestra
brevemente “
”. Después de empezar un
título, es posible de volver a su punto de inicio
con el botón BOP (6) o el botón CUE (17).
3. Después de reproducir un título, la unidad se
establece en pausa precisamente en el punto
donde la música del siguiente título empieza. Este
punto se memoriza como nuevo punto de inicio.
5.3.2 Reproducción de todos los títulos
Para reproducción continua de un título después de
otro, escoger la opción de reproducción de todos los
títulos con el botón CONT./SINGLE (9). La pantalla
muestra desde “AUTO CUE SINGLE” (d) a “CONTINUE” (c). Para volver a la reproducción de un solo
título, presionar de nuevo el botón CONT./SINGLE.
5.3.3 Modo Relay– inicio automático del segundo lector
Al final de un título o de un CD, el otro mecanismo
lector puede iniciarse automáticamente.
Inicio del otro mecanismo lector al final de un
título
1) Insertar un CD dentro de los dos mecanismos
lectores primero antes de presionar el botón
RELAY (3). El LED encima del botón parpadea.
2) Ajustar los dos mecanismos lectores en la reproducción de un solo título con el botón CONT./
SINGLE (9): Las dos pantallas deben indicar
“AUTO CUE SINGLE” (d).
Het andere afspeelmechanisme starten aan het
einde van een track
1) Leg eerst een cd in beide afspeelmechanismen.
Druk dan op de toets RELAY (3). De LED boven
de toets knippert.
2) Schakel beide afspeelmechanismen met de toets
CONT./SINGLE (9) naar Afspelen van een individuele track: op beide displays moet de melding
“AUTO CUE SINGLE” (d) verschijnen.
3) Start het afspelen op een afspeelmechanisme met
de toets
(18). Schakel het andere afspeelmechanisme in de pauzestand (symbool ). Van
zodra het einde van de track is bereikt, schakelt
het betreffende afspeelmechanisme in pauze en
start het andere. Deze procedure blijft zich herhalen tot de relaiswerking wordt uitgeschakeld. (Druk
hiervoor opnieuw op de toets RELAY.)
4) Tijdens het afspelen van de cd kunt u bovendien
op elk moment met de toets
naar het andere
afspeelmechanisme schakelen.
5) Wanneer u in het afspeelmechanisme in pauzestand een andere cd legt, moet u vervolgens met
de toets RELAY opnieuw de relaiswerking activeren.
Opmerkingen:
a Indien u in deze bedrijfsmodus op de toets CUE
(17) van het weergegeven afspeelmechanisme
drukt, dan wisselt u naar het andere afspeelmechanisme.
b Indien u op de toets CUE van een afspeelmechanisme in pauzestand drukt, dan wordt dit afspeelmechanisme weergegeven tot de toets opnieuw
wordt losgelaten.
Het andere afspeelmechanisme starten aan het
einde van een cd
1) Leg eerst een cd in beide afspeelmechanismen.
Druk dan op de toets RELAY (3). De LED boven
de toets knippert.
2) Schakel beide afspeelmechanismen met de toets
CONT./SINGLE (9) naar Afspelen van de volledige
cd: op beide displays moet de melding “CONTINUE” (c) verschijnen.
3) Iniciar la reproducción de un mecanismo lector
con el botón
(18). El otro mecanismo lector
debe establecerse en pausa (pantalla ). Tan
pronto como el título haya sido reproducido hasta
el final, el mecanismo lector se establece en
pausa y el otro lector empieza la reproducción.
Este procedimiento se repite continuamente
hasta que se desactiva el modo relay (para desactivarlo, presionar de nuevo el botón RELAY.)
4) En cualquier punto del CD, la reproducción
puede adicionalmente cambiarse de un mecanismo lector a otro con el botón
.
5) Si se inserta otro CD en el mecanismo lector que
está en pausa, activar el modo relay de nuevo
con el botón RELAY.
Notes:
a Si el botón CUE (17) del mecanismo lector reproduciendo actúa en este modo operativo, la reproducción cambia al otro mecanismo lector.
b Si el botón CUE se mantiene presionado con el
mecanismo lector en modo pausa, la reproducción de este lector continúa hasta que deja de
pulsarse el botón.
Inicio del otro mecanismo lector al final de un CD
1) Primero insertar un CD en los dos mecanismos
lectores antes de pulsar el botón RELAY (3). El
LED de encima del botón empieza a parpadear.
2) Ajustar los dos mecanismos lectores al modo de
reproducción de todos los títulos con el botón
CONT./SINGLE (9): “CONTINUE” (c) debe aparecer en las dos pantallas.
3) Ajustar un mecanismo lector en modo stop: mantener el botón TIME/STOP (10) presionado
hasta que el símbolo de pausa
(b) desaparezca de la pantalla.
4) Empezar la reproducción en el otro mecanismo
lector con el botón
(18). Al final del CD, el
otro mecanismo lector empezará. Este procedimiento se repite hasta que se desactiva el modo
relay. (Para desconectar el modo, presionar el
botón RELAY de nuevo.)
3) Schakel een afspeelmechanisme in de stopstand:
houd de toets TIME/STOP (10) ingedrukt tot het
pauzesymbool (b) van het display verdwijnt.
4) Start het afspelen op het andere afspeelmechanisme met de toets
(18). Aan het einde van
de cd start het andere afspeelmechanisme. De
procedure blijft zich herhalen tot de relaiswerking
wordt uitgeschakeld. (Druk hiervoor opnieuw op
de toets RELAY.)
5) Indien u een andere cd aanbrengt in een afspeelmechanisme in de stopstand, moet u het relaisbedrijf opnieuw starten met de toets RELAY en
het afspeelmechanisme stoppen met de toets
TIME/STOP.
5.4 Een track kort voorbeluisteren
1) Nadat u een cd hebt geladen, gaat u met de toetsen TRACK (7) naar de gewenste track.
2) Indien op het display de looptijd (j) van de track
verschijnt, houdt u de toets CUE (17) ingedrukt.
De track wordt afgespeeld zolang de toets wordt
ingedrukt.
3) Na loslaten van de toets CUE keert het apparaat
terug naar het begin van de track en schakelt hij in
pauze. Druk op de toets
(18) om de track te
starten. U kunt met de toets CUE op elk moment
naar het begin van de track terugspringen.
5.5 Functie OUTRO
De functie OUTRO dient om telkens de laatste 30
seconden van de volgende track af te spelen.
1) Om de functie in te schakelen, houdt u de toets
CONT./SINGLE (9) gedurende ca. 3 seconden
ingedrukt, tot op het display de melding
“OUTRO” (k) wordt weergegeven.
2) Selecteer de gewenste track met de toetsen
TRACK (7). Als de cd-speler in pauze staat, start
u het afspelen met de toets
(18). De laatste
30 seconden van de track worden gespeeld.
3) Om de functie OUTRO uit te schakelen, drukt u
kort op de toets TIME/STOP (10), of u houdt de
5) Si se inserta otro CD en el mecanismo lector que
está en modo stop, activar el modo relay de nuevo
con el botón RELAY y ajustar el mecanismo lector
al modo stop con el botón TIME/STOP.
5.4 Corta reproducción del inicio de un título
1) Después de insertar un CD, ir al título deseado
con los botones TRACK (7).
2) Si la pantalla muestra el tiempo de reproducción
(j) del título, mantener el botón CUE (17) presionado. El principio del título se reproduce mientras el botón está presionado.
3) Después de soltar el botón CUE, la unidad
vuelve al principio del título y se establece en
modo pausa. Presionar el botón
(18) para iniciar el título. Es posible volver al principio del
título con el botón CUE.
5.5 Función OUTRO
La función OUTRO sirve para reproducir los últimos
30 segundos de cada uno de los siguientes títulos.
1) Para activar la función, mantener el botón CONT./
SINGLE (9) presionado durante aprox. 3 segundos
hasta que “OUTRO” (k) se muestra en pantalla.
2) Seleccionar el título deseado con los botones
TRACK (7). Si el lector de CD está en modo
pausa, iniciar al reproducción con el botón
(18). Los últimos 30 segundos del título se reproducen.
3) Para desactivar la función OUTRO, o bien presionar brevemente el botón TIME/STOP (10) o
mantener el botón CONT./SINGLE presionado
de nuevo durante aprox. 3 segundos hasta que
“OUTRO” desaparezca.
toets CONT./SINGLE opnieuw ca. 3 seconden
ingedrukt, tot “OUTRO” van het display verdwijnt.
5.6 Versneld vooruit en achteruit zoeken
1) Om de functie “snel vooruit/achteruit zoeken” te
activeren, drukt u op de toets SEARCH (5). Bij geactiveerde functie licht de LED van de toets op.
2) Draai met de knop (16): Zolang u de knop naar
rechts draait, wordt vooruit gezocht op de cd;
zolang u de knop naar links draait, wordt achteruit gezocht op de cd. De snelheid van het vooruit
resp. achteruit zoeken hangt af van de snelheid
waarmee aan de knop wordt gedraaid.
Bij het Afspelen van de volledige cd (hoofdstuk 5.3.2) werkt de functie vooruit en achteruit
zoeken ook over meerdere tracks tot begin of
einde van de cd.
Als bij het Afspelen van een individuele track
(hoofdstuk 5.3.1) met het vooruit zoeken de volgende track wordt bereikt, of bij het achteruit zoeken het begin van de track, dan schakelt de speler in pauze (neem de betreffende aanwijzingen a
en b hieronder in acht). Het vooruit zoeken over
meerdere tracks is ook mogelijk vanuit pauze;
het achteruit zoeken eindigt daarentegen als het
begin van de track bereikt is.
3) Na het beëindigen van de functie Snel vooruit/
achteruit zoeken is deze nog gedurende ca. 8 seconden actief; daarna gaat de LED van de toets
SEARCH uit en dient de draaiknop weer voor de
functie “Pitch Bend” (hoofdstuk 5.8.1) resp. om –
in de pauzemodus – een plaats op de cd precies
op te zoeken (zie hoofdstuk 5.7).
Opmerkingen: Bevindt de cd-speler zich na het
snel vooruit/achteruit zoeken in de pauzemodus:
a dan wordt de geselecteerde plaats – behalve
wanneer bij achteruit zoeken het begin van de
track is bereikt – continu herhaald, tot het afspelen met de toets
(18) wordt gestart of
wanneer tweemaal kort op de toets CUE (17)
resp. CUE 1 (8) wordt gedrukt.
b dan wordt de functie “Snel vooruit/achteruit zoeken” niet automatisch na ca. 8 seconden gedeac-
2) Girar la rueda (16): mientras se gira la rueda en
sentido horario, la unidad avanza en el CD; mientras se gira en sentido anti horario, la unidad
retrocede en el CD. La velocidad de avance y
rebobinado depende de la velocidad en que se
gire la rueda.
Con reproducción de todos los títulos (capítulo 5.3.2) el avance y el rebobinado van más allá
de unos cuantos títulos hacía el principio o el
final del CD.
Si con reproducción de un solo título (capítulo
5.3.1) el siguiente título se consigue con el
avance o el principio del título con el rebobinado,
la unidad se establece en modo pausa (para esto
ver las notas a y b que hay debajo). El avance
más allá de unos cuantos títulos es también posible en el modo pausa, aún así el rebobinado se
detiene cuando se consigue el principio del título.
3) Después de finalizar el avance/rebobinado, esta
función sigue activa durante unos 8 segundos
aprox., luego el LED del botón SEARCH se apaga, y la rueda sirve de nuevo para la función “Pitch
Bend” (capítulo 5.8.1) o en el modo pausa para la
selección precisa de un punto en el CD (cap. 5.7).
Notas: Si después del avance o rebobinado el lector del CD está en modo pausa:
a el punto actual se repite permanentemente (a
menos que el rebobinado se utilice para ir al principio del título), hasta que la reproducción se inicie con el botón
(18) o el botón CUE (17) o
CUE 1 (8) sea brevemente presionado dos veces.
b la función “fast forward/reverse” no se desactiva
automáticamente después de aprox. 8 segundos
pero debe desconectarse manualmente con el
botón SEARCH.
5.7 Selección precisa de un punto
5.6 Avance y rebobinado
1) Para activar la función “fast forward and reverse”
(avance y retroceso), presionar el botón SEARCH
(5). Con la función activada, el LED que hay al
lado del botón se ilumina.
Con el modo pausa activado, es posible de seleccionar un punto determinado en el CD con la rueda (16):
1) Si la función “fast forward/reverse” está activada
[LED al lado del botón SEARCH (5) se ilumina],
desconectarla presionando el botón SEARCH.
tiveerd, maar moet ze met de toets SEARCH
manueel worden uitgeschakeld.
NL
B
5.7 Een bepaalde plaats in een track precies
opzoeken
In de pauzemodus kunt u met de draaiknop (16) een
bepaalde plaats op de cd precies opzoeken:
1) Als de functie “Snel vooruit/achteruit zoeken”
actief is [LED bij de toets SEARCH (5) licht op],
schakel ze dan uit door op de toets SEARCH te
drukken.
2) Draai aan de draaiknop. Het vooruit- of achteruitspelen van de cd gebeurt zo lang en zo snel
als de draaiknop wordt bediend. De precieze
plaats kunt u hierbij van de tijdsaanduiding (j) op
het display aflezen, en kan in stappen van 1 frame
(F) worden geselecteerd (1 frame = 1/75 seconde).
3) Na het zoeken met de knop wordt de geselecteerd plaats continu herhaald tot éénmaal op de
toets
(18) of tweemaal op de toets CUE (17)
resp. CUE 1 (8) wordt gedrukt.
5.8 Afspeelsnelheid en toonhoogte wijzigen
De afspeelsnelheid en bijgevolg de toonhoogte
(“pitch”) kunt u met de schuifregelaar PITCH CONTROL (14) met max. ±16 % wijzigen:
1) Selecteer het regelbereik voor de snelheidswijziging met de toets PITCH (12). De LED’s (13)
naast de toets geven het geselecteerde bereik
aan: ±8 % (basisinstelling na het inschakelen) of
±16 %. De overeenkomstige LED knippert. Het
knipperen geeft aan dat de regelaar PITCH
CONTROL niet is geactiveerd.
2) Druk op de toets ON/OFF (15). Hiermee is de
regelaar PITCH CONTROL geactiveerd, en de
overeenkomstige LED (13) licht continu op.
3) Wijzig de snelheid met de schuifregelaar PITCH
CONTROL (14). Op het display in het veld PITCH
(h) wordt de procentuele snelheidswijziging
weergegeven.
Indien u met de toets BPM/TAP (21) de manuele beatteller hebt geactiveerd [“BEAT” (e) op het
2) Girar la rueda. La unidad avanza y rebobina en el
CD tanto tiempo y tan rápido como nosotros
hagamos girar la rueda. Durante el proceso es
posible de leer la posición precisa en el tiempo
visualizado (j) y seleccionarlo en pasos de
1 marco (F) [1 marco = 1/75 segundo].
E
3) Después de girar, el punto actual se repite tantas
veces hasta que el botón
(18) se presiona o
el botón CUE (17) o CUE 1 (8) se presiona brevemente dos veces.
5.8 Modificación de la velocidad y la altura tonal
La velocidad y a la vez la altura tonal (“pitch”) pueden modificarse hasta un máx. ±16 % con el control
deslizante PITCH CONTROL (14):
1) Seleccionar el rango de ajuste para el cambio de
altura tonal con el botón PITCH (12). Los LEDs
(13) que hay al lado del botón muestran el rango
deseado: ±8 % (ajuste básico después de la
conexión) o ±16 %. El LED correspondiente parpadea. El parpadeo indica que el PITCH CONTROL no ha sido activado.
2) Presionar el botón ON/OFF (15). Así, el PITCH
CONTROL está activado y el correspondiente
LED (13) se ilumina permanentemente.
3) Cambiar la velocidad con el control deslizante
PITCH CONTROL (14). La pantalla muestra el
porcentaje de desviación de la velocidad en el
campo PITCH (h).
Si el contador manual de beats ha sido
activado con el botón BPM/TAP (21) [“BEAT” (e)
se visualiza], la pantalla muestra el número de
beats por minuto en el campo PITCH (h) [ver
capítulo 5.2.2 “Contador de beats”] que cambia
correspondientemente cuando reajustamos el
control deslizante.
4) Es posible en cualquier momento de escoger con
el botón ON/OFF (15) desde la velocidad ajustada con el control deslizante hasta la velocidad
estándar y viceversa.
29
NL
B
display], dan verschijnt op het display in het
weergaveveld PITCH (h) het aantal beats per
minuut (zie hoofdstuk 5.2.2 “Beatteller”) dat sich
bij het instellen van de schuifregelaar overeenkomstig wijzigt.
4) Met de toets ON/OFF (15) kan steeds tussen de
met de schuifregelaar ingestelde snelheid en de
standaardsnelheid heen en weer worden geschakeld.
5.8.1 Het ritme van twee muziekfragmenten
synchroniseren (“Pitch Bend”)
Met de toetsen PITCH BEND (20) kunt u het ritme
van een track op het afspeelmechanisme 1 afstemmen op dat van een track op het afspeelmechanisme 2 of omgekeerd (synchroniseren).
1) Stem eerst met de regelaar PITCH CONTROL
(14) de snelheid van het geselecteerde muziekfragment af op de snelheid van het tweede
muziekfragment.
2) Gebruik de toetsen PITCH BEND om de beats
van beide muziekfragmenten gelijk te laten
lopen: zolang u de toets - resp. + ingedrukt
houdt, loopt de track ca. 16 % langzamer resp.
sneller ten opzichte van de standaardsnelheid.
3) Door met de draaiknop (16) te draaien, kan de
afspeelsnelheid in functie van de ritmeaanpassing eveneens worden gewijzigd.
5.9 Naar een bepaalde plaats in een track
terugkeren (Cue-punt)
Om snel naar een bepaalde plaats te kunnen gaan,
kunt u met de toets CUE (17) en CUE 1 (8) twee
onafhankelijke beginpunten (Cue-punten) opslaan.
Aanwijzingen voor het met de toets CUE
geplaatste beginpunt:
a Bij Afspelen van een individuele track kan enkel
binnen een track worden teruggekeerd. Bij het
bereiken van de volgende track wordt de gemarkeerde plaats vervangen door het beginpunt van
de volgende track (zie hoofdstuk 5.3.1).
E
5.8.1 Adaptación del ritmo entre dos canciones
(“Pitch Bend”)
Con las teclas PITCH BEND (20), puede adaptar
(sincronizar) el ritmo de una canción reproducida en
el lector 1 al ritmo de una canción reproducida en
lector 2 o lo contrario.
1) Primero unir la velocidad de la música que se
está reproduciendo actualmente con la segunda
pieza de música con el potenciómetro PITCH
CONTROL (14).
2) Con las teclas PITCH BEND, haga exactamente
coincidir los dos ritmos: mientras que la tecla + o
- esté mantenida pulsada, la canción se reproduce 16 % más rápido o menos que a la velocidad estándar.
3) Girando la rueda (16), puede también modificar
la velocidad según el ritmo.
5.9 Vuelve a un punto definido anteriormente
(punto Cue)
Para poder ir rápidamente a un punto definido, es
posible memorizar dos puntos de inicio diferentes
(puntos Cue) con los botones CUE (17) y CUE 1 (8).
Notas para el punto de inicio definido con el
botón CUE:
a Con la reproducción de un solo título, sólo se
puede volver en este mismo título. Cuando se
llega al título siguiente, el punto marcado se
cambia por el punto de inicio del siguiente título
(ver capítulo 5.3.1).
b Con la reproducción de un solo título y con la
reproducción total de títulos, cuando seleccionamos otro título con los botones TRACK (7), el
punto marcado siempre se cambia por el principio del título seleccionado.
Para establecer un punto Cue y volver a él mientras
reproduce:
1) Mientras se reproduce un título, ajustar la unidad
en modo pausa con el botón
(18) si el punto
que se consigue es el que conseguirá la unidad
más tarde. Los botones
y CUE parpadean.
30
b Zowel bij Afspelen van een individuele track als
bij Afspelen van de volledige cd wordt bij het selecteren van een andere track met de toetsen
TRACK (7) de gemarkeerde plaats steeds door
het begin van de geselecteerde track vervangen.
Om een Cue-punt in te stellen en tijdens het afspelen hier naar terug te keren:
1) Schakel tijdens het afspelen van een track met
de toets
(18) in pauze, wanneer de plaats
bereikt is, naar welke later moet worden teruggesprongen. De toetsen
en CUE lichten op.
2) Indien nodig, kan de plaats op de cd met behulp
van de draaiknop (16) nauwkeuriger worden
geselecteerd. De huidige plaats is continu te
horen.
3) Druk even op de toets CUE resp. CUE 1. Hierdoor wordt de plaats intern gemarkeerd. De respectieve toets knippert snel en licht dan continu
op. De toets
blijft knipperen als teken om het
afspelen te starten.
4) Herstart het afspelen opnieuw met de toets
.
5) Om terug te keren naar de gemarkeerde plaats,
drukt u op de betreffende Cue-toets. Het afspeelmechanisme staat dan op de gemarkeerde
plaats in pauzestand. Start het afspelen met de
toets
, of druk opnieuw op de betreffende
Cue-toets en houd deze ingedrukt. Na loslaten
van de Cue-toets staat het afspeelmechanisme
weer op de gemarkeerde plaats in pauze.
Bij het uitschuiven van de cd-lade [toets (4 of 24]
of bij het uitschakelen van de cd-speler [toets
POWER (26)] worden de ingestelde Cue-punten
gewist.
5.9.1 Toets BOP
Tijdens de weergave kunt u ook met de toets BOP
(6) naar het beginpunt terugspringen dat met de
toets CUE (17) is ingesteld. In tegenstelling tot terug
te keren met de toets CUE schakelt het apparaat in
dit geval niet in pauze, maar speelt het onmiddellijk
verder vanaf de gemarkeerde plaats. Door meerdere keren op de toets BOP te drukken, kunt u een
2) Si es necesario, el punto puede seleccionarse de
manera más precisa con la rueda (16). El punto
actual se reproduce continuamente.
3) Presionar brevemente el botón CUE o CUE 1.
Así, se marca el punto internamente. El botón
respectivo parpadea rápidamente y luego se enciende permanentemente. El botón
continua
parpadeando como petición para iniciar la reproducción.
4) Iniciar la reproducción con el botón
.
5) Para ir al punto marcado, presionar el respectivo
botón Cue. El mecanismo lector se ajusta en
modo pausa en el punto marcado. Iniciar la
reproducción con el botón
o mantener el respectivo botón Cue presionado. Después de soltar el botón Cue, el mecanismo lector se ajusta
en modo pausa de nuevo en el punto marcado.
Cuando se abre la bandeja del CD [botón
(4 o
24)] o cuando se desconecta el lector de CD [botón
POWER (26)], los puntos Cue ajustados son borrados.
5.9.1 Botón BOP
Mientras se reproducir, también es posible de ir con
el botón BOP (6) al punto de inicio ajustado con el
botón CUE (17). Contrariamente a la vuelta con el
botón CUE la unidad no se ajusta en modo pausa
en este caso pero inmediatamente continua reproduciendo desde el punto marcado. Presionando el
botón BOP repetidamente, un efecto de tartamudeo
puede reproducirse. Esto es lo más efectivo, el
punto de inicio más apropiado (p. ej. el principio de
una palabra o el inicio de un instrumento musical).
stottereffect genereren. Dit is des te sterker, naargelang het startpunt wordt gekozen (b.v. het begin van
een woord of inzettend instrument).
5.10 Naadloze loop afspelen
Met de toetsen A, B/LOOP – EXIT en RELOOP (19)
kunt u een bepaald fragment op de cd als naadloze
loop opslaan en zo vaak als u wenst herhalen.
1) Start het afspelen met de toets
(18). Wanneer het beginpunt van de gewenste loop is
gevonden (punt a in figuur 6), drukt u op toets A.
De toets knippert even en licht vervolgens continu op. De toets RELOOP licht continu op.
2) Wanneer tijdens het afspelen van de cd het gewenste eindpunt van de loop is bereikt (punt b),
drukt u op toets B/LOOP – EXIT. Het muziekfragment tussen de punten a en b wordt continu herhaald. Alle drie toetsen knipperen en op het display verschijnt de melding “LOOP” (l).
1.
2.
A
PLAY
a
PLAY
b
LOOP
➅
De naadloze loop afspelen
3) Om de loop te verlaten en de track verder af te
spelen, drukt u opnieuw op de toets B/LOOP –
EXIT. De melding “LOOP” verdwijnt van het display. Door het selecteren van een andere track of
door naar een geplaatst Cue-punt te springen
(hfdst. 5.9), wordt de loop eveneens verlaten.
De loop blijft echter opgeslagen. Om dit aan te
duiden, lichten alle drie toetsen continu op.
4) Met de toets RELOOP kunt u de loop te allen
tijde – vanuit de pauze-, afspeel- en stopmodus opnieuw starten.
mina permanentemente. El botón RELOOP se
ilumina permanentemente.
2) Si se consigue el final deseado del bucle (punto
b) mientras la reproducción continua, presionar el
botón B/LOOP – EXIT. La sección entre los puntos a y b se repite continuamente. Los tres botones parpadean y la pantalla muestra “LOOP” (l).
1.
2.
A
PLAY
a
PLAY
b
LOOP
➅
Reproducción de un bucle continuo
3) Para salir del bucle y continuar el título, presionar
el botón B/LOOP – EXIT de nuevo. La visualización de “LOOP” desaparece. También es posible
salir del bucle seleccionando otro título o yendo a
un punto Cue ajustado (capítulo 5.9).
Aún así, el bucle se mantiene memorizado.
Para indicar esto, los tres LEDs se iluminan permanentemente.
4) Con el botón RELOOP el bucle puede iniciarse
en cualquier momento desde el modo pausa, el
modo reproducción y el modo stop.
PLAY
c
5.10 Reproducción de un bucle continuo
Con los botones A, B/LOOP – EXIT y RELOOP (19),
una determinada sección en el CD puede memorizarse como bucle continuo sin ruptura y repetirse
tantas veces como se desee.
1) Escoger la reproducción con el botón
(18). Si
el punto de inicio del bucle deseado se consigue
(punto a en fig. 6), presionar brevemente el botón
A. El botón parpadea brevemente y luego se ilu-
LOOP
➆
Salir y reiniciar un bucle continuo
5) Para memorizar otro bucle continuo, el punto de
inicio y el punto final pueden fácilmente redefinirse con los botones A y B/LOOP – EXIT.
spelen. De geselecteerde tracks kunnen in willekeurige volgorde worden geprogrammeerd.
PLAY
c
LOOP
➆
De naadloze loop beëindigen en opnieuw starten
5) Om een andere naadloze loop op te slaan, kunnen
begin- en eindpunt met de toetsen A en B/LOOP –
EXIT gewoon opnieuw worden vastgelegd.
Bij het uitschuiven van de cd-lade [toets (4 of 24)]
of bij het uitschakelen van de cd-speler [toets
POWER (26)] wordt de naadloze lus gewist.
Tips
a Tussen het begin- en eindpunt van een naadloze
loop moeten minstens 20 frames liggen (=
0,27 seconden), anders wordt de loop niet opgeslagen noch gestart.
b Het begin- en eindpunt van een naadloze loop
kunnen tot op een frame (1/75 seconde) nauwkeurig worden vastgelegd:
1) Schakel het apparaat bij het bereiken van het
beginpunt eerst met de toets
in pauze.
Zoek het punt met de draaiknop (16) nauwkeurig op. Druk dan op de toets A.
2) Zoek nu ofwel het eindpunt direct op met de
draaiknop of start eerst het afspelen met de
toets
, schakel bij het eindpunt opnieuw in
pauze met de toets
en zoek het eindpunt
nauwkeurig op met de draaiknop.
3) Nadat het eindpunt is ingesteld, drukt u op de
toets B/LOOP – EXIT. De naadloze loop wordt
gestart.
6.1 Een reeks tracks programmeren
1) Zet het afspeelmechanisme in de stopstand om
te programmeren: Houd de toets TIME/STOP
(10) ca. 3 seconden ingedrukt tot het weergavesymbool
(a) resp. het pauzesymbool
(b)
van het display verdwijnt.
2) Druk op de toets PROG (11). Het display schakelt
naar de weergave “
”.
3) Selecteer met de toetsen TRACK (7) de gewenste eerste track en bevestig met de toets PROG.
De LED van de toets licht op en het display schakelt naar de tweede geheugenplaats “
”.
4) Herhaal de procedure voor alle andere tracks. U
kan een track ook meerdere keren programmeren,
d.w.z. onder verschillende geheugenplaatsnummers. Na 30 geprogrammeerde tracks verschijnt
op de melding “FULL” (vol) op het display. Er kunnen geen tracks meer worden geprogrammeerd.
6.2 Programmering controleren
1) Roep met de toets PROG. (11) achtereenvolgens
alle geheugenplaatsen op. Op het display verschijnt telkens het overeenkomstig opgeslagen
tracknummer.
Indien de weergave echter vroeger werd gestart, moet voor de controle van de programmering de cd-speler eerst worden gestopt en de
toets PROG. ingedrukt.
2) Indien u op een geheugenplaats een andere
track wenst op te slaan, overschrijft u de huidige
track gewoon door selectie van de gewenste
track. Druk dan opnieuw op de toets PROG.
6.3 Geprogrammeerde reeks tracks afspelen
6
Eigen reeks tracks samenstellen
Met de CD-280DJ kunt u een eigen reeks tracks met
maximaal 30 tracks van een cd samenstellen en af-
Cuando se abre la bandeja del CD [botón
(4 o
24)] o cuando se desconecta el lector de CD
[POWER botón (26)], el bucle continuo se borra.
Notas
a Por lo menos 20 marcos (= 0,27 segundos)
deben haber entre el punto de inicio y el de final
de un bucle continuo, por otra parte no es ni
memorizado ni iniciado.
b El punto de inicio y el de final de un bucle continuo puede definirse precisamente en un marco
(1/75 segundo):
1) Cuando se consigue el punto de inicio, primero establecer la unidad en modo pausa con
el botón
. Seleccionar de manera precisa
el punto con la rueda (16). Luego presionar el
botón A.
2) Ahora o bien seleccionar el punto final directamente con la rueda o primero iniciar la
reproducción con el botón
, cuando se
consigue el punto final, establecer la unidad
en modo pausa de nuevo con el botón
y
seleccionar de manera precisa el punto final
con la rueda.
3) Después de definir el punto final, presionar el
botón B/LOOP – EXIT. El bucle continuo empezará.
6
Creación de una secuencia de títulos individual
El lector CD-280DJ permite componer una secuencia personalizada de hasta 30 canciones de un CD
y de reproducirlas. Las canciones seleccionadas
pueden estar programadas en el orden deseado.
6.1 Programación de una secuencia de títulos
1) Para la programación, ponga el aparato en stop:
pulse la tecla TIME/STOP (10) durante tres segundos mas o menos hasta que el símbolo lectura
(a) o el símbolo pausa (b) se apague.
1) Druk op de toets
(18) om de geprogrammeerde reeks tracks af te spelen. Indien vooraf
de programmering met de toets PROG. (11) werd
gecontroleerd, dan start de track die na de
2) Pulse la tecla PROG (11). La pantalla cambia a la
indicación “
”.
3) Con las teclas TRACK (7), seleccione la primera
canción deseada y confirme con la tecla PROG. El
LED encima de la tecla brilla y la pantalla conmuta
en el segundo sitio de memorización “
”.
4) Repita el proceso para todos las canciones; una
canción puede estar programada varias veces bajo varios números. Cuando 30 canciones están
programadas, la pantalla indica “
” (pleno). Ya
no es posible programar otras canciones.
laatste keer drukken op de toets PROG. op het
display werd weergegeven.
2) Voor een doorlopende weergave van de track
schakelt u met de toets CONT./SINGLE (9) naar
Afspelen van de volledige CD: de melding “CONTINUE” (c) verschijnt op het display. (Bij Afspelen
van een individuele track schakelt de speler na
elke titel in de pauzestand.)
NL
B
3) Tijdens het afspelen kunt u met de toets PROG.
het geheugenplaatsnummer van de geselecteerde track kort weergeven.
4) De weergave kan op elk moment met de toets
worden onderbroken en opnieuw gestart.
Om naar een track terug te keren, drukt u op de
toets
(7) en om tracks over te slaan op de
toets
.
5) Aan het einde van de geprogrammeerde reeks
tracks schakelt de cd-speler bij Afspelen van de
volledige cd naar de stopstand. (Bij Afspelen van
een individuele track is in de pauzemodus opnieuw de eerste geprogrammeerde track geselecteerd.) De reeks tracks kunt u met de toets
zo
vaak opnieuw afspelen tot ze wordt gewist.
6.4 Geprogrammeerde reeks tracks wissen
Schakel met de toets
(18) in pauze of met de
toets TIME/STOP (10) naar de stopstand, en druk
op de toets
(4 of 24) om de cd-lade uit te schuiven. De LED naast de toets PROG. gaat uit en de
programmering is gewist. Door de cd-speler met de
toets POWER (26) uit te schakelen, wordt de geprogrammeerde reeks eveneens gewist.
7
Faderstart via een mengpaneel
De cd-speler kan via een mengpaneel met faderstart-functie op afstand worden bediend. Stel met
de schakelaar REMOTE SELECT (28) aan de
achterzijde van de afspeeleenheid de cd-speler in
op het type faderstartschakelaar van het mengpaneel:
ceder a una canción, pulse la tecla
(7) y para
hacer desfilar las canciones, pulse la tecla
.
5) Una vez la secuencia programada reproducida,
el aparato pasa en stop en caso de reproducción
de todos los títulos. (En caso de reproducción de
un solo título el primer título programado se selecciona de nuevo en modo pausa). La secuencia
programada puede estar seleccionada con la
tecla
tanto como lo desea hasta que esté
borrada.
E
6.4 Borrar una secuencia de títulos programada
6.2 Comprobación de la programación
1) Con la tecla PROG. (11), llame uno tras otro
todos los sitios. La pantalla indica respectivamente él numero de canciones memorizada.
Pero si la lectura ha sido iniciada anteriormente, primero conmute el lector en stop para verificar la programación y luego pulse la tecla PROG.
2) Para memorizar otra canción en una memoria,
sobrescriba el número seleccionando el título
deseado y luego confirme con la tecla PROG.
6.3 Reproducción de una secuencia de títulos programada
1) Para reproducir una secuencia programada de
canciones, pulse la tecla
(18). Sí la programación está anteriormente verificada con la tecla
PROG. (11), la canción que está en pantalla
después de la última presión en la tecla PROG.
arranca.
2) Para una lectura continua de las canciones, conmute con la tecla CONT.SINGLE (9) en lectura de
todas las canciones: “CONTINUE” (c) se visualiza
(en lectura canción por canción, el aparato pasa
en modo pausa después de cada canción).
3) Durante la lectura, es posible, con la tecla
PROG., de visualizar brevemente él número
memorización de canciones en curso.
4) La lectura puede ser interrumpida a todo instante
con la tecla
y arranque de nuevo. Para retro-
Ajustar el mecanismo lector en el modo pausa con
el botón
(18) o ajustarlo al modo stop con el
botón TIME/STOP (10), y con el botón
(4 o 24)
abrir la bandeja del CD. El LED que hay al lado del
botón PROG. se apaga y la programación se borra.
La programación también se borra si el lector de CD
se desconecta con el botón POWER (26).
7
Inicio de fader vía un mezclador
El lector de CD puede ser controlado remotamente
vía un mezclador con función de inicio de fader.
Ajustar el lector de CD al tipo de tecla de inicio de
fader del mezclador con la tecla REMOTE SELECT
(28) en la parte trasera del mecanismo lector:
Posición LOCK SW para la tecla on/off
Esta posición de tecla debe ser seleccionada
para la mayoría de los mezcladores de la gama
de productos de “img Stage Line”. Avanzando el
correspondiente fader en el mezclador, una tecla
que inicia el lector de CD está cerrada en el mezclador. Cuando se cierra el fader, la tecla abre y
así establece el lector de CD en modo pausa.
Mezclador
Start
Pause
➇
Inicio de fader vía una tecla on/off
31
NL
B
Stand LOCK SW voor in-/uitschakelaar
Voor de meeste mengpanelen uit het gamma van
“img Stage Line” moet deze schakelaarstand
worden geselecteerd. Bij het openschuiven van
de overeenkomstige regelaar op het mengpaneel
wordt een schakelaar in het mengpaneel gesloten. Hierdoor start de cd-speler. Bij het dichtschuiven van de regelaar, gaat de schakelaar in
het mengpaneel weer open, waardoor de cd-speler in pauze schakelt.
Mengpaneel
Start
Pause
➇
Faderstart via in-/uitschakelaar
Stand TACT SW voor druktoets
Indien een eerste keer op de drukknop wordt gedrukt, wanneer de bijbehorende schuifregelaar op
het mengpaneel wordt openschoven, start de cdspeler met afspelen. Wanneer de drukknop een
tweede keer wordt bediend bij het dichtschuiven
van de regelaar, schakelt de cd-speler in pauze.
Mengpaneel
1. x Start
2. x Pause
➈
Faderstart via druktoets
Om geen besturingsfouten te veroorzaken, moet u
eerst de cd-speler en het mengpaneel uitschakelen.
Verbind de betreffende faderstartbus op het mengpaneel via een kabel (zie figuur 8 of 9) met de betreffende jack START/PAUSE (30).
Indien het mengpaneel met een voorbeluisteringsfunctie (monitorfunctie) is uitgerust, kan ondanks
dichtgeschoven regelaar voor de cd-speler een
track via een hoofdtelefoon worden beluisterd. Gebruik hiervoor de cd-speler zoals beschreven in het
hoofdstuk 5.4 “Een track kort voorbeluisteren”.
E
Posición TACT SW para botón momentáneo
Si el botón momentáneo se presiona por primera
vez cuando se avanza el mezclador, el lector de
CD se inicia. Si el botón momentáneo se presiona por segunda vez cuando se cierra el fader,
el lector de CD se ajusta en modo pausa.
Mezclador
1. x Start
2. x Pause
➈
8
Inicio de fader vía un botón momentáneo
Mantenimiento de la unidad
Protéjalo del polvo, de las vibraciones, de la luz
directa del sol, de las salpicaduras de agua, de la
humedad elevada y del calor (temperatura de funcionamiento admisible 0 – 40 °C). Para limpiarlo, utilice un trapo seco y suave, no utilice en ningún caso
productos químicos o agua.
Onderhoud van het apparaat
Bescherm de cd-speler tegen stof, trillingen, rechtstreeks zonlicht, druip- en spatwater, hoge vochtigheid en warmte (toegelaten omgevingstemperatuur
0 – 40 °C). Verwijder het stof met een zachte, droge
doek. Gebruik zeker geen water of chemicaliën.
Opmerking in verband met klankstoringen en
leesfouten
Sigarettenrook dringt makkelijk in alle openingen
van de cd-speler en zet zich ook af op de optische
onderdelen van het laser-aftastsysteem. Deze aanslag kan leiden tot leesfouten en klankstoringen.
Omdat sigarettenrook niet steeds te vermijden valt
(b.v. in de discotheek), moet de cd-speler door een
ekwalificeerd vakman worden gereinigd. De kosten
voor deze reiniging draagt de koper, ook tijdens de
garantietermijn!
9
Technische gegevens
Frequentiebereik: . . . . .
THD: . . . . . . . . . . . . . . .
Kanaalscheiding: . . . . . .
Dynamisch bereik: . . . .
Signaal/Ruis-verhouding:
Wow en flutter: . . . . . . .
Uitgangen
Line (analoog): . . . . . .
digital (co-axiaal): . . .
Voedingsspanning: . . . .
Vermogensverbruik: . . .
Omgevingstemperatuur:
20 – 20 000 Hz
< 0,1 %
> 80 dB
> 90 dB
> 80 dB
niet meetbaar,
kwartsprecisie
2V
0,5 Vss S/PDIF
230 V~/50 Hz
25 VA
0 – 40 °C
Ojo: en los cortes del sonido y los errores de
lectura
El humo de los cigarros se introduce fácilmente en las
aperturas del lector y se deposita en la óptica del
sistema láser. Puede generar errores de lectura y cortes de sonido. No puede evitar siempre el humo de
los cigarros (p. ej. en discoteca), confíe imperativamente el mantenimiento del lector a un técnico especializado. Esta operación está bajo la carga del utilizador, incluso cuando él aparato está bajo garantía.
9
Para prevenir el mal funcionamiento, primero desconectar el lector de CD y el mezclador. Conectar el
correspondiente jack del inicio de fader al mezclador vía un cable (ver fig. 8 o 9) al respectivo jack
START/PAUSE (30).
Si el mezclador está equipado con una función
de escucha prefader (función monitorizada), es posible reproducir el principio de un título y monitorizarlo vía los auriculares a pesar de un fader cerrado para el lector de CD. Para conseguir hacer
funcionar el CD tal y como se describe en el cap. 5.4
“Corta reproducción del inicio de un título”.
Nota: Control vía fader mezclador es inútil durante
la reproducción relay (ver capítulo 5.3.3), porque independientemente de los faders correspondientes, la reproducción se detendrá automáticamente al final de un título o de un CD
y el otro mecanismo lector se iniciará.
8
Tip: De besturing via de schuifregelaar van het
mengpaneel is niet zinvol bij relaiswerking (zie
hoofdstuk 5.3.3), omdat de weergave onafhankelijk van de overeenkomstige regelaars automatisch stopt aan het einde van een track resp.
aan het einde van de cd, en het andere afspeelmechanisme start.
Especificaciones
Rango frecuencias: . . . .
THD: . . . . . . . . . . . . . . .
Separaciones canales: .
Rango dinámico: . . . . . .
S/N ratio: . . . . . . . . . . .
Wow and flutter: . . . . . .
Salidas
Línea (analógica): . . .
Digital (coaxial): . . . . .
Alimentación: . . . . . . . .
Consumo: . . . . . . . . . . .
Temperatura ambiente: .
Dimensiones (B x H x P)
Mecanismo lector: . . .
Unidad control: . . . . .
Peso: . . . . . . . . . . . . . . .
Conexiones
Salida audio,
analógica: . . . . . . . . .
20 – 20 000 Hz
< 0,1 %
> 80 dB
> 90 dB
> 80 dB
no mesurable, precisión
cuarzo
2V
0,5 Vpp S/PDIF
230 V~/50 Hz
25 VA
0 – 40 °C
482 x 89 x 260 mm, 2 U
482 x 89 x 80 mm, 2 U
6,9 kg
2 x phono
izquierda/derecha
Salida audio, digital: . 2 x phono
Fader inicio: . . . . . . . . 2 x 3,5 mm jack
Conexión de control: . vía cable 8 polos mini
DIN (longitud 1,2 m)
Datos según fabricante.
Sujeto a modificaciones técnicas.
32
Afmetingen (B x H x D)
Afspeelmechanisme: . . 482 x 89 x 260 mm,
2 rack-eenheden
Besturingseenheid: . . . 482 x 89 x 80 mm,
2 rack-eenheden
Gewicht: . . . . . . . . . . . . . 6,9 kg
Aansluitingen
Audio-uitgang, analoog: 2 x cinch links/rechts
Audio-uitgang, digitaal: 2 x cinch
Faderstart: . . . . . . . . . . 2 x 3,5 mm-jack
Stuurverbinding: . . . . . via 8-polige mini-DINkabel (lengte 1,2 m)
Opgemaakt volgens de gegevens van de fabrikant.
Wijzigingen voorbehouden.
10 Verklaring van de vakbegrippen
Cursief gedrukte woorden zijn trefwoorden die nader worden
verklaard.
Afspelen van de volledige cd: Bedrijfsmodus om tracks continu na elkaar af te spelen, in tegenstelling tot de bedrijfsmodus Afspelen van een individuele track
Afspelen van een individuele track: Speciale bedrijfsmodus
voor DJ-toepassingen: Na afspelen van een track schakelt
het toestel in pauze, in tegenstelling tot bij het afspelen van de
volledige CD.
Anti Shock Buffer Memory: Elektronisch geheugen waarin de
muziek na het aflezen van de cd tijdelijk wordt opgeslagen om
bij hevige bewegingen onderbrekingen in de weergave te vermijden.
Auto Cue: Bij de selectie van een track staat de cd-speler precies op de plaats waar de muziek begint en niet bij de tijdsindex 0:00:00. Daarom start de muziek onmiddellijk zonder
pauze na indrukken van de toets
.
10 Glosario
Las palabras en cursiva son palabras clave que se explican con
más detalle.
Auto Cue: Cuando se selecciona un título, el lector de CD está
exactamente en el punto donde empieza la música y no en el
índice de tiempo 0:00:00. Para esta razón, la música empieza
inmediatamente sin pausa después de presionar el botón
.
Barra gráfica: En la pantalla hay una barra que muestra el
tiempo restante de un título o un CD o el tiempo de reproducción de un título de forma gráfica mediante su longitud.
Botón momentáneo: tecla, su contacto sólo está cerrado
mientras la tecla está siendo presionada, ejemplo botón campana.
BOP (= efecto tartamudeo): El botón BOP sirve para volver y
empezar inmediatamente la reproducción desde el principio
de un título que está sonando actualmente o desde el punto
de inicio definido previamente con el botón CUE. Una pulsación repetida y breve del botón BOP producirá un efecto tartamudeo.
BPM (= beats por minuto): El contador de beats manual integrado determina el número de beats por minuto de un título
cuando el botón BPM/TAP se presiona varias veces al ritmo
de la música.
Bucle (Loop): repetición continua de un determinado trozo del
CD definido estableciendo un determinado punto de inicio y
de final. El bucle continuo memorizado puede dejarse en
cualquier momento y recuperarse más tarde (reloop).
Bucle sin ruptura: la reproducción de un bucle continuo es sin
ruptura, es decir no hay interrupción de la señal de música
mientras el lector de CD va del punto final hasta el punto de
inicio.
NL
Bargrafiek: In het display geeft een balk door zijn lengte de
resterende speeltijd van track resp. cd of de reeds gespeelde
tijd van een track grafisch weer.
Drukknop: schakelaar waarvan het contact zolang wordt gesloten als de schakelaarknop wordt ingedrukt; voorbeeld belschakelaar.
Beatteller (Eng. beatcounter): Berekent het aantal beats per
minuut (BPM) en zodoende hoe snel een muziekfragment
wordt gespeeld.
Elektromagnetische compatibiliteit (EMC): De EMC-richtlijn
89/336/EEG bepaalt hoe groot de stoorstraling van een toestel maximaal mag zijn en met welke stoorstraling het zonder
problemen mag worden belast (storingsongevoeligheid).
moment worden verlaten en later opnieuw opgeroepen
(reloop).
B
Monitorfunctie ➔ Voorbeluisteringsfunctie
BOP (BOP = stottereffect): De toets BOP dient om terug te
keren en onmiddellijk de weergave te starten vanaf het begin
van de geselecteerde track of vanaf een met de toets CUE
geselecteerd beginpunt. Door meerdere keren op de toets
BOP te drukken, ontstaat een stottereffect.
BPM: Eng. beats per minute = beats per minuut
De ingebouwde manuele beatteller bepaalt het aantal beats
per minuut van een track, wanneer de toets BPM/TAP enkele
keren op het ritme van de muziek wordt aangetipt.
CE ( -kenmerk) Fra. Communauté Européenne = Europese
Gemeenschap: Bepaalde producten die in de EU worden verkocht, moeten het CE-kenmerk dragen. Daarmee bevestigt
de producent resp. de verkoper dat het product beantwoordt
aan alle betreffende EU-richtlijnen (b. v. laagspanningsrichtlijn, richtlijn voor elektromagnetische compatibiliteit etc.).
Continue ➔ afspelen van de volledige cd
Cue-punt: Plaats op de cd die u met een Cue-toets vrij kunt selecteren en waar u rechtstreeks kunt naar terugkeren. Als u
met de Cue-toets naar het Cue-punt terugkeert, schakelt de
cd-speler in de pauzemodus.
digitaal: informatie in cijfers weergegeven. Een analoog-digitaalomzetter zet de door een microfoon opgenomen geluidsgolven om in een snel opeenvolgende reeks van enen en
nullen (binaire getallen, b. v. “1001” = 9) om die dan op een cd
worden opgeslagen. Elk binair getal komt overeen met een
momentwaarde van een geluidstrilling. Een uitgekiend foutencorrectiesysteem filtert haperingen en storingen uit, wat
leidt tot de hoge weergavekwaliteit. Een digitaal-analoogomzetter zet de binaire getallen weer om in elektrische trillingen
die dan versterkt naar een luidspreker worden gestuurd.
Faderstart Eng. to fade in = inmengen: Met een schuifregelaar
(fader) op een mengpaneel die aan een schakelaar of drukknop is gekoppeld, kan het cd-afspeelmechanisme bij het
openschuiven van de fader worden gestart en bij het dichtschuiven van de fader weer in pauze worden geschakeld.
Frame: De muziek op een cd is in gegevensblokken (frames)
opgeslagen. In een blok is de muziekinformatie voor 1/75 seconde opgeslagen. Een plaats op de cd kan daardoor in stappen van 1/75 seconde nauwkeurig worden benaderd.
Laagspanningsrichtlijn (73/23/EEG): Richtlijn voor apparatuur die met spanningswaarden tussen 50 V en 1500 V functioneert en daarom voor de gebruiker aangepast veilig moet
zijn geconstrueerd.
LED Eng. light emitting diode: Elektronische component die
elektrische stroom direct omzet in licht (zonder opwekking
van hitte zoals bij de gloeilamp); licht op in verschillende kleuren naargelang van het materiaal, ook in het wit.
Line (-uitgang, -ingang, -niveau) Eng. leiding: Om signalen van
een apparaat naar een ander te kunnen sturen, moeten de
apparatuur een welbepaalde spanning hebben, anders is een
optimale overdracht niet mogelijk. Deze waarde ligt tussen
0,1 V en 2 V (Volt) en wordt lijnniveau genoemd. In- en uitgangen, die voor dit niveau zijn voorzien, hebben meestal het
opschrift LINE.
Loop Eng. lus: eindeloze herhaling van een bepaald muziekfragment op de cd dat door instelling van een begin- en een
eindpunt wordt vastgelegd. De opgeslagen loop kan op elk
Outro: Functie waarbij enkel de laatste 30 seconden van een
track worden afgespeeld.
Pitch Eng. toonhoogte: Met de regelaar PITCH CONTROL kan
de afspeelsnelheid en zodoende de toonhoogte worden gewijzigd.
Pitch Bend: Functie waarmee voor korte tijd de afspeelsnelheid kan worden verhoogd of verlaagd. Het ritme van een
track op een afspeelmechanisme kan zo worden gesynchroniseerd met dat van een track op een ander afspeelmechanisme. Zo wordt bij het mixen van de ene naar de andere
track het dansritme niet gestoord.
Rack Eng. rek: Een rack dient voor de montage van apparatuur
met een standaard vastgelegde breedte van 482 mm (19")
om een volledige geluidsinstallatie samen te stellen, b.v. cdspeler, mengpaneel, equalizer, versterker.
Relaiswerking: Functie waarbij de tracks of de cd’s automatisch afwisselend van de beide afspeelmechanismen worden
afgespeeld.
Seamless loop Eng. naadloze loop: Het afspelen van de loop
gebeurt naadloos, d.w.z. het muzieksignaal wordt niet onderbroken, wanneer de cd-speler van het eindpunt terug naar het
startpunt van de loop springt.
Single ➔ afspelen van een individuele track
Track: Eng. spoor; muziekstuk b.v. op een cd.
Voorbeluisteringsfunctie (Pre Fader Listening): Mogelijkheid
die het mengpaneel biedt om, ondanks de dichtgeschoven
fader (schuifregelaar) het muzieksignaal, b.v. van een cd-speler, via een hoofdtelefoon te beluisteren om de volgende track
of een beginpunt te selecteren.
Deze gebruiksaanwijzing is auteursrechterlijk beschermd voor MONACOR ® INTERNATIONAL GmbH &
Co. KG. Reproductie voor eigen commerciële doeleinden – ook bij wijze van uitzondering – is niet toegestaan.
E
CE (
marca); Comunidad Europea: varios productos que se
venden en la Unión Europea llevan la marca CE. Así, el fabricante o el distribuidor confirman que el producto sigue todos
los requisitos de la EU (p. ej. normativa de bajo voltaje, normativa para la compatibilidad electromagnética, etc)
Compatibilidad Electromagnética (EMC): La normativa EMC
89/336/EEC estipula la interferencia máxima de una unidad
y el nivel de interferencia al cual la unidad puede estar sujeta
sin ningún problema (resistencia a la interferencia).
Contador de beats: determina el número de beats por minuto
(BPM) y también la velocidad de reproducción de una pieza
de música.
Continue ➔ reproducción de todos los títulos
Digital: información visualizada en dígitos. Un convertidor
analógico-digital convierte las ondas del sonido que coge un
micrófono en una secuencia de unos y ceros donde se suceden los unos a los otros (números binarios: p. ej. “1001” = 9)
que luego se almacenan en un CD. Cada número binario corresponde a un valor actual de una vibración de sonido. Un
sofisticado sistema de corrección de errores evita interrupciones sonoras y distorsiones con el resultado de una elevada
calidad de reproducción. Un convertidor digital-analógico
reconvierte los números binarios en oscilaciones eléctricas
que se amplifican y se envían a un altavoz.
Escucha Prefader: facilidad en el mezclador para escuchar la
señal de música, por ejemplo de un lector de CD vía los auriculares a pesar de un fader cerrado (control deslizante) para
seleccionar el siguiente título o el siguiente punto de inicio.
Función monitor ➔ Función de escucha prefader
Funcionamiento Relay: función para la reproducción
automática de títulos o CDs alternativamente en los dos
mecanismos de reproducción.
Inicio de fader: Con un control deslizante (fader) en un mezclador emparejado con una tecla o un botón momentáneo, el
mecanismo lector de CD puede iniciarse avanzando el fader
y puede colocarse en pausa o stop cerrando el fader.
LED (diode que emite luz): componente electrónico que convierte directamente electricidad en luz (sin generar calor
como las lámparas incandescentes); según el material muestra distintos colores incluso el blanco.
Línea (salida línea, entrada línea, nivel línea): para transmitir
señales de una unidad a otra, estas señales deben tener un
valor de voltaje fijo por qué si no es imposible una transmisión
óptima. Este valor está entre 0,1 V y 2 V y está designado
como nivel línea. Entradas y salidas previstas para estos
niveles están normalmente marcadas con LINE.
Marco: La música en un CD se memoriza en bloques de datos
(marcos). La información musical para 1/75 segundos se
memoriza en un bloque. Un punto en el CD puede localizarse
de forma precisa en pasos de 1/75 segundos.
Memoria Anti-shock: memoria electrónica donde la música se
memoriza temporalmente después que se haya leído del CD
para prevenir interrupciones de la reproducción en caso de
choques.
mecanismo lector pueden sincronizarse con los beats de un
título en el otro mecanismo lector. Cuando pasa de un título al
otro no afectará el ritmo de la música.
Punto CUE: punto en el CD que puede seleccionarse con un
botón Cue. La unidad puede ir directamente a este punto. Si
la unidad vuelve al punto Cue con el botón Cue, el lector de
CD se establece en modo pausa.
Rack: Un rack sirve para colocar una unidad con una base
estándar de 482 mm (19") para compilar sistemas completos
de audio, por ejemplo un lector de CD, mezclador, ecualizador o amplificador.
Reproducción de un solo título: modo operativo especial
para aplicaciones DJ: Después de la reproducción de un
título la unidad se establece en pausa, contrario a la reproducción de todos los títulos.
Reproducción de todos los títulos : modo operativo para la
reproducción de un título después de otro de manera continuada, contrario a reproducción de un solo título.
Single ➔ reproducción de un solo título
Track: pieza de música, p. ej. en un CD
Normativa de bajo voltaje (73/23/EEC): normativa para las
unidades que funcionan a voltajes 50 V hasta 1500 V y que
deben tener un diseño seguro para el usuario.
OUTRO: función para la cual solamente los 30 últimos segundos de una canción se reproducen.
Pitch: Altura tonal: El PITCH CONTROL permite la modificación de la velocidad de reproducción y también la altura tonal.
Pitch Bend: función para un aumento o descenso temporal de
la velocidad de reproducción. Los beats de un título en un
Manual de instrucciones protegido por el copyright de MONACOR ® INTERNATIONAL GmbH & Co. KG.
Toda reproducción incluida parcial con fines comerciales está prohibida.
33
PL
Prosimy o otworzenie instrukcji na stronie 3,
gdzie znajdą Państwo opisywane elementy
sterujące i gniazda połączeniowe.
1
1.1 Moduł sterujący (rys. 1)
Spis treści
1
Elementy użytkowe i podłączenia . . . . 34
5.5
Funkcja OUTRO . . . . . . . . . . . . . . . . . . . . . 36
1.1 Moduł sterujący . . . . . . . . . . . . . . . . . . . . . 34
1.1.1 Panel sterujący dla mechanizmu 1
transportu . . . . . . . . . . . . . . . . . . . . . . . . . 34
1.1.2 Wyświetlacz . . . . . . . . . . . . . . . . . . . . . . . . 34
5.6
Szybkie przewijanie do przodu, do tyłu . . 36
5.7
Precyzyjne wybieranie określonego
punktu utworu . . . . . . . . . . . . . . . . . . . . . . 36
1.2
Transport, panel przedni . . . . . . . . . . . . . . 35
1.3
Transport, panel tylni . . . . . . . . . . . . . . . . . 35
2
Środki bezpieczeństwa . . . . . . . . . . . . . 35
3
Zastosowanie . . . . . . . . . . . . . . . . . . . . . 35
4
Instalowanie i podłączanie urządzenia 35
5
Obsługa . . . . . . . . . . . . . . . . . . . . . . . . . . 35
5.1
Odtwarzanie płyt CD . . . . . . . . . . . . . . . . . 35
5.2
Wyświetlanie liczby utworów, czasu
odtwarzania, liczby bitów na minutę,
tryb uśpienia . . . . . . . . . . . . . . . . . . . . . . . 35
5.2.1 Wskaźnik słupkowy . . . . . . . . . . . . . . . . . 36
5.2.2 Licznik bitów . . . . . . . . . . . . . . . . . . . . . . 36
5.2.3 Tryb uśpienia . . . . . . . . . . . . . . . . . . . . . . 36
5.3 Wybór trybu pracy . . . . . . . . . . . . . . . . . . . 36
5.3.1 Odtwarzanie pojedynczych utworów . . . 36
5.2.2 Odtwarzanie całości płyty . . . . . . . . . . . 36
5.3.3 Tryb ciągły – automatyczne
odtwarzanie z drugiej szuflady . . . . . . . . 36
5.4
Odtwarzanie próbek początków . . . . . . . . . .
utworów . . . . . . . . . . . . . . . . . . . . . . . . . . . 36
8 Przyciski CUE 1: powrót do wcześniej zdefiniowanego punktu utworu (zob. rozdział 5.9)
9 Przycisk CONT.SINGLE: wybór trybu pracy
(zob. rozdz. 5.3), włączenie/wyłączenie funkcji
OUTRO:
Domyślne ustawienie: Odtwarzanie
pojedynczych utworów; po zakończeniu odtwarzania utworu, odtwarzacz przechodzi na pauzę. Wskazanie
wyświetlacza “AUTO CUE
SINGLE” (d)
Pierwsze naciśnięcie
przycisku:
Ciągłe odtwarzanie wszystkich utworów z płyty
CD; wskazanie wyświetlacza “CONTINUE” (c)
Drugie naciśnięcie
przycisku:
Powrót
do
ustawień
domyślnych
Przytrzymać przycisk naciśnięty przez około
3 sekundy dopóki nie zostanie wyświetlony
napis “OUTRO” (k):
Funkcja OUTRO służy do odtwarzania ostatnich
30 sekund każdego utworu [Aby wyłączyć
funkcję należy ponownie przytrzymać przycisk
przez około 3 sekundy lub nacisnąć krótko
przycisk TIME/STOP (10).]
10 Przycisk TIME/STOP:
Jeśli przycisk zostanie przytrzymany przez
dłużej niż 3 sekundy spowoduje to zatrzymanie
mechanizmu;
Wskazanie czasu (j): należy krótko nacisnąć
przycisk:
Domyślne ustawienie: Pozostały czas do końca
odtwarzanego utworu
Pierwsze naciśniecie
przycisku:
Aktualny czas odtwarzanego utworu
Drugie naciśnięcie
przycisku:
Pozostały czas do końca
płyty
34
Elementy użytkowe i podłączenia
5.8 Zmiana prędkości oraz wysokości tonu . . 36
5.8.1 Pitch Bend – synchronizowanie bitów
dwóch kawałków muzycznych . . . . . . . . 37
5.9
Powrót do wybranego miejsca na płycie
(Punkt “Cue”) . . . . . . . . . . . . . . . . . . . . . . . 37
5.9.1 Przycisk BOP . . . . . . . . . . . . . . . . . . . . . . 37
5.10 Odtwarzanie ciągłej pętli . . . . . . . . . . . . . . 37
6
Kompilacja własnej sekwencji utworów 37
6.1
Programowanie sekwencji utworów . . . . . 37
6.2
Sprawdzanie zaprogramowanej . . . . . . . . . .
sekwencji . . . . . . . . . . . . . . . . . . . . . . . . . . 37
6.3
Odtwarzanie zaprogramowanej . . . . . . . . . .
sekwencji . . . . . . . . . . . . . . . . . . . . . . . . . . . 37
6.4
Kasowanie zaprogramowanej . . . . . . . . . . . .
sekwencji . . . . . . . . . . . . . . . . . . . . . . . . . . 37
7
Uruchamianie odtwarzacza przez
mikser za pomocą tłumika . . . . . . . . . . 38
8
Konserwacja . . . . . . . . . . . . . . . . . . . . . . 38
9
Dane techniczne . . . . . . . . . . . . . . . . . . . 38
10
Słownik . . . . . . . . . . . . . . . . . . . . . . . . . . . 38
Kolejne naciśnięcie
przycisku:
Powrót do ustawień domyślnych
11 Przycisk PROG. (z podświetleniem): programowanie dowolnej sekwencji utworów – zob. rozdział. 6
12 Przycisk PITCH do wyboru zakresu zmian
prędkości (do wyboru dwa zakresy: maks. 8 %,
lub 16 % od standardowej prędkości). Wybranie
zakresu będzie sygnalizowane zapaleniem się
odpowiedniego wskaźnika LED (13)
13 Wskaźniki LED określające zakres zmiany
prędkości od standardowej, wybrany przyciskiem PITCH (12).
migają = funkcja PITCH CONTROL (14) jest nieaktywna;
świecą ciągle = regulacja jest dostępna przez
naciśnięcie przycisku ON/OFF (15)
14 Suwak PITCH CONTROL: zmiana prędkości lub
wysokości dźwięku (maks. ±16 %); ustawienia
suwaka są aktywne jedynie przy włączonym
przycisku ON/OFF (15)
15 Przycisk ON/OFF do włączania lub wyłączania
funkcji PITCH CONTROL (14)
16 Pokrętło
1. Podświetlenie przycisku SEARCH (5) wygaszone:
pokrętło służy dla funkcji “Pitch Bend”, a w
czasie pauzy do precyzyjnego wyboru
punktu utworu
2. Przycisk SEARCH naciśnięty, podświetlenie
zapalone:
pokrętło służy do szybkiego przewijania do
przodu lub do tyłu
17 Przycisk CUE: odtwarzanie krótkich próbek
początków utworów, oraz powrót do wcześniej
określonego punktu utworu (zob. rozdz. 5.4
lub 5.9)
18 Przycisk PLAY/PAUSE
: przełączanie pomiędzy odtwarzaniem a pauzą.
1 Panel sterujący dla mechanizmu 1 (szczegóły
na rys. 2)
2 Panel sterujący dla mechanizmu 2
3 Przycisk RELAY: automatyczne odtwarzanie z
drugiej szuflady na końcu utworu lub końcu
ostatniego utworu (zob. rozdz. 5.3.3)
Funkcję można aktywować jedynie w przypadku, kiedy w obu kieszeniach napędów znajdują się płyty CD.
1.1.1 Panel sterujący dla mechanizmu 1 transportu (rys. 2)
Panele sterowania dla obu mechanizmów (1 oraz
2) są identyczne.
4 Przycisk : otwieranie i zamykanie szuflady
(22) (niemożliwe podczas odtwarzania).
5 Przycisk SEARCH (z podświetleniem): przełączanie funkcji pokrętła (16) na szybkie przewijanie do przodu lub do tyłu;
Uwaga: Jeśli w czasie odtwarzania pokrętło nie
zostanie poruszone przez około 8 sekund, podświetlenie zgaśnie i zostanie przywrócona
poprzednia funkcja pokrętła: funkcja “Pitch
Bend”. Natomiast w czasie pauzy, pokrętło będzie służyło do precyzyjnego wybrania punktu
utworu.
6 Przycisk BOP: powrót i natychmiastowe odtwarzanie od początku aktualnie odtwarzanego
utworu lub do wcześniej zdefiniowanego
punktu za pomocą przycisku CUE (17).
Naciskając ponownie ten przycisk, można
uruchomić efekt stutter.
7 Przyciski TRACK: wybór utworów.
Przycisk +10: przewinięcie o 10 utworów naprzód
Przycisk
: wybór kolejnego utworu
Przycisk
: powrót do początku wybranego
utworu. Każde kolejne naciśnięcie przycisku
spowoduje przewiniecie do poprzednich
utworów.
19 Przyciski do zapamiętywania i odtwarzania
ciągłej pętli:
Przycisk A: definiowanie punktu startowego pętli
Przycisk B/LOOP– EXIT: definiowanie punktu
końcowego pętli i jednoczesne odtwarzanie
pętli, aby wyjść z pętli należy ponownie
nacisnąć przycisk.
Przycisk RELOOP: odtwarzanie ponowne pętli.
20 Przyciski PITCH BEND: synchronizowanie bitów
utworu z pierwszego napędu z utworem w drugim napędzie.
Dopóki naciśnięty jest jeden z przycisków,
prędkość jest mniejsza lub większa do 16 %.
21 Przycisk BPM/TAP: ręczny licznik bitów.
Aby określić liczbę bitów na minutę utworu,
należy kilka razy nacisnąć przycisk w rytm
muzyki: zamiast napisu “PITCH” (f) podświetli się napis “BEAT” (e). Natomiast polu
PITCH (h) zamiast odchyłki procentowej od
standardowej prędkości wyświetli się liczba
bitów na minutę.
Aby powrócić do wyświetlania odchyłki
należy ponownie nacisnąć przycisk przez
około 3 sekundy dopóki nie podświetli się
napis “PITCH”.
1.1.2 Wyświetlacz (rys. 3)
a symbol odtwarzania
b symbol pauzy
c napis “CONTINUE”: określa tryb pracy:
podświetlony przy włączonym trybie odtwarzania całości płyty, zob. punkt 9 przycisk CONT./
SINGLE
d napis “AUTO CUE SINGLE”: określa tryb pracy:
podświetlony przy włączonym trybie odtwarzania pojedynczych utworów
e napis “BEAT”: jeśli podświetlony, to wskazanie
w polu (h) określa liczbę bitów na minutę, zob.
pozycja 21, przycisk BPM/TAP
f napis “PITCH”: jeśli podświetlony, to wskazanie
w polu (h) określa procentową odchyłkę od
g
h
i
j
k
l
m
standardowej prędkości [ustawionej za
pomocą regulatora (14)]
wskaźnik słupkowy: jego długość określa
pozostały czas do końca utworu lub płyty
[podświetlony napis “REMAIN” (m)] lub też
czas odtwarzania utworu (podświetlenie napisu
“REMAIN” wygaszone).
wskazanie to określa procentową odchyłkę od
standardowej prędkości ustawioną za pomocą
regulatora PITCH CONTROL (14) lub określa
liczbę bitów na minutę określoną przy pomocy
przycisku BPM/TAP (21)
określa numer utworu lub krótko po włożeniu
płyty CD, liczbę utworów na płycie
określa czas wyświetlany w minutach (M),
sekundach (S), oraz ramkach (F), zob. pozycja
10 przycisk TIME/STOP
napis “OUTRO”: podświetlony przy włączonej
funkcji OUTRO, zob. pozycja 9 przycisk CONT./
SINGLE
napis “LOOP”: jeśli podświetlony, włączone jest
odtwarzanie ciągłej pętli (rozdział 5.10)
napis “REMAIN”: jeśli podświetlony, w polu (j)
wyświetlany jest pozostały czas do końca
utworu lub płyty CD
1.2 Transport, panel przedni (rys.4)
22 Szuflada mechanizmu
23 Wskaźnik napędu (22)
24 Przycisk : otwieranie, zamykanie szuflady mechanizmu (nie możliwe podczas odtwarzania)
25 Wskaźnik zasilania
26 Włącznik zasilania
1.3 Transport, panel tylni (rys. 5)
28
29
30
31
32
2
NECT TO MAIN UNIT modułu sterującego z
gniazdem transportu. Dławik przeciwzakłóceniowy (małe pudełeczko) powinien się znaleźć
bliżej gniazda transportu
Przełącznik REMOTE SELECT: wybór typu
sterowania za pomocą gniazda START/PAUSE
(30), zob. rozdział 7.
Pozycja TACT SW: Sterowanie za pomocą
przełącznika monostabilnego.
Pozycja LOCK SW: Sterowanie za pomocą
przełącznika bistabilnego on/off
Kabel sieciowy do podłączenia do gniazda zasilającego (230 V~/50 Hz)
Gniazdo mono 3,5 mm do zdalnego sterowania
funkcją “Start/Pause” poszczególnego transportu z miksera, zob. rozdział 7
Wyjście cyfrowe audio typu chinch poszczególnego transportu
Wyjście analogowe (typu chinch, lewe/prawe)
LINE OUT o poziomie liniowym poszczególnego
mechanizmu
Środki bezpieczeństwa
Urządzenie jest zgodne z wymaganiami normy o
zgodności elektromagnetycznej 89/336/EEC oraz
normy dotyczącej urządzeń niskonapięciowych
73/23/EEC.
Uwaga! Urządzenie jest zasilane niebezpiecznym
dla życia napięciem zmiennym 230 V.
Naprawą urządzenia powinien zajmować
się tylko przeszkolony personel. Poprzez
nieodpowiednie użytkowanie może wystąpić ryzyko porażenia elektrycznego.
Samodzielne otwieranie urządzenia spowoduje wygaśnięcie gwarancji.
27 8 pinowe gniazdo mini DIN do połączenia modułu sterującego z transportem;
Połączyć załączonym w komplecie specjalnym
kablem gniazdo REMOTE CONTROL CON-
Należy zawsze przestrzegać następujących zasad:
● Uwaga! Nie wolno patrzeć do środka odtwarzacza przy wysuniętej szufladzie. Promień lasera
może spowodować uszkodzenie wzroku.
3
lewy, R – kanał prawy – z wejściem przeznaczonym dla CD we wzmacniaczu lub mikserze.
3) Możliwe jest uruchomienie odtwarzacza lub
włączenie pauzy przez mikser wyposażony w
funkcję fader start. Sposób połączeń przedstawiono w rozdziale 7.
4) Podłączyć kabel zasilający (29) do sieci
(230 V~/50 Hz).
Zastosowanie
Podwójny odtwarzacz CD CD-280DJ został zaprojektowany do zastosowań profesjonalnych. Posiada wiele funkcji i rozwiązań stworzonych do takiej
właśnie pracy: licznik bitów, płynne odtwarzanie w
pętli, odtwarzanie pojedyncze lub ręczna synchronizacja bitów dwóch utworów muzycznych.
CD-280DJ pozwala na odtwarzanie płyt CD, płyt
CD nagranych samodzielnie (CD-R). Odtwarzacz
pozwala także na odczyt niektórych płyt CD-RW (w
zależności od typu płyty, nagrywarki oraz oprogramowania).
Odtwarzacz został wyposażony w pamięć dla
układu antywstrząsowego, umożliwiającą zapamiętanie do 10 sekund utworu.
4
Instalowanie i podłączanie urządzenia
Moduł sterujący oraz transport jest przeznaczony
do montażu rackowego (482 mm/19"), jednak
można ustawić je także na półce. Transport należy
zawsze użytkować w pozycji poziomej, natomiast
moduł sterujący w zależności od potrzeb. Dla
modułu sterującego wymagana jest przestrzeń
2 U, a dla transportu 2 U (U = 44,45 mm).
Przed dokonywaniem jakichkolwiek połączeń
należy zawsze wyłączyć odtwarzacz oraz współpracujące z nim urządzenia.
1) Połączyć moduł sterujący oraz transport za
pomocą załączonego w komplecie przewodu:
Połączyć gniazdo REMOTE CONTROL CONNECT TO MAIN UNIT modułu sterującego z
gniazdem transportu CONNECT TO REMOTE
CONTROL (27). Dławik przeciwzakłóceniowy
(małe pudełeczko) powinien się znaleźć bliżej
gniazda transportu.
2) Jeśli mikser lub wzmacniacz posiada wejście
cyfrowe, połączyć je z żółtym gniazdem typu
chinch DIGITAL OUT (31).
Jeśli urządzenia nie posiadają wejść cyfrowych, połączyć wyjścia LINE OUT (32): L – kanał
5
Obsługa
Tekst poniżej opisuje obsługę dla transportu 1.
Jednak obsługa dla drugiego transportu wygląda
identycznie.
●
●
●
●
●
●
●
●
Urządzenie jest przeznaczone tylko do użytku
wewnątrz pomieszczeń. Należy chronić przed
dostaniem się jakiejkolwiek cieczy do środka
urządzenia, dużą wilgotnością oraz ciepłem (temperatura otoczenia powinna wynosić od 0 – 40 °C).
Nie wolno kłaść na urządzeniu żadnych pojemników z cieczą (butelek, itd.).
Aby zapewnić odpowiednią cyrkulację powietrza
dla schłodzenia urządzenia, nie zasłaniać
otworów wentylacyjnych.
Nie wolno wkładać niczego do otworów wentylacyjnych. Może to spowodować porażenie elektryczne.
Nie wolno używać urządzenia lub natychmiast
odłączyć główną wtyczkę zasilającą z gniazda:
1. Jeśli występują widoczne uszkodzenia urządzenia lub kabla zasilającego.
2. Uszkodzenie urządzenia może wystąpić w
wyniku upadku lub innego podobnego zdarzenia.
3. Jeśli urządzenie działa nieprawidłowo.
W takim przypadku naprawą urządzenia powinien zajmować się tylko przeszkolony personel.
Uszkodzony kabel sieciowy może być wymieniany jedynie przez producenta lub przeszkolony
personel.
Nie wolno ciągnąć za kabel zasilający, chcąc go
odłączyć należy trzymać za wtyczkę.
Nie ponosi się odpowiedzialności za wynikłe uszkodzenia sprzętu lub obrażenia użytkownika w
przypadku, gdy urządzenie jest wykorzystywane
w innych celach niż to się przewiduje lub, jeśli
jest nieodpowiednio zainstalowane, użytkowane
lub naprawiane.
Aby nie zaśmiecać środowiska po
całkowitym zakończeniu eksploatacji
urządzeń należy je oddać do punktu
recyklingu.
4)
5)
5.1 Odtwarzanie płyt CD
1) Włączyć zasilanie odtwarzacza za pomocą przycisku POWER (26), zapali się wskaźnik zasilania
(25) oraz wskaźniki (23) nad szufladami napędów (22). Jeśli włożona jest płyta CD, odczytane z niej informacje CD zostaną wyświetlone
na wyświetlaczu (zob. rozdz. 5.2). Jeśli nie
włożono do transportu płyty, na wyświetlaczu
zapali się napis
(brak płyty CD).
2) Otworzyć szufladę napędu przyciskiem (4 lub
24). Włożyć płytę CD nadrukiem do góry do
kieszeni i zamknąć szufladę przyciskiem
.
Jeśli płyta została poprawnie włożona na
wyświetlaczu pojawią się informacje o liczbie
utworów (i), całkowitym czasie płyty (j) a
następnie czasie pierwszego utworu (j).
3) Aby rozpocząć odtwarzanie pierwszego utworu,
nacisnąć przycisk
(18). W trakcie odtwarzania płyty CD na wyświetlaczu będzie zapalony
wskaźnik
(a), a przycisk
podświetlony.
Aby odtworzyć inny utwór wybrać jego numer
utworu za pomocą przycisków TRACK (7):
Naciśniecie przycisku +10: przewinięcie o
10 utworów do przodu.
Naciśniecie przycisku
spowoduje wybranie następnego utworu, natomiast przycisku
PL
6)
7)
: powrót do początku aktualnie wybranego
utworu. Każde kolejne naciśnięcie przycisku
spowoduje wybranie poprzedniego utworu. Aby przewinąć o kilka utworów nacisnąć
kilka razy odpowiedni przycisk
lub
.
Następnie należy nacisnąć przycisk
.
Aby przerwać odtwarzanie należy nacisnąć
przycisk
. Wyświetli się symbol (b). Przyciski
oraz CUE (17) zaczną migać. Aby kontynuować odtwarzanie nacisnąć przycisk
jeszcze raz.
Po włączeniu urządzenia, przełącza się ono
automatycznie na tryb odtwarzania pojedynczych utworów: podświetla się napis “AUTO
CUE SINGLE” (d). Jeśli odtwarzanie utworu
dojdzie do końca, urządzenie automatycznie
przejdzie na pauzę i ustawi się na początku
kolejnego utworu. Aby przełączyć urządzenie w
tryb odtwarzania całości płyty (z jednego
utworu na kolejny) należy nacisnąć przycisk
CONT./SINGLE (9) [zob. rozdział 5.3].
Aby zatrzymać odtwarzanie płyty CD w dowolnym momencie, należy przełączyć odtwarzacz
na pauzę lub zatrzymać mechanizm [przytrzymać przycisk TIME/STOP (10) przez około 3
sekundy]. W tym momencie można wyjąć płytę z
szuflady używając przycisku .
Uwaga: Podczas odtwarzania, szuflada jest
zablokowana przed przypadkowym
otwarciem.
Przed wyłączeniem urządzenia za pomocą przycisku POWER (26), należy pamiętać o zamknięciu szuflad napędów [przyciskiem ], aby
uchronić laser przed zanieczyszczeniami.
5.2 Wyświetlanie liczby utworów, czasu
odtwarzania, liczby bitów na minutę,
tryb uśpienia
W domyślnym ustawieniu, po włączeniu odtwarzacza podczas odtwarzania oraz podczas pauzy, na
wyświetlaczu (rys. 3) wyświetlane są następujące
informacje: numer utworu (i) oraz pozostały czas
35
PL
do końca utworu (j) – że jest to pozostały czas
określa to podświetlenie napisu “REMAIN” (m).
Czas jest wyświetlany w minutach (M), sekundach
(S), oraz ramkach (F) [1 ramka = 1/75 sekundy].
Za pomocą przycisku TIME/STOP (10) można
zmieniać wskazanie czasu (dłuższe naciśnięcie
spowoduje zatrzymanie odtwarzania):
Pierwsze naciśnięcie przycisku:
wyświetlany jest aktualny czas wybranego
utworu (podświetlenie napisu “REMAIN”
wygaszone).
Kolejne naciśnięcie przycisku:
pozostały czas do końca płyty (podświetlenie
napisu “REMAIN”).
Kolejne naciśnięcie przycisku:
Powrót do podstawowych ustawień (pozostały
czas do końca utworu).
5.2.1 Wskaźnik słupkowy
W zależności od trybu wyświetlania czasu ustawionego za pomocą przycisku TIME/STOP (10) wskaźnik słupkowy (g) przez swoją długość określa
pozostały do końca czas utworu lub płyty CD lub
też czas odtwarzania. Jeśli odtwarzane są ostatnie
30 sekund utworu wskaźnik będzie migać na całej
długości, natomiast jeśli pozostanie 15 sekund,
miganie będzie jeszcze szybsze.
5.2.3 Tryb uśpienia
Jeśli oba mechanizmy są ustawione na pauzie na
czas dłuższy niż 30 minut, urządzenie automatycznie przejdzie w tryb uśpienia. Obydwa lasery
zostaną wyłączone. Zostanie wyświetlony napis
, a wszystkie diody LED oraz podświetlenia
przycisków zgasną. Naciskając dowolny przycisk
można powrócić do poprzedniego trybu pracy.
Mechanizm odtwarzacza ustawi się dokładnie w
tym miejscu w którym był przed uśpieniem.
Uwaga: Jeśli jeden z mechanizmów jest zatrzymany
lub w jednym z napędów nie ma płyty CD,
urządzenie nie przejdzie w tryb uśpienia.
5.3 Wybór trybu pracy
5.3.1 Odtwarzanie pojedynczych utworów
Zawsze po włączeniu urządzenia, aktywny będzie
tryb odtwarzania pojedynczych utworów, co jest
szczególnie przydatne dla zastosowań dj:
1. Na wyświetlaczu podświetlony będzie napis
“AUTO CUE SINGLE” (d).
5.2.2 Licznik bitów
Za pomocą manualnego licznika bitów można
określić liczbę bitów na minutę (BPM = z ang. beats
per minute) aktualnie odtwarzanego utworu:
1) Nacisnąć krótko kilka razy przycisk BPM/TAP
(21) w rytm muzyki. Zamiast napisu “PITCH” (f)
podświetli się napis “BEAT” (e). Natomiast polu
PITCH (h) zamiast odchyłki procentowej od
standardowej prędkości wyświetli się liczba
bitów na minutę.
2) Aby określić liczbę bitów następnego utworu,
należy ponownie nacisnąć krótko kilka razy
przycisk BPM/TAP (21) w rytm muzyki. Na
wyświetlaczu pokaże się nowa wartość.
2. Po odczytaniu informacji znajdującej się na
płycie CD, lub po wybraniu utworu, odtwarzacz
ustawi się w miejscu gdzie zaczyna się muzyka
(niekoniecznie na pozycji czasu 0:00:00).
Miejsce to jest automatycznie zapamiętywane jako punkt startowy. Na wyświetlaczu na
krótko pojawi się napis
. Po uruchomieniu
odtwarzania utworu możliwy jest powrót do
punktu startowego przez naciśnięcie przycisku
BOP (6) lub przycisku CUE (17).
spowoduje przełączenie odtwarzania do drugiego napędu.
b) Przytrzymanie przycisku CUE w napędzie ustawionym na pauzę spowoduje odtwarzanie z tego
napędu w momencie zwolnienia przycisku.
5.5 Funkcja OUTRO
Uruchomienie odtwarzania z drugiej szuflady
na końcu płyty CD
1) Włożyć do szuflad napędów płyty CD. Należy to
zrobić przed naciśnięciem przycisku RELAY (3).
Po naciśnięciu przycisku, wskaźnik znajdujący
się nad nim zacznie migać.
2) Ustawić obydwa napędy w tryb odtwarzania
całości płyty przyciskiem CONT./SINGLE (9) –
na obu wyświetlaczach powinien podświetlić się
napis “CONTINUE” (c).
3) Zatrzymać jeden z napędów: przytrzymać naciśnięty przycisk TIME/STOP (10) do momentu
zgaśnięcia symbolu pauzy (b) na wyświetlaczu.
4) Uruchomić odtwarzanie w jednym z napędów
przyciskiem
(18). Na końcu płyty CD odtwarzacz automatycznie przełączy się na odtwarzanie z drugiej szuflady. Taka procedura
będzie powtarzana dopóki nie zostanie
wyłączony tryb ciągły (aby to zrobić należy
nacisnąć przycisk RELAY jeszcze raz).
5) Jeśli do zatrzymanego napędu włożono inną
płytę CD, należy aktywować tryb ciągły przyciskiem RELAY i zatrzymać napęd przyciskiem
TIME/STOP.
5.4 Odtwarzanie próbek początków utworów
1) Po włożeniu płyty do napędu, wybrać żądany
utwór za pomocą przycisków TRACK (7).
2) Jeśli wyświetlacz wskazuje czas utworu (j), przytrzymać przycisk CUE (17). Utwór będzie odtwarzany do momentu zwolnienia przycisku.
3) Po zwolnieniu przycisku urządzenie powróci do
początku utworu i ustawi się na pauzę. Nacisnąć
przycisk
(18), aby rozpocząć odtwarzanie.
Natomiast ponowne naciśnięcie przycisku CUE
spowoduje powrót do początku utworu.
36
3) Aby powrócić do wyświetlania odchyłki należy
nacisnąć przycisk BPM/TAP przez około 3 sekundy dopóki nie podświetli się napis “PITCH”.
3. Po odtworzeniu utworu, odtwarzacz automatycznie przejdzie w tryb pauzy i zatrzyma się na
punkcie startowym następnego utworu. Zostanie on zapamiętany jako nowy punkt startowy.
Funkcja OUTRO służy do odtwarzania ostatnich
30 sekund utworu.
1) Aby aktywować funkcję, nacisnąć przez około
3 sekundy przycisk CONT./SINGLE (9) dopóki
na wyświetlaczu nie podświetli się napis
“OUTRO” (k).
2) Wybrać żądany utwór za pomocą przycisków
TRACK (7). Jeśli napęd jest na pauzie, uruchomić odtwarzanie przyciskiem
(18). Zostanie
odtworzone ostatnie 30 sekund utworu.
3) Aby wyłączyć funkcję OUTRO, nacisnąć krótko
przycisk TIME/STOP (10) lub przytrzymać przez
około 3 sekundy przycisk CONT. SINGLE (9)
dopóki na wyświetlaczu nie zgaśnie podświetlenie napisu “OUTRO” (k).
5.6 Szybkie przewijanie do przodu lub do tyłu
1) Aby włączyć funkcję szybkiego przewijania do
przodu lub tyłu należy nacisnąć przycisk
SEARCH (5). Włączenie funkcji będzie sygnalizowane zapaleniem się wskaźnika obok przycisku.
2) Przekręcić pokrętłem (16): obrót zgodnie z kierunkiem wskazówek zegara spowoduje przewijanie do przodu, obrót w przeciwnym kierunku:
przewijanie do tyłu. Prędkość przewijania
będzie zależała od prędkości obracania kołem.
W trybie odtwarzania całości płyty (rozdział
5.3.2) kręcąc pokrętłem można także przechodzić pomiędzy kolejnymi utworami od
początku od końca płyty CD.
W trybie odtwarzania pojedynczych utworów
(rozdział 5.3.1) przewijając utwór do końca lub
początku, urządzenie automatycznie ustawi się
w tryb pauzy (zob. uwagi w punktach a oraz b
poniżej). Możliwe jest oczywiście szybkie przewijanie do przodu w trybie pauzy pomiędzy kolejnymi utworami, natomiast przy szybkim przewijaniu do tyłu, odtwarzacz zatrzyma się na
początku utworu.
3) Funkcja szybkiego przewijania jest jeszcze
aktywna przez około 8 sekund po jej użyciu. Po
tym czasie podświetlenie przycisku SEARCH
5.3.2 Odtwarzanie całości płyty
Aby przełączyć w tryb odtwarzania całości płyty
należy nacisnąć przycisk CONT./SINGLE (9).
Zmieni się podświetlenie napisów: z “AUTO CUE
SINGLE” (d) na “CONTINUE” (f). Aby przejść w tryb
odtwarzania pojedynczych utworów należy nacisnąć przycisk CONT./SINGLE jeszcze raz.
5.3.3 Tryb ciągły – automatyczne odtwarzanie z drugiej szuflady
Możliwe jest automatyczne uruchomienie odtwarzania z drugiej szuflady w momencie zakończenia
utworu lub ostatniego utworu na płycie CD.
Uruchomienie odtwarzania z drugiej szuflady
na końcu utworu
1) Włożyć do szuflad napędów płyty CD. Należy to
zrobić przed naciśnięciem przycisku RELAY (3).
Po naciśnięciu przycisku, wskaźnik znajdujący
się nad nim zacznie migać.
2) Ustawić obydwa napędy w tryb odtwarzania
pojedynczych utworów przyciskiem CONT./
SINGLE (9) – na obu wyświetlaczach powinien
podświetlić się napis “AUTO CUE SINGLE” (d).
3) Uruchomić odtwarzanie w jednym z napędów
przyciskiem
(18). Drugi napęd musi być na
pauzie (wskazanie wyświetlacza ). W momencie
zakończenia odtwarzania utworu, napęd automatycznie przechodzi na pauzę i włącza się odtwarzanie w drugim mechanizmie. Taka procedura
będzie powtarzana dopóki nie zostanie wyłączony tryb odtwarzania całości płyty (aby to zrobić należy nacisnąć przycisk RELAY jeszcze raz).
4) W każdym momencie oprócz tego, odtwarzanie
może zostać przełączone z jednego napędu na
drugi poprzez naciśniecie przycisku
.
5) Jeśli włożono płytę CD do napędu ustawionego
na pauzę, należy ponownie włączyć tryb ciągły
przyciskiem RELAY.
Uwagi:
a) Naciśnięcie przycisku CUE (17) w napędzie odtwarzającym (przy włączonym trybie ciągłym)
gaśnie i zostaje przywrócona pierwotna funkcja
pokrętła “Pitch Bend” (rozdział 5.8.1) a dla
trybu pauzy: funkcja precyzyjnego wyboru
punktu utworu (rozdział 5.7).
Uwaga: Jeśli po szybkim przewijaniu urządzenie
będzie w trybie pauzy:
a) odtwarzacz będzie odtwarzał stale określony
punkt (chyba, że przewinięto do początku utworu), dopóki nie zostanie włączone odtwarzanie
przyciskiem
(18) lub przez szybkie dwukrotne
naciśnięcie przycisku CUE (17) lub CUE 1 (8).
b) funkcja szybkiego przewijania nie jest automatycznie wyłączana po około 8 sekundach, należy
ją ręcznie wyłączyć przyciskiem SEARCH.
5.7 Precyzyjne wybieranie
punktu utworu
określonego
Podczas pauzy, za pomocą pokrętła (16) można
precyzyjnie wybrać określony punkt utworu:
1) Jeśli jest włączona funkcja szybkiego przewijania
[zapalony wskaźnik LED obok przycisku SEARCH
(5)], należy ją wyłączyć przyciskiem SEARCH.
2) Przekręcić pokrętło. Wybór punktu utworu
będzie zależał od kierunku i prędkości obrotu
pokrętła. W tym czasie na wyświetlaczu (j) można precyzyjnie odczytać pozycję z dokładnością
do 1 ramki (1/75 sekundy).
3) Po ustawieniu, urządzenie będzie odtwarzało
stale ten punkt, do momentu włączenia odtwarzania przyciskiem
(18) lub przez szybkie dwukrotne naciśnięcie przycisku CUE (17)
lub CUE 1 (8).
5.8 Zmiana prędkości oraz wysokości tonu
Urządzenie daje możliwość zmiany prędkości odtwarzania a tym samym wysokości tonu w granicach
maksymalnie ±16 %. Do tego celu służy suwak
PITCH CONTROL (14).
1) Wybrać zakres zmiany prędkości odtwarzania za
pomocą przycisku PITCH (12). Diody LED (13)
obok przycisku sygnalizują zakres: ±8 % (domyślne ustawienie) lub ±16 %. Po wybraniu
zakresu, odpowiednia dioda zacznie migać co
będzie oznaczało, iż PITCH CONTROL nie został
aktywowany.
2) Nacisnąć przycisk ON/OFF (15). W ten sposób
został aktywowany PITCH CONTROL, natomiast
dioda przy wybranym zakresie zacznie świecić
stale.
3) Zmienić prędkość za pomocą suwaka PITCH
CONTROL (14). Na wyświetlaczu pokaże się
procentowa odchyłka od standardowej prędkości w polu PITCH (h).
Jeśli włączony był ręczny licznik bitów [przyciskiem BPM/TAP (21): podświetlony napis
“BEAT” (e)], wyświetlacz wskazuje w polu PITCH
(h) liczbę bitów na minutę. Liczba ta będzie się
zmieniała wraz z regulacją prędkości odtwarzania za pomocą suwaka PITCH CONTROL.
4) W dowolnym momencie można powrócić z ustawionej prędkości do standardowej i vice versa za
pomocą przycisku ON/OFF (15).
5.8.1 Pitch Bend – synchronizowanie bitów
dwóch kawałków muzycznych
Za pomocą funkcji PITCH BEND (20) można zsynchronizować bitowo (rytmicznie) utwór w napędzie
1 z utworem w napędzie 2, lub odwrotnie. W ten
sposób można płynnie przechodzić z jednego do
drugiego utworu.
1) Najpierw należy zsynchronizować prędkość
pierwszego kawałka z prędkością drugiego za
pomocą suwaka PITCH CONTROL (14) – wykorzystać licznik bitów.
2) Zsynchronizować bity obu kawałków muzycznych za pomocą przycisków PITCH BEND: przytrzymując przyciski + lub - można zmienić
prędkość do 16 % od standardowej prędkości.
3) Zmiany prędkości odtwarzania w celu synchronizacji bitów można także dokonać za pomocą
pokrętła (16).
5.9 Powrót do wybranego miejsca na
płycie (Punkt “Cue”)
Aby szybko wybrać określone miejsce na płycie
CD, można zdefiniować i zapamiętać dwa nieza-
3) Aby opuścić pętlę i kontynuować odtwarzanie
utworu, należy nacisnąć ponownie przycisk
B/LOOP – EXIT. Podświetlenie napisu “LOOP”
zgaśnie. Pętlę można także opuścić wybierając
inny utwór lub wybierając punkt Cue (rozd. 5.9).
4) Mimo tego pętla jest stale w pamięci. Świadczy
o tym podświetlenie trzech przycisków.
PLAY
c
LOOP
➆
Opuszczanie i ponowne odtwarzanie pętli
5) Aby zapamiętać inną pętlę, należy ponownie
zdefiniować punkty początkowy i końcowy za
pomocą przycisków A oraz B/LOOP – EXIT.
Otwierając szufladę napędu [przycisk (4 lub 24)]
lub wyłączając odtwarzacz [przycisk POWER (26)]
informacje o zapamiętanej pętli są kasowane.
Wskazówki
a) Aby zapamiętać pętlę musi ona mieć długość
co najmniej 20 ramek (=0,27 sekundy). W przeciwnym razie nie będzie to możliwe.
b) Punkt startowy pętli oraz końcowy może być
określony precyzyjnie z dokładnością do jednej
ramki:
1) Osiągając określony punkt początkowy pętli,
najpierw należy włączyć pauzę – nacisnąć
przycisk
. Wybrać precyzyjnie punkt za
pomocą pokrętła (16). Następnie nacisnąć
przycisk A.
2) Następnie, od razu można precyzyjnie wybrać punkt końcowy, lub wcześniej uruchomić odtwarzanie przyciskiem
, osiągając
określony moment włączyć pauzę przyciskiem
i wybrać punkt końcowy posługując się pokrętłem.
leżne punkty startowe (z ang. Cue points) za
pomocą przycisków CUE (17) oraz CUE 1 (8).
Uwagi dotyczące punktu startowego zdefiniowanego za pomocą przycisku CUE:
a) Przy trybie odtwarzania pojedynczych utworów,
powrót do zdefiniowanego punktu jest możliwy
tylko w czasie trwania utworu. Po dojściu do
końca utworu, zdefiniowany punkt zostaje
zastąpiony punktem startowym kolejnego
utworu (zob. rozdział 5.3.1).
b) Zarówno dla trybu odtwarzania pojedynczych
utworów jak i całości, wybranie innego utworu
za pomocą przycisków TRACK (7) spowoduje
zastąpienie zdefiniowanego punktu, punktem
startowym (początkiem) wybranego utworu.
Aby określić punkt Cue i powrócić do niego
podczas odtwarzania:
1) Podczas odtwarzania utworu, włączyć pauzę
przyciskiem
(18) w momencie osiągnięcia
punktu do którego chcemy potem powrócić.
Podświetlenia przycisków
oraz CUE zaczną
migać.
2) Jeśli to konieczne, punkt Cue można zdefiniować bardziej precyzyjnie posługując się pokrętłem (16). Wybrany punkt będzie powtarzany
“w kółko”.
3) Nacisnąć krótko jeden z przycisków CUE lub
CUE 1. W ten sposób został zapamiętany (zaznaczony) punkt utworu. Podświetlenie odpowiedniego przycisku mignie na chwilę a następnie zapali się na stałe. Natomiast podświetlenie przycisku
zacznie migać.
4) Włączyć odtwarzanie przyciskiem
3) Po zdefiniowaniu punktu końcowego nacisnąć
przycisk B/LOOP – EXIT. Rozpocznie się odtwarzanie pętli.
Kompilacja
utworów
własnej
sekwencji
CD-280DJ pozwala na skompilowanie i odtwarzanie własnej sekwencji utworów składającej się
maksymalnie z 30 tytułów. Wybrane utwory można
zaprogramować w dowolnym porządku.
6.1 Programowanie sekwencji utworów
1) Aby zaprogramować sekwencję, najpierw należy zatrzymać mechanizm: przytrzymać przez
około 3 sekundy przycisk TIME/STOP (10)
dopóki nie zgaśnie symbol odtwarzania
(a)
lub pauzy (b).
2) Nacisnąć przycisk PROG. (11). Na wyświetlaczu
pokaże się napis
.
3) Za pomocą przycisków TRACK (7) wybrać pierwszy utwór i zatwierdzić wybór przyciskiem
PROG. Zapali się dioda obok przycisku, a na
wyświetlaczu pokaże się napis
.
4) Powtarzać procedurę programowania dla dalszych utworów. Te same utwory mogą być
zaprogramowane kilkukrotnie. Jeśli zaprogramowanych zostanie 30 utworów na wyświetlaczu pokaże się napis
. Świadczy to o tym
iż niemożliwe jest dalsze programowanie.
6.2 Sprawdzanie zaprogramowanej sekwencji
1) Za pomocą przycisku PROG. (11) wywołać po
kolei wszystkie zapamiętane utwory. Na wyświetlaczu będą pokazywane ich numery.
Sprawdzić sekwencję można tylko przy zatrzymanym napędzie, jeśli włączone było wcześniej odtwarzanie, należy zatrzymać mechanizm.
2) Aby zamienić jeden z utworów z sekwencji, należy nacisnąć ponownie przy wybranym utworze
przycisk PROG.
PL
5.9.1 Przycisk BOP
Innym sposobem na powrócenie do określonego
punktu Cue podczas odtwarzania jest użycie przycisku BOP (6). W przeciwieństwie do przycisków
CUE, odtwarzacz po powrocie do określonego
punktu nie ustawia się na pauzę, ale natychmiast
rozpoczyna odtwarzanie. Naciskając kilkukrotnie
przycisk BOP można uzyskać ciekawy efekt “stutter” (stutter – jąkać się).
5.10 Odtwarzanie ciągłej pętli
Wykorzystując przyciski A, B/LOOP – EXIT oraz
RELOOP (19) można zapamiętać i odtwarzać wiele
razy pewien określony fragment na płycie CD.
1) Włączyć odtwarzanie przyciskiem
(18). Osiągając określony punkt początkowy pętli (punkt a
na rys. 6) należy krótko nacisnąć przycisk A.
Podświetlenie przycisku krótko mignie, a następnie zaświeci się na stałe. Zapali się także
podświetlenie przycisku RELOOP.
2) Osiągając określony punkt końcowy pętli (punkt
b), należy nacisnąć przycisk B/LOOP – EXIT.
Fragment pomiędzy tymi dwoma punktami
będzie ciągle powtarzany. Wszystkie trzy przyciski zaczną migać, a na wyświetlaczu zapali się
podświetlenie napisu “LOOP” (l).
1.
.
5) Aby powrócić do zdefiniowanego punktu, należy nacisnąć odpowiedni przycisk Cue. Laser
ustawi się w zaznaczonym miejscu a urządzenie
ustawi się na pauzę. Aby uruchomić odtwarzanie należy nacisnąć przycisk
lub przytrzymać odpowiedni przycisk Cue. Po zwolnieniu
przycisku Cue, laser powróci do ustalonego
punktu a urządzenie ustawi się na pauzę.
6
Otwierając szufladę napędu [przycisk (4 lub 24)]
lub wyłączając odtwarzacz [przycisk POWER (26)]
informacje o zapamiętanych punktach Cue są
kasowane.
2.
A
PLAY
a
PLAY
b
LOOP
➅
Odtwarzanie ciągłej pętli
6.3 Odtwarzanie zaprogramowanej sekwencji
1) Aby odtworzyć zaprogramowaną sekwencję
należy nacisnąć przycisk
(18). Jeśli wcześniej sprawdzana była sekwencja, odtwarzanie
rozpocznie się od utworu, którego numer był
ostatnio widoczny na wyświetlaczu po naciśnięciu przycisku PROG.
2) Aby odtwarzać płynnie całą sekwencję należy
włączyć tryb odtwarzania całości płyty przyciskiem CONT./SINGLE (9): zapali się podświetlenie napisu “CONTINUE” (c). [W trybie odtwarzania pojedynczych utworów odtwarzacz przełączy się na pauzę po każdym utworze].
3) Podczas odtwarzania można wyświetlić numer
lokacji pamięci aktualnie odtwarzanego utworu
za pomocą przycisku PROG.
4) Odtwarzanie sekwencji może być w dowolnym
momencie przerwane i rozpoczęte za pomocą
przycisku
. Aby powrócić do utworu należy
nacisnąć przycisk
, aby pominąć utwór
nacisnąć przycisk
.
5) W trybie odtwarzania całości płyty, urządzenie
zatrzyma się na końcu sekwencji (dla trybu
pojedynczego, mechanizm ustawi się na pauzie
na pierwszym utworze). Aby ponownie odtworzyć sekwencję należy nacisnąć przycisk
.
6.4 Kasowanie zaprogramowanej sekwencji
Włączyć pauzę przyciskiem
(18) lub zatrzymać
mechanizm przyciskiem TIME/STOP (10), a następnie otworzyć szufladę przyciskiem
(4 lub 24).
Wskaźnik obok przycisku PROG. zgaśnie, a zaprogramowana sekwencja zostanie skasowana. Taki
sam efekt można osiągnąć wyłączając urządzenia
przyciskiem POWER (26).
37
PL
7
Uruchamianie odtwarzacza przez
mikser za pomocą tłumika
Odtwarzacz CD-280DJ może być zdalnie obsługiwany przez mikser z funkcją “fader start”. Ustawić
za pomocą przełącznika REMOTE SELECT (28)
znajdującego się na panelu tylnim transportu rodzaj przełącznika “fader start” zastosowanego w
mikserze.
Pozycja LOCK SW dla przełącznika bistabilnego typu on/off
Taki przełącznik jest wykorzystywany w większości sprzętu “img Stage Line”. Otwierając tłumik
w mikserze, uruchamiamy funkcje startu w odtwarzaczu CD, natomiast zamykając tłumik,
ustawiamy odtwarzacz na pauzę.
Mikser
mikser. Połączyć wyjście “fader startu” w mikserze
(rys. 8 oraz 9) z odpowiednim wejściem START/
PAUSE (30).
Jeśli mikser jest wyposażony w funkcję odsłuchu
przed suwakiem, możliwe jest odtwarzanie początków utworów i odsłuchiwanie ich na słuchawkach
pomimo zamkniętego tłumika. Należy wtedy
obsługiwać odtwarzacz CD zgodnie z opisem w
rozdziale 5.4 “Odtwarzanie próbek początków
utworów”.
Uwaga: Sterowanie za pomocą tłumika jest bezcelowe w przypadku trybu ciągłego –
automatycznego odtwarzanie z drugiej
szuflady (zob. rozdz. 5.3.3), ponieważ
niezależnie od położenia tłumika odtwarzanie zakończy się na końcu utworu lub
płyty CD i automatycznie rozpocznie w
drugiej szufladzie.
Pozycja TACT SW dla przełącznika monostabilnego
Naciskając przełącznik monostabilny otwierając
tłumik, uruchamiamy funkcje startu w odtwarzaczu CD, natomiast zamykając tłumik (naciskając
ponownie przełącznik), ustawiamy odtwarzacz
na pauzę.
Mikser
1. x Start
2. x Pause
➈
Funkcja “fader start” dla przełącznika monostabilnego typu on /off
Aby funkcja zdalnego startu działała prawidłowo,
zaleca się wcześniej wyłączyć odtwarzacz oraz
20 – 20 000 Hz
< 0,1 %
> 80 dB
> 90 dB
> 80 dB
nie mierzalne,
dokładność kwarcu
Urządzenie należy chronić przed kurzem, wstrząsami, bezpośrednim nastawieniem na promienie
słoneczne, wilgocią, ciepłem (dopuszczalna temperatura otocznia powinna zawierać się w zakresie
0 – 40 °C). Do czyszczenia należy używać suchych,
miękkich ściereczek bez dodatku wody lub innych
detergentów.
Uwagi dotyczące niepoprawnego odtwarzania
dźwięku oraz błędów odczytu
Dym papierosowy w łatwy sposób przechodzi
przez wszelkie otwory urządzenia osadzając się na
elementach optycznych odtwarzacza. Może to
powodować błędy odczytu płyt CD oraz niepoprawne odtwarzanie dźwięku. Ponieważ nie można
zagwarantować
użytkowania
urządzenia
w
pomieszczeniach bez dymu papierosowego (np.
dyskoteka), należy w tym przypadku zadbać o czyszczenie układu optycznego przez wyszkolony
personel. Takie operacje należy wykonywać nawet
w okresie trwania gwarancji.
Zgodnie z danymi producenta
Z zastrzeżeniem do możliwych zmian
8
Funkcja “fader start” dla przełącznika bistabinego typu on/off
Dane techniczne
Pasmo przenoszenia: . .
THD: . . . . . . . . . . . . . . .
Separacja kanałów . . . .
Dynamika . . . . . . . . . . .
Stosunek S/N . . . . . . . .
Drżenie i kołysanie
dźwięku . . . . . . . . . . . . .
Wyjścia
liniowe (analogowe): .
cyfrowe (koaksjalne):
Zasilanie: . . . . . . . . . . . .
Pobór mocy . . . . . . . . . .
Temperatura pracy . . . .
Wymiary (S x W x G)
Transport: . . . . . . . . .
Moduł kontrolny: . . . .
Waga: . . . . . . . . . . . . . .
Podłączenia
wyjście audio,
analogowe: . . . . . . . .
wyjście audio,
cyfrowe: . . . . . . . . . . .
“fader start”: . . . . . . .
sterowanie: . . . . . . . .
Start
Pause
➇
9
Konserwacja
2V
0,5 Vpp S/PDIF
230 V~/50 Hz
25 VA
0 – 40 °C
482 x 89 x 260 mm, 2 U
482 x 89 x 80 mm, 2 U
6,9 kg
2 x chinch lewy/prawy
2 x chinch
2 x mały jack 3,5 mm
przez 8 pinowy kabel z
wtyczkami mini DIN
(długość 1,2 m)
10 Słownik
Słowa pisane kursywą to słowa-klucze szczegółowo wyjaśnione poniżej.
Auto Cue: po wybraniu utworu, odtwarzacz CD
ustawia się dokładnie w tym miejscu gdzie rozpoczyna się muzyka a nie początku na indeksie
0:00:00. Z tego powodu, można od razu
rozpocząć odtwarzanie muzyki po naciśnięciu
przycisku
.
BOP (= efekt “stutter” – jąkania się): Przycisk BOP
służy do powrotu i natychmiastowego rozpoczęcia odtwarzania od początku ścieżki lub punktu
startowego zdefiniowanego przyciskiem CUE.
Krótkie powtarzające się wciskanie przycisku
BOP tworzy efekt stutter.
BPM (bity na minutę): Zintegrowany ręczny licznik
bitów określa liczbę bitów na minutę w utworze.
Aby określić tę liczbę, należy podczas odtwarzania kilkukrotnie nacisnąć przycisk BPM/TAP w
rytm muzyki.
Bufor pamięci antywstrząsowy: pamięć elektroniczna, gdzie tymczasowo zgrywane są i przechowywane dane odczytane z płyty CD (muzyka).
Zapobiega to przerwaniom w odtwarzaniu na
skutek wstrząsów.
CE (znak
) z francuskiego: Communauté Européenne – Społeczność europejska: pewne produkty sprzedawane w Unii Europejskiej muszą
posiadać znak CE. W ten sposób producent
lub dystrybutor potwierdza, że produkt spełnia
wszelkie wymagania i normy UE. (np. wytyczne
niskonapięciowe, normy zgodności elektromagnetycznej, itd.).
38
Continue ➔ Odtwarzanie całości płyty
Cyfrowy: informacje przesyłane w postaci cyfrowej. Przetwornik analogowo-cyfrowy przetwarza
sygnał muzyczny (fale dźwiękowe) zebrane przez
mikrofon w sekwencje zer i jedynek (liczba
binarna np. “1001” = odpowiada liczbie 9 w
systemie dziesiętnym), które w takiej postaci są
przechowywane na CD. Każdej liczbie w systemie
binarnym odpowiada pewna wartość analogowa
określająca falę akustyczną (dźwięk). Specjalny
układ korekcyjny usuwa błędy i zniekształcenia,
co zapewnia wysoką jakość odtwarzania. Przetwornik cyfrowo-analogowy przetwarza z powrotem sygnał cyfrowy na analogowy: ciąg zer i jedynek w analogowy sygnał elektryczny, który po
wzmocnieniu dociera do głośników.
Funkcja odsłuchu ➔ Prefader Listening
Kompatybilność elektromagnetyczna (EMC):
Wytyczna EMC 89/336/EEC określa maksymalny poziom zniekształceń urządzenia oraz maksymalny poziom zniekształceń na które może być
narażone urządzenie, który nie będzie powodował żadnych problemów. (odporność na zakłócenia).
LED (dioda świecąca): elektroniczna część, która
przetwarza prąd elektryczny na światło (bez
emisji ciepła), w zależności od materiału z
którego została wykonana, świeci różnymi kolorami w tym także na biało.
Licznik bitów (Beat counter): określa liczbę
beatów na minutę (BPM) i tym samym szybkość
odtwarzania utworu muzycznego
Liniowe (wyjście, wejście, poziom): przy transmisji
sygnału z jednego urządzenia do drugiego,
sygnały te muszą mieć pewien poziom (wartość
napięcia), w celu zapewnienia optymalnej transmisji. Wartości sygnału pomiędzy 0,1 a 2 V są
określane jako poziom liniowy. Wyjścia na których
występują takie poziomy są określane jako
liniowe (LINE).
Loop (pętla):ciągłe odtwarzanie fragmentu utworu
określonego za pomocą punktu startowego i
końcowego. Zapamiętaną pętlę można opuszczać, lub wywoływać (odtwarzać) [rellop].
Odtwarzanie całości płyty: tryb ciągłego odtwarzania utworów: po zakończeniu jednego
utworu odtwarzacz automatycznie rozpoczyna
odtwarzanie kolejnego, przeciwieństwo odtwarzanie pojedynczych utworów.
Odtwarzanie pojedynczych utworów: specjalny
tryb odtwarzania, przeznaczony do zastosowań
dj. W odróżnieniu do trybu odtwarzanie całości
płyty urządzenie włącza pauzę po odtworzeniu
jednej ścieżki.
OUTRO: funkcja odtwarzania ostatnich 30 sek.
utworu.
Pitch (wysokość dźwięku): za pomocą suwaka
PITCH można zmienić prędkość odtwarzania a
tym samym wysokość dźwięku.
Pitch Bend: funkcja pozwalająca chwilowo zwiększyć lub zmniejszyć prędkość odtwarzania. W
ten sposób można zsynchronizować ze sobą
rytm jednego utworu z drugim (odtwarzane w
dwóch szufladach), co pozwoli na płynne i
miękkie przełączanie pomiędzy tymi utworami.
PL
Prefader Listening (odsłuch przed tłumikiem):
możliwość odsłuchu w mikserze sygnału muzycznego np. z odtwarzacza CD, przez słuchawki,
uniezależniona od pozycji tłumika głównego: do
wybrania kolejnej ścieżki lub punktu startowego.
Track: utwór muzyczny np. na płycie CD
Przycisk monostabilny: przycisk, który działa tak
długo jak jest wciśnięty jak np. dzwonek do drzwi.
Wskaźnik słupkowy (bar graph): jest to rodzaj
wskaźnika na wyświetlaczu, który poprzez swoją
długość określa czas pozostały do końca utworu
lub płyty lub też czas odtwarzania.
Punkt “Cue” (punkt startowy): miejsce na CD
wybrane (określone) za pomocą przycisku Cue.
Urządzenie jest w stanie powrócić dokładnie do
tego miejsca. Po powrocie do punktu startowego, odtwarzacz przełącza się na pauzę.
Tryb ciągły : funkcja, dzięki której po zakończeniu
odtwarzania w jednym z mechanizmów rozpoczyna się odtwarzanie z drugiej szuflady.
Wytyczne niskonapięciowe (73/23/EEC): wytyczne dla urządzeń działających na napięciach
od 50 V do 1500 V, które muszą spełniać odpowiednie normy bezpieczeństwa dla użytkownika.
Rack: obudowa o zunifikowanym wymiarze
482 mm (szerokość) = 19", pozwalająca na
zamontowanie różnego typu urządzeń: wzmacniaczy, odtwarzaczy CD, mikserów.
Ramka (frame): Muzyka na płycie CD jest zapisywana w blokach danych (ramkach).Jeden blok
odpowiada 1/75 sek. muzyki. Punkt (miejsce) na
płycie CD może być ten sposób precyzyjnie ustalone z dokładnością do 1/75 sek.
Seamless loop (ciągła pętla): odtwarzanie pętli
przebiega bez zakłóceń tj. nie ma słyszalnych
przerwań sygnału muzycznego, kiedy urządzenie
przechodzi z punktu końcowego pętli na punkt
startowy.
Single ➔ Odtwarzanie pojedynczych utworów
Tłumik startowy (fader start): Za pomocą regulatora suwakowego (tłumika) w mikserze połączonym z przełącznikiem mono lub bistabilnym
można włączać i wyłączać odtwarzanie w odtwarzaczu CD utwór muzyczny np. na płycie CD
Instrukcje obsługi są chronione prawem copyright for MONACOR ® INTERNATIONAL GmbH & Co. KG.
Przetwarzanie całości lub części instrukcji dla osobistych korzyści finansowych jest zabronione.
39
DK
Dobbelt CD-afspiller
Læs nedenstående sikkerhedsoplysninger opmærksomt igennem før ibrugtagning af enheden. Bortset
fra sikkerhedsoplysningerne henvises til den engelske tekst.
●
Undgå at placere væskefyldte genstande, som
f. eks. glas, ovenpå enheden.
●
Varmen, der udvikles i enheden, skal kunne slippe
ud ved hjælp af luftcirkulation. Ventilationshullerne
i kabinettet må derfor ikke tildækkes.
Vigtige sikkerhedsoplysninger
●
Undlad at indføre genstande i ventilationshullerne! Dette kan forårsage elektrisk stød.
●
Tag ikke enheden i brug og tag straks stikket ud af
stikkontakten i følgende tilfælde:
1. hvis der er synlig skade på enheden eller netkablet
2. hvis der kan være opstået skade, efter at enheden er tabt eller lignende
3. hvis der forekommer fejlfunktion.
Enheden skal altid repareres af autoriseret personel.
Denne enhed overholder EU-direktivet vedrørende
elektromagnetisk kompatibilitet 89/336/EØF og lavspændingsdirektivet 73 / 23 / EØF.
Forsigtig! Enheden benytter livsfarlig netspænding (230 V~). For at undgå fare for elektrisk stød
må kabinettet ikke åbnes. Overlad servicering til
autoriseret personel. Desuden bortfalder enhver
reklamationsret, hvis enheden har været åbnet.
S
Advarsel! Undlad at kigge ind i CD-mekanismen,
når CD-skuffen er åben. Der kan udsendes laserstråler, som kan forårsage øjenskader.
●
Enheden er kun beregnet til indendørs brug. Beskyt den mod vanddråber og -stænk, høj luftfugtighed og varme (tilladt omgivelsestemperatur
0 – 40 °C).
Säkerhetsföreskrifter
Enheten uppfyller EG-direktiv 89 / 336 / EWG avseende elektromagnetiska störfält samt EG-direktiv
73/23/EWG avseende lågspänningsapplikationer.
Beskyt enheden mod støv, vibrationer, direkte sollys, fugt og varme. Til rengøring må kun benyttes en
blød, tør klud; der må under ingen omstændigheder
benyttes vand eller kemikalier.
●
Et beskadiget netkabel må kun repareres af producenten eller af autoriseret personel.
●
Tag aldrig stikket ud af stikkontakten ved at
trække i kablet, tag fat i selve stikket.
●
Hvis enheden benyttes til andre formål, end den
oprindeligt er beregnet til, hvis den betjenes forkert, eller hvis den ikke repareres af autoriseret
●
Placera inte föremål innehållande vätskor, t. ex.
dricksglass, på enheten.
att gälla. Dessutom tas i dessa fall inget ansvar för
skada som uppkommit på person eller materiel.
●
Värmen som alstras vid användning leds bort
genom självcirkulering, täck därför aldrig över kylhålen så att cirkulationen försämras.
●
Stoppa inte föremål i kylhålen! Risk för elektriska
överslag.
●
Tag omedelbart ut kontakten ur elurtaget om
något av följande uppstår.
1. Elsladden eller enheten har synliga skador.
2. Enheten är skadad av fall ed.
3. Enheten har andra felfunktioner.
Enheten skall alltid repareras på verkstad av
utbildad personal.
OBS! Enheten använder hög spänning internt
(230 V~). För att undvika elskador, öppna aldrig
chassiet på egen hand utan överlåt all service till
auktoriserad verkstad. Alla garantier upphör om
enheten har varit öppnad.
Ge även akt på följande:
● Varning! Titta aldrig in i spelmekanismen då
luckan är öppen. Laserstrålen kan skada ögonen.
● Enheten är endast avsedd för inomhusbruk. Enheten skall skyddas mot vätskor, hög luftfuktighet
och hög värme (tillåten omgivningstemperatur
0 – 40 °C).
●
En skadad elsladd skall bytas på verkstad eller
hos tillverkaren.
●
Drag aldrig ut kontakten genom att dra sladden
utan ta tag i kontaktkroppen.
●
Om enheten används på annat sätt än som avses
eller om den används på felaktigt sätt eller repareras av obehörig personal upphör alla garantier
●
Älä sijoita laitteen päälle mitään nestettä sisältävää, kuten vesilasia tms.
●
Laitteessa syntyvä lämpö johdetaan laiteesta ilmankierron avulla. Sen vuoksi kotelon ilma-aukkoja ei saa peittää.
●
Älä työnnä mitään tuuletusaukkoihin! Se voi aiheuttaa sähköiskun.
●
Irrota virtajohto pistorasiasta välittömästi, äläkä
ota laitetta käyttöön jos:
1. laitteessa tai virtajohdossa on näkyvä vaurio,
2. putoaminen tai vastaava vaurio on saattanut
aiheuttaa vian,
3. laitteessa on toimintahäiriöitä.
Laite täytyy kaikissa näissä tapauksissa huollattaa valtuutetussa huoltoliikkeessä.
Om enheten skall kasseras bör den lämnas till återvinning.
Skötsel av enheten
Skydda enheten mot damm, vibrationer, direkt solljus, fukt och värme. Rengör endast med enen mjuk
och torr trasa. Använd aldrig kemikalier eller vatten
vid rengöring.
Vid ljudavbrott och läsfel
Cigarettrök kan lätt komma in i CD-spelaren och ge
upphov till små partiklar som fastnar på lasernålen.
Denna orenhet kan orsaka läsfel. Då rök inte alltid
kan undvikas (på disco od.) skall enheten lämnas för
rengöring på verkstad. Denna rengöring är avgiftsbelagd även under gällande garantitid.
Kaksois CD soitin
Ole hyvä ja huomioi aina seuraavat turvallisuutta
koskevat ohjeet ennen laitteen käyttöön ottoa. Katso
käyttöön liittyviä ohjeita Englannin kielisistä ohjeista,
jos tarvitset lisää tietoa laitteen käytöstä.
Turvallisuudesta
Laite vastaa direktiiviä 89/336/EEC sähkömagneettisesta yhteensopivuudesta sekä matalajännitedirektiiviä 73/23/EEC.
Huomio! Tämä laite toimii hengenvaarallisella
230 V~ jännitteellä. Välttääksesi sähköiskun, älä
avaa laitteen koteloa. Jätä huoltotoimet valtuutetulle, ammattitaitoiselle huoltoliikkeelle. Huomioi
myös, että takuu raukeaa, jos laite on avattu.
Huomioi myös seuraavat seikat:
● Huomio! Älä katso CD mekanismiin, kun CD
kelkka on ulkona. Lasersäteiden säteily voi vahingoittaa silmiä.
● Tämä laite soveltuu vain sisätilakäyttöön. Suojele
laitetta kosteudelta, vedeltä ja kuumuudelta (sallittu ympäröivä lämpötila 0 – 40 °C).
40
Vedligeholdelse af enheden
Dubbel CD spelare
Innan enheten tas i bruk observera följande säkerhetsinstruktioner. Behövs ytterligare information för
handhavande utav enheten finner Ni det i den Engelska delen i manualen.
FIN
Hvis enheden skal tages ud af drift for
bestandigt, skal den bringes til en lokal
genbrugsstation for bortskaffelse.
Bemærkninger vedrørende lydafbrydelser og
læsefejl
Tobaksrøg trænger let ind i alle åbninger på enheden og sætter sig så fast på lasersystemets optiske
dele. Denne hinde af nikotin på laserens optik kan
medføre fejl i forbindelse med læsning af CD’er og
således forårsage forstyrrelser i afspilningen. Da det
ikke altid er muligt at undgå brug af enheden i lokaler med tobaksrøg (f. eks. et diskotek), skal enheden
i tilfælde af funktionsfejl renses af autoriseret personel. Sådan rensning vil kun blive udført mod betaling
– selv hvis reklamationsretten stadig er gældende.
Vær altid opmærksom på følgende:
●
personel, omfattes eventuelle skader ikke af
garantien.
●
Virtajohdon saa vaihtaa vain valmistaja tai valtuutettu huoltohenkilö.
●
Älä koskaan irrota virtajohtoa pistokkeesta johdosta vetämällä.
●
Laitteen takuu raukeaa, eikä valmistaja, maahantuoja tai myyjä ota vastuuta mahdollisista välittömistä tai välillisistä vahingoista, jos laitetta on
käytetty muuhun kuin alkuperäiseen käyttötarkoitukseen, laitetta on taitamattomasti käytetty tai
kytketty tai jos laitetta on huollettu muussa kuin
valtuutetussa huollossa..
Huolehdi laitteen kierrättämisestä, kun
laite lopullisesti poistetaan käytöstä.
Laitteen huolto ja ylläpito
Suojele laitetta pölyltä, värähtelyiltä, suoralta auringonpaisteelta, kosteudelta ja kuumuudelta. Käytä
puhdistamiseen vain kuivaa, pehmeää kangasta.
Älä käytä vettä tai kemikaaleja.
Huomioitavaa ääni- ja levynlukuhäiriöistä
Tupakansavu tunkeutuu helposti laiteen raoista ja
kiinnittyy optiseen lasersysteemiin. Tämä lika saattaa aiheuttaa lukuhäiriöitä ja äänen pätkimistä.
Koska tupakansavua ei aina voida välttää, laite tulee
puhdistuttaa valtuutetussa huoltoliikkeessä. Tällainen puhdistaminen maksaa myös takuuaikana!
®
Copyright © by MONACOR INTERNATIONAL GmbH & Co. KG, Bremen, Germany. All rights reserved. A-0325.99.01.11.2004