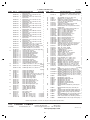
1
OPERATION AND OPERATION AND SERVICE GUIDE SERVICE GUIDE PO-1700Y PO-1700Z 2008 2009 ‘S’ Pumps OPERATOR’S MANUAL & PARTS LIST for Self-priming Centrifugal Pumps Before reading or using this manual be certain of the material of construction of your pump. Check the model number label on the pump as follows: POLYESTER pumps have model numbers beginning with SE POLYPROPYLENE pumps have model numbers beginning with SP RYTON® PUMPS have model numbers beginning with SY ! SAFETY WARNING Verify the chemical compatibility of the materials of your pump with the liquid you want to pump. If you are uncertain regarding chemical compatibility contact your dealer for applications assistance and request a copy of our Corrosion Resistance Charts. Do not use a pump that is not chemically compatible with the liquid you intend to pump or serious bodily injury, death, fire, explosion, or environmental damage could result. ALSO, PLEASE READ SECTION I, II, AND III BEFORE OPERATING PUMP. page no. I. Safety Precautions . . . . . . . . . . . . . . . . . . . . . . . . . . . . . . . . . . . . . . . . . . . . . . . . . . . . . . . . . . . . . . . . . . . . . . . 2 II. Preparing the Pump for Operation . . . . . . . . . . . . . . . . . . . . . . . . . . . . . . . . . . . . . . . . . . . . . . . . . . . . . . . . . . 3 III. Pump Operating Instructions . . . . . . . . . . . . . . . . . . . . . . . . . . . . . . . . . . . . . . . . . . . . . . . . . . . . . . . . . . . . . . 4 Pedestal Mount Hydraulic Drive Close Coupled Gasoline Engine Drive with PROTEK System Electric Drive Close Coupled Gasoline Engine Drive Close Coupled Gasoline Engine Drive with Optional Roll Cage Electric Drive long-coupled 2 ! ! SAFETY WARNING page no. A. Never use these pumps for pumping flammable liquids such as gasoline. AN EXPLOSION AND SERIOUS INJURY MAY RESULT IF THIS WARNING IS IGNORED. B. In pumping corrosive materials, extreme caution should be exercised. Provide safety guards, ventilation and drains to protect people and property in case of a leak in the pump. Handling instructions from the manufacturer(s) of the liquids being pumped should be closely followed. See Page 8. C. Before starting the pump, follow all of the instructions in this manual and any supplemental instructions supplied with the pump. D. Any person operating the pump and it’s power unit should be fully aware of it’s safe operation before they start using it. E. Never operate an engine driven unit in an explosive atmosphere, near combustible materials, or where insufficient ventilation exists unless specific provisions have been made regarding the power unit so as to prevent possible injury and damage. Be certain any other power unit is safe for the area in which it is to be operated. F. Always be sure that the pump is on secure footing so that it cannot slide, shift, or tip over. If the pump is sitting beside a pit, secure it so that it does not fall in. Pump and engine units have slots and holes for fastening to a secure base. Baseplate, skid rail and roll cage kits are available from your pump dealer. G. Never operate the unit with any guards removed. WARNING: H. With engine driven pumps: 1. In refueling engine, observe all safety precautions for the handling of fuel. 2. Never refuel the engine while it is running. Care should be exercised so that no fuel is spilled on a hot engine. Always allow engine to cool at least two minutes before refueling. I. Before working on this pump make sure that the power unit cannot inadvertently be started. J. Be sure that the power unit, pump, wiring and piping installations are suitable for the liquid being pumped. Comply with all applicable codes and regulations. K. Do not use torches or apply fire or flames to this pump for any reason. L. This pump must not be subjected to more than 65 pounds per square inch internal pressure for polyester pumps....55 psi maximum for Ryton® and polypropylene pumps. The pump itself, normally cannot develop more than 55 pounds per square inch pressure. The pump must not be used under any of the following unusual conditions which can result in excessive pressures being developed: 1. Pump shaft speed over 3600 RPM. 2. Quick closing valves in suction or discharge line or any other device which may introduce hydraulic shock into the system. 3. Possible sudden obstruction of discharge line such as vehicle driving over hose. 4. High positive suction pressures (such as with a flooded suction) which would increase the total system pressure to 65 PSI or above . . . 55 psi maximum for polypropylene and Ryton® pumps. I. SAFETY PRECAUTIONS OPERATOR’S MANUAL IV. Pump Trouble Shooting and Repair . . . . . . . . . . . . . . . . . . . . . . . . . . . . . . . . . . . . 3 V. Pump Disassembly and Repair . . . . . . . . . . . . . . . . . . . . . . . . . . . . . . . . . . . . . . . . 4 VI. Special Information: A. Flexible - Coupling: Coupling Alignment . . . . . . . . . . . . . . . . . . . . . . . . . . . . . 4 1. Couplings VII. Pump Parts List and Parts Diagram . . . . . . . . . . . . . . . . . . . . . . . . . . . . . . . . . . .5-6 VIII. Pump Accessories and Options List . . . . . . . . . . . . . . . . . . . . . . . . . . . . . . . . . . . . 7 I. Safety Precautions . . . . . . . . . . . . . . . . . . . . . . . . . . . . . . . . . . . . . . . . . . . . . . . . . 2 II. Preparing the Pump for Operation . . . . . . . . . . . . . . . . . . . . . . . . . . . . . . . . . . . . . 2 III. Pump Operating Instructions . . . . . . . . . . . . . . . . . . . . . . . . . . . . . . . . . . . . . . . . . 3 PLEASE READ SECTIONS I, II, AND III BEFORE OPERATING PUMP. Table of Contents OPERATOR’S MANUAL FOR SELF PRIMING CENTRIFUGAL PUMPS 2 1.8 1.3 1.2 1.8 1.8 1.5 1.1 1.0 1.5 1.5 1.5 1.1 1.0 1.5 1.5 Polyester - Polypropylene - Ryton® O. Do not tighten inlet and discharge fittings more than one turn beyond hand tight. Excessive force will damage the pump or fittings. Use teflon sealing tape on all threaded fittings. P. Long suction and discharge hoses or pipes must be supported so that the weight of the hoses or pipes filled with liquid does not damage or tip the pump over. Q. Use replacement parts supplied by the manufacturer only. R. Do not run the pump dry. Always fill the pump body with the liquid to be pumped before starting the pump. It is not necessary to drain the pump body after use, unless there is danger of freezing, settling of solids or crystallization. S. Do not restrict flow through the pump such as with a closed discharge valve or “starved” suction line. Harmful heat build up will result. If it is necessary to restrict flow through the pump for longer than 5 minutes, either the pump must be stopped or a discharge bypass line installed to keep liquid temperatures below the maximum recommended operating temperatures. T. Do not subject pump to extreme conditions of acidity or basicity. Consult factory for specific recommendations concerning chemicals and temperature. EPDM ELASTOMERS This pump is equipped with EPDM shaft seal and EPDM static seals. These elastomers (“rubber parts”) are suitable for use with water (clean or dirty) and many non-hazardous agricultural and industrial chemicals. Consult the factory for specific non-water application recommendations. BUNA-N-ELASTOMERS This pump is equipped with Buna-N-elastomers (“rubber parts”). Buna-N-material is suitable for use with water (clean and dirty) and other non-hazardous liquids. Consult factory for additional specific nonhazardous application recommendations. A. Pump Preparation 1. Inspect unit for shipping damage immediately upon receipt and before signing for merchandise. If any visible damage exists, note damage on shipping bill of lading or receiving document(s) before signing. Also notify your dealer or distributor immediately of any damage to the shipment. 2. Read these instructions and the power unit instructions until you are sure you can operate it safely and correctly. 3. IMPORTANT INFORMATION ABOUT PUMP ELASTOMERS (”RUBBER PARTS”). This pump is equipped with one of the three following elastomeric materials. Please read the label on the pump for the name of the specific type of elastomer used inside the pump. wire before working on unit to prevent accidental starting. CAUTION: Always remove spark plug or spark plug 3. Before starting, fill fuel tank with clean, fresh, unleaded grade automotive gasoline. Leaded gasoline may be used if unleaded is not available. Do Not mix oil with gasoline. Refer to engine manufacturers operating manual for further instructions. Fuel 2. Before starting, fill crankcase with oil specified by the engine manufacturer. Use a high quality detergent SAE 30 oil classified for service SF, SG, SH, SJ or higher. Do not add anything to the recommended oil. Oil B. Power unit preparation-Gasoline engine driven pumps: 1. For complete operating and maintenance information consult the engine manufacturer’s instructions included with the pump. VITON ELASTOMERS This pump is equipped with Viton elastomers (“rubber parts”). Viton material is suitable for use with water (clean or dirty), and many non-hazardous agricultural and industrial chemicals. However, due to the wide range of chemical solutions, it is not possible to list them all here. Consult the factory for specific non-water application recommendations. II. PREPARING THE PUMP FOR OPERATION M. Do not overtighten the drain or filler plugs. Hand tighten only. Excessive force may damage the threads or the pump body. Do not use metal plugs. N. Use at least one foot of flexible hose to make plumbing connections to the pump body. Rigid piping may put stresses on the pump, causing damage. If rigid piping must be used, properly support it so as to eliminate stresses on the pump. * The specific gravity is the ratio of the weight of the liquid to be pumped to the weight of an equal volume of water. Water has a specific gravity of 1.0 Therefore, a liquid which is heavier than water has a specific gravity greater then 1.0 Impeller Number 58-0667 58-0704 58-0706 58-0974 58-0975 Maximum Specific Gravity* at 3450 RPM 5. Do not pump liquids with specific gravities exceeding the following values: Verify the chemical compatibility of the materials of your pump with the liquid you want to pump. If you are uncertain regarding chemical compatibility contact your dealer for applications assistance and request a copy of our Corrosion Resistance Charts. Do not use a pump that is not chemically compatible with the liquid you intend to pump or serious bodily injury, death, fire, explosion, or environmental damage could result. 3 interchanging any two of the three power leads. 3. Make certain that wiring for your electric motor complies with all existing local codes. D. Power unit preparation-Hydraulic and Pneumatic Motors: Consult the separate instruction sheet supplied with each hydraulic or pneumatic motor powered unit. Power requirements: NOTE: For liquids having specific gravities greater than 1.0, increase the rated horse-power (from catalog) by a factor equal to the specific gravity of the liquid being pumped. (Ex. Catalog HP x Specific gravity = Actual HP required) NOTE; PUMP CAN LIFT WATER FROM A DEPTH OF 25’. HOWEVER IT IS BETTER TO USE THE SHORTEST SUCTION LIFT POSSIBLE INCORRECT AND DANGEROUS! PUMP AND HOSE ARE NOT SUPPORTED, PUMP IS NOT SITTING LEVEL AND NO STRAINER IS USED. A. Fill the pump body with liquid before starting. Do not run the pump dry; damage to the seal may result. There are no points on the pump which need lubrication. The shaft seal is self lubricating, and designed to handle clean liquids. B. Make certain that all hose and pipe connections are airtight. IMPORTANT: An air leak in the suction line may prevent priming, and will reduce the capacity of the C. pump. Always place the pump as close as possible to the liquid to be pumped. Keep all lines as short and straight as possible. Avoid sharp bends in hoses. Keep the pump on a level foundation. See Figure #1. D. If flexible hose must be laid across a roadway, protect it with planking. Instantaneous shut-off pressures applied when a vehicle runs across an unprotected hose will cause“hydraulic shock”. This shock can damage the pump and/or damage the hose. See Figure #2. FIGURE 1 CORRECT! PUMP AND HOSE ARE SUPPORTED. PUMP IS LEVEL AND A STRAINER IS USED. SUPPORT HOSE OR PIPING KEEP PUMP SECURED AND FAR ENOUGH FROM BANK THAT SUCTION HOSE WILL NOT PULL IT INTO THE WATER. TIE PUMP DOWN IF NECESSARY. E When pumping dirty water or other liquids which may contain solids, always use a pump strainer on the end of the suction line specified by the manufacturer. If the suction strainer is likely to clog with dirt and debris, do one of the following: (a) Prepare a bed of rocks on-which to rest the strainer. (see Figure #3.) (b) Tie the strainer so that it stays off the bottom of the pit, excavation, etc. (c) Tie the strainer inside a basket or pail. (see Figure #3.) F. Drain the pump body whenever there is a danger of freezing. G. Always use rubber feet under portable pump when operating on a hard surface. This will prevent damage to the pump and power unit. H. Always flush out the pump at the end of operation if the liquid being pumped may leave a solid or sticky residue in the pump. If this is not done, damage to the pump may result. III. PUMP OPERATING INSTRUCTIONS CAUTION: The engine governor is set at the factory. Do not tamper with any part which may increase the governed engine speed. C. Power unit preparation-Electric Motors: 1. Make certain the input power to your electric motor is proper, single phase or three phase, and is of the proper voltage according to the motor specification plate. 2. Be sure of the proper motor rotation. Pump impeller should rotate counterclockwise, looking from the suction inlet side. For single phase motors consult the motor manufacturer’s instructions for wiring for counterclockwise rotation. Three phase motor rotation may be reversed by The engine exhaust from this product contains chemicals known to the State of California to cause cancer, birth defects, or other reproductive harm. WARNING 3 FIGURE 3 B. Pump has insufficient flow FIGURE 4 (11 INCHES OF MERCURY (MIN.) PUMP RUNNING AT 1750 RPM). PUMP RUNNING AT 3450 RPM. 22 INCHES OF MERCURY (MIN.) 1. Check same items as in 1, 2, and 3 above. 2. Replace any worn or broken components; check clearance between impeller vanes and volute face (See section V #B.5.). 1. Fill pump with clean liquid and try priming again. 2. Shut off power source to pump. Shut off valves to and from pump. While observing all safety precautions for the liquid being pumped, disconnect suction and discharge lines and drain the pump completely. Fill the pump with water. Install a vacuum gauge in the suction port (see figure 4). Turn on power source. Vacuum should exceed 22” of mercury when pump shaft is rotating at 3450 RPM and should equal or exceed 11”of mercury with pump shaft at 1750 RPM. If vacuum is below these values, check the following: a. Leak at suction fitting (PUMP b. Pump rotation. Impeller should rotate counterSUCTION CONNECTION) clockwise when viewing through suction end. c. Pump speed. (Maximum vacuum performance drops off rapidly with decreasing RPM). d. Sealing of check valve gasket between body and volute. e. Check for worn impeller and or volute. If necessary, replace these parts. (See items B.5., B.6. & B.7. of section V). f. Worn shaft seal. 3. If pump suction tests OK, attach suction line and check suction at end of suction line. Failure to get suction here indicates leaking connections, leaking hoses, pipes, or obstructions in the lines. Liners of suction hose will occasionally collapse inside the hose. TREATMENT IV. PUMP TROUBLESHOOTING AND REPAIR A. Does not prime or does not pump DIAGNOSIS FIGURE 2 SUGGESTED WAYS TO KEEP STRAINER OUT OF RIVER SILT. NOTE: Reducing pipe size will drastically reduce pump performance and can damage pump if overly restricted. The suction line should always be the same size or larger than the discharge line. For optimum pump performance the pipe size should remain the same as the port sizes. 4 A. DISASSEMBLY 1. Remove the ten 1/4”-20 body screws. Remove the pump body. 2. Remove the rubber check valve from the volute and the large 0-ring from around the perimeter of the bracket. 3. Remove the volute. 4. Unscrew the impeller screw and remove it along with the small o-ring. Slide the impeller and the key off the shaft. (To facilitate removal of impeller, gently force two screw-drivers 180° apart, under the back of the impeller and gently pry the impeller off the shaft.) 5. One half of the shaft seal is in the impeller hub, the other half is around the shaft, inside the bracket. The impeller portion of the seal can be carefully pried out with a screwdriver. If you plan to reuse the seal, be careful not to nick or scratch either of it’s flat polished faces. 6. Remove the four bracket screws* and the small 0-rings on each screw and remove the 9” 0-ring segment which forms an arc over the shaft seal. Pull the bracket off of the engine. The stationary portion of the shaft seal can now be pressed out from the back side of the bracket. Use a round wooden plug 1 3/16” in diameter and carefully press the seal out straight if it might be reused. (Be careful not to damage the seal face). Remove the 0-ring from around the seal. *NOTE: If plugs are installed over the bracket screws on your pump remove the plugs by screwing a body screw into the hole and carefully pulling them out. B. ASSEMBLY 1. Put all parts back together in the reverse of the order used in disassembly. 2. When installing a new seal, always replace both elements of the seal and put the 0-ring in place around the bracket half of the seal. Protect the smooth lapped sealing surfaces from damage when pressing in the new parts. To press the bracket portion of the seal into place, use a piece of pipe that will bear only on the flange of the metal seal case. Be sure both seal halves are fully seated and square with respect to the pump shaft. 3. During final assembly, it is recommended that all of the screwhead 0-ring seals (item #8, fig. 7) be replaced. Lubricate these with vegetable oil (Do Not use Petroleum base oil) before assembly. 7. Check volute face for excessive wear. Slight scoring is acceptable. 8. The four bracket screws (with o-ring on each) holding pump bracket to engine should be tightened securely with a large screwdriver or socket wrench. 9. NOTE: Carefully assemble the pump. The bracket and the pump body when assembled will hold the volute in place. 10. Lubricate the body o-ring with a vegetable based lubricant before replacing it in the pump. 11. When assembling nipples, fittings, and elbows into the pump body, wrap the NOTE: If the vane thicknesses are less than noted above, shimming up to .090 (Item #30, fig.7) is acceptable. If more shimming than .090 is required, the impeller should be replaced. *See parts list for further description 4. Use a thread locking compound such as Loctite #242 on the bracket screws (Item #9 in fig. 7), and on the impeller screw (Item #16 in fig. 7) 5. The clearance between the impeller vanes and the volute face should be about .015” to .025” for good performance. This front clearance can be attained by shimming. The impeller can be shimmed away from the bracket face by: a. Adding one or more washer type shims (Item #30, fig. 7) under the impeller hub. The impeller can be shimmed closer to the bracket by: a. Removing one of more washer type shims (Item #30, fig. 7) from under the impeller hub (if any were used on your pump). After shimming turn the impeller to ensure that the impeller is not touching the bracket. If necessary, add or remove more shims. Be sure that the impeller is completely on the shaft when checking shimming. Put pressure only on the hub when pressing impeller on the shaft. 6. Check the impeller vanes for proper height. The following measurements should be found when measuring the vane height on the outside perimeter of the impeller: *Impeller Number Vane height at tip of vane 58-0667 .535” 58-0704 .535” 58-0706 .535” 58-0974 .600” 58-0975 .975” V. PUMP DISASSEMBLY AND REPAIR 4 INCORRECT A. FLEXIBLE COUPLED PUMPS: COUPLING ALIGNMENT Measure the diameter of the pump shaft and power unit shaft. Choose the appropriate coupling for your pump and power unit. (See flexible couplings chart number VI-A). Proper shaft and coupling alignment reduces vibration and prevents premature coupling failure. The following 8 steps help in obtaining proper shaft alignment: 1. Make sure you use a rigid base plate large enough for the assembly of the pump and the drive-unit. We offer kits, 58-0028 and 58-0016, for this purpose. (See basePlate kits listed after couplings chart VI-A)** 2. Place the pump and drive-unit on the base plate. 3. Measure the distance between the centerline of the pump shaft and the base plate surface. 4. Measure the distance between the centerline of the drive-unit shaft and base plate. 5. Compare measurements obtained from steps 3 and 4 and use spacer blocks for height adjustment to insure alignment of both shafts. 6. Place the coupling halves over each shaft. Put the “spider” between the two halves and couple the two halves together. 7. To assure parallel alignment (Figure 5) place a straight edge along the side of FIGURE 5 CORRECT noises. A scraping noise indicates improper clearances, requiring disassembly and reshimming. 12. With pump running and with pump body full of water, put vacuum gauge over suction opening and check suction ability according to section IV. ELECTRIC MOTOR FRAME SIZES 56 143T-145T 182-184 182T-184T 213T,215T 213-215 --------- *One-half of each coupling has a .750” diameter bore to fit the pedestal pump shaft. FLEXIBLE-COUPLINGS CHART VI-A 1.375” 1” 75” 58-0788 58-0875 58-0876 58-0786 58-0786 1.125” .625” .875” COUPLING PART NUMBER 58-0787 POWER UNIT SHAFT* DIAMETER FIGURE 6 both coupling halves in two different locations, 90° apart. The coupling is aligned when the straight edge rests squarely on the sides of both coupling halves. 8. To avoid angular misalignment, insert a measuring device (taper gauge or feeler gauge) between the coupling faces at four locations 90° apart (See arrows in Figure 6 ) and measure the gap at each of the four locations. For proper alignment all four measurements should be equal. Reshimming may be required to achieve this alignment. VI. SPECIAL INFORMATION male threads with teflon sealing tape. Proper tightness is hand tight plus one full turn with a pipewrench. CAUTION: After pump is assembled and before starting, rotate the shaft by hand and listen for possible scraping SELF-PRIMING CENTRIFUGAL PUMP - “S” SERIES 58 45 NOTE 1: You will note a multiple choice of impellers, volutes, and top volute screws. Once you have identified the impeller (from the the pump model no., or by comparing your impeller to the descriptions given the various impellers) you can make your choice of impeller, volute, or volute screws by following the same letter grouping. For example: if your impeller is black, open type, 5 vane, .535” wide, then it is part no. 58-0706 30 and has an “A” designation, under the column marked “Group”. You now choose the proper top volute screw (ref no. 19, as required). NOTE 2: Impellers (ref. no. 15) may be ordered with the seal (ref. no. 14) installed. The part no. for these assemblies is the same as the impeller part no. except that the last digit is a “1” for Buna-N seal, a “2” for EPDM and a “3” for Viton seal. For example: Assembly 58-0704 31 consists of impeller 55 47 46 58-0704 30 (ref. no. 15) and a Buna-n seal half (ref. no. 14). NOTE 3: Bracket assemblies are available with the shaft seal (ref. no. 13), shaft seal O-ring (ref. no. 11) and Oring segment (ref. no. 10) installed. For example: in Buna order 58-0703 31, EPDM order 58-0703 48 45 32, and Viton, order 58-0703 34. 33 56 59 57 51 PARTS LIST PP-9900G Nov. 2007 49 50 49 68 63 69 33 38 44 43 32 39 40 54 53 41 66 67 32 31 52 33 35 36 60 19 O 32 33 32 33 62 44 43 31 61 65 64 46 32 31 ITEM # 6 7 8 9 PART # 58-0703 30B 58-0703 40 58-0703 60 58-0719 71 58-0719 72 58-0719 73 58-0717 71 58-0717 72 58-0717 73 58-0715 10 58-0728 10 10 58-0754 71 58-0754 72 58-0754 73 PUMP PARTS LIST PART DESCRIPTION QTY./PUMP BRACKET, Polyester, Black 1 BRACKET, Polypropylene, grey 1 BRACKET, Ryton, brown 1 O-RING, Body, BUNA-N 1 O-RING, Body, EPDM 1 O-RING, Body, VITON 1 O-RING, Screw, BUNA-N 5 O-RING, Screw, EPDM 5 O-RING, Screw, VITON 5 SCREW, Bracket, stainless steel for pumps close-coupled to engine and cast ped. mount, 5/16”-24 x 1.25” 4 SCREW, Bracket, stainless steel for pumps pedestal mounted (plastic), close-coupled to electric, hydraulic or pneumatic motor, 5/16”-18 x 1.5” 4 O-RING, Segment, BUNA-N 1 O-RING, Segment, EPDM 1 O-RING, Segment, VITON 1 5 ITEM # PART # 11 58-0976 71 58-0976 72 58-0976 73 12 58-1750 90 11,13,14 58-0714 11 58-0714 12 58-0714 14 58-0714 15 58-0714 92SG PART DESCRIPTION QTY./PUMP O-RING, Shaft Seal, BUNA-N 1 O-RING, Shaft Seal, EPDM 1 O-RING, Shaft Seal, VITON 1 PLUG, Bracket Screw (non-metallic only) 4 SEAL, Shaft, BUNA-N, 316 S.S.,carbon/ceramic 1 SEAL, Shaft, EPDM, 316 S.S.,carbon/ceramic 1 SEAL, Shaft, VITON, 316 S.S.,carbon/ceramic 1 SEAL, Shaft, Hastelloy C, Teflon, silicon carbide 1 SEAL, Shaft, Non-Metallic, ECTFE, EPDM siliconized graphite 1 58-0714 94SG SEAL, Shaft, Non-Metallic, ECTFE, VITON siliconized graphite 1 58-0891 92SG SEAL, Shaft, Kynar, Polypro, Hastelloy C, EPDM, silicon carbide 1 58-0891 94SG SEAL, Shaft, Kynar, Polypro, Hastelloy C, VITON, silicon carbide 1 58-46250 11 SEAL, Shaft, BUNA-N, 316 SS, silicon carbide 1 58-46250 12 SEAL, Shaft, EPDM, 316 SS, silicon carbide 1 58-46250 13 SEAL, Shaft, VITON, 316 SS, silicon carbide 1 ITEM # 15 16 17 18 19 20 21 22 23 24 25 27 30 “S” SERIES PUMP PARTS LIST PART # GROUP PART DESCRIPTION QTY./PUMP ITEM # PART # 58-0704 30 A IMPELLER, 3 Vane, .535” wide 5.5” dia., 31 58-1014 10 Polyester, black 1 58-0704 40 A IMPELLER, 3 Vane, .535”wide 5.5” dia., 58-1165 10 Polypropylene, grey 1 58-0704 60 A IMPELLER, 3 Vane, .535” wide 5.5” dia., 32 58-0883 Ryton, brown 1 33 58-0745 58-0706 30 A IMPELLER, 5 Vane, .535”wide 5.5” dia., 35 58-1011 20 Polyester, black 1 36 58-0729 H 58-0706 40 A IMPELLER, 5 Vane, .535”wide 5.5” dia., Polypropylene, grey 1 38 58-1826 71 58-0706 60 A IMPELLER, 5 Vane, .535” wide 5.5” dia., 39 58-1828 90 Ryton, brown 1 58-1825 90 58-0974 30 B IMPELLER, 4 Vane, .600” wide 4.75”dia., 40 58-1823 40 Polyester, black 1 58-0974 40 B IMPELLER, 4 Vane, .600”wide 4.75”dia., 41 58-0934 10 Polypropylene, grey 1 42 58-1001 30B 58-0974 60 B IMPELLER, 4 Vane, .600”wide 4.75”dia., 58-1001 40 Ryton, brown 1 58-1001 60 58-0975 30 C IMPELLER, 4 Vane, .975”wide, 4.75”dia., 58-1002 30B Polyester, black 1 58-1002 40 58-0975 40 C IMPELLER, 4 Vane, .975”wide, 4.75”dia., 58-1002 60 Polypropylene, grey 1 58-0755 30B 58-0975 60 C IMPELLER, 4 Vane, .975”wide, 4.75”dia., 58-0755 40 Ryton, brown 1 58-0755 60 58-0667 30 B IMPELLER, 3 Vane, .535”wide, 4.75”dia., 58-0943 30B Polyester, black 1 58-0784 30B 58-0667 40 B IMPELLER, 3 Vane, .535”wide, 4.75”dia., 58-0877 30B Polypropylene, grey 1 43 58-1015 10 58-8706 30 IMPELLER, 5 Vane, .535” w. 5.5” d, black 44 58-1010 20 Polyester (8hp pumps only, 7/2003) 1 58-8975 30 IMPELLER, 4 vane, .975” w x 4.75” d, black 45 58-1955 71 Polyester, (8hp pumps only, 7/2003) 1 58-1955 73 58-0716 10 SCREW, Impeller,S.S., 5/16”-24x.75” 1 46 58-0882 90 58-1668 10 SCREW, Impeller, S.S.,3/8-24x1” (8hp only) 1 47 58-0884 71 58-0702 30 A VOLUTE, Flat, Polyester 1 48 58-1951 90 58-0702 60 A VOLUTE, Flat, Ryton, brown 1 49 58-1954 90 58-0773 31 A VOLUTE, Buna-N lined Polyester 1 50 58-1952 10 58-0773 32 A VOLUTE, EPDM lined Polyester 1 58-1952 91 58-0954 30 B VOLUTE, Flat, Polyester 1 58-1952 93 58-0954 60 B VOLUTE, Flat, Ryton, brown 1 51 58-1953 10 58-0955 31 B VOLUTE, Buna-N lined Polyester 1 52 58-0730 10 58-0955 32 B VOLUTE, EPDM lined Polyester 1 53 58-0729 10 58-0977 30 C VOLUTE, Flat, Polyester 1 54 58-0745 10 58-0977 60 C VOLUTE, Flat, Ryton, brown 1 55 58-0759 20 58-0978 31 C VOLUTE, Buna-N lined Polyester 1 56 58-0777 58-0978 32 C VOLUTE, EPDM lined Polyester 1 58-0777 10 58-0725 10 SCREW, side volute, S.S., #6-cc x.5” long as 55,56 58-2053 01 required 58-2053 02 58-0771 10 A SCREW, top volute, S.S.,#10-24x1.5” as 57 58-1956 10 required 58-0997 10 B,C SCREW, top volute, S.S., #10-24 x .5” as 58 58-2525 10 required 59 58-1950 01 58-0705 71 CHECK VALVE, Buna-N 1 58-0705 72 CHECK VALVE, EPDM 1 58-1950 01H 58-0705 73 CHECK VALVE, VITON 1 58-1206 SCREW, Body, plated steel 1/4”-20 x 2-3/8” 10 58-1950 01T 58-1206 10 SCREW, Body, SS, 1/4”-20 x 2-3/8” long 10 58-1009 71 O-RING, Drain Plug, Buna-N 1 60 58-0686 58-1009 72 O-RING, Drain Plug, EPDM 1 61 58-0634 24 58-1009 73 O-RING, Drain Plug, VITON 1 58-0644 58-0723 30 PLUG, Drain, Polyester, black 1 58-0635 GC 58-0723 40 PLUG, Drain, Polypropylene, grey 1 58-0635 H 58-0723 60 PLUG, Drain, Ryton, brown 1 58-0646 V 58-0967 58-0722 30B PLUG, Filler, Polyester, black 1 62 58-0926 58-0722 40 PLUG, Filler, Polypropylene, grey 1 63 58-0028 58-0722 60 PLUG, Filler, Ryton, brown 1 58-0765 71 O-RING, Filler plug, Buna-N 1 58-0016 58-0765 72 O-RING, Filler plug, EPDM 1 58-0765 73 O-RING, Filler plug, VITON 1 64 58-0933 72 58-0718 KEY, steel 1 58-0935 72 58-0718 10 KEY, stainless steel 1 65 58-0929 58-0718 30 KEY, Polyester 1 58-0778 11 SHIM, .006”, stainless steel as required 66 58-0002 58-0778 12 SHIM, .015”, stainless steel as required 67 58-0778 13 SHIM, .030”, stainless steel as required 68 58-0009 58-46338 10 SHIM, .015”, S.S. (8hp only) as required 69 58-0008 PP-9900G PART DESCRIPTION QTY./PUMP ADAPTER, shaft, for close-coupled electric or pneumatic motor, stainless steel, .625” bore 1 ADAPTER, S.S., for hydraulic motor, .563” bore 1 SET SCREW, 1/4”-20 x .25” long, steel 2 KEPNUT, 5/16”-18, plated steel 4 PEDESTAL, hydraulic motor, molded plastic 1 SCREW, for mounting hydraulic motor to pedestal, 5/16”-18 x 1.0” long, plated steel 4 PAD, Rubber, Saddle 1 SADDLE, Electric motor, 6-5/8” dia. motor 1 SADDLE, 5-11/16” diameter motor 1 BASEPLATE, for close-coupled electric motors, molded plastic 1 STRAP, for close-coupled electric motors, SS 1 BODY, 1-1/2” NPT, Polyester, black 1 BODY, 1-1/2” NPT, Polypropylene, grey 1 BODY, 1-1/2” NPT, Ryton, brown 1 BODY, 2” NPT, Polyester, black 1 BODY, 2” NPT, Polypropylene, grey 1 BODY, 2” NPT, Ryton, brown 1 BODY, 3” NPT, Polyester, black 1 BODY, 3” NPT, Polypropylene, grey 1 BODY, 3” NPT, Ryton, brown 1 BODY, 1-1/2” BSP, Polyester, black 1 BODY, 2” BSP, Polyester, black 1 BODY, 3” BSP, Polyester, black 1 SCREW, hex head cap, 3/8”-16x1.25” long, S.S 4 ADAPTER, Motor, for pump close-coupled to electric or pneumatic motor, molded plastic 1 SEAL, lip, .710” ID, Buna-N 2 SEAL, lip, .710” ID, VITON 2 SHAFT, Sleeve, Polyethylene 1 SLINGER, Buna-N 1 HOUSING, Bearing, cast metal 1 BEARING, Ball, .787” ID 2 SHAFT, stainless steel, .75” diameter 1 SHAFT, Hastelloy, .75” diameter 1 SHAFT, Titanium, .75” diameter 1 PLATE, End, stainless steel 1 FLAT WASHER, .563”, stainless steel 2 SCREW, 5/16”-18 x 1”, stainless steel 2 KEPNUT, 5/16”-18, stainless steel 2 BEARING Pedestal, molded plastic 1 BEARING, Shaft Assy., standard, carbon steel 1 BEARING, Shaft Assy., with S.S. shaft sleeve 1 ASSEMBLY, Pedestal, 3/4” carbon steel shaft 1 ASSEMBLY, Pedestal, with S.S. shaft sleeve 1 SHIM, Bearing Shaft, cast metal pedestal, .006” thick as required SCREW, hex, 1/4”-20 x 3/4” stainless steel 4 BEARING & PEDESTAL ASSY., with 3/4” S.S. shaft (includes items 45, 48, 49, 50, 51, 57 & 58) 1 BEARING & PEDESTAL ASSY., with 3/4” Hastelloy shaft (includes items 45, 48, 49, 50, 51, 57 & 58) 1 BEARING & PEDESTAL ASSY., with 3/4” Titanium shaft (includes items 45, 48, 49, 50, 51, 57 & 58) 1 MOTOR, Hydraulic 1 ENGINE, B&S, Series 550 1 ENGINE, B&S INTEK Series 850 1 ENGINE, Honda, GC 160 1 ENGINE, Honda, GX 160 1 ENGINE, B&S, 6.5HP, Vanguard 1 ENGINE, B & S, INTEK Pro, 305cc 1 MOTOR, pneumatic 1 BASEPLATE KIT, standard duty, call factory for details 1 BASEPLATE KIT, heavy duty, call factory for details 1 GASKET, Engine Protection, EPDM, 3.5HP only 1 GASKET, Engine Protection, EPDM, INTEK only 1 BASE PLATE, for pumps coupled to pneumatic motor 1 BASE RUNNER KIT, two steel rails with fasteners 1 SUCTION STRAINER, see Bulletin PA-206Q ROLL CAGE, w/rubber feet, mounting hardware 1 WHEELED CART, for most engine driven pumps 1 NOTE: All specifications, as shown, are subject to change without previous notice. serving industry worldwide PACER® PUMPS Div. ASM Industries, Inc. 41 Industrial Circle Lancaster, PA 17601-5927 Email: [email protected] 717-656-2161 800-233-3861 FAX: 717-656-0477 www.pacerpumps.com 6 Distributed By: (Printed in U.S.A.) 7 TYPE A PACER HOSE KITS: 20’ SUCTION HOSE, 25’ DISCHARGE HOSE, STRAINER AND FITTINGS P-58-0201 1½” Hose kit with threaded hose ends P-58-0202 1½” Hose kit with quick-connect hose ends P-58-0204 2” Hose kit with threaded hose ends P-58-0206 2” Hose kit with quick-connect hose ends P-58-0207 3” Hose kit with threaded hose ends P-58-0208 3” Hose kit with quick-connect hose ends All 3” pumps All 2” pumps All 1½” pumps All 3” pumps All 2” pumps All 1½” pumps All 3” pumps All 2” pumps All 1½” pumps All 3” pumps All 3” pumps All 2” pumps All 2” pumps All 1½” pumps All 1½” pumps Models starting wtih SEB2YL and SE2YL Polyester/EPDM pumps Models starting wtih SEB2PL and SE2PL All 3” pumps All 2” pumps All 1½” pumps All 3” pumps All 2” pumps 7 P-58-0009 P-58-0074 P-58-1901 V P-58-1902 V P-58-1903 V P-58-1904 V P-58-1475 P-58-1476 P-58-1477 P-58-1465 L P-58-1466 L P-58-1467 L TYPE G TYPE H P-58-1455 P-58-1456 P-58-1457 P-58-1555 P-58-1556 P-58-1557 P-58-1445 P-58-1446 P-58-1447 P-58-1435 L P-58-1436 L P-58-1437 L P-58-1535 L P-58-1536 L P-58-1537 L FULL PORT BALL VALVES P-58-1905 V 1½” P-58-1906 V 2” P-58-1907 V 3” 6/13/08 4:43:29 PM Up to 8 HP All pumps Registered Trademarks: Hastelloy - Haynes International Viton - Dupont Ryton - Phillips Chemical ROLL CAGE for engine driven ‘S’ pumps SEAL REPAIR KIT - Includes EPDM shaft seal and all O-rings ½” ¾” 1” 1¼” 1½” Dust Plug 2” Dust Plug 3” Dust Plug 1½” Dust Cap 2” Dust Cap 3” Dust Cap 1½” Male Adapter/Male Threads, NPT 2” Male Adapter/Male Threads, NPT 3” Male Adapter/Male Threads, NPT 1½” Male Adapter/Male Threads, BSP 2” Male Adapter/Male Threads, BSP 3” Male Adapter/Male Threads, BSP 1½” Male Adapter/Hose Shank 2” Male Adapter/Hose Shank 3” Male Adapter/Hose Shank 1½” Female Coupler/Female Threads, NPT 2” Female Coupler/Female Threads, NPT 3” Female Coupler/Female Threads, NPT 1½” Female Coupler/Female Threads, BSP 2” Female Coupler/Female Threads, BSP 3” Female Coupler/Female Threads, BSP 1½” Female Coupler/Hose Shank 2” Female Coupler/Hose Shank 3” Female Coupler/Hose Shank 1½” Female Coupler/Male Threads, NPT 2” Female Coupler/Male Threads, NPT 3” Female Coupler/Male Threads, NPT 1½” Female Coupler/Male Threads, BSP 2” Female Coupler/Male Threads, BSP 3” Female Coupler/Male Threads, BSP P-58-1415 L P-58-1416 L P-58-1417 L P-58-1515 L P-58-1516 L P-58-1517L P-58-1425 L P-58-1426 L P-58-1427 L 1½” Male Adapter/Female Threads, NPT 2” Male Adapter/Female Threads, NPT 3” Male Adapter/Female Threads, NPT 1½” Male Adapter/Female Threads, BSP 2” Male Adapter/Female Threads, BSP 3” Male Adapter/Female Threads, BSP DESCRIPTION POLYPROPYLENE QUICK-CONNECT COUPLERS P-58-1405 P-58-1406 P-58-1407 P-58-1505 P-58-1506 P-58-1507 PART NUMBER TYPE F TYPE E TYPE D TYPE C All pumps All pumps All 3.5 to 6.5 HP engines with 3/4” diameter shaft TYPE B All 1½” pumps 3.5 to 8HP gas engine driven All pumps 3.5 to 8HP gas engine driven TYPES OF ‘S’ PUMP TO BE USED WITH/ON 3.5 to 6.5HP gas engine driven Elgiloy - Elgiloy Co. Kynar - Pennwalt Halar - Ausimont Contact us for information on Pump Repair Kits, Conversion Kits for changing from one pump driver to another, 0-ring and Shaft Seal Kits, Hardware Kits in Hastelloy or Titanium, and Pumps fitted for Total Non-Metallic Solution Contact. PART NUMBER DESCRIPTION P-58-0002 BASE RUNNER KIT - Includes two steel runners (rails) with fasteners P-58-0114 RUBBER FEET KIT - Includes 4 rubber feet/fasteners to be used with 58-0002 base runner kit P-58-0003 RUBBER FEET KIT, Includes 4 rubbert feet with fasteners P-58-0014 BUNA-N KIT - Buna-N fitted shaft seal, check valve, all o-rings to rebuild pump. P-58-0005 EPDM KIT, Same as P-58-0014, except EPDM P-58-0017 VITON® KIT - Same as P-58-0014, except Viton P-58-0015 PROTEK Engine Protection System P-58-0020 1½” PIPE FITTINGS KIT, NPT - Two faced steel nipples, one polypropylene elbow (for PVC nipples order P-58-0037) P-58-0021 2” PIPE FITTINGS KIT, NPT - Same as Kit 0020 (for PVC nipples order P-58-0038) P-58-0022 3” PIPE FITTINGS KIT, NPT - Same as Kit 0020 (for PVC nipples order P-58-0039) P-58-0161 1½” NPT CAMELOT QUICK CONNECT FITTINGS KIT Two quick connect adapters, Type F, one polypropylene elbow P-58-0162 2” NPT CAMELOT QUICK CONNECT FITTINGS KIT Same as P-58-0161 except 2” adapters and elbow P-58-0163 3” NPT CAMELOT QUICK CONNECT FITTINGS KIT Same as P-58-0161 except 3” adapters and elbow P-58-0211 FILL PLUG & DRAIN PLUG KIT P-58-702EP-P REBUILD KIT , for Polyester pumps with 704 impeller includes impeller, volute, shaft seal and all rubber components P-58-954EP-Y REBUILD KIT , for Polyester pumps with 974 impeller includes impeller, volute, shaft seal and all rubber components P-58-0734 STRAINER, 1½” NPT - For end of suction hose, molded polyethylene P-58-0734 91 STRAINER, 1½” NPT - For end of suction hose, molded Halar P-58-0733 STRAINER, 2” NPT - For end of suction hose, molded polyethylene P-58-0733 91 STRAINER, 2” NPT - For end of suction hose, molded Halar P-58-0757 STRAINER, 3” NPT - For end of suction hose, molded polyethylene P-58-0757 91 STRAINER, 3” NPT - For end of suction hose, molded Halar P-58-0753 40 ELBOW, 90°, 1½” NPT - Male x Female Street Ell, molded polypropylene P-58-0752 40 ELBOW, 90°, 2” NPT - Male x Female Street Ell, molded polypropylene P-58-0756 40 ELBOW, 90°, 3” NPT - Male x Female Street Ell, molded polypropylene P-58-1610 40 ELBOW, 90°, 1½” , Male NPT x Hose Shank, polypropylene P-58-1611 40 ELBOW, 90°, 2” , Male NPT x Hose Shank, polypropylene P-58-1612 40 ELBOW, 90°, 3” , Male NPT x Hose Shank, polypropylene P-58-1615 40 HOSE NIPPLE, 1½” MALE NPT x Hose Shank, polypropylene P-58-1616 40 HOSE NIPPLE, 2” MALE NPT x Hose Shank, polypropylene P-58-1617 40 HOSE NIPPLE, 3” MALE NPT x Hose Shank, Polypropylene PACER ACCESSORIES An Ounce of Prevention . . . Flammable solvents are often purchased in bulk and transferred manually or with motor driven pumps. Care must be taken to neutralize static electricity which may rest as a potential in the storage tank, as well as that which may rest in the receiving tank. The potential of such would, of course, be greatly Sparks from Open Motor Cause Explosion “User of pump is burned while transferring explosive liquids. Accident was caused by the use of an open motor. . . Explosion resulted and the employee was burned over many parts of his body.” In addition to the proper use of bonding and grounding cables, when motorized pumps are used to transfer flammables and combustibles those of the explosionproof or air driven type should be used. Electric or air motors are often wired and/or enclosed in such away that no sparks can be emitted from the motor casing otherwise sparks from the motor could cause the flammable liquid to flash or explode. increased if the liquid were allowed to splash around during movement of the container. Therefore both containers must be satisfactorily grounded, and then each of the containers must be bonded, that is connecting the ground wire from tank to tank so that the potential static electricity is now equalized. Splashing of Acid Causes Burns “Operator working with aggressive acids receives skin burns when pump, which was energized, created pressure in a pressure vessel not closed properly, therefore allowing liquid to escape and splashing the operator.” Operator should have checked the instruction manual and followed procedures as set forth by the manufacturer to ensure that the cover of the pressure vessel was securely tightened. Operator could also have prevented bodily injury if he was protected with adequate clothing, which is fabricated to resist such liquids. Injuries due splashing of aggressive liquids or explosion of flammables be Injuries due to to splashing of aggressive liquids or explosion of flammables can becan avoided wearing properwhich clothing, may include apron, coveralls,apron,shoes, byavoided wearingby proper clothing, may which include coveralls, shoes, goggles, gloves, goggles, face mask andLiquid hat. being pumped is under pressure when pump is face mask gloves, and hat. WARNING: in Each operation. notoperators open drain or fihave ll plugs or disconnect suction line or of the Do above could avoided some bodily harm or by discharge wearing outer fittings while pump is running. Doing so could result in serious injury. garments for protection from skin burns. LIMITED 1 YEAR WARRANTY Pacer Pumps warrants its products to be free from defects of material and workmanship for a period of one year (12 months) of service if the one year of service falls within 24 months from date of manufacture. The company warrants that its products, at the time of shipment, will be free of defects of material and workmanship for normal use and service. This warranty will not apply or be extended to products subjected to misuse, neglect, accident, or improper installation, or to maintenance of products which have been altered or repaired by anyone except Pacer Pumps or its authorized representatives. The Buyer, or any person receiving such a product during the duration of the warranty shall contact his Pacer Pumps dealer as soon as any defect occurs. Contact Pacer Pumps for the name and address of your nearest dealer. Certain components, such as mechanical seals, ceramic liners, impellers, impeller magnet assemblies, pistons, hose, diaphragms, etc. may be subject to wear, and therefore wear should not be misconstrued as to the existence of a defect and as such would not be included in a warranty claim, nor should it be implied that items such as this will last a year without occasional, or even frequent replacement depending upon the severity of the application. Pacer Pumps’ sole obligation under the foregoing warranty shall be limited to: (at its option) repair and replacement (and reship to the Buyer with transportation charges collect to any place in the U.S.) of defective goods provided that if the company is unable to correct a defective component part or product, the Buyer shall be entitled to elect a credit at the original Buyer’s purchase price. To return a DEFECTIVE PUMP, to return any parts for credit, or to obtain service information, contact the Service Department. After receiving permission to return merchandise, the Buyer is authorized to return the product to Pacer Pumps, freight prepaid. If the company determines that the warranty has not been breached, product will be repaired or replaced free of charge. The company will not be responsible for any damages or losses, direct or indirect, arising from any cause whatsoever, nor for damage to equipment caused by outside influences including improper installation or modification, improper voltage supply, lightning, corrosive liquids, abrasive liquids, or careless handling; nor for labor, transportation or other damages incurred in the replacement or repair to defective parts. In these cases, repair will be subject to reconditioning charges in effect at the time. Purchased merchandise, either as a complete product for resale or components used in conjunction with Pacer Pumps manufactured products, carries the warranty of the respective manufacturer of such product or components. PACER PUMPS ® serving industry worldwide Div. of ASM Industries, Inc. 41 Industrial Circle 717/656-2161 Lancaster, PA 17601-5927 U.S.A. 800-233-3861 E-mail: [email protected] FAX 717/656-0477 www.pacerpumps.com Part No. 58-1745 01 NOTE: All specifications, as shown, are subject to change without previous notice. GUÍA DE FUNCIONAMIENTO Y MANTENIMIENTO PO-1700Y PO-1700Z 2008 2009 MANUAL DEL USUARIO Y LISTA DE PIEZAS de las bombas "S", para bombas centrífugas de cebado autónomo Antes de leer o utilizar este manual asegúrese de comprobar el material del que está hecha su bomba. Determine el número del modelo en la etiqueta adherida a la bomba, de esta manera: Los números de modelo de las bombas de POLIÉSTER comienzan con SE Los números de modelo de las bombas de POLIPROPILENO comienzan con SP Los números de modelo de las bombas RYTON® PUMPS comienzan con SY ADVERTENCIA DE SEGURIDAD CONSULTE ADEMÁS LAS SECCIONES I, II y III ANTES DE HACER FUNCIONAR LA BOMBA. Página n.º I. Medidas de seguridad . . . . . . . . .. . . . . . . . . . . . . . . . . . . . . . . . . . . . . . . . . . . . . . . . . . . . . . . . . . . . . . . . . 10 II. Preparación de la bomba para su funcionamiento . . . . . . . . . . . . . . . . . . . . . . . . . . . . . . . . . . . . . . . . . . . . 11 III. Instrucciones de funcionamiento de la bomba . . . . . . . . . . . . . . . . . . . . . . . . . . . . . . . . . . . . . . . . . . . . . . . 12 Pedestal de soporte Impulsor hidráulico y acoplamiento compacto Impulsor con motor de gasolina dotado del sistema PROTEK Impulsor eléctrico y acoplamiento compacto Impulsor con motor de gasolina y acoplamiento compacto Impulsor con motor de gasolina y armazón cilíndrica opcional de protección Impulsor eléctrico y acoplamiento largo 10 AVISO DE SEGURIDAD A. No utilice nunca estas bombas para bombear líquidos inflamables, p. ej. gasolina. EL INCUMPLIMIENTO DE ESTA ADVERTENCIA PODRÍA DAR LUGAR A UNA EXPLOSIÓN Y LESIONES GRAVES. B. El bombeo de materiales corrosivos debe hacerse con extrema precaución. Instale protectores de seguridad, ventilación y drenaje para proteger a las personas y a los equipos en caso de ocurrir un escape en la bomba. Deben seguirse al pie de la letra las instrucciones de manejo indicadas por los fabricantes de los líquidos bombeados. Consulte la página 16. C. Antes de dar arranque a la bomba, siga todas las instrucciones indicadas en este manual y las instrucciones adicionales suministradas con la bomba. D. Todos los usuarios de la bomba y de la unidad impulsora deben familiarizarse plenamente con el funcionamiento seguro de éstas antes de comenzar a utilizarlas. E. No ponga nunca a funcionar una unidad impulsada por motor dentro de una atmósfera explosiva, cerca de materiales combustibles, o en lugares con ventilación insuficiente, a menos que se hayan tomado medidas específicas con relación a la unidad impulsora para evitar posibles lesiones y daños. Asegúrese de que cualquier otro tipo de unidad impulsora es segura para el espacio en el que se hará funcionar. F. Compruebe siempre que la bomba se asienta en una base segura y que no podrá deslizarse, desplazarse o volcarse. Si la bomba está junto a un hueco, asegúrela para evitar que caiga en éste. La bomba y los motores traen ranuras y agujeros para fijarlos a una base segura. Los juegos de elementos de la placa de asiento, de deslizadera y de armazón cilíndrica de protección podrán obtenerse con el concesionario. G. No haga nunca funcionar la unidad si se ha retirado cualquiera de los protectores. ADVERTENCIA: H. En las bombas impulsadas por motor: 1. Al volver a llenar de combustible el depósito del motor, observe todas las medidas de seguridad para el manejo de combustibles. 2. Nunca llene el depósito con el motor en marcha. Debe tenerse mucho cuidado para no derramar combustible sobre un motor caliente. Permita que el motor se enfríe por lo menos dos minutos antes de llenar de combustible el depósito. I. Antes de prestarle mantenimiento a esta bomba, compruebe que no sea posible dar arranque por descuido a la unidad impulsora. J. Compruebe que la unidad impulsora, la bomba, la instalación del cableado y de la tubería sean adecuados para el tipo de líquido que se bombea. Asegúrese de cumplir con todas las reglas y normas pertinentes. K. No utilice sopletes ni aplique fuego o llamas a esta bomba, bajo ninguna circunstancia. L. Esta bomba no podrá someterse a más de 65 lb/pulg2 (4.5 bares) de presión interna (en el caso de bombas de poliéster) y de 55 lb/pulg2 (3.8 bares) (bombas Ryton® y de polipropileno). La bomba en sí no podrá bajo condiciones normales producir una presión superior a 55 lb/pulg2 (3.8 bares) La bomba no debe emplearse bajo cualquiera de las siguientes condiciones atípicas, que podrían causar presiones excesivas: 1. La velocidad angular del eje de la bomba sobrepasa 3600 rpm. 2. El cierre repentino de las válvulas en una línea de succión o descarga o en cualquier otro dispositivo, que podría llevar a un golpe hidráulico en el sistema. 3. La posible obstrucción repentina de la línea de descarga, tal como podría ocurrir si un vehículo pasa por encima de la manguera. 4. Altas presiones positivas de succión (p. ej. con una succión inundada), que llevarían la presión total del sistema a 65 lb/pulg2 (4.5 bares) o más, o bien a 55 lb/pulg2 (3.8 bares) en el caso de bombas de polipropileno o bombas Ryton®. I. MEDIDAS DE SEGURIDAD MANUAL DEL USUARIO IV. Localización y reparación de fallas de la bomba . . . . . . . . . . . . . . . . . . . . . . . . . .11 V. Cómo desarmar y reparar la bomba . . . . . . . . . . . . . . . . . . . . . . . . . . . . . . . . . . . .12 VI. Datos específicos: A. Acoplamiento flexible: Alineamiento del acoplamiento . . . . . . . . . . . . . . . . . .12 1. Acoplamientos VII. Lista y diagrama de piezas de la bomba . . . . . . . . . . . . . . . . . . . . . . . . . . . . . .13-14 VIII. Lista de accesorios y opciones de la bomba . . . . . . . . . . . . . . . . . . . . . . . . . . . . . .15 I. Medidas de seguridad . . . . . . . . . . . . . . . . . . . . . . . . . . . . . . . . . . . . . . . . . . . . . . . .10 II. Preparación de la bomba para su funcionamiento . . . . . . . . . . . . . . . . . . . . . . . .10 III. Instrucciones de funcionamiento de la bomba . . . . . . . . . . . . . . . . . . . . . . . . . . . .11 Página n.º CONSULTE LAS SECCIONES I, II y III ANTES DE HACER FUNCIONAR LA BOMBA. Índice MANUAL DEL USUARIO DE LAS BOMBAS CENTRÍFUGAS DE CEBADO AUTÓNOMO 10 1.8 1.3 1.2 1.8 1.8 1.5 1.1 1.0 1.5 1.5 1.5 1.1 1.0 1.5 1.5 Poliéster - Polipropileno - Ryton® Peso específico máximo* a 3450 rpm utilizar tubería rígida, apóyela debidamente con el fin de eliminar los esfuerzos impuestos en la bomba. O. No apriete los acoples de entrada y descarga más allá de una vuelta medida desde el punto de apriete manual. La fuerza excesiva dañará la bomba o los acoples. Utilice cinta de sellado teflón en todos los acoples roscados. P. Las mangueras o tuberías de succión y descarga largas deben apoyarse de modo que su peso, llenas de líquido, no cause daños a la bomba ni la haga volcar. Q. Utilice sólo piezas de repuesto suministradas por el fabricante. R. No haga funcionar la bomba en seco. Antes de dar arranque a la bomba, llene el cuerpo de ésta con el líquido que va bombear. No es necesario drenar el cuerpo de la bomba después de cada uso, a menos que exista un riesgo de congelamiento, asentamiento de sólidos o cristalización. S. No restrinja el flujo a través de la bomba, p. ej. con una válvula de descarga cerrada o una línea de succión mal alimentada. Podría ocurrir un calentamiento excesivo y peligroso. En caso de ser necesario restringir el flujo a través de la bomba durante más de cinco minutos, tendrá que detenerla o bien instalar una línea de derivación para mantener las temperaturas del líquido por debajo de las temperaturas máximas recomendadas de funcionamiento. T. No someta la bomba a condiciones extremas de acidez o alcalinidad. Consulte la fábrica para obtener las recomendaciones específicas sobre sustancias químicas y temperaturas. ELASTÓMEROS EPDM El sello del eje y los sellos estáticos de esta bomba son de caucho EPDM. Estos elastómeros (piezas de caucho) son aptos para utilizarse con agua (sucia o limpia) y con muchas sustancias químicas agrícolas e industriales inocuas. Consulte con la fábrica sobre recomendaciones específicas para aplicaciones distintas al uso con agua. ELASTÓMEROS BUNA-N Esta bomba está equipada con elastómeros Buna-N (piezas de caucho). El material Buna-N es apto para utilizarse con agua (sucia o limpia) y con otros líquidos inocuos. Consulte con la fábrica sobre otras recomendaciones específicas para aplicaciones inocuas. A. Preparación de la bomba 1. Inmediatamente después de recibir la mercancía y antes de firmar validando su recibo, examine la unidad comprobando que no se hayan producido daños durante el envío. Si hay daños visibles, anótelos en el conocimiento de embarque o en los documentos de recibo antes de firmar. Si descubre cualquier daño en el envío, notifique demás al concesionario o distribuidor de inmediato. 2. Lea estas excepciones y las de la unidad impulsora hasta tener seguridad de que podrá hacer funcionar la máquina de manera segura y correcta. 3. DATOS IMPORTANTES ACERCA DE LOS ELASTÓMEROS (PIEZAS DE CAUCHO) DE LA BOMBA. Esta bomba está equipada con uno de los tres siguientes materiales elastoméricos. Consulte en la etiqueta de la bomba el nombre del tipo específico de elastómero utilizado dentro de la bomba. retire siempre la bujía o el cable de ésta antes de prestar mantenimiento a la unidad. PRECAUCIÓN: Para evitar un arranque accidental, 3. Antes de dar arranque al motor, llene el depósito con gasolina sin plomo para automóvil limpia y fresca. Si no puede obtenerse gasolina sin plomo, podrá utilizarse gasolina con plomo. No mezcle el aceite con la gasolina. En el manual de funcionamiento del fabricante del motor encontrará instrucciones adicionales. Combustible 2. Antes de dar arranque al motor llene el cárter con el aceite especificado por el fabricante. Utilice un aceite detergente de alta calidad SAE 30 clasificado para servicio SF, SG, SH, SJ o superior. No agregue nada al aceite recomendado. Aceite B. Preparación de la unidad impulsora en bombas impulsadas por motor de gasolina: 1. Encontrará los detalles completos de funcionamiento y mantenimiento en las instrucciones que el fabricante del motor ha incluido con la bomba. ELASTÓMEROS VITON Esta bomba está equipada con elastómeros Viton (piezas de caucho). El Viton es apto para utilizarse con agua (sucia o limpia) y con muchas sustancias químicas agrícolas e industriales inocuas. Dada la amplia gama de sustancias químicas, no es posible enumerarlas todas en este documento. Consulte con la fábrica sobre recomendaciones específicas para aplicaciones distintas al uso con agua. II. CÓMO PREPARAR LA BOMBA PARA SU FUNCIONAMIENTO M.No apriete excesivamente los tapones de drenaje o de llenado. Apriételos sólo manualmente. Un ajuste excesivo podría dañar las roscas o el cuerpo de la bomba. No utilice tapones metálicos. N. Utilice al menos 1 pie (0.3 m) de manguera flexible para realizar las conexiones de tubería hasta el cuerpo de la bomba. La utilización de tubos rígidos podría imponer esfuerzos en la bomba y averiarla. En caso de ser necesario * El peso específico es la relación proporcional entre el peso del líquido que se va bombear y el peso de un volumen idéntico de agua. El peso específico del agua es 1.0. Por lo tanto, un líquido de peso superior al del agua tendrá un peso específico superior a 1.0 Número del impulsor 58-0667 58-0704 58-0706 58-0974 58-0975 5.No bombee líquidos que tengan un peso específico superior a los siguientes valores: Compruebe la compatibilidad química entre los materiales de la bomba y el líquido que desea bombear. Si no está seguro de la compatibilidad, comuníquese con el concesionario para solicitar ayuda con estas aplicaciones, y pedir una copia de nuestras tablas de resistencia a la corrosión. No utilice nunca una bomba a menos que sea químicamente compatible con el líquido que pretende bombear; de lo contrario, podrían producirse lesiones graves o mortales, incendios, explosiones o daños medioambientales. 11 NOTA: LA BOMBA PUEDE SUCCIONAR AGUA DESDE UNA PROFUNDIDAD DE 25 PIES (7.6 m). SIN EMBARGO, SE RECOMIENDA UTILIZAR LA PROFUNDIDAD DE SUCCIÓN MÁS CORTA POSIBLE. ¡INCORRECTO Y PELIGROSO! LA BOMBA Y LA MANGUERA NO ESTÁN APOYADAS, LA BOMBA NO ESTÁ NIVELADA Y NO SE UTILIZA UN DEPURADOR. E. Si se bombea agua sucia o cualquier otro líquido que A. Llene el cuerpo de la bomba con líquido antes de darle arranque. No ponga en marcha la bomba en seco ya que podría dañar el sello. No es necesario lubricar ningún punto de la bomba. El sello del eje se lubrica por sí mismo, y ha sido diseñado para manejar líquidos limpios. B. Compruebe que todas las conexiones de mangueras y tubos estén herméticas. IMPORTANTE: Una fuga de aire en la línea de succión podría evitar el cebado, y reducirá además la capacidad de la bomba. C. Coloque siempre la bomba tan cerca como sea posible del líquido que se desea bombear. Mantenga todas las líneas de bombeo tan cortas y tan rectas como sea posible. Evite las curvas cerradas en las mangueras. Mantenga la bomba en una base plana. Observe la figura 1. D. Si es necesario que la manguera flexible atraviese una carretera, protéjala con las debidas tablas. La presión de cierre instantánea que ocurre cuando un vehículo atraviesa corriendo por encima de una manguera sin protección causará un "golpe hidráulico" en el sistema. Este golpe puede averiar la bomba o la manguera. Observe la figura 2. CARRERA DE SUCCIÓN DE 5 PIES (1.5 m) LA PROFUNDIDAD MÁX. DE SUCCIÓN ES DE 25 PIES (7.6 m). FIGURA 1 ¡CORRECTO! LA BOMBA Y LA MANGUERA ESTÁN APOYADAS. LA BOMBA ESTÁ NIVELADA Y SE UTILIZA UN DEPURADOR. APOYE LA MANGUERA O TUBERÍA. MANTENGA LA BOMBA ASEGURADA Y SUFICIENTEMENTE ALEJADA DE LA ORILLA PARA EVITAR QUE LA MANGUERA DE SUCCIÓN LA HAGA CAER AL AGUA. EN CASO NECESARIO, AMARRE LA BOMBA. pueda contener sólidos, utilice siempre un depurador en la bomba, en el extremo de la línea de succión indicado por el fabricante. Si es posible que el depurador de succión se tapone con tierra y residuos, proceda de la siguiente manera: (a) Prepare un lecho de rocas sobre las cuales poner el depurador (observe la figura 3). (b) Amarre el depurador de modo que no toque el fondo de la fosa, excavación, etc. (c) Amarre el depurador dentro de un balde o canasta (observe la figura 3). F. Drene el cuerpo de la bomba siempre que exista el riesgo de congelamiento. G. Si la hace funcionar sobre una superficie dura, ponga siempre patas de goma en la parte inferior de una bomba portátil. Esto evitará daños a la bomba y a la unidad impulsora. H. Purgue siempre la bomba cuando termine de utilizarla si existe la posibilidad de que el líquido bombeado deje un residuo sólido o pegajoso dentro de ella. De no hacerlo, podría causar daños a la bomba. La rotación de los motores trifásicos puede invertirse intercambiando dos cables de alimentación cualquiera, de los tres que existen en total. 3. Compruebe que todo el cableado del motor eléctrico cumple con las normas locales pertinentes. D. Preparación de la unidad impulsora en motores hidráulicos y neumáticos: Consulte la hoja suelta de instrucciones que viene con cada una de las unidades de impulsión hidráulica o neumática. Alimentación: NOTA: Para líquidos de peso específico superior a 1.0, aumente el caballaje nominal (según aparece en el catálogo) multiplicándolo por un factor equivalente al peso específico del líquido que se desea bombear. (p. ej. HP del catálogo x peso específico = HP totales que se requieren) PRECAUCIÓN: El regulador del motor se ajusta en la fábrica. No altere ninguna pieza que podría aumentar la velocidad a la cual el motor ha sido ajustado. C. Preparación de la unidad impulsora en motores eléctricos: 1. Compruebe que la alimentación eléctrica hacia el motor eléctrico es adecuada, monofásica o trifásica, y del voltaje adecuado según se indica en la placa de especificaciones del motor. 2. Compruebe que el motor girará en el sentido correcto. El impulsor de la bomba debe girar en sentido antihorario, cuando se observa desde el costado de la entrada de succión. En el caso de motores monofásicos consulte las instrucciones del fabricante del motor para determinar el cableado necesario para lograr una rotación en sentido antihorario. Los gases de escape de este producto contienen sustancias químicas consideradas por el estado de California como causantes de cáncer, defectos de nacimiento u otros daños de reproducción. ADVERTENCIA 11 FIGURA 3 COLOCAR SOBRE UN LECHO DE ROCAS FONDO DEL RÍO AMARRAR DENTRO DE UN BALDE VIEJO (CONEXIÓN DE SUCCIÓN DE LA BOMBA) B. La bomba presenta un flujo insuficiente FIGURA 4 (11 PULG. DE MERCURIO (MÍN.) BOMBA FUNCIONANDO A 1750 RPM). BOMBA FUNCIONANDO A 3450 rpm. 22 PULG. DE MERCURIO (MÍN.) A. La bomba no puede cebarse o no bombea PROBLEMA 1. Revise los mismos elementos de los numerales 1, 2 y 3 citados más arriba. 2. Cambie todos los componentes averiados o descastados; revise el espacio entre los álabes del impulsor y la cara de la voluta (consulte la sección V n.° B.5.). 1. Llene la bomba con líquido limpio y trate de cebarla de nuevo. 2. Apague la unidad impulsora de la bomba. Cierre las válvulas desde y hacia la bomba Cumpliendo con todas las medidas de seguridad para el líquido que se está bombeando, desconecte las líneas de succión y descarga y llene por completo la bomba. Llene la bomba con agua. Instale un vacuómetro en el puerto de succión (observe la figura 4). Encienda la unidad impulsora. El vacío total debe sobrepasar las 22 pulg. de mercurio con el eje de la bomba girando a 3450 rpm, y debe alcanzar o sobrepasar 11 pulg. de mercurio con el eje girando a 1750 rpm. Si el vacío está por debajo de estas cifras, revise lo siguiente: a. ¿Hay una fuga en el acople de succión? b. Sentido de rotación de la bomba: el impulsor debe girar en sentido antihorario cuando se observa a través del extremo de succión. c. Velocidad de la bomba. (El vacío máximo logrado decae rápidamente cuando disminuyen las rpm). d. Sellado de la empaquetadura de la válvula de retención, entre el cuerpo y la voluta. e. Compruebe que el impulsor o la voluta no estén desgastados. En caso necesario, cambie estas piezas. (Vea los artículos B.5., B.6. y B.7. de la sección V). f. ¿Está desgastado el sello del eje? 3. Si la prueba de succión de la bomba arroja un resultado adecuado, conecte la línea de succión y compruebe la succión que se logra en el extremo de ésta. La ausencia de succión en el extremo revela que hay fugas en las conexiones, mangueras o tuberías, o que hay obstrucciones en las líneas. Ocasionalmente, el revestimiento interior de la manguera de succión puede despegarse. SOLUCIÓN IV. LOCALIZACIÓN Y REPARACIÓN DE FALLAS DE LA BOMBA FIGURA 2 SI LA MANGUERA ATRAVIESA CARRETERAS, COLOQUE TABLONES A CADA LADO DE ÉSTA. OPCIONES SUGERIDAS PARA MANTENER EL DEPURADOR ALEJADO DE LOS SEDIMENTOS DEL RÍO. FONDO DEL RÍO NOTA: Si se reduce el diámetro de la tubería, se reducirá drásticamente el rendimiento de la bomba, que podría dañarse si la restricción es exagerada. La línea de succión debe siempre ser del mismo tamaño (o un poco más grande) que la línea de descarga. Para obtener el rendimiento óptimo de la bomba el diámetro de la tubería debe ser idéntico al diámetro de los puertos. 12 B. MONTAJE 1. Vuelva a instalar toda las piezas en un orden inverso al utilizado para desarmar el equipo. 2. Cuando instale un sello nuevo, cambie siempre ambas partes de éste, y ponga la junta tórica en su lugar alrededor de la mitad del sello que da al soporte. Proteja las superficies de sellado lisas y recubiertas para que no se dañen al oprimir las piezas nuevas en su lugar. Para empujar hasta su lugar el segmento del sello correspondiente al soporte, utilice un segmento de tubería que toque únicamente el reborde metálico del sello. Compruebe que ambas mitades del sello hayan quedado totalmente asentadas en su lugar y alineadas con respecto al eje de la bomba. 3. Durante la etapa final del montaje, se recomienda cambiar todos los sellos de junta tórica de las cabezas de tornillo (artículo n.º 8, figura 7). Lubríquelos con aceite vegetal (no utilice aceite a base de petróleo) antes de instalarlos. 4. Aplique un compuesto de sellado de roscas, p. ej. Loctite #242, en los tornillos del soporte (artículo n.º 9 en la figura 7) y en el tornillo del impulsor (artículo n.º 16 en la figura 7). tornillos del soporte en la bomba, retírelos atornillando un tornillo del cuerpo en el agujero y luego extrayéndolos cuidadosamente. 1. Retire los 10 tornillos de 1/4 pulg.-20 del cuerpo. Retire el cuerpo de la bomba. 2. Retire la válvula de retención de goma de la voluta, y la junta tórica grande del perímetro del soporte. 3. Retire la voluta. 4. Desatornille el tornillo del impulsor y retírelo junto con la junta tórica pequeña. Deslice el impulsor y el pasador retirándolos del eje. (Para facilitar el retiro del impulsor introduzca suavemente dos destornilladores, separados por un ángulo de 180°, por debajo de la parte posterior del impulsor, y haga palanca suavemente para sacarlo del eje). 5. La mitad del sello del eje se encuentra dentro del cubo del impulsor; la otra mitad alrededor del eje, dentro del soporte. La parte del sello que está dentro del impulsor puede cuidadosamente sacarse haciendo palanca con un destornillador. Si tiene previsto volver a utilizar el sello, tenga cuidado de no causar rayas o picaduras en cualquiera de sus dos caras lisas y planas. 6. Retire los cuatro tornillos* del soporte y las pequeñas juntas tóricas de cada tornillo; retire el segmento de 9 pulg. de la junta tórica que forma un arco sobre el sello del eje. Tire del soporte para retirarlo del motor. La parte estacionaria del sello del eje puede ahora oprimirse para sacarla de la parte posterior del soporte. Si piensa volver a utilizar el sello, utilice un taco circular de madera de 1 3/16 pulg. de diámetro para sacarlo cuidadosamente empujándolo en línea recta. (Tenga cuidado de no averiar la cara del sello). Retire la junta tórica del perímetro del sello. *NOTA: Si hay tapones instalados sobre los A. DESARMADO 7. Revise la cara de la voluta para verificar que no presente un desgaste excesivo (un rayado ligero es aceptable). 8. Los cuatro tornillos (cada uno con una junta tórica) que sostienen al soporte de la bomba junto al motor deben apretarse firmemente con un destornillador grande o una llave de copa. 9. NOTA: Tenga mucho cuidado al montar la bomba. El soporte y el cuerpo de la bomba, al montarse juntos, sostendrán en su lugar a la voluta. 10. Lubrique la junta tórica del cuerpo con un lubricante vegetal antes de volver a colocarla en la bomba. 11. Al instalar conectores, acoples y codos en el cuerpo de la bomba, envuelva las roscas macho con cinta selladora de teflón El apriete adecuado es un apriete a mano más un giro completo con una llave para tubos. NOTA: Si el espesor de los álabes es inferior al indicado más arriba, podrá hacerse un espaciado de hasta 0.090 (artículo n.º 30, figura 7). Si se requiere un espaciado superior a 0.090, será necesario reemplazar el impulsor. 5. Para lograr un rendimiento adecuado, la separación entre los álabes del impulsor y la cara de la voluta debe alcanzar aproximadamente 0.015 pulg. a 0.025 pulg. Esta separación delantera puede lograrse mediante espaciadores. El impulsor puede alejarse de la cara del soporte de la siguiente manera: a. Añadiendo una o más arandelas espaciadoras (artículo n.º 30, figura 7) por debajo del cubo del impulsor. El impulsor podrá espaciarse para ponerlo más cerca al soporte de la siguiente manera: a. Retirando una o más arandelas espaciadoras (artículo n.º 30, figura 7) de la parte inferior del cubo del impulsor (en caso de haber utilizado alguna en la bomba). Después de desplazar el impulsor hasta su posición, hágalo girar comprobando que no toque el soporte. En caso necesario añada o retire más arandelas. A revisar el espaciado, compruebe que el impulsor esté sentado por completo en el eje. Al oprimir el impulsor en el eje, aplique presión solamente en el cubo. 6. Compruebe que los álabes del impulsor estén a una altura correcta. La altura de los álabes en el perímetro exterior del impulsor debe presentar las siguientes medidas: Altura del álabe *Número del impulsor en su punta 58-0667 0.535 pulg. 58-0704 0.535 pulg. 58-0706 0.535 pulg. 58-0974 0.600 pulg. 58-0975 0.975 pulg. *Encontrará más detalles en la lista de piezas V. CÓMO DESARMAR Y REPARAR LA BOMBA 12 12.Con la bomba en funcionamiento y el cuerpo de la bomba lleno de agua, coloque el vacuómetro sobre la abertura de succión y examine la capacidad de succión de acuerdo a lo indicado en la sección IV. 1.125 pulg. 1.375 pulg. 1 pulg. 75 pulg. 58-0787 58-0788 58-0875 58-0876 CORRECTO FIGURA 5 56 143T-145T 182-184 182T-184T 213T,215T 213-215 --------- TAMAÑOS DEL BASTIDOR, MOTOR ELÉCTRICO bomba de pedestal. interior de 0.750 pulg. para encajar con el eje de la *La mitad de cada acoplamiento tiene un diámetro TABLA DE ACOPLAMIENTOS FLEXIBLES VI-A 0.625 pulg. 0.875 pulg. 58-0786 58-0786 EJE DE IMPULSIÓN EJE DE LA BOMBA ACOPLAMIENTO EJE DE LA BOMBA EJE DE IMPULSIÓN ACOPLAMIENTO DIÁMETRO DEL EJE DE LA UNIDAD IMPULSORA* ÁNGULO 90° EJE DE IMPULSIÓN FIGURA 6 NÚMERO DE PIEZA DE ACOPLAMIENTO INCORRECTO 1. Asegúrese de utilizar una placa de asiento rígida suficientemente grande para el conjunto de la bomba y la unidad impulsora. Para este efecto ofrecemos los kits 58-0028 y 58-0016. (Observe los kits de placas de asiento indicados tras la tabla de acoplamientos VI-A)** 2. Coloque la bomba y la unidad impulsora en la placa de asiento. 3. Mida la distancia entre la línea central del eje de la bomba y la superficie de la placa de asiento. 4. Mida la distancia entre la línea central del eje de la unidad impulsora y la placa de asiento. 5. Compare las medidas obtenidas en los pasos 3 y 4; utilice bloques espaciadores para ajustar la altura hasta lograr una alineación correcta de ambos ejes. 6. Coloque ambas mitades de acoplamiento sobre cada eje. Coloque la “araña” entre las dos mitades y acóplelas entre sí. 7. Para asegurar una alineación paralela (figura 5) coloque una regla a lo largo del costado de ambas mitades de acoplamiento en dos puntos diferentes, separados 90º. El acoplamiento estará alineado si la regla se mantiene en ángulo recto a los costados de ambas mitades de acoplamiento. 8. Para evitar la falta de alineación angular, inserte un dispositivo de medición (medidor de conicidad o lámina calibradora) entre las caras de acoplamiento, en cuatro puntos separados 90º (observe las fechas en la figura 6); mida la brecha en cada uno de los cuatro puntos. Si la alineación es correcta todas las cuatro medidas deben ser idénticas. Es posible que se requiera volver a espaciar los elementos para lograr esta alineación. VI. INFORMACIÓN ESPECÍFICA DE ACOPLAMIENTO FLEXIBLE: ALINEACIÓN DE ACOPLAMIENTO Mida el diámetro del eje de la bomba y del eje de la unidad impulsora. Seleccione el acoplamiento apropiado para la bomba y la unidad impulsora. (Examine la tabla de acoplamientos flexibles n.º VI-A). La alineación adecuada del eje y el acoplamiento reduce la vibración y evita la falla prematura de éste. Los siguientes 8 pasos le ayudarán a obtener una alineación correcta del eje: A. BOMBAS PRECAUCIÓN: Después de haber montado la bomba y antes de darle arranque, haga girar el eje manualmente comprobando que no se escuchen ruidos de raspado. Un ruido de raspado indicaría un espaciado incorrecto, en cuyo caso sería necesario desarmar y volver a espaciar la unidad. BOMBA CENTRÍFUGA DE CEBADO AUTÓNOMO, SERIE “S” 33 56 58 /,67$'(3,(=$6 33* 1RYLHPEUHGH NOTA 1: Observe que existen varias opciones para los impulsores, volutas y tornillos superiores GHYROXWD7UDVLGHQWL¿FDUHOLPSXOVRUWHQLHQGRHQFXHQWDHOQ~PHURGHOPRGHORGHODERPEDR comparando el impulsor con las descripciones correspondientes a diversos impulsores) podrá seleccionar el impulsor, voluta o tornillos de voluta que necesite guiándose por el mismo grupo de letras. Por ejemplo: Si el impulsor es negro, tipo abierto, 5 álabes, 0.535 pulg. de ancho, se trata de la pieza n.º 58-0706 30 y tiene una designación de “A” por debajo de la columna marcada ³*UXSR´$ FRQWLQXDFLyQSRGUiHVFRJHUHOWRUQLOORGHYROXWDVXSHULRUQGHUHIHUHQFLDVHJ~Q se requiera). NOTA 2: /RV LPSXOVRUHV Q GH UHIHUHQFLD SRGUiQ SHGLUVH FRQ HO VHOOR Q GH UHIHUHQFLD \DLQVWDODGR(OQGHSLH]DSDUDHVWRVFRQMXQWRVHVLJXDODOQGHSLH]DGHO LPSXOVRUH[FHSWRTXHHO~OWLPRGtJLWRVHUiXQ³´SDUDVHOORGH%XQD1³´SDUD VHOORGH(3'0\³´SDUDVHOOR9LWRQ3RUHMHPSOR(OFRQMXQWR 55 FRPSUHQGHHOLPSXOVRUQGHUHIHUHQFLD\PHGLRVHOOR GH%XQDQQGHUHIHUHQFLD NOTA 3: Los conjuntos de soportes están disponibles con el VHOORGHOHMHQGHUHIHUHQFLDMXQWDWyULFDGHVHOODGR GHO HMH Q GH UHIHUHQFLD \ VHJPHQWR GH MXQWD WyULFDQGHUHIHUHQFLD\DLQVWDODGRV3RU HMHPSOR SLGD HO SDUD %XQD HO SDUD (3'0 \ HO SDUD9LWRQ 57 50 68 63 69 33 38 66 33 35 13 53 67 36 60 O 33 33 65 ARTICULO N.º PIEZA N.º % LISTA DE PIEZAS DE LA BOMBA DESCRIPCIÓN DE LA PIEZA CANT./BOMBA 623257(SROLpVWHUQHJUR 623257(SROLSURSLOHQRJULV 623257(5\WRQPDUUyQ -817$ 7Ï5,&$FXHUSR%81$1 -817$ 7Ï5,&$FXHUSR(3'0 -817$ 7Ï5,&$FXHUSR9,721 -817$ 7Ï5,&$WRUQLOOR%81$1 -817$ 7Ï5,&$WRUQLOOR(3'0 -817$ 7Ï5,&$WRUQLOOR9,721 7251,//2VRSRUWHDFHURLQR[LGDEOHSDUD bombas con acoplamiento compacto al PRWRU\PRQWXUDGHSHGHVWDOGHIXQGLFLyQ SXOJ[ SXOJ 7251,//2VRSRUWHDFHURLQR[LGDEOHSDUD ERPEDVPRQWDGDVHQSHGHVWDOSOiVWLFRFRQ DFRSODPLHQWRFRPSDFWRDXQPRWRUHOpFWULFR hidráulico o neumático, SXOJ[ SXOJ -817$ 7Ï5,&$VHJPHQWR%81$1 -817$ 7Ï5,&$VHJPHQWR(3'0 -817$ 7Ï5,&$VHJPHQWR9,721 -817$ 7Ï5,&$VHOORGHOHMH%81$1 -817$ 7Ï5,&$VHOORGHOHMH(3'0 -817$ 7Ï5,&$VHOORGHOHMH9,721 ARTICULO N.º PIEZA N.º 6* 6* 6* 6* 13 DESCRIPCIÓN DE LA PIEZA CANT./BOMBA 7$3Ï1WRUQLOORGHOVRSRUWHVyORQRPHWiOLFR 6(//2HMH%81$1DFHURLQR[LGDEOH FDUERQRFHUiPLFD 6(//2HMH(3'0DFHURLQR[LGDEOH FDUERQRFHUiPLFD 6(//2HMH9,721DFHURLQR[LGDEOH FDUERQRFHUiPLFD 6(//2HMH+DVWHOOR\&WHÀyQFDUEXUR GHVLOLFRQD 6(//2HMHQRPHWiOLFR(&7)((3'0 JUD¿WRVLOLFRQL]DGR 6(//2HMHQRPHWiOLFR(&7)(9,721 JUD¿WRVLOLFRQL]DGR 6(//2HMH.\QDU3RO\SUR+DVWHOOR\& (3'0FDUEXURGHVLOLFRQD 6(//2HMH.\QDU3RO\SUR+DVWHOOR\& 9,721FDUEXURGHVLOLFRQD 6(//2HMH%81$1DFHURLQR[LGDEOH FDUEXURGHVLOLFRQD 6(//2HMH(3'0DFHURLQR[LGDEOH FDUEXURGHVLOLFRQD 6(//2HMH9,721DFHURLQR[LGDEOH FDUEXURGHVLOLFRQD LISTA DE PIEZAS DE LAS BOMBAS DE LA SERIE “S” 15 16 17 18 19 20 21 22 23 24 25 27 30 PIEZA N.º 58-0704 30 GRUPO DESCRIPCIÓN DE LA PIEZA CANT./BOMBA IMPULSOR, 3 álabes, 0.535 pulg. de ancho y 5.5 pulg. 1 de diámetro, poliéster, negro 58-0704 40 A IMPULSOR, 3 álabes, 0.535 pulg. de ancho y 5.5 pulg. 1 de diámetro, polipropileno, gris 58-0704 60 A IMPULSOR, 3 álabes, 0.535 pulg. de ancho y 5.5 pulg. 1 de diámetro, Ryton, marrón 58-0706 30 A IMPULSOR, 5 álabes, 0.535 pulg. de ancho y 5.5 pulg. 1 de diámetro, poliéster, negro 58-0706 40 A IMPULSOR, 5 álabes, 0.535 pulg. de ancho y 5.5 pulg. 1 de diámetro, polipropileno, gris 58-0706 60 A IMPULSOR, 5 álabes, 0.535 pulg. de ancho y 5.5 pulg. 1 de diámetro, Ryton, marrón 58-0974 30 B IMPULSOR, 4 álabes, 0.600 pulg. de ancho y 4.75 pulg. 1 de diámetro, poliéster, negro 58-0974 40 B IMPULSOR, 4 álabes, 0.600 pulg. de ancho y 4.75 pulg. 1 de diámetro, polipropileno, gris 58-0974 60 B IMPULSOR, 4 álabes, 0.600 pulg. de ancho y 4.75 pulg. 1 de diámetro, Ryton, marrón 58-0975 30 C IMPULSOR, 4 álabes, 0.975 pulg. de ancho y 4.75 pulg. 1 de diámetro, poliéster, negro 58-0975 40 C IMPULSOR, 4 álabes, 0.975 pulg. de ancho y 4.75 pulg. 1 de diámetro, polipropileno, gris 58-0975 60 C IMPULSOR, 4 álabes, 0.975 pulg. de ancho y 4.75 pulg. 1 de diámetro, Ryton, marrón 58-0667 30 B IMPULSOR, 3 álabes, 0.535 pulg. de ancho y 4.75 pulg. 1 de diámetro, poliéster, negro 58-0667 40 B IMPULSOR, 3 álabes, 0.535 pulg. de ancho y 4.75 pulg. 1 de diámetro, polipropileno, gris 58-8706 30 IMPULSOR, 5 álabes, 0.535 pulg. de ancho y 5.5 pulg. 1 de diámetro, poliéster negro (sólo para bombas de 8 HP, 7/2003) 58-8975 30 IMPULSOR, 4 álabes, 0.975 pulg. de ancho y 4.75 pulg. de 1 diámetro, poliéster negro (sólo para bombas de 8 HP, 7/2003) 58-0716 10 TORNILLO, impulsor, acero inoxidable, 5/16-24 pulg. x 0.75 pulg. 1 58-1668 10 TORNILLO, impulsor, acero inoxidable, 3/8-24 x 1 pulg. 1 (sólo unidad de 8 HP) 58-0702 30 A VOLUTA, plana, poliéster 1 58-0702 60 A VOLUTA, plana, Ryton, marrón 1 58-0773 31 A VOLUTA, poliéster con revestimiento de Buna-N 1 58-0773 32 A VOLUTA, poliéster con revestimiento de EPDM 1 58-0954 30 B VOLUTA, plana, poliéster 1 58-0954 60 B VOLUTA, plana, Ryton, marrón 1 58-0955 31 B VOLUTA, poliéster con revestimiento de Buna-N 1 58-0955 32 B VOLUTA, poliéster con revestimiento de EPDM 1 58-0977 30 C VOLUTA, plana, poliéster 1 58-0977 60 C VOLUTA, plana, Ryton, marrón 1 58-0978 31 C VOLUTA, poliéster con revestimiento de Buna-N 1 58-0978 32 C VOLUTA, poliéster con revestimiento de EPDM 1 58-0725 10 TORNILLO, voluta lateral, acero inoxidable, n.º 6-cc x 0.5 pulg. 2 de largo 5 8-0771 10 A TORNILLO, voluta superior, acero inoxidable, n.º 10-24 x 1.5 pulg. 1 58-0997 10 B, C TORNILLO, voluta superior, acero inoxidable, n.º 10-24 x 0.5 pulg. 1 58-0705 71 VÁLVULA DE RETENCIÓN, Buna-N 1 58-0705 72 VÁLVULA DE RETENCIÓN, EPDM 1 58-0705 73 VÁLVULA DE RETENCIÓN, VITON 1 58-1206 TORNILLO, cuerpo, acero enchapado, 1/4 pulg.-20 x 2-3/8 pulg. 10 58-1206 10 TORNILLO, cuerpo, acero inoxidable, 1/4 pulg.-20 x 2-3/8 pulg. 10 de largo 58-1009 71 JUNTA TÓRICA, tapón de drenaje, Buna-N 1 58-1009 72 JUNTA TÓRICA, tapón de drenaje, EPDM 1 58-1009 73 JUNTA TÓRICA, tapón de drenaje, VITON 1 58-0723 30 TAPÓN, drenaje, poliéster, negro 1 58-0723 40 TAPÓN, drenaje, polipropileno, gris 1 58-0723 60 TAPÓN, drenaje, Ryton, marrón 1 58-0722 30B TAPÓN, llenado, poliéster, negro 1 58-0722 40 TAPÓN, llenado, polipropileno, gris 1 58-0722 60 TAPÓN, llenado, Ryton, marrón 1 58-0765 71 JUNTA TÓRICA, tapón de llenado, Buna-N 1 58-0765 72 JUNTA TÓRICA, tapón de llenado, EPDM 1 58-0765 73 JUNTA TÓRICA, tapón de llenado, VITON 1 58-0718 PASADOR, acero 1 58-0718 10 PASADOR, acero inoxidable 1 58-0718 30 PASADOR, poliéster 1 58-0778 11 ESPACIADOR, 0.006 pulg., acero inoxidable según se requiera 58-0778 12 ESPACIADOR, 0.015 pulg., acero inoxidable según se requiera 58-0778 13 ESPACIADOR, 0.030 pulg., acero inoxidable según se requiera 58-46338 10 ESPACIADOR, 0.015 pulg., acero inoxidable según se requiera (sólo unidad de 8 HP) ARTICULO N.º A 31 PIEZA N.º 58-1014 10 58-1165 10 32 33 35 58-0883 58-0745 10 58-1011 20 36 58-0729 10 38 39 40 58-1826 71 58-1828 90 58-1825 90 58-1823 40 41 58-0934 10 42 43 58-1001 30B 58-1001 40 58-1001 60 58-1002 30B 58-1002 40 58-1002 60 58-0755 30B 58-0755 40 58-0755 60 58-0943 30B 58-0784 30B 58-0877 30B 58-1015 10 44 58-1010 20 45 57 58-1955 71 58-1955 73 58-0882 90 58-0884 71 58-1951 90 58-1954 90 58-1952 10 58-1952 91 58-1952 93 58-1953 10 58-0730 10 58-0729 10 58-0745 10 58-0759 20 58-0777 58-0777 10 58-2053 01 58-2053 02 58-1956 10 58 59 58-2525 10 58-1950 01 46 47 48 49 50 51 52 53 54 55 56 55, 56 58-1950 01H 58-1950 01T 60 61 62 63 58-0686 24 58-0634 58-0644 58-0635 GC 58-0635 H 58-0646 V 58-0967 58-0926 58-0028 58-0016 64 65 66 67 68 69 58-0933 72 58-0935 72 58-0929 58-0002 58-0009 58-0008 DESCRIPCIÓN DE LA PIEZA CANT./BOMBA ADAPTADOR, eje, para motor eléctrico o neumático de acoplamiento compacto, acero inoxidable, 0.625 pulg. de diámetro int. ADAPTADOR, acero inoxidable, para motor hidráulico, 0.563 pulg. de diámetro int. TORNILLO DE FIJACIÓN, 1/4 pulg.-20 x 0.25 pulg. de largo, acero TUERCA DE RETÉN, 5/16 pulg.-18, acero inoxydable IMPULSOR, 5 álabes, 0.535 pulg. de ancho y 5.5 pulg. de diámetro, Ryton, marrón TORNILLO, para montar motor hidráulico en pedestal, 5/16 pulg.-18 x 1.0 pulg. de largo, acero inoxydable ALMOHADILLA, goma, montura MONTURA, motor de 5-11/16 pulg. de diám. MONTURA, motor de 5-11/16 pulg. de diám. PLACA DE ASIENTO, para motores eléctricos con acoplamiento compacto, plástico moldeado CORREA, para motores eléctricos con acoplamiento compacto, acero inoxidable CUERPO, 1-1/2 pulg. NPT, polipropileno, gris CUERPO, 1-1/2 pulg. NPT, polipropileno, gris CUERPO, 1-1/2 pulg. NPT, Ryton, marrón CUERPO, 2 pulg. NPT, poliéster, negro CUERPO, 2 pulg. NPT, polipropileno, gris CUERPO, 2 pulg. NPT, Ryton, marrón CUERPO, 3 pulg. NPT, poliéster, negro CUERPO, 3 pulg. NPT, polipropileno, gris CUERPO, 3 pulg. NPT, Ryton, marrón CUERPO, 1-1/2 pulg. BSP, poliéster, negro CUERPO, 2 pulg. BSP, poliéster, negro CUERPO, 3 pulg. BSP, poliéster, negro TORNILLO, cabeza hexagonal, 3/8 pulg.-16 x 1.25 pulg. de largo, acero inoxidable ADAPTADOR, motor, para bomba con acoplamiento compacto a motor eléctrico o neumático, plástico moldeado SELLO, reborde, 0.710 pulg. diám. int., Buna-N SELLO, reborde, 0.710 pulg. diám. int., VITON EJE, funda, polietileno ESLINGA, Buna-N CARCASA, rodamiento, fundición RODAMIENTO, bolas, 0.787 pulg. diám. int. EJE, acero inoxidable, 0.75 pulg. diám. EJE, Hastelloy, 0.75 pulg. diám. EJE, titanio, 0.75 pulg. diám. PLACA, extremo, acero inoxidable ARANDELA PLANA, 0.563 pulg., acero inoxidable TORNILLO, 5/16 pulg.-18 x 1 pulg., acero inoxidable TUERCA DE RETÉN, 5/16 pulg.-18, acero inoxidable Pedestal de RODAMIENTO, plástico moldeado RODAMIENTO, conjunto del eje, estándar, acero al carbono RODAMIENTO, conjunto del eje, con funda acero inoxidable para el eje CONJUNTO de pedestal, eje de acero al carbono de 3/4 pulg. CONJUNTO de pedestal, con funda acero inoxidable para el eje ESPACIADOR, eje de rodamiento, pedestal de fundición, 0.006 pulg. de espesor según se requiera TORNILLO hexagonal, 1/4 pulg.-20 x 3/4 pulg., acero inoxidable 4 CONJUNTO DE RODAMIENTO Y PEDESTAL, con eje de 3/4 pulg. acero inoxidable (incluye artículos 45, 48, 49, 50, 51, 57 y 58) CONJUNTO DE RODAMIENTO Y PEDESTAL, con eje de 3/4 pulg. Hastelloy (incluye artículos 45, 48, 49, 50, 51, 57 y 58) CONJUNTO DE RODAMIENTO Y PEDESTAL, con eje de 3/4 pulg. titanio (incluye artículos 45, 48, 49, 50, 51, 57 y 58) MOTOR hidráulico 3.5 HP,550 arranque con mecanismo de retroceso MOTOR, B&S, Series 5.5 HP,Series INTEK850 OHV, arranque con mecanismo de retroceso MOTOR, B&S INTEK 5.0 HP, MOTOR, Honda, GC 160 OHC, arranque con mecanismo de retroceso 5.5 HP, MOTOR, Honda, GX 160 OHV, arranque con mecanismo de retroceso 6.0 HP, Vanguard Vanguard, arranque con mecanismo de retroceso MOTOR, B&S, 6.5HP, 8 HP, INTEK Pro, arranque con mecanismo de retroceso MOTOR, B&S, INTEK Pro, 305cc MOTOR neumático KIT DE PLACA DE ASIENTO, para trabajos normales. Consultar con la fábrica para mayor información. KIT DE PLACA DE ASIENTO, para trabajos pesados. Consultar con la fábrica para mayor información. EMPAQUETADURA, protección del motor, EPDM, sólo para unidad de 3.5 HP EMPAQUETADURA, protección del motor, EPDM, sólo para INTEK PLACA DE ASIENTO, para bombas acopladas a motor neumático KIT DE GUÍA DE DESLIZAMIENTO, dos rieles de acero con sujetadores DEPURADOR DE SUCCIÓN, consultar boletín PA-206Q ARMAZÓN CILÍNDRICA DE PROTECCIÓN con patas de goma y componentes de instalación CARRITO DE RUEDAS, para la mayoría de bombas impulsadas por motor 1 1 2 4 1 4 1 1 1 1 1 1 1 1 1 1 1 1 1 1 1 4 1 2 2 1 1 1 2 1 1 1 1 1 2 2 1 1 1 1 1 1 1 1 1 1 1 1 1 1 1 1 1 1 1 1 1 1 1 1 1 1 1 NOTA: TRGDVODVHVSHFL¿FDFLRQHVWDOFRPRDSDUHFHQHQHVWHGRFXPHQWRHVWiQVXMHWDVDFDPELRVVLQSUHYLRDYLVR servimos a la industria en todo el mundo PACER® PUMPS Div. ASM Industries, Inc. 41 Industrial Circle Lancaster, PA 17601-5927 Email: [email protected] 717-656-2161 800-233-3861 FAX: 717-656-0477 www.pacerpumps.com 14 Distribuido por: (Impreso en EE. UU.) 12 ARTICULO N.º PP-9900G 15 KIT BUNA-N. Sello de caucho Buna-N adaptado para el eje, válvula de retención, todas las juntas tóricas para reacondicionar la bomba KIT de EPDM, igual a la pieza P-58-0014 pero en EPDM KIT de VITON®, igual a la pieza P-58-0014 pero en Viton Sistema PROTEK para protección del motor Todas las bombas de 3 pulg. Todas las bombas de 2 pulg. Todas las bombas de 2 pulg. Todas las bombas de 3 pulg. Todas las bombas de 1½ pulg. Todas las bombas de 1½ pulg. Todas las bombas de 3 pulg. Todas las bombas de 2 pulg. Todas las bombas de 1½ pulg. Todas las bombas de 3 pulg. Todas las bombas de 3 pulg. Todas las bombas de 2 pulg. Todas las bombas de 2 pulg. Todas las bombas de 1½ pulg. Todas las bombas de 1½ pulg. Modelos a partir del SEB2YL y SE2YL Bombas de poliéster/EPDM Modelos a partir del SEB2PL y SE2PL Todas las bombas de 3 pulg. Todas las bombas de 2 pulg. Todas las bombas de 1½ pulg. Todas las bombas de 3 pulg. Todas las bombas de 2 pulg. Todas las bombas Todas las bombas Todos los motores de 3.5 a 6.5 HP con un eje de 3/4 pulg. de diámetro Todas las bombas de 1½ pulg. KITS PACER PARA MANGUERAS: MANGUERA DE SUCCIÓN DE 20 pulg., MANGUERA DE DESCARGA DE 25 pulg., DEPURADOR Y ACOPLES P-58-0201 Kit para manguera de 1½ pulg. con extremos roscados para manguera P-58-0202 Kit para manguera de 1½ pulg. con extremos de conexión rápida para manguera P-58-0204 Kit para manguera de 2 pulg. con extremos roscados para manguera P-58-0206 Kit para manguera de 2 pulg. con extremos de conexión rápida para manguera P-58-0207 Kit para manguera de 3 pulg. con extremos roscados para manguera P-58-0208 Kit para manguera de 3 pulg. con extremos de conexión rápida para manguera KIT DE ACOPLES DE TUBERÍA DE 1½ pulg., NPT. Conectores de acero de doble faz, un codo de polipropileno (para conectores de PVC pedir la pieza P-58-0037) P-58-0021 KIT DE ACOPLES DE TUBERÍA DE 2 pulg., NPT. Igual que el kit 0020 (para los conectores de PVC pedir la pieza P-58-0038) P-58-0022 KIT DE ACOPLES DE TUBERÍA DE 3 pulg., NPT. Igual al kit 0020 (para conectores de PVC pedir la pieza P-58-0039) P-58-0161 KIT DE ACOPLES DE CONEXIÓN RÁPIDA NPT CAMELOT DE 1½ pulg. Dos adaptadores de conexión rápida tipo F, un codo de polipropileno P-58-0162 KIT DE ACOPLES DE CONEXIÓN RÁPIDA NPT CAMELOT DE 2 pulg. Igual a la pieza P-58-0161, pero con adaptadores y codo de 2 pulg. P-58-0163 KIT DE ACOPLES DE CONEXIÓN RÁPIDA NPT CAMELOT DE 3 pulg. Igual a la pieza P-58-0161, pero con adaptadores y codo de 3 pulg. P-58-0211 KIT DE TAPÓN DE LLENADO Y DRENAJE P-58-702EP-P KIT DE REACONDICIONAMIENTO para bombas de poliéster con impulsor 704. Se incluye el impulsor, la voluta, el sello del eje y todos los componentes de goma P-58-954EP-Y KIT DE REACONDICIONAMIENTO para bombas de poliéster con impulsor 974. Se incluye el impulsor, la voluta, el sello del eje y todos los componentes de goma P-58-0734 DEPURADOR DE 1½ pulg., NPT, para el extremo de la manguera de succión, moldeado en polietileno P-58-0734 91 DEPURADOR DE 1½ pulg., NPT, para el extremo de la manguera de succión, moldeado en Halar P-58-0733 DEPURADOR DE 2 pulg., NPT, para el extremo de la manguera de succión, moldeado en polietileno P-58-0733 91 DEPURADOR DE 2 pulg., NPT, para el extremo de la manguera de succión, moldeado en Halar P-58-0757 DEPURADOR DE 3 pulg., NPT, para el extremo de la manguera de succión, moldeado en polietileno P-58-0757 91 DEPURADOR DE 3 pulg., NPT, para el extremo de la manguera de succión, moldeado en Halar P-58-0753 40 CODO DE 90°, 1½ pulg., NPT. Macho y hembra, Street Ell, moldeado en polipropileno P-58-0752 40 CODO DE 90°, 2 pulg., NPT. Macho y hembra, Street Ell, moldeado en polipropileno P-58-0756 40 CODO DE 90°, 3 pulg., NPT. Macho y hembra, Street Ell, moldeado en polipropileno P-58-1610 40 CODO DE 90°, 1½ pulg. Macho NPT x vástago para manguera, en polipropileno P-58-1611 40 CODO DE 90°, 2 pulg. Macho NPT x vástago para manguera, en polipropileno P-58-1612 40 CODO DE 90°, 3 pulg. Macho NPT x vástago para manguera, en polipropileno P-58-1615 40 BOQUILLA PARA MANGUERA DE 1½ pulg. MACHO NPT x vástago para manguera, en polipropileno P-58-1616 40 BOQUILLA PARA MANGUERA DE 2 pulg. MACHO NPT x vástago para manguera, en polipropileno P-58-1617 40 BOQUILLA PARA MANGUERA DE 3 pulg. MACHO NPT x vástago para manguera, en polipropileno P-58-0020 P-58-0005 P-58-0017 P-58-0015 P-58-0014 P-58-0003 KIT DE PATAS DE GOMA. Incluye 4 patas de goma con sujetadores; debe utilizarse con el kit de guía de deslizamiento 58-0002 KIT DE PATAS DE GOMA. Incluye 4 patas de goma con sujetadores P-58-0114 Impulsada por motor de gas de 3.5 a 6.5 HP Impulsada por motor de gas de 3.5 a 8 HP Impulsada por motor de gas de 3.5 a 8 HP Todas las bombas PARA UTILIZARSE CON/EN ESTOS TIPOS DE BOMBAS “S” DESCRIPCIÓN KIT DE GUÍA DE DESLIZAMIENTO. Incluye 2 rieles de acero con sujetadores PIEZA N.º 15 TIPO H Hasta de 8 HP Todas las bom Marcas comerciales registradas: Hastelloy - Haynes International Viton - Dupont Ryton - Phillips Chemical ARMAZÓN CILÍNDRICA DE PROTECCIÓN para bombas “S” impulsadas por motor KIT DE REPARACIÓN DE SELLOS; incluye sello s del eje en EPDM y todas las juntas tórica P-58-0074 P-58-0009 ½ pulg. ¾ pulg. 1 pulg. 1¼ pulg. VÁLVULAS ESFÉRICAS DEL PUERTO DE NIVEL TOPE P-58-1905 V 1½ pulg. P-58-1906 V 2 pulg. P-58-1907 V 3 pulg. Tapón contra polvo de 1½ pulg. Tapón contra polvo de 2 pulg. Tapón contra polvo de 3 pulg. P-58-1901 V P-58-1902 V P-58-1903 V P-58-1904 V P-58-1475 P-58-1476 P-58-1477 Tapapolvo de 1½ pulg. Tapapolvo de 2 pulg. Tapapolvo de 3 pulg. Adaptador macho de 1½ pulg./rosca macho, NPT Adaptador macho de 2 pulg./rosca macho, NPT Adaptador macho de 3 pulg./rosca macho, NPT Adaptador macho de 1½ pulg./rosca macho, BSP Adaptador macho de 2 pulg./rosca macho, BSP Adaptador macho de 3 pulg./rosca macho, BSP P-58-1455 P-58-1456 P-58-1457 P-58-1555 P-58-1556 P-58-1557 TIPO F P-58-1465 L P-58-1466 L P-58-1467 L Adaptador macho de 1½ pulg./vástago para manguera Adaptador macho de 2 pulg./vástago para manguera Adaptador macho de 3 pulg./vástago para manguera P-58-1445 P-58-1446 P-58-1447 TIPO E TIPO G Acoplador hembra de 1½ pulg./rosca hembra, NPT Acoplador hembra de 2 pulg./rosca hembra, NPT Acoplador hembra de 3 pulg./rosca hembra, NPT Acoplador hembra de 1½ pulg./rosca hembra, BSP Acoplador hembra de 2 pulg./rosca hembra, BSP Acoplador hembra de 3 pulg./rosca hembra, BSP Acoplador hembra de 1½ pulg./vástago para manguera Acoplador hembra de 2 pulg./vástago para manguera Acoplador hembra de 3 pulg./vástago para manguera Acoplador hembra de 1½ pulg./rosca macho, NPT Acoplador hembra de 2 pulg./rosca macho, NPT Acoplador hembra de 3 pulg./rosca macho, NPT Acoplador hembra de 1½ pulg./rosca macho, BSP Acoplador hembra de 2 pulg./rosca macho, BSP Acoplador hembra de 3 pulg./rosca macho, BSP Adaptador macho de 1½ pulg./rosca hembra, NPT Adaptador macho de 2 pulg./rosca hembra, NPT Adaptador macho de 3 pulg./rosca hembra, NPT Adaptador macho de 1½ pulg./rosca hembra, BSP Adaptador macho de 2 pulg./rosca hembra, BSP Adaptador macho de 3 pulg./rosca hembra, BSP P-58-1435 L P-58-1436 L P-58-1437 L P-58-1535 L P-58-1536 L P-58-1537 L P-58-1425 L P-58-1426 L P-58-1427 L P-58-1415 L P-58-1416 L P-58-1417 L P-58-1515 L P-58-1516 L P-58-1517L P-58-1405 P-58-1406 P-58-1407 P-58-1505 P-58-1506 P-58-1507 DESCRIPCIÓN ACOPLADOR DE CONEXIÓN RÁPIDA EN POLIPROPILENO TIPO D TIPO C TIPO B TIPO A PIEZA N.º Elgiloy - Elgiloy Co. Kynar - Pennwalt Halar - Ausimont Comuníquese con nosotros para obtener información sobre los siguientes juegos de piezas: de reparación de bombas, de conversión para cambiar de un tipo de impulsor de bomba a otro, de juntas tóricas y sellos de eje, de tornillería en Hastelloy o titanio y de bombas adaptadas para un contacto total de la solución con partes no metálicas. P-58-0002 ACCESORIOS PACER Más vale prevenir que curar . . . Explosión por chispas provenientes de motor descubierto Quemaduras producidas por salpicaduras de ácido "El usuario de la bomba sufrió quemaduras mientras transvasaba líquidos explosivos. El accidente ocurrió por utilizar un motor descubierto. Ocurrió una explosión y el empleado sufrió quemaduras en muchas partes del cuerpo". "Mientras manipulaba ácidos poderosos, un usuario sufrió quemaduras en la piel cuando, al activar la bomba, ésta llenó de presión un tanque presurizado que no se había cerrado debidamente, lo que permitió que el líquido se escapara y salpicara al usuario". Si se utilizan bombas motorizadas para transvasar líquidos inflamables y combustibles, además de utilizar correctamente los cables de tierra y de ligado, deben emplearse bombas a prueba de explosión o con impulsión neumática. Con frecuencia, los motores eléctricos o neumáticos se conectan o se encierran de tal manera que se evite la emisión de chispas desde la carcasa del motor. De lo contrario, estas chispas podrían hacer que el líquido inflamable se encienda en una ráfaga instantánea o explote. El usuario debió haber consultado el manual de instrucciones y seguido los procedimientos establecidos por el fabricante para comprobar que la tapa del tanque presurizado se había ajustado firmemente. El usuario podría también haber evitado las lesiones si se hubiera protegido con la ropa adecuada, diseñada para resistir dichos líquidos. Las lesiones por salpicaduras de líquidos nocivos o la explosión de líquidos inflamables pueden evitarse poniéndose ropa y equipos de protección adecuados, entre los que podrían mencionarse mono de trabajo (overol), delantal, zapatos, gafas de seguridad, guantes, máscara facial y casco. ADVERTENCIA: el líquido bombeado se encuentra bajo presión durante el funcionamiento de la bomba. Mientras la bomba esté en funcionamiento no abra los tapones de drenaje o llenado y no desconecte las líneas de succión, de descarga o los acoples. De hacerlo, podría sufrir graves lesiones. GARANTÍA LIMITADA POR 1 AÑO Pacer Pumps garantiza que sus productos no presentarán defectos materiales o de fabricación durante un período de 1 año (12 meses) de servicio, siempre que dicho año de servicio ocurra dentro de los 24 meses posteriores a la fecha de fabricación. La empresa garantiza que sus productos, al momento de ser despachados, no presentarán defectos materiales ni de fabricación que les impidan un uso y servicio normales. La presente garantía no se aplicará ni será pertinente para los productos que hayan sido sujetos a un uso indebido o negligente, accidentes o una instalación indebida. Tampoco se aplicará para el mantenimiento de productos que hayan sido alterados o reparados por cualquier persona distinta a Pacer Pumps o sus representantes autorizados. El comprador, o cualquier persona que reciba dicho producto durante el período de validez de la garantía tendrá que comunicarse con el concesionario de Pacer Pumps tan pronto como ocurra cualquier fallo. Comuníquese con Pacer Pumps para averiguar el nombre y dirección del concesionario más cercano. Ciertos componentes, p. ej. sellos mecánicos, revestimientos de cerámica, impulsores, conjuntos magnéticos de impulsión, pistones, mangueras, diafragmas, etc. podrían desgastarse. Este desgaste no debe interpretarse indebidamente como un defecto, por lo que no debe incluirse en ningún reclamo por garantía. Tampoco debe entenderse que dichos elementos durarán un año sin requerir un cambió ocasional o incluso frecuente, dependiendo de la intensidad con que se utilice el producto. Conforme a la garantía precedente, la única obligación de Pacer Pumps se limitará a: (a su entera discreción) reparar y cambiar (y volver a enviar al comprador en cualquier lugar de EE. UU., con gastos de envío por cobrar) los productos defectuosos, siempre que, si la empresa es incapaz de corregir un componente o producto defectuoso, el comprador tenga derecho a optar por recibir el reembolso del precio original de compra. Para devolver una BOMBA DEFECTUOSA, devolver cualquier pieza para recibir un reembolso, o averiguar datos sobre el servicio de mantenimiento, comuníquese con el servicio de atención al cliente. Tras recibir permiso para devolver la mercancía, el comprador estará autorizado a devolver el producto a Pacer Pumps, con flete prepagado. Si la empresa determina que no se han violado las condiciones de la garantía, el producto será reparado o reemplazado gratuitamente. La empresa no se hará responsable por cualquier daño o pérdida directos o indirectos que surjan a raíz de cualquier tipo de causa, ni por los daños en los equipos causados por factores externos, p. ej. instalación indebida, modificaciones, alimentación eléctrica incorrecta, rayos, líquidos corrosivos, líquidos abrasivos, manipulación descuidada. Tampoco será responsable por los gastos laborales, de transporte o por otros daños que se produzcan en el reemplazo o reparación de las piezas defectuosas. En estos casos, la reparación estará sujeta a los gastos de reacondicionamiento vigentes en ese momento. La mercancía comprada, ya sea como un producto entero para su reventa o como componentes utilizados en conjunción con los productos fabricados por Pacer Pumps, estará amparada por el fabricante respectivo de dichos productos o componentes. PACER PUMPS ® servimos Div. de ASM Industries, Inc. a la industria 41 Industrial Circle 717/656-2161 en todo el Lancaster, PA 17601-5927 U.S.A. 800-233-3861 mundo Correo electrónico: [email protected] www.pacerpumps.com N.° de pieza 58-1745 01 FAX 717/656-0477 NOTA: Todas las especificaciones, tal como aparecen en este documento, están sujetas a cambios sin previo aviso.