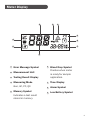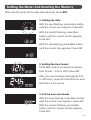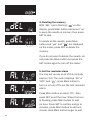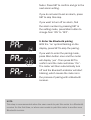
1
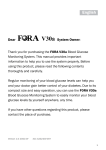
Blood Glucose Monitoring System
Sistema de Vigilancia de Glucosa Sanguinea
Owner’s Manual
Manual del Usuario
English
Dear Owner of
ForaCareTest N’GO™
Blood Glucose Monitoring
System:
The system consists of three main products: the meter, test strips and
control solutions. These products have been designed, tested, and proven
to work together as a system to produce accurate blood glucose test
results. Only use ForaCare Test N’GO™ test strips and control solutions
with the ForaCare Test N’GO™ Blood Glucose Monitoring System.
Version 1.0 2013/02
311-4283200-001
2
TABLE OF CONTENTS
IMPORTANT SAFETY INSTRUCTIONS
Read Before Use
Important Information
Intended Use
Test Principle
Appearance And Key Functions of The Meter
Meter Display
Test Strip
Setting the Meter And Deleting the Memory
04
04
06
07
07
08
09
10
11
CHECKING THE SYSTEM WITH CONTROL SOLUTIONS How to Perform A Control Solution Test
14
14
TESTING YOUR BLOOD
The Four Measuring Modes
How to Perform A Blood Glucose Test
Preparing the Puncture Site
Performing A Blood Glucose Test
17
17
18
19
16
VIEWING THE METER MEMORY
Viewing Results
Viewing Day Average Results
23
23
24
DOWNLOADING RESULTS ONTO A COMPUTER
26
CLEANING AND DISINFECTING YOUR METER
Caring for Your Meter
Disinfecting Procedures
27
27
28
BATTERY RECHARGE
30
DISPLAY MESSAGES AND PROBLEM-SOLVING GUIDE
Troubleshooting
31
33
DETAILED INFORMATION
Reference Values
34
34
Comparing Meter and Laboratory Results
SPECIFICATIONS
Federal Communications Commision (FCC) Statement
34
36
37
3
IMPORTANT SAFETY INSTRUCTIONS
Read Before Use
● The meter and lancing device are for single patient use. Do not share
them with anyone including other family members! Do not use on
multiple patients!
● All parts of the kit are considered biohazardous and can potentially
transmit infectious diseases, even after you have performed cleaning
and disinfection.
For more information, please visit
1. FDA Public Health Notification: Use of Fingerstick Devices on More
than One Person Poses Risk for Transmitting Bloodborne Pathogens:
Initial Communication (2010)
http://www.fda.gov/MedicalDevices/Safety/AlertsandNotices/
ucm224025.htm
2. CDC Clinical Reminder: Use of Fingerstick Devices on More than One
Person Poses Risk for Transmitting Bloodborne Pathogens (2010)
http://www.cdc.gov/injectionsafety/Fingerstick-DevicesBGM.html
4
1. Use this device ONLY for the intended use described in this manual.
2. Do NOT use accessories which are not specified by the manufacturer.
3. Do NOT use the device if it is not working properly or or if it is damaged.
4. Do NOT use the equipment in places where aerosol sprays are being
used, or where oxygen is being administered.
5. This device does NOT serve as a cure for any symptoms or diseases.
The data measured is for reference only.
6. Before using this device to test blood glucose, read all instructions
thoroughly and practice the test. Carry out all the quality control checks
as directed.
7. Keep the device and testing equipment away from young children.
Small items such as the battery cover, batteries, test strips, lancets and
vial caps are choking hazards.
8. Use of this device in a dry environment, especially if synthetic materials
are present (synthetic clothing, carpets etc.) may cause damaging
static discharges that may cause erroneous results.
9. Do NOT use this device in close proximity to sources of strong
electromagnetic radiation, as these may interfere with the accurate
operation.
KEEP THESE INSTRUCTIONS IN A SAFE PLACE
5
Important Information
• Severe dehydration and excessive water loss may cause readings
which are lower than actual values. If you believe you are suffering
from severe dehydration, consult a healthcare professional
immediately.
• If your blood glucose results are lower or higher than usual, and you do
not have symptoms of illness, first repeat the test. If you have
symptoms or continue to get results which are higher or lower than
usual, follow the treatment advice of your healthcare professional.
• Use only fresh whole blood samples to test your blood glucose. Using
other substances will lead to inaccurate results.
• If you are experiencing symptoms that are inconsistent with your blood
glucose test results and you have followed all the instructions given in
this owner s manual, contact your healthcare professional.
• We do not recommend using this product on severely hypotensive
individuals or patients who are in shock. Readings which are lower
than actual values may occur for individuals in a
hyperglycemic-hyperosmolar state, with or without ketosis. Please
consult your healthcare professional before use.
6
Intended Use
ForaCare Test N’GO™ Blood Glucose Monitoring System is intended
for self testing outside the body (in vitro diagnostic use) by people with
diabetes at home as an aid to monitoring the effectiveness of diabetes
control. It is intended to be used for the quantitative measurement of
glucose (sugar) in fresh capillary whole blood samples drawn from the
fingertips. This system is intended for single-patient use (lay-users at
home) and should not be shared.
It should not be used for the diagnosis of or screening for diabetes
mellitus, or testing on newborns.
This system provides you with plasma equivalent results.
Test Principle
Your system measures the amount of sugar (glucose) in whole blood.
The glucose testing is based on the measurement of electrical current
generated by the reaction of glucose with the reagent of the strip. The
meter measures the current, calculates the blood glucose level, and
displays the result. The strength of the current produced by the reaction
depends on the amount of glucose in the blood sample.
NOTE:
Check your system to ensure that it is unopened prior to use and that it contains
all parts listed above. If anything is missing or damaged, please return your
system to the place of purchase.
7
Appearance And Key Functions of The Meter
1
4
3
2
5
7
6
1
Display Screen
2
Test Slot
3
Main Button
4
Charging indicator/Bluetooth indicator
5
SET Button
6
Battery Cover
7
USB Port (only for charge)
For battery recharge.
NOTE:
The meter will turn off automatically after 180 seconds without any action or you
can press and hold the main button for 3 seconds to turn off the meter.
8
Meter Display
3
2
1
9
4
8
7
5
6
1
Error Message Symbol
2
Measurement Unit
3
Testing Result Display
4
5
6
Blood Drop Symbol
Flashes when meter
is ready for sample
application.
Measuring Mode
7
Time Display
Gen, AC, PC, QC.
8
Alarm Symbol
9
Low Battery Symbol
Memory Symbol
Indicates a test result
stored in memory.
9
Test Strip
Your system measures the amount of sugar (glucose) in whole blood.
Blood is applied to the absorbent hole on the test strip and is
automatically drawn into the reaction cell where the reaction takes place.
Absorbent Hole
Apply a drop of blood
here. The blood will be
automatically absorbed.
Test Strip Handle
Hold this part to
insert the test strip
into the slot.
10
Confirmation Window
This is where you confirm
if enough blood has been
applied to the absorbent
hole in the strip.
Contact Bars
Insert this end of the test
strip into the meter. Push
it in firmly until it will go
no further.
Setting the Meter And Deleting the Memory
Start with the meter off (no test strip inserted). Press SET.
1. Setting the date
With the year flashing, press Main button
until the correct year appears. Press SET.
With the month flashing, press Main
button until the correct month appears.
Press SET.
With the day flashing, press Main button
until the correct day appears. Press SET.
2. Setting the time format
Press Main button to select the desired
time format --- 12h or 24h. Press SET.
After you have finished selecting the 12h
or 24h clock, press SET and then the hour
will flash on the screen.
3. Set the hour and minute
With the hour flashing, press Main button
until the correct hour appears. Press SET.
With the minute flashing, press Main
button until the correct minute appears.
Press SET.
11
4. Deleting the memory
With dEL and a flashing
on the
display, press Main button and select no
to keep the results in memory then press
SET to skip.
To delete all the results, press Main
button and yes and
are displayed
on the meter, press SET to delete the
memory.
If you do not want to delete the results, do
not press the Main button but press the
SET button again to turn off the meter.
5. Set the reminder alarm
You may set up any or all of the reminder
alarms (1-4). The meter displays On or
OFF and
, press Main button to
turn on or turn off to set the first reminder
alarm.
Press Main button to select On , then
press SET to set the hour. When the hour
is flashing, press Main button to add
an hour. Press SET to confirm and go to
minutes, press Main button to add one
minute. Hold Main button longer to add
12
faster. Press SET to confirm and go to the
next alarm setting.
If you do not want to set an alarm, press
SET to skip this step.
If you want to turn off an alarm, find
the alarm number by pressing SET in
the setting mode, press Main button to
change from ON to OFF .
6. Enter the Bluetooth pairing
With the no symbol flashing on the
display, press SET to skip the pairing.
If you wish to enter the pairing mode,
press Main button once and the meter
will display yes . Then press SET to
confirm and the meter will show CLr .
The meter will then automatically turn
off and the Bluetooth indicator will start
blinking, which means the meter is in
the process of pairing with a Bluetooth
receiver.
NOTE:
This step is recommended when the user needs to pair this meter to a Bluetooth
receiver for the first time, or when user needs to pair this meter to another new
Bluetooth receiver.
13
CHECKING THE SYSTEM WITH
CONTROL SOLUTIONS
Our control solutions contain a known amount of glucose that reacts with
test strips. By comparing the result of your control solution test with the
expected range printed on the test strip vial label, you can check that the
meter and the test strips are working together as a system and that you
are performing the test correctly. It is very important that you perform this
simple check routinely to make sure you get accurate results.
Do a control solution test when:
● you first received the meter,
● at least once a week for routinely check the meter and test strips,
● you begin using a new vial of test strips,
● you suspect the meter or test strips are not working properly,
● your blood glucose test results are not consistent with how you feel, or
if you think the results are not accurate,
● practicing the testing process, or
● you dropped or think you have damaged the meter.
How to Perform A Control Solution Test
Our control solutions contain a known amount of glucose that reacts
with test strips and is used to ensure that the meter and test strips are
working together correctly.
Test strips, control solutions, or sterile lancets may not be included in
the kit (please check the contents on your product box). They can be
purchased separately. Please make sure you have all items prior to
testing your blood glucose. Please contact the Customer Care Line at
1-866-469-2632 or the place of purchase for availability.
14
1. Insert test strip
Insert a test strip into the test slot with the contact bars end first and
facing up. (Contact bars must be inserted all the way into the meter or
you may get an inaccurate test result.) The meter turns on automatically
and displays the following in sequence:
When the
appears on the display, press the Main button and QC
will appear on the display. When the QC sign is displayed, the meter will
not store your test result in the memory. If you decide not to perform a
control solution test, press the Main button again and the QC sign will
disappear.
CAUTION:
Every time you perform a control solution test you must enter QC test mode so
that the test result will not be stored in the meter memory.
15
2. Apply control solution
Shake the control solution vial thoroughly before use. Squeeze out a
drop and wipe it off, then squeeze out another drop and place it on the
tip of the vial cap. Hold the meter to move the absorbent hole of the test
strip to touch the drop. Once the confirmation window fills completely,
the meter will begin counting down. To avoid contaminating the control
solution, do not directly apply control solution onto a strip.
3. Read and compare the results
After the meter counts to 0, the result of the control solution test will
appear. Compare the result with the range printed on the test strip vial.
The result should fall within this range.
Out-of-range results
If you continue to have test results fall outside the range printed on the
test strip vial, the meter and strips may not be working properly. Do NOT
test your blood. Contact the local customer service or place of purchase
for help.
16
TESTING YOUR BLOOD
Before testing, be sure to read this section and the test strip insert found
in the test strip box carefully. Make sure you have all the items needed for
the test.
The Four Measuring Modes
The meter provides you with four modes for measuring: General, AC, PC
and QC.
USE WHEN
MODES
General
tests
any time of day without regard to time since last
meal
AC
no food intake for at least 8 hours
PC
2 hours after a meal
QC
testing with the control solution
You can switch between the two modes mode by:
1. Start with the meter switched off. Insert a test strip to turn on the
meter. The screen will display a
.
17
2. Press Main button to switch between
General, AC, PC and QC mode.
How to Perform A Blood Glucose Test
Sharing the lancing device and lancets may increase the risk of
contracting infectious diseases. Lancing device must not be used for
more than one person.
To reduce the chance of infection:
● Wash and dry your hands before starting.
● Clean the puncture site using cotton moistened with 70% alcohol and
let it air dry.
● Never share a lancet or the lancing device.
● Always use a new, sterile lancet. Lancets are for single use only.
● Wash and dry your hands thoroughly after handling the meter, lancing
device and test strips to prevent infection. For more information, please
refer to the Cleaning and Disinfection section.
● If the meter is being operated by a second person who is providing
18
testing assistance to the user, the meter and lancing device should be
decontaminated prior to use by the second person.
Preparing the Puncture Site
Rubbing the puncture site before blood extraction has a significant
influence on the accuracy of your test results.
Blood from an alternate a site that has not been rubbed exhibits a
measurably different glucose concentration than blood from the finger.
When the puncture site was rubbed prior to blood extraction, the
difference was significantly reduced.
Please follow the suggestions below before obtaining a drop of blood:
Wash and dry your hands before starting.
● Select the puncture site on fingertips.
● Clean the puncture site using cotton moistened with 70% alcohol and
let it air dry.
● Rub the puncture site for about 20 seconds before penetration.
● Use a clear cap while setting up the lancing device.
19
● Fingertip testing
Press the tip of the lancing device firmly
against the lower side of your fingertip.
Press the release button to puncture your
finger, a click indicates that the puncture
is complete.
NOTE:
• Choose a different spot each time you test. Repeated punctures at the same
spot may cause soreness and calluses.
• It is recommended that you discard the first drop of blood as it might contain
tissue fluid, which may affect the test result.
Performing A Blood Glucose Test
1. Insert the test strip to turn on the meter
Wait for the meter to display
.
2. Select the appropriate measuring mode by pressing Main button
For selecting the measurement mode, please refer to the FOUR
MEASURING MODES .
20
3. Apply blood sample
Obtain a drop of blood of at least 0.5 µL
with a lancing device. Use the clear cap
for sites other than fingers and refer to
the strip package insert for more details.
When the
symbol appears on the
display, touch the drop of blood with the
absorbent hole of the test strip. Do not
rub the test strip with your finger or try to
apply a smeared sample.
Gently apply the drop of blood to the
absorbent hole of the test strip at a titled
angle. Confirmation window should be
completely filled if enough blood sample
has been applied. Do NOT remove your
finger until you hear a beep sound.
If the confirmation window is not filled
completely before the meter begins to
count down, do not add more blood to
the test strip. Discard the test strip and
start again. If you have trouble filling the
test strip, please call your local customer
service number for assistance.
NOTE:
If you do not apply a blood sample within 3 minutes, the meter will automatically
turn off. You must remove the test strip and insert it back into the meter to
restart the test.
21
4. Get result
The result of your blood glucose test will
appear after the meter counts down to 0.
The blood glucose result will be stored in
the memory automatically.
WARNING:
• Please do not change your treatment based on the result without first
consulting your health care professional.
• Turn the meter off by removing the test strip. Discard the used test strip and
lancet carefully according to your local regulations.
• Wash your hands thoroughly with soap and water after handling the meter,
lancing device and test strips to avoid contamination.
22
VIEWING THE METER MEMORY
Your Meter stores the 450 most recent blood glucose test results with
date and time in its memory. You can review the test results with these
easy steps.
Viewing Results
1. Enter the memory mode
With the meter turned off, press the Main
button. The first test result will appear,
indicating that you are in the memory
mode.
When using the meter for the first time or
if the results have been deleted, - - - will
appear, indicating that there are no test
results in the memory.
2. Recall test results
After the last test result, the most recent
test result appears with the date and
time. Press the Main button to review
your last 450 test results in order. When
the memory is full, the oldest result will
be deleted when the newest is added.
23
3. Exit the memory mode
Press the Main button for three seconds to turn off the meter or after the
last result, the display will show End and it will turn off automatically.
NOTE:
The results of control solution tests are NOT stored in the memory. Stored results
are blood glucose results only.
Viewing Day Average Results
1. Press and release Main button
Keep pressing Main button for 3 seconds
until the flashing AVG appears. Release
Main button and then your 7-day average
result measured in general mode will
appear on the display.
24
2. Press Main button to review
14-, 21-, 28-, 60- and 90- day average
results stored in each measuring mode in
the order of Gen, AC, then PC.
3. Exit the meter memory
Keep pressing the Main button and the meter will turn off after displaying
the last test result.
25
DOWNLOADING RESULTS ONTO A
COMPUTER
Data Transmission via Bluetooth
You can use your device with iOS (5.0.1 or higher) or Android system to
download data from your meter via Bluetooth. Follow the steps below to
transmit data from your meter. Please contact local customer services or
the place of purchase for assistance.
Please note that it is required to do the pairing between meter and
Bluetooth Recevier before transmitting data.
1. Make sure your meter is already paired with your device with iOS (5.0.1
or higher) or Android system by following instructions of the setting model
in Step 6.
2. Install iFORA Diabetes Manager App e on your device with iOS (5.0.1
or higher) or Android system.
3. Data transmission
Turn on the Bluetooth on your device with iOS (5.0.1 or higher) or
Android system and keep it on, and your meter will be able to connected
to the device after measurement. You can view the data on your device.
WARNING:
• While the meter is in transmission mode, it will be unable to perform a blood
glucose test.
• Make sure your your device with iOS (5.0.1 or higher) or Android system before
transmitting the data and the meter is within the receiving range.
• The USB port of ForaCare Test N GO™ is only for battery recharge. It does not
have the function of data transmission.
26
CLEANING AND DISINFECTING YOUR
METER
Caring for Your Meter
To avoid the meter and test strips attracting dirt, dust or other
contaminants, please wash and dry your hands thoroughly before use.
Why the cleaning and disinfection should be performed
Cleaning and disinfection are different. Cleaning is the process of
removing dirt (e.g. food debris, grease, dust), disinfection is the process
of killing germs (e.g. bacteria and viruses).
When to clean and disinfect the meter
Clean the meter when you see any dirt on it. You should disinfect the
meter at least once a week to prevent infection.
How to clean and disinfect the meter
The meter must be cleaned prior to the disinfection. Use one disinfecting
wipe to clean exposed surfaces of the meter thoroughly and remove any
visible dirt or blood or any other body fluid with the wipe. Use a second
wipe to disinfect the meter. Do NOT use organic solvents to clean the
meter.
We recommend for meter cleaning and disinfection you should use
the disinfecting wipe/towelette from below. The following product with
isopropyl alcohol as the active ingredient has been shown to be safe for
use with the ForaCare Test N GO™ glucose meter.
► Micro-Kill+™ (Micro-Kill Plus™) by Medline
(EPA Reg. No. 59894-10-37549)
To obtain disinfecting wipes and other information, please contact
Medline at 1-800-MEDLINE (1-800-633-5463) or visit www.medline.com.
27
Disinfecting Procedures
1. Take out one disinfecting wipe from the package and squeeze out any
excess liquid in order to prevent damage to the meter.
2. Wipe all meter s exterior surface
display and buttons. Hold the meter with
the test strip slot pointing down and
wipe the area around the test slot but be
careful not to allow excess liquid to get
inside. Keep the meter surface wet with
disinfection solution for a minimum of 2
minutes for Micro-Kill+™ wipes. Follow
the instructions on the package label of
disinfecting wipe.
3. Allow the meter surface to dry completely.
4. Discard the used wipes and never reuse them. Wash your hands
thoroughly with soap and water after handling the meter, lancing device
and test strips to avoid contamination.
Improper system cleaning and disinfection may result in meter
malfunction. If you have a question, please contact customer service at
1-866-469-2632 for assistance.
28
This device has been validated to withstand 5,000 cleaning and
disinfection cycles using the recommended disinfecting wipe/towelette.
The tested number of cycles is estimated by 2 disinfection cycles per day
for 5 years the expect life of device.
Stop using the meter if you see any signs of deterioration. For example:
• meter can not be turned on,
• LCD display cracks or becomes cloudy,
• buttons no longer function,
• meter outer casing cracks,
• data can not be transmitted to PC,
• color or paint/printing on housing is abnormal, or
• scratches or abrasions on meter are higher than acceptable.
Please contact the customer service for a replacement meter if any of the
signs of deterioration are noticed.
NOTE :
• Do NOT clean and disinfect the meter while performing tests.
• If the meter is being operated by a second person, the meter and lancing
device should be decontaminated prior to use by the second person.
• Do NOT allow cleaning and disinfecting solution to get in the test slot.
• If you do get moisture in the test strip slot, wipe it away with a corner of tissue.
• Always dry the meter thoroughly before using it.
• Do not spray the meter directly with cleaning solutions especially those
containing water (i.e. soapy water), as this could cause the solution to enter
the case inside and damage the electronic components or circuitry.
29
BATTERY RECHARGE
Your meter comes with a built-in rechargeable Li-polymer battery. If
the low battery symbol
appears on the screen indicating that the
battery is low and it is time to recharge the battery.
1. Connect the USB cable to the data port of the meter.
2. Connect the other end of cable to a free USB port on your personal
computer.
3. USb will appear on the display and the charging indicator will light up
in red when battery is recharging. After the battery is fully charged, the
red light will turn green.
4. Remove the USB cable and the meter will automatically switch off.
NOTE :
• It should take approximately 2 hours to be fully recharged. Recharging the
battery does not affect the test results stored in the memory.
• The USB cable is for battery recharging and data transmission with a
computer. If you wish to recharge through a wall outlet, please obtain a USB
adapter.
30
DISPLAY MESSAGES AND
PROBLEM-SOLVING GUIDE
The following is a summary of display messages. If your meter displays
an error message, please follow the actions for the error message as
described in the table below. If the problem persists, please contact your
local customer service agent for help.
MESSAGE
WHAT IT MEANS
Appears when glucose
< 20 mg/dL (1.1 mmol/L).
Appears when glucose
> 600 mg/dL (33.3mmol/L).
The
symbol appears
with this message. This
ACTION
This indicates hypoglycemia
(low blood glucose.) Please
seek immediate medical
assistance.
This indicates severe
hyperglycemia (high
blood glucose). Please
seek immediate medical
assistance.
Replace the battery
immediately.
means that the battery does
not have enough power
remaining for a test.
A used test strip is inserted,
or there is an electrical
problem.
You may have removed the
strip after applying blood to
the absorbent hole.
Repeat test with a new test
strip. If the error message
re-appears, please contact
your local customer service
agent for help.
Keep the test strip in the
meter after it has absorbed
the blood until the meter
displays the test result.
31
MESSAGE
WHAT IT MEANS
The temperature of the
environment, meter, or test
strip is outside the system s
operating range. You cannot
ACTION
Repeat the test after
the meter and test strip
are within the operating
temperatures.
perform a test until the meter
and test strip are within the
operating range of 50°F to
104°F (10°C to 40°C).
Problem with the meter.
Review the instructions and
try again with a new test
strip. If the problem persists,
please contact your local
customer service agent for
help.
For questionable results, please see test strip package insert for
important information.
32
Troubleshooting
1. If the meter does not display a message after inserting a test strip:
POSSIBLE CAUSE
Batteries exhausted.
Test strip inserted upside down or
incompletely.
Defective meter or test strips.
WHAT TO DO
Replace the batteries.
Insert the test strip with contact
bars end first and facing up.
Please contact customer service.
2. If the test does not start counting down after applying the sample:
POSSIBLE CAUSE
Insufficient blood sample.
Defective test strip.
Sample applied after automatic
switch-off (3 minutes after last user
action).
Defective meter.
WHAT TO DO
Repeat the test using a new test strip
with larger volume of blood sample.
Repeat the test with a new test strip.
Repeat the test with a new test strip.
Apply sample only when flashing
appears on the display.
Please contact customer service.
3. If the control solution testing result is out of range:
POSSIBLE CAUSE
WHAT TO DO
Error in performing the test.
Read instructions thoroughly and
repeat the test again.
Control solution vial was poorly shaken. Shake the control solution vigorously
and repeat the test again.
Expired or contaminated control
Check the expiry date of the control
solution.
solution.
Control solution that is too warm or
Control solution, meter, and test strips
too cold.
should be at room temperature (20°C
to 25°C/68°F to 77°F) before testing.
Defective test strip.
Repeat the test with a new test strip.
Meter malfunction.
Please contact customer service.
33
DETAILED INFORMATION
Reference Values
Blood Glucose
Blood glucose monitoring plays an important role in diabetes control. A
long-term study showed that maintaining blood glucose levels close to
normal can reduce the risk of diabetes complications by up to 60%*1.
The results provided by this system can help you and your healthcare
professional monitor and adjust your treatment plan to gain better control
of your diabetes.
Time of day
Normal plasma glucose range for people
without diabetes (mg/dL)
Fasting and before meal
< 100 mg/dL (5.6 mmol/L)
2 hours after meals
< 140 mg/dL (7.8 mmol/L)
Source: American Diabetes Association. Standards of Medical Care in Diabetes –
Diabetes Care 2012; 35 (Suppl 1):S1-S100.
Please work with your doctor to determine a target range that works
best for you.
References:
*1: American Diabetes Association position statement on the Diabetes Control and
Complications Trial (1993).
Comparing Meter and Laboratory Results
The meter provides you with whole blood equivalent results. The result
you obtain from your meter may differ somewhat from your laboratory
result due to normal variation. Meter results can be affected by factors
and conditions that do not affect laboratory results in the same way. To
34
make an accurate comparison between meter and laboratory results,
follow the guidelines below.
Before going to the lab:
● Perform a control solution test to make sure that the meter is working
properly.
● Fast for at least eight hours before doing comparison tests, if possible.
● Take your meter with you to the lab.
While staying at the lab:
Make sure that the samples for both tests test are taken and tested
within 15 minutes of each other.
● Wash your hands before obtaining a blood sample.
● Never use your meter with blood that has been collected in a gray-top
test tube.
● Use fresh capillary blood only.
You may still have a variation from the result because blood glucose
levels can change significantly over short periods of time, especially if
you have recently eaten , exercised, taken medication, or experienced
stress*2. In addition, if you have eaten recently, the blood glucose level
from a finger prick can be up to 70 mg/dL (3.9 mol/L) higher than blood
drawn from a vein (venous sample) used for a lab test*3. Therefore, it is
best to fast for eight hours before doing comparison tests. Factors such
as the amount of red blood cells in the blood (a high or low hematocrit) or
the loss of body fluid (dehydration) may also cause a meter result to be
different from a laboratory result.
References:
*2: Surwit, R.S., and Feinglos, M.N.: Diabetes Forecast (1988), April, 49-51.
*3: Sacks, D.B.: Carbohydrates. Burtis, C.A., and Ashwood, E.R. (ed.), Tietz
Textbook of Clinical Chemistry. Philadelphia: W.B. Saunders Company (1994), 959.
35
SPECIFICATIONS
Dimension: 93.0 (L) x 26.03 (W) x 5.57 (H) mm
Weight: 26.8 g (without battery)
Power Source: Li-Polymer battery
Display: LCD
Memory: 450 measurement results with date and time
Automatic detection of electrode insertion
Automatic reaction time count-down
Automatic blood detection
Temperature warning
Operating Condition:
50°F to 104°F (10°C to 40°C), below 85% R.H.
Storage/Transportation Conditions:
-4°F to 140°F (-20°C to 60°C), below 95% R.H.
Measurement Units: mg/dL
Measurement Range: 20 to 600 mg/dL (1.1 to 33.3 mmol/L)
This device has been tested to meet the electrical and safety requirements of: IEC/
EN 61010-1, IEC/EN 61010-2-101, EN 61326-1, EN 61326-2-6.
36
Federal Communications Commision (FCC)
Statement
15.21
You are cautioned that changes or modifications not expressly
approved by the part responsible for compliance could void the user’s
authority to operate the equipment.
15.105(b)
Federal Communications Commission (FCC) Statement
This equipment has been tested and found to comply with the limits
for a Class B digital device, pursuant to part 15 of the FCC rules. These
limits are designed to provide reasonable protection against harmful
interference in a residential installation. This equipment generates, uses
and can radiate radio frequency energy and, if not installed and used in
accordance with the instructions, may cause harmful interference to radio
communications. However, there is no guarantee that interference will not
occur in a particular installation. If this equipment does cause harmful
interference to radio or television reception, which can be determined by
turning the equipment off and on, the user is encouraged to try to correct
the interference by one or more of the following measures:
• Reorient or relocate the receiving antenna.
• Increase the separation between the equipment and receiver.
• Connect the equipment into an outlet on a circuit different from that to
which the receiver is connected.
• Consult the dealer or an experienced radio/TV technician for help.
This device complies with Part 15 of the FCC Rules. Operation is
subject to the following two conditions:
1) This device may not cause harmful interference and
2) This device must accept any interference received, including
interference that may cause undesired operation of the device.
37
FCC RF Radiation Exposure Statement:
1) This transmitter must not be co-located or operating in conjunction
with any other antenna or transmitter.
2) This equipment complies with FCC RF radiation exposure limits set
forth for an uncontrolled environment. This equipment should be
installed and operated with a minimum distance of 20 centimeters
between the radiator radiation source and your body.
Made for iPod , Made for iPhone , and Made for iPad mean that an electronic accessory has been
designed to connect specifically to iPod, iPhone or iPad, respectively, and has been certified by the
developer to meet Apple performance standards. Apple is not responsible for the operation of this
device or its compliance with safety and regulatory standards. Please note that the use of this accessory
with iPod, iPhone or iPad may affect wireless performance.
iPod touch®, iPhone® and iPad® are trademarks of Apple Inc., registered in the U.S. and other countries.
38
Español
Estimado usuario del Sistema
ForaCareTest N’GO™ :
El sistema consta de tres productos principales: el medidor, tiras
reactivas y soluciones de control. Estos productos se han diseñado,
probado y demostrado que funcionan como un sistema para producir
resultados de las pruebas precisas de la glucosa sanguinea. Utilice
sólo ForaCare Test N’GO™ tiras reactivas y soluciones de control con el
ForaCare Test N’GO™ Sistema de Vigilancia de Glucosa Sanguinea.
39
TABLA DE CONTENIDO
INSTRUCCIONES IMPORTANTES DE SEGURIDAD
Leáse Antes de Ser Usado
Información Importante
Uso Destinado
Principios de la Prueba
Apariencia Y Funciones Principales Del Medidor
Pantalla de Visualización
Tiras Reactivas
Ajuste del Medidor y Borrado de la Memoria
41
41
43
44
44
45
46
47
48
PROBANDO EL SISTEMA CON LA SOLUCIÓN DE CONTROL
Realizando Una Prueba Con la Solución de Control
52
53
ANÁLISIS DE LA GLUCOSA SANGUINEA
Los Cuatro Modos de Medición
Como Realizar Una Prueba De Glucosa Sanguinea
Preparando el Lugar de Punción
Realizando la Prueba de Glucosa en la Sangre
55
55
56
57
58
VISUALIZACIÓN DE LA MEMORIA DEL MEDIDOR
61
Visualización de Los Resultados
61
Revisando Los Resultados del Promedio Diario de la Glucosa Sanguinea 63
DESCARGA DE RESULTADOS A UNA COMPUTADORA
64
LIMPIEZA Y DESINFECCIÓN DE SU MEDIDOR
Cuidado de Su Medidor
Procedimientos de Desinfección
65
65
66
RECARGA DE BATERÍA
69
MENSAJES EN PANTALLA Y GUÍA DE RESOLUCIÓN DE PROBLEMAS
Localización y Resolución de Problemas
70
71
INFORMACIÓN DETALLADA
Valores Referenciales
Comparando el Resultado del Medidor y del Laboratorio
73
73
74
ESPECIFICACIONES
Comunicado Oficial de la Comisión Federal de Comunicaciones
(FCC, siglas en inglés)
76
77
40
INSTRUCCIONES IMPORTANTES DE
SEGURIDAD
Leáse Antes de Ser Usado
● El medidor y el dispositivo de punción son para el uso de un solo
paciente. No los comparta con nadie incluyendo a los miembros de la
familia! No los use en varios pacientes.
● Todas las partes del kit son considerados altamente peligrosos y
potencialmente pueden transmitir enfermedades infecciosas, incluso
después de haber realizado la limpieza y desinfección.
Para obtener más información, visite
1. FDA Public Health Notification: Use of Fingerstick Devices on More
than One Person Poses Risk for Transmitting Bloodborne Pathogens:
Initial Communication (2010)
http://www.fda.gov/MedicalDevices/Safety/AlertsandNotices/
ucm224025.htm
2. CDC Clinical Reminder: Use of Fingerstick Devices on More than One
Person Poses Risk for Transmitting Bloodborne Pathogens (2010)
http://www.cdc.gov/injectionsafety/Fingerstick-DevicesBGM.html
41
1. Utilice este dispositivo ÚNICAMENTE para el uso específico que se
describe en este manual.
2. NO utilice accesorios no especificados por el fabricante.
3. NO utilice el dispositivo si no funciona correctamente o si está dañado.
4. NO utilice el equipo en lugares donde se empleen aerosoles ni donde
se administre oxígeno.
5. Este dispositivo NO sirve como cura para cualquier síntoma ni
enfermedad. Los valores medidos son simplemente una referencia.
6. Antes de usarlo para medir la glucosa en sangre, lea atentamente las
instrucciones y realice la prueba. Haga todos los controles de calidad
tal como se indican.
7. Mantenga el dispositivo y el equipo de medición lejos de los niños
pequeños. Los elementos pequeños, como la tapa de la batería, las
pilas, las tiras de medición, las lancetas y las tapas del envase
constituyen un riesgo de asfixia.
8. El uso de este dispositivo en un ambiente seco, en especial si hay
materiales sintéticos presentes (telas sintéticas, alfombras, etc.)
puede ocasionar descargas estáticas nocivas y resultados erróneos.
9. NO utilice este dispositivo cerca de fuentes de radiación
electromagnética fuerte, puesto que pueden interferir con la exactitud
de la medición.
CONSERVE ESTAS INSTRUCCIONES EN UN LUGAR SEGURO
42
Información Importante
• La excesiva pérdida de agua y la deshidratación severa puede
causar lecturas por debajo de los valores reales. Si usted cree que
está sufriendo de deshidratación severa, consulte con su médico
inmediatamente.
• Si usted obtiene resultados de la glucosa en la sangre más altos o
más bajos de lo normal y no presenta síntomas que lo evidencien,
repita la prueba. Si presenta algún síntoma y/o continúa obteniendo
resultados irregulares, siga el tratamiento recomendado por su
medico.
• Aplique solamente muestra fresca de sangre capilar para realizar la
prueba de glucosa. Usar sólo heparina (heparina sódica) para la
anticoagulación de la sangre entera. La aplicación de otras sustancias
causará resultados incorrectos.
• Si usted tiene síntomas que son inconsistentes con los niveles de la
glucosa en la sangre y usted ha seguido todas las instrucciones
descritas en este manual, contacte con su profesional medico.
• No recomendamos usar este producto en individuos seriamente
hipotensos o pacientes en estado de shock. Pueden ocurrir resultados
más bajos de lo normal si el individuo experimenta un estado
hiperglicémico-hiperosmolar, con o sin cetosis. Por favor consulte
con su profesional médico antes de utilizar este aparato.
43
Uso Destinado
ForaCare Test N’GO™ Sistema de Vigilancia de Glucosa Sanguinea
está destinado para uso externo corporal (para uso de diagnóstico in
vitro y está diseñado para ayudar en la supervisión y control eficaz de
la diabetes. El sistema está destinado para ser utilizado para análisis
cuantitativos de glucosa (azúcar) en muestras frescas de sangre entera
capilar extraída de las yemas de los dedos. El sistema es destinado para
el uso en el hogar. Se destina a ser utilizado por una sola persona y no
debe ser compartido.
No debe ser usado para diagnosticar la diabetes, ni para examinar a
recién nacidos.
El medidor le proporciona resultados equivalentes de plasma.
Principios de la Prueba
Este sistema mide la cantidad de azúcar (glucosa) en la sangre. La
prueba de glucosa en la sangre se basa en la medición del fl uido
eléctrico generado por la reacción de la glucosa con el agente reactivo
de la tira reactiva. El medidor mide la corriente, calcula el nivel de
glucosa en la sangre y muestra el resultado. La fuerza de la corriente
producido por la reacción depende de la cantidad de glucosa en la
muestra de sangre.
NOTA:
Revise su sistema para asegurarse de que no haya sido abierto antes de usarse
y que contiene todas las partes mencionadas anteriormente. Si hay algo que
falta o está dañado, por favor devuelva su sistema al lugar de compra.
44
Apariencia Y Funciones Principales Del Medidor
1
4
3
2
5
7
6
1
La Pantalla de Visualización
2
Ranura de Prueba
3
Botón Main
4
Indicador de Recarga/Bluetooth Indicador
5
Botón SET
6
Tapa de la Batería
7
Puerto USB (sólo para carga)
Para la recarga de la batería.
NOTA:
Mantenga botón Main presionado por 3 segundos o simplemente no realice
ninguna acción por 3 minutos y el medidor se apagará automáticamente.
45
Pantalla de Visualización
3
2
1
9
4
8
7
5
6
1
Símbolo Que Avisa Hay Error
2
Unidad de Medición
3
Resultados de prueba en pantalla
4
5
46
6
Simbolo de Gota de Sangre
Parpadea cuando el medidor
está listo para la aplicación
de la muestra sanguinea.
Cuatro Modos de Medición
7
La Hora en Pantalla
General, AC, PC y QC de resultados.
8
Símbolo de Alarma
9
Símbolo de Batería
Memoria
Indica un resultado de prueba
almacenado en la memoria
Tiras Reactivas
Este sistema mide la cantidad de azúcar (glucosa) sanguinea. La
sangre se aplica al canal absorbente de la tira reactiva y se introduce
automáticamente en la celda de reacción donde tiene lugar la reacción.
Canal Absorbente
Aplique una gota
de sangre aquí. La
sangre será absorbida
automáticamente.
Mango de la Tira
Reactiva
Coja la tira por esta
parte para introducirla
en la ranura.
Ventanilla de
Confirmación
Es donde usted confirma
si ha puesto suficiente
sangre en el Canal
Absorbente de la tira.
Barras de Contacto
Inserte este extremo de
la tira reactiva dentro de
la ranura de prueba
hasta que no entre mas.
47
Ajuste del Medidor y Borrado de la Memoria
Comience con el medidor apagado (sin tira reactiva insertada). A
continuación, oprima el botón SET.
1. Ajuste del Año
Con el año parpadeando, presione botón
Main hasta que el año correcto aparezca.
Presione SET.
Con el mes parpadeando, presione botón
Main hasta que el mes correcto aparezca.
Presione SET.
Con el día parpadeando, presione botón
Main hasta que el día correcto aparezca.
Presione SET.
2. Seleccione reloj de 12 o 24 horas
Presione y libere botón Main para
seleccionar el formato de hora 12h o
24h. Presione SET.
Una vez que haya terminado de
seleccionar el reloj de 12 o 24 horas,
oprima el botón SET y después la hora
parpadeará en la pantalla.
3. Ajuste de la hora
Con la hora parpadeando, presione
botón Main hasta que la hora correcta
aparezca. Presione SET.
48
Con el minuto parpadeando, presione
botón Main hasta que el minuto correcto
aparezca. Presione SET.
4. Borrado de resultados y egreso del
modo de ajuste
Con los símbolos dEL y
parpadeando en pantalla, presione
y seleccione no para conservar los
resultados en memoria, luego presione
SET para saltarlos.
Si desea borrar toda la memoria,
presione el botón Main para seleccionar
yes y
Luego presione SET el seteo
para borrar toda memoria.
Si no desea borrar los resultados, no
presione el botón Main, solo oprima
el botón SET otra vez para apagar el
medidor.
5. Configurar la alarma de recordatorio
Puede configurar cualquiera o todas las
alarmas de recordatorio (1-4). El medidor
muestra On u OFF y
, pulse el
botón Main para activar o desactivar la
alarma del primer recordatorio.
Presione el botón Main para seleccionar
On , luego presione SET para fijar la
hora. Cuando la hora esté parpadeando,
49
pulse el botón Main para añadir una
hora. Pulse SET para confirmar y pasar
a los minutos, pulse el botón Main para
añadir un minuto. Mantenga oprimiendo
el botón Main para añadir más rápido.
Oprima el botón SET para confirmar y
pasar a la configuración de la siguiente
alarma.
Si no desea establecer una alarma,
oprima SET para omitir este paso.
Si desea desactivar una alarma,
encontrar el número de alarma
oprimiendo el botón SET en el modo
de ajuste, oprima el botón Main para
cambiar de ON a OFF .
6. Crear un emparejamiento Bluetooth
Con el símbolo no parpadeando en la
pantalla, oprima el botón SET para omitir
la sincronización.
Si desea entrar en el modo de
emparejamiento, pulse el botón Main
una vez y la pantalla indicará yes .
A continuación, oprima SET para
confirmar y el medidor mostrará CLr .
El medidor se apagará automáticamente
y el Bluetooth indicador comenzará a
parpadear, lo que significa que el medidor
está en el proceso de emparejamiento
con un receptor Bluetooth.
50
NOTA:
Este paso se recomienda cuando el usuario necesita para emparejar este metro
a un receptor Bluetooth por primera vez, o cuando el usuario necesita para
emparejar este metro a otro receptor Bluetooth nuevo.
51
PROBANDO EL SISTEMA CON LA
SOLUCIÓN DE CONTROL
FORA solución de control contiene una cantidad conocida de glucosa que
reacciona con las tiras reactivas. Al comparar el resultado de su prueba
de solución de control con el rango esperado impreso en la etiqueta
del frasco de las tiras, se puede comprobar que el medidor y las tiras
reactivas están trabajando juntos como un sistema y que va a realizar
la prueba correctamente. Es muy importante que realice esta sencilla
prueba rutinariamente para asegurarse de obtener resultados precisos.
Haga una prueba para la solución de control cuando:
• Al adquirir por primera vez su glucómetro
• Al menos una vez a la semana como prueba rutinaria para
verifi car el funcionamiento del glucómetro y de las tiras
reactivas
• Al empezar un envase nuevo de tiras reactivas
• Si sospecha que el glucómetro o las tiras no están
funcionando correctamente
• Si los resultados de la prueba de glucosa en la sangre no
son consistentes a cómo se siente, o si los resultados no
son exactos
• Al practicar el proceso de la prueba, o
• Si ha dejado caer el glucómetro, o si piensa que éste ha
sido dañado.
52
Realizando Una Prueba Con la Solución de Control
Es posible que en el kit no se incluyan tiras reactivas, soluciones de
control o lancetas estériles (compruebe el contenido de la caja del
producto). Se pueden adquirir por separado. Asegúrese de que tiene
todos los artículos antes de analizarse la glucosa en sangre. Póngase en
contacto con la Línea de Atención al Cliente en el 1-866-469-2632 o en
el lugar de compra para la disponibilidad.
1. Inserte la tira reactiva
Inserte una tira reactiva en la ranura de prueba con las barras de
contacto primero y boca arriba. (Los resultados pueden resultar erróneos
si las barras de contacto no están totalmente insertadas en la ranura de
prueba.) El medidor se enciende automáticamente y muestra la siguiente
secuencia:
Cuando el símbolo
aparece en la pantalla, oprima el botón Main
y QC aparecerá en la pantalla. Con QC visualizado, el medidor no
almacenará el resultado de prueba en la memoria. Si decide no hacer
una prueba de la solución de control, presione el botón Main otra vez y
QC desaparecerá.
53
PRECAUCIÓN:
Cuando haga una prueba de solución de control, debe marcarla como tal, así el
resultado no será guardado en la memoria.
2. Aplique la solución de control
Agite bien la botellita de la solución de control. Retire la tapa de la
botellita de solución de control. Coloque la tapa sobre una superficie
plana. Apriete la botellita, deseche la primera gota, y limpie la punta del
gotero para evitar contaminación. Apriete el frasco otra vez para sacar
otra gota de solución de control y aplique esa gota a la cima de la tapa.
Sostenga el medidor con la tira reactiva insertada y toque levemente
el canal absorbente de la tira con la gota. Una vez que la ventanilla de
confirmación esté llena, el medidor empezará el conteo regresivo.
3. Lea y compare los resultados
Después del conteo regresivo hasta 0, el resultado de la solución de
control aparecerá en la pantalla. Compare este resultado con el rango
impreso en el envase de las tiras reactivas; el resultado debe estar
dentro del rango.
Resultados fuera del rango
Si al repetir la prueba el resultado sigue estando fuera de rango, el
sistema podría estar trabajando incorrectamente. NO utilice el sistema
para hacer exámenes de sangre. Contacte a su distribuidor local o bien al
servicio al cliente.
54
ANÁLISIS DE LA GLUCOSA
SANGUINEA
Antes de la prueba, asegúrese de leer esta sección y el hoja de
información sobre la tira reactiva que se encuentra en la caja de tiras
reactivas. Asegúrese de tener todas las cosas necesarias para la prueba.
Los Cuatro Modos de Medición
El medidor le ofrece cuatro modos de medición, General, AC, PC y QC.
CUANDO UTILIZAR
MODOS
Las pruebas generales cualquier hora del día sin tener en cuenta el
(se muestra como Gen ) tiempo transcurrido desde la última comida
sin la ingesta de alimentos durante por lo
AC
menos 8 horas
PC
2 horas después de una comida
QC
prueba con la solución de control
Puede cambiar entre cada modo por la:
1. Comienza con el medidor apagado. Inserte una tira reactiva para
encender el medidor. En la pantalla aparecerá
.
55
2. Oprima el botón Main para cambiar
entre los modos de General, AC, PC y QC.
Como Realizar Una Prueba De Glucosa Sanguinea
Compartir el dispositivo de punción y lancetas puede aumentar el riesgo
de contraer enfermedades infecciosas. Dispositivo de punción no debe
utilizarse durante más de una persona.
Para reducir las posibilidades de infección:
● Lávese y séquese bien las manos antes de empezar.
● Limpie el lugar de punción con un algodón humedecido con 70% de
alcohol y deje secar al aire.
● Nunca comparta la lanceta o el dispositivo de punción.
● Siempre utilice una lanceta nueva y esterilizada. Las lancetas deben
ser utilizadas SOLO una vez.
● Lavar y secar bien las manos después de manipular el medidor, tiras
reactivas y el dispositivo de punción para prevenir la infección. Para
obtener más información, por favor consulte la sección Limpieza y
56
Desinfección .
● Si el medidor está siendo operado por una segunda persona que está
prestando asistencia de pruebas al usuario, el dispositivo medidor y
de punción debe ser descontaminado antes de su uso por la segunda
persona.
Preparando el Lugar de Punción
Para obtener una muestra más significativa de sangre en el valor de
glucosa, antes de la extracción, frote el área de punción para estimular la
perfusión de sangre.
La sangre de un lugar que no ha sido estimulado brinda una
concentración distinta en la medición que la sangre que ha sido extraída
del dedo. Cuando el punto de punción ha sido frotado previamente a la
extracción de la sangre, la diferencia se ve significativamente reducida.
Por favor siga las siguientes sugerencias antes de obtener la gota de
sangre: Lávese y séquese bien las manos antes de empezar.
● Seleccione el lugar de punción en los dedos.
● Limpie el lugar de punción con un algodón humedecido con 70% de
alcohol y deje secar al aire.
● Frote el sitio de punción al menos 20 segundos antes de la
penetración.
● Use la tapa transparente (incluida en este equipo) mientras instala el
dispositivo de punción.
57
● Probando en la yema del ded
Sujete el dispositivo de punción
firmemente sobre el costado de su dedo.
Presione al botón de liberación. Usted
escuchará un clic, indicando que la
punción está completa.
NOTA:
• Escoja una área diferente cada vez que hace el examen. Repetir la punción
en el mismo lugar puede causarle dolor o crearle callosidades.
• Es recomendable descartar la primera gota de sangre ya que por lo general
contiene otras sustancias que podrían afectar el resultado.
Realizando la Prueba de Glucosa en la Sangre
1. Inserte la tira reactiva para encender su medidor
Espere hasta que el medidor le muestre
.
2. Seleccione la función apropiada de medición presionando botón
Main
Para la selección del modo de medición, por favor refiérase a los cuatro
modos de medición .
58
3. Aplique la muestra de sangre
Obtener una gota de sangre de al menos
0,5 µL con un dispositivo de punción. Use
la tapa transparente para los sitios que
no sean los dedos y consulte el prospecto
del envase de tiras reactivas para
más detalles. Cuando el símbolo
aparezca en la pantalla, toque la gota de
sangre con el canal absorbente de la tira
reactiva. No frotar la tira de prueba con
el dedo o tratar de aplicar una muestra
borrosa.
Aplique suavemente la gota de sangre
en el canal absorbente de la tira reactiva
en un ángulo del título. Ventana de
confirmación debe estar completamente
lleno si la muestra de sangre se ha
aplicado suficiente. NO retire el dedo
hasta que escuche un pitido.
Si la ventanilla de confirmación no se
llena por completo antes que el medidor
comience la cuenta regresiva, no agregue
más sangre a la tira reactiva. Deseche la
tira reactiva y empezar de nuevo. Si usted
tiene problemas para llenar la tira de
prueba, por favor llame al número local
de servicio al cliente para obtener ayuda.
NOTA:
Si no se aplica una muestra de sangre dentro de 3 minutos, el medidor se
apagará automáticamente. Debe retirar la tira reactiva y vuelva a insertarla al
medidor para reiniciar la prueba.
59
4. Lea el resultado
El resultado de su prueba de glucosa
sanguinea aparecerá después de que la
cuenta regresiva llegue a 0. Resultados
de las pruebas de glucosa sanguinea
se almacenan automáticamente en la
memoria del medidor.
ADVERTENCIA:
• Por favor, no cambie su tratamiento basándose en el resultado sin antes
consultar a su profesional de la salud.
• Apague el medidor mediante la eliminación de la tira reactiva. Por favor,
deseche la tira reactiva cuidadosamente de acuerdo con las
regulaciones local.
• Lavar y secar bien las manos después de manipular el medidor, las tiras
reactivas y el dispositivo de punción para prevenir la contaminacion.
60
VISUALIZACIÓN DE LA MEMORIA DEL
MEDIDOR
El medidor almacena los 450 más recientes resultados de las pruebas
de glucosa sanguinea con fecha y hora en su memoria. Puede revisar los
resultados de las pruebas con estos sencillos pasos.
Visualización de Los Resultados
1. Ingreso al modo de memoria
Con el medidor apagado, presione el
botón Main. El primero resultado de la
prueba aparecerá. Esto indica que el
medidor está en modo de memoria.
Cuando se utiliza el medidor por
primera vez o si los resultados han sido
eliminados, --- aparecerá, indicando que
no hay resultados de las pruebas en la
memoria.
2. Reproducir los resultados de prueba
Después de ver el resultado de la ultima
prueba, el resultado de la penultima
prueba se muestra con la fecha y hora.
Pulse el botón Main para revisar los
últimos 450 resultados de pruebas en
secuencia. Cuando la memoria está
llena, el resultado más antiguo se borrará
cuando el más nuevo, se añade.
61
3. Salir del modo de memoria
Pulse el botón Main durante tres segundos para apagar el medidor o
después del último resultado, la pantalla mostrará End y se apagará
automáticamente.
NOTA:
Los resultados de las pruebas de solución de control no se almacenan en la
memoria. Sólo los resultados de glucosa en sangre se almacenan.
62
Revisando Los Resultados del Promedio Diario de la Glucosa Sanguinea
1. Presione y suelte el botón Main
Mantenga el botón Main presionado por
3 segundos, hasta que aparezca AVG
parpadeando. Suelte el botón Main y el
resultado promedio de 7 dias medido
en el modo General aparecerán en la
pantalla.
2. Presione el botón Main para revisar
los resultados promedio de
14-, 21-, 28-, 60- y 90- días, almacenados
en la memoria en orden de modo Gen,
AC, y PC.
3. Egreso de la memoria del medidor
Mantenga presionado el botón Main y el medidor se apagará mostrando
el último resultado.
63
DESCARGA DE RESULTADOS A UNA
COMPUTADORA
Transmisión de datos a través de Bluetooth
Usted puede utilizar su dispositivo con iOS (5.0.1 o superior) o el sistema
Android para descargar los datos desde el medidor a través de Bluetooth.
Siga los siguientes pasos para transmitir datos desde el medidor. Por
favor, póngase en contacto con los servicios locales de clientes o el lugar
de compra para obtener ayuda.
Por favor, tenga en cuenta que usted necesita para realizar el
acoplamiento entre el medidor y Recevier Bluetooth antes de la
transmisión de datos.
1. Asegúrese de que su medidor está vinculado con el dispositivo con
iOS (5.0.1 o superior) o el sistema Android siguiendo las instrucciones del
modo de ajuste en el paso 6.
2. Instale Aplicación para gestionar la diabetes iFORA en su dispositivo
con iOS (5.0.1 o superior) o el sistema Android.
3. Transmisión de datos
Encienda el Bluetooth en su dispositivo con iOS (5.0.1 o superior) o el
sistema Android y mantenerlo encendido, y el medidor será capaz de
conectarse al dispositivo después de la medición. Puede ver los datos en
su dispositivo.
ADVERTENCIA:
• Mientras el medidor está en modo de transmisión, será incapaz de realizar
una prueba de glucosa en sangre.
• Asegúrese de que su dispositivo con iOS (5.0.1 o superior) o el sistema
Android ha activado Bluetooth antes de transmitir los datos y el medidor se
encuentra dentro del rango de recepción.
• El puerto USB del medidor ForaCare Test N GO™ es sólo para recargar la
batería. No tiene la función de transmisión de datos.
64
LIMPIEZA Y DESINFECCIÓN DE SU
MEDIDOR
Cuidado de Su Medidor
Para evitar que el medidor y las tiras de prueba atraigan suciedad, polvo
u otro tipo de contaminante, por favor, lavar y secar bien las manos antes
de usar.
¿Por qué la limpieza y desinfección deben ser realizadas?
La limpieza y la desinfección son diferentes. La limpieza es el proceso
de eliminación de la suciedad (por ejemplo, alimentos basura, grasa,
polvo), la desinfección es el proceso de matar los gérmenes (por ejemplo,
bacterias y virus).
Cuando limpiar y desinfectar el medidor
Limpie el medidor cuando lo vea sucio. Usted debe desinfectar el metro
al menos una vez a la semana para prevenir la infección.
Cómo limpiar y desinfectar el medidor
El medidor debe ser limpiado antes de la desinfección. Utilizar una
toallita desinfectante para limpiar las superficies expuestas a fondo
y eliminar cualquier suciedad visible o sangre o cualquier otro fluido
corporal con la toallita. Use un segundo paño para desinfectar el metro.
No utilizar disolventes orgánicos para limpiar el medidor.
Se recomienda para la limpieza y desinfección de medidores usar la
toallita desinfectante/paño desde abajo. Los siguientes productos con
alcohol isopropílico como el ingrediente activo han demostrado que son
seguros para su uso con el medidor de glucosa ForaCare Test N GO™.
► Micro-Kill+™ (Micro-Kill Plus™) por Medline
(EPA Reg. No. 59894-10-37549)
65
Para obtener paños desinfectantes y otra informacion, por favor póngase
en contacto con Medline en 1-800-MEDLINE (1-800-633-5463) o visite
www.medline.com.
Procedimientos de desinfección
1. Sacar una toallita desinfectante del paquete y exprimir el exceso de
líquido con el fin de evitar daños en el medidor.
2. Limpiar la pantalla y toda la superficie
exterior y botones del medidor. Sostenga
el medidor con la ranura de la tira
reactiva hacia abajo y limpie el área
alrededor de la ranura de prueba, pero
tenga cuidado de no permitir que el
exceso de líquido pueda ingresar al
interior. Mantenga el medidor humedo
con la solución desinfectante que figura
en el paño por un mínimo de 2 minutos
para las toallita Micor-Kill + ™. Siga las
instrucciones en la etiqueta del envase
para la desinfección y limpieza.
3. Retirar el paño. Permita que la superficie del medidor se seque por
completo.
4. Deseche las toallitas utilizadas y nunca las vuelva a usar. Lávese
bien las manos con agua y jabón después de manipular el medidor,
dispositivo de punción y tiras reactivas para evitar la contaminación.
66
Sistema de limpieza y desinfección inadecuada puede provocar un mal
funcionamiento del medidor. Si usted tiene alguna pregunta, póngase en
contacto con servicio al cliente al 1-866-469-2632 para obtener ayuda.
Este dispositivo ha sido validado para soportar 5.000 ciclos de
desinfeccion con el uso de paños / toallitas desinfectantes. El número de
ciclos de prueba se estima por los alrededor de 2 ciclos de desinfección
por medidor por día durante los 5 años de la vida util del dispositivo.
Deje de usar el medidor si usted ve cualquier signo de deterioro, tales
como:
• El medidor no se puede activar,
• La pantalla LCD esta estrellada o se nubla,
• Los botones no funcionan mas,
• La cubierta tiene grietas externas,
• Los datos no se pueden transmitir a su computadora,
• El color o la pintura / rotulos de la cubierta es anormal, o
• Rasguños o raspaduras del medidor son mayores que lo aceptable.
Por favor, póngase en contacto con el servicio al cliente para un medidor
de sustitución si alguno de los signos de deterioro se notan.
67
NOTA :
• NO limpie y desinfecte el medidor, mientras realice pruebas.
• Si el medidor está siendo operado por una segunda persona, el medidor y
el dispositivo de punción deben ser descontaminados antes de su uso por esa
segunda persona.
• NO permita que la solución de limpieza y desinfeccion ingrese a la ranura de
prueba.
• Si usted hace ingresar humedad en la ranura de la tira de prueba, limpiela
con una esquina de la toallita desinfectante.
• Siempre seque el medidor completamente antes de usarlo.
• No rocíe el medidor directamente con las soluciones de limpieza
especialmente las que contienen agua (es decir, agua y jabón), ya que esto
podría hacer que la solución ingrese al interior de la cubierta y dañar los
componentes electrónicos o circuitos.
68
RECARGA DE BATERÍA
Su medidor viene con una bateria interna recargable de Li-polímero de
litio. Si el símbolo de batería baja
aparece en la pantalla indicando
que la batería está baja y es el momento para recargar la batería.
1. Conecte el cable USB al puerto de datos del medidor.
2. Conecte el otro extremo del cable a un puerto USB disponible en su
computadora.
3. USb aparecerá en la pantalla y el indicador de carga se ilumina en
rojo cuando la batería se está recargando. Después que la batería este
completamente cargada, la luz roja se cambiará a verde.
4. Desconecte el cable USB y el medidor se apagará automáticamente.
NOTA :
• Debera tomar aproximadamente 2 horas para recargarse completamente. El
recargar la batería no afecta los resultados de las pruebas almacenadas en la
memoria.
• El cable USB es para recargar la batería y la transmision de datos a su
computadora. Si usted desea recargar a través de una toma de corriente en la
pared, por favor obtenga un adaptador USB.
69
MENSAJES EN PANTALLA Y GUÍA DE
RESOLUCIÓN DE PROBLEMAS
El siguiente es un resumen de mensajes de la pantalla. Si su medidor
muestra un mensaje de error, por favor, siga las acciones para el
mensaje de error como se describe en la tabla de abajo. Si el problema
persiste, póngase en contacto con su agente local de servicio al cliente
para obtener ayuda.
MENSAJE
QUÉ SIGNIFICA
Aparece cuando la glucosa
< 20 mg/dL (1.1 mmol/L).
Aparece cuando la glucosa
> 600 mg/dL (33.3mmol/L).
El símbolo
aparece
con este mensaje. Esto
ACCIÓN
Esto indica que la
hipoglucemia (glucosa baja).
Por favor, busque asistencia
médica inmediata.
Esto indica la hiperglucemia
severa (glucosa en sangre
alta). Por favor, busque
asistencia médica inmediata.
Recargar la batería
inmediatamente.
significa que la batería no
tiene suficiente energía
restante para un examen.
Se inserto una tira reactiva
usada, o hay un problema
eléctrico.
70
Repita la prueba con una
nueva tira reactiva. Si vuelve
a aparecer el mensaje de
error, por favor póngase en
contacto con su agente local
de servicio al cliente para
obtener ayuda.
MENSAJE
QUÉ SIGNIFICA
ACCIÓN
Podria usted haber eliminado Mantenga la tira reactiva en
el medidor después de la
la tira después de aplicar
absorción de la sangre hasta
la sangre en el canal
que el medidor muestre el
absorbente.
resultado de la prueba.
La temperatura del medio
ambiente, medidor, o tira
reactiva están fuera del
rango de operación del
Repita la prueba después
que el medidor y la tira de
prueba esten dentro de las
temperaturas de operación.
sistema. No se puede realizar
una prueba hasta que el
medidor y la tira reactiva se
encuentran dentro del rango
de operación de 50°F a
104°F (10°C a 40°C).
Problema con el medidor.
Repita la prueba con una
nueva tira reactiva. Si el
problema continua, por
favor comuniquese con el
servicio al cliente para recibir
asistencia.
Para obtener unos resultados cuestionables, por favor vea la tira de
prueba prospecto para obtener información importante.
Localización y Resolución de Problemas
1. Si el medidor no muestra ningún mensaje después de introducer una
tira reactiva:
71
CAUSAS POSIBLES
Batería agotada.
Tira reactiva colocada al revés o de
modo incompleto.
Medidor defectuoso.
ACCIÓN
Reemplace las baterías.
Inserte la tira reactiva hacia arriba
con las barras de contacto primero.
Por favor contacte con servicio al cliente.
2. Si la prueba no comienza después de colocar la muestra:
CAUSAS POSIBLES
ACCIÓN
Muestra de sangre insuficiente.
Repita la prueba con una nueva tira
reactiva aumentando la cantidad de la
muestra de sangre.
Tira reactiva defectuosa.
Repita la prueba con una nueva tira
reactiva.
Muestra aplicada después del apagado Repita la prueba con una nueva tira
automático (3 minutos después de la
reactiva. Apliqué la muestra solamente
última acción del usuario).
cuando
aparece en la pantalla.
Medidor defectuoso.
Por favor contacte con servicio al
cliente.
3. Si el resultado de la solución de control está fuera de rango:
CAUSAS POSIBLES
Error en la realización de la prueba.
No agitó lo suficiente la solución de
control.
Solución de control expirada o
contaminada.
La solución de control está muy
caliente o fría.
Tira reactiva defectuosa.
Malfuncionamiento del medidor.
72
ACCIÓN
Lea las instrucciones cuidadosamente
y repita nuevamente la prueba.
Agite vigorosamente la solución de
control y repita la prueba nuevamente.
Verifique la fecha de expiración de la
solución de control.
La solución de control, el medidor y las
tiras reactivas debe estar a temperatura
ambiente (68°F a 77°F / 20°C a 25°C),
antes de realizar la prueba.
Repita la prueba con una nueva tira
reactiva.
Por favor contacte con servicio al cliente.
INFORMACIÓN DETALLADA
Valores Referenciales
Glucosa Sanguinea
Supervisar la glucosa en la sangre juega un rol muy importante para
controlar la diabetes. Un estudio a largo plazo mostró que mantener
los niveles de glucosa cerca de lo normal puede reducir el riesgo de
complicaciones de la diabetes en un 60%*1. Los resultados
suministrados pueden ayudarle a usted y a su médico a supervisar mejor
y a optimizar su plan con el fin de obtener un mejor control de su
diabetes.
Hora del día
Rango normal del plasma de la glucosa
para personas sin diabetes (mg/dL)
En ayunas o antes de comer < 100 mg/dL (5.6 mmol/L)
2 horas después de comer
< 140 mg/dL (7.8 mmol/L)
Source: American Diabetes Association. Standards of Medical Care in Diabetes –
Diabetes Care 2012; 35 (Suppl 1):S1-S100.
Consulte a su médico para determinar el mejor rango para usted.
Referencias:
*1: American Diabetes Association position statement on the Diabetes Control
and Complications Trial (1993).
73
Comparando el Resultado del Medidor y del
Laboratorio
El medidor brinda resultados equivalentes a los de la sangre entera. El
resultado obtenido de su medidor puede diferir en alguna manera de los
resultados del laboratorio debido a una variación normal. Los resultados
del medidor pueden verse afectados por factores y condiciones que no
afectan a los resultados del laboratorio de la misma forma. Para alcanzar
una comparación exacta entre los resultados del laboratorio y del
medidor, siga las indicaciones a continuación.
Antes de ir al laboratorio:
● Realice una prueba de la solución de control para asegurarse de
que el medidor esté funcionando apropiadamente.
● Si es posible, ayune por lo menos ocho horas antes de hacer las
comparaciones.
● Lleve su medidor con usted al laboratorio.
Mientras está en el laboratorio:
Asegúrese de que las muestras para ambas pruebas hayan sido
tomadas y analizadas con un máximo de 15 minutos de diferencia
entre cada una.
● Lávese bien las manos antes de obtener la muestra de sangre.
● Nunca utilice su medidor con sangre que ha sido recolectada en
tubos de prueba de tapa gris.
● Utilice solamente sangre fresca capilar.
Es posible que usted todavía experimente variaciones en los resultados
porque los niveles de glucosa en la sangre pueden cambiar
significativamente en períodos cortos, especialmente si usted
recientemente comió, hizo ejercicios, tomó medicamentos o estuvo
bajo estrés*2. También, si usted ha comido recientemente, el nivel
de glucosa en la sangre del dedo puede estar más alto que 70mg/dL
74
(3.9mmol/L) que la sangre extraída de la vena (muestra de sangre
venosa) usada para la prueba del laboratorio*3. Por lo tanto, es mejor
ayunar ocho horas antes de hacer las pruebas de comparación.
Factores como la cantidad de células rojas en la sangre (hematocrito
alto o bajo) o la pérdida de fluido del cuerpo (deshidratación) también
causan resultados diferentes entre el medidor y el laboratorio.
Referencias:
*2: Surwit, R.S., and Feinglos, M.N.: Diabetes Forecast (1988), April, 49-51.
*3: Sacks, D.B.: Carbohydrates. Burtis, C.A., and Ashwood, E.R. (ed.), Tietz
Textbook of Clinical Chemistry. Philadelphia: W.B. Saunders Company (1994), 959.
75
ESPECIFICACIONES
Dimensiones: 93.0 (L) x 26.03 (W) x 5.57 (H) mm,
Peso: 26.8 g (sin batería)
Fuente de alimentación: batería de polímero litio
Pantalla: LCD
Memoria: 450 resultados de mediciones con su fecha y hora
Auto detección al insertar electrodo
Auto reacción de tiempo en cuenta regresiva
Deteccion de muestra sanguinea
Advertencia de temperatura
Condiciones de operación:
50°F a 104°F (10°C a 40°C), bajo un 85% de humedad relativa
Condiciones de almacenamiento y/o transporte:
-4°F a 140°F (-20°C a 60°C), bajo un 95% de humedad relativa.
Unidad de medición: mg/dL
Rango de medición: 20 a 600 mg/dL (1.1 a 33.3 mmol/L)
Este aparato ha sido probado para cumplir todos los requerimientos electrónicos
y de seguridad de: IEC/EN 61010-1, IEC/EN 61010-2-101, EN 61326-1, IEC/EN
61326-2-6.
76
Comunicado Oficial de la Comisión Federal de
Comunicaciones (FCC, siglas en inglés)
15.21
Tenga presente que todo cambio o modifi cación que no se encuentre
expresamente aprobado por la parte responsable puede causar la
anulación de la autorización del usuario para utilizar el equipo.
15.105(b)
Comunicado ofi cial de la Comisión Federal de Comunicaciones (FCC,
siglas en inglés)
Las pruebas a las que ha sido sometido este equipo comprobaron que
cumple con las limitaciones establecidas para dispositivos digitales Clase
B, conforme a lo estipulado en el apartado 15 de las Normas de la FCC.
El propósito de estas limitaciones es brindar una protección razonable
contra interferencias perjudiciales en el hogar. Este producto genera,
usa y puede irradiar energía de frecuencia radioeléctrica y, si no se le
instala y emplea según las instrucciones pertinentes, puede provocar
interferencias en las comunicaciones por radio. No obstante, no existe
garantía alguna de que no vayan a producirse interferencias en alguna
instalación en particular. Si el equipo produjera interferencia perjudicial
en la recepción de radio o televisión, lo cual puede determi70 narse
apagando y volviendo a encender el producto, se recomienda que el
usuario realice alguna de las siguientes operaciones para intentar
corregir tal interferencia:
• Cambie la orientación o ubicación de la antena de recepción.
• Aumente la distancia que separa el equipo del receptor.
• Conecte el producto a un tomacorriente que integre un circuito
diferente de aquél donde está conectado el receptor.
• Solicite asistencia al vendedor o a un técnico de radio/TV.
77
Este aparato cumple con el Apartado 15 del Reglamento de la FCC. Su
funcionamiento está sujeto a las dos condiciones siguientes:
1) Este aparato no puede causar interferencias negativas, y
2) Este aparato tolera cualquier interferencia recibida, incluyendo
aquellas interferencias que pudieran dar lugar a una operación no
deseada.
Declaración referente a la exposición a la radiación de la FCC:
1) Este transmisor no se debe situar en el mismo lugar ni operar
conjuntamente con ningúna antena o transmisor.
2) Este equipo cumple con los límites para la exposición a la radiación
establecidos por la FCC para entornos no controlados. Este equipo
debe ser instalado y operado a una distancia mínima de 20
centímetros entre el aparato emisor de la radiación y su cuerpo.
78
NOTE / NOTA
NOTE / NOTA
Zip / Código Postal
State / Estado
Home Telephone / Telefone de Casa
Country / País
Fora Care Inc.
Online Warranty Registration at www.foracare.com
I would like to receive special offers and updates from Fora Care /
Quisiera recibir ofertas especiales y actualizaciones de Fora Care
Meter Serial Number (See label on back of meter)
Date of Purchase (Month-Day-Year) /
Numero de Serial del Glucometro (Ver la etiqueta en la parte del atras del medidor) Fecha de Compra (Mes-Dia-Año)
City / Ciudad
APT#
Street Address / Dirección
Name / Nombre
Complete this warranty card and mail it promptly / Complete esta tarjeta y enviela lo antes posible
Five Years Warranty Registration Card /
Tarjeta de Registractión de Garantía por 5 años
Fora Care Inc.
893 Patriot Dr., Suite D
Moorpark, CA 93021
PLACE
STAMP HERE
COLOQUE
ESTAMPILLA
AQUI
Distributed by ForaCare / Distribuido por ForaCare
Fora Care Inc.
893 Patriot Dr., Suite D, Moorpark, CA 93021
Products made in Taiwan / Productos hecho en Taiwan
Toll Free / Número de Teléfono Gratuito :
1-888-307-8188 (8:30am-5:00pm PST, Mon.-Fri. / 8:30am-5:00pm N, Lunes a Viernes)
1-866-469-2632 (24 Hours, 7 days/week / 24 Horas, 7 Días a la semana)
www.foracare.com