1
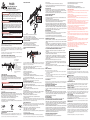
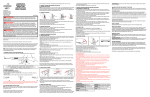
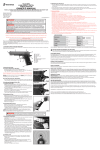
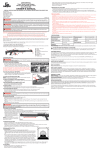
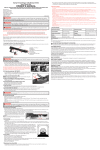
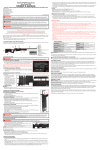
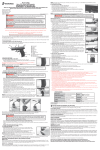
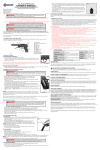
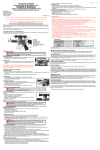
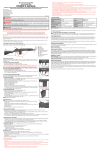
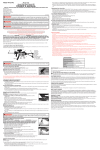
Distributed by:
Crosman Corporation
7629 Routes 5 & 20
Bloomfield, NY 14469
www.crosman.com
1-800-724-7486
Made in China
Model GF460
Airsoft Gun
6mm Plastic BB
OWNER’S MANUAL
3. CHARGING, LOADING AND REMOVING THE BATTERY
A. CHARGING THE BATTERY
NOTE: The battery charging time is 3-4 hours prior to initial use. After firing 500 shots, allow the gun and
battery to cool for 5 to 10 minutes after firing. For optimum performance completely use up the battery before recharging. DO NOT OVERCHARGE THE BATTERY. UNPLUG THE BATTERY CHARGER WHEN NOT IN USE.
B. LOADING THE BATTERY
•Turn off hop up system on gun (sec 5)
•Spray a .22 cleaning patch with Crosman Nitro Lubricant oil.
•With patch on rod, insert in into barrel to clean
•Use an in and out motion
•Swab barrel 3-4 times
•Repeat swabbing procedure with a dry patch
•Barrel is clean when patches come out clean after dry swabbing.
6. USING THE HOP-UP MODE
Your airsoft gun is manufactured with an adjustable hop-up system. The purpose of this system is to change
the spin on the BB as it leaves the muzzle, allowing you to adapt your shot for different distances.
12. Reviewing Safety
•Locate the safety on the left side of the receiver. (Fig. 2a)
•Turn the lever to “SEMI” for semi-auto mode.
•Turn the lever to “AUTO” for full auto mode.
•The airsoft gun is “OFF SAFE” and ready to fire when pointing to either “semi” or “auto.”
•Pull out and hold the charging handle to open the ejection port cover.
•Turn the hop-up adjustment dial clockwise for more spin, counter-clockwise for less spin.
7. ADJUSTING THE STOCK
GF460A515
•Your airsoft gun is shipped with the stock in the closed position and is capable of adjusting to different lengths.
•Before adjusting the stock make sure your airsoft gun is “ON SAFE”, (see section 2A) and pointed in
a SAFE DIRECTION.
•Push the stock release lever and adjust the stock until it locks into the desired position.
This is not a toy. Adult supervision is required. Misuse
may cause serious injury, particularly to the eye. Eye protection must be
worn by the user and any person in range. May be dangerous up to 100
yds. Read the owner’s manual before using.
YELLOW
Do not brandish or display this airsoft gun in public – it
may confuse people and may be a crime. Police and others may think it is
a firearm. Do not change the coloration and markings to make it look more
like a firearm. That is dangerous and may be a crime. READ ALL INSTRUCTIONS AND WARNINGS IN THIS MANUAL BEFORE USING THIS AIRSOFT
GUN.
This product contains a chemical known to the state
of California to cause cancer and birth defects (and other reproductive
harm).
BUYER AND USER HAVE THE DUTY TO OBEY ALL LAWS ABOUT THE USE AND OWNERSHIP OF THIS AIRSOFT
GUN.
Recommend 18 years or older to purchase. Intended for use by those 16 or older.
NOTE: Charge the battery 3-4 hours prior to initial use. This airsoft gun will not operate properly without a
fully charged battery. DO NOT OVERCHARGE THE BATTERY. UNPLUG THE BATTERY CHARGER WHEN NOT IN
USE.
WHITE
RED
BLACK
FIG. 3
•Remove the screw that is holding the fore rail.
•Remove the bottom rail.
NOTE: Battery has two connectors. Use the unmarked connector for the wall charger.
•Connect the battery to the gun wire connector (use the connector marked “NOT FOR CHARGING”).
Then place the connectors in the space above the barrel and place the battery beside the barrel.
•Place the front end of the fore rail back into position, being sure to hold the battery in place.
•Re-insert the pin screw to hold the fore rail in position.
C.ReMOVING the Battery
Please read this owner’s manual completely. And remember, this airsoft gun is not a toy. Treat it with the
same care you would a firearm. Always carefully follow the safety instructions found in this owner’s manual
and keep this manual in a safe place for future use.
•Remove the pin screw that is holding the bottom of the fore rail.
•Remove the battery from the fore rail.
•Place the front end of the fore rail back into position.
•Re-insert the pin screw to hold the fore rail in position.
If you have any questions regarding your new airsoft gun, please contact Crosman at 1-800-724-7486,
585-657-6161 or www.crosman.com.
4. LOADING AND UNLOADING PLASTIC BBS
A. Loading
1. LEARNING THE PARTS OF YOUR NEW AIRSOFT GUN
Learning the names of the parts of your new airsoft gun will help you to understand your owner’s manual.
Use this manual to increase your enjoyment of this airsoft gun.
A. Charging Handle
B. Retractable Stock
C. Stock Release lever
D. Grip
E. Trigger
F. Trigger Guard
G. 300 Round Magazine
H. Magazine release button
(Fig. 4)
I. Safety (see Fig. 2)
J. Forearm/Hand Guard
K. Magazine cap (Fig. 4)
L. Muzzle
2. OPERATING THE SAFETY
A. TO PUT THE AIRSOFT GUN “ON SAFE”
•Locate the safety on the left side of the airsoft gun.
•Turn the safety lever to “SAFE” for “ON SAFE. (Fig 2A). The safety is not “ON SAFE” unless it is
pointing to “SAFE”.
Keep the airsoft gun in the “ON SAFE” position until
you are actually ready to shoot. Then turn the safety to the “OFF SAFE”
position.
Like all mechanical devices, an airsoft gun safety can fail. Even when the safety is “ON SAFE”, you should
continue to handle the airsoft gun safely
NEVER point the airsoft gun at any person. NEVER point the airsoft gun at anything you do not intend to shoot.
B. TO TAKE THE AIRSOFT GUN “OFF SAFE”
NOTE: This airsoft gun fires in semi or full auto-mode. Full auto means it will continue to fire plastic BBs as
long as you hold the trigger. Semi- auto means you will have to pull the trigger each time you want to fire a
shot.
•Locate the safety on the left side of the receiver. (Fig. 2a)
•Turn the lever to “SEMI” for semi-auto mode. (Fig. 2b)
•Turn the lever to “AUTO” for full auto mode. (Fig. 2c)
•The airsoft gun is “OFF SAFE” and ready to fire when pointing to either “semi” or “auto.”
FIG. 4
Use 6 mm plastic BBs only in this airsoft gun. Use of any other ammunition can cause injury to you or damage to the airsoft gun. We recommend using Crosman or GameFace .20g or .25 Heavy BBs.
•Make sure the airsoft gun is “ON SAFE” (section 2A).
•Point the airsoft gun in a SAFE DIRECTION.
•While supporting the BB magazine, push the magazine release lever forward and remove the
magazine.
•Slide open the magazine cap door.
•Insert 6 mm plastic BBs.
•Close the magazine cap door.
•Insert the loaded magazine back into the airsoft gun.
•Rotate the wind up wheel to draw plastic BBs up into the ready tube. Wind the wheel 50 to 75 turns
for optimum performance.
NOTE: IT IS IMPORTANT TO PUT THE MAGAZINE IN THE GUN PRIOR TO WINDING TO HELP AVOID JAMS.
•Winding before putting into the gun can cause a jam.
B. Unloading Plastic BBs
•Make sure the airsoft gun is “ON SAFE” (section 2A).
•Point the airsoft gun in a SAFE DIRECTION.
•While supporting the BB magazine, push the magazine release lever forward and remove the
magazine.
•Slide the magazine cap open.
•Flip open the loading door behind the ready tube
•Pour out BBs.
•To release the BBs in the ready tube, point the clip down in a safe direction and push back and hold
the BB retainer button.
NOTE: BBs will release rapidly.
•Rotate the wind up wheel to draw BBs into the ready tube.
•Repeat the above steps until all the BBs are out of the magazine.
•Close the magazine cap.
FIG. 2A
5. SELECTING THE FIRING MODE
NOTE: This airsoft gun fires in semi or full auto-mode. Full auto means it will continue to fire plastic BBs as long
as you hold the trigger. Semi- auto means you will have to pull the trigger each time you want to fire a shot.
FIG. 2B
FIG. 2C
Never assume that because the airsoft gun no longer fires a BB and/or the loading chamber is removed,
that a BB is not lodged in the barrel. Always treat the airsoft gun as though it is loaded and with the same
respect you would a firearm.
8. AIMING AND FIRING SAFELY
A. Firing Safely
•You and others with you should always wear eye protection designed for airsoft to protect your eyes.
•Always point your airsoft gun in a SAFE DIRECTION.
•Do not shoot at hard surfaces or at the surface of water. The plastic BBs may bounce off or ricochet
and hit someone or something you had not intended to hit.
•DO NOT re-use plastic BBs because they could possibly cause damage to your airsoft gun.
•Your airsoft gun is designed for target shooting and is suited for both indoor and outdoor use.
Always remember to place your target carefully. THINK about what you will hit if you miss the target.
•When you are sure of your target and backstop, and the area around the target is clear, load and
charge the airsoft gun following sections 3 and 4. Take the airsoft gun “OFF SAFE” (section 2A) aim
and pull the trigger to fire.
B. ADJUSTING THE SIGHTS
The rear sight is adjustable for windage.
To adjust for windage, use the dial on the side of the sight.
•Turn clockwise to move the point of impact to the right.
•Turn counter-clockwise to move the point of impact to the left.
The rear sight has 2 different apertures. To change apertures flip from one to the other.
•Do not ever point the airsoft gun at any person. Do not ever point the airsoft gun at anything you do
not intend to shoot.
•Always treat the airsoft gun as though it is loaded and with the same respect you would a firearm.
•Always aim in a SAFE DIRECTION. Always keep the muzzle of the airsoft gun pointed in a SAFE
DIRECTION.
•Always keep the airsoft gun “ON SAFE” until you are ready to shoot in a SAFE DIRECTION.
•Always check to see if the airsoft gun is “ON SAFE” and unloaded when getting it from another
person or from storage.
•Always keep your finger off the trigger and out of the trigger guard until ready to shoot.
•You and others with you should always wear eye protection to protect your eyes.
•Always wear eye protection designed for airsoft over your regular glasses.
•Use 6 mm plastic BBs only.
•Do not reuse plastic BBs because they could cause possible damage to your airsoft gun.
•Do not shoot at hard surfaces or at the surface of water. The plastic BBs may bounce off or ricochet
and hit someone or something you had not intended to hit.
•Replace the backstop if it becomes worn. Place the backstop in a location that will be safe should
the backstop fail.
•Your backstop should be checked for wear before and after each use. All backstops are subject
to wear and will eventually fail. Replace your backstop if the surface is worn or damaged or if a
ricochet occurs.
•Do not attempt to disassemble or tamper with your airsoft gun.
•DO NOT MODIFY OR ALTER YOUR AIRSOFT GUN. Attempts to modify the airsoft gun in any way may
make your airsoft gun unsafe to use, cause serious injury or death and will void the warranty.
•Using unauthorized repair centers or modifying the function of your airsoft gun in any way may be
unsafe and will void your warranty.
•Do not put the airsoft gun away loaded. Make sure ALL of the plastic BBs are unloaded from the
airsoft gun.
•Always store this airsoft gun in a secure location.
SPECIFICATIONS
Mechanism/Action
Electronic
•DO NOT MODIFY OR ALTER YOUR AIRSOFT GUN. Tampering with the airsoft gun or attempts to
change the airsoft gun in any way may make it unsafe to use, may cause serious injury or death and
will void the warranty.
•If you drop your airsoft gun, visually check to see that it works properly before you use it again. If
anything seems changed, like a shorter or weaker trigger pull, this may mean parts are worn out or
broken. Call Customer Service at Crosman for assistance before using your airsoft gun again.
Caliber/Ammunition
6mm Plastic BBs
Magazine
Up to 300 6 mm BBs
Safety
Lever
Velocity
Up to 400 fps with .20g
10. TROUBLE SHOOTING/INCREASING YOUR SHOOTING ENJOYMENT
Battery
8.4V battery / 1200 MAH
Fuse
20A Glass Tube Fuse
9. MAINTAINING YOUR AIRSOFT GUN
•Occasionally shake the gun to ensure smooth BB feeding.
•This is a high precision airsoft rifle. Prevent dust and dirt from getting into the magazine to help
maintain the performance of your airsoft rifle.
•If the efficiency of BB feeding seems to decrease, remove all the BBs from the magazine and spray
silicone oil for 1 to 2 seconds. (Note that the hop-up operation may become unstable for a while
after using silicone oil).
•An odor may be generated from the motor initially from a new airsoft gun, this is normal.
•If the airsoft gun does not fire in semi-auto mode, follow safe shooting rules and turn the gun to full
auto mode for 5 to 10 shots before returning to semi-auto mode.
•Change the battery if firing cycle becomes slow.
•Give the airsoft gun a rest for 5 to 10 minutes after about 500 BBs have been fired.
Clearing a Jam
Never look down the end of barrel to see if a jam has been cleared.
1. Make sure the airsoft gun is “ON SAFE” and pointed in a SAFE DIRECTION.
2. Remove magazine.
3. Insert the tapered end of the cleaning rod into the barrel, with the angle toward the breech (where the
magazine connects).
4. CAREFULLY and slowly apply more pressure until you push the BB out of the breech.
5. Reinstall the magazine and test gun.
11. MOTOR ADJUSTMENT
Periodic adjustment of the motor is required to keep your airsoft gun operating efficiently. To adjust motor,
ensure gun is unloaded of all BB’s, see section 4B Put gun “ON SAFE”. (Sec. 2A)
A. Motor Runs But Gun Does Not Fire
Is gun barrel plugged?
•Insert tapered end of cleaning rod into barrel, tapered side facing loading chamber. Push rod into
barrel to make sure there are no BB’s stuck.
Is motor spinning?
•Locate screw on base of grip and remove. Remove grip. Using 2.5mm allen wrench turn adjustment
screw ¼ turn clockwise to tighten engagement of motor and gears. Squeeze trigger if gun does not
fire repeat procedure until gun fires properly.
B. Motor does not run
Is battery charged?
•Charge battery minimum 3 hours, maximum 4 hours for full charge
Motor still does not turn with fully charged battery
•Locate screw on base of grip and remove. Remove grip. Using 2.5mm allen wrench turn adjustment
screw ¼ turn counter clockwise to loosen engagement of motor and gears. Squeeze trigger if gun
does not fire repeat procedure until gun fires properly.
•DO NOT MODIFY OR ALTER YOUR AIRSOFT GUN. Tampering with the airsoft gun or attempts to
change the airsoft gun in any way may make it unsafe to use, may cause serious injury and will void
the warranty.
•If you drop your airsoft gun, visually check to see that it works properly before you use it again. If
anything seems changed, like a shorter or weaker trigger pull, this may mean parts are worn out or
broken. Call Customer Service at Crosman for assistance before using your airsoft gun again.
C. To clean the Airsoft gun barrel:
PERFORMANCE: Many factors can affect velocity, including brand of projectile, type of projectile and barrel
condition. We recommend using only Crosman brand airsoft BBs. Use of poor quality BBs can damage your
airsoft gun.
STOP! DO NOT RETURN THIS PRODUCT TO THE STORE.
Our friendly customer service representatives will be glad to help. You can get answers to frequently
asked questions at www.crosman.com or you can contact us directly at 1-800-7AIRGUN
(1-800-724-7486)
CUSTOMER SERVICE
If your Airsoft gun is not functioning, we recommend that you call Crosman Corporation Customer Service
at 1-800-724-7486 or 585-657-6161. (International customers should contact their distributor.) DO NOT
ATTEMPT TO DISASSEMBLE IT! If you take it apart you probably will not be able to reassemble it correctly.
Crosman assumes no warranty responsibility under such circumstances.
LIMITED 90 DAY WARRANTY
This product is warranted to the retail consumer for 90 days from date of retail purchase against defects in
material and workmanship and is transferable.
WHAT IS COVERED
Replacement parts and labor. Transportation charges to consumer for repaired product.
WHAT IS NOT COVERED
Transportation charges to Crosman for product. Damages caused by abuse, modification or failure to
perform normal maintenance. Any other expense. CONSEQUENTIAL DAMAGES, INCIDENTAL DAMAGES,
OR INCIDENTAL EXPENSES, INCLUDING DAMAGE TO PROPERTY. SOME STATES DO NOT ALLOW THE
EXCLUSION OR LIMITATION OF INCIDENTAL OR CONSEQUENTIAL DAMAGES, SO THE ABOVE LIMITATION OR
EXCLUSION MAY NOT APPLY TO YOU.
WARRANTY CLAIMS
USA Customers: Attach your name, address, description of problem, phone number and copy of sales
receipt to product. Package and return to Crosman Corporation, Routes 5 & 20, Bloomfield, NY 14469.
International Customers: Please return product to your nearest distributor. If you do not know your
distributor, please call 585-657-6161 and ask for our International Department for assistance.
IMPLIED WARRANTIES
ANY IMPLIED WARRANTIES, INCLUDING THE IMPLIED WARRANTIES OF MERCHANTABILITY AND FITNESS
FOR A PARTICULAR PURPOSE, ARE LIMITED IN DURATION TO 30 DAYS FROM DATE OF RETAIL PURCHASE.
SOME STATES DO NOT ALLOW LIMITATIONS ON HOW LONG AN IMPLIED WARRANTY LASTS, SO THE
ABOVE LIMITATIONS MAY NOT APPLY TO YOU.
To the extent any provision of this warranty is prohibited by federal, state, or municipal law which cannot be
preempted, it shall not be applicable. This warranty gives you specific legal rights, and you may also have
other rights which vary from state to state.
CROSMAN is a registered trademark of Crosman Corporation in the United States.
Modelo GF460
Pistola Airsoft
B. INSTALACIÓN DE LA BATERÍA
a diferentes distancias.
•Tire y sostenga la palanca de carga para abrir la cubierta de la boca de descarga.
•Gire el selector de ajuste del nivel de distancia en sentido horario para una mayor rotación, y en
sentido antihorario para una menor rotación.
Perdigones BB de plástico de 6 mm
MANUAL DEL USUARIO
7. AJUSTE DE LA CULATA
•La pistola Airsoft se envía con la culata cerrada y es capaz de ajustarse a diferentes medidas.
•Antes de ajustar la culata, asegúrese de que la pistola Airsoft tenga el seguro activado (“ON SAFE”)
(consulte la Sección 2A) y esté apuntando hacia una DIRECCIÓN SEGURA.
•Presione la palanca liberadora de la culata y ajuste la culata hasta que trabe en la posición deseada.
Distribuido por: Crosman Corporation • 7629 Routes 5 & 20 • Bloomfield, NY 14469
www.crosman.com • 1-800-724-7486 • Hecho en China
Esto no es un juguete. Se requiere la supervisión de un adulto. El mal uso puede causar lesiones graves, especialmente en los ojos. El usuario y toda persona que se encuentre en el rango
de tiro deben utilizar protección ocular. Puede ser peligroso hasta 100 yardas (91 m). Lea el manual del usuario antes de usarla.
8. APUNTAR Y DISPARAR DE FORMA SEGURA
A. Disparar de forma segura
No blanda ni exhiba esta pistola Airsoft en
público; puede confundir a la gente y puede constituir un delito. La policía y
otras personas pueden creer que se trata de un arma de fuego. No cambie
la coloración ni las marcas para que aparente ser un arma de fuego. Eso
es peligroso y puede ser un delito. LEA TODAS LAS INSTRUCCIONES Y
ADVERTENCIAS INCLUIDAS EN ESTE MANUAL ANTES DE USAR ESTA
PISTOLA AIRSOFT.
Este producto contiene un producto químico
conocido en el estado de California como causante de cáncer y defectos
congénitos (y otros daños reproductivos).
EL COMPRADOR Y EL USUARIO TIENEN EL DEBER DE OBEDECER TODAS LAS LEYES RELATIVAS AL USO Y
PROPIEDAD DE ESTA PISTOLA AIRSOFT.
Se recomienda que sean personas mayores de 18 años quienes realicen la compra. Está diseñada
para ser usada por personas mayores de 16 años.
NOTA: cargue la batería de 3 a 4 horas antes de usarla por primera vez. Esta pistola Airsoft no funcionará
adecuadamente sin la batería completamente cargada. NO SOBRECARGUE LA BATERÍA. DESENCHUFE EL
CARGADOR DE LA BATERÍA CUANDO NO ESTÉ EN USO.
Lea completamente este manual del usuario. Y recuerde, esta pistola Airsoft no es un juguete. Siempre
trátela con el mismo cuidado con el que trataría un arma de fuego. Siempre cumpla cuidadosamente con las
instrucciones de seguridad incluidas en este manual del usuario y conserve este manual en un lugar seguro
para futuras consultas.
Si tiene alguna consulta acerca de su nueva pistola Airsoft, comuníquese con Crosman llamando al 1-800724-7486, 585-657-6161 o visite www.crosman.com.
ROJO
AMARILLO
BLANCO
NEGRO
FIG. 3
•Quite el pasador que sostiene la parte inferior del riel delantero.
•Inserte la batería en el riel delantero, como se muestra.
•Coloque el conector en el espacio que está arriba del cañón.
•Coloque el frente del riel delantero en la posición original, asegurándose de sostener la batería en su lugar.
•Vuelva a insertar el pasador para sostener el riel delantero en su posición.
C. Extracción de la Batería
•Quite el pasador que sostiene la parte inferior del riel delantero.
•Quite la batería que se encuentra en el riel delantero.
•Coloque el frente del riel delantero en su posición original.
•Vuelva a insertar el pasador para sostener el riel delantero en su posición.
4. CARGA Y DESCARGA DE PERDIGONES BB DE PLÁSTICO
A. Carga
FIG. 4
1. DESCRIPCIÓN DE LAS PIEZAS DE SU NUEVA PISTOLA AIRSOFT
Aprender los nombres de las piezas de su nueva pistola Airsoft le ayudará a comprender mejor el manual
del usuario. Utilice este manual para disfrutar aún más de la pistola Airsoft.
A. Palanca de carga
B. Culata retráctil
C. Palanca liberadora de la culata
D. Cacha
E. Gatillo
F. Guardamonte
G. Cargador de 300 municiones
H. Botón liberador del cargador
I. Seguro (consulte la Fig. 2)
J. Protector de antebrazo/mano
K. Tapa del cargador (Fig. 4)
L. Boca
2. OPERACIÓN DEL SEGURO
A. PARA ACTIVAR EL SEGURO DE LA PISTOLA AIRSOFT (“ON SAFE”)
•Busque el seguro que se encuentra del lado izquierdo de la pistola Airsoft.
•Coloque la palanca del seguro en la posición de seguro activado (“SAFE”) para activarlo (“ON
SAFE”) (Fig. 2A). El seguro no está activado (“ON SAFE”) a menos que apunte a la posición de
seguro activado (“SAFE”).
Mantenga la pistola Airsoft en la posición de seguro activado
(“ON SAFE”) hasta que usted esté realmente preparado para disparar. Luego vuelva a colocar el
seguro en la posición de seguro desactivado (“OFF SAFE”).
Como todos los dispositivos mecánicos, el seguro de la pistola Airsoft puede fallar. Aún cuando el seguro
esté activado (“ON SAFE”), debe seguir manipulando la pistola Airsoft con mucho cuidado.
NUNCA apunte la pistola Airsoft hacia una persona. NUNCA apunte la pistola Airsoft hacia un objeto al que
no le desee disparar.
B. PARA QUITAR EL SEGURO DE LA PISTOLA AIRSOFT (“OFF SAFE”)
NOTA: esta pistola Airsoft dispara en modo semiautomático y automático. El modo automático significa que
continuará disparando perdigones BB de plástico mientras mantenga apretado el gatillo. El modo semiautomático significa que tendrá que tirar del gatillo cada vez que desee disparar.
•Busque el seguro que se encuentra en el lado izquierdo de la corredera (Fig. 2a).
•Coloque la palanca en “SEMI” para el modo semiautomático (Fig. 2b).
•Coloque la palanca en “AUTO” para el modo automático (Fig. 2c).
•La pistola Airsoft se encuentra con el seguro desactivado (“OFF SAFE”) y lista para disparar tanto en
la posición “semi” como “auto”.
FIG. 2A
FIG. 2B
FIG. 2C
3. CARGA, INSTALACIÓN Y EXTRACCIÓN DE LA BATERÍA
A. CARGA DE LA BATERÍA
NOTA: La batería tiene dos conectores. Utilice el conector NO MARCADO PARA LA CARGA. • Conecte el
conector del cable de la batería marcada “NOT FOR CHARGING” para arma. A continuación, coloque los
conectores en el espacio por encima del cañón y coloque la batería cerca del cañón.
Use solamente perdigones BB de plástico de 6 mm en esta pistola Airsoft. El uso de una munición diferente
podría causar lesiones personales o hacer que la pistola Airsoft se dañe. Recomendamos usar perdigones
BB pesados de 0.20 o 0.25 g Crosman o GameFace.
•Asegúrese de que la pistola Airsoft tenga el seguro activado (“ON SAFE”) (Sección 2A).
•Apunte la pistola Airsoft hacia una DIRECCIÓN SEGURA.
•Mientras sostiene el cargador de perdigones BB, presione la palanca liberadora del cargador y quite
el cargador.
•Deslice la tapa del cargador para abrirlo.
•Inserte los perdigones BB de plástico de 6 mm.
•Cierre la tapa del cargador.
•Inserte el cargador cargado nuevamente en la pistola Airsoft.
•Gire la rueda para llevar los perdigones BB de plástico al tubo de municiones. Gire la rueda de
50 a 75 vueltas para lograr un rendimiento óptimo.
NOTA: ES IMPORTANTE COLOCAR EL CARGADOR EN LA PISTOLA ANTES DE GIRAR LA RUEDA PARA
EVITAR ATASCOS.
Girar la rueda antes de colocar el cargador en la pistola puede generar un atasco.
B. Descarga de perdigones BB de plástico
•Asegúrese de que la pistola Airsoft tenga el seguro activado (“ON SAFE”) (Sección 2A).
•Apunte la pistola Airsoft hacia una DIRECCIÓN SEGURA.
•Mientras sostiene el cargador de perdigones BB, presione la palanca liberadora del cargador y quite
el cargador.
•Deslice la tapa del cargador para abrirlo.
•Abra la tapa de carga que se encuentra detrás del tubo de municiones.
•Retire los perdigones BB.
•Para liberar los perdigones BB dentro del tubo de municiones, apunte el cargador hacia abajo en
una dirección segura, empuje y sostenga el botón de retención de los perdigones.
NOTA: los perdigones BB se liberarán rápidamente.
•Gire la rueda para llevar los perdigones BB al tubo de municiones.
•Repita los pasos anteriores hasta quitar todos los perdigones BB del cargador.
•Cierre la tapa del cargador.
Nunca suponga que, porque la pistola Airsoft ya no dispara perdigones BB y/o la recámara de carga ha sido
extraída, no quedan perdigones BB atascados en el cañón. Siempre trate la pistola Airsoft como si estuviera
cargada y con el mismo respeto con el que utilizaría un arma de fuego.
5. SELECCIÓN DEL MODO DE TIRO
NOTA: esta pistola Airsoft dispara en modo semiautomático y automático. El modo automático significa que
continuará disparando perdigones BB de plástico mientras mantenga apretado el gatillo. El modo semiautomático significa que tendrá que tirar del gatillo cada vez que desee disparar.
•Busque el seguro que se encuentra en el lado izquierdo de la corredera (Fig. 2a).
•Coloque la palanca en “SEMI” para el modo semiautomático.
•Coloque la palanca en “AUTO” para el modo automático.
•La pistola Airsoft se encuentra con el seguro desactivado (“OFF SAFE”) y lista para disparar tanto en
la posición “semi” como “auto”.
6. USO DEL MODO NIVEL DE DISTANCIA (HOP-UP)
Su pistola Airsoft está fabricada con un sistema ajustable de nivel de distancia (hop-up). El fin de este
sistema es cambiar el giro del perdigón BB cuando deja la boca de la pistola, permitiéndole adaptar su tiro
•Usted y quienes lo acompañen deberán usar siempre la protección ocular diseñada para proteger
los ojos al utilizar la pistola Airsoft.
•Siempre apunte su pistola Airsoft hacia una DIRECCIÓN SEGURA.
•No dispare hacia superficies duras o hacia la superficie del agua. Los perdigones BB de plástico
pueden rebotar y golpear a alguien o algo que usted no tenía intención de golpear.
•NO vuelva a usar los perdigones de plástico ya disparados porque podrían dañar la pistola Airsoft.
•La pistola Airsoft está diseñada para tiro al blanco y es apta para uso en interiores y exteriores. Recuerde siempre colocar su blanco con cuidado. PIENSE en lo que podría impactar si no acierta al blanco.
•Cuando esté seguro del blanco y del respaldo, y el área alrededor del blanco esté despejada, cargue
la pistola Airsoft siguiendo las instrucciones de las Secciones 3 y 4. Quite el seguro (“OFF SAFE”) de
la pistola Airsoft (Sección 2A), apunte y tire del gatillo para disparar.
B. AJUSTE DE LAS MIRAS
El alza puede ajustarse para resistencia aerodinámica.
Use el selector ubicado en la parte lateral de la mira para que ésta se ajuste para la resistencia aerodinámica.
•Gire en sentido horario para mover el punto de impacto hacia la derecha.
•Gire en sentido antihorario para mover el punto de impacto hacia la izquierda.
La mira trasera cuenta con 2 aperturas diferentes. Para intercambiar las aperturas, pase de una a la otra.
9. MANTENIMIENTO DE LA PISTOLA AIRSOFT
•NO MODIFIQUE NI ALTERE SU PISTOLA AIRSOFT. Alterar su pistola Airsoft o intentar modificarla de
alguna manera puede hacer inseguro su uso, puede causar lesiones graves o la muerte e invalidará
la garantía.
•Si la pistola Airsoft se cae, revísela visualmente para verificar que funcione correctamente antes de
volver a utilizarla. Si detecta algo diferente, por ejemplo, el gatillo está más corto o se dispara fácilmente, esto podría estar indicando que las piezas están desgastadas o dañadas. Llame al Centro de
atención al cliente de Crosman para obtener asistencia antes de volver a usar la pistola Airsoft.
10. SOLUCIÓN DE PROBLEMAS/AUMENTO DE LA DIVERSIÓN AL DISPARAR
•Ocasionalmente, sacuda la pistola para asegurarse de que los perdigones BB se carguen sin
complicaciones.
•Este es un rifle Airsoft de alta precisión. Evite el ingreso de polvo y suciedad dentro del cargador
para ayudar a mantener el rendimiento del rifle Airsoft.
•Si la eficiencia de la carga de los perdigones BB parece disminuir, quite todos los perdigones BB
del cargador y rocíelo con aceite de silicona durante 1 o 2 segundos. (Tenga en cuenta que la
operación de nivel de distancia [hop-up] puede tornarse inestable momentáneamente después de
usar aceite de silicona).
•El motor de una pistola Airsoft nueva puede generar olor, lo cual es normal.
•Si la pistola Airsoft no dispara en modo semiautomático, siga las instrucciones de disparo seguro,
coloque la pistola en modo automático y efectúe de 5 a 10 disparos antes de volver a colocarla en
modo semiautomático.
•Cambie la batería si el ciclo de disparo se vuelve lento.
•Deje descansar la pistola Airsoft de 5 a 10 minutos después de disparar aproximadamente 500 perdigones BB.
Eliminación de un atasco
Nunca mire dentro del cañón para ver si se eliminó un atasco.
1. Asegúrese de que el seguro de la pistola Airsoft esté activado (“ON SAFE”) y de que la pistola apunte
hacia una DIRECCIÓN SEGURA.
2. Retire el cargador.
3. Inserte el extremo más delgado de la baqueta de limpieza en el cañón, con el ángulo hacia la recámara
(donde se conecta el cargador).
4. CUIDADOSA y suavemente aplique más presión hasta sacar el perdigón BB fuera de la recámara.
5. Vuelva a instalar el cargador y pruebe la pistola.
11. AJUSTE DEL MOTOR
El ajuste periódico del motor es requerido para mantener su arma de aire suave funcionando eficientemente.
Para ajustar el motor, asegure que la arma no está cargada con municiones, vea sección 4B Ponga la arma
en la posición “SEGURO ACTIVADO”. (Sec. 2A)
A. El motor funciona pero la arma no dispara:
¿Está bloqueado el cañón de la arma?
•Introduzca una baqueta con extremo ahusado dentro del cañón, el lado ahusado orientado hacia
la cámara de carga. Empuje la baqueta dentro del cañón para asegurarse que no hay municiones
atoradas
¿Está girando el motor?
•Ubique el tornillo en la base de la empuñadura y quítelo. Quite la empuñadura. Con una llave allen
de 2.5 mm, gire el tornillo de ajuste 1/4 de vuelta en sentido de las manecillas del reloj para apretar
el motor de conexión y los engranajes.. Apriete elgatillo, si la arma no dispara repita el procedimiento hasta que la arma dispare correctamente.
B. El motor no funciona
¿Esta cargada la batería?
•Cargue la batería por un mínimo de 4 horas, un máximo de 6 horas para carga completa.
¿El motor aun no funciona con la batería cargada completamente?
•Ubique el tornillo en la base de la empuñadura y quítelo. Quite la empuñadura. Con una llave allen
de 2.5 mm, gire el tornillo de ajuste 1/4 de vuelta en sentido contrario a las manecillas del reloj
para aflojar la conexión del motor y los engranajes. Apriete el gatillo, si la arma no dispara repita el
procedimiento hasta que la arma dispare correctamente.
•NO MODIFIQUE NI ALTERE EL RIFLE DE AIRE SUAVE. Forzar el rifle de aire suave o intentar modificarlo
de cualquier manera pueden hacer su uso inseguro, causar graves lesiones y anulará la garantía.
•Si el rifle de aire suave se cae, revise visualmente que funcione correctamente antes de volverlo a
usar. Si parece que cualquier cosa ha cambiado, como que el gatillo está más suave o más duro,
puede indicar que hay piezas desgastadas o rotas. Llame al Servicio al cliente de Crosman para
obtener ayuda antes de volver a usar su pistola de aire suave.
C. Para limpiar el cañón del arma de aire suave:
•Desactive el sistema hop-up del arma ((sección 5)
•Rocíe una almohadilla de limpieza .22 con aceite Crosman Nitro Lubricant.
•Con la almohadilla en la baqueta, introdúzcala en el cañón para limpiarlo
•Utilice un movimiento hacia dentro y hacia fuera
•Recorra el cañón 3 ó 4 veces
•Repita el procedimiento de limpieza con una almohadilla seca
•El cañón está limpio cuando las almohadillas salen limpias después de recorrerlo.
11. Revisión de seguridad
•Nunca apunte la pistola Airsoft hacia una persona. Nunca apunte la pistola Airsoft hacia un objeto al
que no desee disparar.
•Siempre trate la pistola Airsoft como si estuviera cargada y con el mismo respeto con el que
utilizaría un arma de fuego.
•Siempre apunte hacia una DIRECCIÓN SEGURA. Mantenga siempre la boca de la pistola Airsoft
apuntando hacia una DIRECCIÓN SEGURA.
•Mantenga siempre activado el seguro (“ON SAFE”) de la pistola Airsoft hasta que esté listo para
disparar hacia una DIRECCIÓN SEGURA.
•Siempre compruebe que el seguro de la pistola Airsoft esté activado (“ON SAFE”) y que esté descargada al recibirla de manos de otra persona o al sacarla del sitio en donde se guarda.
•Mantenga siempre el dedo alejado del gatillo y fuera del guardamonte hasta que esté listo para disparar.
•Usted y quienes lo acompañen siempre deben usar protección ocular para protegerse los ojos.
•Siempre utilice protección ocular diseñada para Airsoft sobre sus gafas normales.
•Use perdigones BB de plástico de 6 mm únicamente.
•No vuelva a usar los perdigones de plástico ya disparados porque podrían dañar la pistola Airsoft.
•No dispare hacia superficies duras o hacia la superficie del agua. Los perdigones BB de plástico
pueden rebotar y golpear a alguien o algo que usted no tenía intención de golpear.
•Reemplace el respaldo si está desgastado. Coloque el respaldo en un lugar seguro en caso de que
este falle.
•Debe revisar el desgaste del respaldo antes y después de cada uso. Todos los respaldos sufren desgaste y, con el tiempo, fallan. Reemplace su respaldo si observa que la superficie está desgastada o
dañada, o si rebota la munición.
•No intente desarmar ni alterar su pistola Airsoft.
•NO MODIFIQUE NI ALTERE SU PISTOLA AIRSOFT. Los intentos de modificación de su pistola Airsoft
de alguna manera pueden hacer inseguro su uso, pueden causar lesiones graves o la muerte e
invalidarán la garantía.
•El uso de centros de reparación no autorizados o la modificación del funcionamiento de su pistola
Airsoft de cualquier forma pueden ser prácticas inseguras y anularán la garantía.
•No guarde la pistola Airsoft estando cargada. Asegúrese de que TODOS los perdigones BB de
plástico sean descargados de la pistola Airsoft.
•Siempre guarde la pistola Airsoft en un lugar seguro.
ESPECIFICACIONES
Acción/Mecanismo electrónico
Calibre/Munición de perdigón BB de plástico de 6 mm
Cargador de hasta 300 perdigones BB de plástico de 6 mm
Palanca del seguro
Velocidad de hasta 400 pies (121.9 m) por segundo con 0.20 g
Batería de 8.4 V / 1200 MAH
Fusible tubular de vidrio de 20 A
RENDIMIENTO: muchos factores pueden afectar la velocidad, entre ellos la marca y el tipo de proyectil y el
estado del cañón. Recomendamos usar únicamente perdigones BB para pistola Airsoft marca Crosman. El
uso de perdigones BB de baja calidad podría dañar su pistola Airsoft.
¡DETÉNGASE! NO DEVUELVA ESTE PRODUCTO A LA TIENDA.
Nuestros amables representantes de atención al cliente le ayudarán con gusto. Puede obtener las respuestas a preguntas frecuentes en www.crosman.com o comunicándose con nosotros directamente llamando al
1-800-7AIRGUN (1-800-724-7486).
ATENCIÓN AL CLIENTE
Si su pistola Airsoft no funciona, le recomendamos que llame al Servicio de atención al cliente de
Crosman Corporation al 1-800-724-7486 o 585-657-6161. (Los clientes internacionales deberán
comunicarse con sus distribuidores). ¡NO INTENTE DESARMARLA! Si la desarma, es probable que no
pueda volver a armarla correctamente. Crosman no asume ninguna responsabilidad o garantía bajo
dichas circunstancias.
GARANTÍA LIMITADA POR 90 DÍAS
Este producto posee garantía a favor del comprador minorista durante 90 días a partir de la fecha de compra al por menor, por defectos de materiales y mano de obra; asimismo, esta garantía es transferible.
ALCANCE DE LA COBERTURA
Piezas de repuesto y mano de obra. Cargos de transporte al consumidor para los productos reparados.
EXENCIONES DE LA COBERTURA
Cargos de transporte a Crosman por el producto. Daños ocasionados por abuso, modificación o negligencia
en la realización del mantenimiento habitual. Cualquier otro gasto. DAÑOS INDIRECTOS, DAÑOS ACCIDENTALES O GASTOS ADICIONALES, INCLUIDOS LOS DAÑOS A LA PROPIEDAD. EN ALGUNOS ESTADOS NO SE
PERMITE LA EXCLUSIÓN O LIMITACIÓN DE LOS DAÑOS ACCIDENTALES O INDIRECTOS. EN TALES CASOS,
CARECERÁ DE VALIDEZ LA EXCLUSIÓN O LIMITACIÓN ANTERIORMENTE MENCIONADA.
RECLAMOS DE GARANTÍA
Clientes de los Estados Unidos: incluya su nombre, dirección, descripción del problema, número
de teléfono y una copia del recibo de compra del producto. Póngalo en su empaque y devuélvalo a
Crosman Corporation, Routes 5 & 20, Bloomfield, NY 14469.
Clientes internacionales: devuelva el producto a su distribuidor más cercano. Si no conoce cuál es su
distribuidor más cercano, llame al 585-657-6161 y solicite la asistencia del Departamento internacional.
GARANTÍAS IMPLÍCITAS
TODA GARANTÍA IMPLÍCITA, INCLUIDAS LAS GARANTÍAS IMPLÍCITAS DE CONDICIONES APTAS PARA LA
VENTA Y DE QUE LOS BIENES SE ADECÚAN A FINES ESPECÍFICOS PARA LOS CUALES FUERON ADQUIRIDOS, TIENEN UNA VIGENCIA LIMITADA DE 30 DÍAS A PARTIR DE LA FECHA DE COMPRA MINORISTA. EN
ALGUNOS ESTADOS NO SE PERMITEN LAS LIMITACIONES RESPECTO DE LA VIGENCIA DE LA GARANTÍA
IMPLÍCITA; EN TAL CASO, CARECERÁN DE VALIDEZ LAS LIMITACIONES ANTERIORMENTE MENCIONADAS.
En la medida en que cualquier disposición de esta garantía esté prohibida por las leyes federales, estatales
o municipales, y que no pueda sustituir a dichas leyes, la disposición no será aplicada. Esta garantía le
otorga derechos específicos amparados por ley y es posible que usted tenga otros derechos, de acuerdo
con las normas de cada estado.
CROSMAN es una marca registrada de Crosman Corporation en los Estados Unidos.